
Viva Collection HD3139 - Multi-cooker PHILIPS - Free user manual and instructions
Find the device manual for free Viva Collection HD3139 PHILIPS in PDF.


| Product type | Multi-cooker |
| Brand | Philips |
| Model | Viva Collection HD3139 |
| Bowl capacity | 5 liters |
| Dimensions (L x D x H) | 33.2 x 33.2 x 31.6 cm |
| Net weight | 5.5 kg |
| Power supply | 220-240 V, 50-60 Hz, 1000 W |
| Main functions | Pressure cooking, slow cooking, simmering, steaming, reheating, keep warm |
| Included accessories | Non-stick bowl, silicone gasket, steamer basket, spoon, measuring cup |
| Bowl material | Stainless steel and non-stick coating |
| Display | Digital display with timer and program indicators |
| Automatic programs | 20 preset programs (rice, soup, meat, fish, vegetables, etc.) |
| Cleaning and maintenance | Bowl and accessories dishwasher safe; gasket cleaned with soapy water |
| Safety | Safety valve, lid locking, pressure anti-open system, overheat protection |
| Spare parts and repairability | Gasket, bowl, steamer basket and others available on Philips website; repairability score 8/10 |
| Warranty | 2 years |
| Country of origin | China |
Frequently Asked Questions - Viva Collection HD3139 PHILIPS
User questions about Viva Collection HD3139 PHILIPS
0 question about this device. Answer the ones you know or ask your own.
Ask a new question about this device
Download the instructions for your Multi-cooker in PDF format for free! Find your manual Viva Collection HD3139 - PHILIPS and take your electronic device back in hand. On this page are published all the documents necessary for the use of your device. Viva Collection HD3139 by PHILIPS.
USER MANUAL Viva Collection HD3139 PHILIPS
natural_image
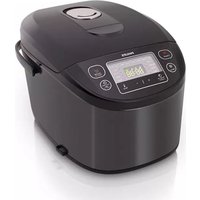
Black Philips rice cooker with digital display and control buttons (no visible text or symbols on body)2 What's in the box 4
3 Overview 4
Controls overview 5
Functions overview 5
4 Using the multicooker 6
Before first use 6
Preparations before cooking 6
Cooking rice/pasta 7
Making jam 8
Making risotto 8
Making yogurt 9
Boiling 9
Making sauces 10
Making Pot-au-feu 10
Reheating 10
Baking 11
Steaming 11
Stewing/Slow cooking 12
Frying 13
Roasting 13
Manual 14
Keep-warm mode 14
Adjusting the cooking time and
temperature 15
Preset time for delayed cooking 16
Setting up child lock 16
5 Cleaning and Maintenance 17
Interior 17
Exterior 17
Accessories 17
6 Environment 17
7 Guarantee and service 17
8 Specifications 17
9 Troubleshooting 18
1 Your multicooker
Congratulations on your purchase, and welcome to Philips!
To fully benefit from the support that Philips offers, register your product at www.philips.com/welcome.
2 What's in the box

Multicooker main unit
Soup ladle Spatula
Measuring cup 2 pcs silicone gloves
Power cord Steam rack
4 pcs yogurt cups User manual
Safety leaflet Warranty card
Recipe
3 Overview
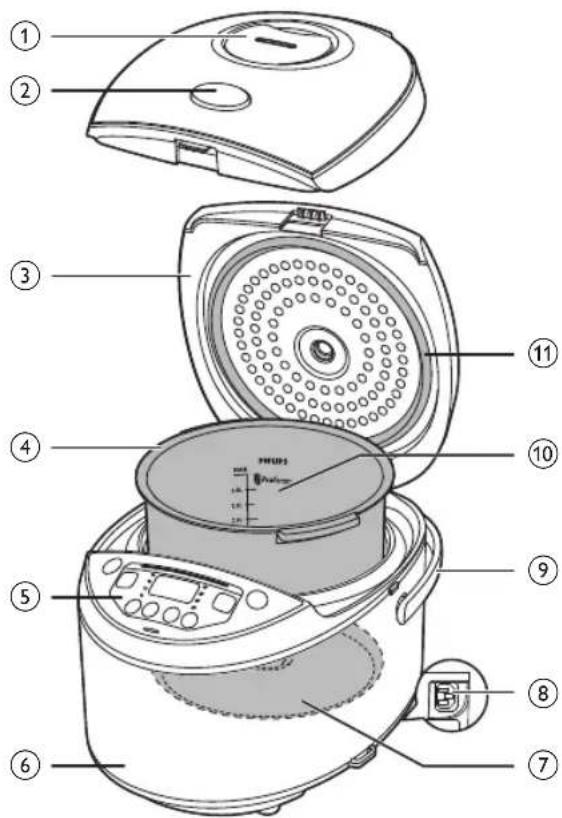
| 1 | Detachable steam vent cap | 7 | Heating element |
| 2 | Lid release button | 8 | Power socket |
| 3 | Top lid | 9 | Cooker handle |
| 4 | Inner pot | 10 | Water level indications |
| 5 | Control panel | 11 | Sealing ring |
| 6 | Main body |
Controls overview
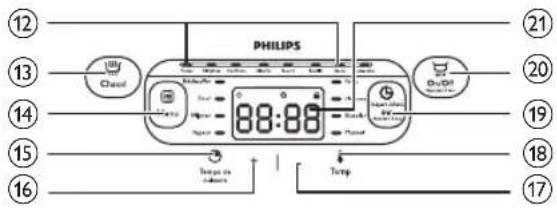
| 12 | Cooking functions | 17 | Decrease button |
| 13 | Keep-warm button | 18 | Cooking time button |
| 14 | Menu button | 19 | Temperature button |
| 15 | Preset button | 20 | Start/Cancel button |
| 16 | Increase button | 21 | Display screen |
English
Functions overview
| Functions | Default cooking time | Adjustable cooking time | Preset time | Default cooking temperature |
| Rice/pasta (Riz/pâtes) | 40 min | / | 1-24 hr | 130-140°C |
| Jam (Confiture) | 10 min | 5 min - 2 hr | 1-24 hr | 90-100°C |
| Risotto (Risotto) | 35 min | / | 1-24 hr | 130-140°C |
| Yogurt (Yaourt) | 8 hr | 6-12 hr | 1-24 hr | 40±3°C |
| Boil (Bouillir) | 1 hr | 20 min-4 hr | 1-24 hr | 100°C |
| Drink (Sauce) | 10 min | 5-40 min | 1-24 hr | 100°C |
| Jelly meat (Pot-au-feu) | 6 hr | 4-10 hr | 1-24 hr | 90-100°C |
| Reheat (Réchauffer) | 25 min | 5-60 min | / | 85°C |
| Bake (Four) | 45 min | 20 min - 2 hr | / | 130°C |
| Stew (Mijoter) | 1 hr | 20 min - 10 hr | 1-24 hr | 90°C |
| Steam (Vapeur) | 20 min | 5 min - 2 hr | 1-24 hr | 100°C |
| Fry (Frire) | 15 min | 5-60 min | / | 145-150°C |
| Slow cook (Slow cook) | 5 hr | 1-15 hr | 1-24 hr | 80°C |
| Roast (Rissoler) | 1 hr | / | 1-24 hr | 130°C |
| Manual (Manuel) | 2 hr | 5 min - 10 hr | 1-24 hr | 100°C |

Note
- The cooking temperature for the baking and manual functions is adjustable. You can select temperature for the baking function between 40°C to 160°C, and select temperature for the manual function between 30°C to 160°C. The step is 10°C.
- After the cooking has started, you can press and hold the start/cancel button (On/Off) to deactivate the cooking process and the multicooker will enter the standby mode.
4 Using the multicooker
Before first use
1 Take out all the accessories from the inner pot. Remove the packaging material of the inner pot.
2 Clean the parts of the multicooker thoroughly before using it for the first time (see chapter 'Cleaning and Maintenance').

Note
• Make sure all parts are completely dry before you start using the multicooker.
Preparations before cooking
Before using the multicooker, you need to do the following steps: Rice:
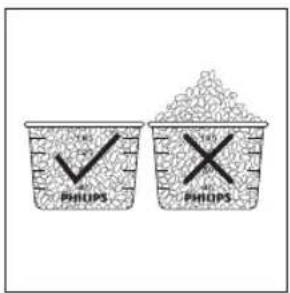
1 Measure the rice using the measuring cup provided.
2 Wash the rice thoroughly.

natural_image
Illustration of a hand washing a bowl with a faucet, showing liquid and bubbles (no text or symbols)3 Put the pre-washed rice in the inner pot.
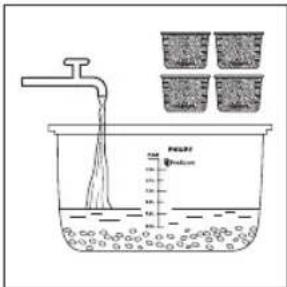
4 Add water to the level indicated on the scale inside the inner pot and smooth the rice surface.
Different dishes:
5 Press the lid release button to open the lid.

natural_image
Line drawing of a kitchen appliance with a lid and handle (no text or symbols)6 Wipe the outside of the inner pot dry, then put the inner pot in the multicooker. Check if the inner pot is in proper contact with the heating element.

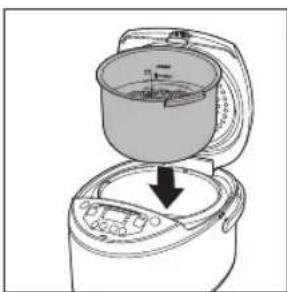
natural_image
Illustration of a kitchen mixer with a downward arrow indicating cooling effect (no text or symbols)7 Close the lid of the multicooker, and put the plug in the power socket.

natural_image
Line drawing of a rice cooker with a black arrow pointing to the lid (no text or symbols)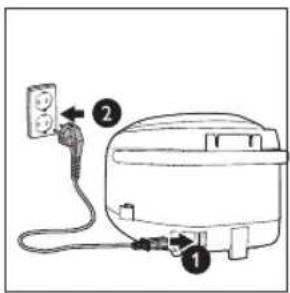

Note
- For details about the ratio of rice and water, see the recipe.
- The level marked inside the inner pot is just an indication. You can always adjust the water level for different types of rice and your own preference.
- Make sure that the outside of the inner pot is clean and dry, and that there is no foreign residue on the heating element or the magnetic switch.
Cooking rice/pasta
1 Follow the steps in "Preparations before cooking".
2 Press the menu button (Menu) until the rice/pasta cooking function (Riz/pâtes) is selected.
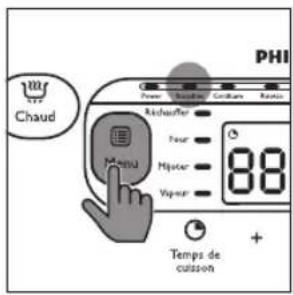
3 Press and hold the start button (On / Off) for 3 seconds to start cooking.
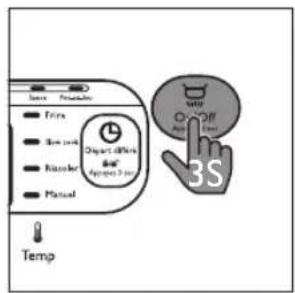
4 When the cooking is finished, you will hear 4 beeps and the selected cooking function light will be off.
5 The multicooker will be in keep-warm mode automatically.
→ The keep-warm indicator (Chaud) lights up.


Note
- If the voltage is unstable at the area you live, it is possible that the multicooker overflows.
• After the cooking is finished, stir the rice and loosen it immediately to release excessive moisture for fluffy rice. - Depending on the cooking conditions, the bottom portion of the rice may become slightly browned.
Making jam
1 Put food and ingredients into the inner pot.
2 Follow steps 6 and 7 in "Preparations before cooking".
3 Press the menu button (Menu) until the jam function (Confiture) is selected.
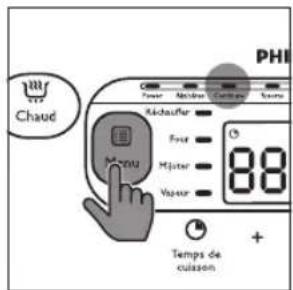
To set a different cooking time, refer to chapter "Adjusting the cooking time and temperature".
4 Press and hold the start button (On / Off) for 3 seconds for 3 seconds to start cooking.

5 When the cooking is finished, you will hear 4 beeps and the selected cooking function light will be off.
6 The multicooker will be in keep warm mode automatically.
→ The keep-warm indicator (Chaud) lights up.

Making risotto
1 Put food and ingredients into the inner pot.
1 Follow steps 6 and 7 in "Preparations before cooking".
2 Press the menu button (Menu) until the risotto function (Risotto) is selected.

3 Press and hold the start button (On / Off) for 3 seconds to start cooking.
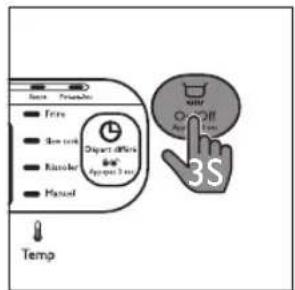
4 When the cooking is finished, you will hear 4 beeps and the selected cooking function light will be off.
5 The multicooker will be in keep-warm mode automatically.
→ The keep-warm indicator (Chaud) lights up.

Making yogurt
1 Whisk the ingredients for the yogurt well and put them in a glass container.
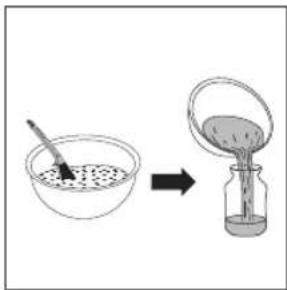
2 Put the glass container in the inner pot. Make sure that the container is sealed.
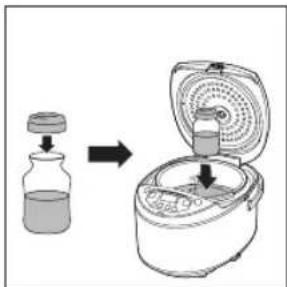
3 Pour some water in the inner pot. Make sure that half of the container is immersed in water.
4 Follow steps 6 and 7 in "Preparations before cooking".
5 Press the menu button (Menu) until the yogurt function (Yaourt) is selected.

To set a different cooking time, refer to chapter "Adjusting the cooking time and temperature".
6 Press and hold the start button (On / Off) for 3 seconds to start cooking.
7 When the cooking is finished, you will hear 4 beeps and the selected cooking function light will be off.
→ The multicooker will enter the standby mode automatically.
Boiling
1 Put food and ingredients in the inner pot.
2 Follow steps 6 and 7 in "Preparations before cooking".
3 Press the menu button (Menu) until the boiling function (Bouillir) is selected.

To set a different cooking time, refer to chapter "Adjusting the cooking time and temperature".
4 Press and hold the start button (On/Off) for 3 seconds to start cooking.
5 When the cooking is finished, you will hear a few beeps and the selected cooking function light will be off.
6 The multicooker will be in keep-warm mode automatically.
→ The keep-warm indicator (Chaud) lights up.
Making sauces
1 Put food and ingredients into the inner pot.
2 Follow steps 6 and 7 in "Preparations before cooking".
3 Press the menu button (Menu) until the sauce function (Sauce) is selected.

4 Press and hold the start button (On / Off) for 3 seconds to start cooking.
5 When the cooking is finished, you will hear 4 beeps and the selected cooking function light will be off.
6 The multicooker will be in keep-warm mode automatically.
→ The keep-warm indicator (Chaud) lights up.
Making Pot-au-feu
1 Put food and ingredients in the inner pot.
2 Follow steps 6 and 7 in "Preparations before cooking".
3 Press the menu button (Menu) until the pot-au-feu function (Pot-au-feu).

To set a different cooking time, refer to chapter "Adjusting the cooking time and temperature".
4 Press and hold the start button (On / Off) for 3 seconds for 3 seconds to start cooking.
5 When the cooking is finished, you will hear a few beeps and the selected cooking function light will be off.
6 The multicooker will be in keep-warm mode automatically.
→ The keep-warm indicator (Chaud) lights up.
Reheating
1 Loosen the cooled food and evenly distribute it in the inner pot.
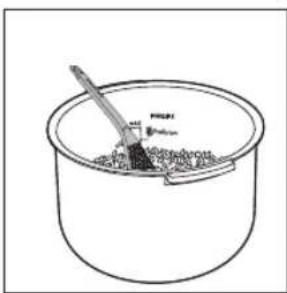
natural_image
Simple line drawing of a cooking pot with a spoon and granular substance inside (no text or symbols)2 Pour some water onto the food to prevent it from becoming too dry. The quantity of the water depends on the amount of food.
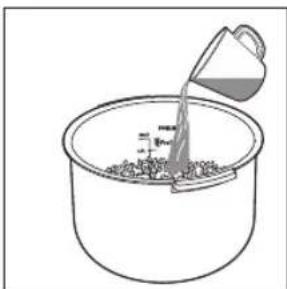
natural_image
Line drawing of a container with liquid being poured into it, no text or symbols present3 Follow steps 6 and 7 in "Preparations before cooking".
4 Press the menu button (Menu) until the reheating function (Réchauffer) is selected.
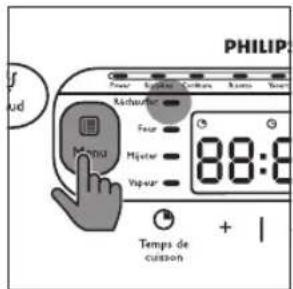
To set a different cooking time, refer to chapter "Adjusting the cooking time and temperature".
5 Press and hold the start button (On / Off) for 3 seconds to start cooking.
6 When the cooking is finished, you will hear 4 beeps and the selected cooking function light will be off.
7 The multicooker will be in keep warm mode automatically.
→ The keep-warm indicator (Chaud) lights up.
Baking
1 Put food and ingredients in the inner pot.
2 Follow step 6 in "Preparations before cooking".
3 Put the plug in the power socket.

Note
- When baking cake, keep the lid closed during cooking. Baking cake at 130^ and by 45 minutes usually delivers best cooking result.
- It's recommended to open lid during cooking when the temperature is above 130°C.
4 Press the menu button (Menu) until the baking function (Four) is selected.

To set a different cooking time and temperature, refer to chapter "Adjusting the cooking time and temperature".
5 Press and hold the start button (On / Off) for 3 seconds to start cooking.
6 When the baking is finished, you will hear 4 beeps and the selected function light will be off.
7 The multicooker will be in keep-warm mode automatically.
→ The keep-warm indicator (Chaud) lights up.

Note
- When removing the inner pot from the multicooker, use a kitchen glove or a cloth, as the inner pot will be very hot.
Steaming
1 Pour some water into the inner pot.
2 Put the food to be steamed on a plate or in the steam tray.
3 If you are using a separate plate, put it into the steam tray.

natural_image
Line drawing of a rice cooker with a circular filter and lid, showing internal components (no text or symbols)4 Put the steam tray into the inner pot.

natural_image
Line drawing of a rice cooker with fish inside, showing internal components and a downward arrow indicating a drop (no text or symbols)5 Follow steps 6 and 7 in "Preparations before cooking".
6 Press the menu button (Menu) until the steaming function (Vapeur) is selected.

To set a different cooking time, refer to chapter "Adjusting the cooking time and temperature".
7 Press and hold the start button (On / Off) for 3 seconds to start cooking.
8 When the cooking is finished, you will hear 4 beeps and the selected cooking function light will be off.
9 The multicooker will be in keep warm mode automatically.
→ The keep-warm indicator (Chaud) lights up.
10 Open the lid and carefully take out the steamed food from the plate or steam basket.

Note
- The quantity of water depends on the amount of food in the steam tray. Do not immerse the steam tray in water.
- Use a kitchen glove or a cloth, as the plate and steam tray will be very hot.
Stewing/Slow cooking
1 Put food and ingredients in the inner pot.
2 Follow steps 6 and 7 in "Preparations before cooking".
3 Press the menu button (Menu) until the stewing function (Mijoter) or the slow cooking function (Slow cook) is selected.

To set a different cooking time, refer to chapter "Adjusting the cooking time and temperature".
4 Press and hold the start button (On / Off) for 3 seconds to start cooking.
5 When the cooking is finished, you will hear a few beeps and the selected cooking function light will be off.
6 The multicooker will be in keep-warm mode automatically.
→ The keep-warm indicator (Chaud) lights up.
Frying
1 Put food and ingredients into the inner pot.
2 Follow step 6 in "Preparations before cooking".
3 Put the plug in the power socket.
4 Press the menu button (Menu) until the frying function (Frire) is selected.
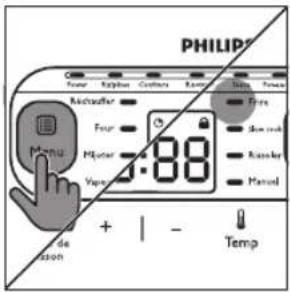
To set a different cooking time, refer to chapter "Adjusting the cooking time and temperature".
5 Press and hold the start button (On / Off) for 3 seconds to start cooking.
6 When the cooking is finished, you will hear 4 beeps and the selected cooking function light will be off.
7 The multicooker will be in keep-warm mode automatically.
→ The keep-warm indicator (Chaud) lights up.

Note
- Do not close the top lid when cooking in the fry mode.
Roasting
1 Put food and ingredients into the inner pot.
2 Follow step 6 in "Preparations before cooking".
3 Put the plug in the power socket.
4 Press the menu button (Menu) until the roasting function (Rissoler) is selected.

To set a different cooking time, refer to chapter "Adjusting the cooking time".
5 Press and hold the start button (On / Off) for 3 seconds to start cooking.
6 There are 2 stages of roasting. For the first stage, cooking time is about 35 minutes, you will hear 5 beeps to remind to turn the food.
7 Press the menu button (Menu) to continue the second stage, if it beeps for 5 minutes without operation, the multicooker will enter into keep warm mode until end of the cooking time.
Manual
You may use the manual mode to cook food with more control over the cooking time and temperature.
1 Put food and ingredients into the inner pot.
2 Follow steps 6 and 7 in "Preparations before cooking".
3 Press the menu button (Menu) until the manual function (Manuel) is selected.
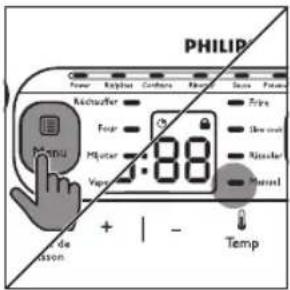
To set a different cooking time and temperature, refer to chapter "Adjusting the cooking time and temperature".
4 Press and hold the start button (On / Off) for 3 seconds to start cooking.
5 When the cooking is finished, you will hear 4 beeps and the selected cooking function light will be off.
6 The multicooker will be in keep-warm mode automatically.
→ The keep-warm indicator (Chaud) lights up.

Note
- If you cook food at a temperature below 70°C, please turn off the keep-warm mode before start cooking.
- In manual (Manuel) mode, when cooking at a temperature higher than 130^ , the top lid must be opened during cooking.
Keep-warm mode
The multicooker provides you with easy control over the keep-warm mode.
• After you have selected the cooking function using the menu button (Menu), if you press the start button (On / Off) directly, the keep-warm indicator will light up. After the cooking is finished, the multicooker will switch to keep-warm mode directly.
• After you have selected the cooking function using the menu button (Menu), if you press the keep-warm button first, and then the start button (On / Off), the keep-warm indicator will be off. After the cooking is finished, the multicooker will be in standby mode.

Note
- In standby mode, you can press the keep-warm button (Chaud) to enter keep-warm mode.
- In keep-warm mode, you can press the keep-warm button (Chaud) to enter standby mode.
Adjusting the cooking time and temperature
You can adjust the cooking time for all functions except the rice/pasta, roast, and risotto functions; and you can adjust the cooking temperature for baking and manual functions. Refer to the "Functions overview" table for the time and temperature regulation of each function.
After you have selected the desired cooking function using the menu button, the default cooking time will be displayed on the screen.
1 To set a different cooking time, press the cooking time button (Temps de cuisson), and the default cooking time starts flashing on the display.

2 Press the increase (+) or the decrease (-) button to set the hour unit.
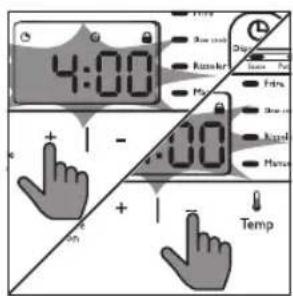
3 After the hour unit is set, wait for a few seconds before the hour unit is confirmed, and the minute unit starts flashing on the display.
4 Press the increase (+) or the decrease (-) button to set the minute unit.
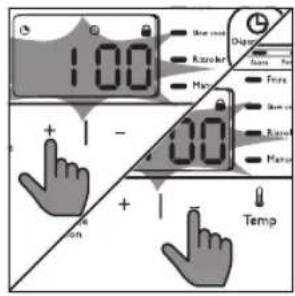
5 To set a different cooking temperature, press the temperature button (Temp), and the default temperature starts flashing on the display.
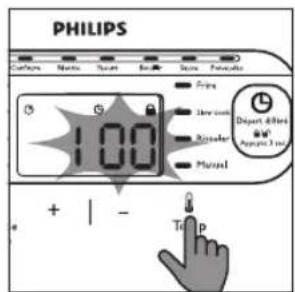
6 Press the increase (+) or the decrease (-) button to set the desired cooking temperature.
Preset time for delayed cooking
You can preset the delayed cooking time for all cooking modes except the reheating, baking, and frying modes.
1 Follow steps 6 and 7 in "Preparations before cooking".
2 Press the menu button (Menu) until your preferred cooking function is selected.
3 Press the preset time button (Départ différé), and the default preset time starts flashing on the display.
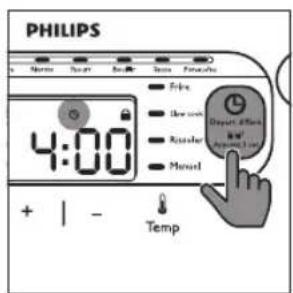
4 Preset the increase button (+) and the decrease button (-) to set the desired preset time.
5 Press and hold the start button (On/Off) to confirm the preset timer.
6 The cooking will be finished when the preset time has elapsed. You will hear 4 beeps and the selected cooking function light will be off.
7 The multicooker will be in keep-warm mode automatically.
→ The keep- warm indicator (Chaud) lights up.

Note
- The preset function is not available in bake (Four), fry (Frire), and reheat (Réchauffer) mode.
- The preset button is not responsive in standby mode.
Setting up child lock
To protect your child from using the multicooker, you may set up the child lock function.
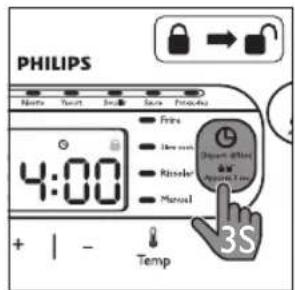
- Press and hold the preset button (Départ différé) for 3 seconds to enter the child lock mode.

→ The child lock icon lights up on the display.
- To unlock, press and hold the preset button (Départ différé) for 3 seconds again.
→ The child lock icon lights off.
5 Cleaning and Maintenance

Note
- Unplug the multicooker before starting to clean it.
- Wait until the multicooker has cooled down sufficiently before cleaning it.
Interior
Inside of the top lid and the main body:
• Wipe with wrung out and damp cloth.
• Make sure to remove all the food residues stuck to the multicooker.
Heating element:
• Wipe with wrung out and damp cloth.
- Remove food residues with wrung out and damp cloth.
Exterior
Surface of the top lid and outside of the main body:
- Wipe with a cloth damped with soap water.
- Only use soft and dry cloth to wipe the control panel.
• Make sure to remove all the food residues around the control panel.
Accessories
Spatula, soup ladle, inner pot, steam rack, yogurt cups, and steam vent cap:
- Soak in hot water and clean with sponge.
6 Environment
Do not throw away the appliance with normal household waste at the end of its life, but hand it in at an official collection point for recycling. By doing this, you can help to preserve the environment.

English
7 Guarantee and service
If you need service or information, or if you have a problem, visit the Philips website at www.philips.com or contact the Philips Customer Care Center in your country. You can find its phone number in the worldwide guarantee leaflet. If there is no Customer Care Center in your country, go to your local Philips dealer.
8 Specifications
| Model Number HD3167 | |
| Rated power output 980W | |
| Rated capacity 5.0L | |
9 Troubleshooting
If you encounter problems when using this multicooker, check the following points before requesting service. If you cannot solve the problem, contact the Philips Consumer Care Center in your country.
| Problem Solution | |
| The light on the button does not go on. | There is a connection problem. Check if the power cord is connected to the multicooker properly and if the plug is inserted firmly into the power outlet. |
| The light is defective. Take the appliance to your Philips dealer or a service center authorized by Philips. | |
| The display does not function. | The multicooker is not connected to the power supply. If there is no power supply, the power failure backup function does not work and the display does not function. |
| The battery for the display runs out of power. Take the appliance to your Philips dealer or a service center authorized by Philips to have the battery replaced. | |
| The rice is not cooked. | There is not enough water. Add water according to the scale on the inside of the inner pot. |
| You did not press the start button (On/Off). | |
| Make sure that there is no foreign residue on the heating element and the outside of the inner pot before switching the multicooker on. | |
| The heating element is damaged, or the inner pot is deformed. Take the multicooker to your Philips dealer or a service center authorized by Philips. | |
| The rice is too dry and not well cooked. | Add more water to the rice, and cook for a bit longer. |
| The multicooker does not switch to the keep-warm mode automatically. | You might have pressed the keep-warm button (Chaud) before pressing the start button (On/Off). In this case the multicooker will be in standby mode after the cooking is finished. |
| The temperature control is defective. Take the appliance to your Philips dealer or a service center authorized by Philips. | |
| The rice is scorched. You have not rinse the rice properly. Rinse the rice until the water runs clear. | |
| Water spills out of the multicooker during cooking. | Make sure that you add water to the level indicated on the scale inside the inner pot that corresponds to the number of cups of rice used. |
| I cannot get to the desired cooking function. | Press the menu button (Menu) repeatedly to select the desired function as shown by the indicator. |
| Rice smells bad after cooking | Clean the inner pot with some washing detergent and warm water. |
| After cooking, make sure the steam vent cap, inner lid and inner pot is cleaned thoroughly. | |
| Error message (E1, E2, E3, or E4) appears on the display. | There has been a power failure during cooking. Take the appliance to your Philips dealer or a service center authorized by Philips. |
Contenu
natural_image
Illustration of a hand washing a bowl with water and a faucet (no text or symbols)Différents plats:
natural_image
Line drawing of hands pouring liquid into a container with droplets (no text or symbols)
natural_image
Line drawing of a kitchen appliance with a bowl and lid, showing a downward arrow indicating a drop or transformation (no text or symbols present)natural_image
Line drawing of a rice cooker with control panel and lid, showing no text or symbols

Remarque
natural_image
Simple line drawing of a container with a spoon and granular substance inside (no text or symbols)natural_image
Simple line drawing of a container with liquid being poured into it, no text or symbols presentnatural_image
Line drawing of a rice cooker with lid and side panel showing internal components (no text or symbols)natural_image
Line drawing of a food item being placed into a cylindrical container with fish inside (no text or symbols)
- Your multicooker
- What's in the box
- Overview
- Note
- Using the multicooker
- Before first use
- Preparations before cooking
- Cooking rice/pasta
- Making jam
- Making risotto
- Making yogurt
- Boiling
- Making sauces
- Making Pot-au-feu
- Reheating
- Baking
- Steaming
- Stewing/Slow cooking
- Frying
- Roasting
- Manual
- Keep-warm mode
- Adjusting the cooking time and temperature
- Preset time for delayed cooking
- Setting up child lock
- Cleaning and Maintenance
- Interior
- Exterior
- Accessories
- Environment
- Guarantee and service
- Specifications
- Troubleshooting
- Contenu
- Remarque
Brand : PHILIPS
Model : Viva Collection HD3139
Category : Multi-cooker