
DM070 - Cupcake Machine INVENTUM - Free user manual and instructions
Find the device manual for free DM070 INVENTUM in PDF.


| Product type | Cupcake machine |
| Brand | Inventum |
| Model | DM070 |
| Number of cupcakes | 6 |
| Power | 500 W |
| Power supply | 220-240 V ~ 50/60 Hz |
| Dimensions (L x W x H) | 24 x 24 x 10 cm |
| Weight | 1.2 kg |
| Material | Stainless steel and food-grade plastic |
| Non-stick coating | Yes |
| Power indicator light | Yes |
| Preheating indicator | Yes |
| Adjustable temperature | No |
| Built-in timer | No |
| Cleaning | Removable plates, washable with soapy water |
| Safety | Non-slip feet, cool-touch surface during operation |
| Spare parts | Cooking plates available from after-sales service |
| Repairability | Repairability index not communicated |
| Standby power consumption | 0.5 W |
| Warranty | 2 years |
Frequently Asked Questions - DM070 INVENTUM
User questions about DM070 INVENTUM
0 question about this device. Answer the ones you know or ask your own.
Ask a new question about this device
Download the instructions for your Cupcake Machine in PDF format for free! Find your manual DM070 - INVENTUM and take your electronic device back in hand. On this page are published all the documents necessary for the use of your device. DM070 by INVENTUM.
USER MANUAL DM070 INVENTUM
natural_image
Orange RIVERTUM electric kettle with four donuts inside a black tray (no text or symbols visible)DM070 MINI DONUTMAKER
MINI DONUT MAKER • MINI DONUT-MACHER • APPAREIL À PETITS DONUTS
NEDERLANDS

Legislation requires that all electrical and electronic equipment must be collected for reuse and recycling. Electrical and electronic equipment marked with the symbol indicating separate collection of such equipment must be returned to a municipal waste collection point.
- SAFETY INSTRUCTIONS PAGE 8
- DESCRIPTION OF THE APPLIANCE PAGE 10
- BEFORE FIRST USE PAGE 10
- PREPARING MINI DONUTS PAGE 10
- TIPS & SUGGESTIONS PAGE 11
- CLEANING & MAINTENANCE PAGE 11
- RECIPES PAGE 11 GUARANTEE & AFTER SALES SERVICE PAGE 21
DEUTSCH

2 | PRODUCTOMSCHRIJVING

natural_image
3D rendered object with a labeled dimension '1' pointing to a small object on a smooth surface (no text or symbols beyond the label)4 | MINI DONUTS MAKEN
1 | SAFETY INSTRUCTIONS
- Please read these instructions before operating the appliance and retain for future use.
- The appliance is intended solely for domestic use within the home.
• The surfaces are liable to get hot. - The appliance is not intended to be operated by means of an external timer or separate remote-control system.
- Before cleaning and storing allow the appliance and the cooking plates to cool completely.
- Before plugging into a socket, check whether the voltage in your home corresponds with the voltage printed at the bottom of the appliance.
- Never let the power cord of the appliance hang over the edge of a table or counter, touch hot surfaces or become knotted.
- Never place this appliance on or near a hot gas or electric burner or in such a place where it could touch a heated oven or microwave. Do not allow this appliance to come in contact with curtains, wall coverings, clothing, dishtowels or other flammable materials during use.
• Always use the appliance on a secure, dry, level surface. - Never leave the appliance unattended when in use.
• Always carry out regular checks
of the power cord to ensure no damage is evident. Should there be any signs of damage to the power cord in the slightest degree, the entire appliance should be returned to the Customer Service Department.
- For your own safety, only use the accessories and spare parts from the manufacturer which are suitable for the appliance.
- Always return the appliance after a malfunction, or if it has been damaged in any manner to the Customer Service Department for examination, repair or adjustment as special purpose tools are required.
- Never unplug it from the socket by pulling the cable.
- Always ensure that your hands are dry before handling the plug or power cord.
- An electrical appliance is not a toy and should therefore always be placed outside of the reach of children. Children are not always able to understand potential risks. Keep the appliance and its cord out of reach of children less than 8 years.
- This appliance may be used by children over the age of 8 and by people with reduced physical, sensory or mental skills or a lack of experience or knowledge, provided that they are supervised or have been instructed on how to use the
appliance safely, and are fully aware of the consequent risks of use.
• Children must not play with the appliance.
- Cleaning and user maintenance must not be performed by children unless supervised.
- Unplug the appliance as soon as you have finished using it and when you are cleaning it.
- If an extension cord is used, compare the marked electrical rating of the extension cord with the electrical rating on the appliance. Make sure that it can not be pulled by children or tripped over unintentionally.
- Should you decide not to use the appliance anymore, make it inoperative by cutting the power cord after removing the plug from the socket. We also recommend making all potentially dangerous parts of the appliance harmless, particularly for children who might be tempted to play with them.
- Never use the appliance if it is not working properly, or if it has been damaged. Any intervention other than cleaning and normal maintenance by the customer must be carried out by an approved Service Centre.
- Never immerse any part of the main body, power cord and plug into water or any other liquid to protect yourself against electrical hazards.
- When the appliance is used for other purposes than intended, or is when it is not handled in accordance with the instruction manual, the full responsibility for any consequences will rest with the user. Any damages to the product or other things are not covered by the warranty.
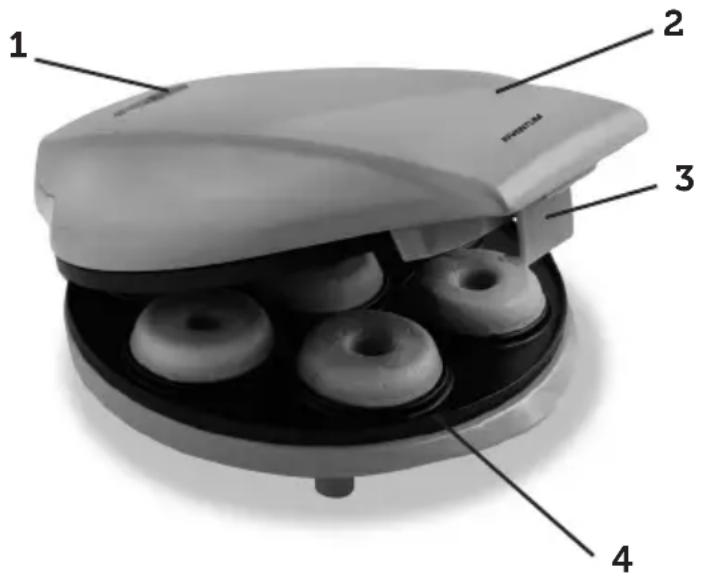
2 | DESCRIPTION OF THE APPLIANCE

natural_image
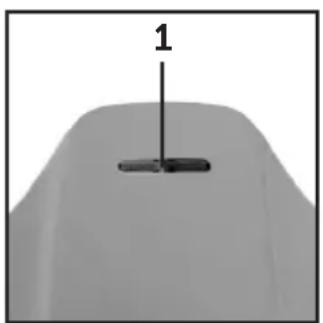
3D rendered object with a labeled dimension '1' pointing to a small object on a smooth surface (no text or symbols beyond the label)- Pilot lights (orange/green)
- Top cooking plate
- Locking lid latch
- Bottom cooking plate with reservoirs (7)
3 | BEFORE FIRST USE
Before you use the appliance for the first time, please do as follows: Unpack the appliance carefully and remove all the packaging material. Keep the material (plastic bags and cardboard) out of reach of children. Check the appliance after unpacking for any visible damage, which could be caused by transportation. Place the appliance on a stable and heat resistant surface. Wipe the housing of the appliance and the cooking plates only with a damp cloth. Dry the appliance and the cooking plates thoroughly.
4 | PREPARING MINI DONUTS
Position the donut maker on a dry, level, heat-resistant surface. Release the lid latch and lift the lid to the open position. To maintain the quality of the non-stick it is recommended to periodically coat the non-stick surface with a small amount of vegetable oil. This can be done with a paper towel or with a non-stick oil spray. Wipe off any excess oil. Plug the power cord into a outlet. Lower the lid to the closed position and allow the donut maker to preheat for a minimum of 3 minutes. The orange POWER light will be illuminated.
TIP: prepare ingredients while the donut maker is preheating.
When the donut maker has preheated to the proper cooking temperature, the green READY light will illuminate. Open the top lid using an oven mitt or pot holder to avoid making contact with the hot surfaces.
Caution: surfaces of the donut maker are hot. To avoid accidental burns or contact with the hot surfaces or steam being released while cooking, always open and close the lid of the donut maker using an oven mitt or pot holder.
Fill each cooking reservoir with approximately 1 tablespoon of batter. Be careful not to overfill the cooking reservoirs as the batter will expand during the cooking process.
TIP: to easily fill the cooking reservoirs, use a disposable pastry bag or a ziptop plastic food storage bag with the corner clipped. Lower the lid using an oven mitt or pot holder. Press down slightly so the lid latch is secured. Actual cooking time will vary depending on ingredients and type of donuts being prepared. A general guide line is 3 to 5 minutes cooking time per batch of donuts. With oven mitts or a pot holder, release the lid latch and open the donut maker lid. Remove the donuts using a wooden or other heat-resistant non-metallic utensil using caution not to scratch or damage the non-stick surface. When finished cooking, remove the plug from the wall outlet and allow the appliance to cool before moving, cleaning or storing.
BASIC RECIPE FOR DONUTS
Ingredients for 50 pieces
• 400 grams all-purpose flour
• 16 grams baking powder
• 250 grams caster sugar
- 1 bag vanilla sugar
- 2 eggs
- 250 ml milk
• 15 grams melted butter
Combine the dry ingredients in a mixing bowl. Add the remaining ingredients and blend until smooth. Fill each cooking reservoir with about 1 tablespoon of batter. Bake about 3 to 5 minutes or until a toothpick inserted into the donut comes out clean.
5 | TIPS & SUGGESTIONS
- For jelly donuts, bake donuts as directed and allow to cool. Split each donut horizontally and spread jelly or jam between the donut layers.
- To enjoy the fresh and crisp taste of each donut, place baked donuts on a wire cooling rack. Cooked donuts may be kept warm before serving and before glazing in an oven-safe dish. Place the oven-safe dish with donuts in the oven at 100^ to keep warm.
- If coating donuts with powdered sugar or cinnamon-sugar, coat donuts while hot. An easy way to do this is to place powdered sugar or cinnamon-sugar in a paper lunch-type bag, add hot donuts and shake gently to coat.
- After pouring batter into the cooking reservoirs, try not to check the donuts during the first few minutes. Opening the lid, may cause the donut to separate before it is cooked.
- Never over mix the donut batter as this could cause the donuts to become tough. Blend batter ingredients until large lumps are gone.
- The recommended amount of donut batter for each cooking reservoir is approximately 2 tablespoons. Use caution not to overfill the cooking reservoirs.
Donuts can be finished off with a colorful array of sweets and toppings. Use your creativity with the various toppings. Remeber, sprinkle donuts while the glaze or frosting is still moist. Here are some topping suggestions:
- mini chocolate chips • crushed candy
- toasted chopped nuts - toasted coconut
- colored sanding sugars
- crushed cookies
6 | CLEANING & MAINTENANCE
Always unplug the appliance after use. Always unplug the appliance before cleaning. Leave the appliance to cool down completely. The donut maker cools down faster when you open it.
Wipe the outside of the housing and the cooking plates with a damp cloth and dry. To remove batter baked onto the cooking surface, pour a small amount of cooking oil onto the hardened batter. After 5 minutes, wipe with a paper towel or dry cloth. Never use any abrasives!
Never immerse the appliance into water or other liquids.
7 | RECIPES
Sour Cream Donuts
Ingredients about 24 pieces
• 165 grams all-purpose flour
- 75 grams sugar
• 1 tablespoon baking powder
- 1 / 2 teaspoon salt
- 125 ml milk
- 60 ml vegetable oil
- 60 ml sour cream
• 1 egg
- 1 teaspoon vanilla
Combine the dry ingredients in a mixing bowl. Add the remaining ingredients and blend until smooth. Fill each cooking reservoir with about 1 tablespoon of batter. Bake about 3 to 5 minutes or until a toothpick inserted into the donut comes out clean. Glaze or coat with powdered sugar or cinnamon-sugar, as desired.
Chocolate Donuts
Ingredients about 24 pieces
• 155 grams all-purpose flour
- 70 grams cocoa
• 115 grams sugar
• 1 tablespoon baking powder
• 185 ml buttermilk
- 60 ml vegetable oil
- 1 egg
• 1 teaspoon vanilla
Combine the dry ingredients in a mixing bowl. Add the remaining ingredients and blend until smooth. Fill each cooking reservoir with about 1 tablespoon of batter. Bake about 3 to 5 minutes or until a toothpick inserted into the donut comes out clean. Glaze or coat with powdered sugar, as desired.
Chocolate glaze
Ingredients
• 100 grams powdered sugar
• 2 tablespoons cocoa
- 2 tablespoon half and half (liquid coffee creamer)
- 1 teaspoon vanilla
Whisk all ingredients together adding more half and half if necessary for the glaze consistency. Dip the donuts halfway in the glaze; place on a wire rack and allow the glaze to set up.
Vanilla glaze or frosting
Ingredients
• 180 grams powdered sugar
• 60 grams melted butter
- 1 to 1 12 tablespoons hot water
- 1 teaspoon vanilla
Combine the melted butter with the powdered sugar, stirring until well blended. Stir in the vanilla. Blend in one tablespoon of hot water and stir until smooth. Add a little of the remaining hot water, if needed, to make a frosting consistency. For glaze style: increase hot water to 2 to 2^1/2 tablespoons.
natural_image
3D rendered object with a labeled dimension '1' pointing to a small object on a smooth surface (no text or symbols beyond the label)natural_image
3D rendered object with a labeled dimension '1' pointing to a small object on a smooth surface (no text or symbols beyond the label)- This product is guaranteed for a period of 2 years from the date of purchase against mechanical and electrical defect.
- Guarantee can only be given if proof of purchase (e.g. till receipt) can be shown. Therefore keep it in a safe place. The guarantee period starts at date of purchase.
• Guarantee is not valid in case of: - normal wear;
- damage through misuse use or when the instructions were not followed correctly;
- lack of maintenance;
- not following the operation- and safety instructions;
- incompetent montage or repairs made by yourself or others;
- using accessories and spare parts which are not suitable for the appliance;
for assessment by our technical department.
• The guarantee is not valid for:
- normal wear;
- (interchangeable) signal- and controllamps
for assessment by our technical department.
Return to your supplier of send the appliance, including a copy proof of purchase and description of the complaint, stamped to:
Inventum Group BV
Generatorstraat 17
3903 LH VEENENDAAL
THE NETHERLANDS
Website: www.inventum.eu
IES Import Electronic Service GmbH
Lembekstrasse 36
22529 Hamburg
GERMANY
When the guarantee is no longer valid or when the period of guarantee has passed, we will charge any costs that flow out of an assessment and/or repairing.
On request we will supply a statement before repairing. Without requesting a statement, we assume that you, by sending the appliance, automatically order to repair the appliance.
A guarantee period of two months is valid for repairs done by our technical department and the used spare parts, counting from the repairdate. When a malfunction occurs within this period which directly flows out of the repairs and the used spare parts, the consumer has the right of repairs without any costs.
GARANTIE & SERVICE


- DM070 MINI DONUTMAKER
- NEDERLANDS
- DEUTSCH
- | PRODUCTOMSCHRIJVING
- | MINI DONUTS MAKEN
- | SAFETY INSTRUCTIONS
- | DESCRIPTION OF THE APPLIANCE
- | BEFORE FIRST USE
- | PREPARING MINI DONUTS
- BASIC RECIPE FOR DONUTS
- | TIPS & SUGGESTIONS
- | CLEANING & MAINTENANCE
- | RECIPES
- Sour Cream Donuts
- Chocolate Donuts
- Chocolate glaze
- Vanilla glaze or frosting
- GARANTIE & SERVICE
Brand : INVENTUM
Model : DM070
Category : Cupcake Machine