
Baby Care V 100 - Baby monitor AUDIOLINE - Free user manual and instructions
Find the device manual for free Baby Care V 100 AUDIOLINE in PDF.


| Product Type | Audio Baby Monitor |
| Brand | Audioline |
| Model | Baby Care V 100 |
| Range (Indoor) | Up to 50 meters |
| Range (Outdoor) | Up to 300 meters |
| Frequency | DECT / 1.9 GHz |
| Power Supply Parent Unit | Rechargeable battery (Li-Ion, 3.7V, 600mAh) or AC adapter |
| Power Supply Baby Unit | AC adapter (230V, 50Hz) |
| Battery Life (Parent Unit) | Approx. 8 hours |
| Dimensions Baby Unit | 60 x 60 x 40 mm |
| Dimensions Parent Unit | 120 x 60 x 25 mm |
| Weight Baby Unit | 50 g |
| Weight Parent Unit | 80 g |
| Main Functions | Two-way communication, sound activation, volume control, battery indicator |
| Sound Activation (VOX) | Yes, adjustable sensitivity |
| Night Light | No |
| Temperature Sensor | No |
| Secure Connection | DECT encrypted |
| Cleaning and Care | Wipe with a dry, soft cloth. Do not use liquid cleaners. |
| Safety Warnings | Keep away from water, do not expose to direct sunlight, use only supplied adapters. |
| Spare Parts / Repairability | Contact Audioline support for replacement batteries or adapters. |
| General Information | Audio monitor for detecting baby sounds. Requires 2 AAA batteries (not included) for backup in baby unit. |
Frequently Asked Questions - Baby Care V 100 AUDIOLINE
User questions about Baby Care V 100 AUDIOLINE
0 question about this device. Answer the ones you know or ask your own.
Ask a new question about this device
Download the instructions for your Baby monitor in PDF format for free! Find your manual Baby Care V 100 - AUDIOLINE and take your electronic device back in hand. On this page are published all the documents necessary for the use of your device. Baby Care V 100 by AUDIOLINE.
USER MANUAL Baby Care V 100 AUDIOLINE
natural_image
White and gray digital camera with a spiky head and 'AUDIOLINE Baby Care V100' label (no other text or symbols visible)Operating Instructions 19.
natural_image
Line drawing of a medical imaging device with labeled component '26' (no text or symbols on the device itself)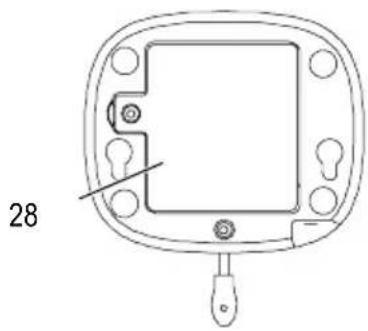
natural_image
Technical line drawing of a mechanical component with mounting holes and a labeled part (28), no readable text or symbols present.natural_image
Pure technical line drawing of a mechanical component with no text or symbols2 Operating Elements and Indicators 23
Monitor unit (receiver) 23
Camera unit (transmitter) 24
3 Putting the Units into Operation 25
Safety information 25
Checking the package contents 25
Connecting and aligning the transmitter 25
Operating with batteries (not contained in the material supplied) 25
Operating with a power adapter plug 25
Connecting the receiver 26
Operating with a power adapter plug 26
Operation with rechargeable batteries 26
Using the belt clip/support 26
4 Operating the Transmitter 27
Switching the transmitter on/off 27
Connecting and aligning the transmitter 27
Night vision 27
Contents
5 Operating the Receiver 28.
Switching the receiver on/off 28.
Setting the brightness 28.
Adjusting the temperature measurement 28. . . . . . . . . . . .
Switching the night light on/off 28.
Switching the vibration alarm on/off 29.
Adjusting the VOX sensitivity 29. . . . . . . . . . . . . . . . . . . .
Selecting a lullaby 29
Intercom function 30
Range 30
Registration 30
6 In Case of Problems 31
Service hotline 31
Problems and solutions 31
7 Technical Properties 32
Technical data 32
Declaration of Conformity 32
8 Maintenance / Guarantee 33
Maintenance 33
Guarantee 33
1 Safety Information
Please read this operating instruction manual thoroughly.
Intended use
The surveillance system has been developed to monitor rooms. The transmitter sends acoustic and video signals from its point of installation to the receiver. Any other use is considered unintended use.
The use of this equipment does not substitute personal supervision, e.g. of a child. Users are not relieved of their personal liability. Unauthorised modification or reconstruction is not permitted. Under no circumstances open the device or complete any repair work yourself.
Installation location and safety information
Never lay the transmitter in a baby's/child's bed or playpen.
Ensure that the transmitter and power cable are out of reach of babies/children, i.e. they are at least one meter away.
Pay attention that the components are sufficiently well-ventilated when in operation. Do not lay a cushion, towel or such over the devices.
The devices are not intended for medical purposes. Warning and signal tones from respiratory or heartbeat monitoring equipment are not transmitted.
The installation location plays a decisive role in ensuring proper operation. Therefore, maintain a distance of at least one meter from other electronic equipment, such as microwave ovens or hi-fi devices, otherwise they could cause mutual interference/faults.
Prevent excessive exposure to smoke, dust, vibration, chemicals, moisture, heat and direct sunlight. Do not use the equipment in potentially explosive areas.
Power adapter plug

Attention: Only use the power adapter plugs contained in the material supplied since other power adapter plugs could damage the surveillance system. Ensure access to the power adapter plug is not obstructed by furniture or such.
When using the equipment with a power adapter plug, pay attention that the plug and cable are in perfect condition. Kinked or worn cable represents the risk of a fatal accident!

wer adapter plug supplied fulfils the ecodesign requirements of the European Union (Directive 2005/32/EC). This means that, both in an operating state and in an idling state, the power consumption is considerably lower compared to power adapter plugs with an older design.
Rechargeable batteries

Attention: Never throw batteries into a fire. Only use batteries of the same type! Pay attention to correct polarity.
Power failure
In the event of a power failure, the devices only operate through battery power. Disconnect the power adapter plugs from the devices in this case.
Medical equipment

Attention: Never use the devices in the vicinity of medical equipment. Effects on such equipment cannot be fully ruled out.
Disposal
In order to dispose of your device, take it to a collection point provided by your local public waste authorities (e.g. recycling centre). According to laws on the disposal of electronic and electrical devices, owners are obliged to dispose of old electronic and electrical devices in a separate waste container. The adjacent symbol indicates that the device must not be disposed of in normal domestic waste!
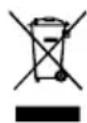
Batteries represent a hazard to health and the environment! Never open, damage or swallow batteries or allow them to pollute the environment.

They may contain toxic, ecologically hazardous heavy metals.
You are legally obliged to dispose of power packs and batteries at the point of sale or in the corresponding containers provided at collection points provided by local public waste authorities. Disposal is free of charge. The adjacent symbols indicate that the batteries must not be disposed of in normal domestic waste and must be brought to collection points provided by local public waste authorities.
Packaging materials must be disposed of according to local regulations.
2 Operating Elements and Indicators
The buttons in this operating manual are subsequently depicted with a uniform contour. Therefore, slight deviations in the appearance of the symbols on the buttons compared to those depicted here are possible.
Monitor unit (receiver)
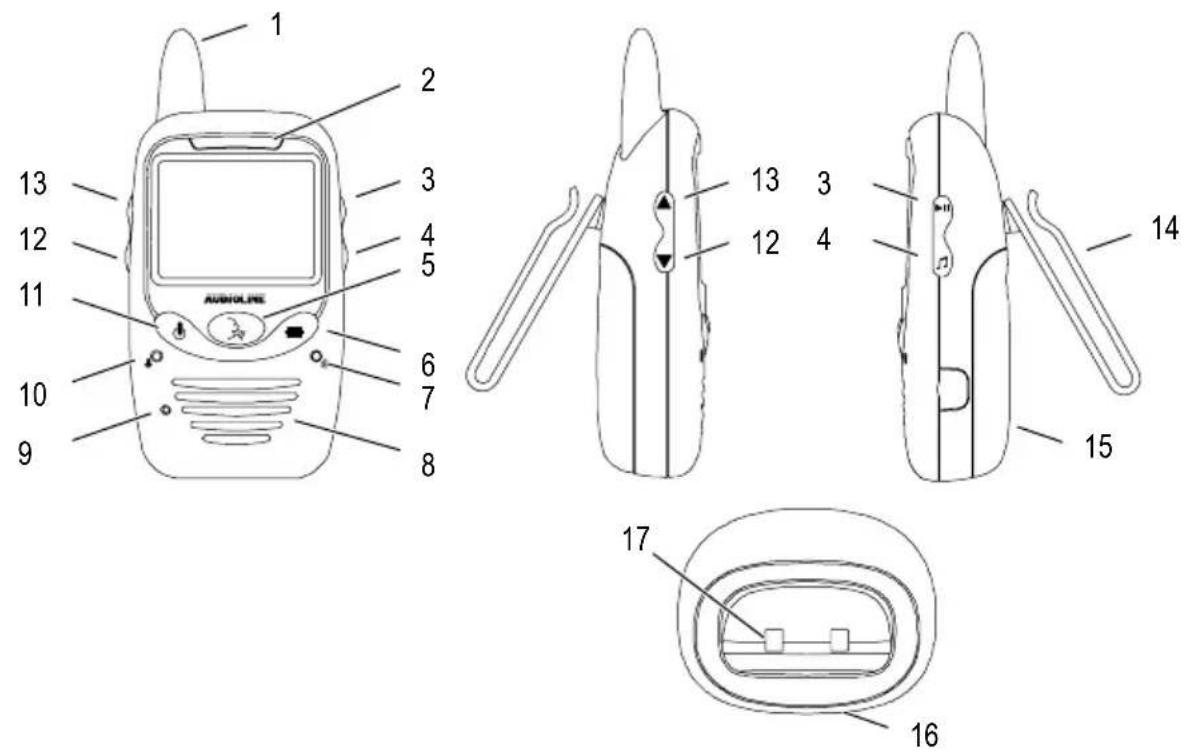
1 Antenna
2 Sound level LEDs
3 Play / Pause
4 Lullaby selector
5 Talk button
6 Menu button
7 VOX LED
8 Loudspeaker
9 Microphone
10 Power LED
11 On/Off switch
12 Reduce volume and brightness / menu options selection
13 Increase volume and brightness / menu options selection
14 Belt clip/Support
15 Battery compartment
16 Charger
17 Charge contacts
GB
Camera unit (transmitter)


natural_image
Line drawing of a computer monitor with a circular vent and labeled component (no text or symbols)
natural_image
Technical line drawing of a mechanical component with mounting holes and a labeled part (28), no readable text or symbols present.18 Night light
19 Light sensor
20 Power LED
21 Microphone
22 Lens
23 Antenna
24 Loudspeaker
25 Temperature sensor
26 Socket for power adapter plug
27 ON/OFF switch
28 Battery compartment
3 Putting the Units into Operation
Safety information

Attention: It is essential to read the Safety Information in Chapter 1 before starting up.
The data transmitted (image and/or sound) can be received publicly in the reception range!
Checking the package contents
The package contains:
| One camera unit (transmitter) | One monitor unit (receiver) with belt clip/support | One rechargeable battery for the receiver |
| One power adapter plug for the transmitter | One charger with power adapter plug for the receiver | An operating manual |
Connecting and aligning the transmitter

Attention: Position the transmitter with a minimum distance of 1 m to other electronic devices, otherwise there is a risk of mutual disturbance. Point the upper section of the transmitter towards the baby or object you want to monitor. Check that the baby or object is suitably displayed on the receiver.
Operating with batteries (not contained in the material supplied)
Use a small screwdriver to open the transmitter's battery compartment on the underside. Insert the batteries, paying attention to correct polarity. Refer to the diagrams in the battery compartment. Close the battery compartment again.

natural_image
Pure technical line drawing of a mechanical component with no text or symbolsThe transmitter is operated by means of 4 AAA Alkaline batteries (not contained in the material supplied). The transmitter cannot be charged. Insert the batteries before connecting the power adapter plug.
In the case of a low battery charge, the Power LED flashes slowly. The batteries must be replaced,
Operating with a power adapter plug
Connect the transmitter as illustrated in the diagram. For safety reasons, only use the power adapter plug supplied.

GB
Connecting the receiver

Attention: Position the receiver with a minimum distance of 1 m to other electronic devices, otherwise there is a risk of mutual disturbance.
Operating with a power adapter plug
Connect the receiver as illustrated in the diagram. For safety reasons, only use the power adapter plug supplied.

Operation with rechargeable batteries
- Turn the belt clip upwards.
- Open the battery compartment on the rear side of the receiver.
- Insert the batteries, paying attention to correct polarity.
- Close the battery compartment again.
- Turn the belt clip back downwards.
The receiver is powered by a 3.6 V, 930 mAh battery pack. The rechargeable battery pack can be recharged directly in the receiver when it is inserted in the charging station. The Power LED lights up red when the receiver is being charged. In the case of a low battery charge, the Power LED flashes slowly. The battery pack must then be recharged.
Using the belt clip/support
You can use the belt clip/support as a belt clip by turning it upwards.
When tuned downwards, it can be used as a support to keep it in a standing position.
4 Operating the Transmitter
Check the transmitter and receiver are working properly each time before the equipment is put into operation.
Switching the transmitter on/off
Position the transmitter in a good position for the monitoring tasks required and align the camera lens to the area to be monitored.

Slide the switch to ON.
The Power LED lights up green. The transmitter is now ready to operate.

To switch the unit off, slide the switch to OFF.

case of a low battery voltage, the Power LED flashes slowly.
In this event replace the 4 x AAA batteries with fresh alkaline cells.
Connecting and aligning the transmitter

Attention: Position the transmitter with a minimum distance of 1 m to other electronic devices, otherwise there is a risk of mutual disturbance. Point the upper section of the transmitter towards the baby or object you want to monitor. Check that the baby or object is suitably displayed on the receiver.
Night vision
The transmitter is equipped with 4 infrared diodes. This enables the transmission of pictures from areas which are not illuminated. The night vision function is activated automatically when the light conditions make it necessary.

When the night-time vision function is activated, the screen display on the receiver turns to black and white.
5 Operating the Receiver
Check the transmitter and receiver are working properly each time before the equipment is put into operation.
Switching the receiver on/off
Press and hold this button until you hear 2 acoustic signals. The logo appears first then the image being taken by the transmitter camera.
Press and hold the button for approx. 1 second to switch the unit off.
In the case of a low battery charge, the Power LED flashes slowly.
Setting the brightness

Press the button once.

This icon appears in the display for a few seconds.

Use this button to adjust the brightness to one of five settings.
Adjusting the temperature measurement IMPORTANT INFORMATION
The ideal temperature for a baby to sleep is 16^ - 18^ . Please set or adjust the room temperature accordingly.

Press the button twice.

This icon appears in the display for a few seconds.

Use the button to set temperature measurement to OFF, °C or °F.
18°C The current temperature is displayed during the temperature measurement, e.g. in °C.
Switching the night light on/off

Press the button three times.

This icon appears in the display for a few seconds.

Use this button to switch the night light on the transmitter on or off.
Switching the vibration alarm on/off

Press the button four times.

This icon appears in the display for a few seconds.

Use this button to switch the vibration alarm on or off.
When the vibration alarm is activated, the receiver vibrates when sounds in the room being monitored are so loud that the red Sound Level LEDs are activated.
Adjusting the VOX ^1 sensitivity
The VOX ^1 function (sound detection) causes the system to start transmitting automatically from the transmitter to the receiver immediately a voice or sound is detected.

Press the button five times.

This icon appears in the display for a few seconds.

Use this button to set VOX to OFF or adjust the sensitivity to one of 5 levels. When one of the five levels has been set, the VOX LED lights up red and the display goes out after 10 seconds.
The display is reactivated when a sound is detected or a button on the receiver is pressed.
^1 VOX: Voice Operated Transmission = Sound detection
Selecting a lullaby

Press the button on the right hand side of the receiver.

This icon appears in the display.

Use the button to select one of the 5 lullabies (1-5).
If no number is displayed, all of the lullabies will continue to play in succession until deactivated.

Use this button to adjust the volume to one of five settings. The volume levels will be adjusted on both the transmitter and receiver simultaneously.

This icon appears during the volume adjustment.
Intercom function

Press and hold the button.

This icon appears in the display.
Speak into the microphone to talk with the person near the other unit. While talking, any lullabies playing are muted.
Range

This icon flashes in the display when the distance between the transmitter and receiver is too great.
Move the receiver nearer to the transmitter.
Registration

The receiver and transmitter are pre-registered. If necessary, registration can also be completed manually:
Transmitter/Receiver
1 Switch the transmitter off. Switch set to OFF.
2 Cover the light sensor with a black cloth and switch the transmitter on. Position ON.

3 With the receiver switched on press and hold the button on the receiver for a few seconds.

c1 4 This icon appears in the display.
5 The Power LED on the transmitter flashes quickly for approx. 15 seconds.

6 Press this button to confirm the selection.
7 C1.... appears initially, then C1....OK.
When a connection is established, the image viewed by the lens appears in the display.
If C1...X appears (registration failed), it may be necessary to remove the batteries from the transmitter for a few seconds.
6 In Case of Problems
Service hotline
Should problems arise with the monitoring system, please refer to the following information first. In the case of technical problems, please contact our Service Hotline under Tel. 0180 5 001388 (costs via German landline at the time of going to print: 14 ct/min., max. 42 ct/min. via mobile phone networks). In the case of claims under the terms of guarantee, contact your sales outlet. There is a 2 year period of guarantee.
Problems and solutions
| Problems Solutions | |
| Equipment does not function | - Transmitter and/or receiver are not switched on.- The batteries are empty or defective.- The power adapter plugs are not connected. |
| No reception - Transmitter | and receiver are not registered.- Transmitter is too far from object being monitored, e.g. baby. Observe the minimum distance of one meter.- The receiver and transmitter are too far apart.- The VOX sensitivity is set too low. |
| Reception interference - The | the receiver and transmitter are too far apart.- The battery power is too low.- Other electronic devices are causing interference in the field of transmission. |
| Beeping noise (acoustic feedback) | - Increase the distance between receiver and transmitter.- Reduce the volume on the receiver. |
| Noise - The battery power | is too low. |
| Picture but no sound transmission | - Volume setting is too low. |
| Picture is in black and white | - The night vision function is active. |
| The battery pack in the receiver is not charged | - The power adapter plug is not connected. |
GB
7 Technical Properties
Technical data
| Feature Value | |
| Camera (transmitter) Socket: 6 V DC | Sensor: 1 night light sensorIR diodes: 4 |
| Monitor (receiver) Screen: 2,4" LC display | Socket: 6 V DC |
| Power supply (receiver) Power adapter plug | input:100-240 VAC, 50-60Hz, 150 mAPower adapter plug, output:6 VDC, 800 mAor rechargeable battery NiMH3.6 V, 930 mAh |
| Initial charging time for battery Up to 16 h | |
| Power supply (transmitter) Power adapter plug | input:100-240 VAC, 50-60Hz, 150 mAPower adapter plug, output:6 VDC, 800 mAor 4 AAA Alkaline batteries |
| Range Up to 150 meters under optimum | conditions.Range is reduced in buildings through walls, doors etc. |
| Frequency range 2.4 GHz | |
| Permissible ambient temperature 0°C to 40°C | |
| Transmission power (TX PA power) 15 ~ 17 | dBm |
Declaration of Conformity
This device fulfils the requirements stipulated in the EU directive:
1999/5/EU directive on radio equipment and telecommunications terminal equipment and the mutual recognition of their conformity. Conformity with the above mentioned directive is confirmed by the CE mark on the device.
To view the complete Declaration of Conformity, please use the download feature free of charge on our web site at www.audioline.de.
CE
GB
8 Maintenance / Guarantee
Maintenance
- Clean the housing surfaces with a soft, fluff-free cloth.
- Never use cleaning agents or solvents.
Guarantee
AUDIOLINE equipment is produced and tested according to the latest production methods. Carefully selected materials and highly developed technology ensure perfect functioning and a long service life. The terms of guarantee do not apply to the batteries or power packs used in the products. The period of guarantee is 24 months from the date of purchase.
All deficiencies related to material or manufacturing errors within the period of guarantee will be redressed free of charge. Rights to claims under the terms of guarantee are annulled following tampering by the purchaser or third parties. Damage caused as the result of improper handling or operation, normal wear and tear, incorrect positioning or storage, improper connection or installation or Acts of God and other external influences are excluded from the terms of guarantee. In the case of complaints, we reserve the right to repair or replace defect parts or provide a replacement device. Replaced parts or devices become our property. Rights to compensation in the case of damage are excluded where there is no evidence of intent or gross negligence by the manufacturer.
If your device shows signs of defect during the period of guarantee, please return it to the sales outlet in which you purchased the AUDIOLINE device together with the purchase receipt. All claims under the terms of guarantee in accordance with this agreement can only be asserted at the sales outlet. No claims under the terms of guarantee can be asserted after a period of two years from the date of purchase and hand-over of the product.
Notes
Notes


- Contents
- Safety Information
- Intended use
- Installation location and safety information
- Power adapter plug
- Rechargeable batteries
- Power failure
- Medical equipment
- Disposal
- Operating Elements and Indicators
- Camera unit (transmitter)
- Putting the Units into Operation
- Safety information
- Checking the package contents
- Connecting and aligning the transmitter
- Connecting the receiver
- Operating the Transmitter
- Switching the transmitter on/off
- Night vision
- Operating the Receiver
- Switching the receiver on/off
- Setting the brightness
- Adjusting the temperature measurement IMPORTANT INFORMATION
- Switching the night light on/off
- Switching the vibration alarm on/off
- Adjusting the VOX 1 sensitivity
- Selecting a lullaby
- Intercom function
- Range
- Registration
- Transmitter/Receiver
- In Case of Problems
- Service hotline
- Technical Properties
- Technical data
- Declaration of Conformity
- Maintenance / Guarantee
- Maintenance
- Guarantee
- Notes
Brand : AUDIOLINE
Model : Baby Care V 100
Category : Baby monitor