USER MANUAL Landroid WG796E WORX
LANDROID®M
UNMANNED
MOWING
VEHICLE
| Lawn Mowing Robot | EN | P02 |
| Roboter-Rasenmäher | D | P16 |
| Robot de fauchage à pelouse | F | P30 |
| Robot tosaerba | I | P44 |
| Robot cortacesped | ES | P58 |
| Robotgrasmaaier | NL | P72 |
| Robot do koszenia trawy | PL | P86 |
| Robotická sekačka | CZ | P100 |
| Robotická kosačka | SK | P114 |
| Robot za košnjo trave | SL | P128 |
ORIGINAL INSTRUCTIONS
TABLE OF CONTENTS
1. Product Safety 3
1.1 General & Additional Safety Instruction 3
1.2 Information on the Android ® M ____ 5
2. Component list 6
3. Understanding Your Android®M 8
3.1 How does my LandroidTM know what to mow? ____ 8
3.2 How does my Landroid®M know where to go? ____ 9
A. Finding the charging base 9
B. Rain sensors 9
C. Sensing the boundary wire 9
D. Starting and stopping while mowing 9
3.3 How big an area can my Landroid®M mow? 10
3.4 How efficiently will my Landroid® M mow the grass? 10
4. Remote Mobile Control 11
5. Boundary Wire Basics 11
5.1 Pegging the Boundary Wire 11
5.2 Burying the Boundary Wire 11
5.3 Joining the Boundary Wire 11
6. Software update 12
7. Maintenance 12
7.1 Keep it Sharp 12
A. Rotate and Flip the Blades 12
B. Replace the Blades 12
7.2 Keep it Clean 13
A. Cleaning the Body 13
B. Cleaning the Underside 13
C. Clean the contact pins and the charging strips 13
7.3 Battery Life 13
7.4 Winter Hibernation 14
7.5 Replacing the battery 14
1. Product Safety
1.1 General & Additional Safety Instruction

WARNING: Read all safety warnings and all instructions. Failure to follow the warnings and instructions may result in electric shock, fire and/or serious injury.
Carefully read the instructions for the safe operation of the machine. Save all warnings and instructions for future reference.
- This appliance is not intended for use by persons (including children) with reduced physical, sensory or mental capabilities, or lack of experience and knowledge, unless they have been given supervision or instruction concerning use of the appliance by a person responsible for their safety.
- Children should be supervised to ensure that they do not play with the appliance.
- The appliance is only to be used with the power supply unit provided with the appliance.
IMPORTANT
READ CAREFULLY BEFORE USE KEEP FOR FUTURE REFERENCE
SAFE OPERATION PRACTICES
Training
a) Read the instructions carefully. Make sure you understand the instructions and be familiar with the controls and the proper use of the appliance;
b) Never allow people unfamiliar with these instructions or children to use the appliance. Local regulations can restrict the age of the operator;
c) The operator or user is responsible for accidents or hazards occurring to other people or their property.
Preparation
a) Ensure the correct installation of the boundary wire as instructed.
b) Periodically inspect the area where the appliance is to be used and remove all stones, sticks, wires, bones, and other foreign objects.
c) Periodically visually inspect to see that the blades, blade bolts and cutter assembly are not worn or damaged. Replace worn or damaged blades and bolts in sets to preserve balance.
d) On multi-spindle appliances, take care as rotating one blade can cause other blades to rotate.
e) WARNING! The lawnmower shall not be operated without the guard in place.
OPERATION
1. GENERAL
a) Never operate the appliance with defective guards, or without safety devices, for example deflectors, in place;
b) Do not put hands or feet near or under rotating parts. Keep clear of the discharge opening at all times;
c) Never pick up or carry an appliance while the motor is running;
d) Operate the disabling device from the appliance;
– Before clearing a blockage;
– Before checking, cleaning or working on the appliance;
e) It is not permitted to modify the original design of robotic lawnmower. All modifications are made at your own risk.
f) Start robotic lawnmower according to the instructions. When the power key is switched on, make sure you keep your hands and feet away from the rotating blades. Never put your hands and feet under the mower.
g) Never lift up robotic lawnmower or carry it when the power key is switched on.
h) Do not let persons who do not know how robotic lawnmower works and behaves use the mower.
i) Do not put anything on top of robotic lawnmower or its charging station.
j) Do not allow robotic lawnmower to be used with a defective blade disc or body. Neither should it be used with defective blades, screws, nuts or cables.
k) Always switch off robotic lawnmower when you do not intend to use the mower. Robotic lawnmower can only start when the power key is switched on and the correct PIN code has been entered.
2. ADDITIONALLY WHEN THE APPLIANCE IS OPERATING AUTOMATICALLY
a) Do not leave the machine to operate unattended if you know that there are pets, children or people in the vicinity.
MAINTENANCE AND STORAGE
WARNING! When the mower is turned upside down, the power key must always be switched off. The power key should be switched off during all work on the mower's underframe, such as cleaning or replacing the blades.
a) Keep all nuts, bolts and screws tight to be sure the appliance is in safe working condition;
b) Inspect the robotic lawnmower each week and replace worn or damaged parts for safety;
c) Check especially that the blades and blade disc are not damaged. Replace all blades and screws at the same time if necessary so that the rotating parts are balanced.
d) Ensure that only replacement cutting means of the right type are used;
e) Ensure that batteries are charged using the correct charger recommended by the manufacturer. Incorrect use may result in electric shock, overheating or leakage of corrosive liquid from the battery;
f) In the event of leakage of electrolyte flush with water/neutralizing agent, seek medical help if it comes into contact with the eyes etc;
g) Servicing of the appliance should be according to manufacturers instructions.
Transport
The original packaging should be used when transporting robotic lawnmower over long distances.
To safely move from or within the working area:
a) Press the STOP button to stop the mower.
b) You select the four digit PIN code when you start the mower for the first time.
c) Always switch off robotic lawnmower if you intend to carry the mower.
d) Carry the mower by the handle at the rear under the mower. Carry the mower with the blade disc away from the body.

Safety warnings for battery pack
a) Do not dismantle, open or shred cells or battery pack.
b) Do not short-circuit a battery pack. Do not store battery packs haphazardly in a box or drawer where they may short-circuit each other or be short-circuited by conductive materials. When battery pack is not in use, keep it away from other metal objects, like paper clips, coins, keys, nails, screws or other small metal objects, that can make a connection from one terminal to another. Shorting the battery terminals together may cause burns or a fire.
c) Do not expose battery pack to heat or fire. Avoid storage in direct sunlight.
d) Do not subject battery pack to mechanical shock.
e) In the event of battery leaking, do not allow the liquid to come into contact with the skin or eyes. If contact has been made, wash the affected area with copious amounts of water and seek medical advice.
f) Seek medical advice immediately if a cell or battery pack has been swallowed.
g) Keep battery pack clean and dry.
h) Battery pack gives its best performance when it is operated at normal room temperature (20°C±5 °C).
i) When disposing of battery packs, keep battery packs of different electrochemical systems separate from each other.
j) Recharge only with the charger specified by WORX. Do not use any charger other than that specifically provided for use with the equipment. A charger that is suitable for one type of battery pack may create a risk of fire when used with another battery pack.
k) Do not use any battery pack which is not designed for use with the equipment.
I) Keep battery pack out of the reach of children.
m) Retain the original product literature for future reference.
n) Dispose of properly.

WARNING - Robotic lawnmower can be dangerous if incorrectly used.
Read through the Operator's manual carefully and understand the content before using your robotic lawnmower.

WARNING - Keep a safe distance from the machine when operating.
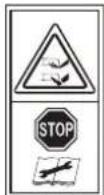
WARNING - Operate the disabling device before working on or lifting the machine.

WARNING - Do not ride on the machine.

Do not burn

Batteries may enter water cycle if disposed improperly, which can be hazardous for ecosystem. Do not dispose of waste batteries as unsorted municipal waste.

Batteries should be recycled. Do not dispose of batteries, Return exhausted batteries to your local collection or recycling point.
Do not wash the machine with a high pressure washer

Class III appliance

Waste electrical products must not be disposed of with household waste. Please recycle where facilities exist. Check with your local authorities or retailer for recycling advice.

2. Component List

- HANDLE BAR
- LOW VOLTAGE CABLE
- CONTACT PINS
- CHARGING BASE
- CHARGING STRIP
- DISPLAY WINDOW
- CONTROL PANEL COVER
- STOP BUTTON
- RAIN SENSOR
- REAR DRIVING WHEEL
- HANDLE
- BATTERY PACK
- BLADE TURNING DISC
- CUTTING BLADE
- FRONT WHEEL
- START KEY
- DISPLAY
- KEYPAD
- ON/OFF KEY
- POWER ADAPTOR
- BOUNDARY WIRE
- WIRE PEGS
-
HEX KEY
-
CHARGING BASE FIXING NAILS
-
BOUNDARY WIRE DISTANCE GAUGE
3. Understanding Your Landroid ® M
We would like to congratulate you on your new purchase of the Landroid®M and entering into the care-free life of automatic mowing. In the following, we would like to help you better understand how your Landroid®M thinks.

3.1 How does my Landroid ® M know what to mow?
The Landroid®M chooses its direction at random. It will make sure your entire lawn is evenly mowed without leaving behind any unattractive mowing paths (See Fig. A).

A
Lawn Mowing Robot EN
3.2 How does my Landroid®M know where to go?
Your Android ® M is capable of doing things on its own. The Android ® M knows when it needs to go to its Charging Base (4) to charge, can sense when it is raining, can stop itself if it senses a problem, and knows to stop, draw back, and then turn around when it bumps into something blocking its path or other object. The Android ® M will also automatically stop its Blade Turning Disc (13) from rotating if it is lifted off the ground to prevent an accident.
A. Finding the charging base
When your Landroid®M needs to recharge, it will stop mowing and follow the Boundary Wire (21) in an anti-clockwise direction back to its Charging Base. Landroid®M is pre-programmed to mow the grass near the boundary wire once a week. If you want to mow the grass near the boundary wire at other times, open the panel cover, press the home button and close the panel cover. Landroid®M will stop mowing, locate the boundary wire and mow the grass near the boundary wire while it locates the charging station. We suggest you use this function when the battery power is more than 75%. You can check the battery power in the display.
B. Rain sensors
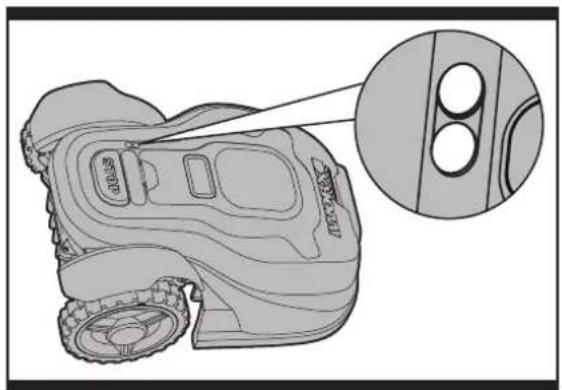
The Landroid®M is fitted with a Rain Sensor (9) that will detect rain drops and tell the Landroid®M to stop mowing and follow the Boundary Wire back to its Charging Base (See Fig. B)
The Landroid®M is programmable to have a delay start function (0 – 180 mins) when it rains. When the rain sensors are wet, the Landroid®M returns to its docking station. Only when the rain sensors become dry will the Landroid®M begin the delay start countdown or return to mowing immediately. See the Programming and Troubleshoot
B
C
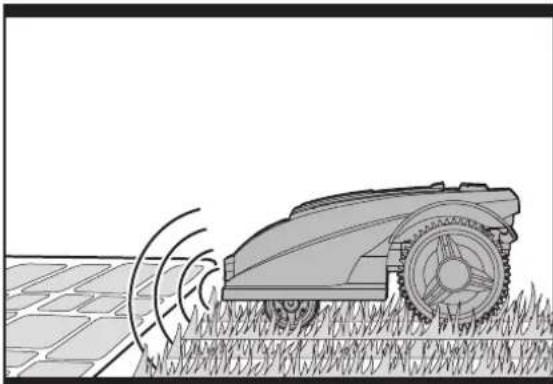
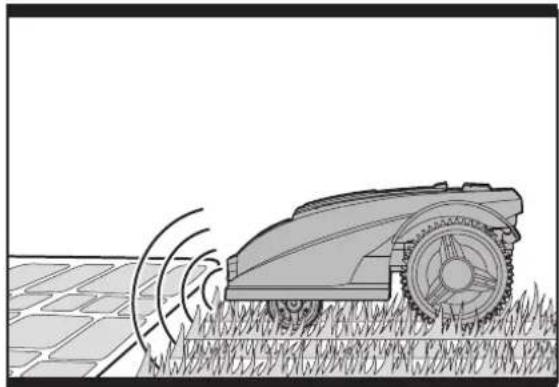
C. Sensing the boundary wire
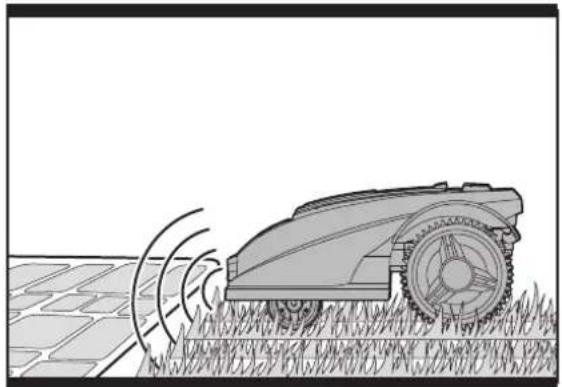
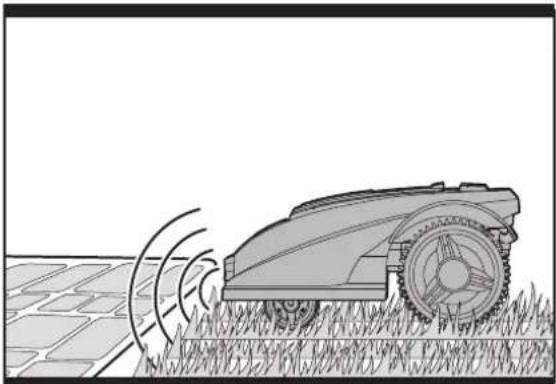
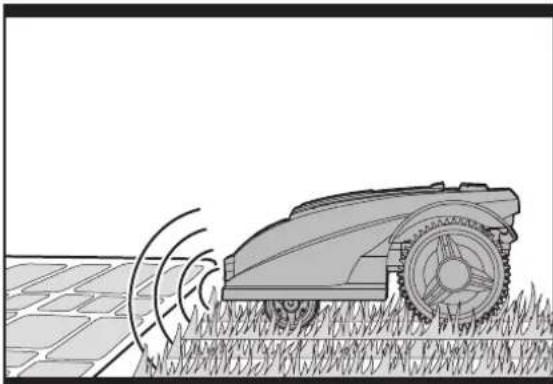
The Landroid®M always obeys the border set by the Boundary Wire and uses two sensors at its front to sense when it is getting close(See Fig. C). Before changing direction, the Landroid®M will overrun the Boundary Wire up to 20 cm*. *This is the recommended distance. Use the provided distance gauge to ensure proper installation.
D. Starting and stopping while mowing (See Fig. D,E)
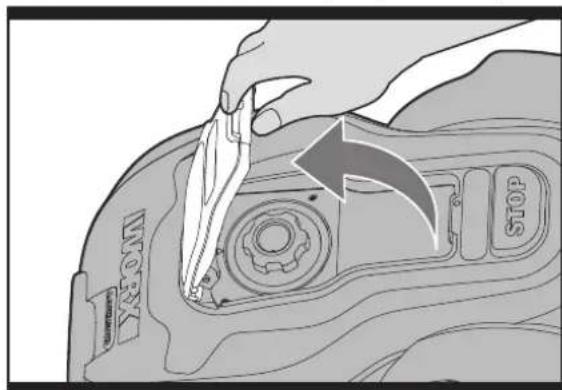
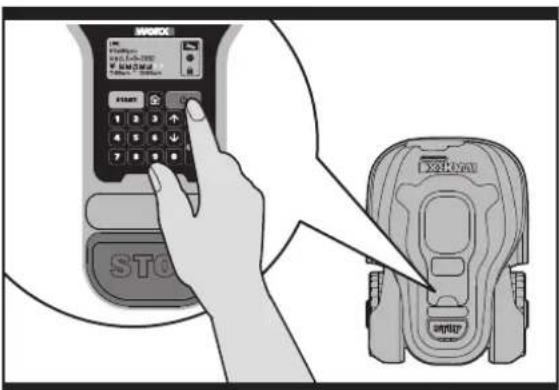
If you would like to command the LandroidTM to stop mowing, then simply press the STOP button (8) on top of the mower. To start mowing, open the Control Panel Cover, press the ON/OFF key and input the PIN code, then press start key and close the panel cover.

D

E
Lawn Mowing Robot EN
If the Landroid®M senses that something is wrong, it will display a fault message on the Display (17), and will turn itself off if it does not receive any input from the user within 20 min (for information on fault messages refer to the Programming and Troubleshooting Guide).
To resume:
Scene 1: STOP – Auto Shutdown after 20 mins
- Open the Control Panel Cover
- Press the ON/OFF Key (19) to ON
- Press 0 key to correct the problem
- Press START button again and Close the Control Panel Cover
- Now the Android M will begin to mow!
Scene 2: STOP- Without Auto Shutdown
- Open the Control Panel Cover
- Press 0 key to correct the problem
- Press START button again and Close the Control Panel Cover
- Now the Landroid M will begin to mow!
3.3 How big an area can my Landroid®M mow?
Your Android ® M is capable of mowing areas of up to different size areas, although this depends on various factors, such as:
• Species of grass in your lawn and its growth rate
• Sharpness of the Cutting Blades (14)
- Humidity
• Surrounding temperature
• Amount of obstacles in your Lawn
If the surrounding temperature is very hot where you live then your LandroidM may charge at a slightly slower rate. The LandroidM uses less energy in open areas that have fewer obstacles, such as flower beds, fountains, walkways, etc... You can find the default work time of LandroidM for different lawn size in programming guide.
Mowing times are different for every lawn depending on the factors mentioned previously. Gradually adjust the time you allow your Landroid®M to mow each day until you find the most suitable setting.
You can find the default work time of Landroid®M for different lawn size in programming guide.
3.4 How efficiently will my Landroid ® M mow the grass?
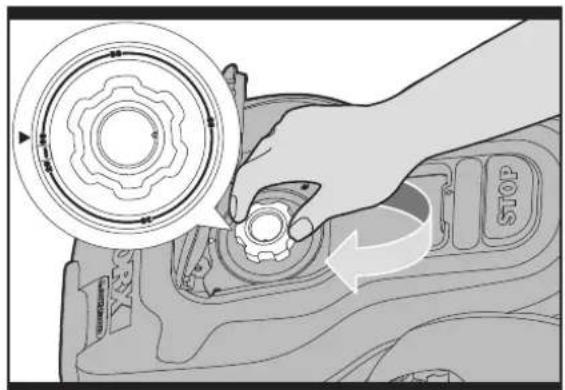
The Landroid®M 's cutting height can be adjusted between 2cm - 6cm. Before starting your Landroid®M for the first time, you should cut the grass to the height not more than 9cm. Then make sure you open the Control Panel Cover (7) and set the cutting height to its maximum cutting height of 6cm (See Fig. F,G).
Your Android ® M will cut its best in dry weather. It does not like wet grass, which can build up on the Blade Turning Disc (13) and within the motor, and can also cause loose traction and slippage while working.
Your Landroid ® M is afraid of Lightening Storms. In case of a Lightening Storm, protect the Landroid ® M by unplugging the Charging Base (4), disconnecting the Boundary Wire (21), and making sure the Landroid ® M is not allowed to charge.
Your Android ® M loves mowing grass and requires the Cutting Blades (14) to be kept in good condition to cut at its best. The Android ® M can do most things by itself, but will need your help sometimes to prevent damage to itself.
- Never let the Landroid M travel over gravel.
- Remove or prevent access to obstacles that the Landroid®M could accidentally climb on and damage its Blade Turning Disc.
- Remove all debris and foreign objects from your lawn.

GF
Your Lanroid ® M could be connected to smart phone. All the general settings could be set on your phone. It will also show the current working status, even errors. For the details settings, please refer to the Landroid ® M Wifi Connection Guide.
5. Boundary Wire Basics
5.1 Pegging the Boundary Wire
Use the Boundary Wire Distance Gauge (24) to set the correct distance from the border of your lawn (More than 35cm *).
* This is the recommended distance. Use the provided distance gauge to ensure proper installation.
If your neighbor also uses a Landroid ® M, then you must keep a spacing of at least 0.5 metres between your Boundary Wire and your neighbors.
The boundary wire must outline the intended mowing area exactly. Your Android ® M will become confused by extra bends or coils of Boundary Wire that are not part of its mowing area (See Fig.
H). If there is excess Boundary Wire after the mowing area has been outlined, then cut it off and store this additional wire in a separate location. However, it is important to leave the necessary length where it connects to the Charging Base so it can be connected and still remain buried.

H
5.2 Burying the Boundary Wire
If you are planning to bury the Boundary Wire then it should be noted that when entering its Charging Base for the first time, your Android ® M may find problems with the way you have laid the wire. It is recommended to first peg down the Boundary Wire to the lawn so it is easy to make adjustments if necessary. This will allow the Android ® M to become adjusted to its new environment and ensures it will successfully work with the charging base before the Boundary Wire is buried.
When you have completed installing the boundary wire, it is recommended that you ask LandroidTM to follow the boundary wire by pressing the home button.
Whilst observing LandroidTM locating the charging station you can then make alterations to the boundary wire route to ensure trouble free tracking of the boundary wire by LandroidTM when locating the charging station.
5.3 Joining the Boundary Wire
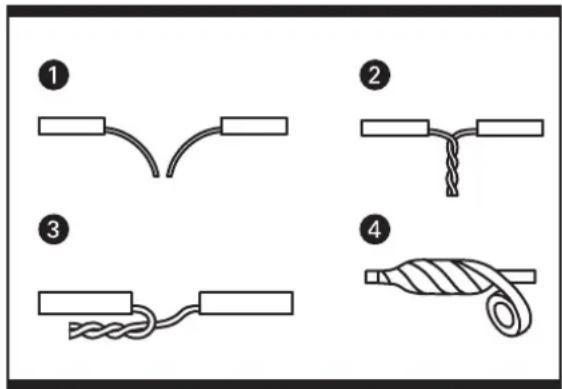
The Boundary Wire (21) can be extended simply by splicing the ends and connecting it to the ends of another piece of wire. You can use insulating tape to secure the joined part of the wire. (See Fig. I)
I
6. Software update
Your Android ® M software can be updated when new versions become available. The software version will be displayed in the diagnosis page by pressing button 2 on homepage. The latest software can be downloaded from our website www.worxlandroid.com. See the detailed guideline on download page.
The manual in box is based on the default software in the mass production. Some new features/functions in the new version may not exist in the manual. If you found some settings not in the manual, please visit www.worxlandroid.com to download the latest manual.
7. Maintenance
Your Android ® M needs to be checked from time to time. The Android ® M works hard and after time needs a good cleaning as well as having some parts replaced, as they can become worn. In the following we want to let you know how to take care of your Android ® M.
7.1 Keep it sharp
WARNING: Before cleaning, adjusting, or replacing the Blades, turn your Landroid®M OFF and put on protective gloves.

J
WARNING: When fitting new blades, make sure you replace ALL the blades. Always use new screws when fitting blades. This is important to ensure blade retention. Failure to use new screws could cause serious injury.
The Landroid®M does not cut grass like other mowers. Its Cutting Blades (14) are razor sharp on all 4 edges and spin in both directions for maximum cutting capacity (See Fig. J). Each blade of your Landroid®M has 4 cutting edges. Depending on the frequency the Landroid®M mows your lawn, the cutting blades will need to be flipped/rotated periodically for a new cutting edge. If your Landroid®M is programmed to mow the lawn every day then the cutting blades will need to be rotated monthly for the best mowing results. Each cutting blade will last up to 4 months when it is programmed to mow every day. When the cutting blades are dull and worn out, they should be replaced with the spare blades provided with your Landroid®M . Spare blades are also available at your nearest WORX retailer.
A. Rotate and flip the blades
Your Android ® M carries the Blades that are all screwed onto the Blade Turning Disc (13). The Blades allow the Android ® M do its job and need care and attention. Every once in awhile, you should simultaneously rotate and flip all blades for a perfect cut. When rotating and flipping the Blades, make sure all the Blades are adjusted at the same time or else it could make the Blade Disc off balance. If your Android ® M mows on a normal schedule (daily) then the Blades should last one season if they are rotated and flipped every month. Always check to see if the Blades are chipped or damaged and replace them if they are.
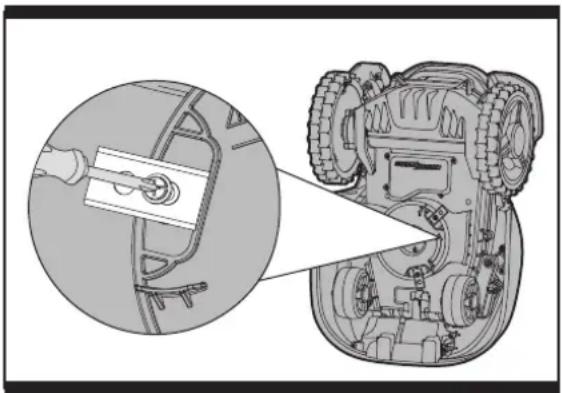
B. Replace the blades (See Fig. K)
After some time, usually every season, your LandroidM 's Blades will need to be replaced. Your LandroidM does not like mowing while using Blades of different age and quality. So when replacing the Blades, make sure to replace all of them at the same time. You can replace them with one of the three spare Blade kits and extra Blade screws supplied with your LandroidM .
Before attempting to replace your Landroid ® M's Blades, turn the power off and put on protective gloves. Then follow these steps:
- Gently flip the Landroid M over.
- Remove the battery cover and remove the battery.
- Take the screws off the Blades with a screwdriver.
- Firmly screw on the new Blades.
- Refit the battery and the battery cover.
IMPORTANT: After screwing the Blade to the Blade Disc, make sure the Blade is able to spin freely.
K
7.2 Keep it clean

WARNING: Before cleaning turn your Android®M OFF. Put on protective gloves before cleaning the Blade Turning Disc (13) and do not use running water. (See Fig. L)
A. Cleaning the body
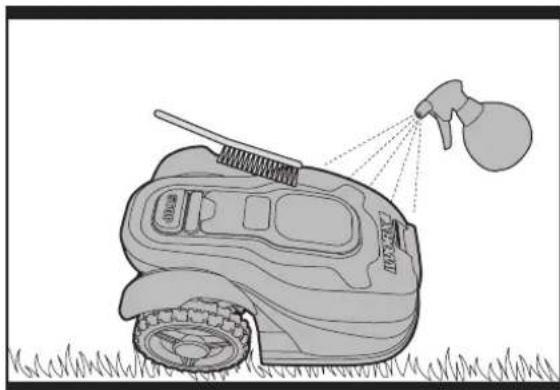
Your Landroid®M will live a much happier and longer life if it is cleaned regularly. Although, as your Landroid®M is an electric machine, you will need to take care when cleaning, so DO NOT use a hose, high pressure washers or otherwise pour running water on your Landroid®M , it is best to use a spray bottle filled with water. When cleaning the machine body use a soft brush or clean cloth and avoid using solvents or polishes (See Fig. L). Lastly, make sure that you remove all build up of grass clippings and debris.

L
B. Cleaning the Underside
Again, it is important that you power the Landroid®M OFF using the ON/Off Button and wear protective gloves before touching the Blade Turning Disc (13).
First, flip your Landroid®M upside down to expose its underside. Here you will see the Blade Disc, the chassis, and the Front Wheel (15) and Driving Wheel(10). Clean everything thoroughly with a soft brush or moist rag. Rotate the Blade Disc to ensure it rotates freely. Check the blades spin freely around the fixing screws. Remove any obstructions.
IMPORTANT: Remove any lodged debris so that it does not cause a crack in the Blade Disc. Even the tiniest crack can decrease your Landroid®M's mowing output.
Clean the Contact Pins (3) located on the Charging Base (4) and the Charging Strip (5) located on the Landroid ® M using a cloth. Remove any build up of grass clippings and debris around the contact pins and charge strips periodically to ensure the Landroid ® M successfully charges each time.
7.3 Battery life
The heart of the LandroidM is its 28-volt lithium-ion battery. No maintenance is required. For proper storage of the battery, make sure it is fully charged in kept in a cool dry place between (20°C-60°C).
The life-span of the Landroid ® M's battery depends on various factors, such as:
- The time span of the mowing season in your region.
- Amount of hours the Landroid M mows per day.
- Battery maintenance during storage.
LandroidM can be charged manually without the boundary wire.
To manually charge the battery without connecting the boundary wire to the charging base;
- Connect the Charging Base to a suitable power supply.
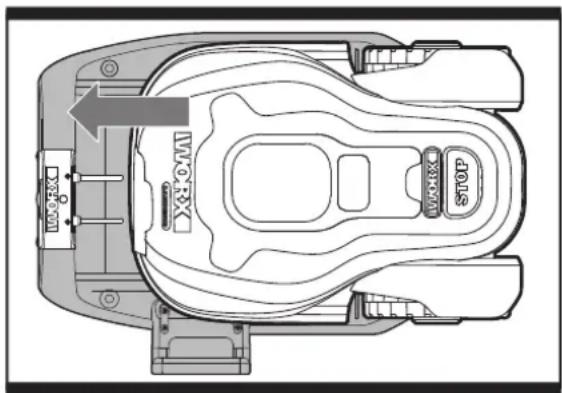
- Manually dock the Landroid M into the Charging Base while the Landroid M is powered off.(See Fig. M1)
- The charging base red light will turn on.
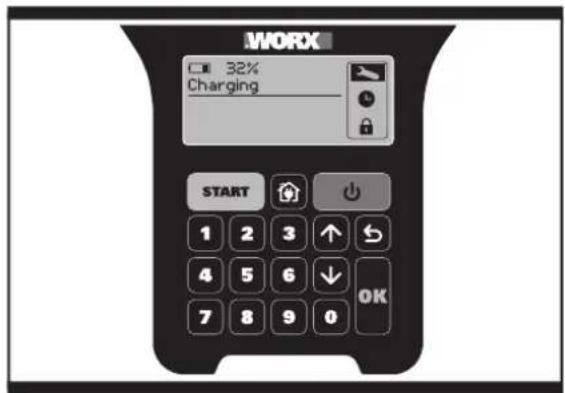
- While "charging" is shown on the screen.(See Fig. M2) Landroid ® M will begin to charge.
M1

M2
Lawn Mowing Robot EN
7.4 Winter hibernation
Your Android ® M will live longer and healthier if it is allowed to hibernate. So even though it is tough, we would recommend that you store your Android ® M in your shed or garage during the winter.
Before you prepare your Landroid®M for winter hibernation, we recommend you:
• Thoroughly clean your Landroid ® M
• Fully charge the battery
- Turn the power off
To maximize the battery life, it is recommended to fully charge the battery before storage during winter.
The Boundary Wire can be left in the ground although its ends should be protected, such as placed in a tin can with grease. If the Charging Base is left outside for winter, leave the Boundary Wire connected.
NOTE: When bringing the Landroid®M back to work after winter hibernation, make sure the Charging Strips (5) and Contact Pins (3) are clean, it is recommended to use a fine grade emery cloth to clean. Then make sure the date and time are correct and send the Landroid®M back to what it loves doing: mowing.
7.5 Replacing the battery

WARNING: Press the ON/OFF Key to OFF before attempting any adjustment, replacement or repair.
If you need to replace the Battery, follow these steps:
- Gently turn your Android ® M upside down.
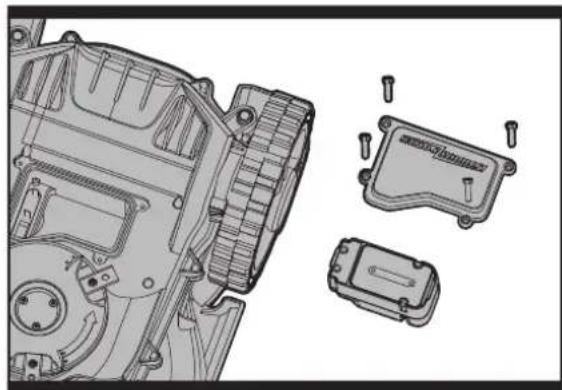
- Remove the four screws on the battery cover (See Fig. N).
- Take out the old battery (See Fig. O).
- Put in the new battery.
- Firmly replace the screws.

N

0
Environmental Protection

Waste electrical products should not be disposed of with household waste. Please recycle where facilities exist. Check with your Local Authority or retailer for recycling advice.

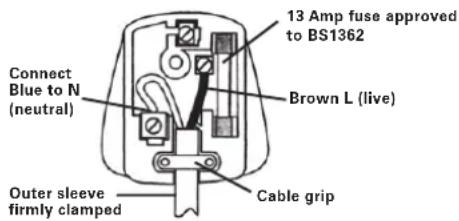
Plug Replacement (UK & Ireland Only)
If you need to replace the fitted plug then follow the instructions below.
IMPORTANT
The wires in the mains lead are colored in
accordance with the following code:
Blue - Neutral
Brown - Live
As the colors of the wires in the mains lead of this appliance may not correspond with the coloured markings identifying the terminals in your plug, proceed as follows. The wire which is coloured blue must be connected to the terminal which is marked with N. The wire which is coloured brown must be connected to the terminal which is marked with L.

WARNING: Never connect live or neutral wires to the earth terminal of the plug. Only fit an approved BS1363/A plug and the correct rated fuse.
NOTE: If a moulded plug is fitted and has to be removed take great care in disposing of the plug and severed cable, it must be destroyed to prevent engaging into a socket.
BEDIENUNGSANLEITUNG
INHALT
- GRIFFSTANGE
- NIEDERSPANNUNGSKABEL
- KONTAKTSTIFTE
- LADESTATION
- LADESTREIFEN
- DISPLAYFENSTER
- KONSOLENABDECKUNG
- STOPPTASTE
- REGENSENSOR
- HINTERES ANTRIEBSRAD
- GRIFF
- AKKU
- MESSERTELLER
- MESSER
- VORDERRAD
- STARTTASTE
- DISPLAY
- TASTATUR
- EIN-/AUSTASTE
- NETZTEIL
- BEGRENZUNGSKABEL
- HERINGE
- LADESTATION-BEFESTIGUNGSSCHRAUBEN
- BEGRENZUNGSKABEL-ABSTANDLEHRE
- INBUSSCHLÜSSEL
A
B
C
E
GF
H
I
K
L
7.2 Sauber halten

M1

M2
7.4 Überwintern
N
0
Umweltschutz

PRATIQUES DE TRAVAIL SÛRES
Apprentissage
- POIGNÉE
- CÂBLE BASSE TENSION
- BROCHES DE CONTACT
- SOCLE DE CHARGEMENT
- BANDE DE CHARGE
- COUVERCLE DU ÉCRAN
- COUVERCLE DU PANNEAU DE COMMANDE
- BOUTON STOP
- CAPTEUR PLUVIOMÉTRIQUE
- ROUE MOTRICE ARRIÈRE
- POIGNÉE
- BATTERIE
- DISQUE DE COUPE ROTATIF
- LAMES DE COUPE
- ROUE AVANT
- BOUTON START
- ÉCRAN
- CLAVIER
- BOUTON MARCHE/ARRÊT
- ADAPTATEUR D'ALIMENTATION
- FIL-BARRIÈRE
- CHEVILLES MÉTALLIQUES
- CLOUS DE FIXATION DE LA BASE DE CHARGE
- JAUGE DE DISTANCE DU FIL-BARRIÈRE
- CLEF ALLEN
A
B

C
E
GF
H
I
K
L
M2
7.4 Hibernation
0
- MANIGLIA DI PROTEZIONE
- CAVO DI BASSA TENSIONE
- PIN DI CONTATTO
- BASE DI RICARICA
- STRISCIA DI RICARICA
- FINESTRA PER LETTURA DISPLAY
- COPERCHIO DEL PANNELLO DEI COMANDI
- TASTO STOP
- SENSORE PIOGGIA
- RUOTA POSTERIORE
- MANIGLIA
- PACCO BATTERIA
- DISCO SUPPORTO LAME
- LAMA
- RUOTA ANTERIORE
- TASTO START
- DISPLAY
- TASTIERA
- TASTO ON/OFF
- TRASFORMATORE
- FILO PERIMETRALE
- PICCHETTO FILO PERIMETRALE
- CHIODI DI ANCORAGGIO DELLA BASE DI RICARICA
- DISTANZIATORE PER IL FILO PERIMETRALE
- CHIAVE A BRUGOLA
3. Per comprendere Landroid ® M
A
Robot tosaerba I
B
C
GF
Robot tosaerba I
H
|
K
L
M2
N

0
Tutela Ambientale

A
Robot cortacesped ES
B

C

GF
H
I
K
L
M2
7.4 Hibernación
N

0
- HANDVAT
- LAAGSPANNINGSKABEL
- CONTACTPINNEN
- LAADSTATION
- LAADSTRIP
- BEELDSCHERM
- KAP VAN BEDIENINGSPANEEEL
- STOPKNOP
- REGENSENSOR
- ACHTERSTE RIJWIEL
- HANDVAT
- BATTERIJPAKKET
- MESDRAAIENDE SCHIJF
- SNIJMES
- VOORWIEL
- STARTKNOP
- SCHERM
- TOETSENBORD
- AAN-UITKNOP
- VOEDINGSAPPARAAT
- GRENSDRAAD
- DRAADPENNEN
- AFSTANDMAL VOOR GRENSDRAAD
-
INBUSSLEUTEL
-
BEVESTIGINGSCHROEVEN VOOR LAADSTATION
A
Robotgrasmaaier NL
B
C
E
Robotgrasmaaier NL
GF
H
I
6. Software-update
K
L
M1
M2
7.4 Winteropslag
N

0
- UCHWYT
- PRZEWÓD NISKIEGO NAPIĘCIA
- WTYKI
- STACJA LADOWANIA
- TAŚMA ŁADOWANIA
- WYŚWIETLACZ
- OSŁONA PANELU STEROWANIA
- PRZYCISK ZATRZYMANIA
- CZUJNIK DESZCZU
- TYLNE KOŁO NAPEDOWE
- RACZKA
- AKUMULATOR
- TARCZA OBROTOWA Z OSTRZEM
- OSTRZE TNACE
- PRZEDNIE KOŁO
- PRZYCISK URUCHOMIENIA
- WYŚWIETLACZ
- KLAWIATURA NUMERYCZNA
- PRZYCISK ON/OFF (WŁ./WYŁ.)
- ZASILACZ SIECIOWY
- PRZEWÓD GRANICZNY
- SZPILKI DO PRZEWODÓW
- ŚRUBY MOCUJĄCE STACJI ŁADOWANIA
- MIERNIK ODLEGŁOŚCI PRZEWODU GRANICZNEGO
- KLUCZ IMBUSOWY
A
B

C
E
GF
H
|
7. Konserwacja
K
L
M2
N

0
Ochrona Środowiska

- RUKOJEŤ
- KABEL PRO NÍZKÉ NAPĚTÍ
- KONTAKTNÍ KOLÍKY
- NABÍJECÍ ZÁKLADNA
- NABÍJECÍ PÁSEK
- DISPLEJ
- KRYT OVLÁDACÍHO PANELU
- TLAČÍTKO STOP
- DEŠTOVÝ SENZOR
- ZADNÍ HNACÍ KOLEČKO
- RUKOJEŠT
- BATERIE
- NOŽOVÝ KOTOUČ
- NÜŽ
- PŘEDNÍ KOLEČKO
- TLAČÍTKO START
- DISPLEJ
- KLÁVESNICE
- TLAČÍTKO ZAPNUTO/VYPNUTO
- NAPÁJECÍ ADAPTÉR
- VYMEZOVACÍ DRÁT
- DRÁTĚNÉ KOLÍKY
- UPEVŇOVACÍ KOLÍKY NABÍJECÍ ZÁKLADNY
- MĚŘIDLO VZDÁLENOSTI VYMEZOVACÍHO DRÁTU
- ŠESTIHRANNÝ KLÍČ
3.1 Jak moje sekačka Landroid® M pozná, co má sekat?
A
B

C
E

GF
H
|
7. Údržba
K
L
M1

M2
7.4 Uložení v zimě
0
-
UPEVŇOVACIE KOLÍKY NABÍJACEJ ZÁKLADNE
-
MERADLO VZDIALENOSTI OHRANIČUJÚCEHO DRÔTU
-
RUKOVÄT
- KÁBEL PRE NÍZKE NAPÄTIE
- KONTAKTNÉ KOLÍKY
- NABÍJACIA ZÁKLADŇA
- NABÍJACIA PÁSKA
- DISPLEJ
- KRYT OVLÁDACIEHO PANELU
- TLAČIDLO STOP
- SENZOR DÁŽDA
- ZADNÉ HNACIE KOLIESKO
- RUKOVÄT
- BATÉRIA
- NOŽOVÝ KOTÚČ
- NÔŽ
- PREDNÉ KOLIESKO
- TLAČIDLO ŠTART
- DISPLEJ
- KLÁVESNICA
- TLAČIDLO ZAPNUTÉ/VYPNUTÉ
- NAPÁJACÍ ADAPTÉR
- OHRANIČUJÚCI DRÔT
- DRÔTENÉ KOLÍKY
- ŠESTHRANNÝ KLÚČ
A
B

C
E
GF
H
|
K
A. Čistenie krytu kosačky
M1

M2
0
SHRANITE ZA KASNEJŠO UPORABO
VARNA UPORABA
Usposabljanje
- KRMILO
- NIZKONAPETOSTNI KABEL
- KONTAKTNA PRIKLOPA
- BAZA ZA POLNJENJE
- TRAKOVA NAPAJALNIKA
- PRIKAZOVALNO OKNO
- POKROV NADZORNE PLOŠČE
- GUMB ZA IZKLOP
- SENZOR ZA DEŽ
- ZADNJE POGONSKO KOLO
- ROČAJ
- AKUMULATOR
- REZALNI KOLUT
- REZILO
- SPREDNJE KOLO
- KONTAKTNI KLJUČ
- ZASLON
- TIPKOVNICA
- TIPKA ON/OFF (VKLOP/IZKLOP)
- NAPAJALNI ADAPTER
- ŽICA ZA OMEJITEV
- KLINI ZA ŽICO
- KLINI ZA PRITRDITEV BAZE ZA POLNJENJE
- MERILNIK RAZDALJE OD MEJE KOŠNJE
- ŠEST ROBI KLJUČ
3. Predstavitev naprave Landroid®M
A
Robot za košnjo trave SL
3.2 Kako moj Landroid ® M ve, kam mora iti?
B
C
E
Robot za košnjo trave SL
Povzetek:
GF
H
I
7. Vzdrževanje
LandroidM morate občasno pregledati. LandroidM deluje s polno močjo in vsake toliko časa ga morate očistiti in zamenjati morebitne obrabljene dele.
K
7.2 Skrbite, da bo naprava vedno čista

A. Čiščenje ohišja
M2
7.4 Shranjevanje preko zime
N

0
VAROVANJE OKOLJA

Copyright © 2015, Positec. All Rights Reserved.
AR01158300