
Capoera DD7114 - Vacuum Cleaner DIRT DEVIL - Free user manual and instructions
Find the device manual for free Capoera DD7114 DIRT DEVIL in PDF.


| Product type | Bagless canister vacuum cleaner |
| Brand | Dirt Devil |
| Model | Capoera DD7114 |
| Dimensions (L x W x H) | 40 x 25 x 25 cm |
| Weight | 5 kg |
| Power supply | Mains, 7 m cable |
| Rated power | 700 W |
| Filtration type | Washable HEPA filter |
| Tank capacity | 1.5 L |
| Operating range | 9 m (cable + hose) |
| Noise level | 78 dB |
| Main functions | Cyclonic, powerful suction, multi-surface nozzle |
| Accessories included | Combination nozzle, upholstery nozzle, parquet brush |
| Maintenance | Regular cleaning of filter and tank |
| Safety | Automatic shut-off in case of overheating |
| Spare parts available | HEPA filter, tank, motorized brush |
| Repairability | Repairability index 7.5/10 |
| Warranty | 2 years |
| Country of origin | China |
Frequently Asked Questions - Capoera DD7114 DIRT DEVIL
User questions about Capoera DD7114 DIRT DEVIL
0 question about this device. Answer the ones you know or ask your own.
Ask a new question about this device
Download the instructions for your Vacuum Cleaner in PDF format for free! Find your manual Capoera DD7114 - DIRT DEVIL and take your electronic device back in hand. On this page are published all the documents necessary for the use of your device. Capoera DD7114 by DIRT DEVIL.
USER MANUAL Capoera DD7114 DIRT DEVIL
natural_image
Illustration of a vacuum cleaner with coiled hose and control panel (no text or symbols)
Bedienungsanleitung
bagged vacuum cleaner

Mode d'emploi
Aspirateur avec sac

natural_image
Illustration of a hand holding a flexible hose with a pointed tip, no text or symbols present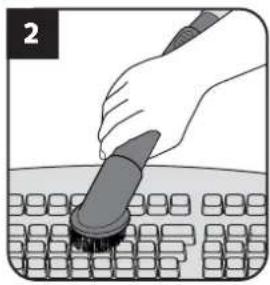
natural_image
Illustration of a hand using a brush to clean or brush another on a grid of squares (no text or symbols)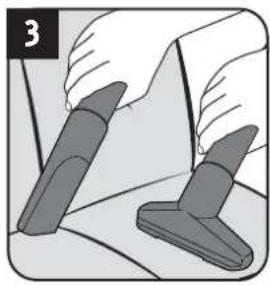
natural_image
Illustration of two hands holding and adjusting a tool, no text or symbols present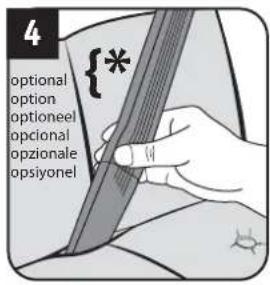
natural_image
Illustration of a hand holding a wristbelt with two arrows indicating downward motion (no text or symbols)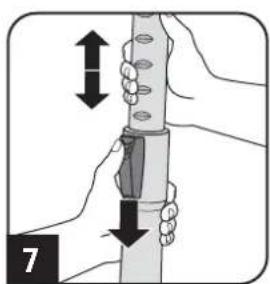
natural_image
Close-up of a mechanical component with a handle and arrow indicating motion (no text or symbols)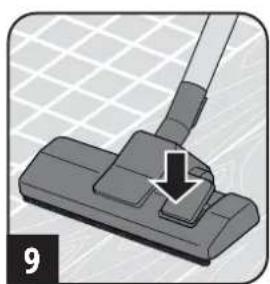
natural_image
Illustration of a hand using a vacuum cleaner to press down a component (no text or symbols visible)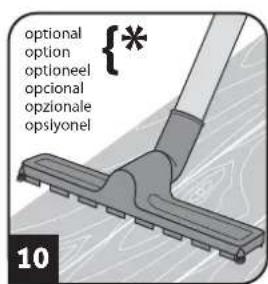
! WARNING:
natural_image
Illustration of a hand using a tool to press or adjust a device (no text or symbols visible)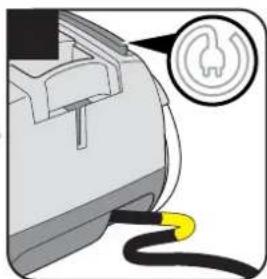
natural_image
Illustration of a plug with a yellow cable and a circular icon showing a plug symbol (no text or labels)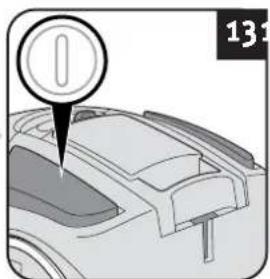
natural_image
Diagram of a car interior with a circular icon and a numbered label (13) pointing to the vehicle (no text or symbols on the diagram itself)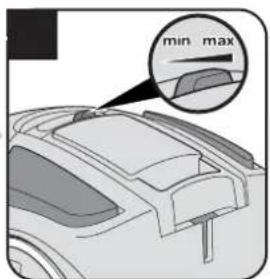

natural_image
Illustration of a person using a handheld tool to clean or wash the material (no text or symbols)WARNING:
natural_image
Illustration of a hand holding a cylindrical device with a bracket and a magnified inset showing internal components (no text or symbols)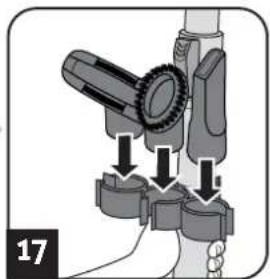
natural_image
Mechanical assembly diagram showing a tool interacting with a base, no text or symbols present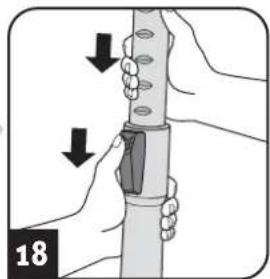
natural_image
Illustration of hands holding a cylindrical object with arrows indicating movement or force direction (no text or symbols)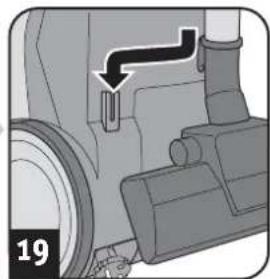
natural_image
Mechanical component diagram showing a pipe fitting with an arrow indicating direction (no text or symbols)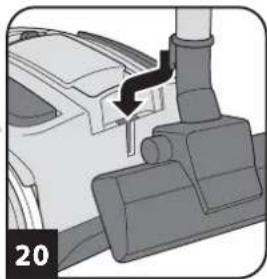
natural_image
Mechanical assembly diagram showing a lever mechanism with a downward arrow and numbered label (20), no readable text or symbols present.! WARNING:
natural_image
Illustration of a capsule-shaped object with red interior and white outline, no visible text or symbols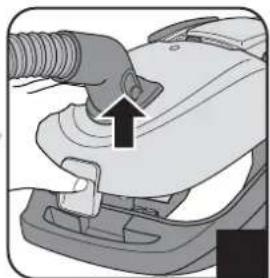
natural_image
Close-up of a hand using a tool to press or install a mechanical component, with no visible text or symbols.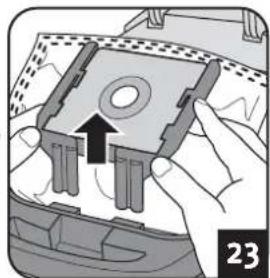
natural_image
Illustration of a mechanical device with a magnified view showing internal components (no text or symbols)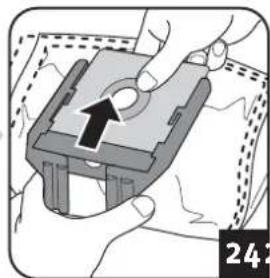
natural_image
Illustration of hands holding a mechanical component with an arrow indicating rotation (no text or symbols)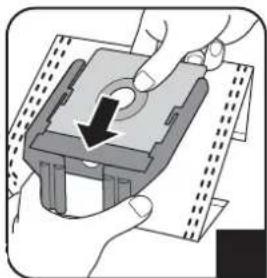
natural_image
Illustration of hands holding a mechanical component with a black arrow indicating rotation (no text or symbols)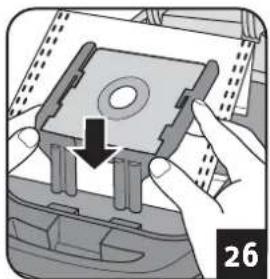
natural_image
Illustration of hands installing or adjusting a mechanical component with a downward arrow (no text or symbols)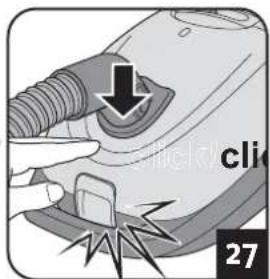
Kaufempfehlung
natural_image
Close-up of a hand inserting a grid into a car interior (no text or symbols visible)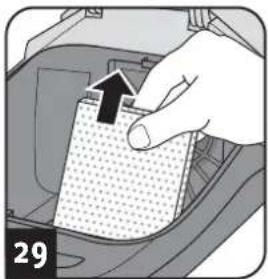
natural_image
Hand inserting a component into a vehicle's door panel (no text or symbols visible)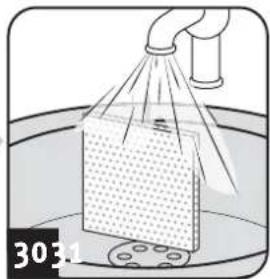
natural_image
Illustration of a spray bottle spraying liquid onto a textured surface, with no visible text or symbols.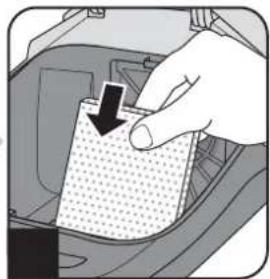
natural_image
Hand inserting a dotted pattern into a car's door panel (no text or symbols visible)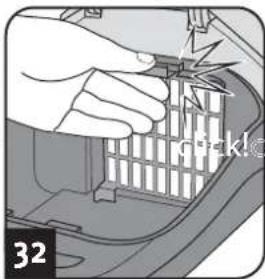
ACHTUNG:
natural_image
Close-up of a hand pressing down on a car dashboard (no visible text or symbols)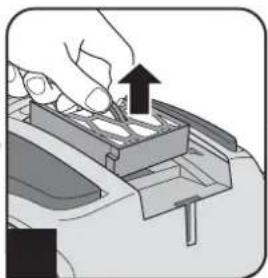
natural_image
Illustration of a hand using a tool to adjust or install a component, with an upward arrow indicating the process (no text or symbols present)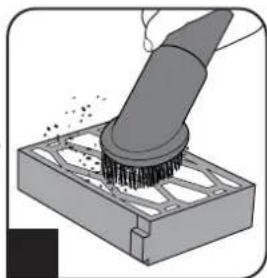
natural_image
Illustration of a brush applying material to a block, no text or symbols present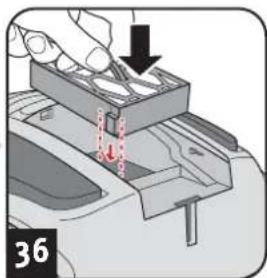
ACHTUNG:
1.1 About the operating manual
Read the operating manual completely before working with the appliance. Keep the operating manual in a safe place. Include the operating manual if you pass the appliance on to a third party. Failure to comply with this operating manual can lead to serious injuries or damage to the appliance. We take no responsibility for damage due to failure to comply with this operating manual. Always comply with the notices marked as follows to avoid accidents and damage to the appliance.

WARNING:
Warns of health hazards and identifies possible risks of injury.

CAUTION:
Indicates possible dangers to the appliance or other objects.
NOTE:
Highlights tips and information for you.
1.2 Concerning certain groups of persons
These appliances can be used by children of 8 years and upwards and persons with impaired physical, sensory or mental abilities, or insufficient experience or knowledge, providing they are supervised or have been instructed in the proper use of the appliance and understand the risks involved.
Children must not play with the appliance. Children must not perform cleaning or user maintenance tasks without supervision. Children under the age of eight should be kept away from the appliance and the connection cable whilst it is switched on or cooling down.
- Packing material must not be used for playing. There is danger of suffocation.
1.3 Information on power supply
The appliance is operated with electrical power, which means there is always a risk of electric shock. Therefore, please comply with the following:
- Never immerse the appliance in water or other liquids; keep it away from rain and moisture. Never touch the plug with wet hands. Do not operate the appliance outdoors or in rooms with a high level of humidity.
Take care that the power cord is not kinked, pinched, or rolled over and ensure it does not come into contact with heat sources. Also take care that it does not become a stumbling hazard.
Before connecting to the power supply, make sure that the voltage stated on the type plate matches the voltage of your plug socket.
■ Always check the power cord for possible damage before using the appliance.
■ Never carry the appliance by its power cord. It could be damaged.
Before you clean or maintain the appliance, switch off the appliance and pull the mains plug from the socket. Always pull directly on the plug when you disconnect the appliance from the mains. Do not pull on the power cord as this could damage it.
If possible, do not use extension cords. If you must use an extension cord, use only safety-certified, water-protected single extension cords (no multi-socket distributors) designed for the power consumption of the appliance.
1.4 Information on proper use
The cylinder vacuum cleaner is intended for home use only.
It is not suitable for commercial use.
Use the cylinder vacuum cleaner only for cleaning dry, normally soiled floors and carpet floorings. Depending on which nozzle you have attached (▷chapter 2.1, „Assemble appliance and adjust nozzles to surface“), you can also use the appliance to vacuum furniture or non-sensitive upholstery.
Any other use is considered improper use and is prohibited.
Also prohibited:
Vacuuming of:
- Persons, animals, plants, especially hair, fingers and other parts of the body as well as pieces of clothing worn on the body. These might be drawn in. This could result in injuries.
- Water and other fluids, especially damp carpet cleaners. Moisture inside the appliance can cause a short-circuit.
- Toner (for laser printers, copying machines, etc.). There is danger of fire or explosion.
- Hot ashes, burning cigarettes or matches. There is a danger of fire.
- Pointed objects, such as glass shards, nails, etc. They can damage the appliance.
- Rubble, plaster, cement, fine drilling-dust, make-up, etc. These might damage the appliance.
To use the appliance near explosive or highly-flammable substances. There is a risk of fire or explosion.
■Use of the appliance outdoors. Rain and dirt may damage the appliance.
■ Sticking objects into the appliance's openings. It could overheat.
■To modify or repair the appliance yourself.
1.5 About the option turbo brush
The bristles of the optionally included turbo brush rotate very rapidly. There is a danger of injury.
- Do not use the turbo brush on persons, animals or plants. Keep body parts away from the rotating brush roller.
- Switch off the vacuum cleaner before cleaning or detaching the turbo brush.
■ Never run over cables. Otherwise, the insulation could get damaged.
The turbo brush is not suitable to clean sensitive surfaces. This may cause damage. Comply with the care and cleaning instructions provided by the manufacturer.
1.6 If the appliance is defective
Never use a defective appliance or operate an appliance with a defective power cord. If the power cord of this appliance is damaged, it must be replaced by the manufacturers, their authorised service representative or a similarly qualified person to avoid danger. Hand over a defective appliance to a specialist dealer or send it to the Dirt Devil customer service department for repairs (▷Page 46, 'International Service').
2.1 Assemble appliance and adjust nozzles to surface
natural_image
Close-up of a hand holding a flexible hose with a pointed tip, no visible text or symbols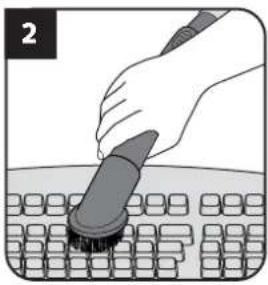
natural_image
Illustration of a hand using a brush to clean or brush another on a grid of squares (no text or symbols)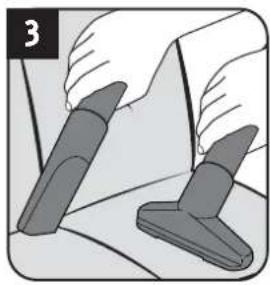
natural_image
Illustration of two hands holding a pen and a pair of similar objects, no text or symbols present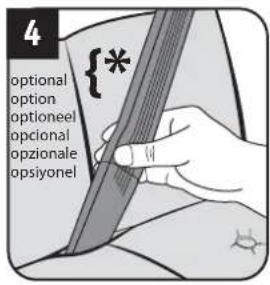
natural_image
Illustration of a hand holding a device with two arrows indicating downward motion (no text or symbols)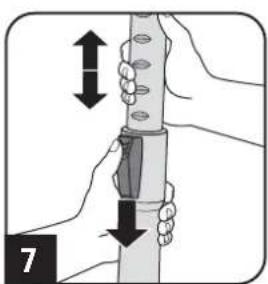
natural_image
Close-up of a cleaning tool applying material to a surface, with a ruler partially visible (no text or symbols)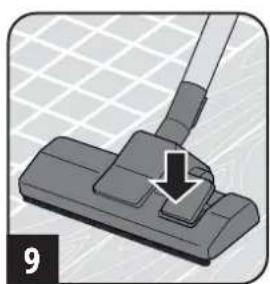
natural_image
Close-up of a hand using a vacuum cleaner to press or install a component, with no visible text or symbols.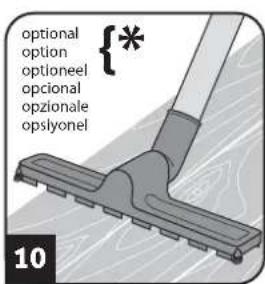
WARNING:
Danger of injury! Only attach the appliance parts when the appliance is not connected to the power supply. Otherwise the machine might start up and parts of your body, hair or pieces of clothing might be sucked in.
CAUTION:
Before assembling, make sure that the fitted nozzle suits the surface to be cleaned. Never use a brush with rotating bristles for example to clean floors or objects that may not be able to withstand the treatment without damage. Observe the flooring manufacturer's recommendations and care information.
NOTE:
You might have to twist the parts when connecting them so they are securely in place. Ensure that installed parts are secure by trying to pull them apart.
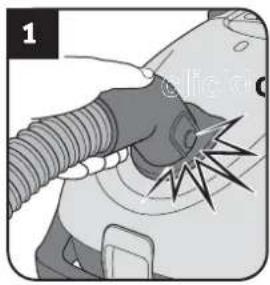
- Connect suction hose and appliance (Fig. 1).
-
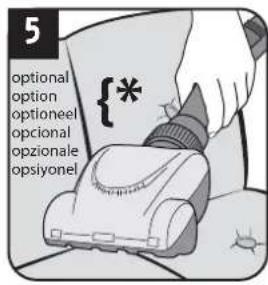
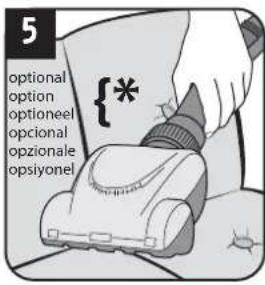
Insert the accessory included in the scope of delivery onto the handle (Fig. 2 - 10) depending on what type of surface you want to vacuum:
-
Furniture brush (Fig. 2) for objects with a sensitive surface
- Upholstery nozzle (Fig. 3) for upholstery, mattresses, and the like
- Crevice nozzle (Fig. 3) or optional long flexible crevice nozzle (Fig. 4) for crevices in upholstery
- Optional mini turbo brush (Fig. 5) for non-sensitive upholstery, runner, mats, and the like
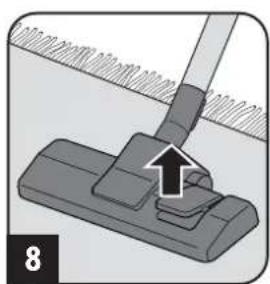
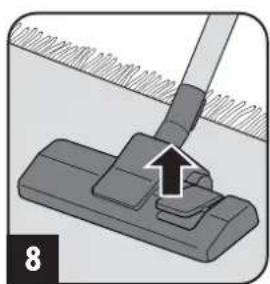
- Floor nozzle with switch position as in Fig. 8 for carpets
- Floor nozzle with switch position as in Fig. 9 for hard floors
-
Optional parquet brush (Fig. 10) for sensitive hard floors
-
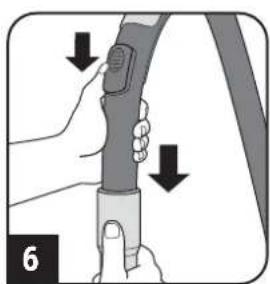
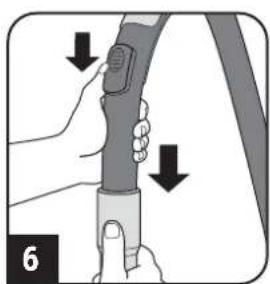
Ensure that the bypass vent is closed (Fig. 6).
-
If you use the telescopic tube, adjust its length (Fig. 7).
2.2 Vacuum cleaning
natural_image
Illustration of a hand inserting a plug into a device (no text or symbols visible)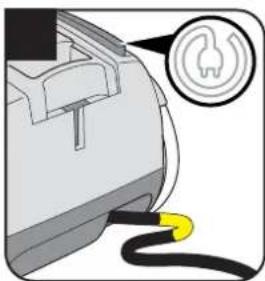
natural_image
Close-up of a car plug with a yellow cable plugged into a socket (no text or symbols visible)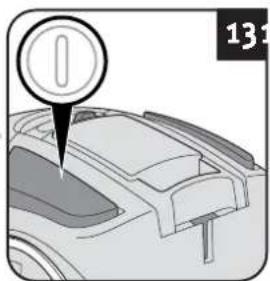
natural_image
Diagram of a car interior with a circular icon and number 131, no readable text or symbols present.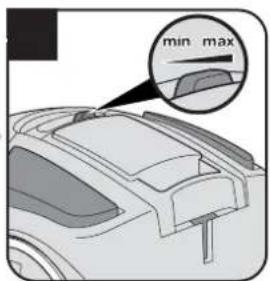
natural_image
Illustration of a person using a long-handled tool to clean or walk (no text or symbols)WARNING:
Danger of injury! Check appliance and power cord before each use. A damaged appliance must never be used.
CAUTION:
Only use the appliance with all filters undamaged, in dry condition and correctly fitted. Make sure that no objects obstruct the telescopic tube, the suction hose or other openings.
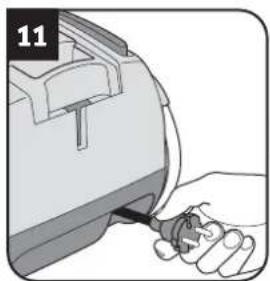
- Pull the cable out of the appliance (Fig. 11) and plug into a socket.
WARNING:
Danger of electric shock! If the red marking shows retract the cord by pressing the retraction button (☐) to pull in the cord up to the yellow mark (Fig. 12) again.
- Switch on the appliance using the on/off switch ( ) (Fig. 13).
- Set the power to the setting that corresponds to the cleaning task. (Fig. 14).
NOTE:
The auxiliary air regulator (Fig. 6) must be completely closed for vacuum cleaning. With the auxiliary air regulator you can quickly reduce the suction power, to release objects (such as curtains) that have been sucked in.
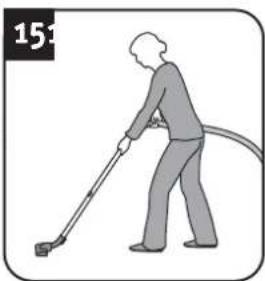
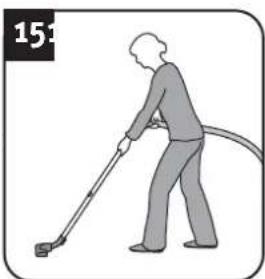
- Vacuum clean (Fig. 15).
WARNING:
Danger of injury! Especially when vacuum-cleaning stairs make sure that you always stand on a higher level than the appliance.
2.3 After use
natural_image
Illustration of a hand holding a cylindrical device with attached mechanical components (no text or symbols visible)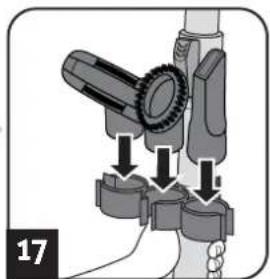
natural_image
Mechanical assembly diagram showing a lever mechanism with arrows indicating motion (no text or symbols)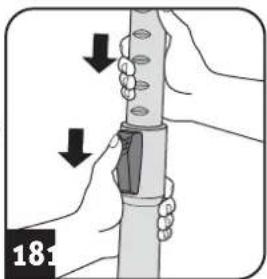
natural_image
Illustration of hands holding a cylindrical object with arrows indicating motion or force direction (no text or symbols)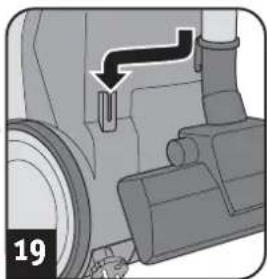
natural_image
Mechanical component diagram showing a pipe insertion and assembly (no text or symbols)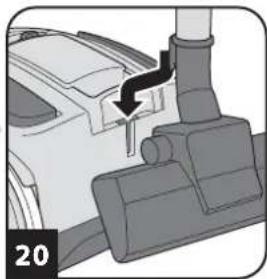
natural_image
Mechanical assembly diagram showing a lever mechanism with a numbered label (20) and no visible text or symbols.
WARNING:
Danger of injury! After vacuuming, switch off the appliance ( ) and wind up the power cord ( ). When winding up the cord keep the plug in your hand so that the cord does not thrash about, possibly injuring you.

WARNING:
Danger of injury! Therefore, always keep the appliance out of the reach of children.

CAUTION:
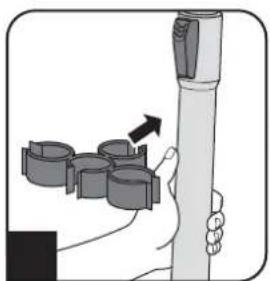
Never store the appliance next to heat sources (e.g. stoves or radiators). Avoid exposing it to direct sunlight. Keep the appliance and accessories cool and dry and so that it does not take up too much space (Fig. 16 – 20).

CAUTION:
If you intend to store the appliance for a long period, first replace the dust filter bag with a new one, Chapter 3.1, 'Changing the dust filter bag'.
3.1 Changing the dust filter bag

CAUTION:
Switch off the appliance before changing the dust filter bag. Otherwise, the appliance might be damaged.
NOTE:
Be careful when removing the dust filter bag so that no dust escapes.
natural_image
Illustration of a capsule-shaped object with a red internal structure and a pointed tip, no text or symbols present.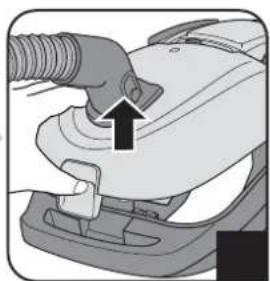
natural_image
Close-up of a mechanical component with a threaded pipe and arrow indicating a step (no text or symbols visible)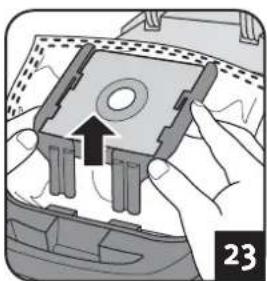
natural_image
Close-up of hands installing a mechanical component with an arrow indicating assembly (no text or symbols visible)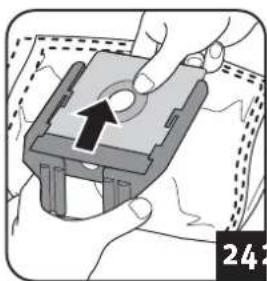
natural_image
Illustration of hands holding a mechanical component with an arrow indicating direction (no text or symbols)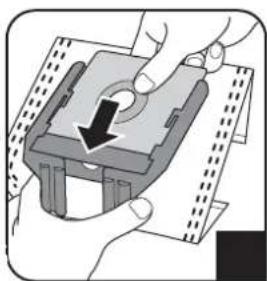
natural_image
Illustration of hands holding a mechanical component with a black arrow indicating rotation (no text or symbols)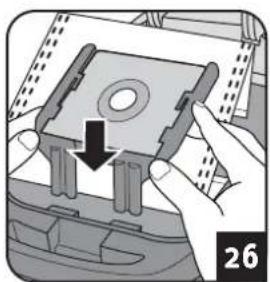
natural_image
Illustration of a hand holding a compact electronic device with a downward arrow indicating compression or disassembly (no text or symbols present)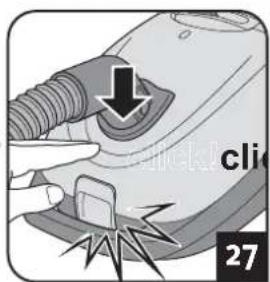
Recommendation
Swirl°
Y50°
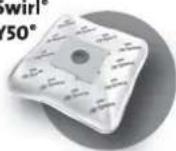
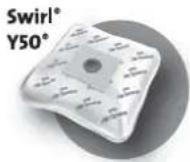
We recommend: Swirl ^® Y50 ^® MicroPor ^® Plus dust filter bags with AirSpace ^® Long Power Guarantee
Swirl ^® , AirSpace ^® MicroPor ^® and Y50 ^® are registered trade marks of a company of the Melitta group and used with their permission.
NOTE:
Insert the bag in the direction of the arrow on the bag. Unfold the bag after insertion so that it can erect itself during vacuuming and fill up optimally.
NOTE:
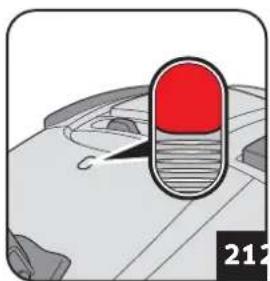
As soon as the dust filter bag change indicator appears in the window (Fig. 21), the dust filter bag has to be changed. In addition, change the dust filter bag at least every three months and before storing for a long period or sending the appliance.
- Switch off the appliance ( ).①
- Pull the plug out of the plug socket.
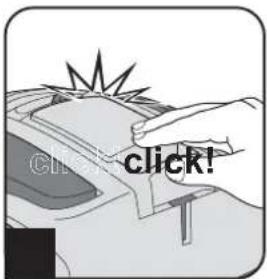
- Open the dust compartment cover (Fig. 22).
- Pull the full dust filter bag out carefully (Fig. 23 - 24).

CAUTION:
You can dispose of the contents of the dust filter bag with your normal domestic waste as long as it contains no substances not allowed in domestic waste.
- Insert a new dust filter bag (Fig. 25 - 26).
- Check whether the dust filter bag is flush with the edges.

CAUTION:
Never use the appliance without having inserted a dust filter bag. Otherwise, the appliance might be damaged.
- Unfold the bag after insertion so that it can erect itself during vacuuming and fill up optimally.
- Shut the dust compartment cover (Fig. 27).
3.2 Cleaning / changing the motor protection filter
natural_image
Close-up of a hand inserting a grid into a car interior (no text or symbols visible)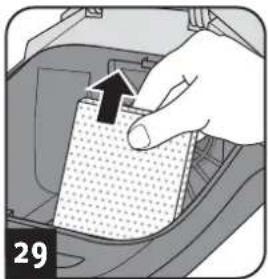
natural_image
Close-up of a hand inserting a plastic component into a car interior (no text or symbols visible)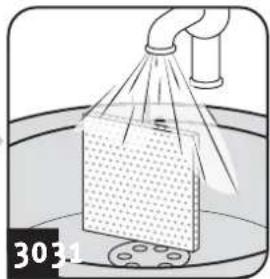
natural_image
Illustration of a hand spraying water onto a rectangular container with dotted pattern, no text or symbols present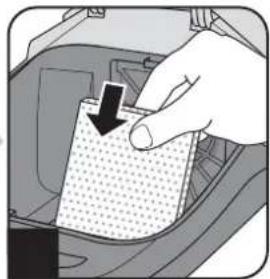
natural_image
Hand inserting a dotted pattern into a car's door panel (no text or symbols visible)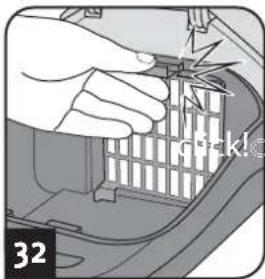
CAUTION:
Clean the motor protection filter upon every filter bag change, and at least every 3 months. Change the motor protection filter every time you open a new dust filter bag packet, because there is a new motor protection filter in every dust filter bag packet.
Change the motor protection filter at least every 6 months.
CAUTION:
The filter is washable, but it may not be cleaned in dishwashers or washing machines. Also, do not use cleaning agents or brushes with hard bristles. Leave the filter to dry after cleaning it with water (approx. 24 hours at room temperature). Only put it back in place when it is completely dry.
- Switch off the appliance ( ).
- Pull the plug out of the plug socket.
- Take the dust filter bag out of the appliance ▷Chapter 3.1, 'Changing the dust filter bag'.
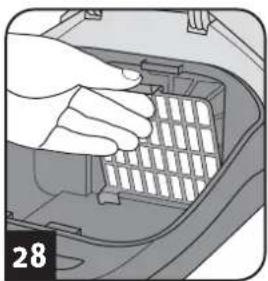
- Open the filter holder (Fig. 28).
- Take the filter out of the filter holder (Fig. 29) and rinse the filter thoroughly under cold or luke-warm running water (Fig. 30).
- Leave the filter to dry (approx. 24 hours at room temperature).
- Insert the filter back into the filter holder (Fig. 31).
- Close the filter holder again (Fig. 32).
- Put the dust filter bag back in ▷Chapter 3.1, 'Changing the dust filter bag'.
3.3 Cleaning / changing the exhaust filter
natural_image
Illustration of a hand holding a car interior panel with a black arrow indicating direction (no text or symbols)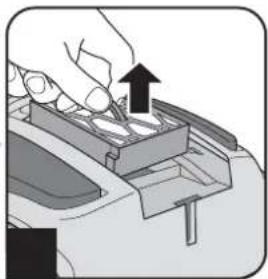
natural_image
Illustration of a hand using a tool to press or install a component, with an arrow indicating the process (no text or symbols present)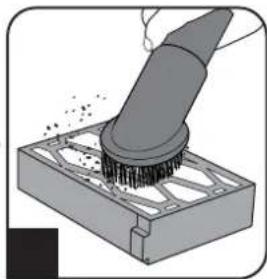
natural_image
Illustration of a brush applying material to a block (no text or symbols visible)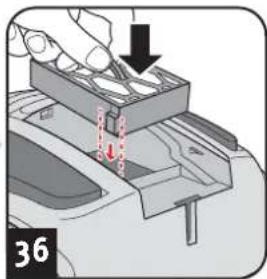
CAUTION:
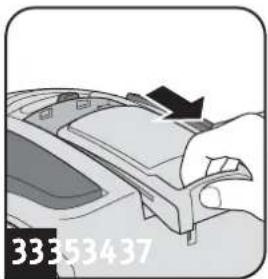
Clean the exhaust filter each time you clean the motor protection filter. Change the exhaust filter as soon as it has deformed or is damaged at the latest.
CAUTION:
The filter cannot be washed. Do not use detergents or brushes with hard bristles to clean it. Otherwise, the filter could get damaged.
- Switch off the appliance ( ).
- Pull the plug out of the plug socket.
- Pull the exhaust filter cover firmly as shown (Fig. 33) and take it off.
- Take the filter out of the appliance (Fig. 34).
- Knock out the dirt and remove the dirt from the exhaust filter with a soft brush, e.g. the furniture brush supplied with the appliance (Fig. 35).
- Put the filter back into its holder (Fig. 36).
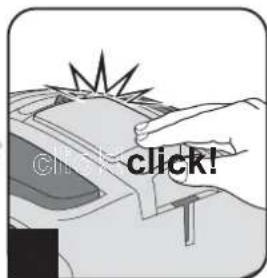
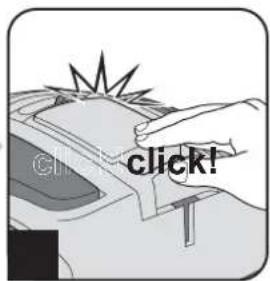
- Put the exhaust filter cover back (Fig. 37) and push it firmly until it locks into place.
3.4 Spare parts and accessories
The following accessories and spare parts can be reordered: Accessory parts and spare parts can be reordered from:
| Item number Description | |
| 7114012 1 exhaust filter | |
| 7710022 4 dust filter bags + 1 motor protection filter | |
| M203-4 | 1 parquet brush |
| M208-8 | 1 turbo brush |
| M219 | 1 mini-turbo brush “Fellino” |
| M221 | 1 midi-turbo brush |
| M232 | 1 long, flexible crevice nozzle |
▷Page 46, 'International Service'
CAUTION:
Only use original spare parts from the scope of delivery or those that you have purchased by reordering.
4.1 Before you send in the appliance

WARNING:
Danger of injury! Never use a defective appliance! Always switch off the appliance and disconnect it before starting troubleshooting.
Before contacting us or even sending the appliance to us, use the table to check whether you can correct the problem yourself.
Problem Possible cause / solution
| The dust filter bag change indicator appears in the window (Fig. 21). | The dust filter bag is full. Change the dust filter bag ▷Chapter 3.1, ‘Changing the dust filter bag’. |
| The filters are dirty.Clean the respective filter, ▷Chapter 3.2, ‘Cleaning / changing the motor protection filter’ or ▷Chapter 3.3, ‘Cleaning / changing the exhaust filter’. | |
| Nozzle, telescopic tube or suction hose is blocked.Remove the obstacle. If necessary, use a long wooden stick (e. g. a broomstick) to do this. | |
| The vacuum cleaner stops suddenly. | The overheating protection has tripped (possibly due to blocked suction channels, filters, or similar).1. Switch the appliance off and pull the plug out of the socket.2. Remove the cause of overheating (e.g. by disassembling telescopic tube and suction hose and removing the obstacle and/or cleaning filters).3. Wait around 45 minutes until the appliance has cooled down.4. After the appliance has cooled off, you may switch it on again. |
Problem Possible cause / solution
| The cleaning results are unsatisfactory in spite of the appliance working correctly. | Bypass vent (Fig. 6) is open. Close the bypass vent (Fig. 6). |
| Position of the suction power control is not appropriate (Fig. 14). Adjust the position of the suction power control (Fig. 14). | |
| The attached nozzle is unsuitable. Change the nozzle, ▷Chapter 2.1, ‘Assemble appliance and adjust nozzles to surface’. | |
| Collar brush of the floor nozzle is in a position inappropriate to the floor (Fig. 8 – 9). Adjust the position of the collar brush to the floor via the switch on the floor nozzle (Fig. 8 – 9). | |
| When using the optional long, flexible crevice nozzle, the appliance generates a whistling sound and the suction power drops rapidly. | Negative pressure in the vacuum cleaner is too high. This caused the safety valve in the vacuum cleaner to trigger. Open the bypass vent until the valve no longer triggers. |
NOTE:
If you cannot solve the problem following these instructions, contact the Dirt Devil customer service (▷Page 46, 'International Service').
4.2 Warranty
The statutory warranty regulations in accordance with the EU Directive 1999/44/EC apply.
In non-EU countries the minimum requirements of the warranty in the respective country apply.
4.3 Disposal


Dispose of the appliance in compliance with the environmental protection laws of your country. Electrical waste may not be disposed of together with domestic waste. Use local old-appliance collection points instead.
The filters and dust filter bags are made from environmentally-friendly materials. You can dispose of them — as opposed to the appliance itself — with your domestic waste, provided they do not contain anything that is forbidden from disposal in domestic waste.
4.4 Technical data
Type of appliance : Bagged vacuum cleaner
Model name : CAPOERA
Model : DD 7114 (-0/-1/.../-8/-9)
Voltage : 220-240 V \~, 50/60 Hz
Power: 1000 W
max. available dust bag capacity : approx. 3 litres
Power cord length : approx. 5 m
Weight
: approx. 4.2 kg



Technical and design specifications may be changed in the course of continuous product improvement. © Royal Appliance International GmbH
natural_image
Illustration of a vacuum cleaner with coiled hose and control panel (no text or symbols)1.1 Mode d'emploi
natural_image
Illustration of a hand inserting a plug into a device component (no text or symbols visible)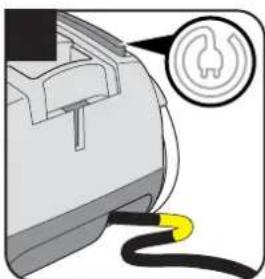
natural_image
Close-up of a car plug with a yellow cable plugged into the plug, showing a small icon (no text or symbols present)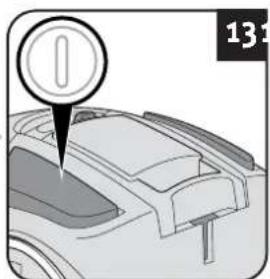
natural_image
Diagram of a car interior with a circular icon and arrow pointing to the side panel (no text or symbols present)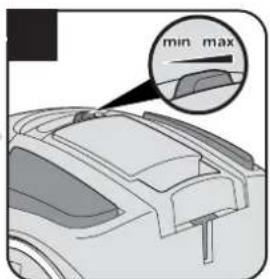
natural_image
Illustration of a person using a power tool to clean or walk (no text or symbols)AVERTISSEMENT:
natural_image
Illustration of a hand holding a cylindrical device with attached circular components, no text or symbols present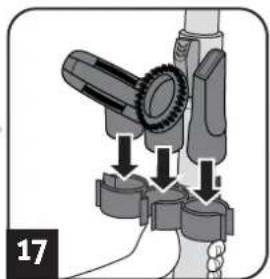
natural_image
Mechanical assembly diagram showing a tool interacting with a base, with arrows indicating motion direction (no text or symbols)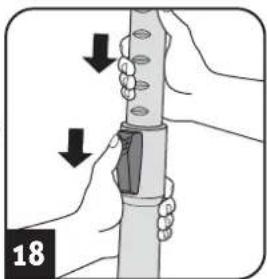
natural_image
Illustration of hands holding a cylindrical object with arrows indicating motion or force direction (no text or symbols)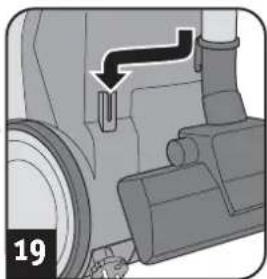
natural_image
Mechanical component diagram showing a pipe or tube inserted into a housing (no text or symbols visible)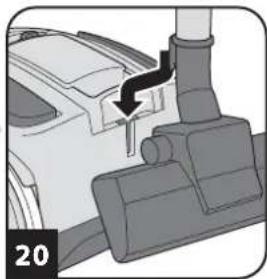
natural_image
Mechanical assembly diagram showing a lever mechanism with a valve and handle (no text or symbols)AVERTISSEMENT:
natural_image
Illustration of a capsule-shaped object with internal layered structure, no visible text or symbols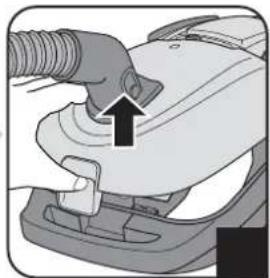
natural_image
Close-up of a hand using a tool to press or install a mechanical component, with no visible text or symbols.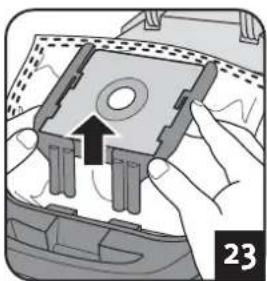
natural_image
Close-up of hands installing a mechanical component with an arrow indicating assembly (no text or symbols visible)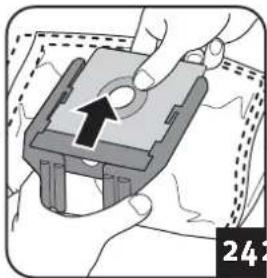
natural_image
Illustration of hands holding a mechanical component with an arrow indicating direction (no text or symbols)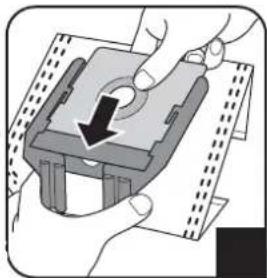
natural_image
Illustration of hands holding a mechanical component with a black arrow indicating rotation (no text or symbols)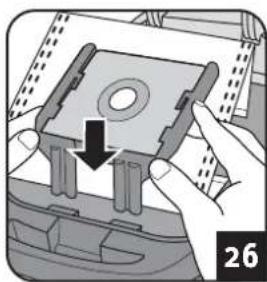
natural_image
Illustration of a mechanical assembly with a hand holding a component, showing a circular feature and a downward arrow (no text or symbols)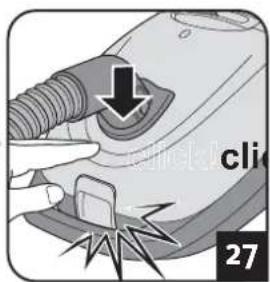
natural_image
Close-up of a hand inserting a grid into a car interior (no text or symbols visible)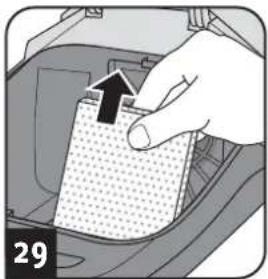
natural_image
Hand inserting a component into a car interior, showing a dotted pattern on the surface (no text or symbols visible)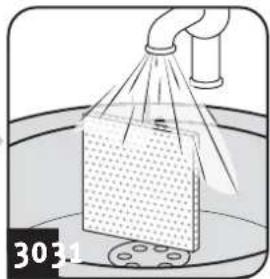
natural_image
Illustration of a hand spraying water onto a rectangular block with a grid pattern, no text or symbols present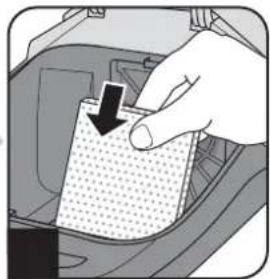
natural_image
Hand inserting a dotted pattern into a car's door panel (no text or symbols visible)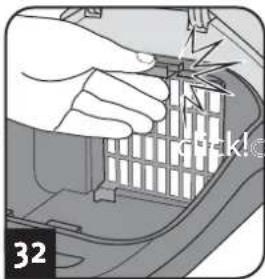
ATTENTION:
natural_image
Diagram of a car interior showing dashboard and steering wheel (no text or symbols)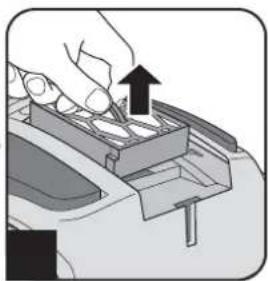
natural_image
Illustration of a hand using a tool to press or install a component, with an upward arrow indicating the process (no text or symbols present)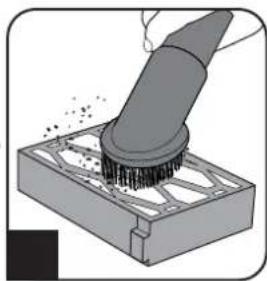
natural_image
Illustration of a brush applying material to a block (no text or symbols)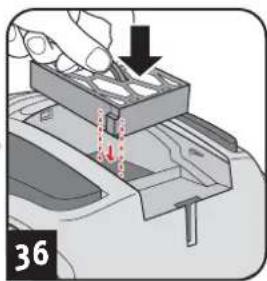
ATTENTION:
natural_image
Illustration of a vacuum cleaner with attached hose and control panel (no text or symbols)| DE GB TRRoyal Appliance International GmbHAbt. KundenserviceJagenbergstraße 1941468 NeussDEUTSCHLANDTel.:+49 (0) 180 - 501 50 50*Fax: +49 (0) 2131 - 60 90 60 95Hotline Ersatzteile: 01805 15 85 08*www.dirtdevil.deservicecenter@dirtdevil.de*0,14 €/Minute aus dem deutschen Festnetz(deutscher Mobilinkhöchstprois 0,42 €/Minutu) | ATfsms gmbhWelser Straße 794060 LeondingÖSTERREICHTel. +43 - 732 - 387 282 35Fax +43 - 732 - 387 282 20dirtdevil@fsms.atwww.fsms.at | BEZ.E.S. Goes B.V.T.a.v. afd. ServicePearyweg 14462 GT GoesNEDERLANDTel: +31 - 113 - 24 07 00Fax: +31 - 113 - 24 07 50dirtdevil@zesgoes.nlwww.zesinternational.com | BGПирита ЕООДул. "Цар Иван-Асен II" 61124 СофияБЪЛГАРИЯPirita Ltd.6, Tzar Ivan Assen II Str. entr. 2, ap.61124 SofiaBULGARIATen./ Tel.: +359 2 973 11 31факс/ Fax: +359 2 944 96 49office@pirita.bgwww.pirita.bg |
| CHTelion AGRuetistrasse 268952 SchlierenTel. 044 732 15 11Fax. 044 732 15 02infokd@telion.ch | CZK+P service s.r.o.Vančurova 8333901 KiatovyČeská RepublikaTel: +420 - 602 366 221k.p.servis@seznam.czwww.tvservis.eu | DKESAK Trading ApSTransitvej 12Port 306330 PadborgDANMARKTel.: +45 77 34 24 08service@ak-trading.com | Venta de recambios:Recambios y accesorios onlineTelf. +34 665931296consultas@recambiosyaccesoriosonline.eswww.recambiosyaccesoriosonline.es |
| ESESESESCall Center / Helpline:Call Center Madrid, S.L.Tel.: +34 902 070 425Fax: +34 931 878 922atencion.cliente@dirtdevil.es | Reparaciones y recambios:SAT EixampleCalabria 277-27908029 BarcelonaESPANATel: +34 934 306 950Fax: +34 934 306 950sateixample@hotmail.com | Reparaciones y recambios:Electronica Latina, S.L.Paseo Virgen del Puerto 1328005 MadridESPANATel.: +34 913 665 202Tel.: +34 913 665 203Fax: +34 913 641 233eleclatina@hotmail.es | Reparaciones y recambios:Servicios Tecnicos B E AGermana de Foix 150015 ZaragozaESPANATel.: +34 976 520 077Fax: +34 976 528 200satbea@satbea.eswww.satbea.es |
| FIMiro OyValimotie 1 b00380 HelsinkiTel.: +358 095877109Fax: +358 043688890Rolf.popper@kolumbus.fi | FRFRService Après Vente FranceTel.: +33 (0)810 810 307****Coût d'un appel local depuis untéléphone fixe français. Coût depuisun mobile suivant opérateurs.Horaires : lundi - vendredi de 9h à 18hsavdirtdevil@tti-fc.comwww.dirtdevilsav.fr | OPM FRANCEService pièce de rechange33 rue du Bois BriandBP 6163544316 NANTES CEDEX 3FRANCETel.: +33 2 40 49 64 25Fax: +33 2 40 93 96 22opm@opm-france.comwww.opm-france.com | HUHiretech Kft.Mihálkovics utca 18.1091 BudapestHungaryTel/Fax: (06 1) 2151 965Mobil: +36 70-6384 527;+36 70 6384 528szerviz@hireltech.hu |
| ITRicambi ElettrodomesticiCorso L. Zanussi 1133080 PorciaITALIATel.: +39 0434 55 08 33Fax: +39 0434 18 51 001info@elettrodomesticiricambi.comwww.elettrodomesticiricambi.com | KOD.Z."VALENTINI"Jakov Xoxa p.n.10000 PrishlineKOSOVOTel.: +386 49 800 400Tel.: +377 44 238 440Tel.: +377 44 168 441Fax: +381 38 225 000valentini.service@gmail.com | LUZ.E.S. Goes B.V.T.a.v. afd. ServicePearyweg 14462 GT GoesNEDERLANDTel: +31 - 113 - 24 07 00Fax: +31 - 113 - 24 07 50dirtdevil@zesgoes.nlwww.zesinternational.com | NLZ.E.S. Goes B.V.T.a.v. afd. ServicePearyweg 14462 GT GoesNEDERLANDTel: +31 - 113 - 24 07 00Fax: +31 - 113 - 24 07 50dirtdevil@zesgoes.nlwww.zesinternational.com |
| NOAK Trading ApSTransitvej 12Port 306330 PadborgDANMARKTel.: +47 21 98 42 44service@ak-trading.com | PLDom Blanco Sp. z o.o.al. Krakowska 505-090 Raszyn k.WarszawyPOLSKAserwis@dombianco.com.pltel: (22) 111 000 8 | PTFTTEVECONTROL REPARACOESRADIOELECTRICAS, LDARua Morais Soares 25 C1900-339 LisboaPORTUGALTel: +351 21 81 25 584www.tevecontrol.netinfo@tevecontrol.net | MJG LDARua B, n° 36Zona Industrial de Arvore4480-620 Arvore Vila do CondePORTUGALTel: +351 25 26 46 120www.mjglda.commjgintdesign@mail.telepac.pt |
| SEAK Trading ApSTransitvej 12Port 306330 PadborgDANMARKTel.: +46 85 09 26 949service@ak-trading.com | SIMEDIA-IMPEKS d.o.o.Kicar 11 g2250 PTUJSLOVENIJATel. +386 599 60 650Fax: +386 2 796 09 21media-impex@siol.netwww.media-impex.com | SKPREMT s.r.o.Skladová 191701 TrnavaSLOVAKIATel: +42 (0) 1 33 55 45 007Fax: +42 (0) 1 33 55 45 007premt@premt.skwww.premt.sk |

DE Servicekarte • GB Service card • FR Carte de service • NL Servicekaart
natural_image
Illustration of a vacuum cleaner with hose and filter (no text or symbols)Fehlerbeschreibung • Description of the malfunction • Description du problème • Omschrijving van de fout • Descripción del fallo • Descrizione del difetto • Hata tanimi:
Royal Appliance International GmbH
Jagenbergstraße 19
41468 Neuss
Germany
servicecenter@dirtdevil.de
www.dirtdevil.de
+49 (0) 1805 - 10 90 19*
+49 (0) 2131 - 60 90 60 95
DE
* € 0.14 per minute from German landlines, maximum German mobile phone tariff € 0.42 per minute.
The cost of calls from abroad—outside Germany—depend upon the current prices of the respective foreign telephone company.
FR
- ! WARNING:
- WARNING:
- Kaufempfehlung
- ACHTUNG:
- About the operating manual
- CAUTION:
- NOTE:
- Concerning certain groups of persons
- Information on power supply
- Information on proper use
- Also prohibited:
- Vacuuming of:
- About the option turbo brush
- If the appliance is defective
- Assemble appliance and adjust nozzles to surface
- Vacuum cleaning
- After use
- Changing the dust filter bag
- Recommendation
- Cleaning / changing the motor protection filter
- Cleaning / changing the exhaust filter
- Spare parts and accessories
- Before you send in the appliance
- Warranty
- Disposal
- Technical data
- Mode d'emploi
- AVERTISSEMENT:
- ATTENTION:
- Royal Appliance International GmbH
- DE
- FR
Brand : DIRT DEVIL
Model : Capoera DD7114
Category : Vacuum Cleaner