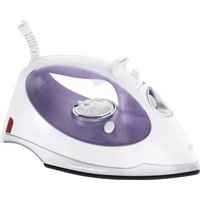
14011 - Iron HAMILTON BEACH - Free user manual and instructions
Find the device manual for free 14011 HAMILTON BEACH in PDF.


| Product Type | Iron |
| Brand | Hamilton Beach |
| Model | 14011 |
| Power Supply | 220-240 V ~ 50/60 Hz |
| Power | 1500 W |
| Tank Capacity | 350 ml |
| Soleplate Type | Stainless Steel |
| Continuous Steam Function | Yes, up to 30 g/min |
| Spray Function | Yes |
| Anti-Drip Function | Yes |
| Vertical Steam Function | Yes |
| Auto Shut-off | Yes, after 30 seconds horizontally and 8 minutes vertically |
| Anti-Calc System | Yes, built-in |
| Cord | 2.5 meters, swivel |
| Weight | 1.2 kg |
| Dimensions (L x W x H) | 30 x 12 x 16 cm |
| Care and Cleaning | Regular descaling with a vinegar/water mixture; clean the soleplate with a damp cloth |
| Spare Parts | Tank, soleplate, steam button available on the manufacturer's website |
| Repairability | Repairability index: 7.6/10 (according to French regulations) |
| Warranty | 2 years |
Frequently Asked Questions - 14011 HAMILTON BEACH
User questions about 14011 HAMILTON BEACH
0 question about this device. Answer the ones you know or ask your own.
Ask a new question about this device
Download the instructions for your Iron in PDF format for free! Find your manual 14011 - HAMILTON BEACH and take your electronic device back in hand. On this page are published all the documents necessary for the use of your device. 14011 by HAMILTON BEACH.
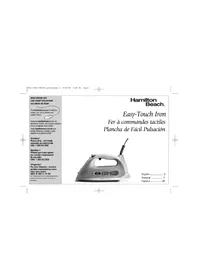
USER MANUAL 14011 HAMILTON BEACH
natural_image
Line drawing of a steam iron with handle and spout (no text or symbols)English 2
USA: 1-800-851-8900
Visit www.hamiltonbeach.com for our complete line of products and Use and Care Guides – as well as delicious recipes, tips, and to register your product online!
Français 15
IMPORTANT SAFETY INSTRUCTIONS
When using electrical appliances, basic safety precautions should always be followed to reduce the risk of fire, electric shock, and/or injury to persons, including the following:
READ ALL INSTRUCTIONS BEFORE USING
- Read all instructions.
- This appliance is not intended for use by persons (including children) with reduced physical, sensory, or mental capabilities, or lack of experience and knowledge, unless they are closely supervised and instructed concerning use of the appliance by a person responsible for their safety.
- Close supervision is necessary when any appliance is used by or near children. Children should be supervised to ensure that they do not play with the appliance.
- Only use an iron for its intended use.
- To avoid the risk of electric shock, do not immerse the iron in water or other liquids.
- Always turn the iron to OFF (O) before plugging or unplugging the iron from the electrical outlet. Never pull on the cord to disconnect the iron from the electrical outlet; instead, grasp the plug and pull on the plug to disconnect the iron.
- Do not let the cord touch hot surfaces. Let the iron cool completely before putting the iron away. Loop cord loosely around iron when storing.
- Always disconnect the iron from the electrical outlet before filling the iron with water, emptying the water from the iron, and when the iron is not in use.
- Do not operate the iron with a damaged cord or in the event the iron has been dropped or damaged or there are visible signs of damage or it is leaking. To avoid the risk of electric shock, do not disassemble the iron. Take it to a qualified serviceman for examination and repair. Incorrect assembly might result in a risk of electric shock when the iron is used after reassembly.
- The iron must be used and rested on a stable surface.
-
When placing the iron on its stand, ensure that the surface on which the stand is placed is stable.
-
Do not leave the iron unattended while the iron is connected or on an ironing board.
- Burns can occur from touching hot metal parts, hot water, or steam. Use caution when you turn a steam iron upside down—there might be hot water in the reservoir.
- To avoid a circuit overload, do not operate an iron on the same circuit with another high-wattage appliance.
- If an extension cord is absolutely necessary, a cord with an ampere rating equal to or greater than the maximum rating of the iron shall be used. A cord rated for less amperage can result in a risk of fire or electric shock due to overheating. Care shall be taken to arrange the cord so that it cannot be pulled or be tripped over.
Other Consumer Safety Information
This appliance is intended for household use only.
WARNING! Shock Hazard: This appliance has a polarized plug (one wide blade) that reduces the risk of electric shock. The plug fits only one way into a polarized outlet. Do not defeat the safety purpose of the plug by modifying the plug in any way or by using an adapter. If the plug does not fit fully into the outlet, reverse the plug. If it still does not fit, have an electrician replace the outlet.
Use the iron on an ironing board. Ironing on any other surface may damage that surface.
Do not iron or vertical steam clothes that are being worn. Do not use vertical steam in the direction of people or pets.
Please Read Before First Use:
- During first use of the iron, it may appear to smoke. This will stop and does not indicate a defect or hazard.
- Many irons spit or sputter during the first few uses with tap water. This happens as the steam chamber becomes conditioned. This will stop after a few uses.
- To clean steam vents before first use, prepare iron for steam ironing; then iron over an old cloth for a few minutes while letting the iron steam. Press the Blast of Steam button several times to clean the vents. Then follow the Self-Cleaning instructions on page 11.
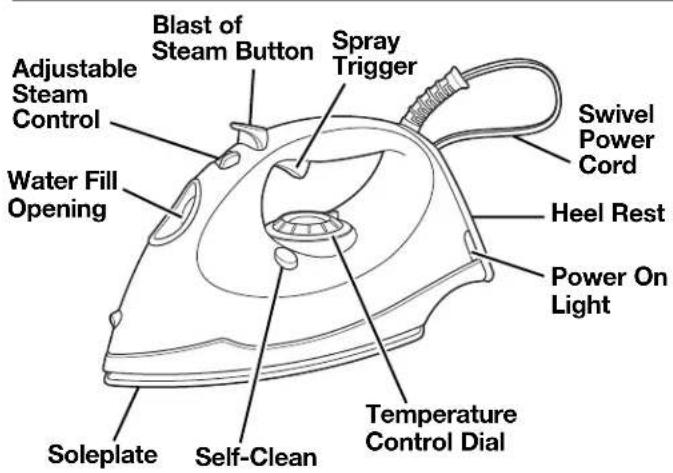
Parts and Features

Sensor Control (available on some models)
This iron is equipped with a position/motion sensor. This means that if the iron is left motionless it will turn off automatically and cool to room temperature.
To restart iron, simply move the iron and allow it to reheat on heel position.
The iron will reheat to the previously selected setting.
Position Sensing
The iron will turn off automatically when left in the following positions.
The auto off time varies based on the iron's position.
| Iron | Position | Motionless Time |
| Resting on soleplate |  | 30 seconds |
| Resting on either side |  | 30 seconds or 15 minutes depending on exact orientation |
| Resting on heel |  | 15 minutes |
Auto Shutoff Reset Light
After 30 seconds of no movement in the horizontal position, the iron will automatically shut off and the red light will blink. Move iron upright to vertical position to turn back on.
Fabric Care Label Symbols
Fabric care labels on garments have symbols that show ironing instructions and recommended temperature settings. These symbols are shown below along with their meaning.

Iron

High Temp Setting

Med Temp Setting

Low Temp Setting

Do Not Iron

Do Not Use Steam
DRY IRON: Synthetics, Silk/Wool (reverse side of fabric)
STEAM IRON: Cotton (while damp; use steam or spray) Linen (while damp on reverse side of fabric)
NOTE: To prevent possible garment damage, we do not recommend ironing fabrics labeled "Dry Clean Only."
To Dry Iron
- Plug the iron into outlet.
- Set Adjustable Steam Control to 0 (Dry Iron).
- Turn Temperature Control Dial to desired temperature. Allow 2 minutes for iron to reach desired temperature.
- To turn iron off, turn Temperature Control Dial to OFF (O) and unplug iron.

To Steam Iron
- Unplug iron. Set Adjustable Steam Control to 0 (Dry Iron). Hold iron with soleplate parallel to the ground.
- Using a cup, slowly pour tap water into water fill opening until MAX fill line is reached. Do not fill iron directly from the faucet.
- Plug iron into outlet.
- Turn Temperature Control Dial to desired fabric setting in the steam range.
- Allow 2 minutes for the iron to reach desired temperature.
- Set Adjustable Steam Control to desired steam setting.
- To turn iron off, set Set Adjustable Steam Control to 0 (Dry Iron). Turn the Temperature Control Dial to OFF (O). Unplug iron.
- Empty water from the iron following directions in "Care and Cleaning."
Water: Please use ordinary tap water. If you have extremely hard water, alternate between tap water and distilled water for use in the iron.
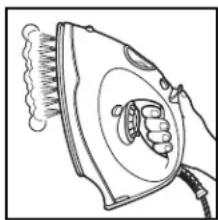
To Vertical Steam
- Follow Steps 1 through 5 in "To Steam Iron."
- Hang garment in a location that is not susceptible to damage from heat or moisture. Do not hang in front of wallpaper, window, or mirror.
- Hold iron about 6 inches (15 cm) away from garment and press and release the Blast of Steam Button to steam out wrinkles. Do not press Blast of Steam Button more than once every 5 seconds
- To turn iron off, turn Temperature Control Dial to OFF (O). Unplug iron.
- Empty water from the iron following directions in "Care and Cleaning."
NOTICE: Do not allow hot soleplate to touch delicate garments.
natural_image
Line drawing of a hand using an iron on a steam iron (no text or symbols)Features
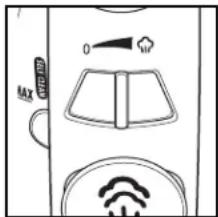
Blast of Steam Button
Push Blast of Steam Button for an extra blast of steam.

natural_image
Simple line drawing of a device with a circular button containing a Wi-Fi symbol (no text or labels)Adjustable Steam Control
This control adjusts the steam to desired steam level.

Power On Light
The red light stays on even if Temperature Control Dial is turned to OFF (O). Light flashes if position sensor is activated.

natural_image
Diagram of a mechanical component with an arrow indicating direction (no text or symbols)Features (cont.)
Spray Trigger
Press Spray Trigger to release a fine spray of water for difficult wrinkles in cotton or linen.

natural_image
Pure mechanical component outline without any text, numbers, or symbolsCare and Cleaning
Iron Storage
- The water tank of your iron should be emptied after each use. Turn Temperature Control Dial to OFF (O). Unplug the iron and hold over a sink. Slowly tilt pointed end of iron down over sink. Water will run out of water fill opening.
- After iron has completely cooled, wrap cord loosely around iron and store in an upright position. Do not store iron laying flat on soleplate.
Soleplate
- Never iron over zippers, pins, metal rivets, or snaps, since these may scratch the soleplate.
- To clean occasional buildup on the soleplate, wipe with a sudsy cloth. Do not use abrasive cleansers or metal scouring pads.
- Always store iron upright in the heel rest position.
Caring and Cleaning (cont.)
Self-Clean
To keep the steam vents clear of any buildup, follow these instructions each time you iron using steam.
- Set Temperature Control Dial to OFF (O). Fill iron with water to 1/2 of its maximum capacity.
- Set Adjustable Steam Control to 0 (Dry Iron). Set Temperature Control Dial to High temperature setting and let iron heat for 2 minutes.
- Set Temperature Control Dial to OFF (O). Unplug iron and hold over a sink with soleplate facing down.
- Press and hold the Self-Clean Button. Boiling water and steam will flow out of steam vents. Allow all water to drain from iron.
- Gently move iron front to back to allow water to clean entire soleplate area.
- If water still remains inside of soleplate, reheat iron as indicated in Step 2. Boiling water and steam could still flow out of steam vents.
Troubleshooting
PROBLEM | THINGS TO CHECK
Iron won't heat
- Is the iron plugged in and the outlet working? Check the outlet by plugging in a lamp.
- Is the Temperature Control Dial turned to a High, Medium, or Low setting?
- If automatic shutoff model, is the Auto Shutoff Light flashing? Move the iron to reset.
Troubleshooting (cont.)
| PROBLEM | THINGS TO CHECK |
| Water is leaking | Do not overfill the water tank.If steam ironing, isAdjustable Steam Control in a steam position, the Temperature Control Dial in the steam range, and did the iron have enough time to preheat?If dry ironing, make sure theAdjustable Steam Control is in the 0 (Dry Iron) position.If using the Blast of Steam Button, push button less frequently.Follow the self-cleaning instructions one or two times with tap water (not distilled) to “condition” the iron. |
| Iron won’t steam | Check the water level.IsAdjustable Steam Control in Steam position?Has the iron had enough time to preheat?Anti-drip feature will not allow steam when temperature setting is in the dry range. |
| Leaves spots | ALWAYS empty the water tank of the iron after using. Water left in the tank may discolor clothing and soleplate. |
| Twisted cord | If the iron cord should become twisted, unplug iron and let cool. Hold iron cord in the middle of entire length. Let plug and iron dangle freely until cord uncoils. This will extend the life of your iron cord. |
| Wrinkles are not removed | Check Temperature Control Dial is set to correct fabric. |
| Iron is too hot/not hot enough | • Check Temperature Control Dial and adjust to desired setting level. Let iron cool down 5 minutes before continuing. |
Fabric Setting Chart
| Steam Setting | To Iron | Ironing Instructions |
| ### | Off | |
| Nylon | Dry iron on the wrong side of the fabric. | |
| Acrylic | Dry iron on the wrong side of the fabric. | |
| Silk | Dry iron on the wrong side of the fabric. | |
 | Polyester | Iron with fabric still damp. |
| Rayon | Iron on the wrong side of fabric. | |
| Wool | Steam iron on the wrong side of fabric. | |
| Cotton | Iron while still damp using steam and/or spray. | |
| Linen | Iron on wrong side of fabric while still damp. |
NOTE: To prevent possible garment damage, we do not recommend ironing fabrics labeled "Dry Clean Only."
LIMITED WARRANTY
This warranty applies to products purchased and used in the U.S. and Canada. This is the only express warranty for this product and is in lieu of any other warranty or condition.
This product is warranted to be free from defects in material and workmanship for a period of one (1) year from the date of original purchase. During this period, your exclusive remedy is repair or replacement of this product or any component found to be defective, at our option; however, you are responsible for all costs associated with returning the product to us and our returning a product or component under this warranty to you. If the product or component is no longer available, we will replace with a similar one of equal or greater value.
This warranty does not cover glass, filters, wear from normal use, use not in conformity with the printed directions, or damage to the product resulting from accident, alteration, abuse, or misuse. This warranty extends only to the original consumer purchaser or gift recipient. Keep the original sales receipt, as proof of purchase is required to make a warranty claim. This warranty is void if the product is used for other than single-family household use or subjected to any voltage and waveform other than as specified on the rating label (e.g., 120V \~ 60 Hz).
We exclude all claims for special, incidental, and consequential damages caused by breach of express or implied warranty. All liability is limited to the amount of the purchase price. Every implied warranty, including any statutory warranty or condition of merchantability or fitness for a particular purpose, is disclaimed except to the extent prohibited by law, in which case such warranty or condition is limited to the duration of this written warranty. This warranty gives you specific legal rights. You may have other legal rights that vary depending on where you live. Some states or provinces do not allow limitations on implied warranties or special, incidental, or consequential damages, so the foregoing limitations may not apply to you.
To make a warranty claim, do not return this appliance to the store. Please call 1.800.851.8900 in the U.S. or 1.800.267.2826 in Canada or visit hamiltonbeach.com in the U.S. or hamiltonbeach.ca in Canada. For faster service, locate the model, type, and series numbers on your appliance.
MESURES DE SÉCURITÉ IMPORTANTES
natural_image
Line drawing of a hand using an iron to clean or smoke (no text or symbols)Caractéristiques
natural_image
Simple line drawing of a device with a circular button and a lightning bolt symbol (no text or labels)natural_image
Pure technical diagram of a mechanical component with an arrow indicating direction (no text or symbols)natural_image
Pure mechanical component outline without any text, numbers, or symbolsnatural_image
Line drawing of a hand ironing an airfoil (no text or symbols)Características
natural_image
Simple line drawing of a device with a circular button containing a Wi-Fi symbol (no text or labels)Control de Vapor Ajustable
Luz de Encendido
natural_image
Pure technical line drawing of a mechanical component with an arrow indicating direction (no text or symbols)natural_image
Pure mechanical component outline without any text, numbers, or symbolsCuidado y Limpieza
Mixcoac MEXICO 03910 D.F.
Tel: 01 55 5563 8723
Fax: 01 55 5615 1856
Jalisco

- IMPORTANT SAFETY INSTRUCTIONS
- READ ALL INSTRUCTIONS BEFORE USING
- Other Consumer Safety Information
- This appliance is intended for household use only.
- Please Read Before First Use:
- Sensor Control (available on some models)
- Position Sensing
- Auto Shutoff Reset Light
- Fabric Care Label Symbols
- To Dry Iron
- To Steam Iron
- To Vertical Steam
- Features
- Blast of Steam Button
- Adjustable Steam Control
- Power On Light
- Features (cont.)
- Spray Trigger
- Care and Cleaning
- Iron Storage
- Soleplate
- Caring and Cleaning (cont.)
- Self-Clean
- Troubleshooting
- PROBLEM | THINGS TO CHECK
- Iron won't heat
- LIMITED WARRANTY
- MESURES DE SÉCURITÉ IMPORTANTES
- Caractéristiques
- Características
- Control de Vapor Ajustable
- Luz de Encendido
- Cuidado y Limpieza
- Jalisco
Brand : HAMILTON BEACH
Model : 14011
Category : Iron