
LED40D2080H - Television CHANGHONG - Free user manual and instructions
Find the device manual for free LED40D2080H CHANGHONG in PDF.


| Product type | LED Television |
| Screen size | 40 inches (102 cm) |
| Resolution | Full HD 1920 x 1080 pixels |
| Dimensions (without stand) | 904 x 521 x 89 mm (W x H x D) |
| Dimensions (with stand) | 904 x 568 x 230 mm (W x H x D) |
| Weight (without stand) | 7.6 kg |
| Weight (with stand) | 8.2 kg |
| Power supply voltage | 220-240 V, 50/60 Hz |
| Power consumption (active) | 65 W |
| Power consumption (standby) | < 0.5 W |
| Connectivity | HDMI x2, USB x1, component input, composite input, headphone jack, DVB-T HD tuner, CI+ |
| Audio output power | 2 x 8 W stereo |
| Maintenance and cleaning | Use a soft, dry cloth. Do not use chemical products. |
| Safety | Do not expose to moisture. Do not block ventilation slots. |
| Spare parts and repairability | Contact Changhong after-sales service for spare parts. |
| General information | Brand: Changhong, Model: LED40D2080H, Category: Television |
Frequently Asked Questions - LED40D2080H CHANGHONG
User questions about LED40D2080H CHANGHONG
0 question about this device. Answer the ones you know or ask your own.
Ask a new question about this device
Download the instructions for your Television in PDF format for free! Find your manual LED40D2080H - CHANGHONG and take your electronic device back in hand. On this page are published all the documents necessary for the use of your device. LED40D2080H by CHANGHONG.
USER MANUAL LED40D2080H CHANGHONG
—Creating Easy Life—
Operation Manual
Model:LED40D2080H

natural_image
Colorful 3D letters spelling 'C' arranged in a grid, no text or symbols presentUK
Contents
1、Safety and warnings.... 2-3
2、Introduction.... 4
3、Installation.... 5-9
4、 Remote Controller....10-11
5、 TV Operation....12-17
6、 Trouble Shooting.... 18
IMPORTANT SAFETY INSTRUCTION
1) Read these instructions.
2) Keep these instructions.
3) Heed all warnings.
4) Follow all instructions.
5) Do not use this apparatus near water.
6) Clean only with dry cloth.
7) Do not block any ventilation openings, install in accordance with the instructions.
8) Do not install near any heat sources such as radiations, heat registers, stoves, or other apparatus (including amplifiers) that produce heat.
9) Do not defeat the safety purpose of the polarized plug. If the provided plug does not fit into your outlet, consult an electrician for replacement of the obsolete outlet.
10) Protected the power cord from being walked on or pinched particularly at plugs, convenience receptacles, and the point where they exit from the apparatus.
11) Only use attachments/accessories specified by the manufacturer.
12) Unplug this apparatus during lighting storms or when unused for long periods of time.
13) Refer all servicing to qualified service personnel. Servicing is required when the apparatus has been damaged in any way, such as power-supply cord or plug is damaged, liquid has been spilled or objects have fallen into the apparatus, the apparatus has been exposed to rain or moisture, does not operate normally, or has been dropped.
14) Mains plug is used as the disconnect device, the disconnect device shall remain readily operable.
15) The ventilation should not be impeded by covering the ventilation openings with items, such as newspapers, table-cloth, curtains, etc.
16) No naked flame sources, such as lighted candles, should be placed on the apparatus.
17) Attention should be drawn to the environmental aspects of battery disposal.
18) The use of apparatus in moderate climate.
19) The apparatus shall not be exposed to dripping or splashing and that no objects filled with liquids, such as vases, shall be placed on the apparatus.
20) To avoid any injury caused by lean of the product, please always ensure the whole product was placed within the table surface in horizontal.
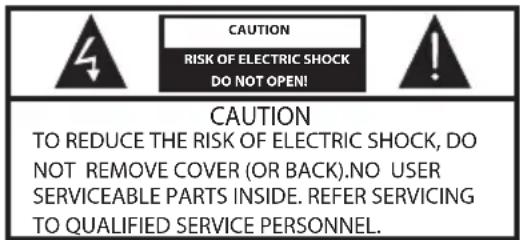

The symbol indicates that dangerous voltages constituting a risk of electric shock are present within this unit.

The symbol indicates that there are important operating and maintenance instructions in the literaturaccompanying this unit.
WARNING:
To reduce the risk of fire or electric shock, do not expose this apparatus to rain or moisture.
WARNING:
The batteries shall not be exposed to excessive heat such as sunshine, fire or the like.
WARNING:
The excessive sound pressure from earphones and headphones can cause hearing loss.

This symbol indicates that this product incorporates double insulation between hazardous mains voltage and user accessible parts. When servicing use only identical replacement parts.

This marking indicates that this product should not be disposed with other household wastes throughout the EU. To prevent possible harm to the environment or human health from uncontrolled waste disposal, recycle it responsibly to promote the sustainable reuse of material resources. To return your used device, please use the return and collection systems or contact the retailer where the product was purchased. They can take this product for environmental safe recycling.
SAFETY AND WARNINGSUK
natural_image
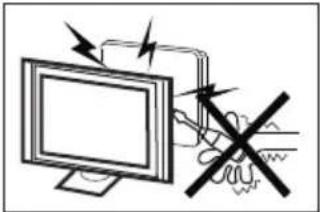
Illustration of a computer monitor with a crossed-out black X symbol, no text or symbols presentHigh voltages are used in the operation of this television receiver. Do not remove the cabinet back from your set. Refer servicing to qualified service personnel.

natural_image
Simple line drawing of a window with a black X mark and paper, next to a curtain and rope (no text or symbols)To prevent fire or electrical shock hazard, do not expose the television receiver to rain or moisture.

natural_image
Simple line drawing of a computer monitor with a cross symbol on its screen (no text or labels)Do not drop or push objects into the television cabinet slots or openings. Never spill any kind of liquid on the television receiver.
natural_image
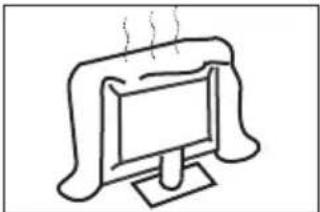
Simple line drawing of a computer monitor with a base, emitting steam (no text or symbols)Do not block the ventilation holes in the back cover. Adequate ventilation is essential to prevent failure of electrical components.
natural_image
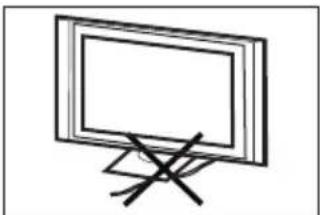
Simple line drawing of a flat-screen monitor with a cross mark on the stand (no text or symbols)Do not trap the power supply cord under the television receiver.
natural_image
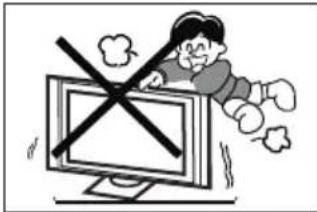
Cartoon illustration of a person lying on a computer monitor with a crossed-out 'X' symbol (no text or symbols present)Never stand on, lean on, or suddenly push the television or its stand. You should pay special attention to children. Serious injury may result if it falls.

natural_image
Simple line drawing of a geometric structure with intersecting lines and a rectangular frame (no text or symbols)Do not place your television on an unstable cart, stand, shelf or table. Serious injury to an individual, and damage to the television, may result if it falls.

natural_image
Illustration of a person reacting to a computer screen with a circular device nearby (no text or symbols)When the television receiver is not used for an extended period of time, it is advisable to disconnect the AC power cord from the AC outlet.

natural_image
Simple line drawing of a monitor with a cross symbol crossed out, next to a warning light icon (no text or symbols)Avoid exposing the television receiver to direct sunlight and other sources of heat. Do not stand the television receiver directly on other products which give off heat, e.g. video cassette players and audio amplifiers. Do not place naked flame sources, such as lighted candles on the television.
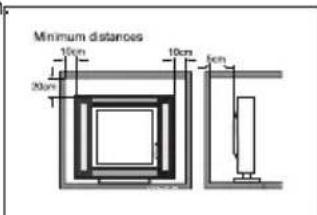
If the television is to be built into a compartment or similar enclosure, the minimum distances must be maintained. Heat build-up can reduce the service life of your television, and can also be dangerous.
Main features
① Used as Television, display terminal, PC display;
② High luminance, wide viewing angle;
③ HDMI interface;
④ Multi-Media player (USB);
Accessories
Infrared Remote Controller...... 1
Battery(AAA)......2
User's Manual....1
Main parameter
| Viewing Picture Size (Diagonal) | 40" |
| Resolution | 1920 x 1080 |
| Aspect Ratio | 16:9 |
| TV System | PAL-B/G, I, D/KSECAM-B/G, D/K, L, L'DVB-T, DVB-C |
| Storage channel number | 1500(DTV); 100(ATV) |
| Video Signal System | PAL/SECAM/MPEG2/MPEG4/H.264 |
| Input Power Voltage | AC 100-240V 50/60Hz |
| Power consumption | 70W |
| Standby Power consumption | ≤$W |
| Audio Output Power (THD ≥%) | 2x8W |
| Signal Input | Analog RGB(VGA) x 1High-Definition Multimedia Interface (HDMI) x 3Composite Video Input x 1Audio Input x 1PC Audio x 1Y Cb (Pb )Cr (Pr) x 1USB x 1RF x 1CI x 1SCART x 1 |
| Signal Output | Headphone x 1COAXIAL x 1 |
| Horizontal definition (TV line) | Composite Video input >=350Y Cb(Pb ) Cr(Pr) >=400 |
Base Stand Assembly Instruction

Prepare to place the TV with the display side down on a flat surface. Due to the size and weight of this TV, the use of 2 people is recommended when moving it. Ensure the table or desk you use provides a flat, totally clean surface, and use a soft cloth between the face of the TV and the table to protect the TV's screen.
- Place the TV with the display side down on a flat surface. Use a cloth to protect the display. Align the back surface of the base pillar base with the TV reserved screw holes.

natural_image
Technical line drawing of an open rear monitor with internal components and mounting feet (no text or symbols)- Install and tighten the four holes at the bottom of the back of the TV with four screws, complete the whole installation.

natural_image
Technical line drawing of an open TV rear panel with labeled connectors and internal components (no text or symbols)Screws(4x26PWM)x4
Front panel
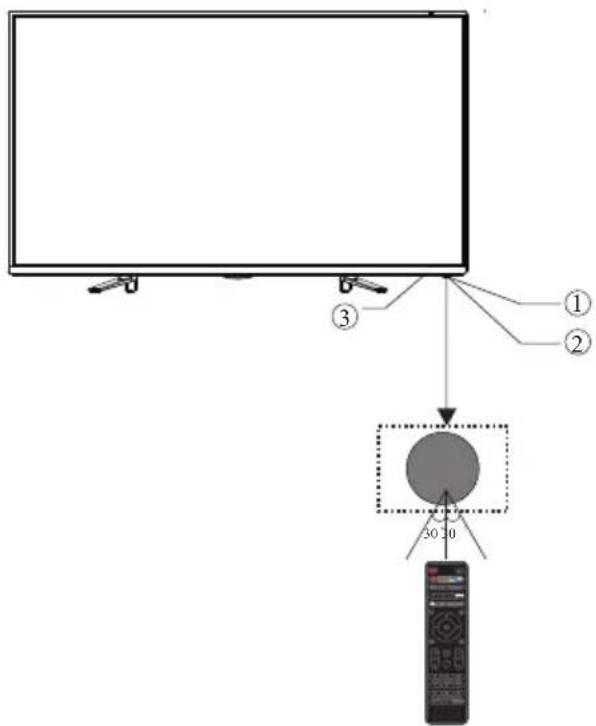
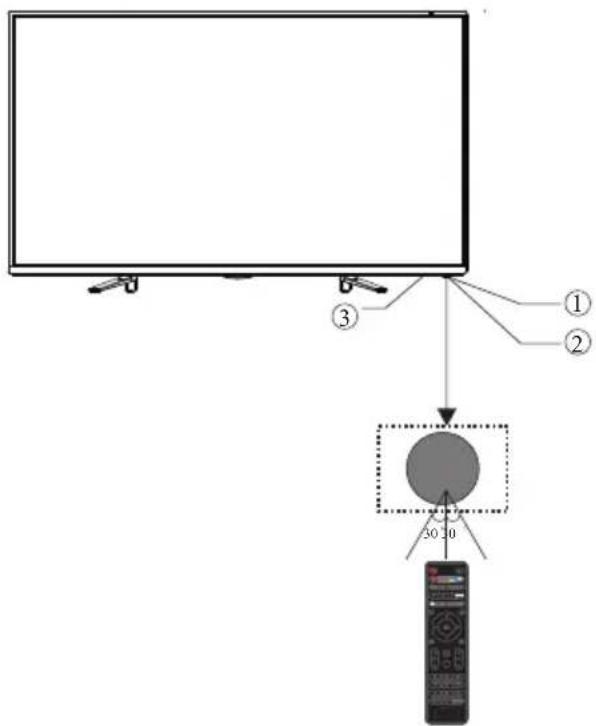
- Remote control sensor
- Indicator LED: RED
- Key board
STANDBY
KEYBOARD

- SOURCE:
Display the input source menu.
- MENU:
Display main MENU.
- V-/V+
Adjust sound level.
In MENU mode, press "V+" or "V-" to adjust the item that you selected.
- CH+/CH-
In TV mode, press "CH+" or "CH-" to change the channel up and down.
In MENU mode, press “CH+” or “CH-” to select items.
- STANDBY
Press this button to turn the unit ON from STANDBY mode.
Press it again to turn the set back to STANDBY.
REAR AV Connections

All the terminals are(from left to right):
AC Power Socket, YPbPr INPUT, VIDEO INPUT, AUDIO INPUT, COAXIAL OUTPUT, , SHART3NPUT.
Note: VIDEO and YPbPr share one audio channel.
REAR AV Connections(SIDE)

All the terminals are(from left to right):
USB, HDMI2, HDMI1, HEADPHONE, CI, PC AUDIO, VGA, RF.
Note: When HDMI port get DVI signal, the audio signal receives from the PC
Audio channel.
ANTENNA

Note:
Aerial connections: IEC(female).
Input impendance:75 Ωunbalanced.
PC
STEPS:
Be sure both the TV and computer are Power off.
- Connect VGA and audio cable
- Connect power cord
3.Power on the TV, switch to PC mode
4.Power on the PC
This sequence is very important.

PRESET MODE (PC)
| RESOLUTION | V.Freq.(Hz) H.Freq.(KHz) | ||
| 1 | 800*600 | 60 | 37.88 |
| 2 | 1024*768 | 60 | 48.36 |
| 3 | 1366*768 | 60 | 47.7 |
NOTE: PC V.Freq.(Hz) not more than 60Hz.
PRESET MODE (HDMI)
| RESOLUTION | V.Freq.(Hz) H.Freq.(KHz) | ||
| 1 | 800*600 | 60 | 37.88 |
| 2 | 1024*768 | 60 | 48.36 |
| 3 | 1360*768 | 60 | 47.7 |
| 4 | 1280*768 | 60 | 47.3 |
| 5 | 1920*1080 | 60 | 67.5 |
AV EQUIPMENT
This TV provides one group of AV, one group of YPbPr for convenient connection to VCR, DVD or other video equipment. Please refer to the owner's manual of the equipment to be connected as well.
You can use the input terminals on TV set rear as follows.

It can be connected to the following appliances: VCR, multi disc player, DVD, camcorder, video game or stereo system, etc... YPbPr can support these video tomats: 480i, 576i, 480p, 576p, 720p, 1080i, 1080p.
Note: 1. VIDEOPbPr share one audio channel.
- When HDMI port get DVI signal, the "PC Audio" channel is changed to receive the audio for HDMI port.
- Sometimes it will not support in different device because the device supplies nonstandard signal.
REMOTE CONTROL
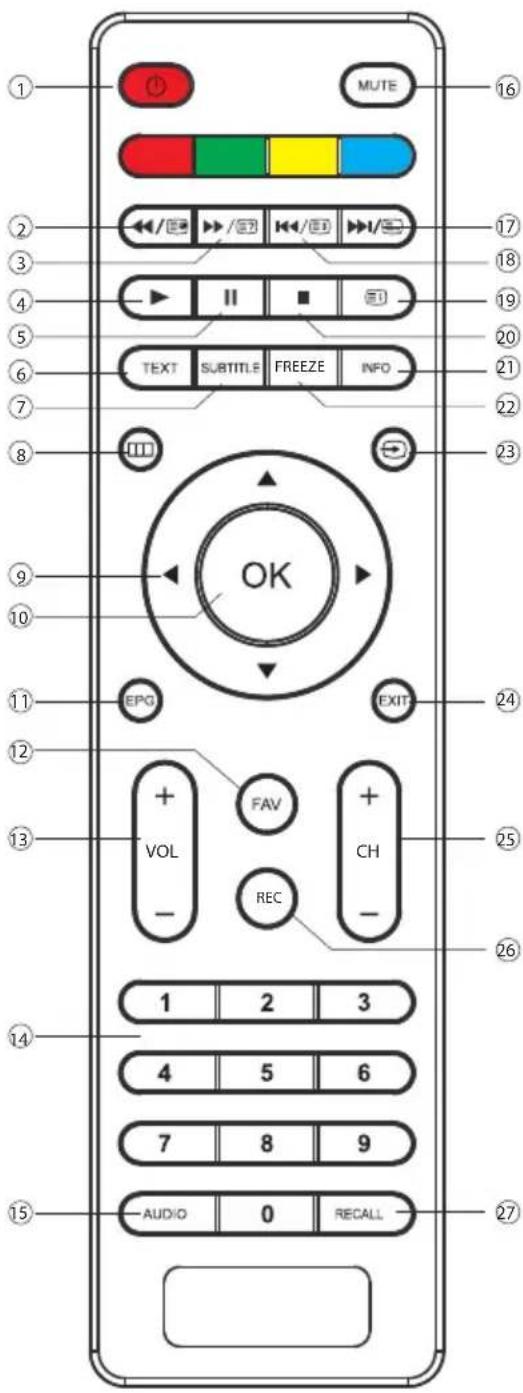
- POWER: To set the TV to standby or power on.
- ◀/☐: In USB mode, used as reverse key, in teletext mode used as subpage key.
-
▶▶/□: In USB mode, used as forward key, in teletext mode used as reveal key.
-
▶ : Press in USB Mode to begin or continue playback.
-
■ : Press in USB Playback Mode to pause playback.
-
TEXT: To enter or TELETEXT.
-
SUBTITLE: To turn on subtitles press the subtitle button in DTV mode.
-
□□□ : Displays the main on-screen menu.
-
CURSOR: To move within the menu.
-
OK: Confirms selection.
-
EPG: To display information about the program being viewed and what's on next in DTV mode.
-
FAV: To access your favourite channels list in TV or DTV mode.
-
VOL+/-: To adjust sound level.
-
NUMERIC KEY: For direct access to channels.
-
AUDIO: To select the available audio language of TV programs.
-
MUTE: To disable or enable the sound output.
-
▶▶/□ : In USB mode, used as next key, in teletext mode used as list key.
-
K/V: In USB mode, used as previous key, in teletext mode used as hold key.
-
☐: In teletext mode used as index.
-
■ : Press to stop play in USB mode.
-
INFO: To display the program information of the show you are watching, press the info button.
-
FREEZE: Press to freeze the picture you are watching.
-
➕ : Press to display and select the available video sources.
-
EXIT: To return to the previous menu or exit menu.
-
CH+/CH-: To access the next or previous channels.
-
REC: Press to record the TV program you are watching in DTV Mode.
-
RECALL: DTV Mode: RECALL: Jumps to last channel viewed.
TELETEXT
Teletext is an information system broadcast by certain channels which can be consulted like a newspaper. It also offers access to subtitles for viewers with hearing problems or who are not familiar with the transmission language(cable networks, satellite channels, etc.)
| Press : | You will obtain : |
| TEXT | This is used to call or exit teletext modes. The summary appears with a list of items that can be accessed. Each item has a corresponding 3 digit page number. If the channel selected does not broadcast teletext, theindication 100 will be displayed and the screen will remain blank (in this case, exit teletext and select another channel). |
SELECTING A PAGE | Enter the number of the page required using the 0 to 9 up/down. Example: page 120, enter 120. The number is displayed top left, the counter turns and then the page is displayed. Repeat this operation to view another page. If the counter continues to search, this means that the page is not transmitted. Select another number. |
DIRECT ACCESS TO THE ITEMS | Coloured are as are displayed at the bottom of the screen. The 4 coloured keys are used to access the items or corresponding pages. The coloured areas flash when the item or the page is not yet available. |
| INDEX | This returns to the contents page (usually page 100). |
| SUB PAGE | Certain pages contain sub-pages which are automatically displayed successively. This key is used to stop or resume sub-page acquisition. The indication appears top left. |
| HOLD | To freeze the page. |
| REVEAL | To display or hide the concealed information (games solutions). |
| LIST | The user can set four favorite pages to be directly linked to the four color keys. While list mode is activated, it is not possibility to use TOP or FLOF navigation with the color keys. The favorite page numbers should be stored and restored to/from nonvolatile memory for each channel by the system software. |
Installation Guide

1). Press the ◀▶▼▲buttons to navigate the menu and change the settings. Press the OK button to confirm.
Select your desired language to be displayed on the menu.

2). Press the ◀▶▼▲buttons to select Home Mode or shop Mode press the OK button to confirm.
HOME or SHOP modes
- Home Mode is an energy-saving Mode. Home Mode is recommended for normal viewing setting and is set as default during manufacturer.
- Shop Mode is an option for retailers for Advertising or product presentation. Shop Mode has a brighter image than Home Mode.
3). Press the buttons to select DVB-T/DVB-C and then press the OK button to confirm.

a. If you select DVB-T to next step is select the Tune and country the press the OK button to start tuning.

b. If you select DVB-C, the next step is to config the DVB-C system like (scan type /Frequency/Network ID/Sy mbol(KS/S) then press OK button to into the tune type and country select menu, this step is the same as DVB-T, select the tune type (DTV/ATV). Choose the right country, press OK button to start tuning.

4). Channel tuning will commence. This operation may take up to several minutes. The display will show the progress of the tuning and the number of channels found.
5). If you want to skip the ATV tuning, press the MENU button to interrupt the tuning half way. A pop-up screen will be displayed, press the button to select YES to confirm. You will then go straight to DTV tuning. You may repeat the above step if you also want to skip the DTV tuning. An installation reminder will appear the next time you turn on the TV.
6). After tuning is complete, the channels are arranged in a preset order. If you wish to skip channels, modify the preset order or rename channels, select Programme Edit under the Channel menu.

1. CHANNEL MENU
1. 1 Auto Tuning (DVB-T)
1). Press the MENU button and then press the buttons to select the CHANNEL menu.

2). Press the ▼ buttons to select Auto Tuning and then press the OK button.

UK
TV OPERATION
3). Press the ▼▲buttons to select DVB-T/DVB-C Press select DVB-T and then press the OK button to confirm.

4). In the Tune Type menu, press the ◀ buttons to select ATV / DTV / DTV + ATV. Press the ▼button and then press the ◀▶▼▲buttons to select the country where you will operate the TV. Press the OK button to confirm.

5). Channel tuning will commence. This operation may take up to several minutes. The display will show the progress of the tuning and the number of channels found.
6). If you want to skip the ATV tuning, press the MENU button to interrupt the tuning half way. A pop-up screen will be displayed, press the button to select YES to confirm. You will then go straight to DTV tuning. You may repeat the above step if you also want to skip the DTV tuning.
7). After tuning is complete, the channels are arranged in a preset order. If you wish to skip channels, modify the preset order or rename channels, select Programme Edit under the channel menu.

1.2 Auto Tuning (DVB-C)
1). Press the MENU button and then press the buttons to select the CHANNEL menu.
2). Press the ▼ buttons to select Auto Tuning and then press the OK button.

3). Press the ▼▲buttons to select DVB-T/DVB-C Press select DVB-C and then press the OK button to confirm.

4). Press ▼▲buttons to select Scan type/Symbol(Ks/S) press the OK button to confirm.

5). In the Tune Type menu, press the ◀ buttons to select ATV / DTV / DTV + ATV. Press the ▼button and then press the ◀▶▼▲buttons to select the country where you will operate the TV. Press the OK button to confirm.
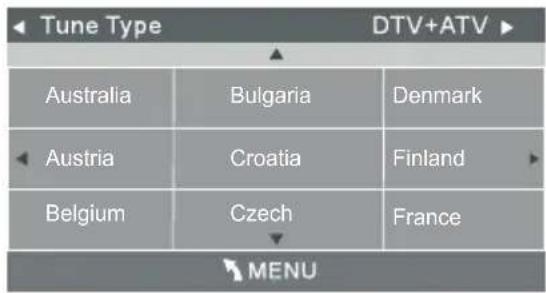
6). Channel tuning will commence. This operation may take up to several minutes. The display will show the progress of the tuning and the number of channels found.
7). If you want to skip the ATV tuning, press the MENU button to interrupt the tuning half way. A pop-up screen will be displayed, press the ◀ button to select YES to confirm. You will then go straight to DTV tuning. You may repeat the above step if you also want to skip the DTV tuning.
8). After tuning is complete, the channels are arranged in a preset order. If you wish to skip channels, modify the preset order or rename channels, select Programme Edit under the channel menu.

NOTE:
All the channels including ATV, DTV and Radio can be tuning by one time, if the Tune Type is DTV+ATV.
All the stored channels will be disappear after auto tuning.
After auto tuning, the channel will skip to the first DTV channel.
2. 1 DTV Manual Tuning (DVB-T)
1). Press the MENU button and then press the buttons to select the CHANNEL menu.
2). Press the ▼▲buttons to select DTV Manual Tuning and then press the OK button.

3). The DTV Manual Tuning screen will pop up. Press the ◀▶buttons to select the desired UHF channel and then press the OK button to commence the search of that channel. When the signal has been tuned, the picture and signal strength will be displayed on the screen.
4). Press the MENU button to return back to the main menu.
5). Press the EXIT button to exit the menu.

2. 2 DTV Manual Tuning (DVB-C)
1). Press the MENU button and then press the buttons to select the CHANNEL menu.

2). Press the ▼ buttons to select DVB-C Manual Tuning and then press the OK button.

3). The CADTV Manual Tuning screen will pop up. Press the ▼▲buttons to select(Frequency /Symbol (ks/s/QAM Type QAM) press the OK button to commence the search of that channel. When the signal has been tuned, the picture and signal strength will be displayed on the screen.
4). Press the MENU button to return back to the main menu.
5). Press the EXIT button to exit the menu.

3.1 ATV Manual tuning :
You can change the sound system to search the analog TV channels and fine tune the channels, then storage the channels you selected.

NOTE:
Press teletext red button to storage to channels after manual tuning.
4.1 Program edit:
You can Delete ,Rename ,Move, Skip , FAV any programs.

Delete
Press teletext red button, the program in cursor will delete.

Rename:
Only can rename ATV programs
Move the cursor to the program, press teletext green button to rename the program.
Press ▼▲to choose the character. Press ◀◀to move the cursor.
Press MENU button to exit edit, Press EXIT to exit the menu.
Note: ATV programs name only can be 5 character.

Move
Use the Arrow Buttons to select the channel you wish to move. Then press the Yellow Button to select Move function. Once active use the Arrow Buttons to move and then press OK to confirm.

Skip
Press ▼▲ to choose the program, press teletext blue button to skip this program, The 📋 will show on the right side of the program.
Choose the skipped program, press blue button again, you can cancel the skip, The will disappear.

Favourite
Press ▼▲ to choose the program, press FAV button, it will show ♥ on the right side of the program. Choose the FAV program, press FAV button again, you can cancel the FAV, ♥ the will disappear.
Once your favorite group is created, you can press the FAV key to quickly access your favorite channel.
5.1 Cl information: (optional)
This menu can display the CI card's information.
2. PICTURE MENU
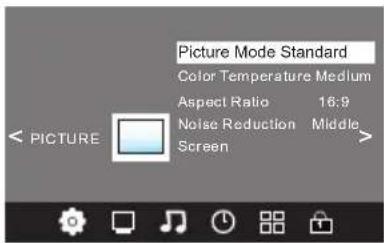
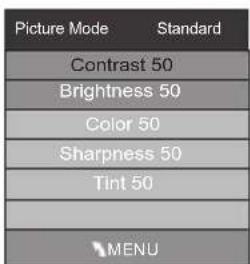
The second item of the MENU is PICTURE MENU. You can adjust picture effect here, such as contrast, brightness, etc.
Press ▼▲to move, press OK to adjust.

NOTE:
1). Tint is available in NTSC system only.
2). There are four colors temperature modes can be selected medium, warm, cool, user
3). Screen is available in PC mode only which, can adjust Horizontal position, vertical position, size and phase.
3.SOUND MENU
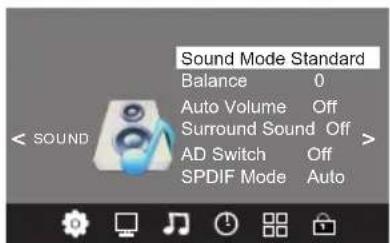
The third item of the MENU is the SOUND MENU. You can adjust the sound effect here such as treble, bass, balance etc.
Press ▼▲ to move, press OK to adjust.
Note:
Auto volume: only available when the input signal volume is too large or distortion.
4.TIME MENU
The fourth item of the menu is the TIME MENU You can adjust the clock, power on/off time, sleep time etc Press ◀▶ to move, press OK to adjust.

NOTE:
Within 15 minutes there is no signal, the TV will auto sleep.
5. OPTION MENU
The fifth item of the MENU is the OPTION MENU. You can adjust the Menu language, Audio language, Subtitle language etc.

In PVR File system menu you can set up USB disk for PVR.

NOTE:
Restore factory default will clear all the programs and password.
6. LOCK MENU
The sixth item of the menu is the LOCK MENU You can lock system, set password, block program and set parental guidance. Once you set the lock system on, you can not search the channels.

NOTE:
The default pass word is 6666.
Block program: Press ▼▲to choose the program, press teletext green button to block the program. If you want unblock the program, pls enter the main menu, input the password, then press green button again. Parental guidance: Press ◀▶to choose rating.
7. USB
Press the source button and then select USB item to enter the USB menu.

Please make sure that the USB device have plugged in the slot. There are four type media item can be selected, such as photo, music, Movie, and text. Select the type media item by pressing ◀▶, press OK button to enter the disk selection menu.

Press the ◀ to select the right disk and press OK to display media files and folder list or choose Return to back to the media type selection menu.

Select the media file by pressing ◀▶ or ▼▲, then the preview frame will pop up. Press the button ▶ to play the media file in full screen. When the media file (photo, music, Movie, or text type) is playing, press the OK or Info button can display the control bar.


Press ◀▶ to select the function icon, press OK button to confirm the function.
Press ▼ or EXITbutton to exit the control bar. NOTE:
You can adjust the audio track, or program in the Info menu while Playing the video file. Choose the Info icon and press OK can display the Info MENU.

USB playback is supported for the following photo file formats:
—JPEG(JPEG format, files with the extension ".jpg")
—BMP (files with the extension ".bmp")
—PNG (files with the extension ".png")
USB playback is supported for the following music file formats:
—MP3 (files with the extension ".mp3")
USB playback is supported for the following text file formats:
—TXT (files with the extension ".txt")
USB playback is supported for the following movie file formats:
—TS (MPEG2 & H.264)
8.EPG Menu(Electronic Program Guide).
The EPG menu is used to look at what is being broadcasted on DTV or Radio channel in the day. To access the EPG menu, press the EPG button, the following menu will be displayed:

1. INFO
Use ✦ ✦ to choose the programs, Press INFO key, you can display the highlight program's information.
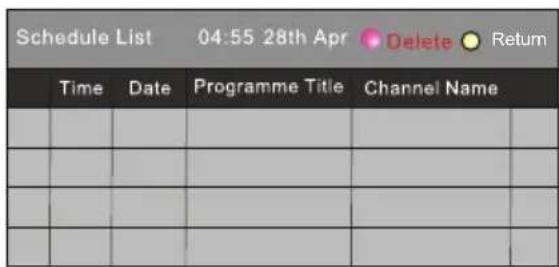
2. Schedule
Press the teletext yellow key, it can list all the reminder schedule, press ▼▲ to choose the list, press red key ● DELETE to delete the schedule list, Press YELLOW to return to EPG menu.
3. Record
Press the red key, it can set the program to be recorded.
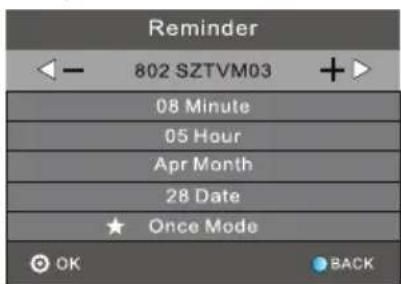
4. Remind
Press the blue key to choose one program and set up one reminder time, the TV screen will skip to the chosen program in the reminder time automatically.
| Trouble phenomenon Symptom | Inspection Check | ||
| Picture Audio | |||
 | Snow Noise | 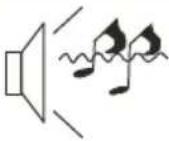 | antenna position, direction or connection |
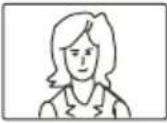 | Ghost |  Normal audio Normal audio | antenna position, direction or connection |
 | Interference |  Noise Noise | electronic equipment, car/ motorcycle, fluorescent light |
 | Normal Picture |  Mute Mute | Volume(check if mute is activated or if the audio system connections are not correct) |
 | No picture Mute |  | Power cord is not inserted Power switch is not opened Contrast and brightness/volume setup Press standby key on the remote control for inspecting |
 | No colour Normal |  control control | |
 | Picture breaking up | 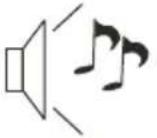 Normal audio or weak Normal audio or weak | retune channel |
 | No colour | 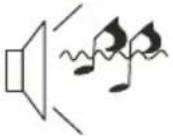 Noise Noise | TVsystem |
 | There is black bar on top and bottom |  Normal audio Normal audio | Change aspect to zoom |
FR
Sommaire
RISQUES D'ELECTROCUTION
NE PAS OUVRIR!

ATTENTION
AFIN DE REDUIRE LES RISQUE DE CHOC ELECTRIQUE, N'ENLEVEZ PAS LE COUVERCLE (OU LE PANNEAU ARRIERE). AUCUNE PIECE À L'INTERIEUR NE PEUT ETRE REPAREE PAR L'UTILISATEUR. POUR TOUTE RÉPARATION, VEUILLEZ FAIRE APPEL À UN TECHNICIEN QUALIFIÉ.

natural_image
Simple line drawing of a window with a black X mark and paper, next to a curtain (no text or symbols)natural_image
Simple line drawing of a computer monitor with a cross symbol on screen, no text or labels present.natural_image
Simple line drawing of a computer monitor with a curved frame and a base, emitting steam (no text or symbols)natural_image
Simple line drawing of a flat-screen monitor with a stand and diagonal lines (no text or symbols)natural_image
Cartoon illustration of a person lying on a computer monitor with a crossed-out X symbol (no text or symbols present)natural_image
Simple line drawing of a geometric structure with intersecting lines and a rectangular frame (no text or symbols)natural_image
Illustration of a person running away from a computer monitor next to a circular object with a broken ring (no text or symbols)natural_image
Simple line drawing of a monitor with a cross symbol and a warning light emitting sound waves (no text or symbols)natural_image
Technical line drawing of a front view of an electronic device with internal components and mounting feet (no text or symbols)natural_image
Technical line drawing of a flat-screen TV rear panel with ventilation grilles and indicator lights (no text or symbols)Vis (4 x 26PWM) x 4
Panneau avant

USB, HDMI2, HDMI1, HEADPHONE, CI, PC AUDIO, VGA, RF.

Enregistrer
natural_image
Illustration of a computer monitor with a crossed-out hand gesture and lightning bolts, no text or symbols present.natural_image
Simple line drawing of a monitor with a cross mark and a cloth, no text or symbols presentnatural_image
Simple line drawing of a computer monitor with a cross symbol crossed out, no text or labels present.natural_image
Simple line drawing of a computer monitor with a base, emitting steam (no text or symbols)natural_image
Simple line drawing of a flat-screen monitor with a stand and diagonal lines (no text or symbols)natural_image
Cartoon illustration of a child lying on a computer monitor with a crossed-out X symbol (no text or symbols present)natural_image
Simple line drawing of a geometric shape with intersecting lines and a rectangular frame (no text or symbols)natural_image
Illustration of a person running away from a computer monitor with a sun icon and a ball nearby (no text or symbols)natural_image
Simple line drawing of a monitor with a cross symbol and a warning light icon (no text or symbols)natural_image
Technical line drawing of a flat-screen TV rear panel with ventilation slots and internal components (no text or symbols)natural_image
Technical line drawing of a flat-screen TV rear panel with internal components and connectors (no text or symbols)USB, HDMI2, HDMI1, HEADPHONE, CI, PC AUDIO, VGA, RF.

natural_image
Illustration of a computer monitor with a crossed-out black X symbol, no text or symbols presentnatural_image
Simple line drawing of a window with a black X mark and paper, next to a curtain and rope (no text or symbols)natural_image
Simple line drawing of a computer monitor with a cross symbol on its screen (no text or labels)natural_image
Simple line drawing of a computer monitor with a base, emitting steam (no text or symbols)natural_image
Simple line drawing of a flat-screen monitor with a cross mark on the stand (no text or symbols)natural_image
Cartoon illustration of a person lying on a computer monitor with a crossed-out 'X' symbol (no text or symbols present)natural_image
Simple line drawing of a geometric shape with crosshairs and a rectangular frame, no text or symbols presentnatural_image
Illustration of a person running away from a computer monitor next to a circular object with a starburst (no text or symbols)natural_image
Simple line drawing of a monitor with a cross symbol and a warning light icon (no text or symbols)natural_image
Technical line drawing of a front view of an electronic device with internal components and mounting feet (no text or symbols)natural_image
Technical line drawing of an open TV rear panel with labeled connectors and internal components (no text or symbols)Screws(4x26PWM)x4
Pannello frontale

3. Record
natural_image
Illustration of a computer monitor with a crossed-out black X symbol, no text or symbols presentnatural_image
Simple line drawing of a window with a black X mark and paper, next to a curtain and rope (no text or symbols)natural_image
Simple line drawing of a computer monitor with a cross symbol on its screen (no text or labels)natural_image
Simple line drawing of a computer monitor with a base, emitting steam (no text or symbols)natural_image
Simple line drawing of a flat-screen monitor with a stand and diagonal lines (no text or symbols)natural_image
Cartoon illustration of a person lying on a computer monitor with a crossed-out 'X' symbol (no text or symbols present)natural_image
Simple line drawing of a geometric structure with intersecting lines and a rectangular frame (no text or symbols)natural_image
Illustration of a person standing next to a computer monitor and a circular object with a starburst (no text or symbols)natural_image
Simple line drawing of a monitor with a cross symbol and a warning light icon (no text or symbols)Baterie (AAA)......2
natural_image
Technical line drawing of an open rear monitor with internal components and mounting feet (no text or symbols)natural_image
Technical line drawing of an open TV rear panel with labeled connectors and internal components (no text or symbols)Šrouby (4 x 26PWM) x 4
Přední panel

NOTE: PC V.Freq.(Hz) not more than 60Hz.
PRESET MODE (HDMI)
| ROZLIŠENÍ | V. frekv. (Hz) H. frekv. (Khz) | ||
| 1 | 800*600 | 60 | 37.88 |
| 2 | 1024*768 | 60 | 48.36 |
| 3 | 1360*768 | 60 | 47.7 |
| 4 | 1280*768 | 60 | 47.3 |
| 5 | 1920*1080 | 60 | 67.5 |
AV ZAŘÍZENÍ
CZ
POUŽÍVÁNÍ


POZNÁMKA:
Poznámka:
POZNÁMKA:
3.
Record
—Creating Easy Life—

- Operation Manual
- UK
- Contents
- IMPORTANT SAFETY INSTRUCTION
- WARNING:
- SAFETY AND WARNINGSUK
- Main features
- Accessories
- Base Stand Assembly Instruction
- REAR AV Connections
- REAR AV Connections(SIDE)
- ANTENNA
- PC
- STEPS:
- AV EQUIPMENT
- REMOTE CONTROL
- TELETEXT
- Installation Guide
- HOME or SHOP modes
- CHANNEL MENU
- 1 Auto Tuning (DVB-T)
- TV OPERATION
- Auto Tuning (DVB-C)
- NOTE:
- 1 DTV Manual Tuning (DVB-T)
- 2 DTV Manual Tuning (DVB-C)
- ATV Manual tuning :
- Program edit:
- Delete
- Rename:
- Move
- Skip
- Favourite
- Cl information: (optional)
- PICTURE MENU
- 3.SOUND MENU
- 4.TIME MENU
- OPTION MENU
- LOCK MENU
- USB
- 8.EPG Menu(Electronic Program Guide).
- INFO
- Schedule
- Record
- Remind
- FR
- Sommaire
- ATTENTION
- Enregistrer
- AV ZAŘÍZENÍ
- CZ
- POUŽÍVÁNÍ
- POZNÁMKA:
- 3.
- Record
Brand : CHANGHONG
Model : LED40D2080H
Category : Television