
WindPad 100W - Tablet MSI - Free user manual and instructions
Find the device manual for free WindPad 100W MSI in PDF.


| Product Type | Tablet PC |
| Brand | MSI |
| Model | WindPad 100W |
| Display Size | 10.1 inches |
| Display Resolution | 1280 x 800 pixels |
| Processor | Intel Atom Z530 (1.6 GHz) |
| System Memory (RAM) | 1 GB DDR2 |
| Storage Capacity | 16 GB SSD |
| Operating System | Windows 7 Home Premium |
| Battery Type | Lithium-Ion, 3-cell (3200 mAh) |
| Battery Life | Up to 4 hours |
| Connectivity | Wi-Fi 802.11 b/g/n, Bluetooth 2.1 |
| Ports | USB 2.0, 3.5mm audio jack, microSD card slot |
| Camera | Front 1.3 MP |
| Dimensions (W x D x H) | 270 x 170 x 15 mm (10.6 x 6.7 x 0.6 in) |
| Weight | 800 g (1.76 lbs) |
| Input Method | Multi-touch capacitive touchscreen, on-screen keyboard |
| Cleaning Instructions | Wipe with a soft, dry cloth. Avoid liquids and abrasive cleaners. |
| Safety Precautions | Do not disassemble. Avoid exposure to moisture and extreme temperatures. |
| Spare Parts Availability | Battery and charger available from MSI service centers. |
| Repairability | Professional repair recommended. Check MSI support for parts. |
Frequently Asked Questions - WindPad 100W MSI
User questions about WindPad 100W MSI
0 question about this device. Answer the ones you know or ask your own.
Ask a new question about this device
Download the instructions for your Tablet in PDF format for free! Find your manual WindPad 100W - MSI and take your electronic device back in hand. On this page are published all the documents necessary for the use of your device. WindPad 100W by MSI.
USER MANUAL WindPad 100W MSI
Table of Content 1-2
Regulations Information.... 1-5
FCC-B Radio Frequency Interference Statement 1-5
FCC Conditions 1-6
CE Conformity 1-6
Safety Instructions.... 1-7
Safety Guideline for Using Lithium Battery 1-11
WEEE Statement 1-15
Trademarks 1-22
Reversion History 1-22
Introductions
Manual Map 2-2
Unpacking....2-3
Specification....2-4
Product Overview 2-8
Getting Started
Power Management 3-2
Battery Power 3-2
AC Power 3-3
Power On the Tablet PC 3-5
Power Management in Windows OS 3-6
Energy Saving Tips.... 3-8
Basic Operations 3-9
Safety and Comfort Tips 3-9
Having a Good Work Habit.... 3-9
Amusing Features 3-10
Rotating the Display 3-13
Using the Quick Launch Buttons 3-14
Using 3G Function (Optionally Supported) 3-16
Connecting the External Devices 3-17
Connecting the Communication Devices 3-17
Connecting the Peripheral Devices 3-19
Regulations Information
FCC-B Radio Frequency Interference Statement
This equipment has been tested and found to comply with the limits for a Class B digital device, pursuant to part 15 of the FCC rules. These limits are designed to provide reasonable protection against harmful interference in a residential installation. This equipment generates, uses and radiates radio frequency energy, and, if not installed and used in accordance with the instructions, may cause harmful interference to radio communications. However, there is no guarantee that interference will not occur in a particular installation. If this equipment does cause harmful interference to radio or television reception, which can be determined by turning the equipment off and on, the user is encouraged to try to correct the interference by one or more of the following measures:
■ Reorient or relocate the receiving antenna.
■ Increase the separation between the equipment and receiver.
■ Connect the equipment into an outlet on a circuit different from that to which the receiver is connected.
■ Consult the dealer or an experienced radio TV technician for help.
NOTE
The changes or modifications not expressly approved by the party responsible for compliance could void the user's authority to operate the equipment.
- Shield interface cables and AC power cord, if any, must be used in order to comply with the emission limits.
FCC Conditions
This device complies with part 15 of the FCC Rules. Operation is subject to the following two conditions:
■ This device may not cause harmful interference.
This device must accept any interference received, including interference that may cause undesired operation.
CE Conformity

This device is in compliance with the essential safety requirements and other relevant provisions set out in the European Directive.
Safety Instructions

Read the safety instructions carefully and thoroughly.
All cautions and warnings on the equipment or user's manual should be noted.

Keep the User's Guide that comes with the package for future reference.

Keep this equipment away from humidity and high temperature.

Lay this equipment on a stable surface before setting it up.

The openings on the enclosure are used for air convection and to prevent the equipment from overheating. Do not cover the openings.

Do not leave the equipment in an unconditioned environment with a storage temperature above 60^ C ( 140^ F) or below 0^ C ( 32^ F), which may damage the equipment.

Make sure the power voltage is within safety range and has been adjusted properly to the value of 100\~240V before connecting the equipment to the power outlet.
- Always unplug the AC power cord before installing any add-on card or module to the equipment.
- Always disconnect the AC power cord or uninstall the battery pack or switch off the wall socket if the equipment would be left unused for a certain time to achieve zero energy consumption.

Never pour liquid into the opening that could damage the equipment or cause an electrical shock.

Place the power cord in a way that people are unlikely to step on it. Do not place anything on top of the power cord.

Always keep the strong magnetic or electrical objects away from the equipment.

When installing the coaxial cable to the TV Tuner, it is necessary to ensure that the metal shield is reliable connected to protective earthing system of the building.
Cable distribution system should be grounded (earthed) in accordance with ANSI/NFPA 70, the National Electrical Code (NEC), in particular Section 820.93, Grounding of Outer Conductive Shield of a Coaxial Cable.

- To prevent explosion caused by improper battery replacement, use the same or equivalent type of battery recommended by the manufacturer only.
◆ Always keep the battery in a safe place.
If any of the following situations arises, get the equipment checked by a service personnel:
- The power cord or plug is damaged.
- Liquid has penetrated into the equipment.
- The equipment has been exposed to moisture.
- The equipment has not worked well or you can not get it work according to User's Manual.
- The equipment was dropped and damaged.
- The equipment has obvious signs of breakage.

Green Product Features
- Reduced energy consumption during use and stand-by
- Limited use of substances harmful to the environment and health
- Easily dismantled and recycled
- Reduced use of natural resources by encouraging recycling
- Extended product lifetime through easy upgrades
- Reduced solid waste production through take-back policy
Environmental Policy
- The product has been designed to enable proper reuse of parts and recycling and should not be thrown away
- Users should contact the local authorized point of collection for recycling and disposing of their end-of-life products.

廢電池請回收
For better environmental protection, waste batteries should be collected separately for recycling or special disposal.
Safety Guideline for Using Lithium Battery
(English) CAUTION: Danger of explosion if battery is incorrectly replaced. Replace only with the same or equivalent type recommended by the equipment manufacturer. Discard used batteries according to manufacturer's instructions.
(English) Under the European Union ("EU") Directive on Waste Electrical and Electronic Equipment, Directive 2002/96/EC, which takes effect on August 13, 2005, products of "electrical and electronic equipment" cannot be discarded as municipal waste anymore and manufacturers of covered electronic equipment will be obligated to take back such products at the end of their useful life.
- All trademarks are the properties of their respective owners.
- SRS Premium Sound, SRS and the symbol are trademarks of SRS Labs, Inc.
- THX and THX TruStudio Pro are trademarks of THX Ltd. which may be registered in some jurisdictions. All rights reserved.
Revision History
| Version | Revision | History | Date | |
| 1.0 | First | Released | 01, | 2011 |
Congratulations on becoming an user of this product, the finely designed tablet PC. This brand-new exquisite tablet PC will give you a delightful and professional experience in using it. We are proud to tell our users that this product is thoroughly tested and certified by our reputation for unsurpassed dependability and customer satisfaction.
Manual Map
This User's Manual provides instructions and illustrations on how to operate this tablet PC. It is recommended to read this manual carefully before using this tablet PC.
Chapter 1, Preface, gives users the basic safety information and caution that is interrelated to using this tablet PC. It is recommended to read these information or caution when using this tablet PC for the first time.
Chapter 2, Introductions, includes the descriptions of all the accessories of this tablet PC. It is recommended to check out that if you have all the accessories included when you open the packing box. If any of these accessories is damaged or missing, please contact the vendor where you purchased this product. Also, this chapter provides the specification of this tablet PC, and introduces the function buttons, quick launch buttons, connectors, LEDs and externals of this product.
Chapter 3, Getting Started gives the basic operation instructions on using this tablet PC. Beside, the steps of connecting the AC power; and the procedures of connecting the various external devices, communication devices, and so on, are also provided to help users getting familiar with this product.
Unpacking
First, unpack the shipping carton and check all items carefully. If any item contained is damaged or missing, please contact your local dealer immediately. Also, keep the box and packing materials in case you need to ship the unit in the future. The package should contain the following items:

Tablet PC

Quick Start Manual

AC/DC adapter and AC power cord

Carry bag (optional)

All-in-one application disk, containing the full version of user's manual, drivers, utilities, and optional recovery function, etc..
Specification
Physical Characteristic
Dimension 274 (W) x 173 (D) x 18.5 (H) mm
Weight 847g
with
battery
CPU
Processor Type Intel Atom Z530 1.6GHz
Support Processor Intel Menlow
Process 45nm
L2 Cache 512KB
FSB Speed 533MHz
Special Notification
The actual processor preinstalled in this product depends on the model you purchased. Please contact the local dealer for detailed information.
Core Chips
Core Chip Intel Poulsbo
Special Notification
The actual core chips preinstalled in this product depends on the model you purchased. Please contact the local dealer for detailed information.
Memory
Technology DDR2 800 Mhz
Memory DDR2 SO-DIMM X 1 slot
1GB
DDR2
Maximum up to 2GB (2GB DDR2 SO-DIMM x 1) (optional)
Storage (Items listed here may vary depending on the model users purchased)
SSD (Solid-State Disk) 32GB
Special Notification
The actual SSD preinstalled in this product depends on the model you purchased, and may very without notice.
Power
AC/DC Adapter 40W, 19V
Input:
100-240V\~
1.2A-0.6A
Output:

19V
Battery Type 2 cells
RTC Battery Yes
I/O Port
USB
x 1 (USB version 2.0)
Headphone out (on docking)
× 1
Mini HDMI
x 1
Expansion Docking Port x 1
Internal Microphone x 1 (on docking)
Card Reader x 1 (SD/MMC)
The supported memory cards may vary without notice.
Communication Port (Items listed here may vary without notice)
| Wireless LAN Supported | ||
| Bluetooth | Supported | |
| 3G | Optionally | Supported |
Audio
Sound Controller Realtek ^® ALC 888VC2
Internal Speaker 2 speakers with housing
Sound Volume Adjust by volume button, K/B hot-key & SW
Video (optional)
Graphics UMA
Dual View Function External display devices will be auto detected when connected.
External Display Output Supported
Display
LCD Type 10.1" LED panel
LCD Resolution 1024 x 600
Multi Touch Supported
Brightness Brightness controlled by K/B hot-keys
WebCam
CMOS (optional) Supported
Software & BIOS
USB Flash Boot Yes, USB floppy boot up DOS only
BIOS Fast Boot Support --- Yes
Others
G-Sensor
Supported
Compliance
WHQL
Product Overview
This section provides the description of basic aspects of this tablet PC. It will help you to know more about the appearance of this device before using it. Please be aware that the device shown in this section may vary from the actual one that users purchased.

1. Power Button
Press the power button to turn this product ON and OFF.
2. WLAN or 3G Function Button (Optionally Supported)
Press this button to turn the Wireless LAN or 3G function on or off recurrently. For detailed instructions of using WLAN or 3G Function, please refer to the chapter 3 of this manual.
3. Bluetooth Function Button (Optionally Supported)
Press this button to turn the Bluetooth function on or off recurrently. For detailed instructions of using Bluetooth Function, please refer to the chapter 3 of this manual.
4. Stereo Speakers
Give high quality sound blaster with stereo system and Hi-Fi function supported.
5. Internal Microphone
This is the built-in microphone and its function is the same with microphone.
6. Front Webcam/ Rear Webcam
This built-in Front/ Rear Webcam can be used for picture taking, video recoding or conferencing, and any other interactive applications.
7. Status LEDs

Power LED
♦ Glowing blue when this device is powered on.
♦ LED goes off when this device is powered off.

Battery Status
♦ Glowing green when the battery is being charged.
♦ Glowing amber when the battery is in low battery status.
- Blinking amber if the battery fails and it is recommended to replace a new battery. Consult the local dealer for purchasing an equivalent type of battery recommended by the manufacturer.
- Battery LED goes out when it is fully charged or when the AC/DC adapter is disconnected.

Bluetooth/ Wireless LAN / 3G (Optionally Supported)
- This LED indicator glows blue when Bluetooth function is enabled.
- This LED indicator glows blue when Wireless LAN function is enabled.
- This LED indicator glows blue when 3G function is enabled.
- LED indicator goes out when all functions are disabled.
Note: Functions listed here may be optional supported depending on the model users purchased. - Warning: For flight safety consideration, make sure this LED indicator goes out when you are in flight.
- Contact the local distributor for further information if necessary.
8. Headphone Connector
Used for connecting the speakers or headphones.
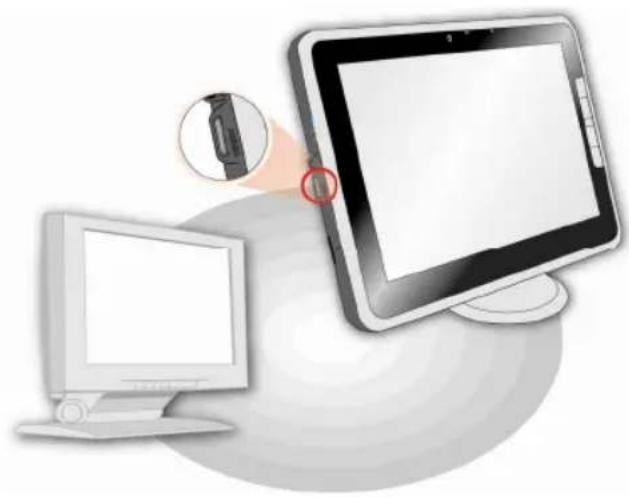
9. Mini HDMI Connector
HDMI (High Definition Multimedia Interface) is a new interface standard for PCs, displays and consumer electronics devices that supports standard, enhanced and high-definition video, plus multi-channel digital audio on a single cable.
10. Card Reader
The built-in card reader may support two types of memory card, which are MMC (Multi-Media Card) and SD (Secure Digital) Contact the local dealer for further and correct information and be noted that the supported memory cards may vary without notice.
Note that there is a dummy card attached to this slot to protect the empty slot. Do not mislay the dummy card when it is taken out, and always leave the dummy card inserted when not using this slot.
11. Docking Station Connecting Port
This port is provided to connect a Docking Station (optional), which gives an additional flexibility and expandability to this tablet PC. Users are allowed to connect a compliant Docking Station to this port to obtain extra connecting interfaces. For detailed instructions of connecting and using the Docking Station, please refer to the chapter 3 of this manual.
12. SIM Card Slot (Optionally Supported)
Insert the SIM card properly with correct orientation into the SIM card slot provided by this tablet PC for internet services. Contact your internet service provider for any internet connecting issue.
13. Multi Touch Display
This tablet PC is equipped with a user-friendly multi touch display which lets users use hands or finger gestures to interact with multi-media content, play games, read e-books, access documents, create special effects, manipulate art and photographs, and even surf on the internet, in a truly unique and compelling way.
14. Quick Launch Buttons
Use the quick launch buttons to activate the specific applications or tools.
With the help of these quick launch buttons, users will be able to do work more efficiently.

Webcam
- Press this button to turn the Webcam function on. Press again to turn it off.
- Long press this button for 3 seconds to enable or disable the G-sensor. With this function enabled, whenever the display is rotated, the screen will be rotated and expanded to fit the display automatically.
- Read the icon on behalf of the Webcam Status appearing on the display to learn the function status.

Volume Up

Volume Down
- Press the Volume Up or Volume Down button to decrease or increase the sound volume.
-
Read the icon on behalf of the Sound Level Status appearing on the display to learn the function status.
-
Press the Mute button to disable the sound volume. Press again to restore the sound volume to the previous sound level.
- Press and hold the Mute button for 3 seconds to bring up the tag of Windows Security. In this tag, users can lock the device for security concern, if necessary.
- Read the icon on behalf of the Mute Status appearing on the display to learn the function status.

Mute

- This button works the same as the Enter button on the keyboard.
15. USB Port
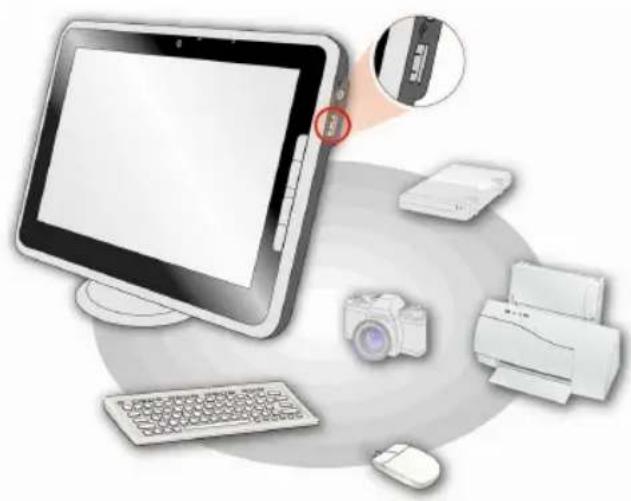
The USB 2.0 port allows you to connect USB-interface peripheral devices, such as mouse, keyboard, modem, portable hard disk module, printer and more.
16. Power Connector
Provided to connect the AC/DC adapter and supply AC power for this tablet PC.
CHAPTER 3
Getting Started
Power Management
Battery Power
This tablet PC is equipped with a high-capacity Li-ion battery pack. The rechargeable Li-ion battery pack is an internal power source of this device.
However, the battery equipped is not replaceable by users, and may be damaged if users try to disassemble the product and the battery pack installed inside on their own.
Also, note that the limited warranty to the product may also lose its efficacy when this product is disassembled not by an authorized machinist.
Please follow your local laws and regulations to recycle the product.
Conserving Battery Power
Efficient battery power is critical to maintain a normal operation. If the battery power is not managed well, the saved data and customized settings may be lost.
To optimize battery life and avoid a sudden power loss, read the tips below:
- Suspend system operation if the system will be idle for a while or shorten the suspend timer's time period.
- Turn off the system if you won't be using it for a period of time.
◆ Disable unnecessary settings or remove idle peripherals. - Connect an AC/DC adapter to the system whenever possible.
Charging the Battery Pack
The battery pack equipped is rechargeable, however please pay attention to the following tips before recharging the battery:
♦ Plug in an external AC/DC adapter.
- You can use the system, suspend system operation or shut down and turn off the system without interrupting the charging process.
- The battery pack installed inside the device uses Lithium-ion battery cells that have no "memory effect." It is unnecessary to discharge the battery before recharging. However, to optimize the life of battery, we suggest that consuming the battery power completely once a month is necessary.
- The actual charging time will be determined by the applications in use.
AC power
It is strongly recommended to connect the AC/DC adapter to the tablet PC and use the AC power while using this tablet PC for the first time. When the AC power is connected, recharging the battery will start immediately.
Note that the AC/DC adapter included in the package is approved for your tablet PC; using other adapter model may damage either the tablet PC or other devices attached to it.
Do not cover the AC/DC adapter since it may produce a certain heat while in use. Always be aware of heat coming from the AC/DC adapter in use.
Connecting the AC Power
- Unpack the package to find the AC/DC adapter and power cord.
- Attach the power cord to the connector of the AC/DC adapter.
- Plug the DC end of the adapter to the tablet PC, and the male end of the power cord to the electrical outlet.
Disconnecting the AC Power
When disconnecting the AC/DC adapter, you should:
- Unplug the power cord from the electrical outlet first.
- Unplug the connector from the tablet PC.
- Disconnect the power cord and the connector of AC/DC adapter.
- When unplugging the power cord, always hold the connector part of the cord. Never pull the cord directly!
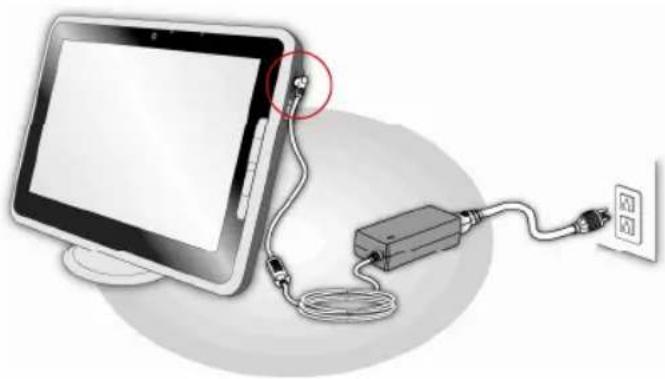
natural_image
Illustration of a tablet connected to a power adapter and cable, with a wall-mounted socket nearby (no text or symbols)Power On the Tablet PC
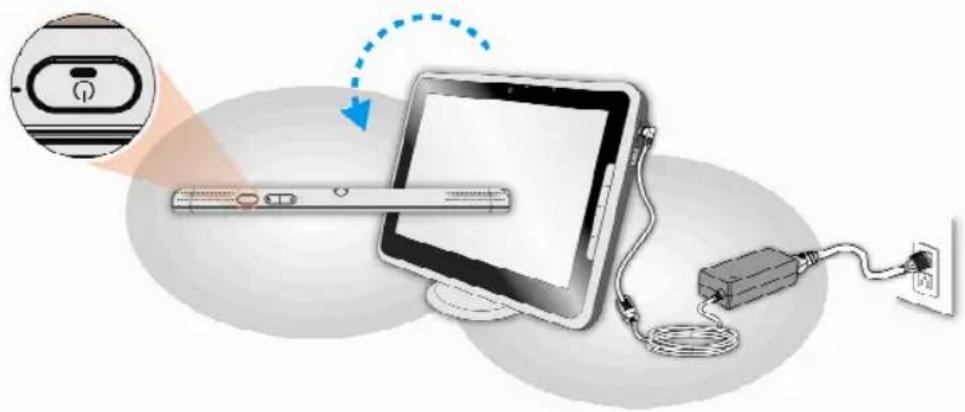
To power on the tablet PC, follow the steps below:
- Connect the AC power to the device first,
- Find the location of the Power Button as shown in the figure,
- Press the Power Button to power on the tablet PC.
Power Management in Windows OS
Power management of personal computers (PCs) and monitors has the potential to save significant amounts of electricity as well as deliver environmental benefits. To be energy efficient, turn off your display or set your PC to standby/hibernate mode after a period of user inactivity.
Follow the instructions below to adjust the power management settings in Windows OS:
- Power Options in Windows OS allow you to control the power management features of your display, hard drive, and battery. Go to the Start menu and click on the Control Panel. Click on the System and Security.
- Then click on the Power Options.
- Then select a power plan that meets your personal needs
- The Shut Down Computer menu will present the options to Sleep (S3/S4), Shut Down (S5), or Restart your computer.
- The computer should be able to wake up from power saving mode in response to a command from the power button.
1

System and Security Review your computer's status Back up your computer Find and fix problems
2

Power Options Require a password when the computer wakes | Change what the power buttons do Change when the computer sleeps
3
Select a power plan Power plans can help you maximize your computer's performance or conserve energy. Make a plan active by selecting it, or choose a plan and customize it by changing its power settings. Tell me more about power plans
Preferred plans
Balanced (recommended)
Change plan settings
Automatically balances performance with energy consumption on capable hardware.
Power saver
Change plan settings
Saves energy by reducing your computer's performance where possible.
Show additional plans

4
Shut down

Switch User
Log Off
Lock
Restart
Sleep
Hibemate
Energy Saving Tips
- Turn off the monitor after a period of user inactivity.
- Tune the settings in Power Options under Windows OS to optimize the computer's power management.
- Always disconnect the AC power cord or uninstall the battery pack or switch off the wall socket if the computer would be left unused for a certain time to achieve zero energy consumption.
Basic Operations
If you are a beginner to this tablet PC, please read the following instructions to assure your own safety, and make yourself comfortable during the operations.
Safety and Comfort Tips
This tablet PC is a portable platform that allows you to work anywhere. However, choosing a good workspace is important if you are going to use your tablet PC for a long period of time.
- Your work area should have enough illumination.
- Choose the proper desk and chair and adjust their height to fit your posture when operating.
- Avoid using this tablet PC in the space where may cause you discomfort.
- Since this is an electrical device, please treat it with great care to avoid personal injury.
- The tablet PC should be operate under maximum ambient temperature of 40°C (104°F)
Having a Good Work Habit
Have a good work habit is important if you are going to use this tablet PC for long periods of time; otherwise, it may cause discomfort or injury to you. Please keep the following tips in mind when operating.
- Change your posture frequently.
♦ Stretch and exercise you body regularly.
◆ Remember to take a break after working for a period of time.
Amusing Features
Writing Notes

Listening Music
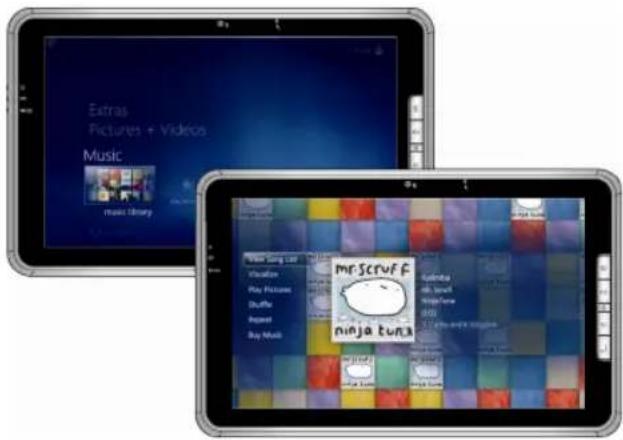
Surfing on the Web

Viewing Pictures

natural_image
Two tablet devices displaying a collage of photos and yellow tulips against a blue sky background (no visible text or symbols)Sending and Receiving Mails
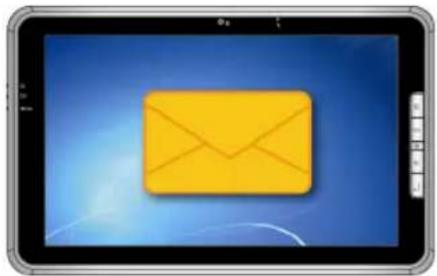
natural_image
Illustration of a yellow envelope icon on a blue background, displayed on a tablet device (no text or symbols)Watching Video

Rotating the Display
This tablet PC is equipped with G sensor module which gives users an enjoyable experience in viewing web pages, documents, pictures, videos, etc., either in portrait or landscape at they own will at anytime and anyplace. Whenever the display is rotated, the screen will be rotated and expanded to fit the display automatically.
This function can be disabled, if preferred, by long pressing the Webcam quick launch button for 3 seconds.

Using the Quick Launch Buttons
This tablet PC provides several Quick Launch Buttons. Use the quick launch buttons to activate the specific applications or tools.

Power

Wireless LAN / 3G
(Optional)
- Press the Power button to turn this tablet PC ON and OFF.
- Press this button to turn the Wireless LAN or 3G function on or off recurrently.
- Read the icon on behalf of the Wireless LAN or 3G function appearing on the display to learn the function status.

Bluetooth
- Press this button to turn the Bluetooth function on or off recurrently.
-
Read the icon on behalf of the Bluetooth function appearing on the display to learn the function status.
-
Press this button to turn the Webcam function on. Press again to turn it off.
- Long press this button for 3 seconds to enable or disable the G-sensor. With this function enabled, whenever the display is rotated, the screen will be rotated and expanded to fit the display automatically.

Webcam
| Read the icon on behalf of the Webcam Status appearing on the display to learn the function status. | |
| Volume Up | Press the Volume Up or Volume Down button to decrease or increase the sound volume. |
| Volume Down | Read the icon on behalf of the Sound Level Status appearing on the display to learn the function status. |
| Mute | Press the Mute button to disable the sound volume. Press again to restore the sound volume to the previous sound level. Press and hold the Mute button for 3 seconds to bring up the tag of Windows Security. In this tag, users can lock the device for security concern, if necessary. Read the icon on behalf of the Mute Status appearing on the display to learn the function status. |
| OK | This button works the same as the Enter button on the keyboard. |
Using 3G Function (Optionally Supported)
To use the optional 3G function, follow the steps below:
-
Make sure the tablet PC is powered off, and the AC power is disconnected.
-
Locate the SIM card slot and insert the 3G SIM card carefully.
-
Power on the tablet PC, and turn on the 3G function by pressing the

button.
- Please read the icon on behalf of the 3G function appearing on the display to make sure whether this function is turned on or off.

Connecting the External Devices
The I/O (input/output) ports on the tablet PC allow users to connect peripheral devices. All devices listed here are for reference only.
Connecting the Communication Devices
Using Wireless LAN Connection
This tablet PC is equipped with wireless LAN module which allows users to perform fast data transmission with the standard IEEE 802.11 for wireless LAN. This gives users the mobility to move around within a broad coverage area and still be connected to the network.
By using the 64-bit/128-bit Wired Equivalent Privacy (WEP) encryption technology and Wi-Fi Protected Access feature, the optional built-in wireless LAN is capable to achieve a more efficient and a more secure solution to the wireless communication.
Using Bluetooth Connection
This tablet PC is equipped with Bluetooth module which allows users to connect various Bluetooth-enabled devices to the notebook. Bluetooth provides a way to connect and exchange information between devices such as mobile phones, personal computers, printers, GPS receivers, PDAs, digital cameras, and video game consoles through a secure, globally unlicensed Industrial, Scientific and Medical (ISM) 2.4 GHz short-range radio frequency bandwidth.
For more instructions or detailed steps on using the Wireless LAN and Bluetooth functions, please ask your MIS staff or network manager for help.

flowchart
graph TD
    subgraph WLAN
        A["Access Point"] --> B["Modem"]
        B --> C["Router"]
        D["Laptop"] --> E["Internet"]
    end
    subgraph BlueTooth
        F["BlueTooth Device"] --> G["Mobile Phone"]
        H["Desktop Computer"] --> I["Computer"]
        J["Desktop Tablet"] --> K["Desktop Tablet"]
    end
    style WLAN fill:#f9f,stroke:#333
    style BlueTooth fill:#bbf,stroke:#333
Connecting the Peripheral Devices
Connecting the USB devices
This tablet PC provides USB ports for connecting various USB devices, such as mouse, keyboard, digital camera, webcam, printer, and external optical storage device, etc.. To connect these devices, install the drivers for each device first if necessary, and then connect the device to the tablet PC. This tablet PC is capable to auto detect the USB devices installed, and if there is no detection of the devices, please manually enable the USB devices by going to Start Menu / Control Panel / Add Hardware to add the new device.
natural_image
Illustration of a desktop computer setup with monitor, keyboard, printer, and mouse (no text or symbols)Connecting the External Display Devices to HDMI port
HDMI (High Definition Multimedia Interface) is a new interface standard for PCs, displays and consumer electronics devices that supports standard, enhanced and high-definition video, plus multi-channel digital audio on a single cable.
natural_image
Illustration of a desktop computer with a monitor and tablet, showing a close-up of the screen (no text or symbols present)Once the display is connected to the tablet PC, power on the tablet PC and the external display should respond by default..


- Introductions
- Getting Started
- Regulations Information
- FCC-B Radio Frequency Interference Statement
- NOTE
- FCC Conditions
- CE Conformity
- Safety Instructions
- Green Product Features
- Environmental Policy
- 廢電池請回收
- Safety Guideline for Using Lithium Battery
- Manual Map
- Unpacking
- Specification
- Physical Characteristic
- CPU
- Core Chips
- Memory
- Storage (Items listed here may vary depending on the model users purchased)
- Power
- I/O Port
- Audio
- Video (optional)
- Display
- WebCam
- Software & BIOS
- Others
- Product Overview
- Power Button
- WLAN or 3G Function Button (Optionally Supported)
- Bluetooth Function Button (Optionally Supported)
- Stereo Speakers
- Internal Microphone
- Front Webcam/ Rear Webcam
- Status LEDs
- Power LED
- Battery Status
- Bluetooth/ Wireless LAN / 3G (Optionally Supported)
- Headphone Connector
- Mini HDMI Connector
- Card Reader
- Docking Station Connecting Port
- SIM Card Slot (Optionally Supported)
- Multi Touch Display
- Quick Launch Buttons
- USB Port
- Power Connector
- CHAPTER 3
- Power Management
- Battery Power
- Conserving Battery Power
- Charging the Battery Pack
- AC power
- Connecting the AC Power
- Disconnecting the AC Power
- Power On the Tablet PC
- Power Management in Windows OS
- 1
- 2
- 3
- 4
- Energy Saving Tips
- Basic Operations
- Safety and Comfort Tips
- Having a Good Work Habit
- Amusing Features
- Rotating the Display
- Using the Quick Launch Buttons
- Using 3G Function (Optionally Supported)
- Connecting the External Devices
- Connecting the Communication Devices
- Using Wireless LAN Connection
- Using Bluetooth Connection
- Connecting the Peripheral Devices
- Connecting the USB devices
- Connecting the External Display Devices to HDMI port
Brand : MSI
Model : WindPad 100W
Category : Tablet