
NVR-4900 6K1000 - Washing machine NEVIR - Free user manual and instructions
Find the device manual for free NVR-4900 6K1000 NEVIR in PDF.


| Product Type | Freestanding Washing Machine |
| Brand | Nevir |
| Model | NVR-4900 6K1000 |
| Capacity | 6 kg |
| Maximum Spin Speed | 1000 rpm |
| Dimensions (H x W x D) | 85 x 60 x 55 cm |
| Weight | Approx. 65 kg |
| Energy Rating | Class A+ (typical) |
| Power Supply | 220-240 V, 50 Hz |
| Water Connection | Cold water only, 3/4" threaded hose |
| Programs | Cotton, Synthetics, Delicates, Quick Wash, Wool, Rinse & Spin, Drain |
| Key Functions | Delay start, temperature selection, spin speed adjustment, child lock |
| Display | LED or LCD (typical) |
| Door Type | Front-loading, tempered glass |
| Drum Material | Stainless steel |
| Noise Level (Wash/Spin) | ~58 dB / ~75 dB |
| Maintenance | Clean detergent drawer and filter monthly; run drum clean cycle |
| Safety Features | Overflow protection, unbalanced load detection, child lock |
| Spare Parts Availability | Common parts (door seal, pump, belt) available online |
| Manual Languages | English, Spanish, and others via email translation |
Frequently Asked Questions - NVR-4900 6K1000 NEVIR
User questions about NVR-4900 6K1000 NEVIR
0 question about this device. Answer the ones you know or ask your own.
Ask a new question about this device
Download the instructions for your Washing machine in PDF format for free! Find your manual NVR-4900 6K1000 - NEVIR and take your electronic device back in hand. On this page are published all the documents necessary for the use of your device. NVR-4900 6K1000 by NEVIR.
USER MANUAL NVR-4900 6K1000 NEVIR
natural_image
White NEVIR washing machine with control panel and front panel (no visible text or symbols on the device body)natural_image
Illustration of a person pointing upward with one finger (no text or symbols)natural_image
Illustration of a person standing beside a large washing machine (no text or symbols visible)natural_image
Hand-drawn illustration of a washing machine with sun and smoke, no text or symbols presentnatural_image
Illustration of a child washing clothes next to a washing machine with a hand emitting sound waves (no text or symbols)natural_image
Line drawing of a cardboard box next to a washing machine (no text or symbols)Accesorios
natural_image
Line drawing of a washing machine with handlebars and internal components (no text or symbols)natural_image
Simple line drawing of a pipe fitting with a valve (no text or symbols)
natural_image
Diagram of a hand holding a hose and belt, with no visible text or symbols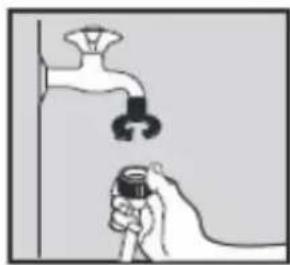
natural_image
Illustration of a faucet above a person holding a bucket, both showing water flow (no text or symbols)natural_image
Line drawing of a person wearing a long-sleeve shirt and striped skirt, labeled 'Diagram 3' (no text or symbols on the figure itself)natural_image
Diagram of a door with internal components and a cross symbol, no text or labels presentnatural_image
Illustration of hands inserting a device into a drawer (no text or symbols visible)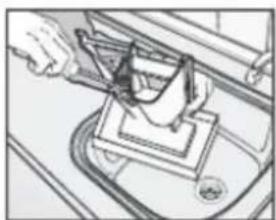
natural_image
Close-up of a hand using a tool to adjust or install a component on a mechanical base (no visible text or symbols)natural_image
Simple line drawing of a mechanical component with a downward arrow indicating force or direction (no text or symbols)natural_image
Illustration of a hand washing a bowl with a small object above (no text or symbols)natural_image
Illustration of two hands holding a small mechanical component (no text or symbols visible)Safety notices....20
Parts and features....22
Installation....24
The functions of the control panel....26
How to use washer....28
Cleanness and Maintenance....31
Troubleshooting guide....33
Technical parameters....34
WARNING
Read and understand thoroughly these safety instructions before use. The items indicated here are very important safety precautions, which must be followed. We cannot be held liable for damage caused by non-compliance with the warning and safety instructions or resulting from incorrect use or operation.
This appliance can be used by children aged from 8 years and above and persons with reduced physical, sensory or mental capabilities or lack of experience and knowledge if they have been given supervision or instruction concerning used of the appliance in a safe way and understand the hazards involved. Children shall not play with the appliance. Cleaning and user maintenance shall not be made by children without supervision.
natural_image
Illustration of a person pointing upward with one finger (no text or symbols)Technical safety
- Before setting up the washing machine, check it for any externally visible damage. Do not install or use a damaged washing machine. Before connecting the washing machine, ensure that the connection data on the data plate (voltage and current) match the electricity supply. If in any doubt, consult a qualified electrician.
- The electrical safety of this washing machine can only be guaranteed when continuity is complete between it and an effective earthing system which complies with current local and national safety regulations. It is most important that this basic safety requirement is present and regularly tested, and where there is any doubt the
- Household wiring system should be inspected by a qualified electrician.
- The manufacturer cannot be held liable for the consequences of an inadequate earthing system. Do not connect the washing machine to the mains electricity supply by an extension lead. Extension leads do not guarantee the required safety of the appliance.
- Unauthorized repairs could result in unforeseen dangers for the user, for which manufacturer cannot accept liability. Repairs should only be undertaken by an approved service technician. Ensure current is not supplied to the machine until after maintenance or repair work has been carried out.
- If the connection cable is damaged or broken it must only be replaced by an approved service technician to protect the user from danger.
- Faulty components must only be replaced by genuine manufacturer original spare parts. Only when these parts are fitted can the safety standards of the machine be guaranteed.

natural_image
Illustration of a person pushing a large washing machine with a sad face (no text or symbols)NOTE: THIS WASHING MACHINE MOST BE EARTHED
Correct use
- To avoid the risk of personal injury or damage to the washing machine, do not install it in place where it is damp and where it suffers from rainfall.
- Do not install the washing machine in place where it suffers from the sun directly, in which plastic or components will be damaged. It will be shortened the life of your washing machine. Do not install the washing machine in place where temperatures below freezing may occur. Frozen hoses may burst or split. The reliability of the electronic control unit may be impaired at temperatures below freezing point.
- Do not shoot the washing machine with water when you clean it. Keep the washing machine away from fire or heat sources.
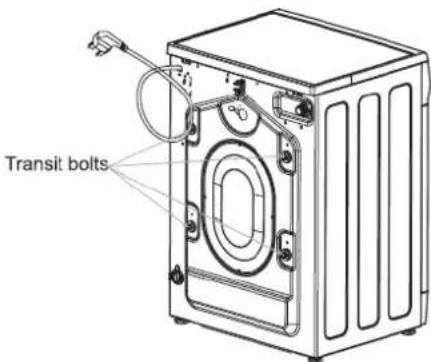
- Before using the washing machine for the first time, check that the transit bolts at the rear of the machine have been removed. During spinning, transit bolts which is still in place may result in damage to both the machine and adjacent furniture or appliances.
- Turn off the tap if the machine is to be left for any length of time (e.g. holiday), especially if there is no floor drain (gully) in the immediate vicinity.
- Take care to ensure that foreign objects (e.g. nails, pins, coins, paper clips) do not find their way into the machine with the laundry. These may damage components of the machine (e.g. drum), which in turn can result in damage to the laundry.
- Do not wash water-repellent things (e.g. raincoats) with washing machine.
- Only remove laundry from the washing machine once the drum has stopped turning. Reaching into a moving drum is extremely dangerous and could result in injury.

natural_image
Simple line drawing of a washing machine with a sun and smoke, no text or symbols presentSafety with children
- Keep children away from the washing machine at all times. To avoid the risk of injury do not allow children to play on or near it or to play with its controls. Supervise children whilst you are using it.
- Older children may only use the washing machine if its operation has been clearly explained to them and they are able to use it safely, recognising the dangers of misuse.
- For machines with a 'porthole' door, remember that the porthole glass will be hot when washing at very high temperatures. Do not let children touch it.

natural_image
Illustration of a child washing clothes next to a large washing machine with a hand gesturing nearby (no text or symbols)Parts and Safety

NOTE: Unscrew the drain pump filter to let water run out when the machine is no used for a long time

NOTE: The drawing of machine in the manual is only used for instruction. It may vary from the model you buy
Backout packing
- Remove all the packing (including the foam base) or the vibration and noise may occur.
- Dispose all the wrappage safely and keep them out of the reach of children. Danger of suffocation!
- It is normal that water drops appear on the packing plastic bag and the door glass, which are resulted from the water left in the tub for checking out.

natural_image
Line drawing of an open box next to a washing machine (no text or symbols)Accessories
Make sure that you have received all the items shown below.
| Accessories | Name | Qty. | Accessories | Name | Qty. |
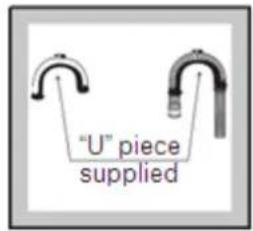
 | Inlet hose | 1 |  | “U” piece | 1 |
 | Transit bolts caps | 4 |  | Manual | 1 |
Removing transit bolts
- Remove all the transit bolts at the back of the machine with tools.
- Plug the holes with the transit bolts caps supplied.
NOTE: Strong vibration, noise or failures may occur if the transit bolts are not removed.
- Keep the transit bolts for future transportation. Whenever the machine is transported, the transit bolts most be refittet.
Installation
Installation place requirement
- A concrete floor is the most suitable installation surface for a washing machine, being far less prone to vibration during the spin cycle than wooden floorboards or a carpeted surface.
- The machine must be level and securely positioned. The distance between the machine and wall must be more than 10 cm.
- To avoid vibrations during spinning, the machine should not be installed on soft floor coverings.

Level adjustment
The machine must stand perfectly level on all four feet to ensure safe and proper operation. Incorrect installation may increase electricity and water consumption and may cause the machine to move about.
To do these when the machine is not level: Using t
- The spanner turn locknut in a clockwise direction. Then turn locknuts together with adjust feet to unscrew.
- Use a spirit level to check the machine is standing level.
- Hold adjusts feet securely with a pipe wrench. Turn locknut again using the spanner until it sits firmly up against the housing.

NOTE: Vibration and noise may occur if the locknuts do not sit firmly up against the houses
Drain hose connection
- Direct into a sink. If the outlet spigot has not been used before, removing any blanking plug that may be in place. Push the drain hose onto the spigot and secure with a clip if required, ensure a loop is formed in the drain hose to prevent waste from the sink entering the washing machine. If required, the drain hose can be extended to a length of 4m.

natural_image
Simple line drawing of a pipe fitting with a handle and outlet (no text or symbols)
- Connected securely to a standpipe.
Firstly form a hook in the end of the drain hose using the "U" piece supplied.
Place the drain hose into your standpipe, which should have an internal diameter of approximately
38mm thus ensuring there is an air break between the drain hose and standpipe.
When discharging into a standpipe ensure that the top of the standpipe is no more than 90cm and no less than 60cm above floor level.
Water inlet connection

natural_image
Diagram of a washing machine connected to a pipe with a 30cm height measurement (no text or symbols present)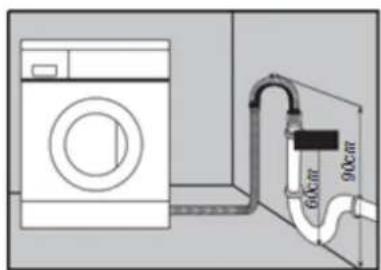
Connect the inlet hose supplied with the machine to a tap with a 3/4" thread. Do not use previously employed hoses.
Installation should comply with local water authority and building regulations' requirements.

natural_image
Diagram of a pipe fitting with a valve, showing mechanical components without any text or symbols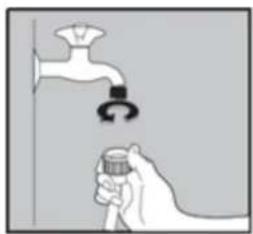
natural_image
Illustration of a hand holding a pipe with a faucet above it, no text or symbols present
The functions of the control panel
The control panel

1. Knob
Turn this knob clockwise or anticlockwise to select a required wash program. The available programs are Synthetic, Wool, Delicate, Sterilization, Cotton, Standard, Quick, Wash and Spin. Once the "Start/Pause" button is pressed and the machine is running the program cannot be changed. The details of programs are on page 8.
2. Temp
Press this button and select a required wash temperature. The details are on page 8. When all the lights of temperature are off the wash temperature is "Cold"
3. Start/Pause
Press this button to start or pause the machine. The LED of "Start/Pause" flickers when the machine is in standby mode or pauses, and it is lighted when running.
4. Power
Press this button to switch the machine on or off.
Important
Be sure to switch the machine off at the end of a wash cycle.
Note:
“”is for Standard Cotton program.
Standard cotton at 60^ C and 40^ C are suitable to clean normally soiled cotton laundry and they are the more efficient program in terms of combined energy and water consumptions for washing that type of cotton laundry; in addition, the actual water temperature may differ from the declared cycle temperature.
The content of programs
| Program | Time(min) | Temp.(°C) | Rinse times | Spin speed (rpm) | MAX. Load (kg) |
| Cotton | 85 | Cold/20/40/60 | 2 | 1000 | 6 |
| 108 | Cold/20/40/60 | 2 | 1000 | 6 | |
| Quick Wash | 16 | Cold/20/40 | 1 | 1000 | 1.5 |
| Spin | 13 | -- | 0 | 1000 | 6 |
| Sterilization | 138 | 90 | 2 | 1000 | 3.5 |
| Delicate | 50 | Cold/20/40 | 2 | 400 | 2 |
| Wool | 58 | Cold/20/40 | 2 | 600 | 1.5 |
| Synthetic | 59 | Cold/20/40/60 | 2 | 800 | 3.5 |
Note: The running time above is for the default programa, which is only for reference, and it may different because of different laundries, weights and washing temperatura. The default options of the programa are in boldface.
How to use washer
Before washing clothes for the first time, you must run a complete cycle without clothes. To do these:
- Connect the power and turn on the tap.
- Press the "Power" button, then turn the knob to position "Cotton".
- Press "start/ pause".
It can remove the water which is left in the tub because of manufacturer's checking out.
Washing preparation
- Connect the inlet hoses well and tum on the tap.
- After making sure the power socket is grounded reliably, insert the power plug into the power socket.
- Place the drain hose well.
Preparation of clothes
- Sort the laudry by colour and by care label. Most garments have a textile care label in the collar or side seam.
- Make sure all the pockets are empty, foreign objets (e.g. nails, coins, paper clips, etc.) can cause damage to garments and components in the machine.
- Close and zips, fasten hooks and eyes etc before washing.
- Dark textiles often contain excess dye and should be whashed separately several times before being included in a mixed load. Always wash whites and coloureds separately.
- Badly soiled areas, stains, etc. should be pre-treated with liquid detergent, stain removers, etc.
- Turn the clothes which pill easily and is with woolen surface before putting them into the machine.

Put clothes into the washer
Unfold the laundry and load loosely in the drum. Mixing both large and small items gives better wash results and also helps distribute the load avantly during spinning. The most efficient use of energy and water is achieved when a fullload is washed. Howavar, do not overload as this causes creases and reduces cleaning efficiency.
NOTE: Make sure that no garments are caught between the door and the seal.

natural_image
Diagram of a washing machine with a central vent and cross mark (no text or symbols)Using the detergent drawer
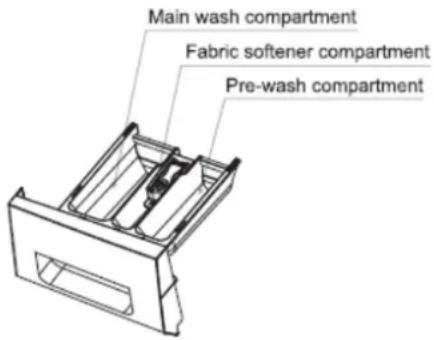
- Open the drawer and add adequate detergent into main wash compartment market “” or “II”.
- Add the fabric softener into compartment marked “☑” or “✗”. Do not exceed the maximum level mark.
- Add the detergent into the pre-wash compartment marked "U" or "I" according to the programme you select.
- Close the drawer.
The right amount to dispenser will depend on the following:
• The quantity of laundry
• The soiling level of the laundry
- Lightly soiled. No visible dirt or stains. Possibly slight body odour.
- Normally soiled. Visible dirty and/or just a few slight stains.
- Heavily soiled. Visible dirt and stains and/or dried on soiling.
• The water harness level.
When the washing cycle is finnished, the machine will change into a standby mode. And the power will be off after 10 minutes without any control on the control panel
Washing steps
- Turn on the power tab, and connect the power.
- Open the door and put the cloth into the drum one by one.
- Close the door, and put a suitable amount of detergent and fabric softener into the dispenser, then close the drawer.
- Press the "Power" button, and choose a programme you need by turning the knob.
- Press the "Temp." button and select a wash temperature.
- Press Start/Pause" button to start the washing machine.
- When the cycle is finnished, there's a warning tone sound.
When washing cycle is finnished, the machine will change into a standby mode. And the power will be off after ten minutes without any control on the control panel.
Washing programme chart
| Programme | Washing symbol | Fabric |
| Cotton | Cottons, linens or cotton mix fabrics, e.g. table linen, towelling, underwear, T-shirts etc. | |
| Quick Wash | Small loads of items which require freshening up and which can be washed in a Cotton programme. | |
| Spin | Separate spin for cotton and linen items | |
| Standard Cotton | Cottons, linens or cotton mix fabrics, e.g. table linen, towelling, underwear, T-shirts etc. | |
| Synthetic | Synthetic or mixed fabrics, underwear, coloured garments, non-shrink shirts. | |
| Wool | Machine-washable or hand-washable wool or wool blend fabrics. If the care label does not specify a temperature, wash using the cold setting. Also suitable for hand-washable silks. Reduce the spin speed. | |
| Delicate | For delicate garments made of synthetic fibres, mixed fibres, rayon and easy care cottons. Also suitable for machine-washable silks. |

The machine is fitted with a balance control device, which ensures the machine is stable during the spin. To protect the machine, it will cut in if the laundry is not evenly distributed in the drum. The laundry is redistributed by reverse rotation of the drum. This may happen several times before the unbalance disappears and normal spinning can resume. If, after 15 minutes, the laundry is still not evenly distributed in the drum, the machine will not spin. In this case, redistributed the load manually and reselect the spin programme.
Door lock
- When the machine is started, the door lock is locked though you press the "Start/Pause" button. Press the "power" button to switch off the machine and the door lock is unlocked in two minutes.
- When the temperature inside the drum is above 53^ , the door lock is locked.
- When the water is above a certain level, the door lock is locked.
- When the washing cycle is finnished, the door lock is unlocked after two minutes.
Important:
Do not try to open the door when the washing cycle is not finished or power supply is cut off during the washing cycle, because the temperature may be high and you may be scalded.
Cleanness and maintenance

Disconnect the machine from the mains electricity supply and withdraw the plug from the socket before ing the machine.

The washing machine most be hosed down.
Cleaning the exterior
Clean the exterior with a mild non-abrasive cleaning agent or soap and water using a well wrung-out cloth. Wipe down with a soft cloth.

Do not use solvents, abrasive cleaners, glass cleaners or all purpose cleaning agents. These t damage plastic surfaces and other components because of the chemicals they contain.

The washing drum
Clean the drum every 3 months by using the "Sterilization" program.

Cleaning the drawer
Remove detergent residues regularly. Clear the drawer following these:
- Pull out the drawer until a resistance is felt. Press down the release catch and at the same time pull the drawer right out of the machine.
- Remove the siphon from compartment and clean it.
- Clean the dispenser using a brush and warm water.

natural_image
Line drawing of hands using a tool to adjust or install a tray (no text or symbols)
natural_image
Line drawing of a hand using a tool to adjust or install a mechanical component (no text or symbols visible)
Cleaning the drawer housing
Use a bottle brush to remove detergent residues inside the drawer housing.

Cleaning the water inlet filter
Use pointed nose pliers to withdraw the plastic filter. Clean, put back and secure. These filter should be checked every 6 months or so, or more often if there are frequent interruptions to the water supply.

natural_image
Illustration of a hand using a tool to adjust or install a component, no text or symbols visible
natural_image
Technical line drawing of a mechanical component with two threaded fasteners inserted (no text or symbols)The filter must be put back in place after cleaning.
Cleaning the drain pump filter

natural_image
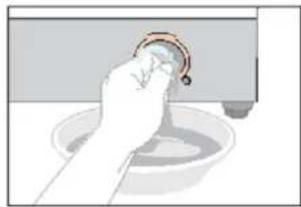
Simple line drawing of a mechanical component with an arrow indicating direction (no text or symbols)- Disconnect the machine from the main electricity supply and open the lower cover with a screwdriver.
natural_image
Hand washing a basin with a circular knob (no text or symbols visible)- Place a container under the pump. Unscrew and remove the filter.

natural_image
Illustration of two hands holding a small object with a tool, no text or symbols visible- Clean the filler carefully.

The filter should be cleaned every 2 months or when there is fault that the "Rinse" and "Spin" LED flicker.
Important:
If the machine is exposed to temperatures below 0^ , certain precautions should be taken.
- Turn off the water tap.
- Unscrew the inlet hose.
- Unhook the drain hose from the rear support and position the end of this hose and that of the inlet hose in a bowl. Run the spin program.
- Disconnect the appliance.
- Screw the inlet hose and reposition the drain hose.
- When you intend to start the machine up again, make aura that the room temperature la above 0°
Troubleshooting guide
| Problem | Error Code | Possible Cause | Solutions |
| The machine fills overtime. | "Spin" LED flickers. | 1. The water tap is not open.2. The drain hose is put down.3. The water inlet valve is damaged. | 1. Open the water tap.2. hook up the hose.3. Change the water inlet valve. |
| There is a Door lock alarm. | "Rinse" LED flickers. | 1. The door is not locked well.2. garment is caught between the door and the seal.3. The door lock is damaged. | 1. Lock the door well.2. Put the garment into the drum.3. Change the door lock. |
| The machine drains overtime. | "Rinse" and "Spin" LEDs flicker. | 1. The drain hose is squashed or kinked.2. The drain pump filter is block.3. The drainage system pipes are blocked. | 1. Check the drain hose.2. Clean the filter.3. Check the drainage system and clean it. |
| Water overflows the machine./ Water sensor works abnormal. | "Washing" LED flickers. | 1. The water inlet valve is damaged.2. The connection between the water sensor and wire is not secure.3. The water sensor is damaged. | 1. Change the water inlet.2. Check the connection and ensure it is secure.3. Change the water sensor. |
| The motor does not work. | "Washing" and "Spin" LEDs flicker. | 1. The connection between the motor and wire is not secure.2. The motor is protected because of over-heat.3. The motor is damaged. | 1. Check the connection and ensure it is secure.2. Check if the machine is overloaded Switch off the machine, and retry when the motor becomes cool.3. Change the motor. |
| There is a heating tube fault. | "Washing" and "Rinse" LEDs flicker. | 1. The connection between the heating tube and wire is not secure.2. The heating tube is damaged. | 1. Check the connection and ensure it is secure.2. Change the heating tube. |
| There is a temperature sensor fault. | "Washing", "Rinse" and "Spin" LEDs flicker. | 1. The connection between the temperature sensor and wire is not secure.2. The temperature sensor is damaged. | 1. Check the connection and ensure it is secure.2. Change the temperature sensor. |
Technical parameters
| Model Parameter | |
| Power | 220V-240V~, 50Hz |
| Washing / spin capacity | 6.0kg |
| Rated power | 2100W |
| Water pressure | 0.02–0.8MPa |
| Power of off-mode | 0.42W |
| Power of left-on mode | 0.42W |
| Program time (min) | 189 |
| Remaining moisture content | Class C |
| Average Energy consumption | 0.796kWh |
| Average Water consumption | 43L |
| Net weight / gross weight | 64kg/68kg |
| Outer dimension (W x D x H) mm | 595X530X845 |
Note:
Data can vary from the nominal values given depending on water pressure, water hardness, water inlet temperature, room temperature, type and volume of load, fluctuations in the electricity supply and any extra options selected.
Symbol explanation
| V | Volt | ~ | Alternating current |
| W | Watt | Hz | Hertz |
 | Safe test |  | CE symbol |
Correct Disposal of this product

This marking indicates that this product should not be disposed with other house hold wastes throughout the EU. To prevent possible harm to the environment or human health from uncontrolled waste disposal, recycle it responsibly to promote the sustainable reuse of material resources. To return your used device, please use the return and collection systems or contact the retailer where the product was purchased. They can take this product for environmental safe recycling.
Electric Diagram

flowchart
graph TD
    A["Pressure switch"] --> B["Heater"]
    B --> C["Wash NTC"]
    C --> D["Pump"]
    D --> E["Motor"]
    E --> F["Tacho M4"]
    F --> G["M10"]
    G --> H["M9"]
    H --> I["M8"]
    I --> J["M7"]
    J --> K["S6"]
    K --> L["TY501"]
    L --> M["Optioni"]
    M --> N["K1"]
    N --> O["K3"]
    O --> P["K2"]
    P --> Q["S7"]
    Q --> R["I/O"]
    R --> S["TY2"]
    S --> T["I/O"]
    T --> U["I/O"]
    U --> V["MCU"]
    V --> W["UI"]
    W --> X["S4"]
    X --> Y["CLK"]
    X --> Z["DATA"]
    X --> AA["GND"]
    X --> AB["+5V"]
    X --> AC["CS"]
    W --> AD["S2"]
    AD --> AE["Option"]
    AE --> AF["Hot valve"]
    AE --> AG["Pre valve"]
    AE --> AH["Main valve"]
    AD --> AI["S3-3"]
    AI --> AJ["N"]
    AI --> AK["L"]
    AI --> AL["S5"]
    AL --> AM["L"]
    AL --> AN["S3-2"]
    AN --> AO["L''"]
    AO --> AP["S3-1"]
    AP --> AQ["K4"]
    AQ --> AR["L''"]
    AR --> AS["S8"]
    AS --> AT["I/O"]
    AT --> AU["I/O"]
    AU --> AV["TY2"]
    AV --> AW["I/O"]
    AW --> AX["I/O"]
    AX --> AY["S3-4"]
- Accesorios
- WARNING
- Technical safety
- Correct use
- Safety with children
- Parts and Safety
- Backout packing
- Accessories
- Removing transit bolts
- Installation
- Installation place requirement
- Level adjustment
- Drain hose connection
- Water inlet connection
- The functions of the control panel
- The control panel
- Knob
- Temp
- Start/Pause
- Power
- Note:
- How to use washer
- Washing preparation
- Preparation of clothes
- Put clothes into the washer
- Using the detergent drawer
- Washing steps
- Washing programme chart
- Door lock
- Important:
- Cleanness and maintenance
- Cleaning the exterior
- Cleaning the drawer housing
- Cleaning the water inlet filter
- Cleaning the drain pump filter
- Technical parameters
- Symbol explanation
Brand : NEVIR
Model : NVR-4900 6K1000
Category : Washing machine