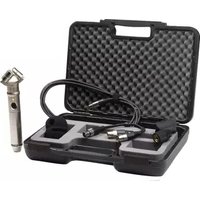
NT4 - Microphone RODE - Free user manual and instructions
Find the device manual for free NT4 RODE in PDF.


| Product Type | Stereo Condenser Microphone |
| Brand | Rode |
| Model | NT4 |
| Polar Pattern | Cardioid (each capsule) |
| Frequency Range | 20Hz - 20kHz |
| Maximum SPL | 143dB SPL |
| Output Impedance | 200Ω |
| Signal-to-Noise Ratio | 80dB |
| Power Source | 2x AA batteries or 48V phantom power |
| Battery Life | Up to 40 hours (alkaline) |
| Dimensions | 250mm length, 20mm diameter |
| Weight | Approx. 345g (12.2oz) |
| Output Connector | 3.5mm TRS stereo jack |
| Included Accessories | Stereo bar, windshields, batteries, pouch |
| Maintenance | Clean with a dry, lint-free cloth; avoid moisture |
| Safety Warnings | Do not disassemble; avoid dropping; keep away from liquids |
| Spare Parts Availability | Contact Rode or authorized dealers |
| Repairability | Professional repair recommended |
| General Information | Designed for field recording, interviews, and live performances |
Frequently Asked Questions - NT4 RODE
User questions about NT4 RODE
0 question about this device. Answer the ones you know or ask your own.
Ask a new question about this device
Download the instructions for your Microphone in PDF format for free! Find your manual NT4 - RODE and take your electronic device back in hand. On this page are published all the documents necessary for the use of your device. NT4 by RODE.
USER MANUAL NT4 RODE
natural_image
Exterior view of a metallic cylindrical device with dual lens and control knobs (no text or symbols visible)www.rodemic.com
Introduction
Thank you for investing in the NT4 stereo condenser microphone.
The NT4 solves the age-old problem of stereo recording by eliminating the need to purchase matched pairs and the associated complex set-up bars and adaptors to get professional results. With a fixed 90 Degree X/Y configuration and perfectly matched stereo condenser capsules, the NT4 lets you record any source with immaculate stereo detail.
The NT4 has a 128 dB dynamic range, 143 dBA SPL and low self-noise. Offering selectable battery or phantom power operation with power indicator light, the NT4 is ideally suited to both studio and location recording.
Please take the time to visit www.rodemic.com and register your microphone for a full ten year warranty. While there you can view recording tips and techniques, as well as browse the comprehensive range of accessories for RODE microphones.
Peter Freedman
R∅DE Microphones
Sydney, Australia
Specifications
Acoustic Pressure gradient
Principle:
Directional Cardioid (per capsule)
Pattern: (see graph)
Frequency 20 Hz - 20 kHz
Range: (see graph)
Output 200Ω per side
Impedence:
Sensitivity: -38 dB re 1 Volt/Pascal
(12 mV @ 94 dB SPL)
+/- 2 dB @ 1kHz
Equivalent Noise: <16 dB SPL
(A - weighted per IEC651)
Maximum +13.9dBu (@ 1kHz,
Output: 1% THD into 1KΩ load)
Dynamic Range: >128dB
Maximum SPL: 143dB @ 1% THD into 1k
Signal/Noise: 78 dB SPL
(A - weighted per IEC651)
Power P48 (48V) phantom supply
Requirement: or 9V battery
Current P48: 4.50mA (per channel)
Consumption: 9V: 2.50mA
Output 5 Pin XLR
Connection:
Net Weight: 480gm
Specifications
Frequency Response

line
| Frequency | dB re 1 V/Pa | | --------- | ------------ | | 20Hz | -5 | | 100 | -5 | | 1000 | 0 | | 10000 | 5 | | 20000 | 0 |Polar Response
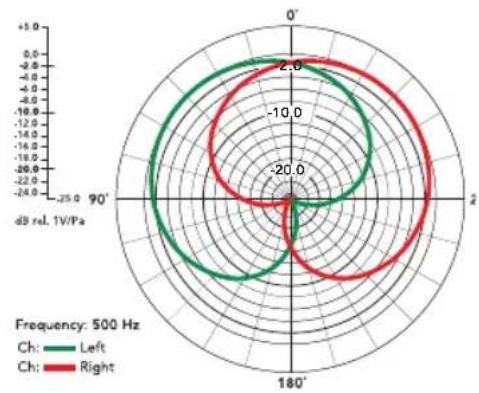
radar
| Angle | Left (dB rel. 1V/Pa) | Right (dB rel. 1V/Pa) | |-------|----------------------|----------------------| | 0° | -2.0 | -1.0 | | 90° | -1.0 | 0.0 | | 180° | -2.0 | -1.0 | | 250° | -1.0 | -2.0 |Features
• Stereo XY condenser microphone
- Dual externally biased 1/2" capsules with gold sputtered diaphragm
- Capsules closely matched with full frequency response
- Dual power operation
- Custom stereo cables included - dual XLR and mini stereo jack
- Custom twin head windshield (WS4) included
• Durable satin-nickel fi nish
• Surface mount circuitry
• 10 year warranty*
*Online product registration required.
Accessories


RM3 Stand mount WS4 Wind shield

RC4 Case

natural_image
Two black cable connectors with metallic connectors, isolated on white background (no text or symbols)NT4-DXLR stereo XLR lead NT4-MJ XLR to 3.5mm stereo cable
Powering the NT4
- The NT4 can be powered by either phantom power (see specifications) or a 9V battery.
- If phantom power is not available on your equipment, you will need to use battery power. To use battery power, a 9 Volt (PP3) battery should be fitted into the cavity within the microphone body ensuring correct polarity (+ to + and - to -).
- To install the battery simply unscrew the lower section of the body and insert the battery into the cavity (terminals fi rst). Secure the battery in place with the fl exible spring clip and reassemble the body, screwing the sections fi rmly together.
Powering the NT4
- The ON/OFF switch turns the microphone ON or OFF when powered by either phantom or battery. When using battery power, the switch should be switched to OFF when the microphone is not in use. If left ON, the battery power will be unnecessarily depleted.
- We recommend that during long periods of non-use, the battery should be removed, as it may leak and that could damage your NT4.
- If a battery is installed but phantom power is available, current will not be drawn from the battery.
- When the NT4 is switched ON, the red battery status LED gives an indication of battery power and should always be carefully observed. When the LED fl ashes (illuminates for about 1 second), the battery power is 'good'. If the LED remains illuminated signifi cantly longer, the battery should be replaced.
- We recommend that you use a high quality alkaline battery. Tests have shown a life expectancy for a high quality alkaline battery used in the NT4 to be in excess of 400 hours. This is roughly the equivalent of 8 hours usage per week for a year.
Connecting the NT4
- The NT4 is supplied with both a dual XLR cable (NT4-DXLR), and a stereo mini-jack cable (NT4-MJ).
- The NT4 may be connected directly to two channels of a mixer using the twin XLR cable (marked L and R) supplied, with each channel panned left and right as required. Connection may also be made direct to a portable recording device to enable fi eld/location operation using the 9V battery supply.
- A stand mount clip (RM3) is included with your NT4, and should be used to connect the NT4 firmly and safely to a stable microphone stand unless operating by hand which should only be used when it is not possible to stand mount the NT4.
- We recommend that all connections made to the mixer or recorder are made with the attenuation (gain) set to OFF.
- When first switching the mixer ON and phantom power is applied to the NT4, or when the microphone battery power is switched ON, several seconds should be allowed for the microphone to stabilise.
Using the NT4
- The NT4 is an easy to use, precision stereo condenser microphone. Choirs, orchestras, drum over-heads, solo or ensemble instruments, and many other situations may all be recorded with the ambience and 'space' that only a true stereo microphone like the NT4 can capture.
- The two capsules used in the NT4 measure 1/2" in diameter and have a cardioid polar pattern. The cardioid patterns pick-up sound from in front of the microphone and reject sound from the rear. This helps with reducing unwanted sound such as reverberation and audience sound from the rear of the capsules.
- It is crucial when stereo recording to have the capsules closely matched, as in the NT4. The polar frequency response of each capsule must be matched because much of the sound in an XY stereo arrangement is picked up off-axis by each capsule. The tone can be varied by rotating the NT4 on its axis, so that the capsules are pointing towards different areas of the sound source. It is recommended that you experiment with subtle position changes to help you achieve your desired results. The matched capsules of the NT4 allow for an accurate response when recording a wide variety of sources in various locations.
- To ensure the lowest noise/distortion, your mixer input gain control should be set so that the Peak Program Indicator (PPI) LED flashes ON during peaks (high levels) of the program source (Voice/Instrument). If there is no PPI, adjust the input gain while listening for distortion of the sound. As distortion is heard, reduce the gain gradually until the sound is undistorted (clean).
- Sound quality is of course subjective and 'your sound' will be achieved by experimenting. We suggest that you begin with EQ set FLAT/OFF (no boost or cut).
- Remember that EQ cannot change the acoustic properties of a room. In a studio recording situation, you should try placing absorbent or reflective panels/material in various positions within the vicinity of the sound source and microphone. The positioning of the microphone also has dramatic effect on the sound quality.
- The best way to assess your recording environment, is to listen to the 'unplugged' sound you wish to record (use your ears). Remember that no amount of EQ can correct a 'bad' sounding instrument, voice or recording environment. Any further desired modification of sound can then be undertaken with the EQ.
Some of the (many) potential applications of the NT4 might be:
- Drums/Percussion: As an XY stereo overhead for the recording of drum kits. Simply positioned at the rear of the kit in the centre behind the drummer and angled down towards the drums, the NT4 produces a 'real' sounding kit. This method is very quick and easy. There is no need to worry

natural_image
Line drawing of a multi-part electric guitar with drum, paddles, and control knobs (no text or labels)about the angles of two individual microphones, or testing to see if they are two of the same model which sound a little different to each other.
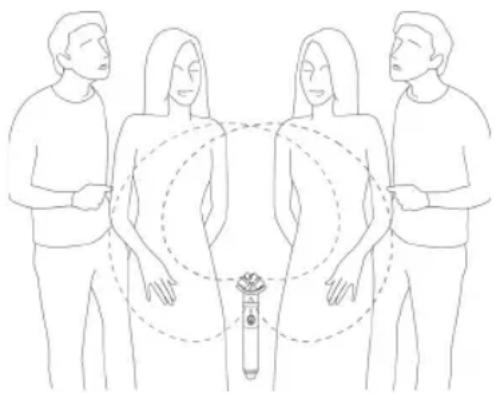
- Choir/Vocal group: Placement can be in front of the vocalists with the microphone pointing towards the middle of the group. The distance between the vocalists and the microphone depends on the acoustics of the environment, level of the vocalists and the sound that you are trying to achieve. More bass frequencies are evident when the microphone and vocalists are closer together.
natural_image
Line drawing of four people standing with a central device, no text or symbols present- Piano: Placed strategically above a grand piano, the NT4 easily and clearly produces the true, stereo image of that instrument.
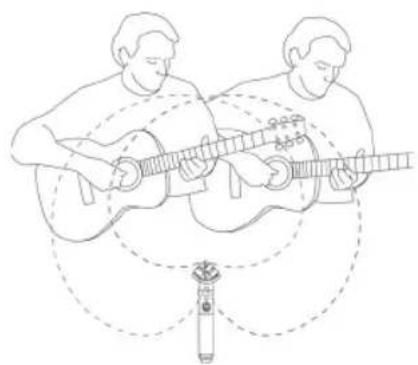
- Guitar: Acoustic guitar performances (duo or ensembles) are captured in true spatial stereo simply by positioning the NT4 centrally between or among them, and finely adjusting the position for the ultimately desired responses. A solo acoustic guitar will also benefit from the ambient sound captured by the NT4. (The closer the microphone is to the instrument, the less ambience and more direct guitar sound. For more room ambience, gradually move the microphone away from the guitar).
Using the NT4
natural_image
Line drawing of two musicians playing acoustic guitars with dotted sound wave lines around them (no text or symbols)- Location recording: When using the NT4 outdoors, care must be taken to avoid excessive handling noise and wind noise. As with all condenser microphones, the NT4 is sensitive to strong gusts of wind and so should be adequately shielded. The supplied wind shield (WS4) is designed for vocal applications and indoors only. The WS4 is typically not effective enough outdoors in high wind conditions – in this instance we recommend the optional R∅DE Dead Kitten furry windshield.
Storage
- Like all condenser microphones, the NT4 should be kept dry and clean at all times.
- The NT4 is a precision transducer and you should be careful not to drop or knock it as this could cause serious damage.
- Be sure to place the moisture-absorbent crystals (supplied) at the head of the microphone(s), so as to absorb any moisture present. Eventually this pack of crystals will need to be dried. This is indicated by the crystals turning pink in colour. They can easily be re-used by placing them in an oven at 100 - 150 degrees celsius for approximately ten minutes. The crystals will operate effectively again once they have turned blue.
Warranty
All RODEphones are warranted for one year from date of purchase. You can extend that to a full ten years if you register online at www.rodemic.com.
The warranty covers parts and labour that may be required to repair the microphone during the warranty period. The warranty excludes defects caused by normal wear and tear, modification, shipping damage, or failure to use the microphone as per the instruction guide.
If you experience any problem, or have any questions regarding your RODE microphone, first contact the dealer who sold it to you. If the microphone requires a factory authorised service, return will be organised by that dealer.
We have an extensive distributor/dealer network, but if you have diffi culty getting the advice or assistance you require, do not hesitate to contact us directly.
R∅DE Microphones
International
PO Box 6685
Silverwater NSW 2128 Australia
Ph: +61 2 9648 5855
Fax: +61 2 9648 2455
USA
P.O. Box 4189
Santa Barbara, CA 93140-4189
Ph: 805 566 7777
Fax: 805 566 0071
Technical Support
For information and technical support questions contact: support@rodemic.com
In the United States and Puerto Rico, contact usasupport@rodemic.com or call 805 566 7777
In Australia, contact ozsupport@rodemic.com or call (02) 9648 5855
Anywhere except Australia, the United States and Puerto Rico, contact support@rodemic.com or call +61 2 9648 5855

Brand : RODE
Model : NT4
Category : Microphone