
Movie Cube F200 - Digital decoder EMTEC - Free user manual and instructions
Find the device manual for free Movie Cube F200 EMTEC in PDF.


| Product Type | Digital Decoder / Media Player |
| Brand | EMTEC |
| Model | Movie Cube F200 |
| Dimensions (approx.) | 120 x 80 x 25 mm |
| Weight (approx.) | 150 g |
| Power Supply | 5V DC, 1A via USB or AC adapter |
| Power Consumption | < 5 W |
| Video Output | HDMI 1.4, composite (AV) |
| Audio Output | HDMI, stereo RCA |
| Storage Support | USB 2.0 host for flash drives and HDDs |
| Supported Video Formats | MPEG-2, MPEG-4, H.264, AVI, MKV, up to 1080p |
| Supported Audio Formats | MP3, AAC, WMA, PCM |
| Supported Image Formats | JPEG, PNG, BMP |
| Remote Control | IR remote included |
| File System Support | FAT32, NTFS |
| Care and Cleaning | Wipe with dry soft cloth; avoid liquids and abrasives |
| Safety Precautions | Keep away from moisture and heat sources; unplug when not in use |
| Spare Parts and Repairability | Remote control and power adapter available; limited user serviceable parts |
| General Information | Designed for playback of digital media from USB devices via TV or monitor |
Frequently Asked Questions - Movie Cube F200 EMTEC
User questions about Movie Cube F200 EMTEC
0 question about this device. Answer the ones you know or ask your own.
Ask a new question about this device
Download the instructions for your Digital decoder in PDF format for free! Find your manual Movie Cube F200 - EMTEC and take your electronic device back in hand. On this page are published all the documents necessary for the use of your device. Movie Cube F200 by EMTEC.
USER MANUAL Movie Cube F200 EMTEC
F200 Set-top-box streamer
Quick Start Guide

TABLE OF CONTENTS
INTRODUCTION....3
The F200 unit 3
Set up for Windows XP, Vista, 7 and <ac .... 3
CONNECT THE F200 TO YOUR SET-TOP-BOX (STB)....3
Connect the F200 to the network....4
Connect the power adapter .... 4
9install and run the F200 player 4
Set Up Wireless Settings 5
Video input configuration 6
Set up the EPG (Electronic Program Guide) 7
Select a set-top-box 7
ASSIGN A NAME AND PASSWORD....8
DOWNLOAD AND INSTALL PLAYERS....10
TROUBLESHOOTING....11
FREQUENTLY ASKED QUESTIONS....11
INTRODUCTION
Congratulations on buying the F200! We will take you through a few simple steps to get you up and running.
The F200 is a sleek and stylish consumer device that connects to your television STB (Set Top Box5, and enables a complete television and 9internet media experience on your Android Smartphone or Tablet, iPhone, iPad, BlackBerry, PC, <ac. F200 allows you to enjoy live home television anytime, anywhere!
THE F200 UNIT

SET UP FOR WINDOWS XP, VISTA, 7 AND MAC
These steps are for setting up your F200 from a Windows XP, Windows 7, Windows Vista PC or Mac.
You will need a Set-Top Box to use the F200. Your STB has output connectors on the back for Component, Composite or both. 9f you have both, use Component for better video quality.
Connect the audio and video cables from the STB "Output" connectors to the F200's video and audio "9nput" connectors as shown. For Component, you will use two cables. For Composite, you will only use one.
Via Component

Via Composite: 3 options
- Composite
• or Composite - Scart
adapter
• or Freebox connector

Write down your STB brand and model number. You will need it later for the Setup.
CONNECT THE F200 TO THE NETWORK
You can use either a wired LAN or Wi-Fi connection to attach the F200 to your home network. But for the first setup process use the wired connection7
Wired LAN connection: connect the F200 to your router using the supplied Ethernet cable.
Wi-Fi connection: configuration will be available later during setup wizard process.
CONNECT THE POWER ADAPTER
Plug the power adapter into the F200 and a wall plug or power strip.
INSTALL AND RUN THE F200 PLAYER
Before installing the Player program, please make sure that your PC is connected to the network where you want to install the F200.
➢ Install the F200 Player from the installation CD. When asked if you want to run the program, click on Execute: the F200 Setup Wizard will execute and lead you through the remaining steps.


When you see this dialog box, click Finish.
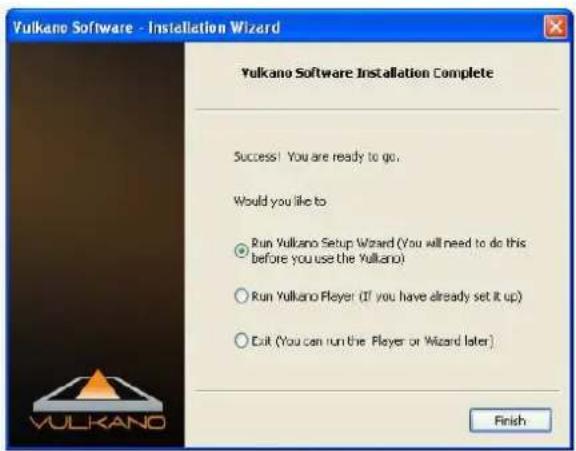
The F200 Setup Wizard will automatically search for the F200 connected to your network.

SET UP WIRELESS SETTINGS
9n the "Set up the wireless settings" window:
- Select the name of your wireless network in the Select your home network field
- Enter the appropriate Network key or password
- Click Next
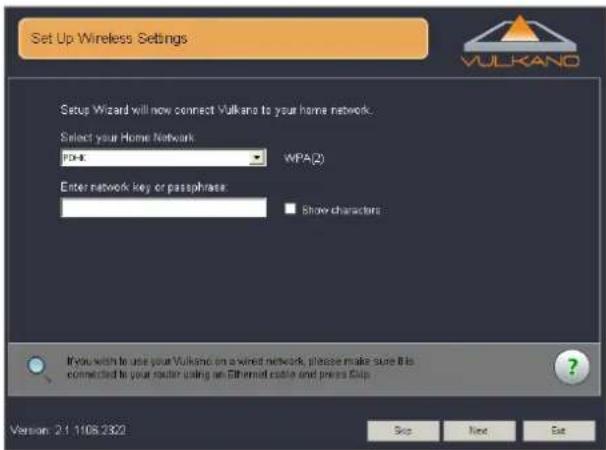
The specified wireless settings will be applied to your F200.
Note: If you wish to use your F200 on a wired network, please make sure it is connected to your router using Ethernet cable and press "Skip"7
Your F200 has been connected to your wireless network, it will no longer be necessary to have your F200 connected directly to your router.
➢ Disconnect the Ethernet cable from your F200.
The Setup wizard will search for the F200 connected to your network.
- Select the appropriate video input configuration that corresponds to how you connected the F200 to your STB:
Via Composite if you used the Red/White/Yellow cable or the Red/White/Yellow to Scart cable or the Red/White/Yellow to Freebox cable
Via Component if you used the Red/Green/Blue & Red/White cable

- Click Next
Note: The EPG is only supported in the United States7 If you are located in another country, click "Skip"7
9n the "Set up EPG" window:
- Enter your Z9P Code
- Click Next
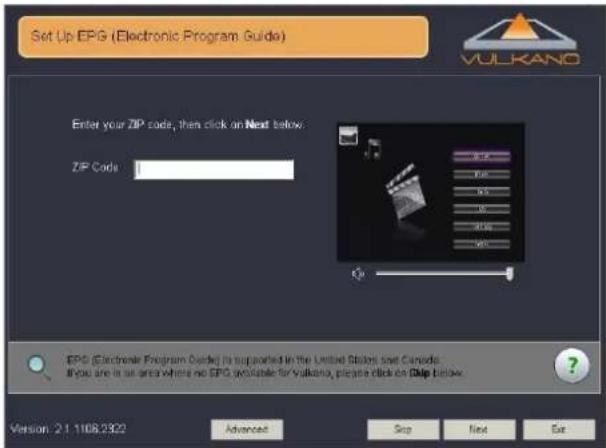
9n the "Configure EPG" window:
- Enter your Z9P Code
- Click Next

SELECT A SET-TOP-BOX
Note: the IR blaster cable has to be connected first on the F200 and fixed close the infrared receiver of your STB to transmit remote control signal7 Please refer to the connexion guide Step 37
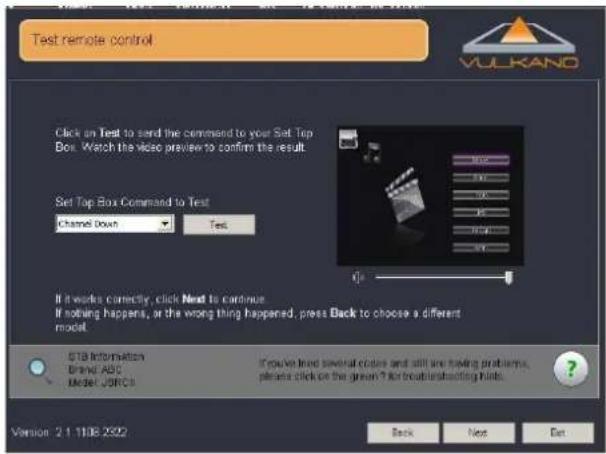
9n the Select Set Top Box window:
- Select your STB Manufacturer
- Select your STB Model
- 9f your model (or similar) is not in the list, check the FAQ at the end of this manual. Otherwise, click Next
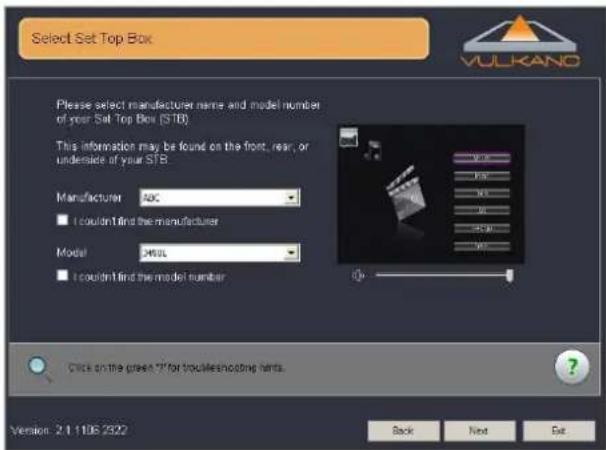
The Setup wizard will proceed to a test:
- Select a Set Top Box command
- Click Test
9f the Set Top Box works properly, click Next.
9f the Set Top Box does not work properly, click Back and choose a different model.
ASSIGN A NAME AND PASSWORD
- Enter a name for your F200 in the Name field
- Enter a password in the Password and Confirm password fields
- Click Next

The system will check the configuration7
When this dialog box is displayed, you have successfully set up your F200!

- Click Finish
For PC
• Install the PC Player on your PC from the CD-Rom supplied
- Run the Player
- Select Run the Player if you have already set up the F200
- Go to Player > Add or Select Vulkano > Add
- Enter the name and password
- Select Watch TV to get started
For Mac
- Install the Mac Player on your Mac from the CD-Rom supplied
- Run the Player
- Go to Player > Add/Select Vulkano > Add
- Enter the name and password
- Go back to the Home screen and push Watch TV to get started
For Mobile Players
Note: Please be sure to select the correct version7 Use "Vulkano Player for Flow and Blast"7
iPhone / iPad
- Download the Player on your iPhone or iPad from the iTunes App Store
- Run the player
- Go to Settings > Select to enter the name and password
- Go back to the Home screen and push Live TV to get started
Android
- Download the Player on your phone from the Android Market
- Run the Player
- Go to Settings > Selected Vulkano > Add Vulkano
- Enter the name and password
- Go back to the Home screen and push Live TV to get started
Blackberry
- Download the Player on your phone from the Blackberry Apps World
- Run the Player
- Go to Settings > Selected Vulkano > Add Vulkano
- Enter the name and password
- Go back to the Home screen and push Live TV to get started
TROUBLESHOOTING
For additional information or technical assistance for your F200, go to EMTEC Technical Support Website at: www.emtec-international.com > Support
FREQUENTLY ASKED QUESTIONS
Q: I have forgotten my F200 Password. Is there any way to retrieve it?
A: You can retrieve the User Name and Password of your F200 from the PlayerSettings.xml file of your laptop by following these steps:
For Windows XP
Go to C:\Documents and Settings\User Account\Local Settings\Application Data\Monsoon
Multimedia\F200 PlayerSettings.xml
For Vista & Win7
Go to C:\Users\
Note: Local Settings and\AppData are hidden Folders7 Unhide them to get to the PlayerSettings7xml file7
◆ Follow these steps to unhide the folders in XP:
http://www.howtogeek.com/howto/windows/display-hidden-folders-in-xp/
◆ Follow these Steps to unhide the folders in Vista & Win7:
http://www.howtogeek.com/howto/windows-vista/show-hidden-files-and-folders-in-windows-vista/
Q: What are the different types of Input & Output Ports on the F200?
A: Audio/Video Inputs and output ports on the F200 are as follows:
• RCA Composite Video (In and Out)
• RCA Left and Right Audio (In and Out)
- Component Y-Pb-Pr (In and Out) provides the better video quality
Q: How many STB / Video Source can I connect?
A: One. Although there are two sets of video inputs (Component / Composite), only one set of audio input is supported.
Q: How can I connect the F200 to a TV Antenna?
A: You may firstly connect the TV antenna to an external STB, or Digital Video Recorder (DVR), then connect the STB or DVR to the F200 via the Composite or Component port.
Q: I cannot see any image during the input setup.
A: You may see this dialog box: "Video was not detected at either the composite or component input".
Please make sure the cables are connected correctly as in the Connexion guide. Also, make sure your input source is powered on.
Q: How can I watch TV remotely on a PC or Mac at a remote location?
A: For remote viewing you just have to open the PC Player, then click on "Player" in the toolbar on top of the PC Player. Click on "Add/Select Vulkano" and enter your username and Password.
Once you are done, you can simply click on "Connect" to watch your Favorite Programs from the remote location.
Q: I can't view the TV on iOS devices via 3G and it shows below screenshots.
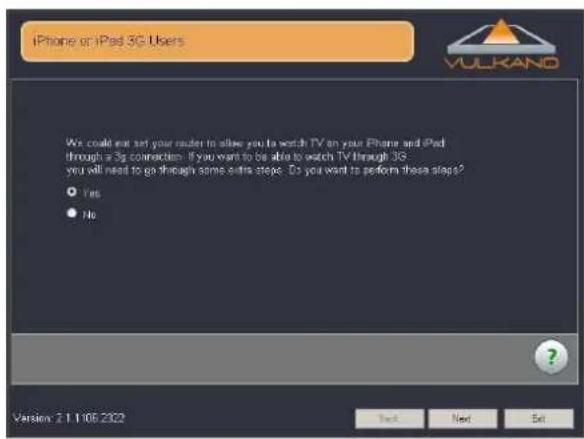
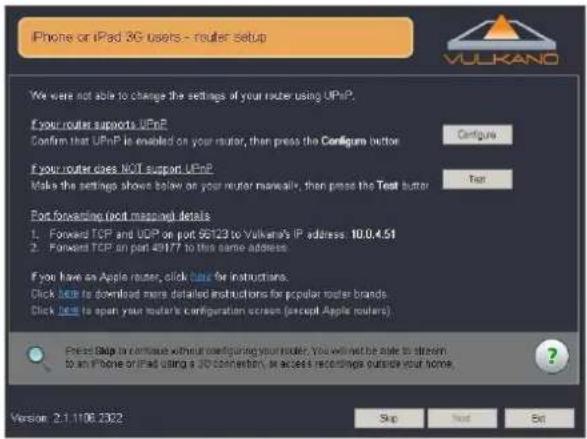
A: The F200 uses TCP 49177 and TCP + UDP 56123 for Remote access. It can usually configure your router automatically if the UPnP of your router is enabled. If not, or if your router doesn't not support UPnP, a manual port forwarding may be required.
- Follow the instruction on the screen to configure the port forwarding.
- Or go to http://www.portforward.com. Select the brand and model of your router, (skip the advertisement), search for <onsoon Vulkano in the list and click on it.
- Follow the instructions as how to forward the ports for the F200. You may call he Technical Support for any assistance, if needed.
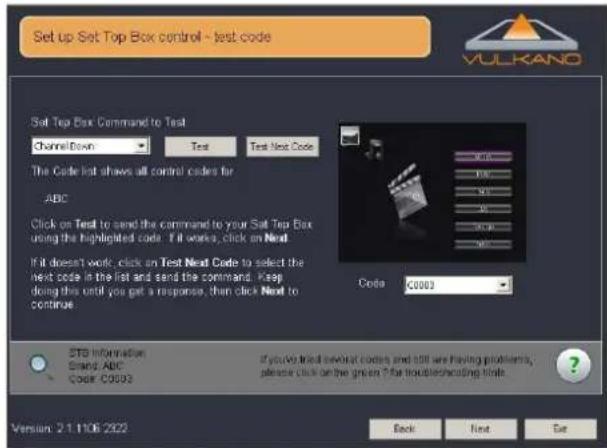
Q: I cannot find the model of my Set-Top-Box in the list.
A: Test each code until success.
- Select a Set-Top-Box command
- Click Test. Note: If the Set Top Box does not work properly, click Test Next Code and click Test, or select a Code from the drop-down list and click Test
- Click Next
Q: I couldn't find a control that works. I want F200 to learn my remote control codes.
A: For this option:
- Select your Set Top Box type
- Select a command from the list box
- Click Learn
- Follow the screen prompts

Q: Is static IP setup for F200 required?
A: Since the F200 renegotiates the UPnP port forwarding rules whenever it gets an 9P address, it should not need to have a static 9P set if your router supports UPnP (and if UPnP is enabled). However, there is no harm in having the 9P set for static either – just the standard warnings about making sure that the static 9P chosen is not in the D8CP allocation range set by the router or used by another device using static 9P on the same LAN.
9f the F200 is being used on a router that does NOT support UPnP, and as a result port forwarding had to be set manually using the router's web interface, then a static 9P assignment for the F200 is recommended. Some routers feature a way to assign the same 9P address to a device repeatedly, which can be used instead of setting static 9P on the F200.
This can be called (depending on the router):
• D8CP reservation
- Static D8CP
• Reserved 9P address
and requires you to enter both the 9P address you wish to use and the <ac address of the device in question (F200). See your router's documentation for more information on this feature.
Q: IR code learning fails or is ok but fails to control the STB
A: Place the remote control around 5cm away from the 9R lens of the F200 during the 9R code learning. Try to press and hold the button of the remote control during the 9R code learning until the Setup Wizard detects the 9R key. Select "Verify" to confirm the 9R key learned is correct and can control the external device.
Otherwise, redo the 9R code learning of this key again.



- F200 SET-TOP-BOX STREAMER
- TABLE OF CONTENTS
- INTRODUCTION....3
- CONNECT THE F200 TO YOUR SET-TOP-BOX (STB)....3
- ASSIGN A NAME AND PASSWORD....8
- DOWNLOAD AND INSTALL PLAYERS....10
- TROUBLESHOOTING....11
- FREQUENTLY ASKED QUESTIONS....11
- INTRODUCTION
- VIA COMPOSITE: 3 OPTIONS
- CONNECT THE F200 TO THE NETWORK
- CONNECT THE POWER ADAPTER
- INSTALL AND RUN THE F200 PLAYER
- SET UP WIRELESS SETTINGS
- SELECT A SET-TOP-BOX
- ASSIGN A NAME AND PASSWORD
- THE SYSTEM WILL CHECK THE CONFIGURATION7
- FOR PC
- FOR MAC
- FOR MOBILE PLAYERS
- TROUBLESHOOTING
- FREQUENTLY ASKED QUESTIONS
- NOTE: LOCAL SETTINGS AND\APPDATA ARE HIDDEN FOLDERS7 UNHIDE THEM TO GET TO THE PLAYERSETTINGS7XML FILE7
- Q: IS STATIC IP SETUP FOR F200 REQUIRED
- Q: IR CODE LEARNING FAILS OR IS OK BUT FAILS TO CONTROL THE STB
Brand : EMTEC
Model : Movie Cube F200
Category : Digital decoder