
HDMS-S1D - Server SONY - Free user manual and instructions
Find the device manual for free HDMS-S1D SONY in PDF.


| Product Type | Media Server |
| Brand | Sony |
| Model | HDMS-S1D |
| Dimensions (W x H x D) | approx. 200 x 50 x 200 mm |
| Weight | approx. 1.5 kg |
| Power Supply | AC 100-240V, 50/60Hz, 30W |
| Main Functions | Digital media storage and streaming, network file sharing, backup |
| Storage Capacity | Supports up to 2TB internal HDD (not included) |
| Connectivity | Gigabit Ethernet, USB 2.0 |
| Supported File Systems | FAT32, NTFS, EXT4 |
| Operating System | Embedded Linux |
| Cooling | Passive cooling (fanless) |
| Noise Level | Silent operation |
| Material | Aluminum chassis |
| Maintenance and Cleaning | Wipe with dry soft cloth; avoid solvents. Keep vents unobstructed. |
| Safety | Do not expose to moisture; use only supplied adapter; handle with care. |
| Spare Parts and Repairability | Contact Sony support for replacement parts; repair by qualified service personnel. |
| General Information | This server is designed for home media streaming and network storage. |
Frequently Asked Questions - HDMS-S1D SONY
User questions about HDMS-S1D SONY
0 question about this device. Answer the ones you know or ask your own.
Ask a new question about this device
Download the instructions for your Server in PDF format for free! Find your manual HDMS-S1D - SONY and take your electronic device back in hand. On this page are published all the documents necessary for the use of your device. HDMS-S1D by SONY.
USER MANUAL HDMS-S1D SONY
natural_image
Black-and-white collage of three animal photos: a wolf's head, a sunflower field, and a tree-lined path (no text or symbols)3-274-542-12(1)
Preparations
Importing Photos
Enjoying Photos
Editing Photos
Exporting Photos
Printing Photos
Connecting to a Computer
Setting Up the Unit
Additional Information

http://www.sony.net/

Printed on 70% or more recycled paper using VOC (Volatile Organic Compound)-free vegetable oil based ink.
Printed in Japan
3-274-542-12(1)
High Definition Media Storage HDMS-S1D
Operating Instructions
© 2007 Sony Corporation
Thank you for purchasing the High Definition Media Storage HDMS-S1D.
This document explains how to prepare your unit for use. Before operating the unit, please read this document thoroughly, and retain it for future reference.
WARNING
To reduce the risk of fire or electric shock, do not expose this apparatus to rain or moisture.
To avoid electrical shock, do not open the cabinet. Refer servicing to qualified personnel only.
Batteries or batteries installed apparatus shall not be exposed to excessive heat such as sunshine, fire or the like.
CAUTION
The use of optical instruments with this product will increase eye hazard. As the laser beam used in this Media Storage is harmful to eyes, do not attempt to disassemble the cabinet.
Refer servicing to qualified personnel only.

This label is located on the laser protective housing inside the enclosure.


This symbol is intended to alert the user to the presence of uninsulated “dangerous voltage” within the product’s enclosure that may be of sufficient magnitude to constitute a risk of electric shock to persons.

This symbol is intended to alert the user to the presence of important operating and maintenance (servicing) instructions in the literature accompanying the appliance.
These graphical symbols are located on the AC adaptor.
NOTE
This equipment has been tested and found to comply with the limits for a Class B digital device, pursuant to Part 15 of the FCC Rules. These limits are designed to provide reasonable protection against harmful interference in a residential installation. This equipment generates, uses, and can radiate radio frequency energy and, if not installed and used in accordance with the instructions, may cause harmful interference to radio communications.
However, there is no guarantee that interference will not occur in a particular installation. If this equipment does cause harmful interference to radio or television reception, which can be determined by turning the equipment off and on, the user is encouraged to try to correct the interference by one or more of the following measures:
- Reorient or relocate the receiving antenna.
- Increase the separation between the equipment and receiver.
- Connect the equipment into an outlet on a circuit different from that to which the receiver is connected.
- Consult the dealer or an experienced radio/TV technician for help.
You are cautioned that any changes or modifications not expressly approved in this manual could void your authority to operate this equipment.
The shielded Interface cable must be used with the equipment in order to comply with the limits for a digital device pursuant to Subpart B of Part 15 of FCC Rules.
If you have any questions about this product, you may call: Sony Customer Information Service Center 1-800-222-SONY (7669) or http://www.sony.com/service.
The number below is for the FCC related matters only.
Regulatory Information
Declaration of Conformity
Trade Name: SONY
Model No.:
HDMS-S1D
Responsible Party:
Sony Electronics Inc.
Address:
16530 Via Esprillo,
San Diego, CÃ
92127 U.S.A.
Telephone No.:
858-942-2230
This device complies with Part 15 of the FCC Rules. Operation is subject to the following two conditions: (1) This device may not cause harmful interference, and (2) this device must accept any interference received, including interference that may cause undesired operation.
Important Safety Instructions
1) Read these instructions.
2) Keep these instructions.
3) Heed all warnings.
4) Follow all instructions.
5) Do not use this apparatus near water.
6) Clean only with dry cloth.
7) Do not block any ventilation openings. Install in accordance with the manufacturer's instructions.
8) Do not install near any heat sources such as radiators, heat registers, stoves, or other apparatus (including amplifiers) that produce heat.
9) Do not defeat the safety purpose of the polarized or grounding-type plug. A polarized plug has two blades with one wider than the other. A grounding type plug has two blades and a third grounding prong. The wide blade or the third prong are provided for your safety. If the provided plug does not fit into your outlet, consult an electrician for replacement of the obsolete outlet.
10) Protect the power cord from being walked on or pinched particularly at
plugs, convenience receptacles, and the point where they exit from the apparatus.
11) Only use attachments/accessories specified by the manufacturer.
12) Use only with the cart, stand, tripod, bracket, or table specified by the manufacturer, or sold with the apparatus. When a cart is used, use caution when moving the cart/apparatus combination to avoid injury from tip-over.

S3125A
13) Unplug this apparatus during lightning storms or when unused for long periods of time.
14) Refer all servicing to qualified service personnel. Servicing is required when the apparatus has been damaged in any way, such as power-supply cord or plug is damaged, liquid has been spilled or objects have fallen into the apparatus, the apparatus has been exposed to rain or moisture, does not operate normally, or has been dropped.
Copyright
Copyright law prohibits unauthorized use of any recorded audio/video for any other purpose than personal enjoyment. Please be warned that the “Memory Stick” containing images and data protected by copyright shall be strictly used within copyright law.
Owner's Record
The model and serial number are located on the rear panel of the unit. Record the serial number in the space provided below. Refer to these numbers whenever you call upon your Sony dealer regarding this product.
Model No. HDMS-S1D
Serial No. ____
For the State of California, USA only
Perchlorate Material - special handling may apply, See
www.dtsc.ca.gov/hazardouswaste/
perchlorate
Perchlorate Material: Lithium battery contains perchlorate.
Notes About the Discs
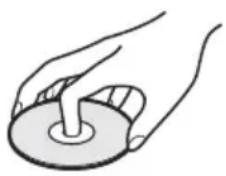
- To keep the disc clean, handle the disc by its edge. Do not touch the surface.
natural_image
Illustration of two hands holding a circular object with a central rod (no text or symbols)
- Do not expose disc to direct sunlight or heat sources such as hot air ducts, or leave it in a car parked in direct sunlight as the temperature may rise considerably inside the car. - After playing, store the disc in its case. - Clean the disc with a cleaning cloth. Wipe the disc from the center out.

- Do not use solvents such as benzine, thinner, commercially available disc/lens cleaners, or anti-static spray intended for vinyl LPs. - If you have printed the disc's label, dry the label before playing.
Precautions
Usage and storage
- Only use the specified power cord.
- Never short-circuit any of the connectors with a metallic object such as a keyholder.
- Do not leave the unit in locations where the temperature may rise above 60^ (140°F), such as in direct sunlight.
- Protect the unit from water and moisture.
- Use the unit on a flat level surface.
- Do not install this equipment in a confined space such as a bookshelf or similar unit.
- To prevent fire or shock hazard, do not place objects filled with liquids, such as vases, on the apparatus.
- Turn off the unit before carrying it.
- Do not touch the memory card while copying.
- Do not place any objects on the unit.
- Do not place the remote control on the floor, etc., as buttons may be pressed by mistake.
- Do not place the unit upright.
- Watch the screen in a bright room.
- Keep this unit away from children. If any part of the unit is swallowed, promptly see a doctor.
On power sources
The Media Storage is not disconnected from the AC power source as long as it is connected to the wall outlet, even if the unit itself has been turned off.
Overheating
If the unit has become hotter than normal during operation, turn off the unit, disconnect the power cord, and contact a service center.
Condensation
If the unit is brought from a cold to a warm location, or if the ambient temperature suddenly rises, moisture may form on the outer surface and on the interior of the unit. Do not use the unit in such a condition, as damage may occur. If condensation has occurred, leave the unit for about an hour before turning it on.
Hard disk
The hard disk has a high storage density, and holds a vast amount of images. However, it can easily be damaged by shock, vibration or dust, and should be kept away from magnets. To avoid losing important data, observe the following precautions.
- Do not apply strong shock to the unit.
- Do not place the unit in a location subject to mechanical vibration or in an unstable location.
- Do not place the unit on top of a hot surface, such as a VCR or amplifier (receiver).
- Do not use the unit in a place subject to extreme changes in temperature (temperature gradient less than 10^/hour ).
- Do not move the unit with its power cord connected.
- Do not disconnect the power cord while the power is on.
- When disconnecting the AC power cord, turn off the power and make sure that the hard disk drive is not operating (the EXPORT and IMPORT indicator on the front panel are turned off).
- Do not move the unit for one minute after you have unplugged the power cord.
- Do not attempt to replace or upgrade the hard disk by yourself, as this may result in malfunction.
Should the hard disk drive malfunction, you will not be able to recover lost data. The hard disk drive is only a temporary storage space. It is highly recommended to regularly back up the contents of the hard disk. Sony Corporation does not accept any liability for any data loss.
About repairing the hard disk drive
- The contents of the hard disk drive may be checked in case of repair or inspection during a malfunction or modification. However, the contents will not be backed up or saved by Sony.
- If the hard disk needs to be formatted or replaced, it will be done at the discretion of Sony. All contents of the hard disk drive will be erased, including contents that violate copyright laws.
Disc
• Music discs encoded with copyright protection technologies
This product is designed to playback discs that conform to the Compact Disc (CD) standard. Recently, various music discs encoded with copyright protection technologies are being marketed by some record companies. Please be aware that among those discs, there are some that do not conform to the CD standard and may not be playable by this product.
- Some discs cannot be played on this unit due to the recording quality or physical condition of the disc, or the characteristics of the recording device and authoring software. The disc will not play if it has not been correctly finalized. For more information, refer to the operating instructions for the recording device.
On AC adaptor
Install this unit so that the power cord can be unplugged from the wall socket immediately in the event of trouble.
Use the supplied AC adaptor for this unit, as other adaptors may cause a malfunction.
Table of Contents
WARNING 2
Notes About the Discs ...... 4
Precautions 4
Main Features 8
Guide to the Display Operations .... 10
Preparations
Unpacking 12
Preparing the Remote ...... 12
Controlling a TV with the remote 13
Connecting to Your TV ...... 14
Connecting to your TV using an HDMI cord 14
Connecting to your TV using a component video cord (Y, PB, PR) 16
Connecting to your TV using an audio/video cord or S video cord .... 16
Connecting the Power Cord 17
Turning on the unit 17
Setting the Clock 18
Importing Photos
Preparation to Import Photos to the Unit 19
Inserting and removing a memory card 19
Inserting and removing a disc .... 21
Connecting to USB device such as a digital still camera 21
Importing All Photos to the Unit 22
Importing Selected Photos or Folders to the Unit 24
Importing a single photo to the unit ....24
Importing multiple photos to the unit 25
Enjoying Photos
Viewing Photos (Photo Browser) 27
Viewing photos stored in a memory card or disc ....30
Playing a slideshow ....31
Enjoying Photo Albums ("x-ScrapBook") 32
Browsing the scrapbook ....32
Editing the scrapbook ....35
Creating a scrapbook manually ....37
Exporting scrapbooks to a memory card or disc ....38
Erasing scrapbooks ....39
Enjoying Advanced Slideshows ("x-Pict Story HD") 40
Playing “x-Pict Story HD” files ....40
Editing the “x-Pict Story HD” file ....41
Creating a “x-Pict Story HD” file manually ....43
Erasing “x-Pict Story HD” files ....44
Editing Photos
Labeling Photos or Albums ... 45
Entering characters ....45
Erasing Albums or Photos ..... 46
Exporting Photos
Exporting to Memory Cards or Discs 47
Printing Photos
Printing Photos Using a PictBridge Printer 48
Connecting to a Computer
Preparing the Unit and the Computer 50
Connecting with a USB cable ....50
Connecting to the network .....51
Importing/Exporting Photos to/from a Computer 57
Importing photos from a computer via a USB cable ....57
Exporting photos in the unit to a computer via a USB cable ....57
Importing photos from a computer via a network ....58
Exporting photos in the unit to a computer via a network ....58
Setting Up the Unit
How to Set Up the Unit ..... 59
Application Settings ......60
Unit Settings ......60
Video Setup 61
Network 61
Backup/Restore 62
Initialization ......63
Setup Initialization ......63
Additional Information
Troubleshooting 64
Wide Screen Mode 67
Supported Memory Card Types 68
Supported Disc Types ...... 70
Note on using discs 70
Specifications 71
Parts and Controls 73
Index 76
Main Features
Easy photo import procedure

natural_image
Two digital camera models, one black and one white, shown against a plain background (no text or symbols visible)For photos shot with a digital still camera, you can select to:
Import all photos to the unit (page 22).
Import selected photos to the unit (page 24).
Enjoying "x-ScrapBook"
When photos are imported to the unit, "x-ScrapBook" albums are automatically created.
You can change the wallpaper or edit an "x-ScrapBook" of your own.
See "Enjoying Photo Albums ("x-ScrapBook")" (page 32).
natural_image
Black-and-white collage of four outdoor scenes: elephant in natural setting, family taking photo, elephant holding a long nose, and close-up of people (no visible text or symbols)Enjoying "x-Pict Story HD"
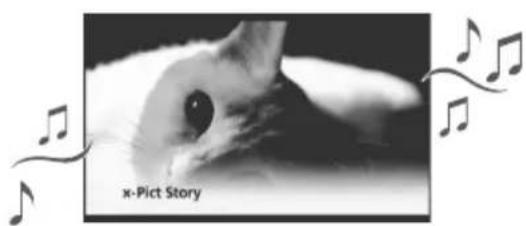
"x-Pict Story HD" files (advanced slideshows with background music) are also created automatically when photos are imported to the unit. You can make your own unique file(s) using preset music or music from a favorite CD.
See "Enjoying Advanced Slideshows ("x-Pict Story HD")" (page 40).
Enjoying the best quality images on "BRAVIA"

natural_image
Black-and-white photo of two smiling children on a computer monitor (no text or symbols visible)The unit displays imported photos on a connected TV. You can enjoy better quality images by connecting with an HDMI cord. If you have a Sony “BRAVIA” TV compatible with “PhotoTV HD,” you can enjoy the best quality images in splendid colors suitable for your TV.

See "Connecting to Your TV" (page 14).
Simply print and enjoy
Connect the unit directly to a PictBridge printer. You can print out photos and "x-ScrapBook" albums without a computer.

See "Printing Photos Using a PictBridge Printer" (page 48).

natural_image
3D rendering of a generic printer with paper spines and a paper airplane (no text or symbols visible)Making a disc copy for storage

natural_image
Close-up of a silver CD or DVD disc with visible blades and central hole (no text or symbols)Enjoy your favorite photos more by sharing with your friends or by bringing them to a photo studio for a better print.

See "Exporting to Memory Cards or Discs" (page 47).
Guide to the Display Operations

Press HOME, and select an image or menu item using ↔↔.


To return to the previous display, press RETURN.

natural_image
Black-and-white landscape photo of snow-capped mountains with a river in the foreground (no visible text or symbols)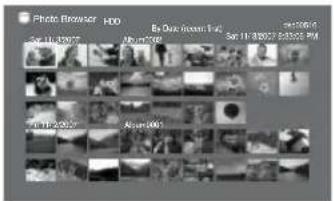
Types of displays


Home menu
Displays the menu items.
Thumbnail list
Displays the index screen.
When the unit is turned on, the last viewed image appears on the screen.
Press Ⓧ to enter the item.

natural_image
Black-and-white landscape photo of snow-capped mountains with bare trees in the foreground (no text or symbols visible)
To use various functions, press OPTIONS.
Displayed items differ depending on the screen.
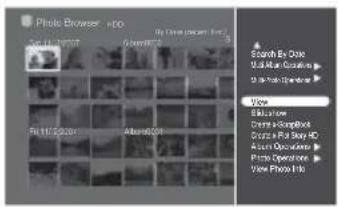
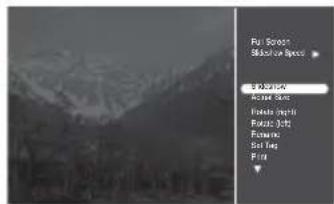
To close the OPTIONS menu, press OPTIONS again.

natural_image
Black-and-white landscape photo of snow-capped mountains with trees in the foreground (no visible text or symbols)Full screen display
Photos will fit the size of the display.
Pressing DISPLAY repeatedly shows/hides related information.
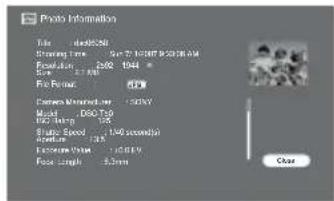
Detailed information
When you press INFO, details such as the shooting time will appear.
Unpacking
Check that you have the following items. Should anything be missing, contact your nearest Sony dealer or local authorized Sony service facility.
- AC power cord (1)
• AC adaptor (AC-LX1M) (1) - Component video cord (Y, P_B , Pr ) (1)
• Audio/video cord (1) - Remote commander (remote) (1)
- Size AA (R6) batteries (2)
- Operating Instructions (this document) (1)
- Quick Start Guide (1)
- Warranty card (1)
- Software License Information (1)
Preparing the Remote
Insert two size AA (R6) batteries, matching the ⊕ and ● ends on the batteries with the markings inside the battery compartment. Be sure to close the battery cover properly.
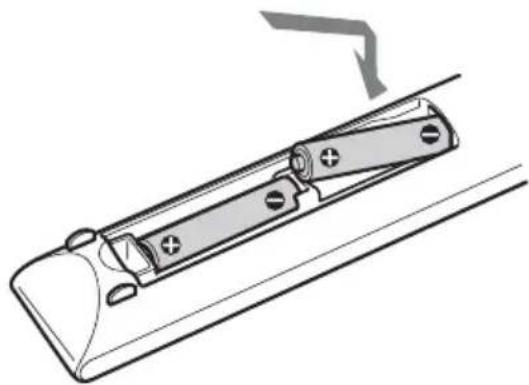
natural_image
Technical line drawing of a mechanical component with mounting holes and a tool (no text or symbols)When using the remote, point it at the remote sensor F on the unit.

Note
Do not expose the remote sensor direct light from the sun or lighting apparatus. Doing so may cause a malfunction.
Controlling a TV with the remote
You can set the remote control's signal to control your TV. If you set the supplied remote to your TV's setting, you can operate your TV's power switch, channel, or volume.

While holding down TV I/⏻, press ↑↓←→ or ⓐ according to the following list.
| Manufacturer | Press in first | Press in second |
| Sony (default) | ⊕ | ↓ |
| Daewoo | ↑ | → |
| Emerson | → | ⊕ |
| GE | ⊕ | ↑ |
| Gold star 1 | ⊕ | ← |
| Gold star 2 | ← | ⊕ |
| Hitachi | ⊕ | → |
| JVC | ↓ | ↑ |
| Panasonic | ← | → |
| Philips 1 | ↓ | ← |
| Philips 2 | ↑ | ↓ |
| Pioneer | ← | ↑ |
| RCA | ↓ | ⊕ |
| Samsung 1 | → | ↑ |
| Samsung 2 | ↑ | ⊕ |
| Sanyo | → | ← |
| Sharp | ← | ↓ |
| Toshiba | ↓ | → |
| Zenith | → | ↓ |
Hint
When you replace the batteries of the remote, make the appropriate TV setting again.
Notes
- If you cannot operate your TV with the supplied remote, try another setting under the same manufacturer again.
- The MUTING button can only be used on Sony TVs.
- The INPUT button, used only on Sony TVs, can switch the TV's input source.
Connecting to Your TV
You can view stored photos on a connected TV. Connect the unit and TV with a suitable cord.
Using the RESOLUTION switch on the rear, you can switch the resolution corresponding to your TV's resolution.
480i: Outputs images from all the jacks.
480p, 720p, 1080i: Outputs images from the HDMI OUT and COMPONENT VIDEO OUT jacks.
For details on resolution, refer to the TV's operating instructions.
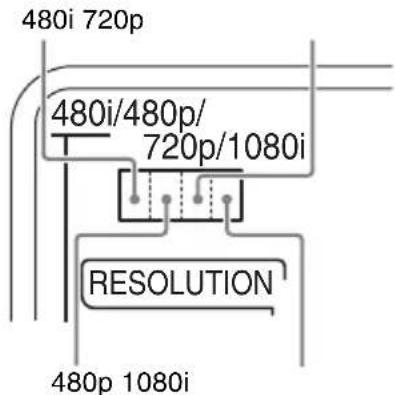
Slide the switch to select one of four resolutions.
Notes
• To view High Definition images, your TV must be compatible with 720p or 1080i.
- Plug the cords into jacks firmly.
- Be sure to turn off the unit when connecting or reconnecting.
- Do not tread on cord.
Connecting to your TV using an HDMI cord
Connect the HDMI OUT jack using an HDMI cord (not supplied). Using only an HDMI cord, you can output both high quality images and sound.

Hints
- Set [Video Resolution] of [Video Setup] to [Prioritize HDMI] (page 61).
- Set the RESOLUTION switch on the rear to [720p] or [1080i].
Using the HDMI\* Control function for "BRAVIA" Theatre Sync
If you have a Sony TV with HDMI Control function, you can turn on your TV or change the TV's input source automatically using the remote supplied with this unit. Set [HDMI Control] of [Unit Settings] to [On] (page 60).
Refer to the TV's operating instructions.
Viewing best quality images
If you have a Sony TV compatible with “PhotoTV HD,” you can enjoy best quality images by the following connection and setting.
1 Connect the unit to the TV using an HDMI cord (not supplied).
2 Set the TV's video setting to [VIDEO-A] mode.
For details about [VIDEO-A], refer to the TV's operating instructions.
Hint
To enjoy images captured in Adobe RGB mode, set the TV's video setting to [sYCC] mode. The color space including Adobe RGB is converted into sYCC and is output from the unit.
For details, refer to the TV's operating instructions.
On "PhotoTV HD"
“PhotoTV HD” allows for a highly-detailed, photo-like expression of subtle textures and colors. By connecting Sony’s “PhotoTV HD”-compatible devices, whole new world of photos can be enjoyed in breathtaking Full HD quality. For instance, the delicate texture of the human skin, flowers, sands and waves can now be expressed on the large screen in beautiful photo-like quality.
When connecting to the HDMI OUT jack
Improper handling may damage the HDMI OUT jack and the connector.
Make sure the connector is not upside down or tilted.

Connector is upside down

Not straight
Insert the HDMI connector straight into the HDMI OUT jack.
Do not bend or apply pressure to the HDMI connector.

Notes
- Be sure to disconnect the HDMI cord when moving the unit.
- Do not apply too much pressure to the cabinet wall, if you place the unit on the cabinet with the HDMI cord connected. It may damage the HDMI OUT jack or the HDMI cord.
- When connecting or disconnecting, do not screw in or rotate the HDMI connector.
* HDMI, the HDMI logo and High-Definition Multimedia Interface are trademarks or registered trademarks of HDMI Licensing LLC.
Connecting to your TV using a component video cord (Y, P_B , P_R )
Connect the COMPONENT VIDEO OUT jacks using the supplied component video cord. You will enjoy accurate color reproduction and high quality images.
Be sure to connect to the AUDIO OUT jacks using the supplied audio/video cord.

flowchart
graph TD
    A["TV INPUT"] --> B["Component video cord (supplied)"]
    B --> C["COMPONENT VIDEO OUT"]
    B --> D["COMPONENT VIDEO IN"]
    B --> E["Audio/video cord (supplied)"]
    E --> F["yellow"]
    E --> G["(white)"]
    E --> H["(red)"]
    E --> I["green"]
    E --> J["blue"]
    E --> K["red"]
    B --> L["L"]
    B --> M["R"]
    B --> N["VIDEO"]
    B --> O["OUTPUT"]
    style A fill:#f9f,stroke:#333
    style B fill:#ccf,stroke:#333
    style C fill:#cfc,stroke:#333
    style D fill:#fcc,stroke:#333
    style E fill:#cff,stroke:#333
    style F fill:#ffc,stroke:#333
    style G fill:#ffc,stroke:#333
    style H fill:#ffc,stroke:#333
    style I fill:#ffc,stroke:#333
    style J fill:#ffc,stroke:#333
    style K fill:#ffc,stroke:#333
    style L fill:#cfc,stroke:#333
    style M fill:#cfc,stroke:#333
    style N fill:#cfc,stroke:#333
    style O fill:#cfc,stroke:#333
Match the color of the plug to that of the jack.
Hint
If you use a component video cord, remove the yellow (video) plug of the audio/video cord.
Connecting to your TV using an audio/video cord or S video cord
Connect the supplied audio/video cord to the VIDEO OUT and AUDIO OUT (L/R) jacks. To enjoy higher quality images, connect an S video cord (not supplied) to the S-VIDEO OUT jack instead of the yellow (video) plug. Set the RESOLUTION switch to [480i] (left most). The output signal is fixed to 480i.

flowchart
graph TD
    A["480i/480p/720p/1080i RESOLUTION"] --> B["Resolution switch to [480i"] (left most).]
    B --> C["(yellow)"]
    B --> D["(white)"]
    B --> E["(red)"]
    C --> F["L"]
    D --> G["R"]
    E --> H["AUDIO OUT"]
    F --> I["S VIDEO"]
    G --> J["S VIDEO OUT"]
    H --> K["S video cord (not supplied)"]
    L["TV INPUT"] --> M["L"]
    L --> N["R"]
    L --> O["VIDEO"]
    P["S VIDEO INPUT"] --> Q["S VIDEO"]
Match the color of the plug to that of the jack.
Hint
If you use an S video cord, remove the yellow (video) plug of the audio/video cord.
Connecting the Power Cord
Connect the supplied AC adaptor in the numeric order shown in the following illustration. When removing the adaptor, do so in reverse order.
See also to "On AC adaptor" of "Precautions" (page 5).

Notes
- Before moving the unit, turn off the power, disconnect the power cord from the wall outlet, and wait for at least one minute. Do not apply vibration or strong shock to the unit. Before doing the above, make sure that [HDMI Control] of [Unit Settings] is set to [Off] (page 60).
- Use the supplied AC adaptor (AC-LX1M) for this unit, as other adaptors may cause a malfunction.
- Connect the power cord after all other connections have been made.
Turning on the unit
1 Switch the input selector of the TV.
2 Press I/⏻ (on/standby) to turn on the unit.

The light on the ⬆/⏻ (on/standby) button changes from red to green. When the unit is turned on for the first time, the date and time setting display will appear. To set the date and time, see “Setting the Clock” (page 18).
To turn off the unit
Press the I/⏻ (on/standby) button of the unit or remote.
If the unit does not respond
Turn off the power by force. For details, see “To turn off the power by force” (page 66).
Note
Even if the I/O button turns red, the unit may be operational. When disconnecting the power cord from a wall outlet or from the DC IN terminal, check that the EXPORT indicator and IMPORT button are turned off.
Setting the Clock
When the unit is turned on for the first time, the date and time setting display will appear.
Set the date and time according to the display.
1 Select [Date] and press
2 Press to select the month, date, or year, and then press to set each item.
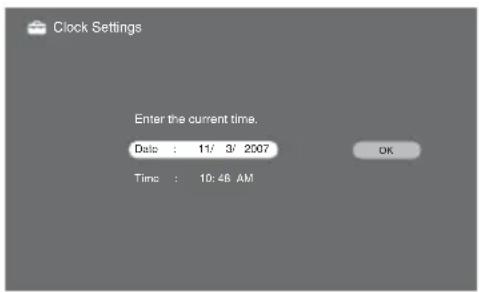
After setting each item, press ⏻
3 Select [Time] and press .
4 Press to select the hour, minute, or AM/PM, and then press to set each item.
After setting each item, press ⊕
5 Select [OK] and press .⊕
Hint
When resetting the clock, press HOME and select [Settings] – [Unit Settings] – [Clock Set].
Notes
- The date setting range on the unit is from 1/1/2007 to 12/31/2030.
- When turning on the unit for the first time, you cannot cancel the “Clock Settings.”
Preparation to Import Photos to the Unit
Inserting and removing a memory card
Inserting a “Memory Stick,” “Memory Stick Duo,” or SD Memory Card (SD) / Multi Media Card (MMC) / xD-Picture Card (xD)
Insert a memory card into its corresponding memory card slot.
If you use a “Memory Stick Micro” (“M2”) or miniSD/microSD card, you need an “M2” or miniSD/microSD adaptor (not supplied).
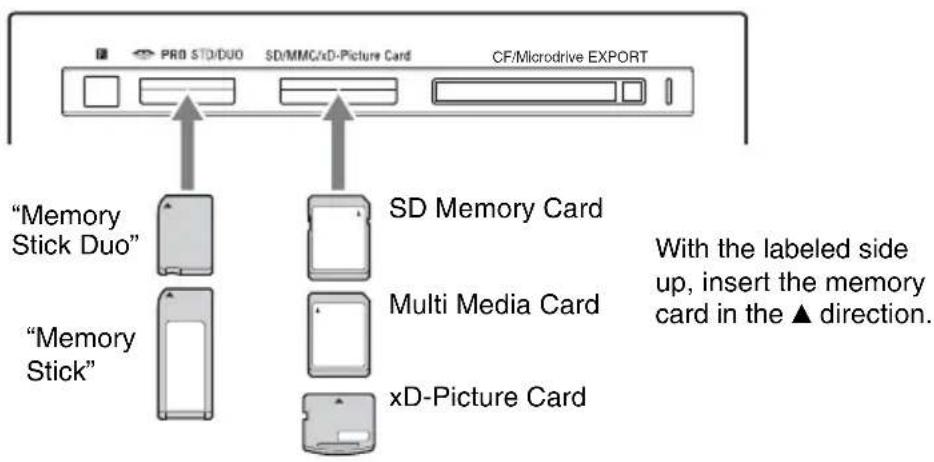
To remove, pull out the card.
Inserting a CompactFlash (CF) / Microdrive
Insert the CF/Microdrive all the way into the slot.
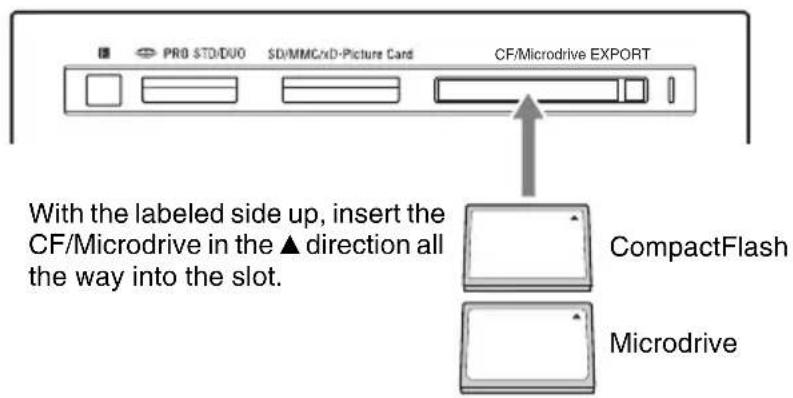
To remove a CF / Microdrive
Push the eject button all the way in, release it, and then pull the CF/Microdrive out.
Push the eject button. CF/Microdrive pops out.
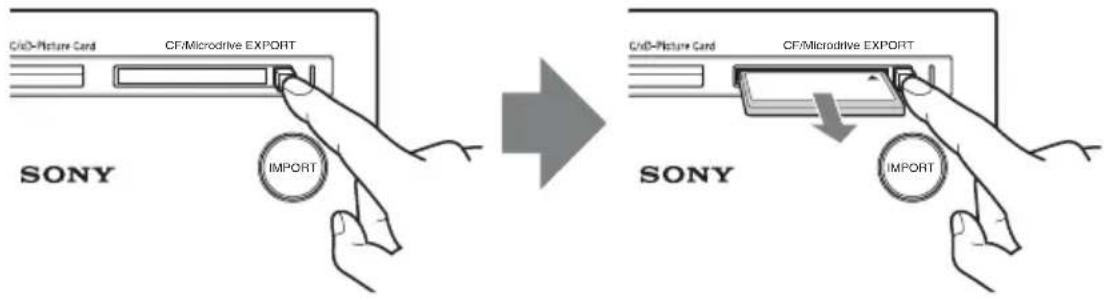
Notes
- When multiple memory cards are inserted while the unit is turned on, the card inserted first has priority to be recognized.
- You can use a “Memory Stick Duo” without an adaptor, as the unit automatically detects the size of the inserted “Memory Stick.”
- Do not insert more than one memory card in each slot, as damage may occur.
- Before use, check that the memory card is inserted correctly.
- Insert the memory card straight. If you push the memory card by force, this will cause damage to both the memory card and the unit.
- Do not remove the memory card while importing, as damage to data may occur.
- If you attempt to insert a “Memory Stick Micro” or miniSD/microSD without an “M2” or SD adaptor respectively, it may become jammed.
- Memory cards should be kept away from small children to prevent them from accidental swallowing.
- Insert the memory card into the corresponding slot.
- Do not apply too much pressure to the memory card in the slot, as it may cause a malfunction.
Inserting and removing a disc
For details on discs that can be used in the unit, see page 70. Before inserting a disc, turn on the unit.
1 Press ▲ (open/close).
The disc tray opens.
2 Insert a disc.

3 Press ▲ (open/close) again to close the disc tray.
Connecting to USB device such as a digital still camera
Connect a digital still camera to the USB jack on the front panel using a USB cable (not supplied).

flowchart
graph LR
    A["Digital still camera"] -->|USB cable (not supplied)| B["Output Port"]
    C["SONY Device"] -->|USB cable (not supplied)| B
Hints
- Turn on the digital still camera before connecting.
- If the message “Incompatible Device.” appears when connected as above, change the USB connection settings of the digital still camera. For details, refer to the operating instructions supplied with the digital still camera.
Importing All Photos to the Unit
You can import photos from a memory card, disc, or digital still camera by simply pressing the IMPORT button.
For subsequent importing, additional photos will be imported onto the unit without importing the previous contents again.
1 Insert a memory card or disc containing photos (page 19).
When importing from a digital still camera directly, connect to the USB jack (page 21).
When recognizing media, the IMPORT button lights up in white.
2 Press IMPORT.

The IMPORT button changes from white to red and the unit starts importing photos.
To cancel importing, select [Cancel] and press ⊕
To finish importing
When the IMPORT button changes from red to white, importing has finished. The number of photos and albums imported, and “x-ScrapBook” and “x-Pict Story HD” created, are displayed. Select [OK] and press ,then remove the memory card or disc.
To import photos without turning on the unit
You can import photos from a memory card or digital still camera by pressing the IMPORT button without turning on the unit.
When you press the IMPORT button, the button flashes slowly to indicate the media has been recognized. The unit starts importing photos when the button lights up red. When the IMPORT button turns off, importing has finished.
The next time you turn on the unit, the display shows the number of imported photos, etc.
To check the remaining capacity of the hard disk
Check [Device Information] of [Unit Settings] (page 60).
About album names and image storage locations
When you import photos to the unit, all photos are stored in an automatically created album. When [Auto Group] of [Application Settings] is set to [On], an album name is automatically given according to the created order as [Album0001], [Album0002], and so on (page 60).
Hints
- You can also import photos from the computer ("Connecting to a Computer" page 50).
- If a digital still camera, memory cards, and/or a disc are connected/inserted at the same time, the unit imports from one of them, in the following order of priority: digital still camera, memory card (in the left-most slot), disc.
- When you insert multiple memory cards with the unit turned on, the card inserted first has import priority.
- When [Auto Creation (x-ScrapBook/x-Pict Story)] is set to [On] (page 60), “x-ScrapBook” album(s) or “x-Pict Story HD” file(s) will automatically be created when importing has completed.
Notes
- The data read/write speed differs depending on the memory card, disc and usage environment.
- Coded data, such as data protected by MagicGate, cannot be imported to the unit.
- If you stop importing while importing photos, importing will be canceled and no photos will be imported to the unit.
- If you stop importing while the unit is creating “x-ScrapBook” album(s)/“x-Pict Story HD” file(s), all the photos imported and “x-ScrapBook” album(s)/“x-Pict Story HD” file(s) created until then will remain in the unit.
- Photos which are unplayable in this unit can be imported, but will not be used in “x-ScrapBook” and “x-Pict Story HD.”
- If you press I/⏻ (on/standby) during importing, the display turns off but importing continues. The unit turns off completely after importing is finished.
Importing Selected Photos or Folders to the Unit
Importing a single photo to the unit

1 Insert a memory card or disc containing photos (page 19). When importing from a digital still camera directly, connect to the USB jack (page 21).
2 Press HOME.
3 Select [Photo Browser] and press .
4 Select a media or device and press .
5 Select a photo to import, and press OPTIONS.

6 Select [Import Photo] and press .
7 Select [YES] and press .
8 Select an album to import to, and press .
To create a new album, select [New Album] and press ⏻ Importing starts.

Hints
- To import the whole album (folder), select [Album Operations] – [Import] in step 6.
- The unit displays up to 16 levels of a root directory on a media.
Notes
- When selecting photos or albums (folders) and importing them, all the selected photos will be imported including photos previously imported.
- Remaining time indicated on the display is approximate, and may fluctuate. This is not a malfunction.
Importing multiple photos to the unit
1 After step 5 on page 24, select [Multi-Photo Operations] and press ⊕.
2 Select [Multi-Import] and press .⊕
3 Select a photo to import, and press .
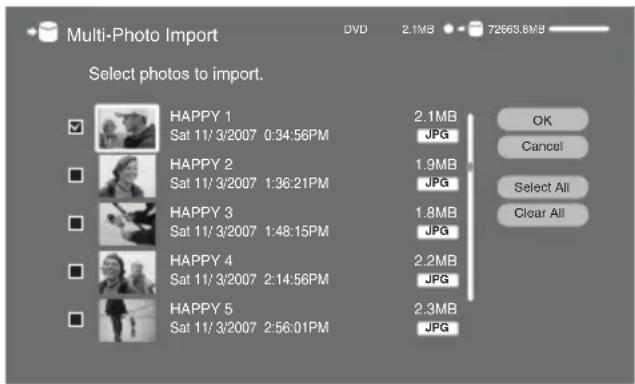
Select all photos to import by repeating step 3.
[Select All]: Selects all photos in the list.
[Clear All]: Cancels all the selections you have made.
4 Select [OK] and press .⊕
5 Select [YES] and press .⊕
6 Select an album to import to, and press .⊕
To create a new album, select [New Album] and press ⊕
Importing starts.
Hint
When selecting [Multi-Album Operations] on step 1, you can select multiple albums (folders) to import.
Note
When selecting albums (folders) or photos and importing them, all the selected photos will be imported including photos previously imported.
Viewing Photos (Photo Browser)
Displays photos stored in the unit.
1 Press HOME.
2 Select [Photo Browser] and press
3 Select [HDD] and press

4 Select the photo you want to view, and press.
The selected photo appears in full screen. To display the previous or next photo, press or . Pressing DISPLAY repeatedly displays/hides the related information on the screen.

Notes
- The unit plays JPEG image files that conform to the DCF* image file format.
* "Design rule for Camera File system": Image standards for digital cameras regulated by JEITA (Japan Electronics and Information Technology Industries Association). -
Some functions may not work correctly for JPEG images that does not conform to DCF format (still images edited with a computer, etc.).
-
It may take time to display depending on the file size.
• The following photos cannot be played: -
JPEG image files larger than 6,145 (width) × 4,097 (height).
– Image files smaller than 63 dots (width or height). - Progressive JPEG images files.
– JPEG image files exceeding 16 MB. - Image files with extreme aspect ratios may be unplayable.
Available OPTIONS during playback
Available options differ depending on the situation.
| Items Details | |
| Standard/Full Screen | [Standard]: Displays the entire photo on the screen. Black bands may appear vertically or horizontally around the photo.[Full Screen]: Displays the photo to fit the screen. The portions that do not fit will be cut off. |
| Slideshow speed Sets the pace for slideshow (page 31). | |
| Slideshow/Pause Plays/pauses slideshow (page 31). | |
| Actual Size Displays the photo in actual size. | |
| Rotate (right) Rotates the photo clockwise by 90 degrees. | |
| Rotate (left) Rotates the photo counterclockwise by 90 degrees. | |
| Rename Changes photo names (page 45). | |
| Set Tag Assigns a tag of character strings to the photo. | |
| Print Prints the photo (page 48). | |
| Export Exports the photo to a memory card or disc (page 47). | |
| View Info | Displays photo information. |
| Hide/Show | Hides/shows the photo on the screen. You cannot view hidden photos. |
Available OPTIONS for the thumbnail screen
Available options differ depending on the situation.
| Items Details | ||
| Sort | Sorts albums [By Date (recent first)], [By Date (oldest first)], [By Title (A to Z)], [By Title (Z to A)], [By Icon], or [By Creation Date]. | |
| Jump | Jumps to the desired photo according to the date, title, or icon order. | |
| Search By Tag | Searches for the photo by tag, such as “trip,” “kids,” etc. | |
| Search By Date | Searches for the photo by shooting date. | |
| Multi-Album Operations | Exports multiple albums (page 47). | |
| Multi-Photo Operations | Enables some operations of [Photo Operations] (page 29) to multiple photos. | |
| Search Results (previous) | Displays the previous search results. | |
| Search Results (next) | Displays the next search results. | |
| View | Shows the photo in the album. | |
| Slideshow | Plays slideshow for photos in the album (page 31). | |
| Create x-ScrapBook | Allows you to create an “x-ScrapBook” (page 37). | |
| Items | Details | |
| Create x-Pict Story HD | Allows you to make an “x-Pict Story HD” (page 43). | |
| Album Operations | Copy | Copies the album in which the selected photo is contained. |
| Erase | Erases the album that the selected photo is included (page 46). | |
| Divide | Divides the album that the selected photo is included into two. | |
| Combine | Combines the album in which the selected photo is contained with the other album. | |
| Rename Changes an album name (page 45). | ||
| Set Icon Sets an icon to the album. | ||
| Print Prints the album that the selected photo is included (page 48). | ||
| Export Exports the album to a memory card or disc (page 47). | ||
| View Info Displays album information. | ||
| Photo Operations | Copy Copies the photo. | |
| Erase Erases the photo (page 46). | ||
| Rotate (right) | Rotates the photo clockwise by 90 degrees. | |
| Rotate (left) | Rotates the photo counterclockwise by 90 degrees. | |
| Hide/Show | Hides/shows the photo. You cannot view hidden photos. | |
| Rename Changes the photo name (page 45). | ||
| Set Tag | Assigns a tag of character strings to the photo. | |
| Print Prints the photo (page 48). | ||
| Export Exports the photo to a memory card or disc (page 47). | ||
| View Photo Info | Displays photo information. | |
To create a new album by collecting your favorite photos
1 Press OPTIONS in the thumbnail screen (page 27).
2 Select [Multi-Photo Operations] and press .
3 Select [Multi-Copy] and press .
4 Select all photos to copy and press .⊕
[Select All]: Selects all photos in the list.
[Clear All]: Cancels all the selections you have made.
5 Select [OK] and press .⊕
6 Select [YES] and press .⊕
7 Select [New Album] and press .
8 Input the album name (page 45).
9 Select [Enter] and press .
Photos are copied to the album created in step 8.
Viewing photos stored in a memory card or disc
You can view photos stored in a memory card, disc, or digital still camera connected with an USB cable.
1 Press HOME.
2 Select [Photo Browser] and press .⊕
3 Select a media or connected device, and press.
Example: Select [Memory Stick] and press ⊕
4 Select the photo you want to view, and press.
Available OPTIONS for the thumbnail list
Available options differ depending on the situation.
Items Details
| Multi-Album Operations | Imports multiple albums (folders) (page 25). |
| Multi-Photo Operations | Imports multiple photos (page 25). |
View Shows the photo.
| Slideshow Plays photos in the media as a slideshow (page 31). |
Album Operations Erases or imports the folder, or displays information.
| Import Photo Imports the photo (page 24). |
View Photo Info Displays photo information.
Hint
The unit displays up to 50,000 photos and 16 levels of a root directory on a media.
Playing a slideshow
You can play photos in an album as a slideshow.
The slideshow stops when all the photos in the album have been displayed.
Large size photos may take time to display.
1 After selecting a photo in step 4 of "Viewing Photos (Photo Browser)" (page 27), press OPTIONS.
2 Select [Slideshow] and press .⊕
The slideshow starts.
To pause the slideshow
1 Press OPTIONS where you want to pause.
2 Select [Pause] and press ⊕
To resume, select [Slideshow] from OPTIONS menu and press ⊕
To change the slideshow pace
1 Press OPTIONS.
2 Select [Slideshow Speed] and press .
3 Select [Fast], [Standard], or [Slow], and press.
Hints
- While viewing a photo (page 27), you can start a slideshow by pressing ⨣. To pause, press again. To return to the thumbnail list, press RETURN.
- If you press OPTIONS while playing the slideshow, the OPTIONS menu appears and the slideshow pauses. Press OPTIONS again to close the OPTIONS menu, then the slideshow restarts.
If you perform an operation on the OPTIONS menu, the slideshow will stop. If you change the slideshow pace, you must start the slideshow again from the beginning.
Enjoying Photo Albums ("x-ScrapBook")
Every time photos are imported, the unit automatically creates original photo albums (scrapbooks) using all photos. The unit can store up to 3,000 scrapbooks.
Hint
You can also set not to create "x-ScrapBook" albums automatically (page 60).
Browsing the scrapbook
1 Press HOME.
2 Select [x-ScrapBook] and press .

3 Select the scrapbook you want to view, and press.
The cover page or the last viewed page appears.
When you view from the cover page, press OPTIONS during playback and select [Cover], then press ⏻
To stop viewing the scrapbook
Press RETURN.
Hints
• To display the scrapbook title, press DISPLAY during playback.
• To display the scrapbook information for details, press INFO in the thumbnail screen.
Scrapbook viewing mode
You can switch between Page mode and Cursor mode.
To switch the mode, press OPTIONS during playback and select [Page Mode] or [Cursor Mode], then press ⏻
Page Mode
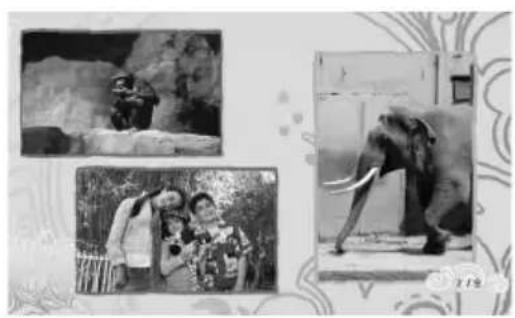
You can browse the entire scrapbook as if turning pages of a photo album.
Press ← or → to turn pages.

natural_image
Black-and-white collage of three black-and-white photos: a monkey in natural setting, an adult woman with children, and an elephant walking down (no visible text or symbols)Cursor Mode
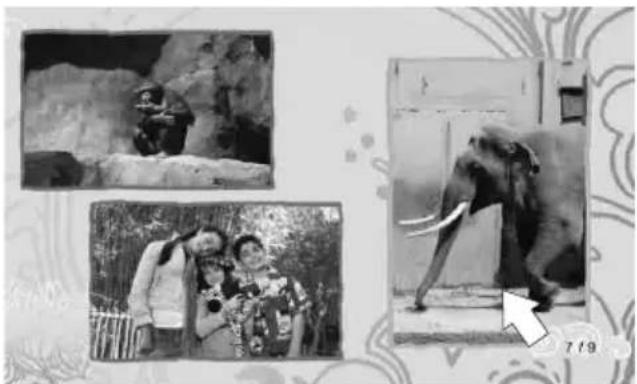
You can select a single photo on a page for zooming.
natural_image
Black-and-white collage of three black-and-white photos: monkey, elephant, and child (no visible text or symbols)To turn pages, select the left-most or the right-most photo and press or . To show a photo in full-screen, press , and then . To return to the scrapbook, press RETURN.
Hints
- When you view the photo in full screen, you can export or print the photo (see "Viewing Photos (Photo Browser)" on page 27).
- To rotate a scrapbook photo, display the photo in full screen in Cursor mode, then select [Rotate (right/left)] in the OPTIONS menu.
Notes
- Even if you add/erase photos to/from an album after creation, the scrapbook remains unchanged. In this case, you can create a new scrapbook manually (page 37).
- You cannot select a photo from the front or back cover of a scrapbook.
Available OPTIONS for Page mode
Available options differ depending on the situation.
| Items Details | ||
| Cursor Mode Switches to Cursor mode. | ||
| Cover Plays the scrapbook from the beginning. | ||
| Stop Stops playback and returns to the thumbnail screen. | ||
| Music Settings Adds background music to the scrapbook (page 36). | ||
| Edit | Change Theme | Changes the design theme (page 35). |
| Export Page | Exports the scrapbook page to a memory card or disc (page 38). | |
| Print Page | Prints the scrapbook page (page 48). | |
Available OPTIONS for Cursor mode
Available options differ depending on the situation.
| Items Details | ||
| Edit | Change Theme | Changes the design theme (page 35). |
| Music Settings | Adds background music to the scrapbook (page 36). | |
| Stop | Stops playback and returns to the thumbnail screen. | |
| Cover | Plays the scrapbook from the beginning. | |
| Page Mode | Switches to Page mode. | |
| View | Shows the selected photo in full screen. | |
| Adjust | Capture Adjusts the photo position manually. | |
| Erase | Photo | Erases a photo from the scrapbook page and rearranges the layout. It will not be erased from the original album. If the scrapbook only contains a single photo, it cannot be erased. |
Available OPTIONS for the thumbnail screen
Available options differ depending on the situation.
| Items Details | ||
| Sort | Sorts scrapbooks [By Date (recent first)], [By Date (oldest first)], [By Title (A to Z)], [By Title (Z to A)], [By Icon], or [By Creation Date]. | |
| Jump | Jumps to the desired scrapbook according to the date, title, or icon order. | |
| Multi-File Operations | Multi-Erase | Erases multiple scrapbooks (page 39). |
| Multi-Export | Exports multiple scrapbooks to a memory card or disc (page 38). | |
| Play | Displays the scrapbook. | |
Items Details
| Operations | Erase Erases scrapbook (page 39). | |
| Rename Changes scrapbook title name (page 45). | ||
| Change Theme | Changes the design theme (page 35). | |
| Set Icon Sets an icon to scrapbook. 23 icons are available. | ||
| Print Prints all pages of scrapbook (page 48). | ||
| Export | Exports all pages of scrapbook to a memory card of disc (page 38). | |
| View Info Displays “x-ScrapBook” information. | ||
Editing the scrapbook
To change the wallpaper (Change Theme)
You can change the design theme of scrapbooks after creation.
1 Press HOME.
2 Select [x-ScrapBook] and press .
3 Select a scrapbook to edit, and press OPTIONS.
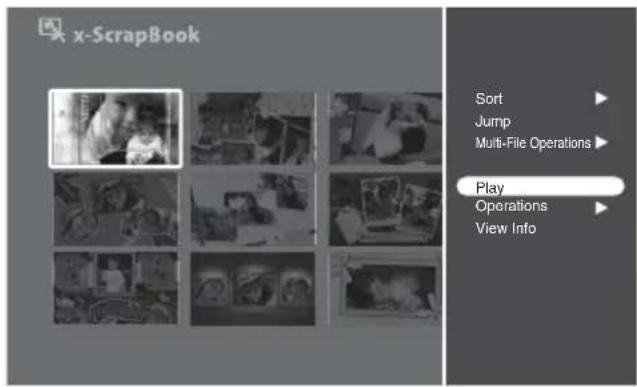
4 Select [Operations] and press .⊕
5 Select [Change Theme] and press .⊕

6 Select the desired theme and press ⊕
Hint
You can change the theme by selecting [Edit]-[Change Theme] in the OPTIONS menu during playback.
To add background music
You can select from originally contained tracks in the unit. When you import favorite songs from music CDs to the unit, you can also use it for background music.
1 While playing the scrapbook, press OPTIONS.
Example: When playing in Page mode

2 Select [Music Settings] and press .⊕
3 Select [Select Music] and press .
To stop playing music, select [No Music].
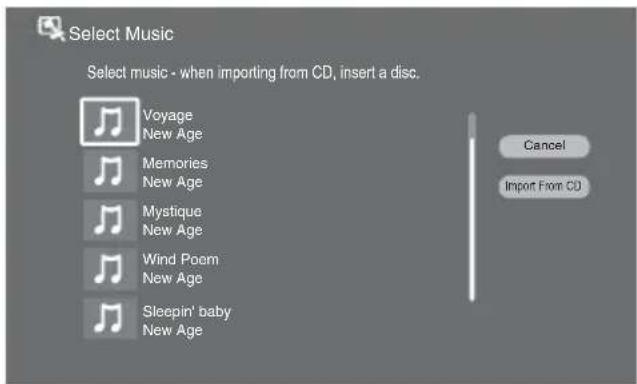
4 Select the track you want to use and press.
The display lists the original tracks, and up to the last 5 tracks imported from music CDs.
To import tracks from music CDs
After inserting a CD into the unit, select [Import From CD] and press ⚙️ Select tracks from the list and press ⚙️
Creating a scrapbook manually
You can create a new scrapbook for the album that you added photos to.
1 Press HOME.
2 Select [Photo Browser] and press ⊕
3 Select [HDD] and press
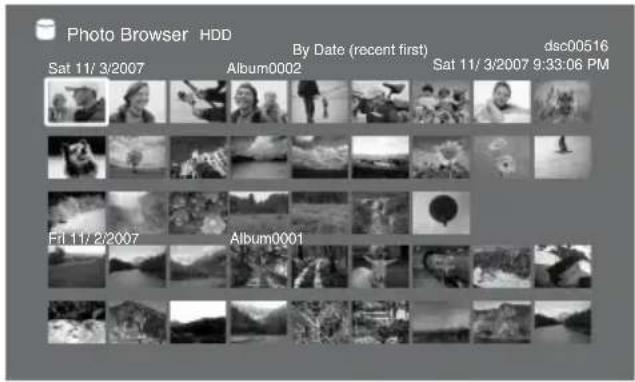
4 Select any photo in the album to make a scrapbook from, and press OPTIONS.
5 Select [Create x-ScrapBook] and press .
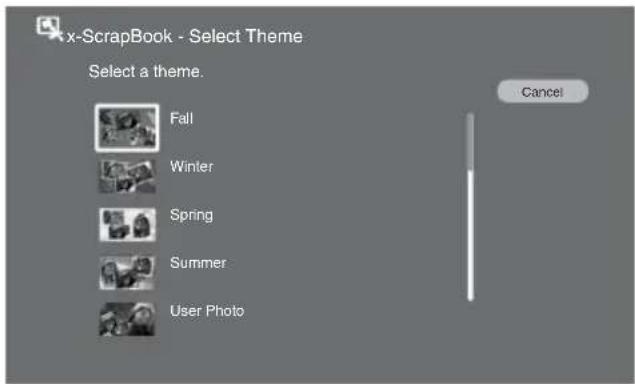
6 Select a design theme and press .⊕
The created scrapbook plays. You can select the created scrapbook from the thumbnail screen any time you want to view.
To create a new scrapbook by collecting favorite photos
1 Perform steps 1 to 9 of "To create a new album by collecting your favorite photos" (page 29) to create a new album.
2 Perform steps 4 to 6 above to create a new scrapbook.
Exporting scrapbooks to a memory card or disc
You can export all the photos used in the scrapbook and the scrapbook pages (each page saved as JPEG).
For usable memory cards and discs, see “Supported Memory Card Types” (page 68) and “Supported Disc Types” (page 70).
1 Press HOME.
2 Select [x-ScrapBook] and press .⊕
3 Select a scrapbook to export and press OPTIONS.
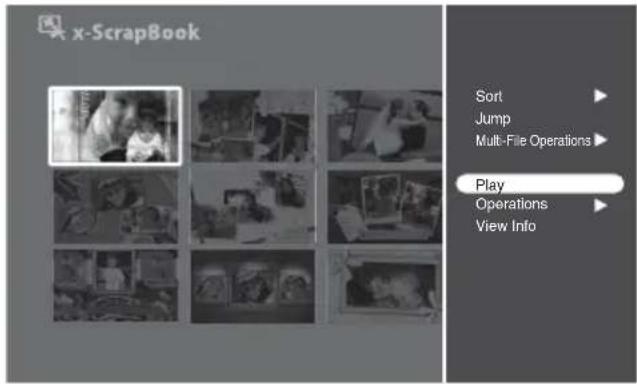
4 Select [Multi-File Operations] and press .
5 Select [Multi-Export] and press .
6 Select a media to export to, and press .⊕
7 Insert the memory card or disc into the unit.
8 Select all the scrapbooks you want to export.

[Select All]: Selects all scrapbooks in the list.
[Clear All]: Cancels all selections you have made.
9 Select [OK] and press .
10 Select [YES] and press
Hints
- When you select [Operations] – [Export] in steps 4 and 5 above, you can export a single scrapbook.
- While playing a scrapbook in Page mode, you can export the scrapbook page you are viewing. Press OPTIONS and select [Export Page], then press (page 34).
Notes
- When you insert a blank, unformatted disc, initialize the disc by following the on-screen instructions.
- Exported scrapbooks cannot be played in the same way as in this unit.
- For future uses, the memory card or disc will include control data files in addition to the actual “x-ScrapBook” files.
Erasing scrapbooks
You can erase unwanted scrapbooks. Even when you erase a scrapbook, the original album remains in the unit.
1 Press HOME.
2 Select [x-ScrapBook] and press .⊕
3 Select the scrapbook you want to erase and press OPTIONS.
4 Select [Multi-File Operations] and press .
5 Select [Multi-Erase] and press .⊕
6 Select all the scrapbooks you want to erase.
7 Select [OK] and press .⊕
8 Select [YES] and press .⊕
Hint
When you select [Operations] - [Erase] in steps 4 and 5 above, you can erase a single scrapbook.
Enjoying Advanced Slideshows ("x-Pict Story HD")
Every time photos are imported, the unit automatically creates a HD (High Definition) quality slideshow with visual effects and original background music. The application recognizes the location of faces in the photos and applies visual effects accordingly.
Music imported from a music CD can be used for background music. Up to 3,000 “x-Pict Story HD” files can be stored in the unit.
Hint
You can also set not to create "x-Pict Story HD" files automatically (page 60).
Notes
- You cannot export "x-Pict Story HD" files to a memory card or disc.
- For “x-Pict Story HD” files created from photos imported with the “Image Analysis” function set to “Off” (page 60), the function recognizing the location of faces does not work.
Playing "x-Pict Story HD" files
1 Press HOME.
2 Select [x-Pict Story HD] and press


3 Select the "x-Pict Story HD" file you want to play and press. Playback starts.

To stop playback
Press RETURN.
Note
Even when you add/erase photos to/from the album after creation, the “x-Pict Story HD” file remains unchanged. In this case, you can create a new “x-Pict Story HD” file manually (page 43).
Available OPTIONS for the thumbnail screen
Available options differ depending on the situation.
| Items Details | ||
| Sort | Sorts “x-Pict Story HD” files [By Date (recent first)], [By Date (oldest first)], [By Title (A to Z)], [By Title (Z to A)], [By Icon], or [By Creation Date]. | |
| Jump | Jumps to the desired “x-Pict Story HD” file according to the date, title, or icon order. | |
| Multi-File Operations | Multi-Erase | Erases multiple “x-Pict Story HD” files (page 44). |
| Play | Plays the “x-Pict Story HD” file. | |
| Repeat Play | Plays the “x-Pict Story HD” file repeatedly. | |
| Operations | Erase Erases the “x-Pict Story HD” file (page 44). | |
| Rotate Photo | Rotates the photo in the “x-Pict Story HD” file. | |
| Rename | Changes the “x-Pict Story HD” file title name (page 45). | |
| Change Theme | Changes the design theme or BGM (page 42). | |
| Set Icon Sets an icon to the “x-Pict Story HD” file. 23 icons are available. | ||
| View Info | Displays “x-Pict Story HD” information. | |
Editing the "x-Pict Story HD" file
1 Press HOME.
2 Select [x-Pict Story HD] and press .⊕
3 Select a "x-Pict Story HD" file and press OPTIONS.
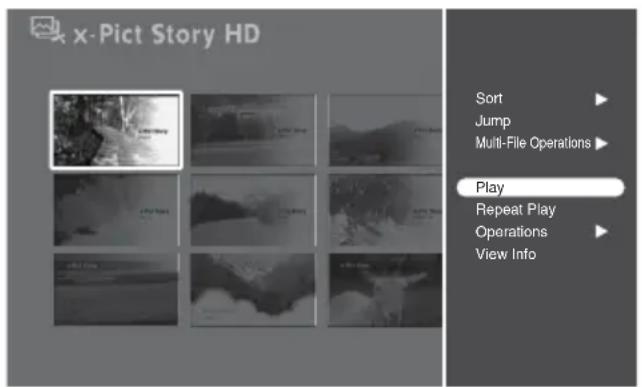
4 Select [Operations] and press .
To change background music or design theme
You can select from originally contained tracks in the unit, or songs imported from your CDs.
1 After step 4 on page 41, select [Change Theme] and press ⊕.
2 Select a track for background music.
The display lists original tracks and up to 5 tracks last imported.

[Import From CD]: Imports a track for BGM from a music CD. After inserting a CD, select the track.
[Creation Mode]: Adjusts the playing time of the "x-Pict Story HD" file. Select a playing mode.
| Items | Details |
| Random | Adjusts the length of the audio track and number of photos used automatically (default setting). |
| Use Entire Track Plays the entire audio track. | |
| Use All Photos Plays all photo files. | |
When you select an original track for BGM, the design theme is set according to the music automatically. Go to step 4.
3 Select a design theme to match the music.

Indicates the effect tempo. The more marks, the faster the tempo.
4 Press ⊕
The edited “x-Pict Story HD” file plays for preview.
When you select an original track for BGM in step 2 above, the effect will be changed according to the music. The effect may be in sepia or monochrome, but is not a malfunction.
When you select a track imported from a music CD, the effect will be changed according to the theme you select in step 3.
5 Select [Start] and press .
The BGM and design theme has been changed. You can select a “x-Pict Story HD” file from the thumbnail screen.
Hint
If you select [Random] or [Use Entire Track] in the [Creation Mode] menu, the number of photos displayed varies according to music length.
Note
Only the last 5 tracks you imported will appear in the BGM selection display. If you want to use another track, import it again.
Creating a "x-Pict Story HD" file manually
When you have edited an album, or created a new album by selecting favorite photos, you can create a new “x-Pict Story HD” file manually.
1 Press HOME.
2 Select [Photo Browser] and press ⊕
3 Select [HDD] and press .
4 Select any photo in the album to make a "x-Pict Story HD" file from, and press OPTIONS.
5 Select [Create x-Pict Story HD].
6 Perform steps 2 to 5 of “To change background music or design theme” (page 42) to select a design theme and music.
The created "x-Pict Story HD" file plays.
You can select the created “x-Pict Story HD” file from the thumbnail screen any time you want to view.
To create a new “x-Pict Story HD” file by collecting favorite photos
1 Perform steps 1 to 9 of “To create a new album by collecting your favorite photos” (page 29) to create a new album.
2 Perform steps 4 to 6 above to create a new "x-Pict Story HD" file.
Erasing "x-Pict Story HD" files
You can erase unwanted “x-Pict Story HD” files. Even if you erase a “x-Pict Story HD” file, the original album remains.
1 Press HOME.
2 Select [x-Pict Story HD] and press ⊕
3 Select the "x-Pict Story HD" file you want to erase and press OPTIONS.
4 Select [Multi-File Operations] and press .
5 Select [Multi-Erase] and press .⊕
6 Select all the "x-Pict Story HD" files you want to erase.
7 Select [OK] and press .⊕
8 Select [YES] and press .⊕
Hint
When you select [Operations] – [Erase] in steps 4 and 5 above, you can erase a single "x-Pict Story HD" file.
▶ Editing Photos
Labeling Photos or Albums
The display for entering characters appears when you rename an album/photo/scrapbook/“x-Pict Story HD” file.
You can also use the connected USB keyboard.
Entering characters
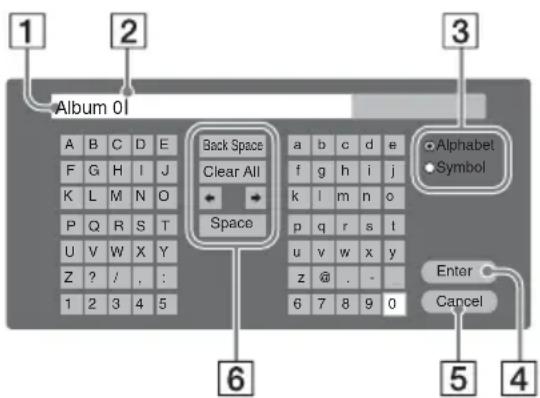
1 Entry field
You can enter up to 32 characters for an album name, and 24 for a tag name.
2 Cursor
3 Shift buttons
Switches between alphabet and numbers/symbols.
4[Enter]
Sets the input name and finishes the setting.
5 [Cancel]
Cancels the setting and returns to the previous display.
6 Setting buttons
1 Select the character you want to enter and press ⊕.
The character appears in the entry field.
If necessary, select the following items and press ⊕.
| Items | Details |
| Back Space | Erases the character to the left of the cursor. |
| Clear All | Clears all input characters. |
| ←→ | Moves the cursor. |
| Space | Inserts a space. |
2 Repeat step 1 to complete the entry.
3 Select [Enter] and press ⊕.
The display returns to the previous display.
To use a USB keyboard
Connect a USB keyboard to the USB jack on the front panel of the unit.
Erasing Albums or Photos
1 Press HOME.
2 Select [Photo Browser] and press ⊕.
3 Select [HDD] and press .
4 Select a photo in the album you want to erase and press OPTIONS.

5 Select [Photo Operations] or [Album Operations], and press ⏻.
6 Select [Erase] and press .
7 Select [YES] and press .
Hints
- When you select [Multi-Photo Operations] in step 5, you can erase multiple photos.
- To erase scrapbooks or "x-Pict Story HD" files, see page 39 and 44.
- You cannot erase the sample albums or sample photos. To hide the samples, set [Sample] in [Application Settings] to [Off] (page 60).
Exporting to Memory Cards or Discs
You can export photos stored in the unit to a memory card or disc. For usable memory cards and discs, see “Supported Memory Card Types” (page 68) and “Supported Disc Types” (page 70).
1 Insert a memory card or disc into the unit.
2 Press HOME.
3 Select [Photo Browser] and press ⊕.
4 Select [HDD] and press
5 Select a photo you want to export and press OPTIONS.
6 Select [Photo Operations] and press ⏻
7 Select [Export] and press .⊕
8 Select the media to export to, and press ⏻
9 Select [YES] and press .
Hints
- When you select [Multi-Photo Operations] (or [Multi-Album Operations]) – [Multi Export] in steps 6 and 7, you can export multiple photos or albums.
- When you select [Album Operations] – [Export] in steps 6 and 7, you can export an album.
- You can export "x-ScrapBook" albums to a memory card or a disc (page 38).
Notes
- Even if you press I/⏻ (on/standby) during exporting, the unit continues exporting until it is finished.
- You cannot export to a DVD-R/DVD+R/CD-R already recorded.
- If you export to a DVD-RW or DVD+RW already containing files, those files will be erased.
Printing Photos Using a PictBridge Printer
When you connect a PictBridge*-compatible printer to the unit, you can print photos or scrapbooks without using a computer.
* PictBridge is a unified standard established by the Camera & Imaging Products Association (CIPA).
1 Press HOME.
2 Select [Photo Browser] and press ⏻.
3 Select [HDD] and press .
4 Select a photo you want to print and press OPTIONS.
5 Select [Photo Operations] (or [Album Operations]) – [Print], and press ⏻
The waiting-for-a-printer-connection display appears.
6 Connect a PictBridge-compatible printer to the unit and turn it on.

7 Select the setting items you want to set, and press ⏻
8 After you complete the settings, select [Print] and press ⏻.
Hints
- Some printers support printing the shooting date on a photo. To print the date, set [Print With Date] to [Yes] in step 7.
- When you select [Multi-Photo Operations] – [Multi-Print] in step 5, you can print multiple photos.
- When you print a scrapbook, select [x-ScrapBook] in step 2, and select [Operations] from the OPTIONS menu in the thumbnail screen, and then select [Print].
Notes
- Connect the printer directly to the unit. If you connect through a USB hub, the unit may not work properly.
- When you connect a printer with an LCD display, the printer may show a message such as “Unsupported USB device is detected,” but printing will still be performed. If you encounter a further problem, disconnect and connect the USB cable and reset the printer in step 6.
- When you print a scrapbook page, some printers may not print the entire image.
Preparing the Unit and the Computer
You can connect this unit to a computer with a USB cable or a network cable.
Computer environment
- Windows Vista Ultimate
- Windows Vista Business
- Windows Vista Home Premium
- Windows Vista Home Basic
- Windows XP* Professional (Service Pack 2 or later)
- Windows XP* Home Edition (Service Pack 2 or later)
* Windows Media Player 11 or later must be installed for USB connection.
When connecting to the network, restriction may apply if you use Home Edition of Windows Vista or Windows XP.
Connecting with a USB cable
to the USB port
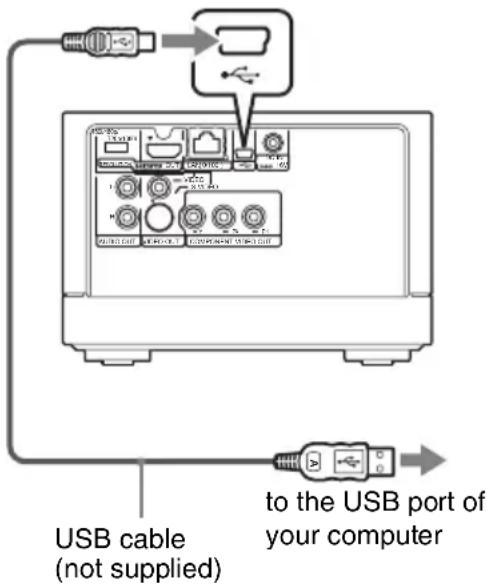
1 Connect a USB cable (not supplied) to the USB port on the rear of the unit.
2 Connect the other end of the USB cable to your computer. The unit enters connecting status. For further operations, see page 57.
Hint
When connected for the first time, the unit automatically installs necessary programs on the computer. (Windows Media Player 11 or later must be installed for Windows XP.)
Notes
- Connect the unit directly to the computer. The unit may not work properly if connected to a USB hub.
- Before moving the unit to connect to a computer, turn off the power, disconnect the power cord, and wait for at least one minute.
Connecting to the network
Connect the unit and computer using a network cable. Connection differs depending on your network environment.

1 Connect the network cable (not supplied) to the LAN port on the rear of the unit.
2 Connect the other end of the network cable to your home network.
See pages 52 to 56 for connection.
To start up the server
1 When connecting to a hub (or router with hub), make sure it is turned on.
2 Turn on the computer.
3 Turn on the TV, and switch the input selector on your TV so that the signal from the unit appears on your TV screen.
4 Turn on the unit.
5 Press HOME.
6 Select [Settings] and press
7 Select [Server Startup] from [Network] and press
The unit starts connecting to the computer, and the server starts up. For further operations, see page 58.
Check your usage environment
To connect the unit to a computer, a network connector of the computer should not be used, or one or more ports should be available for a hub or router with hub.
See the table below to check your connection, and make the necessary connections following “To connect the unit to the network” (page 54).
Note
You cannot connect to the Internet using this unit.
When your computer is connected to the Internet using a network (LAN) cable
| Connection Environment Connection | ||
A ADSL modem with router, etc. 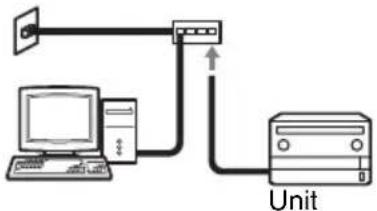 | When LAN ports are available on ADSL modem with router, etc. | Connect LAN port of unit to that of ADSL modem, etc., using network cable. |
B ADSL modem with router, etc.  | When LAN ports are full on ADSL modem with router, etc. ↓ Hub is necessary | Example 2: When connecting using a hub (page 55). |
C ADSL modem without router, etc. 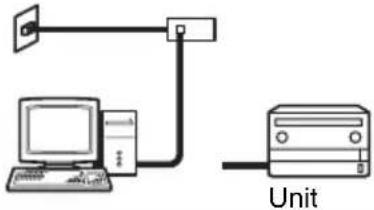 | When ADSL modem, etc. without router ↓ Router with hub is necessary | Example 1: When connecting using a router with hub (C on page 54). |
D  | When connecting directly to LAN system outdoors such as housing complexes ↓ Router with hub is necessary | Example 1: When connecting using a router with hub (D on page 54). |
When your computer is connected to the Internet without using a network (LAN) cable, or not connected to the Internet
| Connection Environment Connection | ||
E | When connecting to Internet using built-in modem | Examples 3: When network connection of the computer is available (page 56). |
F | When not connecting to Internet | |
G | When connecting to multiple computers with connection E or F↓Router with hub (or hub) is necessary | Example 1: When connecting using a router with hub (G on page 54). |
Hint
Refer to the operating instructions supplied with your ADSL modem, etc., to check if your modem is equipped with a router.
To connect the unit to the network
Connect the unit and computer using a network cable (not supplied) as illustrated below. You can also connect multiple computers.
Example 1: When connecting using a router with hub (for connection C, D, G)

flowchart
graph TD
    D["Computer 1"] -->|to LAN port| Computer1["Computer 2"]
    Computer1 -->|to LAN port| Computer2["Computer 2"]
    Computer2 -->|to LAN port| Router1["Router with hub *2 (commercial item)"]
    Router1 -->|LANWAN| C["Internet"]
    C -->|ADSL modem/cable modem, etc., with a router *1 (commercial item)| D
    Router1 -->|Network cable *3 (not supplied)| Computer1
    Router1 -->|Network cable *3 (not supplied)| Computer2
    C -->|LINE LANWAN| D
    style D stroke-dasharray: 5 5
    style C stroke-dasharray: 5 5
    style Router1 stroke-dasharray: 5 5
    note right of D: When using a router with hub in connection G, do not use the WAN port.
    note right of C: ADSL modem/cable modem, etc., with a router *1 (commercial item)
    note right of C: Linux LANWAN
    note right of C: Network cable *3 (not supplied)
    note right of C: Network cable *3 (not supplied)
    note right of C: Network cable *3 to LAN port
    note right of C: Linux LANWAN
    note right of C: Linux LANWAN
    note right of C: Linux LANWAN
*1 Depending on the connecting environment, the configuration may vary. For details, consult your contracted (or contracting) connection service center.
*2 Use a router with hub compatible with 10BASE-T/100BASE-T.
*3 Use a network cable compatible with 10BASE-T/100BASE-T.
Example 2: When connecting using a hub (for connection B)

flowchart
graph TD
    A["Internet"] --> B["ADSL modem/cable modem, etc., with a router *1 (commercial item)"]
    B --> C["Hub *2 (commercial item)"]
    C --> D["Computer 1"]
    D --> E["Computer 2"]
    E --> F["to LAN port"]
    F --> G["Network cable *3 (not supplied)"]
    G --> H["Network cable *3 (not supplied)"]
    H --> I["to LAN port"]
    I --> J["Computer 2"]
    style A fill:#f9f,stroke:#333
    style J fill:#ccf,stroke:#333
*1 Depending on the connecting environment, the configuration may vary. For details, consult your contracted (or contracting) connection service center.
*2 Use a hub compatible with 10BASE-T/100BASE-T.
*3 Use a router with hub (or hub) compatible with 10BASE-T/100BASE-T.
Example 3: When network connection of the computer is available (for connection E, F)

Note
When connecting the unit and computer as illustrated above, the following settings are necessary.
- Set the IP address of the computer to "Use a fixed IP address."
- Set the IP address on the unit (page 61).
Importing/Exporting Photos to/from a Computer
By connecting to a computer, you can import/export photos in the unit via a USB cable or network cable from/to the computer. See “Preparing the Unit and the Computer” (page 50) for connection to the computer. To illustrate, this section explains how to exchange data between the unit and a computer running Windows XP Professional. Progress can be observed on the computer display.
Notes
- You cannot export scrapbooks or "x-Pict Story HD" files to a computer.
- You cannot erase photos in the [ExportFolder].
Importing photos from a computer via a USB cable
You can import photos stored in the computer to the unit via a USB cable.
1 Turn on the computer, and open [My Computer].
2 Double-click [HDMS-S1D] (the unit).
3 Import the photos in the computer to [ImportFolder] by dragging and dropping.
4 After importing is finished, disconnect the USB cable.
5 Turn off the unit, and then turn it on again.
The import dialog appears.
6 Complete importing according to the instructions.
Exporting photos in the unit to a computer via a USB cable
1 Turn on the computer, and open [My Computer].
2 Double-click [HDMS-S1D] (the unit).
3 Export the photos in [Export Folder] to a folder on the computer by dragging and dropping.
4 After exporting is finished, disconnect the USB cable.
Importing photos from a computer via a network
You can import photos stored in the computer to the unit via a network.
1 Start the unit server by the procedure in "Connecting to the network" (page 51).
2 Turn on the computer, and open [My Network].
3 Click the [Workgroup] icon in [Microsoft Windows Network] of [Whole Network].
4 Double-click [HDMS-S1D] (the unit).
5 Import photos in the computer to [ImportFolder] by dragging and dropping.
6 When importing is completed, select [Finish] in the display of this unit, and press ✅
The server quits, and the import dialog appears.
7 Complete importing according to the instructions.
Exporting photos in the unit to a computer via a network
1 Start the server of the unit by the procedure in "Connecting to the network" (page 51).
2 Turn on the computer, and open [My Network].
3 Click the [Workgroup] icon in [Microsoft Windows Network] of [Whole Network].
4 Double-click [HDMS-S1D] (the unit).
5 Export photos in [Export Folder] to a folder on the computer by dragging and dropping.
6 When exporting is completed, select [Finish] in the display of this unit, and press ⚙
The server quits.
Note
The unit ([HDMS-S1D]) may not appear on the computer display when connecting via a network. In this case, enter the following in the Windows address bar:
- \HDMS-S1D
- \ (IP address of the unit) (input if you cannot access by the unit name) For example, enter \192.168.0.5
Check the IP address in the “Network Settings” display (page 61).
If the unit still does not appear on the computer, refer to the operating instructions supplied with the computer, and take the necessary steps.
How to Set Up the Unit
You can change various settings in the Setup menu screen. For details on setting options, see “Setting List.”
1 Press HOME.
2 Select [Settings] and press

3 Select the menu to change and press ⏻
Example: [Unit Settings]
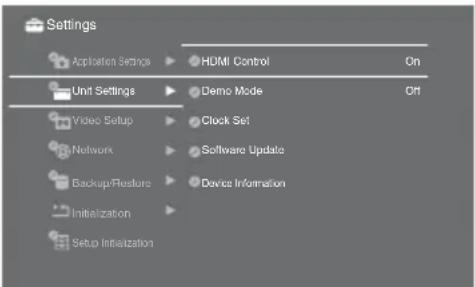
4 Set the options and press.
To return to the previous Settings screen
Press RETURN.
Setting List
You can set up the following options.
Options
Application Settings (page 60)
Allows you to create "x-ScrapBook" and "x-Pict Story HD" automatically and set the other playback options.
Unit Settings (page 60)
Allows you to set the date and time, update firmware in the unit, confirm the hard disk capacity, and set the demo mode, etc.
Video Setup (page 61)
Adjusts the video settings (e.g. in case the aspect ratio of output images does not fit to TV screen).
Network (page 61)
Sets the network to connect to a computer.
Exports data in the unit's hard disk to DVD. The data can be restored from a backup to the hard disk.
Initialization (page 63)
Initializes the hard disk of the unit or inserted DVD/memory card. Note that all stored images will be deleted.
Setup Initialization (page 63)
Resets all settings to default. Date and time are not reset. Data such as stored images are not deleted.
Application Settings
The default setting is underlined.
x-Pict Story Date Display
Selects whether to display date information for “x-Pict Story HD” files. (On/Off)
Auto Creation (x-ScrapBook/x-Pict Story)
Selects whether to create a scrapbook and “x-Pict Story HD” file automatically when importing photos. (On/Off)
x-ScrapBook Page Numbering
Selects whether to display a page number of a scrapbook when you export to a memory card/disc or print out. (On/Off)
Image Analysis
Selects whether to activate the face location function, etc., when importing photos simply by pressing the IMPORT button (page 22). (On/Off)
Auto Group
Selects whether to activate the album creation function automatically by date or specific event when importing, simply by pressing the IMPORT button (page 22). (On/Off)
Info Banner
Selects whether to automatically display the playback status, title, etc., momentarily while playing a photo or an “x-ScrapBook.” (On/Off)
Sample
Selects whether to display samples in Photo Browser or the thumbnail list. (On/Off)
Unit Settings
The default setting is underlined.
HDMI Control
Sets whether to link with the operation of the connected HDMI device (e.g., turning on the power for both the unit and TV). (On/Off)
Demo Mode
Sets whether to start the demo automatically after turning on the unit or not operating for a set period of time. (On/Off)
Note
The demo may automatically start even while the slideshow or "x-Pict Story HD" file is playing. To stop the demo mode, set [Demo Mode] to [Off].
Clock Set
Sets the clock of the unit. See “Setting the Clock” (page 18).
Software Update
To improve the function of the unit, program or template updates may become available in the future. Save the program downloaded from the Internet on a memory card or a disc with the computer.
Note
Do not turn off the unit until the update is completed.
1 Insert a memory card or a disc containing the update program.
2 Press HOME.
3 Select [Settings] and press ⊕.
4 Select [Unit Settings] and press ⊕.
5 Select [Software Update] and press ⊕.
6 Select [YES] and press .
The update starts.
The unit turns off and restarts automatically when the update is complete.
7 Select [OK] and press .
Device Information
Displays the software version and the approximate free space of the unit's hard disk.
Video Setup
The default setting is underlined.
TV Type
Selects the image size according to the aspect ratio of the connected TV. For details, refer to the operating instructions of your TV.
| 16:9 | Select this when connecting to a wide-screen TV. |
| 4:3 | Select this when connecting to a 4:3 screen TV without a wide mode function. |
Video Resolution
Selects the resolution of video signals output from the HDMI OUT jack according to the resolution of your TV, or to the RESOLUTION switch setting on the rear of the unit.
| Link WithSwitch | Selects the resolution set by the RESOLUTION switch. |
| Prioritize HDMI | Selects the highest resolution acceptable for your TV when connected HDMI OUT jack. |
HDMI Settings
Selects the type of video signals output from the HDMI OUT jack.
| Auto | Switches output signals automatically. |
| RGB Outputs | RGB signals. |
| Y Cb Cr Outputs | Y, PB/CB, PR/CR signals. |
Notes
- Even if you select [RGB] or [Y Cb Cr], if your TV is not compatible, or its video settings are not appropriate, the unit will output a signal acceptable with your TV.
- When connected to a TV compatible with "PhotoTV HD" by an HDMI cord, you can enjoy higher quality images by selecting [Auto].
Black Level
Selects the black level (Setup level) for 480i video signals output from the VIDEO OUT/S-VIDEO OUT/COMPONENT VIDEO OUT jacks.
| On | Raises the standard black level. Select this when the picture appears too dark. |
| Off | Sets the black level of the output signal to the standard level. |
Network
The default setting is underlined.
Network Settings
You can acquire an IP address to connect the network using a LAN cable.
The setting options will differ according to the situation.
IP Address Acquiring Method
| Use a fixed IP address | Sets the value according to the router usage. |
| Use DHCP | Automatically assigns the setting by the DHCP server function of the router. |
When you select [Use a fixed IP address], fill in [IP Address], [Subnet Mask], and [Default Gateway]. The values depend on your network
environment. 0-255 can be entered as the sequence of numbers. [MAC address] shows the unique number identifying the network interface within the network.
Server Startup
When you use the unit as a server by connecting the unit to a computer using a network cable, you can exchange photos between the unit and other computers within the network. See “Connecting to the network” (page 51).
Backup/Restore
The data stored in the hard disk of the unit can be backed up to the disc (DVD+R/DVD+RW/DVD-R/DVD-RW). Should a problem occur with the hard disk, data is restorable from the backup disc. The following backup items are available.
x-ScrapBook Backup
Exports “x-ScrapBook” files and the photos/BGM used for scrapbooks to DVD.
x-Pict Story Backup
Exports “x-Pict Story HD” files and the photos/BGM used for “x-Pict Story HD” to DVD.
Album Backup
Exports all the photos stored in the album to DVD.
Note
Should trouble occur with the hard disk, consult your nearest Sony dealer or local authorized Sony service facility.
1 Press ▲ (open/close) and insert the blank disc for backup.
2 press HOME.
3 Select [Settings] and press
4 Select [Backup/Restore] and press ⏻.
5 Select the item and press .
6 Select the contents and press
[Auto Select]: Automatically selects items that have not been backed up (up to the disc's capacity).
7 Select [OK] and press .
8 Select [YES] and press .
Hints
- In step 4, a “BackUp” mark is added to an item that has been backed up once. You can erase the marks by selecting [Erase History].
- If the content exceeds a single disc's capacity, you can back up to multiple discs. Replace the disc according to the messages on the screen.
Restore
1 Press ▲ (open/close) and insert the backup disc.
2 Press HOME.
3 Select [Settings] and press
4 Select [Backup/Restore] and press ⏻.
5 Select [Restore] and press ⊕.
6 Select [YES] and press .
If you restore from multiple discs, replace the disc according to the messages on the screen.
Initialization
You can delete data in bulk to initialize the unit's hard disk, disc, or memory card.
Hint
When the hard disk is initialized, only data is deleted. See “Setup Initialization” to return to the default setting (page 63).
1 Press HOME.
2 Select [Settings] and press
3 Select [Initialization] and press .
4 Select the media you want to initialize and press.
5 Select [YES] and press .
6 Select [YES] and press again.
- Note that all stored photos, scrapbooks, and "x-Pict Story HD" files in the unit are deleted when selecting [Initialize HDD] in step 4.
- When you delete all data from a memory card, you may not be able to record with a digital still camera. In this case, initialize the memory card with the digital still camera again.
- Do not initialize the hard disk of the unit with a computer.
- Even if the hard disk is initialized, the samples will not be deleted.
- You cannot initialize a DVD-R/DVD+R/CD-R already recorded.
Setup Initialization
You can return all settings to their defaults.
Be careful all set items except the Clock Setting are initialized.
1 Press HOME.
2 Select [Settings] and press
3 Select [Setup Initialization] and press.
4 Select [Start] and press .
Hints
• After you initialize settings, the date and time setting display will appear (page 18).
- To delete all data stored in the unit, such as photos, select [HDD] in step 4 of “Initialization” (page 63).
▶ Additional Information
Troubleshooting
This section provides information related to the most common problems encountered by users of this product, and their solutions. Check the points listed here before contacting your Sony dealer or local authorized Sony service facility. Refer also to the operating instructions of your computer.
POWER
The power does not turn on.
→Check that the AC adaptor or AC power cord is connected securely.
TV
Images do not appear on your TV.
→Check that all connecting cords are connected securely.
→Check whether the connecting cords are damaged.
→Switch the input selector on your TV (such as to “VIDEO”).
→Check the TV settings and the video connection (page 14).
→Check the RESOLUTION switch on the rear. Slide the switch according to your TV's resolution (page 14).
→Check the connection and the setting according to the connected jack as follows.
- When connected HDMI OUT jack
- Check the connection.
- Check that [Video Resolution] is set to [Prioritize HDMI] in [Video Setup] (page 61).
- When connected COMPONENT VIDEO OUT jacks
- Disconnect the HDMI cord, if connected.
-
Slide the RESOLUTION switch according to your TV's resolution.
-
When connected VIDEO OUT/S-VIDEO OUT jacks
- Slide the RESOLUTION switch to 480i (page 16).
- Check the connection of the audio/video cord.
- If the HDMI cord is also connected, the HDMI connection may have priority. In this case, disconnect the cord after switching the RESOLUTION switch to 480i.
The photo does not fill the screen.
→Set the image size to fit the aspect ratio of your TV (page 67).
HDMI Control function does not work.
→Check the HDMI connection.
→Check [HDMI Control] of [Unit Settings] is set to [On] (page 60).
→Check whether the connected TV is compatible with HDMI Control function.
→Check the HDMI Control setting on the connected TV. Refer to the instructions of your TV.
Images
Imported photos are sorted by shooting date automatically.
→Import manually (page 24).
The “?” icon appears on the thumbnail list.
→Files other than images or unplayable images are displayed as a “?” icon on the thumbnail screen. The unit may not play photos edited on other units.
The photo cannot be displayed.
→The unit plays JPEG image files that conform to the DCF* image file format.
* "Design rule for Camera File system": Image standards for digital cameras regulated by JEITA (Japan Electronics and Information Technology Industries Association).
→Some functions may not work correctly for JPEG images that do not conform to DCF format (image files edited with a computer, etc.).
→It may take time to display depending on the file size.
→The following photos cannot be played:
- JPEG image files larger than 6,145 (width) × 4,097 (height).
- Image files smaller than 63 dots (width or height).
- Progressive JPEG images files.
- JPEG image files exceeding 16 MB.
→Image files with extreme aspect ratios may be unplayable.
The shooting date does not appear on an album title.
→The album name is automatically given according to the created order as [Album0001], [Album0002], and so on (page 23).
It takes time to display a photo, thumbnail, or slideshow.
→It may take time depending on the file size or format.
The slideshow stops halfway.
→The slideshow pauses when is pressed. To restart, press again. If the problem is still unresolved, force the power off and turn on again (page 66).
The slideshow or "x-Pict Story HD" file suddenly stops playing, and the demo starts.
→Set [Demo Mode] of [Unit Settings] to [Off] (page 60).
When a photo is rotated vertically, the top and bottom will appear clipped in the slideshow.
→Select [Standard] in OPTIONS menu during playback (page 28).
The rotated status of a photo differs when displayed in the thumbnail screen or full screen.
→If a photo is edited by rotating by the computer's application, the rotated status may differ in the thumbnail screen or full screen.
Free space of the unit's hard disk does not increase even if you erase photos or albums.
→Erase the “x-ScrapBook” or “x-Pict Story HD” created from the photos/albums you erase.
USB connection
The unit does not detect the USB device.
→Connect the USB device to this unit directly.
→Check whether the connected equipment is USB compatible.
→Check whether the USB device is turned on.
Computer connection
The unit cannot connect to computer.
→Check whether the computer is turned on (page 50).
- When connecting to the network Check the connection of the network as follows:
- Check the hub or router is turned on. Refer to the instructions of your hub or router.
- Check that you turn on the router before the unit (page 51).
- Check this unit and the hub/router are connected with the network cable (page 54).
A photo imported from the computer cannot be displayed.
→A photo edited on a computer may not be able to be displayed on this unit.
A photo cannot be imported from the computer.
→Check the file is stored in “ImportFolder” of the unit.
Remote commander (remote)
The remote does not work.
→Batteries are weak.
→Point the remote at the remote sensor on this unit (page 12).
→The remote is too far from the unit.
The remote does not operate the TV.
→Batteries are weak.
→Check the TV setting is made correctly (page 13). Some buttons cannot be used depending on the TV.
→Make the TV setting again if you have replaced the batteries (page 13).
Others
EXPORT or IMPORT indicator flashes in red.
→Turn on the unit and check the error message.
To turn off the power by force
If the problem is still unresolved after checking the troubleshooting guide, turn off the power by force. Hold down the I/ ^① (on/standby) button on the unit for more than 10 seconds.
Wide Screen Mode
The unit can be set to correctly display on a 16:9 aspect ratio TV screen. If a photo is not correctly displayed on a 4:3 TV screen, change the setting as follows.
TV screen Settings
Black bands are seen in the right and left of the screen and the image is enlarged vertically.
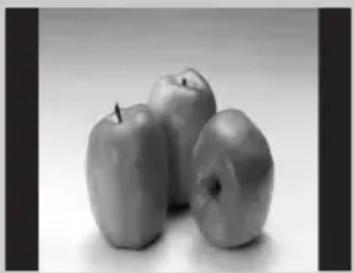
natural_image
Black and white photo of three apples on a plain background (no text or symbols)Black bands are seen around the image.
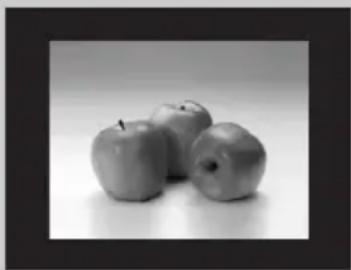
natural_image
Black-and-white photo of three apples on a plain background (no text or symbols)Set [TV Type] to [4:3] on the unit (page 61).
Above is an example when playing a photo shot in 4:3 horizon aspect in normal 16:9 mode of this unit. By setting [TV Type] to [4:3], a 4:3 photo displays in full screen on a 4:3 TV screen.
Supported Memory Card Types
The following memory cards can be used with the unit ^*1 .
| Type of Memory Card | Maximum size (guaranteed) |
| “Memory Stick” (w/o MagicGate) 128 MB | |
| “MagicGate Memory Stick”*2 | 128 MB |
| “Memory Stick” (with MagicGate) *2 *3 | 128 MB |
| “Memory Stick Duo” (w/o MagicGate) 32 MB | |
| “MagicGate Memory Stick Duo”*2 | 128 MB |
| “Memory Stick Duo” (with MagicGate) *2 *3 | 128 MB |
| “Memory Stick PRO Duo” *2 *3 | 8 GB |
| “Memory Stick PRO-HG Duo” *6 | 4 GB |
| “Memory Stick Micro” (“M2”) *2 *3 *4 | 1 GB |
| SD Memory Card *5 | 2 GB |
| miniSDTM Card *4 *5 | 2 GB |
| microSDTM card *4 *5 | 2 GB |
| MMC (MultiMediaCard) *7 | 2 GB |
| CompactFlash® | 8 GB |
| Microdrive® | 6 GB |
| xD-Picture CardTM 2 GB |
*1 Not all memory cards are guaranteed to work.
Operation is not assured if non-supported memory cards are used.
*2 Recording or playback of data that uses MagicGate technology is not supported.
*3 Parallel data transfer (high-speed data transfer) is supported.
Actual transfer speed may vary depending on media.
*4 An adaptor (not supplied) is required.
*5 Copyright protect functions are not supported. SDHC Memory Cards are not supported.
*6 Actual transfer speed is the same as "Memory Stick PRO Duo."
*7 MMCplus and MMCmobile are not supported.
Note
Do not insert any media or devices into the unit, other than those listed above.
What is MagicGate?
"MagicGate" is a copyright protection technology developed by Sony.
Notes on using "Memory Stick"
- If you set the write-protect switch to "LOCK," data cannot be recorded, edited, or erased.

-
Do not remove a “Memory Stick” while reading or writing data.
• Data may be damaged if: -
You remove a "Memory Stick" or turn off the unit while reading or writing data.
-
You use a “Memory Stick” in a place where susceptible to static electricity or electric noise.
-
We recommend that you make a backup copy of important data.
- Do not touch the terminal of the “Memory Stick” with your fingers or metallic objects.
- Do not bend, drop, or impact a “Memory Stick.”
- Do not disassemble or modify a "Memory Stick."
- Keep a “Memory Stick” away from water.
-
Do not use or store a “Memory Stick” under an unfavorable condition as below:
-
Extremely hot place (such as in a parked car with windows closed in summer, or a spot under direct sunlight)
– Humid place - Place near corrosive substances
- If you format a “Memory Stick” in which data has been already written, all the data and software will be erased. Be careful not to mistakenly erase any important data.
Notes on using "Memory Stick Duo"
- When you use a “Memory Stick Duo” without a write-protect switch, be careful not to edit or erase important data by mistake.
- When you use a “Memory Stick Duo” with a write-protect switch, data cannot be recorded, edited, or erased by setting the switch to “LOCK.”

- Use an object with a sharp tip to move the write-protect switch.
- Do not press on the memo area strongly when writing.
- Carry and keep a “Memory Stick” in its original case.
Supported Disc Types
The following discs can be used with this unit.
| Type of Disc Importing Exporting | ||
| DVD-ROM | × | |
| DVD-R (Ver2.0, 2.1 16x-speed max) | ||
| DVD-RW (Ver1.1, 1.2 6x-speed max) | ||
| DVD+R (Up to 16x-speed discs) | ||
| DVD+RW (Up to 8x-speed discs) | ||
| DVD-R DL (Up to 8x-speed discs) | × | |
| DVD+R DL (Up to 8x-speed discs) | × | |
| CD | × | |
| CD-R | ||
| CD-RW | ||
| Other | × | × |
Notes
- DVD-RAMs, Super Audio CDs, Blu-ray Discs, and HD-DVDs cannot be used.
- DVD-Videos, DVD Audio discs, VIDEO CDs and Game discs cannot be played.
- CDs formatted under UDF1.5 or ISO9660, and DVDs formatted under UDF2.01 are recognized.
Note on using discs
- A recorded disc may not be playable on this unit due to the recording quality or physical condition of the disc, or its authoring software. The disc will not play if it has not been correctly finalized.
- If you perform a disc operation (eg. import/export photos, etc.), the disc's rotation will increase and make a high-speed rotating sound to reduce processing time.
Specifications
Storage capacity
80 GB
(The capacity that can actually be used is approximately 76 GB due to the system management area on the hard disk. It will be displayed as 71 GB on your PC since it calculates 1 GB as 1,073,741,824 bytes. When measuring media capacity, 1 GB equals 1 billion bytes, a portion of which is used for data management.)
Media slots
"Memory Stick" slot (1)
SD Memory Card/MultiMediaCard/xD-Picture Card slot (1)
CompactFlash/Microdrive slot (1)
Supported memory cards
See page 68.
Connectors
USB (Type A) (for connecting digital still camera/USB keyboard) (1)
USB (mini-B) (for connecting
PictBridge printer/computer) (1)
LAN (1)
HDMI OUT (480i/480p/720p/1080i) (1)
COMPONENT VIDEO OUT (480i/
480p/720p/1080i) (1)
VIDEO OUT (480i) (1)
S-VIDEO OUT (480i) (1)
AUDIO OUT (L/R)(1 each)
DC IN (1)
Power requirements
120V AC, 60 Hz (the unit: DC 16V)
Power consumption
38 W maximum
Ambient conditions
Operating temperature: 5^ C to 35^ C ( 41^ F to 95^ F) (temperature gradient less than 10^ C/hour ( 50^ F/hour))
Operating humidity: 20% to 80% (non-condensing)
Dimensions
Approx. 171 × 115 × 195 mm (6 3/4 × 4 5/8 × 7 3/4 in.)
(W × H × D, without protruding parts)
Mass
Approx. 2.7 kg (6 lbs.)
Supported file formats
Still image
JPEG: JPG
RAW*: SRF, SR2, ARW
* Thumbnail of RAW files is displayed as native.
Resolution of recording pixels\*
25,165,824 pixels (6,144 (width) × 4,096 (height)) (file size less than 16 MB).
* Note that recording pixels differ from valid pixels.
Maximum number ^* of photos/albums
Albums: 3,000
Photos: 50,000
Photos for "x-ScrapBook"/"x-Pict
Story HD": 50,000
Photos within a single album/“x-
ScrapBook"/"x-Pict Story HD" file: 9,999
* Maximum number includes the samples in the unit.
Supplied accessories
See "Unpacking" (page 12).
Design and specifications of the unit are subject to change without notice.
Screen displays in this manual may not be the same as those of the product.
On copyrights and trademarks
•, "Memory Stick", "Memory Stick Duo", "MagicGate Memory Stick", "MagicGate Memory Stick Duo", "Memory Stick PRO Duo", "Memory Stick Micro" and "M2" are registered trademarks or trademarks of Sony Corporation.
- “BRAVIA” is a trademark of Sony Corporation.
- “PhotoTV HD” is a trademark of Sony Corporation.
- “” is a registered trademark of Sony Corporation.
- Microsoft ^® , Windows ^® , the Windows logo, Windows Vista ^TM , and Windows Media ^® Player are registered trademarks or trademarks of Microsoft Corporation in the United States of America and/or other countries.
- Other system and product names used herein are registered trademarks or trademarks of their respective manufacturers. ^TM and ^® marks may not be written in this manual.
- The raster process of TrueType fonts is based on the FreeType Team software.
- HDMI, the HDMI logo and High-Definition Multimedia Interface are trademarks or registered trademarks of HDMI Licensing LLC.
• xMP Picture Card™ are trademarks or registered trademarks of FUJIFILM Inc.
- Adobe is a registered trademark or a trademark of Adobe Systems Incorporated in the United States of America and/or other countries.
Parts and Controls
For more information, see pages in parentheses.
Front panel

1 I/ (on/standby) button/ indicator (17)
2 Remote sensor (12)
3 "Memory Stick" slot (19)
4 SD/MMC/xD-Picture Card slot (19)
5 CompactFlash / Microdrive slot (19)
6 CompactFlash / Microdrive eject button (19)
7 EXPORT indicator (47)
8 ▲ (open/close) button (21)
⑨ USB jack (for connecting digital still camera / USB keyboard) (21, 45)
10 IMPORT button/indicator (22)
11Disc tray (21)
Rear panel
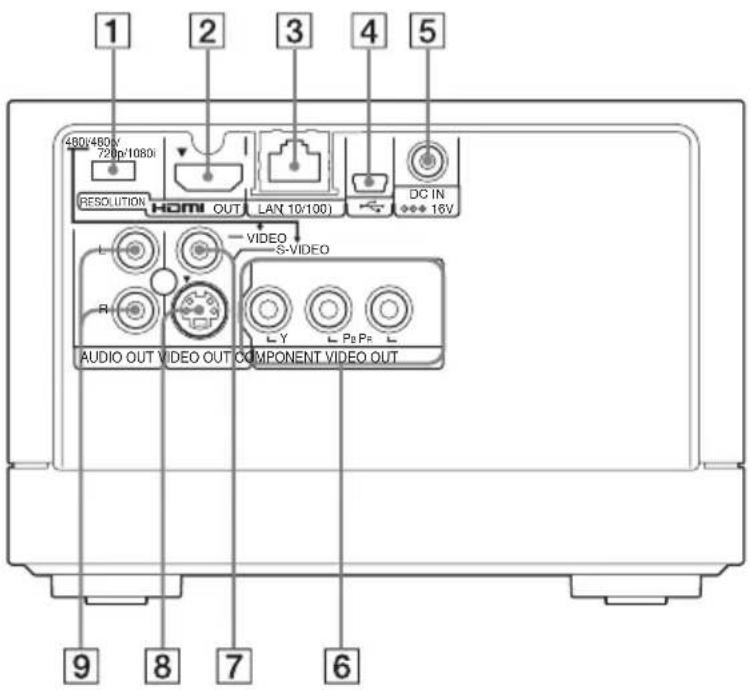
1 RESOLUTION switch (14, 61)
2 HDMI OUT jack (14)
3 LAN (10/100) jack (51)
4 USB jack (for connecting printer or computer) (48, 50)
5 DC IN 16V (AC adaptor input) jack (17)
6 COMPONENT VIDEO OUT (Y, PB, PR) jacks (16)
7VIDEO OUT jack (16)
8 S-VIDEO OUT jack (16)
9 AUDIO OUT L/R jacks (16)
Remote

1 INPUT button (13)
2 TV I/⏻ (on/standby) button (13)
③ INFO (information) button (10)
4RETURN button (10)
5 I/ (on/standby) button (17)
6 DISPLAY button (10)
7 ↑/↓/←/→, ⊕ (enter) buttons (10)
8 OPTIONS button (10)
9 HOME button (10)
10 TV operation buttons (13)
- VOL (volume) +/- buttons
- CH (channel) +/- buttons*
- MUTING button
Index
Words in blackets appear in the on-screen displays.
A
AC adaptor 17
[Album Backup] 62
[Application Settings] 60
AUDIO OUT 16
[Auto Creation (x-ScrapBook/
x-Pict Story)] 60
[Auto Group] 60
B
[Backup/Restore] 62
Battery 12
BGM
x-Pict Story HD 42
x-ScrapBook 36
[Black Level] 61
"BRAVIA" Theatre Sync 14
C
[Change Theme]
x-Pict Story HD 42
x-ScrapBook 35
Clock 18
[Clock Set] 60
CompactFlash (CF) 19
COMPONENT VIDEO OUT16
Computer environment 50
Connecting
digital still camera using a
USB cable 21
power cord 17
to a computer with a USB
cable 50
to the network 51
to TV 14
Controlling a TV with the remote 13
[Create x-ScrapBook] 37
Creating
album 29
x-Pict Story HD 43
x-ScrapBook 37
[Creation Mode] 42
Cursor mode 33
D
Date and time 18
[Demo Mode] 60
[Device Information] 61
Disc tray 21
Disc types 70
DISPLAY 11, 27, 32
Display 10
E
Editing
x-Pict Story HD 41
x-ScrapBook 35
Entering characters 45
Erasing
albums or photos 46
x-Pict Story HD 44
x-ScrapBook 39
[Export Page] 39
Exporting 47
to a computer via a network 58
to a computer via a USB
cable 57
x-ScrapBook 38
F
Front panel 73
[Full Screen] 28
H
HDMI Control 14, 60
HDMI OUT 14
[HDMI Settings] 61
HOME 10
|
[Image Analysis] 60
IMPORT 22
[Import From CD] 36, 42
Importing
all photos to the unit 22
from a computer via a network 58
from a computer via a USB
cable 57
selected photos or folders to
the unit 24
INFO 11
[Info Banner] 60
[Initialization] 63
INPUT 13
IP address acquiring method 61
L
LAN port 51
M
[MAC address] 62
Memory card 19
Memory card types 68
"Memory Stick" 19
"Memory Stick Duo" 19
Microdrive 19
[Multi Export] 47
Multi Media Card (MMC) 19
[Multi-Erase] 39, 44
Music
x-Pict Story HD 42
x-ScrapBook 36
[Music Settings] 36
N
[Network] 61
Network 51
[Network Settings] 61
0
OPTIONS 11, 24, 28, 30, 34, 41
P
Page mode 33
Parts and controls 73
Photo Browser 27
Playing
photos 27
slideshow 31
x-Pict Story HD 40
x-ScrapBook 32
Power cord 17
[Print With Date] 48
Printing 48
R
[Random] 42
Rear panel 74
Remote 12, 75
RESOLUTION switch 14
[Restore] 62
RETURN 10
[Rotate (left)] 28
[Rotate (right)] 28
s
[Sample] 60
Scrapbooks 32
SD Memory Card (SD) 19
[Server Startup] 51, 62
Setting list 59
Setting the clock 18
[Setup Initialization] 63
Slideshow 31
[Software Update] 60
Specifications 71
[Standard] 28
S-VIDEO OUT 16
T
Theme
x-Pict Story HD 42
x-ScrapBook 35
Troubleshooting 64
Turning off the power by force 66
Turning on the unit 17
TV I/13
TV operating buttons 13
[TV Type] 61
U
[Unit Settings] 60
USB keyboard 45
[Use All Photos] 42
[Use Entire Track] 42
V
VIDEO OUT 16
[Video Resolution] 61
[Video Setup] 61
Viewing
photos 27
x-Pict Story HD 40
x-ScrapBook 32
X
xD-Picture Card (xD) 19
[x-Pict Story Backup] 62
[x-Pict Story Date Display] 60
"x-Pict Story HD" 40
"x-Pict Story HD" files 40
"x-ScrapBook" 32
[x-ScrapBook Backup] 62
[x-ScrapBook Page
Numbering] 60


- WARNING
- CAUTION
- NOTE
- Declaration of Conformity
- Important Safety Instructions
- Copyright
- Owner's Record
- For the State of California, USA only
- Notes About the Discs
- Precautions
- Usage and storage
- On power sources
- Overheating
- Condensation
- Hard disk
- About repairing the hard disk drive
- Disc
- • Music discs encoded with copyright protection technologies
- On AC adaptor
- Table of Contents
- Preparations
- Importing Photos
- Enjoying Photos
- Editing Photos
- Exporting Photos
- Printing Photos
- Connecting to a Computer
- Setting Up the Unit
- Additional Information
- Main Features
- Easy photo import procedure
- Enjoying "x-ScrapBook"
- Enjoying "x-Pict Story HD"
- Enjoying the best quality images on "BRAVIA"
- Simply print and enjoy
- Making a disc copy for storage
- Guide to the Display Operations
- Press Ⓧ to enter the item.
- To use various functions, press OPTIONS.
- Full screen display
- Detailed information
- Unpacking
- Preparing the Remote
- Controlling a TV with the remote
- Hint
- Notes
- Connecting to Your TV
- Connecting to your TV using an HDMI cord
- Hints
- Using the HDMI\* Control function for "BRAVIA" Theatre Sync
- Viewing best quality images
- On "PhotoTV HD"
- When connecting to the HDMI OUT jack
- Connecting to your TV using a component video cord (Y, P_B , P_R )
- Connecting to your TV using an audio/video cord or S video cord
- Connecting the Power Cord
- Turning on the unit
- To turn off the unit
- If the unit does not respond
- Setting the Clock
- Preparation to Import Photos to the Unit
- Inserting and removing a memory card
- Inserting a “Memory Stick,” “Memory Stick Duo,” or SD Memory Card (SD) / Multi Media Card (MMC) / xD-Picture Card (xD)
- Inserting a CompactFlash (CF) / Microdrive
- To remove a CF / Microdrive
- Inserting and removing a disc
- Connecting to USB device such as a digital still camera
- Importing All Photos to the Unit
- To finish importing
- To import photos without turning on the unit
- To check the remaining capacity of the hard disk
- About album names and image storage locations
- Importing Selected Photos or Folders to the Unit
- Select an album to import to, and press .
- Importing multiple photos to the unit
- Viewing Photos (Photo Browser)
- Available OPTIONS during playback
- Available OPTIONS for the thumbnail screen
- To create a new album by collecting your favorite photos
- Select [Enter] and press .
- Viewing photos stored in a memory card or disc
- Available OPTIONS for the thumbnail list
- Playing a slideshow
- To pause the slideshow
- To change the slideshow pace
- Enjoying Photo Albums ("x-ScrapBook")
- Browsing the scrapbook
- To stop viewing the scrapbook
- Scrapbook viewing mode
- Page Mode
- Cursor Mode
- Available OPTIONS for Page mode
- Available OPTIONS for Cursor mode
- Editing the scrapbook
- To change the wallpaper (Change Theme)
- To add background music
- To import tracks from music CDs
- Creating a scrapbook manually
- To create a new scrapbook by collecting favorite photos
- Exporting scrapbooks to a memory card or disc
- Select [YES] and press
- Erasing scrapbooks
- Enjoying Advanced Slideshows ("x-Pict Story HD")
- Playing "x-Pict Story HD" files
- To stop playback
- Editing the "x-Pict Story HD" file
- To change background music or design theme
- Press ⊕
- Select [Start] and press .
- Creating a "x-Pict Story HD" file manually
- To create a new “x-Pict Story HD” file by collecting favorite photos
- Erasing "x-Pict Story HD" files
- ▶ Editing Photos
- Labeling Photos or Albums
- Entering characters
- To use a USB keyboard
- Erasing Albums or Photos
- Exporting to Memory Cards or Discs
- Printing Photos Using a PictBridge Printer
- Preparing the Unit and the Computer
- Computer environment
- Connecting with a USB cable
- Connecting to the network
- To start up the server
- Check your usage environment
- When your computer is connected to the Internet using a network (LAN) cable
- When your computer is connected to the Internet without using a network (LAN) cable, or not connected to the Internet
- To connect the unit to the network
- Importing/Exporting Photos to/from a Computer
- Importing photos from a computer via a USB cable
- Exporting photos in the unit to a computer via a USB cable
- Importing photos from a computer via a network
- Exporting photos in the unit to a computer via a network
- How to Set Up the Unit
- To return to the previous Settings screen
- Setting List
- Options
- Application Settings (page 60)
- Unit Settings (page 60)
- Video Setup (page 61)
- Network (page 61)
- Initialization (page 63)
- Setup Initialization (page 63)
- Application Settings
- x-Pict Story Date Display
- Auto Creation (x-ScrapBook/x-Pict Story)
- x-ScrapBook Page Numbering
- Image Analysis
- Auto Group
- Info Banner
- Sample
- Unit Settings
- HDMI Control
- Demo Mode
- Clock Set
- Software Update
- Device Information
- Video Setup
- TV Type
- Video Resolution
- HDMI Settings
- Black Level
- Network
- Network Settings
- Server Startup
- Backup/Restore
- x-ScrapBook Backup
- x-Pict Story Backup
- Album Backup
- Restore
- Initialization
- Setup Initialization
- ▶ Additional Information
- Troubleshooting
- POWER
- The power does not turn on.
- TV
- Images do not appear on your TV.
- The photo does not fill the screen.
- HDMI Control function does not work.
- Images
- Imported photos are sorted by shooting date automatically.
- The “?” icon appears on the thumbnail list.
- The photo cannot be displayed.
- The shooting date does not appear on an album title.
- It takes time to display a photo, thumbnail, or slideshow.
- The slideshow stops halfway.
- The slideshow or "x-Pict Story HD" file suddenly stops playing, and the demo starts.
- When a photo is rotated vertically, the top and bottom will appear clipped in the slideshow.
- The rotated status of a photo differs when displayed in the thumbnail screen or full screen.
- Free space of the unit's hard disk does not increase even if you erase photos or albums.
- USB connection
- The unit does not detect the USB device.
- Computer connection
- The unit cannot connect to computer.
- A photo imported from the computer cannot be displayed.
- A photo cannot be imported from the computer.
- Remote commander (remote)
- The remote does not work.
- The remote does not operate the TV.
- Others
- EXPORT or IMPORT indicator flashes in red.
- To turn off the power by force
- Wide Screen Mode
- TV screen Settings
- Supported Memory Card Types
- What is MagicGate?
- Notes on using "Memory Stick"
- Notes on using "Memory Stick Duo"
- Supported Disc Types
- Note on using discs
- Specifications
- Storage capacity
- Media slots
- Supported memory cards
- Connectors
- Power requirements
- Power consumption
- Ambient conditions
- Dimensions
- Mass
- Supported file formats
- Resolution of recording pixels\*
- Maximum number * of photos/albums
- Supplied accessories
- On copyrights and trademarks
- Parts and Controls
- Rear panel
- Remote
- Index
- Words in blackets appear in the on-screen displays.
- A
- B
- C
- D
- E
- F
- H
- |
- L
- M
- N
- 0
- P
- R
- s
- T
- U
- V
- X
Brand : SONY
Model : HDMS-S1D
Category : Server