
DMX 25 HBK - DVD player SCOTT - Free user manual and instructions
Find the device manual for free DMX 25 HBK SCOTT in PDF.


| Product Type | DVD Player |
| Brand | Scott |
| Model | DMX 25 HBK |
| Dimensions (W x H x D) | 430 x 45 x 260 mm |
| Weight | 2.5 kg |
| Power Supply | AC 110-240V, 50/60 Hz |
| Power Consumption | 12 W (typical) |
| Disc Compatibility | DVD, DVD±R/RW, CD, CD-R/RW, MP3, JPEG |
| Video Output | Composite, Component (YPbPr), HDMI |
| Audio Output | Stereo RCA, Coaxial Digital |
| Playback Functions | Play, Pause, Stop, Skip, Fast Forward/Rewind, Repeat, Zoom |
| Supported Regions | Region 2 (Europe) or multi-region (check manual) |
| Remote Control | Included (battery type: CR2025) |
| Maintenance & Cleaning | Clean with soft dry cloth; use lens cleaning disc occasionally |
| Safety | Class II (double insulation); laser class 1 |
| Spare Parts & Repairability | Contact Scott support for spare parts; repair by qualified technician |
| General Information | Designed for home entertainment; plug and play |
Frequently Asked Questions - DMX 25 HBK SCOTT
User questions about DMX 25 HBK SCOTT
0 question about this device. Answer the ones you know or ask your own.
Ask a new question about this device
Download the instructions for your DVD player in PDF format for free! Find your manual DMX 25 HBK - SCOTT and take your electronic device back in hand. On this page are published all the documents necessary for the use of your device. DMX 25 HBK by SCOTT.
USER MANUAL DMX 25 HBK SCOTT
The lightning flash with an arrowhead symbol, within an equilateral triangle, is intended to alert the user to the presence of uninsulated "dangerous voltage" within the product's enclosure that may be of sufficient magnitude to constitute a risk of electric shock to persons.

The exclamation mark within an equilateral triangle is intended to alert the user to the presence of important operating and maintenance (servicing) instructions in the literature accompanying the appliance.
To prevent direct exposure to the laser beam, do not try to open the enclosure.
WARNINGS:
To reduce the risk of fire or electric shock, do not expose this appliance to rain or moisture.
DO NOT REMOVE COVER or OPEN CASING.
Dangerous high voltages are present inside the enclosure. Do not open the casing. Refer servicing to qualified personnel only.
Use of controls or adjustments or performance of procedures other than those specified may result in hazardous radiation exposure.

LASER:
Type: Dual semiconductor laser GaAlAs
Wavelength: 650nm and 780nm
Output Power: 7mW
Beam Divergence: 60 degrees

INVISIBLE LASER RADIATION WHEN OPEN OR INTERLOCK FAILED OR DEFEATED.
WARNINGS:
DO NOT STARE INTO BEAM. Avoid direct exposure to laser beam.
To prevent direct exposure to laser beam, do not try to open the enclosure.
IMPORTANT SAFETY INSTRUCTIONS
CAUTION: Read and observe all warnings and instructions in this user guide and those marked on your unit. Keep this guide for future reference.
This unit has been designed and manufactured in a way that ensures your personal safety.
Improper use can result in electric shock or fire hazard. The safeguards incorporated in this unit will protect you if you observe the following procedures for installation, use, and servicing. This unit does not contain any parts that can be repaired by the user.
Do not remove the casing or you may be exposed to dangerous voltage. Refer servicing to qualified service personnel only.
- Read these instructions.
- Keep these instructions.
- Heed all of the warnings.
- Follow all of the instructions.
- Do not use this unit near water. For example, do not use this unit near a bath tub, wash bowl, kitchen sink or washing machine, in a wet basement, or near a swimming pool.
- Clean only with a dry cloth. Unplug this unit from the wall outlet before cleaning. Do not use liquid cleaners.
- Install in accordance with these instructions. Do not block the ventilation slots and openings in the unit, in order to ensure ventilation, and reliable operation of your unit. This will also prevent the unit from overheating.
- Do not place the unit on a bed, sofa, carpet or other similar surface. This product should not be placed in a built-in installation such as a bookcase or rack unless correct ventilation is provided or these instructions have been adhered to.
- Do not install near any heat sources such as radiators, hot air outlets, stoves, amplifiers or or other electronic devices that produce heat.
- Prevent the power cord from being walked on or pinched particularly at plugs and connections.
• The Mains plug is used as the disconnect device. It shall remain readily operable, and should not be obstructed during intended use - Use only attachments or accessories that are recommended by the manufacturer.
- Make sure that the unit is placed on a stable base. If using a trolley, stand the unit on it carefully so that it cannot fall off and injure someone.
- Unplug this unit during lightning storms or when unused for long periods of time.
- Refer all servicing to qualified service personnel. Servicing is required when your unit has been damaged in any way, such as when the power-supply cord or plug is damaged, liquid has been spilled into your unit or objects have fallen into it, your unit has been exposed to rain or moisture, if it is not working properly or it has been dropped.
- If replacement parts are required, make sure that the service technician uses replacement parts specified by the manufacturer or parts that have the same characteristics as the original part. Unauthorized substitutions may result in fire, electric shock, or other hazards.
CONTENTS
SAFETY....1
IMPORTANT SAFETY INSTRUCTIONS....2
CONTENTS 2
PACKAGE 3
MOUNTING....3
DESCRIPTION OF THE UNIT....3
CONNECTIONS 3
REMOTE CONTROL 4
GETTING STARTED & BASIC SETUP 5
PLAYING DVD / CD / VCD DISCS 8
TROUBLESHOOTING GUIDE 14
TECHNICAL SPECIFICATIONS .... 15
PACKAGE
DVD player
Remote control
A/V cable
Instruction manual
Stand
AC adapter
MOUNTING
Mounting on the stand
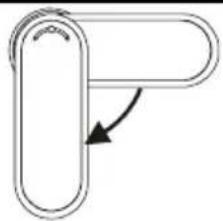
Insert the stand into the unit's slot at the back and rotate the stand around 90°.
Place the unit in an upright position.
Wall-mounting
You can remove the stand and mount the unit on a wall with the slots at the back of the unit and two screws (not supplied).

DESCRIPTION OF THE UNIT

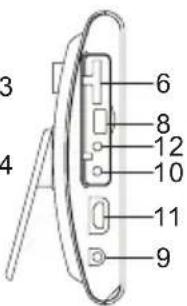

- ON/STANDBY ⏻button
- Disc slot
- LED display
- Infrared (IR) remote control sensor
- OPEN/CLOSE ▲ button
- SD/MMC/MS card slot
- PLAY/PAUSE ▶ button
- USB Port
9.
DC 5V jack
- Composite AV output
- HDMI output
- ⚙ (earphones)/Digital COAXIAL output jack
- Slots for wall mounting
- Stand
CONNECTIONS
Note: Open the side cover to connect earphones/coaxial and AV output.
Connecting to a TV
The way in which the unit is connected and the kinds of cables used can make a noticeable difference to picture and sound quality. Before selecting one of the options, please make sure that any other equipment has the required input/output connections. Use any of the options below:
| Different options for connecting your DVD player to a TV | ||||
| Output(s) | Picture quality | Cable | Cable supplied (Yes/No) | Video mode (Press the SETUP button on the remote control and select “SYSTEM SETUP” menu) |
| Composite AV (Audio/VIDEO) output | Normal | A/V cable (yellow, white and red) | Yes | Select “VIDEO” – “CVBS”) |
| HDMI | Excellent | HDMI cable | No | Select “HDMI OUTPUT” |
Connecting to an amplifier/5.1 speaker system
You can connect your DVD player to an analogue stereo amplifier or a digital amplifier using a 5.1 speaker system CH:
| Different options for connecting to an amplifier | |||
| Output | Sound | quality | Cable supplied Cable (Yes/No) |
| AV audio outputs | Normal | Audio cable (white and red) | Yes (A/V cable) |
| Digital coaxial output (COAXIAL) | Very good Coaxial | audio cable No | |
Connecting earphones
Plug earphones or headphones into the unit's 🌐 earphones jack for private listening. The speaker output will be shut off automatically.
REMOTE CONTROL
-
⏻ STANDBY
-
USB/CARD
-
A U D I O
-
1 - 9, 0/10, 10+ (number keys)
-
CLEAR
-
SETUP
-
◀/▶/▲/▼ navigation buttons
-
<</▶ REV/FWD (FAST REVERSE/FORWARD)
-
STEP
-
■ STOP
-
- VOL +
-
N/P (NTSC/PAL)
-
SLOW
-
HD/RES (HD resolution)
-
PROGRAM
-
▲OPEN/CLOSE
-
SEARCH
-
SUB/RIP (Subtitle/Ripping)
-
MENU
-
TITLE
-
DISPLAY
-
ENTER
-
◀PREV/NEXT
-
▶I PLAY/PAUSE
-
A-B Repeat
-
REPEAT
-
MUTE
-
ANGLE
-
PBC (playback control for VCD)
-
RETURN
-
ZOOM

GETTING STARTED
Power supply for the unit
- Carry out the connections for the unit as shown in "CONNECTIONS".
- Insert 2 AAA batteries (supplied) into the battery compartment in the remote control, taking care to follow the correct polarities.
- Connect the AC adapter power cord to an AC mains outlet and the other end to the unit's DC 5V jack. Press the ⏻ button on the unit or on the remote control to turn on the unit.
- Turn on the TV and set to the correct video-in source.
- To go to standby mode, press the ⏻ button on the remote control or on the unit. If the unit is not to be used for a long time, please disconnect the power cord from the mains outlet.
Notes:
- The remote control has a range of about 5 meters.
- Replace the remote control batteries when the range starts to reduce.
- If the remote control is not to be used for a long time, remove the batteries to avoid damage caused by battery leakage.
Precautions when using batteries
- Use only the size and type of batteries specified.
- Ensure that you follow the correct polarities marked in the battery compartment when installing the batteries. Reversed polarities may damage the remote control.
- Exhausted batteries must be removed because they might leak.
- Dispose of batteries properly according to the environmental regulations in force.
Inserting a disc
- Insert a disc with label side facing the front (insertion is automatic). Press the ▲ button on the front panel or the remote control to eject the disc. The unit will read the disc and start to play it, or it will display a start menu.
Inserting a USB device or an SD/MMC/MS card
- Open the side cover and insert a USB device or SD/MMC/MS card into the unit. Press the USB/CARD button on the remote control to select the source: DISC, CARD or USB.
Notes:
- Please ensure the USB device or SD/MMC/MS card is correctly inserted..
- This unit cannot support NTFS format. If the unit does not recognize your USB device, please check the device's file system and format it in FAT or FAT32.
Although you can watch a movie immediately, to get the best from this unit, it is recommended that you proceed with the Basic Setup first.
BASIC SETUP
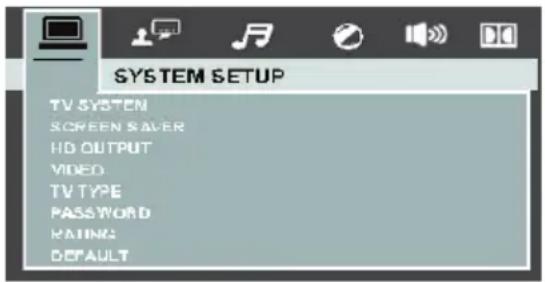
Press the ⏻ button to turn on the unit and press the SETUP button when no disc has been inserted or in stop mode to enter the SYSTEM SETUP menu.
Basic Operation
-
Use the ◀ or ▶ buttons to select one of the following menus (icons at the top of the display):
-
SYSTEM SETUP
• LANGUAGE SETUP - AUDIO SETUP
• VIDEO SETUP - SPEAKER SETUP
• DIGITAL SETUP
-
Use the ▲ or ▼ button to select a menu item. Press ▶ or ENTER to confirm.
-
Use ▲ or ▼ to select an item in the sub-menu, then press ENTER to confirm.
- Repeat steps 1 to 3 to change any settings.
- Press the SETUP button to exit setup.
For more details, please refer to the next chapters.
1. SYSTEM SETUP
1.1 "TV SYSTEM"
This player supports two different TV systems: NTSC or PAL. Choose the system that corresponds to your TV.
“NTSC”: Select this system if your television supports the NTSC color system used in North America.
“PAL”: Select this system if your television supports the PAL color system used in Europe and Asia.
"AUTO": Select this option to automatically switch to PAL or NTSC mode according to the disc inserted.
Note: If you use the HDMI output and the disc's color system is different to the TV system selected, the image may flicker. Select the "AUTO" option to adjust it.
Note: In stop mode, you can also use the N/P button on the remote control to select the TV system.
1.2 "SCREEN SAVER"
The screen saver appears 3 if the player is stopped for more than 3 minutes. It protects the television screen from being damaged. It can be turned on or off.
On: Screen saver on.
Off: Screen saver off.
1.3 "HDMI OUTPUT"
This function allows you to select the screen resolution for the HDMI output.
Notes:
- If your TV or monitor does not support HDCP, the screen will turn blue when playing DVDs which are protected by copyright.
- The HDMI output options depend on the TV color system selected (PAL or NTSC).
- Refer to your TV's instruction manual for more information on how to select the video input source.

- Please ensure that your HD TV supports the high resolution that you have selected.
- You can also select a resolution using the HD/RES button on the remote control.
1.4 "VIDEO"
Select a video output mode. Please ensure that you have connected the corresponding video source. In order to do this, refer to "CONNECTIONS".
CVBS: Select this option when the player is connected to a TV through a composite VIDEO input.
1.5 "TV FORMAT"
"4:3 PS" Select this format if the unit is connected to a normal TV. The left and right edges of the wide screen images are cut so that the image can be displayed in full screen.
“4:3 LB” Select this format when the unit is connected to a normal TV. Wide screen images are shown with black bands at the top and bottom.
"16:9" Select this format when the unit is connected to a widescreen TV.
Notes:
- Your selection may be disregarded due to the format used to record the disc.
- A disc recorded in 4:3 format will only play in 4:3 format.
- Choose the TV format that corresponds to your TV.
1.6 "PASSWORD" & "RATING"
Many DVDs contain Motion Picture Association rating codes. This DVD Player will recognize the codes on these discs, providing a method to prevent children from viewing films which are not suitable for them.
1 (Kid safe): Suitable for all audiences.
2 (G): Suitable for general audiences.
3 (PG): Parental guidance suggested.
4 (PG-13): Parental guidance suggested, unsuitable for children under 13.
5 (PG-R): Parental guidance recommended - brief scenes containing mature language or situations.
6 (R): Restricted - violence, adult language and situations unsuitable for young viewers.
7 (NC 17): Adult theme or content, not suitable for children under 17.
8 (Adult): Adult themes, language and nudity.
- Use the ▲ or ▼ buttons to select "Rating", then press ▶. Select a parental control level and then press ENTER.
- Use the ▲ or ▼ buttons to select "Password", then press ▶. Use the number keys (0-9) to enter your four-digit password (the default password is "0000") and press ENTER to confirm. The system is locked, which means that the parental control function is switched on.
- In the SYSTEM SETUP menu, use the ▲ or ▼ buttons to select "Password" and then press ▶. Use the number keys (0-9) to enter the four-digit password (the default password is "0000") and press ENTER to confirm. The system is unlocked, which means that you can adjust the setup for parental control. If you make a mistake, enter the 4-digit password again. DVDs that are rated above the selected level will not play. To change the password, first enter the old password, then enter the new password.
Indicates that the parental lock is NOT active. indicates that the parental lock is active.
Notes:
- The rating levels are only functional when the parental lock is active.
- The rating levels can only be changed when the parental lock is not active.
1.7 "DEFAULT"
This option allows you to restore the default settings.
2. LANGUAGE SETUP
You can select different languages for the setup menu. You can also select a language for the audio, subtitles, and disc menu depending on the different languages available on the DVD.
2.1 "OSD LANGUAGE"
Select the on screen display language.
2.2 "AUDIO LANG"
Select the audio language.
2.3 "SUBTITLE LANG"
Select the subtitle language.
2.4 "MENU LANG"
Select the disc menu language.
2.5 "MPEG4 SUBTITLE"
Select an alphabet for MPEG4 subtitles.
3. AUDIO SETUP

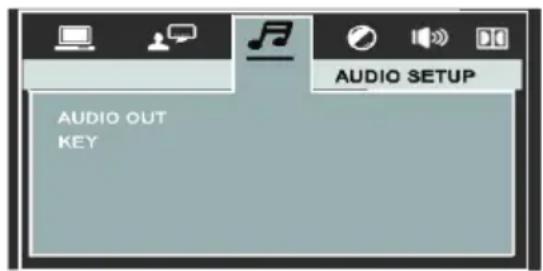
3.1 "AUDIO OUT"
If a digital amplifier is connected to the unit with a coaxial cable, the following settings can be selected.
"SPDIF/OFF": The audio signal is not transmitted via the "COAXIAL" or "HDMI" output. Select this option when no digital output is used.
"SPDIF/RAW": Dolby Digital signals are unaltered. Generally, this setting is used with a digital 5.1 channel receiver.
"SPDIF/PCM": Dolby Digital and MPEG 2 multi-channel signals are converted to PCM (Pulse Code Modulation). This setting is suitable for amplifiers or receivers without digital multi-channel sound decoders.
Note:
- This unit does not support DTS decoding.
3.2 "KEY"
Use the ▲ or ▼ button to adjust the key tone.
4. VIDEO SETUP
Use the ▲ or ▼ buttons to adjust the BRIGHTNESS, CONTRAST, HUE, SATURATION, and SHARPNESS of the video output quality. Press ▶ to confirm the option selected and then change the setting with the ▲/▼ buttons. Press ◀ to go back.
5.SPEAKER SETUP
5.1 "DOWNMIX"
LT/RT: This option allows you to listen to the soundtrack as it would sound in a movie theatre, if the original movie was recorded in the Pro Logic Dolby Digital format.
STEREO: When 2-channel sound is being played, select this option to obtain stereo sound.
VSS: When 5.1-channel sound is being played, the surround sound effect will be heard on the main soundtrack.
6.DIGITAL SETUP
6.1 "OP MODE" (dynamic compression)
LINE OUT: This option allows the user to adjust the dynamic compression in order to limit variations in volume to a level that is suitable for use at night.
RF REMOD: This option switches off dynamic compression for daytime use (the volume variations are set to normal).
6.2 "DYNAMIC RANGE"
Select "LINE OUT" in OP MODE to adjust the compression rate. Select "FULL" to limit the volume variations as much as possible. Select "OFF" to switch off the dynamic compression function.
6.3 "DUAL MONO"
Select this sub-menu to setup the L and R output modes. You can choose between 4 modes STEREO, MONO L, MONO R, and MIX MONO.
PLAYING DVD / CD / VCD DISCS
1. ▲(Open / Close)
Note: Load the disc on the disc slot with disc label facing the front.
- The unit will start playback automatically. Press the ▲ button to eject the disc.
2. ▶ (PLAY/PAUSE)
- Press the ▶ button on the remote control to start playback. Press it again to pause playback.
3. STEP (Frame-by-Frame Advance)
The image can be advanced frame by frame.
- For DVD / VCD playback, press STEP to advance frame by frame. Each time you press the button, playback will advance by one frame. Press to resume normal playback.
4. SLOW
Press the SLOW button to start forward slow motion play in the following sequence: 1/2, 1/3, 1/4, 1/5, 1/6, 1/7. Press the ▶Button to resume normal playback.
Note: Slow motion is not available when playing a CD.
5. ◀◀/▶ (fast forward/backward)
Press the ◀◀/▶▶ buttons to perform a fast forward or backward search. Press the ▶Button to resume normal playback. Each time these buttons are pressed, the playback speed will be adjusted in the following sequence: x2, x4, x8, x20. Press the ▶Button to resume normal playback.
6. |◀◀▶▶(Skip Forward/Backward)
When a disc is playing, you can skip backward/forward to the next track or chapter.
- Press the ◀ button to skip to the beginning of the previous chapter or track.
- Press the ▶ button to skip to the beginning of the next chapter or track.
For audio CDs, use the number buttons to directly select a track number.
7. ■ (Stop)
- Press ■ once to interrupt playback. Press ▶II to resume playback from the point where the disc was stopped.
- Press ■ twice to stop playback completely. It is now impossible to resume playback from the place where playback was stopped. Press ▶ to start playback from the beginning of the disc.
8. MENU
- Press to display the disc menu.
Notes:
This function is not available when playing an audio CD or VCD.
9. TITLE
- Press to display the title menu if available on the disc (DVD only).
10. ZOOM
The picture size can be magnified or reduced during playback.
- When a disc is playing, press the ZOOM button. Each time the ZOOM button is pressed, the size of the image will be changed as follows:
ZOOM 2 --> ZOOM 3 --> ZOOM 4 --> ZOOM 1/2 --> ZOOM 1/3 --> ZOOM 1/4 --> ZOOM: OFF - While an image is magnified, use the ▲, ▼, ◀ and ▶ keys to pan the image for viewing.
- To return to the normal view, press the ZOOM key until the message ZOOM: OFF appears. The image will return to its normal size.
11. ANGLE
ANGLE (select the viewing angle on a DVD)
This button enables you to view a scene from different angles (the availability of this function depends on the disc).
- Press ANGLE repeatedly to select different viewing angles.
12. AUDIO
(select one of the audio languages available on the disc)
During DVD playback, different audio languages can be selected.
- When a disc is playing, press AUDIO to show the current audio language.
- Press repeatedly to select the desired audio language.
○: [1] 2CH
Note:
- For VCD playback, press the AUDIO button to select an audio output (STEREO, MONO L, MONO R, MIX MONO).
- If a DTS disc is playing, there will be no sound output when DTS audio format is selected.
13. SUB/RIP

(select one of the Subtitle Languages available on the disc)
During playback, you can change the subtitle language or disable the subtitle function.
- While a disc is playing, press SUB/RIP to show the current subtitle playback language.
- Press repeatedly to select the desired subtitle language.
Notes:
- This function can only be used for discs on which different subtitle languages have been recorded.
- The number of languages recorded differs from disc to disc.
- This button is also used to rip audio CDs (refer to "AUDIO CD RIPPING").
ADVANCED PLAYBACK FUNCTIONS
1. DISPLAY function
While a disc is playing, press DISPLAY to display the playback information available, depending on the disc.
2. SEARCH function
This function allows you to select any point on the disc and to start playback from that point.


2.1 Selecting a specific title/chapter/time on a DVD or track on a CD/VCD
You can select any specific title/chapter/track/time and start playback from this point by directly selecting it.
- Press SEARCH.
- Use ◀ or ▶ to highlight the title / chapter / track / time field or enter the corresponding with the number keys.
- Press ENTER to confirm. The unit will then start playback from the selected position.
Notes:
- Some discs may not allow the use of this function.
- Some scenes may not be located as precisely as specified.
- This method for accessing a specific location is available only within the current title (DVD) or current track (CD).
- For VCDs, this function is only available if PBC is off.
- Press CLEAR to delete any mistakes.
3. Programming playback
You can choose the order in which the contents of the disc can be played.
- Press the PROGRAM button.
Note:
During VCD/SVCD playback, this function is only available when PBC is OFF.
3.1 DVD Programming
- Enter the title number of your choice (2 digit format, e.g. 01). Use the ◀ / ▶ buttons to highlight the chapter number field and then enter the chapter number (two digits).
- Use ◀, ▶, ▲ or ▼ to move to another field.
- Repeat the above steps for the next titles/chapters.
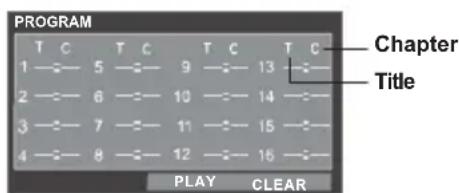
- Press ▶ or select PLAY and press ENTER to start the programmed playback.
3.2 CD/VCD/SVCD Programming
- Enter the track number of your choice.
• Refer to the previous section to program the tracks of your choice.

3.3 Clear a programmed item
- Select the field you want to delete and then press CLEAR to delete the item.
Note:
- Highlight "CLEAR" on the PROG screen and press ENTER to delete all of the programmed items.
4. Repeat playback
A specific title, chapter or track can be played repeatedly.
Note: During VCD / SVCD playback, repeat playback is only available when PBC is OFF.
4.1 Repeating a Title/Chapter/Track/All disc
- Press the REPEAT button
For DVDs: "OFF"> "CHAPTER"> "TITLE"> "REP ALL"
For CD/VCD/SVCD discs: "OFF"> "REP 1" > "REP All"
For MP3/JPEG/WMA files: "OFF">"REP 1">"REP DIR">"REP All"
4.2 Repeating a specific section
A-B repeat playback allows a specific section to be repeated.
- While the disc is playing, press the A-B button to set the beginning (point A) of the section to be played repeatedly.
- Press the A-B button again to set the end (point B) of the section to be played repeatedly.
- The unit will then immediately begin replaying the selection (A to B) repeatedly.
- Press the A-B button again to clear the programmed repeat playback and return to normal playback. Note:
- The A-B repeat function can only be used within the same title or track. If points A and B are defined in different titles or tracks, A-B repeat is cancelled.
REPEAT A-B
REPEAT A-
5.VCD/SVCD playback control
While a VCD / SVCD is playing, press PBC repeatedly to switch PBC (Playback Control) on or off.
- When PBC is ON, the disc menu (if available) will appear on the screen. Use the ◀◀◀▶buttons or the number keys (1-10) to select an option.
PLAYING MP3 / JPEG / WMA / MPEG 4 FILES
1. ▶ (PLAY/PAUSE)
- Pass the ▶button to start playback. Press it again to pause playback.
2. V◀◀(Bki p)
- Festox\$/pipetoides mack or picture.
3. ■ (Stop)
- Press to stop playback and display the selection menu (JPEG and movie files).
Note: Press ▶ to start playback from the beginning.
4. ZOOM
- Press to zoom into the image when playing JPEG or MPEG4 files.
5. Flipping and rotating images (JPEG)
- Press the navigation keys(▲,▼,◀,▶) to flip or rotate an image.
▲: flip the image vertically.
▼: flip the image horizontally.
◀: rotate the image 90° counterclockwise.
▶: rotate the image 90° clockwise.
6. Audio (MPEG4)
- During playback, press AUDIO to show the current playback audio language.
- Press repeatedly to select the desired audio language.
7. Subtitle (MPEG4)
- The unit supports MPEG4 files with external subtitles.
• To use the subtitle function:
1). Download or create the subtitle file in a suitable format, e.g. Subrip (*.srt), MicroDVD (*.sub), SAMI Captioning (*.smi), SubViewer 2.0 (*.sub).
2). Give the MPEG 4 movie and subtitle file the same name (e.g. abc.avi and abc.srt). Burn them to a CD disc or copy them to a USB device or SD/MMC/MS card.
3). Insert MPEG card USB tray, other p68/MMC/MS card and select SUB/RIP to turn the subtitles on or off.
Selection Menu
The selection menu will appear when MP3/WMA/JPEG/MPEG4 files are read. All of the folders will appear on the left hand menu and will be numbered in ascending order. When one of the folders is highlighted, all of the contents of that folder will be displayed on the right side of the menu. You can display one type of file only (music, pictures or films). Use the navigation keys to highlight the icon corresponding to the type of file that you would like to select (music, image or film). These icons can be found at the bottom of selection menu. Press ENTER to confirm. Then select the files and press ENTER or ▶ to start playback.
![[BITRATE]BITRATE 03 MP3 01 . BITRATE 02 . FOLDER TEST 03 . FOLDER 1 04 . ADD CHARAK 01 . BITRATE_03 02 . BITRATE_04 03 . BITRATE_05 04 . BITRATE_06 05 . BITRATE_07 06 . BITRATE_08 07 . BITRATE_09 08 . BITRATE_10 09 . BITRATE_11 Music Picture Movie](/content/2026/06/1258685/images/be5bd7ddf8aeed02e0bc1fada211fd349c2581b6a1cbabce782d4184300ec853.jpg)
[MUSIC] --- MP3 / WMA files
The unit will play the MP3 / WMA file currently selected. It will then play all the files in the sub-folders contained within the current folder. After that, the unit will play all of the remaining folders on the disc.
[PICTURE] --- JPEG files
Press ▶, and the unit will start a slideshow from the JPEG file currently selected. You can then zoom in on or rotate the images displayed. You can also select a folder and display all of the files in that folder. Select the folder of your choice and press the ▶ button. During playback, press the PROGRAM button repeatedly to select a transition mode.
[MOVIE] --- MPEG 4 files
The unit will read the file currently selected.
Notes:
- WMA, MP3, JPEG and MPEG4 files cannot be played simultaneously.
- The icon displayed at the bottom of the menu shows what kind of file is playing.
AUDIO CD RIPPING (ENCODING IN MP3 FORMAT)
With this player, you file around USB by your favorite audio CDs into MP3 format and save the device or SD/MMC/MS card.
- Check that the USB device or SD/MMC/MS card has been properly connected.
- Insert a CD disc that contains the music you want to record into the disc tray.
- Use the USB/CARD button on the remote control to select the disc mode.
- Press the SUB/RIP button on the remote control to display, the CD RIPPING menu.
"The cursor will be on "OPTIONS" by default. Press ▶ to access the settings for this function. Press ENTER to change and confirm the settings. Use the ▲,▼ buttons to select another option
ENCODE OPTIONS
SPEED: Set the encoding speed between 1X and 4X. Note: audio out is turned off for 4X.
BITRATE: You can choose one of the following bitrates: "128KBPS", "160KBPS", "192KBPS", "256KBPS" and "320KBPS". The sound quality of the MP3 files depends on the compression rate that you choose. To obtain audio quality

similar to that of a CD, use a sampling rate between 128 Kbps and 160 Kbps. Using a higher rate, such as 192 Kbps or more, rarely gives better quality. Conversely, files with a decompression rate lower than 128 Kbps are not of sufficient quality.
FILE OPTIONS
CREATE PLAYLIST: This option allows you to create a playlist under the name "Unknown Album.m3u". This list includes all of the tracks recorded and can be played on a PC.
STORAGE OPTIONS
This option allows you to select the source on which you would like to record extracts: USB device or SD/MMC/MS card. RIP CD-UNKNOWN ALBUM
- Select TRACKS. By default, all of the tracks are selected, with a cross. To remove a cross and delete a track from the list, use ▲ or ▼ to select the track that you do not want to record and then press ENTER to confirm deletion.
| RIP CD-UNKNOWN ALBUM | |||
| OPTIONS ►TRACKS START QUIT | ✓ TRK TITLE LENGTH | ||
| ✓ 1 TRACK 1 3:10 | |||
| ✓ 2 TRACK 2 2:49 | |||
| ✓ 3 TRACK 3 4:06 | |||
| ✓ 4 TRACK 4 2:59 | |||
| ✓ 5 TRACK 5 3:40 | |||
| ✓ 6 TRACK 6 2:55 | |||
- Select START. The following information will appear on the right of the screen: TOTAL TRACKS, TOTAL TIME AND TOTAL SIZE.
Press ENTER to start playing and recording the selected tracks.
--> The TRACK PROGRESS and TOTAL PROGRESS bars show the recording progress.
--> Dohing"CHANGEg, SPEED" and press ENTER to change the encoding speed. If you select the encoding speed 4X, the sound will be turned off.
--> Seling. "CANCEL" and press "ENTER" to stop rec
--> The message "FULL" appears if the storage space on the USB device is full.

When recording is complete, press ENTER to confirm.
- Select QUIT and press ENTER to exit the CD RIPPING menu.
- All of the tracks are saved in the folder named "Unknown Album".
Note:
- If the message "ERROR" appears during CD ripping, or the MP3 files cannot be read after ripping, please format the USB device or SD/MMC/MS card in FAT or FAT32 and then start the ripping again.
TROUBLESHOOTING GUIDE
If it appears that the unit is faulty at first finding this problem, he also be thought may be the overlooked.
Note: Under no circumstances should you try to repair the unit yourself as this will void the warranty. Only qualified service personnel should remove the cover or service this unit.
NO POWER
- Check that the power cord is properly connected.
• Chepkathetithswitched on.
NO PICTURE
- Check that the TV is switched on.
- Check that the correct AV input is selected on the TV (refer to the TV manual for more details).
- Check-inections between the player and TV.
NCEPNCADRI MODE.
- Check that the HDMI input is selected on your TV.
- Check HDMI resolution selected corresponds to the resolution of your HD TV.
- Check that your HD TV supports HDCP.
BAD QUALITY PICTURE
- Check the disc for fingerprints and clean with soft cloth, wiping from the center to the edge.
- Check that the disc format is compatible with the TV (PAL/NTSC).
BLATURAND WHITE PI
- Check if the disc format is compatible with the TV (PAL/NTSC).
- Chayerthan DVd Nepalected via the VCR.
PICTURE INTERFERENCE
- Relocate the unit further away from possible sources of interference or emissions (e.g. radio, power amplifier, radiator etc.).
THE REMOTE CONTROL IS NOT WORKING
- Aim the remote control directly at the sensor on the front of the player.
- Renocretahy obstacles bet control and the sensor.
- Chalkeries polarity of the
- Replace the batteries if necessary.
NO SOUND
- Check the audio connections.
- If using a Hi-Fi amplifier, try another sound source.
- Clean the disc.
- The disc may be damaged. Try another.
NO AUDIO SIGNAL FROM THE DIGITAL OUTPUT
- Check the digital connections.
- Check the audio setup menu to make sure that the digital output is correctly set.
- Check that the audio format selected i compatible with the player.
DISC CANNOT BE PLAYED
- Make sure the disc is placed properly in the disc slot.
IMPROPERIONING
- Strong interference may case this unit to malfunction. Reset the unit by unplugging the power cord and plugging it back in again.
TECHNICAL SPECIFICATIONS
| Power supplyAC adapter | Input: AC 100-240V ~ 50/60 Hz Output: DC 5V 2A |
| Power consumption | Standby: 1.77 WUSB/memory card mode: 5 WDisc mode: 6.5 W |
| Discs and files supported /RW | DVDR/RW, CD/DARCD-R/RW, MP3, JPEG, VCD2.0, MPEG 4,Xvid (.avi)This player can play discs from zone “2”.This indication is marked on the DVD disc label.  |
| TV system PAL/NTSC | |
| Video out | Composite video 1.0 Vp-p 75 Ohm |
| Audio out | Analog audio out 2.0 Vp-p / 10K Ohm |
| Frequency response | 20Hz -20KHz +/- 3dB |
| Output terminals Audio/video (composite) output x 1Digital coaxial output x 1HDMI output x 1, earphones x 1 | |
| USB Port Type 2.0 | |
| Maximum Capacity supported by the USB Port | 8 GB |
| Card types supported SD/MMC/MS | |
| Maximum capacity supported by the card reader | 8 GBSome external hard disks may not be supported (particularly if they are not in FAT32 format).Detecting and scanning the hard disk may sometimes take a few minutes. |
| Dimensions | Player: 245 (L) X 178 (W) X 43 (H) mm |
| Weight (full package) | Approx 1.4 Kg |
Note: Due to continuing improvements, these technical specifications are subject to change without notice.

If at any time in the future you should need to dispose of this product please note that electrical products should not be disposed of with household waste. Find out where your nearest recycling centre is. Check with your local authority or retailer for more details (Waste Electrical and Electronic Equipment Directive).



- WARNINGS
- DO NOT REMOVE COVER OR OPEN CASING
- LASER
- IMPORTANT SAFETY INSTRUCTIONS
- CONTENTS
- PACKAGE
- MOUNTING
- MOUNTING ON THE STAND
- WALL-MOUNTING
- DESCRIPTION OF THE UNIT
- CONNECTIONS
- CONNECTING TO A TV
- CONNECTING TO AN AMPLIFIER/5.1 SPEAKER SYSTEM
- CONNECTING EARPHONES
- REMOTE CONTROL
- GETTING STARTED
- POWER SUPPLY FOR THE UNIT
- NOTES
- PRECAUTIONS WHEN USING BATTERIES
- INSERTING A DISC
- INSERTING A USB DEVICE OR AN SD/MMC/MS CARD
- BASIC SETUP
- BASIC OPERATION
- SYSTEM SETUP
- 1.1 "TV SYSTEM
- 1.2 "SCREEN SAVER
- 1.3 "HDMI OUTPUT
- 1.4 "VIDEO
- 1.5 "TV FORMAT
- 1.6 "PASSWORD" & "RATING
- 1.7 "DEFAULT
- LANGUAGE SETUP
- 2.1 "OSD LANGUAGE
- 2.2 "AUDIO LANG
- 2.3 "SUBTITLE LANG
- 2.4 "MENU LANG
- 2.5 "MPEG4 SUBTITLE
- AUDIO SETUP
- 3.1 "AUDIO OUT
- NOTE
- 3.2 "KEY
- VIDEO SETUP
- 5.SPEAKER SETUP
- 5.1 "DOWNMIX
- 6.DIGITAL SETUP
- 6.1 "OP MODE" (DYNAMIC COMPRESSION)
- 6.2 "DYNAMIC RANGE
- 6.3 "DUAL MONO
- PLAYING DVD / CD / VCD DISCS
- ▲(OPEN / CLOSE)
- (PLAY/PAUSE)
- STEP (FRAME-BY-FRAME ADVANCE)
- SLOW
- ◀◀/▶ (FAST FORWARD/BACKWARD)
- ◀◀▶▶(SKIP FORWARD/BACKWARD)
- (STOP)
- MENU
- TITLE
- ZOOM
- ANGLE
- ANGLE (SELECT THE VIEWING ANGLE ON A DVD)
- AUDIO
- (SELECT ONE OF THE AUDIO LANGUAGES AVAILABLE ON THE DISC)
- SUB/RIP
- (SELECT ONE OF THE SUBTITLE LANGUAGES AVAILABLE ON THE DISC)
- ADVANCED PLAYBACK FUNCTIONS
- DISPLAY FUNCTION
- SEARCH FUNCTION
- 2.1 SELECTING A SPECIFIC TITLE/CHAPTER/TIME ON A DVD OR TRACK ON A CD/VCD
- PROGRAMMING PLAYBACK
- 3.1 DVD PROGRAMMING
- 3.2 CD/VCD/SVCD PROGRAMMING
- 3.3 CLEAR A PROGRAMMED ITEM
- REPEAT PLAYBACK
- 4.1 REPEATING A TITLE/CHAPTER/TRACK/ALL DISC
- 4.2 REPEATING A SPECIFIC SECTION
- 5.VCD/SVCD PLAYBACK CONTROL
- PLAYING MP3 / JPEG / WMA / MPEG 4 FILES
- V◀◀(BKI P)
- FLIPPING AND ROTATING IMAGES (JPEG)
- AUDIO (MPEG4)
- SUBTITLE (MPEG4)
- SELECTION MENU
- [MUSIC] --- MP3 / WMA FILES
- [PICTURE] --- JPEG FILES
- [MOVIE] --- MPEG 4 FILES
- AUDIO CD RIPPING (ENCODING IN MP3 FORMAT)
- ENCODE OPTIONS
- FILE OPTIONS
- STORAGE OPTIONS
- TROUBLESHOOTING GUIDE
- NO POWER
- NO PICTURE
- NCEPNCADRI MODE
- BAD QUALITY PICTURE
- BLATURAND WHITE PI
- PICTURE INTERFERENCE
- THE REMOTE CONTROL IS NOT WORKING
- NO SOUND
- NO AUDIO SIGNAL FROM THE DIGITAL OUTPUT
- DISC CANNOT BE PLAYED
- IMPROPERIONING
Brand : SCOTT
Model : DMX 25 HBK
Category : DVD player