
DVX 650 DT - DVD player SCOTT - Free user manual and instructions
Find the device manual for free DVX 650 DT SCOTT in PDF.


| Brand | SCOTT |
| Model | DVX 650 DT |
| Product Type | DVD Player |
| Dimensions (Approx.) | 430 x 260 x 50 mm |
| Weight (Approx.) | 2.5 kg |
| Power Supply | AC 220-240V, 50/60 Hz |
| Power Consumption | 12 W (standby: <1 W) |
| Disc Compatibility | DVD, DVD±R/RW, CD, CD-R/RW, VCD, SVCD |
| Video Output | Composite, Component, HDMI |
| Audio Output | Stereo analog, Digital Coaxial, Digital Optical |
| Playback Formats | MPEG-2, MPEG-4, DivX, XviD, MP3, WMA, JPEG |
| Remote Control | Included (batteries: 2x AAA) |
| Parental Control | Yes (rating levels) |
| Multi-language Menu | Yes |
| Maintenance | Clean with soft dry cloth; avoid liquids; do not disassemble |
| Safety Features | Auto power-off, overheat protection |
| Spare Parts & Repairability | Remote, AC adapter (internal); consult service center |
| User Manual Languages | English (PDF available) |
Frequently Asked Questions - DVX 650 DT SCOTT
User questions about DVX 650 DT SCOTT
0 question about this device. Answer the ones you know or ask your own.
Ask a new question about this device
Download the instructions for your DVD player in PDF format for free! Find your manual DVX 650 DT - SCOTT and take your electronic device back in hand. On this page are published all the documents necessary for the use of your device. DVX 650 DT by SCOTT.
USER MANUAL DVX 650 DT SCOTT
WARNING: SHOCK HAZARD-DO NOT OPEN


The lightning flash with an arrowhead symbol within an equilateral triangle, is intended to alert the user to the presence of uninsulated "dangerous voltage" within the product's enclosure that may be of sufficient magnitude to constitute a risk of electric shock to persons.

The exclamation mark within an equilateral triangle is intended to alert the user to the presence of important operating and maintenance (servicing) instructions in the literature accompanying the appliance.
WARNINGS:
To reduce the risk of fire or electric shock, do not expose this appliance to rain or moisture.
DO NOT REMOVE COVER or OPEN CASING.
Dangerous high voltages are present inside the enclosure. Do not open the casing. Refer servicing to qualified personnel only.
Use of controls or adjustments or performance of procedures other than those specified may result in hazardous radiation exposure.

LASER:
Type: Dual semiconductor laser GaAlAs
Wavelength: 650nm and 780nm
Output Power: 7mW
Beam Divergence: 60 degrees

INVISIBLE LASER RADIATION WHEN OPEN OR INTERLOCK FAILED OR DEFEATED.
WARNINGS:
DO NOT STARE INTO BEAM. Avoid direct exposure to laser beam.
To prevent direct exposure to laser beam, do not try to open the enclosure.
IMPORTANT SAFETY INSTRUCTIONS
CAUTION: Read and observe all warnings and instructions in this user manual and those marked on your unit. Retain this manual for future reference.
This unit has been designed and manufactured in a way that ensures your personal safety. Improper use can result in electric shock or fire. The safeguards incorporated in this unit will protect you if you observe the instructions for installation, use, and servicing. This unit does not contain any parts that can be repaired by the user.
Do not remove the casing or you may be exposed to dangerous voltage. Refer servicing to qualified service personnel only.
- Read these instructions.
- Keep these instructions.
- Heed all of the warnings.
- Follow all of the instructions.
- Do not use this unit near water. For example, near a bathtub, washbowl, kitchen sink, laundry tub, in a wet basement or near a swimming pool.
- Clean only with a dry cloth. Unplug this unit from the wall outlet before cleaning. Do not use liquid cleaners.
- Install in accordance with these instructions. Do not block the ventilation slots and openings in the unit, in order to ensure ventilation, and reliable operation of your unit. This will also prevent the unit from overheating.
- Do not place the unit on a bed, sofa, carpet or other similar surface. This product should not be placed in a built-in installation such as a bookcase or rack unless adequate ventilation is provided or these instructions have been adhered to.
- Do not install near any heat sources such as radiators, hot air vents, stoves, amplifiers or any other devices that produce heat.
- Make sure that the power cord is not walked on or crushed, particularly at plugs and connections.
- The power cord and mains plug should remain easily accessible.
- Use only attachments or accessories that are recommended by the manufacturer.
- Make sure that the unit is installed on a steady base.
- Unplug this unit during lightning storms or when not in use for long periods of time.
- Refer all servicing to qualified service personnel. Servicing is required when your unit has been damaged in any way, such as when the power-supply cord or plug is damaged, liquid or objects have got into the unit or it has been exposed to rain or moisture; or if it is not working properly or has been dropped.
- When replacement parts are required, be sure the service technician uses replacement parts specified by the manufacturer or have the same characteristics as the original part. Unauthorized substitutions may result in fire, electric shock, or other accidents.
CONTENTS
IMPORTANT SAFETY INSTRUCTIONS 2
CONTENTS....3
PACKAGE 3
FRONT AND BACK PANEL....3
CONNECTIONS 2
REMOTE CONTROL....3
GETTING STARTED & BASIC SETUP 4
PLAYING DVD / CD / VCD DISCS 6
ADVANCED PLAYBACK FUNCTIONS 7
PLAYING MP3 / JPEG / WMA / MPEG 4 FILES....8
DVB-T OPERATION....9
TROUBLESHOOTING GUIDE....13
TECHNICAL SPECIFICATIONS....14
PACKAGE
DVD player
A/V cable
Remote control
Instruction manual
FRONT AND BACK PANEL
Front panel

- ⏻ button (on/standby)
- Disc tray
- LED display
- Infrared (IR) remote control sensor
- OPEN/CLOSE ▲button
- PLAY/PAUSE ▶Button
- On/Standby LED indicator (On: green, Standby: red)
- USB port
Back panel

- Power cord
- L (Left) audio output
- SCART input
- Composite VIDEO output
- R (Right) audio output
- Digital COAXIAL output
- ANTENNA output
- SCART output
- ANTENNA input
CONNECTIONS
Connecting to a TV and VCR
See diagram before selecting a connection option.
Note: You can connect a TV and VCR as shown in the diagram.
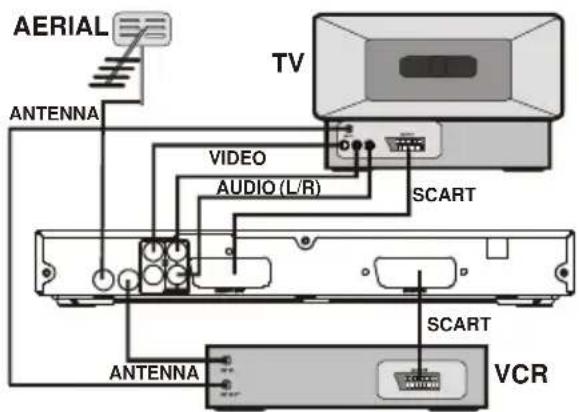
| Different options for connecting your DVD player to a TV | |||
| Output(s) Cable | Cable supplied (Yes/No) | Video Output(Press the SETUP button on the remote control and select System Setting-Display Setup -Video Output) | |
| SCART | SCART cable No | RGB | |
| Composite VIDEO output + L/R (Left/Right) audio outputs | A/V cable (yellow+white+red) | Yes | RGB or CVBS |
Connecting to amplifier
You can connect an amplifier to your DVD player in several different ways:
| Different options for connecting to an amplifier | |||
| Output Sound quality Cable | Cable supplied (Yes/No) | ||
| L/R (Left/Right) audio outputs | Normal Audio cable (white + red) | Yes (A/V cable) | |
| Digital coaxial output (COAXIAL) | Very good Coaxial audio cable No | ||
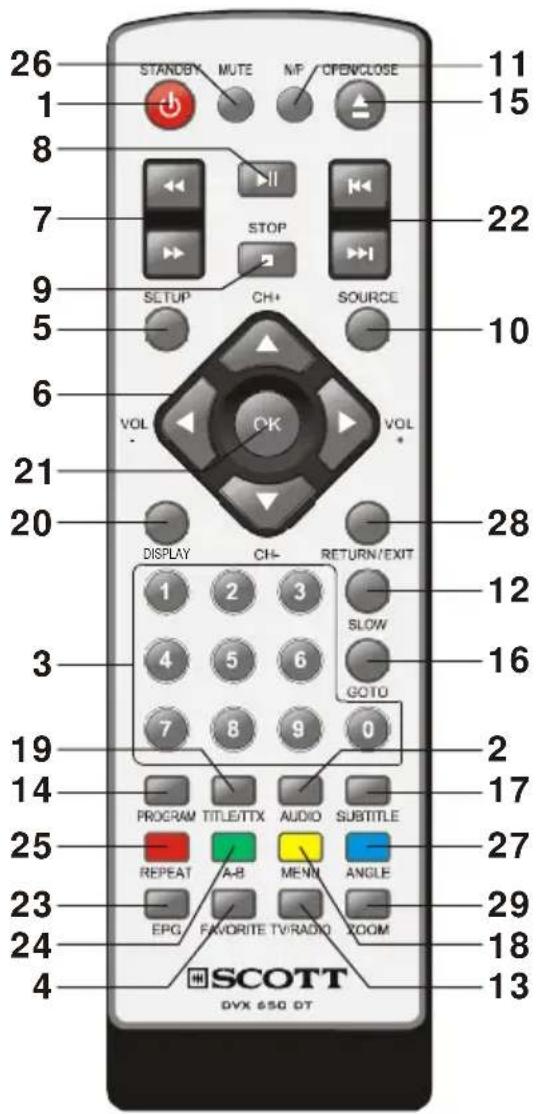
REMOTE CONTROL
- ⏻ STANDBY
- AUDIO
- 0 - 9 (number keys)
- FAVORITE
- SETUP
- ◀/▶(VOL+/-) / ▲/▼(CH+/-) (navigation keys)
- (fast reverse/forward)
- ▶II (PLAY/PAUSE)
-
■ STOP
-
SOURCE
-
N/P (NTSC/PAL/AUTO)
-
SLOW
-
TV/RADIO
-
PROGRAM
-
OPEN/CLOSE
-
GOTO
-
SUBTITLE
-
MENU (/PBC)
-
TITLE/TTX (teletext)
-
DISPLAY
-
OK
-
PREV/NEXT
-
EPG (electronic program guide)
-
A-B (repeat A-B)
-
REPEAT
-
MUTE
-
ANGLE
-
RETURN/EXIT
-
ZOOM
GETTING STARTED & BASIC SETUP
GETTING STARTED
Power supply for the unit
- Make the connections for the unit as shown in "CONNECTIONS".
- Insert 2 AAA batteries (supplied) into the battery compartment in the remote control, taking care to follow the correct polarity.
- Connect the power cord to an AC mains outlet. Press the ⏻STANDBY button to turn on the unit.
- Turn on the TV and set to the correct video-in source.
- To go to standby mode, press the STANDBY button. If the unit is not to be used for a long time, please disconnect the power cord.
Note:
- The range of the remote control is about 5 meters.
- Replace the batteries when the remote control range starts to reduce.
- If the remote control is not to be used for a long time, remove the batteries to avoid damage caused by battery leakage.
Precautions when using batteries
- Only use the batteries recommended by the manufacturer.
- Ensure the correct polarity when installing the batteries (see compartment)
Reversed polarity may damage the remote control. - Exhausted batteries must be removed to prevent possible battery leakage.
- Dispose of batteries properly according to environmental regulations.
Inserting a disc
Press the SOURCE button on the remote control and use the ▲/▼ buttons to select the source: DVD-ROM Drive. Press the OK button to confirm.
- Press the ▲OPEN/CLOSE button to open the disc tray.
- Insert a disc, then press the ▲ OPEN/CLOSE button again to close the disc tray. The unit will read the disc and start to play it, or it will display a start menu.
Inserting a USB device
Insert a USB device into the unit. Press the SOURCE button on the remote control and use the ▲/▼ buttons to select the source: DVD, DVB or USB. Press the OK button to confirm.
BASIC SETUP
Main Menu
The main menu allows you to access DVD Setup, DVB Menu, System Setting and Game. Press the SETUP button to access the main menu.
Use the ▲▼◀ and ▶arrow buttons to select a sub-menu.
Press the OK button to confirm.

DVD Setup
Language Setup
The following options are available:
Menu: To select the disc menu language.
Audio: To select the audio language.
Subtitle: To select the subtitle language.
External Subtitle: To select an alphabet for the MPEG4 subtitle language.
Audio Setup
Digital Output
OFF – Select this option when no digital output is used.
SPDIF/RAW - Dolby Digital signals are unaltered. Generally, this setting is used with a digital 5.1 channel amp.
SPDIF/PCM – Dolby Digital and MPEG 2 multi-channel signals are converted to PCM (Pulse Code Modulation). This setting is suitable for amplifiers or receivers without digital multi-channel sound decoders.
Downmix
Lo/Ro: Select this option to obtain stereo sound when playing 2-channel sound.
Lt/Rt: This option allows you to listen to the soundtrack as it would sound in a movie theatre, if the original movie was recorded in Pro Logic Dolby Digital format.
Custom Setup
Parental Ctrl
Select a level and press OK to confirm. Then enter the default password "6666" and press OK to confirm.
If you forget the password, you can always use the default password "6666".
Angle Mark
On: Enable the angle mark function. Off: Disable the function.
System Setup
Language Setup
OSD: To select the on-screen display language.
Display Setup
TV Standard
You can select one of the following systems: NTSC, PAL and AUTO (Multi). Select the system that matches your TV.
Display type
Choose the aspect ratio 4:3 or 16:9.
4:3PS – Select this format to display 4:3 images without distorting the picture. In this case, black bands will appear on left and right of the screen.
4:3LB – Select this format when the unit is connected to a 4:3 TV. Wide-screen images will be shown in full with black bands at the top and bottom of the screen.
16:9 – Select this format to play wide-screen videos in full-screen mode.
Video Output
Select the video output: CVBS (Composite VIDEO) or RGB (SCART or Composite VIDEO).
Brightness
Select one of the following video output picture modes: "Normal", "Bright" or "Soft".
Contrast
Select the contrast of the display.
Preference
UI Style
UI Style 1/2/3/4: Four setup menu styles can be selected.
Change PIN
Change the parental control password. The default is "6666".
Default Type
DVD/DVB/USB/User Select/Last Operating Type: Select the default source when the unit is switched on.
Default
Read: Restore the factory default settings.
System Info
The system information includes the Model, HW (hardware), SW (software) and Date.
Game
There are three games and a calendar.
PLAYING DVD / CD / VCD DISCS
1. ▲(Open / Close)
- Press to open the disc tray.
Note: Load the disc on the disc tray with printed side facing up. - Press this button again to close the disc tray. The unit will start playback automatically.
2. ▶(PLAY/PAUSE)
- Press to start playback. Press this button again to pause playback.
3. SLOW
Press the SLOW button to start forward slow motion play. Each time the SLOW button is pressed, the playback speed will change as follows: 1/2, 1/4, 1/8, 1/16, 1/32. Press the ▶ button to return to normal playback.
Note: Slow motion is not available when playing a CD.
4. /←→ (fast forward/backward)
Press the ◀◀▶ buttons to perform a fast forward or backward search. Press the▶ button to return to normal playback. Each time these buttons are pressed, the playback speed will change as follows: x2, x4, x8, x16, x32. Press the ▶ button to return to normal playback.
5. (Skip Forward/Backward)
When a disc is playing, you can skip backward/forward to the next track or chapter.
- Press the ◀button to skip to the beginning of the previous chapter or track.
- Press the ▶ button to skip to the beginning of the next chapter or track.
For audio CD discs, use the number buttons to directly enter the number of the track you want to listen to.
6. ■ (Stop)
- Press ■ once to interrupt playback. Press ▶ to resume playback from the point where the disc was stopped.
- Press ■ twice to stop playback completely. It is now impossible to resume playback from the place where playback was stopped. Press ▶ to start playback from the beginning of the disc.
7. MENU
- Press to display the disc menu.
Note:
This button has no function when playing an audio CD.
8. TITLE
- Press to display the DVD title menu (the availability of this function depends on the disc).
9. ZOOM
The picture size can be magnified during playback.
- When a disc is playing, press the ZOOM button. Each time the ZOOM button is pressed, the image size will change as follows:
Zoomx1-->Zoomx2-->Zoomx4 - While an image is magnified, use the ▲, ▼, ◀ and ▶ keys to pan the image for viewing.
- To return to the normal view, press the ZOOM button until the message Zoomx1 appears. The screen will return to normal.
10. ANGLE
ANGLE (change the viewing angle on a DVD)
This button enables you to view a scene from different angles (the availability of this function depends on the DVD).
- Press ANGLE repeatedly to select different viewing angles.
11. AUDIO (select the audio languages available on the disc)
Different audio languages can be selected when playing a DVD.
- When a disc is playing, press AUDIO to show the current audio language.
- Press repeatedly to select the desired audio language.
Note:
- You can select the audio output when playing a VCD disc: L/L (Left), R/R (Right), L/R (Mix).
- There will be no sound output when DTS audio format is selected when playing a DTS disc.
12. SUBTITLE (To select one of the subtitle languages available on the disc)
During playback, you can change the subtitle language or disable the subtitle function.
- While a disc is playing, press SUBTITLE to show the current subtitle language.
- Press repeatedly to select the desired subtitle language.
Note:
- This function can only be used for discs on which different subtitle languages have been recorded.
- The number of languages recorded differs from disc to disc.
ADVANCED PLAYBACK FUNCTIONS
1. DISPLAY function
While a disc is playing, press DISPLAY to display playback information available, depending on the disc.
2. GOTO function
Selecting a specific title/chapter on a DVD or time on a CD/VCD
- Press GOTO.
- Press ◀ or ▶ to highlight the title / chapter (DVD) or time (CD/VCD) field or enter the relevant number using the numeric keypad.
- Press OK to confirm. The unit will then start playback from the selected position.
Note:
- Some discs may not allow use of this function.
- For VCDs, this function is only available if PBC is off.
3. Programming playback
The contents of the disc can be played in a selected order.
- Press the PROGRAM button.
Note: During VCD/SVCD playback, this function is only available when PBC is OFF.
3.1 DVD Programming
- Use the ▲ or ▼ button to select the title number to the right of the program menu and press the OK button. Use the ▲/▼ buttons to select a chapter number and then press OK to confirm your selection. The selected program number "xx--xx" will be displayed to the left of the program menu.
- Repeat the above step for the next titles/chapters.
- Press ▶ or OK to start the programmed playback.
3.2 CD/VCD/SVCD Programming
- Refer to the previous section to program the tracks of your choice.
3.3 Deleting a programmed item
- Select the item and then press ■ to delete it.
4. Repeat playback
A specific title, chapter or track can be played repeatedly.
Note: During VCD / SVCD playback, repeat playback is only available when PBC is OFF.
4.1 Repeating a title, chapter, track or the complete disc
- Press the REPEAT button
For DVDs: "Off"> " Chapter"> " Title"
For CD /VCD/SVCD: "Off"> "Track"> "All"
For MP3 / JPEG / WMA files: “ ⇧ off”> “ ⇧ Track”> “ ⇧ Folder”> “ ⇧ All
4.2 Repeating a Specific Section A-B
You can repeat the playback of a specific section, A-B.
- While the disc is playing, press the A-B button to set the beginning of the section (point A) to be played repeatedly.
- Press the A-B button again to set the end of the section (point B).
- The unit will then immediately begin replaying the selection (A to B) repeatedly.
- Press the A-B button again to clear the programmed repeat playback and return to normal playback.
Note: The A-B repeat function can only be used within the same title or track. If points A and B are defined in different titles or tracks, A-B repeat is cancelled.
5. VCD/SVCD playback control
While a VCD / SVCD is playing, press MENU repeatedly to switch PBC (Playback Control) on or off.
- If PBC OFF is selected, use the ◀◀◀▶▶ buttons or the number keys (0-9) to select an option.
PLAYING MP3 / JPEG / WMA / MPEG 4 FILES
Note: This unit does not support the DIVX3 format.
1. ▶(PLAY/PAUSE)
- Press to start playback. Press again to pause playback.
2. |◀◀(Skip)
- Press to skip to the next/previous track or picture.
3. ■ (Stop)
- Press to stop playback and display the selection menu (JPEG and movie files).
Note: Press ▶b play from the beginning.
4. ZOOM
- Press to zoom in on an image when playing JPEG or MPEG4 files.
5. Flipping and rotating images (JPEG)
- Press the navigation keys(▲,▼,◀,▶) to flip or rotate an image.
Selection Menu
Program:
- Press STOP ■ to display the root menu.
- Press ◀, ▶, ▲ or ▼ to select a folder or file and then press the OK button to confirm.
[IMAGES] --- JPEG files
Press ▶ to start a slideshow from the JPEG file currently selected. You can then zoom or rotate the images displayed. Press the ANGLE button repeatedly to select a different transition mode. During playback, you can press the MENU

button to return to the root menu or press the ■ button to display the JPEG files in thumbnail mode and you can then select "Rotate" or "Slide Show".
[MOVIE] --- MPEG 4 files
The unit will read the file currently selected.
DVB-T OPERATION
Press the SOURCE button on the remote control and use the ▲/▼ buttons to select the source: DVB. Press the OK button to confirm.
First Time Installation
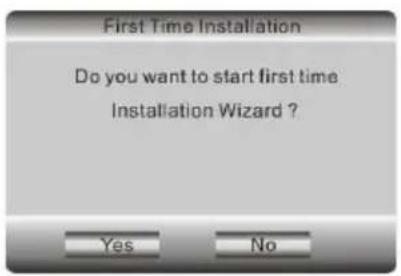


When DVB mode is used for the first time, the screen will display the First Time Installation page. This will guide the user through the initial DVB mode setup.
First, choose "Yes", then press the OK button. The system will then start the initial setup.
Then select the relevant regional information (country, OSD language and Time Zone. The system will automatically scan through the channels according to the information you have entered.
Select "Yes" to launch the automatic search.
At the end of the search, the system will go to DVB mode in order to view the channels found.
DVB Menu


In DVB mode, press the SETUP button to enter the main menu. To access the DVB menu, select "DVB menu" using the ▲,▼,◀ or ▶ buttons and press OK.
1) Channel List
a) TV Channels
The table has three options: Favor, Move and Del.
Favor
You can use this option to select your favorite channels. Go to the "Favor" box corresponding to the channel which you want to add to your favorites and press OK. Once a channel is chosen, a symbol (heart) will appear in the corresponding "Favor" box. To remove a channel from the favorites list, select the channel and press OK. You can then use the FAVORITE button to access your favorite channels.
Move
This option allows you to change the order of channels on the list. Go to the "Move" box corresponding to the channel that you want to move. Press OK, then use the ▲,▼ buttons to move the channel. Then press OK to confirm.
Del
You can use this option to delete channels. Go to the "Del" box corresponding to the channel that you want to delete, then press the OK button. An X will appear. This channel will not appear the next time the list is displayed.
b) Music Program


The list of radio stations is displayed in the same way as the list of TV Channels. Please refer to the previous section to edit the radio station list.
c) Sort
You can sort channels on the list by Name (channel name), Service ID, Channel No. (number) or LCN (Logic channel numbers sorted by frequency or the program provider).
2) Channel Search
a) Automatic Search
This option enables the user to search for channels automatically according to the Country and Time Zone settings. Before starting a search, the system will ask whether existing channels in the program list should be deleted. Choose "Yes" to replace the old channels with the new channels. Choose "No" to add the new channels to the list. When the automatic search is over, DVB mode will close and the unit will return to the channel display mode. If you press the RETURN/EXI the new channels will be added to the list and the unit will show the last channel found.
b) Manual Search
Use manual search to find a particular channel. You must provide the system with the channel number and confirm with the OK button. The channels found during the manual search will be added to the list but the unit will not exit the menu automatically.
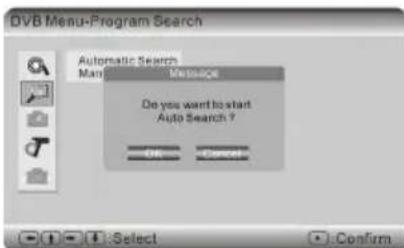
' button to suspend the search,

3) Parental control
a) Channel Lock
Select Channel Lock to block certain channels. To activate the channel lock ("Yes"), no code is needed. But to disable the channel lock ("No"), the user must enter the code.
b) Parental Setting
The Parental Setting can be used together with the Channel lock to lock channels. In order to enter the Parental Setting page, you must enter the PIN code. This menu
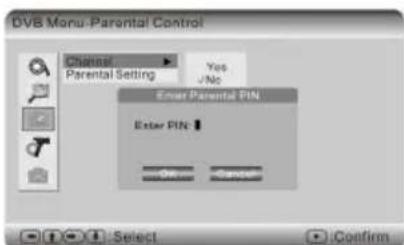
enables you to select the channels to be locked. To view the locked channels, the user must enter the correct PIN code. Note: the default PIN code is 6666. To change it, return to Main Menu and select "System Setting", then enter the System Setting Menu-Preference page and select the "Change PIN" option.

4) System Setting
a) Antenna Power
The default setting is "Off". Turn it on if you are using an amplified (active) portable antenna that does not have a power supply. This unit can supply 5V d.c. at 50mA maximum.
b) Country
Select this option to set the country for receiving DVB signals.
c) Language
The Language submenu has 3 options: "Audio 1", "Audio 2", and "Subtitle".
"Audio 1" and "Audio 2"
The user can choose the audio language from "Audio 1" or "Audio 2".

Subtitle
Select this option to choose the subtitle language.
Note: The Language option only works when the channel offers several languages. Otherwise, the preset language of that channel will be chosen automatically.
d) GMT Usage
Select this option to turn GMT usage on/off. When it is "Off", the Time Zone option will not be available and you must set the time yourself. When it is "On", you can select the Time Zone for your location.
e) Time Zone
Select this option to set your time zone.
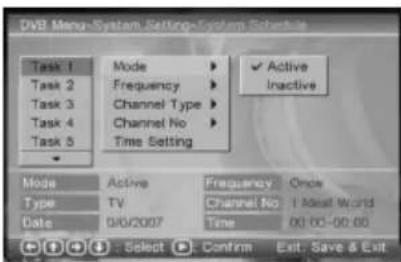
f) System Schedule
Select this option to preset the time for changing the channel. You can preset up to 10 channels.
Using DVB mode
Selecting a Channel
- Press CH-/CH+ to go through the channels or press the number buttons on the remote control.
- In normal playback mode, press the OK button to display the channel list on the screen. You can then select which channel you want to watch.
Audio
Press the AUDIO button to choose the audio channel (Audio 1 or Audio 2) and three audio modes: LL, RR and LR.
Subtitles
Press the SUBTITLE button to choose the subtitle language. The number of languages that available depends on the channel. If no other language can be chosen, only the "off" option will be available.
EPG Page
Press the EPG button to enter EPG mode (electronic program guide). Use the ▲,▼ buttons to choose a channel and check the program list for the next two sessions. To return to normal viewing of the channel, press the OK button. To check the complete program list for a day, press the ▶ button to display it. Press the ▲,▼ buttons to obtain detailed information. This information will be shown to the right of the program list. When you have chosen a program, use the OK button to preset the time for changing channel to make sure that you do not miss the program.
TV/RADIO
Press the TV/RADIO button to select the TV or radio channels.
TROUBLESHOOTING GUIDE
If you have a problem with your DVD player, please first check the points below. It may be that something simple has been overlooked.
Note: Under no circumstances should you try to repair the unit yourself as this will invalidate the warranty. Only qualified service personnel are authorized to remove the cover or service this unit.
NO POWER
- Check that the power cord is properly connected.
- Check that the player is switched on. Press the \$TANDBY button.
NO PICTURE
- Check that the TV is switched on.
- Check that the correct AV input is selected on the TV (refer to the TV manual for more details).
- Check the video connection between the player and the TV.
- Check the connection between the unit and the antenna.
POOR QUALITY PICTURE
- Check the disc for fingerprints and clean with soft cloth, wiping from the center to the edge.
- Check that the disc is compatible with the TV format (PAL/NTSC).
- Check the antenna cable and the antenna installation (using an amplifier may improve signal quality).
BLACK AND WHITE PICTURE
- Check that the disc is compatible with the TV format (PAL/NTSC).
- Check that the DVD player is not connected to the TV through the VCR.
PICTURE INTERFERENCE
- Place the unit as far away as possible from any sources of interference or emission (e.g. radios, etc.).
REMOTE CONTROL NOT WORKING
- Aim the remote control directly at the sensor on the front of the player.
- Remove any obstacles between the remote control and the sensor.
- Check the polarity of the batteries.
- Replace the batteries if necessary.
NO SOUND
- Check the audio connections.
- If using a Hi-Fi amplifier, try another sound source.
- Clean the disc.
- The disc may be damaged. Try another one.
NO AUDIO FROM DIGITAL OUTPUT
- Check the digital connections.
- Check the audio setup menu to make sure that the digital output is correctly set.
- Check that the audio format selected is compatible with the player.
DISC CANNOT BE PLAYED
- Make sure that the disc is placed correctly in the disc tray.
IMPROPER FUNCTIONING
- Strong interference may disturb normal operation of this unit. Just reset the player by disconnecting and reconnecting the power cord.
TECHNICAL SPECIFICATIONS
Power supply AC 100-240V \~ 50/60 Hz
Power consumption 15 W
Discs and files supported DVD-Video, DVD+R/RW DVD-R/RW, CD-DA,
CD-R/RW, MP3, JPEG, VCD2.0, MPEG 4, Xvid (.avi)
This player can play discs from zone "2".
This will be indicated on the disc label.
TV system PAL/NTSC/AUTO
Video output Composite video 1.0 Vp-p 75 Ohm
Audio output Analog audio output 2.0V (RMS) / 10KOhm
Frequency response 20Hz -20KHz +/- 3dB
Output terminals Audio/video (composite) output x 1
SCART output x 1, SCART input x 1
Antenna output x 1, Antenna input x 1
Digital coaxial output x 1
USB port Port type: 1.0
Some external hard disks may not be supported
(particularly if they are not in FAT32 format).
Dimensions 200(L) X 320 (W) X 38 (H) mm
Weight (full package) Approx 2 Kg
Note: Due to continuing improvements, these technical specifications are subject to change without notice.
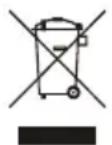
If at any time in the future you should need to dispose of this product please note that waste electrical products should not be disposed of with household waste. Find out where your nearest recycling center is. Check with your local authority or retailer for more details (Waste Electrical and Electronic Equipment Directive).



- WARNINGS
- DO NOT REMOVE COVER OR OPEN CASING
- LASER
- INVISIBLE LASER RADIATION WHEN OPEN OR INTERLOCK FAILED OR DEFEATED
- IMPORTANT SAFETY INSTRUCTIONS
- CONTENTS
- PACKAGE
- FRONT AND BACK PANEL
- FRONT PANEL
- BACK PANEL
- CONNECTIONS
- CONNECTING TO A TV AND VCR
- CONNECTING TO AMPLIFIER
- REMOTE CONTROL
- GETTING STARTED & BASIC SETUP
- GETTING STARTED
- POWER SUPPLY FOR THE UNIT
- NOTE
- PRECAUTIONS WHEN USING BATTERIES
- INSERTING A DISC
- INSERTING A USB DEVICE
- BASIC SETUP
- MAIN MENU
- DVD SETUP
- LANGUAGE SETUP
- AUDIO SETUP
- DIGITAL OUTPUT
- DOWNMIX
- CUSTOM SETUP
- PARENTAL CTRL
- ANGLE MARK
- SYSTEM SETUP
- DISPLAY SETUP
- TV STANDARD
- DISPLAY TYPE
- VIDEO OUTPUT
- BRIGHTNESS
- CONTRAST
- PREFERENCE
- UI STYLE
- CHANGE PIN
- DEFAULT TYPE
- DEFAULT
- SYSTEM INFO
- GAME
- PLAYING DVD / CD / VCD DISCS
- ▲(OPEN / CLOSE)
- (PLAY/PAUSE)
- SLOW
- ←→ (FAST FORWARD/BACKWARD)
- (SKIP FORWARD/BACKWARD)
- (STOP)
- MENU
- TITLE
- ZOOM
- ANGLE
- ANGLE (CHANGE THE VIEWING ANGLE ON A DVD)
- AUDIO (SELECT THE AUDIO LANGUAGES AVAILABLE ON THE DISC)
- SUBTITLE (TO SELECT ONE OF THE SUBTITLE LANGUAGES AVAILABLE ON THE DISC)
- ADVANCED PLAYBACK FUNCTIONS
- DISPLAY FUNCTION
- GOTO FUNCTION
- SELECTING A SPECIFIC TITLE/CHAPTER ON A DVD OR TIME ON A CD/VCD
- PROGRAMMING PLAYBACK
- 3.1 DVD PROGRAMMING
- 3.2 CD/VCD/SVCD PROGRAMMING
- 3.3 DELETING A PROGRAMMED ITEM
- REPEAT PLAYBACK
- 4.1 REPEATING A TITLE, CHAPTER, TRACK OR THE COMPLETE DISC
- 4.2 REPEATING A SPECIFIC SECTION A-B
- VCD/SVCD PLAYBACK CONTROL
- PLAYING MP3 / JPEG / WMA / MPEG 4 FILES
- ◀◀(SKIP)
- FLIPPING AND ROTATING IMAGES (JPEG)
- SELECTION MENU
- PROGRAM
- [IMAGES] --- JPEG FILES
- [MOVIE] --- MPEG 4 FILES
- DVB-T OPERATION
- FIRST TIME INSTALLATION
- DVB MENU
- CHANNEL LIST
- TV CHANNELS
- FAVOR
- MOVE
- DEL
- MUSIC PROGRAM
- SORT
- CHANNEL SEARCH
- AUTOMATIC SEARCH
- MANUAL SEARCH
- PARENTAL CONTROL
- CHANNEL LOCK
- PARENTAL SETTING
- SYSTEM SETTING
- ANTENNA POWER
- COUNTRY
- LANGUAGE
- AUDIO 1" AND "AUDIO 2
- SUBTITLE
- GMT USAGE
- TIME ZONE
- SYSTEM SCHEDULE
- USING DVB MODE
- SELECTING A CHANNEL
- AUDIO
- SUBTITLES
- EPG PAGE
- TV/RADIO
- TROUBLESHOOTING GUIDE
- NO POWER
- NO PICTURE
- POOR QUALITY PICTURE
- BLACK AND WHITE PICTURE
- PICTURE INTERFERENCE
- REMOTE CONTROL NOT WORKING
- NO SOUND
- NO AUDIO FROM DIGITAL OUTPUT
- DISC CANNOT BE PLAYED
- IMPROPER FUNCTIONING
- TECHNICAL SPECIFICATIONS
Brand : SCOTT
Model : DVX 650 DT
Category : DVD player