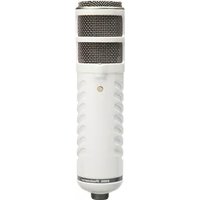
Podcaster - Microphone RODE - Free user manual and instructions
Find the device manual for free Podcaster RODE in PDF.


| Product Type | USB Broadcast Microphone |
| Acoustic Principle | Dynamic (neodymium 28mm) |
| Directional Pattern | Cardioid |
| Frequency Range | 40Hz – 14kHz |
| Sensitivity | -51dB re 1V/Pa @ 1kHz (2.8mV @ 94dB SPL) |
| Maximum SPL | 115dB |
| Signal-to-Noise Ratio | >78dB |
| Resolution | 18-bit |
| Sampling Rate | 8kHz – 48kHz |
| Power Requirement | USB bus powered |
| Output Connection | USB digital interface, 3.5mm stereo headphone jack |
| Headphone Output | 150mW into 32Ω, adjustable volume |
| Dimensions | 215 x 56 x 52mm (8.5 x 2.2 x 2 in) |
| Net Weight | 610g (21.5oz) |
| Included Accessories | Stand mount (3/8" & 5/8" thread), 3m (40") USB cable |
| Compatibility | Windows XP/Vista, Mac OS X (native support) |
| Warranty | 1 year standard, extendable to 10 years with online registration |
| Country of Origin | Designed and manufactured in Australia |
| Cleaning and Maintenance | Wipe with a soft, dry cloth; avoid moisture and solvents; store in a dry place |
| Safety | Do not disassemble; keep away from liquids; use only with USB power |
Frequently Asked Questions - Podcaster RODE
User questions about Podcaster RODE
0 question about this device. Answer the ones you know or ask your own.
Ask a new question about this device
Download the instructions for your Microphone in PDF format for free! Find your manual Podcaster - RODE and take your electronic device back in hand. On this page are published all the documents necessary for the use of your device. Podcaster by RODE.
USER MANUAL Podcaster RODE
Podcaster Instruction Manual

natural_image
White studio microphone with mesh grille and control knob, no visible text or symbols on bodywww.rodemic.com
Introduction
Thank you for investing in the RODeaster, the world's fi rst broadcast sound quality USB microphone.
Those of you who are first time RODEomers, may be interested to know that we are one of the largest and most respected professional microphone companies in the world. Our studio microphones are the 'tone' behind some of the biggest hits of the last decade, and our award winning live performance microphones are on tour daily in 52 countries.
The RODEaster has been designed for any application where recorded voice clarity and direct digital connection is demanded. Designed with Podcasting as a main use, this revolutionary microphone is also perfect for adding voice-overs while editing digital video, and for the 'on location' reporter who can quickly record on a laptop and then simply e-mail this to the studio for instant broadcast.
Just plug in the RODE Podcaster with the supplied USB cable, launch your recording or video editing program and begin. It is that simple.
In the following pages, you'll find a detailed description of the features of the RODE Podcaster, as well as a step-by-step instruction for its setup.
Please take the time to visit www.rodemic.com a register your microphone for a full ten year warranty.
While there you can view studio tips and techniques, as well as browse the comprehensive range of accessories for the Podcaster and other RODE microphones.

Peter Freedman
R∅DE Microphones
Sydney, Australia
Specifications
Acoustic Dynamic (neodymium) 28mm
Principle:
Active Analogue signal conditioning +
Electronics: A/D and USB interface
Directional Cardioid
Pattern:
Frequency 40Hz \~ 14kHz
Range: (see graph)
Sensitivity: -51dB re 1V/Pa @ 1kHz
(2.8mV @ 94dB SPL)
±3dB @ 1kHz
Maximum SPL: 115dB
Signal/Noise: >78dB
Analogue Headphone audio output for
Output I/F: monitoring. Drives 150mW into
32 Ω. Output level adjustment.
Resolution: 18bits
Audio Control AC97
I/F:
Power Power supplied via USB port
Requirement:
Output USB Digital Interface
Connection:
Net Weight: 610g (21.5oz)
Packed Weight: 1025g (36oz)
Dimensions 215 x 56 x 52mm
8.5 × 2.2 × 2"
Specifications
Frequency Response
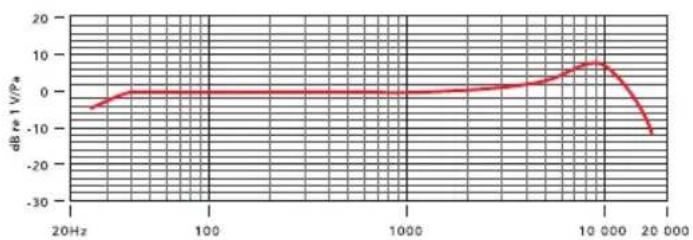
line
| Frequency | dB vs 1V/P* | | --------- | ----------- | | 20Hz | -5 | | 100 | 0 | | 1000 | 0 | | 10000 | 5 | | 20000 | -10 |Polar Response
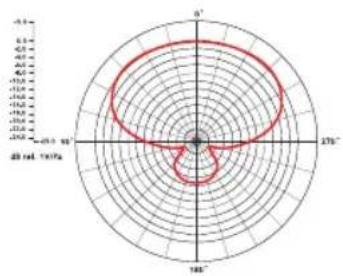
radar
| Angle (°) | Value | | --------- | ----- | | 0 | 10.5 | | 30 | 8.0 | | 60 | 6.0 | | 90 | 4.0 | | 120 | 2.0 | | 150 | 0.0 | | 180 | -2.0 | | 210 | -4.0 | | 240 | -6.0 | | 270 | -8.0 | | 300 | -10.5 |Features
• High quality broadcast sound
• Dynamic capsule (neodymium) 28mm
• 18-bit Resolution, 8kHz to 48kHz sampling
- Windows and Mac compatible
- Tight cardioid pattern for superior off-axis sound rejection
- Powered by USB bus
- Includes microphone mount and 3m (40") USB cable
- 3.5mm stereo headphone jack output with volume control
- Designed and manufactured in Australia
• Full 10 year guarantee*
*Online product registration required.
Mic Layout

Installing the Podcaster
The R∅DE Podcaster is designed for native support in Windows XP, Vista and Mac OS X operating systems.
Installing the Podcaster on Mac OS X
- Plug one end of the USB cable into the microphone and the other end into your USB port on the Mac.
The LED will flash red and then go green to indicate that everything is functioning correctly with USB power.
The Mac will recognise the USB audio device and automatically install a universal driver.
- To select the Podcaster as the computer's new audio input, open the 'System Preferences' from the dock or the main Apple Menu.

Next open the 'Sound' preference and click the 'Input' tab. Select 'R∅DE Podcaster'.

This will allow you to use your Podcaster through the existing sound recording software on your Mac.
- The 'Input Volume' slider can be used to adjust the sensitivity of the Podcaster.
Installing the Podcaster
The following example is for setting up the Podcaster in Windows XP Service Pack 2. Other versions may vary slightly.
Installing the Podcaster on Windows XP
- Plug one end of the USB cable into the microphone and the other end into your PC.
The LED should flash red and then go green to indicate that everything is functioning correctly with USB power.
The PC will recognise the USB audio device and automatically install a universal driver.
- To select the Podcaster as the computer's new audio input, open 'Sounds and Audio Devices' through the Control Panel.
This is usually done by going to Start/Control Panel and selecting the 'Sounds and Audio Devices' icon.
Click on the 'Audio' tab, and under the 'Sound Recording' option, you should now be able to select 'R∅DE Podcaster' as your default device.
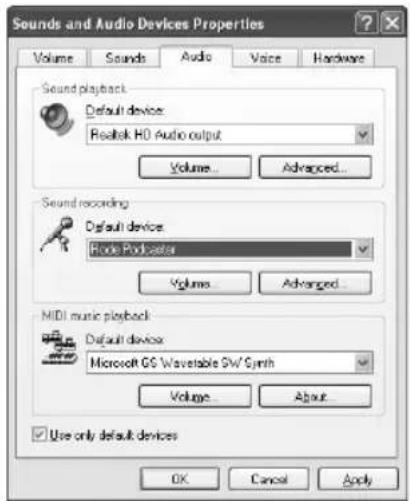
This will allow you to use your Podcaster through the existing sound recording software on your PC.
- The level slider under 'Volume' can be used to adjust the sensitivity of the Podcaster.
Setting up the Podcaster
Setting the sound level correctly
The first step in setting up your recording environment is to get a good 'Sound Level' on your equipment. This is done to ensure that you do not exceed the level of sound that your equipment can handle before it distorts the signal and at the same time, ensuring that the sound is not too low and indistinguishable.
By adjusting the recording volume slider you should be able to set a reasonable level very quickly.
The way to do this is to set the Podcaster up in front of you and raise the slider control while you are speaking at the same level you will use when recording. (see pages 6 & 7 for operating system control, or refer to your application documentation for native instruction).
If your slider control features a graphic level you will be able to gauge an appropriate level slightly below where the level reaches an overload (typically red).
Your recording will now be set at a useful level. Experimentation with this will allow you to fine tune your recordings over time.
Talking in to your Podcaster
The Podcaster is an end address microphone. This simply means that to get the clearest sound, you must talk directly into the front of the microphone as shown below. When you are talking into the microphone you should be able to clearly see the green status LED.

natural_image
Black-and-white photo of a man singing into a microphone, with no visible text or symbolsSetting up the Podcaster
Positioning your Podcaster
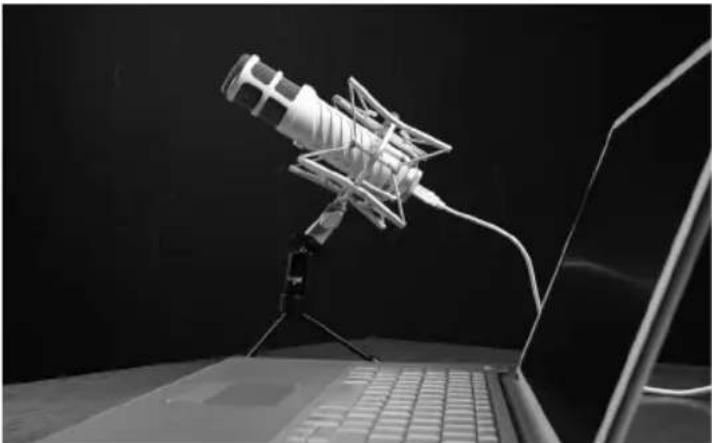
You will find that where you position your Podcaster will alter the quality of the sound.
Environment and background noise will vary every time a microphone is moved to a different location. The most successful method to optimise the sound you want is to try various positions and isolate the recording environment from external noise sources as much as possible.
Proximity effect is an increased bass response which happens when you are close to the microphone. This can be used in a positive way to enhance the quality of your voice, but be careful as being too close may increase the bass response too much which will distort the sound.
natural_image
Black-and-white photo of a desktop microphone on a laptop, no visible text or symbolsConnecting headphones to your Podcaster
A unique feature of your Podcaster is the in-built, high level, headphone amplifier.
Simply connect the 3.5mm jack from your headphones, and adjust the volume control on the microphone and you have direct monitoring of the sound from the microphone.
The advantage of connecting the headphones directly to the microphone is that you are able to hear exactly what you are recording before it is recorded. This allows for more accurate fine tuning and should reduce the need to re-record as problems can be detected earlier in the recording process.
Setting up the Podcaster
Mounting the Podcaster
The Podcaster comes with a stand mount that will allow you to connect it to a microphone stand or 'Anglepoise® style' arm such as the R∅DE PSA-1.
The mount comes with a 3/8" brass insert that can be removed. Once removed the internal thread of the mount is a 5/8" thread. This allows the mount to be used on either a US 5/8" stand or pole or a Euro 3/8" stand or pole.
Also on the mount is a thumb screw which when loosened will allow the mount to rotate to enable you to angle your microphone to the most appropriate direction.
To mount the microphone into the clip follow the steps below.
- Remove the locking collar from the base of the microphone.
- Slide the base of the microphone into the hole in the stand mount.
- Screw the locking collar back into position to carefully secure the Podcaster to the mount.
- Now, loosen the thumbscrew on the stand mount and adjust the microphone to the desired angle. Once set, tighten the thumbscrew to secure the microphone in place.
Setting up the Podcaster
Using the PSM-1 mount (optional)
For additional vibration isolation, the Podcaster can be fitted to the optional PSM-1 'spider' shock mount. The PSM-1 is a recommended and useful addition to any recording facility as it significantly reduces unwanted noise transmission to the microphone.
- First screw the PSM-1 shock mount onto your mic stand, boom arm or 'Anlgepoise® style' arm. If you're using a US 5/8" mic stand or boom, remove the 3/8" insert.
- Remove the locking collar from the base of the Podcaster and store it away in a safe place where it will not get lost.
• Install the Podcaster into the PSM1 by fitting the microphone into the center of the web and onto the bottom mounting plate.
There is a captive locking collar in the centre of the shock mount which will screw onto the thread on the bottom of the Podcaster.
- Rotate the captive locking collar to secure the Podcaster firmly in the shock mount.
- Loosen the thumb screw on the PSM1 shock mount to adjust the angle of the Podcaster and position it to the desired location. Once set, tighten the thumbscrew to secure the Podcaster in place.
Note: Be careful not to over tighten the thumbscrew as this could cause cross threading and the mount will not maintain the correct angle if this occurs.
Warranty
All RODEphones are warranted for one year from date of purchase. You can extend that to a full ten years if you register online at www.rodemic.com.
The warranty covers parts and labour that may be required to repair the microphone during the warranty period. The warranty excludes defects caused by normal wear and tear, modification, shipping damage, or failure to use the microphone as per the instruction guide.
If you experience any problem, or have any questions regarding your RODE microphone, first contact the dealer who sold it to you. If the microphone requires a factory authorised service, return will be organised by that dealer.
We have an extensive distributor/dealer network, but if you have difficulty getting the advice or assistance you require, do not hesitate to contact us directly.
R∅DE® Microphones
International
PO Box 6685
Silverwater NSW 2128 Australia
Ph: +61 2 9648 5855
Fax: +61 2 9648 2455
USA
P.O. Box 4189
Santa Barbara, CA 93140-4189
Ph: 805 566 7777
Fax: 805 566 0071
Technical Support
For information and technical support questions contact: support@rodemic.com
In the United States and Puerto Rico, contact
usasupport@rodemic.com or call 805 566 7777
In Australia, contact ozsupport@rodemic.com or call (02) 9648 5855
Anywhere except Australia, the United States and Puerto Rico, contact support@rodemic.com or call +61 2 9648 5855

- Podcaster Instruction Manual
- Introduction
- Specifications
- Features
- Mic Layout
- Installing the Podcaster
- Installing the Podcaster on Mac OS X
- Installing the Podcaster on Windows XP
- Setting up the Podcaster
- Setting the sound level correctly
- Talking in to your Podcaster
- Positioning your Podcaster
- Connecting headphones to your Podcaster
- Mounting the Podcaster
- Using the PSM-1 mount (optional)
- Warranty
- R∅DE® Microphones
- International
- USA
- Technical Support
Brand : RODE
Model : Podcaster
Category : Microphone