
DVR2008 - Audio recorder PHILIPS - Free user manual and instructions
Find the device manual for free DVR2008 PHILIPS in PDF.


| Product Type | HDD Recorder (Hard Disk Drive) |
| Brand | Philips |
| Model | DVR2008 |
| Hard Disk Capacity | 160 GB |
| Recording Modes & Hours | HQ (22h), SP (42h), LP (63h), EP (85h), SLP (123h) |
| Video Recording Format | MPEG2 |
| Video Playback Formats | DivX, DivX Ultra, XviD, MPEG2, VOB, DAT, HD MPEG2 TS/TP |
| Audio Playback Formats | MP3, WMA, WAV, OGG, AAC, Dolby Digital, PCM |
| Photo Playback Formats | JPEG, HD JPEG, BMP |
| TV System | PAL |
| Video Outputs | S-Video, Composite (CVBS), Component (Y Pb Pr) |
| Audio Outputs | Stereo RCA (L/R) |
| Inputs | Antenna (RF), Composite (CVBS), Component (Y Pb Pr), USB (front) |
| Power Supply | 220-240 V, 50 Hz |
| Power Consumption | 18 W (typical), <3 W (standby) |
| Dimensions (W x H x D) | 360 x 50 x 296 mm |
| Net Weight | 3 kg |
| Remote Control | Included (with batteries) |
| Accessories | Remote control, batteries, RF antenna cable, audio/video cable, Quick Start Guide |
| Timer Recording | Up to 8 events, daily/weekly repeat |
| Time Shift Buffer | Up to 10 hours (SP mode) |
| Special Features | Pause Live TV, Instant Replay, FlexTime, Media Jukebox |
| Child Lock | Yes (4-digit password, default 0808) |
| Firmware Update | Via USB flash drive |
Frequently Asked Questions - DVR2008 PHILIPS
User questions about DVR2008 PHILIPS
0 question about this device. Answer the ones you know or ask your own.
Ask a new question about this device
Download the instructions for your Audio recorder in PDF format for free! Find your manual DVR2008 - PHILIPS and take your electronic device back in hand. On this page are published all the documents necessary for the use of your device. DVR2008 by PHILIPS.
USER MANUAL DVR2008 PHILIPS
Register you product and get support at
www.philips.com/welcome
DVR2008

natural_image
Black Philips 3.0 audio router device with control buttons and indicator lights (no visible text beyond branding)EN HDD Recorder 2
ZH-CN 硬盘录像机 59
PHILIPS
| 部件名称Name of the Parts | 有毒有害物质或元素Hazardous/Toxic Substance | |||||
| 铅(Pb, Lead) | 汞(Hg, Mercury) | 镉(Cd, Cadmium) | 六价铬(Chromium 6+) | 多溴联苯(PBB) | 多溴二苯醚(PBDE) | |
| Housing外壳 | O | O | O | O | O | |
| Hard Disk硬盘 | X | O | O | O | O | |
| PWBs电路板组件 | X | O | O | O | O | |
| Accessories(Remote control & cables)附件(遥控器,电源线,连接线) | X | O | O | O | O | |
| Batteries in Remote Control(ZnC)遥控器电池 | X | O | O | O | O | |
○:表示该毒有害物质在该部件所有均质材料中的含量均在SJ/T11363-2006标准规定的限量要求以下。
O: Indicates that this toxic or hazardous substance contained in all of the homogeneous materials for this part is below the limit requirement in SJ/T11363-2006.
×:表示该毒有害物质至少在该部件的某一均质材料中的含量超出SJ/T11363 - 2006 标准规定的限量要求。X: Indicates that this toxic or hazardous substance contained in at least one of the homogeneous materials used for this part is above the limit requirement in SJ/T11363 - 2006.

环使用期限 Environmental Protection Use Period
This logo refers to the period (10 years) during which the toxic or hazardous substances or elements contained in electronic information products will not leak or mutate so that the use of these [substances or elements] will not result in any severe environmental pollution, any bodily injury or damage to any assets.
电池标识 Battery labeling logo

环使用期限 Environmental Protection Use Period
This logo refers to the period (5 years) during which the toxic or hazardous substances or elements contained in the battery will not leak or mutate so that the use of these [substances or elements] will not result in any severe environmental pollution, any bodily injury or damage to any assets.
For Customer Use:
Read carefully the information located at the bottom or rear of your HDD Recorder and enter below the Serial No. Retain this information for future reference.
Model No. HDD RECORDER
DVR2008
Serial No. ____
Contents
1 Important 6
Safety 6
Notice 6
2 Your product 8
Features highlight 8
Product Overview 9
3 Connect 12
Place the unit 12
Connect antenna or cable 12
Connect video/audio cables 13
Connect other devices 15
4 Get Started 18
Prepare the remote control 18
First Time Settings 19
5 Watch live TV 21
Use your recorder to watch live TV 21
About Time Shift Buffer - temporary
HDD storage 21
Control live TV 22
5 Record 23
Before you record 23
Record settings 23
Record the current TV programme 24
About timer recording 25
Schedule a timer recording 25
Edit a timer recording 26
View history of timer recordings 27
Record from other devices 28
Simultaneous record and play 28
6 Play 29
Play from USB 29
Play video 30
Play music 31
View photos 32
Control Play 33
7 Edit Recordings 35
About the recording list 35
Sort titles 35
Edit titles 36
8 Copy Files 41
Copy to USB 41
Copy to HDD 41
9 Adjust Settings 42
Language Settings 42
Tuner Settings 43
Video Settings 45
Recording Settings 46
System settings 47
10 Additional Information 51
Care 51
About Media Files 51
Upgrade software 52
Specifications 53
11 Troubleshooting 54
12 Glossary 57
1 Important
Safety

Warning!
Risk of fire or electric shock!
- Ensure that air can circulate freely through the ventilation holes on this unit. Allow at least 5\~10 cm clearance around the unit.
• Never expose this unit to direct sunlight, naked flames or heat. - Never place this unit on another electrical equipment.
- Keep away from this unit during lightning storms.
• Never remove the casing of this unit. Please leave all maintenance work to qualified personnel. - Keep this unit away from water, moisture and liquid-filled objects.
• Install this unit near the AC outlet where the AC power plug can be easily reached. - Where the MAINS plug or an appliance coupler is used as the disconnect device, the disconnect device shall remain readily operable.

Caution!
- Remove batteries if they are exhausted or if the remote control is not to be used for a long time.
- Do not mix batteries (old and new or carbon and alkaline, etc.).
- Batteries contain chemical substances, they should be disposed of properly.
- Use of controls or adjustments on performance of procedures other than herein may result in hazardous radiation exposure or other unsafe operation.

Note
• Refer to the type plate at the rear or bottom of the product for identification and supply ratings.
Notice
Recycle notice

Please act according to your local rules and do not dispose of your old products with your normal household waste. The correct disposal of your old product will help prevent potential negative consequences for the environment and human health.
Copyright notice

Be responsible Respect copyrights
The making of unauthorised copies of copy-protected material, including computer programmes, fi les, broadcasts and sound recordings, may be infringement of copyrights and constitute a criminal offence. This unit should not be used for such purposes.
6 EN
Trademark notice
This product incorporates copyright protection technology that is protected by US patents. Use of this copyright protection technology must be authorised by Macrovision, and is intended for home and other limited viewing uses only unless otherwise authorised by Macrovision. Reverse engineering or disassembly is prohibited.
Manufactured under license from Dolby Laboratories. “Dolby” and the double-D symbol are trademarks of Dolby Laboratories.
DivX Ultra Certified products: "DivX, DivX Ultra Certified, and associated logos are trademarks of DivX, Inc. and are used under license.
2 Your product
Congratulations on your purchase and welcome to Philips! To fully benefit from the support that Philips offers, register your product at www.philips.com/welcome.
This recorder makes recording easy. With the built-in 160GB Hard Disk Drive, you can record up to 123 hours of video in SLP (Super Long Play) recording mode.
On top of that, you can store the DivX movies, music fi les and digital camera photos in the HDD Media Jukebox.

Note
- DO NOT disconnect the recorder from the power supply unless you are not using this product for a long period of time. Power is needed to enable the recorder to perform essential tasks like timer recording.
Features highlight
Pause Live TV
You can pause any live TV programme by pressing the 播放/暂停 button. Resume play by pressing the 播放/暂停 button again. You can now continue watching the remainder of the programme. To return to the live TV programme, just press the 电视实况 button.
Instant Replay
You can repeat any scene of a live TV programme by pressing the left button on the remote control. To return to live TV programme, press the 停止 button.
FlexTime
With FlexTime, you can watch a TV programme while it is recorded. You do not need to wait for the recording to finish to watch it.
Time Shift Buffer (TSB)
Once you turn on the recorder, the Time Shift Buffer stores the TV channel it is tuned to. It can store up to 10 (ten) hours of TV programmes in SP mode and automatically removes anything that is older.
Media Jukebox
The media jukebox stores media fi les (video, music and photos). These fi les are stored according to its media type.
Enhanced USB upgrade
You can get information and upgrade the software from a USB flash drive.
8 EN
Product Overview

Main Unit
① ⏻ (Standby-on)
- Turns on this unit or switches to standby mode.
- Blinks rapidly when receiving command signals from the remote control.
② HDD Indicator
③ ④
• Lights up when a timer has been programmed.
④ ▶ II (Play/Pause)
• Starts/ pauses playback or recording.

- Press to make a forward/ reverse search.
LIVE TV
- Go to tuner mode.
• In time shift mode, go to current broadcast position.
⑤ ● (Record)
• Starts recording the current TV channel or the current video source.
- Press repeatedly to extend the recording time.
• Indicator lights up during recording.
⑥ USB
• Input for USB device or digital camera.
- Only brands and models of digital cameras and devices which conform to USB Mass Storage Device class standard are supported.
Remote Control

• Turns on the recorder or switches to standby mode.
② USB
- Access the contents of the connected USB device.
③ 信号源
- Selects the recorder video source (Tuner, CVBS or YPbPr).
④ Colour coded buttons
- Selects the corresponding screen option.
⑤ 主选单
- Access/ exits the home menu.
⑥ ◀ ▶ :
- Cursor keys for moving to the left/right.
- During viewing of a TV programme, press and hold to replay or skip forward.

- Cursor keys for moving up/ down.
⑦ OK
- Confirms an entry or selection.
⑧ 返回
• Returns to the previous menu.
- During play of DivX Ultra fi les, press to return to the main DivX menu.
⑨

- Fast reverse or fast forward search.
⑩ 播放/暂停 ▶II
• Starts/ pauses play or recording.
⑪ 音量 + / -
- Adjusts the volume of the TV (compatible TVs only).
静音
- Mute the volume output from the recorder.
10 EN
⑫ Numeric keypad
- Selects a chapter/track number to play.
- Selects the recorder's preset TV tuner channel.
⑬ 字幕
- Selects a subtitle language during play of DivX Ultra Video content.
⑭ A-B 重复
• Repeats a specific section of a title.
⑮ 慢放
- Starts slow motion play. Press repeatedly to toggle through various options.
⑯ 录像清单
• Displays the list of recorded titles.
⑰ 电视实况
- Go to tuner mode.
- In time shift mode, go to current broadcast position.
⑱ 定时
- Enters the timer schedule menu.
⑲ 显示
- Displays/ hides the on-screen help text.
⑳ |◀▶|
- Skips to the previous or next chapter/track/title.
② 录像 ●
- Starts recording the current TV channel or the current video source.
- Press repeatedly to extend the recording time.
停止 ■
- Stops play or recording.
②2 频道 + / -
- In tuner mode, select the next or previous TV channel.
②3 音频
- Selects an audio language.
⑳ 清晰度
- Adjust display resolution.
⑲ 缩放
- Enlarges a picture or recording during play. Press repeatedly to toggle through various options.
3 Connect
This section describes the connections for the recorder.
Basic connections:
- Connect antenna or cable
- Connect video/audio cables
Optional connections:
- Connect other devices
- Connect to Cable box/ Satellite receiver
- Connect to VCR or other similar device
- Connect to DVD player or other similar device
- Connect to analogue camcorder
Place the unit
- Place this unit on a flat, hard and stable surface. Do not place this unit on a carpet.
• Install this unit near the AC outlet where the AC power plug can be easily reached.
Connect antenna or cable
To watch and record TV programmes, connect this recorder to an antenna or a cable box/satellite receiver.
Connect to an off-air antenna or cable TV signals
To get TV reception, connect the recorder directly to an off-air antenna or cable TV signals.
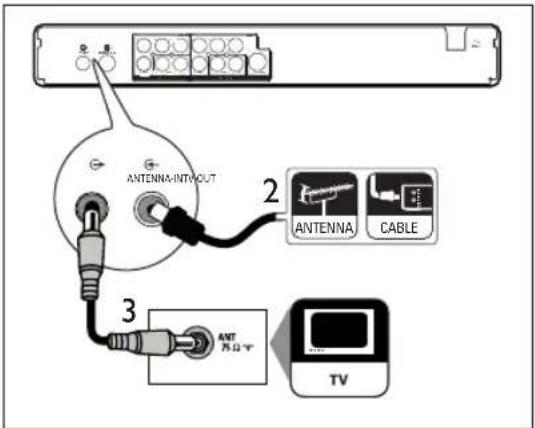
1 Unplug the existing antenna cable.
2 Connect the antenna cable to the ANTENNA-IN G-socket.
3 Connect the supplied RF antenna cable to the TV OUT ➕ socket and to the antenna input on the TV.

Tip
- The antenna input socket on your TV may be labelled as ANT, ANTENNA IN or RF IN.
12 EN
Connect video/audio cables
To view the playback from this recorder, connect the recorder to the TV.
Before you start, select the best video connection.
- Option 1: Connect to S-video socket (for a standard TV).
- Option 2: Connect to composite video sockets (for a standard TV).
- Option 3: Connect to component video sockets (for a Progressive Scan TV).
Option 1: Connect to S-Video socket

1 Connect an S-Video cable (not supplied) from the S-VIDEO OUTPUT socket to the S-Video input socket on the TV.
2 Connect an audio cable (red/white ends) from the AUDIO OUTPUT sockets to the matching audio input sockets on the TV.

Tips
- The S-video input socket on your TV may be labelled as Y/C or S-VHS.
• This connections provides standard picture quality.
Option 2: Connect to composite video sockets

1 Connect a composite video cable (yellow end) from the CVBS OUTPUT socket to the video input socket on the TV.
2 Connect an audio cable (red/white ends) from the AUDIO OUTPUT sockets to the matching audio input sockets on the TV.

Tips
- The video input socket on your TV may be labelled as A/V IN, VIDEO IN, COMPOSITE or BASEBAND.
• This connections provides standard picture quality.
Option 3: Connect to component video sockets

1 Connect component video cables (red/blue/green - not supplied) from the Y Pr Pb OUTPUT sockets to the component input sockets on the TV.
2 Connect an audio cable (red/white ends) from the AUDIO OUTPUT sockets to the matching audio input sockets on the TV.

Tip
- Select the supported video resolution progressive scan. See chapter "Adjust Settings – Video settings – Set video format",
14 EN
Connect other devices
To connect this recorder to other devices, you can use these suggested connections for common used cases. Other solutions may be possible, depending on the features of the device.
Connect to cable box/ satellite receiver
1 Ensure that the cable box/ satellite receiver is connected to the TV with an antenna cable.

2 Connect a composite video cable (yellow end) from the CVBS INPUT socket to the video output socket on the cable box/ satellite receiver.
3 Connect an audio cable (red/white ends) from the AUDIO INPUT sockets to the matching audio output socket on the cable box/satellite receiver.
- To view the video input, press 信号源 repeatedly until 'CVBS' is displayed.

Tips
- With this connection, automatic channel search is not required. See chapter 'Get Started'.
- The CVBS sockets on the device may be labelled as TV OUT or TO TV.
Connect to VCR or similar device
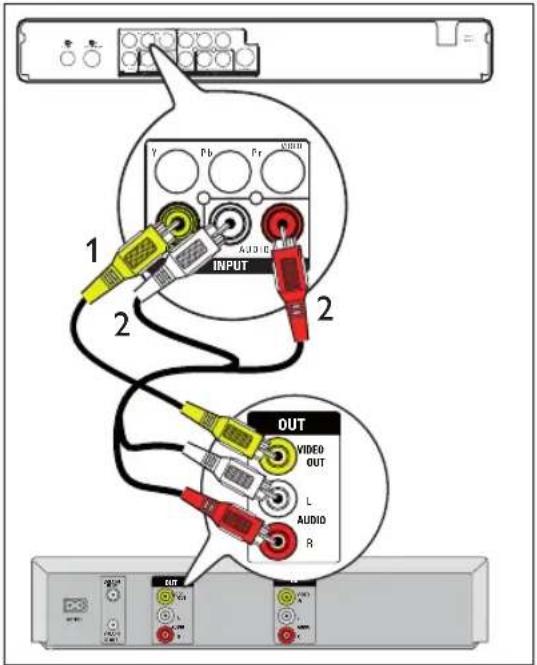
1 Connect a composite video cable (yellow end) from the CVBS INPUT socket to the video output socket on the device.
2 Connect an audio cable (red/white ends) from the AUDIO INPUT sockets to the matching audio output socket on the device.
- To view the video input, press 信号源 repeatedly until 'CVBS' is displayed.

Notes
- Your new recorder replaces the VCR for all your recording needs. Just unplug all the connections to your VCR.
- Most commercial video tapes and DVDs are copy-protected and therefore cannot be recorded.
Connect to DVD player or similar device
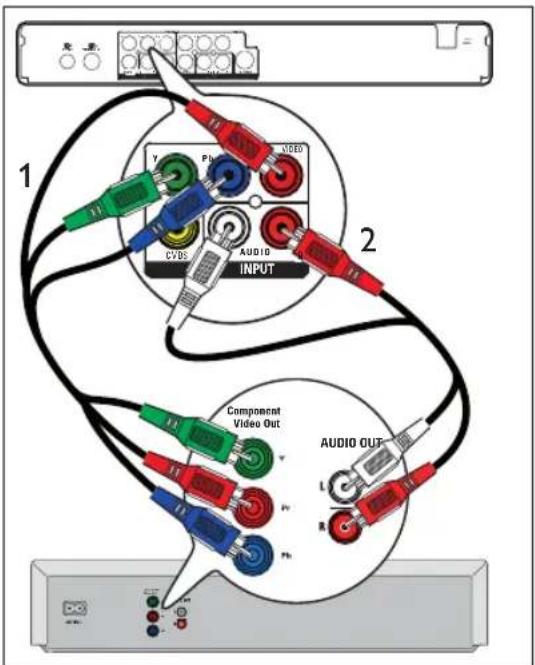
1 Connect a component video cable (red/blue/green ends - not supplied) from the Y Pb Pr INPUT socket to the component video output socket on the device.
2 Connect an audio cable (red/white ends) from the AUDIO INPUT sockets to the matching audio output socket on the device.
- To view the video input, press 信号源 repeatedly until 'YPbPr' is displayed.

Note
- Most commercial video tapes and DVDs are copy-protected and therefore cannot be recorded.
Connect to an analogue camcorder

1 Connect a video cable (yellow end) from the CVBS INPUT socket and to the S-VHS or video output socket on the camcorder.
2 Connect the audio cable (red/white ends) from the AUDIO INPUT sockets and to the audio output sockets on the camcorder.
- To view the video input, press 信号源 repeatedly until 'CVBS' is displayed.

Tip
- To record from this device, see chapter 'Record from other devices'.
Connect to a USB device or digital camera

1 Connect a USB device or digital camera to the ✦ USB socket.

Note
- The USB socket does not support a USB hub device. Only digital cameras and devices which support USB Mass Storage Device class standard are supported.

Tips
- You can copy files from the recorder to your USB device.
- To view the contents of the connected USB device, see chapter 'Play – Play from USB'.
4 Get Started
Prepare the remote control

natural_image
Technical line drawing of a remote control box with arrows indicating motion or movement (no text or symbols)1 Open the battery compartment cover.
2 Insert two batteries type R03 or AAA. Match the indications (+ -) inside the battery compartment.
3 Close the cover.

Note
- If you are not going to use the remote control for a long time, remove the batteries.
Navigate through the menu
1 Point the remote control directly at the remote sensor on the front panel and select the desired function.
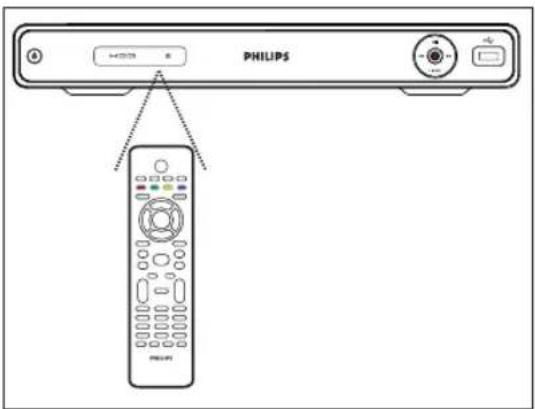
2 Use the following buttons on the remote control to navigate through the on-screen menus, enter numbers and confirm your selection.
| Action Button | |
| Move up or down in a menu. | ▲▼ |
| Move left or right in the top menu. | ◀▶ |
| Confir rm a selection. | OK |
First Time Settings
When you turn on this recorder for the first time, follow the instructions on the TV to complete the initial setup for this recorder.

Notes
- Before you start, ensure that you have made all the required connections.
- If a cable box or satellite receiver is connected, turn it on now.
- Complete the initial setup for this recorder before you record.
1 Press ⏻ to turn on the recorder.
2 Turn on the TV to the correct video-in channel.
- Select a channel on your TV, then press the channel down button on your TV remote control until you see the menu language screen. (The screen options may differ depending on your country of purchase).
| First Installation | |
| Menu Language | √ English简体中文繁體中文 |
| TV Region | |
| TV Shape | |
| Auto Scan | |
| Clock | |
3 Press ▲▼ to select an on-screen menu language and press OK.
→ The country selection screen is displayed.
| First Installation | |
| Menu Language | Others |
| TV Region | China |
| TV Shape | Hong Kong |
| Auto Scan | India |
| Clock | Malaysia |
| Singapore | |
| Thailand | |
4 Press ▲▼ to select the country of your residence and press OK.
→ The TV aspect selection screen is displayed.
| First Installation | |
| Menu Language | √ 4:3 Pan Scan4:3 Letter Box16:9 Widescreen |
| TV Region | |
| TV Shape | |
| Auto Scan | |
| Clock | |
[4:3 Pan Scan]
![PHILIPS DVR2008 - [4:3 Pan Scan] - 1](/content/2026/06/1258422/images/3c3d87643fb4ccf15324fa975516478914eab1f7ce038891f57b1a7a16d5dcd4.jpg)
Select this for a full-height picture with both sides trimmed.
[4:3 Letter Box]
![PHILIPS DVR2008 - [4:3 Letter Box] - 1](/content/2026/06/1258422/images/3b36cefee28398017c07784966b93ea805892a8cfa028ffe831ec2f7f4a98595.jpg)
Select this for a 'wide screen' display with black bands on the upper and lower portions of the TV screen.
[16:9 Widescreen]
![PHILIPS DVR2008 - [16:9 Widescreen] - 1](/content/2026/06/1258422/images/d2ece360cea2ffa76d25a72fe55fed5ff27f61c1d29ac23e1dce5b7df8201fd6.jpg)
Select this for a wide screen TV (frame ratio16:9).
5 Press ▲▼ to select a TV shape option and press OK.
→ Auto channel tuning begins.
| First Installation | |
| Menu Language | Cancel |
| TV Region | OK |
| TV Shape | |
| Auto Scan | |
| Clock | |
- If a cable box or satellite receiver is connected: select [ Cancel ] to skip the channel search.
- If an off-air antenna is connected: select [OK] to start the channel search. This process takes a few minutes. Once complete, press OK.
→ The time and date entry screen is displayed.
| First Installation | |||
| Menu Language | Year | Month | Day |
| TV Region | 2008 | 1 | 1 |
| TV Shape | Hour | Min. | Sec. |
| Auto Scan | 00 | 00 | 00 |
| Clock | |||
6 Press ▲▼ (or the numeric keys) to enter the correct entry. Press OK to go to the next field.
A confirmation message is displayed.
7 Select [ Confirm ] and press OK.
→ The installation is complete. The recorder is now ready for use.
| First Installation | |
| Menu Language | Setup Completed |
| TV Region | |
| TV Shape | |
| Auto Scan | |
| Clock | |
![PHILIPS DVR2008 - [16:9 Widescreen] - 2](/content/2026/06/1258422/images/74a6290c9181913ded8554429822d2ea79222b317f5bf9265ff1fbdf50e98415.jpg)
Tips
• To re-install or modify the TV channels, see chapter 'Adjust Settings - Tuner settings'.
5 Watch live TV
Use your recorder to watch live TV
Once you switch to live TV, this recorder stores the current TV programme into the Time Shift Buffer. You can now control live TV broadcast. For example, pause live TV and resume play at any time or replay the live TV programme.
1 Turn on the TV to the correct viewing channel for this recorder.
2 Press ⏻ to turn on this recorder.
3 Press 电视实况.
4 Press 频道 +/− to select a channel.
About Time Shift Buffer - temporary HDD storage
The Time Shift Buffer (TSB) is a temporary hard disk storage in your recorder.
The Time Shift video bar displays the status and time of the stored TV programmes.

Notes
- Content in the Time Shift Buffer is cleared if you press the 录像 button.
- In Home menu, content in the Time Shift Buffer is cleared if you select [ Recordings ], [ Media Files ], [ USB ] or [ Timer ] and press OK.
Press 显示 to display or hide the information bar.
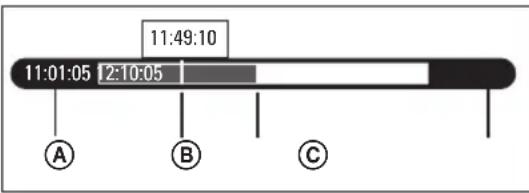
Ⓐ Start time of the TV programme.
(B) Current play position of the TV programme.
© Current position of the broadcast TV programme.
(D) Current time of the TV programme.
EN 21
Select the time shift buffer quality
You can select the time shift buffer video quality.
1 Press 主选单.
→ The home menu is displayed.
2 Select [ Settings ], then press OK.
3 Press ▶ to select [Recording], then press ▼ to select [Time Shift Buffer Quality] and press OK.
| Recording | System | Language | Tuner | Video |
| Recording Quality | SP | |||
| Time Shift Buffer Quality | SP | |||
| Auto Chapter Marking | 20 Minutes | |||
| Time Shift Buffer | Auto | |||
4 Select a setting and press OK.
[ HQ ] High quality.
[SP] Standard play.
[LP] Long Play
[EP] Extended Play.
[SLP] Super Long Play
5 To exit the menu, press 主选单.
Control live TV
To control live TV, you can use the following buttons on the remote control:
| Action Button | |
| Pause live TV or resume play. | ▶II |
| Press to skip backward (instant replay). | ◀ |
| Press to skip forward (skip ahead). | ▶ |
| • Press to fast rewind a programme.• Press repeatedly to toggle between speed options. | ◀◀ |
| • Press to fast forward a programme.• Press repeatedly to toggle between speed options. | ▶▶ |
| Go to current play position of video source. | ■ |
| Go to live TV broadcast. | 电视实况 |
| Display the information bar. | 显示 |
22 EN
5 Record
Before you record
Record media

Note
• Copy-protected programmes cannot be recorded.
- If a power failure occurs during recording, the title is not recorded.

• High storage capacity.
• TV programmes are recorded to the hard disk.
• Media fi les are stored to the hard disk.
| Recording Quality | Hours of recording |
| [ HQ ] - high quality 22 hours | |
| [ SP ] - standard play quality | 42 hours |
| [ LP ] - long play 63 hours | |
| [ EP ] - extended play 85 hours | |
| [ SLP ] - super long play | 123 hours |
The data is subjected to change if the user has modified the hard disk partition between [Media Files] and [Recordings] during firmware upgrade.
Record settings
Select the recording quality
Before you record, select the recording quality. The recording quality determines the amount of space the recorded title occupies on the hard disk recorder.
1 Press 主选单.
→ The home menu is displayed.
2 Select [ Settings ], then press OK.
3 Press ▶ to select [Recording], then press ▼ to select [Recording Quality] and press OK.
| Recording | System | Language | Tuner | Video |
| Recording Quality | SP | |||
| Time Shift Buffer Quality | SP | |||
| Auto Chapter Marking | 20 Minutes | |||
| Time Shift Buffer | Auto | |||
4 Select a setting and press OK.
[ HQ ] High quality.
[SP] Standard play.
[LP] Long Play
[EP] Extended Play.
[SLP] Super Long Play
5 To exit the menu, press 主选单.

Tips
• The default record mode is SP.
- For other record settings, see chapter "Adjust Settings – Recording settings".
Record the current TV programme
1 Turn on the TV to the correct viewing channel for the recorder.

2 Select a recording source:
- To record directly in tuner mode: press 频道 +/— key to select the TV channel you wish to record.
- To record from a satellite receiver or cable box connected to VIDEO OUTPUT: press 信号源 repeatedly to select 'CVBS' or 'YPbPr'.
3 Press ● to start recording.
• To add recording time, press ● repeatedly to extend the recording time.
• To pause recording, press ▶II.
• To continue recording, press ▶II again.
4 To stop recording, press ■.
24 EN
About timer recording
Schedule a timer recording to start and stop at a specified date and time.
You can schedule up to 8 recordings at a time. During timer recording, you can only watch the current channel.
Before you start ...
Ensure that the system clock is correct. To adjust the system clock, see chapter "Adjust Settings - System settings".
Schedule a timer recording

1 Turn on the TV to the correct viewing channel for the recorder.
2 Press 定时.
→ The timer recording schedule is displayed.
| Timer 2008/1/3 Thu 11:23 | ||||
| No | Source | Start time | Length | Status |
3 To create a new timer entry, press the Red button [ New ].
→ The timer schedule is displayed.

4 Press ▲▼ buttons to select the value of each setting, and use ◀▶ keys to move the next option.
[ Source ]
Select the TV channel or the correct video source (Tuner, CVBS or YPbPr), which you have used to connect the external device.
[Start time]
Start date and time of recording (year/month/date and hours : minutes).
[Length]
Duration of recording. (Hours: minutes)
[Repeat]
Select a repeat recording option: (Once, Everyday, Mon-Fri, Mon-Sat, Sun, Mon, Tue, Wed, Thu, Fri and Sat).
[Quality]
Select a mode of recording quality:
- [HQ] \~ [SLP] – See chapter 'Before you record – Select the recording quality'.
[Language]
Enable or disable recording of the optional audio language. (Only available if the source has dual language broadcast).
5 Once complete, press the Yellow button [Save].
• To reset the entry, press the Blue button [Restore Default].
A confirmation message is displayed.
6 To confirm the timer recording schedule, select [ Confirm ], then press OK.
- To cancel, select [ Cancel ], then press OK.
7 Press 返回 to exit the menu.
8 Press ⏻ to switch the recorder to standby mode.
Edit a timer recording

Notes
- Timer editing is not available during a timer recording.
- If a timer schedule is marked [LOCK], it is not available for editing.
1 Turn on the TV to the correct viewing channel for the recorder.
2 Press 定时.
→ The timer recording list is displayed.
| Timer | 2008/1/3 | Thu | 11:23 | ||
| No | Source | Start time | Length | Status | |
| ○ List 1 | PR1 | 01/05 | 08:00 (Once) | 00:30 | Ready |
| ● List 2 | PR3 | 01/08 | 10:00 (Sun) | 01:00 | Ready |
| ○ List 3 | PR4 | 01/09 | 09:15 (Mon) | 00:30 | Ready |
| Delete Status HistoryNew | |||||
3 Select a timer to edit and press OK.
4 Make the necessary changes and press the Yellow button [ Save ].
5 To confirm, select [ Confirm ], then press OK.
6 Press 返回 to exit the menu.
To delete a timer schedule:
1 Select the timer, then press the Green button [ Delete ].
2 Select an option, then press OK.
3 Once a timer is deleted, it is removed from the recording timer list.
To pause a timer schedule:
1 Select the timer, then press the Yellow button [ Status ].
2 Select [ Pause the selected scheduled recording ] and press OK.
→ The timer recording list is displayed and the timer is paused.
To activate a paused timer:
1 Select the paused timer, press the Yellow button [ Status ].
2 Select [ Enable the timer by user's setting ] and press OK.
→ The timer recording list is displayed and the timer is ready for recording.
View history of timer recordings
1 Turn on the TV to the correct viewing channel for the recorder.
2 Press 定时.
→ The timer recording list is displayed.
3 Press the Blue button [ History ].
→ The history timer recordings is displayed.
To delete any previous timer history:
The history of timer recordings are automatically replaced by the most recent recordings.

Note
- Timer editing is not available during a timer recording.
1 Select the timer, then press the Green button [ Delete ].
2 Select [ Confirm ], then press OK.
→ The history is deleted and removed from the history list.
Record from other devices
Record from an external device (Analogue camcorder/ Satellite receiver/ VCR/ DVD Player)
You can record from the external device to this recorder. Copy-protected material cannot be recorded on this recorder.
1 Turn on the TV to the correct viewing channel for the recorder.
2 Connect the external device (e.g. analogue camcorder, VCR, DVD player) to this recorder.
3 Press 信号源 to select the video source.
- [CVBS]: the device connected to the CVBS INPUT (CVBS and AUDIO L/R) sockets on the recorder.
- [YPbPr] : the device connected to the Y Pb Pr INPUT (YPbPr and AUDIO L/R) sockets on the recorder.
4 Start play on the connected device and locate the content to record.
5 Press ● at the point you want to start recording.
- To add recording time, press ● repeatedly to extend the recording time.
• To pause recording, press ▶II.
- To continue recording, press ▶II again.
6 To stop recording, press ■. → A new title is saved.
7 To exit, press 信号源.
Simultaneous record and play
Play the programme during recording
1 Press 录像清单.
2 Select the title marked [ Recording... ], then press ▶II.
Play another recording or media file during recording
Play from HDD
1 Press 录像清单.
2 Select a title to play, then press ▶II.
Playback from USB
1 Insert the USB device to the USB socket.
A message is displayed. Select [Confirm] to view the USB contents menu.
- If the USB is already connected, press USB to access the content menu.
2 Select a file to play, then press ▶II.
Watch other TV programme
1 Use the TV remote control to select a TV channel.
2 To view play from the recorder, switch the TV back to its correct viewing channel for recorder.
6 Play
Play from USB
View the contents of a USB drive, USB memory card reader or digital camera through this recorder. The USB socket supports the play of these formats:
- Video : AVI (V: DivX 3x/ 4x/ 5x/ 6x, Xvid), DivX and DivX Ultra, HD MPEG2 ts/tp, VOB, DAT, MPEG1/2
- Audio : MP3/ WMA/ WAV/ OGG/ AAC. Maximum number of fi les recognizable 4096 fi les (In one page.)
- Photo : JPEG/HD JPEG/BMP Maximum number of picture recognizable 4096 files (preview 6 files in the same time).

Notes
- WMA Pro & Advanced Profi le and WMA with DRM are not supported.
- The USB socket does not support a USB hub device. Only digital cameras and devices which support USB Mass Storage Device class standard are supported.
• In USB mode, the time shift buffer is cleared.

1 Insert the USB device to the •USB socket.
A message is displayed. Select [Confim] to view the USB contents menu.
- If the USB is already connected, press USB to access the content menu.
2 Select a file, then press ▶II.

Tip
For more play options, see chapter 'Play'.
Play from a USB card reader

Note
In USB mode, the time shift buffer is cleared.
1 Insert the USB device to the USB socket.
A message is displayed. Select [Confir rm] to view the USB contents menu.
- If the USB is already connected, press USB to access the content menu.
2 Each memory card in the reader is assigned its own folder. Select a folder and press OK.
3 Select a file, then press ▶II to start.

Tip
- During play, when you select another card in the reader, play stops.
Play video
Play a recorded title
1 Press 录像清单.
→ The list of recorded titles is displayed.

2 Select a title and press ▶II.
Play a Movie
You can play a DivX® fi le stored on this hard disk recorder or from a USB fi ash drive. To copy data fi les to this recorder, see chapter "Copy Files". This recorder supports play of the following formats: VOB (DVD), MPG (MPEG-1/2), AVI (DivX 3x/4x/5x/6x, MPEG-4 ASP: XviD), DivX, DivX Ultra, DAT (VCD), and HD MPEG2 TS/TP fi les (resolution up to 1080i).
1 Press 主选单.
2 Select a source:
- For data files on the recorder: select [Media Files], then press OK.
• For USB devices: press USB.
→ The content menu is displayed.
3 Press ▶ to select [Movies].
30 EN
4 Locate the file to play.
• To display all DivX files, select [ List ].
- If the file is stored in another folder, select the folder, then press OK
- If the folder contains many fi les, press ◀ ▶ to view the previous/next page of fi le names.
5 Select a file and press ▶II.
• To stop playback, press ■.
• To return to the previous level, select [Previous], then press OK.
- To select another subtitle language, press 字幕.
- You can select another character set, see chapter "Adjust Settings – Language settings - Set DivX subtitle font".

Notes
- The supported subtitle file formats include:.srt, .smi, .sub, .sami.
- Low-quality DivX® video may be pixelated.

Tip
- During play of DivX Ultra files, press 返回 to return to the main DivX menu.
Play music
Play MP3/ WMA fi les
Play most MP3/ WMA fi les copied to a USB device or the recorder.
1 Press 主选单.
2 Select a source:
- For data fi les on the recorder: select [ Media Files ], then press OK.
• For USB devices: press USB.
→ The content menu is displayed.
3 Press ▶ to select [Music].
4 Locate the file to play.
• To display all MP3/WMA files, select [List].
- If the file is stored in another folder, select the folder, then press OK
- If the folder contains many fi les, press ◀ ▶ to view the previous/next page of fi le names.

5 Select a file and press ▶II.
• To stop playback, press ■.
• To repeat play, press the Yellow button [Repeat] repeatedly to toggle between the repeat options.

Tips
- This recorder does not support MP3PRO audio format.
- If any special characters are present in the MP3 track name (ID3) or album name, it might not be displayed correctly on the screen because these characters are not supported.
Select another track/ fi le
When a folder contains several tracks or fi les, you can select a different track or fi le during playback.
| Action | Button |
| To go to the next track/fi le. | ▶ |
| To return to the start of the previous track/fi le. | ◀ |
Select repeat options
You can select various repeat functions during playback. The repeat play options vary depending on the media type.
1 During play of the audio files, press the Yellow button [ Repeat ].
2 Press the Yellow button [ Repeat ] repeatedly to select the repeat option and press OK.
[All]
Repeat play of all fi les.
[Repeat 1]
Repeat play of the selected file.
3 To cancel repeat play, press the Yellow button [Repeat] repeatedly to select [Repeat Off].
EN 31
View photos
Play a picture slide show
You can view JPEG/ HD JPEG/ BMP files as a slide show.
1 Press 主选单.
2 Select a source:
- For data fi les on the recorder: select [ Media Files ], then press OK.
• For USB device: press USB.
→ The content menu is displayed.
3 Press ▶ to select [Photos].
4 Locate the file to play.
• To display all JPEG files, select [List].
- If the fi les are stored in another folder, select the folder, then press OK
- If the folder contains many fi les, press ◀ ▶ to view the previous/next page of fi le names.

5 Select a file and press ▶II.
→ The slide show begins.
6 During play, use the following keys.
| Action Button | |
| To enter/exit zoom mode. Press repeatedly to select the zoom factor. | 缩放 |
| In zoom mode, to pan through the enlarged picture. | ◀▶▲▼ |
| To rotate the picture. | ◀▶ |
| View the previous/next picture | ▲▼ |
7 Press 返回 to return to the main menu.
8 To stop and view the content menu, press ■.
Start a musical slide show playback,
1 Select an MP3 file and press OK.
→ The MP3 file starts playback.
2 Select a picture file in the menu and press OK.
→ The slide show begins.
Supported JPEG picture formats File format:
- The file extension has to be 'JPG', or '. JPEG.'
- This recorder can only display digital camera pictures according to the JPEG-EXIF format, typically used by almost all digital cameras. It does not display Motion JPEG or pictures in formats other than JPEG or sound clips associated with pictures.

Tips
- It may require a longer time for the recorder to display the USB contents due to the large number of songs/pictures compiled onto the drive.
- If the JPEG picture is not recorded with an 'exif' type fi le, the actual thumbnail picture will not be displayed in the content menu.
32 EN
Enlarge a picture
You can enlarge the picture on the screen and pan through the picture.
1 Press 缩放 repeatedly.
→ The zoom mode is activated.
2 Use ▲▼◀▶ keys to pan through the enlarged picture.
3 To exit, press 缩放 repeatedly until normal size resumes.
Play from a digital camera
1 Connect the digital camera to the USB socket on the front panel.
2 Use the digital camera to control playback settings.
Control Play
Select another title/ chapter
During play, select another title or chapter by following these steps:
| Action Button | |
| To go to the next chapter. | ▶| |
| To return to the start of the previous chapter. | ◀| |
| To select by a chapter number. | Numeric keys 0 - 9 |
Select a subtitle language
Select a subtitle language on DivX® Ultra fi les.

1 During play, press 字幕.
2 Select a language and press OK.
- If the selected language is not available, the default content language is used.
Select an audio language
Select an audio language in Live TV mode.
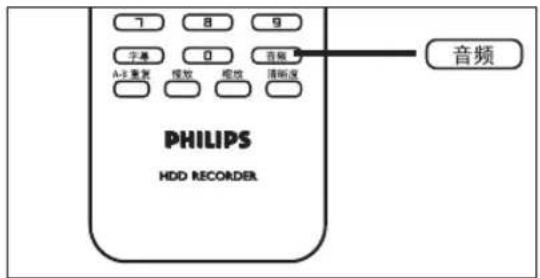
1 During play, press 音频.
→ The language options appear. If the selected audio channel is not available, the default audio channel will be used.
Search forward/ backward
You can fast forward search or fast reverse search the video content during playback.
1 During play, press ◀◀ or ▶▶.
→ The search status bar is displayed and the sound is muted.
2 Press ◀◀ or ▶▶ repeatedly to cycle through the different speed options.
- To resume normal playback, press ▶II.
Slow motion play
1 During play of DivX ^® fi les or title recordings, press the 慢放 key to enable slow motion play.
2 Press 慢放 repeatedly to cycle through the different slow motion speed.
• To resume normal playback, press ▶II.
Repeat a specific scene (A-B Repeat)
You can repeat play of a specific segment within a title or chapter. To do so, you must mark the start and end of the segment you want.

Note
- This feature is only available when playing a recording from the recording list.
1 During play, press A-B 重复 at the point to mark the start point for repeat play.
2 Press A - B 重复 again at the end point and press OK.
Play skips to the start of the marked segment. The segment is repeated until repeat mode is cancelled.
3 To cancel repeat play, press A - B 重复 repeatedly until [ Repeat Off ] is displayed.
Resume play from the last stopped point
This option is available if you have not finished watching a title played previously. You can resume play from its last stopped point.
1 Press 录像清单.
→ The list of recorded titles is displayed.
2 Select the fi le which you have not fi nished watching and press the Blue button [Resume Play].
→ Play starts from the last stopped point.
7 Edit Recordings
Sort titles
You can easily find a title by using the sort options.
About the recording list
The recording list screen displays the recordings on this recorder. It is displayed once you press 录像清单.
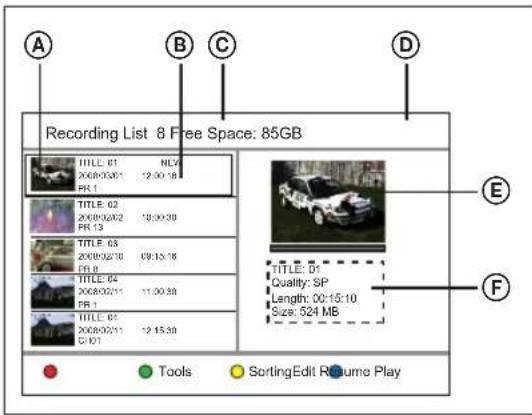
The recording menu screen displays information on:
Ⓐ The thumbnail of a title.
⑧ The title number, recording date and time, and the title name. If a recording has not been played, it is marked [NEW].
© Number of recorded titles.
(D) The available hard disk space for recordings.
E The preview of the title.
⑤ The title number, recording quality, length of recording and its file size.
1 Press 录像清单.
2 Select a title, then press the Yellow button [Sorting].
→ The sort menu is displayed.
3 Select an option, then press OK.
[Title Number]
Sort titles according to its title number (eg. TITLE 01).
[Recording Time]
Sort titles according to its time of recording. The last recorded title is listed first.
[ Title Name ]
Sort titles according to its title name.
[ New Titles ]
Titles which have not been played are listed first.
Edit titles
You can use the colour coded buttons in the recording list to edit your recordings:

Tools Sorting Edit Resume Play
• The Red button [ Edit ]:
- Set a thumbnail
- Erase a scene (A-B Erase)
- Divide a title
- Merge a title
- Add/ remove a chapter marker
- Rename a title
• The Green button [Tools]:
- Delete all titles
- Delete a title
- Set child lock
- Protect a title
Set a thumbnail
1 Press 录像清单.
2 Select a title, then press the Red button [Edit].
→ The edit menu is displayed.
3 Select [ Set Thumbnail ], then press OK.
- Press ◀◀▶▶ keys to make a fast forward/ reverse search.
4 Locate the scene and press ▶II.
- To cancel, select [ Cancel ] and press OK.
5 To confirm, select [ Confirm ] and press OK.
→ The thumbnail of the title is changed.
Erase a scene in a title
1 Press 录像清单.
2 Select a title, then press the Red button [Edit].
→ The edit menu is displayed.
3 Select [ A-B Erase ], then press OK.
- Press ◀◀▶▶ keys to make a fast forward/ reverse search.
A - B Erase

flowchart
graph LR
    A[" "] --> B["SET B Cancel"]
    B --> C["SET A Confirm"]
    C --> D[" "]
4 Press ▶II to pause at the start point.
5 Select [ SET A ], then press OK.
6 Press ▶II to resume play and press ▶II again at the end point.
7 Select [ SET B ] and press OK.
- To cancel, select [ Cancel ] and press OK.
A - B Erase

8 To confirm, select [ Confirm ] and press OK.
→ This scene is erased from the title.
Divide a title
1 Press 录像清单.
2 Select a title, then press the Red button [Edit].
→ The edit menu is displayed.
3 Select [ Divide Title ], then press OK.
- Press ◀◀▶▶ keys to make a fast forward/ reverse search.

4 Press ▶II to pause at the point to divide.
- To cancel, select [ Cancel ] and press OK.
5 To confirm, select [ Confirm ] and press OK.
→ This title is divided into two.
Merge a title

Tip
- Select the older recording to merge with the next recording in the list.
1 Press 录像清单.
2 Select title, then press the Red button [Edit].
→ The edit menu is displayed.
3 Select [Merge Title], then press OK.
→ The two titles to merge are displayed.
• To cancel, select [Cancel] and press OK.
Merge Title
TITLE: 01, TITLE: 02
Cancel
Confirm
4 To confirm, select [ Confirm ] and press OK.
→ This title is merged into one.
Add or remove chapter markers
To add chapter markers
1 Press 录像清单.
2 Select a title, then press the Red button [Edit].
→ The edit menu is displayed.
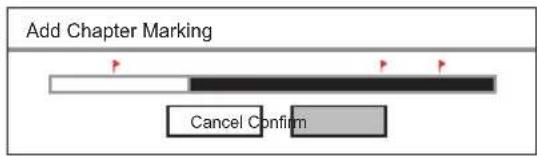
3 Select [ Add Chapter Marking ], then press OK.
- Press ◀◀▶▶ keys to make a fast forward/ reverse search.
flowchart
graph TD
    A["Add Chapter Marking"] --> B["Progress Bar"]
    B --> C["Cancel Confirm"]
4 To add a chapter marker, select [Confirm] and press OK.
A chapter marker is added and indicated by a red fl ag.
5 To exit, press select [ Cancel ].
To remove chapter markers
1 Press 录像清单.
2 Select a title, then press the Red button [Edit].
→ The edit menu is displayed.
3 Select [ Remove Chapter Marking ], then press OK.
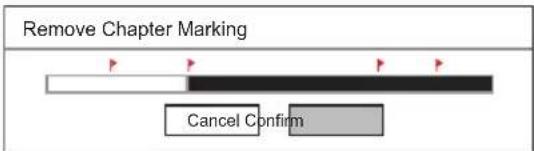
flowchart
graph TD
    A["Remove Chapter Marking"] --> B["Process Step"]
    B --> C["Cancel Confirm"]
4 To remove the highlighted chapter marker, select [ Confirm ] and press OK.
→ The chapter marker is removed.
5 To exit, press select [ Cancel ].
Edit a title name
1 Press 录像清单.
2 Select a title, then press the Red button [Edit].
→ The edit menu is displayed.
3 Select [Rename], then press OK.
An on-screen keyboard is displayed.
4 Select the key to enter, then press OK.
• Use the following keys to edit:
| Action Option | |
| Insert a space between the characters. | [ Space ] |
| Remove the character to the left of the cursor. | [ Delete ] |
| Toggle between upper, lower case characters or symbols | [ CAPS ] |
5 To confirm, select [OK], then press OK.
→ The title name is edited.
Delete all titles
1 Press 录像清单.
2 Select a title, then press the Green button [Tools].
→ The tools menu is displayed.
3 Select [ Delete all titles ], then press OK.
A confirmation message is displayed.
- To cancel, select [ Cancel ], then press OK.
4 To confirm, select [ Confirm ], then press OK.
→ All titles are removed.
Delete a title
1 Press 录像清单.
2 Select a title, then press the Green button [Tools].
→ The tools menu is displayed.
3 Select [ Delete ], then press OK.
A confirmation message is displayed.
- To cancel, select [ Cancel ], then press OK.
4 To delete the selected title, select [Confirm], then press OK.
→ The title is removed.
Set child lock
Before you start...
Ensure you have enabled the child lock function. (See chapter "Adjust settings - Video settings - Enable child lock".)
You can prevent a child from viewing a title which requires parental guidance by setting a child lock to the title.
1 Press 录像清单.
2 Select a title, then press the Green button [Tools].
→ The tools menu is displayed.
3 Select [ Child Lock ], then press OK.
A confirmation message is displayed.
- To cancel, select [ Cancel ], then press OK.
4 To confirm, select [ Confirm ], then press OK.
5 Enter the password, then press OK.
→ The title is locked from viewing.
To unlock child lock
1 Press 录像清单.
2 Select a title, then press the Green button [Tools].
→ The tools menu is displayed.
3 Select [ Un-Lock ], then press OK.
A confirmation message is displayed.
- To cancel, select [ Cancel ], then press OK.
4 To confirm, select [ Confirm ], then press OK.
5 Enter the password, then press OK.
→ The title is unlocked for viewing.
Protect/ Unprotect a title
You can protect the recorded title to prevent accidental loss of recordings.
1 Press 录像清单.
2 Select a title, then press the Green button [Tools].
→ The tools menu is displayed.
3 Select [ Protect Title ], then press OK.
A confirmation message is displayed.
- To cancel, select [ Cancel ], then press OK.
4 To confirm, select [ Confirm ], then press OK.
→ The title is protected. It cannot be erased or edited.
To unprotect a title,
1 Press 录像清单.
2 Select a title, then press the Green button [Tools].
→ The tools menu is displayed.
3 Select [ Unprotect Title ], then press OK.
A confirmation message is displayed.
- To cancel, select [ Cancel ], then press OK.
4 To confirm, select [ Confirm ], then press OK.
→ The title is unprotected.
8 Copy Files
Copy to USB

Notes
- Only digital cameras and devices which support USB Mass Storage Device class standard are supported.
- Recorded titles are copied in FAT32 format to the USB device. To format your device in FAT32 format, see chapter "Adjust Settings – Format Files".
- If the USB device is formatted in NTFS system, it may not be operate properly with this recorder.
- When viewing recorded titles on a computer:
- in FAT32 format, titles which are larger than 2GB will be divided in several fi les.
- in FAT and FAT16 formats, titles which are larger than 1GB will be divided in several fi les.
Before you start...
Insert a USB device to the USB socket. Select [Confirm] to view the USB contents menu.
Copy recordings to USB
1 Press 录像清单.
2 Select a title, then press the Red button [Edit].
→ The edit menu is displayed.
3 Select [ Copy to USB ], then press OK.
→ The title is copied to the USB.
4 Once complete, select [Close], then press OK.
Copy media fi les to USB
1 Press 主选单.
2 Select [ Media Files ], then press OK.
→ The content menu is displayed.
3 Select the folder or file to copy and press the Green button [ Edit ].
4 Select [ Copy to USB ], then press OK.
→ The USB content menu is displayed.
5 To confirm, press the Green button [Paste].
→ The folder/fi le is copied to the USB flash drive. A confirmation message is displayed.
6 To exit, press OK.
Copy to HDD
Copy media fi les to HDD
1 Press 主选单.
2 Select [USB], then press OK.
→ The USB content menu is displayed.
3 Select the folder or file to copy and press the Green button [ Edit ].
4 Select [ Copy to Media Files ], then press OK.
→ The media fi les menu is displayed.
5 To confirm, press the Green button [Paste].
→ The folder/fi le is copied to the media fi les. A confirmation message is displayed.
6 To exit, press OK.
9 Adjust Settings

Note
Underlined options are the factory default settings.
Language Settings
Change system menu language
1 Press 主选单.
2 Press [ Settings ], then press OK.
3 Press ▶ to select [Language].
4 Press ▼ to select [Menu Language], then press OK.
5 Select an option and press OK.
6 To go to Home menu, press 主选单.
Set DivX subtitle font
1 Press 主选单.
2 Press [ Settings ], then press OK.
3 Press ▶ to select [Language].
4 Press ▼ to select [ DivX Subtitle Font ], then press OK.
5 Select an option and press OK.
[Standard] Display a standard list of Roman subtitle fonts supported on this recorder.
[简体中文]
Display Simplified Chinese fonts.Under
[繁體中文] Display Traditional Chinese fonts.
6 To go to Home menu, press 主选单.
Set media font
Select a font which displays the fi lename of the media content.
1 Press 主选单.
2 Press [ Settings ], then press OK.
3 Press ▶ to select [Language].
4 Press ▼ to select [ Media Title Font ], then press OK.
5 Select an option and press OK.
[Standard] Display a standard list of Roman subtitle fonts supported on this recorder.
[简体中文] Display Simplified Chinese fonts.
[繁體中文] Display Traditional Chinese fonts.
6 To go to Home menu, press 主选单.
42 EN
Set recording language
1 Press 主选单.
2 Press [ Settings ], then press OK.
3 Press ▶ to select [Language].
4 Press ▼ to select [ Dual Language ], then press OK.
5 Select an option and press OK.
[Language I]
The first broadcast language will be recorded.
[Language II]
The second broadcast language will be recorded.
6 To go to Home menu, press 主选单.
Tuner Settings
Select country of residence
1 Press 主选单.
2 Press [ Settings ], then press OK.
3 Press ▶ to select [Tuner].
4 Select [TV Region], then press OK.
5 Select an option and press OK.
6 To go to Home menu, press 主选单.
Install all TV channels

Note
All channels stored on the recorder will be reset.
1 Press 主选单.
2 Press [ Settings ], then press OK.
3 Press ▶ to select [Tuner].
4 Press ▼ to select [ Auto Scan ], then press OK.
→ Channel tuning begins.
• To cancel, select [ Cancel ], then press OK.
5 To go to Home menu, press 主选单.
Manage preset channels
1 Press 主选单.
2 Press [ Settings ], then press OK.
3 Press ▶ to select [Tuner].
4 Press ▼ to select [ Manage Presets ], then press OK.
5 Select [ Edit ], then press OK.
| PR | Name Channel Edit | ||
| 1 | PR | Status | ON |
| 2 | PR | Name | PR 2 |
| 3 | PR | Fine Tune | 1 |
| 4 | PR | Video System | PAL B/G |
| 5 | PR | Swap With | 1 |
| 6 | PR | Seek 175.2 | MHz |
| 7 | PR | 7 | |
| 8 | PR | 8 | |
6 Select a channel to edit, then press OK.
7 Use ◀▶ keys to change the setting and
▲▼ keys to select the previous/next entry fi eld.
[Status]
• [ON] : You can access the channel by using the 频道 +/− key.
• [OFF] : You can access the channel only by pressing the corresponding numeric key.
[Name]
Displays the channel name.
[ Fine Tune ]
Adjust the frequency of the channel.
- Use ◀▶ keys to increase/decrease the frequency.
[Video Format]
Use ◀▶ keys to select a TV system standard that produces the least distortion of picture and sound.
[ Swap With ]
Select the target channel to change position with the current channel.
[Seek]
Enter the frequency of the channel.
- Select the key to enter and press OK.
- To confirm, select [OK], then press OK.
6 Once complete, press OK.
7 To go to Home menu, press 主选单.
Video Settings
Set picture display format
The picture format determines the aspect ratio of display according to the type of TV you have connected.
1 Press 主选单.
2 Press [ Settings ], then press OK.
3 Press ▶ to select [Video].
4 Press ▼ to select [ TV Shape ], then press OK.
5 Select an option and press OK.
[4:3 Pan Scan]

Select this for a full-height picture with both sides trimmed.
[4:3 Letter Box]

Select this for a 'wide screen' display with black bands on the upper and lower portions of the TV screen.
[16:9 Widescreen]

Select this for a wide screen TV (frame ratio16:9).
6 To go to Home menu, press 主选单.
Set video format
Set a video format supported by the connected TV. You can also press the 清晰度 button to toggle through the video options.

Note
- If the selected resolution is not supported, the screen turns blank and resumes to the optimal resolution in twenty seconds.
- If you select the options [720p] or [1080i], there will not be any concurrent display through the CVBS video connections.
1 Press 主选单.
2 Press [ Settings ], then press OK.
3 Press ▶ to select [Video].
4 Press ▼ to select [ Video Format ], then press OK.
5 Select an option and press OK.
[ PAL 576i ]. [ PAL 576p ], [ 720p ], or [ 1080i ]
Select a video resolution according to the capability of the connected TV: "i" denotes interlace and "p" denotes progressive.
6 To go to Home menu, press 主选单.
View DivX(R) VOD registration code
Select to view the DivX® VOD (Video On Demand) registration code that allows you to rent or purchase videos using DivX® VOD services. For more information, visit www.divx.com/vod.
1 Press 主选单.
2 Press [ Settings ], then press OK.
3 Press ▶ to select [Video].
4 Press ▼ to select [ DivX(R) VOD ], then press OK.
→ The registration code is displayed. Use this code to purchase or rent videos from DivX® VOD service at www.divx.com/vod.
5 To go to Home menu, press 主选单.
Recording Settings
Select the recording quality
See chapter 'Record – Recording settings'.
Select the time shift buffer quality
See chapter 'Watch Live TV – About Time Shift Buffer - temporary HDD storage'.
Set auto chapter markers
Divide a recording (title) into chapters by inserting chapter markers at a specific interval. This enables you to access a specific point in the recording quickly.
1 Press 主选单.
2 Press [ Settings ], then press OK.
3 Press ▶ to select [ Recording ].
4 Press ▼ to select [Auto Chapter Marking], then press OK.
5 Select an option and press OK.
[5 minutes], [10 minutes], [15 minutes], [20 minutes]
Chapter markers are inserted automatically within the title during recording at every 5, 10, 15, or 20 minutes interval.
[OFF]
No chapter markers are inserted in the recording.
6 To go to Home menu, press 主选单.
Control Time Shift Buffer
1 Press 主选单.
2 Press [ Settings ], then press OK.
3 Press ▶ to select [ Recording ].
4 Press ▼ to select [Time Shift Buffer], then press OK.
5 Select an option and press OK.
[Auto]
Programmes are automatically stored to the time shift buffer once you switch on the recorder.
[Manual]
Time shift buffer is activated manually.
- When viewing a video source or live TV, press ▶II to enable time shift mode. To disable, press ■.
6 To go to Home menu, press 主选单.
System settings
Adjust time and date
1 Press 主选单.
2 Press [ Settings ], then press OK.
3 Press ▶ repeatedly to select [ System ].
4 Select [Clock], then press OK.
- Use the numeric keypad to enter each field.
- Use ◀▶ to select the previous/next field.
[Year Month Day]
Enter the date in the format : year, month and day.
[ Hour Min. Sec. ]
Enter the time in the format : hour, minutes and seconds.
5 To confirm, press OK.
A confirmation message is displayed.
• To cancel, select [ Cancel ], then press OK.
6 To proceed, select [ Confirm ], then press OK.
7 To go to Home menu, press 主选单.
Enable night mode
Night mode optimises playback of sound at low volumes
1 Press 主选单.
2 Press [ Settings ], then press OK.
3 Press ▶ repeatedly to select [ System ].
4 Press ▼ to select [Night Mode], then press OK.
5 Select an option and press OK.
[ON]
Enable night mode. High volume output is softened and low volume output is increased to an audible level.
[OFF]
Disable night mode.
[ Auto Volume Adjust ]
Enable automatic night mode.
6 To go to Home menu, press 主选单.
Enable child lock
Child lock allows you to set a password to prevent viewing of prohibited content.
1 Press 主选单.
2 Press [ Settings ], then press OK.
3 Press ▶ repeatedly to select [ System ].
4 Press ▼ to select [Child Lock], then press OK.
5 Select an option and press OK.
[ON]
Enable child lock.
[OFF]
Disable child lock.
6 Enter the existing four digit password.
- If you are entering the password for the first time or if you forget the password, the default password is '0808'.
7 To go to Home menu, press 主选单.
Change password
Change the password for child lock. This four digit password may be required when you are playing prohibited content.
1 Press 主选单.
2 Press [ Settings ], then press OK.
3 Press ▶ repeatedly to select [ System ].
4 Press ▼ to select [ Change Password ], then press OK.
| System Language Tuner Video Recording | |
| Clock | Input Password |
| Night Mode | - - - - |
| Child Lock | Input New Password |
| Change Password | - - - - |
| Firmware Upgrade | Confirm New Password |
| HDD Information | - - - - |
| Format | - - - - |
| Restore Default | - - - - |
5 Enter the existing four digit password.
- If you are entering the password for the first time or if you forget the password, the default password is '0808'.
6 Enter the new four digit pin code.
7 Enter the same four digit pin code again, then press OK.
8 Select [OK] and press OK.
9 To go to Home menu, press 主选单.
View fi rmware information
Display information on the hard disk space.
1 Press 主选单.
2 Press [ Settings ], then press OK.
3 Press ▶ repeatedly to select [ System ].
→ The current version of the firmware of this recorder is displayed.
4 To go to Home menu, press 主选单.
View hard disk information
Display information on the hard disk space.
1 Press 主选单.
2 Press [ Settings ], then press OK.
3 Press ▶ repeatedly to select [ System ].
4 Press ▼ to select [ HDD Information ], then press OK.
→ Information on available space for recording is displayed.
5 To exit, select [OK] and press OK.
6 To go to Home menu, press 主选单.
Format fi les
This option removes all recordings and media files on the recorder or a USB flash drive
1 Press 主选单.
2 Press [ Settings ], then press OK.
3 Press ▶ repeatedly to select [ System ].
4 Press ▼ to select [Format], then press OK.
5 Select an option and press OK.
[ Recordings ]
Removes recorded titles on the recorder.
[ Media Files ]
Removes all media fi les (MP3, WMA, jpeg and DivX fi les) on the recorder.
[USB]
Removes all files on the USB flash drive.
6 To go to Home menu, press 主选单.
Reset the recorder to factory default settings.

Note
- After the reset, the initial setup is required. See chapter 'Get Started - First time settings'. All previous settings are reset.
1 Press 主选单.
2 Press [ Settings ], then press OK.
3 Press ▶ repeatedly to select [ System ].
4 Press ▼ to select [Restore Default], then press OK.
→ A confirmation message is displayed.
5 Select [OK] and press OK.
6 To go to Home menu, press 主选单.
10 Additional Information
Care
Hard disk drive handling care
To avoid damage to the hard disk and losing important data:
- Do not move the recorder or subject it to vibration during its operation.
- Do not disconnect the AC power plug from the mains socket without switching the recorder to standby mode.
Regularly backup data in the hard disk in case of data corruption or loss. Philips bears no responsibility for loss of data stored on the hard disk.
About Media Files
The media jukebox stores media fi les (video, music and photos). If the hard disk partition between Media Files and Recordings is not modified, the media files folder can store up to 40GB of video, music and photos.
| Media Type Details | |
| [ Movies ] | 100 Hours/ 60 movies in DivX.(Based on 100Min per DivXUltra movie, video: 640*480,5028Kbps, 25.0fps, audio:192Kbps, 48000Hz, 2CH AC3, 8subtitle, 8 audio) |
| [ Photos ] | 71,000 photos in JPG(Based on 562KB, 1920*1080HD JPG) |
| [ Music ] | 8,600 songs in WMA/ 716 hours(Based on 128Kbps, 4.65MB, 5minutes per song). |
The data is subjected to change if the user has modified the hard disk partition between [Media Files] and [Recordings] during firmware upgrade.
Upgrade software
The software installed in your recorder is continuously being refi ned for greater stability and compatibility of the set. Periodically, Philips issues upgrades for the software which you can copy onto a USB flash drive to install on your recorder.

Caution!
• Power supply must not be interrupted during upgrade!
Copy upgrade information

Note
- When checking for the latest fi mare upgrade, please also check for any accompanying instructions on installing the fi rmware.
1 Insert the USB device to the USB socket. Select [Confirm] and press OK,
2 Press 主选单.
3 Press [ Settings ], then press OK.
4 Press ▶ to select [ System ].
5 Press ▼ to select [ Firmware Upgrade ], then press OK.
A confirmation message is displayed.
6 To proceed, select [OK], then press OK.
→ The information is copied to the USB device.
7 Once copying completes, press OK and remove the USB device.
8 Connect the USB device to a personal computer with internet access.
→ Double-click on the fi le
52 EN
9 Follow the on-screen instructions and download the required firmware.
Install fi rmware
Before you start...
- Copy the latest fi rmware to the root directory of your USB device.
- Switch off the power supply to the recorder.
1 Insert the USB device to the USB socket.
2 Press and hold ⏻ on the front panel and switch on the recorder.
→ Release the ⏻ button when you see the fi rmware install screen is displayed.
To retain the recordings and media files in your hard disk,
1 Select [ Cancel ], then press OK.
Installation begins. Once complete, the initial setup is displayed. (See chapter "Get Started - First time settings").
To format your hard disk,
1 Select [ Confirm ], then press OK.
2 You can modify the hard disk partition between [Media Files] and [Recordings].
- Use ◀▶ keys to modify the hard disk partition.
3 To confirm, press OK.
Installation begins. Once complete, the initial setup is displayed. (See chapter "Get Started - First time settings".)
Specifications

Notes
- Specification and design are subject to change without notice.
- Only brands and models of digital cameras and devices which conform to USB Mass Storage Device class standard are supported.
Accessories supplied
• Remote control and batteries
• RF antenna cable
• Audio/video cable
- Quick Start Guide
Recording Media
• Recording media: HDD, USB
Playback Media
USB
- Compression formats: VOB (DVD), MPG (MPEG-1/2), AVI (DivX 3x/4x/5x/6x, MPEG-4 ASP: XviD), DivX, DivX Ultra, DAT (VCD), and HD MPEG2 TS/TP fi les
Storage Media
• Hard Disk capacity: 160 GB
Tuner/Reception/Transmission
• TV system: PAL
• Aerial Input: 75 Ohm coaxial (IEC75)
Picture/Display
• D/A converter: 12 bit, 108 MHz
• A/D converter: 10 bit, 27 MHz
• Picture enhancement: Progressive scan
Sound
• D/A converter: 24 bit, 192 kHz
• A/D converter: 24 bit, 192 kHz
• Signal to noise ratio: 98 dB
• Crosstalk (1kHz): 90 dB
• Dynamic Range (1kHz): 90 dB
Video Recording
• Recording system: PAL
• Compression formats: MPEG2
- Recording modes: High Quality (HQ), Standard Play (SP), Long Play (LP), Extended Play (EP), Super Long Play (SLP)
• Audio compression: MPEG
Audio Playback
- Compression formats: Dolby Digital, MPEG2 Multichannel, PCM, MP3, Mpeg I Layer 1,2,3/ Mpeg II Layer 1,2/ Dolby Digital AC3/ LPCM/ WMA/ AAC, LPCM/ MPEG audio recording
• MP3 bit rates: 32\~256 kbps and VBR
Still Picture Playback
• Picture compression formats: JPEG, HD JPEG, BMP
• Picture enhancement: Rotate, Zoom
Convenience
- Programming/Timer Enhancements: Daily/Weekly, Repeat Programme, Manual Timer, One Touch Recording
• Programmable events: 8
Power
• Power supply: 220 - 240V, 50Hz
• Consumption: 18 W (typical)
• Standby power consumption: < 3W
Cabinet
• Dimensions (W × H × D) : 360 × 50 × 296 mm
- Net Weight: 3 kg
11 Troubleshooting

Warning!
- Risk of electric shock. Never remove the casing of this recorder.
To keep the warranty valid, never try to repair the system yourself.
If you encounter problems when using this recorder, check the following points before requesting service. If the problem remains unsolved, register your product and get support at www.philips.com/welcome.
Main Unit
No power.
- Press ⏻ (Standby-On) button on the front of the recorder to turn on the system.
- Ensure that the AC outlet has power.
Remote control does not work.
- Aim the remote control directly at the sensor on the front of the recorder (not towards TV).
- Remove any obstacles between the recorder and the remote control.
- Batteries are weak. Replace the batteries.
No TV signal is received. Check the connection to the antenna or cable TV signal.
- Manually tune and store the TV channel. See chapter 'Adjust Settings – Manage preset channels'.
Picture
No picture Check the video connections. See chapter 'Connect'.
• Turn on the TV to the Video In channel.
- Use the TV remote control to select the channel until you see the video output from the recorder. See chapter 'Get Started'.
- Your recorder might have been set to progressive scan mode while your TV does not support progressive scan. Follow the steps below:
1) Connect the supplied AV cable (red/white/yellow) from the CVBS OUTPUT jacks on the rear panel of the recorder to the TV's Video In and Audio In jacks.
2) Turn on the TV and use the TV's remote control to select the corresponding video-in channel on the TV (eg., AV, EXT1, EXT2).
3) Turn on the recorder and wait until the TV displays the recorder screen.
- The video resolution is not supported on your TV. Press the 清晰度 button to toggle to a suitable video resolution.
Play
Unable to play DivX movies
- Check that the DivX file is encoded according to the 'Home Theatre Profi le' mode with DivX encoder.
- Check that the downloaded DivX movie is a complete file.
Unable to display some JPEG photos.
- This recorder only supports JPEG photos saved in Baseline Standard or Baseline Optimised mode.
Recording
A TV channel installed during the recorder's automatic TV channel search is fuzzy or distorted.
- Check the video connection between the recorder and the TV.
- Press 频道 +/— to search for the same TV channel which may have a clearer picture.
- You can fi ne-tune the signal of the TV channel. See chapter on “Adjust Settings – Tuner Settings”.
Recordings are not occurring as scheduled. New recordings cannot be made.
- The TV channel you want is not stored or the wrong program number was selected. Check the TV channels stored.
- In the timer recording list, one of the following messages may be displayed in the [Status] column:
- [FAIL]: A power cut had occurred at the time of the scheduled recording.
12 Glossary
Analogue sound
Sound that has not been converted into numbers. Analogue sound varies, while digital sound has specific numerical values. These sockets send audio through two channels, the left and right.
Aspect ratio
The ratio of vertical and horizontal sizes of a displayed image. The horizontal vs. vertical ratio of conventional TVs. is 4:3, and that of wide-screens is 16:9.
AUDIO OUT sockets
Red and white sockets that send audio to another system (TV, Stereo, etc).
Chapter
Sections of a picture or a music piece on a recording that are smaller than titles. A title is composed of several chapters. Each chapter is assigned a chapter number enabling you to locate the chapter you want.
Component Video Out sockets:
Sockets that send high quality video to a TV that has Component Video In sockets (R/G/B, Y/Pb/Pr, etc).
DivX
The DivX code is a patent pending, MPEG-4 based video compression technology, developed by DivX Inc., that can shrink digital video to sizes small enough to be transported over the internet, while maintaining high visual quality.
Dolby Digital
A surround sound system developed by Dolby Laboratories containing up to six channels of digital audio (front left and right, surround left and right, centre and subwoofer).
JPEG
A common digital still picture format. A still-picture data compression system proposed by the Joint Photographic Expert Group, which features small decrease in image quality in spite of its high compression ratio.
MP3
A fi le format with a sound data compression system. "MP3" is the abbreviation of Motion Picture Experts Group 1 (or MPEG-1) Audio Layer 3.
MPEG
Motion Picture Experts Group. A collection of compression systems for digital audio and video.
S-Video
Produces a clear picture by sending separate signals for the luminance and the colour. You can use S-Video only if your TV has an S-Video In socket.
Title
The section of a movie or music feature on the recording. Each title is assigned a title number, enabling you to locate the title you want.
VIDEO OUT socket
Yellow socket that sends the video display to a TV.


- 环使用期限 Environmental Protection Use Period
- 电池标识 Battery labeling logo
- Contents
- Important 6
- Your product 8
- Connect 12
- Get Started 18
- Watch live TV 21
- Record 23
- Play 29
- Edit Recordings 35
- Copy Files 41
- Adjust Settings 42
- Additional Information 51
- Troubleshooting 54
- Glossary 57
- Important
- Safety
- Warning!
- Risk of fire or electric shock!
- Caution!
- Note
- Notice
- Recycle notice
- Copyright notice
- Be responsible Respect copyrights
- EN
- Trademark notice
- Your product
- Features highlight
- Pause Live TV
- Instant Replay
- FlexTime
- Time Shift Buffer (TSB)
- Media Jukebox
- Enhanced USB upgrade
- EN
- Product Overview
- Main Unit
- LIVE TV
- Remote Control
- 静音
- Connect
- Basic connections:
- Optional connections:
- Place the unit
- Connect antenna or cable
- Connect to an off-air antenna or cable TV signals
- EN
- Connect video/audio cables
- Tips
- Tip
- EN
- Connect other devices
- Connect to cable box/ satellite receiver
- Connect to VCR or similar device
- Notes
- Connect to DVD player or similar device
- Connect to an analogue camcorder
- Connect to a USB device or digital camera
- Get Started
- Navigate through the menu
- First Time Settings
- [4:3 Pan Scan]
- [4:3 Letter Box]
- [16:9 Widescreen]
- Watch live TV
- Use your recorder to watch live TV
- About Time Shift Buffer - temporary HDD storage
- Select the time shift buffer quality
- Control live TV
- EN
- Record
- Before you record
- Record media
- Record settings
- Select the recording quality
- Record the current TV programme
- About timer recording
- Before you start ...
- [ Source ]
- [Start time]
- [Length]
- [Repeat]
- [Quality]
- [Language]
- Edit a timer recording
- To delete a timer schedule:
- To pause a timer schedule:
- To activate a paused timer:
- View history of timer recordings
- To delete any previous timer history:
- Record from other devices
- Simultaneous record and play
- Watch other TV programme
- Play
- Play from USB
- Play from a USB card reader
- Play video
- Play a recorded title
- Press 录像清单.
- Select a title and press ▶II.
- Play a Movie
- Press 主选单.
- Select a source:
- Press ▶ to select [Movies].
- EN
- Locate the file to play.
- Select a file and press ▶II.
- Play music
- Play MP3/ WMA fi les
- Select another track/ fi le
- Select repeat options
- View photos
- Play a picture slide show
- EN
- Enlarge a picture
- Play from a digital camera
- Control Play
- Select another title/ chapter
- Select a subtitle language
- Select an audio language
- Search forward/ backward
- Slow motion play
- Repeat a specific scene (A-B Repeat)
- Resume play from the last stopped point
- Edit Recordings
- Sort titles
- About the recording list
- [Title Number]
- [Recording Time]
- [ Title Name ]
- [ New Titles ]
- Edit titles
- Set a thumbnail
- Erase a scene in a title
- Divide a title
- Merge a title
- Add or remove chapter markers
- To add chapter markers
- To remove chapter markers
- Edit a title name
- Delete all titles
- Delete a title
- Set child lock
- Before you start...
- To unlock child lock
- Protect/ Unprotect a title
- To unprotect a title,
- Copy Files
- Copy to USB
- Copy recordings to USB
- Copy media fi les to USB
- Copy to HDD
- Copy media fi les to HDD
- Adjust Settings
- Language Settings
- Change system menu language
- Set DivX subtitle font
- Select an option and press OK.
- Set media font
- Set recording language
- Tuner Settings
- Select country of residence
- Install all TV channels
- Manage preset channels
- [Status]
- [Name]
- [ Fine Tune ]
- [Video Format]
- [ Swap With ]
- [Seek]
- Video Settings
- Set picture display format
- Set video format
- View DivX(R) VOD registration code
- Recording Settings
- Set auto chapter markers
- [OFF]
- Control Time Shift Buffer
- [Auto]
- [Manual]
- System settings
- Adjust time and date
- [Year Month Day]
- [ Hour Min. Sec. ]
- Enable night mode
- [ON]
- [ Auto Volume Adjust ]
- Enable child lock
- Change password
- View fi rmware information
- View hard disk information
- Format fi les
- Additional Information
- Care
- Hard disk drive handling care
- About Media Files
- Upgrade software
- Copy upgrade information
- EN
- Install fi rmware
- To retain the recordings and media files in your hard disk,
- To format your hard disk,
- Specifications
- Accessories supplied
- Recording Media
- Playback Media
- Storage Media
- Tuner/Reception/Transmission
- Picture/Display
- Sound
- Video Recording
- Audio Playback
- Still Picture Playback
- Convenience
- Power
- Cabinet
- Troubleshooting
- Picture
- Play
- Recording
- Glossary
- Analogue sound
- Aspect ratio
- AUDIO OUT sockets
- Chapter
- Component Video Out sockets:
- DivX
- Dolby Digital
- JPEG
- MP3
- MPEG
- S-Video
- Title
- VIDEO OUT socket
Brand : PHILIPS
Model : DVR2008
Category : Audio recorder