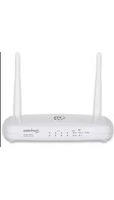
1200AC - Router MANHATTAN - Free user manual and instructions
Find the device manual for free 1200AC MANHATTAN in PDF.


| Product Type | Wireless Router (Model 1200AC) |
| Wireless Standards | IEEE 802.11 a/b/g/n/ac |
| Frequency Bands | 2.4 GHz and 5 GHz |
| Max Wireless Speed | Up to 867 Mbps (5 GHz) + 300 Mbps (2.4 GHz) |
| Ports | 4 x 10/100/1000 Mbps LAN, 1 x 10/100/1000 Mbps WAN |
| Antennas | 4 external antennas (dual-band) |
| Power Supply | 5V DC, 1.2A via included adapter |
| Dimensions (approx.) | 150 x 120 x 30 mm (5.9 x 4.7 x 1.2 in) |
| Weight (approx.) | 200 g (7.1 oz) |
| Wireless Security | WEP, WPA/WPA2 (TKIP/AES), WPS |
| Firewall | NAT, SPI, DoS prevention, URL blocking, MAC/IP filtering |
| Advanced Features | QoS, Virtual Server, Port Forwarding, DMZ, DDNS, UPnP |
| DHCP Server | Yes, with static lease management |
| Management | Web-based GUI (http://manhattanrouter), remote management |
| Warranty | Three years |
Frequently Asked Questions - 1200AC MANHATTAN
User questions about 1200AC MANHATTAN
0 question about this device. Answer the ones you know or ask your own.
Ask a new question about this device
Download the instructions for your Router in PDF format for free! Find your manual 1200AC - MANHATTAN and take your electronic device back in hand. On this page are published all the documents necessary for the use of your device. 1200AC by MANHATTAN.
USER MANUAL 1200AC MANHATTAN
WIRELESS ROUTER USER MANUAL
MODELS 525459, 525466, 525480

300N Model 505466
manhattan® Life just got easier.™
MH-525459/525466/525480-UM-0713-01
Thank you for purchasing this Manhattan ^® Wireless Router: Model 525459 (150N 4-Port), Model 525466 (300N 4-Port) or Model 525480 (1200AC 4-Port).
The latest in wireless networking, these Wireless Routers serve multiple purposes — an access point for your wireless network, a four-port router for hard-wiring Ethernet devices — and bring it all together so that the devices can access a high-speed Internet connection.
Detailed instructions in this user manual make installation reasonably quick and simple so you'll soon be enjoying the benefits of these and more popular features:
• Network link speed of up to 150 Mbps for Model 525459, 300 Mbps for Model 525466 and 867 Mbps for Model 525480 (at 5 GHz)
• Supports WMM function to meet the multimedia data bandwidth requirement
• Supports Wi-Fi Protected Setup (WPS)
• Supports WEP and WPA/WPA2 (TKIP and AES) data encryption
• Auto MDI/MDI-X support
• DHCP server assigns IP addresses for all LAN users
• DHCP server supports static lease management
• Supports virtual server, port forwarding and DMZ (demilitarized zone)
• Supports DDNS (dynamic DNS)
• Supports UPnP (Universal Plug and Play)
- Integrated anti-DOS firewall
• QoS (Quality of Service) bandwidth management
- VPN Passthrough
- Easy installation through Web-based user interface
- Three-Year Warranty
Package Contents
- Wireless 150N 4-Port Router, Wireless 300N 4-Port Router or Wireless 1200AC Router
- Quick install guide, plus user manual on CD
- Power adapter
- Ethernet Cat5 RJ45 cable: 1.0 m (3 ft.)
NOTE: Some screen images have been modified to fit the format of this manual. Hardware sections 1.1 and 1.2 feature images of the 150N Router: Displays and components for the 300N Router are similar.
For specifications, refer to each model's datasheet at manhattan-products.com.
TABLE OF CONTENTS
section page section page
1 HARDWARE....5
1.1 Front Panel Display....5
1.2 Back Panel Display 5
2 SYSTEM & NETWORK SETUP ......6
2.1 Connecting the Router 6
2.2 Obtaining an IP Address 6
2.2.1 Windows XP Setup....7
2.2.2 Windows Vista/7 Setup......9
2.2.3 Router IP Address Lookup...... 10
2.3 Quick Setup 13
2.3.1 Cable Modem 14
2.3.2 Fixed IP xDSL (Static IP) ..... 15
2.3.3 PPPoE xDSL 16
2.3.4 PPPTP xDSL 16
2.3.5 L2TP xDSL 18
2.3.6 Telstra BigPond 18
2.4 Basic Setup.... 19
2.4.1 Time Zone / Auto-Synch......20
2.4.2 Changing Mngmt. Password....20
2.4.3 Remote Management 21
2.5 WAN Setup 22
2.5.1 Dynamic IP 23
2.5.2 Static IP 23
2.5.3 PPPoE....24
2.5.4 PPPTP 24
2.5.5 L2TP 25
2.5.6 Telstra BigPond 26
2.5.7 DNS 26
2.5.8 DDNS 27
2.6 LAN Configuration 28
2.6.1 LAN IP 28
2.6.2 DHCP Server....29
2.7 WLAN Configuration....30
2.7.1 Basic Wireless Settings ...... 31
2.7.2 Advanced Wireless Settings .... 32
2.7.3 Wireless Security....33
2.7.4 Wireless Access Control......37
2.7.5 WPS 38
2.7.6 Security Tips......39
3 ADVANCED FUNCTIONS 41
3.1 QoS....41
3.1.1 Basic QoS Settings.....41
3.1.2 Adding a new QoS Rule ..... 42
3.2 NAT....43
3.2.1 Port Forwarding....44
3.2.2 Virtual Server....45
3.2.3 Port Mapping 46
3.2.4 UPnP 47
3.2.5 ALG 47
3.3 Firewall....48
3.3.1 Access Control 48
3.3.2 Add PC 50
3.3.3 URL Blocking....51
3.3.4 DoS Attack Prevention......52
3.3.5 DMZ....53
4 ADDITIONAL FUNCTIONS....55
4.1 Status....55
4.1.1 Internet Connections 55
4.1.2 Device Status 56
4.1.3 System Log....56
4.1.4 Security Log 56
4.1.5 Active DHCP Client 57
4.1.6 Statistics 57
4.2 Tools 57
4.2.1 Configuration Tools....57
4.2.2 Firmware Upgrade 58
4.2.3 Reset 59
5 TROUBLESHOOTING....60
6 GLOSSARY....62
SAFETY GUIDELINES
For the protection of equipment users and connected devices, follow these safety guidelines:
- This router is designed for indoor use only; do not place this router outdoors.
- Do not place this router in hot or humid environments.
- Do not yank any connected cables.
- Firmly secure this device if it's placed at any significant height.
- Router accessories such as the antenna and power supply should be considered dangerous when handled by children under the age of 3. Keep this device out of the reach of children.
- The router will become hot when used for long time. This is normal and is not a malfunction, but keep the router away from paper, cloth and other flammable materials.
- There are no user-serviceable parts inside the router. If the router is not working properly, contact your dealer (place of purchase) and ask for help. Do not disassemble the router, as doing so will void the warranty.
- If the router falls into water while it's powered on, do not pick it up with your hands. Disconnect the power before you do anything, or contact an experienced technician for help.
- If you smell something strange, or if you see some smoke coming from the router or power supply, remove the power supply or switch the electrical power off immediately and call the dealer for help.
1 HARDWARE
1.1 Front Panel Display


LED Status Description
PWR On Router is powered on.
WLAN On Wireless network is switched on or WPS mode is on.
Flashing Wireless LAN activity (transferring or receiving data).
WAN / On WAN port is connected.
WAN LNK/ACT Flashing WAN activity (transferring or receiving data).
LAN (1-4) On LAN port is connected.
LAN LNK/ACT Flashing LAN activity (transferring or receiving data).
2.4G On 2.4GHz Wireless WPS function is enabled.
Flashing Wireless LAN activity (transferring or receiving data).
5G On 5GHz Wireless WPS function is enabled.
Flashing Wireless LAN activity (transferring or receiving data).
1.2 Back Panel Display

Feature Description
Radio Activate or deactivate the wireless function with this ON/OFF switch.
Reset/ Reset the router to factory default settings (clear all settings) or start the
WPS WPS function. Press and hold for 10 seconds to restore all settings to factory defaults; press for less than 5 seconds to start WPS.
1-4 Local Area Network (LAN) ports 1 to 4.
WAN Wide Area Network (WAN/Internet) port.
5VDC Connects the A/C power adapter (5V DC).
2 SYSTEM & NETWORK SETUP
2.1 Connecting the Router
- Connect your DSL or cable modem to the WAN port of the router using the provided RJ45 Ethernet cable. NOTE: Standard modems provided by Internet service providers come with at least one LAN/Ethernet port, which connects to the WAN port of the router.

- Connect all your computers and network devices (network-enabled components like game consoles, network media players, network storage units or LAN switches) to the LAN ports (1-4) of the router.
- Connect the A/C power adapter to the wall socket, and then connect it to the power jack of the router.
- Check all LEDs on the front panel. The PWR LED should be on, and the WAN and LAN LEDs should be on if the computer or network device connected to the corresponding router port(s) is powered on and correctly connected.
2.2 Obtaining an IP Address
Before you can connect to the router and start configuration procedures, your computer must be able to obtain an IP address automatically (that is, to use a dynamic IP address). This is the default setup for any standard Windows computer, and it normally is not required to make any changes.
-
With your computer connected to a LAN port on the router, activate the network connection. Start your Web browser and open http://manhattanrouter to display a login window (right).
-
Enter "admin" as the username and "1234" as the password, then click "OK."
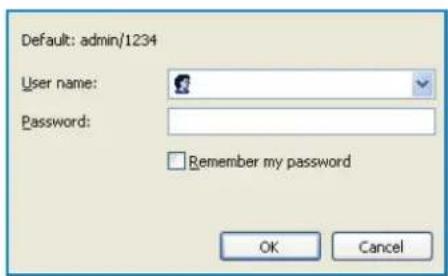
NOTE: If this procedure is successful, skip the following subsections and proceed to 2.3 Using Quick Setup. If the above procedure doesn't result in your obtaining an IP address, or if you know that your computer has a static IP address setup, follow the steps in the appropriate subsection below.
2.2.1 Windows XP IP Address Setup
- Click "Start," then go to the control panel. Double-click the Network & Internet Connections icon, then click "Network Connections" and double-click "Local Area Connection" to display the Local Area Connection Status window. Click "Properties."
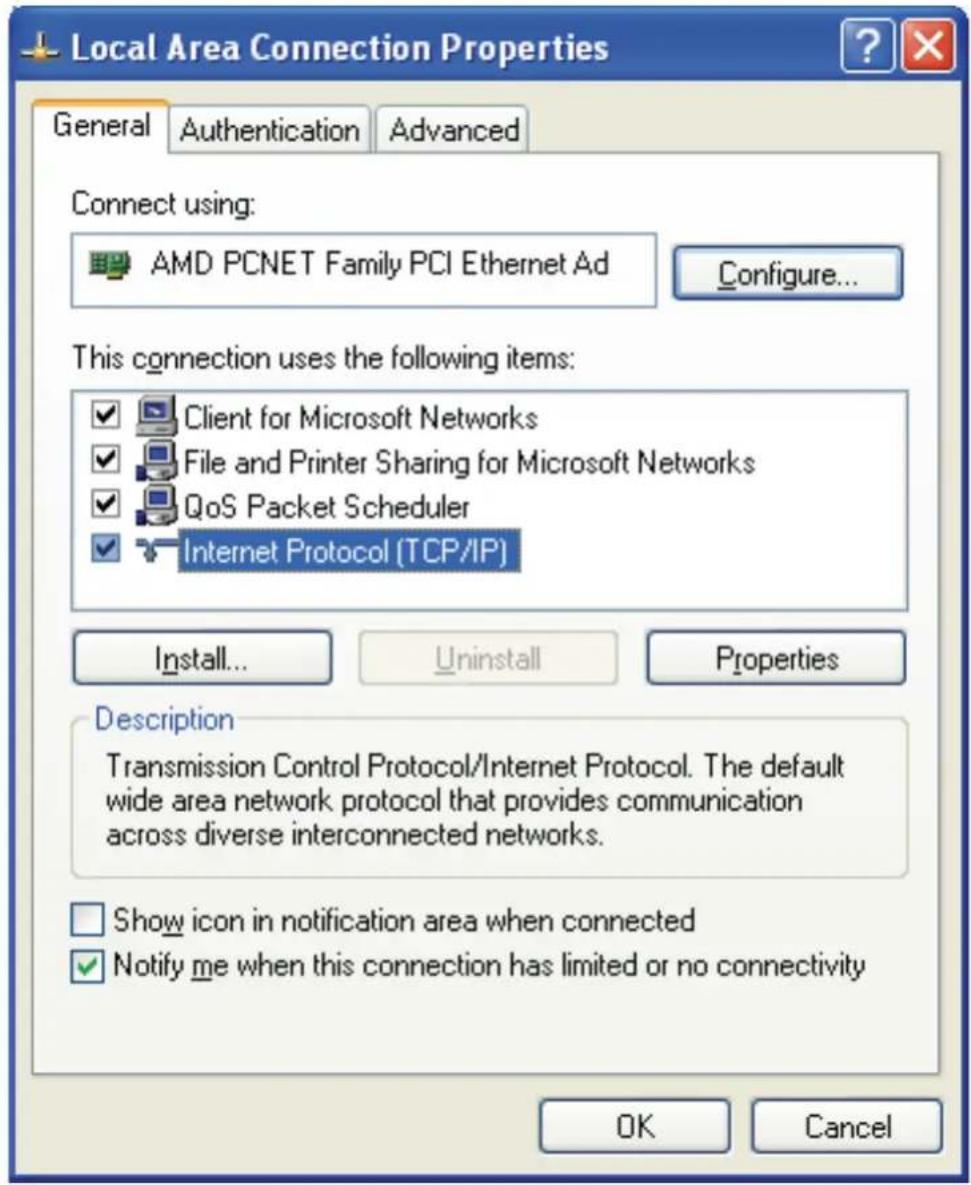
- Select "Obtain an IP address automatically" and "Obtain DNS server address automatically," then click "OK."
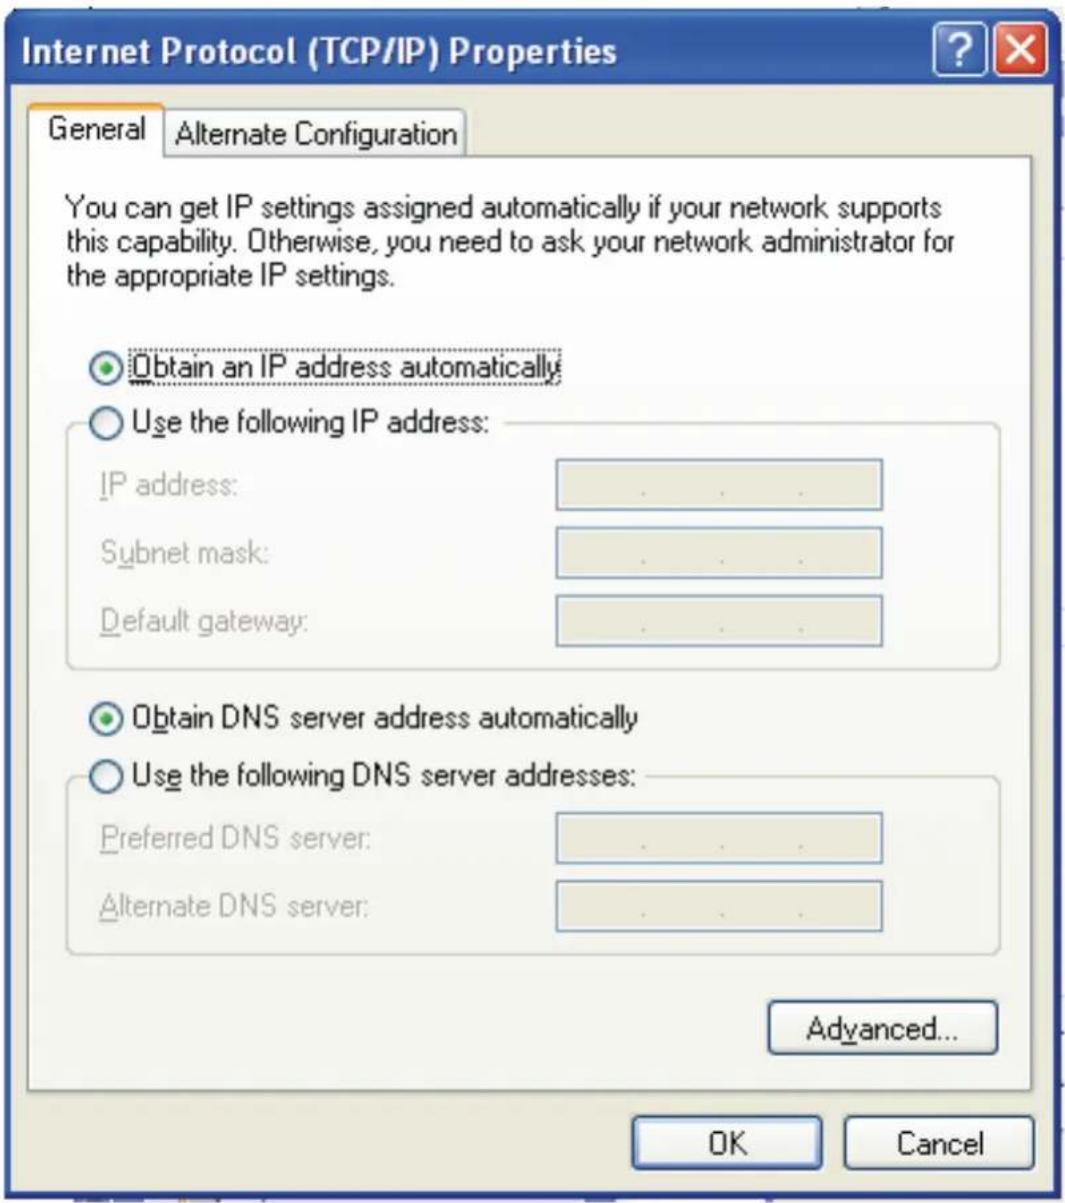
2.2.2 Windows Vista/7 IP Address Setup
- Click "Start," then go to the control panel. Click "View Network Status and Tasks," then click "Manage Network Connections." Right-click "Local Area Network," then select "Properties." With the Local Area Connection Properties window displayed, select "Internet Protocol Version 4 (TCP / IPv4)," and click "Properties."
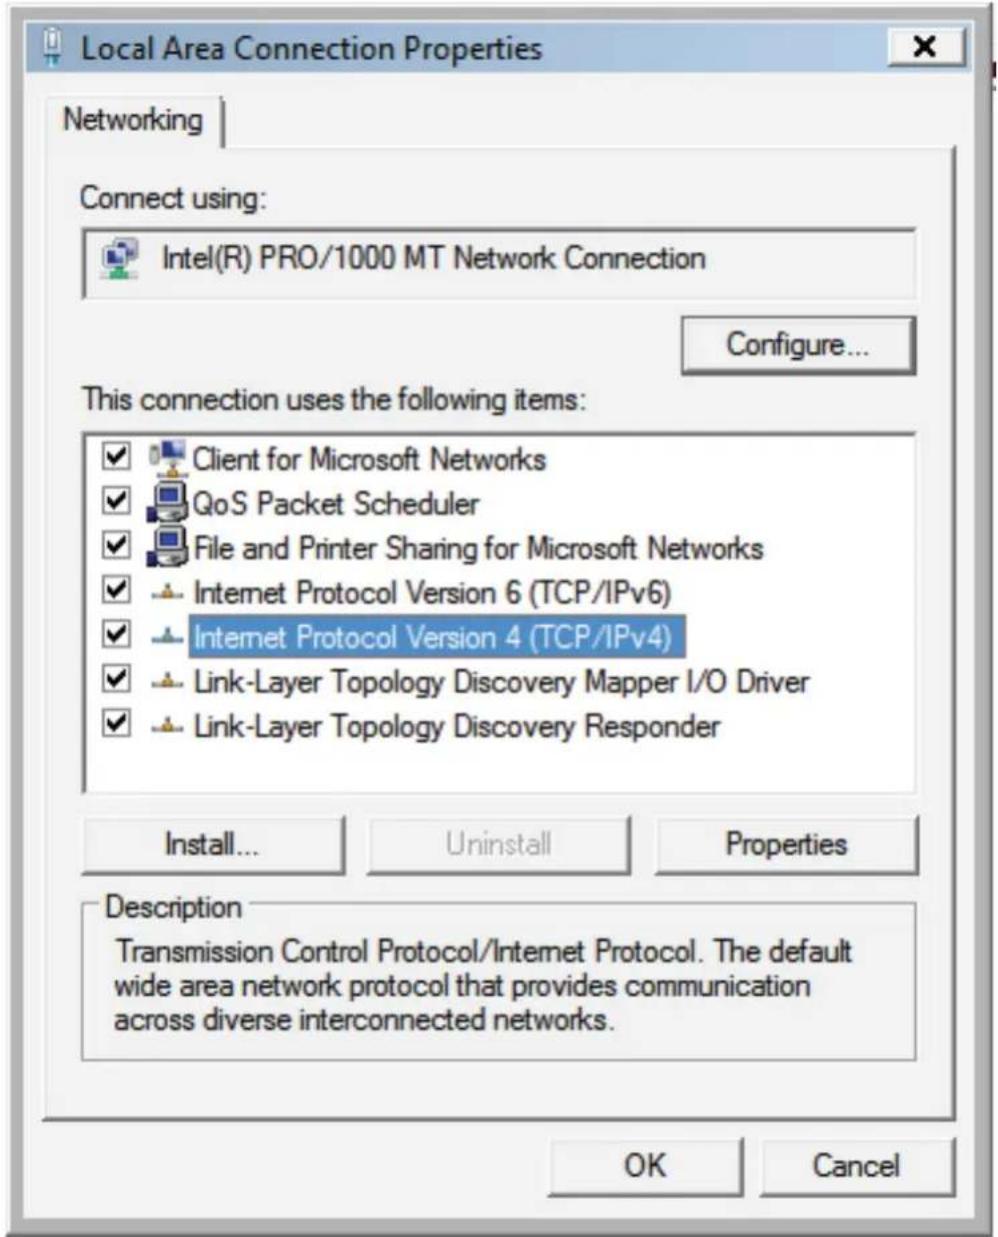
- Select "Obtain an IP address automatically" and "Obtain DNS server address automatically," then click "OK."

2.2.3 Router IP Address Lookup
- After the IP address is set up, click "Start" at the bottom-left of the desktop, then click "Run."
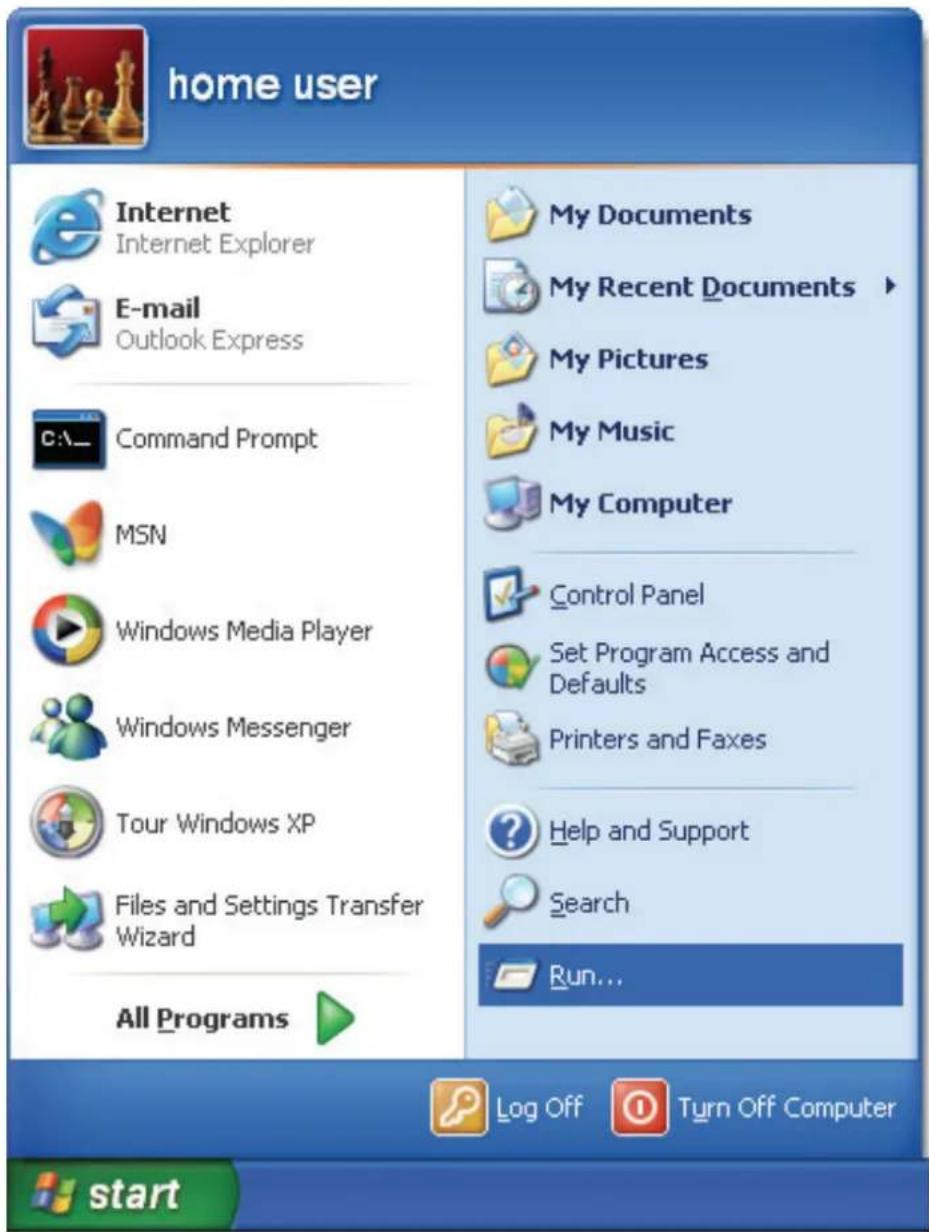
- With the Run window displayed, enter "cmd" in the "Open:" text field, then click "OK."
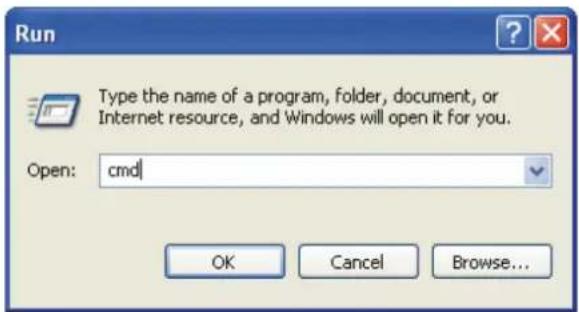
- Enter "ipconfig," then press
. The IP address displays, followed by the default gateway. In the example below, the IP address of the router is 19 2.168. 2.1.

NOTE: If the IP address of the gateway is not displayed, or if the address begins with 169, recheck the network connection between your computer and the router, and re-check each step of the network setup procedure.
- Once your computer has obtained an IP address from the router, open your Web browser and enter the IP address of the router into the address bar. When the login window displays (see 2.2 above), enter the username (“admin”) and the password (“1234”). Press “OK” to display the router’s Web management interface.
NOTE: If you can't see the Web management interface and you're being prompted to enter the user name and password again, it means you didn't enter the correct username and password. Re-type the username and password. If you're certain that the username and password are correct, refer to 4-2 Troubleshooting to perform a factory reset to set the password back to the default value.
TIP: This page (see 2.3 Quick Setup below) shows the four primary setting categories: QuickSetup, General Setup, Status and Tools. You can jump to another menu category directly by clicking the link at the top-right of each screen.
2.3 Quick Setup
The Quick Setup procedure lets you configure all the settings required for quick Internet access.

The initial Quick Setup screen presents time settings.
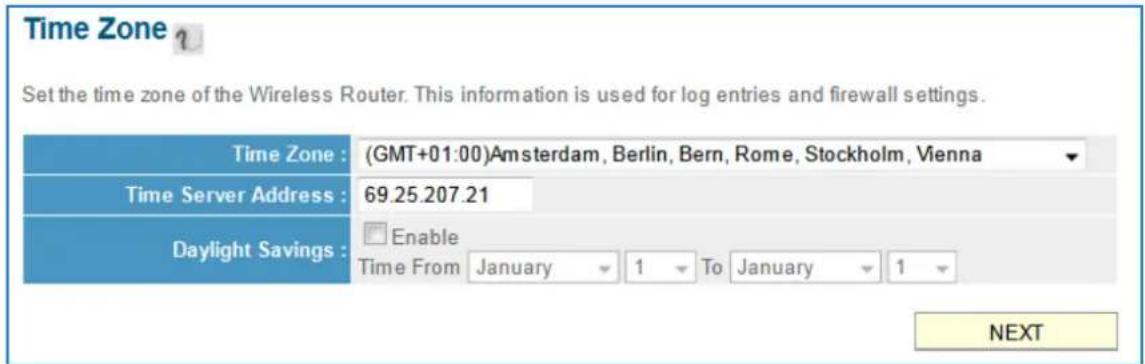
Set Time Zone — Use the drop-down menu to select your time zone.
Time Server Address — Enter the IP address/hostname of the time server. This isn't normally required, but if the default time server (NTP) should go offline, you can obtain a new NTP server from the list at http://www.ntp.org.
Daylight Savings — If your locale uses Daylight Saving, activate "Enable Function" and select the duration using the drop-down menus.
Click "Next" to continue to the next screen of the Quick Setup procedure, where you select the broadband (Internet connection) type you use.
On all screens, click "Apply" (if such button appears at the bottom) to submit any option or configuration changes. Click "Back" to return to the previous screen. Click "Cancel" to undo any changes you've made on that screen. Click "Next" or "OK" to proceed to the next screen.
Cable Modem
A connection through a cable modem requires minimal configuration. When you set up an account with your Cable provider, the Cable provider and your Wireless Router will automatically establish a connection, so you probably do not need to enter anything more.
Fixed-IP xDSL
Some xDSL Internet Service Providers may assign a Fixed IP Address for your Wireless Router. If you have been provided with this information, choose this option and enter the assigned IP Address, Subnet Mask, Gateway IP Address and DNS IP Address for your Wireless Router.
PPPoExDSL
If you connect to the Internet using an xDSL Modem and your ISP has provided you with a Password and a Service Name, then your ISP uses PPPoE to establish a connection. You must choose this option and enter the required information.
PPTP xDSL
If you connect to the Internet using an xDSL Modem and your ISP has provided you with a Password, Local IP Address, Remote IP Address and a Connection ID, then your ISP uses PPTP to establish a connection. You must choose this option and enter the required information.
L2TP xDSL
Layer Two Tunneling Protocol is a common connection method used in xDSL connections.
Telstra Big Pond
If your Internet service is provided by Telstra Big Pond in Australia, you will need to enter your information below. This information is provided by Teistra BigPond.
BACK
There are six types of Internet connections available, as explained below: Cable Modem, Fixed IP xDSL, PPPoE xDSL, PPTP xDSL, L2TP xDSL and Telstra BigPond. Cable Modem and PPPoE xDSL are the most common, but if you're not sure which type of service you have, simply contact your Internet service provider (ISP) to find out. You won't be able to connect to the Internet if you choose the wrong type during the router setup. NOTE: DSL Internet Service Providers normally operate using the PPPoE protocol; thus, PPPoE xDSL should be the broadband type. However, in recent years more DSL ISPs provide customers with DSL modems that handle the PPPoE portion of Internet access automatically. In such cases, you need to select Cable Modem as your broadband type even if you have a DSL service.
2.3.1 Setup Procedure for Cable Modem (Dynamic IP)
Host Name — Input the host name of your computer. This is optional, and is only required if your service provider asks you to do so.

MAC address — Enter the MAC address of your computer here if your service provider only permits a computer with a certain MAC address to access the Internet. If you're using a computer used to connect to the Internet via cable modem, you can simply click "Clone Mac address" to fill in the MAC address field with the MAC address of your computer.
2.3.2 Setup Procedure for Fixed IP xDSL (Static IP)

IP address — Enter the IP address assigned by your ISP.
Subnet Mask — Enter the subnet mask assigned by your ISP.
DNS address — Enter the IP address of the DNS server provided by your ISP.
Service Provider Gateway Address — Enter the gateway IP address provided by your ISP.
NOTE: You can choose this Internet connection method if your service provider assigns a fixed IP address (also know as a static address) to you, and doesn't use DHCP or PPPoE protocol. Contact your service provider for further information.
2.3.3 Setup Procedure for PPPoE xDSL

User Name — Enter the username assigned by your ISP.
Password — Enter the password assigned by your ISP.
Service Name — Provide a name for this Internet service. (optional)
MTU — Enter the MTU value of your network connection. NOTE: Use the default value unless your ISP specifies otherwise.
Connection Type — Select one of the three connection types in the drop-down menu:
- “Continuous” keeps the Internet connection alive and does not disconnect. This is the preferred choice for always-on / flat-rate Internet services.
- “Connect on Demand” only connects to the Internet when there’s a connect attempt. This is the preferred choice for all users who have paid-per-minute or per-transferred-data Internet service.
- “Manual” only connects to the Internet when “Connect” is selected, and disconnects when “Disconnect” is selected.
Idle Time Out — Specify the time to shut down the Internet connection after no Internet activity is detected. This option is only available when the connection type is Connect on Demand.
2.3.4 Setup Procedure for PPTP xDSL
PPTP xDSL requires two groups of settings: the WAN interface settings (to set up IP address) and PPTP settings (PPTP username and password).
In the WAN Interface Settings panel, select how you obtain an IP address from your service provider: "Obtain an IP address automatically" or "Use the following IP address" (i.e., a static IP address). The WAN interface settings must be
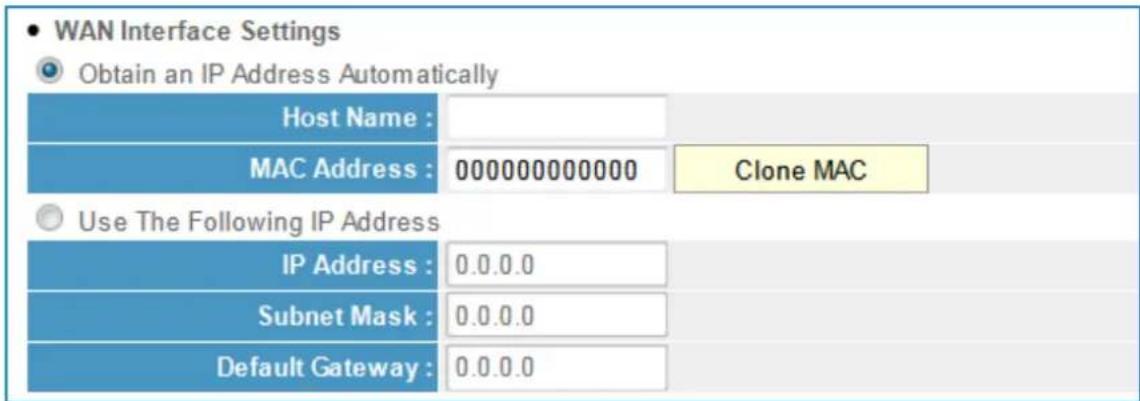
correctly entered; otherwise, the Internet connection will fail even if the PPTP settings are correct. Contact your ISP if you don't know how you should fill in these fields.
The PPTP Settings panel presents these options:
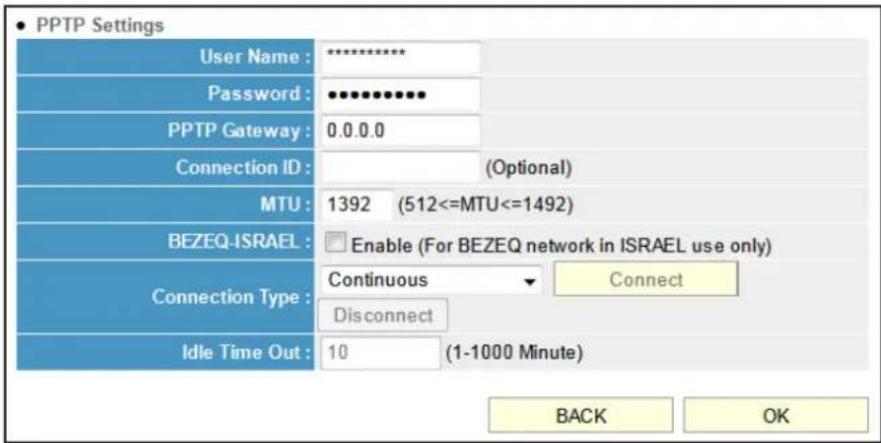
User Name — Enter the username assigned by your ISP.
Password — Enter the password provided by your ISP.
PPTP Gateway — Enter the IP address of PPTP gateway assigned by your ISP.
Connection ID — Enter the connection ID. (optional)
MTU — Enter the MTU value of your network connection. NOTE: Use the default value unless your ISP specifies otherwise.
Connection Type — Select one of the three connection types in the drop-down menu (see PPPoE above):
Idle Time Out — Specify the time to shut down the Internet connection after no Internet activity is detected. This option is only available when the connection type is Connect on Demand.
NOTE: Enable BEZEQ-ISRAEL only if you're using that network provider.
2.3.5 Setup Procedure for L2TP xDSL
L2TP is another popular connection method for xDSL and other Internet connection types, and all required setting items are the same as the PPTP connection (see section 2.3.4 above).
2.3.6 Setup Procedure for Telstra BigPond
This procedure is only for the Telstra BigPond network service in Australia.

User Name — Enter the username assigned by Telstra.
Password — Enter the password assigned by Telstra.
Assign login server manually — Select to choose the login server by yourself.
Server IP Address — Enter the IP address of the login server.
When all settings are finished (and after you click "OK"), you'll see this message (right) on your Web browser.

Click "Apply" to restart the router. You'll see a second restart message (right).

Wait for about 30 seconds, then click "OK." You'll be forwarded to the router's Web management interface. The router is now running with the new settings, and, if all information entered is correct, you can now access the Internet.
NOTE TO DSL USERS
While PPPoE is the most common way to connect to DSL Internet service, it still may be necessary to enable “Cable Modem” in the Broadband settings. Below are examples for using Cable Modem instead of xDSL PPPoE, even if your Internet service is a DSL service.
- Your ISP has given you a so-called "modem-router" instead of a simple modem
- Your ISP has not given you a username and password for PPPoE login (implying that it is not required).
- When your computer is connected directly to the modem, the computer obtains an IP address which is in the private IP network range (192.168.xxx.yyy, 10.xxx.yyy, 172.16.xxx.yyy).
- You can connect to the Internet with your computer connected directly to the modem without using a dialer program asking for a username and password.
- If attempts to utilize PPPoE xDSL fail repeatedly, you should activate "Cable Modem" as a troubleshooting step.
2.4 Basic Setup
This section explains how to change the time zone, password and remote
| Manhattan® Life just got easier.™ | | Home | General Setup | Status | Tools | | |
| Quick Setup The Quick Setup provides only the necessary configurations to connect your Wireless Router to your Internet Service Provider (ISP) through an external cable or a DSL modem. | ||
| General Setup The Wireless Router supports advanced functions like Virtual Server, Access Control, Hacker Attack Detection and DMZ. We highly recommend you keep the default settings. | ||
| Status The Wireless Router's status information provides the following information about your Wireless Router: Hardware/Firmware version, Serial Number, and its current operating status. | ||
| Tools Wireless Router Tools - Tools Include Configuration tools, Firmware upgrade and ResetConfiguration tools allow you to Backup, Restore, or Restore to Factory Default setting for your Wireless Router. The Firmware upgrade tool allows you to upgrade your Wireless Router's firmware. The RESET tool allows you to reset your Wireless Router. | ||
management settings. Start your Web browser and log on to the router's Web management interface by opening http://manhattanrouter, then click the "General Setup" button on the left.
2.4.1 Time Zone and Time Auto-Synchronization
Click the "System" menu on the left of the Web management interface, then click "Time Zone." You'll be prompted to select a time zone from the "Set time zone" drop-down menu and enter the IP address or host name of the time server. If you want to enable the Daylight Saving setting, check the "Enable Function" box and set the duration of Daylight Saving.
Click "Apply" and this message will display. Click "Continue" to save the settings and make additional changes; click "Apply" to save the settings and restart the router so the
settings will take effect after it reboots.

2.4.2 Changing the Management Password
The default password of this router is 1234, and it's displayed on the login prompt when accessed from the Web browser. There's a security risk if you don't change the default password, since everyone can see it. This is very important when you have the wireless function enabled. To change the password, click the "System" menu on the left of the Web management interface, then click "Password Settings."

Current Password — Enter the current password (for example, 1234). New Password — Enter the new password. Confirm Password — Enter the new password again.
If the passwords entered in the "New Password" and "Confirmed Password" fields aren't the same, you'll see the message at right. Re-enter the new password.
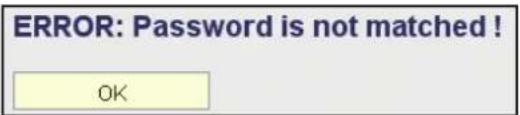
If you see the error message at right, it means the content in the "Current Password" field is
wrong. Click "OK" to go back to the previous menu, and try entering the current password again. If the current and new passwords are correctly entered, click "Apply" and you'll be prompted to log in again. Enter the new password and enter "admin" for the username.

2.4.3 Remote Management
This router by default does not allow management access from the Internet to prevent possible security risks (especially when you have defined a weak password or didn't change the default password). However, you can still manage this router from a specific IP address by enabling the Remote Management function.
Click the "System" menu on the left of Web management interface, then click "Remote Management." The screen below will display on your Web browser.

Host Address — Enter the IP address of the remote host you want to initiate management access..
Port — You can define the port number through which this router should expect an incoming request. If you're providing a Web service (default port number is 80), you should try to use another port number. You can use the default port setting (8080) or something like 32245 or 1429 (any integer between 1 and 65534)..
Enabled — Select the field to start the configuration.
Click "Apply," then either click "Continue" to save the settings and make additional changes or click "Apply" again to save the settings and restart the router so the settings will take effect after it reboots.
NOTE: To manage this router from another computer on the Internet, you need to input the IP address and port number of this router. If your Internet service provider assigns you a static IP address, it will not be a problem; but if the IP address your service provider assigns will vary every time you establish an Internet connection, this will be a problem. Either ask your ISP to give you a static IP address, or use a dynamic DNS service like DDNS. (See section 2.5.8 DDNS Client below for details.)
NOTE: The default port number the Web browser will use is 80. If the "Port" setting on this page is not 80, you need to assign the port number in the address bar of the Web browser manually. For example, if the IP address of this router is 1.2.3.4, and the port number you set is 8888, you need to enter http://1.2.3.4:8888 in the address bar of the Web browser.
2.5 Setting Up an Internet Connection (WAN Setup)
The Internet connection setup can be done by using the Quick Setup menu described in section 2-3. However, you can set the WAN connections up by using the WAN configuration menu. You can also program advanced functions like DDNS (Dynamic DNS) here.
Click the "WAN" menu on the left of the Web management interface, then select an Internet connection method based on the type of connection you're using. You can either click the connection method in the left-side menu or select it from the main panel in the center (which requires that you then click "More Configuration" to continue).
| System WAN Dynamic IP Static IP PPPoE PPTP L2TP Telstra Big Pond DNS DDNS WISP LAN Wireless QoS NAT Firewall | WAN The Wireless Router can connect to your Internet Service Provider with the following methods. Dynamic IP Static IP PPPoE PPTP L2TP Telstra Big Pond | Obtains an IP Address automatically from your Service Provider. Uses a Static IP Address. Your Service Provider gives a Static IP Address to access Internet services. PPP over Ethernet is a common connection method used in xDSL connections. Point-to-Point Tunneling Protocol is a common connection method used in xDSL connections. Layer Two Tunneling Protocol is a common connection method used in xDSL connections. Telstra Big Pond is a Internet service is provided in Australia More Configuration |
2.5.1 Setup Procedure for Dynamic IP
Dynamic IP

The Host Name is optional, but may be required by some Service Providers. The default MAC Address is set to the WAN physical interface on the Wireless Router. If required by your Service Provider, you can use the 'Clone MAC Address' button to copy the MAC Address of the Network Interface Card installed in your PC and replace the WAN MAC Address with this MAC Address.

Host Name — Enter the host name of your computer. (This is optional and is only required if your service provider asks you to do so.)
MAC Address — Enter the MAC address of your computer if your service provider only permits a computer with a certain MAC address to access the Internet. If you're using the computer to connect to the Internet via cable modem, you can simply click "Clone MAC" to fill the "MAC Address" field with the MAC address of your computer.
2.5.2 Setup Procedure for Static IP
Static IP

If your Service Provider has assigned a Fixed IP address; enter the assigned IP Address, Subnet Mask and the Gateway IP Address provided.
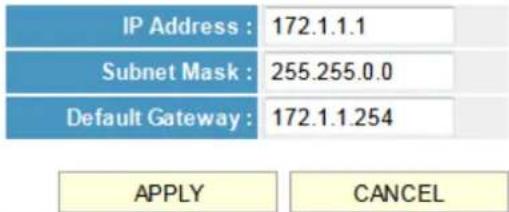
IP Address — Enter the IP address assigned by your service provider.
Subnet Mask — Enter the subnet mask assigned by your service provider.
Default Gateway — Enter the IP address of the gateway server assigned by your service provider.
2.5.3 Setup Procedure for PPPoE
PPPoE?
Enter the PPPoE User Name and Password assigned by your Service Provider. The Service Name is normally optional, but may be required by some Service Providers. Enter a Idle Time (in minutes) to define a maximum period of time for which the Internet connection is maintained during inactivity. If the connection is inactive for longer than the Maximum Idle Time, then the connection will be dropped. You can enable the Connect on Demand option to automatically re-establish the connection as soon as you attempt to access the Internet again. If your Internet Service Provider requires the use of PPPoE, enter the information below.

User Name — Enter the user name assigned by your Internet service provider.
Password — Enter the password assigned by your Internet service provider.
Service Name — Enter a name for this Internet service. (optional)
MTU — Enter the MTU value of your network connection. NOTE: Use the default value unless your ISP specifies otherwise.
Connection Type — Select one of the three connection types in the drop-down menu:
- “Continuous” keeps the Internet connection alive and does not disconnect. This is the preferred choice for always-on / flat-rate Internet services.
- “Connect on Demand” only connects to the Internet when there’s a connect attempt. This is the preferred choice for all users who have paid-per-minute or per-transferred-data Internet service.
- "Manual" only connects to the Internet when "Connect" is selected, and disconnects when "Disconnect" is selected.
Idle Time Out — Specify the time to shut down the Internet connection after no Internet activity is detected. This option is only available when the connection type is Connect on Demand.
2.5.4 Setup Procedure for PPTP
PPTP requires two groups of settings: the WAN interface settings (to set up the IP address) and PPTP settings (PPTP username and password).
In the WAN Interface Settings panel, select how you obtain an IP address from your service provider: "Obtain an IP address automatically" or "Use the following IP address" (i.e., a static IP address). The WAN interface settings must be correctly
entered; otherwise, the Internet connection will fail even if the PPTP settings are correct. Contact your ISP if you don't know how you should fill in these fields.

The PPTP Settings panel presents these options:

User Name — Enter the username assigned by your ISP.
Password — Enter the password provided by your ISP.
PPTP Gateway — Enter the IP address of PPTP gateway assigned by your ISP.
Connection ID — Enter the connection ID. (optional)
MTU — Enter the MTU value of your network connection. NOTE: Use the default value unless your ISP specifies otherwise.
Connection Type — Select one of the three connection types in the drop-down menu (see PPPoE above):
Idle Time Out — Specify the time to shut down the Internet connection after no Internet activity is detected. This option is only available when the connection type is Connect on Demand.
NOTE: Enable BEZEQ-ISRAEL only if you're using that network provider.
2.5.5 Setup Procedure for L2TP
L2TP settings are the same as the PPTP connection (see section 2.5.4 above).
2.5.6 Setup Procedure for Telstra BigPond
This procedure is only for the Telstra BigPond network service in Australia.

User Name — Enter the username assigned by Telstra.
Password — Enter the password assigned by Telstra.
Assign login server manually — Select to choose the login server by yourself.
Server IP Address — Enter the IP address of the login server.
2.5.7 Setup Procedure for DNS
If you select Dynamic IP or PPPoE as the Internet connection method, the ISP typically assigns the DNS server information to the router. However, if you have a
DNS ?
ADNS (Domain Name System) server is like an index of IP Addresses and Web Addresses. If you type a Web address into your browser, such as www.broadbandrouter.com, a DNS server will find that name in its index and find the matching IP address. Most ISPs provide a DNS server for speed and convenience. Since your Service Provider may connect you to the Internet through dynamic IP settings, it is likely that the DNS server IP Address is also provided dynamically. However, if there is a DNS server that you would rather use, you need to specify the IP Address of that DNS server. The primary DNS will be used for domain name access first, in case the primary DNS access failures, the secondary DNS will be used.

preferred DNS server or use a static IP address, or if your service provider didn't assign the IP address of the DNS server for any reason, you can input the IP address of the DNS server here.
Primary DNS — Enter the IP address of the DNS server provided by your ISP. Secondary DNS — Enter the IP address of the secondary DNS server provided by your ISP. (optional)
NOTE: Only an IP address can be entered here; do not use the hostname of the DNS server! (Only numeric characters and periods are accepted; for example, 10.20.30.40 would be acceptable, but dns.serviceprovider.com would not be.)
2.5.8 Setup Procedure for DDNS
DDNS (Dynamic DNS) is an IP-to-hostname mapping service for Internet users who don't have a static (fixed) IP address. It will be a problem when a user wants to provide services to other users on the Internet because their IP addresses will vary every time they connect, and they will not be able to know the IP address they're using at any certain time.
This router supports the DDNS service of several service providers; for example: DynDNS (http://www.dyndns.org) and TZO (http://www.tzo.com). You can go to one of these DDNS service provider's Web sites and get a free DDNS account by following their instructions.

Dynamic DNS — Select "Enable" or "Disable."
Provider — Select your DDNS provider from the drop-down menu.
Domain Name — Enter the domain name you've obtained from the DDNS service provider.
Account — Enter the user account of your DDNS registration.
Password/Key — Enter the DDNS service password or key.
2.6 LAN Configuration
This section explains the IP address settings of the local network. Normally, there is no need to make any changes here: The default values work fine for most applications, and you could just go directly to section 2.7 WLAN Configuration.
There are two ways to assign IP addresses to computers: static IP address (set the IP address for every computer manually) and dynamic IP address (the IP address of computers will be assigned by the router automatically). It's recommended for most of the computers to use a dynamic IP address, as it will save a lot of time when setting IP addresses for every computer, especially when there are a lot of computers in your network. For servers and network devices that will provide services to other computers and users that come from the Internet, a static IP address should be used so other computers can locate the server.
SUGGESTIONS FOR AN IP ADDRESS NUMBERING PLAN
If you have no idea how to define an IP address plan for your network, here are some suggestions.
- A valid IP address has four fields: a.b.c.d. For most home and company users, it's suggested to use 192.168.c.d, where c is an integer between 0 and 254, and d is an integer between 1 and 254. This router is able to work with up to 253 clients, so you can set the "d" field of the router's IP address as 1 or 254 (or any number between 1 and 254), and pick a number between 0 and 254 for field "c."
- In most cases, you should use 255.255.255.0 as the subnet mask, which allows up to 253 clients. (This also meets the router's capability of working with up to 253 clients.)
- For all servers and network devices that will provide services to other people (like Internet service, print service and file service), use a static IP address. Give each of them a unique number between 1 and 253, and maintain a list, so everyone can locate those servers easily.
- For computers not dedicated to providing specific service to others, use a dynamic IP address.
NOTE: Recommended setup values are provided in the sections that follow in order to provide further clarification.
Click the “LAN” menu on the left of the Web management interface. There are three setup groups presented (as explained below): LAN IP, DHCP Server and Static DHCP Leases Table.
2.6.1 LAN IP
IP address — Enter the IP address of this router.

Subnet Mask — Enter the subnet mask for this network.
802.1d Spanning Tree — Select "Enable" or "Disable" from the drop-down menu.
DHCP Server — Select "Enable" or "Disable" from the drop-down menu.
RECOMMENDED VALUES
IP Address: 192.168.2.1
Subnet Mask: 255.255.255.0
802.1d Spanning Tree: Disabled
DHCP Server: Enabled
2.6.2 DHCP Server
These settings are only available when "DHCP Server" in the LAN IP section is enabled, but will also affect wireless clients.

Lease Time — Choose a lease time (the duration that every computer can keep a specific IP address) from the drop-down menu of every IP address assigned by this router.
Start IP — Enter the start IP address of the IP range.
End IP — Enter the end IP address of the IP range.
Domain Name— Enter a domain name for your network. (optional)
NOTE: The number of the last field (the "d" field) of "End IP" must be greater than "Start IP" and can't be the same as the router's IP address. Also, the first three fields of the IP address of "Start IP," "End IP" and "IP Address" in the LAN IP section (the "a," "b" and "c" fields) should be the same.
RECOMMENDED VALUES
Lease Time: Two Weeks (or "Forever" if
you have fewer than 20 computers)
Start IP: 19 2.168. 2.10 0
End IP: 192.168.2.200
Domain Name: (leave it blank)
2.6.3 Static DHCP Leases Table
This function allows you to assign a static IP address to a specific computer forever, so you don't need to set the IP address for a computer to enjoy the benefit of using a DHCP server. A maximum of 16 static IP addresses can be assigned here.
NOTE: If you set "Lease Time" to "Forever" in the DHCP Server section, you can also assign an IP address to a specific computer permanently; however, you won't be able to assign a certain IP address to a specific computer, since IP addresses will be assigned in random order this way.
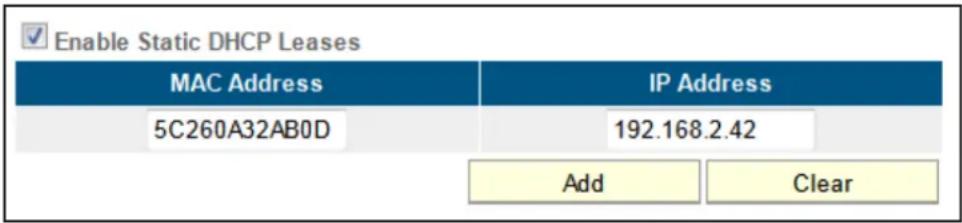
Enable Static DHCP Leases — Select to enable; de-select to disable.
MAC Address — Enter the MAC address of the computer or network device (a total of 12 characters, with numerals from 0 to 9 and characters from a to f, such as 001122aabbcc).
IP Address — Enter the IP address you want to assign to this computer or device. Click "Add" to include a MAC address and IP address pair into the Static DHCP Leases table (below). Click "Clear" to remove characters entered in a text field.

To delete a specific item, check the "Select" box of a MAC address and IP address mapping, then click "Delete Selected." To delete all mappings, click "Delete All." To deselect all mappings, click "Reset."
2.7 Wireless LAN Configuration
NOTE: Depending on your router, you may only see one menu called "Wireless" instead of "Wireless 2.4GHz" and "Wireless 5GHz," which are exclusive to Dual-Band Wireless routers. Dual-Band routers allow you to control both wireless radios independently, hence the two menus. If your computer, PDA, game console or other network device is equipped with a wireless network interface, you can use
the wireless function of this router to connect to the Internet and share resources with other computers on your network. It's strongly recommended that you use the built-in security functions to protect your network from intruders.
Click the "Wireless" menu on the left of the Web management interface to open the wireless settings page. Remember to click "Apply" to save your settings.

2.7.1 Basic Wireless Settings

Band — Select one of the options from the drop-down menu:
- “2.4 GHz (B)” only allows an 802.11b wireless network client to connect to this router (maximum transfer rate of 11 Mbps).
- “2.4 GHz (N)” only allows an 802.11n wireless network client to connect to this router (maximum transfer rate of 300 Mbps).
- “2.4 GHz (B+G)” only allows a802.11b and 802.11g wireless network clients to connect to this router (maximum transfer rate of 11 Mbps for 802.11b clients; maximum 54 Mbps for 802.11g clients).
- “2.4 GHz (G)” only allows an 802.11g wireless network client to connect to this router (maximum transfer rate of 54 Mbps).
- “2.4 GHz (B+G+N)” allows 802.11b, 802.11g and 802.11n wireless network clients to connect to this router (maximum transfer rate of 11 Mbps for 802.11b clients; maximum of 54 Mbps for 802.11g clients; maximum of 300 Mbps for 802.11n clients.
NOTE: For optimal compatibility with wireless clients, select "2.4 GHz (B+G+N)." ESSID — Enter the name for your wireless network. You may choose to use the default value, but you can adjust the value to make identification in areas with different wireless networks easier; e.g., to differentiate your wireless network from that of your neighbors.
Channel Number — Select a channel from the drop-down menu: 1-13 for Europe; 1-11 for the U.S.
Associated Clients — Click “Show Active Clients” to see the status of all active wireless stations connected to the access point.
You can try to change the channel number if you think the data transfer rate is too slow. There could be interference from other wireless networks in the area using the same channel, and the cross-talk between the two networks can reduce the wireless data transfer rate. Ideally, you want to set your channel to a value which leaves at least two channels spaced between the two networks.
Example: If your neighbor's wireless network runs on channel 3, set your channel to 6 or higher. Even a handheld phone in your household can cause interference with the wireless signal, and changing the channel by two or three numbers often resolves the problem.
2.7.2 Advanced Wireless Settings
Normally, there is no need to make any changes here. Unless you know that your network requires special settings, you can proceed to 2.7.3 Wireless Security.
Fragment Threshold — Set the fragment threshold of the wireless radio. NOTE: If you aren't sure what this should be set to, leave it as the default value of 2346.
RTS Threshold — Set the RTS (return to sender) threshold of the wireless radio.
NOTE: If unsure what this should be set to, leave it as the default value of 2347.
Beacon Interval — Set the beacon interval of the wireless radio. NOTE: If you aren't sure what this should be set to, leave it as the default value of 100.
DTIM Period — Set the DTIM (delivery traffic indication message) period of the wireless radio. NOTE: If you aren't sure what this should be set to, leave it as the default value of 3.
Data Rate — Set the wireless data transfer rate to a specific value. Since most wireless devices will negotiate with each other and pick a proper data transfer rate automatically, it's not necessary to change this value unless you know what will happen after modification.
Advanced Settings

Set the time zone of the Wireless Router. This information is used for log entries and firewall settings.
| Fragment Threshold : | 2346 | (256-2346) |
| RTS Threshold : | 2347 | (0-2347) |
| Beacon Interval : | 100 | (20-1000 ms) |
| DTIM Period : | 3 | (1-10) |
| Data Rate : | Auto ▼ | |
| N Data Rate : | Auto ▼ | |
| Channel Width : | Auto 20/40 MHZ 20 MHZ | |
| Preamble Type : | Short Preamble Long Preamble | |
| Broadcast Essid : | Enable Disable | |
| CTS Protect : | Auto Always None | |
| Tx Power : | 100 % ▼ | |
| WMM : | Enable Disable | |
N Data Rate — Same as above, but only for 802.11n clients.
Channel Width — Set the channel width of the wireless radio. NOTE: If you aren't sure what this should be set to, leave it as the default setting ("Auto 20/40 MHz").
Preamble Type — Set the preamble type. NOTE: If you aren't sure what this should be set to, leave it as the default setting ("Short Preamble").
Broadcast ESSID — Decide if the wireless router will broadcast its own ESSID. You can hide the ESSID of your wireless router (select "Disable") so only people who know the ESSID of your wireless router can connect to it.
CTS Protect — Enabling this function reduces the chance of radio signal collisions between 802.11b and 802.11g/n wireless access points. NOTE: The recommended setting is either “Auto” or “Always.”
Tx Power — Set the output power of the wireless radio. Unless you're using this router in a really big space, you may not need to set this to "100%."
WMM — Set WMM (Wi-Fi Multimedia, which enhances the data transfer performance of multimedia content sent over a wireless network) to “Enable” or leave it as the default (“Disable”).
2.7.3 Wireless Security
Unlike the Advanced Wireless Settings options, these settings are critical: If not done properly, freeloaders can use your Internet connection without your knowledge and hackers could gain access to your network and steal vital data such as credit
card information or bank records. Click the “Security Settings” menu on the left of the Web management interface to select one of the four encryption methods from the drop-down menu (see image below).
2.7.3.1 Disable Wireless Security
When you select this mode, data encryption is disabled and every wireless device in proximity will be able to connect your wireless router if no other security measure is enabled (like using MAC address access control disabling ESSID broadcast).
NOTE: Only use this option when you want to allow everyone to use your wireless router and you don't care if someone reads the data you transfer over the network without your consent.
2.7.3.2 Wired Equivalent Privacy (WEP)
WEP encryption is an outdated method to secure your network, as it doesn't meet the security standards of modern data encryption. Thus, it's not recommended that you use WEP, unless you use WLAN adapters or WLAN networking devices that don't support WPA/WPA2 encryption. If your WLAN card supports WPA/WPA2, you can proceed to section 2.7.3.3 Wi-Fi Protected Access (WPA).
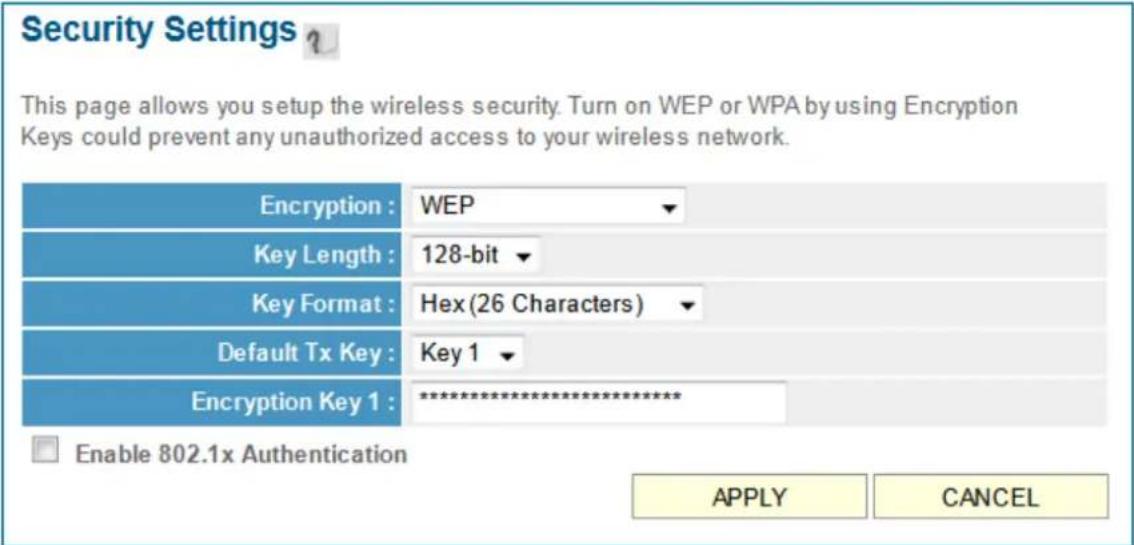
Key Length — There are two types of WEP key length: 64-bit and 128-bit. Selecting "128-bit" is safer than "64-bit," but will reduce some data transfer performance.
Key Format — There are two types of key format: ASCII and hexadecimal, or "hex." When you select a key format, the number of characters in the key will be displayed. For example, if you select "64-bit" as the key length and "Hex" as the key format, you'll see the message to the right of "Key Format" is "Hex (10 characters)," which means the length of the WEP key is 10 characters.
Default Tx Key — You can set up to four sets of WEP keys, and you can designate one as the default here. NOTE: If you don't know which one you should use, select "Key 1."
Encryption Key 1-4 — Enter WEP key characters here. The number of characters must be the same as the number displayed n the "Key Format" field. You can use any alphanumerical characters (0-9, a-z and A-Z) if you select "ASCII" for the key format. If you select "Hex" as key the format, you can use 0-9, a-f and A-F. You must enter at least one encryption key here; if you enter multiple WEP keys, they should not be same.
Enable 802.1x Authentication — IEEE 802.1x is an authentication protocol. Every user must use a valid account to log in to this router before accessing the wireless LAN. The authentication is processed by a RADIUS server. This mode authenticates the user by IEEE 802.1x, but it does not encrypt the data during communication. If there is a RADIUS server in your environment, enable this function. Check this box and another sub-menu will appear:

RADIUS Server IP address — Enter the IP address of the RADIUS server. RADIUS Server Port — Enter the port number of the RADIUS server. RADIUS Server Password — Enter the password of the RADIUS server.
EXAMPLES OF A WEP KEY
Obviously, you don't want to copy these examples:
• ASCII (5 characters): daisy
- ASCII (13 characters): digitalFAMILY
• Hex (10 characters): 287d2aa732
• Hex (26 characters): 9284bcda8427c9e036f7abcd84
To improve the security level, don't use words found in a dictionary or that are too easily remembered. ("daisy" is a bad example and is just intended to show how a WEP key looks). Wireless clients will remember the WEP key, so you only need to input the WEP key for a wireless client once. It's worth using a complicated WEP key to improve the security level. Once you enter your WEP key and save the settings, all wireless clients will need to enter that identical character configuration in order to gain access to your wireless network. NOTE: 128-bit encryption and ASCII key format are recommended.
2.7.3.3 Wi-Fi Protected Access (WPA) Pre-Shared Key

WPA Unicast Cipher Suite — Once you select one of the three cipher options — "WPA (TKIP)," "WPA2 (AES)" or "WPA2 Mixed" — make sure your wireless clients support it.
Pre-shared Key Format — Select the type of pre-shared key from the drop-down menu: "Passphrase" (8 or more alphanumeric characters, up to 63) or "Hex" (64 characters of 0-9 and a-f).
Pre-shared Key — Enter the WPA passphrase. NOTE: As mentioned earlier, try to avoid common terms or character combinations.
Some wireless devices (especially those manufactured before 2003) only support the WEP or WPA (TKIP) cipher. A driver upgrade would be needed for them to be able to use WPA and WPA2 encryption.
2.7.3.4 WPA RADIUS
If you have a RADIUS server, this router can work with it and provide even safer wireless authentication.
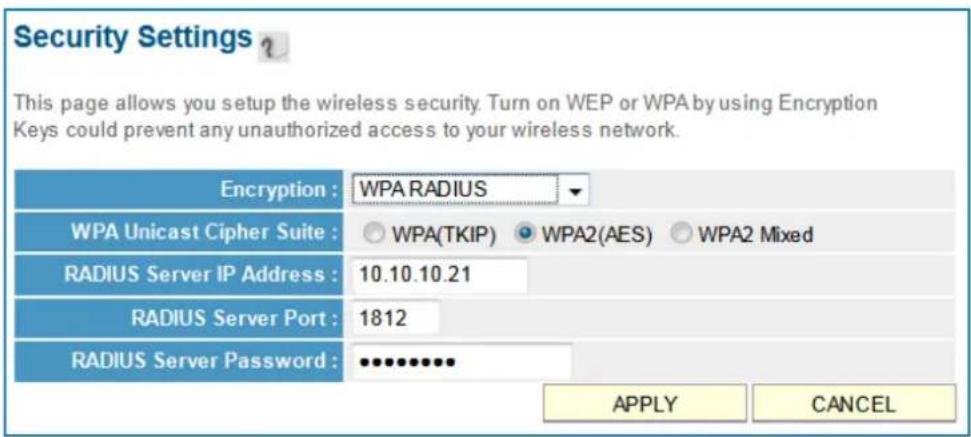
WPA Unicast Cipher Suite — Once you select one of the three cipher options —
"WPA (TKIP)," "WPA2 (AES)" or "WPA2 Mixed" — make sure your wireless clients support it.
RADIUS Server IP address — Enter the IP address of the RADIUS server.
RADIUS Server Port — Enter the port number of the RADIUS server.
RADIUS Server Password — Enter the password of the RADIUS server.
2.7.4 Wireless Access Control
This function helps to prevent unauthorized users from connecting to your router: Only those wireless devices that have the MAC address you assign here can gain access. The MAC address is a unique hardware identification number that every network adapter carries. You can use this function in combination with data encryption (WPA, WPA2 or WEP) to create an additional layer of security for your wireless network.
Up to 20 MAC addresses can be assigned using this function. Click the "Wireless" menu on the left of the Web management interface, then click "Access Control."
NOTE: As explained below, all allowed MAC address will display in the MAC Address Filtering table.
Access Control
For security reason, the Wireless Router features MAC Address Filtering that only allows authorized MAC Addresses associating to the Wireless Router.
• MAC Address Filtering Table It allows 20 entries only.
| NO. | MAC Address | Comment | Select |
| 1 | 5c:26:0a:32:ab:0d | My Desktop | |
| Delete | Delete All |
Enable Access Control
| MAC Address | Comment | ||
| 9f3655abdcfa | My Laptop | Add | Clear |
| APPLY | CANCEL | ||
Delete — To delete a specific MAC address entry, check the "Select" box of the MAC address you want to delete, then click "Delete Selected." (You can select more than one MAC address at a time.)
Delete All — Click to delete all MAC addresses listed.
Enable Access Control — Select to enforce MAC address filtering. The router will not filter the MAC addresses of wireless clients if this is left unchecked.
MAC Address — Enter the MAC addresses of your wireless devices here without special characters. If the MAC address label of your wireless device indicates
"aa-bb-cc-dd-ee-ff" or "aa:bb:cc:dd:ee:ff," just enter "aabbccddeeff" (without the quote marks).
Comment — This is optional and can be left blank, but it's recommended that you enter something (such as "My Desktop," as shown) that will help you identify an address later.
Add — Click to add the MAC address and associated comment to the MAC Address Filtering table.
Clear — Click to remove whatever you entered in the "MAC Address" or "Comment" fields.
2.7.5 Wi-Fi Protected Setup (WPS)
Wi-Fi Protected Setup (WPS) is the simplest way to build a connection between wireless network clients and this router. You don't need to select an encryption mode and input a long encryption passphrase every time you need to set up a wireless client: You only need to press a button on a wireless device/client and this wireless router, and the WPS will do the rest for you.

This router supports two types of WPS: Push-Button Configuration (PBC) and PIN code. To use PBC, you need to push a specific button on the wireless client to start the WPS mode and switch this router to WPS mode. You can push the Reset/WPS button of this router, or click "Start PBC" in the Web configuration interface to do this. To use PIN code, you need to know the PIN code of the wireless client and switch it to WPS mode, then provide the PIN code of the wireless client you want
to connect to this wireless router.
Click the "Wireless" menu on the left of the Web management interface, then click "WPS."
Enable WPS Settings — Check the box to enable the function; uncheck to disable.
Enable WPS Proxy — Check the box to enable the function; uncheck to disable.
When enabled, it allows another access point to serve as an “intermediary” device for the connection between wireless network clients and the router.
WPS Status — “Configured” is displayed if the wireless security (encryption) function of this wireless router is properly set. “Not configured” is shown if the WPS function has not been configured correctly.
PinCode Self — This is the WPS PIN code of this wireless router, which is useful when you need to build a wireless connection by WPS with other WPS-enabled wireless devices.
SSID — As it defines this router.
Authentication Mode — If you don't enable the security function of the router before WPS is activated, the router will auto-set the security to WPA (AES) and generate a set of passphrase keys for WPS connection.
Passphrase Key — As it was configured.
Config Mode — There are “Registrar” and “Enrollee” modes as options for the WPS connection. When “Registrar” is enabled, wireless clients will follow the router’s wireless settings for a WPS connection. When “Enrollee” mode is enabled, the router will follow the wireless settings of wireless client for a WPS connection.
Configure by Push Button — Click "Start PBC" to start a Push-Button-style WPS setup procedure. This wireless router will wait for WPS requests from wireless clients for two minutes. The WLAN LED on the wireless router will be on for two minutes when this wireless router is waiting for an incoming WPS request.
Configure by Client PinCode — Enter the PIN code of the wireless client you want to connect, and click "Start PIN." The WLAN LED on the wireless router will be on when this wireless router is waiting for an incoming WPS request.
2.7.6 Security Tips for Wireless Networks
Below are five reminders that will help you maintain a higher level of security for your wireless network.
- Never use simple words for the WPA/WEP encryption passphrase. A good password cannot be found in the dictionary and consists of a combination of characters, symbols and numbers. You should also refrain from using passwords that carry a personal meaning — names of pets, names or birthdays of a spouse, and such — as these can easily be guessed by unauthorized users.
- Use WPA versus WEP whenever possible: WPA encryption and (even more so) WPA2 encryption are much stronger. If your wireless network adapters support
WPA or WPA2, you should abandon WEP entirely.
- You can hide the ESSID of this router by setting the “Broadcast ESSID” option (refer to section 2.7.2.Advanced Wireless Settings) to “Disable.” Once this option is disabled, the router will no longer broadcast the SSID; thus, wireless clients in the area will not be able to see the wireless network in the list of available WLAN networks. Keep in mind that hiding the SSID will make it more difficult for wireless clients to join the network — and that is basically the idea. Instead of selecting the wireless network from the list, the user now must manually enter the wireless SSID, which will be difficult without knowing what it is. While this option offers additional protection, you should never rely on this mechanism as your only means of protection. A WPA encryption key is still highly recommended. Hiding the SSID of your access point is simply one additional step you can take.
- Use the Access Control function (section 2.7.4) so people who are not on your list will not be able to connect to your network. If you don't have guest traffic, you normally know which computers access your network, and you can specifically allow those computers and deny all the others.
- Utilizing all three mechanisms (encryption, no SSID broadcast and MAC address filtering) offers the best protection against unauthorized access.
3 ADVANCED FUNCTIONS
3.1 Quality of Service (QoS)
Quality of service provides an efficient way for computers on the network to share the Internet bandwidth with a promised quality of Internet service. Without QoS, all computers and devices on the network compete with each other to get Internet bandwidth, and some applications which require guaranteed bandwidth (like video streaming and network telephone) are affected negatively, resulting in an interruption of video/audio transfers. QoS allows you to limit the maximum bandwidth or grant a guaranteed bandwidth for a specific computer or network service port.
3.1.1 Basic QoS Settings
Click "QoS" on the left of the Web management interface.

Enable QoS— Check to enable the function; uncheck if you prefer not to enforce QoS bandwidth limitations.
Total Download Bandwidth — You can set the limit of total download bandwidth in kilobits. To disable the download bandwidth limitation, enter "0."
Total Upload Bandwidth — You can set the limit of total upload bandwidth in kilobits.
To disable the upload bandwidth limitation, enter "0." NOTE: Both Total Download and Total Upload bandwidths should be specified according to the maximum performance of your Internet service. If you're not sure about these numbers, contact your ISP. QoS can only be effective if accurate information is provided.
Current QoS Table — All existing QoS rules are shown here.
Add — Click to add new QoS rules (see section 3.1.2 Adding a New QoS Rule).
Edit — To modify the content of a specific rule, check the "Select" box of that rule, then click "Edit." NOTE: Only one rule should be selected at a time. If you didn't select a rule before clicking "Edit," you'll be prompted to add a new rule.
Delete — You can select one or more rules to delete by checking the "Select" box of the rule(s) you want to delete, then clicking "Delete." If the QoS table is empty, this button is inaccessible.
Delete All — Click to delete all rules in the QoS table. If the QoS table is empty, this button is inaccessible.
Move Up — Click to raise the priority of the selected QoS rule.
Move Down — Click to lower the priority of the selected QoS rule.
3.1.2 Adding a New QoS Rule
After you click "Add" on the QoS screen, you'll have these options.
QoS
This page allows users to add/modify the QoS rule's settings.

Rule Name — Enter a name for the QoS rule (up to 15 alphanumerical characters; e.g, "VoIP Phone").
Bandwidth — Set the bandwidth amount of the QoS rule. You need to select the data direction of this rule (Upload or Download) and the speed of the bandwidth limitation in kbps, then select the type of QoS: "Guarantee" (guaranteed usable bandwidth for this rule) or "Max" (set the maximum bandwidth for the application allowed by this rule).
Local IP Address — Specify the local (source) IP address that will be affected by this rule. Enter the starting IP address in the left field, and enter the end address in the right field to define a range of IP addresses; or just enter the IP address in the left field to define a single IP address.
Local Port Range — Enter the range of local (source) port numbers that should be affected by this rule. To apply this rule on ports 80 to 90, enter “80-90”; to apply this rule only to a single port, just enter the port number, such as “80.”
Remote IP Address — Specify the remote (destination) IP address that should be affected by this rule. Enter the starting IP address in the left field, and enter the end address in the right field to define a range of IP addresses; or just enter the IP address in the left field to define a single IP address.
Remote Port Range — Enter the range of remote (destination) port numbers that should be affected by this rule. To apply this rule on ports 80 to 90, enter "80-90"; to apply this rule only to a single port, just enter the port number, such as "80." If the remote (destination) IP address and/or port number is universal, just leave it blank.
Traffic Type — Select the traffic type of this rule from the drop-down menu: "None," "SMTP," "HTTP," "POP3" or "FTP." To make this rule an IP address-based rule (to apply the limitation on all traffic from/to the specified IP address or port number), select "None."
Protocol — Select the protocol type of this rule from the drop-down menu: "TCP" or "UDP." If you don't know what protocol your application uses, try "TCP" first and switch to "UDP" if this rule doesn't seem to work.
Click “Save” to add the new rule. It will appear in the current QoS table. Should an error message show up after you click “Save,” you can try again, but fixing the problem first and then clicking “Save” will have a better chance of working.
To erase all values you've entered, click "Reset."
3.2 Network Address Translation (NAT)
Network Address Translation (NAT, also known as Network Masquerading, Native Address Translation or IP Masquerading) is a technique of transceiving network traffic through a router that involves re-writing the source and/or destination IP addresses and usually the TCP/UDP port numbers of IP packets as they pass through. Checksums (both IP and TCP/UDP) must also be rewritten to take account of the changes. Most systems using NAT do so in order to enable multiple hosts on a private network to access the Internet using a single public IP address (see gateway). Many network administrators find NAT a convenient technique and use it widely. Simply put: The router's NAT function allows the connection of multiple computers to one Internet line.
Click the "NAT" menu on the left of the Web management interface. NAT is enabled by default, and there is normally no need to change this.

3.2.1 Port Forwarding
With this function, you can tell the router to forward incoming connections bound to a specific port or port range to an IP address on your local network. Many online games, game consoles with Internet service, remote access applications and special network devices such as network cameras require you to open and forward ports, often referred to as port mapping.
With port forwarding, the external and internal ports are always the same. If you need to redirect an incoming request on public port A to internal port B, you need to use the Virtual Server function (see section 3.2.2 Virtual Server).

Enable Port Forwarding — Check to enable this function; uncheck to disable.
Private IP — Enter the IP address of the computer on the local network that provides Internet service.
Computer Name — With all the computers connected to the router listed in this drop-down menu, you can select a name without checking its IP address.
Type — Select the type of connection from the drop-down menu: "TCP," "UDP" or "Both." If you're not sure which to use, select "Both."
Port Range — Enter the starting port number in the left field and enter the ending port number in the right field. To redirect a single port number, just enter the port number in the left field.
Comment — Enter text to describe this mapping, using up to 16 alphanumeric characters; e.g., “camera web port.”
Add — Add the mapping to the Current Port Forwarding Table.
Reset — Click to remove all entries.
Current Port Forwarding Table — Shows all existing port forwarding rules (port mapping).
Delete — Select a port forwarding mapping by checking the "Select" box of the mapping, then clicking "Delete." If there's no existing mapping, this button will be grayed out.
Delete All — Click to delete all existing port mappings.
Reset — Click to unselect all mappings.
3.2.2 Virtual Server
This function is very similar to Port Forwarding. The difference is that Virtual Server only allows you to specify one port. On the other hand, it enables you to redirect a public port to a different private port (e.g., public port 80 redirects to private port 85). This makes Virtual Server the obvious choice for hosting public Web services (such as a Web server) on a computer connected to one of the router LAN ports.
Virtual Server
You can configure the Wireless Router as a Virtual Server so that remote users accessing services such as the Web or FTP at your local site via Public IP Addresses can be automatically redirected to local servers configured with Private IP Addresses. In other words, depending on the requested service (TCP/UDP) port number, the Wireless Router redirects the external service request to the appropriate internal server (located at one of your LAN's Pirivate IP Address).

Enable Virtual Server
| Private IP | Computer Name | Private Port | Type | Public Port | Comment |
| 192.168.2.50 | <<----Select----▼ | 80 | Both▼ | 80 | Web Server |
| Add | Reset | ||||
- Current Virtual Server Table
| NO. | Computer Name | Private IP | Private Port | Type | Public Port | Comment | Select |
| Delete | Delete All | Reset | |||||
| APPLY | CANCEL | ||||||
Private IP — Enter the IP address of the computer on the local network that provides Internet service.
Computer Name — With all the computers connected to the router listed in this drop-down menu, you can select a name without checking its IP address.
Private Port — Enter the port number of the IP address that provides Internet service.
Type — Select the type of connection from the drop-down menu: "TCP," "UDP" or "Both." If you're not sure which to use, select "Both."
Public Port — Select the port number of Internet IP address that will be redirected to the port number of the local IP address defined above.
Comment — Enter text to describe this mapping, using up to 16 alphanumeric characters; e.g., "FTP Server."
Add — Add the mapping to the Virtual Server Table.
Reset — Click to remove all entries.
Current Virtual Server Table — Shows all existing virtual server mappings.
Delete — Select a virtual server mapping by checking the “Select” box of the mapping, then clicking “Delete.” If there’s no existing mapping, this button will be grayed out.
Delete All — Click to delete all existing virtual server mappings.
Reset — Click to unselect all mappings.
3.2.3 Port Mapping for Special Applications
Some applications require more than one connection a time. This function allows these applications to work when they won't work with simple NAT rules.
Enable Special Applications — Check to enable this function; uncheck to disable.
IP Address — Enter the IP address of the computer where you want to open the ports.
Computer Name — With all the computers connected to the router listed in this drop-down menu, you can select a name without checking its IP address.
TCP Port to Open — This is the outgoing (outbound) range of TCP port numbers for this particular application.
UDP Port to Open — This is the outgoing (outbound) range of UDP port numbers for this particular application.
Comment — Enter a description for this setting.
Popular Applications — The drop-down menu lists some popular applications that require multiple connections. To save one to the Current Trigger-Port Table, select it and click “Add.”
Add — Click to add a selection to the Current Trigger-Port Table.
Reset — Click to remove all entries.
Special Applications
Some applications require multiple connections, such as Internet gaming, video conferencing, Internet telephony and others. These applications cannot work when Network Address Translation (NAT) is enabled. If you need to run applications that require multiple connections, specify the port normally associated with an application in the "Trigger Port" field, select the protocol type as TCP or UDP, then enter the public ports associated with the trigger port to open them for inbound traffic. Note: The range of the Trigger Port is 1 to 65535.

Enable Special Applications


Current Trigger-Port Table
| NO. | Computer Name | IP Address | TCP Port to Open | UDP Port to Open | Comment | Select | ||
| Delete | Delete All | Reset | ||||||
| APPLY | CANCEL | |||||||
Current Trigger-Port Table — All the settings for the specifal applications are listed here.
Delete — To remove a Special Application setting from the Current Trigger-Port Table, select the setting and click "Delete."
Delete All — Click to delete all existing specifal application settings.
3.2.4 UPnP
This function enables network auto-configuration for peer-to-peer communications. With this function, network devices will be able to communicate with other UPnP-enabled devices directly and learn about other devices. Many network devices and applications rely on UPnP function nowadays.

UPnP Module — There is nothing to configure for UPnP. Just select "Enable" or "Disable."
3.2.5 ALG
Application Layer Gateway (ALG) is a special function of this router. It includes many preset routing rules for numerous applications (as shown below) that require special support to work with the NAT architecture. Check “Enable” next to the listing and click “Apply.”
| Enable | Name | |
| √ | FTP | Support for FTP. |
| √ | H323 | Support for H323/netmeeting. |
| √ | IPsec | Support for IPsec passthrough |
| √ | PPTP | Support for PPTP passthrough. |
| √ | L2TP | Support for L2TP passthrough. |
| √ | SIP | Support for SIP. |
3.3 Firewall
In addition to the NAT feature, this router provides firewall functionality to block malicious intruders from accessing the computers on your local network. Click the "Firewall" menu on the left of the Web management interface.
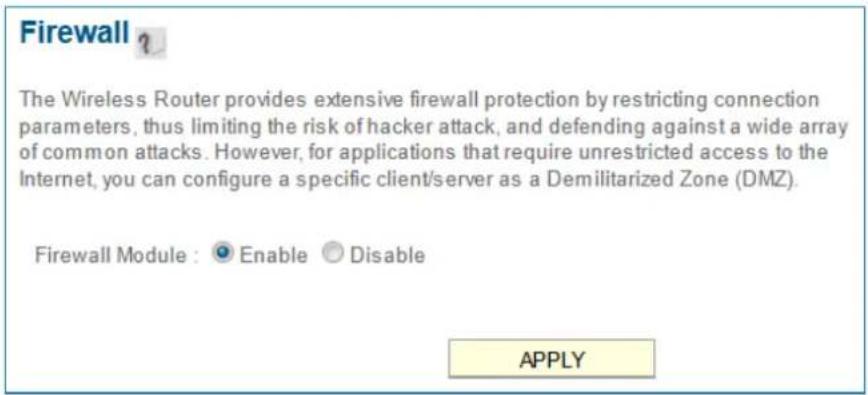
Firewall Module — Check to enable this function; uncheck to disable.
3.3.1 Access Control
This function allows or denies computers with a specific MAC address — or a specific IP address, protocol or port — access to the network.
Enable MAC Filtering — Check this box to enable MAC address-based filtering, and select "Deny" or "Allow" to determine the behavior of the MAC filtering table. If you select "Deny," all MAC addresses listed in the filtering table will be denied access to the network; if you select "Allow," only MAC addresses listed in the filtering table will be able to connect to the network, and all other network devices will be rejected.
Client PC MAC address — Enter the MAC address of the computer or network device. Dashes (−) or colons ( : ) are not required. For example, if the MAC
Access Control?
Access Control allows users to define the traffic type permitted or not permitted in your LAN. You can control which PC client uses what services in which they can have access to these services. If both of MAC filtering and IP filtering are enabled simultaneously, the MAC filtering table will be checked first and then IP filtering table.
√ Enable MAC Filtering ☑ Deny ☐ Allow
| Client PC MAC Address | Computer Name | Comment |
| 5C260A32AB0D | << ----Select----▼ | Son's iPAD |
| Add Reset | ||
Current MAC Filtering Table
| NO. | Computer Name | Client PC MAC Address | Comment | Select |
| Delete | Delete All | Reset | ||
Enable IP Filtering Deny Allow
| NO. | Client PC Description | Client PC IP Address | Client Service | Protocol | Port Range | Select |
| Add PC | Delete | Delete All | ||||

address label of your device reads "aa-bb-cc-dd-ee-ff" or "aa:bb:cc:dd:ee:ff," just enter "aabbccddeeff" (without the quote marks).
Computer Name — With all the computers connected to the router listed in this drop-down menu, you can select a name without checking its IP address.
Comment — Enter up to 16 alphanumeric characters to identify the MAC address, such as "Room 2A Computer." This is optional, and you can leave it blank.
Add — Click to add the MAC address and associated comment to the MAC address filtering table.
Reset — Click to remove all entries (in either panel).
Current MAC Filtering Table — All existing MAC addresses in the filtering table.
Delete — You can select one or more MAC addresses to delete by checking the "Select" box of those you want to delete, then clicking "Delete."
Delete All — Click to delete all MAC addresses listed.
Enable IP Filtering — Check this box to enable IP address-based filtering, and select "Deny" or "Allow" to determine the behavior of the IP filtering table. If you select "Deny," all IP addresses listed in the filtering table will be denied access to the network; if you select "Allow," only IP addresses listed in the filtering table will be able to connect to the network; all other network devices will be rejected.
Add PC — Click to add a new IP address to the IP filtering table. Up to 20 addresses can be added. (Refer to section 3.3.1.1 Add PC below.)
Delete — You can select one or more IP addresses to delete by checking the "Select" box of those you want to delete, then clicking "Delete."
Delete All — Click to delete all IP addresses listed.
3.3.2 Add PC
Clicking "Add PC" on the Access Control screen will display this page.
Access Control Add PC
This page allows users to define service limitation of client PC, including IP address and service typ
Client PC Description :
Client PC IP Address :
- Client Service :
| Service Name | Detail Description | Select |
| WWW | HTTP, TCP Port 80, 3128, 8000, 8080, 8081 | |
| E-mail Sending | SMTP, TCP Port 25 | |
| News Forums | NNTP, TCP Port 119 | |
| E-mail Receiving | POP3, TCP Port 110 | |
| Secure HTTP | HTTPS, TCP Port 443 | |
| File Transfer | FTP, TCP Port 21 | |
| MSN Messenger | TCP Port 1863 | |
| Telnet Service | TCP Port 23 | |
| AIM | AOL Instant Messenger, TCP Port 5190 | |
| NetMeeting | H.323, TCP Port 389,522,1503,1720,1731 | |
| DNS | UDP Port 53 | |
| SNMP | UDP Port 161, 162 | |
| VPN-PPTP | TCP Port 1723 | |
| VPN-L2TP | UDP Port 1701 | |
| TCP | All TCP Port | |
| UDP | All UDP Port |
| User Define Service | ||
| Protocol: | Both | |
| Port Range: | ||
| Add Reset | ||
Client PC Description — Enter up to 16 alphanumeric characters to describe this IP address.
Client PC IP Address — Enter the starting IP address in the left field and the end IP address in the right field to define a range of IP addresses, or just input the IP address in the left field to define a single IP address.
Client PC Service — Select all services you want to allow or deny through this IP address.
Protocol — If the service you need is not listed, you can create a new service yourself. Select "TCP" or "UDP" from the drop-down menu and follow the Port Range instructions below. If you're not sure which Protocol to use, select "Both." Port Range — Enter the port range of the new service. To specify ports 80 to 90, enter "80-90"; to apply this rule to a single port, just enter the port number. Add — Click to save the settings. You'll be re-directed to the previous menu, and the rule you just set will appear in the IP Filtering Table. Reset — Click to remove all entries.
3.3.3 URL Blocking
To prevent computers in the local network from accessing certain Web sites, you can define the Web sites, IP addresses or keywords here. This function is useful for parents and company managers: The former can protect children from inappropriate contents on the Internet; the latter can protect employees from losing their jobs.
You can block full Web site URLs, such as "www.microsoft.com"; IP addresses, such as "207.46.232.182"; or just a part of a URL. For example, if you enter the keyword "downloads," the computer can connect to "www.microsoft.com" but not "www.microsoft.com/downloads."

Enable URL Blocking — Check to enable this function; uncheck to disable. URL/Keyword — Enter the URL (host name or IP address of a Web site, such as
"http://www.blocked-site.com" or "http://11.22.33.44"), or a keyword contained in a URL (like "pornography," "sex," "banner advertisement," etc).
Add — Click to add the URL/keyword to the URL/Keyword Filtering Table.
Reset — Click to remove all entries in the "URL/Keyword" text field.
Current URL Blocking Table — All existing URL/keywords in the filtering table.
Delete — Select a URL/keyword by checking the “Select” box of the entry, then clicking “Delete.”
Delete All — Click to delete all existing URL/keyword entries.
3.3.4 DoS Attack Prevention
A denial-of-service (DoS) attack is an attempt to make a computer resource unavailable to its intended users. DoS attacks generally consist of the concerted, malevolent efforts of a person or persons to prevent an Internet site or service from functioning efficiently or at all, temporarily or indefinitely. One common method of attack involves saturating the target (victim) machine, in this case the router, with external communications requests, such that it cannot respond to legitimate traffic or responds so slowly as to be rendered effectively unavailable.
This router has a built-in DoS attack prevention mechanism to prevent DoS attacks from succeeding. Activating all options is recommended.
Ping of Death — Ping of Death is a special packet, and it will cause certain computers to stop responding. Check this box and the router will filter out this kind of packet.
Discard Ping From WAN — Ping is a common and useful tool for knowing the connection status of a specified remote network device, but some malicious intruder could try to fill your network bandwidth with a lot of PING request data packets to make your Internet connection become very slow — even unusable. Check this box and the router will ignore all inbound PING requests. NOTE:

Unfortunately, when you activate this function, you will not be able to ping your own router from the Internet, either.
Port Scan — An intruder could try to use a port scanner to determine how many ports of your Internet IP address are open, through which they can collect a lot of valuable information. Check this box and the router will block all traffic that's involved in trying to scan your Internet IP address.
Sync Flood — Another kind of attack, this one uses a lot of fake connection requests to consume the memory of your server, rendering it unusable. Check this box
and the router will filter this kind of traffic out.
Advanced Settings — Click to set advanced settings of the DoS prevention method listed above. (See section 3.3.4.1 DoS – Advanced Settings below.)
3.3.4.1 DoS - Advanced Settings
Clicking "Advanced Settings" on the first DoS Module screen will display this page.

Ping of Death — Set the threshold of when this DoS prevention mechanism will be activated. Check the box for Ping of Death and enter the frequency of threshold (how many packets per second, minute or hour). You can also enter the “Burst” value: When this number of Ping of Death packets is received within a very short timeframe, this DoS prevention mechanism will be activated.
Discard Ping From WAN — Check the box to activate this mechanism.
Port Scan — A number of port scan methods are listed here. Check one or more DoS attack methods you want to prevent.
Sync Flood — As with Ping of Death, you can set the threshold for when this DoS prevention mechanism will be activated.
3.3.5 Demilitarized Zone (DMZ)
With NAT and the firewall, this router protects all connected computers in your local network. Sometimes, however, you may want to expose a computer or network device to the Internet intentionally for various reasons; e.g., troubleshooting of network problems. Placing a computer in the DMZ puts it at great risk because the protection mechanisms of the router no longer apply.
So, unless you know what you are doing, you should not use this function at all.
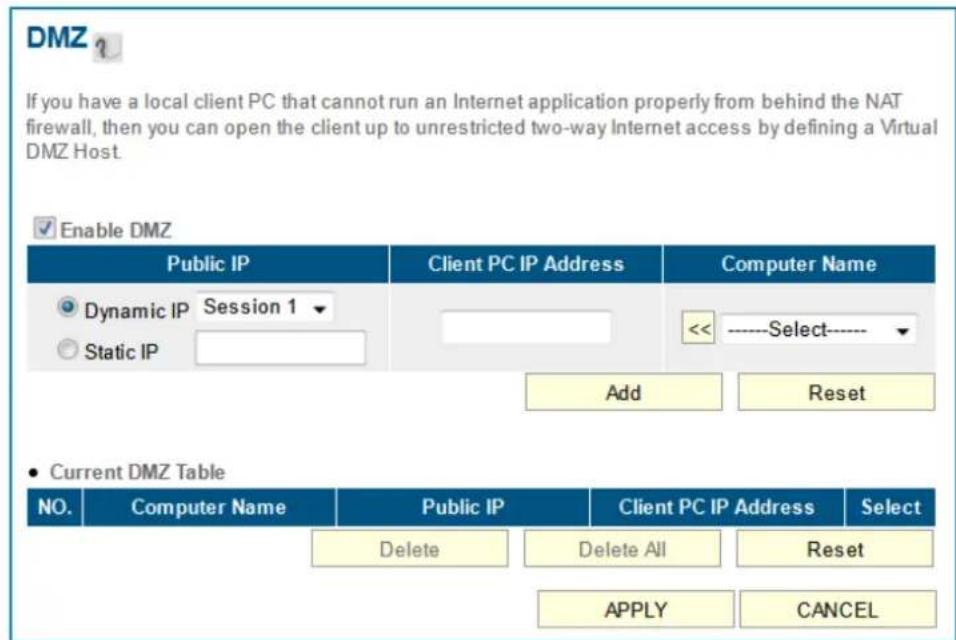
Enable DMZ — Check to enable this function; uncheck to disable.
Public IP — Select "Dynamic IP" or "Static IP." If you select "Dynamic IP," you need to select an Internet connection session from the drop-down menu; if you select "Static IP," enter the IP address that you want to map to a specific private IP address.
Client PC IP Address — Enter the private IP address that the Internet IP address will be mapped to. That is the computer you want to bypass the firewall and NAT. Computer Name — With all the computers connected to the router listed in this drop-down menu, you can select a name without checking its IP address.
Add — Click to add the public IP address and associated private IP address to the DMZ table.
Reset — Click to remove all entries (in either panel).
Current DMZ Table — All existing public/private IP address mappings.
Delete — Select one or more DMZ entries to delete by checking the “Select” box of those you want to delete, then clicking “Delete.”
Delete All — Click to delete all DMZ entries.
4 ADDITIONAL FUNCTIONS/FEATURES
4.1 Status
This screen and the submenus that can be accessed from here show information about the firmware version of the router, the Internet connection, IP address information, log files and more. Click the "Status" link at the upper-right corner of the Web management interface.
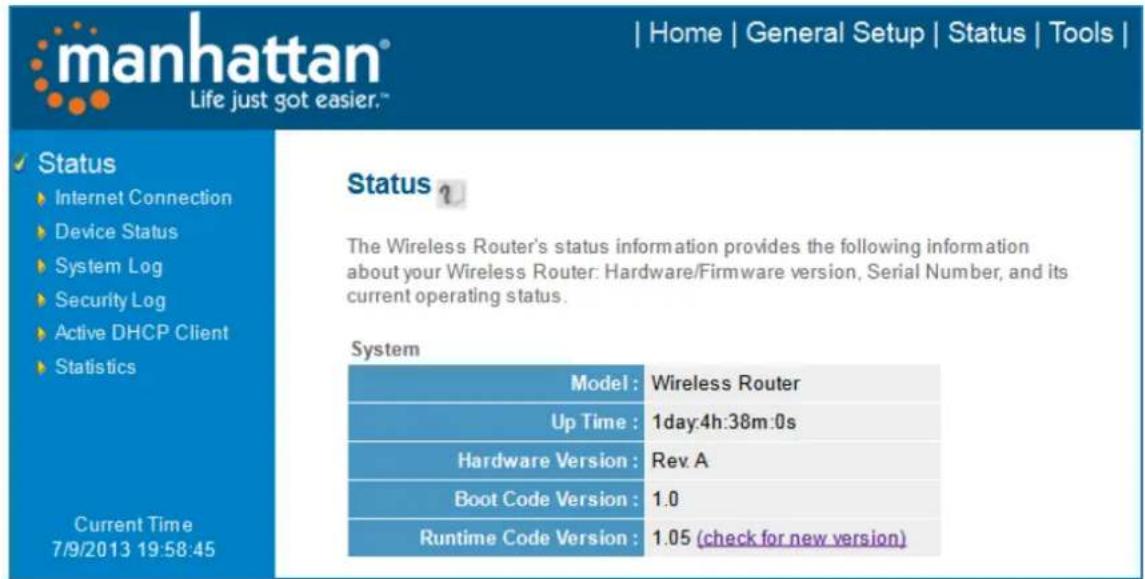
In case you experience technical difficulties with the router and need to contact technical support, you should write down the Boot Code Version and Runtime Code Version shown on your screen (which may vary from the example shown here). It is very likely that you would be asked to provide these numbers by the technical support representative.
4.1.1 Internet Connection

This screen shows IP address information the router has obtained. If you experience problems with your Internet connection, open this page and check the contents. Values for IP address, default gateway and primary DNS should always be filled. If they're missing, it indicates that there is a connection problem preventing the router from accessing the Internet.
4.1.2 Device Status
This screen shows information about the wireless configuration as well as the LAN configuration, including information about the encryption and IP address settings of the router.
| Wireless Configuration | |
| Mode: | Access Point |
| ESSID: | Manhahttan |
| Channel Number: | 11 |
| Security: | WPA pre-shared key |
| LAN Configuration | |
| IP Address: | 192.168.2.1 |
| Subnet Mask: | 255.255.255.0 |
| DHCP Server: | Enable |
| MAC Address: | 80:1F:02:4C:32:2E |
4.1.3 System Log
All important system events are logged here.
Save — Click to save the current event log to a text file.
Clear — Click to delete all event log messages displayed.
Refresh — Click to refresh the view to display the most current event log messages.
4.1.4 Security Log
You can keep an eye on intruders here.
Save — Click to save the current event log to a text file.
Clear — Click to delete all event log messages displayed.
Refresh — Click to refresh the view to display the most current event log messages.
4.1.5 Active DHCP Client
If you're using the DHCP server function of this router, you can use this function to check all active DHCP leases issued by this router.

4.1.6 Statistics
Statistics of the wireless LAN, wired LAN and WAN interface of the router are shown on this screen.

Refresh — Click to display the latest information. NOTE: The information is accumulative and is only reset after the router is restarted.
4.2 Tools
This screen and the submenus that can be accessed from here provide options and information helpful in managing files and router information. Click the "Tools" link at the upper-right corner of the Web management interface
4.2.1 Configuration Tools
This screen lets you back up the configuration of the router to a file so you can

reload it at a later time. You can save different configurations, each with unique settings, and reload them as needed.
Backup Settings — Click "Save..." and you'll be prompted to download the configuration as a file (the default filename is "default.bin"). Remember to save it as another filename each time you back up for easier retrieval of information..
Restore Settings — Click "Browse..." to select a saved configuration file from your computer, then click "Upload" to transfer the configuration file to the router. After the configuration is uploaded, the router's current configuration will be replaced by the file you just uploaded.
Restore to Factory Default — Click to reset all settings of the router to the factory default values.
4.2.2 Firmware Upgrade
The firmware of the router is like the operating system on your computer. Firmware upgrades for this router may be available at manhattan-products.com. If you experience technical difficulties, you should first check if any updated firmware is available for the router and install it using this firmware upgrade function.

Next — Click to proceed to the upgrade procedure screen.

Browse — Click to locate the firmware file you've downloaded. If the file is in Zip (compressed archive) format, you need to uncompress it prior to the upgrade. Apply — Click to start the firmware upgrade process.
Never interrupt the upgrade process by closing the Web browser or by physically disconnecting your computer from the router. If the upgrade process is interrupted by a network problem or a power failure, the router will cease to function. Damages resulting from improperly performed firmware upgrades are excluded from the product warranty!
4.2.3 Reset
This screen lets you restart the router without disconnecting the power from the unit. A restart (or system reset) may be necessary if the router responds slowly, if your Internet connection speed has dropped or if the router behaves in an unusual manner.
Reset ?
In the event that the system stops responding correctly or stops functioning, you can perform a Reboot. Your settings will not be changed. To perform the reboot, click on the APPLY button below. You will be asked to confirm your decision. The Reboot will be complete when the LED Power light stops blinking.
APPLY
Apply — Click to reset the router. It will be operational again after a few minutes. NOTE: This function does not change any settings you have made. It simply restarts (reboots) the router — just as Start / Shut Down / Restart reboots your computer — freeing up memory and system resources for more stable operation.
5 TROUBLESHOOTING
This section helps you troubleshoot problems you may be experiencing with the router. Before you contact your dealer for help, you should perform the following troubleshooting steps as they apply to your situation.
The router is not responding when I want to access it with the Web browser.
- Check the power connection and the connection of the network cable. All cords and cables should be correctly and firmly inserted into the router.
- If all LEDs on the router are off, check the status of the A/C power adapter, and make sure it's correctly plugged into your power outlet.
- Verify the IP address you connect to. The router's default IP address is 192.168.2.1, but you may have changed it. Always use the address http://manhattanrouter to access the Web Administrator interface.
- Are you using a MAC or an IP address filter? Try to connect to the router with another computer and see if it works; if not, restore the router's factory default settings by pressing the Reset button on the back panel of the router for at least 10 seconds.
- Set your computer to obtain an IP address automatically (DHCP) and check if your computer gets an IP address.
- If you did a firmware upgrade before the problem started, contact your dealer for assistance.
I can't get connected to the Internet.
- Go to Status / Internet Connection and check the Internet connection status.
- Be patient — sometimes the Internet is just slow.
- Connect a computer directly to the DSL or cable modem to see if you can access the Internet that way. If you can, check the WAN connection settings of the router to make sure they are set up correctly.
- Check the PPPoE / L2TP / PPTP user ID and password again.
- Call your Internet service provider and ask if there's something wrong with their service.
- If you just can't connect to one or more Web sites but you can still use other Internet services, check the URL/keyword filter to make sure that you are not trying to access a blocked Web site.
- Restart your modem and the router.
- Reset the device provided by your Internet service provider.
- Try to use an IP address instead of a hostname. If you can use an IP address to communicate with a remote server but can't use a hostname, check the DNS settings.
My wireless notebook cannot see or connect to the wireless network.
- Check if Broadcast ESSID is off. Remember that you need to input the ESSID on your wireless client manually if the ESSID broadcast is disabled.
- Check that you've securely attached the antenna(s).
- Make sure that you're not too far away from the router.
I can't log on to the Web management interface: The password is wrong.
- Make sure you're connecting to the correct IP address of the router.
- The password is case-sensitive. Make sure the Caps Lock feature isn't on.
- If you've simply forgotten your password, do a hardware reset using the Reset button on the back panel of the router.
The router becomes hot.
- It's normal for the router to heat up during operation, and this is usually nothing to worry about. If, however, the router gets too hot to touch, or if you smell something burning or see smoke coming from the router or A/C power adapter, immediately disconnect the router and adapter from the utility power — making sure it's safe to do this — and call your dealer for help.
The date and time of all the event logs are wrong.
- Adjust the internal clock of the router.
6 GLOSSARY
Default Gateway (Router): Every non-router IP device needs to configure a default gateway's IP address. When the device sends out an IP packet, if the destination is not on the same network, the device has to send the packet to its default gateway, which will then send it out toward the destination.
DHCP: Dynamic Host Configuration Protocol. This protocol automatically gives every computer on your home network an IP address.
DNS Server IP Address: DNS stands for Domain Name System, which allows Internet servers to have a domain name (such as www.Broadbandrouter.com) and one or more IP addresses (such as 192.34.45.8). A DNS server keeps a database of Internet servers and their respective domain names and IP addresses, so that when a domain name is requested (as in typing “Broadbandrouter.com” into your Internet browser), the user is sent to the proper IP address. The DNS server IP address used by the computers on your home network is the location of the DNS server your ISP has assigned to you.
DSL Modem: DSL stands for Digital Subscriber Line. A DSL modem uses your existing phone lines to transmit data at high speeds.
Idle Timeout: Idle Timeout is designed so that after there is no traffic to the Internet for a pre-configured amount of time, the connection will be disconnected.
IP Address and Network (Subnet) Mask: An Internet Protocol address consists of a series of four numbers separated by periods, which identifies a single, unique Internet computer host in an IP network. Example: 192.168.2.1 consists of two portions: the IP network address and the host identifier. The IP address is a 32-bit binary pattern that can be represented as four cascaded decimal numbers separated by “.”: aaa.aaa.aaa.aaa, where each “aaa” can be anything from 000 to 255; or as four cascaded binary numbers separated by “.”: bbbbbbbb.bbbbbbbb.bbbbbbbb.bbbbbbbb, where each “b” can either be 0 or 1. A network mask is also a 32-bit binary pattern, and consists of consecutive leading 1’s followed by consecutive trailing 0’s, such as 1111111.1111111.1111111.0 00 0 0 0 00. Therefore, sometimes a network mask can also be described simply as “x” number of leading 1’s. When both are represented side by side in their binary forms, all bits in the IP address that correspond to 1’s in the network mask become part of the IP network address, and the remaining bits correspond to the host ID. For example, if the IP address for a device is, in its binary form, 11011001.10110000.10010000.00000111, and if its network mask is 1111111.1111111.11110 0 0 0.00 0 0 0 00 it means the device’s network address is 11011001.10110000.10010000.00000000, and its host ID is 00000000.00000000.00000000.00000111. This is a convenient and efficient method for routers to route IP packets to their destination.
ISP: Internet Service Provider. An ISP is a business that provides connectivity to the Internet for individuals and other businesses or organizations.
LAN: Local Area Network. A LAN is a group of computers and devices connected together in a relatively small area (such as a house or an office). Your home network is considered a LAN.
MAC Address: MAC stands for Media Access Control. A MAC address is the hardware address of a device connected to a network, and is a unique identifier for a device with an Ethernet interface. It is composed of two parts: three bytes of data that corresponds to the Manufacturer ID (unique for each manufacturer), and three bytes that are often used as the product's serial number.
NAT: Network Address Translation. This process allows all of the computers on your home network to use one IP address. Using the broadband router's NAT capability, you can access the Internet from any computer on your home network without having to purchase more IP addresses from your ISP.
PPPoE: Point-to-Point Protocol over Ethernet. Point-to-Point Protocol is a secure data transmission method originally created for dial-up connections; PPPoE is for Ethernet connections. PPPoE relies on two widely accepted standards, Ethernet and the Point-to-Point Protocol. It is a communications protocol for transmitting information over Ethernet between different manufacturers.
Protocol: A protocol is a set of rules for interaction agreed upon between multiple parties so that when they interface with each other based on such a protocol, the interpretation of their behavior is well-defined and can be made objectively, without confusion or misunderstanding.
Router: A router is an intelligent network device that forwards packets between different networks based on network layer address information such as IP addresses.
Subnet Mask: A subnet mask, which may be a part of the TCP/IP information provided by your ISP, is a set of four numbers (e.g., 255.255.255.0) configured like an IP address. It's used to create IP address numbers used only within a particular network (as opposed to valid IP address numbers recognized by the Internet, which must be assigned by InterNIC).
TCP/IP, UDP: Transmission Control Protocol/Internet Protocol and Unreliable Datagram Protocol are the standard protocols for data transmission over the Internet. Both TCP and UDP are transport layer protocols. TCP performs proper error detection and error recovery, and thus is reliable. UDP, on the other hand, is not reliable. They both run on top of the IP (Internet Protocol), a network layer protocol.
WAN: A Wide Area Network connects computers located in geographically separate areas (e.g., different buildings, cities, countries). The Internet is a wide area network.
manhattan® Life just got easier.™
manhattan-products.com
© IC Intracom. All rights reserved. Manhattan is a trademark of IC Intracom, registered in the U.S. and other countries.
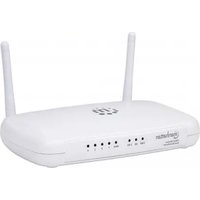


- WIRELESS ROUTER USER MANUAL
- Package Contents
- TABLE OF CONTENTS
- HARDWARE....5
- SYSTEM & NETWORK SETUP ......6
- ADVANCED FUNCTIONS 41
- ADDITIONAL FUNCTIONS....55
- TROUBLESHOOTING....60
- SAFETY GUIDELINES
- HARDWARE
- Front Panel Display
- LED Status Description
- Back Panel Display
- Feature Description
- SYSTEM & NETWORK SETUP
- Connecting the Router
- Obtaining an IP Address
- Windows XP IP Address Setup
- Windows Vista/7 IP Address Setup
- Router IP Address Lookup
- Quick Setup
- Cable Modem
- Fixed-IP xDSL
- PPPoExDSL
- PPTP xDSL
- L2TP xDSL
- Telstra Big Pond
- Setup Procedure for Cable Modem (Dynamic IP)
- Setup Procedure for Fixed IP xDSL (Static IP)
- Setup Procedure for PPPoE xDSL
- Setup Procedure for PPTP xDSL
- Setup Procedure for L2TP xDSL
- Setup Procedure for Telstra BigPond
- NOTE TO DSL USERS
- Basic Setup
- Time Zone and Time Auto-Synchronization
- Changing the Management Password
- Remote Management
- Setting Up an Internet Connection (WAN Setup)
- Setup Procedure for Dynamic IP
- Dynamic IP
- Setup Procedure for Static IP
- Static IP
- Setup Procedure for PPPoE
- PPPoE?
- Setup Procedure for PPTP
- Setup Procedure for L2TP
- Setup Procedure for Telstra BigPond
- Setup Procedure for DNS
- DNS ?
- Setup Procedure for DDNS
- LAN Configuration
- SUGGESTIONS FOR AN IP ADDRESS NUMBERING PLAN
- LAN IP
- RECOMMENDED VALUES
- DHCP Server
- Static DHCP Leases Table
- Wireless LAN Configuration
- Basic Wireless Settings
- Advanced Wireless Settings
- Advanced Settings
- Wireless Security
- Disable Wireless Security
- Wired Equivalent Privacy (WEP)
- EXAMPLES OF A WEP KEY
- Wi-Fi Protected Access (WPA) Pre-Shared Key
- WPA RADIUS
- Wireless Access Control
- Access Control
- Wi-Fi Protected Setup (WPS)
- Security Tips for Wireless Networks
- ADVANCED FUNCTIONS
- Quality of Service (QoS)
- Basic QoS Settings
- Adding a New QoS Rule
- QoS
- Network Address Translation (NAT)
- Port Forwarding
- Virtual Server
- Virtual Server
- Port Mapping for Special Applications
- Special Applications
- UPnP
- ALG
- Firewall
- Access Control
- Access Control?
- Add PC
- Access Control Add PC
- URL Blocking
- DoS Attack Prevention
- DoS - Advanced Settings
- Demilitarized Zone (DMZ)
- ADDITIONAL FUNCTIONS/FEATURES
- Status
- Internet Connection
- Device Status
- System Log
- Security Log
- Active DHCP Client
- Statistics
- Tools
- Configuration Tools
- Firmware Upgrade
- Reset
- Reset ?
- TROUBLESHOOTING
- The router is not responding when I want to access it with the Web browser.
- I can't get connected to the Internet.
- The router becomes hot.
- GLOSSARY
- manhattan® Life just got easier.™
Brand : MANHATTAN
Model : 1200AC
Category : Router