
RTS-E10T - Home Theater System SAMSUNG - Free user manual and instructions
Find the device manual for free RTS-E10T SAMSUNG in PDF.


| Product type | Home theater system |
| Brand | Samsung |
| Model | RTS-E10T |
| Dimensions (W x H x D) | 430 x 300 x 150 mm |
| Weight | 2.5 kg |
| Power supply | 100-240 V AC, 50/60 Hz |
| Power consumption (operating) | 40 W |
| Power consumption (standby) | < 0.5 W |
| Output power | 500 W |
| Number of channels | 5.1 |
| Supported audio formats | MP3, WMA, AAC, WAV |
| Connectivity | Bluetooth, HDMI, USB, optical input, analog audio input |
| Radio functions | FM stereo with RDS |
| Built-in player | DVD |
| Supported video formats | DivX, MPEG4, AVI |
| Included accessories | Remote control, HDMI cable, audio cable, FM antenna, user manual |
| Care and cleaning | Use a soft, dry cloth. Do not use solvents. |
| Safety | Do not open the device. Keep away from water. Operating temperature: 5°C to 35°C. |
| Spare parts | Remote control, HDMI and audio cables, FM antenna |
| Repairability | Repair index not provided. Contact an authorized service center. |
Frequently Asked Questions - RTS-E10T SAMSUNG
User questions about RTS-E10T SAMSUNG
0 question about this device. Answer the ones you know or ask your own.
Ask a new question about this device
Download the instructions for your Home Theater System in PDF format for free! Find your manual RTS-E10T - SAMSUNG and take your electronic device back in hand. On this page are published all the documents necessary for the use of your device. RTS-E10T by SAMSUNG.
USER MANUAL RTS-E10T SAMSUNG
Thank you for purchasing this Samsung product.
To receive more complete service,
please register your product at
www.samsung.com/global/register
features
Multi-Disc Playback & FM Tuner
The RTS-E10 combines the convenience of multi-disc playback capability, including, DVD-VIDEO, CD, VCD, MP3-CD, WMA-CD, DivX, CD-R/RW, with a sophisticated FM tuner, all in a single player.
USB Host support
You can connect and play files from external USB storage devices such as MP3 players, USB flash memory, etc. using the Room Cinema's USB HOST function.
TV Screen Saver Function
If the main unit remains in Stop mode for 3 minutes, Samsung logo appears on TV screen.
The RTS-E10 automatically switches itself into the power saving mode after 20 minutes in the Screen Saver mode.
Power Saving Function
The RTS-E10 automatically shuts itself off after 20 minutes in Stop mode.
WHAT'S INCLUDED
Check for the supplied accessories below.

natural_image
Illustration of a audio video cable with multiple connectors (no text or symbols on the cable itself)
natural_image
Simple line drawing of a FM antenna with a cable (no text or symbols on the diagram itself)

SAFETY WARNINGS
TO REDUCE THE RISK OF ELECTRIC SHOCK, DO NOT REMOVE THE COVER(OR BACK). NO USER-SERVICEABLE PARTS ARE INSIDE. REFER SERVICING TO QUALIFIED SERVICE PERSONNEL.

CAUTION
RISK OF ELECTRIC SHOCK DO NOT OPEN

CLASS 1 LASER PRODUCT KLASSE 1 LASER PRODUKT LUOKAN 1 LASER LAITE KLASS 1 LASER APPARAT PRODUCTO LASER CLASE 1

This symbol indicates “dangerous voltage” inside the product that presents a risk of electric shock or personal injury.

This symbol indicates important instructions accompanying the product.
CLASS 1 LASER PRODUCT
This Compact Disc player is classified as a CLASS 1 LASER product.
Use of controls, adjustments or performance of procedures other than those specified herein may result in hazardous radiation exposure.
CAUTION : INVISIBLE LASER RADIATION WHEN OPEN AND INTERLOCKS DEFEATED, AVOID EXPOSURE TO BEAM.
WARNING : To reduce the risk of fire or electric shock, do not expose this appliance to rain or moisture.
CAUTION : TO PREVENT ELECTRIC SHOCK, MATCH WIDE BLADE OF PLUG TO WIDE SLOT, FULLY INSERT.
- This apparatus shall always be connected to a AC outlet with a protective grounding connection.
- To disconnect the apparatus from the mains, the plug must be pulled out from the mains socket, therefore the mains plug shall be readily operable.
CAUTION
- Apparatus shall not be exposed to dripping or splashing and no objects filled with liquids, such as vases, shall be placed on the apparatus.
- The Mains plug is used as a disconnect device and shall stay readily operable at any time.


natural_image
Illustration of a megaphone with steam rising, crossed by a black X (no text or symbols)Ensure that the AC power supply in your house complies with the identification sticker located on the back of your player. Install your player horizontally, on a suitable base (furniture), with enough space around it for ventilation (7.5\~10cm). Make sure the ventilation slots are not covered. Before moving the player, ensure the disc tray is empty. This player is designed for continuous use. Switching off the Room Cinema System to the stand-by mode does not disconnect the electrical supply. In order to disconnect the player completely from the power supply, remove the main plug from the wall outlet, especially when left unused for a long period of time.

natural_image
Illustration of a computer monitor with a power outlet connected to a wall, next to a window with a lightning bolt (no text or symbols)During thunderstorms, disconnect the AC main plug from the wall outlet. Voltage peaks due to lightning could damage the unit.

natural_image
Illustration of a cylindrical device with a cross mark on top, placed above a window with a sun in the background (no text or symbols)Do not expose the unit to direct sunlight or other heat sources. This could lead to overheating and malfunction of the unit.

Protect the player from moisture (i.e. vases), and excess heat (e.g. fireplace) or equipment creating strong magnetic or electric fields (i.e. speakers...). Disconnect the power cable from the AC supply if the player malfunctions. Your player is not intended for industrial use. Use of this product is for personal use only.
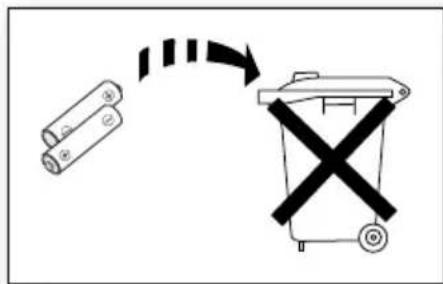
The batteries used with this product contain chemicals that are harmful to the environment.
Do not dispose of batteries in the general household trash.
Condensation may occur if your player or disc has been stored in cold temperatures. If transporting the player during the winter, wait approximately 2 hours until the unit has reached room temperature before using.
FEATURES
2 What's included
2
SAFETY INFORMATION
3 Safety Warnings
4 Precautions
3
GETTING STARTED
7 Before Reading the User's Manual
8 Playable Discs
8 Do not use the following types of disc!
8 Copy Protection
9 Disc Type and Characteristics
DESCRIPTION
10 Front Panel
11 Rear Panel
10
REMOTE CONTROL
13 Tour of the Remote Control
12
CONNECTIONS
15 Connecting the Speakers
17 Connecting the Video Out to your TV
18 Connecting Audio from External Components
19 Connecting the FM Antenna
BEFORE USING YOUR ROOM CINEMA
20
PLAYBACK
21 Disc Playback
21
22 MP3/WMA-CD Playback
23 JPEG File Playback
25 DivX Playback
27 Using the Playback Function
33 Playing Media Files using the USB Host Feature
SYSTEM SETUP
35
35 Setting the Language
36 Setting The Audio
37 Setting TV Screen Type
39 Setting The Password Parental Controls
39 Rating Level
40 Change Password
40 DIVX(R) Registration
41 Setting the DRC (Dynamic Range Compression)
41 Setting the EQUALIZER Function
RADIO
42
42 Listening to Radio
TROUBLESHOOTING
43
USB HOST FEATURE SUPPORTED
PRODUCTS
45
45 Digital Camera
45 USB Flash Disc
45 MP3 Player
APPENDIX
46
46 Cautions on Handling and Storing Discs
47 Specifications
Make sure to check the following terms before reading the user manual.
Icons that will be used in manual
| Icon Term | Defi nition | |
 | DVD | This involves a function available with DVD or DVD-R/DVD-RW discs that have been recorded and fi nalized in Video Mode. |
 | VCD | This involves a function available with VCD discs that have been recorded and fi nalized in Video Mode. |
 | CD This involves a function available with a data CD (CD-R or CD-RW). | |
 | MP3 This involves a function available with CD-R/-RW discs. | |
 | JPEG This involves a function available with CD-R/-RW discs. | |
 | DivX | This involves a function available with MPEG4 discs.(DVD ± R/RW, CD-R or CD-RW) |
 | Caution | This involves a case where a function does not operate or settings may be cancelled. |
 | Note | This involves tips or instructions on the page that help each function operate. |

In this manual, the instructions marked with "DVD ( )" are applicable to DVD-VIDEO, DVD-AUDIO and DVD-R/-RW discs that have been recorded in Video Mode and then finalized. Where a particular DVD type is mentioned, it is indicated separately.
If a DVD-R/-RW disc has not been recorded properly in DVD Video format, it will not be playable.
About the use of this user's manual
1) Be sure to be familiar with Safety Instructions before using this product. (See pages 3\~4)
2) If a problem occurs, check the Troubleshooting. (See pages 43\~44)
Copyright
©2008 Samsung Electronics Co., Ltd.
All rights reserved; No part or whole of this user's manual may be reproduced or copied without the prior written permission of Samsung Electronics Co., Ltd.

Room Cinema Systems and the discs are coded by region. These regional codes must match in order for the disc to play. If the codes do not match, the disc will not play.
The Region Number for this player is given on the rear panel of the player.
(Your Room Cinema System will only play DVDs that are labeled with identical region codes.)
PLAYABLE DISCS
| Disc Type Mark (Logo) | Recorded Signals | Disc Size Max. | Playing Time | |
| DVD-VIDEO VIDEO |  | 12 cm | Approx. 240 min. (single-sided) | |
| Approx. 480 min. (double-sided) | ||||
| 8 cm | Approx. 80 min. (single-sided) | |||
| Approx. 160 min. (double-sided) | ||||
| AUDIO-CD |  | AUDIO | 12 cm 74 min. | |
| 8 cm 20 min. | ||||
| VIDEO CD AUDIO |  | 12 cm 74 min. | ||
| 8 cm 20 min | ||||
| DivX |  | AUDIO + VIDEO | 12 cm 74 min. | |
| 8 cm 20 min. | ||||
DO NOT USE THE FOLLOWING TYPES OF DISC!
- LD, CD-G, CD-I, CD-ROM, DVD-RAM and DVD-ROM discs cannot be played on this player.
• DVD discs purchased abroad may not play on this player.
COPY PROTECTION
- Many DVD discs are encoded with copy protection. Because of this, you should only connect your Room Cinema System directly to your TV, not to a VCR. Connecting to a VCR results in a distorted picture from copy-protected DVD discs.
- This product incorporates copyright protection technology that is protected by methods claims of certain U.S. patents and other intellectual property rights owned by Macrovision Corporation and other rights owners. Use of this copyright protection technology must be authorized by Macrovision Corporation, and is intended for home and other limited viewing uses only unless otherwise authorized by Macrovision Corporation. Reverse engineering or disassembly is prohibited.
This product does not support Secure (DRM) Media fi les.
◆ CD-R Discs
- Some CD-R discs may not be playable depending on the disc recording device (CD-Recorder or PC) and the condition of the disc.
- Use a 650MB/74 minute CD-R disc. Do not use CD-R discs over 700MB/80 minute as they may not be played back.
- Some CD-RW (Rewritable) media, may not be playable.
- Only CD-Rs that are properly "closed" can be fully played. If the session is closed but the disc is left open, you may not be able to fully play the disc.
◆ CD-R MP3 Discs
- Only CD-R discs with MP3 files in ISO 9660 or Joliet format can be played.
- MP3 file names should be 8 characters or less in length and contain no blank spaces or special characters (. / = +).
- Use discs recorded with a compression/decompression data rate greater than 128Kbps.
- Only files with the "mp3" and extensions can be played.
- Only a consecutively written multisession disc can be played. If there is a blank segment in the Multisession disc, the disc can be played only up to the blank segment.
- If the disc is not closed, it will take longer to begin playback and not all of the recorded files may be played.
- For files encoded in Variable Bit Rate (VBR) format, i.e. files encoded in both low bit rate and high bit rate (e.g., 32Kbps \~ 320Kbps), the sound may skip during playback.
- A maximum of 500 tracks can be played per CD.
- A maximum of 300 folders can be played per CD.
◆ CD-R JPEG Discs
- Only fi les with the "jpg" extensions can be played.
- If the disc is not closed, it will take longer to start playing and not all of the recorded files may be played.
- Only CD-R discs with JPEG files in ISO 9660 or Joliet format can be played.
- JPEG file names should be 8 characters or less in length and contain no blank spaces or special characters (. / = +).
- Only a consecutively written multisession disc can be played. If there is a blank segment in the multisession disc, the disc can be played only up to the blank segment.
- A maximum of 9,999 images can be stored on a single CD.
- When playing a Kodak/Fuji Picture CD, only the JPEG files in the picture folder can be played.
- Picture discs other than Kodak/Fuji Picture CDs may take longer to start playing or may not play at all.
DVD±R/RW, CD-R/RW DivX Discs
- Since this product only provides encoding formats authorized by DivX Networks, Inc., a DivX file created by the user might not play.
- Software updates for incompatible formats are not supported. (Example: QPEL, GMC, resolution higher than 800 x 600 pixels, etc.)
- Sections with a high frame rate might not be played while playing a DivX file.
- For more information about the formats authorized by DivX Networks, Inc., please visit "www.divxnetworks.net".
FRONT PANEL

| 1 POWER( )BUTTON | 5 SKIP ( )BUTTON | 9 Display |
| 2 SKIP ( )BUTTON Volume Control (+) | 10 DISC TRAY | |
| 3 STOP ( □ ) BUTTON | 7 Volume Control (-) | |
| 4 PLAY/PAUSE ( )BUTTON | 8 EJECT BUTTON | |

■ Service for Speaker system is not available. For speaker system replacement please contact your authorize Samsung Service Center.
The main unit (R Speaker) has a groove on the front side. You can open it by puliling it with a thin and hard end tool (such as ruller or screwdriver). Do not open unless for service purpose

| 1 | SPEAKER OUTPUT CONNECTORS Connect Left, subwoofer speakers. | |
| 2 | USB Host | Connect digital still camera, MP3 Player, memory stick, card reader, or other removable storage devices. |
| 3 | AUX IN JACK | Connect to the analog output of an external device (such as a MP3 Player) |
| 4 | FM 75Ω Connect the FM antenna. | |
| 5 | AUDIO L, R OUT JACKS | You can connect your system to the television using the audio cable if the appropriate input is available on the television. |
| 6 | VIDEO OUTPUT JACK | Connect the TV's Video input jack (Video IN) to the Video Out Jack. |
| 7 | COMPONENT VIDEO OUTPUT JACKS Connect a TV with Component video inputs to these jacks. | |
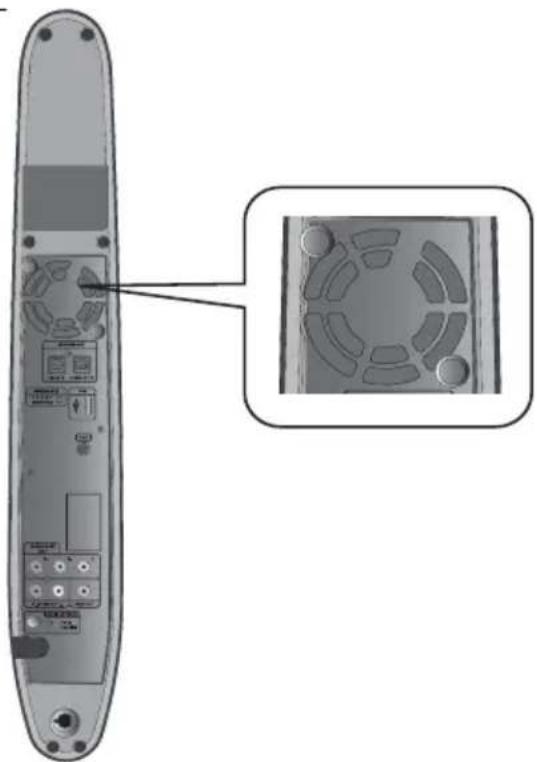
| 8 | COOLING FAN | The fan always revolves when the power is on. Ensure a minimum of 10 Cm of clear space on all sides of the fan when installing the product. |
Operation Range of the Remote Control
The remote control can be used up to approximately
23 feet (7 meters) in a straight line. It can also be operated at a horizontal angle of up to 30irc from the remote control sensor.

natural_image
Illustration of a remote control with antenna and remote device (no text or symbols)Insert Remote Batteries

natural_image
Diagram of a rolled-up sheet being cut with an arrow indicating upward motion (no text or symbols)

natural_image
Diagram of a mechanical device with a rolled sheet and an arrow indicating motion (no text or symbols)-
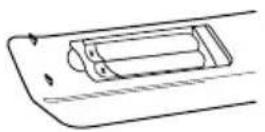
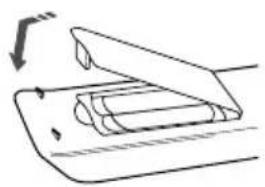
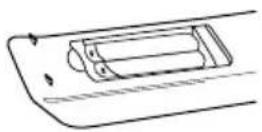
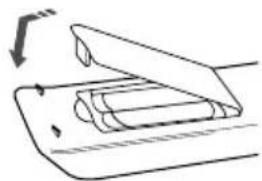
Remove the battery cover in the direction of the arrow.
-
Insert two 1.5V AAA batteries, paying3 attention to the correct polarities (+ and -).
Replace the battery cover.

Follow these precautions to avoid leaking or cracking cells:
- Place batteries in the remote control so they match the polarity: (+) to (+) and (−) to (−).
■ Use the correct type of batteries. Batteries that look similar may differ in voltage.
■ Always replace both batteries at the same time. - Do not expose the batteries to heat or a flame.

remote control
1 DVD, TUNER RECEIVER button
2 POWER button
3 Number (0\~9) buttons
4 REMAIN button
5 STEP button
6 REVERSE/FORWARD Skip buttons
7 STOP Button
8 MUTE button
9 VOLUME button
10 MENU button
11 Preset ▼, ▲, Seek Up, Down/Cursor/ Enter button
12 SUBTITLE button
13 AUDIO button
14 Power Sound button
15 EQ button
16 ZOOM, MO/ST button
17 AUTO SCAN, ANGLE button
18 EXIT button
19 INFO button
20 RETURN button
21 TUNNING button
22 REVERSE/FORWARD SEARCH button
23 PLAY and PAUSE button
24 REPEAT button
25 CANCEL button
26 EJECT button
27 SLEEP button
28 USB button
29 AUX button
connections
This section involves various methods of connecting the Digital Room Cinema to other external components.
Before moving or installing the product, be sure to turn off the power and disconnect the power cord.
CONNECTING THE SPEAKERS

Position of Digital Room Cinema
Place it on a stand or cabinet shelf, or under the TV stand.
Selecting the Listening Position
The listening position should be located about 2.5 to 3 times the distance of the TV's screen size away from the TV. Example: For 32" TVs 2\~2.4m (6\~8feet)
For 55" TVs 3.5\~4m (11\~13feet)
Front Speakers L R
Place these speakers in front of your listening position, facing inwards (about 45°) toward you.
Place the speakers so that their tweeters will be at the same height as your ear.
Align the front face of the front speakers with the front face of the center speaker or place them slightly in front of the center speakers.
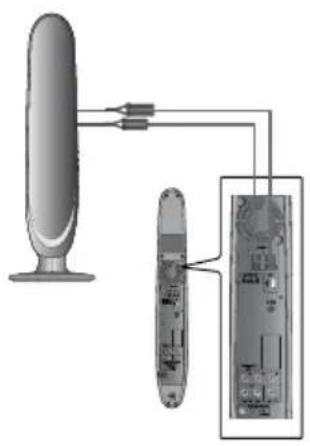
Connecting The Speakers
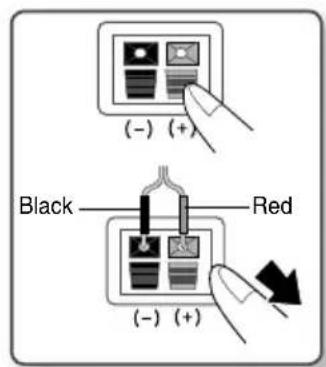
- Press down the terminal tab on the back of the speaker.
- Insert the black wire into the black terminal (−) and the red wire into the red (+) terminal, and then release the tab.
- Connect the connecting plugs to the back of the Room Cinema.
- Make sure the colors of the speaker terminals match the colors of the connecting plugs.
Front Speaker (L)
natural_image
Diagram showing two electronic devices connected to a device panel, with no visible text or symbols.
- Do not let children play with or near the speakers. They could get hurt if a speaker falls.
- When connecting the speaker wires to the speakers, make sure that the polarity (+/−) is correct.

If you place a speaker near your TV set, screen color may be distorted because of the magnetic field generated by the speaker. If this occurs, place the speaker away from your TV set.
CONNECTING THE VIDEO OUT TO YOUR TV
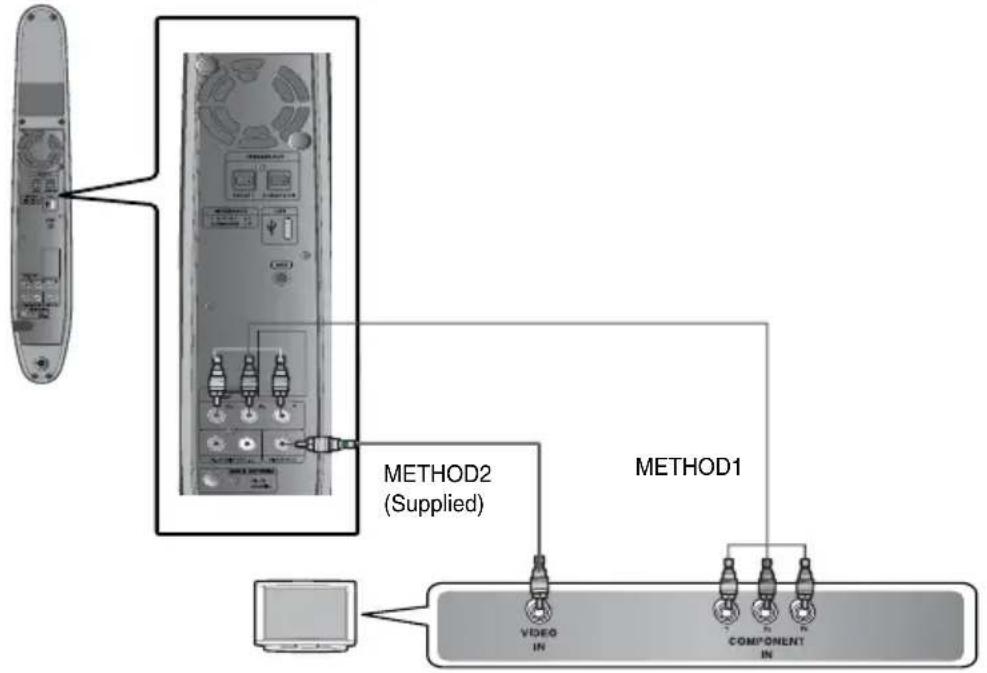
Choose one of the two methods for connecting to a TV.
flowchart
graph TD
    A["Server Unit"] --> B["METHOD2 (Supplied)"]
    B --> C["METHOD1"]
    C --> D["Component In"]
    D --> E["VIDEO IN"]
    D --> F["COMPONENT IN"]
METHOD 1 : Component Video
If your television is equipped with Component Video inputs, connect a Component Video cable (not supplied) from the Component Video Output ( PR , PB and Y) jacks on the back of the Room Cinema System to the Component Video Input jacks on your TV.
METHOD 2 : Composite Video
Connect the supplied Video cable from the VIDEO OUT jack on the back of the Room Cinema System to the VIDEO IN jack on your TV.

This product operates in Interlace scan mode 576i(480i) for component output.
connections
CONNECTING AUDIO FROM EXTERNAL COMPONENTS
AUX : Connecting an External Component/MP3 player
Components such as an MP3 Player

- Connect AUX IN (Audio) on the Room Cinema to the Audio Out of the external component/MP3 player.
- Press the AUX button on the remote control to select AUX input.

- When the unit is powered on and you connect an iPod MP3 player, the unit will charge your iPod's battery.
- Connect the FM antenna supplied to the FM 75Ω COAXIAL Jack.
- Slowly move the antenna wire around until you find a location where reception is good, then fasten it to a wall or other rigid surface.


This unit does not receive AM broadcasts.
Cooling Fan
The cooling fan supplies cool air to the unit to prevent overheating.
Please observe the following cautions for your safety.
- Make sure the unit is well-ventilated. If the unit has poor ventilation, the temperature inside the unit may rise and may damage it.
- Do not obstruct the cooling fan or ventilation holes. (If the cooling fan or ventilation holes are covered with a newspaper or cloth, heat may build up inside the unit and fire may result.)
natural_image
Diagram of a remote control panel with labeled ports and an inset showing internal components (no text or symbols present)before using your room Cinema
The Room Cinema System

natural_image
Illustration of a cylindrical device with a power outlet and cable, labeled with numbers 1 and 2 (no text or symbols on the device itself)- Plug the main unit's power cord into the AC power supply.
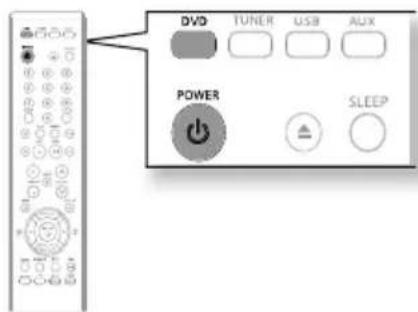
- Press the DVD button to switch to DVD mode to operate the DVD Room Cinema.


-
When you turn the power on or off by using the key touch on the main set, there will be a delay time about 3 seconds.
■ There will be a delay time 2 seconds, while you were ejecting the disc. -
Load a disc vertically into the Disc Insert Hole.
- Place a disc gently into the tray with the disc's label facing up.
- Close the compartment by pressing the PLAY (💡) button.
- Playback starts automatically.

To stop playback, press the STOP (■) button during playback.
- If pressed once, PRESS PLAY is displayed and the stop position will be stored in memory. If the PLAY (☐) button or ENTER button is pressed, playback resumes from the stop position. (This function works only with DVDs.)
- If pressed twice, STOP is displayed, and if the PLAY (💡) button is pressed, playback starts from the beginning.
To temporarily pause playback, press the PAUSE (☐) button during playback.
• To resume playback, press the PLAY ⏻ button again.

- Depending on the content of the disc, the initial screen may appear different. - Pirated discs will not run in this player because it violates the CSS (Content Scrambling System: a copy protection system) recommendations.
MP3/WMA-CD PLAYBACK
Data CDs (CD-R, CD-RW) encoded in MP3/WMA format can be played.


-
Load the MP3/WMA disc.
-
The MP3/WMA menu screen will appear and playback will start.
-
The appearance of the menu depends on the MP3/WMA disc.
• WMA-DRM fi les cannot be played. -
In Stop mode, use the Cursor ▼, ▲, ◀, ► button to select the album, and then press the ENTER button.
- Use the Cursor ▼, ▲ button to select the track.
-
To change the album, use the Return and Cursor ▼, ▲ button to select another album, and then press the ENTER.
-
Press the STOP (■) button to stop playback.


■ Depending on the recording mode, some MP3/WMA-CDs may not play.
Table of contents of a MP3-CD varies depending on the MP3/WMA track format recorded on the disc.
To play a file icon in the screen,
- Press the Cursor ▼, ▲, ◀, ▶ button when it is in Stop mode and select a desired icon from the top part of the menu.

Music File Icon : To play music files only, select the Icon.
Image File Icon : To view image files only, select the 📂 Icon.
Movie File Icon : To view movie files only, select the icon.
JPEG File Playback
Images captured with a digital camera or camcorder, or JPEG files on a PC can be stored on a CD and then played back with this Room Cinema.
Picture CD Playback

If you insert a Picture (JPEG) CD Disc into the Room Cinema System, you can see the folder directory.
1 Press the ▲ or ▼ button to select the picture you want to view, then press the ENTER button. The selected picture is displayed.
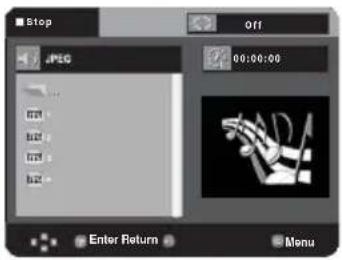
2 Press the ◀◀ or ▶▶ I button to display the previous or next picture.

natural_image
Cartoon illustration of a girl holding a microphone, with no visible text or symbolsRotation

Press the ◀ or ▶ button to select 📄. Each time the ENTER button is pressed, the picture rotates 90 degrees clockwise.

natural_image
Illustration of a person with a red hair tied to their head, holding a paper airplane (no text or symbols)Zoom

Press the ◀ or ▶ button to select 🔒. Each time the ENTER button is pressed, the picture is enlarged up to 4X. (Normal → 2X → 4X → 2X → Normal)

natural_image
Illustration of a cartoon girl holding a magnifying glass, standing beside a scroll (no text or symbols)Slideshow

Press the ◀ or ▶ button to select 📋 Press the ENTER button. The 3 icons are displayed for time interval.

Press the ◀ or ▶ button to select one of these. Press the ENTER button.
The pictures change automatically with about an 6 second interval.
The pictures change automatically with about an 12 second interval.
The pictures change automatically with about an 18 second interval.
- Depending on the file size, each interval --between images may take longer or shorter --than the manual suggests.

The maximum resolutions supported by this product are 5120 x 3480 (or 19.0 MPixel) for standard JPEG files and 2048 x 1536 (or 3.0 MPixel) for progressive image files.
DIVX PLAYBACK
The functions on this page apply to DivX disc playback.
Skip Forward/Back

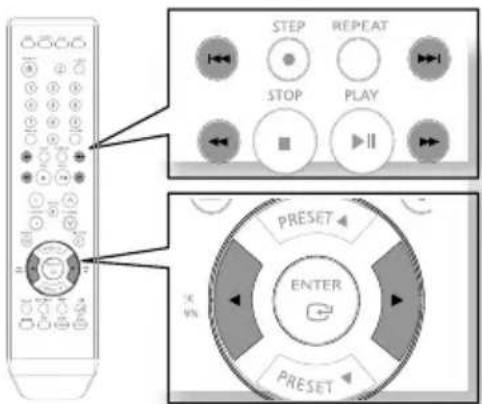
During playback, press the [I◄◄ or ►►I] button.
- Goes to the next file whenever you press the ▶▶I button, if there are over 2 fi les in the disc.
- Goes to the previous file whenever you press the ◀◀ button, if there are over 2 files in the disc.
Fast Playback

During playback, press the ◀◀,▶▶ button.
To play back the disc at a faster speed, press the ◀ or ▶ button during playback.
• Each time you press either button, the playback speed will change as follows:
2x → 4x → 8x.
Audio Display

Press the AUDIO button.
- If there are multiple audio tracks on a disc, you can toggle between them.
• Each time you press the button, your selection will toggle between AUDIO (1/N, 2/N ...) and.


is displayed when there is one supported language in the disc.
Subtitle Display

Press the SUBTITLE button.
• Each time you press the button, your selection will toggle between SUBTITLE (1/N, 2/N ...) and SUBTITLE OFF.
- If the disc has only one subtitle file, it will be played automatically.
• See number 2 (Caption Function) below for more details concerning Subtitle usage with DivX discs.

DivX(Digital internet video eXpress)
DivX is a video file format developed by Microsoft and is based on MPEG4 compression technology to provide audio and video data over the Internet in real-time.
MPEG4 is used for video encoding and MP3 for audio encoding so that the users can watch a movie at near DVD-quality video and audio.
1. Supported Formats
This product only supports the following media formats. If both video and audio formats are not supported, the user may experience problems such as broken images or no sound.
Supported Video Formats
| Format AVI WMV | |
| Supported Versions DivX3.11~DivX5.1, XviD V1/V2/V3/V7 | |
Supported Audio Formats
| Format MP3 WMA AC3 | |||
| Bit Rate 80~384kbps 56~128kbps | 128~384kbps | ||
| Sampling Frequency 44.1khz 44.1/48khz | |||
- Aspect Ratio : Although the default DivX resolution is 640x480 pixels (4:3), this product supports up to 800x600 pixels (16:9). TV screen resolutions higher than 800 will not be supported.
- When you play a disc whose sampling frequency is higher than 48khz or 320kbps, you may experience shaking on the screen during playback.
2. Caption Function
- You must have some experience with video extraction and editing in order to use this feature properly.
- To use the caption function, save the caption file (*.smi) in the same file name as that of the DivX media file (*.avi) within the same folder.
Example. Root Samsung_007CD1.avi
Samsung_007CD1.smi
- Up to 60 alphanumeric characters or 30 East Asian characters (2 byte characters such as Korean and Chinese) for the file name.
USING THE PLAYBACK FUNCTION
Displaying Disc Information


To view the current Title, Chapter, and counter position, press the INFO button during DVD playback. The display screen can also be used to quickly choose a title, chapter, or playing time.
1. View the Display
During DVD playback, press the INFO button.
- To make the screen disappear, press the EXIT button again.
2. Press the ▲ or ▼ button to select the desired item.
3. Press the ◀ or ▶ button to make the desired setup, then press the ENTER button.
- You may use the number buttons of the remote control to directly access a title, chapter or to start the playback from the desired time.


4. To make the screen disappear, press the EXIT button again.
To access the desired title when there is more than one in the disc. For example, if there is more than one movie on a DVD, each movie will be identified. A DVD may contain several different titles. For example, if a disc contains four different movies, each might be considered a title.

Most of DVD discs are recorded in chapters so that you can quickly find a specific passage. Each Title on a DVD is usually divided into chapters.

Allows playback of the fi Im from a desired time.

Refers to the language of the fi lmsoundtrack. In the example, the soundtrack is played in English 5.1CH.A DVD disc can have up to eight different soundtracks.

Refers to the subtitle languages available in the disc. You will be able to choose the subtitles language or, if you prefer, turn them off from the screen. A DVD disc can have up to 32 different subtitles.
Checking the Remaining Time


Press the REMAIN button.
- For checking the total remaining time of being played.

Fast Playback

Press the (◀◀ or ▶▶) button.
• Each time the button is pressed during playback, the playback speed changes as follows:


Slow Playback
In Pause mode, Press the (◀◀ or ▶▶) button.
• Each time the button is pressed during playback, the playback speed changes as follows:




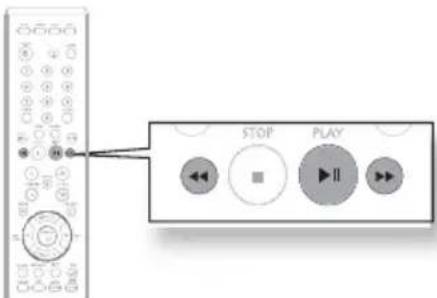

■ No sound is heard during slow playback.
■ Reverse slow playback does not work with DivX.
Skipping Scenes/Songs

Press the [I◄◄ or ►►I] button.
- Each time the button is pressed during playback, the previous or next chapter, track or directory (fi le) will be played.

Repeat Playback


Repeat playback allows you to repeatedly play a chapter, title, track (song), or directory (MP3 file).
Press the REPEAT button.
• Each time the button is pressed during playback, the repeat playback mode changes as follows:
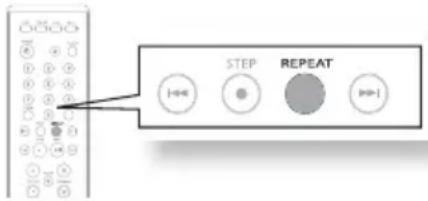

REPEAT : OFF → REPEAT : CHAPTER → REPEAT : TITLE → REPEAT : A-B


REPEAT : OFF → REPEAT : TRACK → REPEAT : FOLDER → REPEAT : RANDOM

REPEAT : OFF → REPEAT : TITLE → REPEAT : FOLDER
CHAPTER : Repeatedly plays the selected chapter.
TITLE : Repeatedly plays the selected title.
TRACK : Repeatedly plays the selected track.
FOLDER : Repeatedly plays the selected folder
OFF : Cancels Repeat Playback.
RANDOM : You can listen to songs randomly or in the desired sequence.
A-B Repeat Playback

You can repeatedly play back a designated section of a DVD.
-
Press the REPEAT button.
-
Press the Cursor ◀ or ▶ button to select A- and then press the ENTER button.
- When the ENTER button is pressed, the selected position will be stored in memory.

- Press the ENTER button at the end of the desired segment.
- The specified segment will be played repeatedly.

To return to normal playback, press the Cursor◀ or ▶ button to select OFF.

The A-B Repeat function does not operate with DivX, MP3 or JPEG discs.
Step Function

Press the STEP button.
- The picture moves forward one frame each time the button is pressed during playback.
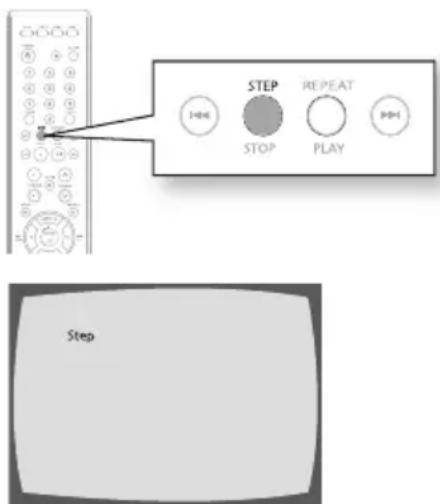

■ No sound is heard during step motion playback.
Audio Language Selection Function

- Press the INFO button.
- Press the Cursor ▲ or ▼ button to select the desired audio language.
- Depending on the number of languages on a DVD disc, a different audio language (ENGLISH, SPANISH, FRENCH, etc.) is selected each time the button is pressed.
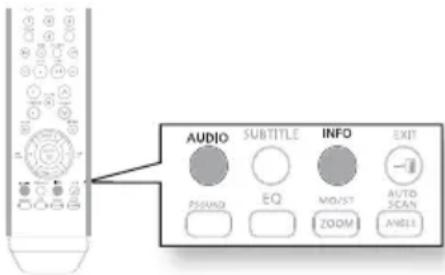

■ To operate this function, you can also press the AUDIO buttons on the remote control.
■ Depending on the disc, the Audio Language functions may not be available.
Subtitle Language Selection Function

- Press the INFO button.
- Press the Cursor ▲ or ▼ button to move to SUBTITLE (☐) display.
- Press the Cursor ◀ or ▶ button or ENTER button to select the desired subtitle.


- To operate this function, you can also press the SUBTITLE buttons on the remote control.
■ Depending on the disc, the Subtitle Language functions may not be available.
Using the Disc Menu

You can use the menus for the audio language, subtitle language, profi le, etc.
DVD menu contents differ from disc to disc.
- Press the MENU button.
- Press the Cursor ▲ or ▼ button or numeric buttons to move to Disc Menu and then press the ENTER button.
- When you select Disc Menu and it is not supported by the disc, the "This menu is not supported" message appears on the screen.
-
Press the Cursor ▲, ▼, ◀, ▶ button to select the desired item.
-
Press the ENTER button.


■ The disc menu display may be different depending on the disc.
Using the Title Menu

For DVDs containing multiple titles, you can view the title of each movie. Depending on the disc, the availability of this feature may vary.
- Press the MENU button.
- Press the Cursor ▲ or ▼ button to move to Title Menu.
- Press the ENTER button. • The title menu appears
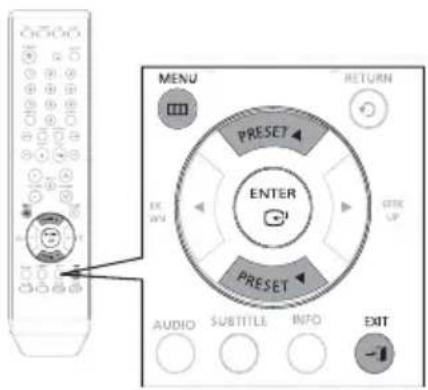

■ The Title menu display may be different depending on the disc.
The function of Power Sound mode amplifier bass and improves high key or bass twice as much. For you to appreciate powerfull real sound.
To make this function works press the volume button, then repeat with press the P.SOUND button, the display will show :
P.Sound ON → P.Sound OFF
PLAYING MEDIA FILES USING THE USB HOST FEATURE
You can enjoy the media files such as pictures, movies and tunes saved in an MP3 player, USB memory or digital camera in high audio by connecting the storage device to the USB port of the Room Cinema System.
Using the USB HOST feature
- Connect the USB device to the USB port on the front of the unit.
- If there is partition Of USB, Press the ▲/▼ button to select the one of partition from USB, then Press ENTER.
- Press the ▲/▼ or ◀/▶ buttons to select a file in USB. Press ENTER to Open file.
Note
• Each time the USB button on the remote control is pressed, a frame of the USB device selection will appear.
- "USB" appears on the display screen.
- USB MENU screen appears on the TV screen and the saved file is played.
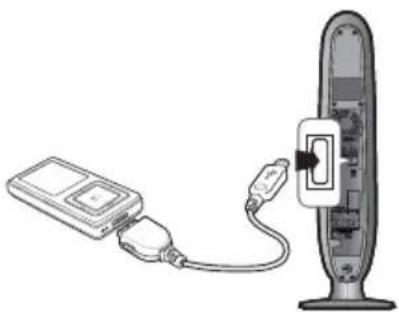
natural_image
Illustration of a device connected to a vertical electronic device (no text or symbols visible)
Safe USB Removal
To prevent damage to the memory stored in the USB device, perform safe removal before disconnecting the USB cable.
- Press the STOP (■) button
- Remove the USB cable.
Skip Forward/Back
During playback, press the (I◄◄ or ►►I) button.
- When there is more than one file, when you press the I◀◀ or ▶▶I button, the next and previous file is selected.

Fast playback
During playback, press the ◀◀,▶▶ button.
• Each time you press either button, the playback speed will change as follows:
2x → 4x → 8x.

Compatible Devices
- USB devices that support USB Mass Storage v1.0. (USB devices that operate as a removable disc in Windows (2000 or later) without additional driver installation.)
- MP3 Player: HDD and flash type MP3 players.
- Digital camera: Cameras that support USB Mass Storage v1.0.
- Cameras that operate as a removable disc in Windows (2000 or later) without additional driver installation.
-
USB HDD and USB Flash Drive: Devices that support USB2.0 or USB1.1.
-
You may experience a difference in playback quality when you connect a USB1.1 device.
-
For a USB HDD, make sure to connect an auxiliary power cord to the USB HDD for proper operation.
-
USB card Reader: One slot USB card reader and Multi slot USB card reader.
-
Depending on the manufacturer. the USB card reader may not be supported.
-
If you install multiple memory devices into a multi card reader, you may experience problems.
-
If you use a USB extension cable, the USB device might not be recognized.
Supported Formats
| Format File name | File extension | Bit rate Version Pixel | Sampling Frequency | |||
| Still Picture | JPG | JPG .JPEG | --640x480- | |||
| Music | MP3 .MP3 80~384kbps -- 44.1kHz | |||||
| WMA .WMA 56~128kbps V8 - 44.1kHz | ||||||
| Movie | DivX | .AVI,.ASF 4Mbps | DivX3.11~ DivX5.1, XviD | 720x480 | 44.1KHz~48KHz | |
• CBI (Control/Bulk/Interrupt) is not supported.
- Digital Cameras that use PTP protocol or require additional program installation when connected to a PC are not supported.
- A device using NTFS file system is not supported. (Only FAT 16/32 (File Allocation Table 16/32) fi le system is supported.)
- Some MP3 players, when connected to this product, may not operate depending on the sector size of their file system.
- The USB host function is not supported if a product that transfers media files by its manufacturer-specific program is connected.
- Does not operate with Janus enabled MTP (Media Transfer Protocol) devices.
- The USB host function of this product does not support all USB devices. For information on the supported devices, see page 45.
system setup
For your convenience, you can set this Room Cinema's features for the best use in your home environment.
SETTING THE LANGUAGE
OSD(On-Screen Display) language is set to English by default.
- In Stop mode, press the MENU button.
- Press the Cursor ▼ button to move to Setup and then press the ENTER or ▶ button.
- Select Language Setup and then press the ENTER or ▶ button.
- Press the Cursor ▲, ▼ button to select Player Menu and then press the ENTER or ▶ button.
- Press the Cursor ▲, ▼ button to select the desired language and then press the ENTER button.
- The language is selected and the screen returns to Language Setup Menu.
➢ Press the RETURN button to return to the previous level.
➢ Press the EXIT button to exit the setup screen.


- Player Menu: Selecting the Player Menu Language.
- DISC MENU : Selecting the Disc Menu Language (recorded on the disc)
• AUDIO : Selecting the Audio Language (recorded on the disc) - SUBTITLE : Selecting the Subtitle Language (recorded on the disc)
• DivX Subtitle : Selecting the DivX Subtitle Language.

SETTING THE AUDIO
OSD(On-Screen Display) language is set to English by default.
- In Stop mode, press the MENU button.
-
Press the Cursor ▼ button to move to Setup and then press the ENTER or ▶ button.
-
Select Audio Setup and then press the ENTER or ▶ button.
-
Press the Cursor ▲,▼ button to select the required item.
-
Press the Cursor ▲, ▼ button to select the desired option and then press the ENTER button.

- The option is selected and the screen returns to Audio Setup Menu.
➢ Press the RETURN button to return to the previous level.
➢ Press the EXIT button to exit the setup screen.
• Dynamic Compression :
On: To select dynamic compression.
▶ Off: To select the standard range.
- PCM Down Sampling:

On: Select this when the amplifier connected to the player is not 96KHz compatible. In this case, the 96KHz signals will be down converted to 48KHZ.
➢ Off: Select this when the amplifier connected to the player is 96KHz compatible. In this case, all signals will be output with out any changes.
SETTING TV SCREEN TYPE
Depending on your TV type (Wide Screen or conventional 4:3), you can select the TV's aspect ratio.
- In Stop mode, press the MENU button.
- Press the Cursor ▼ button to move to Setup and then press the ENTER or ▶ button.
- Press the Cursor ▼ button to move to Display Setup and then press the ENTER or ▶ button.
- Press the Cursor ▲,▼ button to select the desired item and then press the ENTER button.
- Once the setup is complete, you will be taken to the previous screen.
➢ Press the RETURN button to return to the previous level.
➢ Press the EXIT button to exit the setup screen.

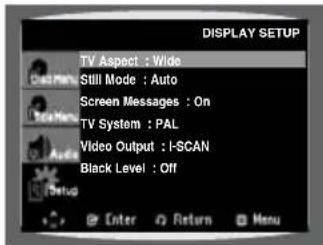
Adjusting the TV Aspect Ratio (Screen Size)
The horizontal to vertical screen size ratio of conventional TVs is 4:3, while that of widescreen and high definition TVs is 16:9. This ratio is called the aspect ratio. When playing DVDs recorded in different screen sizes, you should adjust the aspect ratio to fit your TV or monitor.
For a standard TV, select either 4:3PS or 4:3LB option according to personal preference. Select WIDE/HDTV if you have a widescreen TV.
4:3 Letter box
Select this to play a 16:9 picture in the letter box mode on a conventional TV. Black bars will appear at the top and bottom of the screen.
4:3 Pan&Scan
Select this to play a 16:9 picture in the pan & scan mode on a conventional TV.
- You can see the central portion of the screen only (with the sides of the 16:9 picture cut off).

natural_image
Illustration of three people seated at a table with a small object, no visible text or symbols
natural_image
Illustration of two people sitting at a table with a glass, no visible text or symbols16:9 WIDE
Select this to view a 16:9 picture in the full-screen mode on your widescreen TV.
- You can enjoy the widescreen aspect.
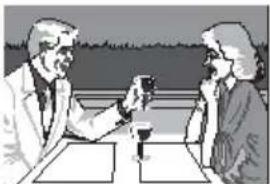
natural_image
Illustration of two people in a meeting, one holding a glass, with no visible text or symbols
If a DVD is in the 4:3 ratio, you cannot view it in widescreen.
■ Since DVD discs are recorded in various image formats, they will look different depending on the software, the type of TV, and the TV aspect ratio setting.
- If a DVD is in the 4:3 ratio, you cannot view it in widescreen. - Since DVD discs are recorded in various image formats, they will look different depending on the software, the type of TV, and the TV aspect ratio setting.
system setup
STILL MODE
These option will help prevent picture shake in still mode and display small text clearer.
- Auto: When selecting Auto, field/Frame mode will be automatically converted.
- Field : Select this feature when the screen shakes in the Auto mode.
- Frame : Select this feature when you want to see small letters more clearly in the Auto mode.
SCREEN MESSAGES
Use to turn on-screen messages On or Off.
TV SYSTEM
NTSC : In case of using NTSC disc.
- If your TV system only has PAL-Video input, you must choose "PAL". When you chose "PAL" Interlace output format is PAL 60Hz output.
- If your TV system only has NTSC, input you must choose: "NTSC" PAL: In case of using PAL Disc.
- If your TV system only has NTSC-Video input, you must choose "NTSC"
- If your TV system only has PAL input, you must choose "PAL"

VIDEO OUTPUT
Select Video Output.
- I-SCAN : Select when you want to use Component Interlace (525i) Out.
- P-SCAN : Select when you want to use Component Progressive (525p) Out.
- If the Yes/No selection in the Display Setup sub Menu is not made within 10 seconds, the screen returns to the previous menu.
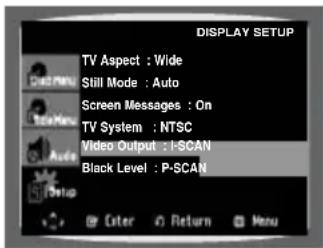
BLACK LEVEL
Adjusts the brightness of the screen. (On or Off) it does not function in Progressive mode.

- Consult your TV User's manual to find out if your TV support Progressive Scan. If Progressive Scan is supported, follow the TV User's Manual regarding Progressive Scan setting in the TV's menu system.
- If video OUtput is set incorrectly, the screen maybe blocked.
SETTING THE PASSWORD PARENTAL CONTROLS
You can set the password for the Parental (rating level) setting.
- In Stop mode, press the MENU button.
- Press the ▲ or ▼ button to select SETUP, then press the Enter or ▶ button.
- Press the ▲ or ▼ button to select Parental Setup. Then press the Enter or ▶ button.
- The Enter Password menu is displayed. Enter your password by pressing the number buttons.
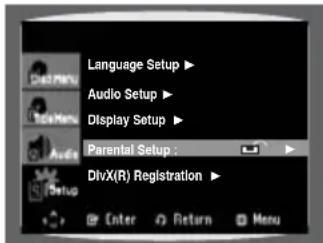

■ The password is set to "0000" by default.
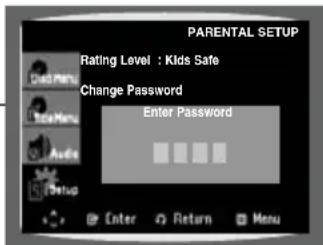
If you have forgotten the rating level password, do the following
- While the player is in No Dlsc mode, hold the SKIP (▶▶) button on the front panel for longer than 5 seconds. INITIAL appears on the display and all settings will return to the default values.
- Using the RESET function will erase all stored settings. Do not use this unless necessary.
SETTING (RATING LEVEL)
Use this to restrict playback of adult or violent DVDs you do not want children to view.
- In Stop mode, press the MENU button.
- Press the ▲ or ▼ button to select SETUP, then press the Enter or ▶ button.
- Press the ▲ or ▼ button to select Parental Setup. Then press the Enter or ▶ button.
- Press the ▲ or ▼ button to select Rating Level, then press the ENTER or ▶ button. - For example, if you select up to level 6, Discs that contain Level 7, 8 will now not play.
- To make the Setup menu disappear press the MENU button.
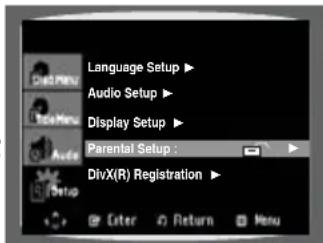
➢ Press the RETURN button to return to the previous level.
➢ Press the EXIT button to exit the setup screen.
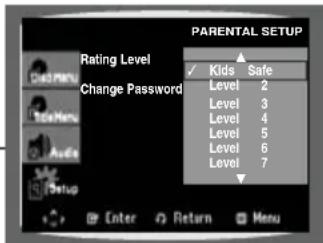
This function works only if a DVD disc contains the rating level information.
system setup
CHANGE PASSWORD
Use this to restrict playback of adult or violent DVDs you do not want children to view.
- In Stop mode, press the MENU button.
- Press the ▲ or ▼ button to select SETUP, then press the Enter or ▶ button.
- Press the ▲ or ▼ button to select Parental Setup. Then press the Enter or ▶ button.
- Press the ▲ or ▼ button to select Change Password.
- The Enter Password is displayed. Enter your password by pressing the number buttons. Then the Enter New Password is displayed to confirm the password.
- To make the Setup menu disappear press the MENU button.
➢ Press the RETURN button to return to the previous level.
➢ Press the EXIT button to exit the setup screen.
This function works only if a DVD disc contains the rating level information.
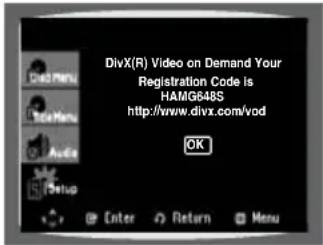
DVIX (R) REGISTRATION


Please use the Registration code to register this player with the DivX (R) video on demand format.
To learn more, go to www.divx.com/vod.
SETTING THE DRC (DYNAMIC RANGE COMPRESSION)
This feature balances the range between the loudest and quietest sounds. You can use this function to enjoy Dolby Digital sound when watching movies at low volume at night.
- In Stop mode, press the MENU button.
- Press the Cursor ▼ button to move to Audio and then press the ENTER or ▶ button.
- Press the Cursor ▼ button to move to DRC and then press the ENTER or ▶ button.
- Press the Cursor ▲, ▼ to adjust the DRC.
- When the Cursor ▲ button is pressed, the effect is greater, and when the Cursor ▼ button is pressed, the effect is smaller.
➢ Press the RETURN button to return to the previous level.
➢ Press the EXIT button to exit the setup screen.
SETTING THE EQUALIZER FUNCTION
EQ : You can select CLASSIC, ROCK, JAZZ or POP to optimize the sound for the genre of music you are playing
- In Stop mode, press the MENU button.
- Press the Cursor ▼ button to move to Audio and then press the ENTER or ▶ button.
- Press the Cursor ▼ button to move to EQUALIZER and then press the ENTER or ▶ button.
- Press the Cursor ▲,▼ to choose the EQUALIZER.
EQ.OFF → EQ.CLASSIC → EQ.ROCK → EQ.JAZZ → EQ.POP

This feature works with CDs, MP3-CDs, DivX, tuner and Dolby Digital discs.
radio
LISTENING TO RADIO
This feature lets you to listen FM radio from this Room Cinema System. Anytime we want to display FM radio menu, just press TUNER button on the remote control.
To Scan the frequency
- With the unit in Stop mode, Press the TUNER button on the remote control.
- Press the √ or ▶ button to scan the frequency manually.
It will seek automatically for an available frequency within range.
To change the preset value
- With the unit in Stop mode, Press the TUNER button on the remote control.
- Press PRESET ▼ or π buttons. The preset number are selected.
To save the frequency value as a preset mode.
- Please do 1-2 step above before saving the frequency.
- Press STOP or ENTER button to save frequency value as the preset number. After press STOP or ENTER button, the value on the preset will be blinking for around 5 second.
- Press STOP or ENTER again to save the frequency. To return from FM radio menu, just press RETURN button and if there is a disk on the tray, it will play automatically.

■ FM radio can be accessed when the player no disc and the unit in stop mode.
■ While you were listening the Radio, if there is no operations for 3 minutes, the screen saver will appear.
This conditions will be back to normal, if you press any button.
troubleshooting
Refer to the chart below when this unit does not function properly. If the problem you are experiencing is not listed below or if the instruction below does not help, turn off the unit, disconnect the power cord, and contact the nearest authorized dealer or Samsung Electronics Service Center.
| SYMPTOM Check/Remedy | |
| I cannot eject the disc. • Is the power cord plugged securely into the outlet?Turn off the power and then turn it back on. | |
| Playback does not start. • Check the region number of the DVD.DVD discs purchased from abroad may not be playable.CD-ROMs and DVD-ROMs cannot be played on this Room Cinema System.Make sure that the rating level is correct. | |
| Playback does not start immediately when the Play/Pause button is pressed. | Are you using a deformed disc or a disc with scratches on the surface?Wipe the disc clean. |
| Sound is not produced. • No sound is heard during fast playback, slow playback, and step motion playback.Are the speakers connected properly? Is the speaker setup correctly customized?Is the disc severely damaged? | |
| The remote control does not work. | Is the remote control being operated within its operation range of angle and distance?Are the batteries exhausted? |
troubleshooting
| SYMPTOM Check/Remedy | |
| Disc is rotating but no picture is produced.Picture quality is poor and picture is shaking. | Is the TV power on?Are the video cables connected properly?Is the disc dirty or damaged?A poorly manufactured disc may not be playable. |
| Audio language and subtitles do not work. | Audio language and subtitles will not work if the disc does not contain them. |
| Menu screen does not appear even when the menu function is selected. | Are you using a disc that does not contain menus? |
| Aspect ratio cannot be changed. | You can play 16:9 DVDs in 16:9 WIDE mode, 4:3 LETTER BOX mode, or 4:3 PAN SCAN mode, but 4:3 DVDs can be seen in 4:3 ratio only. Refer to the DVD disc jacket and then select the appropriate function. |
| The main unit is not working.(Example: The power goes out or strange noise is heard.)The Room Cinema System is not working normally. | While the player is in No Dlsc mode, hold the SKIP (▶▶1)button on the front panel for longer than 5 seconds.Using the RESET function will erase all stored settings.Do not use this unless necessary. |
| The password for rating level has been forgotten. | Press the▶▶1 button (in front panel) for more than 5 secondsunder no disc inside. All settings including the password will revert to the factory settings. Don't use this unless absolutely necessary.Using the RESET function will erase all stored settings.Do not use this unless necessary. |
| Can't receive radio broadcast. • Is | the antenna connected properly?If the antenna's input signal is weak, install an external FM antenna in an area with good reception. |
USB host feature supported products
DIGITAL CAMERA
| Product | Company | Type | Product | Company | Type |
| Finepix-A340 | Fuji | Digital | UC300era | Olympus | Digital Camera |
| Finepix-F810 | Fuji | Digital | XC350era | Olympus | Digital Camera |
| Finepix-F610 | Fuji | Digital | CC350era | Olympus | Digital Camera |
| Finepix-f450 | Fuji | Digital | C-500era | Olympus | Digital Camera |
| Finepix S7000 Fuji Digital Camera | X1 | Olympus | Digital Camera | ||
| Finepix A310 Fuji Digital Camera | U-mini | Olympus | Digital Camera | ||
| KD-310Z | Konica | Digital | Lumix-F200era | Panasonic | Digital Camera |
| Finecam SL300R Kyocera Digital Camera | DMC-FX7GD | Panasonic | Digital Camera | ||
| Finecam SL400R Kyocera Digital Camera | Lumix LC33 | Panasonic | Digital Camera | ||
| Finecam S5R Kyocera Digital Camera | LUMIX DMC-F1 | Panasonic | Digital Camera | ||
| Finecam Xt Kyocera Digital Camera | Optio-S40 | Pentax | Digital Camera | ||
| Dimage-Z1 | Minolta | Digital Camera | Optio-S50 | Pentax | Digital Camera |
| Dimage Z1 | Minolta | Digital Camera | Optio 33LF | Pentax | Digital Camera |
| Dimage X21 | Minolta | Digital Camera | Optio MX | Pentax | Digital Camera |
| Coolpix4200 | Nikon | Digital Camera | Digimax-420 | Samsung | Digital Camera |
| Coolpix4300 | Nikon | Digital Camera | Digimax-400 | Samsung | Digital Camera |
| Coolpix 2200 | Nikon | Digital Camera | Sora PDR-T30 | Toshiba | Digital Camera |
| Coolpix 3500 | Nikon | Digital Camera | Coolpix 5900 | Nikon | Digital Camera |
| Coolpix 3700 | Nikon | Digital Camera | Coolpix S1 | Nikon | Digital Camera |
| Coolpix 4100 | Nikon | Digital Camera | Coolpix 7600 | Nikon | Digital Camera |
| Coolpix 5200 | Nikon | Digital Camera | DMC-FX7 | Panasonic | Digital Camera |
| Stylus 410 digital Olympus Digital Camera | Dimage Xt | Minolta | Digital Camera | ||
| 300-digital | Olympus | Digital Camera | AZ-1 | Olympus | Digital Camera |
| 300-digital | Olympus | Digital Camera | |||
USB FLASH DISC
| Product | Company | Type | Product | Company | Type |
| Cruzer Micro | Sandisk | USB 2.0 USB Flash Drive 128M | XTICK | LG | USB 2.0 128M |
| Cruzer Mini | Sandisk | USB 2.0 128M | Micro Mini Iomega | USB 2.0 | 128M |
| Cruzer Mini | Sandisk | USB 2.0 256M | iFlash | Imation | USB 2.0 64M |
| SONY Micro Vault | Sony | USB 2.0 64MB | LG | XTICK(M) | USB 2.0 64M |
| FLEX DRIVE | Serotech | USB 2.0 32MB | RiDATA | EZDrive | USB 2.0 64M |
| AnyDrive | A.L tech | USB 2.0 128MB |
MP3 PLAYER
| Product | Company | Type | Product | Company | Type |
| Creative MuVo NX128M | Creative | 128 MB MP3 Player | YP-780 | Samsung | MP3 Player |
| Iriver H320 | Iriver | 20G HDD MP3 Player | YP-35 | Samsung | MP3 Player |
| YH-920 | Samsung | 20G HDD MP3 Player | YP-55 | Samsung | MP3 Player |
| YP-T7 | Samsung | MP3 Player | iAUDIO U2 | Cowon MP3 Player | |
| YP-MT6 | Samsung | MP3 Player | iAUDIO G3 | Cowon MP3 Player | |
| YP-T6 | Samsung | MP3 Player | iAudio M3 | Cowon | HDD MP3 Player |
| YP-53 | Samsung | MP3 Player | SI-M500L | Sharp | 256MB MP3 Player |
| YP-ST5 | Samsung | MP3 Player | H10 | Iriver | MP3 Player |
| YP-T5 | Samsung | MP3 Player | YP-T5 VB | Samsung | MP3 Player |
| YP-60 | Samsung | MP3 Player | YP-53 | Samsung | 256MB MP3 Player |
appendixappendix
CAUTIONS ON HANDLING AND STORING DISCS
Small scratches on the disc may reduce sound and picture quality or cause skipping.
Be especially careful not to scratch discs when handling them.
Handling discs
Do not touch the playback side of the disc.
Hold the disc by the edges so that fingerprints will not get on the surface.
Do not stick paper or tape on the disc.
Disc Storage
| Do not keep in direct sunlight | Keep in a cool ventilated area | Keep in a clean Protection jacket.Store vertically. |
 |  |  |

- Do not allow the discs to become contaminated with dirt.
- Do not load cracked or scratched discs.
Handling and Storing Discs
When you get fingerprints or dirt on the disc, clean it with a mild detergent diluted in water and wipe with a soft cloth.
- When cleaning, wipe gently from the inside to the outside of the disc

- Condensation may form if warm air comes into contact with cold parts inside the player. When condensation forms inside the player, the player may not operate correctly. If this occurs, remove the disc and let the player stand for 1 or 2 hours with the power on.
SPECIFICATIONS
| General | Power Consumption | 30 W | |
| Weight | 4.8 kg | ||
| Dimensions | 646(W) x 357(H) x 552(D) mm | ||
| Operating Temperature Range | +5°C ~ +35°C | ||
| Operating Humidity Range | 10 % to 75 % | ||
| Disc | DVD (Digital Versatile Disc) | Reading Speed: 3.49 ~ 4.06 m/sec. | |
| Approx. Play Time (Single Sided, Single Layer Disc): 135 min. | |||
| CD: 12 cm (COMPACT DISC) | Reading Speed: 4.8 ~ 5.6 m/sec. | ||
| Maximum Play Time: 74 min. | |||
| CD: 8 cm (COMPACT DISC) | Reading Speed: 4.8 ~ 5.6 m/sec. | ||
| Maximum Play Time: 20 min. | |||
| Video Output | Composite Video | 1.0 Vp-p (75 Ω load) | |
| Component Video | Y: 1.0 Vp-p (75 load) | ||
| Pr: 0.70 Vp-p (75 Ω load) | |||
| Pb: 0.70 Vp-p (75 Ω load) | |||
| Amplifier | Front speaker output | 20W x 2(3Ω) | |
| Subwoofer speaker output | 40W(6Ω) | ||
| Frequency range | 20Hz~30KHz | ||
| S/N Ratio | 70dB | ||
| Channel separation | 65dB | ||
| Input sensitivity | (AUX)400mV | ||
| Speaker | Speaker system | 2.1ch speaker system | |
| Front | Subwoofer | ||
| Impedance | 3 Ω | 6 Ω | |
| Frequency range | 175 Hz ± 20 % | 70 Hz ± 20 % | |
| Output sound pressure level | 79dB | 84dB | |
| Rated input | 40W | 40W | |
| Maximum input | 40W | 40W | |
| Dimensions (W x H x D) | Front: 181 x 569 x 261 mm | ||
| Weights | Front: 390 g | ||
*: Nominal specifi cation
- Samsung Electronics Co., Ltd reserves the right to change the specifications without notice.
- Weight and dimensions are approximate.
Contact SAMSUNG WORLD WIDE
If you have any questions or comments relating to Samsung products, please contact the SAMSUNG customer care center.
| Region Country Customer Care Center Web Site | |||
| North America | CANADA 1-800-SAMSUNG(726-7864) www.samsung.com/ca | ||
| MEXICO 01-800-SAMSUNG(726-7864) www.samsung.com | |||
| U.S.A 1-800-SAMSUNG(726-7864) www.samsung.com | |||
| Latin America | ARGENTINE 0800-333-3733 www.samsung.com/ar | ||
| BRAZIL 0800-124-421, 4004-0000 www.samsung.com | |||
| CHILE 800-SAMSUNG(726-7864) www.samsung.com/cl | |||
| NICARAGUA 00-1800-5077267 | |||
| HONDURAS 800-7919267 | |||
| COSTA RICA 0-800-507-7267 www.samsung.com/latin | |||
| ECUADOR 1-800-10-7267 www.samsung.com/latin | |||
| EL SALVADOR 800-6225 www.samsung.com/latin | |||
| GUATEMALA 1-800-299-0013 www.samsung.com/latin | |||
| JAMAICA 1-800-234-7267 www.samsung.com/latin | |||
| PANAMA 800-7267 www.samsung.com/latin | |||
| PUERTO RICO 1-800-682-3180 www.samsung.com/latin | |||
| REP. DOMINICA 1-800-751-2676 www.samsung.com/latin | |||
| TRINIDAD & TOBAGO 1-800-SAMSUNG(726-7864) www.samsung.com/latin | |||
| VENEZUELA 0-800-100-5303 www.samsung.com/latin | |||
| COLOMBIA 01-8000112112 www.samsung.com.co | |||
| Europe | BELGIUM 0032 (0)2 201 24 18 www.samsung.com/be | ||
| CZECH REPUBLIC 844 000 844Distributor pro Českou republiku: Samsung Zrt., Česka organizačni složka Vyskočilova 4, 14000 Praha 4 www.samsung.com/cz | |||
| DENMARK 70 70 19 70 www.samsung.com/dk | |||
| FINLAND 030-6227 515 www.samsung.com/fi | |||
| FRANCE 3260 SAMSUNG (€ 0,15/Min), 08 25 08 65 65 (€ 0,15/Min) www.samsung.com | |||
| GERMANY 01805 - SAMSUNG(726-7864) (€ 0,14/Min) www.samsung.com | |||
| HUNGARY 06-80-SAMSUNG(726-7864) www.samsung.com | |||
| ITALIA 800-SAMSUNG(726-7864) www.samsung.com | |||
| LUXEMBURG 0035 (0)2 261 03 710 www.samsung.com/oe | |||
| NETHERLANDS 0900-SAMSUNG(726-7864) (€ 0,10/Min) www.samsung.com/nl | |||
| NORWAY 815-56 480 www.samsung.com/no | |||
| POLAND 0 801 801 881, 022-607-93-33 www.samsung.com/pl | |||
| PORTUGAL 80820-SAMSUNG(726-7864) www.samsung.com/pt | |||
| SLOVAKIA 0800-SAMSUNG(726-7864) www.samsung.com/sk | |||
| SPAIN 902 10 11 30 www.samsung.com | |||
| SWEDEN 0771-400 200 www.samsung.com/se | |||
| U.K 0845 SAMSUNG (7267864) www.samsung.com | |||
| EIRE 0818 717 100 www.samsung.com/e | |||
| AUSTRIA 0800-SAMSUNG(726-7864) www.samsung.com/at | |||
| SWITZERLAND 0800-SAMSUNG(726-7864) www.samsung.com/ch | |||
| CIS | RUSSIA 8-800-555-55-55 www.samsung.com | ||
| KAZAHSTAN 8-10-800-500-55-500 www.samsung.kz | |||
| UZBEKISTAN 8-10-800-500-55-500 www.samsung.uz | |||
| KYRGYZSTAN 00-800-500-55-500 | |||
| TADJIKISTAN 8-10-800-500-55-500 | |||
| UKRAINE 8-800-502-0000 www.samsung.com | |||
| LITHUANIA 8-800-77777 www.samsung.lt | |||
| LATVIA 800-7267 www.samsung.com/lv | |||
| ESTONIA 800-7267 www.samsung.ee | |||
| Asia Pacific | AUSTRALIA 1300 362 603 www.samsung.com | ||
| NEW ZEALAND 0800SAMSUNG(726-7864) www.samsung.com/nz | |||
| CHINA 800-810-5858, 010-6475 1880 www.samsung.com | |||
| HONG KONG 3698-4698 www.samsung.com/hk | |||
| INDIA 3030 8282, 1800 110011 www.samsung.com | |||
| INDONESIA 0800-112-8888 www.samsung.com | |||
| JAPAN 0120-327-527 www.samsung.com/jp | |||
| MALAYSIA 1800-88-9999 www.samsung.com/my | |||
| PHILIPPINES 1800-10-SAMSUNG(726-7864) www.samsung.com/ph | |||
| SINGAPORE 1800-SAMSUNG(726-7864) www.samsung.com | |||
| THAILAND 1800-29-3232, 02-689-3232 www.samsung.com | |||
| TAIWAN 0800-329-999 www.samsung.com/tw | |||
| VIETNAM 1 800 588 889 www.samsung.com | |||
| Middle East & Africa | TURKEY 444 77 11 www.samsung.com | ||
| SOUTH AFRICA 0860-SAMSUNG(726-7864) www.samsung.com | |||
| U.A.E 800-SAMSUNG (726-7864), 8000-4726 www.samsung.com | |||
SAMSUNG
Système
Home cinéma
CLASS 1 LASER PRODUCT
natural_image
Illustration of a cylindrical device with a steaming control panel and a cross mark, no text or symbols present.natural_image
Illustration of a computer monitor with a power cord and cable, next to a window with a lightning bolt (no text or symbols)
natural_image
Illustration of a cylindrical object with a cross mark on top, placed above a table with a window and sun in the background (no text or symbols)Évitez d'exposer le
natural_image
Illustration of a remote control with a triangular pointer and a separate remote device (no text or symbols)natural_image
Simple line drawing of a rolled-up sheet being cut with an arrow indicating upward motion (no text or symbols)

natural_image
Simple line drawing of a roll being cut with a knife, no text or symbols presentnatural_image
Diagram showing a TV tower connected to a computer tower via cable (no text or symbols present)
natural_image
Diagram of a remote control panel with labeled ports and an inset showing internal layout (no text or symbols)natural_image
Illustration of a vertical electronic device with a cable inserted, no text or symbols present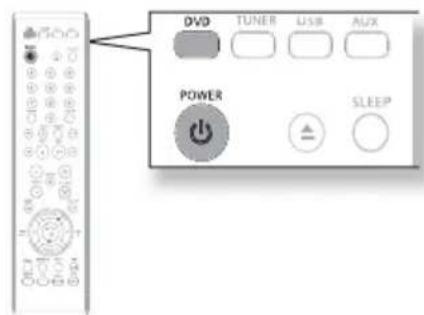
natural_image
Cartoon illustration of a girl holding a microphone, with no visible text or symbolsRotation

natural_image
Illustration of a stylized person with red hair and a book, no text or symbols presentZoom

natural_image
Illustration of a cartoon character holding a microphone, no text or symbols presentDiaporama

natural_image
Diagram showing a remote control with playback buttons and a separate play button (no text or symbols)Lecture lente


REPEAT : NON → REPEAT : CHAPITRE → REPEAT : TITRE → REPEAT : A-B


REPEAT : NON → REPEAT : PLAGE → REPEAT : FOLDER → REPEAT: ALÉATOIRE

REPEAT : NON → REPEAT : TITRE → REPEAT : FOLDER


natural_image
Diagram showing a device connected to a cable and a connector, next to a vertical electronic device (no text or symbols visible)Remarque
Lecture rapide
natural_image
Illustration of two people in a meeting, one holding a pen and the other speaking (no text or symbols visible)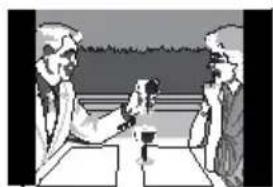
natural_image
Illustration of three people in a meeting setting with a table and a cup (no text or symbols visible)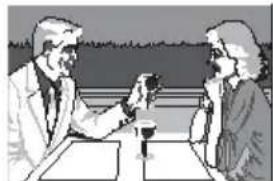
natural_image
Illustration of two people in a meeting, one holding a glass and the other speaking (no text or symbols visible)
MESSAGES ÉCRAN (SCREEN MESSAGES)
If you have any questions or comments relating to Samsung products, please contact the SAMSUNG customer care center.
natural_image
Illustration of a megaphone emitting steam from a computer (no text or symbols)natural_image
Illustration of a computer monitor with a power cord connected to a wall, next to a window with a lightning bolt (no text or symbols)natural_image
Illustration of a cylindrical object with a cross mark on top, placed on a table next to a window with sunburst patterns (no text or symbols)natural_image
Illustration of a vintage remote with antenna and control panel (no text or symbols)natural_image
Diagram of a folding paper or sheet with an arrow indicating upward motion (no text or symbols)natural_image
Simple line drawing of a roll being cut with a downward arrow (no text or symbols)natural_image
Diagram showing two electronic devices connected to a circuit board, with no visible text or symbols.
natural_image
Diagram of a remote control panel with labeled ports and an inset showing internal components (no text or symbols present)natural_image
Illustration of a vertical electronic device with a power outlet connected to its side, labeled '2.' (no text or symbols on the device itself)
natural_image
Illustration of a cartoon girl with red hair holding a microphone, wearing a white top and shorts (no text or symbols)Rotation

natural_image
Illustration of a person with a red hair tied to their head, holding a paper (no text or symbols present)REPRODUCCIÓN
Zoom

natural_image
Illustration of a cartoon girl holding a magnifying glass, with no visible text or symbolsSlideshow


REPEAT : OFF → REPEAT : CHAPTER → REPEAT : TITLE → REPEAT : A-B


REPEAT : OFF → REPEAT : TRACK → REPEAT : FOLDER → REPEAT : RANDOM

REPEAT : OFF → REPEAT : TITLE → REPEAT : FOLDER
natural_image
Illustration of a handheld device connected to a vertical electronic device (no text or symbols visible)Nota
Reproducción rápida
natural_image
Illustration of two people seated at a table with a small object, no visible text or symbols4:3 Pan&Scan
natural_image
Illustration of two men in conversation at a table, one holding a pen (no text or symbols visible)16:9 Panorámico
natural_image
Illustration of two people in a meeting, one holding a small object (no text or symbols visible)If you have any questions or comments relating to Samsung products, please contact the SAMSUNG customer care center.
- features
- Multi-Disc Playback & FM Tuner
- USB Host support
- TV Screen Saver Function
- Power Saving Function
- WHAT'S INCLUDED
- SAFETY WARNINGS
- CAUTION
- CLASS 1 LASER PRODUCT
- SAFETY INFORMATION
- GETTING STARTED
- DESCRIPTION
- REMOTE CONTROL
- CONNECTIONS
- BEFORE USING YOUR ROOM CINEMA
- PLAYBACK
- SYSTEM SETUP
- 35
- RADIO
- 42
- TROUBLESHOOTING
- 43
- USB HOST FEATURE SUPPORTED
- PRODUCTS
- 45
- APPENDIX
- 46
- About the use of this user's manual
- Copyright
- DO NOT USE THE FOLLOWING TYPES OF DISC!
- COPY PROTECTION
- ◆ CD-R Discs
- ◆ CD-R MP3 Discs
- ◆ CD-R JPEG Discs
- DVD±R/RW, CD-R/RW DivX Discs
- FRONT PANEL
- Operation Range of the Remote Control
- Insert Remote Batteries
- CONNECTING THE SPEAKERS
- Position of Digital Room Cinema
- Selecting the Listening Position
- Front Speakers L R
- CONNECTING THE VIDEO OUT TO YOUR TV
- METHOD 1 : Component Video
- METHOD 2 : Composite Video
- CONNECTING AUDIO FROM EXTERNAL COMPONENTS
- AUX : Connecting an External Component/MP3 player
- Cooling Fan
- The Room Cinema System
- To stop playback, press the STOP (■) button during playback.
- To temporarily pause playback, press the PAUSE (☐) button during playback.
- MP3/WMA-CD PLAYBACK
- To play a file icon in the screen,
- JPEG File Playback
- Picture CD Playback
- Rotation
- Zoom
- Slideshow
- DIVX PLAYBACK
- Skip Forward/Back
- Fast Playback
- Audio Display
- Subtitle Display
- DivX(Digital internet video eXpress)
- Supported Formats
- Caption Function
- USING THE PLAYBACK FUNCTION
- Displaying Disc Information
- View the Display
- Press the ▲ or ▼ button to select the desired item.
- Press the ◀ or ▶ button to make the desired setup, then press the ENTER button.
- To make the screen disappear, press the EXIT button again.
- Checking the Remaining Time
- Slow Playback
- Skipping Scenes/Songs
- Repeat Playback
- A-B Repeat Playback
- Step Function
- Audio Language Selection Function
- Subtitle Language Selection Function
- Using the Disc Menu
- Using the Title Menu
- PLAYING MEDIA FILES USING THE USB HOST FEATURE
- Using the USB HOST feature
- Note
- Safe USB Removal
- Compatible Devices
- SETTING THE LANGUAGE
- SETTING THE AUDIO
- • Dynamic Compression :
- - PCM Down Sampling:
- SETTING TV SCREEN TYPE
- Adjusting the TV Aspect Ratio (Screen Size)
- 4:3 Letter box
- 4:3 Pan&Scan
- 16:9 WIDE
- STILL MODE
- SCREEN MESSAGES
- TV SYSTEM
- VIDEO OUTPUT
- BLACK LEVEL
- SETTING THE PASSWORD PARENTAL CONTROLS
- If you have forgotten the rating level password, do the following
- SETTING (RATING LEVEL)
- CHANGE PASSWORD
- DVIX (R) REGISTRATION
- SETTING THE DRC (DYNAMIC RANGE COMPRESSION)
- SETTING THE EQUALIZER FUNCTION
- LISTENING TO RADIO
- To Scan the frequency
- To change the preset value
- To save the frequency value as a preset mode.
- USB host feature supported products
- appendixappendix
- CAUTIONS ON HANDLING AND STORING DISCS
- Handling discs
- Handling and Storing Discs
- Contact SAMSUNG WORLD WIDE
- Système
- Home cinéma
- Diaporama
- Lecture lente
- Remarque
- Lecture rapide
- MESSAGES ÉCRAN (SCREEN MESSAGES)
- REPRODUCCIÓN
- Nota
- Reproducción rápida
- 16:9 Panorámico
Brand : SAMSUNG
Model : RTS-E10T
Category : Home Theater System