Sonata DV30 - DVD player CAMBRIDGE - Free user manual and instructions
Find the device manual for free Sonata DV30 CAMBRIDGE in PDF.


| Product Type | DVD Player |
| Brand | Cambridge |
| Model | Sonata DV30 |
| Dimensions (W x D x H) | 430 x 245 x 43 mm |
| Weight | 2.5 kg |
| Power Supply | AC 100-240V, 50/60 Hz |
| Power Consumption | 10 W (standby <1 W) |
| Disc Compatibility | DVD, DVD±R/RW, CD, CD-R/RW, VCD, SVCD, MP3, JPEG |
| Video Outputs | Composite video, S-Video, Component video, HDMI |
| Audio Outputs | Stereo analog, Coaxial digital, Optical digital |
| Playback Functions | Play, Pause, Stop, Skip, Fast Forward, Slow Motion, Zoom, Repeat |
| Remote Control | Included (IR, range 7 m) |
| Parental Control | Yes (password-protected rating limits) |
| Audio Decoders | Dolby Digital, DTS, PCM |
| Maintenance | Clean lens with soft cloth; avoid moisture and extreme temperatures |
| Safety | Do not open cover, keep away from liquids, use only in dry location |
| Spare Parts | Remote control (model CR-DV30), power cord |
| Repairability | Refer to qualified service center; no user-serviceable parts |
| General Information | Free user manual available for download in PDF |
Frequently Asked Questions - Sonata DV30 CAMBRIDGE
User questions about Sonata DV30 CAMBRIDGE
0 question about this device. Answer the ones you know or ask your own.
Ask a new question about this device
Download the instructions for your DVD player in PDF format for free! Find your manual Sonata DV30 - CAMBRIDGE and take your electronic device back in hand. On this page are published all the documents necessary for the use of your device. Sonata DV30 by CAMBRIDGE.
USER MANUAL Sonata DV30 CAMBRIDGE

Cambridge Audio
Your music + our passion
Cambridge Audio
Make sure you register your purchase.
Visit: www.cambridge-audio.com/sts
By registering, you'll be the first to know about:
● Future product releases
●Software upgrades
● News, events and exclusive offers plus competitions!
This guide is designed to make installing and using this product as easy as possible. Information in this document has been carefully checked for accuracy at the time of printing; however, Cambridge Audio's policy is one of continuous improvement, therefore design and specifications are subject to change without prior notice.
This document contains proprietary information protected by copyright. All rights are reserved. No part of this manual may be reproduced by any mechanical, electronic or other means, in any form, without prior written permission of the manufacturer. All trademarks and registered trademarks are the property of their respective owners.
© Copyright Cambridge Audio Ltd 2009
iPod is a trademark of Apple Inc., registered in the U.S. and other countries.
Contents
Introduction....3
Important safety instructions....4
Limited warranty....7
Rear panel connections 8
Front panel controls ....10
Front panel display 11
Remote control 12
Analogue video connections....14
HDMI connections....15
Audio connections....16
Surround-sound formats 17
Video formats ....18
DVD player setup....18
Video setup menu 19
Audio setup menu 23
Dolby Digital setup menu....24
Preference menu....25
Basic operating instructions....26
DivX/MP4 playback....28
Troubleshooting....30
Technical specifications....31
Introduction
Thank you for purchasing this Cambridge Audio Sonata DV30 DVD/CD player. Like all Cambridge Audio products, the Sonata DV30 adheres to three core principles – stunning performance, ease of use and incredible value.
The new Sonata DV30 was designed from the ground up based on a new and highly evolved DVD chipset, which includes the ability to reproduce a progressive scan image in both PAL and NTSC formats via either analog component video or digital HDMI output. Great care has been taken with both the digital and analog video circuitry to achieve the best possible audio and video performance, whichever connection you use. A Digital to Analog converter IC from Wolfson ensures audiophile replay of DVD or CD soundtracks. The HDMI output is also capable of up-scaling DVDs to the latest 720p, 1080i or 1080p video formats for use with HD TV sets.
Your Sonata DV30 can only be as good as the system it is connected to and we particularly recommend equipment from the Cambridge Audio Sonata range. The matching AR30 (FM/AM, and Sirius radio-ready in the US) and DR30 (DAB/FM) 2.1 channel receivers have been designed together with the DV30. Both of these feature trigger outputs to sync with your DV30, and can be seamlessly controlled with your DV30 from one remote. They also are supplied with a matching DD30 dock for iPod. Your speakers are an important part of the equation and we recommend speakers from our Sirocco range which have been designed to the same exacting standards as this product and are a perfect acoustic and aesthetic match.
Thank you for taking the time to read this manual; we recommend that you keep it for future reference.

Matthew Bramble,
Cambridge Audio Technical Director and the Sonata design team
Cambridge Audio
Important safety instructions
For your own safety please read the following important safety instructions carefully before attempting to connect this unit to the mains power supply. They will also enable you to get the best performance from and prolong the life of the unit:
-
Read these instructions.
-
Keep these instructions.
-
Heed all warnings.
-
Follow all instructions.
-
Do not use this apparatus near water.
-
Clean only with a dry cloth.
-
Do not block any ventilation openings. Install in accordance with the manufacturer's instructions.
-
Do not install near any heat sources such as radiators, heat registers, stoves, or other apparatus (including amplifiers) that produce heat.
-
Do not defeat the safety purpose of the polarized or grounding-type plug. A polarized plug has two blades with one wider than the other. A grounding-type plug has two blades and a third grounding prong. The wide blade or the third prong are provided for your safety. If the provided plug does not fit into your outlet, consult an electrician for replacement of the obsolete outlet.
-
Protect the power cord from being walked on or pinched, particularly at plugs, convenience receptacles and the point where they exit from the apparatus.
-
Only use attachments/accessories specified by the manufacturer.
-
Use with only the cart, stand, tripod, bracket, or table specified by the manufacturer, or sold with the apparatus. When a cart is used, use caution when moving the cart/ apparatus combination to avoid injury from tip-over.
-
Unplug this apparatus during lightning storms or when unused for long periods of time.
-
Refer all servicing to qualified service personnel. Servicing is required when the apparatus has been damaged in any way, such as the power supply cord or plug having been damaged, liquid has been spilled or objects have fallen into the apparatus, the apparatus has been exposed to rain or moisture, does not operate normally, or has been dropped.
WARNING - To reduce the risk of fire or electric shock, do not expose this unit to rain or moisture.
The unit must be installed in a manner that makes disconnection of the mains plug from the mains socket outlet (or appliance connector from the rear of the unit) possible. Where the mains plug is used as the disconnect device, the disconnect device shall remain readily operable. Only use the mains cord supplied with this unit.
Please ensure there is ample ventilation (at least 10cm clearance all round). Do not put any objects on top of this unit. Do not situate it on a rug or other soft surface and do not obstruct any air inlets or outlet grilles. Do not cover the ventilation grilles with items such as newspapers, tablecloths, curtains, etc.
This unit must not be used near water or exposed to dripping or splashing water or other liquids. No objects filled with liquid, such as vases, shall be placed on the unit.


| CAUTION | AVIS | ACHTUNG |
| Risk of electric shock.Do not open. | Risque de choc électrique.Ne pas ouvrir. | Vorm öffnen des gorâtes.Netzstecker ziehen. |

The lightning flash with the arrowhead symbol within an equilateral triangle is intended to alert the user to the presence of un-insulated 'dangerous voltage' within the product's enclosure that may be of sufficient magnitude to constitute a risk of electric shock to persons.
The exclamation point within an equilateral triangle is intended to alert the user to the presence of important operating and maintenance instructions in the service literature relevant to this appliance.

The symbol on this product indicates that it is of CLASS II (double insulated) construction.

WEEE symbol
The crossed-out wheeled bin is the European Union symbol for indicating separate collection for electrical and electronic equipment. This product contains electrical and electronic equipment which should be reused, recycled or recovered and should not be disposed of with unsorted regular
waste. Please return the unit or contact the authorised dealer from whom you purchased this product for more information.

CE mark
This product complies with European Low Voltage (2006/95/EC) and Electromagnetic Compatibility (2004/108/EEC) Directives when used and
installed according to this instruction manual. For continued compliance only Cambridge Audio accessories should be used with this product and servicing must be referred to qualified service personnel.

C-Tick mark
This product meets the Australian Communications Authority's Radio communications and EMC requirements.

Ross Test Stamp
This product meets Russian electronic safety approvals.
FCC regulations
NOTE: THE MANUFACTURER IS NOT RESPONSIBLE FOR ANY RADIO OR TV INTERFERENCE CAUSED BY UNAUTHORIZED MODIFICATIONS TO THIS EQUIPMENT. SUCH MODIFICATIONS COULD VOID THE USER AUTHORITY TO OPERATE THE EQUIPMENT.

This equipment has been tested and found to comply with the limits for a Class B digital device, pursuant to Part 15 of the FCC Rules. These limits are designed to provide reasonable protection against harmful
Interference in a residential installation. This equipment generates, uses and can radiate radio frequency energy and, if not installed and used in accordance with the instructions, may cause harmful interference to radio communications. However, there is no guarantee that interference will not occur in a particular installation.
If this equipment does cause harmful interference to radio or television reception, which can be determined by turning the equipment off and on, the user is encouraged to try to correct the interference by one or more of the following measures:
- Re-orient or relocate the receiving antenna.
- Increase the separation between the equipment and receiver.
- Connect the equipment into an outlet on a circuit different from that to which the receiver is connected.
- Consult the dealer or an experienced radio/TV technician for help.
Cambridge Audio
Important safety instructions (continued)
Ventilation
IMPORTANT - The unit will become hot when in use. Do not stack multiple units on top of each other. Do not place in an enclosed area such as a bookcase or in a cabinet without sufficient ventilation.
Ensure that small objects do not fall through any ventilation grille. If this happens, switch off immediately, disconnect from the mains supply and contact your dealer for advice.
Positioning
Choose the installation location carefully. Avoid placing it in direct sunlight or close to a source of heat. No naked flame sources, such as lighted candles, should be placed on the unit. Also avoid locations subject to vibration and excessive dust, cold or moisture. The unit can be used in a moderate climate.
This unit must be installed on a sturdy, level surface. Do not place in a sealed area such as a bookcase or in a cabinet. Any space open at the back (such as a dedicated equipment rack) is fine however. Do not place the unit on an unstable surface or shelf. The unit may fall, causing serious injury to a child or adult as well as serious damage to the product. Do not place other equipment on top of the unit.
Due to stray magnetic fields turntables or CRT TVs should not be located nearby due to possible interference.
Electronic audio components have a running in period of around a week (if used several hours per day). This will allow the new components to settle down, the sonic properties will improve over this time.
Power sources
The unit should be operated only from the type of power source indicated on the marking label. If you are not sure of the type of power supply to your home, consult your product dealer or local power company.
This unit has been designed to be left in Standby mode when not in use, this will increase the life of the unit (this is true with all electronic equipment). To turn the unit off, switch off at the rear panel. If you do not intend to use this unit for a long period of time, unplug it from the mains socket.
Overloading
Do not overload wall outlets or extension cord as this can result in a risk of fire or electric shock. Overloaded AC outlets, extension cords, frayed power cords, damaged or cracked wire insulation, and broken plugs are dangerous. They may result in a shock or fire hazard.
Be sure to insert each power cord securely. To prevent hum and noise, do not bundle the interconnect leads with the power cord or speaker leads.
Cleaning
To clean the unit, wipe its case with a dry, lint-free cloth. Do not use any cleaning fluids containing alcohol, ammonia or abrasives. Do not spray an aerosol at or near the unit.
Battery disposal
Batteries may contain substances harmful to the environment. Please dispose of any discharged batteries with due consideration and in accordance with local environmental/electronic recycling guidelines.
Loudspeakers
Before making any connections to loudspeakers, make sure all power is turned off and only use suitable interconnects.
Servicing
These units are not user serviceable, never attempt to repair, disassemble or reconstruct the unit if there seems to be a problem. A serious electric shock could result if this precautionary measure is ignored. In the event of a problem or failure, please contact your dealer.
Limited warranty
Cambridge Audio warrants this product to be free from defects in materials and workmanship (subject to the terms set forth below). Cambridge Audio will repair or replace (at Cambridge Audio's option) this product or any defective parts in this product. Warranty periods may vary from country to country. If in doubt consult your dealer and ensure that you retain proof of purchase.
To obtain warranty service, please contact the Cambridge Audio authorised dealer from which you purchased this product. If your dealer is not equipped to perform the repair of your Cambridge Audio product, it can be returned by your dealer to Cambridge Audio or an authorised Cambridge Audio service agent. You will need to ship this product in either its original packaging or packaging affording an equal degree of protection.
Proof of purchase in the form of a bill of sale or receipted invoice, which is evidence that this product is within the warranty period, must be presented to obtain warranty service.
This Warranty is invalid if (a) the factory-applied serial number has been altered or removed from this product or (b) this product was not purchased from a Cambridge Audio authorised dealer. You may call Cambridge Audio or your local country Cambridge Audio distributor to confirm that you have an unaltered serial number and/or you purchased from a Cambridge Audio authorised dealer.
This Warranty does not cover cosmetic damage or damage due to acts of God, accident, misuse, abuse, negligence, commercial use, or modification of, or to any part of, the product. This Warranty does not cover damage due to improper operation, maintenance or installation, or attempted repair by anyone other than Cambridge Audio or a Cambridge Audio dealer, or authorised service agent which is authorised to do Cambridge Audio warranty work. Any unauthorised repairs will void this Warranty. This Warranty does not cover products sold AS IS or WITH ALL FAULTS.
REPAIRS OR REPLACEMENTS AS PROVIDED UNDER THIS WARRANTY ARE THE EXCLUSIVE REMEDY OF THE CONSUMER. CAMBRIDGE AUDIO SHALL NOT BE LIABLE FOR ANY INCIDENTAL OR CONSEQUENTIAL DAMAGES FOR BREACH OF ANY EXPRESS OR IMPLIED WARRANTY IN THIS PRODUCT. EXCEPT TO THE EXTENT PROHIBITED BY LAW, THIS WARRANTY IS EXCLUSIVE AND IN LIEU OF ALL OTHER EXPRESS AND IMPLIED WARRANTIES WHATSOEVER INCLUDING, BUT NOT LIMITED TO, THE WARRANTY OF MERCHANTABILITY AND FITNESS FOR A PRACTICAL PURPOSE.
Some countries and US states do not allow the exclusion or limitation of incidental or consequential damages or implied warranties so the above exclusions may not apply to you. This Warranty gives you specific legal rights, and you may have other statutory rights, which vary from state to state or country to country.
For any service, in or out of warranty, please contact your dealer.
Plug Fitting Instructions (UK Only)
The cord supplied with this appliance is factory fitted with a UK mains plug fitted with a 3 amp fuse inside. If it is necessary to change the fuse, it is important that a 3 amp one is used. If the plug needs to be changed because it is not suitable for your socket, or becomes damaged, it should be cut off and an appropriate plug fitted following the wiring instructions below. The plug must then be disposed of safely, as insertion into a mains socket is likely to cause an electrical hazard. Should it be necessary to fit a 3-pin BS mains plug to the power cord the wires should be fitted as shown in this diagram. The colours of the wires in the mains lead of this appliance may not correspond with the coloured markings identifying the terminals in your plug. Connect them as follows:
The wire which is coloured BLUE must be connected to the terminal which is marked with the letter 'N' or coloured BLACK.
The wire which is coloured BROWN must be connected to the terminal which is marked with the letter 'L' or coloured RED.
If a standard 13 amp (BS 1363) plug is used, a 3 amp fuse must be fitted, or if any other type of plug is used a 3 amp fuse must be fitted, either in the plug or adaptor, or on the distribution board.

Cambridge Audio
Rear panel connections

① Power On/Off
Switches the unit on or off.
② AC power socket
Once you have completed all connections, plug the AC power cable into an appropriate mains socket then switch on. Your unit is now ready for use.
Note: The preferred connection method for video sources is always HDMI (highest quality, and can also carry audio in some circumstances), then Component Video, RGB/SCART, S-Video, and Composite Video (lowest quality). The HDMI and Component outputs also support Progressive Scan which gives better picture quality if supported by your TV.
③ HDMI Out
HDMI (High-Definition Multi-Media Interface) is a purely digital connection that can carry both audio and video. Use a dedicated HDMI cable to connect to a TV or monitor with a compatible HDMI input.
④ Analogue Video Outputs
Composite - Connect to your television via 75ohm RCA/phono cable designed specifically for video use.
S-Video - Connect to your television via dedicated S-Video cable.
Component - Connect to the YCbCr or YPbPr terminals (often coloured Red-Green-Blue) of a television set via three 75 ohm RCA/phono cables designed specifically for video use.
Note: Component is enabled by default - 720p (50Hz) for PAL, or 720p (60Hz) for NTSC.
⑤ SCART RGB
Use a SCART/Peritel cable to connect to the 21-pin SCART input jack of a TV. SCART carries both audio (stereo) and video (as either Composite or RGB) at the same time. With SCART RGB enabled, RGB and composite signals are output simultaneously via the SCART socket. Your television will automatically select RGB (the better quality signal) if it is able to support this signal. If you are having difficulty in obtaining an RGB picture on your TV screen or want to check which SCART socket of your TV is suitable, please consult your television manual.
Note: If RGB output via SCART is desired, then HDMI output must be set to 'Off' (HDMI Resolution option) and SCART RGB must be selected instead of Component output (Scart/Component option) in the Video Setup Menu.
⑥ Trigger In
The DV30 can be turned on and off (i.e. brought in and out of Standby mode) by the presence of 5-12V DC at the Trigger input. The matching Sonata AR30 or DR30 2.1 receivers have a suitable output which provides such a trigger allowing them to automatically turn the DV30 on or off as required.
⑦ Digital Outputs
Digital audio outputs can be used to connect to a suitable Audio/Video Receiver for surround sound decoding (output must be set for 'RAW Bitstream' – refer to the Audio Setup section). These outputs can also be used to connect to a separate DAC or digital recording device (output must be set for 'PCM Stereo' – see Audio Setup section).
Note: The HDMI output can also carry surround sound or stereo audio (as well as video). See the Audio Setup Menus section on page 23 for details.
Toslink Optical - Use a high quality TOSLINK fibre optic cable. S/P DIF Co-axial Digital - Use a high quality 75 ohm digital RCA/Phono interconnect cable designed specifically for digital audio use.
Important: To achieve the best results, we always recommend using high quality Cambridge Audio leads which carry a lifetime guarantee.
⑧ 2.1 Channel Audio Out
These sockets provide 2.1 output, i.e. stereo plus sub. They can be used to connect to the 2.1 audio line-level inputs of an amplifier, AV receiver or amplified speaker package as required.
Important Note


This unit has been designed to play video DVDs, compact discs, recordable CDs (CD-R) and rewritable CDs (CD-RW) bearing the identification logos shown here. No other discs can be used. The CD-R/CD-RW discs should contain properly recorded TOC (Table of Contents) information so that they can be played back. This unit can play only the discs recorded in the CD-DA format designed for music reproduction. Do not attempt to play a disc containing other data, such as a CD-ROM for PCs with mp3 or WMA files, on this unit.
Cambridge Audio
Front panel controls

① Standby/On
Switches the unit between Standby mode (indicated by dim power LED) and On (indicated by bright power LED). Standby is a low power mode where the power consumption is less than 10 Watts. The unit may be left in Standby mode when not in use.
② Infrared sensor
Receives IR commands from the supplied remote control. A clear unobstructed line of sight between the remote control and the sensor is required.
③ Stop/Eject
Press to open or close the disc tray. When a disc is playing, press once to stop playback. Pressing Play will resume playback from the same position. Press Stop again to fully stop playback, and again to eject the disc tray.
④ Disc tray
DVD/Compact Disc tray. Use the Stop/Eject button to open or close the tray.
⑤ Display
Used to display the Sonata DV30's functions and playback state, etc.
⑥ Play/Pause
Plays the disc and pauses (freezes) playback.
⑦ Skip
Press repeatedly to skip between tracks or chapters.
Sonata | DV30
Front panel display

flowchart
graph LR
    A["<<"] --> B["TITLE"]
    B --> C["CHP"]
    C --> D["<<"]
    D --> E["DIGITAL"]
    E --> F["<<"]
    F --> G["<<"]
    G --> H["<<"]
    H --> I["<<"]
    I --> J["<<"]
    J --> K["<<"]
    K --> L["<<"]
    L --> M["<<"]
    M --> N["<<"]
    N --> O["<<"]
    O --> P["<<"]
    P --> Q["<<"]
    Q --> R["<<"]
    R --> S["<<"]
    S --> T["<<"]
    T --> U["<<"]
    U --> V["<<"]
    V --> W["<<"]
    W --> X["<<"]
    X --> Y["<<"]
    Y --> Z["<<"]
① Title/Chapter
Indicates the chapter title and chapter number fields.
② Time
Shows the hour, minutes and seconds of DVD playback elapsed.
③ Decoding mode indicator
Indicates a Dolby Digital Soundtrack is being decoded and downmixed to 2.1 output.
④ Playback
Shows when the disc is being played or paused.
⑤ Main information display
Used to display the various functions of the unit.
Cambridge Audio
Remote control
The DV30 is supplied with a Navigator remote control which operates this unit. In addition it can also operate a matching AR30 or DR30 2.1 receiver and their supplied docking station for iPod, and/or a CD30 CD player. Always use alkaline batteries.
Important!
The default mode for remote operation is multi-functional control.
To control the DV30 in this mode, first press the DVD button on the remote (which also selects the DVD source).
To control other functions of an AR30 or DR30, their built-in tuners, DD30 dock for iPod or a CD30, first press the required source (e.g. MP3 for iPod, CD for CD30, etc.) to select the right mode.
If you do not have an AR30 or DR30, you can lock your remote to DV30 control. This means that you do not need to press the DVD button to access DV30 control. Hold down the DVD button whilst inserting the batteries to lock the remote to DV30 control mode. To restore the default mode, remove the batteries and allow a five-minute interval before re-inserting them.
Open/Close
Press to open or close the disc tray.
Standby/On
Switches the unit between low-power Standby and On modes.
Numerical buttons
Press the number of a desired chapter or track to go directly to it. To select a number greater than ten, press 10+ once followed by the second digit (e.g. to select 15 press 10+ followed by 5). To select a number greater than 20, press 10+ twice followed by the second digit (e.g. to select 23 press 10+ twice followed by 3). These buttons can also be used to select tuner presets on an AR30 or DR30, or tracks on a CD30.
Return
Press to return to the previous operation in any disc setup menu.

Angle
Press to access various camera angles (if available on the DVD disc).
Subtitle
Press repeatedly to scroll through different language Subtitles (if available on the DVD disc).
Brightness
Switches the display brightness between bright and dim.
▲▼◄►Navigation
Press the directional arrows to move around the Setup menus.
Enter
Press to accept the item or function highlighted in the display menu.
Disc Title
Press to access the DVD's Title menu. This is usually the root menu from where the film can be started or where navigation to scene selections or special features, etc., can be made.
Disc Menu
Press to go to a DVD disc's own setup menu.
Setup
Press to enter the DV30's Setup menu. Please refer to the DVD Player Setup section of this manual for more information.
Audio
Press to access alternate audio soundtracks on the DVD (if available on the DVD disc).
Play/Pause
Press to begin or pause playback.*
Stop
Press to stop DVD playback.*
In MP3 mode, press to access an iPod menu. This feature is accessible only when the iPod is inserted in a DD30 dock connected to either an AR30 or DR30 receiver.
Skip/Scan
Right Skip - Press once to skip forward by one track or chapter on the disc. Press and hold to skip forwards through several tracks.*
Left Skip - Press once to skip backward by one track or chapter on the disc. Press and hold to skip backwards through several tracks.*
Shuffle
Press to activate the shuffle function of an iPod (when inserted in a DD30 dock) or CD30 CD player.*
Repeat
Press to play repeatedly a single chapter or title on a DVD video or a single track or entire disc on a CD. The first press (DVD/CD) selects Chapter/Track repeat, the second press (DVD/CD) selects Title/Disc repeat, the third press (DVD only) selects All repeat.*
Slow
When playing a DVD, press repeatedly to cycle through the various speeds of slow motion, forwards and back to normal speed.
Info
While playing a DVD, press to cycle through the information options (Title Elapsed, Title Remain, Chapter Elapsed, Chapter Remain, Display Off) displayed on the screen.
* These buttons perform the same function on a CD30 CD player or an iPod (inserted in a DD30 dock) when connected to an AR30 or DR30 receiver.
The following buttons are used to control functions of the matching AR30 or DR30 receivers and do not control the DV30 itself:
Alarm/Clock
Press to access the alarm and sleep menus.
Mute
Mutes the audio. Press again to cancel mute.
Volume
Increase or decrease the volume of the amplifier.
Tone/Balance
Press repeatedly to access the Bass, Treble and Balance menus of the AR30 or DR30. Use the volume buttons to make an adjustment.
Source buttons (CD, DVD, Aux, Tuner, MP3, Band)
Press relevant source button to select desired input source.
Cambridge Audio
Analogue video connections
The DV30 can output video in both fully digital (HDMI) and analogue (Composite, S-Video, SCART RGB and Component) formats. If your TV set supports HDMI, this is the preferred format (see HDMI Connections on page 15).
If your TV set supports only analogue video, the preferred connection is (in declining order of quality) Component, RGB/SCART, S-Video and lastly Composite.
① Component - Connect with 75ohm Component video cables (3RCA-3RCA, usually coloured Red-Green-Blue).
② SCART RGB – Connect with a dedicated Scart Audio/Video cable.
③ S-Video - Connect with S-Video cable.
④ Composite – Connect with single 75ohm video phono cable (RCA-RCA, usually coloured Yellow).

HDMI connections
HDMI (High-Definition Multi-Media Interface) is a digital connection that can carry both audio and video in one cable. Direct digital transfer of video and support for various types of High Definition video content make this the best connection type for picture quality.
As HDMI can carry both digital audio and video, HDMI can also be used to connect to AV receivers that support this function to allow decoding of surround-sound, etc. In the diagram at right, option 1 shows direct connection to a TV while option 2 shows connection via a surround-sound receiver with HDMI In/Out.
DVI (Digital Video Interface) output can be supported simply by using DVI-to-HDMI adaptors as these two connection types are compatible. When using DVI, only video will be passed to the TV or monitor. A separate analogue or digital audio connection would then need to be made from the DV30 to the AV receiver or TV.

* If your AV receiver can switch HDMI but not receive audio in this way, an additional SPDIF or TOSlink cable will be required.
① Direct connection to a TV
② Connection to a TV via an AV receiver
Cambridge Audio
Audio connections
Three types of audio connection can be made between the Sonata DV30 and your stereo or AV system:

① Analogue stereo (with or without subwoofer)
The Sonata DV30 is capable of playing Dolby Digital or LPCM soundtracks itself and outputting these as analogue 2.1. To connect to a stereo receiver (such as the matching AR30 or DR30) or amplified speaker system, use stereo phono/RCA cables as shown.
If you have an AR30 or DR30 and subwoofer, you can also connect the DV30's subwoofer output to the receiver's subwoofer input, and the receiver's subwoofer output to your subwoofer.
② Digital audio
The digital audio outputs can be used to send the surround-sound soundtracks of DVDs to an external AV receiver (Note: SPDIF output must be set to 'RAW Bitstream' in the Audio Setup menu). The Sonata DV30 sends an undecoded audio bitstream to the AV receiver for decoding into 5.1, 6.1 or 7.1, etc.
Either a 75ohm co-axial cable designed for digital audio or a TOSlink fibre optic cable should be used (only one at a time).
Note: It is also possible to output stereo digital audio from the Digital Outputs for recording on conventional CD-R/MD machines, etc. See the section on DVD player setup for more information.
③ HDMI
The HDMI output can send audio and video either directly to a TV or via an AV receiver for decoding surround-sound, etc. See page 15 for more information.

Surround-sound formats
Via its analogue outputs, the DV30 can play back CDs and DVDs in stereo or 2.1 output when they have been encoded with Dolby Digital (5.1), Dolby Digital EX (6.1), ProLogic II or IIX, or LPCM soundtracks.
In all cases, the DV30 will decode the soundtrack and output it as 2.1 (stereo plus sub). Because it is a stereo unit, it cannot decode to 5.1, 6.1 or 7.1 outputs.
However, the machine is able to send a raw bitstream version of any soundtrack via its digital outputs for decoding by an external AV receiver (such as Cambridge Audio's 640R). This allows the decoding of the many surround-sound formats available in 5.1, 6.1 or 7.1 and beyond.
A brief guide to common surround-sound formats you may encounter follows:
DOLBY DIGITAL
Dolby Digital (5.1)
This is the mandatory soundtrack encoding for DVD movies. Also known as DD (3/2) or DD 5.1, DD provides (up to) 5.1 output from suitably encoded Dolby Digital DVDs. There are five main channels (Front Left, Front Right, Centre, Surround Left, Surround Right) and a Low Frequency Effects Channel for the subwoofer, all discretely encoded. Decoding of Dolby Digital to full 5.1 requires a Dolby Digital encoded DVD disc (nearly all DVDs) and a digital connection from the DV30 to a suitable AV Receiver. The DV30 itself can also decode DD 5.1 soundtracks into analogue 2.1 only.
Note: Dolby Digital and DTS formats can sometimes carry fewer channels than their maximum, e.g. Dolby Digital (2/0), in which case a Dolby Digital encoded signal is only carrying a two-channel stereo signal (other channels inactive). This is dependent on the way the DVD has been encoded during manufacture.
DOLBY DIGITAL·EX
Dolby Digital EX
Also known as DD (3/3) or DD 6.1, this is an enhanced form of Dolby Digital. In addition to the discretely encoded 5.1 channels, DD EX provides an extra sixth channel (Surround Back, giving 6.1 or 7.1 with mono rear surrounds) matrix encoded into the rear surrounds. Decoding Dolby Digital EX requires a Dolby Digital EX-encoded DVD disc and a digital connection from the DV30 to a suitable AV receiver that can decode this format. The DV30 will decode DD 6.1 soundtracks into analogue 2.1 only.
DOLBY DIGITAL PROLOGICII
Dolby ProLogic II
ProLogic II is a Dolby technology whereby five channels (Front Left, Front Right, Centre, Surround Left and Surround Right) are encoded into a Stereo mix by an analogue matrix process. This mix will just be played back as normal Stereo by equipment such as the DV30 that does not decode PLII (as Stereo + Sub in the DV30's case).
Decoding PLII soundtracks to five channels requires an analogue or digital connection from the DV30 to a suitable surround-sound processor able to decode this format.




DTS 5.1, DTS-ES 6.1 Matrix, DTS-ES 6.1 Discrete, DTS Neo:6, DTS 96/24
Various DTS technologies providing (up to) 5.1/6.1 (and 7.1 with mono rear surrounds) output from suitably encoded DTS material. Some newer DVDs carry both the mandatory DD and an optional DTS surround encoding on alternative audio tracks.
The DV30 cannot decode these optional DTS formats itself but is able to pass them, via its digital outputs, for decoding externally by a suitable AV receiver. Decoding DTS requires a suitably encoded DTS disc and a digital connection from the DV30 to an AV Receiver capable of decoding the appropriate DTS encoding type.
Cambridge Audio
Video formats DVD player setup

DVDs are encoded using the MPEG 2 lossy video format giving over two hours of high-quality digital video on single layer discs or over four hours on dual-layer discs.
Note: Dual layer discs always exhibit a small pause or delay in playback when the layer transition is made.
As well as the video itself, DVDs are also capable of storing up to eight alternative tracks of digital audio, 32 subtitle tracks and nine camera angles (where used by the film producers).
DIVX MP4
DivX is an even more compressed (than normal DVD) digital video format, rather like MP3 for video. DivX compresses the video data to a fraction of its original size using the more lossy MPEG 4 Part 2 compression. DivX enhances the basic MP4 encoding by allowing extra features on the disc and various levels of quality or compression to be applied at the encoding stage.
DivX or basic raw MPEG 4 files are supported by the DV30 on either CD or DVD discs.
The DV30 may also be able to play MP4 type files created with other CODEC programs (such as Xvid ® ), but playback of these is not guaranteed.
Press Setup on the remote control to enter the DV30 Setup menus:

The DV30's on-screen Setup menu is available on all video outputs. Note: The default setting for the HDMI output is 'Enabled'.
Video setup menu
Running along the top of the screen are icons that represent the four main menu sections:

Video Setup

Audio Setup

Dolby Digital Setup

Preference Setup*
* Note: To enter the Preferences menu, the unit must first be in Stop mode.
Press Setup to enter the menu system. Use the Navigation arrows (▲▼◀▶) on the remote to highlight the icon at the top of the screen for the main menu you want to select and then press either Enter or ▼ to go into that menu and select its first sub-menu. You can now navigate to each sub-menu item you might want to change using ▲▼, and then ◀▶ to select settings.
The yellow highlight always shows the menu or setting you have navigated to, the orange/brown highlight shows the current setting that is being used. Pressing Enter stores a highlighted setting as the new one to use. To navigate out of a sub-menu, press ◆ to move to the sub-menu list if necessary and ◆ again to move back to the main menu list. You can now use ◆ ▶ to select a new main menu.
Note: Some setup is inter-related with other setup items and if the enabling of one function automatically disables another, the disabled function will appear grey and cannot be set.
Press Setup to exit the menu system. All setup is saved on exiting the menus and is saved even if the unit is powered off.

With the Video setup menu selected, use the ▲ and ▼ arrows to move up or down to the desired sub-menu. Use the navigation arrows (▲▼◀▶) to adjust the settings and press Enter to confirm your selection. The following list overleaf shows the Video Setup menu structure:
Cambridge Audio
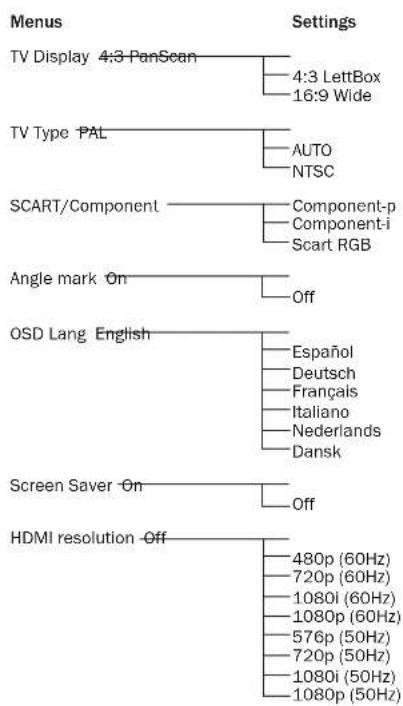
flowchart
graph TD
    A["TV Display 4:3 PanScan"] --> B["4:3 LettBox\n16:9 Wide"]
    C["TV Type PAL"] --> D["AUTO\nNTSC"]
    E["SCART/Component"] --> F["Component-p\nComponent-i\nScart RGB"]
    G["Angle mark On"] --> H["Off"]
    I["OSD Lang English"] --> J["Espanol\nDeutsch\nFrançais\nItaliano\nNederlands\nDansk"]
    K["Screen Saver On"] --> L["Off"]
    M["HDMI resolution Off"] --> N["480p (60Hz)\n720p (60Hz)\n1080i (60Hz)\n1080p (60Hz)\n576p (50Hz)\n720p (50Hz)\n1080i (50Hz)\n1080p (50Hz)"]
TV Display
Select the screen format to fit your TV screen.
4:3 PanScan — You can select this screen when connected to a normal TV set. The widescreen picture will display on the full screen, but some parts of the video picture will be cut off automatically. This feature is disc dependant and will only be available if the manufacturer of the disc has included this format.
4:3 LettBox — Alternatively you can select this screen when connected to a normal TV set. The full widescreen picture is displayed on the screen with black strips on the top and bottom of the screen.
16:9 Wide — Select this screen when connected to a widescreen TV set. The full picture will now be displayed with no picture cropping or black bars (unless the movie itself has black bars recorded into the video, as sometimes seen with "Director's Cut" or 2.35:1 ratio widescreen movies).


Note: If you lose a TV picture, perhaps because of selecting a format, resolution or connection type which your TV cannot display, then connect the composite output from the DV30 to your television. This is the simplest connection type and is always active, which will allow you to access the on-screen menu and restore the setting on your DV30 to one which your television is able to display.
TV Type
Either select 'NTSC' or 'PAL' to force the analogue video outputs of the DV30 to match the TV system in your area (the DV30 will also automatically convert any PAL DVDs to NTSC playback or vice versa as necessary), or select 'AUTO' to allow the output of the DV30 to follow the encoding on the disc.
Note: Some TVs are unable to display both types of system and a blank screen or no picture may appear if the wrong system is selected.
SCART/Component
Note: HDMI output must be set to 'Off' for this menu to be accessible. Select between the following choices:
Component-p - Enables progressive scan component (YPbPr) using the 3 phono/RCA component outputs on the rear panel.
Component-i - Enables interlaced scan component (YCbCr) using the three phono/RCA component outputs on the rear panel.
SCART RGB – Enables interlaced scan RGB + Sync using the SCART/Peritel output on the rear panel.
Note: Not all TV sets can accept Progressive Scan Component and a blank screen may result if the set does not support this format.
For Component-p, the component outputs will be 480p if the TV type has been set to NTSC, or 576p if the TV type has been set to PAL. Similarly for Component i, the component outputs will 480i if the TV type has been set to NTSC, or 576i if the TV type has been set to PAL. If the Auto setting is used the format will follow the disc type.
Note:
- The Composite (CVBS) and S-Video outputs are always present and always output interlaced video, whether Component, RGB or HDMI is selected.
- Setting HDMI output to 'On' by selecting an output resolution disables the TV type and SCART/Component menus and, in fact, always forces the component outputs 'On' in component-p (Progressive Scan) format.
- With HDMI output 'On', all analogue video outputs will output PAL if a 50Hz HDMI mode is selected, or will output NTSC if a 60Hz HDMI mode is selected.
- With HDMI output 'Off', all analogue video outputs follow the TV type for their PAL/NTSC mode choice.
HDMI Setup
The default setting is 'Enabled'. The default resolution is 720p (50Hz) for PAL, or 720p (60Hz) for NTSC. Should you wish to change the resolution, select the one you desire:
576p (50Hz) Progressive format PAL
720p (50Hz) Upscaled to PAL at 720 lines progressive
1080i (50Hz) Upscaled to PAL at 1080 lines interlaced
1080p (50Hz) upscaled to PAL at 1080 lines progressive
480p (60Hz) Progressive format NTSC
720p (60Hz) Upscaled to NTSC at 720 lines progressive
1080i (60Hz) Upscaled to NTSC at 1080 lines interlaced
1080p (60Hz) upscaled to NTSC at 1080 lines progressive
Note: Selecting a 50Hz format will automatically cause the TV Type menu item to show PAL. Selecting a 60Hz format will automatically cause the TV Type menu item to show NTSC.
Important! If you select an HDMI resolution that your TV does not support, you may lose the picture. In this case you may need to make an analogue video connection to your TV to be able to see the picture again and select another resolution in the Setup menu.

Cambridge Audio
Video setup menu (continued)
Important Note
Some TVs may have occasional problems re-acquiring an HDMI signal (no picture or incorrect colour balance appears) when an HDMI setting is changed on the DVD player.
Should this happen, simply re-select the default HDMI Resolution via the DV30's Video Setup menu:

This allows your TV to re-acquire the signal and for normal operation to resume.
Angle Mark
For DVDs recorded with multi-angular scenes, you can change the angle of the screen. There are two modes in the Angle Mark setting: 'On' and 'Off'. When set to 'On', the current playing angle number is displayed in the top right hand corner of the TV screen. When set to 'Off', no angle mark number is displayed on the TV screen.
Note: The angle number differs from disc to disc or from scene to scene.
Press Angle on the remote control to switch between multi-angles.
OSD Language
There are seven language modes to select from: English, Spanish, German, French, Italian, Dutch and Danish.
Screen-Saver
If you activate the screen-saver function, a screen-saver picture will appear when the unit is stopped, the disc tray is open or there is no disc, or the picture is still for about 60 seconds. The purpose of this screensaver is to reduce the risk of Image retention (screen burn) caused by a static image. Image retention can affect all TV types; however, plasma TVs are particularly susceptible to this problem.
Note: The default setting is 'On'.
Audio setup menu

With the Audio setup menu selected, use the ▲ and ▼ arrows to move to the desired sub-menu. Use the navigation arrows (▲▼◀) to adjust the settings and press the Enter button to confirm your selection. The Audio setup menu structure is as follows:

flowchart
graph TD
    A["SPDIF Output -SPDIF Off"] --> B["RAW Bitstream"]
    A --> C["PCM Stereo"]
    D["SPDIF PCM Out 48k"] --> E["96k"]
    F["HDMI Audio Follow SPDIF"] --> G["PCM stereo"]
SPDIF (and TOSlink Optical) Output
Three options are available: Off, Raw Bitstream and PCM Stereo.
If 'PCM Stereo' is selected, the digital output will always be Digital PCM Stereo (LPCM) for use with a DAC, recording to an MD or CD-R machine, etc.
If 'Raw Bitstream' is selected, the output will be either PCM Stereo for Stereo disc or soundtracks or surround-sound bitstream from surround-sound soundtracks. For decoding by an external AV Receiver, see the table below:
| Setting DISC | PCM Raw | |
| CD PCM @ 16/44.1 | PCM @ 16/44.1 | |
| DVD-V | Downmixed PCM@ 24/48 or 24/96* | Raw bitstream for surround soundsoundtracksPCM @ 24/48 or 24/96*for stereo soundtracks |
* 48kHz or 96kHz depending on soundtrack bit depth and LPCM limit set as below.
SPDIF PCM Out
This selects whether the SPDIF LPCM output from DVDs can be at 96kHz maximum sample rate (if the disc supports it), or if it will be downsampled to 48kHz maximum. Some equipment can only support a 48kHz maximum sample rate and hence it can be useful to set this maximum limit. CDs are 16/44.1 and so are unaffected.
Cambridge Audio
Audio setup menu (continued)
HDMI Audio
Two options are available: PCM Stereo and Follow SPDIF.
When HDMI Audio is set to 'PCM Stereo', the HDMI output will always be 16/44.1 for CDs and 24/48 stereo or stereo downmix for DVD.
When the DV30 is connected directly to a TV set which can receive stereo audio over HDMI, PCM Stereo is the best setting to use. Your TV set will then always receive a two-channel downmix from CDs or DVDs.
When HDMI Audio is set to 'Follow SPDIF', the HDMI output will follow exactly the SPDIF output as per the previous section and table. When the DV30 is connected to an AV receiver by HDMI, there are two possibilities depending on whether the receiver accepts HDMI audio directly or switches HDMI video and uses SPDIF for digital audio reception:
- For AV receivers that can receive HDMI audio, set the HDMI Output to 'Follow SPDIF'. Now set the SPDIF Output to 'Raw/Bilstream'. The AV receiver can now decode the bitstream over HDMI into the formats it supports. The TV itself will then not receive any audio (unless the receiver has the capability of making a stereo downmix and outputting it over HDMI).
- For AV receivers that switch HDMI and use SPDIF for audio reception, set the HDMI output to 'PCM Stereo' and set SPDIF Output to 'Raw/Bitsstream'. The AV receiver now receives and decodes surround-sound via the SPDIF connection. The TV will always also receive a two-channel downmix directly from the DVD player over HDMI which can be used if desired.
Dolby Digital setup menu

When the Dolby Digital setup menu is selected, use the ▲ and ▼ arrows to move to the desired menu. Use the Navigation arrows (▲▼◀▶) to adjust the settings and press Enter to confirm your selection.
Dynamic
Dolby Digital encoded discs allow for the dynamic range (the difference between loud and quiet passages) to be compressed (i.e. for late night listening). The options are:
Full, 7/8, 3/4, 5/8, 1/2, 3/8, 1/4, 1/8, Off
When 'Full' is selected, the peak-to-peak value of the audio signal is compressed by the maximum amount. When 'Off' is selected, no compression is applied.
Preference menu

The Preference menus are used to set the default language tracks the DV30 will use for Soundtrack, Subtitles and Disc Menu (if they are available on the disc). Where possible, the DV30 will automatically select the appropriate language from those available on the disc.
It is possible to restrict the type of disc that can be played by using the Parental control menu item.
When the Preference menu is selected, use the ▲ and ▼ arrows to move to the desired menu. Use the navigation arrows (▲▼◀▶) to adjust the settings and press Enter to confirm your selection. The Preference menu structure is shown as follows:

flowchart
graph TD
    A["Audio"] --> B["English"]
    A --> C["French"]
    A --> D["German"]
    A --> E["Spanish"]
    A --> F["Italian"]
    A --> G["Dutch"]
    A --> H["Danish"]
    I["Subtitle"] --> J["English"]
    I --> K["French"]
    I --> L["German"]
    I --> M["Spanish"]
    I --> N["Italian"]
    I --> O["Dutch"]
    I --> P["Danish"]
    Q["Disc Menu -English"] --> R["French"]
    Q --> S["German"]
    Q --> T["Spanish"]
    Q --> U["Italian"]
    Q --> V["Dutch"]
    Q --> W["Danish"]
    X["Parental -1-KID-SAF"] --> Y["2 G"]
    X --> Z["3 PG"]
    X --> AA["4 PG 13"]
    X --> AB["5 PGR"]
    X --> AC["6 R"]
    X --> AD["7 NC 17"]
    X --> AE["8 ADULT"]
    AF["Password"] --> AG["Change"]
    AF --> AH["Reset"]
    AI["Default"] --> AJ["DivX VOD OK"]
Preference menu (continued)
Audio
Use this to set the default language of the sound output from the speakers.
Subtitle
Use this to set the default language of the subtitles displayed on the TV.
Disc Menu
Use this to set the default language of the menus in the disc top menu.
Parental
Use this to restrict the playback of adult-rated DVDs that you do not want children to watch. Select the rating level you want to prevent access to and press Enter. Discs with this rating and higher will then require a password to be played.
Note: Viewing cannot be restricted unless the restriction level is recorded on the disc. Discs without a restriction level encoded will still be accessible.
Password
Use this to change the password. The unit's default password is '1234'.
Default
Select 'Default', highlight 'Reset' and press the Enter button to restore the DVD player to its factory default settings.
Note: All settings previously set by the user will be lost!
DivX VOD
Use this to view your DivX Video On Demand registration code. For more information on registering for this service, see page 28.
Basic operating instructions
Getting started
Turn on power at the TV, amplifier or AV receiver and any other components which are connected to the DVD player. Make sure the TV and the audio receiver are set to the correct input channel.
-
Press Stop/Eject to open the disc tray.
-
Place the disc on the tray, printed side facing up.
-
Press Play/Pause. The tray will automatically close and playback will begin.
Playback of CDs will begin straight away at track 1. For DVDs, the disc will usually go first to the Title menu (the main menu recorded on the DVD). This is where various disc options will be presented on-screen, depending on the disc.
DVDs are normally split into one or more titles, each subdivided into chapters. Each title may also provide alternative soundtracks and subtitles. From the Title menu it is possible to start playback of the main film, go directly to different chapters or access special features.
Examples of special features are alternative soundtracks (such as Stereo, DD 5.1, or DTS 5.1, commentaries and different language versions of the soundtrack) and subtitles. More than one title may be available (different versions of the film or 'making-of' featurettes, for instance). These features are encoded on the disc and the options presented are entirely disc-dependant.
Move around the options using the navigation arrows (▲▼◄►), select the option that starts the film playback in the version you want and press Enter.
- Press Stop/Eject at any time to stop playback.
Note:
- Do not put anything except a DVD or CD-sized disc into the tray; foreign objects may damage the mechanism.
- Do not force the tray by hand during the opening and closing operations.
- To avoid dirt and dust entering the mechanism, keep the disc tray closed when not in use.
- If the disc is seriously scratched or too dirty, the player may not be able to read or play it.
- Never load more than one disc into the disc tray at one time.
- Do not insert discs with adhesive labels as these may become detached during playback and cause damage.
Skip playback
- Press ▶ once to skip forward by one track or chapter on the disc. Press repeatedly to skip forwards through several tracks or chapters.
- Press once to skip backward by one track or chapter on the disc. Press repeatedly to skip backwards through several tracks or chapters.
Fast Forward/Rewind search
This allows you to cycle between 2X, 4X, 8X and 16X playback speed (without sound) and back to normal playback. The ▶button enables backwards playback options, the ▶button for forwards playback. When using the fast forward search function, for example, press, hold and release ▶for 2X playback speed; press, hold and release for 4X playback speed, and so on up to 16X and then normal playback. Press Play at any point to return to normal playback speed.
Slow
When playing a DVD, press repeatedly to cycle round the various speeds of slow motion (1/2, 1/4, 1/8 and 1/16), forwards and back to normal speed.
Repeat
Note: The Repeat function is available only during playback.
Press Repeat on the remote control to repeatedly play a single chapter or title on a DVD video or a single track or entire disc on a CD. The first press selects Chapter/Track repeat, the second press selects Title/Disc repeat, whilst the third press selects All repeat.
Note: The repeat Chapter/Title setting will be cleared when moving to another chapter or title.
During DVD playback it is also possible to access soundtracks, subtitles and angles (where present on the disc) without having to go back to the Title Menu or stopping playback. Use the following remote control buttons:
Audio
Press to directly access alternate audio soundtracks on the DVD (if available on the DVD disc).
Subtitle
Press to enable or disable Subtitles (if available on the DVD disc).
Angle
Press to access various camera angles (if available on the DVD disc).
Cambridge Audio
DivX/MP4 playback
If a disc (CD or DVD) containing DivX/MP4 files is loaded, the DV30 will detect these file types and show a special folder navigation screen as below:
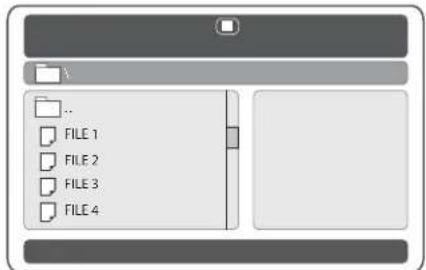
Navigate the folders using the navigation arrows (▲▼◄►) to highlight the desired movie clip. Press Play or Enter to start playback of that file.
Note: If there are multiple DivX/MP4 files in one folder, you can select them directly by pressing the relevant numerical keys, including 10+ for numbers greater than ten.
During playback the Play, Pause, Stop and Forward or Reverse Scan buttons work as for CD/DVD.
DivX Video On Demand
The DV30 is able to playback DivX encoded content downloaded to a PC from suitable websites, and then burnt to a disc for playback in the unit. To enable this service your DV30 needs to be activated and registered with DivX as explained below. See www.divx.com for more details about the DivX VOD service in general.
DivX VOD registration
To enable DivX Video On Demand playback for the DV30, you have to first register the device (DV30) through the DivX Player Programme on your PC.
The procedure is as follows: launch www.divx.com in an internet browser on your PC and then select the 'Free Download' button on the website to install the DivX Player Program (version 6.8 is the latest at the time of writing).
Once installed open the DivX Player Program and go to Tools — Device Manager — Register Device. Then follow the on-line instructions where you will be asked for a DivX Video On Demand Registration Code (or ID).
This is the code unique to each DV30. Your code can be found in the DV30's 'Preference Page' menu under 'DivX VOD'.
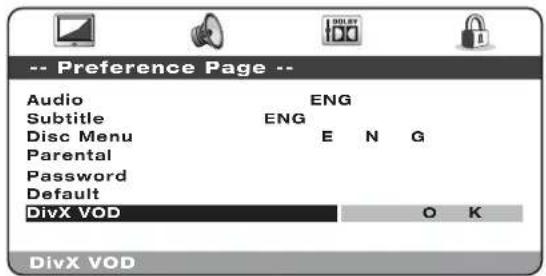
Using the right cursor of the remote control, highlight OK (Yellow) and press Enter to view the Registration Code. Make a note of this Code and then press Enter (OK) to finish.
Sonata | DV30
DivX(R) Video On Demand Registration
Your registration code is: EBEEKFXU
OK
Enter this code when prompted by the player program. www.divx.com will then download an Activation File to the DivX Player Program that will appear under Download Manager (Media Library). This file should then be copied to a CD-R using the DivX Player Programme in the normal way (i.e. dragged from the Download Manager and dropped to 'Burn to Disc').
This Activation File should then be played back on the DV30 to complete the DivX VOD Activation. When this disc is inserted into the DV30, an AVI file will appear on screen in a sub-folder. Press Enter or Play and a short DivX message will appear on-screen to confirm that the activation has been successful.
Note: This action should only be performed once on the DV30 otherwise previously downloaded DivX material can no longer be played on the unit.
Cambridge Audio
Troubleshooting
There is no power
Ensure the AC power cord is connected securely.
Ensure the plug is fully inserted into the wall socket and is switched on.
Check fuse in the mains plug or adaptor.
Check that the unit is turned on at its rear panel switch
The player will not read the disc
Check the disc is not loaded upside down.
Check that the disc is not too scratched or dirty.
Check that the disc is of a compatible type.
There is no sound
Check that the speakers are connected correctly.
Check that the right source is selected on the connected amplifier or TV.
The disc is skipping
Check that the disc is not too scratched or dirty.
Ensure the player is on a firm surface and not subject to vibrations.
The remote handset will not function
Check that the batteries have not expired.
Ensure that nothing is blocking the remote sensor.
There is a hum coming from the speaker
Ensure that all cable connections are secure, particularly ground/shield connections.
There is unwanted background noise and interference
Move the unit away from other electrical equipment that is likely to cause interference.
In the event that the above solutions do not remedy your problem, please consult our frequently asked questions (FAQ) section on our website:
www.cambridge-audio.com/sts/faqs
You can also use this facility to post a question to our Technical Support team.
For all servicing, in or out of warranty, please contact your dealer.
Technical specifications
Disc types CD (CD-DA), DVD-V, CD-R/RW,
DVD-R/RW, DVD+R/RW, DivX, MP4
DAC architecture Wolfson Microelectronics WM8746
24-Bit/192kHz capable
Analogue audio outputs • Stereo + Sub
Analogue video outputs • Composite Video (CVBS)
• S-Video (SVHS)
- RGB/SCART
• Component (YCbCr/YPbPr)
HDMI output Scaling/Deinterlacing to 480p, 576p,
720l/p, 1080l/p
(compatible with HDMI receivers from HDMI 1.0 upwards)
THD (unweighted) < 0.01% @ 20Hz-20kHz
S/N ratio < -98dB
Crosstalk @1kHz < -80dB @ 1kHz
Frequency response 5Hz-20kHz ± 0.2dB
Composite Video 1.0V pk-pk (75 ohms)
S-Video Y: 1.0V pk-pk (75 ohms)
C: 0.286V pk-pk (75 ohms)
Component Video Y: 1.0V pk-pk (75 ohms)
Cb/Cr: 0.75V pk-pk (75 ohms)
Pb/Pr: 0.75V pk-pk (75 ohms)
Power supply 100-230V AC \~ 50/60Hz
Maximum power consumption 15W
Dimensions (H x W x D) 67 x 270 x 285mm
Weight 2.3kg (5.1lbs)
Cambridge Audio is a brand of Audio Partnership Plc
Registered Office: Gallery Court, Hankey Place,
London SE1 4BB, United Kingdom
Registered in England No. 2953313
www.cambridge-audio.com

© 2009 Cambridge Audio Ltd
- Cambridge Audio
- Make sure you register your purchase.
- By registering, you'll be the first to know about:
- Contents
- Introduction
- Important safety instructions
- WEEE symbol
- CE mark
- C-Tick mark
- Ross Test Stamp
- FCC regulations
- Ventilation
- Positioning
- Power sources
- Overloading
- Cleaning
- Battery disposal
- Loudspeakers
- Servicing
- Limited warranty
- Plug Fitting Instructions (UK Only)
- ① Power On/Off
- ② AC power socket
- ③ HDMI Out
- ④ Analogue Video Outputs
- ⑤ SCART RGB
- ⑥ Trigger In
- ⑦ Digital Outputs
- ⑧ 2.1 Channel Audio Out
- Important Note
- ① Standby/On
- ② Infrared sensor
- ③ Stop/Eject
- ④ Disc tray
- ⑤ Display
- ⑥ Play/Pause
- ⑦ Skip
- Sonata | DV30
- Front panel display
- Remote control
- Numerical buttons
- Angle
- Subtitle
- Enter
- Disc Title
- Disc Menu
- Setup
- Audio
- Play/Pause
- Stop
- Skip/Scan
- Shuffle
- Repeat
- Slow
- Info
- Alarm/Clock
- Mute
- Volume
- Tone/Balance
- Source buttons (CD, DVD, Aux, Tuner, MP3, Band)
- Analogue video connections
- HDMI connections
- Audio connections
- ① Analogue stereo (with or without subwoofer)
- ② Digital audio
- ③ HDMI
- Surround-sound formats
- DOLBY DIGITAL
- Dolby Digital (5.1)
- DOLBY DIGITAL·EX
- Dolby Digital EX
- DOLBY DIGITAL PROLOGICII
- Dolby ProLogic II
- DTS 5.1, DTS-ES 6.1 Matrix, DTS-ES 6.1 Discrete, DTS Neo:6, DTS 96/24
- Video formats DVD player setup
- DIVX MP4
- Video setup menu
- TV Display
- TV Type
- SCART/Component
- Note:
- HDMI Setup
- Angle Mark
- OSD Language
- Screen-Saver
- Audio setup menu
- SPDIF (and TOSlink Optical) Output
- SPDIF PCM Out
- Audio setup menu (continued)
- HDMI Audio
- Dolby Digital setup menu
- Dynamic
- Preference menu
- Preference menu (continued)
- Parental
- Password
- Default
- DivX VOD
- Basic operating instructions
- Getting started
- Skip playback
- Fast Forward/Rewind search
- DivX/MP4 playback
- DivX Video On Demand
- DivX VOD registration
- DivX(R) Video On Demand Registration
- OK
- Troubleshooting
- There is no power
- The player will not read the disc
- There is no sound
- The disc is skipping
- The remote handset will not function
- There is a hum coming from the speaker
- There is unwanted background noise and interference
- Technical specifications
Brand : CAMBRIDGE
Model : Sonata DV30
Category : DVD player