
WITL 105 - Washing machine INDESIT - Free user manual and instructions
Find the device manual for free WITL 105 INDESIT in PDF.


| Product Type | Front-loading washing machine |
| Brand | Indesit |
| Model | WITL 105 |
| Capacity | 5 kg |
| Maximum Spin Speed | 1000 rpm |
| Energy Class | A+ |
| Dimensions (H x W x D) | 85 cm x 59.5 cm x 43.5 cm |
| Net Weight | 61 kg |
| Power Supply | 220-240 V / 50 Hz |
| Power Consumption (Wash) | 1.15 kWh |
| Noise Level (Wash/Spin) | 59 dB / 76 dB |
| Number of Programs | 16 |
| Key Programs | Cottons, Synthetics, Delicates, Wool, Quick Wash 30' |
| Special Features | Delay start, Intensive rinse, Half load |
| Water Consumption per Cycle | 49 L |
| Child Lock | Yes |
| Overflow Protection | Yes |
| Cleaning and Maintenance | Clean filter regularly; descale periodically |
| Spare Parts Availability | Original parts available for 10 years after model discontinuation |
Frequently Asked Questions - WITL 105 INDESIT
User questions about WITL 105 INDESIT
0 question about this device. Answer the ones you know or ask your own.
Ask a new question about this device
Download the instructions for your Washing machine in PDF format for free! Find your manual WITL 105 - INDESIT and take your electronic device back in hand. On this page are published all the documents necessary for the use of your device. WITL 105 by INDESIT.
USER MANUAL WITL 105 INDESIT
Unpacking
Fig. 1

Fig. 2

Fig. 3

Fig. 4
Indicator lights
Fig. 1

Fig. 2

Fig. 3 Fig. 4

Unpacking and levelling, 14
Electric and water connections, 14-15
The first wash cycle, 15
Technical details, 15
Washing machine description, 16-17
Control panel, 16
How to open and shut the drum, 17
Leds, 17
Starting and Programmes, 18
Briefly: how to start a programme, 18
Programme table, 18
Personalisations, 19
Setting the temperature, 19
Setting the spin cycle, 19
Functions, 19
Detergents and laundry, 20
Detergent dispenser, 20
Bleach cycle, 20
Preparing your laundry, 20
Special items, 20
Precautions and advice, 21
General safety, 21
Disposal, 21
Saving energy and respecting the environment, 21
Care and maintenance, 22
Cutting off the water or electricity supply, 22
Cleaning your appliance, 22
Caring for your appliance door and drum, 22
Cleaning the pump, 22
Checking the water inlet hose, 22
Cleaning the detergent dispenser, 22
Troubleshooting, 23
Service, 24
Before calling for Assistance, 24

indesit
Keep this instruction manual in a safe place for future reference. Should the appliance be sold, transferred or moved, make sure the instruction manual accompanies the washing machine to inform the new owner as to its operation and features.
Read these instructions carefully: they contain vital information on installation, use and safety.
Unpacking and levelling
Unpacking

- Unpack the washing machine.
- Check whether the washing machine has been damaged during transport. If this is the case, do not install it and contact your retailer.
- Remove the four protective screws and the rubber washer with the respective spacer, situated on the rear of the appliance (see figure).
- Seal the gaps using the plastic plugs provided.
- Keep all the parts: you will need them again if the washing machine needs to be moved to another location.
Warning: should the screws be re-used, make sure you fasten the shorter ones at the top.
Packaging materials are not children's toys.
Levelling
Your machine may make a considerable amount of noise if the two front feet have not been adjusted correctly.

- Install the washing machine on a flat, sturdy floor, without resting it up against walls, furniture, cabinets, or other objects.
- If the floor is not perfectly level, compensate for any unevenness by tightening or
loosening the adjustable front feet (see figure); the angle of inclination, measured according to the worktop, must not exceed 2 degrees.
Levelling your appliance correctly will provide it with stability and avoid any vibrations, noise, and shifting during operation. If it is placed on a fitted or loose carpet, adjust the feet in such a way as to allow enough room for ventilation beneath the washing machine.
Putting your appliance in place and moving it.

If your washing machine is equipped with a special set of retractable wheels, you can easily move it. To lower the wheels and thus move the appliance effortlessly, just pull the lever, situated on the left-hand side beneath the
base. Once the appliance is in the required position, put the lever back in place. The washing machine is now firmly in place (see figure).
Electric and water connections
Connecting the water inlet hose

- Insert seal A into the end of the inlet hose and screw the latter onto a cold water tap with a 3/4 gas threaded mouth (see figure).
Before making the connection, allow the water to run freely until it is perfectly clear.

- Connect the other end of the water inlet hose to the washing machine, screwing it onto the appliance's cold water inlet, situated on the top right-hand side on the rear of the appliance (see figure).
- Make sure there are no kinks or bends in the hose.
!The water pressure at the tap must be within the values indicated in the Technical details table (on the next page).
!If the water inlet hose is not long enough, contact a specialist store or an authorised serviceman.
! Never use hoses that have already been used.
Connecting the drain hose

Connect the drain hose, without bending it, to a draining duct or a wall drain situated between 65 and 100 cm from the floor;

alternatively, place it over the edge of a basin, sink or tub, fastening the duct supplied to the tap (see figure). The free end of the hose should not be underwater.
! We advise against the use of hose extensions; in case of absolute need, the extension must have the same diameter as the original hose and must not exceed 150 cm in length.
Electric connection
Before plugging the appliance into the mains socket, make sure that:
- the socket is earthed and in compliance with the applicable law;
- the socket is able to sustain the appliance's maximum power load indicated in the Technical details table (on the right);
- the supply voltage is included within the values indicated on the Technical details table (on the right);
- the socket is compatible with the washing machine's plug. If this is not the case, replace the socket or the plug.
! The washing machine should not be installed in an outdoor environment, not even when the area is sheltered, because it may be very dangerous to leave it exposed to rain and thunderstorms.
! When the washing machine is installed, the mains socket must be within easy reach.
! Do not use extensions or multiple sockets.
! The power supply cable must never be bent or dangerously compressed.
! The power supply cable must only be replaced by an authorised serviceman.
Warning! The company denies all liability if and when these norms are not respected.
The first wash cycle
Once the appliance has been installed, and before you use it for the first time, run a wash cycle with detergent and no laundry, setting the 90°C programme without a pre-wash cycle.
| Technical details | |
| Model | WITL 105 |
| Dimensions | 40 cm wide85 cm high60 cm deep |
| Capacity | from 1 to 5 kg |
| Electric connections | Please refer to the technical data plate fixed to the machine. |
| Water connections | maximum pressure 1 MPa (10 bar)minimum pressure 0.05 MPa (0.5 bar)drum capacity 42 litres |
| Spin speed | up to 1000 rpm |
| Control programmes according to EN 60456 directive | programme 2; temperature 60°C;run with a load of 5 kg. |
 | This appliance is compliant with the following European Community Directives:- 89/336/CEE of 03/05/89(Electromagnetic Compatibility) and subsequent amendments- 2006/95/CE (Low Voltage)- 2002/96/CE |
Washing machine description
Control panel
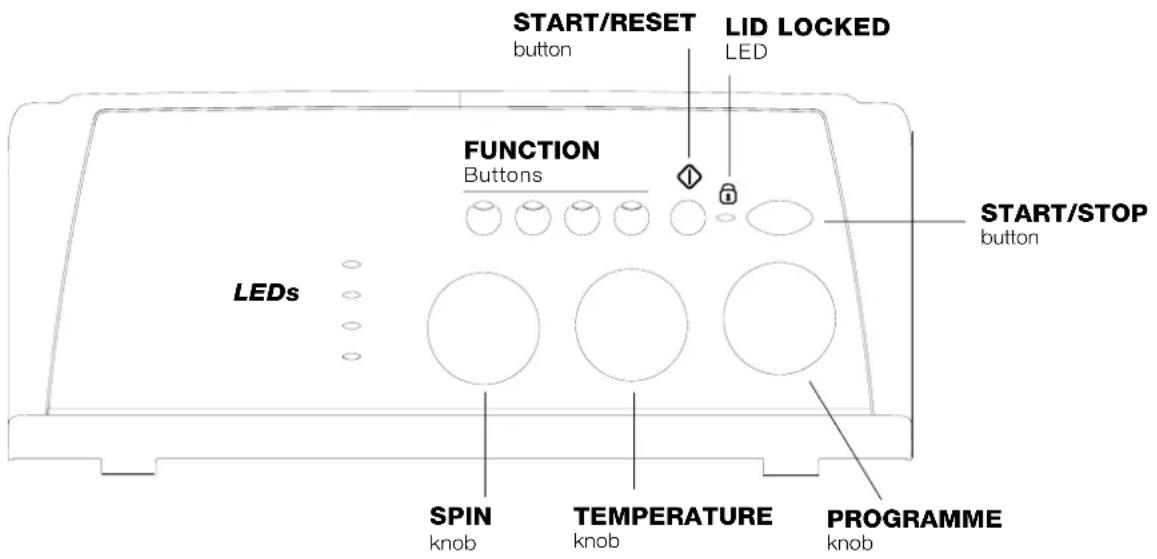
Detergent dispenser to add detergent and fabric softener (see page 20).
LEDs to find out which wash cycle phase is under way.
If the Delay Timer function has been set, the time left until the programme starts will be indicated (see page 17).
FUNCTION keys to select the functions available.
The button corresponding to the selected function will remain on.
SPIN SPEED knob to set the spin speed or exclude the spin cycle completely (see page 19).
TEMPERATURE knob to set the temperature or the cold wash cycle (see page 19).
ON/OFF key to turn the washing machine on and off.
START/RESET key to start the programmes or cancel incorrect settings.
ON-OFF/LID LOCK led, to find out whether the washing machine is on (flashing) and if the lid may be opened (see page 16).
PROGRAMME knob to set the programmes (see page 18).
The knob stays still during the cycle.
ON-OFF/LID LOCK led:
If this LED is on, the appliance lid is locked to prevent it from being opened accidentally; to avoid any damages, you must wait for the lamp to flash before you open the lid.
! The rapid flashing of the ON-OFF/LID LOCK LED together with the flashing of at least one other LED indicates an abnormality (see page 23).
How to open and close the drum

Fig. 1

Fig. 2

Fig. 3
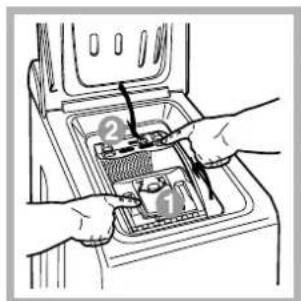
Fig. 4
Leds
The LEDs provide important information. This is what they can tell you:
Delay set:
If the Delay Timer function has been enabled (see page 19), once you have started the programme, the LED corresponding to the delay set will begin to flash:

As time passes, the remaining delay will be displayed, and the corresponding LED will flash:

Once the set delay is complete, the flashing LED will turn off and the programme set will start.
A) Opening (Fig. 1).
Lift the external lid and open it completely.
B) Then open the drum using both hands as shown in Fig. 2:
- Press the button indicated by the arrow in Fig. 2 lightly downwards, with one hand firmly resting on the doors to prevent them from suddenly opening and hurting your fingers;
- Therefore follow the appliance doors along as these unhook and open easily.
C) Loading the washing machine. (Fig. 3).
- Close the drum fully by first shutting the front door followed by the rear one;
- then ensure the hooks on the front door are perfectly housed within the seat of the rear door;
- after the hooks have clicked into position, press both doors lightly downwards to make sure they do not come loose;
- finally shut the external lid.
Cycle phase under way:
During the wash cycle, the LEDs gradually illuminate to indicate the cycle phase under way:

Note: during draining, the LED corresponding to the Spin cycle phase will be turned on.
Function buttons
The FUNCTION BUTTONS also act like LEDs. When a function is selected, the corresponding button is illuminated.
If the function selected is incompatible with the programme set, the button will flash and the function will not be enabled.
If you set a function that is incompatible with another function you selected previously, only the last one selected will be enabled.
Starting and Programmes
Briefly: starting a programme
- Switch the washing machine on by pressing button (I). All the LEDs will light up for a few seconds and the ON-OFF/DOOR LOCK LED will begin to flash.
- Load your laundry into the washing machine, add the detergent and any fabric softener (see page 20) and shut the appliance door.
- Set the PROGRAMME knob to the programme required.
- Set the wash temperature (see page 19).
- Set the spin speed (see page 19).
- Start the programme by pressing the START/RESET button. To cancel it, keep the START/RESET button pressed for at least 2 seconds.
- When the programme is finished, the ON-OFF/DOOR LOCK LED will flash to indicate that the appliance door can be opened. Take out your laundry and leave the appliance door ajar to allow the drum to dry thoroughly. Turn the washing machine off by pressing button ⏻
Programme table
| Type of fabric and degree of soil | Programmes | Tempe-rature | Detergent | Fabric softener | Stain removal option/bleach | Cycle length (minutes) | Description of wash cycle | |
| pre-wash | wash | |||||||
| Standard | ||||||||
| Cotton: Extremely soiled whites (sheets, tablecloths, etc.) | 1 | 90°C • | • • | 167 | Pre-wash, wash cycle, rinse cycle, intermediate and final sp in cycles | |||
| Cotton: Extremely soiled whites (sheets, tablecloths, etc.) | 2 | 90°C • | • | Delicate/ Trad itional | 152 | Wash cycle, rinse cycles, intermediate and final sp in cycles | ||
| Cotton: Heavily soiled whites and fast colours | 2 | 60°C • | • | Delicate/ Trad itional | 150 | Wash cycle, rinse cycles, intermediate and final sp in cycles | ||
| Cotton: Heavily soiled whites and delicate colours | 2 | 40°C • | • | Delicate/ Trad itional | 140 | Wash cycle, rinse cycles, intermediate and final sp in cycles | ||
| Cotton: Slightly soiled whites and delicate colours (shirts, jump ers, etc.) | 3 | 40°C • | • | Delicate/ Trad itional | 99 | Wash cycle, rinse cycles, intermediate and final sp in cycles | ||
| Synthetics: Heavily soiled fast colours (b aby linen, etc.) | 4 | 60°C | • • D elicate | 80 | Wash cycle, rinse cycles, anti-crease or delicate spin cycle | |||
| Synthetics: Heavily soiled fast colours (b aby linen, etc.) | 4 | 40°C • • | D elicate | 71 | Wash cycle, rinse cycles, anti-crease or delicate spin cycle | |||
| Synthetics: Delicate fast colours (slightly soiled) | 5 | 40°C • • | D elicate | 71 | Wash cycle, rinse cycles, anti-crease or delicate spin cycle | |||
| Wool | 6 | 40°C • | • | 50 | Wash cycle, rinse cycles, delicate spin cycle | |||
| Very delicate fabrics (cu rtains, silk, viscose, etc.) | 7 | 30°C • | • | 52 | Wash cycle, rinse cycles, anti-crease or draining cycle | |||
| Time 4 you | ||||||||
| Cotton: Heavily soiled whites and fast colours | 8 | 60°C • | • | 60 | Wash cycle, rinse cycles, intermediate and final sp in cycles | |||
| Cotton: Slightly soiled whites and delicate colours (shirts, jump ers, etc.) | 9 | 40°C • | • | 50 | Wash cycle, rinse cycles, intermediate and final sp in cycles | |||
| Synthetics: Delicate colours (all types of slightly soiled garments) | 10 | 40°C | • | • | 40 | Wash cycle, rinse cycles, delicate spin cycle | ||
| Synthetics: Delicate colours (all types of slightly soiled garments) | 11 | 30°C • | • | 30 | Wash cycle, rinse cycles and delicate spin cycle | |||
| Sport | ||||||||
| Sports shoes (MAX. 2 pairs) | 12 | 30°C | • | • | 50 | Cold was h (without detergents), wash cycle, rinse cycles, and delicate spin cycle | ||
| Fabrics for sportswear (Tracksuits, shorts, etc.) | 13 | 30°C • | • | 63 | Wash cycle, rinse cycles, intermediate and final sp in cycles | |||
| PARTIAL PROGRAMMES | ||||||||
| Rinse • | Delicate/ Trad itional | Rinse cycles and spin cycle | ||||||
| Spin Draining and spin cycle | ||||||||
| Drain Draining | ||||||||
Notes
-For programmes 8 and 9, we advise against exceeding a wash load of 3.5 kg. -For programme 13 we advise against exceeding a wash load of 2 kg. -For the anti-crease function: see Easy iron, opposite page. The information contained in the table is purely indicative.
Special programme
Daily Refresh (programme 11 for Synthetics) is designed to wash lightly soiled garments in a short amount of time: it only lasts 30 minutes and allows you to save on both time and energy. By setting this programme (11 at 30°C), you can wash different fabrics together (except for woollen and silk items), with a maximum load of 3 kg. We recommend the use of liquid detergent.

Setting the temperature
Turn the TEMPERATURE knob to set the wash temperature (see Programme table on page 18).
The temperature can be lowered, or even set to a cold wash (

Setting the spin speed
Turn the SPIN SPEED knob to set the spin speed for the selected programme.
The maximum spin speeds for each programme are as follows:
Programme | Maximum spin speed
Cottons | 1000 rpm
Synthetics | 800 rpm
Wool | 600 rpm
Silk | no spin
The spin speed can be lowered, or the spin cycle can be excluded altogether by selecting symbol Ⓞ. The washing machine will automatically prevent you from selecting a spin speed higher than the maximum speed for each programme.
! To avoid excessive vibrations, before every spin cycle the machine distributes the load in a uniform manner by continuously rotating the drum at a speed which is slightly faster than the normal washing speed.
When, despite repeated attempts, the load is still not evenly distributed, the machine spins at a lower speed than the set frequency.
If the load is excessively unbalanced, the machine attempts to distribute it instead of spinning.
The balancing attempts may extend the total duration of the cycle, up to a maximum of 10 minutes.
Functions
To enable a function:
- Press the button corresponding to the desired function, according to the table below;
- The function is enabled when the corresponding button is illuminated.
Note: The rapid flashing of the button indicates that the corresponding function cannot be selected for the programme set.
| Option | Effect Comments | Enabled with programmes: | |
Delay Timer | Delays the start of the wash by up to 9 hours. | Pess the button repeatedly until the LED corresponding to the desired delay is turned on. The fifth time the button is pressed, the function will be disabled.N.B.: Once you have pressed the Start/Reset button, the delay can only be decreased if you wish to modify it. | All |
Bleaching | Bleaching cycle designed to remove the toughest stains. | Please remember to pour the bleach into extra compartment 4 (see page 20).This option is incompatible with the EASY IRON option. | 2, 3, 4, 5,Rinse cycles. |
Easy iron | This option reduces the amount of creasing on fabrics, making them easier to iron. | If you set this option, programmes 4, 5, 6, 7,and Delicate Rinse will be suspended, leaving the laundry to soak (Anti-crease) and iconwill flash:- to conclude the cycle, press the START/RESET button;- to run the draining cycle alone, set the knob to the relative symboland press the START/RESET button.This option is incompatible with the BLEACHING option. | 3, 4, 5, 6, 7,8, 9, 10 and Rinse cycles |
Extra Rinse | Increases the efficiency of the rinse. | Recommended when the appliance has a full load or with large quantities of detergent. | 1, 2, 3, 4, 5,8, 9, 10, 12,13 and Rinse cycles. |
Detergents and laundry
Detergent dispenser
Good washing results also depend on the correct dose of detergent: adding too much detergent won't necessarily make for a more efficient wash, and may in fact cause build up on the interior of your appliance and even pollute the environment.

Open up the detergent dispenser and pour in the detergent and fabric softener, as follows.
Compartment 1: Detergent for pre-wash (powder)
Compartment 2: Detergent for the wash cycle (powder or liquid)
Liquid detergent should only be poured in immediately prior to the wash cycle start.
! Do not use hand wash detergent because it may form too much foam.
Compartment 3: Additives (fabric softeners, etc.)
When pouring the softener in compartment 3, avoid exceeding the "max" level indicated.
The softener is added automatically into the machine during the last wash. At the end of the wash programme, some water will be left in compartment 3. This is used for the inlet of denser fabric softeners into the machine, i.e. to dilute the more concentrated softeners. Should more than a normal amount of water remain in compartment 3, this means the emptying device is blocked. For cleaning instructions, see page 22.
The fabric softener should not overflow from the grid.
Compartment 4: Bleach
Bleach cycle
Traditional bleach should be used on sturdy white fabrics, and delicate bleach for coloured fabrics, synthetics and for wool.
When pouring in the bleach, be careful not to exceed the "max" level indicated on compartment 4 (see figure).
To run the bleach cycle alone, pour the bleach into compartment 4 and set the Rinse programme (for cotton fabrics) and push the button Bleaching.
Preparing your laundry
- Divide your laundry according to:
- the type of fabric/the symbol on the label.
- the colours: separate coloured garments from whites.
- Empty all pockets and check for loose buttons.
- Do not exceed the weight limits stated below, which refer to the weight when dry:
Sturdy fabrics: max 5 kg
Synthetic fabrics: max 2.5 kg
Delicate fabrics: max 2 kg
Wool: max 1 kg
How much does your laundry weigh?
1 sheet 400-500 g
1 pillow case 150-200 g
1 tablecloth 400-500 g
1 bathrobe 900-1,200 g
1 towel 150-250 g
Special items
Curtains: fold curtains and place them in a pillow case or mesh bag. Wash them separately without exceeding half the appliance load. Use programme 7 which excludes the spin cycle automatically.
Quilted coats and windbreakers: if they are padded with goose or duck down, they can be machine-washed. Turn the garments inside out and load a maximum of 2-3 kg, repeating the rinse cycle once or twice and using the delicate spin cycle.
Wool: for best results, use a specific detergent, taking care not to exceed a load of 1 kg.
! The washing machine was designed and built in compliance with the applicable international safety regulations. The following information is provided for your safety and should consequently be read carefully.
General safety
- This appliance has been designed for non-professional, household use and its functions must not be changed.
- This washing machine should only be used by adults and in accordance with the instructions provided in this manual.
- Never touch the washing machine when barefoot or with wet or damp hands or feet.
- Do not pull on the power supply cable to unplug the appliance from the electricity socket. Pull the plug out yourself.
- Do not open the detergent dispenser while the appliance is in operation.
- Do not touch the drain water as it could reach very high temperatures.
- Never force the washing machine door: this could damage the safety lock mechanism designed to prevent any accidental openings.
- In the event of a malfunction, do not under any circumstances touch internal parts in order to attempt repairs. • Always keep children well away from the appliance while in operation.
- The appliance door tends to get quite hot during the wash cycle.
- Should it have to be moved, proceed with the help of two or three people and handle it with the utmost care. Never try to do this alone, because the appliance is very heavy.
- Before loading your laundry into the washing machine, make sure the drum is empty.
Disposal
- Disposal of old electrical appliances The European Directive 2002/96/EC on Waste Electrical and Electronic Equipment (WEEE), requires that old household electrical appliances must not be disposed of in the normal unsorted municipal waste stream. Old appliances must be collected separately in order to optimise the recovery and recycling of the materials they contain and reduce the impact on human health and the environment.
The crossed out "wheeled bin" symbol on the product reminds you of your obligation, that when you dispose of the appliance it must be separately collected.
Consumers should contact their local authority or retailer for information concerning the correct disposal of their old appliance.
- Disposing of an old washing machine: before scrapping your appliance, cut the power supply cable and remove the appliance door.
Saving energy and respecting the environment
Environmentally-friendly technology
If you only see a little water through your appliance door, this is because thanks to the latest technology, your washing machine only needs less than half the amount of water to get the best results: an objective reached to respect the environment.
Saving on detergent, water, energy and time
- To avoid wasting resources, the washing machine should be used with a full load. A full load instead of two half loads allows you to save up to 50% on energy.
- The pre-wash cycle is only necessary on extremely soiled garments. Avoiding it will save on detergent, time, water and between 5 and 15% energy.
- Treating stains with a stain remover or leaving them to soak before washing will cut down the need to wash them at high temperatures. A programme at 60°C instead of 90°C or one at 40°C instead of 60°C will save up to 50% on energy.
- Use the correct quantity of detergent depending on the water hardness, how soiled the garments are and the amount of laundry you have, to avoid wastage and to protect the environment: despite being biodegradable, detergents do contain ingredients that alter the natural balance of the environment. In addition, avoid using fabric softener as much as possible.
- If you use your washing machine from late in the afternoon until the early hours of the morning, you will help reduce the electricity board's peak load. The Delay Timer option (see page 7) helps to organise your wash cycles accordingly.
- If your laundry has to be dried in a tumble dryer, select a high spin speed. Having the least water possible in your laundry will save you time and energy in the drying process.
Care and maintenance
Cutting off the water or electricity supply
- Turn off the water tap after every wash. This will limit the wear of your appliance's water system and also prevent leaks.
- Unplug your appliance when cleaning it and during all maintenance operations.
Cleaning your appliance
The exterior and rubber parts of your appliance can be cleaned with a soft cloth soaked in lukewarm soapy water. Do not use solvents or abrasives.
Cleaning the detergent dispenser
Remove the dispenser by raising it and pulling it out (see figure).
Wash it under running water; this operation should be repeated frequently.
Caring for your appliance door and drum
• Always leave the appliance door ajar to prevent unpleasant odours from forming.
Cleaning the pump
The washing machine is fitted with a self-cleaning pump that does not require any maintenance. Sometimes, small items (such as coins or buttons) may fall into the pre-chamber that protects the pump, situated in the lower part of the same.
! Make sure the wash cycle has ended and unplug the appliance.
To recover any objects that have fallen into the pre-chamber:

- remove the plinth at the bottom on the front side of the washing machine by pulling from the side with your hands (see figure);
- unscrew the lid rotating it anticlockwise (see figure): a little water may trickle out. This is perfectly normal;
- clean the interior thoroughly;
- screw the lid back on;
- reposition the panel, making sure the hooks are securely in place before you push it onto the appliance.

Checking the water inlet hose
Check the water inlet hose at least once a year. If you see any cracks, replace it immediately: during the wash cycles, water pressure is very strong and a cracked hose could easily split open.
! Never use hoses that have already been used.
How to clean the detergent dispenser
Disassembly:
Press lightly on the large button on the front of the detergent dispenser and pull it upwards (fig. 1).
Cleaning:
Then clean the dispenser under a tap (fig. 3) using an old toothbrush and, once the pair of siphons inserted in the top of compartments 1 and 2 (fig. 4) have been pulled out, check whether the same are not clogged and then rinse them.
Reassembly:
Do not forget to reinsert the pair of siphons into the special housings and then to replace the dispenser into its seat, clicking it into place (fig. 4, 2 and 1).

Fig. 1 Fig. 2


Fig. 3

Fig. 4
Your washing machine could fail to work. Before calling for Assistance (see page 24), make sure the problem can't easily be solved by consulting the following list.
Problem
The washing machine won't start.
The wash cycle won't start.
The washing machine fails to load water.
The washing machine continuously loads and unloads water.
The washing machine does not drain or spin.
The washing machine vibrates too much during the spin cycle.
The washing machine leaks.
The ON-OFF/DOOR LOCK Led flashes rapidly at the same time as at least one other LED.
There is too much foam.
Possible causes/Solution:
- The appliance is not plugged into the socket, or not enough to make contact.
• There has been a power failure.
- The appliance door is not shut properly. The Lid locked Led flashes.
- The (1) button has not been pressed.
- The START/RESET button has not been pressed.
- The water tap is not turned on.
- A delayed start has been set (using the Delay Timer, see page 19).
- The water inlet hose is not connected to the tap.
- The hose is bent.
- The water tap is not turned on.
- There is a water shortage.
- The water pressure is insufficient.
- The START/RESET button has not been pressed.
- The drain hose is not fitted between 65 and 100 cm from the floor (see page 15).
- The free end of the hose is underwater (see page 15).
- The wall drainage system doesn't have a breather pipe.
If the problem persists even after these checks, turn off the water tap, switch the appliance off and call for Assistance. If the dwelling is on one of the upper floors of a building, there may be drain trap problems causing the washing machine to load and unload water continuously. In order to avoid such an inconvenience, special anti-drain trap valves are available in shops.
- The programme does not foresee the draining: some programmes require enabling the draining manually (see page 18).
- The Easy iron option is enabled: to complete the programme, press the START/RESET button (see page 19).
- The drain hose is bent (see page 15).
- The drain duct is clogged.
- When the machine is installed, the locking screws for the oscillating assembly are still in place. Remove the screws (see page 14).
- The washing machine is not level (see page 14).
- The washing machine is closed in between furniture cabinets and the wall (see page 14).
- The water inlet hose is not screwed on correctly (see page 14).
- The detergent dispenser is obstructed (to clean it, see page 22).
- The drain hose is not secured properly (see page 15).
- Switch off the machine and unplug the appliance; wait for approximately 1 minute then switch it on again. If the problem persists, contact Assistance.
- The detergent is not suitable for machine washing (it should bear the definition "for washing machines" or "hand and machine wash", or the like).
- You used too much detergent.
Before calling for Assistance:
- Check whether you can solve the problem on your own (see page 23);
- Restart the programme to check whether the problem has been solved;
- If this is not the case, contact an authorised Technical Service Centre on the telephone number provided on the guarantee certificate.
! If the machine has been installed or used incorrectly, you may be charged for the maintenance callout service.
!Always request the assistance of authorised servicemen.
Notify the operator of:
• the type of problem; • the appliance model (Mod.); • the serial number (S/N).
This information can be found on the data plate situated on the rear of the washing machine.

Croatian
Overview
Installation, 26-27
- Place the washing machine on a solid and level floor, and do not lean it against walls, furniture, or other objects.
- If the floor is not perfectly level, compensate for the difference in height by unscrewing or screwing the front feet (see
- Connect the supply hose to the washing machine by screwing it onto the appropriate water intake opening on the rear, top right (see figure).
- Make sure the hose is not kinked or pinched.
! The water pressure in the tap must be within the values given in the Technical Data table (see next page). ! If the length of the supply hose is not sufficient, contact a specialized store or an authorized technician. ! Do not use hoses that have already been used.
or rest it on the edge of a sink or tub, tying the supplied guide to the tap (see figure). The free end of the drain hose must not remain immersed in water.
Fig. 1

Fig. 2
A) Opening the top cover (fig. 1)
Fig. 3

Fig. 4
D) Closing (Fig. 4)
- Close the drum properly by first lowering the first door, then leaning the second door against it;
- check that the hooks of the first door are perfectly seated in the housings of the second door;
- when you hear a "click" indicating that the hooks have engaged, gently press down on both doors, which must not come undone;
- finally, close the outer cover.
Fig. 1
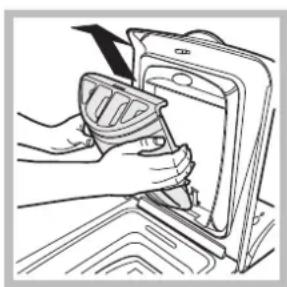
Fig. 2

Fig. 3 Fig. 4

It may happen that the washing machine does not work. Before calling the Service Department (see page 36), check that it is not a problem that can be easily solved with the help of the following list.
| Nepravilnosti: | Mogući uzroci / Rješenja: |
| Perilica se ne uključuje. | • Utikač nije u utičnici ili ne dovoljno da bi ostvario kontakt.• Nestalo je struje u kući. |
| Ciklus pranja ne započinje. | • Vrata nisu dobro zatvorena.• Niste pritisnuli tipku (↓)• Niste pritisnuli tipku START/RESET.• Slavina za vodu je zatvorena.• Postavili ste kašnjenje u pokretanju (“Delay Timer”,vidi str. 31). |
| Perilica ne uzima vodu. | • Dovodna cijev za vodu nije spojena na slavinu.• Cijev je savijena.• Slavina za vodu je zatvorena.• Nestalo je vode u kući.• Pritisak nije dovoljan.• Niste pritisnuli tipku START/RESET. |
| Perilica stalno uzima i izbacuje vodu. | • Cijev za izbacivanje vode nije postavljena na 65-100 cm od tla (vidi str. 27).• Završetak cijevi za izbacivanje vode je uronjen u vodu (vidi str. 27).• Odvod u zidu nema odušak za zrak.Ako se ni nakon ovih provjera problem ne može riješiti, zatvorite slavinu s vodom, isključite perilicu i pozovite Servisnu službu. Ako se stan nalazi na posljednjim katovima zgrade, moguća je pojava fenomena sifonaže, uslijed čega perilica stalno uzima i izbacuje vodu.Ova se nepogodnost uklanja naročitim ventilima protiv sifonaže koji se mogu naći u prodaji. |
| Perilica ne izbacuje vodu ili ne centrifugira. | • Program ne predviđa izbacivanje vode: kod nekih ga je programa potrebno ručno pokrenuti (vidi str. 30).• Aktiviran je način “Manje peglanja”: završavanje programa vrši se pritiskom na tipku START/RESET (vidi str. 31).• Cijev za izbacivanje vode je savijena (vidi str. 27).• Odvodni kanal je začepljen. |
| Perilica jako vibrira tijekom centrifugiranja. | • Bubanj u trenutku postavljanja nije pravilno osloboden (vidi str. 26).• Perilica nije u ravnini (vidi str. 26).• Perilica je stisnuta između namještaja i zida (vidi str. 26). |
| Perilica gubi vodu. | • Dovodna cijev za vodu nije dobro navijena (vidi str. 26).• Pretinac za deterdžent je začepljen (za čišćenje vidi str. 34).• Cijev za izbacivanje vode nije dobro učvršćena (vidi str. 27). |
| Svjetlo UKLJUČENJE/VRATA BLOKIRANA ubrzano trepti istovremeno s bar još jednim kontrolnim svjetlom. | • Pozvati Servisnu službu jer takvo treptanje ukazuje na nepravilnost. |
| Stvara se prevelika pjena. | • Deterdžent nije pogodan za pranje u perilici (mora imati natpis “za strojno pranje rublja”, “za ručno i strojno pranje” ili sličan).• Pretjerali ste s deterdžentom. |
- If the floor is not perfectly level, adjust the position of the washing machine by unscrewing or screwing the front feet (see figure). The slope on the working surface must not exceed 2°.
For easier movement, your washing machine is equipped with a special trolley with folding wheels. To lower the trolley and thus easily move the machine, pull the lever located at the bottom left under the base.
or rest it on the edge of the sink or basin; with the supplied guide, attach it to the tap (see figure). The free end of the drain hose must not be submerged in water.
Figure 1

Figure 2

Figure 3 Figure 4

Symbols
Inspection of water inlet pipes
Figure 1

Figure 2

Figure 3 Figure 4

Unpacking
Fig. 1
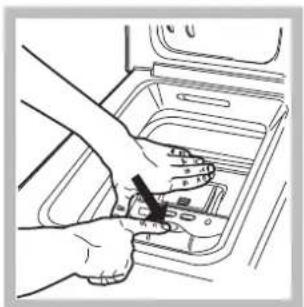
Fig. 2

Fig. 3 Fig. 4

Indicator lamps
Fig. 1

Fig. 2

Fig. 3

Figure 1

Figure 2

Figure 3
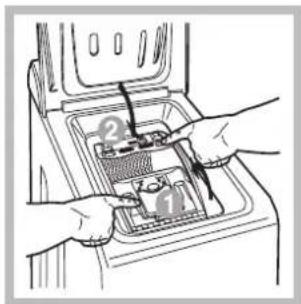
Figure 4
Indicator lights
Figure 1

Figure 2

Figure 3

Figure 4
- UNPACKING
- INDICATOR LIGHTS
- WASHING MACHINE DESCRIPTION
- STARTING AND PROGRAMMES
- PERSONALISATIONS
- DETERGENTS AND LAUNDRY
- PRECAUTIONS AND ADVICE
- CARE AND MAINTENANCE
- TROUBLESHOOTING
- SERVICE
- UNPACKING AND LEVELLING
- LEVELLING
- PUTTING YOUR APPLIANCE IN PLACE AND MOVING IT
- ELECTRIC AND WATER CONNECTIONS
- CONNECTING THE WATER INLET HOSE
- CONNECTING THE DRAIN HOSE
- ELECTRIC CONNECTION
- THE FIRST WASH CYCLE
- CONTROL PANEL
- ON-OFF/LID LOCK LED
- HOW TO OPEN AND CLOSE THE DRUM
- LEDS
- DELAY SET
- OPENING (FIG. 1)
- THEN OPEN THE DRUM USING BOTH HANDS AS SHOWN IN FIG
- LOADING THE WASHING MACHINE. (FIG. 3)
- CYCLE PHASE UNDER WAY
- FUNCTION BUTTONS
- BRIEFLY: STARTING A PROGRAMME
- NOTES
- SPECIAL PROGRAMME
- SETTING THE TEMPERATURE
- SETTING THE SPIN SPEED
- PROGRAMME | MAXIMUM SPIN SPEED
- FUNCTIONS
- DETERGENT DISPENSER
- COMPARTMENT 1: DETERGENT FOR PRE-WASH (POWDER)
- COMPARTMENT 2: DETERGENT FOR THE WASH CYCLE (POWDER OR LIQUID)
- COMPARTMENT 3: ADDITIVES (FABRIC SOFTENERS, ETC.)
- COMPARTMENT 4: BLEACH
- BLEACH CYCLE
- PREPARING YOUR LAUNDRY
- HOW MUCH DOES YOUR LAUNDRY WEIGH
- SPECIAL ITEMS
- GENERAL SAFETY
- DISPOSAL
- SAVING ENERGY AND RESPECTING THE ENVIRONMENT
- ENVIRONMENTALLY-FRIENDLY TECHNOLOGY
- SAVING ON DETERGENT, WATER, ENERGY AND TIME
- CUTTING OFF THE WATER OR ELECTRICITY SUPPLY
- CLEANING YOUR APPLIANCE
- CLEANING THE DETERGENT DISPENSER
- CARING FOR YOUR APPLIANCE DOOR AND DRUM
- CLEANING THE PUMP
- CHECKING THE WATER INLET HOSE
- HOW TO CLEAN THE DETERGENT DISPENSER
- DISASSEMBLY
- CLEANING
- REASSEMBLY
- PROBLEM
- POSSIBLE CAUSES/SOLUTION
- BEFORE CALLING FOR ASSISTANCE
- NOTIFY THE OPERATOR OF
- OVERVIEW
- INSTALLATION
- SYMBOLS
- INSPECTION OF WATER INLET PIPES
- INDICATOR LAMPS
Brand : INDESIT
Model : WITL 105
Category : Washing machine