
OV-1416 - Oven TRISTAR - Free user manual and instructions
Find the device manual for free OV-1416 TRISTAR in PDF.


| Product type | Compact electric oven |
| Brand | TriStar |
| Model | OV-1416 |
| Dimensions (L x D x H) | Approx 40 x 30 x 25 cm |
| Weight | Approx 5 kg |
| Power supply | 220-240 V, 50 Hz, 1200-1500 W |
| Capacity | Approx 20 litres |
| Main functions | Convection, grill, conventional cooking, defrost |
| Adjustable thermostat | Yes, from 100°C to 230°C |
| Timer | Yes, up to 60 minutes with automatic shut-off |
| Cavity material | Easy-clean enamel |
| Included accessories | Baking tray, wire rack, drip tray, handle |
| Interior light | Yes |
| Glass door | Yes, double glazing for safety and insulation |
| Maintenance and cleaning | Clean with a damp cloth and mild detergent; do not immerse |
| Safety | Automatic shut-off at end of timer, overheat protection |
| Available spare parts | Baking tray, wire rack, drip tray, heating elements |
| Repairability | Repairable by a qualified professional |
| Color | Black |
Frequently Asked Questions - OV-1416 TRISTAR
User questions about OV-1416 TRISTAR
0 question about this device. Answer the ones you know or ask your own.
Ask a new question about this device
Download the instructions for your Oven in PDF format for free! Find your manual OV-1416 - TRISTAR and take your electronic device back in hand. On this page are published all the documents necessary for the use of your device. OV-1416 by TRISTAR.
USER MANUAL OV-1416 TRISTAR
natural_image
Exterior view of a modern flat-screen toaster oven with two bread rolls and a sandwich on the side (no text or symbols visible)EN Instruction manual
NL Gebruiksaanwijzing
FR Mode d'emploi
DE Bedienungsanleitung
ES Manual de usuario
PT Manual de utilizador
PL Instrukcja obsługi
IT Manuale utente
SV Bruksanvisning


TRISTAR


You can find all information and spare parts at service.tristar.eu
Dear customer,
Congratulations and thank you for purchasing this high quality product. Please read the instruction manual carefully so that you will be able to make the best possible use of the appliance. This manual includes all the necessary instructions and advice for using, cleaning and maintaining the appliance. If you follow these instructions you will be guaranteed of an excellent result, it saves you time and will avoid problems. We hope you will have a great deal of pleasure from using this appliance.
SAFETY INSTRUCTIONS
- Read all instructions before use.
- Do not touch hot surfaces. Use handles or knobs.
- To protect against electric shock, do not immerse cord, plug or appliance in water or any other liquid.
- Unplug from outlet when not in use and before cleaning. Allow the device to cool before putting on or taking off parts. Do not operate any appliance with a damaged cord or plug or after the appliance malfunctions, or has been damaged in any manner.
- The use of accessory attachments not recommended by the appliance manufacturer may cause injuries and invalidate any warranty you may have.
- Do not use outdoors, or on or near direct heat sources.
- Do not let cord hang over edge of table or counter, or touch hot surfaces or come into contact with the hot parts or allow the product to be situated underneath or close to curtains, window coverings etc.
-
This appliance is for household use only and only for the purpose it is made for.
-
The appliance must be placed on a stable, level surface.
- This appliance is an attended appliance, and as such should never be left ON or whilst hot without adult supervision.
- The appliance can be used by children aged from 8 years and above and persons with reduced physical, sensory or mental capabilities or lack of experience and knowledge if they have been given supervision or instruction concerning use of the appliance in a safe way and understand the hazards involved. Children shall not play with the appliance. Cleaning and user maintenance shall not be made by children unless they are older than 8 and supervised.
- Keep the appliance and its cord out of reach of children less than 8 years.
- This device is not intended for use with an external timer or a remote control system.
- Note: To avoid danger by the accidental resetting thermal protection, the device may not be powered through an external switching device, such as a timer, or connected to a circuit and is turned regularly by the subject.
SAVE THESE INSTRUCTIONS FOR FUTURE REFERENCE
TRISTAR Instruction manual
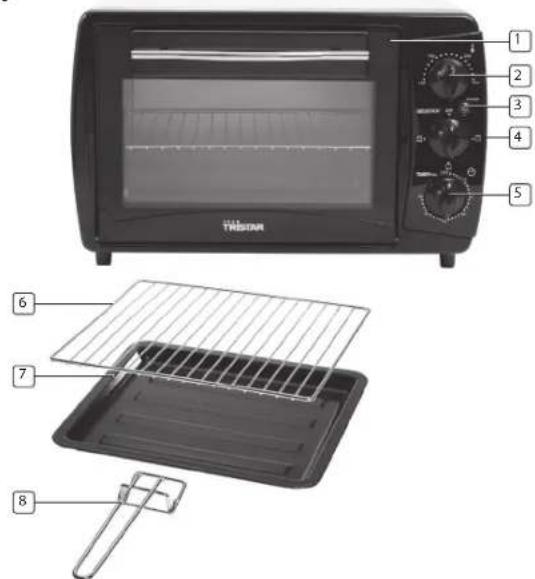
PARTS DESCRIPTION
- Glass door
- Temperature control button
- Indicator light
- Heating position button
- Time control button
- Grid
- Baking tray
- Handle
BEFORE FIRST USE
- Remove all packaging of the device.
- Check if the voltage of the appliance corresponds to the main voltage of your home. Rated voltage OV-1416: AC220-240V 50Hz, OV-1421: AC230V 50Hz.
- Wash before using the device for the first time all loose parts in warm soapy water. Rinse and dry thoroughly. These parts are also dishwasher safe.
- Always place the unit on a flat stable surface and ensure at least 30 cm. free space around the unit.
- This device is not suitable for outdoor installation or use.
- Place the device on a safe place. Not too close to a wall, the wall can burn or discolour. Please make sure that curtains or something similar do not make contact with the device.
- Do not put anything between the bottom of the device and the surface on which you place the device in order to prevent it will burn.
- Food like bread, pizza and meat that remains in the oven too long can burn. Prevent this by checking the food regularly.
- Never heat food in jars or cans directly in the oven, the heat could explode and cause injuries.
• Always use oven-proof bowls and plates. - The oven may at first use spread some smell and smoke; this is normal. Use the device in a well ventilated area.
Caution!
The exterior of the device is hot. Avoid any physical contact, as it can seriously injure you. Always use the handle on the glass door (no. 2) to open the oven.
USE OF ACCESSORIES
- Use the grid (no. 6) to prepare dry foods such as bread and pizza.
- The baking tray (no. 7) is suitable for cooking food that is producing fat, such as meat and chicken dishes.
- The baking tray (no. 7) can also be placed under the grid (no. 5) to absorb fat.
USE
- Use the temperature control button (no. 2) to set the desired temperature depending on the dish.
- Use the heating position button (no. 4) to set the desired heating mode. Below schedule gives an explanation of the various settings.
- Set the time control button (no. 5) on 10 minutes and preheat the oven, the red indicator light (no. 3) turns off when the device has reached the setting time.
• The device is preheated and ready for use.
Heating position button (no. 4)
OFF Switch off the oven

- Place the grid (no. 6), the baking tray (no. 7) or both in the oven.
• These can be set in three positions. On the inside of the oven are three conductors. - Use the temperature control button (no. 2) to set the desired temperature, for the time setting use the time control button (no. 5), depending on the dish to prepare.
- Select the desired heating position by switching the heating position button (no. 4). The maximum time setting is 60 minutes, the minimum time setting is 2 minutes.
- The maximum temperature setting is 230°C, the minimum temperature setting 100°C.
- The red indicator light illuminates. When the device has reached the setting time, the indicator light turns off and the device gives a beep signal.
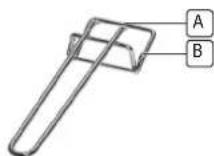
• Always use the provided handle (no. 8) to take the grid or the baking tray out of the oven.
A For use with the baking tray (no. 7)
Clip upper terminal of the handle on top of the baking tray (no. 7).
B For use with the grid (no. 6)
Clip lower terminal of the handle on top of the grid (no. 6).
TRISTAR Instruction manual
CLEANING THE UNIT
- Remove the plug from the outlet and let the device cool down.
- Wash all parts in warm soapy water.
• Rinse and dry thoroughly.
• These parts are also dishwasher safe. - Clean the exterior with a damp cloth.
- Clean the inside of the device with a mild detergent or dedicated oven cleaner.
- Never use harsh and abrasive cleaners, scouring pad or steel wool, which damages the device.
- Never immerse the device in water or other liquid. Do not place the device in the dishwasher to clean.
- If the inside of the oven is contaminated, boil and bake process can take longer time than normal.
COOKING TIPS
- Your oven is extremely suitable to prepare wonderful dishes. In the chart beside you will find some tips on preparation time and the oven temperature settings for different dishes.
• The indicated temperatures and times are indicative only. - The baking results vary depending on the recipes, the dishes and the ingredients used.
- For the exact cooking time of your recipe, please refer to the packaging, if the preparation time is mentioned.
Heating position:
| 1 | 2 | 3 |
| Recipe Amount Temp. | °C Time Position | ||
| Fresh pizza 400 g 200 °C 25 min. 3 | |||
| Salted cake 600 g 200 °C 35 min. 3 | |||
| Frozen pizza 450 g 220 °C 15 min. 3 | |||
| Lasagne 1500 g 200 °C 40 min. 3 | |||
| Whole chicken 1500 g 220 °C 90 min. 3 | |||
| Meatballs | 1000 g 200 °C 60 min. 3 | ||
| Aubergines with cheese | 1700 g 200 °C 30 min. 1 | ||
| Grilled meat | 1000 g 220 °C 20 min 1 | ||
| Scallopped potatoes | 1500 g 200 °C 40 min. 1 | ||
| Apple pie | 1000 g 190 °C 90 min. 3 | ||
| Pistolet | 500 g 220 °C 10 min. | 3 | |
| Trout in a package | 800 g 190 °C 40 min. | 2 | |
Add to the cooking time approximately 10 minutes for the pre-heating of the oven.
GUARANTEE
- The device supplied by our company is covered by 24 month guarantee starting on the date of purchase (receipt).
- During the life of the guarantee any fault of the device or its accessories to material or manufacturing defects will be eliminated free of charge by repairing or, at our discretion, by replacing it. The guarantee services do not entail an extension of the life of the guarantee nor do they give rise to any right to a new guarantee!
- Proof of the guarantee is provided by the proof of purchase. Without proof of purchase no free replacement or repair will be carried out.
- If you wish to make a claim under the guarantee please return the entire machine in the original packaging to your dealer together with the receipt.
- Damage to accessories does not mean automatic free replacement of the whole machine. In such cases please contact our hotline. Broken glass or breakage of plastic parts are always subject to a charge.
- Defects to consumables or parts subject to wearing, as well as cleaning, maintenance or the replacement of said parts are not covered by the guarantee and hence are to be paid!
- The guarantee lapses in case of unauthorized tampering.
• After the expiry of the guarantee repairs can be carried by the competent dealer or repair service against the payment of the ensuing costs

GUIDELINES FOR PROTECTION OF THE ENVIRONMENT
This appliance should not be put into the domestic garbage at the end of its useful life, but must be disposed of at a
central point for recycling of electric and electronic domestic appliances. This symbol on appliance, instruction manual and packaging puts your attention to this important issue. The materials used in this appliance can be recycled. By recycling used domestic appliances you contribute an important push to the protection of our environment. Ask your local authorities for information regarding the point of recollection
Packaging
The packaging is 100% recyclable, return the packaging separated.
Product
This device is equipped with a mark according to the European Directive 2002/96/EC on Waste Electrical and Electronic Equipment (WEEE). By ensuring that this product will be correctly processed into waste, it will help prevent possible negative consequences for the environment and human health.
EC declaration of conformity
This device is designed, manufactured and marketed in accordance with the safety objectives of the Low Voltage Directive "No 2006/95/EC, the protection requirements of the EMC Directive 2004/108/EC "Electromagnetic Compatibility" and the requirement of Directive 93/68/EEC.
Quality shouldn't be a luxury!

natural_image
Exterior view of a black portable electric grill with a dome-shaped top and four legs (no text or symbols visible)
natural_image
Black square microwave oven with open lid and control knobs (no visible text or symbols)
natural_image
Grilled grill with fried bread and meat, no visible text or symbols on the grating itself
service.tristar.eu
Tristar Europe B.V. | Jules Verneweg 87 | 5015 BH Tilburg | The Netherlands


- SAFETY INSTRUCTIONS
- SAVE THESE INSTRUCTIONS FOR FUTURE REFERENCE
- TRISTAR Instruction manual
- PARTS DESCRIPTION
- BEFORE FIRST USE
- Caution!
- USE OF ACCESSORIES
- USE
- Heating position button (no. 4)
- A For use with the baking tray (no. 7)
- B For use with the grid (no. 6)
- CLEANING THE UNIT
- COOKING TIPS
- GUARANTEE
- GUIDELINES FOR PROTECTION OF THE ENVIRONMENT
- Packaging
- Product
- EC declaration of conformity
Brand : TRISTAR
Model : OV-1416
Category : Oven