
KT250 - Thermometer ELRO - Free user manual and instructions
Find the device manual for free KT250 ELRO in PDF.


| Product Type | Digital Thermometer |
| Brand | ELRO |
| Model | KT250 |
| Dimensions (approx.) | 10 x 2 x 1.5 cm |
| Weight (approx.) | 30 g |
| Power Supply | 1 x 1.5V LR44 battery |
| Display Type | LCD digital display |
| Temperature Range | -50°C to 300°C (-58°F to 572°F) |
| Accuracy | ±1°C between -20°C and 100°C, ±2°C otherwise |
| Resolution | 0.1°C / 0.1°F |
| Units Selectable | Celsius / Fahrenheit |
| Probe Type | Stainless steel, foldable |
| Measurement Function | Instant temperature reading |
| Auto Power Off | After approximately 10 minutes of inactivity |
| Low Battery Indication | Display icon when battery low |
| Calibration | Factory calibrated, no user calibration required |
| Housing Material | ABS plastic |
| Ingress Protection | Not waterproof, wipe clean only |
| Cleaning Instructions | Wipe with a damp cloth; do not immerse in water |
| Storage Temperature | -10°C to 60°C |
| Operating Temperature | 0°C to 50°C |
Frequently Asked Questions - KT250 ELRO
User questions about KT250 ELRO
0 question about this device. Answer the ones you know or ask your own.
Ask a new question about this device
Download the instructions for your Thermometer in PDF format for free! Find your manual KT250 - ELRO and take your electronic device back in hand. On this page are published all the documents necessary for the use of your device. KT250 by ELRO.
USER MANUAL KT250 ELRO


GB
TABLE OF CONTENT
1 INTRODUCTION....2
2 INSTALLATION 4
3 SETTING CLOCK 11
4 SETTING PROGRAM....12
5 MANUAL OVERRIDE 15
6 HEATER OPERATION....17
7 LOW BATTERY OPERATION....18
8 SPECIFICATIONS....19
1 INTRODUCTION
This thermostat can replace most common indoor residential thermostat and is designed to be used with electric, gas or oil heating system.
1.1 Outlook
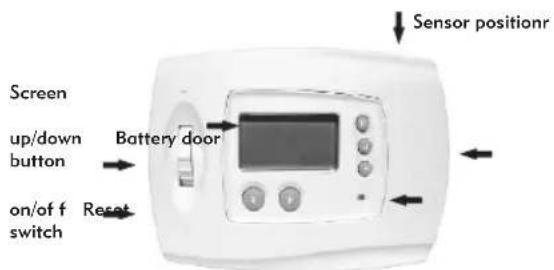
-1--2-


GB


GB
1.2 LCD
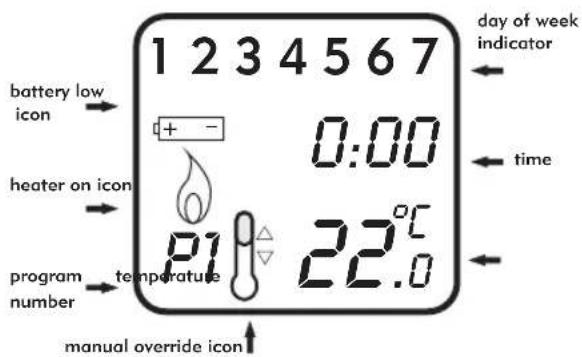
-3.-4-
1.3 Features
Several useful functions and operating modes have been incorporated to adapt a variety of customer needs.
- LCD shows the "NEED TO KNOW" information only, which is more easy to understand
- 8 Changeable Programs (4 programs for weekday; 2 programs each for Saturday and Sunday)
- Real Time Clock with Day of Week Display
- Room Temperature Display
- Simplified Temperature Adjustment
- Simplified Programming Procedure
- Manual Set-Temperature Override
- 2 x AAA Size Alkaline Batteries Operation (Not Included)
- Low Battery Indication
- Heater Operation Mode
- On /Off Switch
- Slim Housing Design

GB


GB
2 INSTALLATION
This thermostat has been designed for simple and quick installation requiring only a few tools.
CAUTION:
- The appliance can only be mounted on dry indoor places.
- A suitable fuse with rating not exceeding 5A, should be in the power line.
- Observe the national regulation for the wiring.
- Qualified electrician is recommended for installation and servicing.
2.1 Required Material
Hammer
Masking tape
Drill and 3/16" drill bit
Screwdriver
2.2 Removing your old thermostat
CAUTION: To avoid electric shock, turn off the power of the heating system at the main power box in your home. Read the following instructions carefully before disconnecting the wires.
- Turn off the old thermostat.
- Remove the cover from the old thermostat.
- Unscrew the old thermostat from the wall plate.
- Find and remove the screws attaching the wall plate to the wall. Pull the wall plate a small distance from the wall. Do not disconnect any wire yet, simply locate the wires.
Warning: After removing the wall plate, if you find that it is mounted on a junction box (e.g. a box similar to one behind a light switch or electric outlet), high voltage circuit may be present and there is a danger of electric shock. Please consult a qualified electrician.


GB


GB
2.3 Wire Labeling
-
Disconnect and identify each wire.
-
Tape the wires to the wall to keep them from slipping through the hole in the wall. If the hole in the wall is larger than necessary, fill it in order to prevent hot or cold air to penetrate the thermostat. In this manner, the thermostat will function perfectly.
2.4 Choosing a Location
For a new installation, choose a mounting location:
-
About 5 feet (1.5 meter) above the floor in an area with good air circulation.
-
Away from:
I. Drafts of dead air sports
II. Air ducts
III. Radiant heat from the sun or appliances
IV. Concealed pipes and chimneys
- The best viewing angle is 12 o'clock direction.
-7.-8-
2.5 Mounting
- Mounting the thermostat onto the wall.
- Remove completely the front housing of the thermostat by using a screwdriver. (see picture)
- Mark the holes' position and align the wire coming from the wall in the hole beside the connectors. (see picture)
- rill two holes and insert the plastic anchors carefully into the holes until they are flush with the wall.
- Fasten securely the thermostat to the wall with the two screws.

natural_image
Close-up of a handheld electronic device with a display and control buttons (no visible text or symbols)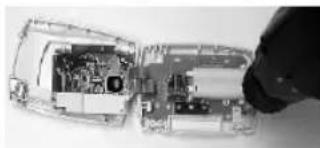
natural_image
Close-up of an open electronic device showing internal circuitry and components (no visible text or symbols)GB


GB
2.6 Connecting the Wires
- Connect the system wires to the terminals according to the wiring diagram shown in the section 2.7 "WIRING DIAGRAM".
2.7 Wiring Diagram
The T103 thermostat can be used with single stage heating system. Inside the thermostat, three terminals which label COM, NC and NO would be found. In most case, COM and NO are used.

natural_image
Close-up of a hand holding an open electronic device with visible internal components (no text or symbols)-9.-10-
2.8 Battery Installation
The KT250 is operated by two AAA 1.5V Alkaline batteries. Please follow the installation instruction:
- Find out the battery door at the side of the case.
- Slide the door downward to open it.
- Two old batteries would "jump out".
- Take out the old batteries.

natural_image
Close-up of hands holding a white handheld electronic device (no visible text or symbols)- Insert two batteries in right position as shown. Be sure the polarity of the batteries are in right position.
- Push and slide the door upward to close it. If first use, skips the instruction (3) and (4).


GB


GB
2.9 Temperature Span
Span is the temperature difference between the turn ON and OFF temperature. The factory pre-set span is 1°C. For example, control temperature setting is 20.0°C. The heater will be operated when the room temperature drops to 19.5°C and will be turned off when the temperature rises to 20.5°C.
2.10 Temperature Measurement
'HI' will be shown when temperature is above 40^ C and 'LO' will be shown when temperature falls below 0^ C.
2.11 Power Installation
The thermostat is operated at two AAA size 1.5V Alkaline batteries. To power-up the unit, installs battery as shown in above section "Battery Installation" and slide the ON/OFF switch to ON position. When power is applied for the first time or reset button is pressed, the display will show as follows:
-11--12-
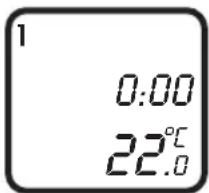
When power is applied for the first time or reset button is pressed, the display will show as follows:
If the display is different as shown, use a fine probe such as straightened paper clip to gently push the reset button.
TIME 0:00
DAY MONDAY
TEMPERATURE 22°C
OUTPUT OFF

GB
3. SETTING CLOCK
- Press one of D, H or M button to set clock. Only the day of week and the time are displayed.
- Press D button to adjust the day of week.
- Press H button to adjust the hour digits.
- Press M button to adjust the minute digits.
- Hold D, H or M button about 3 seconds to fast advance the day, hour or minute adjustment rate respectively.
- Press R button to return to normal operation mode.
- The unit will return to normal operation mode if no key is pressed for 10 seconds.

-13--14-
4 SETTING PROGRAM
4.1 Pre-recorded Programs
Program Day of Week Time Temp for Heat Control 1 Weekday 6:00 20°C
2 (Mon - Fri) 8:30 14°C
3 16:00 20°C
4 22:00 14°C
5 Saturday 7:00 20°C
6 23:00 14°C
7 Sunday 7:30 20°C
8 22:00 14°C
- After power up or reset, press P button to view the prerecorded programs. All the programs are factory preset at the above values.
- Press P button again will scroll weekday (P1 - 4), Saturday (P5 - 6) and Sunday (P7 - 8) programs.
- The program is set as a sequence: P1 » P2 » ... » P8 » P1 » ...

GB


GB
4.2 Program Modification
The pre-recorded programs could be modified. Follow the instructions shown below.
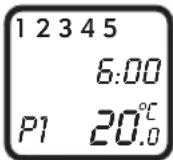
- Press P button to select program (P1 - P8).
- Press H button to set the hour indicator.
- Press M button to increase the minute indicator setting by 15 minutes each time.
- Push ▲/▼ button to adjust to your desired set temperature. Temperature will be increased or decreased by 0.5°C for each push.
-
Program temperature can only be set in the control temperature range from 5^ C to 35^ C, not wrap around at two ends.
-
Press D button will turn on or off the program. For example, you want to turn off program 2, press P button to select program 2. Then press D button. Program 2 is off as shown beside. Press D button again will turn on the program.

- Hold H, M, ▲ or ▼button about 3 seconds to fast advance the hour, minute, or temperature adjustment rate respectively.
- Press R button to store the settings and back to normal operation mode.
- The settings will be stored automatically and back to normal operation mode when no button is pressed about 10 seconds.
-16--15-


GB


GB
5 MANUAL OVERRIDE
At the normal operation mode, the current temperature setting could be overridden until the next program comes.
- Push ▲▼button to view the overriding temperature which is set last time.
- Hold ▲/▼ button about 3 seconds and the temperature indicator will flash one time.
- Push ▲/▼ button to decrease or increase the temperature setting.
- Hold ▲/▼ button to fast advances the adjustment rate.

- Press R button to terminate the setting procedure and back to normal mode with the new temperature setting.
- The unit will be back to normal operation mode automatically when no button is pressed about 10 seconds.
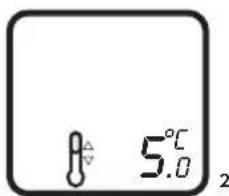
- Program temperature can only be set in the control temperature range from 5°C to 35°C, not wrap around at two ends. When pushing the ▲ button to increase the temperature to 35°C, the "up arrow" of the Manual Override Icon will be turned off as shown.
Likewise, when pushing ▼ button to decrease the temperature to 5°C, the "down arrow" of the Manual Override Icon will be turned off as shown.
GB


GB



-19-
6 HEATER OPERATION
6.1 Heater On Operation
The heater will be turned on by setting programs or manual override.
If the heater is turned on by setting programs, the Program Number, and the Heater On Icon will be displayed as shown.
If the heater is turned on by manual override, only the Heater On Icon will be displayed as shown.
6.2 Output-On Delay
For safety purposes, the thermostat has an auto 20 seconds' delay for heater to restart.
-20-

GB


GB
When the voltage of the battery decrease to certain level, the low battery indicator will be turned on and the thermostat cannot detect the temperature anymore.
When the battery indicator is
turning on, the batteries should be changed as soon as possible to avoid any data loss.

8 SPECIFICATIONS
8.1 Physical Characteristics
Size:
98 (W) X 28 (L) X 73 (H) mm
Material:
Polycarbonate (PC)
Weight: 98g (battery not included)
-21-
8.2 Electrical Characteristics
Power Source: AAA 1.5V Alkaline
battery x 2
(not included)
Switching Relay:
Resistive load:
5A at 250VAC
Inductive load:
3A at 250VAC
Clock Accuracy: ±60 seconds/month
Temperature Measurement: 0 - 40°C
Temperature Accuracy: ±1.0°C
Temperature Control: 5 - 35°C
Temperature Control Span:
Output On Delay:
Operating Temperature:
1°C
20 seconds
-10°C to 50°C
(non-condensing)
Storage Temperature:
Operating polluted condition:
-30°C to 60°C
Normal
-22-

GB

- GB
- TABLE OF CONTENT
- INTRODUCTION
- Features
- INSTALLATION
- CAUTION:
- Required Material
- Removing your old thermostat
- Wire Labeling
- Mounting
- Connecting the Wires
- Wiring Diagram
- Battery Installation
- Temperature Span
- Temperature Measurement
- Power Installation
- SETTING CLOCK
- SETTING PROGRAM
- Pre-recorded Programs
- MANUAL OVERRIDE
- HEATER OPERATION
- Heater On Operation
- Output-On Delay
- SPECIFICATIONS
- Electrical Characteristics
Brand : ELRO
Model : KT250
Category : Thermometer