
VRFTY-71E - Rear Camera CRUX - Free user manual and instructions
Find the device manual for free VRFTY-71E CRUX in PDF.


| Product Type | Rearview Camera |
| Brand | CRUX |
| Model | VRFTY-71E |
| Video Resolution | 720p (HD) |
| Viewing Angle | 170° |
| Night Vision | Infrared LEDs for low-light visibility |
| Waterproof Rating | IP68 |
| Power Supply | 12V DC (vehicle electrical system) |
| Operating Temperature | -20°C to 70°C (-4°F to 158°F) |
| Mounting Type | Bracket or flush mount (included) |
| Cable Length | Approx. 6 meters (20 feet) |
| Video Output | Composite video (RCA connector) |
| Mirror Image | Yes (switchable for rear or front view) |
| Dimensions (Camera Body) | 2.5 x 1.8 x 1.2 inches (approx) |
| Weight | Approx. 100 g (0.22 lb) |
| Maintenance | Clean lens with a soft, dry cloth; avoid harsh chemicals |
| Safety | Do not expose connections to moisture; secure wiring away from moving parts |
| Included Parts | Camera, mounting bracket, screws, 6m video/power cable, user manual |
| Reparability | Not user-serviceable; contact CRUX support for issues |
Frequently Asked Questions - VRFTY-71E CRUX
User questions about VRFTY-71E CRUX
0 question about this device. Answer the ones you know or ask your own.
Ask a new question about this device
Download the instructions for your Rear Camera in PDF format for free! Find your manual VRFTY-71E - CRUX and take your electronic device back in hand. On this page are published all the documents necessary for the use of your device. VRFTY-71E by CRUX.
USER MANUAL VRFTY-71E CRUX
- Adds front and rear view camera inputs, plus 1 extra video input.
- Adds an additional audio/video input.
- Uses the steering wheel control buttons to toggle between the sources.
- Retains factory backup camera if present.
PARTS INCLUDED:

natural_image
Black electronic device with red LED and black outline, no visible text or symbols
natural_image
Coiled black cable with various colored wires and connectors, no visible text or symbolsVRFTY-71E Module VRFTY-71E Harness
OPTIONAL ADD-ON CAMERAS:
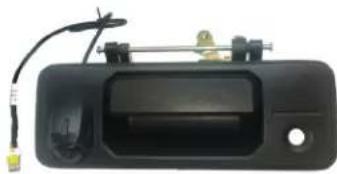
Optional aftermarket add on cameras are available for the VRFTY-71E. Cameras available and sold separately include: (More cameras can be found at www.cruxinterfacing.com)
natural_image
Black rectangular object with a handle and cable, no visible text or symbols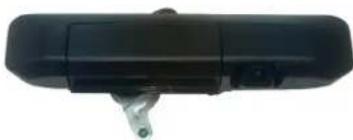
natural_image
Black rectangular electronic device with a metallic connector (no visible text or symbols)CTY-01T Tacoma/Tundra Tailgate Handle Camera CTY-02T Tacoma Tailgate Handle Camera (2006-2015)

CFF-01 Bullet Type Front Camera (Recommended)

CFF-02 Square Body Front Camera
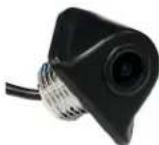
CUL-04 Lip Mount Backup Camera
INSTALLATION DIAGRAM:
To Vehicle Harness

flowchart
graph TD
    A["10 PIN"] --> B["To Radio"]
    C["24 PIN"] --> B
    D["28 PIN"] --> B
    B --> E["DIP Switches"]
    E --> F["CRUX Chip"]
    F --> G["Audio/Video Input"]
    F --> H["Front and Rear Camera Power Output +12V (purple/white)"]
    F --> I["Video In Power Output +12V (orange/white)"]
    F --> J["Front Camera Input"]
    F --> K["Video Input"]
    F --> L["Aftermarket Backup Camera Input"]
    style A fill:#f9f,stroke:#333
    style C fill:#f9f,stroke:#333
    style D fill:#f9f,stroke:#333
    style E fill:#ccf,stroke:#333
    style F fill:#cff,stroke:#333
    style G fill:#ffc,stroke:#333
    style H fill:#ffc,stroke:#333
    style I fill:#ffc,stroke:#333
    style J fill:#ffc,stroke:#333
    style K fill:#ffc,stroke:#333
    style L fill:#ffc,stroke:#333
DIP SWITCH SETTINGS:
| DIP# ON OFF | — | — |
| 1 No Function – Leave OFF | ||
| 2 Front Camera ON Front Camera OFF | ||
| 3 Set to OFF | ||
| 4 Set to OFF | ||
| 5 Video Input ON Video Input OFF | ||
| 6 Set to OFF | ||
| 7 AUX A/V ON AUX A/V OFF | ||
| 8 Set to OFF | ||
VRFTY-71E module installation on a Toyota Tacoma:

natural_image
Close-up of a car's front dashboard and side panel being adjusted by hand (no visible text or symbols)
natural_image
Interior view of a car with a hand holding a digital camera module, showing dashboard and steering wheel (no visible text or symbols)- Carefully pull out the radio trim bezel. The trim bezel is attached to the dashboard by these clips.

natural_image
Close-up of a black electronic device with a screwdriver inserted, showing internal components and no visible text or symbols.
natural_image
Close-up of a hand inserting a small electronic device into a car's engine compartment (no visible text or symbols)- Remove the 4 screws holding the radio and unplug the connectors. Set the radio to the side.

natural_image
Close-up of a car's front grille and dashboard with a metallic tool (no visible text or symbols)
natural_image
Close-up of a car door panel with a black handle and circular button, no visible text or symbols- Install the front and back up cameras and the extra video source (if applicable), and run the video wires towards the radio.
natural_image
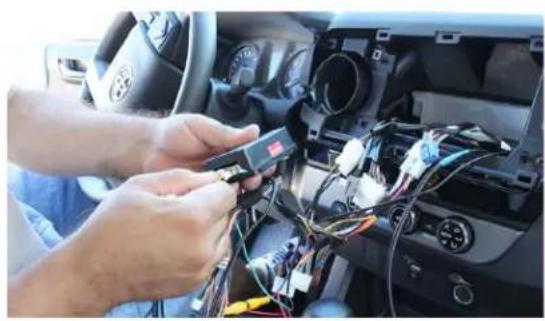
Person installing or connecting a small electronic component into a car dashboard (no visible text or symbols)- Make the video RCA connections at the VRFTY-71E harness. See diagram on page 2 for the camera power connections.
OPERATION:

natural_image
Close-up of a car dashboard with the Toyota ABEAC logo and a hand adjusting the key (no visible text beyond logo)- Press and hold the HANG UP button for 3 seconds to turn on forced camera view mode. Each press of the button thereafter toggles which ever cameras are turned on using the DIP switches. It will also toggle to AV mode. (Forced view of the backup camera is only available if using an aftermarket backup camera.) While in reverse gear, press and hold the HANG UP button to toggle between reverse, and the extra video input.
OPERATION:

natural_image
Interior view of a car dashboard displaying a digital camera screen showing a snowy landscape scene (no visible text or symbols)- The front camera (if installed) will automatically show on the screen for 10 seconds when the gear is put to Drive from Reverse.

natural_image
Person holding smartphone displaying a landscape photo on car dashboard (no visible text or symbols)- Go to AUX IN mode on the radio to hear audio when using the AV Input. Image shown using Crux part# VCIP5, HDMI to CVBS adapter. (sold separately)
FORCED VIEW CAMERA SEQUENCE:
Using OEM backup Camera
FRONT → VIDEO INPUT → AV INPUT
Using Aftermarket backup Camera
FRONT → BACKUP → VIDEO INPUT → AV INPUT
VEHICLE APPLICATIONS:
TOYOTA
2015 - 2019 Highlander / Hybrid
2012 - 2017 Sequoia
2015 - 2017 Sienna
2016 - 2018 Tacoma
2016 - 2018 Tundra


Brand : CRUX
Model : VRFTY-71E
Category : Rear Camera