
SM-QKVM-S - KVM switch Smart-AVI - Free user manual and instructions
Find the device manual for free SM-QKVM-S Smart-AVI in PDF.


| Product Type | KVM Switch |
| Brand | Smart-AVI |
| Model | SM-QKVM-S |
| Number of Ports | 4 |
| Supported Interface | USB, PS/2 |
| Maximum Resolution | 1920 x 1200 |
| Audio Support | Yes (Mic & Speaker) |
| USB Hub | Yes, 2 USB 2.0 ports |
| Switching Method | Push button, Hotkeys, OSD |
| Power Supply | DC 9V 1A |
| Power Consumption | 5W |
| Dimensions (W x D x H) | 170 x 85 x 35 mm |
| Weight | 0.4 kg |
| Operating Temperature | 0°C to 50°C |
| Storage Temperature | -20°C to 60°C |
| Humidity | 0% to 80% RH non-condensing |
| EMI Standards | FCC, CE |
| Package Includes | KVM switch, power adapter, user manual |
| Warranty | 2 years |
Frequently Asked Questions - SM-QKVM-S Smart-AVI
User questions about SM-QKVM-S Smart-AVI
0 question about this device. Answer the ones you know or ask your own.
Ask a new question about this device
Download the instructions for your KVM switch in PDF format for free! Find your manual SM-QKVM-S - Smart-AVI and take your electronic device back in hand. On this page are published all the documents necessary for the use of your device. SM-QKVM-S by Smart-AVI.
USER MANUAL SM-QKVM-S Smart-AVI
View four different analog/digital video sources simultaneously on one screen with USB keyboard and mouse support.
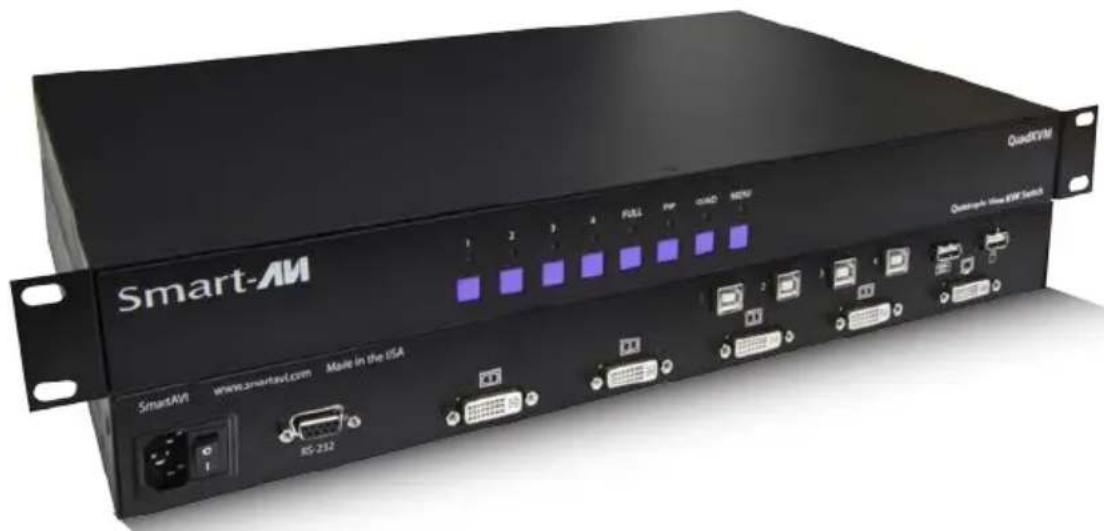
Installation Manual
Smart-AM
SMART AUDIO VIDEO INNOVATION
Table of Contents
| TECHNICAL SPECIFICATIONS 3 | |
| INTRODUCTION / FEATURES 4 | |
| APPLICATIONS 5 | |
| INSTALLATION 6 | |
| OPERATION - FRONT PANEL 7 | |
| OPERATION - OSD 8 | |
| OPERATION - KEYBOARD HOTKEYS | 9 |
| OPERATION - RS-232 CONTROL | 10 |
What's in the Box?
| PART NO. QTY DESCRIPTION | ||
| SMQKVM 1 4-Port DVI, USB 1.1 KVM switch with PiP/Dual/Quad/Full modes | ||
| CCPWR06 1 6ft Power Cable | ||
| CBLDB906 1 6ft DB9 | Serial RS232 Cable | |


Technical Specifications
| VIDEO | |
| Format DVI-D Single Line | |
| Maximum Pixel Clock 165 MHz | |
| Input Interface (4) DVI-I/D 29-pin female | |
| Output Interface (1) DVI-D 29-pin female | |
| Input Resolution DVI-I/D | up to 1920 x 1200 @60HzVGA up to 1600 x 1200 @60Hz |
| Output Resolution DVI-D | up to 1920 x 1080 @60HzDVI-D up to 1920 x 1200 @60Hz |
| DDC 5 volts p-p(TTL) | |
| Input Equalization Automatic | |
| Input Cable Length Up to 20 ft. | |
| Output Cable Length Up to 20 ft. | |
| USB | |
| Signal Type USB 1.1 and 1.0 | |
| Input Interface (4) USB Type B (Female) | |
| Output Interface (2) USB Type A (Female) | |
| CONTROL | |
| Front Panel Tact Switches | |
| Keyboard | Hotkeys |
| RS-232 | RS-232 Commands |
| OTHER | |
| Power | External 100-240 VAC/5VDC4A @20W |
| Dimensions | 17"W x 1.75"H x 10.25"D |
| Weight 5 lbs. | |
| Approvals | UL, CE, ROHS Compliant |
| Operating Temp. 32-131°F (0-55 °C) | |
| Storage Temp. | -4-185 °F (-20-85 °C) |
| Humidity | Up to 95% |
Introduction
The QuadKVM Switch allows you to view up to four different analog and digital video sources simultaneously on one display device. It also supports keyboard and mouse functionality, allowing you to access all four sources with one set of interface controls. Connections to video sources are managed via DVI-I connectors. Advanced viewing options include dual-mode, quad-mode, full-screen mode, and PiP (Picture in Picture) mode. Use this device to simplify management of multiple sources by accessing and controlling them all through a single display and set of controls.
Features
• View up to four computers on a single monitor at the press of a button
• Supports USB keyboard and mouse
- On-screen display (OSD) makes setup and switching easy
• Change views by pressing the tact switches, keyboard hotkeys, and RS-232
• Display each computer with clean and crisp high-resolution video
• Supports DVI-I/D input resolutions up to 1900 x 1200 @ 60 Hz
• Supports VGA input resolutions up to 1600 x 1200 @ 60Hz
• DVI-D output
• Quad-mode splits the screen to show four computers on one screen
• Dual-mode splits the screen to show two computers on one screen
• PiP-mode displays one computer in full screen with three thumbnail views
• Control any one computer while monitoring three others
• User-defined frame rate for each input
Applications
The QuadKVM can be used in many applications that require the real-time monitoring of multiple computers. It is a perfect solution in situations where a user needs to monitor several computers at the same time. In Air Traffic Control environments, several computers need to be monitored for the progress of flights and flight information. The QuadKVM is perfect for multi-tasking, allowing the user to run tasks on each computer and monitor their progress without having to switch back and forth between them.
• Corporate or Educational Presentations
• Financial (Remote Servers/User Control)
• Call Centers for Technical Support
• Industrial (Long-Range Workstation Isolation)
• Airport Installations (Air Traffic Control/Passenger Information)
• KVM Extension where Exceptional Quality of Signal is Crucial
• Medical (Remote Operation Away from Sensitive/Magnetic Equipment)
- Recording (for Large Studios where Editing/Mixing Stations are Compact and/or Require Complete Silence)
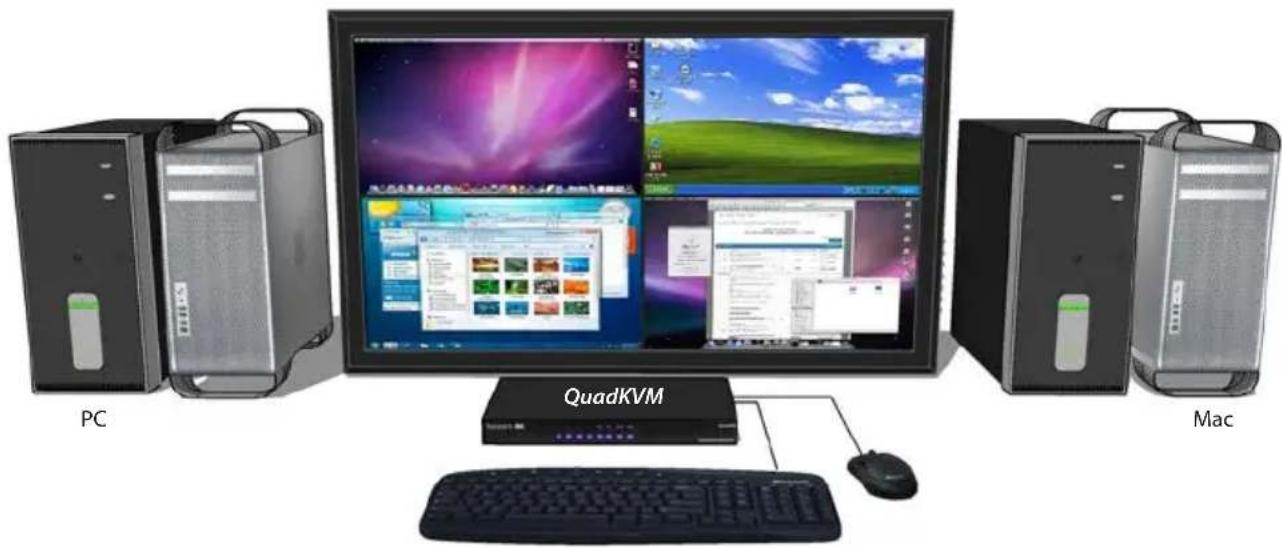
natural_image
Desktop setup with PC, QuadKVM, and Mac connected to a central computer monitor displaying multiple applications (no visible text or symbols on main devices)Installation

natural_image
Computer setup with multiple desktop towers, a central monitor displaying a butterfly image, and a mouse on the right (no readable text or symbols)USB OUTPUTS (to keyboard/mouse)USB I

- Power off all computers and the display.
- Connect the USB output of each computer to the USB inputs on the QuadKVM using male-to-male A to B USB cables.
- Connect the DVI-I/D output of each computer to the DVI-D inputs on the QuadKVM using male-to-male DVI-D cables.
- Connect the USB keyboard and mouse to the USB outputs on the QuadKVM.
- Connect the DVI-D display to the DVI-D output on the QuadKVM.
- Power on the QuadKVM by connecting the power cable.
- Power on the computers and the display.
Front Panel Operation
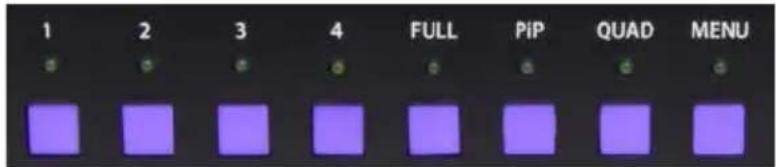
QuadKVM Front Panel Buttons and Indicators
The QuadKVM operates in much the same way as a conventional KVM. To view and control any input, simply press the corresponding button on the front of the QuadKVM. For example, press 1 for the first input, 2 for the second input, and so on. The LED lights will change accordingly.
Setting the Resolution
The first time you connect a display to the QuadKVM, you will need to set the output resolution to that of your display. To change the resolution, press MENU and 2/3 at the SAME TIME.
The corresponding resolutions are as follows:
Menu+2 - UXGA 1920x1080
Menu+3 - WUXGA 1920x1200
In addition to the standard KVM functions, the QuadKVM is capable of displaying several inputs at a time with different modes of operation. To switch to a particular mode, simply press the corresponding button on the front of the QuadKVM. The available modes are defined as follows:

FullScreen Mode - For Fullscreen Mode, press FULL. To select the source computer for keyboard and mouse control, press 1/2/3/4 on the front panel.

PiP Mode - For Picture-in-Picture Mode, press PiP. To select the source computer for the main display and keyboard and mouse control, press 1/2/3/4 on the front panel.

Dual-Mode - For Dual-Mode, press PiP and FULL at the same time, then press 1/2/3/4 for the left source computer and 1/2/3/4 for the right source computer.

Quad-Mode - For Quad-Mode, press QUAD. To select the source computer for keyboard and mouse control, press 1/2/3/4 on the front panel.
To display the system information, press MENU and PiP at the SAME TIME. To exit press MENU. To reset the QuadKVM to its factory default settings, press MENU, QUAD and FULL at the SAME TIME.
On-Screen-Display (OSD) Operation
The QuadKVM has an OSD that is accessible by pressing MENU on the front panel. To select an option:
- press 1/2/3/4 on the front panel (1-4 only)
- use the keyboard up and down arrow keys, pressing enter to select, left arrow to go back.
• press the corresponding F-key
To exit the OSD, press MENU or escape.
SYSTEM
F1 . HOTKEY CFG
F2. OSD POSITION
F3 . USER SELECT
F4 . SCAN
<- to go back
The SYSTEM OSD option (F1 from the main OSD) allows the user to configure the hotkeys (F1), change the OSD position (F2), select from set users (F3), and scan the inputs 1-4 once (F4).
SMARTAVI
QUADKVM
F1. SYSTEM
F2. MODE
F3. CONFIGURATION
F4. VIDEO
F5. HELP
Screenshot of the QuadKVM's Main OSD.
MODE
F1. PIP
F2 . FULL
F3.QUAD
<- to go back
The MODE OSD option (F2 from the main OSD) allows the user to set the mode. The available modes via OSD are PiP (Picture in Picture) (F1), Full (F2), and Quad (F3).
CONFIGURATION
F1. SAVE SETTINGS
F2 . FACTORY RESET
The CONFIGURATION OSD option (F3 from the main OSD) allows the user to back up the settings (including pre-defined user settings) (F1) and to perform a factory reset to reset the QuadKVM to its factory default settings (F2).
VIDEO CONFIG
F1 . VIDEO INFO
F2. RES SELECT
F3 . HORZ POSITION
F4 . VERT POSITION
<- to go back<- to go back
The VIDEO CONFIG OSD option allows the user to view the video status (F1), select the output resolution (F2), and set the horizontal (F3) and vertical (F4) position of the video output.
Keyboard Hot-Key Operation
The QuadKVM can be controlled via keyboard hot-keys that make the functions of the QuadKVM available at the console keyboard. The hot-keys are programmable via the OSD menus. By default, the primary HotKey is Ctrl. The default hotkey can be changed in the SYSTEM OSD (see On-Screen-Display (OSD) Operation).
| HOTKEY SEQUENCE FUNCTION | |
| HotKey, HotKey, O Brings up | the On Screen Display (See OSD Operation). |
| HotKey, HotKey, I Displays an | informational status screen. See below. |
| HotKey, HotKey, Q Selects Quad Mode. | |
| HotKey, HotKey, U,1/2/3/4 | Selects source for control. Use 1/2/3/4 to select the source computer for display, keyboard and mouse control. |
| HotKey, HotKey, F,1/2/3/4 | Selects Full Mode. Use 1/2/3/4 to select the source computer for display, keyboard and mouse control. |
| HotKey, HotKey, P,1/2/3/4 | Selects PiP Mode. Use 1/2/3/4 to select the source computer for display, keyboard and mouse control for the main screen. |
| HotKey, HotKey,D,(right)1/2/3/4/,(left)1/2/3/4 | Selects Dual Mode. Use 1/2/3/4 to select the LEFT source computer for display, and 1/2/3/4 to select the RIGHT source computer for display. |
| HotKey, HotKey, V,1/2/3 Changes the output resolution.1 - WUXGA 1920x10802 - WUXGA 1920x1200 | |
| HotKey, HotKey, R Resets the USB board. Use if a source computer's USB is unplugged during use. This resets control to the first available source. Alternately, you can use HotKey, HotKey, U,1/2/3/4 . | |
| HotKey, HotKey, B Resets the QuadKVM to factory defaults. | |
QuadKVM ver 2.06
Out 1920 x 1080
1 1280 x 1024 DVI
2 1600 x 1200 DVI
3 1280 x 1024 VGA
4 NO SOURCE DVI
USB: OK MODE: PIP
F1 1920 x 1080
F2 1920 x 1200
HotKey, HotKey, I displays an informational status screen like the one shown above. Press F1/F2/F3 to change the output resolution.
RS-232 Operation
The QuadKVM may also be controlled via RS-232 commands. To use these commands, you must use HyperTerminal or an alternate terminal application. The settings for the connection are as follows:

Once you have connected to the QuadKVM, you will see resolution information for the connected sources and a command prompt.
The screen should look similar to the following:
The resolution read for input 1 is SXGA 1280x1024 The resolution read for input 2 is UXGA 1600x1200 The resolution read for input 3 is SXGA 1280x1024 There is an invalid source on input port. 4 QuadView Apr 20 2012 09:48:10 ver#2.06>>_
RS-232 Operation (continued)
Once you have entered the correct password, the following commands may be issued:
| Help and a list of options ? | |
| Information i | |
| Dual Mode d[LEFT 1-4][RIGHT 1-4] | |
| Full-Screen f | |
| Quad-Mode q | |
| PiP-Mode p[1-4] | |
| Output Resolution o[0-XGA|1-HD|2-WUXGA] | |
| Set the EDID E[1-WUXGA|2-VGA|3-HD](for 1)[1-WUXGA|2-VGA|3-HD](for 2)[1-WUXGA|2-VGA|3-HD](for 3)[1-WUXGA|2-VGA|3-HD](for 4) | |
| Reset the QuadKVM reset | |
| Upload Firmware u1 | |
| USB Bootload Mode u2 | |
| Reset USB Board ru |
The following is an example screen shot of the QuadKVM help/options screen (this screen was displayed by pressing ?
q Quad view q
p PiP p [Main Screen]<1-4>
o Output Mode o [0-XGA|1-HD|2-WUXGA]
S Run scan of input ports.
u1 Upload new firmware to the USB board
reset Reset the QuadView.
ru Reset the USB board.
E EDID E[INPUT PORT][1-WUXGA][2-VGA][3-HD].
u2 Put the USB ports in bootload mode
? Help ?
To display the port information, press i
| Port | source | mode | res |
| 1 | DVI | SXGA | 1280×1024 |
| 2 | DVI | UXGA | 1600×1200 |
| 3 | VGA | SXGA | 1280×1024 |
| 4 |
Current Output: HD 1920×1080
Current Mode: QUAD VIEW
To check for the latest firmware, please call our technical support team at 1-800-AVI-2131.
At SmartAVI, we offer a complete line of audio/video solutions for high-quality signal switching and distribution. Our devices support multiple signal types including VGA, DVI, HDMI, USB, RS232, IR and more.
EXTENDERS

flowchart
graph LR
    A["COMPUTER"] --> B["EXTENDER"]
    B --> C["FIBER OPTIC"]
    C --> D["DISPLAY"]
SPLITTERS

flowchart
graph LR
    A["BLUERAY PLAYER"] --> B["SPLITTER"]
    B --> C["DISPLAYS"]
    C --> D["Display"]
SWITCHES

flowchart
graph TD
    A["DVR"] --> B["MATRIX SWITCH"]
    C["GAMING CONSOLE"] --> B
    D["DISPLAY"] --> B
    B --> E["Computer"]
At SmartAVI, we offer high-quality products including digital signage, video walls, signal extenders, splitters and switches and fiber optics. All of our products are manufactured in the United States in our North Hollywood, California facility.

natural_image
Exterior view of a modern office building with 'Smart-AM' signage and purple awnings, surrounded by palm trees and parked cars (no readable text beyond signage)NOTICE
The information contained in this document is subject to change without notice. SmartAVI makes no warranty of any kind with regard to this material, including but not limited to, implied warranties of merchantability and fitness for any particular purpose. SmartAVI will not be liable for errors contained herein or for incidental or consequential damages in connection with the furnishing, performance or use of this material. No part of this document may be photocopied, reproduced or translated into another language without prior written consent from SmartAVI. For more information, visit www.smartavi.com.
© Copyright 2014 SmartAVI, All Rights Reserved
SmartAVI, Inc. / Twitter: smartavi - 11651 Vanowen St. North Hollywood, CA 91605
Tel: (818) 503-6200 Fax: (818) 574-5581 - http://www.SmartAVI.com
Smart-AM
SMART AUDIO VIDEO INNOVATION


Brand : Smart-AVI
Model : SM-QKVM-S
Category : KVM switch