
AP-SNCL-VHD40GS - Unspecified Smart-AVI - Free user manual and instructions
Find the device manual for free AP-SNCL-VHD40GS Smart-AVI in PDF.


| Product Type | Digital Signage Media Player |
| Brand | Smart-AVI |
| Model | AP-SNCL-VHD40GS |
| Form Factor | uATX (6.75 x 6.75 inches) |
| Dimensions | 8 x 8.375 x 2.25 inches (20.32 x 21.27 x 5.72 cm) |
| Weight | Approximately 2.5 lbs (1.1 kg) |
| Power Supply | External power adapter (included) |
| Processor | Integrated Intel Celeron 215 (533 MHz FSB) |
| Memory | 512 MB DDR2 SDRAM (up to 1 GB) |
| Storage | Internal flash memory (OS and media storage) |
| Video Output | VGA; optional S-Video |
| Audio | ADI AD1888 audio codec (line out) |
| Network | 10/100 Ethernet; supports wireless via USB adapter |
| USB Ports | 2 x USB 2.0 |
| Supported Media Formats | Video: AVI, MPEG1/2/4, WMV, DIVX; Images: JPEG, GIF, BMP, PNG; Audio: MP3, WMA; Documents: PDF, PPT; Web: HTML, RSS, Flash |
| Operating System | Embedded Linux |
| Software Included | SignagePro Manager (server) and Player (client) with Task Scheduler, Template Creator, Creeping Line Editor, Logo Manager |
| Box Contents | SignagePro Client unit, Power Cord, Unique USB Key, Software CD, Quick Setup Guide |
| Warranty | 1 year limited warranty |
Frequently Asked Questions - AP-SNCL-VHD40GS Smart-AVI
User questions about AP-SNCL-VHD40GS Smart-AVI
0 question about this device. Answer the ones you know or ask your own.
Ask a new question about this device
Download the instructions for your Unspecified in PDF format for free! Find your manual AP-SNCL-VHD40GS - Smart-AVI and take your electronic device back in hand. On this page are published all the documents necessary for the use of your device. AP-SNCL-VHD40GS by Smart-AVI.
USER MANUAL AP-SNCL-VHD40GS Smart-AVI
natural_image
Exterior view of a Siemens Audio Drive connected device (no visible text or symbols on the device body)Deliver your message to audiences all over the world with our integrated management solution that is powerful and easy-to-use
Installation
Manual
www.smartavi.com
Table of Contents
Introduction 1
Disclaimer notice 2
Limited warranty statement 3
-
Contents of box 4
-
Installing Signage Manager 5
-
Setting up the SignagePro Client 9
3.1 Settings and Configurations of Client.... 10
Table 3.2 Quick Keys and Functions of SignagePro Client.... 12
- Adding your company logo 13
4.1 Sample .slogo file without clock.... 16
4.2 Field values for .slogo files.... 17
4.3 Add Time and Date to .slogo 18
- Wireless Configuration 20
5.1 Connecting to a Hidden Network.... 22
- Schedules, Tasks, Templates, RSS 25
6.1 User Manager.... 27
6.2 Task Manager.... 30
6.2.A Create a new Task.... 31
6.3 Schedules - Creation, Export, Import 34
6.3.A Modifying Tasks within the Schedule.... 36
6.3.B Run Schedule after a power failure 38
6.3.C Export Schedule and upload it to an offline box via USB.... 42
6.3.D Import a Schedule.... 47
6.4 SuperSchedules.... 49
6.5 Template Creator 50
6.5.A Create Template and Assign Task 50
6.5.B Layout example.... 58
6.6 Creeping Line Editor.... 59
6.6.A Opening Editor....59
6.6.B Add Content 59
6.6.C Window and Transparency.... 62
6.6.D Set the position of creeping text.... 63
6.6.E Line in a Task.... 64
Save Changes......66
- Screen Configuration 68
7.1 Rotating a Screen 72
7.2 Installing and Removing Fonts 89
-
Updating the SignagePro Clients Via Schedule 91
-
Update clients firmware via USB 93
Specifications 96
Sample Network Configuration #1 98
Sample Network Configuration #2 100
Index 0
§ Introduction
Congratulations on your purchase of the SignagePro Digital Signage Solution. Please read the instructions carefully before using.
SignagePro is a digital signage solution that creates new marketing and information sharing portals to reach target audiences with real time information. SignagePro attracts audiences by displaying your message using vivid, high-quality video and animation replacing traditional signs and posters.
SignagePro uses your IP network to remotely manage, control, and broadcast your information to target audiences in specific locations across the globe. Because it uses a closed network, your information is safe and secure.
SignagePro is capable of playing back all industry standards, such as Flash files, Video .MPG, HTML, QuickTime, Power Point, .JPG's, Java Applets, and more.
SignagePro is the ultimate solution that provides both hardware and software for the display and management of your digital content. It is highly cost effective and easy to use. It is the perfect solution for both small-scale and large-scale projects.
§ Disclaimer notice
The information contained in this document is subject to change without notice. Applica makes no warranty of any kind with regard to this material, including but not limited to, implied warranties of merchantability and fitness for particular purpose.
Applica will not be liable for errors contained herein or for incidental or consequential damages in connection with the furnishing, performance or use of this material.
No part of this document may be photocopied, reproduced, or translated into another language without prior written consent from Applica, Inc.
§ Limited warranty statement
A. Extent of Limited Warranty
-
Applica, Inc. warrants to the end-user customers that the Applica product specified above will be free from defects in materials and workmanship for the duration of 1 year, which duration begins on the date of purchase by the customer. Customer is responsible for maintaining proof of date of purchase.
-
Applica's limited warranty covers only those defects which arise as a result of normal use of the product, and do not apply to any:
a. Improper or inadequate maintenance or modifications.
b. Operations outside product specifications.
c. Mechanical abuse and exposure to severe conditions.
-
If Applica receives, during applicable warranty period, a notice of defect, Applica, Inc. will, at its discretion, replace or repair the defective product. If Applica is unable to replace or repair the defective product covered by the Applica warranty within a reasonable period of time, Applica shall refund the cost of the product.
-
Applica shall have no obligation to repair, replace or refund unit until customer returns defective product to Applica.
-
Any replacement product could be new or like new, provided that it has functionality at least equal to that of the product being replaced.
-
Applica limited warranty is valid in any country where the covered product is distributed by Applica.
§ 1. Contents of box
 |  |
| 1 - SignagecPro Client | 1 - SignagecPro Software CD |
 | 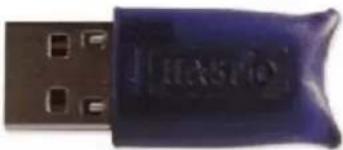 |
| 1 - Power Cord | 1 - Unique USB Key |
§ 2. Installing Signage Manager
This quick setup guide will instruct you on how to install and setup the SignagePro software onto your Server (Host PC) and how to setup the SignagePro client (Player).
To ensure proper installation of the server software;
- Please make sure you are running Windows XP Professional with Service Pack 3 or Windows Server 2003 SP2.
- Make sure that you are logged in as the system administrator.
- Turn off the Windows firewall. (see figure 1.0.2 for Windows XP)
You can alternately select SignagePro services under the exceptions tab. This option is available after you finish with SignagePro Manager software installation. (figure 1.0.1)
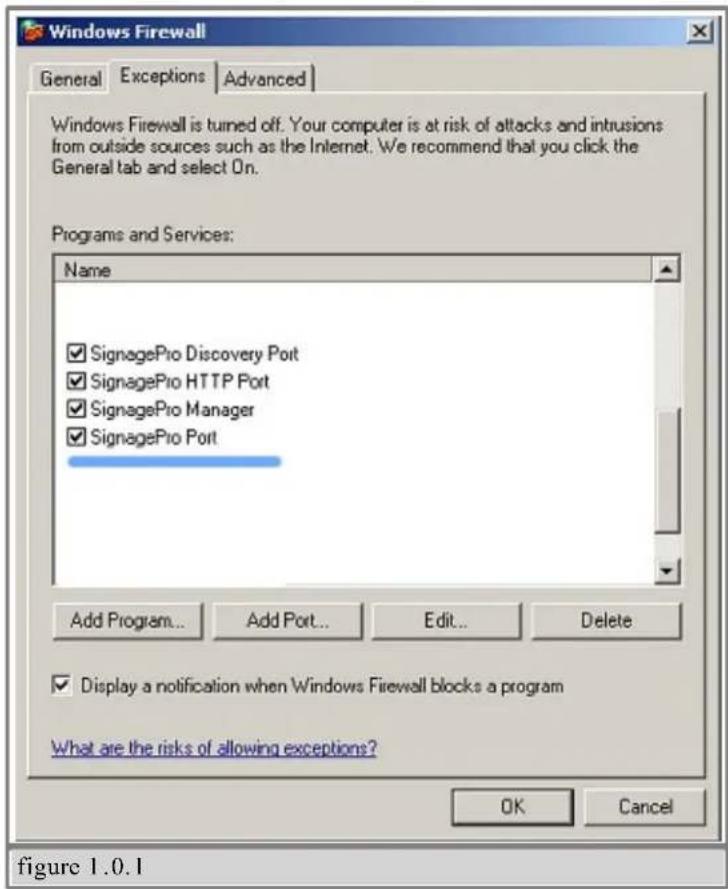

Note: If you will be using SignagePro across more than one network, refer to port 13325 when configuring your router port forwarding.
SignageServer requires a unique USB key to be installed. You will find your key on back of the SignageServer CD sleeve. In addition, you must complete the online registration for your copy of SignageServer. If you do not register in the thirty-day window, your SignageServer software will become disabled. A registration window will open automatically. If you wish to register at a later date, simply select Help/Registration.
Note:
You must insert the USB protection key provided into any available USB slot on the . Once inserted, windows will ask for the drivers you may cancel that request; drivers will be installed during SignageServer installation.
- Double click on the SignageServer executable. Read the License Agreement then click 'I Agree'
-
Enter in your name and organization and enter the unique serial number provided to you. Important: When entering the serial number, please make sure it is typed with ALL CAPS, or registration will not give you a 30 day grace period. (figure 2.0.1)
-
The next window will be to choose components, make sure "SignageServer" is checked. (figure 2.0.2)
- Choose the installation location you would like to install the SignageServer. Click 'Next'.
- Before the installation completes, you will be asked to create a password for the Administrator account. Leave it blank for the first time.
You must sign in as the Administrator for the first time you load the SignagePro Manager. For more information on the User Manager, go to Section 6.1 of the manual.
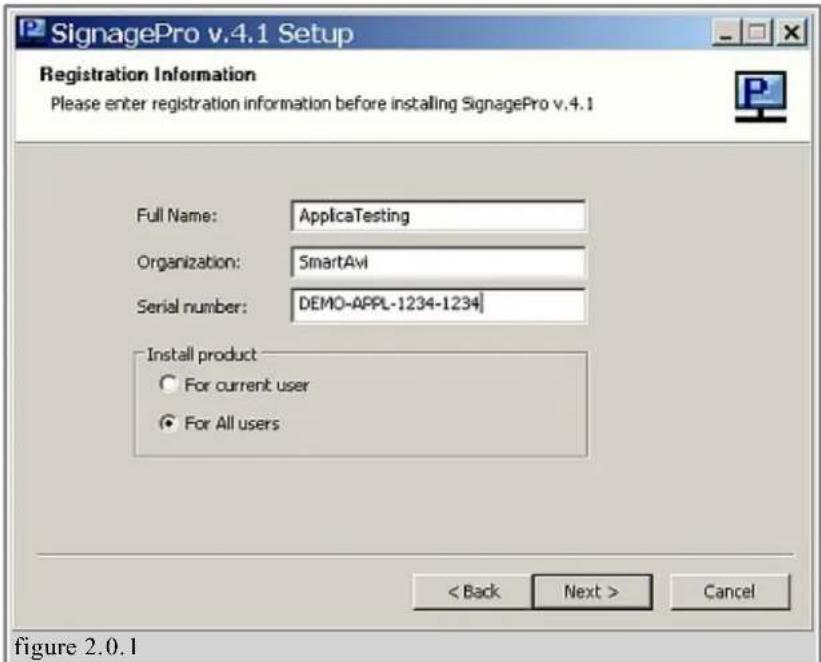

figure 2.0.2
§ 3. Setting up the SignagePro Client
- Connect the power supply cable to the SignagePro client and plug the cable into a grounded power outlet.
- Connect the mouse and keyboard cables to the corresponding ports.
- Attach the VGA cable from the monitor or display to the VGA port on back of the client. If you don't have VGA Cable attached, you won't see the SignagePro player in the Client list of SignagePro Manager!
- Connect the SignagePro client to a router using Cat5 cable. (If you will be using a wireless router, please refer to your router's manual for additional information).
- Press the power button to start the SignagePro client.
- Turn on the display connected to the client.

figure 3.0.1
§ 3.1 Settings and Configurations of Client
Once you've logged in, use the keys described in table 3.3 to navigate the various menus and functions.
Some of these menus include:
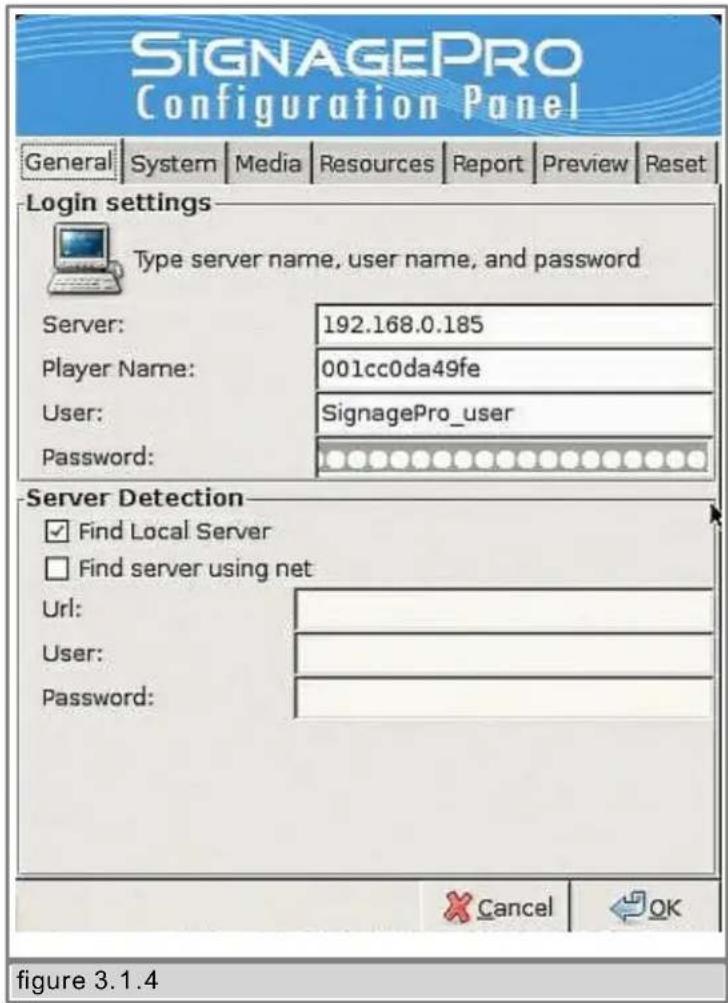
A) SignagePro Configuration( Alt + Ctrl + 2): These tabs include:
- Server: IP address of the SignagePro server (Host PC with SignageManager installed on it)
-Username and Password - Player Name: A unique name given to identify this client on the SignageServer network.
- Resolution: Here you can choose the resolution settings of the screen.
- Initializing: This option will set your SignagePro client to factory default settings. All settings and media will be erased.

B) Network Configuration menu (ALT + CTRL + 3): Manually enter your IP address or use DHCP Server (figure 3.1.5)
§ Table 3.2 Quick Keys and Functions of SignagePro Client
Keys Functions that you can use by applying directly to Signage Pro Player or in "Remote Administration" mode from the server side.
| ALT + CTRL + 1 | Displays navigation menu. |
| ALT + CTRL + 2 | Setup Signage options; such as login username and password, IP address, player name and schedule. (figure 3.4) |
| ALT + CTRL + 3 | Setup network configuration. Use this option for static IP or for use over WAN. If your network uses DHCP you will not use this option. (figure 3.5) |
| ALT + CTRL + 4 | Displays the SignagePro Information Window. Information includes; time & date, download status of your media, current version of SignagePro and connection status. |
| ALT + CTRL + 5 | Allows user to use the Linux terminal. |
| ALT + CTRL + 6 | Disconnects USB flash disks |
| ALT + CTRL + 7 | Turns media on/off |
| ALT + CTRL + 9 | Shut down and turn off the SignagePro client. |
§ 4. Adding your company logo
One of the major functions of digital signage is to get your message out and to increase your brand recognition. One of the most important aspects of your brand is your logo. Combining your logo with informative content is one of the best ways to do this. Each logo on the SignagePro server consists of two files; an image file and a text file. The text file describes the placement of the logo and adds a time and date.
To enable your logo please do the following:
- If you haven't done so already, create an image file of your company logo. SignagePro support the following image formats; .png, .jpg and .gif. (figure 4.0.1)
Sample LOGO
figure 4.0.1
picture = sample_logo.gif
origin = bottom left
offset x = 10
offset_y = 10
table 4.1
- Create a text file using notepad (or comparable text editor) and insert the fields from tables 4.2 and 4.3. See table 4.1 for format examples.

sample_logo.slogo
SLOGO File
1 KB

sample_logo.gif
956 x 157
GIF Image
Files on the USB flash drive
-
Save the file using the file name you used for your logo and .slogo as the extension. Example= sample_logo.slogo
-
Copy the image file and the .slogo file onto your USB flash drive.
-
Insert the USB flash drive containing your logo image file and the .slogo file into the SignagePro client, which is Player.
-
Run the configuration tool by pressing ALT+CTRL+2 and click on "Resources".

- Click on "Install from USB", Select the 'Logo" tab. (figure 4.0.2)

- Select the sample_logo in dialog box and click 'Ok' (figure 4.0.3)
- You can install more logos from USB thumb drive by pressing "Install from USB" button. To remove a logo you can use the 'Uninstall' button. (figure 4.0.2)
§ 4.1 Sample .slogo file without clock
| Sample .slogo file without clock | Sample .slogo file with clock |
| picture = logoname.pngorigin = bottom leftoffset_x = 10offset_y = 10 | picture = logoname.pngorigin = bottom leftoffset_x = 10offset_y = 10text = %H:%M:%Stext_x = 0text_y = 37text_face = Arialtext_size = 16text_color = #000000text_slant = normaltext_weight = normal |
Table 4.1
§ 4.2 Field values for .slogo files
The following table describes the different fields in the .slogo file and their meaning.
Picture should specify PNG file that will be used as background for logo. If PNG have alpha channel these areas will be transparent.
| origin | bottom leftbottom righttop lefttop rightThis value defines the corner of the screen from which offset value taken. |
| offset_y | This is length of "Y" coordinate between origin point and logo's closest point to origin. |
| text | This is text that will be displayed on logo. Ordinary characters display without conversion. Conversion specifications are introduced by a character '%' see next table. |
| text_x 'X' | coordinate of text inside of logo |
| text_y 'Y' | coordinate of text inside of logo |
| text_face | Font name |
| text_size | Font size |
| text_color | Font color in HTML format (example: #000000) |
| text_slant | Text slant (normal, italic) |
| text_weight | Text weight (bold, normal) |
Table 4.2
§ 4.3 Add Time and Date to .slogo
You have the option of adding time and date to your logo by adding one of the following fields to your .slogo file. (table 4.3)
See example (table 4.1)
| %a | The abbreviated weekday name according to the current locale. |
| %A | The full weekday name according to the current locale. |
| %b | The abbreviated month name according to the current locale. |
| %B | The full month name according to the current locale. |
| %c | The preferred date and time representation for the current locale. |
| %C | The century number (year/100) as a 2-digit integer. (SU) |
| %d | The day of the month as a decimal number (range 01 to 31). |
| %D | Equivalent to %m/%d/%y |
| %e | Like %d, the day of the month as a decimal number, but a leading zero is replaced by a space. |
| %F | Equivalent to %Y-%m-%d (the ISO 8601 date format). (C99) |
| %G | The ISO 8601 year with century as a decimal number. The 4-digit year corresponding to the ISO week number (see %V). This has the same format and value as %y, except that if the ISO week number belongs to the previous next year, that year is used instead. (TZ) |
| %g | Like %G, but without century, i.e., with a 2-digit year (00-99). (TZ) |
| %h | Equivalent to %b. (SU) |
| %H | The hour as a decimal number using a 24-hour clock (range 00 to 23). |
| %I | The hour as a decimal number using a 12-hour clock (range 01 to 12). |
| %j | The day of the year as a decimal number (range 001 to 366). |
| %k | The hour (24-hour clock) as a decimal number (range 0 to 23); single digits a preceded by a blank. (See also %H.) (TZ) |
| %l | The hour (12-hour clock) as a decimal number (range 1 to 12); single digits preceded by a blank. (See also %I.) (TZ) |
| %m | The month as a decimal number (range 01 to 12). |
| %M | The minute as a decimal number (range 00 to 59). |
| %n | A new line character. (SU) |
| %O | Modifier: use alternative format, see below. (SU) |
| %p | Either AM or PM according to the given time value, or thecorresponding strings for the current locale. Noon is treated as pm and midnight as am. |
| %P | Like %p but in lowercase: am or pm or a corresponding string for the current locale. (GNU) |
| %r | The time in a.m. or p.m. notation. In the POSIX locale this is equivalent to %I:%M:%S %p. (SU) |
| %R | The time in 24-hour notation (%H:%M). (SU) For a version including the seconds, see %T below. |
| %s | The number of seconds since the Epoch, i.e., since 1970-01-01 00:00:00 U (TZ) |
| %S | The second as a decimal number (range 00 to 60). (The range is up to 60 to allow for occasional leap seconds.) |
| %t | A tab character. (SU) |
| %T | The time in 24-hour notation (%H:%M:%S). (SU) |
| %u | The day of the week as a decimal, range 1 to 7, Monday being 1.See also %(SU) |
| %U | The week number of the current year as a decimal number, range 00 to 53, starting with the first Sunday as the first day of week 01. See also %V and % |
| %V | The ISO 8601:1988 week number of the current year as a decimal number, range 01 to 53, where week 1 is the first week that has at least 4 days in the current year, and with Monday as the first day of the week. See also %U and W. (SU) |
| %w | The day of the week as a decimal, range 0 to 6, Sunday being 0.See also %u. |
| %W | The week number of the current year as a decimal number, range 00 to 53, starting with the first Monday as the first day of week 01. |
| %x | The preferred date representation for the current locale without the time. |
| %X | The preferred time representation for the current locale without the date. |
| %y | The year as a decimal number without a century (range 00 to 99). |
| %Y | The year as a decimal number including the century. |
| %z | The time-zone as hour offset from GMT. Required to emit RFC 822-conformant dates (using "%a, %d %b %Y %H:%M:%S %z"). (GNU) |
| %Z | The time zone or name or abbreviation. |
| %+ | The date and time in date (1) format. (TZ) |
| %% | A literal % character |
Table 4.3
§ 5. Wireless Configuration
Important: Before configuring Wireless network connection under the SignagePro client you will need to setup your Wireless Router to have appropriate wireless settings.
We recommend to use WPA2-PSK with an AES configuration.
- Turn Off the SignagePro client.
- Insert the USB wireless adapter into any available USB slot on your SignagePro client.
- Boot your SignagePro client with the USB wireless adapter connected.

- Once the unit is in the main screen (blue taskbar), go to CTRL+Alt+3. Hit the “refresh” button and your wireless network should automatically show up in the list of networks. Go to Properties of your Network. (figure 5.0.1)

- Select Encryption Type (WPA 1/2 stands for WPA or WPA2) and enter the appropriate encryption key. (figure 5.0.2)
- Hit "connect". You should now be connected to your wireless network.
§ 5.1 Connecting to a Hidden Network
- Turn Off the SignagePro client.
- Insert the USB wireless adapter into any available USB slot on your SignagePro client.
-
Boot your SignagePro client with the USB wireless adapter connected.
-
Once the unit is in the main screen (blue taskbar), go to CTRL+Alt+3. Hit the "refresh" button to update wireless List. You would not see your hidden wireless network SSID in the list.

- Point your mouse cursor on the "Network" Tab and click on it. In the field that would appear you need to type-in the SSID name of the hidden network. (figure 5.1.2)

- Type the name of the network and click on Connect. (figure 5.1.3)
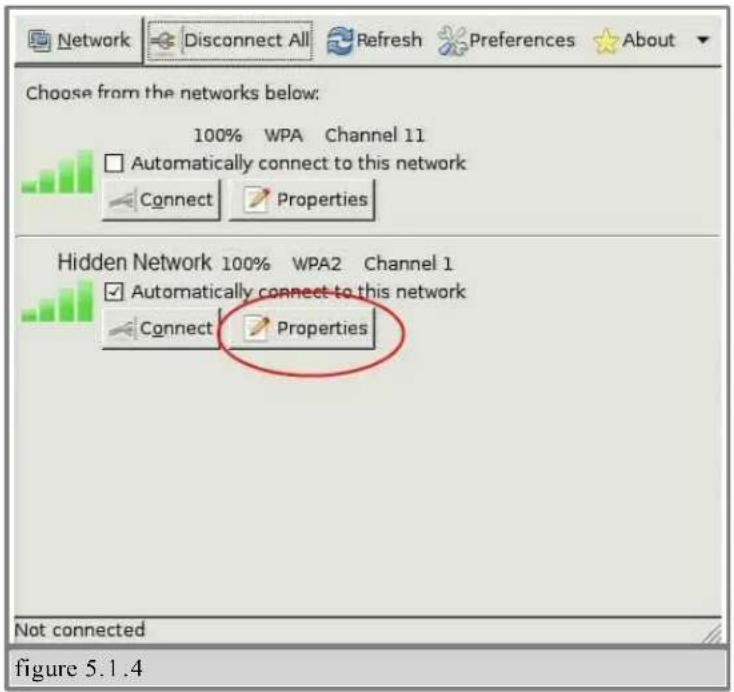
- Now you will see the new network in your list with "Hidden Network" name. Go to the Properties of that network. (figure 5.1.4)

- Select Encryption Type (WPA 1/2 stands for WPA or WPA2) and enter the appropriate encryption key. (figure 5.1.5)
- Hit "connect". You should now be connected to your wireless network.
§ 6. Schedules, Tasks, Templates, RSS
- Double click on the SignageServer Station Manager icon either on your desktop or start menu.
![SignagePro Manager Run Station Configuration Help Clients: Default SignagePro-PC SIGNAGEPRO-PC Vital 134 Connected managers: Manager User name Station Mngr (SIGNAGEPRO-PC) SignagePro Task Mngr (SIGNAGEPRO-PC) SignagePro Server Logon settings Type the name of the computer or chose a computer from the drop-down list. Computer: 127.0.0.1 User Name: SignagePro Password: OK Cancel Log: Time 2008.03.11 09:15:19.779 2008.03.11 09:16:26.812 2008.03.11 09:33:14.515 2008.03.11 09:34:18.399 2008.03.11 11:24:41.880 2008.03.11 11:27:40.375 Login user: Task Manager SIGNAGEPRO-PC [127.0.0.1] Logoff user: Task Manager SIGNAGEPRO-PC [127.0.0.1] Task Manager Hide Figure 6.0.1](/content/2026/06/1247929/images/6b143bc558bdcd96b64359a7ae1348cae5968cd2d4e4a57f1b0710c85ddedd06.jpg)
- You will first be prompted with a 'Server Logon settings' dialog box. The default IP address is 127.0.0.1. In the user name and password fields use the new Administrator user and password you created in the installation process and hit 'OK'. (figure 6.0.1)
![SignagePro Manager Run Station Configuration Help Clients: Default SignagePro PC SIGNAGEPRO PC Vista1 134 Connected managers: Manager User name Station Mngr (SIGNAGEPRO PC) SignagePro Task Mngr (SIGNAGEPRO PC) SignagePro Logs: Time From Description 2008.03.11 09.15:19.779 Server Login user: Station Manager SIGNAGEPRO PC [127.0.0] 2008.03.11 09.16:26.812 Server Login user: Task Manager SIGNAGEPRO PC [127.0.0] 2008.03.11 09.33:14.515 Server Logoff user: Client Vista1 [192.168.1.4] [SignagePro] 2008.03.11 09.34:18.399 Server Login user: Client Vista1 [192.168.1.4] [SignagePro] 2008.03.11 11.24:41.880 Server Login user: Task Manager SIGNAGEPRO PC [127.0.0] 2008.03.11 11.27:40.375 Server Logoff user: Task Manager SIGNAGEPRO PC [127.0. Task Manager Hide figure 6.0.2](/content/2026/06/1247929/images/f0d2c4fe50015581002690bc0d7b96d10c391bef98db0a52783841f63bd095eb.jpg)
- Once the SignageServer Station Manager is loaded. You will see the following:
Connected SignagePro clients. Loopback IP. (127.0.0.1)
Your user name and password.
Click Save Password to stay logged in. (figure 6.0.2)
§ 6.1 User Manager
Our user manager allows SignagePro users to manage and control their own user database. Each user created is allowed a set of permissions. The user rights are described as followed:
- Administrator
- Full access to everything, only user that is able to create and manage users.
•Task Manager
- Allowed to access and control the task manager and selectable clients assigned by the administrator.
- Station Manager
- allowed to access and control the station manager.
- Client
- used for the SignagePro clients to connect to the signage server only.
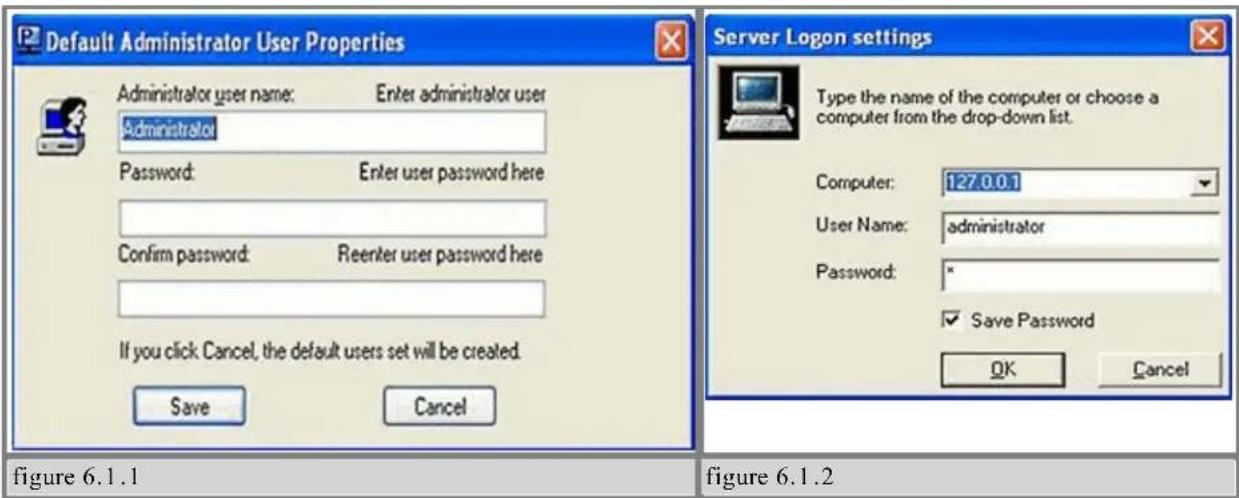
During the installation, you will be asked to create the administrator password. You can leave it blank, so it would be the default password (figure 6.1.1)
To have different users log in, always click on 'Configuration' then 'Login server.' Click 'Save Password' while logged in. To log out, uncheck 'Save Password'. (figure 6.1.2)
After you log into the SignagePro manager, you can create new users by clicking 'Run,' then clicking on 'User Manager' (figure 6.1.3)
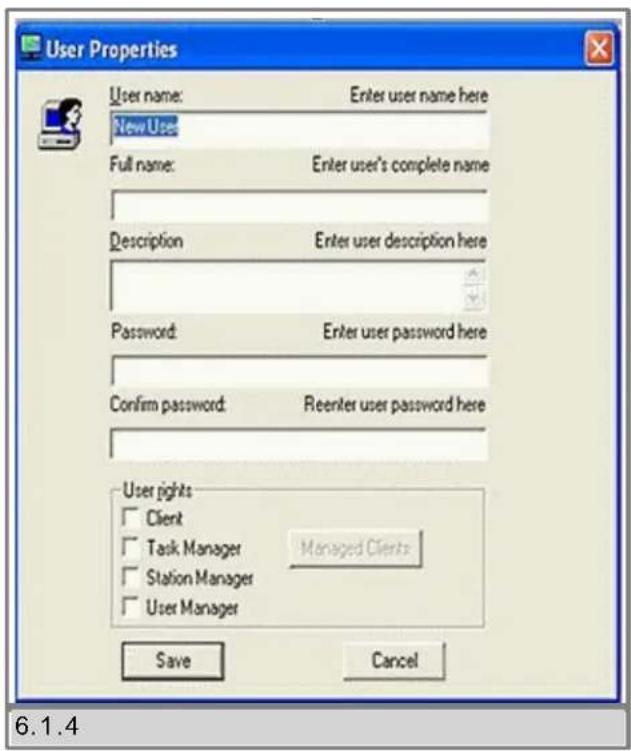
Click 'Save'. You will then see the new user in the list. (figure 6.1.3)
To create a new user, right click or click on 'User' then 'New User.' The user properties window will open. Here is where you enter in your new user information (figure 6.1.4):
- User name
- The name of the new user.
- Full name
- The real name of the user.
- Description
- The description of the user.
- Password
- The password for that user.
- User rights
- Select the rights you want this user to have.

§ 6.2 Task Manager
The main feature of SignagePro is the Task Manager. This is where you set up and manage all of your presentations. To open the Task Manager:
![SignagePro Manager Run Station Configuration Help Task Manager User Manager Creeping line editor Connected managers: Manager User name Station Mngr (SMARTAVI-TESTIN) Administrator Logs: Time From Description 2010.04.12 12:34:53.906 Server Login user: Station Manager SMARTAVI-TESTIN [127.0] 2010.04.12 12:34:59.546 Server Login user: User Manager SMARTAVI-TESTIN [127.0] 2010.04.12 12:39:11.609 Server Logoff user: User Manager SMARTAVI-TESTIN [127.0] Task Manager Hide User Administrator logged in successfully figure 6.2.1](/content/2026/06/1247929/images/07924056b198fb70463083ee124f822a3e4d425c89af5308618bb6eaabc2ba34.jpg)
- Select Run then click on the Task Manager. (figure 6.2.1)
Once you are in the Task Manager you can begin setting up your presentations.
Tasks: are individual presentations such as movies, PowerPoint presentations or Flash files; in order to run a Task it must be placed into a schedule.
Schedules: are used to schedule a Task or a series of Tasks to run together at a specific time and day.
Setting up Tasks: In the Task menu option, you can create, delete, and view the properties of all the applications you wish to run on SignagePro.
§ 6.2.A Create a new Task
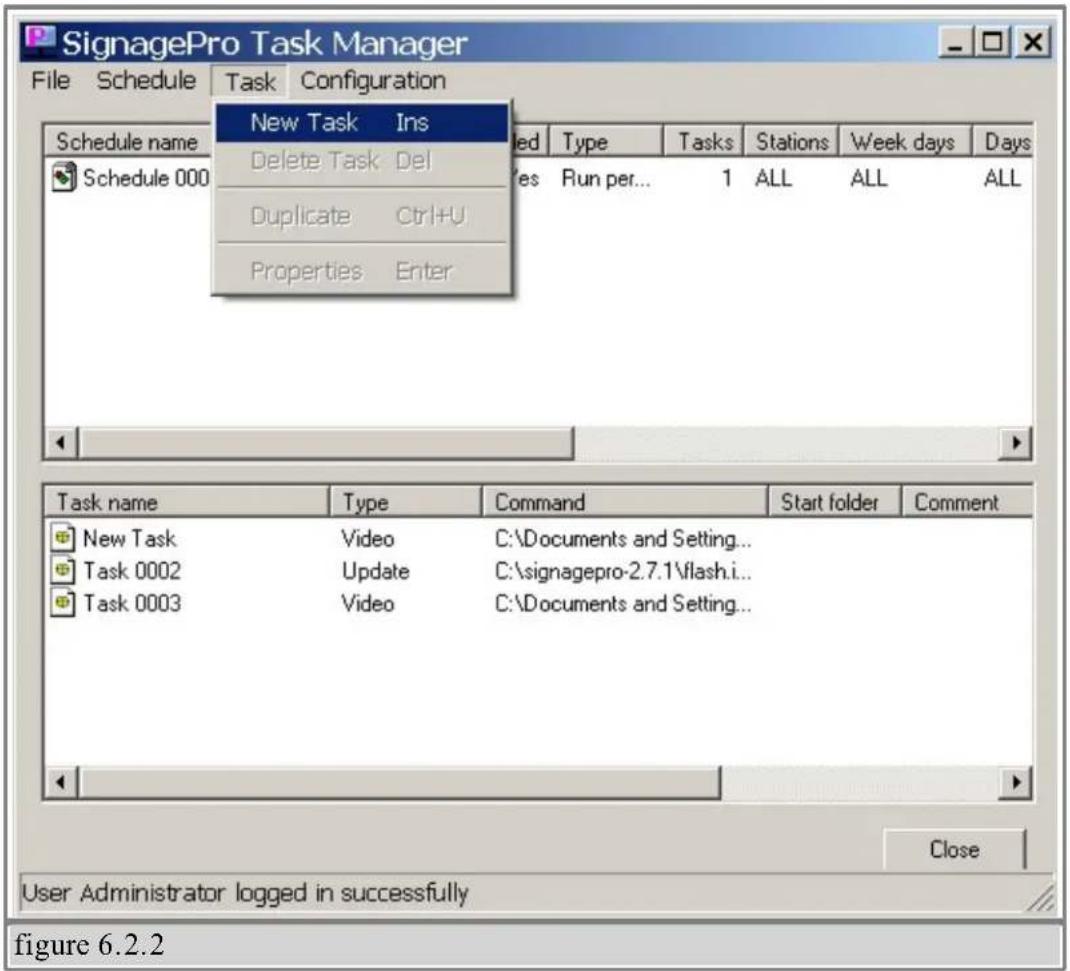
- Explore Task tab and select 'New Task'. (figure 6.2.2)

- Select the type of file you are going to use. (figure 6.2.3) You can select from a wide variety of file types such as Creeping lines (marquis text), Web Pages, PowerPoint, Video, PDF, Images and more)

- Select the file located on your hard drive (figure 6.2.4)
Once the task has been added, you can configure the following properties:
- The duration of the task - setting the duration to 0:0:0 will cause the program to run indefinitely.
- Operation on End of Task - Here you can set what will happen upon completion of the Task if it is included in a schedule.
- Run Next Task - will open up the next task in the schedule upon completion.
- Restart Current Task - will cause the task to repeat itself without going to the next task. The window properties of the file. (window size, full-screen, etc.)
Look to section 6.6 on how to add Creeping Line(s) to a task.
Note: You can override these configurations in the 'Schedule' menu.
§ 6.3 Schedules - Creation, Export, Import
A schedule is where you combine all of the different tasks that you've created in chapter 6.2. A and put them into one place. From here you create the programming schedule. You can select a variety of task to run at specific times, run once, or loop continuously. If you use the template feature (described in chapter 6.5) you will select which tasks will run in which window. Schedules can be as complex or as simple as you like. You can control hundreds of tasks to run at specific times or simply have one or two tasks set to loop continuously.

- In the Task Manager select 'Schedule' and click 'New Schedule'. The Schedule Properties Dialog will appear. (figure 6.3.1)
- In the 'General' tab give your schedule a name. (optional)
- Begin populating the schedule with various tasks. These tasks can be videos, images, web pages, PowerPoint Presentations, etc.
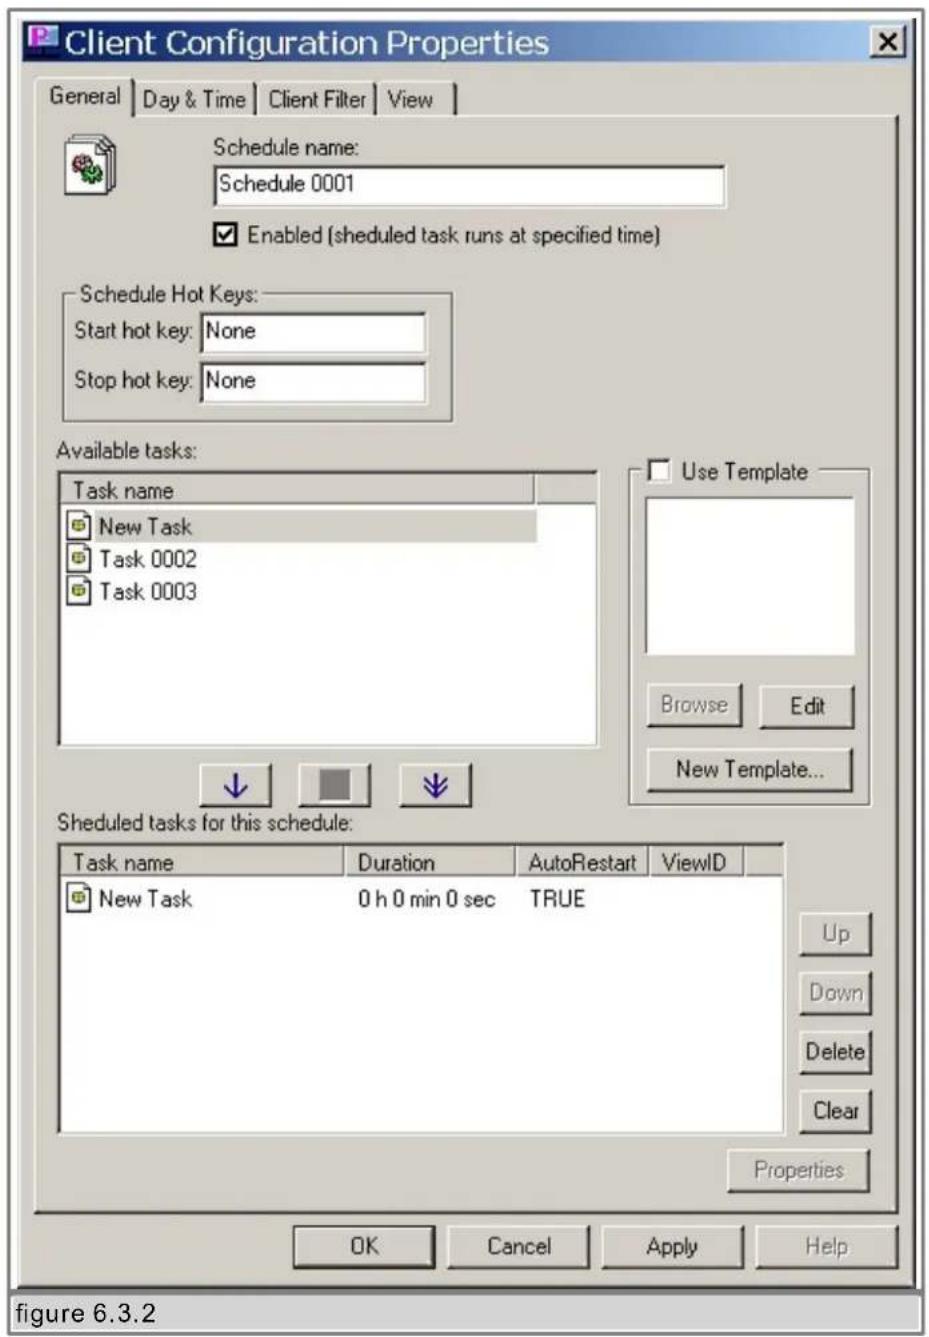
a. To do this you must use your mouse to highlight one of the tasks you created in the previous step. (figure 6.3.2)
b. With the task highlighted click the arrow just to move the task into your schedule. (figure 6.3.2)
c. The task within the schedule will run in order starting from the task at the top of the list. You can arrange tasks by selecting them and using the up and down buttons.
d. You also have the option of deleting the task from the schedule or clearing the schedule
entirely.
§ 6.3.A Modifying Tasks within the Schedule
Once you have added your tasks to the schedule, you are ready to modify the tasks properties!
While in the ‘Schedule Properties’ dialog, double-click the task you wish to modify from the ‘Scheduled Tasks’ section. This brings up the ‘Schedule Task Properties’ dialog. From here you are given several options:
a. Operation on end of task
- Run next task in schedule: This option will run the next task that you've added to the schedule once the
task has ended.
- Restart current task: This will restart the current task once it has finished. Use this selection to loop your task indefinitely.
- Wait for end of task period and then start next task in schedule: Use this Selection if you've set a specific duration for the task.
b. Duration: Lets you configure how long you would like the task to be displayed on your screen. Setting this to 0:0:0 will automatically stop the task once it has ended. This is primarily used for video and flash movies.
c. Window: Lets you configure whether you want your task to be displayed actual size, maximized, minimized, or hidden. (figure 6.3.4)
d. Use View: If you are using templates*, this control lets you select which view to display your task. (figure 6.3.5)
e. Click 'OK' to save your settings.

- Day and Time: Use the 'Day and Time' tab to control when and for how long the schedule will play. The Day and Time dialog controls the following;
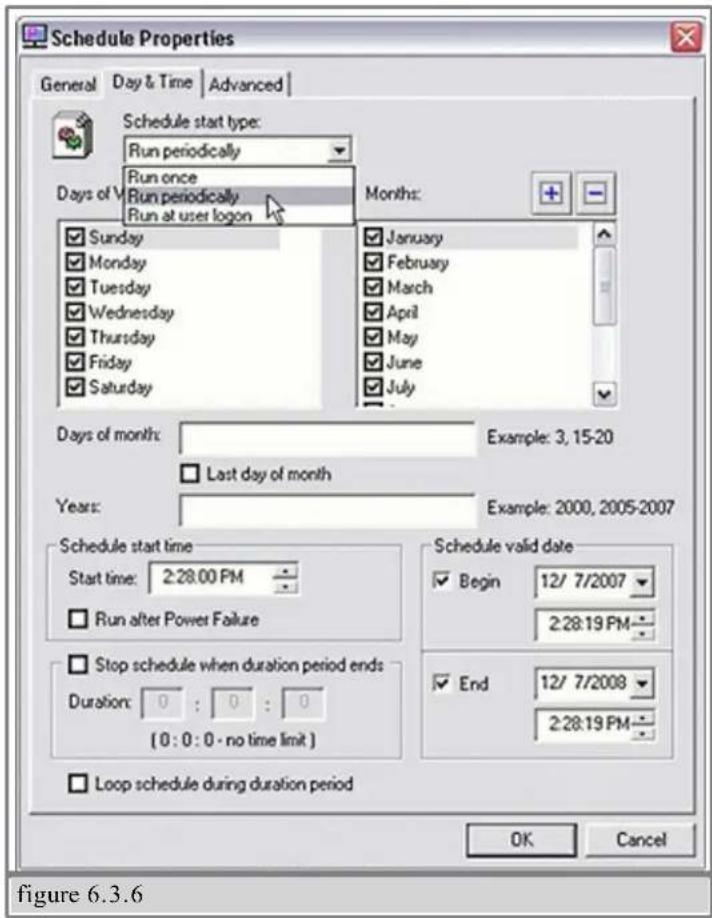
a. Schedule start type: This feature selects how the schedule will operate. (figure 6.3.6)
- Run at user logon: This will start the schedule as soon as the user is logged on.
- Run once: Select a specific time and date for the schedule to run.
- Run periodically: Set the time and date for your schedule to play. This option allows you to alternately control a variety of schedules.
b. The following features let you control when your schedules will play up to the minute. (figure 6.3.7)
Days of week, Month, Day(s) of month, Years, Start time, End time, Duration, and Intervals.

§ 6.3.B Run Schedule after a power failure
If you need a schedule to start by itself even if you disconnect the SignagePro Player from a network and re-plug the power, you will need to follow those steps:
a) We will need to have SignagePro Player to be connected to the network so the server would see it and that would allow us to apply new settings.
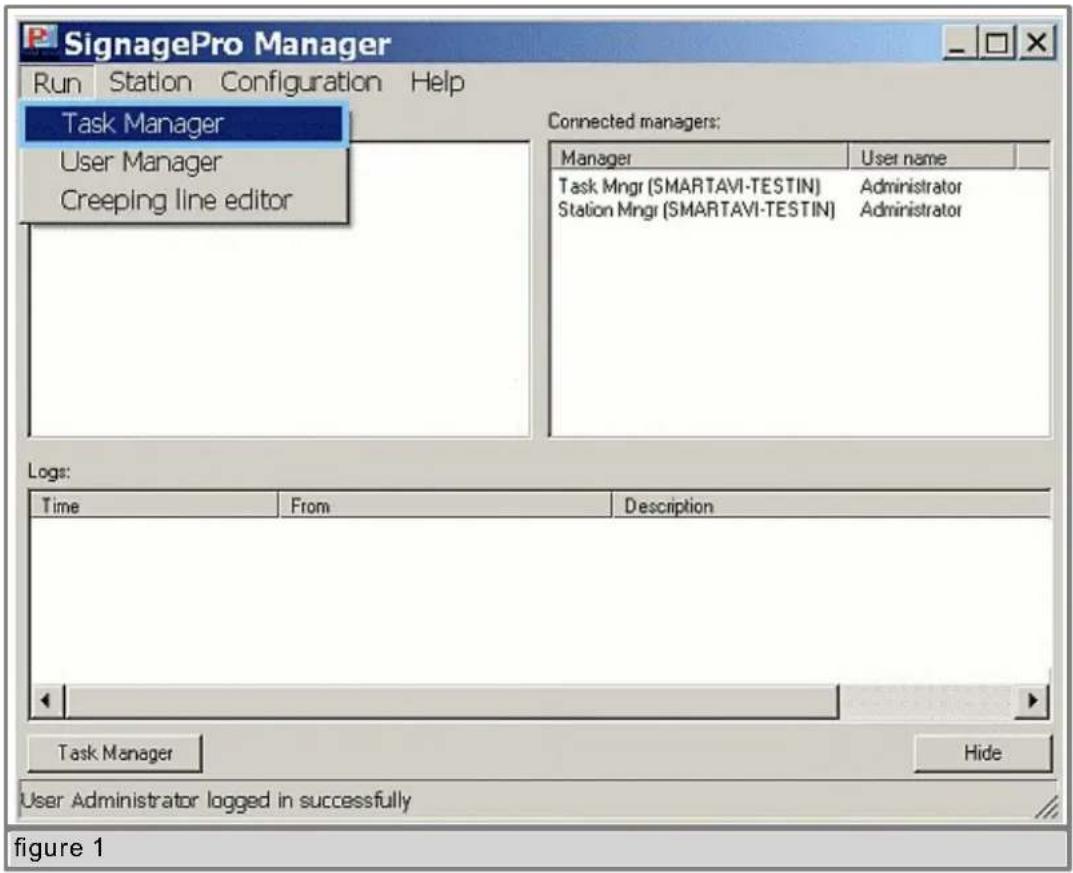
First, open SignagePro Manager software and go to the Task Manager, where you will need to create a schedule or modify existing one. (figure 1)
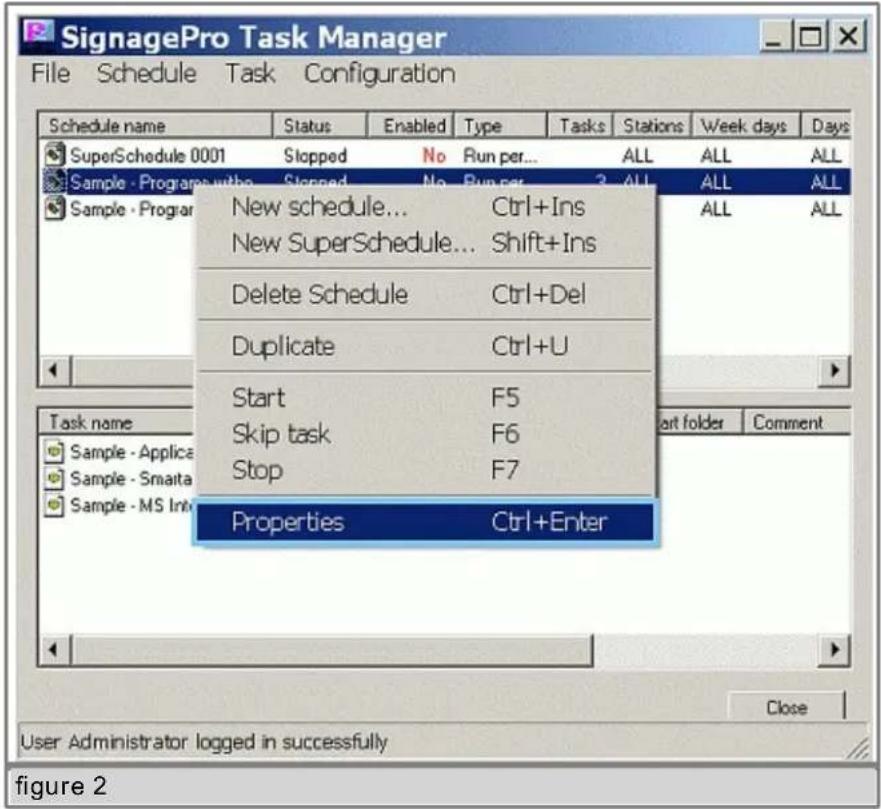
Second, you need to click on the “properties” of the Schedule and go to the Day and Time tab on top. (figures 2 and 3). In the properties of the “Day and Time” tab you can find a little box that states “Run after power failure”, check that box if you want this schedule to start by itself even if the box is offline.

§ 6.3.C Export Schedule and upload it to an offline box via USB
![SignagePro Manager Run Station Configuration Help Task Manager User Manager Creeping line editor Connected managers: Manager User name Station Mngr (SMARTAVI-TESTIN) Administrator Logs: Time From Description 2010.06.01 11:22:58.468 Server Login user: Station Manager SMARTAVI-TESTIN [127] 2010.06.01 11:23:16.125 Server Logoff user: Station Manager SMARTAVI-TESTIN [12] Task Manager Hide User Administrator logged in successfully figure 1](/content/2026/06/1247929/images/af622ce9ad9425806198969348247dc127c8d444c852936783453ef007f4a1b1.jpg)
1) Open SignagePro Manager, go to "Run" and click on the "Task Manager". (figure 1)
2) Prepare a schedule and a task that you want to upload to an offline Player via USB.

3) Go to the properties of the Schedule, choose an appropriate task and move it to the task-list by pressing the small arrow button. (figure 2)

4) Go to the "Day and Time" properties of the schedule and in the "Schedule Start Type" select "Run at User logon". This setting will allow SignagePro Player to run the schedule as soon as you reboot the player. (figure 3)

5) Go back to the "Task Manager", click on "File" on the top menu bar and choose "Export Schedule".
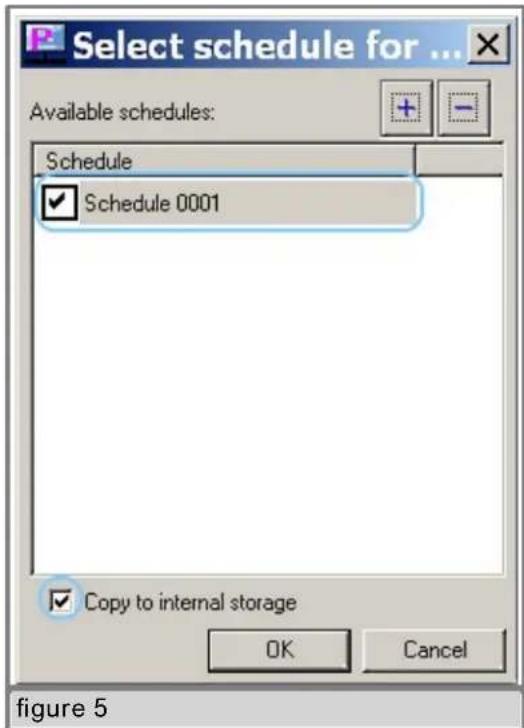
6) Select the schedules that you want to export and check the box which states "Copy to internal storage". (figure 5)
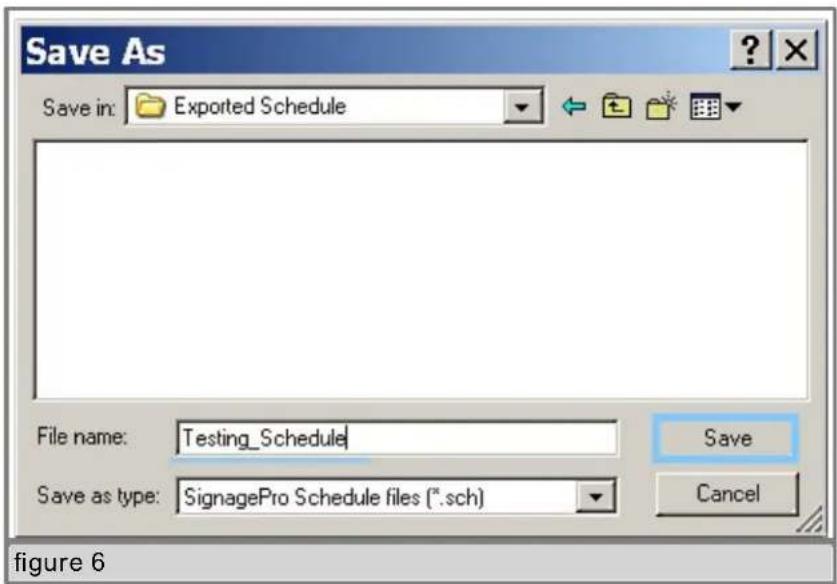
7) Create a new folder on a USB Thumbdrive and save the exported schedule there. It should create several files – the .sch (schedule) file and the related task files.
8) Take the USB Thumbdrive and connect it to the SignagePro Player, after few seconds it will prompt you to remove the usb drive. Restart the player and the schedule should start after reboot.
§ 6.3.D Import a Schedule
1) Go to the "Task Manager" and click on the "Import Schedule". (figure 1)

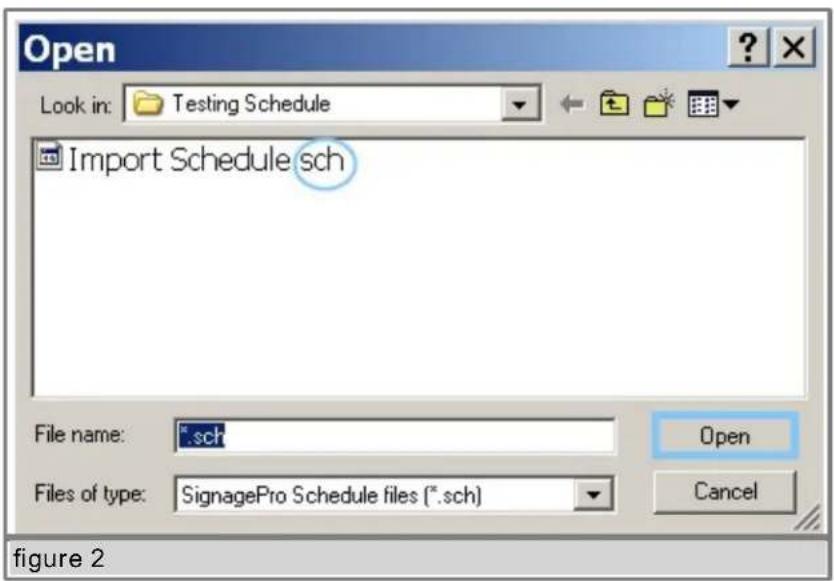
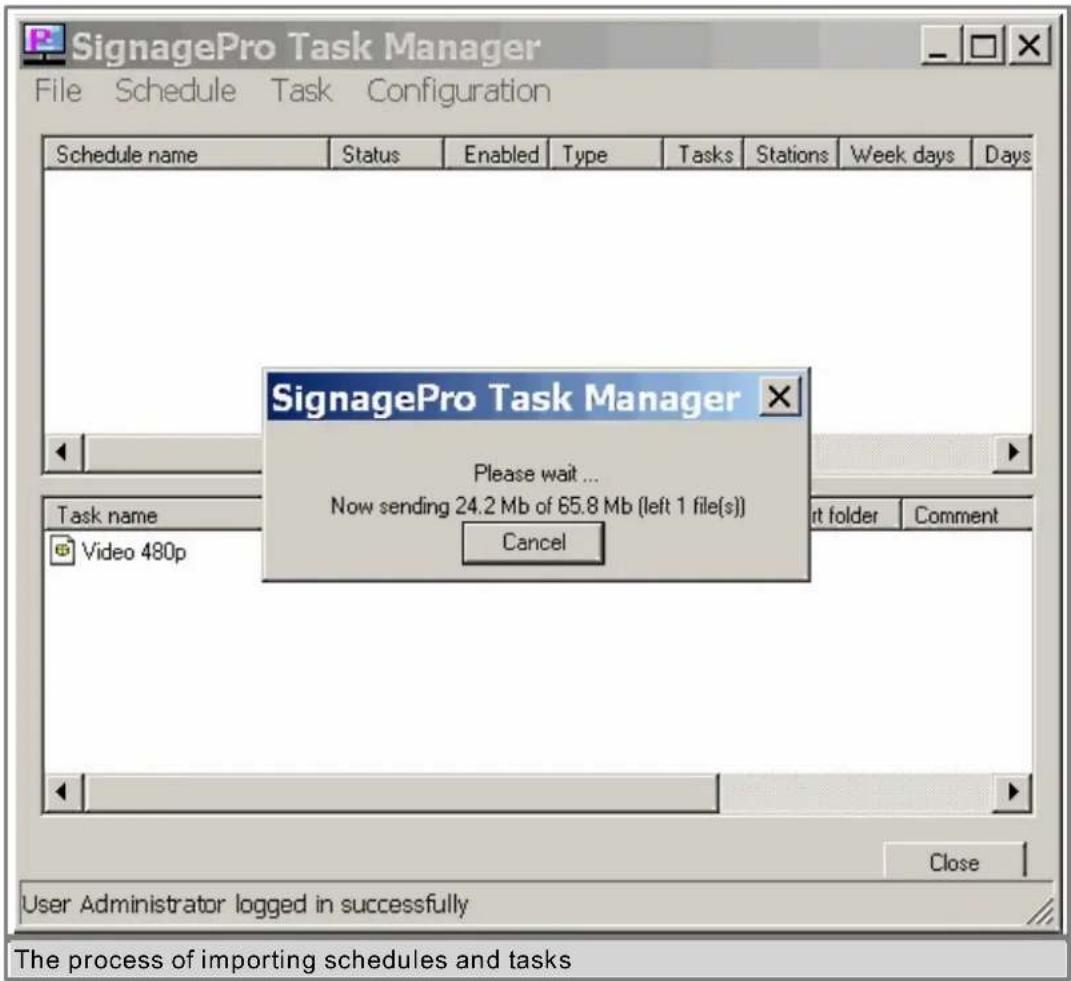
2) Locate the folder where you have exported schedules and tasks and find a .sch file, select it and click on the "open" button. (figure 2)
§ 6.4 SuperSchedules
Super Schedules were designed to allow multiple schedules to run in one, also allowing a drag and drop friendly user interface. To use the Super Schedule, open up the Task Manager and then click on 'Schedule' then select 'New Super Schedule'.
- In the Setup Schedule tab, this is where you will setup your multiple schedules. Click on 'Add'. In the window that opened you can name your schedule and select the duration. Then click 'Ok'. (figure 6.4.1)
- Select a schedule in the list, then with the media icon, drag and drop it into the blue box. A Task Properties window will appear just like the normal Task Properties. Browse for your media. Click 'Save'. You can now add more schedules to your Super Schedule. (figure 6.4.2)
- The Day & Time tab has the same functionality as the one in the normal Schedule.
- The Client Filter tab will allow you to specify the clients that will download and run your Super Schedule.
- The View tab must always remain checked on View 1. Click 'Ok' and your new Super Schedule will be shown in the Schedule list.
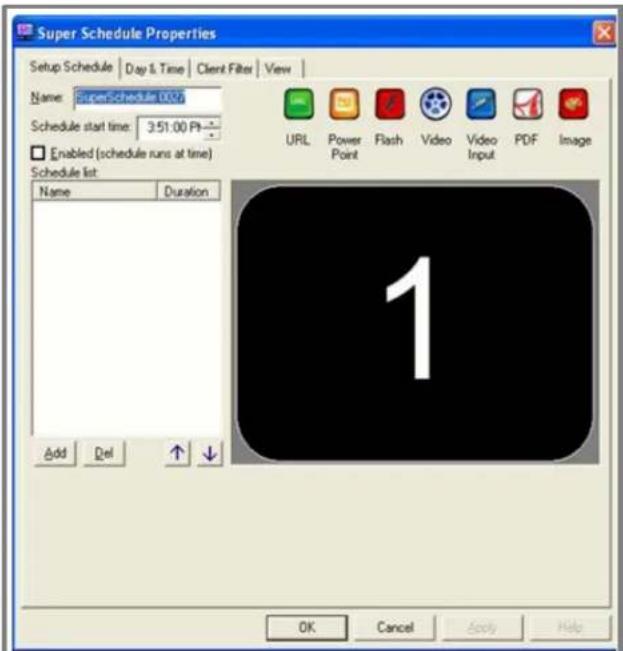
figure 6.4.1

figure 6.4.2
§ 6.5 Template Creator
The Template creator is powerful feature of SignagePro. Templates allow users to create and assign regions. This gives you the ability to run several tasks simultaneously on one screen. The result is the integration of high-resolution graphics with dynamic video and scrolling text messages and news feeds.
§ 6.5.A Create Template and Assign Task
- Use your mouse to highlight the schedule you wish to use for your template.
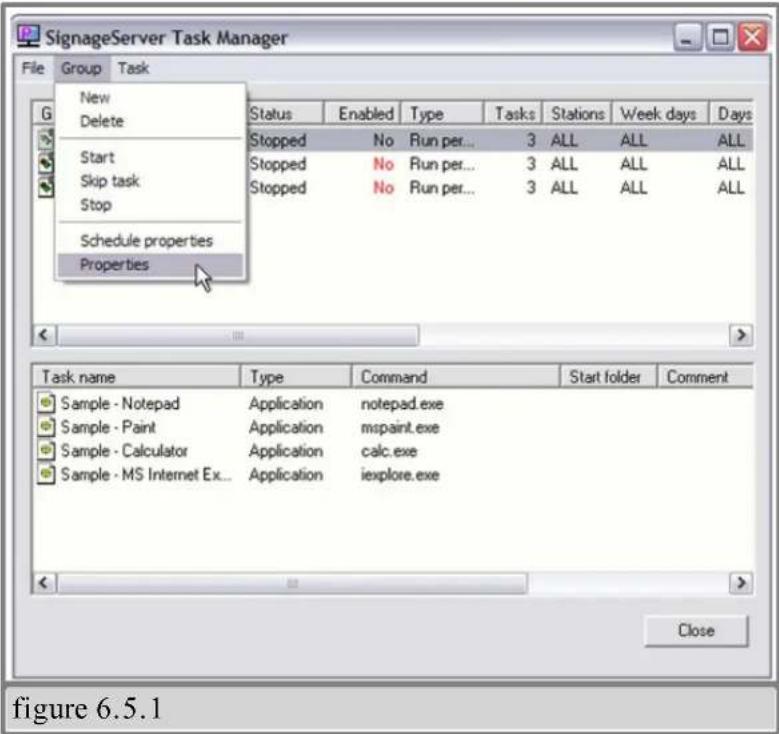
- From the schedule menu select ‘properties’ (figure 6.5.1)

- Once the Template Creator window is open you can now create regions.
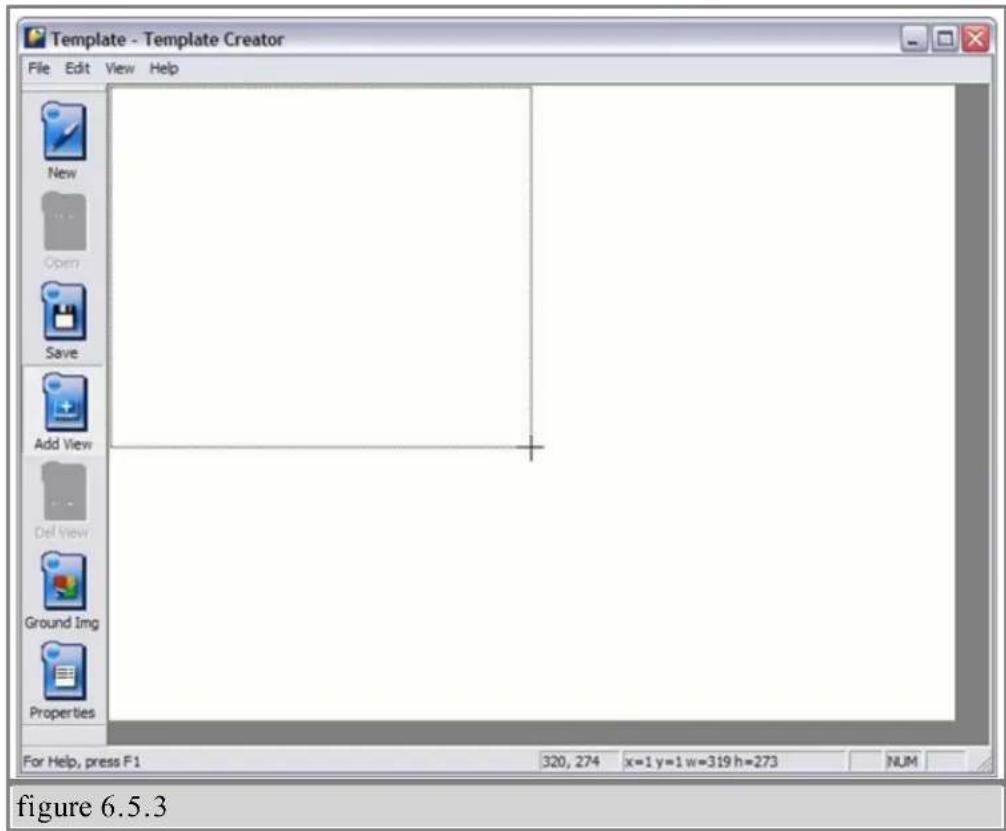
- To create your first region click on the 'Add View' icon and drag your mouse across the white display editor. (figures 6.5.2 and 6.5.3)
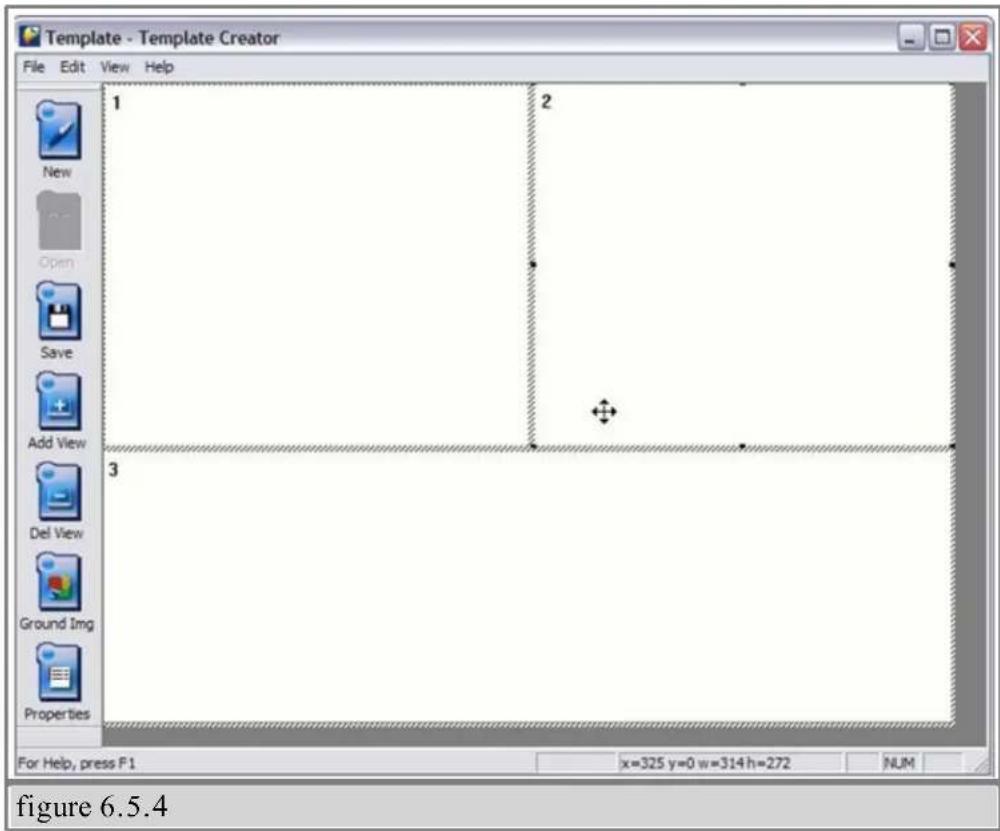
- You may continue adding, deleting, resizing, and moving regions until you are satisfied with the results. (figure 6.5.4)

- You can also assign a background image to your layout by clicking the 'Properties' icon and selecting an image from your hard drive. (figure 6.5.5)
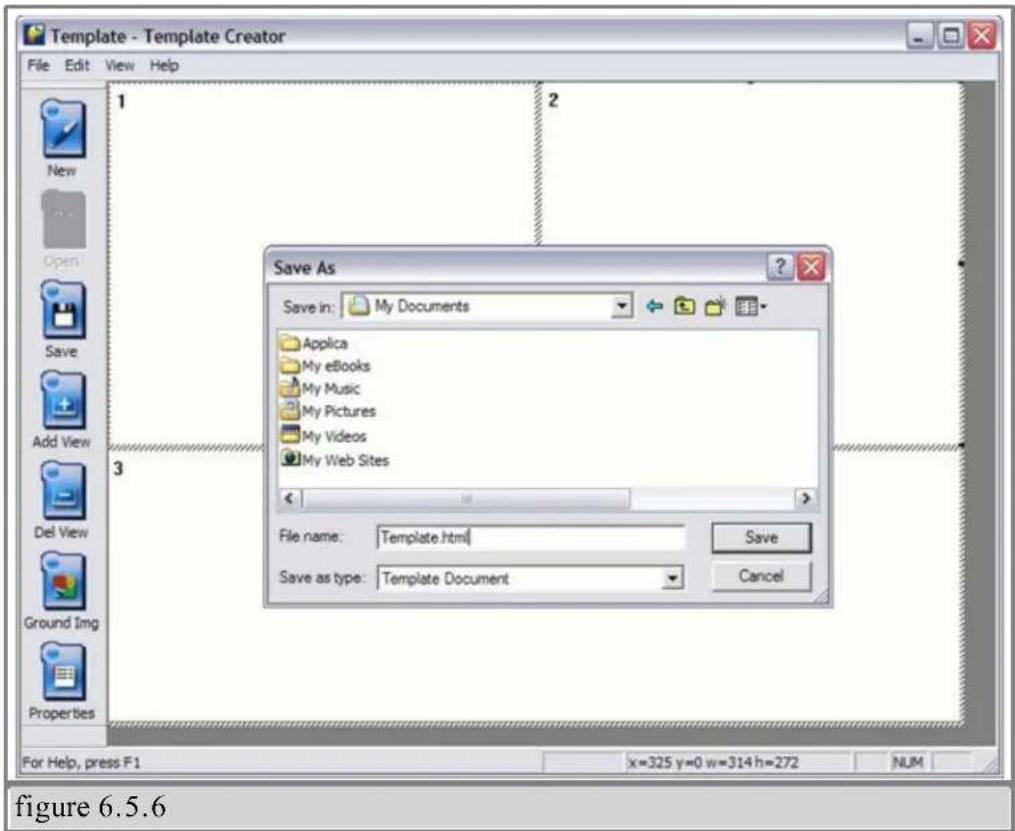
- Once you are satisfied with your layout, save the template file on your computer hard drive. (figure 6.5.6)
Now you are ready to assign views. This is where you select which task will be displayed into the different regions you've just created.

- From the ‘Schedule Properties’ dialog double click on any of the tasks for this schedule. This will bring up the ‘Schedule Task Properties’ dialog. (figure 6.5.7)

- Select the view from the dropdown menu you where you would like the task displayed. Then click "ok" (figure 6.5.8)
§ 6.5.B Layout example

A typical layout using Applica's template creator
§ 6.6 Creeping Line Editor
SignagePro's Creeping Line Editor enables you to create a scrolling marquis anywhere on your screen. You can use RSS feeds, text from a file, or simply type text directly into the editor.
§ 6.6.A Opening Editor
- From the SignageServer Manager select 'Run' and click 'Creeping Line Editor' (figure 6.6.1)

§ 6.6.B Add Content
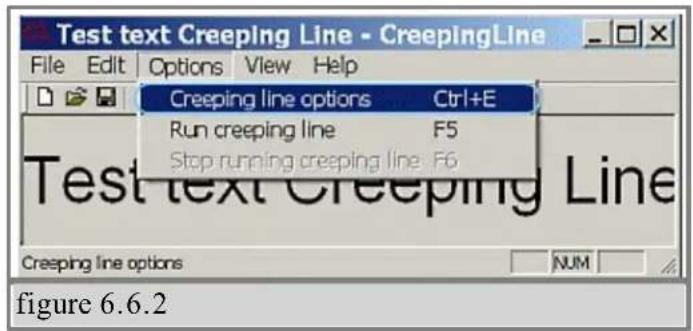
- Add Content - To create and edit scrolling text, select "Options" and click 'Creeping Line Options' (figure 6.6.2)
- In the 'General' tab Creeping Line Property Sheet you are given several options;
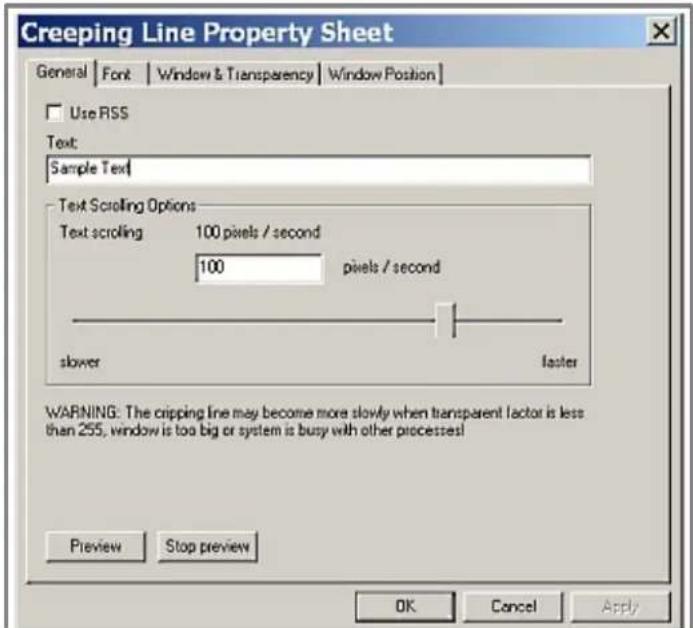
figure 6.6.3

figure 6.6.4

- Input text: Type your text directly into the editor. (figure 6.6.3)
- Use RSS: Input the URL of the RSS feed of your choice. (figure 6.6.4)
• Control the speed of your scrolling text. (figure 6.6.5) - Preview the text directly on your desktop.

- Customizing fonts - Select the 'Font' tab to adjust the size, style and color of your font. (figure 6.6.6)
§ 6.6.C Window and Transparency

In the Text Window and Transparency dialog box you are given several adjustment options. (figure 6.6.8)
- Background Color
- Window Border:
- Transparency
- Transparent Color
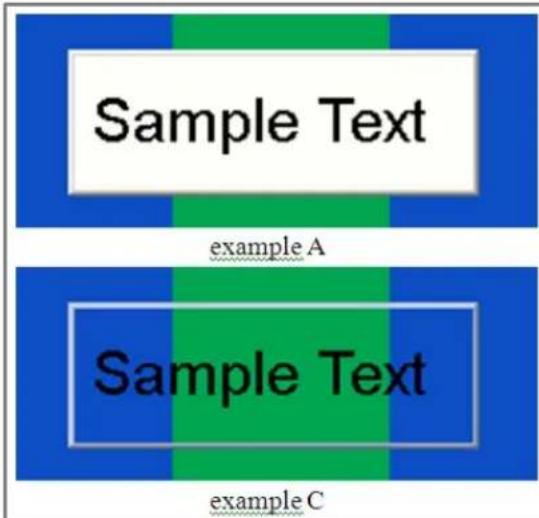
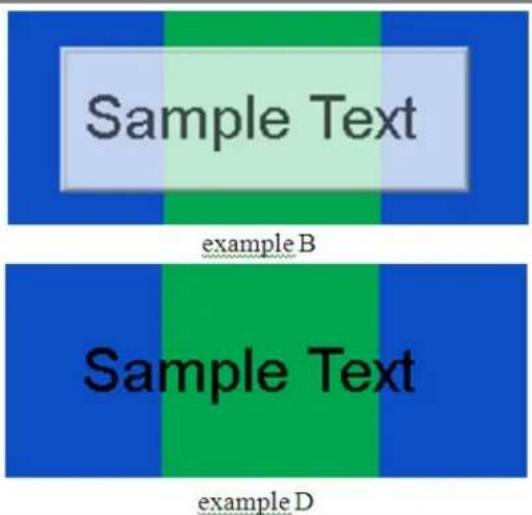
figure 6.6.9
Above are some examples of different transparency settings (figure 6.6.9)
§ 6.6.D Set the position of creeping text

The Window Position dialog lets you decide where you would like the scrolling text to appear on your screen. You have the option of either docking your window to the top or bottom of your screen, or positioning it exactly where you want it. (figure 6.6.10)

figure 6.6.11
You also have the ability to adjust the height and width of your textbox as well. (figure 6.6.11)
Note: You can preview your changes anytime by clicking the 'Preview' button.
§ 6.6.E Line in a Task
The new Creeping Line Manager allows SignagePro users to add multiple Creeping Lines in a Task rather than in a Schedule. You can now add multi Creeping Lines into specific Tasks.
To add Creeping Lines into a Task:
- Click on the Task Properties of the Task you want to add the Creeping Line into.

- Click on the button that is labeled 'Creeping Line Manager' (figure 6.6.13)

- In the Creeping Line Manager, you can add existing Creeping Lines or create new ones. To create a new one, click on 'Edit.' To add existing Creeping Lines, click on 'Add' and browse for your file. (figure 6.6.14)

- You can add more than one Creeping Line in each task. To stop a previous Creeping Line
in a different Task that is running in one Schedule, click on ‘Stop previous Creeping Lines.’ (figure 6.6.15)
- 'Enable Creeping Line documents below:' must be checked for the Creeping Lines to play. (figure 6.6.15)
- You can change the Creeping Lines in Tasks that are already placed in Schedules by going to your Task properties via the Schedule Properties.
RSS Creeping line from CNN News...

natural_image
Underwater scene with dark seabed and fish swimming near a shoreline, no visible text or symbolsAnother Creeping line from CNN News!
figure 6.6.16
- Two creeping lines and video (figure 6.6.16)
§ Save Changes
- To accept your changes click the 'OK' button on your Creeping Line Property Sheet.
- To save your work select ‘File’ and click either ‘Save’ or ‘Save As’ from the section menu. (figure 6.6.12)
- Name your file and save on your hard drive.

figure 6.6.12
§7. Screen Configuration
- Once you turn on the client, you are greeted with the SignagePro Splash Screen.
- After the kernel initiates you are given approximately 15 seconds to press 'F2' and enter the configuration console.
- Type "axorgcfg" and press "Enter".
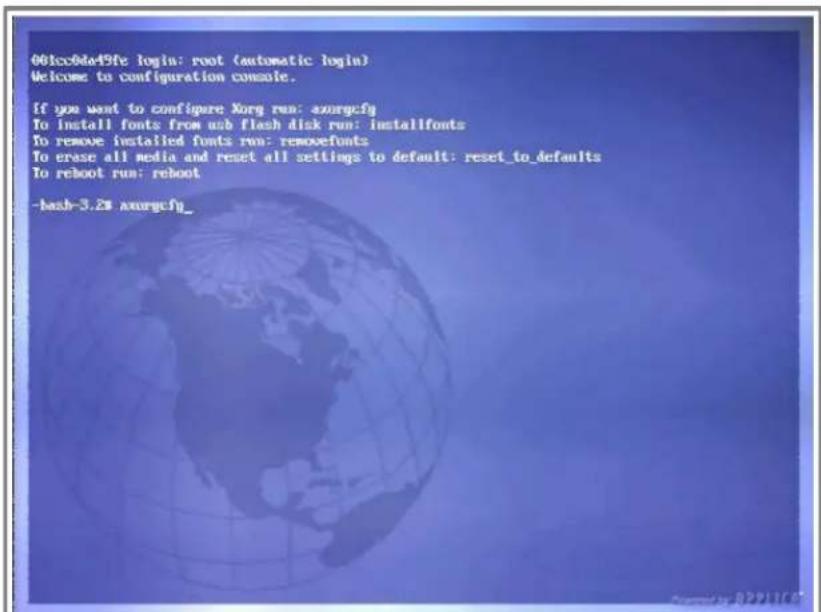
figure 7.2
After you type "axorgcfg" command you will be given the following options (figure 7.3):
![Main menu Choose one of the options: Configure mouse Configure keyboard Configure monitor Configure screen Write xorg.conf and quit Quit [ Ok ] Cancel](/content/2026/06/1247929/images/cb584feb3458d092eddf64107a7426ae59e11e37ad6688deed5897bb0d0189b0.jpg)
figure 7.3
- Configure mouse
Settings to configure mouse.
- Configure keyboard
Settings to configure keyboard.
- Configure monitor
Each time you connect a new display to the SignagePro Client you will need to add or edit the monitor settings;
- Select the horizontal sync range that corresponds to your monitor. (figure 7.4)
![Monitor HorizSync You must indicate the horizontal sync range of your monitor. You can either select one of the predefined ranges below that correspond to industry-standard monitor types, or give a specific range. Enter your own horizontal sync range 31.5: Standard VGA, 640x480 @ 60 Hz 31.5 - 35.1: Super VGA, 800x600 @ 56 Hz 31.5, 35.5: 8S14 Compatible, 1024x768 @ 87 Hz interlaced (no 800x600) 31.5, 35.15, 35.5: Super VGA, 1024x768 @ 87 Hz int., 800x600 @ 56 Hz 31.5 - 37.9: Extended Super VGA, 800x600 @ 60 Hz, 640x480 @ 72 Hz 31.5 - 48.5: Mon-Interlaced SUGA, 1024x768 @ 60 Hz, 800x600 @ 72 Hz 31.5 - 57.0: High Frequency SUGA, 1024x768 @ 70 Hz 31.5 - 64.3: Monitor that can do 1280x1024 @ 60 Hz 31.5 - 79.0: Monitor that can do 1280x1024 @ 74 Hz 31.5 - 82.0: Monitor that can do 1280x1024 @ 76 Hz [ Next >>] Cancel](/content/2026/06/1247929/images/9d84cc1e1095e68dc5951a2749774ea2cb10036b5a39afa7c7ddcdc54a4e927c.jpg)
figure 7.4
It is recommended that you select a sync range that accommodates the highest resolution for your display. If you are unsure, please refer to your display manual.
- Select 'Next' and hit 'Enter'
- Select the Vertical refresh rate.
- Select the vertical refresh rate that corresponds to your monitor (figure 7.5)
- If you are unsure of this setting, please refer to your display manual.
- Select 'Finish' and hit 'Enter'
![Monitor VertRefresh You must indicate the vertical sync range of your monitor. You can either select one of the predefined ranges below that correspond to industry-standard monitor types, or give a specific range. For interlaced modes, the number that counts is the high one (e.g. 87 Hz rather than 43 Hz). Enter your own vertical sync range 50 - 70 50 - 90 50 - 100 40 - 150 [ Finish ] Cancel](/content/2026/06/1247929/images/fb28e741d60a17a8bd5d2e7c78e12547c17cf9c94d8b2195f9f0b84453b40b81.jpg)
figure 7.5
- Configure screen
Each time you connect a new display to the SignagePro Client you will need to add or edit the screen settings.
- Select either 'Edit Screen', 'Add new screen', or 'Remove screen' from the Screen Configuration Menu.
- Select 'OK' and hit 'Enter'
- 'Select Screen Rotation' gives you the following options; (figure 7.6)
![Screen rotation Please specify screen rotation: Normal - Do not rotate CW - Rotate screen clockwise INVERT - Invert screen CCW - Rotate screen counter clockwise [ Next >>] Cancel](/content/2026/06/1247929/images/34b8f8e525ffde6678fac179ee0abb19d6cb1149029ce8df0b69e51f0719fca9.jpg)
figure 7.6
- Normal - Do not rotate
- CW - Rotate screen clockwise
- Invert – Flip screen upside down
-
CCW - Rotate screen counter clockwise
-
Select 'Next' and hit 'Enter'
- Screen Depth – Configures the default ‘color quality’ or color ‘depth’ for your display.
- Select the desired 'Screen Depth' and hit 'Next'
- Screen Modes – Configures the video mode for your display.
- Use the up/down keys to scroll for the desired resolution.
- Use the space bar to check the desired resolution.
- Select 'Finish' and hit 'Enter' to save your settings and return to the main menu of the Configuration Panel.
- Select 'Ok' on the confirmation window and hit 'Enter'
• Write Xorg.conf and quit
Saves all of your changes by writing your configuration settings to the Xorg Configuration file and quits the configuration panel.
- Select 'OK' and hit 'Enter' to save your settings.
- Quit
- Quit the configuration panel without saving your settings.
- Once you save your setting you will be prompted to test your configuration. We recommend that you test your settings to
- Type 'Y' for yes and hit 'Enter'.
- If the tests are successful you will be taken to a screen with a printout of your settings.
a. Use your mouse to place the cursor within the white area of your screen and 'click'.
b. Type 'Exit' in the command line and press "Enter" to exit the test results page.
c. Type 'reboot' in the command line to exit configuration and reboot the SignagePro client.
§ 7.1 Rotating a Screen
In this chapter we will describe how to rotate the image on the SignagePro Client screen and how to apply templates to it.
1) In order to get to the screen configuration menu you need to press F2 at the initial startup of the Signage Pro Client ( Player ) It will take you to the configuration console. Type "axorgcfg" and press "Enter"

figure 8.1.1
2) If you used that command before you will need to type "Y" to confirm that you want to edit current configuration.
![001cc0da49fe login: root (automatic login) Welcome to configuration console. If you want to configure Xorg run: axorgcfg To install fonts from usb flash disk run: installfonts To remove installed fonts run: removefonts To erase all media and reset all settings to default: reset_to_defaults To reboot run: reboot -bash-3.2# axorgcfg Do you want to edit current config (n will) generate new one) [Y/n]:y](/content/2026/06/1247929/images/e0ee34ddf49704f9cfcc6ea77ab95d4554527b6b10250760bca9f5fbc01618e8.jpg)
figure 8.1.2
3) Select "OK" and press "Enter", it will create xorg.conf file based on menu selections you make.

figure 8.1.3
4) After you type "axorgcfg" command you will be given the following options: Each time you connect a new display to the SignagePro Client you will need to add or edit the monitor settings;
![Main menu Choose one of the options: Configure mouse Configure keyboard Configure monitor Configure screen Write xory.conf and quit Quit [ Ok ] Cancel](/content/2026/06/1247929/images/281bd3b1c1dd44d99506df1f39c1931a3f02648e1fdfff5577331c19382c0fe8.jpg)
figure 8.1.4
5) Select "Edit Monitor0" and click on "OK".
![Monitor configuration You can edit or remove a previously configured monitor, or add a new one. Edit Monitor0 Add new monitor Remove Monitor0 [ Ok ] Cancel](/content/2026/06/1247929/images/09cc82ce7ac9ba381936bf70e149395b6148609849283bfbc40c58649e3ffec8.jpg)
figure 8.1.5
6) Select the horizontal sync range that corresponds to your monitor. It is recommended that you select a sync range that accommodates the highest resolution for your display. If you are unsure, please refer to your display manual.
- Select 'Next' and press 'Enter'
![Monitor HorizonSync You must indicate the horizontal sync range of your monitor. You can either select one of the predefined ranges below that correspond to industry-standard monitor types, or give a specific range. Enter your own horizontal sync range 31.5: Standard VGA, 640x480 @ 60 Hz 31.5 - 35.1: Super VGA, 800x600 @ 56 Hz 31.5, 35.5: 8514 Compatible, 1024x768 @ 87 Hz interlaced (no 800x600) 31.5, 35.15, 35.5: Super VGA, 1024x768 @ 87 Hz int., 800x600 @ 56 Hz 31.5 - 37.9: Extended Super VGA, 800x600 @ 60 Hz, 640x480 @ 72 Hz 31.5 - 48.5: Non-Interlaced SVGA, 1024x768 @ 60 Hz, 800x600 @ 72 Hz 31.5 - 57.0: High Frequency SVGA, 1024x768 @ 70 Hz 31.5 - 64.3: Monitor that can do 1288x1024 @ 68 Hz 31.5 - 79.0: Monitor that can do 1288x1024 @ 74 Hz 31.5 - 82.0: Monitor that can do 1288x1024 @ 76 Hz [ Next >>] Cancel](/content/2026/06/1247929/images/de5c3ee20399755906616179f547b3fe3031b9db8cdfda86f2f10d73af0263a6.jpg)
figure 8.1.6
7) Select the vertical refresh rate that corresponds to your monitor
- If you are unsure of this setting, please refer to your display manual.
- Select 'Finish' and press 'Enter'
![Monitor VertRefresh You must indicate the vertical sync range of your monitor. You can either select one of the predefined ranges below that correspond to industry-standard monitor types, or give a specific range. For interlaced modes, the number that counts is the high one (e.g. 87 Hz rather than 43 Hz). Enter your own vertical sync range 50 - 70 50 - 90 50 - 100 40 - 150 [ Finish ] Cancel](/content/2026/06/1247929/images/fbd930c9e443bbbacb755ae38d9ca92813ba0e981323498b66990b728e7e60e0.jpg)
figure 8.1.7
8) Each time you connect a new display to the SignagePro Client you will need to add or edit the screen settings.
- Select the "Configure Screen" option
- Select 'OK' and hit 'Enter'
![Main menu Choose one of the options: Configure mouse Configure keyboard Configure monitor Configure screen Write xorg.conf and quit Quit [ OK ] Cancel](/content/2026/06/1247929/images/2a1524e72e7725b0ccc6ce7254428b309304566c9108299605e8c2d42d9d8e3c.jpg)
figure 8.1.8
9) Select "Edit Screen" and click "OK"
![Screen configuration You can edit or remove a previously configured screen, or add a new one. Edit Screen0 Add new screen Remove Screen0 [ Ok ] Cancel](/content/2026/06/1247929/images/a3ab2b711db90ee3978aab9d9291c8557bb9561aef97bcb477555a33a2e0687e.jpg)
figure 8.1.9
10) Select appropriate rotation directions, such as clockwise or counterclockwise, and click on "Next". In our example we will rotate screen ClockWise.
![Screen rotation Please specify screen rotation: Normal - Do not rotate CW - Rotate screen clockwise INVERT - Invert screen CCW - Rotate screen counter clockwise [ Next >>] Cancel](/content/2026/06/1247929/images/758118b66bfbcb155575f03ae5dbd535802ae6117debd959e1a001f2a0ee02fe.jpg)
figure 8.1.10
11) Found any unnecessary resolutions that are checked and uncheck it by selecting them and pressing the "Spacebar".
![Screen modes Select the video modes for this screen: [ ] 2048x1536 [ ] 1920x1440 [ ] 1920x1200 [ ] 1920x1080 [ ] 1856x1392 [ ] 1800x1440 [ ] 1800x1400 [X] 1792x1344 Uncheck all unnecessary resolutions [ Finish ] Cancel](/content/2026/06/1247929/images/62dd7a7b111981535f3a98527fbc850ff0fd06f2e00dbade6839a1591e8fec46.jpg)
figure 8.1.11
12) Find the resolution you are using on your Screen, select it and Check the box next to it by pressing on "Spacebar". For this example we are using 1024 by 768.
![Screen modes Select the video modes for this screen: [ ] 1280x360 [ ] 1280x854 [ ] 1280x800 [ ] 1280x768 [ ] 1280x720 [ ] 1152x864 IX] 1024x768 [ ] 1024x576 Check the necessary resolution [ Finish ] Cancel](/content/2026/06/1247929/images/7d4a25207c202d858f018ce4d659a1af1c102dea755d4e3321d7028f10230b4d.jpg)
figure 8.1.12
13) Select "Write xorg.conf and quit" and click on "Ok".
![Main menu Choose one of the options: Configure mouse Configure keyboard Configure monitor Configure screen Write xorg.coaf and quit Quit [ Ok ] Cancel](/content/2026/06/1247929/images/25a854ff1154f0f499de5d2d33f74f5d3ad24cca6a863c52cf7c0ae5aa0c678d.jpg)
figure 8.1.13
14) Write configuration file by clicking on "Ok".
![Write xorg.conf Write configuration to file: /etc/conf/xorg.conf_ [ 0k ] Cancel](/content/2026/06/1247929/images/3ff776b22df0d859a7b85af0a2a6fdc65b75a43c1f5f9b63e9c68d6caf475c1b.jpg)
figure 8.1.14
Reboot the client.
After rebooting the client, the screen should display the rotated picture.
Now we need to create a template that will allow us to display different tasks in different places on the screen, and we will be using "KompoZer HTML Editor" to modify the templates.
This is the example of the source code for the template that we are using for vertical rotation:
<!DOCTYPE html PUBLIC "-//W3C//DTD XHTML 1.0 Transitional//EN" "http://www.w3.org/TR/xhtml1/DTD/xhtml1-transitional.dtd">
<html xmlns="http://www.w3.org/1999/xhtml">
<head>
<meta http-equiv="REFRESH" content="1800" />
<title>Template</title>
</head>
<body scroll="no"
style="margin: 0pt 0px 0pt 0pt; background-color: rgb(0, 0, 0); width: 768px; height: 1024px;">
<div id="1" style="left: -1px; top: 150px; width: 769px; height: 480px; position: absolute;"><div id="2" style="left: 35px; top: 850px; width: 199px; height: 200px; position: absolute;"> <embed src="http://www.clocklink.com/clocks/0051-blue.swf?TimeZone=EST&" wmode="transparent" type="application/x-shockwave-flash" height="150" width="150"></div> <div id="3" style="left: 230px; top: 850px; width: 180px; height: 206px; position: absolute;"> <iframe marginheight="0" marginwidth="0" name="wxButtonFrame" id="wxButtonFrame" src="http://btn.meteomedia.ca/weatherbuttons/template7.php? placeCode=CAQC0363&category0=Cities&containerWidth=180& btnNo=&backgroundColor=blue&multipleCity=0&citySearch=0& celsiusF=C" align="top" frameborder="0" height="150" scrolling="no" width="180"></iframe></div> <div id="4" style="left: 600px; top: 850px; width: 280px; height: 150px; position: absolute;"><div id="4"> </div>
</body>
</html>
Source of the template to display rotated DVD Video and Web-Pages below it. "Sample_html_for_rotation.html"
You can use the template from the above table and save it as a html file.
IMPORTANT: The screen resolution specified in the HTML must match the resolution of your display. In this example it is 1024x768.
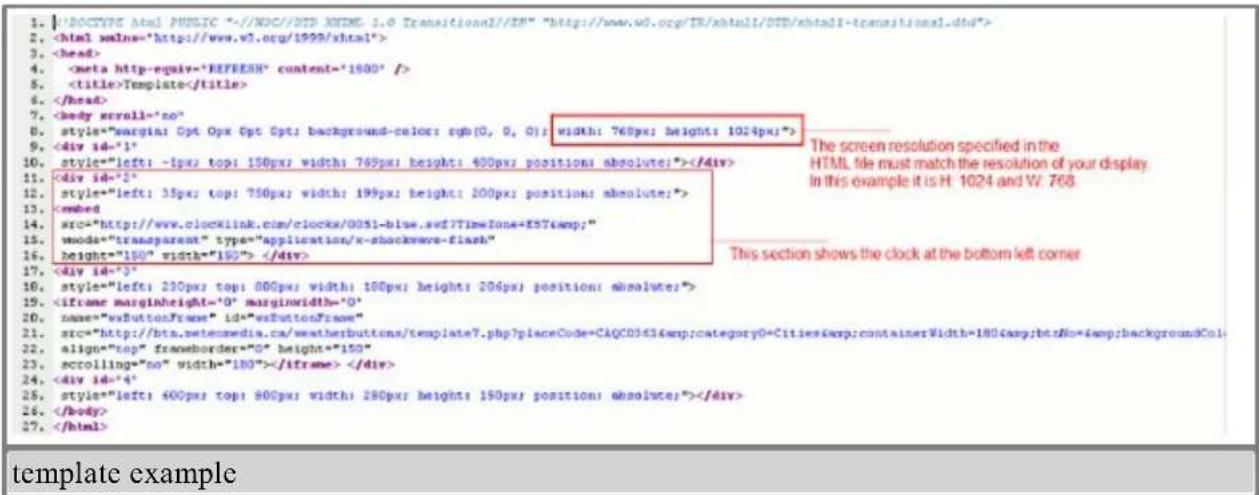
figure 8.1.15

natural_image
Illustration of green soldiers in formation on a golden river, with cloud patterns and a clock showing 12:00 (no text or symbols)The final layout of the rotated screen
§ 7.2 Installing and Removing Fonts
-
Logging into the configuration console.
-
Once you turn on the client, you are greeted with the SignagePro Splash Screen.
- After the kernel initiates you are given approximately 15 seconds to press 'F2' and enter the configuration console.

figure 7.2.1
- Once you are at the configuration console you are given four options.
These options are as follows:
- If you want to configure xorg run: axorgcfg
This is where you configure your monitor and resolution settings.
• To install fonts from usb flash disk run: installfonts
Typing installfonts into the command line will install fonts from your USB flash drive.
It is important to note that if you use specialized fonts in your presentations, you will need to install those fonts onto the SignagePro client for your presentation to display properly.
• To remove installed fonts run: removefonts
Type ‘removefonts’ into the command line and press ‘Enter’ to remove any fonts that are no longer being used.
• To reboot run: reboot
Typing 'reboot' into the command line reboots the system and brings you back to the main
SignagePro interface.
§ 8. Updating the SignagePro Clients Via Schedule
-
Select Run then click "Task manager"
-
Create new Task and select "Upload" type, click on "Browse" button and point to the folder where you have the new firmware saved. For example, source folder could be -
C:\signagepro-2.7.1\
where you can select flash.img file. (figure 9.0.1)
Make sure you have flash.img and flash.inf files in the same folder.

- Create new schedule with the Update task in it and start it on the client that you want to update. (figure 9.0.2)

figure 9.0.2
Screen that attached to the SignagePro Client will become RED saying not to shutdown the player. The process of writing new firmware into the Client will take approximately two or three minutes. After updating is done client will reboot itself automatically.
Once the writing has finished and rebooted, the client should now be ready.
§ 9. Update clients firmware via USB
Important: You would need a USB thumbdrive that is at least 2gb in capacity.
- Save the firmware .zip folder onto your C:\ drive. Extract this folder on to the same location. (figure 10.0.1)

- Format your USB thumbdrive. Check the letter of the drive, in this example removable drive have letter E: (figure 10.0.2)

- Begin writing the Linux SignagePro firmware onto it by doing this :

- On your PC, go to START->RUN->CMD (figure 10.0.3) and change the directory from the default location (c:\documents and settings\user... etc) to the folder where the unpacked firmware is saved, so for example type in:
CD C:\signagepro-2.7.1\
(this is just a sample), but make sure you type in the exact directory where the unpacked firmware folder is located. Then hit ENTER. After the command directory has been changed to the correct folder, type in:
WRITE E:
“E” will be the letter of your USB thumbdrive; ( We just use “E” as an example. Your USB should have its own designated drive letter, if it’s H, then type WRITE H: then hit ENTER.
The writing process will take about 15-20mins.
![C:\WINDOWS\system32\cmd.exe - write e: Microsoft Windows XP [Version 5.1.2600] (C) Copyright 1985-2001 Microsoft Corp. C:\Documents and Settings\Administrator>cd c:\signagepro-2.7.1\ C:\signagepro-2.7.1>write e: ...](/content/2026/06/1247929/images/938f1cc5ce9724eb15507a386797dc84fa6e6c6c6c87b195072cf47677448ca7.jpg)
- After the USB writing is done, bring the USB to the SignagePro client and insert into the USB port.
- Boot the client and hit DELETE on the keyboard, which is attached to client, several times to enter into the BIOS. Once you are in the BIOS, tab over to the "Boot" menu to make sure your USB will be the first device to boot from and save changes.
Reboot.
- Once rebooting the client, the unit should recognize your USB and it should automatically start writing the Linux SignagePro firmware onto the internal drive. This will take about 1-3mins.
Once the writing has finished and rebooted, the client should now be ready.
§ Specifications
Form Factor
uATX (6.75 inches by 6.75 inches [171.45 millimeters by 171.45 millimeters])
Processor
Integrated Intel® Celeron® processor 215 with a 533 MHz system bus
Memory
• One 240-pin DDR2 512mb
SDRAM Dual Inline Memory Module (DIMM) sockets
• Support for DDR2 533 MHz and DDR2 400 MHz DIMMs
- Support for up to 1 GB of system memory
Chipset
SiS SiS662
Audio
ADI AD1888 audio codec
Video
Integrated SiS Mirage 1 graphic engine
I/O Control
Winbond W83627DHG-B based Legacy I/O controller for hardware management, serial, parallel, and PS/2 ports
LAN Support
10/100 Mbits/sec LAN subsystem using the Broadcom LAN adapter device
Peripheral Interfaces
- Two USB 2.0 ports
- One parallel ATA IDE interface with UDMA 33, ATA-66/100/133 support
• One S-Video output port (optional) - One serial port
- One parallel port
- PS/2* keyboard and mouse ports
Expansion Capabilities
One PCI Conventional bus connector
Operating System
- OS Embedded Linux
Dimensions
•Length: 8" (20.32 cm)
•Width: 8.375" (21.273 cm)
•Height: 2.25" (5.715 cm)
Formats Supported
• Video (AVI, MPEG1, MPEG2, MPEG4, WMV, FLA, DIVX),
- Flash (SWF)
- Still Images (JPEG, GIF, BMP, PNG)
- WebPages (URL)
• Adobe Acrobat (PDF)
- PowerPoint (PPT)
• Audio (MP3, WMA)
- News (RSS)
Server Requirements
Processor: Intel Pentium 4 HT
Operating System: Windows XP Professional, Windows 2003
Memory: 1 GB RAM
Networking: 10/100/1G
Page 59 of 64
§ Sample Network Configuration #1
Configuration #1 Router/Switch/Hub with DHCP Server in the a same network\*
- Connect the server and the SignagePro client to a router/switch/hub with DHCP configured.
- At the server's CMD prompt, enter 'ipconfig' to determine the IP number of the server. If the server got assigned an IP number correctly from the DHCP server, the result should look similar to the following:

Sample of DHCP Network configuration on the SignagePro Manager PC, an IP Address in this example 192.168.0.185
The IP address on the above example is '192.168.0.185. These numbers are needed for the SignagePro client to connect to the server. The SignagePro client screen should look like the following:

* Same Network means that Client and Server are in one broadcast domain, so they can communicate to each other without gateway.
§ Sample Network Configuration #2
Configuration #2 Router/Switch/Hub without a DHCP server in a same network\*
Connect the SignagePro server and the SignagePro client to a hub using CAT-5 or CAT-6 cables.
- Manually assign IP numbers to the server.
A sample might look like the following:
Server IP number: 192.168.0.185
Server IP Mask: 255.255.255.0
Server IP Gateway: Put the address of a network gateway
Here is a description on how to put an IP address manually in Windows XP environment.
- Go to the Start Menu and click on the Control Panel Icon.


look for a network icon click on it
- Double-click on the Network Connections Icon.

- Right-click on the Local Area Connection Icon (or your current connection) and click Properties.
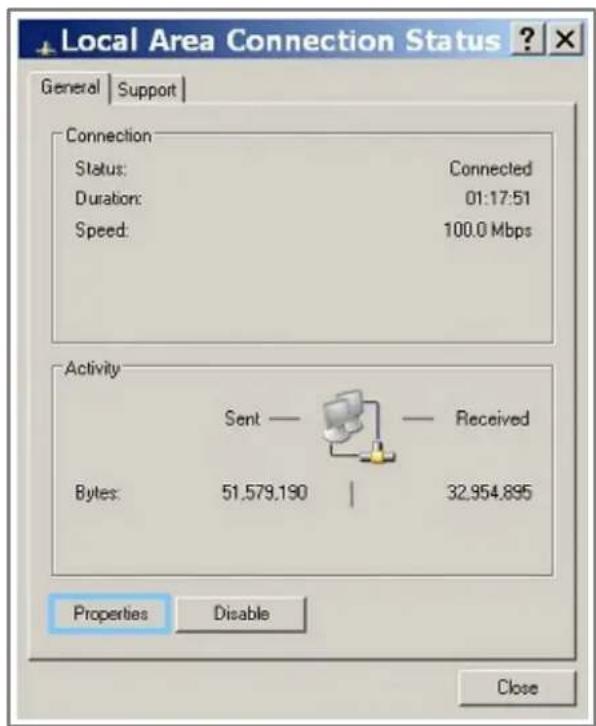
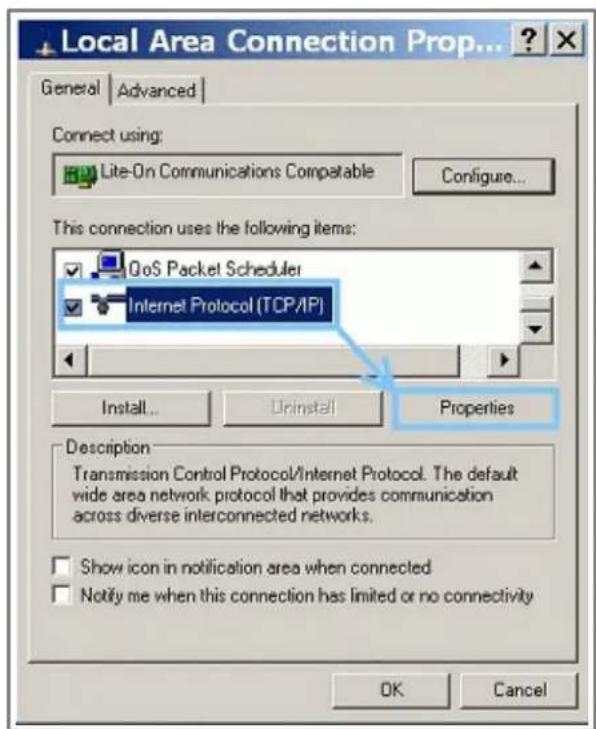
- Select Internet Protocol (TCP/IP) and Click the Properties Button.

- Enter the IP Address, Subnet Mask, Default Gateway and DNS Servers. For an example please see the beginning of this chapter where it says "Manually assign IP address to the server".
- Manually assign IP numbers to SignagePro Client
A sample might look like the following:
Client IP number: 192.168.0.25
Client IP Mask: 255.255.255.0
Client IP Gateway: we can leave it blank
Preferred DNS Server: 127.0.0.1
Note: Make sure that the new network address you assign does not conflict with existing network numbers!
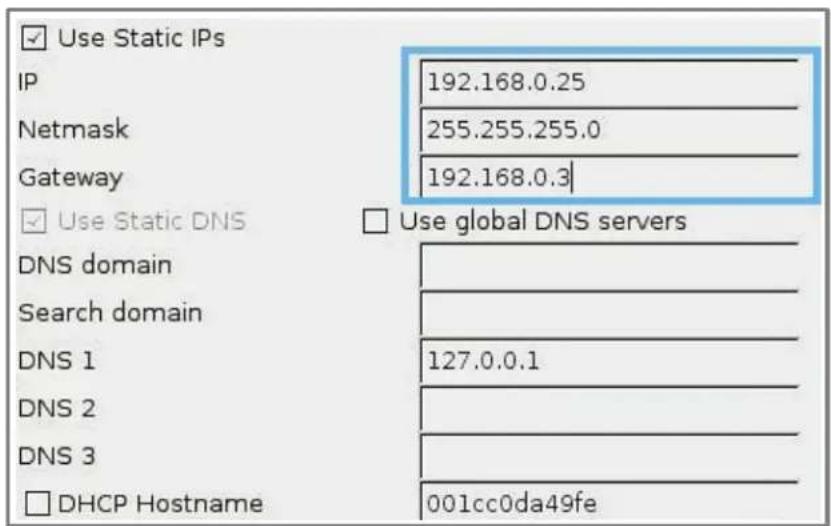
The command for the network configuration on the SignagePro is "Ctrl Alt + 3".
* Same Network means that Client and Server are in one broadcast domain, so they can communicate to each other without gateway.


- Table of Contents
- § Introduction
- § Disclaimer notice
- § Limited warranty statement
- § 1. Contents of box
- § 2. Installing Signage Manager
- Note:
- § 3. Setting up the SignagePro Client
- § 3.1 Settings and Configurations of Client
- § Table 3.2 Quick Keys and Functions of SignagePro Client
- § 4. Adding your company logo
- Sample LOGO
- § 4.2 Field values for .slogo files
- § 4.3 Add Time and Date to .slogo
- § 5. Wireless Configuration
- § 5.1 Connecting to a Hidden Network
- § 6. Schedules, Tasks, Templates, RSS
- § 6.1 User Manager
- - Administrator
- •Task Manager
- - Station Manager
- - Client
- § 6.2 Task Manager
- § 6.2.A Create a new Task
- § 6.3 Schedules - Creation, Export, Import
- § 6.3.A Modifying Tasks within the Schedule
- § 6.3.B Run Schedule after a power failure
- § 6.3.C Export Schedule and upload it to an offline box via USB
- § 6.3.D Import a Schedule
- § 6.4 SuperSchedules
- § 6.5 Template Creator
- § 6.5.A Create Template and Assign Task
- § 6.6 Creeping Line Editor
- § 6.6.A Opening Editor
- § 6.6.B Add Content
- § 6.6.C Window and Transparency
- § 6.6.D Set the position of creeping text
- figure 6.6.11
- § 6.6.E Line in a Task
- § Save Changes
- §7. Screen Configuration
- - Configure keyboard
- - Configure monitor
- - Select the Vertical refresh rate.
- - Configure screen
- • Write Xorg.conf and quit
- - Quit
- § 7.1 Rotating a Screen
- Reboot the client.
- § 7.2 Installing and Removing Fonts
- § 8. Updating the SignagePro Clients Via Schedule
- § 9. Update clients firmware via USB
- WRITE E:
- § Specifications
- Form Factor
- Processor
- Memory
- Chipset
- Audio
- Video
- I/O Control
- LAN Support
- Peripheral Interfaces
- Expansion Capabilities
- Operating System
- Dimensions
- Formats Supported
- Server Requirements
- § Sample Network Configuration #1
- Configuration #1 Router/Switch/Hub with DHCP Server in the a same network\*
- § Sample Network Configuration #2
- Configuration #2 Router/Switch/Hub without a DHCP server in a same network\*
Brand : Smart-AVI
Model : AP-SNCL-VHD40GS
Category : Unspecified