
SVID410IR - Unspecified StarTech.com - Free user manual and instructions
Find the device manual for free SVID410IR StarTech.com in PDF.


| Product Type | VGA Video Splitter / Distribution Amplifier |
| Number of Video Inputs | 1 |
| Number of Video Outputs | 4 |
| Maximum Resolution | 1920 x 1200 (WUXGA) |
| Video Connector Type | VGA (HD-15) Female |
| Supported Video Signals | VGA, SVGA, XGA, UXGA, WUXGA (up to 1920x1200) |
| IR Remote Control | Included |
| Rackmountable | Yes (1U, brackets included) |
| Power Supply | External AC adapter (5V DC, 2A) |
| Power Consumption | 10W (max) |
| Dimensions (W x D x H) | 17.0 x 4.0 x 1.75 inches (432 x 102 x 44 mm) |
| Weight | 2.2 lbs (1.0 kg) |
| Operating Temperature | 32°F to 104°F (0°C to 40°C) |
| Storage Temperature | -4°F to 140°F (-20°C to 60°C) |
| Humidity | 20% to 80% (non-condensing) |
| Enclosure Material | Metal (steel) |
| LED Indicators | Power and signal status |
| Compliance | FCC, CE, RoHS |
| Maintenance | Clean with dry cloth; avoid liquids; disconnect power before cleaning. |
| Safety | Use only supplied power adapter; avoid exposure to moisture; do not open casing. |
| Repairability / Spare Parts | Contact StarTech.com support for replacement power adapter or IR remote. |
Frequently Asked Questions - SVID410IR StarTech.com
User questions about SVID410IR StarTech.com
0 question about this device. Answer the ones you know or ask your own.
Ask a new question about this device
Download the instructions for your Unspecified in PDF format for free! Find your manual SVID410IR - StarTech.com and take your electronic device back in hand. On this page are published all the documents necessary for the use of your device. SVID410IR by StarTech.com.
USER MANUAL SVID410IR StarTech.com
4-to-1 Composite/S-Video & RCA Audio Switch with Remote Control
SVID410IR
Instruction Manual
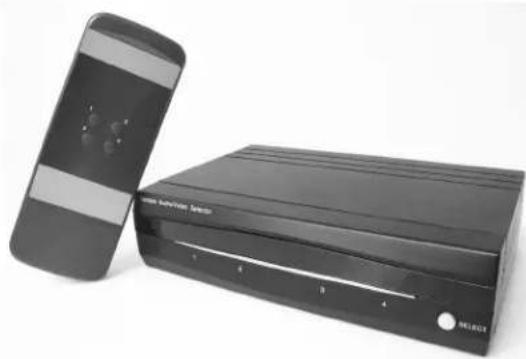
natural_image
Exterior view of a black SEIBOX broadband device with a flat-screen screen and indicator lights (no visible text or symbols on the device body)Actual product may vary from photo
StarTech.com

The Professionals' Source for Hard-to-Find Computer Parts
FCC Compliance Statement
This equipment has been tested and found to comply with the limits for a Class B digital device, pursuant to part 15 of the FCC Rules. These limits are designed to provide reasonable protection against harmful interference in a residential installation. This equipment generates, uses and can radiate radio frequency energy and, if not installed and used in accordance with the instructions, may cause harmful interference to radio communications. However, there is no guarantee that interference will not occur in a particular installation. If this equipment does cause harmful interference to radio or television reception, which can be determined by turning the equipment off and on, the user is encouraged to try to correct the interference by one or more of the following measures:
- Reorient or relocate the receiving antenna.
- Increase the separation between the equipment and receiver.
- Connect the equipment into an outlet on a circuit different from that to which the receiver is connected.
- Consult the dealer or an experienced radio/TV technician for help.
Use of Trademarks, Registered Trademarks, and other Protected Names and Symbols
This manual may make reference to trademarks, registered trademarks, and other protected names and/or symbols of third-party companies not related in any way to StarTech.com. Where they occur these references are for illustrative purposes only and do not represent an endorsement of a product or service by StarTech.com, or an endorsement of the product(s) to which this manual applies by the third-party company in question. Regardless of any direct acknowledgement elsewhere in the body of this document, StarTech.com hereby acknowledges that all trademarks, registered trademarks, service marks, and other protected names and/or symbols contained in this manual and related documents are the property of their respective holders.
Instruction Manual
Table of Contents
Introduction ....1
Before You Begin....1
System Requirements 1
Contents 1
Installation 2
Connecting Devices to the Switch 2
Using the Video Switch ....3
Using the Remote Learning Feature 3
Troubleshooting 4
Accessory Products from StarTech.com ....5
Technical Support....6
Warranty Information 6
Instruction Manual
Introduction
Thank you for purchasing a StarTech.com video switch. This product allows you to connect up to four A/V devices that have composite or S-Video output to a display using a single set of inputs. You can use either the front panel selection button or the included remote control to switch between devices. This product is perfect for use with DVD players, VCRs, game consoles and other video devices when you have a limited number of inputs available on your TV or other display.
Features
- Connect up to four devices to your TV using a single set of inputs
- Includes an easy-to-use remote control for easy switching between devices
- You can program the video switch to work with your existing universal remote
- Maintains clear audio and video signals for excellent performance
Before You Begin
System Requirements
- A display that has at least one set of inputs that accommodate RCA audio and either composite video or S-Video
- A set of cables for each device to be connected to the switch that use RCA audio and either composite video or S-Video
- A set of cables to connect the switch to the display, using RCA audio and either composite video or S-Video
Contents
This package should contain:
- Video switch (1)
- Remote control (1)
- Instruction manual (1)
Instruction Manual
Installation
These instructions assume that the display has at least one available set of inputs that use RCA audio and either composite video or S-Video, and that all the devices have their cables attached. You may need to disconnect an existing device from the display to make an input available and re-connect that device using the video switch.
Connecting Devices to the Switch
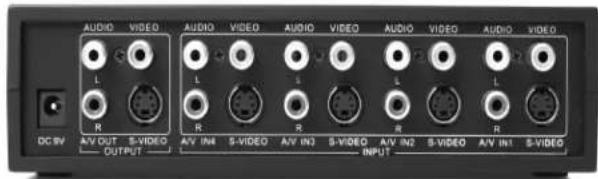
NOTE: The video switch does not convert between S-Video and composite video signals. These instructions assume that all devices connected to the switch use the same connection that the switch will use to connect to the display (i.e. the switch connects to the S-Video input on a television, so all devices will be connected to the switch using S-Video). If you wish to mix both composite video and S-Video connections for different devices connected to the video switch, your display must have both S-Video and composite video connectors on the same input (i.e. the connectors marked A/V 1 or similar), and you must connect both the S-Video and composite outputs from the switch to your display.
- Place the switch near the display and the devices you wish to use with the switch.
- Connect the first device (VCR, DVD player, etc.) to the set of connectors labeled A/V IN1 on the back of the switch. RCA audio has two inputs (left/right, marked as white and red, respectively). Connect the sound cables from the device to the switch. Connect either the composite video (yellow) cable or the S-Video (4 pin) from the device to the switch. Do not connect both a composite and S-Video cable from a device to the same port on the video switch.
- Connect up three additional devices following the instructions in step 2.
- Connect RCA audio cables and either a composite video or S-Video cable to the ports labeled OUTPUT on the video switch. Connect the opposite end of those cables to the appropriate connectors on the display (normally marked as A/V IN or similar). If you are mixing S-Video and composite video devices on the video switch as described in "NOTE" above, you must connect both a S-Video and composite video cable from the OUTPUT connectors on the video switch to the same input on the display.
- Connect the power adapter (provided) to the port marked DC 9V on the video switch. Connect the opposite end to a wall outlet or other suitable power source.
The video switch is now ready to use.
Instruction Manual
Using the Video Switch
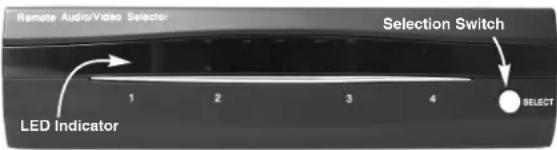
Once you have connected devices to the video switch, you can proceed to test the connection to the television or other display. Turn on the display, and select the input to which you connected the video switch. Consult the documentation for your display if you are unsure on how to select A/V inputs. Usually, there will be a button on the display's remote or front panel labeled INPUT or A/V. If the display has multiple inputs, you will need to ensure the input you have selected corresponds to the connectors on the television you used for the switch. A red LED indicator will light on the front panel of the switch to show which device is active.
Power on all the devices you connected to the video switch. You should now be able to use the buttons on the video switch remote to select a device by pressing a button on the remote (1/2/3/4) and the image from that device should be displayed on the screen. As an alternative to using the remote, you can also press the SELECT button on the front of the switch to change active inputs on the switch.
Using the Remote Learning Feature
If you prefer, you can use an existing universal remote with this product. You can program the video switch to select an input using the signal from any remote.
- Press and hold the SELECT button on the video switch for a minimum of 5 seconds. The LED indicator for input 1 will flash on the video switch when you release the button.
- Aim your universal remote at the video switch. Press the key on the remote that corresponds to the key you want to use to select input 1 on the video switch. Once the video switch has stored that setting, the LED indicator for input 2 will flash on the video switch.
- Repeat this process for inputs 2, 3, and 4. When the process is complete, the video switch will automatically return to the input you selected before entering Learn Mode. To abort the programming at any time, press the SELECT button once.
Instruction Manual
Troubleshooting
If you're having difficulty using the video switch, try the following solutions based on the nature of the problem.
None of the devices connected to the video switch are displayed on the screen.
1) Ensure the video switch is plugged in and receiving power. One LED indicator on the front panel will be lit when the switch is receiving power.
2) Try selecting another input on the display and verify which input the switch is connected to. Most displays will have their A/V inputs marked with a number, so ensure the input selected on the screen matches the physical connection between the switch and the display.
3) Verify cable connections between the video switch and display are snug.
Some of the devices connected to the switch do not appear on the display when they are connected.
1) Ensure the device you selected is powered on and that it has media inserted (if applicable: tape, DVD, etc.). If needed, press play on the device to ensure an image is displayed.
2) Ensure that all the cable connections between devices and the switch are correct and snug. Also ensure that the device is connected to the set of inputs that you selected on the switch.
Video or audio quality is poor.
1) Ensure the connections between the devices and the switch, and the switch and the display, are snug.
2) Try using a higher quality A/V cable to make the connection between the devices and the switch for the best possible performance.
Instruction Manual
Accessory Products from StarTech.com
Contact your local StarTech.com dealer or visit www.startech.com for cables or other accessories that will help you get the best performance out of your new product.
COMPHQ3
3 ft Premium Composite Video Cable
COMPHQ6
6 ft Premium Composite Video Cable
COMPHQ12
12 ft Premium Composite Video Cable
COMPAAHQ3
3 ft Premium Composite+RCA Audio Cable
COMPAAHQ6
6 ft Premium Composite+RCA Audio Cable
COMPAAHQ12
12 ft Premium Composite+RCA Audio Cable
AUDIORCA3
3 ft Premium RCA Audio Cable
AUDIORCA6
6 ft Premium RCA Audio Cable
AUDIORCA12
12 ft Premium RCA Audio Cable
SVIDAAHQ3
3 ft Premium S-Video+RCA Audio Cable
SVIDAAHQ6
6 ft Premium S-Video+RCA Audio Cable
SVIDAAHQ12
12 ft Premium S-Video+RCA Audio Cable
SVIDHQ3
3 ft Premium S-Video Cable
SVIDHQ6
6 ft Premium S-Video Cable
SVIDHQ12
12 ft Premium S-Video Cable
Instruction Manual
Technical Support
StarTech.com's lifetime technical support is an integral part of our commitment to provide industry-leading solutions. If you ever need help with your product, visit www.startech.com/support and access our comprehensive selection of online tools, documentation, and downloads.
Warranty Information
This product is backed by a one-year warranty. In addition, StarTech.com warrants its products against defects in materials and workmanship for the periods noted, following the initial date of purchase. During this period, the products may be returned for repair, or replacement with equivalent products at our discretion. The warranty covers parts and labor costs only. StarTech.com does not warrant its products from defects or damages arising from misuse, abuse, alteration, or normal wear and tear.
Limitation of Liability
In no event shall the liability of StarTech.com Ltd. and StarTech.com USA LLP (or their officers, directors, employees or agents) for any damages (whether direct or indirect, special, punitive, incidental, consequential, or otherwise), loss of profits, loss of business, or any pecuniary loss, arising out of or related to the use of the product exceed the actual price paid for the product.
Some states do not allow the exclusion or limitation of incidental or consequential damages. If such laws apply, the limitations or exclusions contained in this statement may not apply to you.
About StarTech.com
StarTech.com is “The Professionals’ Source for Hard-to-Find Computer Parts”. Since 1985, we have been providing IT professionals with the quality products they need to complete their solutions. We offer an unmatched selection of computer parts, cables, server management solutions and A/V products and serve a worldwide market through our locations in the United States, Canada, the United Kingdom and Taiwan.
Visit www.startech.com for complete information about all our products and to access exclusive interactive tools such as the Parts Finder and the KVM Reference Guide. StarTech.com makes it easy to complete almost any IT solution. Find out for yourself why our products lead the industry in performance, support, and value.


- FCC Compliance Statement
- Use of Trademarks, Registered Trademarks, and other Protected Names and Symbols
- Instruction Manual
- Table of Contents
- Introduction
- Features
- Before You Begin
- System Requirements
- Contents
- Installation
- Connecting Devices to the Switch
- Using the Video Switch
- Using the Remote Learning Feature
- Troubleshooting
- Accessory Products from StarTech.com
- COMPHQ3
- COMPHQ6
- COMPHQ12
- COMPAAHQ3
- COMPAAHQ6
- COMPAAHQ12
- AUDIORCA3
- AUDIORCA6
- AUDIORCA12
- SVIDAAHQ3
- SVIDAAHQ6
- SVIDAAHQ12
- SVIDHQ3
- SVIDHQ6
- SVIDHQ12
- Technical Support
- Warranty Information
- Limitation of Liability
- About StarTech.com
Brand : StarTech.com
Model : SVID410IR
Category : Unspecified