
PPBCM22 - Camera Pyle - Free user manual and instructions
Find the device manual for free PPBCM22 Pyle in PDF.


| Type | Security Camera |
| Model | PPBCM22 |
| Brand | Pyle |
| Dimensions | 6.7 x 2.8 x 2.8 inches |
| Weight | 1.2 lbs |
| Power Source | 12V DC, 1A |
| Resolution | 1080p Full HD |
| Lens Focal Length | 3.6mm |
| Night Vision Range | Up to 65 feet |
| Weatherproof Rating | IP66 |
| Mounting Type | Ceiling/Wall |
| Connectivity | BNC (Analog) |
| Motion Detection | Yes |
| IR LEDs | Yes |
| Image Sensor | CMOS |
| Video Output | Composite video (1 Vpp, 75 ohms) |
| Care Instructions | Clean lens with soft, dry cloth |
| Safety Precautions | Disconnect power before cleaning or maintenance |
| Spare Parts Availability | Available through Pyle or authorized dealers |
| General Information | Outdoor security camera with weatherproof housing and IR night vision |
Frequently Asked Questions - PPBCM22 Pyle
User questions about PPBCM22 Pyle
0 question about this device. Answer the ones you know or ask your own.
Ask a new question about this device
Download the instructions for your Camera in PDF format for free! Find your manual PPBCM22 - Pyle and take your electronic device back in hand. On this page are published all the documents necessary for the use of your device. PPBCM22 by Pyle.
USER MANUAL PPBCM22 Pyle
natural_image
Black tactical camera with hexagonal lens and multiple lenses (no visible text or symbols)



natural_image
Technical line drawing of a 18-pin electronic device housing (no text or symbols on the component itself)- White LED Light
- Laser Light
- 8IR LED Lights
- Camera Mic
- Walkie talkie Mic
- Video Recording
- Audio Recording/Menu
- Playback/OK Function
-
Up/Night vision
-
Down/White Light Function
- Activity Indicator
- Speaker
- 2.0inch LCD Display
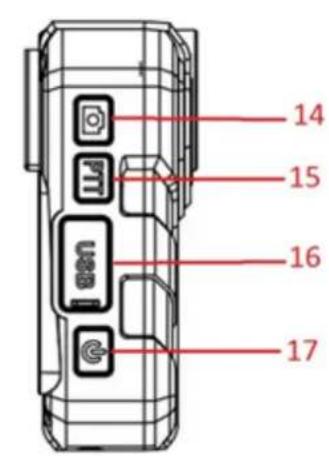
- Photo
- PTT Function
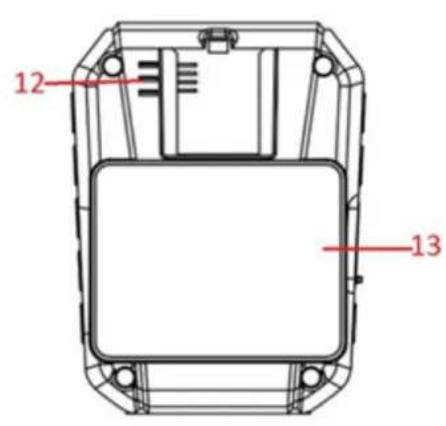
- Mini USB Port
- Power/Laser
- Dock charging port/PTT port
- Power/Charging Indicator
Note: For the reset button, open the USB rubber plug and you will find a hole for the reset button.

LCD SCREEN

Press and hold the Power button (located on the bottom-right of the device) for about 3 seconds, the unit will vibrate with sound and a green indicator on top of the unit will turn on. The camera and LCD display will turn on and enter into standby mode. The video preview mode is displayed on the LCD.
Tip: The LCD screen will turn off automatically in about 3 minutes if there is no operation on the device.
VIDEO RECORDING:
A. To record a video, press the Video Recording button located on the top of the left side of the device. The unit will vibrate once briefly. The red dot symbol on the LCD display will indicate the camera is currently recording.
B. To mark the video, short press OK button in video recording mode, the lock icon will be shown on LCD.
C. To record videos at night or in the dark, press Up/Night Vision button once. Videos recorded in night-vision will be black and white.
D. Press the Video Recording button again to stop recording. The camera will vibrate once and the red dot symbol will disappear. The camera will stop recording and save the video.
TAKING PHOTOS:
A. To take a photo, press the Camera button located on the top of the right side of the device.
B. To take photos at night or in the dark, press Up/Night Vision button once. Photos taken in night-vision will be black and white.
To record only audio, press the Audio Recording button located below the Video Recording button. The unit will vibrate once briefly and a microphone icon will appear on the LCD display. Press the Audio Recording button again to stop recording. The audio recording will be saved as an audio file.

Video:
Blinking Red = On/Standby
Power:
Green = On/Standby
Audio:
Blinking Yellow: Recording
Battery:
CHARGING:
Via USB:
- You can charge the camera using the included USB cable and wall charger via any power outlet.
- You can also charge the camera by plugging the camera into your computer via the USB cable.
B. Via single charging dock
- Put the camera into the dock, connect the dock to power via USB cable.

natural_image
Black tactical camera with mounted sensor base (no visible text or symbols)VIDEO, PHOTO, AND AUDIO PLAYBACK:
A. Press the Playback/OK Function button to enter into the Playback Menu.
B. Use the Up/Down button to select the desired icon, and then press the OK button to display all saved recording files of that type.
C. Select the file to view by using the Up/Down buttons. Press the OK button on the desired file to view in full screen.
D. To return to the Playback Menu, press the OK button.
E. To return to the preview display, press the Power button.
Tip: While viewing video, press the Up button to rewind and the Down button to fast forward, both at 2X to 64X speed.
MENU SETTINGS:
To enter into the menu from video preview mode, long press the Audio button.
There are 3 sub-menus: Video Setup, Camera Setup, and System Settings. Short press the Audio button to move from one tap to the next. And then press the Menu button to enter into the sub-menu. Press the Audio button when it is at the System Settings, it will return to the video preview mode.
VIDEO RESOLUTION:
A. In the Video Setup Menu, select the option that displays the current resolution and press the OK button.
B. There are seven resolution options to select from:
a. 2560×1080 30fps 21:9
b. 2304×1296 30fps 16:9
c. 1920×1080 30fps 16:9
d. 1920×1080 45fps 16:9
e. 1280×720 60fps 16:9
f. 1280×720 30fps 16:9
g. 848×480 30fps 16:9
C. Select the resolution you prefer and press the OK button.
D. Press the OK button again to return to the previous menu.
VIDEO QUALITY:
A. In the Video Setup Menu, select "Quality" and press the OK button.
B. There are three options to select from:
a. S.Fine
b. Fine
c. Normal
C. Select the option you prefer and press the OK button.
Tip: This refers to the video bit rate. The higher the setting, the better the video quality and the larger the video size. To achieve the most battery life, please set to Normal,
Pre-recording:
A. In the Video Setup Menu, select "Pre-record" and press the OK button.
B. There are two options to select from:
a. On = camera will re-record up to 1min(length depends on the video resolution)
b. Off = pre-recording will be disabled
C. Select the option you prefer and press the OK button.
Tip: When Pre-recording is on, press the Video Recording button to enable pre-recording, press Video Recording button again to start normal recording.
DELAY-RECORDING:
- In the Video Setup menu, select "Delay-Record" and press the OK button.
- There are two options to select from:
a. On = camera will continue recording up to 10sec after stopping recording(time depends on the video resolution)
b. Off = delay-recording will be disabled
C. Select the "Delay-Record" option you prefer and press the OK button.
STAMP:
- In the Video Setup menu, select "Stamp" and press the OK button.
- There are two options to select from:
a. On = camera will record videos with date, time, ID numbers watermark on.
b. Off = stamp will be disabled
MOTION DETECTION:
A. In the Video Setup Menu, select "Motion Detection" and press the Menu button.
B. There are two options to select from:
a. On = device will automatically begin recording when it senses motion.
b. Off = motion detection will be disabled.
C. Select the Motion Detection option you prefer and press the Menu button.
PHOTO RESOLUTION:
A. In the Camera Setup Menu, select the option that shows the current resolution and press the OK button.
B. There are seven options to select from:
a. 4M(2688×1512 16:9)
b. 16M(5376×3024 16:9)
c. 18.5M(4976×3732 4:3)
d. 20M(5120×3840 4:3)
e. 23M(6400×3600 16:9)
f. 30M(6400×4800 4:3)
g. 32M(7552×4248 16:9)
CAMERA QUALITY:
A. In the Camera Setup Menu, select "Quality" and press the OK button.
B. There are three options to select from:
a. S.Fine
b. Fine
c. Normal
C. Select the Camera Quality you prefer and press the OK button.
MULTI CAPTURE:
A. In the Camera Setup Menu, select "Multi Capture" and press the OK button.
B. There are four options to select from.
a. Multi Capture 1
b. Multi Capture 5
c. Multi Capture 10
d. Multi Capture 20
C. Select the Multi Capture setting you prefer and press the OK button.
STAMP:
A. In the Photo Setup menu, select "Stamp" and press the OK button.
B. There are two options to select from:
a. On = camera will take photos with date, time, ID numbers watermark on.
b.Off = stamp will be disabled
LANGUAGE SETTING:
A. In the System Setting Menu, select "Language Setting" and press OK button.
B. There are four options to select from:
a. English
b. Chinese (Simplified)
c. Chinese (Traditional)
d. Russian
C. Select the language option you prefer and press the OK button.
CARD VOLUME:
A. In the System Setting Menu, select "Language Setting" and press OK button. Camera will show the SD card status. For example as below:
Card Volume
Total: 61471MB
Used: 1302MB
Reserved: 60169MB
B. Press OK button or Audio Recording button to return to System Setting Menu.
RECORD MODE SETTING:
A. In the System Setting Menu, select "Record Mode Setting" and press OK button.
B. There are two options to select from:
a. Auto Record (camera will start recording automatically the moment camera is turned on)
b.Manual Record
C. Select the Record Mode Setting option you prefer and press the OK button.
LOOP VIDEO:
A. In the System Setting Menu, select "Loop Video" and press OK button.
B. There are two options to select from:
a.on = once the memory is full the device will begin overwriting the oldest files
b.off
C. Select the Loop Video option you prefer and press the OK button.
DATE AND TIME:
A. In the System Setting Menu, select the current date and time and press OK button.
B. Press OK button to select the Year/Month/Date/Hour/Minute options.
C. Press Up/Down button to set the time.
D. Press OK button to get to next item and back to previous menu.
DISPLAY SETTING:
A. In the System Setting Menu, select the "Display Setting" and press OK button.
B. Press OK button to select the LCD Brightness.
C. There is a brightness selecting slide(slide from 0 to 15), press Up/Down button to set the LCD Brightness you prefer.
D. Press OK button to get back to previous menu, press Audio Recording button to return to System Menu Setting.
AUTO POWER OFF:
A. In the System Setting Menu, select the "Auto Power Off" and press OK button.
B. There are three options to choose from:
a. Off = device only powers off manually
b.3min
c.5min
C. Select the Auto Power Off option you prefer and press the OK button.
POWER SAVING-SET:
A. In the System Setting Menu, select the "Power saving-set" and press OK button.
B. There are two options to choose from:
a.Off
B.on( camera will enter low power consumption mode, but when turn on camera again, camera will delay 1-2seconds to be power on.)
C. Select the Power saving-set option you prefer and press the OK button.
POLICE ID SETTING:
A. In the System Setting Menu, select the "Police ID Setting" and press OK button.
B. There is a keyboard for you to choose numbers and letters:

C. Select the Police ID number you prefer and press the OK button to move to next number.
D. Press the Audio Recording button to return to System Setting Menu.
VERSION INFO:
A. In the System Setting Menu, select "Version Info" and press OK button. Camera will show the camera firmware version edition. For example as below:
Version Info
Z07.20151216.01
B. Press OK button or Audio Recording button to return to System Setting Menu.
Tip: For our FAQs page, latest firmware upgrades, and more please visit: www.patroleyes.com/
LOW POWER DISPLAY:
When the battery voltage is too low, the battery icon in the upper right corner of the screen will turn red and flashing produce a Tone, in 5 minutes the camera will automatically shut down. In a low power state, please charge immediately, so as not to affect your use.
LASER LIGHT AND WHITE LIGHT INTRODUCTION
In boot status, press “Power/Laser key” to turn on/off laser light, device emits red laser beam for positioning the imaging direction.
In boot status, press "Power/Laser key" to turn on/off laser light, device emits white light which can be used as torch light.
CONNECTED TO A COMPUTER
The software is divided into the following two versions of the product:
-
USB flash drive version of the software: connected to computer directly, without having to install any drivers, direct use the USB cable to connect to the computer;
-
Police version of the software: need to install drivers, the use instruction of driver installation and background management os operation, please refer to the CD-ROM software instructions.
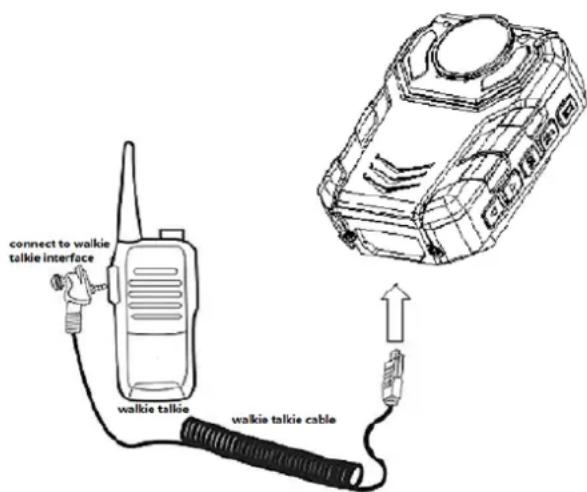
TALK BACK (SHOULDER MICROPHONE FUNCTION)
-
Connect the body camera with the walkie talkie via the dedicated walkie talkie cable.
-
Press on the "talk back key" to talk back, release pressing to stop the talk back, the talk back content will not be saved in the storage card.
Sensor 5MP CMOS
Chip..... Ambarella A7LSDK540: SVNR155888M
Photo resolution......32 M(7552×4248 16×9)(30M/23M/20M/18.5M16M/4M)
Video Resolution ....Multiple video resolution: 2304*1296 30fps 2305*1296 15fps 1920*1080 30fps 1920×1080 30fps/ 1280×720 60fps/ 1280×720 30fps / 848×480 60fps at 16:9
Video Format....H.264 .AVI/ MPEG4(.mp4)
Photo Format......JPEG
Fast Forward....2X, 4X, 8X, 16X, 32X, 64X
Rewind....2X, 4X, 8X, 16X, 32X, 64X
Audio ......High quality dual microphone
Audio Format ...... AAC2./MP3
Mark ...... Camera ID, User ID ,Time, Date could printed directly on the video
Snapshots......Able to capture during recording
Recording time:
Continuous recording time: 300 minutes (battery full grid, without infrared, resolution ratio 1080P);
Storage 64GB
Storage class ...... Visual indicator
Video light ....Red
One-touch recording ....Supported
Pre-record function ≥ 10 seconds pre-record
Extension record ≥10 second extend
Video Quality.... HD, Good, General
Video section ..... 5 minutes / 10 minutes / 15 minutes / 30 minutes / 45 minutes
Burst 2/3/5/10/15/20 shooting pictures
Red infrared switch....Auto / hand Control
Motion Detection ...... Auto / hand Control
Language.....English / Russian/Chinese/ (OEM)
Screen Saver....30 seconds / 1 minute / 3 minutes / 5 minutes
Time Lapse....5/10 seconds
Automatic shutdown....30 seconds / 1 minute / 3 minutes / 5 minutes
Key Tone....Supported
Volume Adjust....Supported
User Type ...... Police / government / security sector
Slideshow....Supported
LCD Screen 2 inches TFT-LCD high-resolution color display
Audio Playback....Supported
Video output......AV
Video Conversion.... USB 2.0
VIDEO CAMERA
Recording angle ......Wide-angle 170 degrees
Night vision.... Within 5-10 meters can see the face
Waterproof IP68
Clip.... Standard 360 degree pocket clip, or high-speed stud
PTT...... Can be connected to different types of wireless devices
BATTERY
Model ...... Built-in 2650mAh
Charging time 180 minutes
Battery standby 12hrs
Battery Level......Visual indicators
OTHER
Unique ID number / unit....5-digit device ID and 6-digit user ID
Password Protection
You can set an administrator password, and delete the video which input through the software. Users can only browse the video, but cannot be deleted
Size 77mm*56mm*28mm
Weight....128g
Working temperature ....-40\~60 °C
Storage temperature ....-20\~55 °C
Flashlight......Built-in flashlight
ACCESSORIES
- SD card
- Charger
- USB cable
• CD
- User Manual
- Remote Control Key--1pc(Optional)
- Single charging and data transfer dock (Optional)
- Radio cable
- Small clip
- Big clip--1ptc
• Leather Clasp (optional)
- Car charger (optional)
DEVICE DOES NOT BOOT, NO RESPONSE
- Please connect the charger to equipment, charging 2 hours later, then check the problem.
- Please check the charger and the connecting line is normal.
- Please press the reset key to restore the device to factory settings, and then check to the problem.
- If it does not resolve the problem, please contact customer service staff to return the factory repair.
DEVICE FAILED TO CONNECT COMPUTER, AND FAILURE TO ENTER UPLOAD MODE
Please contact customer service staff to get issue resolved.
FORGOT PASSWORD
Please contact customer service staff to get issue resolved.
TIME CAN NOT BE SYNCHRONIZED
Please use the single version software (HD Police Camera V1.0) to synchronize the time of the device, if it can not change the time, please contact customer service staff remote networking solution.
RED EQUIPMENT IMAGE
The device uses relay control infrared filter lens. When it has been hit in the course of transportation or fall could lead to an infrared filter lens stuck, the magnetic force can not be reset after the relay is energized. At this time, please repeatedly pressing the infrared switch, recovery relay control infrared filter lens. If not, please shut down after the inverted device, to beat in a surface is relatively soft place (Arm of the chair, mouse pad etc.). Boot and check is normal, if not, please contact customer service staff to return the factory repair.
PYLE®
PyleUSA.com


- VIDEO RECORDING:
- TAKING PHOTOS:
- CHARGING:
- Via USB:
- Via single charging dock
- VIDEO, PHOTO, AND AUDIO PLAYBACK:
- MENU SETTINGS:
- VIDEO RESOLUTION:
- VIDEO QUALITY:
- Pre-recording:
- DELAY-RECORDING:
- STAMP:
- MOTION DETECTION:
- PHOTO RESOLUTION:
- CAMERA QUALITY:
- MULTI CAPTURE:
- LANGUAGE SETTING:
- CARD VOLUME:
- RECORD MODE SETTING:
- LOOP VIDEO:
- DATE AND TIME:
- DISPLAY SETTING:
- AUTO POWER OFF:
- POWER SAVING-SET:
- POLICE ID SETTING:
- VERSION INFO:
- LOW POWER DISPLAY:
- LASER LIGHT AND WHITE LIGHT INTRODUCTION
- CONNECTED TO A COMPUTER
- TALK BACK (SHOULDER MICROPHONE FUNCTION)
- VIDEO CAMERA
- BATTERY
- OTHER
- Password Protection
- ACCESSORIES
- DEVICE DOES NOT BOOT, NO RESPONSE
- DEVICE FAILED TO CONNECT COMPUTER, AND FAILURE TO ENTER UPLOAD MODE
- FORGOT PASSWORD
- TIME CAN NOT BE SYNCHRONIZED
- RED EQUIPMENT IMAGE
- PYLE®
- PyleUSA.com
Brand : Pyle
Model : PPBCM22
Category : Camera