
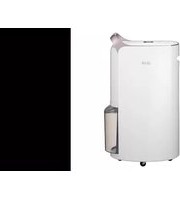
FH15GPN - Dehumidifier LG - Free user manual and instructions
Find the device manual for free FH15GPN LG in PDF.


| Product Type | Dehumidifier |
| Model | FH15GPN |
| Brand | LG |
| Capacity | 15 pints per day (at 80°F, 60% RH) |
| Recommended Room Size | Up to 300 sq ft |
| Water Tank Capacity | 1.5 gallons |
| Dimensions (W x H x D) | 14.9 x 19.2 x 9.4 inches |
| Weight | 29.8 lbs |
| Power Supply | 115V, 60Hz, 1.2A |
| Power Consumption | 150W |
| Humidity Control | Yes, adjustable humidistat (30%-80%) |
| Continuous Drain | Yes, with garden hose connection |
| Auto Shut-off | Yes, when tank is full |
| Filter | Washable, reusable mesh filter |
| Noise Level | 52 dB |
| Safety Features | Overload protection, auto defrost |
| Warranty | 1 year limited |
Frequently Asked Questions - FH15GPN LG
User questions about FH15GPN LG
0 question about this device. Answer the ones you know or ask your own.
Ask a new question about this device
Download the instructions for your Dehumidifier in PDF format for free! Find your manual FH15GPN - LG and take your electronic device back in hand. On this page are published all the documents necessary for the use of your device. FH15GPN by LG.
USER MANUAL FH15GPN LG
Read this owner's manual thoroughly before operating the appliance and keep it handy for reference at all times.
FH15GP ® Series
EN ENGLISH
TABLE OF CONTENTS
This manual may contain images or content different from the model you purchased. This manual is subject to revision by the manufacturer.
SAFETY INSTRUCTIONS ....03
INSTALLATION....10
Parts Instruction 10
Unpacking the Appliance.... 14
Installation Location Requirements 15
Transportation Requirements 15
OPERATION 16
Status Display 16
Control Panel.... 17
Getting Started 21
Start Heating 24
Using Extra Functions 27
SMART FUNCTIONS....31
LG ThinQ Application 31
Smart Diagnosis 33
MAINTENANCE 35
Maintaining the Appliance 35
Cleaning the Appliance 36
Maintaining the Filter 37
TROUBLESHOOTING....39
Before Calling for Service.... 39
Appliance Specifications 44
SAFETY INSTRUCTIONS
EN
READ AND SAVE THESE INSTRUCTIONS
The following safety guidelines are intended to prevent unforeseen risks or damage from unsafe or incorrect operation of the appliance.
The guidelines are separated into 'WARNING' and 'CAUTION' as described below.

This symbol is displayed to indicate matters and operations that can cause risk. Read the text marked with this symbol carefully and follow the instructions in order to avoid risk.

WARNING
This indicates that failure to follow the instructions can cause serious injury or death.

CAUTION
This indicates that failure to follow the instructions can cause minor injury or damage to the product.
IMPORTANT SAFETY INSTRUCTIONS

WARNING
To reduce the risk of explosion, fire, death, electric shock, injury or scalding to persons when using this product, follow basic precautions, including the following:
Children in the Household
• This appliance is not intended for use by persons (including children) with reduced physical, sensory or mental capabilities, or lack of experience and knowledge, unless they have been given supervision or instruction concerning use of the appliance by a person responsible for their safety. Children should be supervised to ensure that they do not play with the appliance.
Installation
- Do not install the appliance on an uneven or inclined surface.
- Do not install the appliance in an area exposed to direct sunlight or near heat-generating equipment.
- Do not install the product in a place where combustible gas may leak or industrial oil or metallic particulates are present.
- Do not allow the appliance to push against the power cord or plug.
- Do not touch the power plug with wet hands.
- When unplugging the power cord, always pull it by the plug.
- Unplug the appliance during thunder or lightning storms or when not in use for a long time.
- Do not bend the power cord excessively or place a heavy object on top of it.
- Do not extend the length of the power cord or alter it.
- Do not use several devices on a multi-socket extension outlet.
- Make the connection securely so that screw in terminals will not be loosened when the power cord is pulled.
• Make sure that the power cord cannot be be pulled out or
EN
- Do not run cord under carpeting. Do not cover cord with throw rugs, runners, or similar coverings. Do not route cord under furniture or appliances. Arrange cord away from traffic area and where it will not be tripped over.
• Install the safe plate to use the product safely. - If there are children around, be sure to install a safe guard.
- Do not place this product directly under an electrical outlet.
• To reduce the risk of fire, make sure that fabrics, curtains, or other combustible materials are kept at least 1 meter away from the air outlet. - Do not allow the product or power plug to come into contact with any hot surface. Do not pass the power plug under furniture or electric appliances.
- During initial installation, use the heating mode after operating it for more than 5 minutes in the fan mode.
Operation
- If the appliance is immersed in water, stop using it and contact an LG Electronics Customer Information Center.
- If there is a gas leakage (isobutane, propane, LNG, etc.), do not touch the product or power plug and ventilate the area immediately.
- Do not clean the appliance with brushes, cloths or sponges which are abrasive or made of metal.
-
If you detect any abnormal noise, odor or smoke, unplug the product immediately and contact an LG Electronics Customer Information Center.
-
Do not use or store fire, combustibles (ether, benzene, alcohol, drugs, propane, butane, combustible spray, insecticide, air freshener, cosmetics, etc.) or flammable materials (candles, lamps, etc.) near the product.
- Do not place the power cord under rugs, carpeting or mats.
- Do not allow animals or pets to chew on the power cord.
- Do not move the appliance when it is in operation.
- Do not hit the appliance.
- Do not insert hands or metal objects into the air inlet or outlet.
- Do not install and use broken parts.
- Do not put flammables into the appliance.
- Do not allow children to climb on or play with the appliance.
- Do not place anything on top of the appliance.
• The fan is not a toy. It should not be played with or placed where young children can reach it. - Be careful that children do not get their hands caught in the vanes by putting their hands during the vanes operation.
- This product uses UVnano LED. Do not disconnect or replace the UVnano LED arbitrarily. LEDs must be replaced only by LG-approved service providers.
- Harmful UVnano radiation may leak if the device is used in an unintended way or if the wires are damaged. UVnano radiation, even in very small amounts, can harm the eyes and skin.
EN
- Do not replace the UV Lamp while it is plugged in.
- Skin or eye damage may result from directly viewing the light produced by the lamp in this apparatus. Always disconnect power before relamping or servicing. Replace Lamp With Lamp CUD7GF1B, Manufactured by Seoul Viosys Co., LTD. Replace Lamp With Lamp LTPL-G35U275GC-TWA, Manufactured by Lite-On Technology Corporation.
- Some parts of this product become very hot and may cause burns. Special care should be taken when using this product in the presence of children and infirm people or animals.
• To avoid overheating, do not cover the product.
Maintenance
- Dispose of the packing materials (vinyl, styrofoam, etc.) to keep them out of reach of children.
• Take care not to injure or pinch yourself when you detach and reattach parts of the appliance.
- Turn off and unplug the appliance before cleaning it or replacing the filter.

CAUTION
To reduce the risk of minor injury to persons, malfunction, or damage to the product or property when using this product, follow basic precautions, including the following:
Installation
- Do not tilt the appliance to pull or push it when transporting.
-
Do not install the appliance in a vehicle, RV, or marine vessel.
-
Do not place the appliance near a TV or stereo equipment.
- Do not place the appliance under bright light.
- The appliance must be installed in accordance with national wiring regulations.
- When moving or storing the appliance, wrap the power cord around the base of the appliance to prevent personal injury, damage to the cord or damage to floors.
- Do not place the appliance near curtains.
Operation
- Do not use the product for removal of toxic gas such as carbon monoxide.
- Do not use the product for ventilation purposes.
- Do not use the appliance for a long time in a region with unstable voltage.
- Do not place obstacles around the air inlet or outlet.
- For safe use of the appliance, children or others with reduced mental capabilities need to be closely monitored by a person who is responsible for their safety.
- Do not use the product for special purposes such as preserving plants, precision instruments, artworks, etc.
- Do not operate the appliance with wet hands.
- Do not let the moisture from a humidifier directly touch the appliance.
- Do not use the appliance while it is not in an upright position.
- Do not use the appliance near objects vulnerable to heat.
EN
- Do not use detergents, cosmetics, chemicals, air fresheners, or disinfectants in the appliance.
- Do not touch any internal parts while the unit is operating or immediately after operation.
- Use the filter only for its intended purpose.
- The Deodorizing Care filter and V filter are assembled together. Do not try to detach them from each other.
- Do not insert any objects into the air outlet.
- Do not allow the moisture emitted from the humidifier to come into direct contact with the product.
Maintenance
- Do not use strong detergents or solvents to clean the product. Use a soft cloth to clean.
- Do not clean the appliance with an alkaline detergent.
- Do not wipe the appliance surface using sulfuric acid, hydrochloric acid or organic solvents (thinner, kerosene etc.) or attach a sticker on the appliance.
- Do not allow water inside the appliance.
- Do not wash the filter with water.
- Be careful not to damage the ultra-fine filter when cleaning it with a vacuum cleaner.
INSTALLATION
- The appearance or functions of the appliance may differ depending on the model.
Parts Instruction
Front
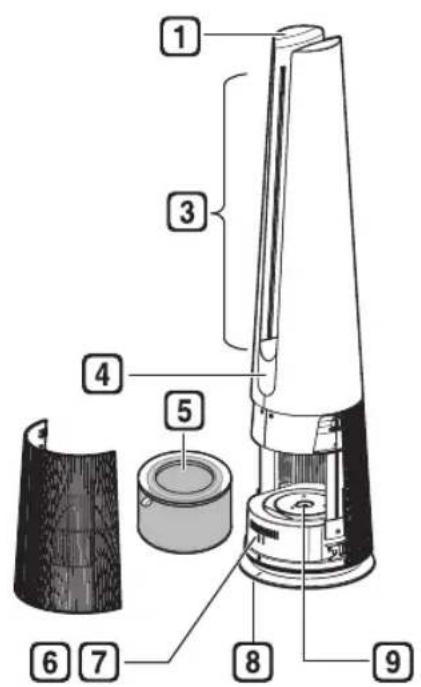

Rear

1 Control Panel
- Sets the product functions.
② Vane
- Moves depending on the operating mode (Wide Mode/ Direct Mode / Diffusion Mode).
- Operates according to the mode to change the direction of the wind.
3 Air Outlet
- It discharges purified air through the filter.
4 Display
(Status Display / Remote Controller Receiver)
• Displays the settings of the product and the air condition.
5 Filter
- Minimizes allergens, fine particulates, possible sources of sick house syndrome, smog, and other odors.
6 Smart Diagnosis
- If the product malfunctions, use Smart Diagnosis to check the product status. (See Smart Diagnosis in Smart Functions)
7 Sensor
- PM1.0 (ultra-fine particles) Sensor: Detects the concentration levels of dust. (You do not need to clean the sensor lens separately.) Odor(Gas) Sensor: Detects the concentration levels of odor(gas)
8 Product Center Line
- It is the center line of the product.
9 UVnano LED (Only models with UVnano applied)
- Remove the harmful bacteria at internal fan of the air purifier.
10 Remote Controller Holder
- Attach the remote controller to store it. - Attach the rear part of the remote controller to the location marked on the product.
11 Handle
• Use when carrying the product.
12 Temperature/Humidity Sensor
• Detects temperature and humidity.
13 Air Inlet (Cover)
- Air goes into the purifier through the inlet. - The front and rear covers may be removed separately.
14 Heater (inside the product)
- During heating, the heater warms up the air drawn into the air purifier.
CAUTION
- Be careful not to stick magnets or metal objects to the remote controller holder as it is attached with magnets.
- Be careful that children do not get caught by putting their hands during the vane operation.
Filter System

① Deodorizing Care Filter
Minimizes odors from the bathroom, cigarettes, food and other common sources.
② V Filter
Minimizes PM1.0 and cigarette smoke from the air.
③ Filter Handle
Use it to remove the filter from the product.
4 Ultra Fine Filter
Minimizes large particles floating in the air.
CAUTION
- Do not forcefully separate the Deodorizing Care Filter and V Filter as they are intergrated.
- Do not throw the filter or use it for any other purpose.

NOTE
- A slight odor may be emitted from the new filter at the beginning after purchase. The odor will disappear after a day or so of using the product, so you can use it without worry.
- The frequency of cleaning and filter replacement may vary depending on environment and usage time.
- Filters may be used for up to 1 year. The more polluted the indoor air, the shorter the life of the filter.
- If an excessive odor is present in the room, first ventilate the air to remove the odor, and then use the air purifier to remove the remaining odor.
- If the air purifier is used after not having been used for a long time and there is an odor, you can reduce the odor from the filter by operating it on fan speed 10 step in a ventilated area
- The filter may emit an odor when used continuously in a humid environment or where moisture from a humidifier is absorbed into the filter. If odor is generated due to moisture, dry the filter in sunlight before use.
- Carbon monoxide (CO) is a harmful gas that is mainly introduced from the outside, and cannot be removed with a filter.
- Keep the windows or doors closed while using the product. However, if you operate the product for a long time in a closed space, the carbon dioxide concentration may rise. So be sure to ventilate the indoor regularly.
- The deodorization function of the air purifier operates by trapping the odor in the filter. If you use the product for a long time in a room with excessive odor, the performance of the filter may decrease significantly.
- Using an ultrasonic humidifier and air purifier at the same time may drastically reduce the filter life due to the lime contained in the humidifier spray.
- If you plan on using a humidifier with the air purifier, we recommend using an evaporative humidifier.
- If the surrounding odor is absorbed by the filter and the product smells while operating, it is time to replace the filter. Filter replacement costs are not covered under warranty. To purchase new filters, contact an LG Electronics Customer Information Center or visit the website at www.lg.com.
Accessories

Remote Controller/
Battery
(CR2025, 1 Unit)

Owner's Manual / Quick Guide

Safe Plate Safe Guard

EN
Unpacking the Appliance
Remove the fi xing tape, protective vinyl and its fi iter before use.
Removing fi Iter vinyl
1 Remove the product from the packaging and remove the fi xing tape attached to the product.
2 Grab the cover and gently pull to separate it from the appliances.
- The direction with the LG logo on the product display is the front of the product.
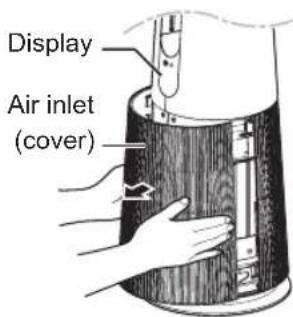
3 After separating the filter, remove its protective vinyl.
- When removing the packaged filter, separate it from the protective vinyl.

natural_image
Diagram showing a hand operating a cylindrical device next to a container with a tool, illustrating the process (no text or symbols present)4 Install the filter in the product.
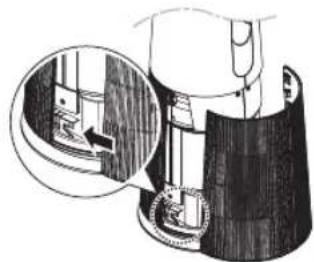
• Make sure that the handle is facing upward

5 Insert the tabs at the bottom of the cover into the slots in the base of the appliance and close the cover.
natural_image
Illustration of a hand holding a wooden object with a magnified inset showing a window and a small circular component (no text or symbols)CAUTION
- Be sure to remove the vinyl from the fi Iter before using the product.
- Pay attention to the direction of the fi Iter when installing the fi Iter.
EN
Removing vane vinyl
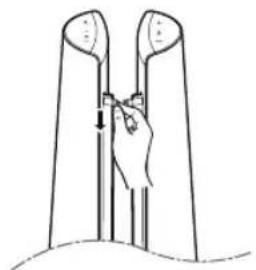
Use the product after removing the vane vinyl.
1 Operating product.
2 Press Mode button and select Diffusion Mode.
3 After vanes come out, grasp the vinyl at the top and remove it slowly in the downward direction.
CAUTION
- If you do not remove the vane vinyl, be aware that the vinyl may make noise while operating the product.
natural_image
Line drawing of a hand adjusting a vertical tube or tube structure (no text or symbols)Installation Location Requirements
Install at a distance of at least 3 14 ft (1 m) from a wall.
- If there is not enough space for air to be taken in, performance of the air purifi er may be reduced.

The performance of the product may differ depending on the operating environment (such as temperature and humidity).
- Product performance may be slightly degraded when used outside of a humidity range of 40% to 70%.
Transportation Requirements
Be careful not to drag the power cord on the floor when moving or storing the product.
Transporting the Appliance
Carry the product safely by using the handles at the top and back of the product.

natural_image
Diagram of a handheld device with two circular components and a hand interacting with it (no text or symbols)CAUTION
- Do not move the product by holding the outer cover. The cover may open and the product may fall.
OPERATION
- The appearance or accessories of the product may differ depending on the model.
Status Display
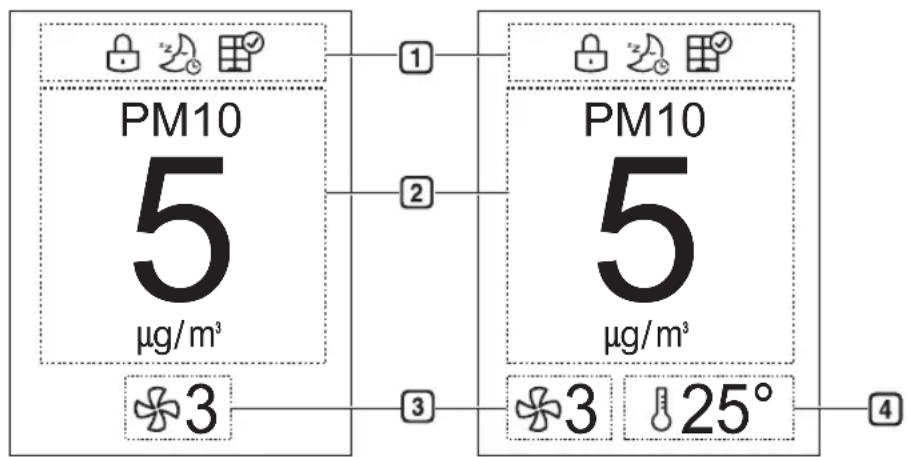
flowchart
graph LR
    A["PM10 5 μg/m³"] --> B["1"]
    A --> C["2"]
    A --> D["3"]
    E["PM10 5 μg/m³"] --> F["3"]
    E --> G["4"]
    H["25°"] --> I["4"]
[Heating Mode][Fan Mode]
1 Add-on Display
- Up to three icons are displayed - Icons are shown or displayed according to display priority.
- Button Lock > Timer > Filter Replacement Notification > UVnano > Wi-Fi Connection
- UVnano function is applied only to models applied UVnano
| Icon Description | |
| Displays when the control panel is locked. | |
| Displayed when the sleep timer is set. | |
| Displays when it is time to replace the filter. | |
| UV | Displayed when the UVnano setting is enabled. |
| UV | Displayed when the UVnano is not working normally. (Check if the filter and air intake cover are properly installed.) |
| Displays Wi-Fi (if connected), and allows remote control. (You can set the warming operation time up to 8 hours.) | |
② Status display
• Air quality, PM10/PM2.5/PM1.0 dust concentration, odor, temperature, humidity, and operation status are displayed.
3 Fan Speed Display
- Displays Fan speed from Auto, Steps 1 to 10 and Turbo.
4 Heating Target Temperature Display
- Displays the set temperature of the warm air ranging from 16 °C to 30 °C.
* The heating target temperature is displayed only during heating.
Control Panel


1 Standby On/Off Button
Can start or stop operation.
2 Speed Button
Allows you to adjust the fan speed of the product.
③ Mode Button
Use it to set the operation mode of the product.
* Diffusion mode is not available during heating.
4 Heating Button
Use this button to start or stop heating.
5 Rotation Button
Sets the rotation of the product. (45°, 60°, 90°, 140°, Stop)
NOTE
- You can use extra functions by pressing the button on the control panel for longer than 3 seconds. (Example: Press the -Mode + Mode button and the Heating button at the same time for 3 seconds or longer.) * UVnano fuction is applied only to models applied UVnano
| Long press (more than 3 seconds) | Function |
| Control Panel Lock/Unlock | |
| Connect Wi-Fi | |
| Product sound On/Off | |
| UVnano On/Off | |
| Smart Diagnosis | |
| Filter Replacement Notification Reset |
- Press and hold the button
| Press and hold the button | Function |
| ^ | Continuous change of Fan speed |
| ∨ | Continuous change of Fan speed |
| ON/OFF | Continuous change of standby screen |
Remote Controller

1 Standby On/Off button Can start or stop operation.
2 Speed button
Allows you to adjust the fan speed of the product.
③ Mode button
Sets the operation mode.
(Wide Mode/ Direct Mode / Diffusion Mode)
※ Diffusion mode is not available during heating.
4 Show Info button
Use to set the standby screen.
(Air quality, Fine dust information, Odor, Temperature, Humidity, Operating status)
5 Increase Target Temperature button Use this button to change the target temperature during heating. (Temperature setting range: 16 °C to 30 °C)
6 Decrease Target Temperature button Use this button to change the target temperature during heating. (Temperature setting range: 16 °C to 30 °C)
7 Rotation button Sets the rotation of the product. (45°, 60°, 90°, 140°, Stop)
8 Sleep Timer button Sets the sleep schedule. (1 \~ 12 - Off)
NOTE
- You can use extra functions by pressing the buttons on the remote controller for longer than 2 seconds.
| Long press (more than 2 seconds) | Function |
| ^ | Continuous change of Fan speed |
| √ | Continuous change of Fan speed |
| Product sound On/Off | |
| Setting Display brightness | |
| Heating On | |
| Heating Off |
Preparing to Use the Remote Controller
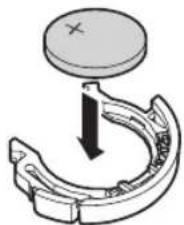
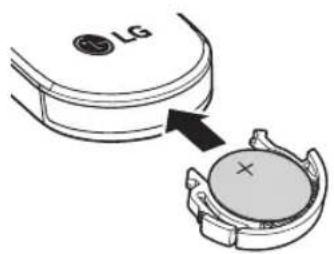
1 With the front side of the remote controller facing up, remove the battery tray by pushing in the direction of number 2 while pressing part 1 with a simple tool (cotton swab, etc.).


2 Insert the battery provided with the appliance into the tray. Place it with the + mark facing up.
natural_image
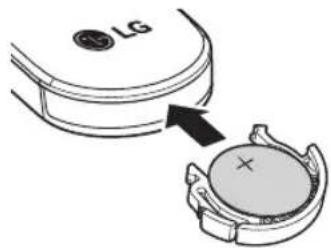
Mechanical component diagram showing a curved bracket with a circular top and downward arrow indicating motion (no text or symbols)3 Insert the battery tray back into the remote controller.
NOTE
- If the remote controller is not operating properly, check the polarity (+, -) of the battery or replace the battery before contacting the service center.
- Separately collect exhausted batteries.
- When using the remote controller, point the remote controller transmitter toward the display(status panel / remote controller receiver) on the product.
- The remote controller is not received properly at a distance of more than 7 m from the product.
- The remote controller signal reception may be interrupted when strong lights such as fluorescent lamps or neon signs are present. In this case, use the remote controller in front of the remote signal receiver of the indoor unit.


WARNING
- The remote controller uses button/coin type batteries (CR2025).
- Swallowing batteries may cause serious injury or death. Go to hospital emergency room immediately to seek medical attention.
- Keep the battery out of reach of children.
- If the battery tray is not secured firmly, stop using the appliance immediately and keep it away from children.


CAUTION
- Do not arbitrarily modify the battery.
- Do not recharge or disassemble the battery.
- Do not throw the battery into a fire for disposal or leave it near heat.
- Do not press multiple buttons at the same time.
- Do not use it near a lot of water or moisture.
- Do not use it near flames or heat.
- Remove and store the battery in a safe location if you do not intend to use the remote controller for a long time.
- Batteries may explode if inserted incorrectly.
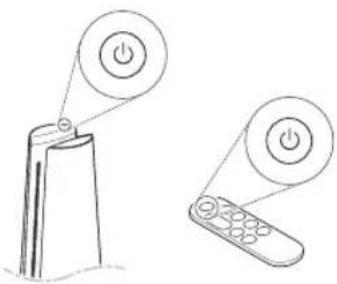
Getting Started
Press the Standby On/Off button to start operation.
natural_image
Line drawing of a remote control with two buttons and a power button (no text or symbols)NOTE
- When starting operation for the first time after installing the product, it will operate in Wide mode and with step 5 of fan speed.
- If you stop operation and resume it, it will start cleaning with the mode you last selected.
- Even if power is lost due to a blackout, the product will remember the mode(Fan speed, Mode, Display brightness) you used last.
- When you start driving, the dust concentration is displayed after sensor stabilization (about 15 seconds). While sensor stabilization is in progress, the clean stabilization screen 📋 appears on the status display.
Using the Mode
Sets the operation mode of the air purifier.

- Each time the Mode button is pressed during operation, the sequence of Wide Mode – Direct Mode – Diffusion Mode is repeated.
NOTE
- Wide Mode - In operation mode, you can feel cool and comfortable with clean wind discharged to the front.
- Direct Mode - As the vane closes slightly, the air is intensively discharged.
- Diffusion Mode - Operation mode in which the vane changes the direction of the wind to clean the indoor space in various directions and to use it without being cold even in winter.
Adjusting the Fan Speed
Adjusts the fan speed of the air purifier.

natural_image
Line drawing of a remote control device with two buttons and a scroll (no text or symbols)• Each time the Speed button is pressed during operation, it changes in the order of steps Auto ↔ 1 \~ 10 ↔ Turbo.
- Press and hold the Speed button to change the fan speed in a row.

NOTE
- The stronger the wind, the faster the space is cleaned.
- If you set the fan speed to Turbo, it automatically changes to Auto after 20 minutes.
- If you set the fan speed to Auto, it automatically adjusts according to the pollution level (dust concentration and odor) of the inside air.
EN
Using Rotation
Sets the rotation of the air purifier.
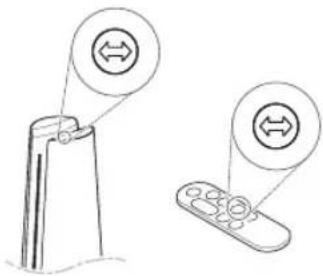
natural_image
Illustration of a remote control device with bidirectional arrows indicating left and right motion (no text or symbols)• Each time the Rotation button is pressed during operation, the sequence of 45irc-60irc-90irc-140irc -Stop is repeated.

NOTE
- It rotates at 140irc during the initial rotation and starts rotating from the center of the product after position initialization.
- When the Rotation button is pressed while the product is rotating, it will set to 'Stop'.
- When the function is changed while using the rotation, the rotation stops for a while so that the display status can be checked, and then the rotation operates again after the setting is completed.
- When using rotation mode: When the product is turned off, the product rotates to the center and stops.
- When the rotation mode is not in use: When the product is turned off, the product turns off at a stationary position.
-
Product rotation rotates around the center of the product.
-
Do not forcefully rotate the product by holding it.
- If you hold the product and force it to rotate, you will need to re-center the product.
- To center the product, turn off the product, unplug the power cord, wait for a while, and then plug in the power cord again. After that, if you turn on the rotation, the initialization proceeds automatically.
• If the product is rotated arbitrarily, noise may occur during initial rotation.
- After one initial rotation, the product operates normally.
Start Heating
Press the Standby On/Off button to start operating, and then press the Heating button to start Heating.
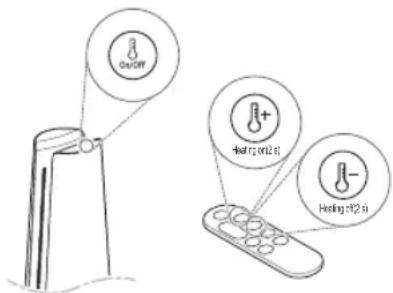
- Diffusion mode is not available during heating.
- Press the Heating button on the control panel to start or stop heating.
- Press and hold the ⏻ Increase Target Temperature button on the remote controller for 2 seconds or longer to start heating.
- Press and hold the ⏻ Decrease Target Temperature button on the remote controller for 2 seconds or longer to stop heating.
WARNING
- Some parts of this product become very hot and may cause burns. Special care should be taken when using this product in the presence of children and infirm people or animals.

NOTE
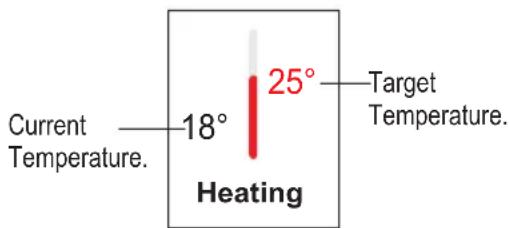
- Press the ⏻ Increase Target Temperature or ⏻ Decrease Target Temperature buttons to change the target temperature from 16 °C to 30 °C.
- When you start heating after installing the product for the first time, it operates at 30 °C and a fan speed level of 1.
-
If the current temperature is higher than the target temperature, the product operates as follows:
-
The heater inside the product stops working.
- The vane comes out and the wind direction changes.
- The color of ⏻ on the status display turns white.
- If the current temperature is lower than the target temperature, the product operates as follows:
- First, the vane goes back to the original position and the wind direction changes.
- The heater inside the product starts working.
-
The color of 🖱 on the status display turns red.
-
Excessive electricity bills may be charged when heating is used for a long time. (Rated power consumption during warming: 1,500W)
- When you stop and restart heating, the product will start at the last set temperature.
EN
- Heating auto-block function: Heating can work continuously for up to 8 hours, but it turns off automatically after 8 hours of operation. If you want to restart it, press the Heating button to restart heating. If you want to set the duration of heating to less than 8 hours, you can use the ThinQ app to set the duration from 1 to 8 hours.
- Residual heat removal: When you turn off the power during heating, the residual heat removal works to cool down the residual heat inside the product. While residual heat removal is in progress, the Cooling down message
appears on the status display.
- During heating, there may be odor from the heat generated in the air outlet. Rest assured that the odor will naturally decrease over time.
- Rest assured that the following types of noise are not a sign of a malfunction:
- Noises that sound like 'tick', 'click', or 'pop' may be generated from contraction and expansion due to the temperature difference of the plastic.
- Noises that sound like 'clang', 'ting', or 'clank' may be generated from contraction and expansion due to the temperature difference of the heater.
- Noise that sounds like ‘clunk’ or ‘phut’ may be generated from the heater switch operating during heating.
Adjusting the Fan Speed (Heating)
Adjusts the fan speed of the purifier.

• Each time the Speed button is pressed during heating, it changes in order of steps Auto ↔ 1 \~ 10.
- Press and hold the Speed button to change the fan speed in a row.
Using Rotation (Heating)
Sets the rotation of the air purifier.

natural_image
Diagram showing two mechanical components with bidirectional arrows indicating movement (no text or symbols)• Each time the Rotation button is pressed warming, the sequence of 45irc-60irc-90irc-140irc - Stop is repeated.

NOTE
- Rotation mode works the same even during warming. (See Using Rotation on page 23)

NOTE
• The stronger the wind, the faster the space is cleaned.
• As the fan speed gets higher the warmth may decrease.
Using Extra Functions
Setting standby display

Displays air quality, air quality circulation, odor, temperature, humidity and operation information.
- Press and hold the Heating button in the control panel.
- Press the show Show Info button on the remote controller.
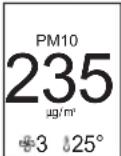
- The order of Air Quality - PM10 - PM2.5 - PM1.0 - Odor - Temperature - Humidity - Operating status is repeated.
| 1 Air Quality | 2 PM10 | 3 PM2.5 | 4 PM1.0 |
| • Displays the overall air quality status | • Displays fi ne dust information | • Displays ultra-fi ne dust information | • Displays super ultra-fi ne dust information |
 |  |  |  |
| 5 Odor | 6 Temperature | Humidity | 8 Mode status | ||
| • Displays indoor odor information. | • Displays room temperature information. | • Displays indoor humidity information. | • Displays operation status information. | ||
 |  |  |  |  |  |
NOTE
- Overall Air quality is calculated based on the concentrations of dust and odor(gas) is categorized into 4 levels: green, yellow, orange, and red, depending on the contamination of the air.
| Color | Overall air quality | Concentration of PM ( µg/m3 ) | Concentration of Odor(Gas) | |||
| State PM | 0 PM2.5 PM1. | 0 State Level | ||||
| Red P | Poor 255 or more | 56 or more 5 | 6 or more Very | Strong 4 | ||
| Orange | Unhealthy | 155 ~ 254 | 36 ~ 55 | 36 ~ 55 | Strong | 3 |
| Yellow | Moderate | 55 ~ 154 | 13 ~ 35 | 13 ~ 35 | Normal | 2 |
| Green | Good | 54 or less | 12 or less | 12 or less | Weak | 1 |
- Overall air quality can be seen by the color of the air quality indicator and the text indicating the concentration of dust and odor.
- The color of overall air quality is determined based on the worst condition among dust concentration and odor(gas) concentration.
Checking air condition on the Status Display
You can check the overall air quality and dust/odor(gas) concentration on the Status display of the product.
- Overall air quality : Overall air quality can be seen by the color of the air quality indicator and the text indicating the dust concentration and odor(gas) concentration.
- Dust concentration: The dust concentration is indicated with the color displayed with specific figures, depending on particle size. Displays the dust concentration of PM10/PM2.5/PM1.0.
- Odor(Gas) concentration : You can check through the odor(gas) concentration text and color of the status display.

NOTE
- The color of overall air quality is determined based on the worst condition among dust concentration and odor(gas) concentration.
- Dust concentration is displayed in units of 1 from 4 to 999. For dust concentration, refer to the sensor manufacturer's data sheet.
- The fine dust/ultra-fine dust concentration displayed on the product may be different from the measurement standards of other instruments and other products.
- If the dust concentration is high, the difference between the displayed dust concentration and the actual dust concentration may be large.
- Temperature and humidity may vary depending on the surrounding environment, such as doorways, windows, and vents.
- Temperature and humidity may appear differently depending on air circulation in the same room. Also, the temperature and humidity may be different from other products and thermo-hygrometers.
- If different or identical products are used in the same space, there may be differences in the concentration readings due to air circulation.
- Unlike odor (gas), fine dust spreads slowly, delaying the time when dust concentration is measured.
- If the product is used in the following environments, the dust concentration may be displayed differently from the actual value.
- Around fabric sofas and beds, around deep pile carpets, when shaking out blankets/ clothes, when using a vacuum cleaner, in places with bugs and pets, or places with high humidity.
- Places where outside air enters, such as around construction sites, roadsides, factories, doorways, windows, and ventilation openings.
- Places where products that generate steam and fine particles (humidifiers, cooking utensils, sprays, etc.) are used.
- Even if dust is generated by activity such as dusting or cleaning, the sensor may not respond if large dust of PM10 or higher is generated, but the dust is removed by the filter.
- The odor (gas) concentration can be changed by products that cause odor (gas), such as air fresheners, odor remover, cleaning agents, cosmetics, perfumes, etc.
- The odor (gas) sensor will not stabilize until two minutes after starting driving. During the stabilization time, the odor (gas) concentration is not reflected in the overall air quality.
Setting a Sleep Timer
It is set to automatically stop operation after operation for a set period of time.

- Press the Sleep Timer button while the appliance is operation.
- Each time the Sleep Timer button is pressed, it repeats in the order of 1\~12- Off.
- If the sleep schedule is set, the display brightness level 1 and rotation are operated at stop. (However, if you set the display brightness to off before setting the sleep mode, the display brightness will remain off.)
NOTE
- When you make a sleep reservation, the fan speed is set to level 1, and after a certain period of time, it is automatically adjusted according to the air condition.
- You can change the fan speed, display brightness, and rotation even when the sleep timer is set.
- If you press the Sleep Timer button once more while the sleep schedule is set, the sleep schedule is canceled.
• Even if you set a sleep timer during heating, the maximum operation time is 8 hours.
Setting Display Brightness
Adjusts display brightness.
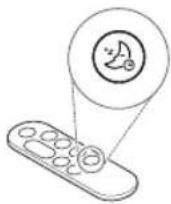
- Press the Sleep Timer button for more than 2 seconds to enter the display brightness setting screen.
- Each time the button is pressed once or for more than 2 seconds, it changes in the order of Brightness 3 - Brightness 2 - Brightness 1 - Off.
- Press any other key on the remote controller to exit the display brightness setting screen.
NOTE
- When setting the display brightness to off, if you press the button, it turns on at brightness 1 for a while, and then the screen on the display turns off.
-
The default display brightness is set to Brightness 2.
-
Brightness 3: 100%
- Brightness 2: 60%
- Brightness 1: 10%
Using button lock
You can lock the buttons on the control panel to prevent unwanted operation by children or other factors.

natural_image
Simple line drawing of a person standing on a pole with a magnified circular icon showing a person (no text or symbols)- Press the Mode button for 3 seconds.
• is displayed on the status display.

NOTE
- The remote controller can be used even when locked.
- You can use the LG ThinQ application to change modes even when the device is locked.
- To unlock, press the Mode button again for at least 3 seconds.
Setting the Product sound
Turns On/Off the sound of the air purifier.

- Press the Speed up and Heating buttons on the control panel at the same time for 3 seconds.
- Press and hold the Rotation button on the remote controller for 2 seconds.
Using UVnano (Only models with UVnano applied)
Remove the harmful bacteria the fan inside the air purifier to circulate cleaner air.
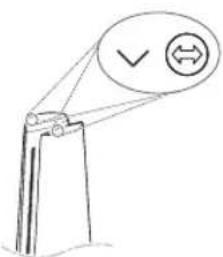
- Press the Speed down and Rotation buttons on the control panel at the same time for 3 seconds.

NOTE
- To disable UVnano, press the Speed down and Rotation buttons button on the control panel again for at least 3 seconds.
- UVnano is a compound of UV (ultraviolet light) and nanometer (unit of length).
- If there is dust of foreign matter inside the UVnano LED, wipe with a soft cloth.
- Do not operate the product if damage to the UVnano LED is evident.
- Be sure to turn off the product before cleaning and performing other maintenance.
- If the product cover is opened or the filter is removed, the UVnano operation status may not be displayed normally.
- UV icon on the status display is a display that guides UVnano on/off, not a UVnano operation on/off indicator.
- UV ® Displayed when UVnano does not operate normally. (Check that the filter and air intake (cover) are installed in the correct position.)
- When using the product for the first time, the UVnano function is turned on.
SMART FUNCTIONS
EN EN
LG ThinQ Application
The LG ThinQ application allows you to communicate with the appliance using a smartphone.
LG ThinQ Application Features
Smart Diagnosis
If you experience a problem while using the appliance, this smart diagnosis feature will help you diagnose the problem.
Settings
Allows you to set various options on the appliance and in the application.

NOTE
- If you change your wireless router, Internet service provider, or password, delete the connected appliance from the LG ThinQ application and connect it again.
- The application is subject to change for appliance improvement purposes without notice to users.
• Functions may vary by model.
Before using LG ThinQ Application
This feature is only available on models with Wi-Fi function.
1 Check the distance between the appliance and the wireless router (Wi-Fi network).
- If the appliance is too far from the wireless router, the signal strength becomes weak. It may take a long time to connect or installation may fail.
2 Turn off the Mobile data or Cellular Data on your smartphone.

3 Connect your smartphone to the wireless router.


NOTE
- To verify the Wi-Fi connection, check that the Wi-Fi 🔊 icon on the status display is lit.
- The appliance supports 2.4 GHz Wi-Fi networks only. To check your network frequency, contact your Internet service provider or refer to your wireless router manual.
- LG ThinQ is not responsible for any network connection problems or any faults, malfunctions, or errors caused by network connection.
- If the appliance is having trouble connecting to the Wi-Fi network, it may be too far from the router.
- The Wi-Fi connection may not connect or may be interrupted because of the home network environment.
- The network connection may not work properly depending on the Internet service provider.
- The surrounding wireless environment can make the wireless network service run slowly.
- If the appliance cannot be connected due to problems with the wireless signal transmission, unplug the appliance and wait about a minute before trying it again.
- If the firewall on your wireless router is enabled, disable the firewall or add an exception to it.
- The wireless network name (SSID) should be a combination of English letters and numbers. (Do not use special characters.)
- Smartphone user interface (UI) may vary depending on the mobile operating system (OS) and the manufacturer.
- If the security protocol of the router is set to WEP, the network setup may fail. Change the security protocol (WPA2 is recommended) and connect the product again.
Installing the LG ThinQ Application
Search for the LG ThinQ application from the Google Play Store or Apple App Store on a smartphone. Follow instructions to download and install the application.
Open Source Software Notice Information
To obtain the source code that is contained in this product, under GPL, LGPL, MPL, and other open source licenses that have the obligation to disclose source code, and to access all referred license terms, copyright notices and other relevant documents, please visit https://opensource.lge.com.
LG Electronics will also provide open source code to you on CD-ROM for a charge covering the cost of performing such distribution (such as the cost of media, shipping, and handling) upon email request to opensource@lge.com.
This offer is valid to anyone in receipt of this information for a period of three years after our last shipment of this product.
Smart Diagnosis
This is a function that can diagnose the cause of product failure.

NOTE
- Service may be suspended due to external factors (such as unavailability of Wi-Fi, disconnection of Wi-Fi, app store policy, app unavailability, etc.) that are not due to the negligence of LG Electronics.
- This is subject to change without prior notice, and the service method may vary depending on local circumstances.
Using LG ThinQ to Diagnose Issues
If a problem occurs with a Wi-Fi-equipped product, you can diagnose the problem by sending data to your smartphone using LG ThinQ.
- After launching LG ThinQ, select Smart Diagnosis from the menu. Diagnose the product according to procedure provided by LG ThinQ.

NOTE
- When diagnosing with Wi-Fi, you can diagnose the product with a beep sound when the Wi-Fi connection with the product is disconnected.
Using Audible Diagnosis to Diagnose Issues
If Smart Diagnosis using the app continues to fail, click the Use Diagnosis with 'Go to Audible Diagnosis' button of the ThinQ App and follow the instructions that appear.
1 Press the Mode and Heating buttons on the control panel at the same time for 3 seconds.
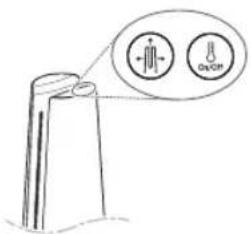
2 Place your phone near the product. • Make sure the phone's microphone is facing the front of the product.

natural_image
Diagram of a laboratory apparatus with a funnel and base, no visible text or symbols3 The results of Smart Diagnosis will be displayed in the LG ThinQ application.

NOTE
- For accurate diagnosis, do not move the smartphone away from the product until the beep stops.
- Please be quiet around the product during Smart Diagnosis.
MAINTENANCE
EN EN
WARNING
- Stop operation of the product and unplug the power plug or cord from the outlet before cleaning and replacing the filter.
- Do not spray water directly on the product.
Maintaining the Appliance
Frequency of Cleaning and Filter Replacement
| Type | Cleaning frequency | Replacement cycle |
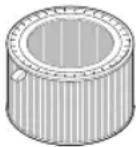 Filter Filter | Ultra Fine FilterIf it is contaminated, use a vacuum cleaner or a soft brush to clean it. | 1 year |
NOTE
- The operating environment and operation hours may affect the cleaning frequency. Clean more often if operating in a dusty environment.
- Failure to clean the product following the recommended schedule may result in it smelling bad or not working properly.
- The filter must be replaced at the end of its lifespan, and the cost of replacement filters is not covered under the warranty. To purchase new filters, contact an LG Electronics Customer Information Center or visit the website at www.lg.com
-
You can also have the filter cleaned or replaced by the Service Center. You will be charged a nominal fee for filter cleaning and replacement services.
-
The upper and lower parts of the filter are made of paper instead of plastic. Repeated removal of the filter may cause scratches on the top and bottom of the filter.
- Even if there are scratches on the top and bottom of the filter, there is no problem in use.
Alerts on the Status Display
| Notification | Corrective action |
 | Replace the filter. |
NOTE
- Filter replacement alerts appear based on the maximum usage time, taking into account the operating hours of the product. The replacement frequency is determined by the operating hours and environment.
Cleaning the Appliance
Cleaning the Exterior of the Product
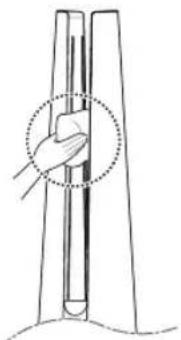
1 Use a vacuum cleaner to remove dust from the air inlet.
2 Wipe the air outlet and the exterior of the product with a soft cloth.
natural_image
Line drawing of a hand holding a cylindrical object with a dotted circle highlighting the part (no text or symbols)3 Press the Mode button to select the diffusion mode. When the vane is finished, wipe the front and back of the vane with a soft cloth.

natural_image
Illustration of a hand holding a tool or device with a double-headed arrow indicating compression or insertion (no text or symbols present)Back
CAUTION
- Do not clean the product with alkaline detergent.
- Do not wipe the product surface using sulfuric acid, hydrochloric acid, or an organic solvent (thinner, kerosene, acetone, etc.) or attach stickers to the product. This may damage the product surface.
- Do not let water enter into the product.
NOTE
- If you find it difficult to remove dust from the front and rear covers, remove the filters and wash them with water. Then, dry them completely in the shade.
Maintaining the Filter
Cleaning the Filters
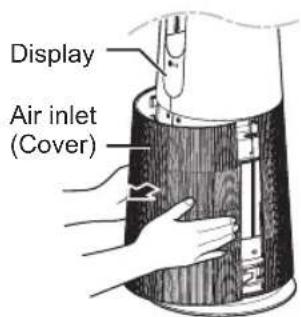
1 Remove the front and rear covers of the product.
Grab both sides of the top of the air inlet (cover) from the front of the product and pull gently to separate it.
- The direction with the LG logo on the product display is the front of the product.
2 Remove dust surrounding the Ultra-fine filter with a vacuum cleaner or soft brush.

natural_image
Technical line drawing of a mechanical device with a tool inserted, no visible text or symbolsCAUTION
- Do not wash the Deodorizing Care filter or V filter with water. This shortens the filter's life.
- Be careful not to damage the ultra fine filter when using a vacuum cleaner.
- Be careful not to damage the filter if liquid gets on the filter.
Replacing the Filter
1 Remove the front and rear covers of the product and pull the handle to replace the filter.
- To avoid polluting the surroundings when replacing the filter, place newspaper on the floor before you remove the filter.

2 Once you have replaced the filter, turn off the filter replacement alert.
Reset filter replacement notification
(Filter replacement notification) on the status display is canceled and the replacement notification time is reset.

- Press Heating and Rotation buttons at the same time for at least 3 seconds.
• Use when replacing with a new filter.
NOTE
- A notification is displayed when a filter replacement is required.
- When the filter is installed, scratches may occur on the upper and lower surfaces, but there is no problem in operation.
Storing the Product
If the product will not be used for a long period of time, store in a dry, shaded place without moisture.
1 Operate the product for at least 1 hour on a sunny day.
- This removes moisture and prevents mold from building up inside the product.
2 Turn off the power and unplug it from the electrical outlet.
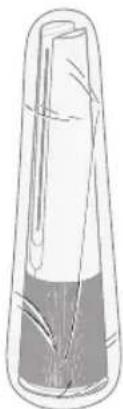
3 Package the product to prevent dust or foreign substances from entering the product. Store the packaged product in a shaded place.
natural_image
Simple line drawing of a test tube with liquid inside, no text or symbols presentStoring the Remote Controller

natural_image
Line drawing of a handheld device with control panel and buttons (no text or symbols)Remote Controller Holder
- The Remote Controller can be stored by attaching it to the magnet at the location marked on the product.
- Attach the rear part of the Remote Controller under the Remote Controller attachment location label.

CAUTION
Do not store the product in a humid place or in a place exposed to the direct sunlight.
TROUBLESHOOTING
EN EN
Before Calling for Service
Please check the following before you contact the service center.
If the problem persists, contact your local service center.
| Symptom Cause | Remedy | |
| It does not operate at all. | Is the power cord unplugged from the outlet? | ·Insert it into the socket correctly. |
| The amount of wind is small and there is a noise. | Did dust accumulate in the ultra fine filter? | ·Clean the ultra fine filter thoroughly. |
| Did dust accumulate in the V filter? | ·Replace the filter. | |
| The air inside is not purified well enough. | Is the indoor pollution severe? | ·Ventilate the indoors before using the product. |
| Did dust accumulate in the ultra fine filter? | ·Clean the ultra fine filter thoroughly. | |
| Did dust accumulate in the V filter? | ·Replace the filter. | |
| Are you using it in a place that is too spacious or too open? | ·Use a product that suits the size of the room. ·Avoid well-ventilated places such as doors, windows, etc. | |
| Is there any obstacle nearby? | ·Remove the obstacle. | |
| Is the product installed at a corner? | ·Move the product and install it again. | |
| There is a smell, but the overall air quality color does not change. | Doesn't the overall air quality change to red and orange? | ·The color of overall air quality is determined based on the worst condition among dust concentration and odor(gas) concentration. Make sure the dust concentration is not worse. ·Since the odor(gas) sensor is a sensor that detects contaminated gases, it may not react to the smell of food. But the Deodorizing Care filter removes the odor. |
| The overall air quality color is still in red. | Does the color not change even if it is moved to a clean room? | ·Display status may not change when the amount of odor is greater than the product's ability to handle.·Remove the power cord from the outlet and reconnect after 1 minute. |
| Did you use a spray near the product? | ·Do not use a spray near the product. | |
| The buttons on the control panel do not work. | Is displayed on the status display? | ·To unlock, press the Mode button on the control panel for 3 seconds. |
| The concentration of the fine dust does not change. | Is the product used in a closed space? | ·In closed spaces, the Air Quality level may continue to stay the same without change. |
| The concentration of fine dust continues to remain high. | Does the air continue to flow in from the outside to the location where the product is installed? | ·In an environment where there is an inflow of outside air, the concentration may continue to remain high. |
| The overall air quality color and dust concentration value are different. | Is the overall air quality color the same as the color indicating the odor concentration? | ·The overall air quality is expressed by comprehensively evaluating the odor and dust concentration.·Even if the dust concentration is low, if the odor is strong, the overall odor color may change. |
EN
| Symptom Cause | Use Remedy | |
| A strange odor comes out from the air outlet as well as the filter. | Did you purchase the product recently? | ·This is the odor of activated charcoal, and is not harmful. This is similar to the odor you may experience in a brand new car. It will go away within a day after use. |
| Is the product used in a place with a lot of smoke or odors? | ·If the air purifier is operated after an air freshener, diffuser, or scented candle has been used, or interior work or wallpaper replacement have occurred, the filter may absorb and emit the odor. Ventilate the room first before using the product. | |
| Does the filter have a bad smell? | ·The filter replacement frequency may differ depending on the usage environment. If there is an odor, replace with a new filter. | |
| Is it in an environment where food is prepared? | ·If you use the product for a long period of time where you cook or broil fish/meat, the filter lifespan may be significantly decreased. ·If possible, open a window for ventilation while cooking, and use the product to remove the odor left after the ventilation. | |
| Is it a humid environment? | ·The filter may emit an odor if used in a humid environment. Dry the filter in sunlight before use. | |
| The dust concentration levels are different between the product and the LG ThinQ app. | Are you looking at the same type of dust particle? | ·Make sure that the levels of the PM1.0/PM2.5/PM10 dust are displayed consistently between the LG ThinQ app and your product. ·A difference in values could be caused by the difference in update time between the LG ThinQ app and the product. |
| Symptom Cause | Remedy | |
| The appliance and smartphone cannot be connected via Wi-Fi. | The password for the Wi-Fi that you are trying to connect to is incorrect. | · Find the Wi-Fi network connected to your smartphone and remove it, then connect your appliance in LG ThinQ. |
| The auto-connect function of the smartphone is set. | · Uncheck the ‘Automatic Mobile Data Switching’, ‘Smart Network Switching’, ‘Passpoint’, and ‘Internet Disabled’ items in the Advanced section (More) in the mobile Wi-Fi settings of your smartphone. The item name may be different for each manufacturer/carrier. | |
| Mobile data for your smartphone is turned on. | · Turn off the Mobile data of your smartphone and connect the appliance using the Wi-Fi network. | |
| The wireless network name (SSID) I set incorrectly. | · The wireless network name (SSID) should be a combination of English letters and numbers. (Do not use special characters.) | |
| The router frequency is not 2.4 GHz. | · Only a 2.4 Ghz router frequency is supported. Set the wireless router to 2.4 GHz and connect the appliance to the wireless router. To check the router frequency, check with your Internet service provider or the router manufacturer. | |
| The appliance is too far from the router. | · If the appliance is too far from the router, the signal may be weak and the connection may not be configured correctly. Move the router closer to the appliance. | |
| The display does not appear. | Is the display brightness set to off? | · To change the display brightness, press the Sleep Timer button on the remote controller for more than 2 seconds. |
EN
| Symptom Cause | Remedy | |
| I set UVnano, but the UV icon is not displayed on the status display. (Only models with UVnano applied) | Is there no indication of UV / UV o on the status display? | Only 3 icons are displayed according to priority.Reset the UVnano by pressing the Speed down and Rotation buttons on the control panel at the same time for 3 seconds. |
| Is UV o on the status indicator? | Displayed when UV does not operate normally. (Check if the filter and air intake (cover) are installed in the correct position.) | |
| The temperature/humidity is displayed differently from other products. | Is outside air continuously coming into the place where the product is installed? | Temperature and humidity values may fluctuate continuously in an environment where outside air is introduced.Temperature and humidity may vary depending on the surrounding environment such as doorways, windows, and ventilation holes.Temperature and humidity may appear differently depending on air circulation in the same room. Also, the temperature and humidity may be different from other products and thermo- hygrometers. |
| Temperature/humidity remains at outliers for a long time. | Is the product installed in an enclosed space from the outside? | Depending on the indoor environment, the temperature and humidity values may remain unchanged for a long time.Unplug the power cord from the outlet and plug it in again after a minute.If you determine that the temperature and humidity values are abnormal, try Smart Diagnosis. |
| The heater frequently turns on and off during heating. | Did you check the filter status? | Clean the filter or replace it with a new one. |
| After the operation of the product is finished, a sound such as 'pop' or 'clank' occurs. | Did you forcefully shut down the product during hot air operation? | After heating operation, the product must be turned off after removing residual heat. Turn off the product after operating it for about 1 minute in fan mode. |
Appliance Specifications

The external appearance and dimensions of the product are subject to change without prior notice.
| Model Name | FH15GP* Series |
| Power | AC 220V~ 50Hz |
| Exterior dimensions(width x depth x height) | 265 mm x 265 mm x 1,120 mm |
用戶手冊
空氣淨化器


後側

1 控制面板
- 設定產品功能
② 葉片
natural_image
Illustration of a mechanical device with a cylindrical component and a separate cylindrical device (no text or symbols visible)natural_image
Diagram of a mechanical device with a cylindrical component and an arrow indicating a specific part (no text or symbols present)natural_image
Diagram of a mechanical device with a magnified inset showing a close-up view of a component (no text or symbols present)注意
natural_image
Line drawing of a hand adjusting a vertical tube with arrows indicating force or measurement (no text or symbols)安裝位置要求
安裝位置距離牆壁至少3½英尺(1米)。
natural_image
Diagram of a hand holding a tool with dotted circles indicating contact or interaction points (no text or symbols present)注意
① 待機開/關按鈕
可開始或停止操作。
2 風速按鈕
可用於調節本產品的風扇轉速。
3 運作模式按鈕

natural_image
Mechanical component diagram showing a curved housing with a circular top and downward arrow indicating force or motion (no text or symbols)3 將電池槽放回遙控器內。
備註
注意
natural_image
Line drawing of a remote control with two buttons and a power button (no text or symbols)備註
natural_image
Simple line drawing of a device with two labeled icons: a cylindrical object and a remote control (no text or symbols)natural_image
Illustration of a remote control device with two labeled buttons (no text or symbols present)natural_image
Illustration of a remote control device and a handheld remote device with directional arrows (no text or symbols)natural_image
Two technical diagrams showing a device with bidirectional arrows indicating movement, no text or symbols present.natural_image
Simple line drawing of a person standing on a chair with a magnified circular icon showing a person (no text or symbols)2 將智能手機連接您的無線路由器。


備註
2 將您的手機置放於本產品旁邊。
natural_image
Diagram of a laboratory apparatus with a funnel and container (no text or labels)natural_image
Line drawing of a hand holding a cylindrical object with a dotted circle highlighting the part (no text or symbols)natural_image
Illustration of a hand holding a tool or device with a central handle and arrow indicating direction (no text or symbols)後側
注意
natural_image
Technical line drawing of a mechanical device with a tool inserted, no visible text or symbols注意
natural_image
Simple line drawing of a test tube with liquid inside, no text or symbols present遙控器存放

natural_image
Line drawing of a mechanical device with a control panel (no text or symbols)遥控器固定位置
LG Life's Good Warranty Card 產品保用證
| Product Type產品 | Product Description產品種類 | Warranty Period (Year)保養期(年) |
| Refrigerator雪櫃 | Appliance主機 | 3 |
| Inverter Linear Compressor*線性變頻式壓縮機* | 10 | |
| Smart Inverter Compressor*智能變頻式壓縮機* | 10 | |
| Washing Machine洗衣機 | Appliance主機 | 2 |
| Inverter Direct Drive Motor*直驅式變頻摩打* | 10 | |
| Smart Inverter Motor*智能變頻式摩打* | 10 | |
| Dryer乾衣機 | Appliance主機 | 2 |
| Inverter Motor*變頻摩打* | 10 | |
| Dual Inverter Compressor*雙迴轉變頻式壓縮機* | 10 | |
| Vacuum Cleaner吸塵機 | Appliance主機 | 2 |
| Inverter Motor*變頻摩打* | 10 | |
| Battery*電池* | 1 | |
| Air Purifier空氣清新機 | Appliance主機 | 2 |
| Inverter Motor*變頻摩打* | 10 | |
| Dehumidifier抽濕機 | Appliance主機 | 2 |
| Dual Inverter Compressor*雙迴轉變頻式壓縮機* | 10 | |
| Styler衣物護理機 | Appliance主機 | 2 |
| Smart Inverter Compressor*智能變頻式壓縮機* | 10 |
* This extended parts warranty is applicable on specific parts only. The consumer will be charged for labour after the product warranty has expired.
*零件延長保養僅適用於產品上的指定零件,在產品的保養期後則需另付人工費用。
LG's mission is to create value for customers. We are committed to improve the life of our customers by putting the customers first, and delivering the best possible pre and after sales services in the way they want.
為顧客創造價值乃LG一貫宗旨。我們致力提供最貼心的售前及售後服務,一切以顧客為先,希望為客戶帶來最優質的生活。
Service Commitment 服務承諾
If you want to receive an additional 3 months warranty, please complete warranty registration within 1 month after purchase at https://www.ig.com/hk_en/support/my-lg/product-registration
如欲享受額外3個月產品保養,請在購買產品後1個月內登入 https://www.lg.com/hk/support/my-lg/product-registration
Privacy Statement
You are aware that any information supplied by you after purchase of our product will be retained by LG Electronics HK Ltd. and will not be released to third parties. You also authorize LG Electronics HK Ltd. to send you direct promotion materials. Please contact our Customer Service Hotline at (852) 3543 7777 if you wish to modify or erase your provided personal information.
Thank you for your purchase of LG Electronics product under the terms and conditions listed on this warranty card.
Please keep and present this warranty card and pre rendered. Otherwise, this warranty will be voided.
顧客請保留此保用途及購買發票,並需在檢查/維修時出示,否則保用無效。
终止本保用垫。
- TABLE OF CONTENTS
- SAFETY INSTRUCTIONS
- READ AND SAVE THESE INSTRUCTIONS
- WARNING
- CAUTION
- IMPORTANT SAFETY INSTRUCTIONS
- Children in the Household
- Installation
- Operation
- EN
- Maintenance
- Parts Instruction
- Control Panel
- ② Vane
- Air Outlet
- Display
- Filter
- Smart Diagnosis
- Sensor
- Product Center Line
- UVnano LED (Only models with UVnano applied)
- Remote Controller Holder
- Handle
- Temperature/Humidity Sensor
- Air Inlet (Cover)
- Heater (inside the product)
- Filter System
- NOTE
- Accessories
- Unpacking the Appliance
- Removing fi Iter vinyl
- Removing vane vinyl
- Installation Location Requirements
- Transportation Requirements
- Transporting the Appliance
- Status Display
- Add-on Display
- ② Status display
- Fan Speed Display
- Heating Target Temperature Display
- Control Panel
- Remote Controller
- Preparing to Use the Remote Controller
- Getting Started
- Using the Mode
- Adjusting the Fan Speed
- Using Rotation
- Start Heating
- Adjusting the Fan Speed (Heating)
- Using Rotation (Heating)
- Using Extra Functions
- Checking air condition on the Status Display
- Setting a Sleep Timer
- Setting Display Brightness
- Using button lock
- Setting the Product sound
- Using UVnano (Only models with UVnano applied)
- SMART FUNCTIONS
- LG ThinQ Application
- LG ThinQ Application Features
- Smart Diagnosis
- Settings
- Before using LG ThinQ Application
- Installing the LG ThinQ Application
- Open Source Software Notice Information
- Using LG ThinQ to Diagnose Issues
- Using Audible Diagnosis to Diagnose Issues
- Maintaining the Appliance
- Frequency of Cleaning and Filter Replacement
- Alerts on the Status Display
- Cleaning the Appliance
- Cleaning the Exterior of the Product
- Maintaining the Filter
- Cleaning the Filters
- Replacing the Filter
- Reset filter replacement notification
- Storing the Product
- Storing the Remote Controller
- TROUBLESHOOTING
- Before Calling for Service
- Appliance Specifications
- 用戶手冊
- 空氣淨化器
- 控制面板
- ② 葉片
- 注意
- 安裝位置要求
- 備註
- 遙控器存放
Brand : LG
Model : FH15GPN
Category : Dehumidifier