
APM - Audio AUDISON - Free user manual and instructions
Find the device manual for free APM AUDISON in PDF.


| Product Type | Car Audio Sound Quality Measurement System |
| Brand | Audison |
| Model | APM |
| Dummy Head Microphone Type | 2 x Electret Condenser, Omnidirectional |
| Dummy Head Sensitivity | -44 dB (6.3 mV/Pa) |
| Dummy Head Frequency Response | 20 Hz - 20 kHz |
| Dummy Head Signal-to-Noise Ratio | > 62 dB |
| Dummy Head Impedance | < 2.2 kΩ |
| TMD Microphone Type | Electret Condenser, Omnidirectional |
| TMD Sensitivity | -60 dB (0.1 mV/Pa) |
| TMD Frequency Response | 15 Hz - 20 kHz |
| TMD Signal-to-Noise Ratio | > 62 dB |
| TMD Impedance | 600 Ω |
| Software Compatibility | Windows XP / Vista / 7 / 8 / 10 (32/64 bit) |
| PC Requirements | 1.5 GHz processor, 1 GB RAM, 1024x600 graphics |
| PC Connection | USB 2.0 / 3.0 |
| Power Supply | 12 V DC or 110-220 VAC via supplied adapter |
| Operating Temperature | 0 °C to 55 °C (32°F to 131°F) |
| Storage Temperature | -20 °C to +50 °C (-4°F to 122°F) |
| Included Accessories | Dummy Head, TMD with omnidirectional microphone, 3-pole and 5-pole cables (3 m), ABS carrying case, CD-ROM with software and test tracks, warranty card |
| Measurement Functions | Front Stage Analysis (FSA), Total Music Distortion (TMD), SPL Meter, Auto FSA+TMD |
| Calibration Frequency | Every 3 months or after long inactivity |
| Safety Precautions | Avoid moisture, engine compartments, temperatures outside 0-55°C; use only supplied adapters |
Frequently Asked Questions - APM AUDISON
User questions about APM AUDISON
0 question about this device. Answer the ones you know or ask your own.
Ask a new question about this device
Download the instructions for your Audio in PDF format for free! Find your manual APM - AUDISON and take your electronic device back in hand. On this page are published all the documents necessary for the use of your device. APM by AUDISON.
USER MANUAL APM AUDISON
natural_image
Interior view of a futuristic concept car with white and blue seats, featuring a robotic head and mannequin (no text or symbols visible)I bit

natural_image
Exterior view of a futuristic white concept car with blue accent design (no visible text or symbols)
acoustic performance measurement
OWNER'S MANUAL
rev. 1.1a
audison.com


2.1 DUMMY HEAD DIMENSIONS....6
2.2 TMD 6
3. DESCRIPTION 7
3.1 DUMMY HEAD APM....7
3.2 TMD 8
4. CONNECTIONS 9
4.1 POWER SUPPLY AND TURN ON 9
4.2 PERSONAL COMPUTER....10
4.3 APM DUMMY HEAD CONNECTION 10
4.4 TMD CONNECTION....11
5. SOFTWARE AND DRIVERS INSTALLATION 12
5.1 PC SOFTWARE AND DRIVER INSTALLATION WIZARD....12
5.2 UNINSTALLING BIT TUNE SOFTWARE and DRIVER 19
6. APM / bit Tune DESKTOP 20
6.1 SOFTWARE START IN APM MODE....21
6.2 APM TARGET MODE 22
6.2.1 CONNECTION STATUS MENU 22
6.2.2 SESSION NOTE MENU 22
6.2.3 "FILE" MAIN MENU 23
6.2.4 "TOOLS" MAIN MENU 25
- Auto FSA + TMD: 25
- Front stage analysis 25
- Total music distorsion 27
- SPL meter 29
6.2.5 "APM" MAIN MENU....30
- Mode....30
- New measurement 30
- Disconnect to....30
- Save measurement....30
- Save measurement as 30
- Create report ....30
- Apm rank calculator 31
- Master sound quality race....31
- Save measurement....31
6.2.6 "SETTINGS" MAIN MENU 32
6.2.7 MEASURAMENT WIZARD / TOOLS 35
6.2.8 MEMORY STATUS 36
6.2.9 FILES MANAGEMENT 36
7. MEASUREMENT SESSION - FREE MODE 37
7.1 AUTO FSA+TMD 37
7.2 FSA 42
7.3 TMD 42
7.4 SPL 43
8. MEASUREMENT SESSION COMPETITION MODE 44
8.1 COMPETITION MODE WIZARD 44
9. TECHNICAL SPECIFICATIONS 49
1. APM DESCRIPTION
THE PROJECT
Audison APM is the result of years of research and development into a complex topic, the evaluation of in-car sound quality. It has always been a challenge for the automotive industry to provide a measurement system dedicated to the objective evaluation of the sound quality, intended to support and not replace the subjective evaluation that remains one of the most amazing human qualities.
Thanks to APM's technology, sound quality evaluation is no longer influenced by the listener's preferred music genre. APM technology is able to replicate the auditory perception of humans and therefore to measure the system performance with a high level of precision.
The bit Tune hardware platform implements APM functions, providing the market as well as industry specialists with a complete tool. This enables two innovative types of analysis, which objectively evaluate customized and OEM car audio systems.
APM MEASUREMENTS
The APM software is composed by two measurement tools: the FSA (Front Stage Analysis) and TMD (Total Music Distortion).
The asymmetric listening position affects the quality of in-car sound reproduction. Placing the front soundstage at the center of a car hi-fi system is the most critical and challenging element. The FSA tool provides the ability to automatically determine the location of the virtual sound image generated by a stereophonic configuration.
This technology was made possible thanks to the dummy head, which allows to recreate the HRTF (Head Related Transfer Function) and an innovative approach, based on binaural and monaural cue which was studied to simulate the human auditory perception of the sound image.
Thanks to the FSA, the front sound emission can be analyzed as if your dashboard were the soundstage of a concert to determine, with high level of accuracy, the centre stage on the two axis, providing the FSA score as result.
TMD (Total Music Distortion) is a tool able to measure the linear and non-linear distortions of the system's frequency response using a real musical track unlike conventional methods of measurement. This analysis can be performed at different sound pressure levels, which is very significant to identify the system's performance when we push the system close to or over its distortion point, giving different TMD scores for different SPL categories.
MASTER SOUND QUALITY RACE
The Master Sound Quality Race is a new contest format where the evaluation of the sound quality is determined partly by a traditional listening test, made by qualified judges, and partly by the APM system.
Our goal is not to replace human presence with APM technology. We rather see an opportunity to add further value to the judge's critical listening and create an online worldwide network to allow the participants to compare and share the APM results.
1.1 PRECAUTIONARY NOTES
Before using the bit Tune, please refer to all instructions contained in the manual. We recommend to closely follow the instructions. Failure to comply with these instructions could result in unintentional injuries or damage to equipment or devices connected to it.
- In order to use the APM measurement tools, you must install the software on a personal computer running Windows XP, Windows Vista or Windows 7/8/10, with a 1.5 GHz processor or higher, 1 GB of RAM and a graphics card with minimum resolution of 1024 x 600 pixels.
Remarks: - The APM PC software might show malfunctioning with some PCs manufactured before 2008 even with processors running at higher speed than the minimum required. It is recommended to check using "Windows Update" and make sure that the available updates are installed in the PC. - Before performing the measurements, check that the Antivirus is not scanning the PC. If you experience any problems, it is advisable to disable the Antivirus, even if it is not scanning the PC, and close any other running programs.
- Please use only the specific power adapters provided in the package (bit Tune +APM).
- For use in the car please check that the vehicle's electrical system has a supply voltage of 12 VDC with negative to ground. If you are using the network adapter, select the power supply connector suitable for the country of use (provided in the bit Tune package).
- Do not perform any measurements in the engine compartment and in locations exposed to water, excessive moisture, dust and dirt.
- Take measurements in places where the temperature does not go below 0 °C (32 °F) and does not exceed 55 °C (131 °F).
- Make sure that the positioning of the device does not interfere with the proper functioning of the car's electrical or mechanical devices.
- Make sure you do not short the power cord during the measurement.
- In order to facilitate the measurement, route the cables the best possible way, using cables supplied with the product and referring to instructions provided in the USER MANUAL.
1.2 PACKAGING CONTENTS
- Dummy Head

natural_image
Simple line drawing of a human head in profile view (no text or symbols)- TMD + omnidirectional microphone
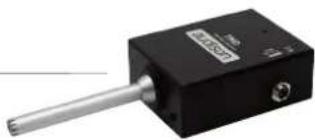
natural_image
Close-up of a black rectangular electronic device with a metallic rod and circular ports (no visible text or symbols)- 3-Poles connection cable (3 m)

- 5-Poles connection cable (3 m)

- ABS Carrying Case

- CD ROM, containing:
APM Software
This User's Manual (.pdf)
Audio Test tracks

- Warranty
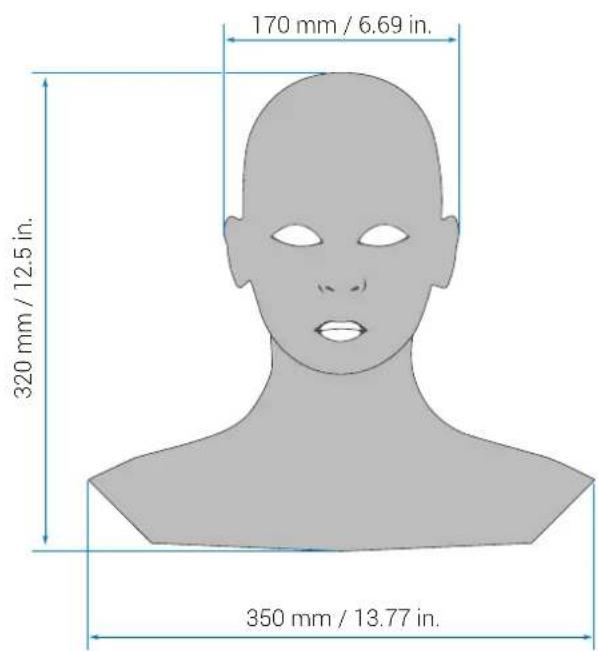
2. DIMENSIONS
2.1 DUMMY HEAD DIMENSIONS

2.2 TMD

3. DESCRIPTION

- Omnidirectional microphone Right Ear.
- Omnidirectional microphone Left Ear.
- HSM: XLR 5 poles Mini Connector, to be connected using the specific cable to the bit Tune HSM socket (see sect. 4.3).
- LPM: 3 poles XLR Mini Connector, to be connected using the specific cable to the bit Tune LPM socket (see sect. 4.3).
- ON: Blue led, APM measurement set is turned on.
- Bracket to fix the Dummy Head to the HSM microphone bracket provided in the bit Tune packaging.
- Adhesive labels showing the Dummy Head Left and Right microphones calibration. These values will need to be entered during the calibration stage of the APM measurement system (see sect. 6.2.6.1).

$$ \mathbf {A} = \mathbf {A} ^ {\mathrm{I}} $$
$$ \mathbf {B} = \mathbf {B} ^ {\mathrm{I}} $$

Use the support provided with the bit Tune
3.2 TMD
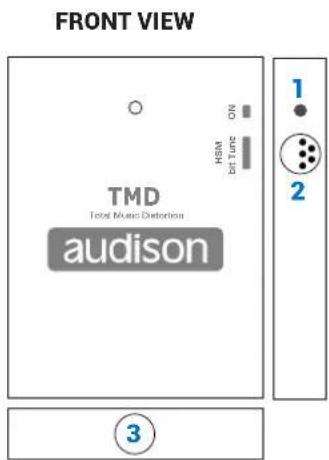

- ON: Blue Led, indicates the TMD measuring set power on.
- HSM bit Tune: Mini XLR 5 poles connector, to be connected via dedicated cable to the bit Tune HSM socket (see sect. 4.4).
- Slot to plug in the omnidirectional microphone (see point 5).
- Slot to plug in the HDM microphone bracket provided in the bit Tune packaging.
- ECM 800 omnidirectional microphone.
How to plug in the omnidirectional microphone on the TMD.


natural_image
Close-up of a black electronic device with a metallic rod and label 'BUDOSOT' (no readable text beyond branding)TDM INSTALLATION

4. CONNECTIONS
4.1 POWER SUPPLY AND TURN ON
- POWER SUPPLY VIA 12V DC PLUG IN
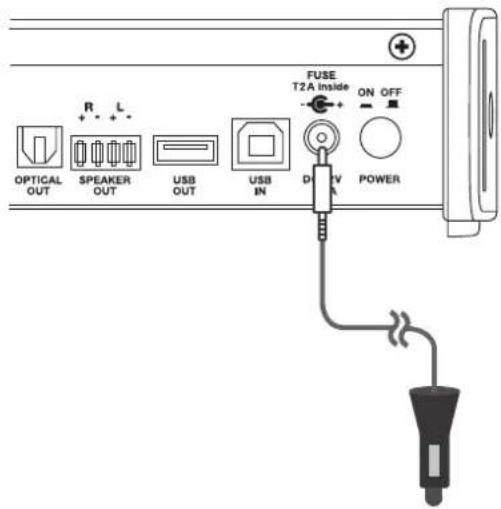
Remark: the bit Tune is protected internally by a 2° Cilyndrical fuse located inside the product. To replace it please check section 9.4 of the bit Tune manual.
- POWER SUPPLY VIA NETWORK ADAPTER

*The universal adapter 110 - 220 VAC is provided with tension adapters for EUROPEAN, UK, USA, ASIA sockets.
WARNING: when using the universal network
Adpter it may be necessary, for some measures, to connect the ground reference cable (provided in the packaging), by connecting it between the vehicle battery and the bit Tune (see sect. 7.9 bit Tune manual).
- bit Tune TURN ON

4.2 PERSONAL COMPUTER
1. PERSONAL COMPUTER E bit Tune 2. PERSONAL COMPUTER bit Tune + Audison bit
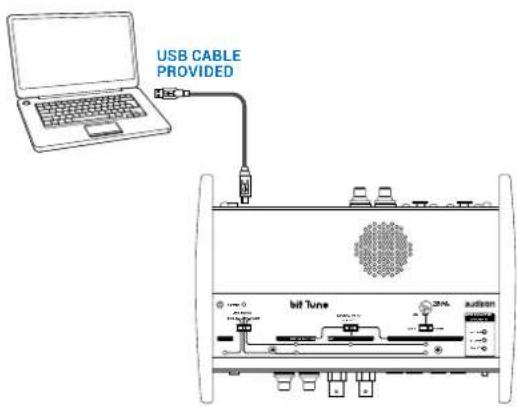

Remark: the bit Tune can be connected to all Audison bit devices featuring a DSP.
4.3 APM DUMMY HEAD CONNECTION

4.4 TMD CONNECTION
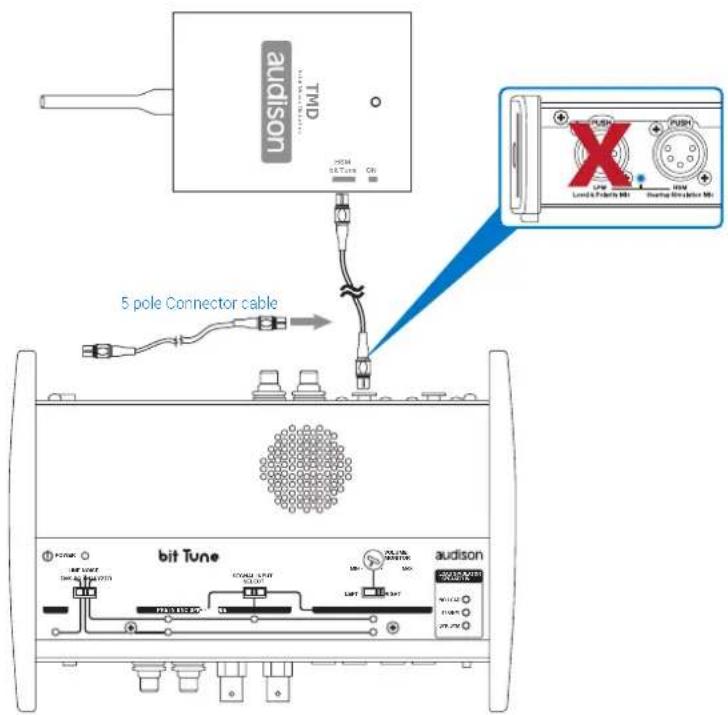
5. SOFTWARE AND DRIVERS INSTALLATION
5.1 PC SOFTWARE AND DRIVER INSTALLATION WIZARD
- Insert the "APM Setup CD 1.0" in the CD-ROM player of the PC that you intend to use.
- Windows XP: go to My Computer in the START menu;
Windows Vista: go to My Computer in the START menu;
Windows 7: go to My Computer in the START menu;
Windows 8/10: click on the DESKTOP icon from the MAIN menu;
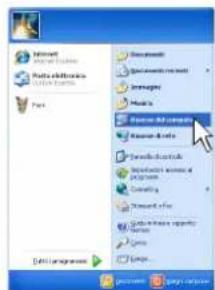


Windows XP Windows Vista Windows 7 Windows 8/10
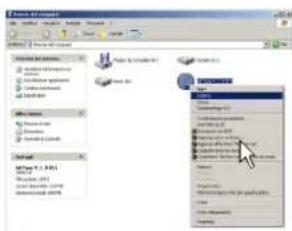
- Windows XP: with the right mouse button select the "APM Setup CD 1.0" icon and click Browse;
Windows Vista: with the right mouse button select the "APM Setup CD 1.0" icon and click Browse;
Windows 7: with the right mouse button select the "APM Setup CD 1.0" icon and click Open;
Windows 8/10: double click on the Computer icon.



natural_image
Close-up of white daisies against a blue sky background, no text or symbols visibleWindows XP Windows Vista Windows 7 Windows 8/10
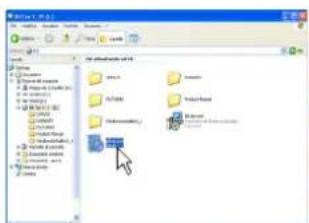
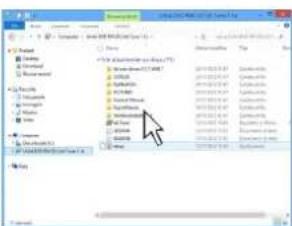
- Windows XP: double click on the setup icon;
Windows Vista: double click on the setup icon;
Windows 7: double click on the setup icon;
Windows 8/10: select the CD ROM drive and double click on setup icon.


Windows XP Windows Vista Windows 7 Windows 8/10
Remark: to remove any active restrictions on Windows Vista 7/8/10 operating systems, right-click on the setup icon and select "Run as administrator" option.
In the next "User Account Control" window, select Yes to continue with the installation.
- Windows XP: select ACCEPT; Windows Vista: select ACCEPT; Windows 7: select ACCEPT; Windows 8/10: select ACCEPT.

- Windows XP: select ACCEPT and wait for the installation; Windows Vista: select ACCEPT and wait for the installation; Windows 7: select ACCEPT and wait for the installation; Windows 8/10: select ACCEPT and wait for the installation.

- Windows XP: select NEXT to continue with the installation, CANCEL to stop it; Windows Vista: select NEXT to continue with the installation, CANCEL to stop it; Windows 7: select NEXT to continue with the installation, CANCEL to stop it; Windows 8/10: select NEXT to continue with the installation, CANCEL to stop it.

- Windows XP: select I Agree, then NEXT; Windows Vista: select I Agree, then NEXT; Windows 7: select I Agree, then NEXT; Windows 8/10: select I Agree, then NEXT.

- Windows XP: select NEXT; Windows Vista: select NEXT; Windows 7: select NEXT; Windows 8/10: select NEXT.
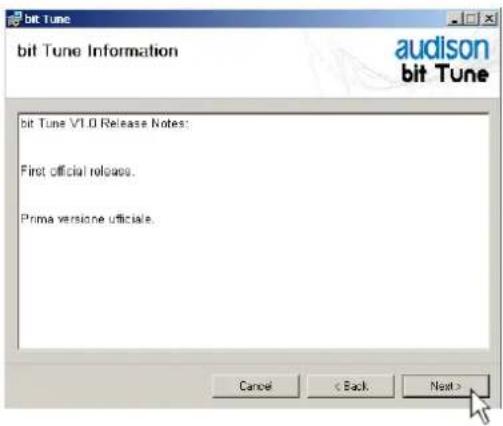
- Windows XP: choose NEXT to start the installation of audio codecs; Windows Vista: choose NEXT to start the installation of audio codecs; Windows 7: choose NEXT to start the installation of audio codecs; Windows 8/10: choose NEXT to start the installation of audio codecs.

11. Windows XP: select
- Everyone if you have administration rights for the system, so that the program, once installed, can be accessed by all users of the PC.
- Just me if you want the program, once installed, to be accessed by the current user only. Then click NEXT.
Windows Vista: select
- Everyone if you have administration rights for the system, so that the program, once installed, can be accessed by all users of the PC.
- Just me if you want the program, once installed, to be accessed by the current user only. Then click NEXT.
Windows 7: select
- Everyone if you have administration rights for the system, so that the program, once installed, can be accessed by all users of the PC.
- Just me if you want the program, once installed, to be accessed by the current user only. Then click NEXT.
Windows 8/10: select
- Everyone if you have administration rights for the system, so that the program, once installed, can be accessed by all users of the PC.
- Just me if you want the program, once installed, to be accessed by the current user only. Then click NEXT.
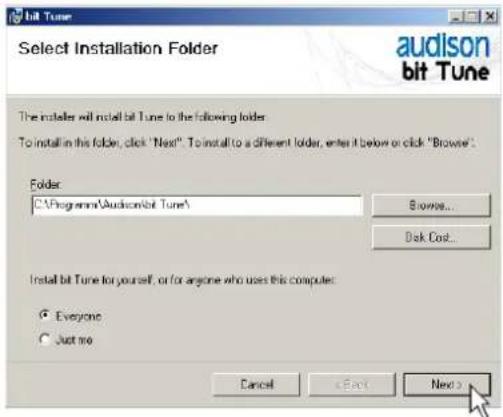
- Windows XP: select NEXT to start the installation;
Windows Vista: select NEXT to start the installation;
Windows 7: select NEXT to start the installation;
Windows 8/10: select NEXT to start the installation.
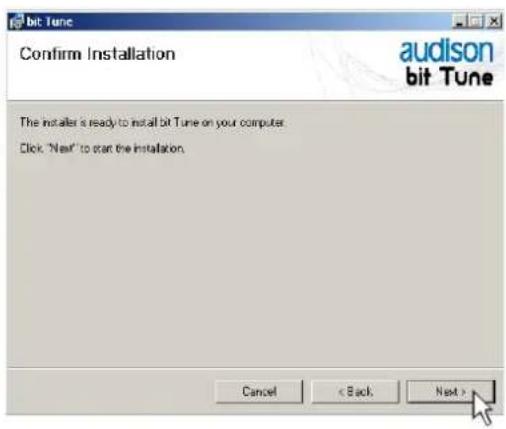
- Windows XP: select NEXT to start the installation of the audio driver, turn the bit Tune on and connect it to the USB port of your PC;
Windows Vista: select NEXT to start the installation of the audio driver, turn the bit Tune on and connect it to the USB port of your PC;
Windows 7: select NEXT to start the installation of the audio driver, turn the bit Tune on and connect it to the USB port of your PC;
Windows 8/10: select NEXT to start the installation of the audio driver, turn the bit Tune on and connect it to the USB port of your PC.

Possible error message:
If the bit Tune is not recognized by the PC, make sure that the bit Tune is turned on and connected to the PC via USB, then select NEXT.
If the problem persists, see sect. 7.9, bit Tune manual on troubleshooting the installation.

- Windows XP: select INSTALL to start the installation;
Windows Vista: select INSTALL to start the installation;
Windows 7: select INSTALL to start the installation;
Windows 8/10: select INSTALL to start the installation.

- Windows XP: select NEXT to complete the installation of the audio driver and then select FINISH;
Windows Vista: select NEXT to complete the installation of the audio driver and then select FINISH;
Windows 7: select NEXT to complete the installation of the audio driver and then select FINISH;
Windows 8/10: select NEXT to complete the installation of the audio driver and then select FINISH.


- Windows XP: select "No, not now" and click "Next".
Windows Vista: will not ask for confirmation; drivers will be installed automatically;
Windows 7: will not ask for confirmation; drivers will be installed automatically;
Windows 8/10: will not ask for confirmation; drivers will be installed automatically.

- Windows XP: select "Install the software automatically" and click "Next";
Windows Vista: will not ask for confirmation; drivers will be installed automatically;
Windows 7: will not ask for confirmation; drivers will be installed automatically;
Windows 8/10: will not ask for confirmation; drivers will be installed automatically.

- The system will install the XMOS interface drivers.

- If the procedure is successful, the system will notify that the driver installation is complete.
Windows XP: click "Finish";
Windows Vista: will not ask for confirmation, drivers will be installed automatically;
Windows 7: will not ask for confirmation, drivers will be installed automatically;
Windows 8/10: will not ask for confirmation, drivers will be installed automatically.

- If the procedure is successful, the system will notify that the driver installation is complete.
Windows XP: click "CLOSE";
Windows Vista: click "CLOSE";
Windows 7: click "CLOSE";
Windows 8/10: click "CLOSE".
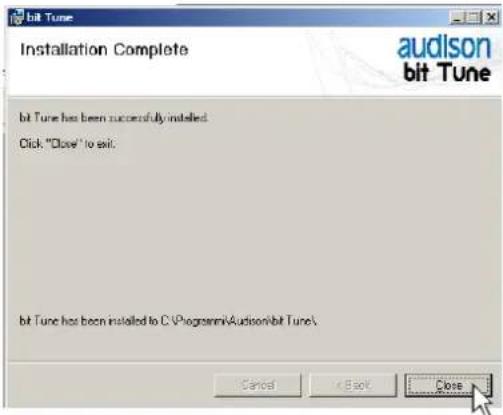
- The installation of the bit Tune software and drivers is now complete.
At this point the bit Tune is ready for use (see sect. 6).
5.2 UNINSTALLING BIT TUNE SOFTWARE and DRIVER
- To uninstall the bit Tune PC software you can use the uninstall command from the menu:

Windows XP, Windows Vista, Windows 7 Windows 8/10
-
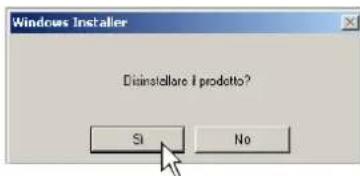
Windows XP: click "YES"; Windows Vista: click "YES"; Windows 7: click "YES"; Windows 8/10: click "YES".
-
Windows XP: click "UNINSTALL"; Windows Vista: click "UNINSTALL"; Windows 7: click "UNINSTALL"; Windows 8/10: click "UNINSTALL".
-
Windows XP: click "NEXT"; Windows Vista: click "NEXT"; Windows 7: click "NEXT"; Windows 8/10: click "NEXT".
-
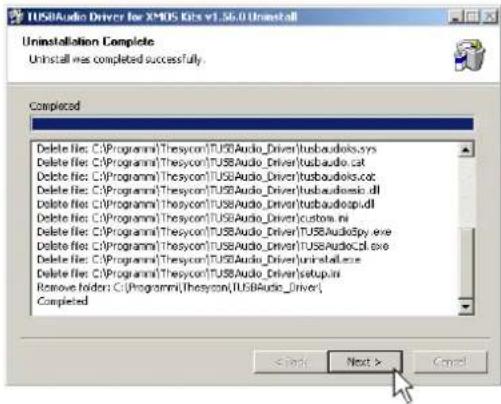
Windows XP: click "FINISH" to complete the uninstall process; Windows Vista: click "FINISH" to complete the uninstall process; Windows 7: click "FINISH" to complete the uninstall process; Windows 8/10: click "FINISH" to complete the uninstall process.


6. APM / BIT TUNE DESKTOP
In order to use the main APM tools of the bit Tune you must install the software rev 2.1.2 (see sect. 5) on your PC. The bit Tune must be connected to the PC and be turned on by setting the measurement selection switch in the PC analyzer position. Start the software by clicking the icon previously installed in your PC.

bit Tune
The first screen that appears is the starting screen, where you need to select one of the following modes:
- APM: starts the APM measurement software (Acoustic Performance Measurement);
- bit Tune (see Audison bit Tune Advanced Manual);
- bit Tune + Processor: bit Tune connected and interfaced to a processor (see Audison bit Tune Advanced Manual);
- Rescue Mode: firmware upgrade recovery (see sect. 9.3, bit Tune manual).
For the first three measurement modes the software can also be started in OFF LINE mode.

To select the starting mode, go to the drop-down menu, select the entry APM using the mouse.
6.1 SOFTWARE START IN APM MOD
The use of the bit Tune in this mode is mainly aimed at making measurements of your audio system, in order to evaluate parameters related to the quality of reproduction. It is possible to start the analysis of the audio system by connecting an Audison bit product, or simply analyse an audio system without these.

Possible error message.
When the bit Tune is not found during the scan:
- check that the processor is turned on;
- check that the USB cable is connected properly;
- restart the program, otherwise the PC software will turn on in OFF-LINE mode.
When the product is switched on for the first time, information relating to the user will be requested; fill in the fields and click OK. The Organization field is mandatory. These data may be completed or modified afterwards (see sect. 6.2.5.5); they will be used on the report


Long periods of inactivity or new installations can modify the internal calibrations of the Dummy Head and TMD microphones. The calibration must be performed at the time of first use, and then repeated at least once every 3 months, or after long periods of non-use.
To calibrate the microphones select YES (see sect. 6.2.6). If you select NO the quality of the measurements that will be carried out may be compromised.

6.2 APM TARGET MODE
The following paragraphs will describe the functions that allow the system calibration and its fine tuning.
![bit Tune - APM_session_04* File Tools APM Settings 3 4 5 6 2 Year: Make: Car: Customer: Date: 19/11/2019 Operator: Note: Mode Free Competition SPL Category 90 dB bit Tune: not connected Acoustic performance Position: Front Left FSA 100.0 Azimut Elevation -6.0° 14.0° TMD Distortion Low frequency Mid frequency High frequency Alteration Average [20-20k] Maximum [20-20k] Average [80-10k] Measurement Wizard Auto FSA+TMD Tools FSA TMD SPL 30 60.0 200.0 500.0 2.0k 4.0k 8.0k 20.0k Third Music Noise Moller 7 Memory Status F APM_session_01_measurement_07.apm 9 Processor: not verified](/content/2026/06/1246473/images/61d87bc0e865379dc7fc8cde60dfe643ece9f2d1db05b6f3bfd9e97f6510546c.jpg)
Remark: • To enlarge the window in full screen, click on the icon □ Enlarge, or double click on the title bar section of the PC Software window. • To restore the previous dimensions, click on the icon □ Restore ,or double click on the title bar section of the PC Software window.
6.2.1 CONNECTION STATUS MENU 1
This bar shows the connection information of the bit Tune to the PC, and of a possible bit line Audison device to it.
bit Tune: fw ver. 2.1.0.1, SN 00000000000000
Processor: not verified
6.2.2 SESSION NOTE MENU 2
- The APM SW provides for the entry of basic user data, the input fields vary depending on the operating mode selected (see point 3).
- Mode: two working modes can be selected:
A. Free: open mode. It allows the use of all the tools in the SW independently.
B. Competition: mode dedicated to the Master Sound Quality Race contest, for unofficial competitions and/or private events. By selecting this mode, the user is bound to use only the guided procedure (Auto FSA + TMD) and SPL meter, which guarantees protection of the operating conditions with which the measurements are carried out and guides the judge/operator step by step in the process of measurement.
3. CAR DISPLAY: graphically displays the audio system listening position.
You can select Front Left, Center, Front Right.

6.2.3 "FILE" MAIN MENU
3
By clicking on the dedicated section a drop-down menu will appear showing the items in the image:
- New session: it opens a new measurement work session. A new measurement session with the name "APM_session_xy" will be automatically renamed. Clicking on the dedicated button a drop-down menu will appear showing the items in the image.
| File | Tools | APM | Settings |
| 1 | New Session | ||
| 2 | Load Session... | ||
| 3 | Save Session | ||
| 4 | Save Session as... | ||
| 5 | Registration | ▶ | |
| 6 | Software Updates | ▶ | |
| 7 | Reset Default Answer | ||
| 8 | Credits | ||
| 9 | Exit | ||
- Load session: it loads the complete bit Tune configuration from a file saved from a previous measurement session (i.e.: "APM_session_xy.sap"). This function is useful if you want to view previously saved measurements or integrate successive measurements of the same race session or calibration.

-
Save session: it saves the complete session of an existing file (i.e.: "APM_session_xy.sap") in a default folder in the Documents folder. This file can be reloaded later using the Load session function.
-
Save session as: it saves the complete bit Tune configuration provided by the measurement session in a new file (i.e.: "APM_session_xy.sap") allowing to rename the file and choosing the destination folder.

- Registration: the Registration command opens the system browser at the page that allows you to register the product and create your own personal account on the "bit" portal. This must be done only once, after which you can access your account via the Login Account command.

Remark: for the use of these commands, you must have an active Internet connection.
6. Software Updates.
Update firmware: updates the bit Tune firmware (see sect. 7.9, bit Tune manual).
Check for Updates: it checks in real-time the availability of new firmware/PC Software updates.
Autocheck for Updates: when enabled availability of firmware/PC Software updates is checked automatically each time you start the program.

Remark: in order to use these commands you must have an active Internet connection.
-
Reset Default Answer: this command resets the display of warning messages if they have been previously disabled by checking "Don't ask me again".
-
Credits: it displays information about the bit Tune software in use.
-
EXIT: used to exit the PC software.

6.2.4 "TOOLS" MAIN MENU 4
By clicking the dedicated section a drop down menu opens showing the items in the image on the right:
- Auto FSA + TMD: it starts the selected procedure (see point 7.1)
- Front Stage Analysis (FSA): it starts the selected procedure (see point 6.2.4.2 - 7.2)
- Total Music Distortion (TMD): it starts the selected procedure (see point 6.2.4.3 - 7.3)
- SPL Meter: it starts the selected procedure (see point 6.2.4.4 - 7.4)

2. FRONT STAGE ANALYSIS
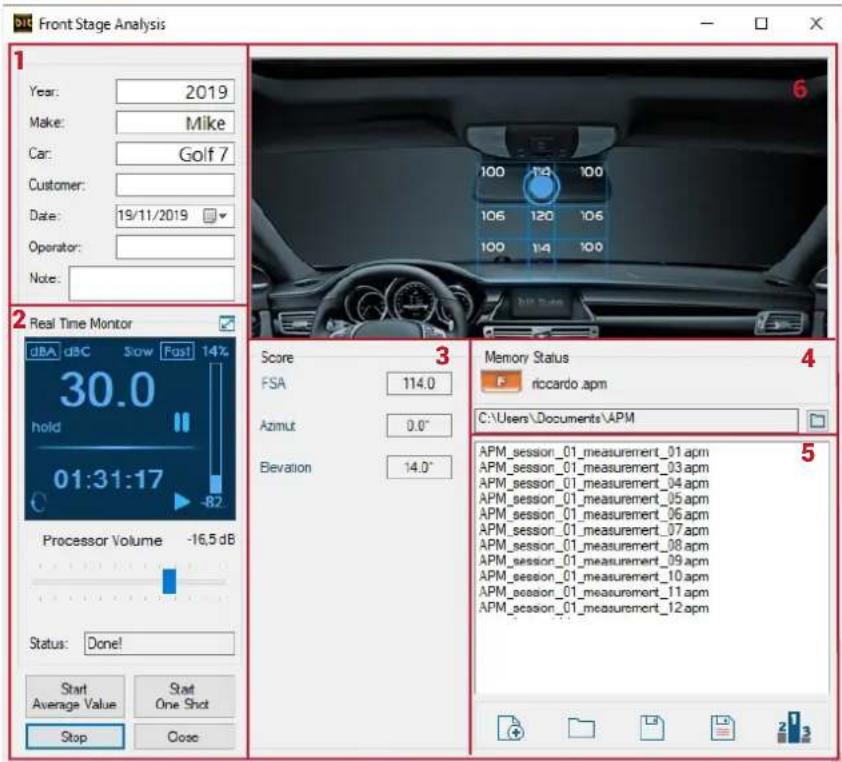
-
User data: replicates the main fields with the related information.
-
Real time monitor: it displays the APM SPL meter during the measurement, showing the signal saturation bar and the timer in real time. The status message flashes "In progress !!". APM Out of Measure, displays all the Real Time information of the SPL meter, and allows offline viewing of results.
- FSA Score: it displays scores and chart.
- Memory Status: it displays the file of the measurement loaded. Thanks to the syntax of the default file name, the user is facilitated in recognizing the session and measure number (see sect. 6.2.8).
- File management: it allows the display of the measurement files contained in the working folder, and provides the basic keys for the files management. The operation is the same as the block of the main User Interface.
- FSA: the analysis is ideally able to identify a point in the two-dimensional space. Taking into account the actual accuracy of the measurement system (algorithm / HW / head / environment), the measurement area could be
subdivided into at least 7 (H) x 5(V) = 35 blocks having variable amplitude, such as to allow a greater
resolution of the central area of the dashboard. Therefore, the result is shown to the user as above (graphically enlarging point and circle) and the SW displays the same result if the point returned by the analysis falls within one of the prepared blocks. The goal is to obtain a measurement resolution that guarantees results that can be repeated by the user. The horizontal axis should be privileged with respect to the vertical.

Calculation of the FSA score
The azimuth and elevation (°) values, determined by the software during the measurement according to the position of the dummy head microphone, are displayed with a point within the two-dimensional space that represents the virtual stage of the car.
This is divided into 35 blocks (7x5) with non-constant width for greater resolution in the central area, a reference to locate the virtual sound stage generated by the stereo system.

The total score derives from the weighted average of elevation and azimuth values. The estimation of the aforementioned values is carried out using an advanced model of psychoacoustic perception that optimizes correspondence with human perception, while the assignment of the related score is assigned according to the weights of the MSQR.
• 120 (MAX) corresponds to the exact center of the sound stage and is an indicator of excellent stereophonic effect.
- 70 (min) it corresponds to the 4 extreme squares of the plan and they are an indicator of very bad stereophonic effect.
- 100-114 (threshold interval) correspond to the 8 squares adjacent to the exact center, and identify a central area which is an indicator of a good stereophonic effect.
The software assigns the scores by privileging azimuth and elevation values that fall in the central area, consisting of 9 blocks, and which can therefore be attributable to a good/excellent perception of the virtual stereo image generated by the audio system. The blocks outside the central area are given scores that are gradually decreasing in proportion to how off-center you are.
PUNTEGGI FSA ELEVATION
| 70 79 86 91 86 79 70 | |||||
| 82 93 100 | 114 | 100 93 82 | |||
| 85 96 106 120 106 96 85 | |||||
| 82 | 93 | 100 | 114 | 100 | 93 |
| 70 79 86 91 86 79 70 |
| ○ | RANGE |
| 25 | [+21' ÷ +45'] |
| 16 | [+5' ÷ +20'] |
| 9 | [-4' ÷ +4'] |
| 16 | [-5' ÷ +20'] |
| 25 | [-21' ÷ +45'] |
| AZIMUT | |||||||
| ° | 19 | 16 | 8 | 5 | 8 | 16 | 19 |
| RANGE | [-45°÷-27°] | [-26°÷+11°][-21°÷+45°] | [-2°÷+2°] | [-3°÷+10°] | [+11°÷+26°] | [+27°÷+45°] | |
- Memory Status: it displays the file of the measurement loaded. Thanks to the syntax of the default file name, the user is facilitated in recognizing the session and measure number (see sect 6.2.8).
- File Management: it allows the display of the measurement files contained in the working folder, and provides the basic keys for the files management. The operation is the same as the block of the main User Interface.
- TMD: during the measurement, it shows the signal saturation bar and the timer in real time. The status message flashes "In progress !!".
3. TOTAL MUSIC DISTORTION
![Total Music Distortion 1 Year: 2018 Make: Mike Car: BMW Customer: Date: 14/06/2018 Operator: Note: 2 Real Time Monitor DBA dBC Slow Fast 40% 58.7 hold 00:00:00 -57.7 Processor Volume 0dB Status: Ready Start Stop Close 6 30 20 10 0 -10 -20 -30 -40 -50 -60 30.0 50.0 80.0 200.0 400.0 700.0 2.0k 3.0k 5.0k 8.0k 20.0k 6 Third Music Noise Moller Score TMD Distortion Low frequency Mid frequency High frequency Alteration Average [20-20k] Maximum [20-20k] Average [30-10k] TMD Microphone Range 90dB 96dB 102dB Memory Status F APM_session_05_measurement_01.apm C:\Users\vincenzo-c\Documents\APM_data\Measu... APM_session_01_measurement_01.apm APM_session_02_measurement_01.apm APM_session_04_measurement_01.apm 5](/content/2026/06/1246473/images/8aa11b079cb8b6c3835042c8e8defabb417ef0d36fb714d7aa6e4d1f976d5666.jpg)
Sections:
- User Data: replicates the main fields with the related information.
- Real time monitor: it displays the SPL meter, status and STOP
- Points scoring system: it shows the weighing table of the individual APM items that contribute to the MSQR scoring system.

other
| Category | Partial | FSA score | FSA % overall | APM score | | -------------- | ------- | --------- | ------------- | --------- | | Azimuth | 70% | 120 max | 50% | 120 max | | Elevation | 30% | 70 min | 50% | 70 min | | Distortion | 25% | 50% | 60% | - | | Low frequency | 50% | 25% | - | - | | Mid frequency | 25% | - | - | - | | High frequency | - | - | - | - | | Alteration | 20% | 120 max | 50% | - | | Average [20-20k] | 20% | 70 min | - | - | | Maximum [20-20k] | 60% | - | - | - | | Average [80-10k] | - | - | - | - |The software separately calculates the overall scores for the TMD and FSA analyses by applying a logarithmic scale to the weighted average of the individual partial indexes. The APM total score is calculated as the average of the overall scores for the TMD and FSA analyses.
The score scale can assume values in the interval between 70 (minimum score) and 120 (maximum score).
Calculation of the TMD score
The values of total distortion (%) and total alteration (dB) are determined respectively by the weighted average of the partial distortion indexes (high, medium, low range) and by the weighted average of the partial alterations according to the weights of the MSQR.

line
| Metric | Value | |--------|-------| | Distortion | 1.0% | | Low frequency | 0.3% | | Mid frequency | 1.2% | | High frequency | 1.0% | | Alteration | 5.6 dB | | Average [20-20k] | 4.2 dB | | Maximum [20-20k] | 12.2 dB | | Average [80-10k] | 3.8 dB |The software performs an appropriate rounding to make the fluctuations of the values stable and significant and derives the scores by using a logarithmic scale calibrated to have a real correspondence with the perception of quality and to make the MSQR contest engaging.
- 120 (MAX) corresponds to a distortion / alteration equal or less than 1%/ 1dB respectively
• 70 (min) corresponds to a distortion / alteration equal or higher than 15% / 15dB respectively - 100 (Soglia) corresponds to a distortion / alteration of respectively 3% / 3dB, considered as an acceptability threshold for a real system perceived as good.
The software favors distortion / alteration values between 3% / 3 dB and 1% / 1dB, where it is possible to earn up to 20 points and the perception of quality linked to the TMD indexes finds an excellent correspondence with human perception.
4. SPL METER
It has the function of pre-calibrating the source volume in order to obtain a certain level of pressure. The SPL meter display features the following basic functions:
Time: Fast/Slow;
SPL: dB(A)/dB(C);
Functions: Min, Max (peak hold), Hold; Scale for displaying dynamics peaks; play button, stop (hold); reset all button (clears the timer).
Fig. 1 Fig. 2

The measurement of the sound pressure level is made in limited band. On the right there is a level scale. When opening the SPL Meter tool the microphone connected to the bit Tune is automatically detected, Dummy Head (fig.1), TMD (fig.2).
Remark: as shown in fig.2, it is possible to choose the full scale/range of the microphone (90 dB, 96 dB, 102 dB) used. By default when using the supplied TMD microphone the scale is set to 90 dB.
Level calibration must be done using tracks 1, 5 and 6 of the SETUP CD. If the source used does not feature a CD player, copy the tracks in the SETUP CD in MP3 format.
Level calibration must be done using tracks 1, 6 and 7 of the SETUP CD. If the source used does not feature a CD player, copy the tracks in the SETUP CD in MP3 format.
6.2.5 "APM" MAIN MENU 5
1. MODE:
Selection of "Free" or "Competition" modes.
-In Free mode the use of all existing audio systems is contemplated. -In Competition mode only the use of Audison/Hertz Pprocessors/DSP is contemplated.
2. NEW MEASUREMENT:
It creates a new file "APM_session xy_measurement_xy.apm" where:
"APM_session_xy_" is the suffix (default name) of the session added to the measure "measurement_xy", and saved with the extension ".apm". The measurement index xy is progressive. Every time a new measurement is launched, the SW cleans the results, asking whether to clean or not and the user data, if previously written (alert box with check). If the user is working on a measurement that has not yet been terminated and/or has not yet been saved and/or changes from the previously saved version, the SW reminds the user to save to avoid data loss.
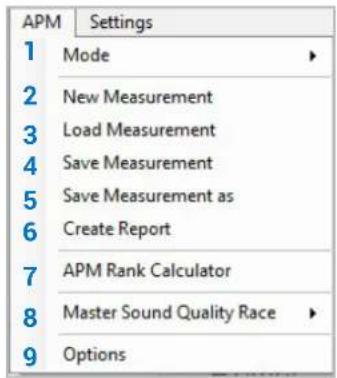
3. LOAD MEASUREMENT:
To upload a previously saved *.apm file. This can be loaded in offline, to view the results, or uploaded and then overwritten with a subsequent measurement. If the user is working on a measurement that has not yet been terminated and/or has not yet been saved and/or changes from the previously saved version, the SW reminds the user to save to avoid data loss.

4. SAVE MEASUREMENT:
It saves a *.apm file in the PC. The default destination folder is: "APM_data ->Measurements" and is created under the Documents folder in the PC.
5. SAVE MEASUREMENT AS:
It saves a *.apm file in the PC and allows the modification of the name and/or the destination folder.

6. CREATE REPORT:
It creates the report of the current measurement. If a complete measurement is loaded, the report will show all the parameters (user data, results) it contains.

7. APM RANK CALCULATOR:
It opens the tool to draw up the APM ranking (see point 6.2.9.6). It is a semi-automatic tool, where you can select one or more *sap (session) or *.apm (measure) files type, then generate an automatic ranking based on the Master Sound Quality Race scoring system. The loaded measurement files, generated in Free or Competition mode, are always discriminated by the related parameter in the report.

8. MASTER SOUND QUALITY RACE:
This is the sub-menu dedicated to online calls to the portal dedicated to the Master Sound Quality Race contest. It is possible to select:
A. Registration: it opens the link to the registration page.
B. Log-in: it opens the link to the MASTER SOUND QUALITY page.
C. Upload Measurement: this link sends the measurement file to the portal, only if it is created in Competition mode, currently loaded in the SW (in Open or Offline session). This file must first be saved by the SW before it can be uploaded online. If the user loads a measurement file in Free mode, the SW does not allow the upload and display an error notification via the alert box.
D. Rulebook: it opens the link to the page containing the contest rules and/or Marketing & Communication information.
9. OPTIONS:
It opens the Options menu window, which contains:
A. General: it allows the change of the destination folders to save data.
B. Points Scoring System: it shows the weighing table of the individual APM entries that compete in the scoring system in the MSQR contest.
The scoring system is non-linear but logarithmic, where the minimum score is 70 and corresponds to a system with distortion.

flowchart
graph TD
    A["Admit Elevation"] --> B["PARTIAL 20% 30%"]
    C["Distortion"] --> D["PARTIAL 25% 50% 25%"]
    C --> E["TOTAL 60%"]
    F["Ablation"] --> G["PARTIAL 20% 20% 60%"]
    F --> H["TOTAL 40%"]
    I["FSA score 120 max 70 min"] --> J["FSA % overall 50%"]
    K["APM score 120 max 70 min"] --> L["TMD score 120 max 70 min"]
    L --> M["TMD % overall 50%"]
    N["OK"] --> O["Cancel"]
6.2.6 "SETTINGS" MAIN MENU
6
By clicking on the Settings section a drop-down menu opens as shown in the image:
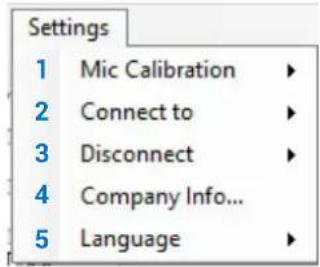
1. MIC CALIBRATION:
This function starts a wizard for calibrating the microphone. The procedure must be performed when using the device for the first time and periodically according to use.
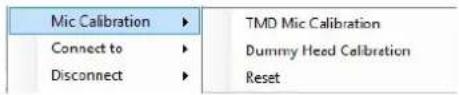
A. TMD Mic Calibration:
This function starts a wizard to calibrate the TMD microphone.
The procedure must be performed when the device is first used and periodically based on its use, using a sound level meter (Not supplied) for level measurement.
Connection:

Fig. 1

flowchart
graph TD
    A["SIGNAL INPUTS"] --> B["Digital Signal Outputs"]
    B --> C["AUX 1 INPUTS"]
    C --> D["Laptop"]
    E["SIGNAL OUTPUTS"] --> B
    F["SIGNAL INPUTS"] --> B
    G["SIGNAL OUTPUTS"] --> B
    H["SIGNAL INPUTS"] --> B
    I["SIGNAL OUTPUTS"] --> B
    J["SIGNAL INPUTS"] --> B
    K["SIGNAL OUTPUTS"] --> B
    L["SIGNAL INPUTS"] --> B
    M["SIGNAL OUTPUTS"] --> B
    N["SIGNAL INPUTS"] --> B
    O["SIGNAL OUTPUTS"] --> B
    P["SIGNAL INPUTS"] --> B
    Q["SIGNAL OUTPUTS"] --> B
    R["SIGNAL INPUTS"] --> B
    S["SIGNAL OUTPUTS"] --> B
    T["SIGNAL INPUTS"] --> B
    U["SIGNAL OUTPUTS"] --> B
    V["SIGNAL INPUTS"] --> B
    W["SIGNAL OUTPUTS"] --> B
    X["SIGNAL INPUTS"] --> B
    Y["SIGNAL OUTPUTS"] --> B
    Z["SIGNAL INPUTS"] --> B
    AA["SIGNAL OUTPUTS"] --> B
    AB["SIGNAL INPUTS"] --> B
    AC["SIGNAL OUTPUTS"] --> B
    AD["SIGNAL INPUTS"] --> B
    AE["SIGNAL OUTPUTS"] --> B
Fig. 2
* Install the TMD microphone inside the vehicle interior as described in section 3.2, and follow the procedure below to perform the calibration:
-
Connect the bit Tune to the AUX input of the Audison bit processor, as shown in fig. 1 or 2. The calibration operation must be carried out in the least possible noisy environment, with the car engine switched off, air conditioning off, doors and windows tightly closed and radio-frequency devices away from the passenger compartment of the vehicle.
-
Turn on the bit Tune and connect the USB cable to the PC.
- Set the bit Tune function switch to PC ANALYZER.
- Turn on the Audison bit processor and connect the USB cable to the bit Tune.
- Fasten the TMD microphone inside the passenger compartment of the vehicle as shown in the figure in section 3.2, and connect it to the bit Tune HSM input.
-
Start the bit Tune software by clicking on the icon on the PC Desktop and start the software in APM mode.
-
Click on the Settings menu and select Mic Calibration->TMD MIC Calibration. A window will appear indicating that you are running Track 1 from your player.

Play track 1 and then select Start.
- Place a sound level meter near the TMD microphone and switch the source volume until 80dB SPL is displayed. Then select DONE to complete the calibration.

B. Dummy Head Calibration.:
This function starts a Dummy Head calibration wizard. The procedure must be performed the first time the device is used, or if the Dummy Head or the bit Tune are replaced.
- Connect the bit Tune to the PC.
-
Connect the Dummy Head to the bit Tune.
-
Turn on the bit Tune - Set the bit Tune function switch to PC ANALYZER.
- Start the bit Tune software by clicking on the icon on the PC Desktop and start the software in APM mode.
- Click on the Settings menu and select Mic Calibration-> Dummy Head Calibration.
Manually enter the microphone calibration values, shown on the labels behind the Dummy Head. End the calibration by clicking on OK.

C. Reset:
Selecting Yes the bit Tune default calibration values will be restored.

2. CONNECT TO:
This feature allows to connect and synchronize the PC Software to the bit Tune or to the Audison bit processor, connecting it via the USB OUT port of the APM bit Tune. When the Audison processor connection is active (see seci. 6.2.6), it will not be possible to interact with the PC software of the Audison processor.
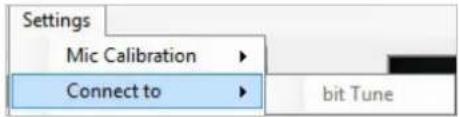
Select Connect to -> bit Tune to connect the PC Software to the bit Tune. Select Connect to -> Processor to connect the PC Software to an Audison bit processor.
3. DISCONNECT TO:
This feature allows you to disconnect from the bit Tune PC Software a previously interfaced Audison processor or the bit Tune itself. When the processor is DISCONNECTED from the bit Tune PC Software, but is still connected via the USB cable, you can use the processor's PC software at the same time as the bit Tune software.
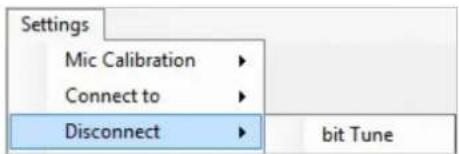
Select Disconnect -> bit Tune to disconnect the bit Tune from the PC Software. Select Disconnect -> Processor to disconnect the Audison bit processor from the PC Software.
4. COMPANY INFO:
It customizes the bit Tune through the user's personal data. This information will be printed on the header of the final report (see sect 6.1).

5. LANGUAGE:
Allows you to display context messages in the selected language (Italian or English). By default, the PC software is automatically set to the English language. To change the language, select language from the menu and restart the PC software.
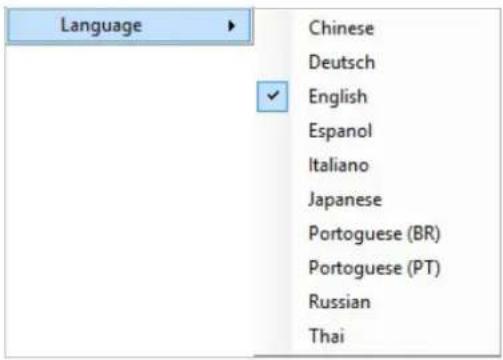
Remark: additional languages may be available in the future. Please check through "Check for Updates" (see sect. 6.2.3.6).
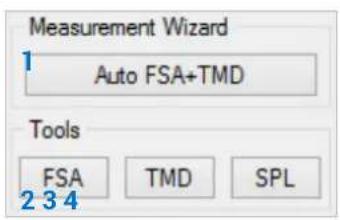
6.2.7 MEASURAMENT WIZARD / TOOLS 7
- Auto FSA + TMD: it starts the selected procedure (see point 7.1 - 8.1).
- Front Stage Analysis (FSA): it starts the selected procedure (see point 7.2).
- Total Music Distortion (TMD): it starts the selected procedure (see point 7.3).
- SPL Meter: When the SPL Meter tool is selected, the TMD microphone connected to the bit Tune is automatically detected (see section 7.4).
Remark: it will be possible to select the scale/range (90 dB, 96 dB, 102 dB) used for the microphone. By default, using the TMD microphone supplied, the scale is set to 90 dB.
6.2.8 MEMORY STAUS 8
At the top right is the display of the currently loaded measurement file. Thanks to the syntax of the default file name, the user is facilitated in recognizing session and measure nr. There is also a label indicating:
- Measurement not saved
- Measurement saved
- APM Measurement saved but not complete (such as, only FSA or only TMD, performed in Free mode)
Memory Status

APM_session_04_measurement_01.apm
6.2.9 FILES MANAGEMENT 9
MENU description:


- NEW: opens a new measurement work session.
- OPEN: ☐ads the complete configuration of the bit Tune APM from a file saved during a previous measurement session (i.e.: "APM_session_xy.sap"). This function is useful if you want to view previously saved measures or integrate successive measures of the same race session or calibration.
- SAVE: Saves the complete configuration of the bit Tune from a measurement session in an existing file or a file to be replaced (i.e.: "BMW E60 Walter.ses"), which can be reloaded later in the bit Tune using the Load function.
- SAVE AS: saves the complete configuration of the bit Tune from a measurement session in a new file (i.e.: "bitTuneConfig.ses") renaming it each time with a different name.
- UPLOAD: uploads the data collected during the measurement online on the site Master Quality Race.
- APM RANK CALCULATOR: Provides the ability to load more measurements/sessions showing their results. It allows the processing of rankings by sorting the scores/results according to the selected filters.

7. MEASUREMENT SESSION - FREE MODE
To perform this operation it is not necessary to connect an Audison bit processor to the bit Tune. This type of measurement in Free mode allows to perform measurements with all types of audio systems, whether they are active multi-amplified or passive.
7.1 AUTO FSA+TMD
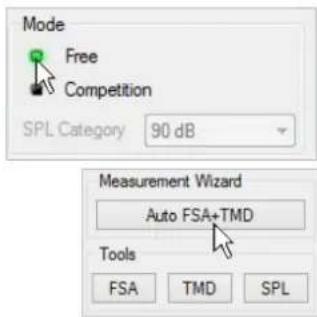
- Select Free in the PC Software main page.
- Select Auto FSA +TMD.
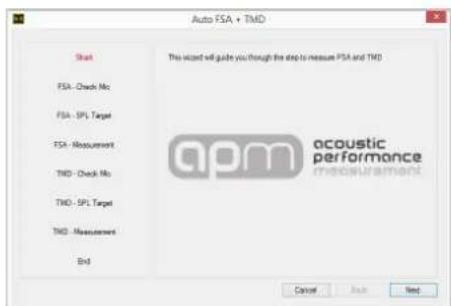
- Press Next to continue with the measurements.
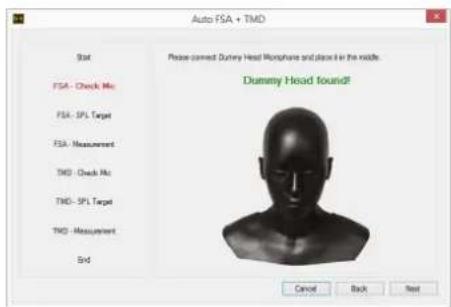
- Appropriately place the Dummy Head in the vehicle compartment (see sect. 3.1). If the bit Tune and Dummy Head are interfaced correctly, a message informing about the correct interfacing "Dummy Head found" will be displayed.
Press BACK to go back to the previous step.
Press NEXT to continue with the measurement.
Press CANCEL to exit.
Possible error message.
The message "Dummy Head not found", appears in case the connections between Dummy Head and bit Tune are not found or the cables are not connected correctly. Check the connections and wait for the message stating that there is a connection between the devices "Dummy Head found".

5. Follow the instructions below:
- Insert the CD supplied with the product: "Setup CD" if the source used is a CD AUDIO player. If the source used does not feature a CD player download the tracks from the CD in mp3 format, to be used with multimedia devices to interface via USB mass storage.
- Play track 1(press Play);
- Adjust the source volume till you reach the value of 80 db.
WARNING: after setting the source volume to 80 db, do not
change it again till all the measurements have been completed.
Press BACK to go back to the previous step.
Press NEXT to continue with the measurement.
Press CANCEL to exit.
6. Play track 2;
The software will execute the FSA performing an average with a track based on 3 test tones. If there are noisy listening environments, the software will discard the unreliable measurements, suggesting to repeat the measurement. By choosing "YES" it will be possible to average from a minimum of 3 to a maximum of 5 acquired measurements
Press BACK to go back to the previous step.
Press NEXT to continue with the measurement.
Press CANCEL to exit.
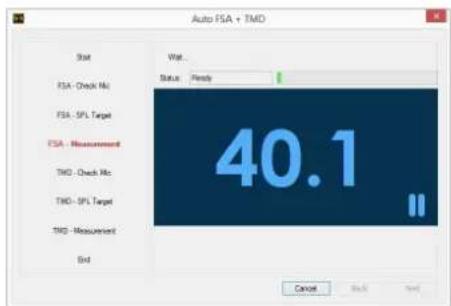
- Wait a few minutes for the measurement to be completed.


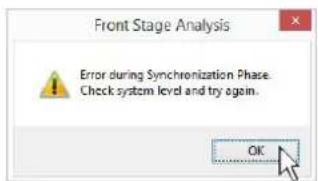
Possible error message.
If the error shown to the right is displayed, press OK and repeat the operations from point 5.
During the measurement, a status bar will indicate the status of the measurement.
When the measurement is completed successfully, the window shown to the right will be displayed.
Press BACK to go back to the previous step. Press NEXT to continue with the measurement. Press CANCEL to exit.
- Appropriately place the TMD in the vehicle compartment (see sect. 3.2). If the bit Tune and Dummy Head are not interfaced correctly, a message informing about the a non correct interfacing "Microphone not found" will be displayed.
The correct connection of the TMD microphone will be displayed with the message "Microphone found".
Press BACK to go back to the previous step. Press NEXT to continue with the measurement. Press CANCEL to exit.
-
Follow the instructions below:
-
Play track 1(press Play);
- Adjust the source volume till you reach the value of 90 db.
Press BACK to go back to the previous step. Press NEXT to continue with the measurement. Press CANCEL to exit.


10. Play track 3 ;
Press BACK to go back to the previous step. Press NEXT to continue with the measurement. Press CANCEL to exit.
11. Wait a few minutes for the measurement to be completed. During the measurement a status bar will show the measurement status.
Press BACK to go back to the previous step. Press NEXT to continue with the measurement. Press CANCEL to exit.
When the measurement is completed successfully, the window shown to the right will be displayed.
12. Press CLOSE to end the measurement session.
At the end of the measurement session, the first results relevant to the audio system measured will be available.


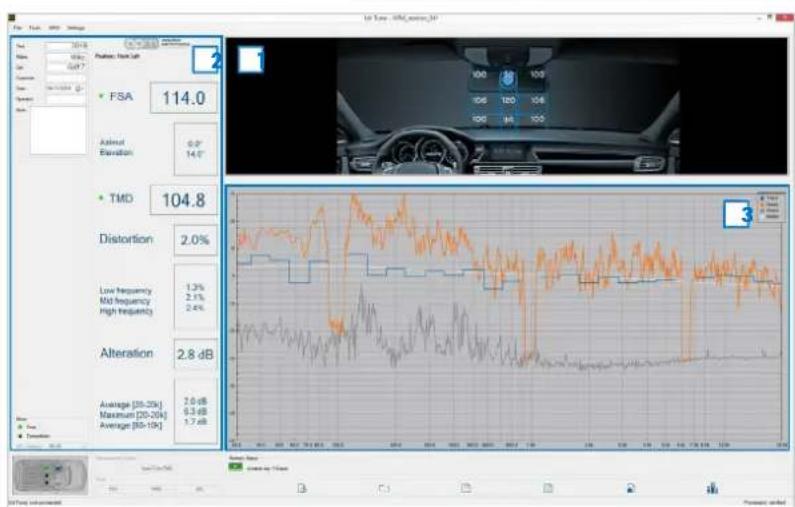
line
| Metric | Value | | ---------------- | ------- | | FSA | 114.0 | | TMD | 104.8 | | Distortion | 2.0% | | Low frequency | 1.3% | | Mid frequency | 2.1% | | High frequency | 2.4% | | Alteration | 2.8 dB | | Average [20-25k] | 2.6 dB | | Maximum [20-25k]| 9.3 dB | | Average [50-10k]| 1.7 dB |Measurement session description:

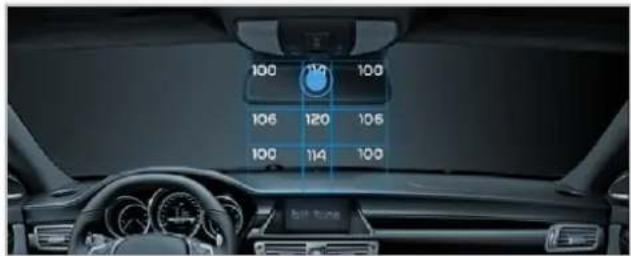
listening point of the sound scene quired is displayed.

values of the measurements acquired are displayed.
Thanks to the FSA analysis (Front Stage Analysis), the sound front emission can be analysed as if the dashboard of your car was the stage of a concert and this allows us to determine, with a high level of accuracy in the xy axis, the central point of the virtual soundtrack generated by the stereo system, providing the FSA score as a result.
The results within the blue grid outline the good scenic quality of your audio system.
![QPM acoustic performance measurement Position: Front Left FSA 79.0 Azimut 18.0° Elevation -34.0° TMD 87.8 Distortion 4.8% Low frequency 1.8% Mid frequency 1.3% High frequency 14.4% Alteration 8.8 dB Average [20-20k] 7.0 dB Maximum [20-20k] 28.0 dB Average [80-10k] 2.9 dB](/content/2026/06/1246473/images/a794f532dc31df5d568c93c02098363ad99608de78e8c36fc758b86f8c39516c.jpg)

trend of the acquired acoustic surements is shown.
TMD (Total Music Distortion) is a tool capable of measuring linear and non-linear distortion of the system's frequency response using a real music track, unlike conventional measurement methods. The analysis can be performed at different levels of sound pressure, an extremely

significant factor to identify the performance of a system when pushing it around or above its distortion point, thus assigning different TMD scores for different SPL categories.
Scoring calculation:
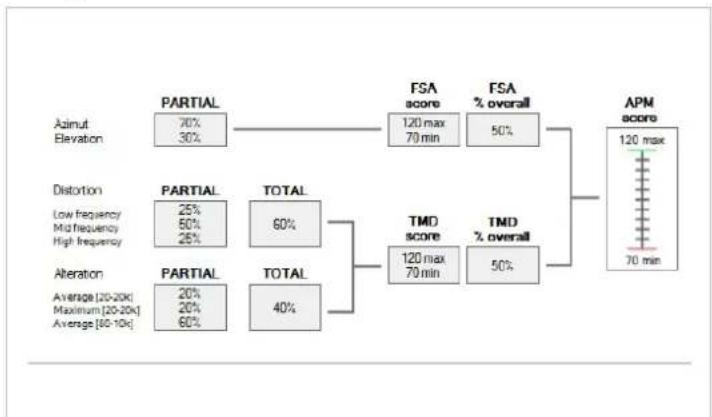
other
| Category | PARTIAL (%) | TOTAL (%) | |---|---|---| | Aimut Elevation | 70 | 30 | | Distortion Low frequency | 25 | 50 | | Distortion Mid frequency | 25 | 25 | | Distortion High frequency | 0 | 0 | | Alteration Average [20-20k] | 20 | 20 | | Alteration Maximum [20-20k] | 20 | 60 | | Alteration Average [60-10k] | 40 | 60 | FSA score 120 max 70 min FSA % overall 50% TMD score 120 max 70 min TMD % overall 50% APM score 120 max 70 min7.2 FSA
- SelectFree in the PC Software main page.
- Accurately place the Dummy Head in the vehicle compartment (see sect 3.1).
- Select FSA.
Press BACK to go back to the previous step. Press NEXT to continue with the measurement. Press CANCEL to exit.
Important remark: before going ahead with the measurements make sure that the audio system volume has been previously set to a level enabling the measurement to take place. If you have doubts leave this measurement session and set the level, following the instructions in section 7.4.
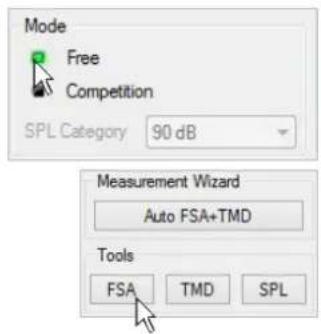
-
To go on with the measurement select the button:
-
Start One Shot: through the track 4 it allows the FSA single measure.
-
Start Average Value: through track 2 it allows a more accurate measurement of the FSA by performing an average with a track based on 3 test tones Track. If there are noisy listening environments, the software will discard the unreliable measurements, suggesting to repeat the measurement. By choosing "YES" it will be possible to average from a minimum of 3 to a maximum of 5 acquired measurements.
-
At the end of the measurement, the FSA data will be available on screen. It will be possible to save the measurement using the save key and recall it at any time.
- Press CLOSE to exit this measurement session or press start to perform a new one.

7.3 TMD
- Select Free in the PC Software main page.
-
Accurately place the TMD microphone in the vehicle compartment (see sect. 3.1).
-
Select TMD
Press BACK to go back to the previous step. Press NEXT to continue with the measurement. Press CANCEL to exit.
Important remark: before going ahead with the measurements make sure that the audio system volume has been previously set to a level enabling the measurement to take place. If you have doubts leave this measurement session and set the level, following the instructions in section 7.4.

- To proceed with the measurement, select the start button. A wizard will indicate the operations to be performed.
- At the end of the measurement, the TMD data will be available on screen. It will be possible to save the measurement using the save key and recall it at any time.
- Press CLOSE to exit this measurement session or press start to perform a new one.

line
| Metric | Value | | -------------- | ------ | | FSA | 114.0 | | TIME | 104.8 | | Distortion | 2.6% | | End Powering | 3.2% | | End Voltage | 2.9% | | High Powering | 2.8% | | FIBAN (LVA) | 2.8 | | Average (LVA) | 1.1-4 | | Maximum (LVA) | 3.5-7 | | Average (LVA) | 1.7-10 |7.4 SPL
- Select Free in the PC Software main page.
- Accurately place the Dummy Head in the vehicle compartment (see sect 3.1).
- Select SPL.
Press BACK to go back to the previous step.
Press NEXT to continue with the measurement.
Press CANCEL to exit.
-
To go ahead with the measurement, select the TMD microphone Range among the below categories: 90dB, 96 dB, 102dB.
-
Insert the CD supplied with the product: "Setup CD" if the source used is a CD AUDIO player. If the source used does not feature a CD player, download the MP3 tracks CD provided o fron the bit Drive portal, copying them on a USB mass storage.
- Play track 1(press Play);
- Adjust the source volume till you reach the value of 80 db.
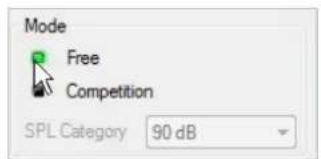


Remark: the choice of the SPL category depends on the category that the installation taking part to the race belongs to.
8. MEASUREMENT SESSION COMPETITION MODE
To perform this operation it is necessary to connect an Audison bit processor to the bit Tune.
8.1 COMPETITION MODE WIZARD
-
Select Competition on the main PC Software page. Then select the SPL category, using the drop-down menu.
-
Select Auto FSA +TMD.
-
Press Next to continue with the measurements.
-
Accurately place the Dummy Head in the vehicle compartment (see sect 3.1). If the bit Tune and Dummy Head are interfaced correctly, a message showing the correct interfacing will be displayed "Dummy Head found".
Press BACK to go back to the previous step. Press NEXT to continue with the measurement. Press CANCEL to exit.
Possible error message.
The message "Dummy Head not found" appears in case the connections between Dummy Head and bit Tune are not found or the cables are not connected correctly. Check the connections and wait for the message stating that there is a connection between the devices "Dummy Head found".


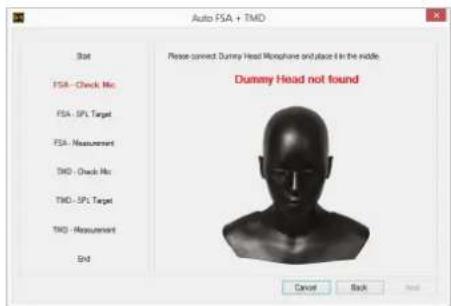
5. Follow the instructions below:
- Insert the CD supplied with the product: "Setup CD" if the source used is a CD AUDIO player. If the source used does not feature a CD player, download the MP3 tracks CD provided o fron the bit Drive portal, copying them on a USB mass storage.
- Play track 1(press Play);
- Adjust the source volume till you reach the value of 80 db.
Press BACK to go back to the previous step.
Press NEXT to continue with the measurement.
Press CANCEL to exit.
6. Play track 2 ;
Press BACK to go back to the previous step.
Press NEXT to continue with the measurement.
Press CANCEL to exit.
7. Wait a few minutes for the measurement to be completed.


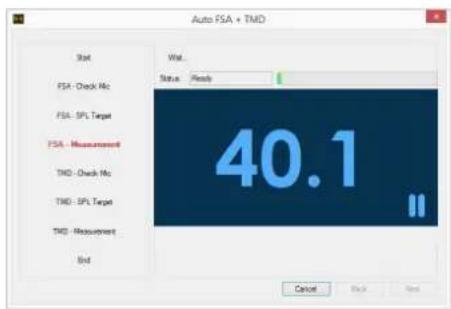
Possible error message.
If the error shown to the right is displayed, press OK and repeat the operations from point 5.

During the measurement, a status bar will indicate the status of the measurement.
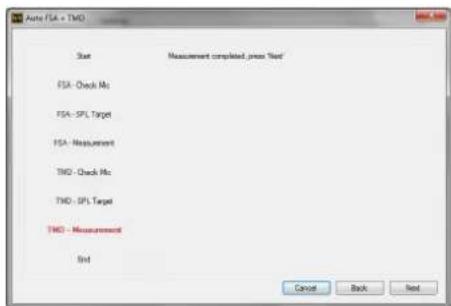
When the measurement is completed successfully, the window shown to the side will be displayed.
Press BACK to go back to the previous step. Press NEXT to continue with the measurement. Press CANCEL to exit.
- Accurately place the TMD in the vehicle compartment (see sect. 3.1). If the bit Tune and Dummy Head are not interfaced correctly, a message showing the incorrect interfacing will be displayed "Dummy Head not found".
TMD (Total Music Distortion) is a tool capable of measuring linear and non-linear distortion of the system's frequency response using a real music track, unlike conventional measurement methods. The analysis can be performed at different sound pressure levels, an extremely significant factor to identify the performance of a system when it is pushed around or beyond its distortion point, thus assigning different TMD scores for different SPL categories
The correct connection of the TMD microphone will be notified with the message "Microphone found".
Press BACK to go back to the previous step. Press NEXT to continue with the measurement. Press CANCEL to exit.
-
Follow the instructions below:
-
Play track 1 (press Play);
- Adjust the source volume till you reach the value of 90 db.
Press BACK to go back to the previous step.
Press NEXT to continue with the measurement. Press CANCEL to exit.


10. Play track 3;
Press BACK to go back to the previous step.
Press NEXT to continue with the measurement.
Press CANCEL to exit.
11. Wait a few minutes for the measurement to be completed. During the measurement, a status bar will indicate the status of the measurement.
Press BACK to go back to the previous step.
Press NEXT to continue with the measurement.
Press CANCEL to exit.
When the measurement is completed successfully, the window shown to the side will be displayed.
12. Press CLOSE to end the measurement session.
At the end of the measurement session, the first results relevant to the audio system measured will be available.



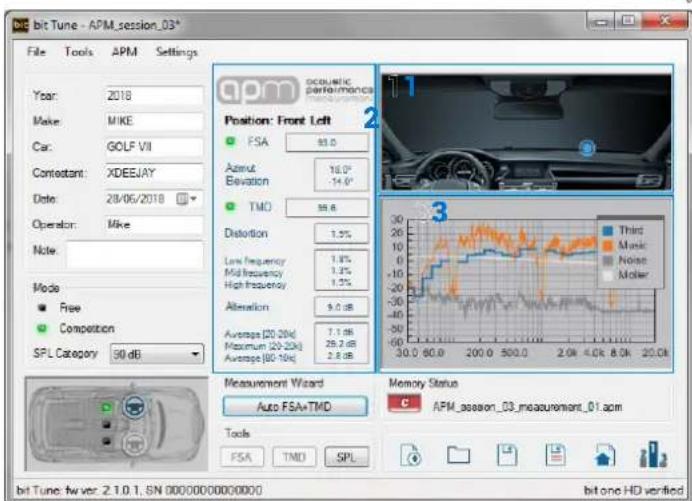
- The listening point of the sound scene acquired is displayed.

- The values of the measurements acquired are displayed. Thanks to the FSA analysis (Front Stage Analysis), the sound front emission can be analysed as if the dashboard of your car was the stage of a concert and this allows us to determine, with a high level of accuracy in the xy axis, the central point of the virtual soundtrack generated by the stereo system, providing the FSA score as a result.
![GPM acoustic performance measurement Position: Front Left FSA 79.0 Azimut 18.0° Elevation -34.0° TMD 87.8 Distortion 4.8% Low frequency 1.8% Mid frequency 1.3% High frequency 14.4% Alteration 8.8 dB Average [20-20k] 7.0 dB Maximum [20-20k] 28.0 dB Average [80-10k] 2.9 dB](/content/2026/06/1246473/images/7b433f73b20d1a7da975ccd3df9dc6617ae9c8f9cf688642b6773092060c4da5.jpg)
- The trend of the acquired acoustic measurements is shown. TMD (Total Music Distortion) is a tool capable of measuring linear and non-linear distortion of the system's frequency response using a real music track, unlike conventional measurement methods.
The analysis can be performed at different levels of sound pressure, an extremely significant factor to identify the performance of a system when pushing it around or above its distortion point, thus assigning different TMD scores for different SPL categories.

line
| Time | Short | Medium | Meter | |------|-------|--------|-------| | 2010 | 30 | 30 | 30 | | 2015 | 35 | 35 | 35 | | 2020 | 40 | 40 | 40 | | 2025 | 45 | 45 | 45 |Scoring calculation:

other
| Category | PARTIAL (%) | TOTAL (%) | |---|---|---| | Azimut Elevation | 70 | 30 | | Distortion Low frequency Mid frequency High frequency | 25 | 50 | | Distortion Low frequency Mid frequency High frequency | 25 | 25 | | Alteration Average [20-20k] Maximum [20-20k] Average [60-10k] | 20 | 20 | | Alteration Average [20-20k] Maximum [20-20k] Average [60-10k] | 60 | 40 | FSA score 120 max 70 min FSA % overall 50% TMD score 120 max 70 min TMD % overall 50% APM score 120 max 70 min9. TECHNICAL SPECIFICATIONS
DUMMY HEAD
| Microphone Type 2 x Electret Condenser | |
| Polar Pattern Omni Directional | |
| Sensitivity (±3dB)-44dB(6.3mV/Pa) | |
| Frequency Response 20Hz~20kHz | |
| S/N ratio More than 62dB | |
| Impedance Less than 2.2k Ohm | |
| Operating Temperature -20 °C~+50 °C |
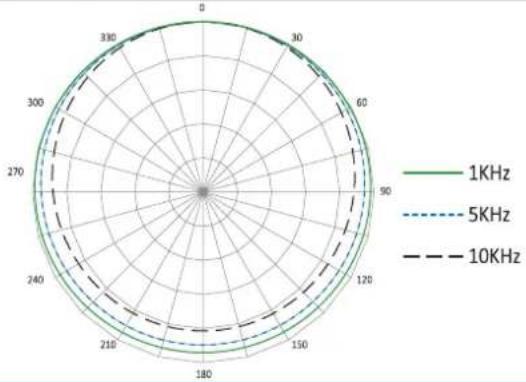
radar
| Angle | 1KHz | 5KHz | 10KHz | |-------|------|------|-------| | 0 | 330 | 330 | 330 | | 30 | 30 | 28 | 26 | | 60 | 24 | 22 | 20 | | 90 | 18 | 16 | 14 | | 120 | 12 | 12 | 10 | | 150 | 8 | 8 | 6 | | 180 | 4 | 4 | 2 | | 210 | 2 | 2 | 1 | | 240 | 1 | 1 | 0.5 | | 270 | 0.5 | 0.5 | 0.25 | | 300 | 0.25 | 0.25 | 0.1 | | 330 | 0.1 | 0.1 | 0.05 |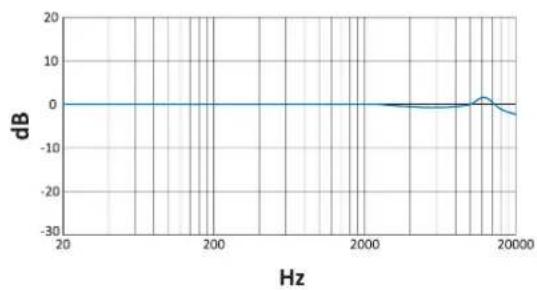
line
| Hz | dB | |-------|------| | 20 | 0 | | 2500 | 0 | | 3000 | 0 | | 3500 | 0 | | 4000 | 0 | | 4500 | 0 | | 5000 | 0 | | 5500 | 0 | | 6000 | 0 | | 6500 | 0 | | 7000 | 0 | | 7500 | 0 | | 8000 | 0 | | 8500 | 0 | | 9000 | 0 | | 9500 | 0 | | 10000 | 0 | | 10500 | 0 | | 11000 | 0 | | 11500 | 0 | | 12000 | 0 | | 12500 | 0 | | 13000 | 0 | | 13500 | 0 | | 14000 | 0 | | 14500 | 0 | | 15000 | 0 | | 15500 | 0 | | 16000 | 0 | | 16500 | 0 | | 17000 | 0 | | 17500 | 0 | | 18000 | 0 | | 18500 | 0 | | 19000 | 0 | | 19500 | -2 | | 20000 | -3 |TMD
| Microphone Type 2 x Electret Condenser | |
| Polar Pattern Omni Directional | |
| Sensitivity (±3dB)-60dB(0.1mV/Pa) | |
| Frequency Response 15Hz~20kHz | |
| S/N ratio More than 62dB | |
| Impedance 600 Ohm | |
| Operating Temperature -20 °C~+50 °C |

radar
| Angle | Value (dB) | |-------|------------| | 0° | 30 | | 90° | 40 | | 90° | 50 | | 90° | 60 | | 90° | 70 |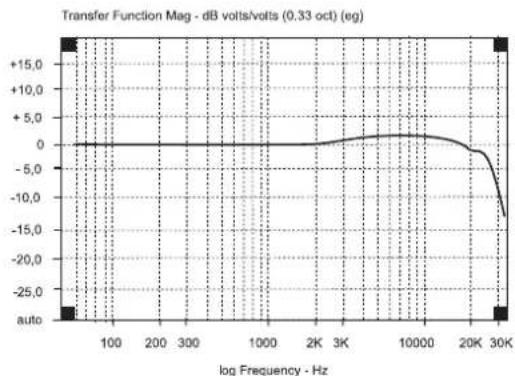
line
| log Frequency - Hz | Transfer Function Mag - dB volts/volts (0.33 oct) (eg) | | ------------------ | --------------------------------------------------- | | 100 | 0.0 | | 200 | 0.0 | | 300 | 0.0 | | 1000 | 0.0 | | 2K | 0.0 | | 3K | 0.0 | | 10K | 0.0 | | 20K | -5.0 | | 30K | -15.0 |GENERAL REQUIREMENTS
| PC connections USB 2.0 / 3.0 | |
| Software/PC requirements | Microsoft Windows (32 / 64 bit) XP, Vista / 7 / 8 / 10 |
| Graphic card min. resolution 1024 x 600 | |
| Temperature range | Operating: 0 °C to 55 °C (32°F to 131°F) |
audison.com
- OWNER'S MANUAL
- DESCRIPTION 7
- CONNECTIONS 9
- SOFTWARE AND DRIVERS INSTALLATION 12
- APM / bit Tune DESKTOP 20
- "APM" MAIN MENU....30
- MEASUREMENT SESSION - FREE MODE 37
- MEASUREMENT SESSION COMPETITION MODE 44
- TECHNICAL SPECIFICATIONS 49
- APM DESCRIPTION
- THE PROJECT
- APM MEASUREMENTS
- MASTER SOUND QUALITY RACE
- PRECAUTIONARY NOTES
- PACKAGING CONTENTS
- DIMENSIONS
- DESCRIPTION
- TMD
- TDM INSTALLATION
- CONNECTIONS
- POWER SUPPLY AND TURN ON
- PERSONAL COMPUTER
- PERSONAL COMPUTER E bit Tune 2. PERSONAL COMPUTER bit Tune + Audison bit
- APM DUMMY HEAD CONNECTION
- TMD CONNECTION
- SOFTWARE AND DRIVERS INSTALLATION
- PC SOFTWARE AND DRIVER INSTALLATION WIZARD
- Windows XP: select
- Windows Vista: select
- Windows 7: select
- Windows 8/10: select
- Possible error message:
- UNINSTALLING BIT TUNE SOFTWARE and DRIVER
- APM / BIT TUNE DESKTOP
- SOFTWARE START IN APM MOD
- Possible error message.
- APM TARGET MODE
- CONNECTION STATUS MENU 1
- SESSION NOTE MENU 2
- "FILE" MAIN MENU
- 3
- Software Updates.
- "TOOLS" MAIN MENU 4
- FRONT STAGE ANALYSIS
- Calculation of the FSA score
- TOTAL MUSIC DISTORTION
- Sections:
- Calculation of the TMD score
- SPL METER
- "APM" MAIN MENU 5
- MODE:
- NEW MEASUREMENT:
- LOAD MEASUREMENT:
- SAVE MEASUREMENT:
- SAVE MEASUREMENT AS:
- CREATE REPORT:
- APM RANK CALCULATOR:
- MASTER SOUND QUALITY RACE:
- OPTIONS:
- "SETTINGS" MAIN MENU
- 6
- MIC CALIBRATION:
- TMD Mic Calibration:
- Dummy Head Calibration.:
- Reset:
- CONNECT TO:
- DISCONNECT TO:
- COMPANY INFO:
- LANGUAGE:
- MEASURAMENT WIZARD / TOOLS 7
- MEMORY STAUS 8
- FILES MANAGEMENT 9
- MEASUREMENT SESSION - FREE MODE
- AUTO FSA+TMD
- Follow the instructions below:
- Play track 2;
- Play track 3 ;
- Wait a few minutes for the measurement to be completed. During the measurement a status bar will show the measurement status.
- Press CLOSE to end the measurement session.
- Measurement session description:
- FSA
- TMD
- SPL
- MEASUREMENT SESSION COMPETITION MODE
- COMPETITION MODE WIZARD
- Play track 2 ;
- Wait a few minutes for the measurement to be completed.
- Play track 3;
- Wait a few minutes for the measurement to be completed. During the measurement, a status bar will indicate the status of the measurement.
- TECHNICAL SPECIFICATIONS
Brand : AUDISON
Model : APM
Category : Audio