
HTZ-221DVD - Home Theater System PIONEER - Free user manual and instructions
Find the device manual for free HTZ-221DVD PIONEER in PDF.


| Product Type | Home Theater System |
| Brand | Pioneer |
| Model | HTZ-221DVD |
| Channels | 5.1 |
| Disc Playback | DVD, CD |
| Tuner | AM/FM |
| HDMI Output | 1 |
| Audio Inputs | 2 analog, 1 optical |
| RMS Power Output | 600W total |
| Dimensions (Main Unit) | 420 x 60 x 350 mm |
| Weight (Main Unit) | 3.5 kg |
| Power Consumption | 80 W (standby 0.5 W) |
| Speaker Types | 2 front, 2 surround, 1 center, 1 subwoofer |
| Subwoofer Type | Passive |
| Surround Sound Formats | Dolby Digital, DTS |
| Remote Control | Included |
| User Manual Languages | English, Spanish, French, etc. |
| Warranty | 1 year (varies by region) |
Frequently Asked Questions - HTZ-221DVD PIONEER
User questions about HTZ-221DVD PIONEER
0 question about this device. Answer the ones you know or ask your own.
Ask a new question about this device
Download the instructions for your Home Theater System in PDF format for free! Find your manual HTZ-221DVD - PIONEER and take your electronic device back in hand. On this page are published all the documents necessary for the use of your device. HTZ-221DVD by PIONEER.
USER MANUAL HTZ-221DVD PIONEER
Thank you for buying this Pioneer product.
Please read through these operating instructions so you will know how to operate your model properly.
After you have finished reading the instructions, put them away in a safe place for future reference.
IMPORTANT

The lightning flash with arrowhead symbol, within an equilateral triangle, is intended to alert the user to the presence of uninsulated "dangerous voltage" within the product's enclosure that may be of sufficient magnitude to constitute a risk of electric shock to persons.
CAUTION
RISK OF ELECTRIC SHOCK DO NOT OPEN
CAUTION:
TO PREVENT THE RISK OF ELECTRIC SHOCK, DO NOT REMOVE COVER (OR BACK). NO USER-SERVICEABLE PARTS INSIDE. REFER SERVICING TO QUALIFIED SERVICE PERSONNEL.

The exclamation point within an equilateral triangle is intended to alert the user to the presence of important operating and maintenance (servicing) instructions in the literature accompanying the appliance.
D3-4-2-1-1_A1_En
CAUTION
This product is a class 1 laser product classified under the Safety of laser products, IEC 60825-1:2007.

D58-5-2-2a_A1_En
WARNING
This equipment is not waterproof. To prevent a fire or shock hazard, do not place any container filled with liquid near this equipment (such as a vase or flower pot) or expose it to dripping, splashing, rain or moisture.
D3-4-2-1-3_A1_En
WARNING
Before plugging in for the first time, read the following section carefully.
The voltage of the available power supply differs according to country or region. Be sure that the power supply voltage of the area where this unit will be used meets the required voltage (e.g., 230 V or 120 V) written on the rear panel.
D3-4-2-1-4* A1 En
VENTILATION CAUTION
When installing this unit, make sure to leave space around the unit for ventilation to improve heat radiation (at least 10 cm at top, 10 cm at rear, and 10 cm at each side).
WARNING
Slots and openings in the cabinet are provided for ventilation to ensure reliable operation of the product, and to protect it from overheating. To prevent fire hazard, the openings should never be blocked or covered with items (such as newspapers, table-cloths, curtains) or by operating the equipment on thick carpet or a bed.
D3-4-2-1-7b*_A1_En
Operating Environment
Operating environment temperature and humidity: +5 °C to +35 °C (+41 °F to +95 °F); less than 85 %RH (cooling vents not blocked)
Do not install this unit in a poorly ventilated area, or in locations exposed to high humidity or direct sunlight (or strong artificial light)
D3-4-2-1-7c* A1 En
If the AC plug of this unit does not match the AC outlet you want to use, the plug must be removed and appropriate one fitted. Replacement and mounting of an AC plug on the power supply cord of this unit should be performed only by qualified service personnel. If connected to an AC outlet, the cut-off plug can cause severe electrical shock. Make sure it is properly disposed of after removal. The equipment should be disconnected by removing the mains plug from the wall socket when left unused for a long period of time (for example, when on vacation).
D3-4-2-2-1a_A1_En
CAUTION
The ⏻ STANDBY/ON switch on this unit will not completely shut off all power from the AC outlet. Since the power cord serves as the main disconnect device for the unit, you will need to unplug it from the AC outlet to shut down all power. Therefore, make sure the unit has been installed so that the power cord can be easily unplugged from the AC outlet in case of an accident. To avoid fire hazard, the power cord should also be unplugged from the AC outlet when left unused for a long period of time (for example, when on vacation).
D3-4-2-2-2a*_A1_En
This product is for general household purposes. Any failure due to use for other than household purposes (such as long-term use for business purposes in a restaurant or use in a car or ship) and which requires repair will be charged for even during the warranty period.
K041_A1_En
POWER-CORD CAUTION
Handle the power cord by the plug. Do not pull out the plug by tugging the cord and never touch the power cord when your hands are wet as this could cause a short circuit or electric shock. Do not place the unit, a piece of furniture, etc., on the power cord, or pinch the cord. Never make a knot in the cord or tie it with other cords. The power cords should be routed such that they are not likely to be stepped on. A damaged power cord can cause a fire or give you an electrical shock. Check the power cord once in a while. When you find it damaged, ask your nearest PIONEER authorized service center or your dealer for a replacement.
S002* A1 En
WARNING
To prevent a fire hazard, do not place any naked flame sources (such as a lighted candle) on the equipment.
D3-4-2-1-7a_A1_En
Safe way to remove the battery or the battery from the equipment:
Remove the old battery pack, follow the steps in reverse order than the assembly. To prevent contamination of the environment and bring on possible threat to human and animal health, the old battery or the battery put in the appropriate container at designated collection points. Do not dispose of batteries or battery together with other waste. It is recommended that you use local, free reimburse ment system batteries and accumulators.
The battery shall not be exposed to excessive heat such as sunshine, fire or the like.
Copyrights
It is forbidden by law to copy, broadcast, show, broadcast via cable, play in public, or rent copyrighted material without permission. This product features the copy protection function developed by Rovi Corporation. Copy protection signals are recorded on some discs. When recording and playing the pictures of these discs picture noise will appear. This product incorporates copyright protection technology that is protected by U.S. patents and other intellectual property rights. Use of this copyright protection technology must be authorized by Rovi Corporation, and is intended for home and other limited viewing uses only unless otherwise authorized by Rovi Corporation. Reverse engineering or disassembly is prohibited.
CONSUMERS SHOULD NOTE THAT NOT ALL HIGH DEFINITION TELEVISION SETS ARE FULLY COMPATIBLE WITH THIS PRODUCT AND MAY CAUSE ARTIFACTS TO BE DISPLAYED IN THE PICTURE. IN CASE OF 525 OR 625 PROGRESSIVE SCAN PICTURE PROBLEMS, IT IS RECOMMENDED THAT THE USER SWITCH THE CONNECTION TO THE 'STANDARD DEFINITION' OUTPUT. IF THERE ARE QUESTIONS REGARDING OUR TV SET COMPATIBILITY WITH THIS MODEL 525p AND 625p UNIT, PLEASE CONTACT OUR CUSTOMER SERVICE CENTER.
This item incorporates copy protection technology that is protected by U.S. patents and other intellectual property rights of Rovi Corporation. Reverse engineering and disassembly are prohibited.
Notes on Copyrights
- Many DVD discs are encoded with copy protection. Because of this, you should only connect your player directly to your TV, not to a VCR. Connecting to a VCR results in a distorted picture from copy-protected discs.
- Under the U.S. Copyright laws and Copyright laws of other countries, unauthorized recording, use, display, distribution, or revision of television programmes, videotapes, BD-ROM discs, DVDs, CDs and other materials may subject you to civil and/or criminal liability.
1
Safety Information
2 CAUTION
4 Copyrights
2
Preparation
8 Unique Features
8 Playable Discs
9 Supplied Accessories
10 Playable files
12 Front panel
13 Rear panel
14 Remote Control
3
Installation
16 Assemble the speakers
16 Speaker Setup
16 Wall mounting
17 Additional notes on speaker
18 Positioning the System
19 Connections to your TV
19 Component Video Connection
20 HDMI OUT Connection
21 Video Connection
22 Optional Equipment Connection
22 AUX IN Connection
22 PORTABLE IN Connection
23 USB Connection
23 Antenna Connection
24 Adjust the Initial Settings
24 To display and exit the Initial Settings Menu
24 Initial Settings Menu
24 Digital Audio Out settings
24 Video Output settings
25 Language settings
25 Display settings
25 Options settings
4
Operation
26 Basic Operations
27 Other Operations
27 Displaying Disc Information on-screen
27 To display the DVD Menu
27 To display the DVD Title
27 Selecting a subtitle language
27 Switches Audio
27 Switches Angle
27 1.4 times speed playback
28 Last Scene Memory
28 A-B Repeat
28 Creating a program list
29 Other functions available from the program menu
29 Searching a disc
29 Viewing photo files as a slide show
29 Listening to music during slide show
30 Radio Operations
30 Listening to the Radio
30 Presetting the Radio stations
30 Deleting all the saved stations
30 Improving poor FM reception
31 Audio Settings
31 To display Audio Settings Menu
31 Audio Settings parameters
32 Video Adjust
32 To display Video Adjust Menu
32 Video Adjust parameters
33 Advanced Operations
33 Sleep Timer Setting
33 Dimmer
33 Screen Saver
33 Turn off the sound temporarily
33 Audio Sync
33 Listening to music from your portable player or external device
34 Setting the TV system
34 Copying files on to USB devices
35 Recording audio CD tracks on to USB devices
36 Karaoke
36 Using karaoke
37 Extra functions for karaoke
5 Maintenance
38 Notes on Discs
38 Handling the Unit
6 Troubleshooting
39 Troubleshooting
7 Appendix
40 Operating the TV with the player's remote control
42 Language Codes
43 Area Codes
44 Trademarks and Licences
45 Specifications (HTZ-421DVD)
46 Specifications (HTZ-221DVD)
2
Preparation
Unique Features
Portable In
Listens to music from your portable device. (MP3, Notebook, etc)
USB Direct Recording
Records music from CD to your USB device.
playable Discs
| DVD-Video | DVD-Video discsDVD-R/-RW/-R DL and DVD+R/+RW/+R DL discs recorded in the Video mode |
| DVD VR | DVD-R/-RW/-R DL discs recorded in the VR mode |
| Video CD | Video CDs (including Super VCDs) |
| CD(R/RW) | Audio CDsCD-R/-RW/-ROM discs containing music recorded in the CD-DA format |
| JPEG | JPEG files recorded on DVD-R/-RW/-R DL discs, CD-R/-RW/-ROM discs |
| DivX | DivX video files recorded on DVD-R/-RW/-R DL discs, CD-R/-RW/-ROM discs |
| WMA | WMA files recorded on DVD-R/-RW/-R DL discs, CD-R/-RW/-ROM discs |
| MP3 | MP3 files recorded on DVD-R/-RW/-R DL discs, CD-R/-RW/-ROM discs |
- Only the discs that have been finalized can be played.
• This unit is not compatible to CPRM.
Discs that cannot be played
- Blu-ray discs
- HD DVDs
AVCHD
AVCREC
• DVD-Audio discs - DVD-RAM discs
- SACDs
CD-G
• Discs recorded with packet writing - Programs that can be recorded only once and that are (already) recorded on a DVD-R/-RW/-R DL
Supplied Accessories
Please check and identify the supplied accessories.

natural_image
Simple line drawing of a ribbon cable with two connectors (no text or symbols)
natural_image
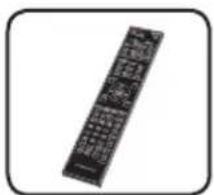
Black rectangular electronic device with visible internal components (no text or symbols)VIDEO cable (1) Remote Control (1)

natural_image
Simple line drawing of two cylindrical batteries with star-shaped markings (no text or symbols)AAA/R03 dry cell batteries (2)

natural_image
Simple line drawing of a cable with two connectors (no text or symbols)FM Antenna (1)

natural_image
Five identical dark rectangular panels arranged in a 2x2 grid, each with circular cutouts (no text or symbols)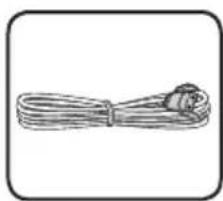
natural_image
Simple line drawing of a coiled cable or wire with a terminal connector (no text or symbols)Non-skid pads (5) Power cord

natural_image
Illustration of five screws arranged in a 2x2 grid (no text or symbols)WARNING
Store small parts out of the reach of children and infants. If accidentally swallowed, contact a doctor immediately.
Screws M3.5x12 [Taping type] (5)
These screws are used to fix the speakers to the stands.
- Operating instructions (This document)
Symbol Used in this Manual

NOTE
Indicates special notes and operating features.

CAUTION
Indicate cautions for preventing possible damages from abuse.
All discs and file listed below
ALL
MP3 files
MP3
DVD and finalized
DVD
DVD+R/+RW/-R/-RW
VCD
Video CD and Super VCD
WMA
WMA files
DivX
DivX files
ACD
Audio CDs
JPEG
JPEG files
Regional Codes
This unit has a regional code printed on the rear of the unit. This unit can play only DVD discs labeled same as the rear of the unit or "All".
- Most DVD discs have a globe with one or more numbers in it clearly visible on the cover. This number must match your unit's regional code; or the disc cannot play.
- If you try to play a DVD with a different regional code from your unit, the message "Incompatible disc region number Can't play disc" appears on the TV screen.
playable files
- Only discs recorded in ISO9660 Level 1, Level 2 and Joliet can be played.
- Files protected by DRM (Digital Rights Management) cannot be played.
- Files other than the ones below (WMV, MPEG4-AAC, etc.) are not guaranteed to play.
Supported video file formats DivX
Extension: .divx .avi Resolution: up to 720 x 480
- DivX is a media technology created by DivX, Inc. DivX media files contain image data.
- DivX files may also include such advanced playback functions as menu screens and selection of multiple subtitle languages/audio tracks.
- Files not containing DivX video signals cannot be played, even if they have the extension ".avi".
Displaying external subtitle files
- The font sets listed below are available for external subtitle files. You can see the proper font set on-screen by setting the Subtitle Language on page 25 to match the subtitle file.
• This player supports the following language groups:
| Group 1 | Afrikaans (af), Basque (eu), Catalan (ca), Danish (da), Dutch (nl), English (en), Faroese (fo), Finnish (fi), French (fr), German (de), Icelandic (is), Irish (ga), Italian (it), Norwegian (no), Portuguese (pt), Rhaeto-Romanic (rm), Scottish (gd), Spanish (es), Swedish (sv) |
| Group 2 | Albanian (sq), Croatian (hr), Czech (cs), Hungarian (hu), Polish (pl), Romanian (ro), Slovak (sk), Slovenian (sl) |
| Group 3 | Bulgarian (bg), Byelorussian (be), Macedonian (mk), Russian (ru), Serbian (sr), Ukrainian (uk) |
| Group 4 | Hebrew (iw), Yiddish (ji) |
| Group 5 | Turkish (tr) |
- Some external subtitle files may be displayed incorrectly or not at all.
- For external subtitle files the following subtitle format filename extensions are supported (please note that these files are not shown within the disc navigation menu): .srt, .sub, .ssa, .smi
- The filename of the movie file has to be repeated at the beginning of the filename for the external subtitle file.
- The number of external subtitle files which can be switched for the same movie file is limited to a maximum of 10.
Supported image file formats JPEG
Extension: .jpg .jpeg
• Resolution: Up to 3 072 x 2 048 pixels
• This player supports baseline JPEG.
• This player supports Exif Ver.2.2.
Supported audio file formats
- This player does not support VBR (Variable Bit Rate) and lossless encoding.
Windows Media™ Audio (WMA)
Extension: .wma
• Sampling frequencies: 32 kHz, 44.1 kHz and 48 kHz
• Bit rate: Up to 192 kbps
- This player supports files encoded using Windows Media Player Ver. 7/7.1, Windows Media Player for Windows XP and Windows Media Player 9 Series.
- Windows Media is either a registered trademark or trademark of Microsoft Corporation in the United States and/or other countries.
- This product includes technology owned by Microsoft Corporation and cannot be used or distributed without a license from Microsoft Licensing, Inc.
MPEG-1 Audio Layer 3 (MP3)
Extension: .mp3
• Sampling frequencies: 32 kHz, 44.1 kHz and 48 kHz
- Bit-rates: 128 kbps or higher recommended
• This Player supports ID3 tag Ver1.1.
Compatible USB Devices
• MP3 Player : Flash type MP3 player.
- USB Flash Drive : Devices that support USB 2.0 or USB 1.1.
- The USB function of this unit does not support some USB devices.
USB device requirement
• Devices which require additional program installation connected to a computer, are not supported.
- Do not extract the USB device while in operation.
- For a large capacity USB, it may take longer than a few minutes to be searched.
• To prevent data loss, back up all data.
- If you use a USB extension cable or USB hub, the USB device is not recognized.
- Using NTFS file system is not supported. (Only FAT(16/32) file system is supported.)
- This unit is not supported when the total number of files is 600 or more.
- External HDD, Card readers, Locked devices, or hard type USB devices are not guaranteed to support.
- USB port of the unit cannot be connected to PC. The unit can not be used as a storage device.
- Some copyright-protected files cannot be played.
- The maximum displayable number of characters for the folder and file names on the Disc Navigator is 14.
- The order of the folder and file names displayed on the Disc Navigator is dependant on the time and date when the folders or files were created on the USB device.
Front panel

1 Disc Tray
2 Operationbuttons
STANDBY/ON
Switches the unit ON or OFF.
▲ OPEN/CLOSE
FUNCTION
Changes the input source or function.
▶/Ⅲ (PLAY/PAUSE)
■ (STOP)
|◀◀▶▶| (SKIP)
-TUNE + (Radio tuning)
3 ECHO VOL
4 MIC VOL
5 MIC 1,2
6 Remote Sensor
7 PORTABLE IN
8 USB port
9 Display window
10 Volume control
Rear panel

1 AC IN
Plug into the power source.
2 SPEAKERS connectors
3 HDMI OUT (type A)
Connects to TV with HDMI inputs.
4 VIDEO OUTPUT
5 COMPONENT VIDEO (Y P_B P_R ) OUTPUT
6 AUX (L/R) INPUT
7 FM ANTENNA connector
Remote Control
Remote control
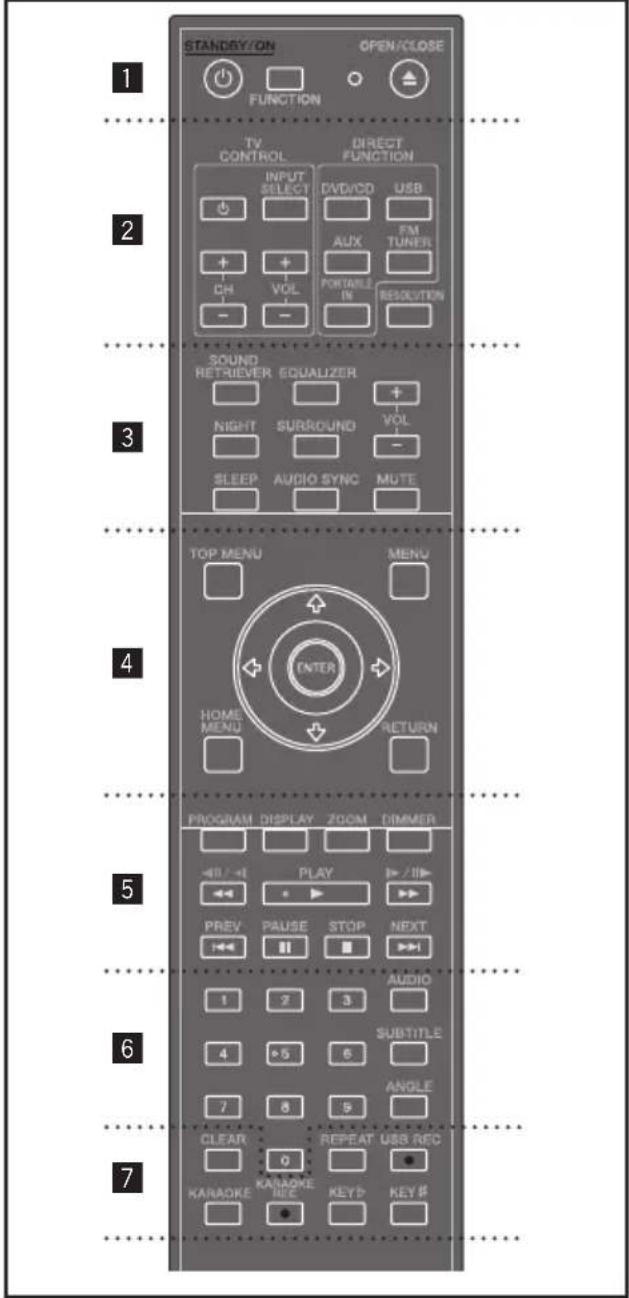
STANDBY/ON (☐): Switches the unit ON or OFF.
FUNCTION : Selects the function and input source. (DVD/CD, USB, FM TUNER, AUX, PORTABLE IN)
OPEN/CLOSE (▲): Opens and closes the disc tray.
2
TV CONTROL buttons: Controls the TV.
Controlling the TV
You can control the sound level, input source, and power switching of Pioneer TVs as well (See page 40 for details).
DIRECT FUNCTION buttons : Changes input source or function.
RESOLUTION: Sets the output resolution for HDMI and COMPONENT VIDEO OUT jacks.
3
SOUND RETRIEVER : Switches Sound Retriever setting.
NIGHT: Switches the night mode ON or OFF.
SLEEP: Sets the system to turn off automatically at a specified time.
EQUALIZER: Chooses sound impressions.
SURROUND: Switches between 5 Speaker Mode and Dolby Pro Logic II.
AUDIO SYNC: Switches AUDIO SYNC.
VOL (Volume) (+/-): Adjusts speaker volume.
MUTE: Mutes the sound.
4
TOP MENU: If the current DVD title has a menu, the title menu appears on the screen. Otherwise, the disc menu may not appear.
MENU : Accesses the menu on a DVD disc.
+/√/←(up/down/left/right): Used to navigate on-screen displays.
ENTER: Acknowledges menu selection.
HOME MENU : Press to display/hide HOME MENU.
RETURN : Moves backwards in the menu or exits the Initial Settings menu.
5
PROGRAM : Registers FM radio stations.
DISPLAY: Accesses On-Screen Display.
ZOOM: Will zoom in or zoom out.
DIMMER: Adjusts the display brightness.
◀/◀ (◀◀), ▶/▶ (▶▶): Searches backward or forward.
PLAY (▶): Starts playback.
PREV (I◄◄), NEXT (►►I): Goes to next or previous title/chapter/track/file.
PAUSE (Ⅲ): Pauses playback.
STOP (■): Stops playback or recording.
6
0 to 9 numerical buttons : Selects numbered options in a menu.
AUDIO: For discs or files including multiple audio streams/channels, the audio stream/channel can be changed during playback.
SUBTITLE: On DVD-Video or DivX discs containing subtitles in multiple languages, the subtitle can be changed during playback.
ANGLE : On DVD-Video discs featuring multiple angle, the angle can be changed during playback.
7
CLEAR: Removes a track number on the Program List.
REPEAT: Select Title Repeat, Chapter Repeat or Track Repeat.
USB REC (●): USB Direct Recording.
KARAOKE: Press to display the Karaoke Settings screen.
KARAOKE REC (●): Starts recording KARAOKE.
KEY b: Lowers the key for KARAOKE by a semitone.
KEY #: Raises the key for KARAOKE by a semitone.
Put the battery into the remote control
- Make sure for the + (plus) and - (minus) on the battery to be matched on the remote control.
- The batteries included with the unit are to check initial operations; they may not last over a long period. We recommend using alkaline batteries that have a longer life.
WARNING
Do not use or store batteries in direct sunlight or other excessively hot place, such as inside a car or near a heater. This can cause batteries to leak, overheat, explode or catch fire. It can also reduce the life or performance of batteries.
When disposing of used batteries, please comply with governmental regulations or environmental public institution's rules that apply in your country/area.
3 Installation
Assemble the speakers
Speaker Setup
- Connect the wires to the player.
Insert the cables connected to the player to the same colored connector on the speaker.


CAUTION
- These speaker terminals carry HAZARDOUS LIVE voltage. To prevent the risk of electric shock when connecting or disconnecting the speaker cables, disconnect the power cord before touching any uninsulated parts.
- Do not connect any speakers other than those supplied to this system.
-
Do not connect the supplied speakers to any amplifier other than the one supplied with this system. Connection to any other amplifier may result in malfunction or fire.
-
Attach the non-skid pads to the base of each speaker.

Wall mounting
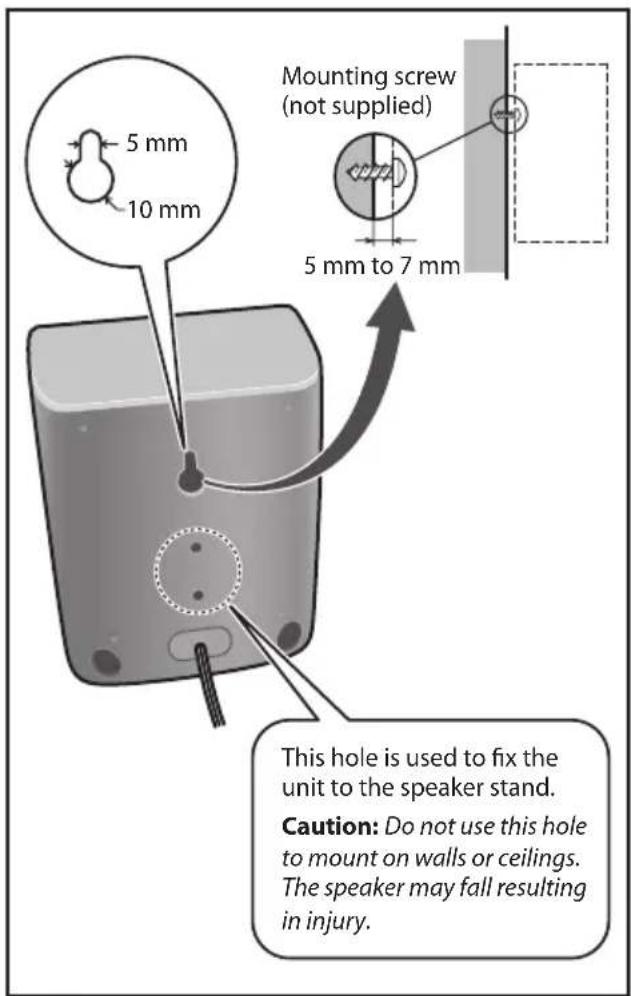
All speakers have a mounting hole which can be used to mount the speaker on the wall.
Before mounting
Remember that the speaker system is heavy and that its weight could cause the screws to work loose, or the wall material to fail to support it, resulting in the speaker falling. Make sure that the wall you intend to mount the speakers on is strong enough to support them. Do not mount on plywood or soft surface walls.
Mounting screws are not supplied. Use screws suitable for the wall material and support the weight of the speaker.

CAUTION
- If you are unsure of the qualities and strength of the wall, consult a professional for advice.
- Pioneer is not responsible for any accidents or damage that result from improper installation.
Additional notes on speaker
Install the main front left and right speakers at an equal distance from the TV.
Precautions:
The center speaker supplied with this system are magnetically shielded. However, depending on the installation location, color distortion may occur if the speaker is installed extremely close to the screen of a television set. If this case happens, turn the power switch of the television set OFF, and turn it ON after 15 min. to 30 min. If the problem persists, place the speaker system away from the television set.
The subwoofer is not magnetically shielded and so should not be placed near a TV or monitor. Magnetic storage media (such as floppy discs and tape or video cassettes) should also not be kept close to the subwoofer.
Do not attach the subwoofer to a wall or ceiling. They may fall off and cause injury.
Positioning the System
The following illustration shows an example of positioning the system.
Note that the illustrations in these instructions differ from the actual unit for explanation purposes.
For the best possible surround sound, all the speakers other than the subwoofer should be placed at the same distance from the listening position (A).

flowchart
graph TD
    A["Component A"] --> C["Central Unit"]
    B["Component B"] --> C
    C --> D["Component D"]
    D --> E["Component E"]
    E --> F["Component F"]
    A -.-> C
    B -.-> C
    C -.-> D
    D -.-> E
    style A fill:#f9f,stroke:#333
    style B fill:#f9f,stroke:#333
    style C fill:#ccf,stroke:#333
    style D fill:#ccf,stroke:#333
    style E fill:#ccf,stroke:#333
Ⓐ Front left speaker (L)/ ⒷFront right speaker (R):
Place the front speakers to the sides of the monitor or screen and as flush with the screen surface as possible.
© Center speaker: Place the center speaker below or in front of the monitor or screen.
D Surround left speaker (L)/ESurround right speaker (R):
Place these speakers behind your listening position, facing slightly inwards.
Subwoofer: The position of the subwoofer is not so critical, because low bass sounds are not highly directional. But it is better to place the subwoofer near the front speakers. Turn it slightly toward the center of the room to reduce the wall reflections.
© Unit

CAUTION
- Be careful to make sure children do not put their hands or any objects into the *subwoofer duct.
*subwoofer duct: A hole for plentiful bass sound on subwoofer cabinet (enclosure). - Place the centre speaker at a safe distance from the child's reach.
Otherwise it may result in the speaker falling down and causing personal injury and/or property damage. - The speakers contain magnet parts, so color irregularity may occur on the TV screen (CRT) or PC monitor screen. Please use the speakers away from the TV screen (CRT) or PC monitor screen.
Connections to Your TV
Make one of the following connections, depending on the capabilities of your existing equipment.

NOTE
- Depending on your TV and other equipment you wish to connect, there are various ways you could connect the player. Use only one of the connections described in this manual.
- Please refer to the manuals of your TV, Stereo System or other devices as necessary to make the best connections.

CAUTION
- Make sure the unit is connected directly to the TV. Tune the TV to the correct video input channel.
- Do not connect your unit via your VCR. The image could be distorted by the copy protection system.
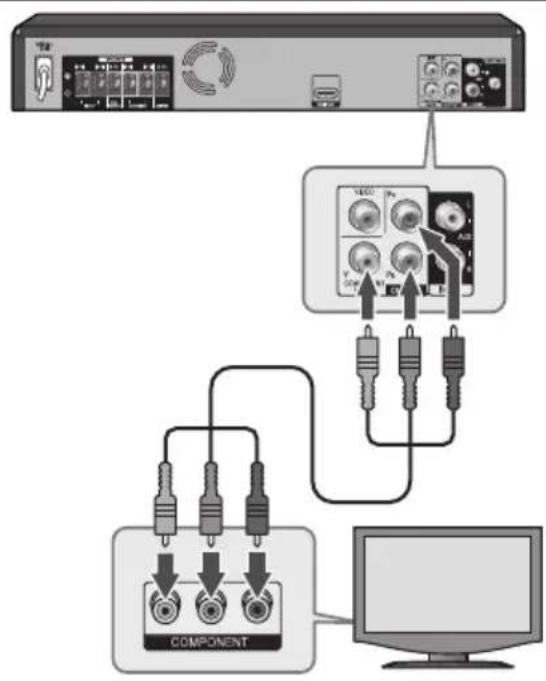
Component Video Connection
Connect the COMPONENT VIDEO (PROGRESSIVE SCAN) OUTPUT jacks on the unit to the corresponding input jacks on the TV using Y Pb Pr cables.
You can hear the sound through the system's speakers.
Component Video Connection
flowchart
graph TD
    A["Monitor"] --> B["Audio Control Panel"]
    B --> C["Component"]
    C --> D["Computer"]

NOTE
If your TV accepts progressive format signals, you can use this connection and set [Component Out] in [Video Output Settings] setup to [Progressive] (See page 24).
HDMI OUT Connection
If you have a HDMI TV or monitor, you can connect it to this unit using a HDMI cable. Connect the HDMI OUT jack on the unit to the HDMI IN jack on a HDMI compatible TV or monitor.
Set the TV's source to HDMI (refer to TV's Owner's manual).
HDMI OUT Connection
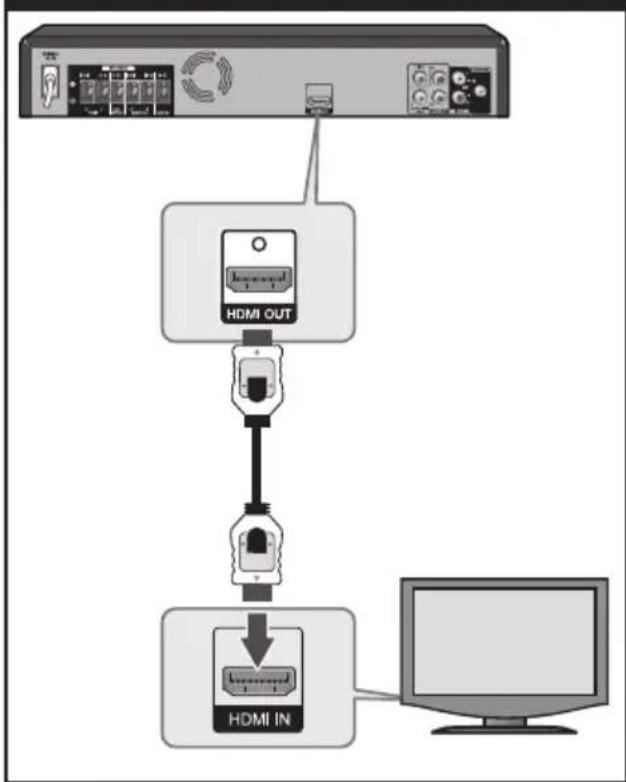
flowchart
graph TD
    A["Server"] --> B["HDMI OUT"]
    B --> C["Internal Inverter"]
    C --> D["Computer"]
    D --> E["HDMI IN"]

TIP
You can fully enjoy digital audio and video signals together with this HDMI connection.

NOTE
- If a connected HDMI device does not accept the audio output of the unit, the HDMI device's audio sound may be distorted or may not output.
- When you connect a HDMI or DVI compatible device make sure of the following:
- Try switching off the HDMI/DVI device and this unit. Next, switch on the HDMI/DVI device and leave it for around 30 seconds, then switch on this unit.
- The connected device's video input is set correctly for this unit.
- The connected device is compatible with 720x480i (or 576i), 720x480p (or 576p), 1280x720p, 1920x1080i or 1920x1080p video input.
- Not all HDCP-compatible HDMI or DVI devices will work with this unit.
- The picture will not be displayed properly with non-HDCP device.
- This unit does not playback and TV screen is changed to black or green screen or the snow noise may occur on the screen.

CAUTION
- Changing the resolution when the connection has already been established may result in malfunctions. To solve the problem, turn off the unit and then turn it on again.
- When the HDMI connection with HDCP is not verified, TV screen is changed to black or green screen or the snow noise may occur on the screen. In this case, check the HDMI connection, or disconnect the HDMI cable.
- If there is noise or lines on the screen, please check the HDMI cable (length is generally limited to 4.5 m) and use a High Speed HDMI® cable (Version 1.3).
Video Connection
Connect the VIDEO OUTPUT jack on the unit to the video in jack on the TV using a video cable.
You can hear the sound through the system's speakers.

flowchart
graph TD
    A["Device 1"] --> B["Audio Amplifier"]
    B --> C["Computer"]
    D["Signal Line"] --> E["Amplifier"]
    E --> F["Display Unit"]
    style A fill:#f9f,stroke:#333
    style D fill:#ccf,stroke:#333
    style E fill:#cfc,stroke:#333
    style F fill:#fcc,stroke:#333
Optional Equipment Connection
AUX IN Connection
Connect an Output of auxiliary device to the AUX Input (L/R) Connector. If your TV has only one output for audio (mono), connect it to the left (white) audio jack on the unit.
AUX IN Connection
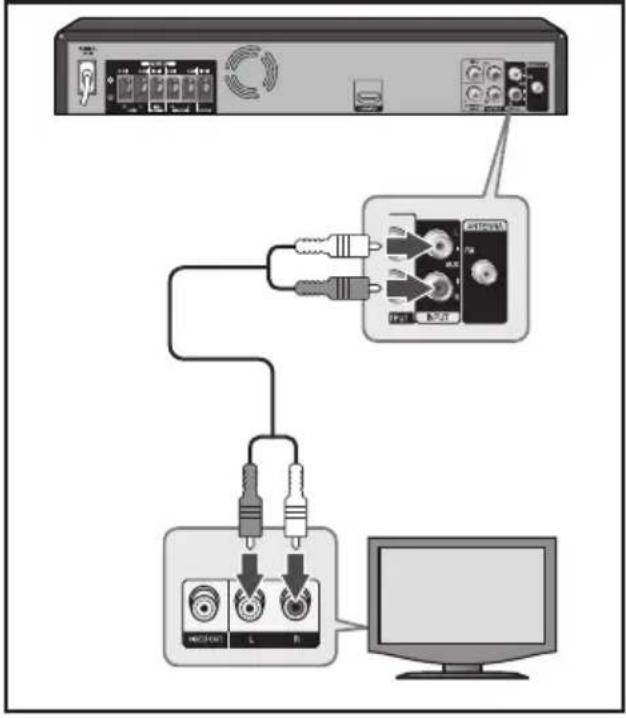
flowchart
graph TD
    A["Audio Input"] --> B["Amplifier"]
    B --> C["Computer Monitor"]
    D["Input"] --> B
    E["Switch"] --> B
    F["Radio"] --> B
    G["Signal"] --> B
    H["Ground"] --> B
PORTABLE IN Connection
Connect an OUTPUT of portable device (MP3 or PMP etc) to the PORTABLE IN connector.
PORTABLE IN Connection
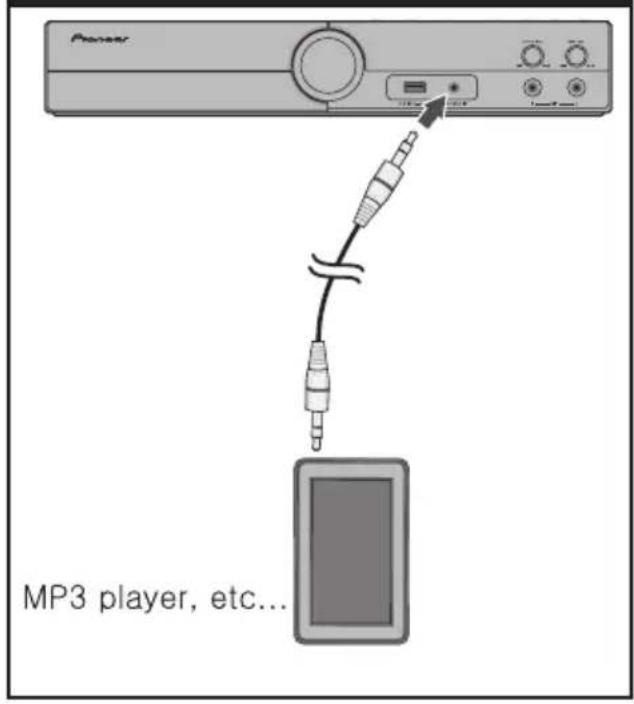
USB Connection
Connect the USB port of USB Memory (or MP3 player, etc.) to the USB port on the front of the unit.
USB Connection
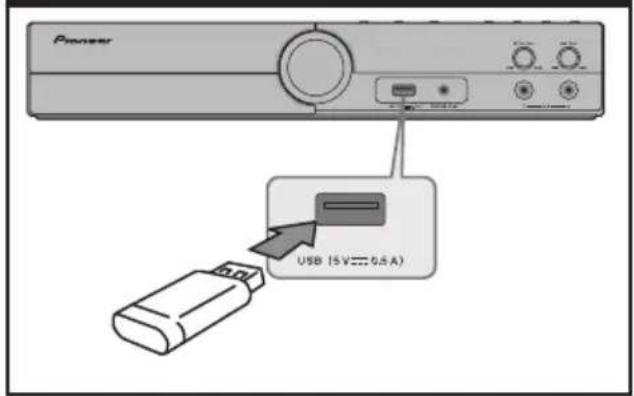
Removing the USB Device from the unit
-
Choose a different function mode or press STOP (■) twice in a row.
-
Remove the USB device from the unit.
Antenna Connection
Connect the supplied FM antenna for listening to the radio.
Connect the FM Wire antenna to the FM antenna connector.
Antenna Connection


NOTE
Be sure to fully extend the FM wire antenna. After connecting the FM wire antenna, keep it as horizontal as possible.
Adjust the Initial Settings
By using the Initial Settings menu, you can make various adjustments to items such as picture and sound.
You can also set a language for the subtitles and the Initial Settings menu, among other things. For details on each Initial Settings menu item, see pages 24 to 25.
To display and exit the Initial Settings Menu
- Press DVD/CD or press FUNCTION several times to select "DVD/CD" functions.
- Press HOME MENU to display "HOME MENU".
- Select "Initial Settings".
About help menu for Setup
| Buttons Operation | |
 | Moving to another menu. |
| [byztl] | Moving to previous level. |
| [aswwl] | Moving to next level or selecting menu. |
| HOME MENUorRETURN | To exit Initial Settings. |
| ENTER | To confirm menu. |
Initial Settings Menu
The factory default settings are indicated in italic.
Digital Audio Out settings
HDMI Out
Select the audio signals to be output from the HDMI OUT terminal (LPCM (2CH)/Auto/Off) according to the connected HDMI-compatible device.
Video Output settings
TV Screen
Change the picture's display format (4:3 (Letter Box)/4:3 (Pan & Scan)/16:9 (Wide)/16:9 (Compressed)), according to the connected TV.
Component Out
Change the output format of the video signals output from the COMPONENT VIDEO OUT terminals. (Progressive/Interlace).
HDMI Resolution
Change the resolution of the video signals output from the HDMI OUT terminals (720x480i/720x576i/720x480p/720x576p/1280x720p/1920x1080i/1920x1080p).
HDMI Color
Change the video signals output from the HDMI OUT terminal (Full range RGB/RGB/Component).
Deep Color
Select Auto when the connected TV or monitor is compatible with Deep Color (Auto/Off).
Language settings
Audio Language
Select the language you prefer for the audio track when listening to the sound of DVD-Video discs (English/available languages/Other Language).
Subtitle Language
Select the language you prefer for the subtitles displayed for DVD-Video discs (English/available languages/Other Language).
DVD Menu Lang.
Select the language you prefer for the menu displays of DVD-Video discs (w/Subtitle Lang./available languages/Other Language).
Subtitle Display
Select whether to display subtitles (On) or not (Off).
Display settings
OSD Language
Select the language you prefer for the operation messages (Play, Stop, etc.) displayed on the TV screen (English/available languages).
Angle Indicator
Select whether to display the angle mark on the TV screen (On) or not (Off).
On Screen Display
Select whether to display operation messages (Play, Stop, etc.) on the TV screen (On) or not (Off).
Options settings
Parental Lock
Restrict DVD-Video viewing (Password/Level Change/Country Code).
DivX VOD
Display the registration code required for playing DivX VOD files (Activate/Deactivate).
ABOUT DIVX VIDEO: DivX® is a digital video format created by DivX, LLC, a subsidiary of Rovi Corporation. This is an official DivX Certified® device that plays DivX video. Visit divx.com for more information and software tools to convert your files into DivX videos.
ABOUT DIVX VIDEO-ON-DEMAND: This DivX Certified® device must be registered in order to play purchased DivX Video-on-Demand (VOD) movies. To obtain your registration code, locate the DivX VOD section in your device setup menu. Go to vod.divx.com for more information on how to complete your registration.
Auto Power Off
Select whether to turn the power off automatically (On) or not (Off). When set to On, the power automatically turns off if no operation is performed for 30 minutes or more.
Load Default
Restore the settings to the factory Default.
4
Operation
Basic Operations
- Insert the disc by Pressing OPEN/CLOSE or connect the USB device to the USB port.
- Select the DVD/CD or USB function by pressing FUNCTION, DVD/CD or the USB button.
- Select a file (or track/title) you want to play by pressing ♦/♥/↔.

NOTE
If "Can't play this format" is displayed, select an appropriate file.
| To Do this | |
| Stop | Press ■ |
| Playback | Press ▶ |
| Pause | Press || |
| Frame-by-Frame playback | Press ▶▶ during PAUSE to move forward to the next frame or ◀◀ to return to the previous frame. ▶▶ to move forward can be used for DVD, VCD and DivX, but ◀◀ to return to the previous frame can only be used for DVD. |
| To Do this | |
| Skipping to the next/ previous chapter/ track/file | During playback, press ◀◀◀ or ▶▶▶ I to go to the next chapter/track or to return to the beginning of the current chapter/track. Press ◀◀◀ twice briefly to step back to the previous chapter/track. |
| Locating a point quickly by playing a file in fast forward or fast reverse | During playback, press ◀◀◀ or ▶▶▶ repeatedly to select the required scan speed.To return to normal speed, press PLAY. |
| Playing repeatedly or randomly | Press HOME MENU and select play mode while playing, or press REPEAT while playing, and the current title, chapter or track will be played back repeatedly or randomly.- Repeat play mode can be used for DVD, CD, VCD, DivX.- Random play mode can be used for DVD, CD, VCD. |
| Slowing down the playing speed | When either ◀◀◀ or ▶▶▶ is pressed and held down during PAUSE, it will become slow-motion playback or reverse slowmotion playback.When either ◀◀◀ or ▶▶▶ is pressed during slowmotion playback or reverse slow-motion playback, the playing speed can be changed.Slow-motion playback feature can be used for DVD, VCD and DivX.Reverse slow-motion playback feature can only be used for DVD. |
Other Operations
Displaying Disc Information on-screen DVD ACD VCD DivX
You can display various information about the disc loaded on-screen.
- Press DISPLAY to show various playback information. The displayed items differ depending on the disc type or playing status.
To display the DVD Menu DVD
When you play a DVD which contains several menus, you can select the menu you want using the Menu.
- Press MENU. The disc's menu appears.
- Select the menu by using ↗/↙/↙ ↗.
- Press ENTER to confirm.
To display the DVD Title DVD
When you play a DVD which contains several titles, you can select the title you want using the Menu.
- Press TOP MENU. The disc's title appears.
- Select the menu by pressing // .
- Press ENTER to confirm.
Selecting a subtitle language DVD DivX
During playback, press SUBTITLE repeatedly to select a desired subtitle language.
Switches Audio DVD ACD VCD
During playback, press AUDIO to the audio stream/channel.
Switches Angle DVD
During playback, press ANGLE to switch angle. When a multi-angle scene is playing, a icon appears on screen (this can be switched off if you prefer — see Display settings on page 25).
1.4 times speed playback DVD
The 1.4 speed allows you to watch the pictures and listen to the sound quicker than playing at a normal speed.
-
During playback, press ▶/□▶(▶▶) to play at 1.4 times speed. "X1.4 ▶▶" appears on the screen.
-
Press ▶ again to exit.
Last Scene Memory DVD
This unit memorizes the last scene from the last disc that is viewed. The last scene remains in memory even if you remove the disc from the player or switch off (Stand-by mode) the unit. If you load a disc that has the scene memorized, the scene is automatically recalled.

NOTE
- This unit may not memorize the last scene depending on the type of disc.
- This unit memorizes the last scene after pressing ■ during playback.
A-B Repeat DVD VCD ACD
The A-B Repeat function allows you to specify two points (A and B) within a track (CD, Video CD/Super VCD) or title (DVD) that form a loop which is played over and over.
- During playback, press either HOME MENU and select "Play Mode".
- Select "A-B Repeat".
- Press ENTER on "A (Start Point)" to set the loop start point.
- Press ENTER on "B (End Point)" to set the loop end point. After pressing ENTER, playback jumps back to the start point and plays the loop.
- To resume normal playback, select "Off".
Creating a program list
DVD ACD VCD
This feature lets you program the play order of titles/chapters/tracks on a disc.
- During playback, press HOME MENU and select "Play Mode".
- Select "Program" then select "Create/Edit" from the list of program options.
- Use ♦/♦/♦ → and ENTER to select a title, chapter or track for the current step in the program list.
- For a DVD disc, you can add a title or a chapter.
- For a CD or Video CD/Super VCD, select a track to add to the program list.
After pressing ENTER to select the title/chapter/track, the step number automatically moves down one.
-
Repeat step 3 to build up a program list. A program list can contain up to 24 steps.
-
You can insert steps by just highlighting the position where you want the new step to appear and entering a title/chapter/track number.
-
To delete a step, highlight it and press CLEAR.
-
To play the program list, press PLAY. Program play remains active until you turn off program play (see page 29), erase the program list, eject the disc or switch off.
Other functions available from the program menu
DVD ACD VCD
There are a number of other options in the program menu in addition to Create/Edit.
- Playback Start – Starts playback of a saved program list
- Playback Stop – Turns off program play, but does not erase the program list
- Program Delete – Erases the program list and turns off program play
Searching a disc
DVD ACD VCD DivX
You can search DVD discs by title or chapter number, or by time; CDs and Video CD/Super VCDs by track number or time; DivX by time.
- During playback, press either HOME MENU and select "Play Mode".
- Select "Search Mode". The search options that appear depend on the kind of disc loaded.
- Select a search mode.
- The disc must be playing in order to use time search.
- Use the number buttons to enter a title, chapter or track number, or a time.
- For a time search, enter the number of minutes and seconds into the currently playing title (DVD/DivX video) or track (CD/Video CD/Super VCD) you want playback to resume from.
- Press ENTER to start playback.
Viewing photo files as a slide show JPEG
This unit can play discs with photo files.
- Select the DVD/CD or USB function by pressing FUNCTION.
-
Press ♠/♦ to select a folder, and then press ENTER. A list of files in the folder appears. If you are in a file list and want to return to the previous folder list, use the ♠/♦ buttons on the remote to highlight □... and press ENTER.
-
If you want to view a particular file, press / to highlight a file and press ENTER or PLAY. While viewing a file, you can press STOP to move to the previous menu (JPEG menu).
About help menu for slide show
| Buttons Operation | |
| +/↓ | Rotates image 180 degrees. |
| ←/→ | Rotates image 90 degrees. |
| |◄◄/►►| | Moves to the next image in succession. |
| PAUSE | Pauses the slide show. |
| STOP or RETURN | Returns to file list display window. |
Listening to music during slide show JPEG
- Play after selecting either MP3 file or WMA file on the list display window.
- When the JPEG file is selected from the list window display, the JPEG file can be displayed while the music is being played.
Radio Operations
Be sure that FM aerial is connected. (Refer to the page 23)
Listening to the Radio
-
Press FM TUNER or FUNCTION until FM appears in the display window. The last received station is tuned in.
-
Scanning will start when either the ▶▶ or the ◀◀ button is pressed.
or Press ↑/↓ repeatedly.
- Adjust the volume by rotating VOLUME on the front panel or by pressing VOL + or VOL - on the remote control repeatedly.
Presetting the Radio Stations
You can preset 50 stations for FM. Before tuning, make sure that you have turned down the volume.
- Press FM TUNER or FUNCTION until FM appears in the display window. The last received station is tuned in.
- Select the desired frequency by using / .
- Press PROGRAM a preset number will flash in the display window.
- Press to select the preset number you want.
- Press PROGRAM. The station is stored.
- Repeat the steps 2 to 5 to store other stations.
- You can select the stored station by pressing .
Deleting all the saved stations
- Press and hold STOP for two seconds. "ERASE ALL" will flash up on the display window.
- Press STOP to erase all of the saved radio stations.
Improving poor FM reception
Press AUDIO on the remote control. This will change the tuner from stereo to mono and usually improve the reception.
Audio Settings
To display Audio Settings Menu
- Press HOME MENU to display "HOME MENU".
- Select "Audio Settings".
You can adjust the following settings.
Audio Settings parameters
The factory default settings are indicated in italic.
Sound Retriever (High/Low/Off)
- A WMA or MP3 file is played with high sound quality. This is only valid for files with the extension ".wma" or ".mp3".
- The effect depends on the file. Try different settings, and choose the one providing the best effect.
About Sound Retriever function
When audio data is removed during the compression process, sound quality often degrades. The Sound Retriever function automatically enhances compressed audio and restores CD quality sound.
Equalizer (Off/Rock/Pop/Live/Dance/Techno/Classic/Soft)
- Select according to the genre of music being played.
Surround (Off/5 Speaker Mode1/5 Speaker Mode2/Dolby PL II Movie/Dolby PL II Music)
- Select the Surround mode.
5 Speaker Mode1: The sound from the front speakers will also be output by the rear speakers.
5 Speaker Mode2: The same sound will be output from the 5 speakers other than the sub woofer.
* 5 Speaker Mode1 and 5 Speaker Mode2 are valid in both 2 channel audio source and 5.1 channel audio source.
Dolby PL II Movie/Dolby PL II Music: Dolby Pro Logic II enables you to play stereo source on 5.1-channel. Dolby PL II Movie and Dolby PL II Music are valid in 2 channel audio source.
- Surround setting can be changed directly by pressing SURROUND.
Night Mode (Off/On)
- Night Mode can be changed directly by pressing NIGHT.
• This makes loud sounds weaker and weak sounds louder. - This setting only affects Dolby Digital sound.
• The effect may be weak for some discs.

NOTE
- In some of surround modes, on some speakers, there's no sound or low sound. It depends on the mode of surround and the source of audio, it is not defective.
- You may need to reset the surround mode, after switching the input, sometimes even after the sound track changed.
Video Adjust
To display Video Adjust Menu
- Press DVD/CD or press FUNCTION several times to select "DVD/CD" functions.
- Press HOME MENU to display "HOME MENU".
- Select "Video Adjust".
You can adjust the following settings.
Video Adjust parameters
The factory default settings are indicated in italic.
Sharpness (Fine/Standard/Soft)
- Adjusts the picture's sharpness.
Brightness (-20 to +20)
- Adjusts the picture's brightness.
Contrast (-16 to +16)
- Adjusts the ratio of the brightness of the brightest and darkest portions of the picture.
Gamma (-3 to +3)
- Adjusts the look of the dark portions of the picture.
Hue (green 9 to red 9)
- Adjusts the balance between green and red.
Chroma Level (-9 to +9)
- Adjusts the density of the colors. This setting is effective for sources with many colors, such as cartoons.
Factory default settings for Brightness,
Contrast, Gamma, Hue and Chroma Level are set to 0.
Advanced Operations
Sleep Timer Setting
Press SLEEP one or more times to select delay time between 15 and 60 minutes, after the unit will turn off.
To cancel the sleep function, press SLEEP repeatedly until "SLEEP 15" appears, and then press SLEEP once again while "SLEEP 15" is displayed.

NOTE
Depending on the SLEEP timer setting, there may be a few minutes of discrepancy.
Dimmer
Press DIMMER once. The display changes among three levels of brightness. To cancel it, press DIMMER repeatedly until dim off.
Screen Saver
The screen saver appears when you leave the unit in Stop mode for about five minutes.
Turn off the sound temporarily
Press MUTE to mute your unit.
You can mute your unit, for example, to answer the telephone, the "MUTE" displayed in the display window.
Audio Sync
Sometimes Digital TV encounters a delay between picture and sound. You can improve it by setting the delay on the sound.
Press AUDIO SYNC and select delay time using ←/→.
Listening to music from your portable player or external device
The unit can be used to play the music from many types of portable player or external devices. (Refer to the page 22)
- Connect the portable player to the PORTABLE IN connector of the unit.
Or
Connect the external device to the AUX connector of the unit.
-
Turn the power on by pressing STANDBY/ON.
-
Select PORTABLE or AUX function by pressing FUNCTION, AUX, or PORTABLE IN button.
-
Turn the portable player or external device and start it playing.
Setting the TV system
If the picture of the disc being played is distorted, switch the TV system to the one used in your country or region.
-
Display "HOME MENU" by Pressing HOME MENU.
-
Press "9", "8", "7", "6".
Then TV system switches as shown below.
AUTO → NTSC
NTSC → PAL
PAL → AUTO
The default setting is AUTO.
| Types of discs/files | Format | Player Setting | ||
| NTSC PAL AUTO | ||||
| DVD-Video | NTSC NTSC PAL NTSC | |||
| DVD VR | PAL NTSC PAL PAL | |||
| Video CD | ||||
| DivX | ||||
| CD (R/RW) | — NTSC PAL | NTSC or PAL | ||
| WMA | ||||
| MP3 | ||||
| JPEG | ||||
| no disc | ||||
Copying files on to USB devices
JPEG DivX WMA MP3
Files stored on the discs can be copied on to the USB device through the player.
-
Switch to DVD/CD function. Press DVD/CD or press FUNCTION several times to select "DVD/CD" functions.
-
Display the Disc Navigator screen. Press MENU.
- Press STOP to stop playback if the file is being played.
- Select the file.
Use // to select, then press
- Start copying.
Use to select Yes, then press ENTER. The file copying process will appear on the screen.

NOTE
- Do not operate any buttons during the file copying process.
- A folder named "PIONEER" is automatically created on the USB device. The copied files are stored in this folder.
Recording audio CD tracks on to USB devices
The tracks can be recorded from the audio CD on to the USB device through the player.
- Load the audio CD.
Press STOP to stop playback if it starts automatically. -
Press HOME MENU.
Select "CD -> USB Rec" or press USB REC. -
Select "Select Track".
Use ↑/↓ to select, then press ENTER or →.
- Select the type of recording.
Use ↑/↓ to select, then press ENTER or →.
Types of recording
- Individual: Select 1 track at a time.
-
Select All: Select all the tracks.
• All Clear: Deselect all the tracks. -
Select Bitrate (transfer rate).
Use // to select, then press ENTER.
- Select 128 kbps, 192 kbps or 320 kbps.
- Start recording.
Use // to select "Start", then press ENTER.

NOTE
- The audio signals are converted into MP3 format for output.
- CD -> USB Rec can only be selected when the audio CD is stopped.
- When recording is completed, a folder named "PIONEER" is automatically created on the USB device. The recorded tracks are stored in this folder.
- DTS CD and Copy Protection CD cannot be converted.
The making of unauthorized copies of copy-protected material, including computer programs, files, broadcasts and sound recordings, may be an infringement of copyrights and constitute a criminal offense. This equipment should not be used for such purposes.
Be responsible Respect copyrights
Karaoke
Using karaoke
Be sure to adjust the volume to the minimum before connecting the microphone, otherwise it may result in damage to the speakers.
- Adjust the microphone volume to minimum.
Turn MIC VOL on the front panel counterclockwise (to MIN). - Connect the microphone.
Connect the microphone to the MIC terminal on the front panel (see page 12). - Display the Karaoke Settings screen. Press KARAOKE.
- Select "Karaoke".
Use / to select, then press ENTER or . - Activate Karaoke.
Use ♠/▼to select "On", then press ENTER.
Karaoke function become valid. - Load the disc and start playback.
Adjust the microphone volume. Turn MIC VOL on the front panel clockwise (towards MAX).

NOTE
KARAOKE function cannot be used for FM TUNER, AUX, or Portable functions.
To adjust the echo
Adjust by turning the ECHO VOL on the front panel.
- ECHO VOL is effective for both MIC 1 and MIC 2.
To adjust the key
Press either the KEY b or the KEY # on the remote control.
• Key value will be displayed on the display window and monitor.
• Factory default value is 0.
- The last adjusted value will be retained.
- Key can be adjusted between -10 to +10.

NOTE
When inserting the MIC terminal, support the top of the unit with your hand to prevent it from moving.
Extra functions for karaoke
Scoring your karaoke DVD VCD
- Display the Karaoke settings screen. Press KARAOKE.
- Select "Karaoke Score". Use ↑/↓ to select, then press ENTER or →.
- Activate karaoke scoring. Use ↑/↓ to select "On", then press ENTER.

NOTE
- To cancel scoring, select "Off" on the Karaoke Score screen.
- Karaoke scoring can be activated before or during playback.
Recording your karaoke tracks on to USB devices VCD
You can record your karaoke tracks on to a USB device through the player.

NOTE
- Use this function after adjusting the microphone volume and the echo level using the operations on the left column.
-
Depending on the USB device used, this function may not operate normally.
-
Display the Karaoke Settings screen during the playback.
2 Select "Karaoke Rec". Use ↑/↓ to select, then press ENTER or →. - Start Karaoke recording. Use ←/→ to select "Yes", then press ENTER. When recording is completed, a folder named "KARAOKE" is automatically created on the USB device. The recorded tracks are stored in this folder.
5 Maintenance
Notes on Discs
Handling Discs

natural_image
Two diagrams showing a hand pressing on a circular object and a cross symbol on a ring (no text or labels)Never stick paper or tape on the disc.
Storing Discs
After playing, store the disc in its case. Do not expose the disc to direct sunlight or sources of heat and never leave it in a parked car exposed to direct sunlight.
Cleaning Discs
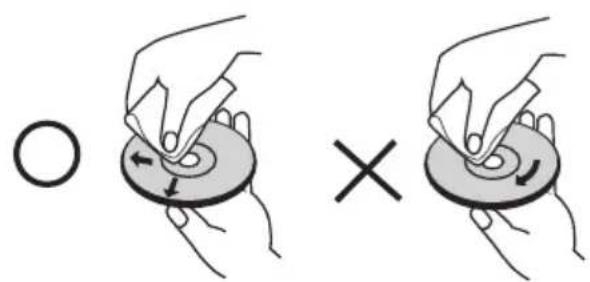
Do not use strong solvents such as alcohol, benzine, thinner, commercially available cleaners, or anti-static spray intended for older vinyl records.
Handling the Unit
When shipping the unit
Please save the original shipping carton and packing materials. If you need to ship the unit, for maximum protection, re-pack the unit as it was originally packed at the factory.
Keeping the exterior surfaces clean
- Do not use volatile liquids such as insecticide spray near the unit.
- Wiping with strong pressure may damage the surface. Do not leave rubber or plastic products in contact with the unit for a long period of time.
Cleaning the unit
To clean the player, use a soft, dry cloth. If the surfaces are extremely dirty, use a soft cloth lightly moistened with a mild detergent solution. Do not use strong solvents such as alcohol, benzine, or thinner, as these might damage the surface of the unit.
Maintaining the Unit
The unit is a high-tech, precision device. If the optical pick-up lens and disc drive parts are dirty or worn, the picture quality could be diminished. For details, please contact your nearest authorized service centre.
6
Troubleshooting
| PROBLEM CAUSE | CORRECTION | |
| No Picture | The TV is not set to receive the DVD signal. | Select the appropriate video input mode on the TV so the picture from the DVD Receiver appears on the TV screen. |
| The video cables are not connected securely. | Connect the video cables securely to both the TV and DVD Receiver. | |
| There is little or no sound | The audio cables are not connected to the DVD Receiver securely. | Connect the audio cables into the connection terminals correctly. |
| Speaker cables are not connected correctly. Connect speaker cables correctly. | ||
| The DVD picture quality is poor | The disc is dirty. Clean the disc using a soft cloth with outward strokes. | |
| A DVD/CD will not play | An unplayable disc is inserted. Insert a playable disc (see page 8 for details). | |
| The disc is inserted upside down. | Place the disc with the label or printed side facing upwards. | |
| Noise heard while a DVD or CD is playing | The disc is dirty. Clean the disc using a soft cloth with outward strokes. | |
| The DVD receiver is located too close to the TV, causing feedback. | Move DVD receiver and audio components further away from your TV. | |
| Radio stations can't be tuned in properly | The antenna is positioned or connected poorly. | Check the antenna connection and adjust its position. |
| Attach an external aerial if necessary. | ||
| The signal strength of the radio station is too weak. | Tune to the station manually. | |
| No stations have been preset or preset stations have been cleared (when tuning by scanning preset channels). | Preset some radio stations, see page 30 for details. | |
| The remote control doesn't work well/at all | The remote is not pointed directly at the unit. Point the remote directly at the unit. | |
| The remote is too far from the unit. Use the remote within 7 m of the DVD receiver. | ||
| There is an obstacle in the path between the remote control and the unit. | Remove the obstacle. | |
| The battery in the remote control is flat. Replace the battery with new ones. | ||
| The DVD receiver's power turns off automatically | The Auto Power Off is set to On. | If Auto Power Off is set to On, this unit will automatically turn off if no operation is performed for 30 minutes or more. Set Auto Power Off to Off to turn this feature off (see page 25). |
| No sound from the microphone | KARAOKE function is not valid. Validate KARAOKE function (see page 36). | |
| HDMI output does not display TV image | TV is not compatible with the HDMI Resolution. | Press RESOLUTION on the remote control and change the HDMI Resolution. |
| Audio volume goes down during playback | The function that lowers the volume to prevent malfunction has automatically activated to turn the volume down as continuing to play at high volume will lead to the unit malfunctioning. | It is not a malfunction. Adjust the volume on the unit or the remote control to recover the volume. However, continuing to play at high volume may force the same function to activate again. |
7 Appendix
Operating the TV with the player's remote control
When the manufacturer code for your brand of TV is set on the player's remote control, the TV can be operated using the player's remote control.

CAUTION
- For some models it may not be possible to operate the TV with the player's remote control, even for TVs of brands listed on the manufacturer code list.
- The setting may be restored to the default after the batteries are replaced. If this happens, reset it.

- Input the 2-digit manufacturer code. Press the number buttons (0 to 9) to input the code while pressing TV CONTROL ⏻.

NOTE
• The factory default setting is 00 (PIONEER).
- If you make a mistake when inputting the code, release TV CONTROL ⏻ then start over from the beginning.
- When there are multiple codes for a manufacturer, try inputting them in the indicated order until the TV can be operated.
- Check that the TV can be operated.
Operate the TV using TV CONTROL.
- Press to turn the TV's power on and off.
INPUT SELECT – Press to switch the TV's input.
CH +/- - Press to select the TV channel.
VOL +/- - Press to adjust the volume.
TV Preset code list
Manufacturer Code(s)
PIONEER 00, 31, 32, 07, 36, 42, 51, 22
ACURA 44
ADMIRAL 31
AIWA 60
AKAI 32, 35, 42
AKURA 41
ALBA 07, 39, 41, 44
AMSTRAD 42, 44, 47
ANITECH 44
ASA 45
ASUKA 41
AUDIOGONIC 07, 36
BASIC LINE 41, 44
BAUR 31, 07, 42
BEKO 38
BEON 07
BLAUPUNKT 31
BLUE SKY 41
BLUE STAR 18
BPL 18
BRANDT 36
BTC 41
BUSH 07, 41, 42, 44, 47, 56
CASCADE 44
CATHAY 07
CENTURION 07
CGB 42
CIMLINE 44
CLARIVOX 07
CLATRONIC 38
CONDOR 38
CONTEC 44
CROSLEY 32
CROWN 38, 44
CRYSTAL 42
CYBERTRON 41
DAEWOO 07, 44, 56
DAINICHI 41
DANSAI 07
DAYTON 44
DECCA 07, 48
DIXI 07, 44
DUMONT 53
ELIN 07
ELITE 41
ELTA 44
FUJITSU 48
FUNAI 40, 46, 58
GBC 32, 42
GE 00, 01, 08, 07, 10, 11, 17, 02, 28, 18
GEC 07, 34, 48
GELOSO 32, 44
GENERAL 29
GENEXXA 31, 41
GOLDSTAR 10, 23, 21, 02, 07, 50
GOODMANS 07, 39, 47, 48, 56
GORENJE 38
GPM 41
GRAETZ 31, 42
GRANADA 07, 35, 42, 43, 48
GRADIENTE 30, 57
GRANDIN 18
GRUNDIG 31, 53
HANSEATIC 07, 42
HCM 18,44
HINARI 07, 41, 44
HISAWA 18
HITACHI 31, 33, 34, 36, 42, 43, 54, 06, 10, 24, 25, 18
HUANYU 56
HYPSON 07, 18, 46
ICE 46, 47
IMPERIAL 38, 42
INDIANA 07
INGELEN 31
INTERFUNK 31, 32, 07, 42
INTERVISION 46, 49
ISUKAI 41
ITC 42
ITT 31, 32, 42
JEC 05
JVC 13, 23
KAISUI 18, 41, 44
KAPSCH 31
KENDO 42
KENNEDY 32, 42
KORPEL 07
KOYODA 44
LEYCO 07, 40, 46, 48
LIESENK&TTER 07
LOEWE 07
LUXOR 32, 42, 43
M-ELECTRONIC 31, 44, 45, 54, 56, 07, 36, 51
MAGNADYNE 32, 49
MAGNAFON 49
MAGNAVOX 07, 10, 03, 12, 29
MANESTH 39, 46
MARANTZ 07
MARK 07
MATSUI 07, 39, 40, 42, 44, 47, 48
MCMICHAEL 34
MEDIATOR 07
MEMOREX 44
METZ 31
MINERVA 31, 53
MITSUBISHI 09, 10, 02, 21, 31
MULTITECH 44, 49
NEC 59
NECKERMANN 31, 07
NEI 07, 42
NIKKAI 05, 07, 41, 46, 48
NOBLIKO 49
NOKIA 32, 42, 52
NORDMENDE 32, 36, 51, 52
OCEANIC 31, 32, 42
ORION 32, 07, 39, 40
OSAKI 41, 46, 48
OSO 41
OSUME 48
OTTO VERSAND 31, 32, 07. 42
PALLADIUM 38
PANAMA 46
PANASONIC 31, 07, 08, 42, 22
PATHO CINEMA 42
PAUSA 44
PHILCO 32, 42 03
PHILIPS 31, 07, 34, 56, 68
PHOENIX 32
PHONOLA 07
PROFEX 42, 44
PROTECH 07, 42, 44, 46, 49
QUELLE 31, 32, 07, 42, 45, 53
R-LINE 07
RADIOLA 07
RADIOSHACK 10, 23, 21, 02
RBM 53
RCA 01, 10, 15, 16, 17, 18, 61, 62, 09
REDIFFUSION 32, 42
REX 31,46
ROADSTAR 41, 44, 46
SABA 31, 36, 42, 51
SAISHO 39, 44, 46
SALORA 31, 32, 42, 43
SAMBERS 49
SAMSUNG 07, 38, 44, 46, 69, 70
SANYO 35, 45, 48, 21, 14, 91
SBR 07, 34
SCHAUB LORENZ 42
SHARP 02, 19, 27, 67, 90
SIAREM 32, 49
SIEMENS 31
SINUDYNE 32, 39, 40, 49
SKANTIC 43
SOLAVOX 31
SONOKO 07, 44
SONOLOR 31.35
SONTEC 07
SONY 04
SOUNDWAVE 07
STANDARD 41, 44
STERN 31
SUSUMU 41
SYSLINE 07
TANDY 31, 41, 48
TASHIKO 34
TATUNG 07.48
TEC 42
TELEAVIA 36
TELEFUNKEN 36, 37, 52
TELETECH 44
TENSAI 40. 41
THOMSON 36, 51, 52, 63
THORN 31, 07, 42, 45, 48
TOMASHI 18
TOSHIBA 05, 02, 26, 21, 53
TOWADA 42
ULTRAVOX 32, 42, 49
UNIDEN 92
UNIVERSUM 31, 07, 38, 42, 45, 46, 54
VESTEL 07
VICTOR 13
VOXSON 31
WALTHAM 43
WATSON 07
WATT RADIO 32, 42, 49
WHITE WESTINGHOUSE 07
YOKO 07, 42, 46
ZENITH 03, 20
Language Codes
Use this list to input your desired language for the following initial settings: Disc Audio, Disc Subtitle, Disc Menu.
Language names (codes) an input codes
| Japanese (ja), 1001 | Bhutani (dz), 0426 | Kirghiz (ky), 1125 | Sinhalese (si), 1909 |
| English (en), 0514 | Esperanto (eo), 0515 | Latin (la), 1201 | Slovak (sk), 1911 |
| French (fr), 0618 | Estonian (et), 0520 | Lingala (ln), 1214 | Slovenian (sl), 1912 |
| German (de), 0405 | Basque (eu), 0521 | Laothian (lo), 1215 | Samoan (sm), 1913 |
| Italian (it), 0920 | Persian (fa), 0601 | Lithuanian (lt), 1220 | Shona (sn), 1914 |
| Spanish (es), 0519 | Finnish (fi), 0609 | Latvian (lv), 1222 | Somali (so), 1915 |
| Chinese (zh), 2608 | Fiji (fj), 0610 | Malagasy (mg), 1307 | Albanian (sq), 1917 |
| Dutch (nl), 1412 | Faroese (fo), 0615 | Maori (mi), 1309 | Serbian (sr), 1918 |
| Portuguese (pt), 1620 | Frisian (fy), 0625 | Macedonian (mk), 1311 | Siswati (ss), 1919 |
| Swedish (sv), 1922 | Irish (ga), 0701 | Malayalam (ml), 1312 | Sesotho (st), 1920 |
| Russian (ru), 1821 | Scots-Gaelic (gd), 0704 | Mongolian (mn), 1314 | Sundanese (su), 1921 |
| Korean (ko), 1115 | Galician (gl), 0712 | Moldavian (mo), 1315 | Swahili (sw), 1923 |
| Greek (el), 0512 | Guarani (gn), 0714 | Marathi (mr), 1318 | Tamil (ta), 2001 |
| Afar (aa), 0101 | Gujarati (gu), 0721 | Malay (ms), 1319 | Telugu (te), 2005 |
| Abkhazian (ab), 0102 | Hausa (ha), 0801 | Maltese (mt), 1320 | Tajik (tg), 2007 |
| Afrikaans (af), 0106 | Hindi (hi), 0809 | Burmese (my), 1325 | Thai (th), 2008 |
| Amharic (am), 0113 | Croatian (hr), 0818 | Nauru (na), 1401 | Tigrinya (ti), 2009 |
| Arabic (ar), 0118 | Hungarian (hu), 0821 | Nepali (ne), 1405 | Turkmen (tk), 2011 |
| Assamese (as), 0119 | Armenian (hy), 0825 | Norwegian (no), 1415 | Tagalog (tl), 2012 |
| Aymara (ay), 0125 | Interlingua (ia), 0901 | Occitan (oc), 1503 | Setswana (tn), 2014 |
| Azerbaijani (az), 0126 | Interlingue (ie), 0905 | Oromo (om), 1513 | Tonga (to), 2015 |
| Bashkir (ba), 0201 | Inupiak (ik), 0911 | Oriya (or), 1518 | Turkish (tr), 2018 |
| Byelorussian (be), 0205 | Indonesian (in), 0914 | Panjabi (pa), 1601 | Tsonga (ts), 2019 |
| Bulgarian (bg), 0207 | Icelandic (is), 0919 | Polish (pl), 1612 | Tatar (tt), 2020 |
| Bihari (bh), 0208 | Hebrew (iw), 0923 | Pashto, Pushto (ps), 1619 | Twi (tw), 2023 |
| Bislama (bi), 0209 | Yiddish (ji), 1009 | Quechua (qu), 1721 | Ukrainian (uk), 2111 |
| Bengali (bn), 0214 | Javanese (jw), 1023 | Rhaeto-Romance (rm), 1813 | Urdu (ur), 2118 |
| Tibetan (bo), 0215 | Georgian (ka), 1101 | Kirundi (rn), 1814 | Uzbek (uz), 2126 |
| Breton (br), 0218 | Kazakh (kk), 1111 | Romanian (ro), 1815 | Vietnamese (vi), 2209 |
| Catalan (ca), 0301 | Greenlandic (kl), 1112 | Kinyarwanda (rw), 1823 | Volapük (vo), 2215 |
| Corsican (co), 0315 | Cambodian (km), 1113 | Sanskrit (sa), 1901 | Wolof (wo), 2315 |
| Czech (cs), 0319 | Kannada (kn), 1114 | Sindhi (sd), 1904 | Xhosa (xh), 2408 |
| Welsh (cy), 0325 | Kashmiri (ks), 1119 | Sangho (sg), 1907 | Yoruba (yo), 2515 |
| Danish (da), 0401 | Kurdish (ku), 1121 | Serbo-Croatian (sh), 1908 | Zulu (zu), 2621 |
Area Codes
Choose a area code from this list.
Country/Area name, Input codes and Country/Area code
| United States, 2119, us | Switzerland, 0308, ch | Pakistan, 1611, pk |
| Argentina, 0118, ar | Sweden, 1905, se | Philippines, 1608, ph |
| United Kingdom, 0702, gb | Spain, 0519, es | Finland, 0609, fi |
| Italy, 0920, it | Thailand, 2008, th | Mexico, 1324, mx |
| India, 0914, in | Taiwan, 2023, tw | Brazil, 0218, br |
| Indonesia, 0904, id | China, 0314, cn | France, 0618, fr |
| Australia, 0121, au | Chile, 0312, cl | Belgium, 0205, be |
| Austria, 0120, at | Denmark, 0411, dk | Portugal, 1620, pt |
| Netherlands, 1412, nl | Germany, 0405, de | Hong Kong, 0811, hk |
| Canada, 0301, ca | Japan, 1016, jp | Malaysia, 1325, my |
| Korea, Republic of, 1118, kr | New Zealand, 1426, nz | |
| Singapore, 1907, sg | Norway, 1415, no |
Trademarks and Licences
HDMI
HDMI, the HDMI Logo, and High-Definition Multimedia Interface are trademarks or registered trademarks of HDMI Licensing LLC in the United States and other countries.

DVD is a trademark of DVD Format/Logo Licensing Corporation.
Manufactured under license from Dolby Laboratories. "Dolby", "Pro Logic", and the double-D symbol are trademarks of Dolby Laboratories.
DIVX™
DivX®, DivX Certified® and associated logos are trademarks of Rovi Corporation or its subsidiaries and are used under license.
This product includes technology owned by Microsoft Corporation and cannot be used or distributed without a license from Microsoft Licensing, Inc.

Manufactured under license under U.S. Patent Nos: 5,956,674; 5,974,380; 6,487,535 & other U.S. and worldwide patents issued & pending. DTS, the Symbol, & DTS and the Symbol together are registered trademarks & DTS Digital Surround and the DTS logos are trademarks of DTS, Inc. Product includes software. © DTS, Inc. All Rights Reserved.
Specifications (HTZ-421DVD)
General
• Power requirements: AC 220 V to 240 V, 50 Hz/60 Hz
• Power consumption: 120 W
In Standby mode: Less than 0.5 W
• Dimensions (W x H x D): 360 mm x 64 mm x 351 mm
• Net Weight (Approx.): 2.8 kg
• Operating temperature: 5 °C to 35 °C
• Operating humidity: 5 % to 85 %
- Bus Power supply (USB): DC 5 V = 500 mA
Inputs/Outputs
• VIDEO OUTPUT:
1.0 V (p-p), 75 Ω, sync negative, RCA jack x 1
- COMPONENT VIDEO OUT:
(Y) 1.0 V (p-p), 75 Ω, sync negative, RCA jack x 1, (Pb)/(Pr) 0.7 V (p-p), 75 Ω, RCA jack x 2
• HDMI OUT (video/audio): 19 pin (HDMI standard, Type A)
- PORTABLE IN:
0.5 Vrms (3.5 mm stereo jack)
• MIC INPUT: Mic jack 2
- USB: 4 pin A Type
Tuner
• FM Tuning Range: 87.5 MHz to 108.0 MHz
Amplifier
• Power output, (RMS), THD 30 %
Front 125 W x 2 (6 Ω)
Centre 250 W (3 Ω)
Surround 125 W x 2 (6 Ω)
Sub-Woofer 250 W (3 Ω)
System
• Lase Semiconductor laser
• Signal system:
Standard PAL/NTSC colour TV system
Speakers
-
Front/Surround speaker (Left/Right) Type: 1 Way
Impedance Rated: 6 Ω
Net Dimensions
(W x H x D): 95 mm x 80 mm x 90 mm
Net Weight: 0.33 kg -
Centre speaker
Type: 1 Way
Impedance Rated: 3 Ω
Net Dimensions
(W × H × D): 95 mm × 80 mm × 90 mm
Net Weight: 0.4 kg
- Subwoofer
Type: 1 Way
Impedance Rated: 3 Ω
Net Dimensions
(W × H × D): 200 mm × 340 mm × 270 mm
Net Weight: 3.4 kg
Specifications (HTZ-221DVD)
General
• Power requirements: AC 110 V to 240 V, 50 Hz/60 Hz
• Power consumption: 95 W
In Standby mode: Less than 0.5 W
• Dimensions (W x H x D): 360 mm x 64 mm x 351 mm
• Net Weight (Approx.): 2.7 kg
• Operating temperature: 5 °C to 35 °C
• Operating humidity: 5 % to 85 %
- Bus Power supply (USB): DC 5 V = 500 mA
Inputs/Outputs
• VIDEO OUTPUT:
1.0 V (p-p), 75 Ω, sync negative, RCA jack x 1
- COMPONENT VIDEO OUT:
(Y) 1.0 V (p-p), 75 Ω, sync negative, RCA jack x 1, (Pb)/(Pr) 0.7 V (p-p), 75 Ω, RCA jack x 2
• HDMI OUT (video/audio): 19 pin (HDMI standard, Type A)
- PORTABLE IN:
0.5 Vrms (3.5 mm stereo jack)
• MIC INPUT: Mic jack 2
- USB: 4 pin A Type
Tuner
• FM Tuning Range: 87.5 MHz to 108.0 MHz
Amplifier
• Power output, (RMS), THD 30%
Front 75 W x 2 (4 Ω)
Centre 150 W (8 Ω)
Surround 75 W x 2 (4 Ω)
Sub-Woofer 150 W (8 Ω)
System
• Laser Semiconductor laser
• Signal system:
Standard PAL/NTSC colour TV system
Speakers
-
Front/Surround speaker (Left/Right) Type: 1 Way
Impedance Rated: 4 Ω
Net Dimensions
(W x H x D): 95 mm x 80 mm x 90 mm
Net Weight: 0.33 kg -
Centre speaker
Type: 1 Way
Impedance Rated: 8 Ω
Net Dimensions
(W x H x D): 95 mm x 80 mm x 90 mm
Net Weight: 0.36 kg
- Subwoofer
Type: 1 Way
Impedance Rated: 8 Ω
Net Dimensions
(W × H × D): 200 mm × 340 mm × 270 mm
Net Weight: 3.4 kg
natural_image
Simple line drawing of a ribbon cable with two connectors (no text or symbols)VIDEO cable (1)
natural_image
Black rectangular electronic component with grid pattern, no visible text or symbolsnatural_image
Simple line drawing of two cylindrical batteries with star-shaped markings (no text or symbols)Pilas secas AAA/R03 (2)

natural_image
Simple line drawing of a cable with two connectors (no text or symbols)Antena FM (1)

natural_image
Five identical square panels arranged in a triangular pattern, each with circular cutouts (no text or symbols)Apoyos antideslizantes (5)

natural_image
Simple line drawing of a coiled cable or wire with a terminal connector (no text or symbols)natural_image
Illustration of five screws arranged in a row (no text or symbols)ADVERTENCIA
Indicates special notes and operating features.

PRECAUCIÓN
© Altavoz surround derecho (R):

Nota
Sound Retriever (High/Low/Off)
Sharpness (Fine/Standard/Soft)
Brightness (-20 to +20)
Hue (green 9 to red 9)
natural_image
Two diagrams showing a hand pressing on a circular object and a cross symbol on a ring (no text or labels)PIONEER 00, 31, 32, 07, 36, 42, 51, 22
ACURA 44
ADMIRAL 31
AIWA 60
AKAI 32, 35, 42
AKURA 41
ALBA 07, 39, 41, 44
AMSTRAD 42, 44, 47
ANITECH 44
ASA 45
ASUKA 41
AUDIOGONIC 07, 36
BASIC LINE 41, 44
BAUR 31, 07, 42
BEKO 38
BEON 07
BLAUPUNKT 31
BLUE SKY 41
BLUE STAR 18
BPL 18
BRANDT 36
BTC 41
BUSH 07, 41, 42, 44, 47, 56
CASCADE 44
CATHAY 07
CENTURION 07
CGB 42
CIMLINE 44
CLARIVOX 07
CLATRONIC 38
CONDOR 38
CONTEC 44
CROSLEY 32
CROWN 38, 44
CRYSTAL 42
CYBERTRON 41
DAEWOO 07, 44, 56
DAINICHI 41
DANSAI 07
DAYTON 44
DECCA 07, 48
DIXI 07, 44
DUMONT 53
ELIN 07
ELITE 41
ELTA 44
FUJITSU 48
FUNAI 40, 46, 58
GBC 32, 42
GE 00, 01, 08, 07, 10, 11, 17, 02, 28, 18
GEC 07, 34, 48
GELOSO 32, 44
GENERAL 29
GENEXXA 31, 41
GOLDSTAR 10, 23, 21, 02, 07, 50
GOODMANS 07, 39, 47, 48, 56
GORENJE 38
GPM 41
GRAETZ 31, 42
GRANADA 07, 35, 42, 43, 48
GRADIENTE 30, 57
GRANDIN 18
GRUNDIG 31, 53
HANSEATIC 07, 42
HCM 18,44
HINARI 07, 41, 44
HISAWA 18
HITACHI 31, 33, 34, 36, 42, 43, 54, 06, 10, 24, 25, 18
HUANYU 56
HYPSON 07, 18, 46
ICE 46, 47
IMPERIAL 38.42
INDIANA 07
INGELEN 31
INTERFUNK 31, 32, 07, 42
INTERVISION 46, 49
ISUKAI 41
ITC 42
ITT 31, 32, 42
JEC 05
JVC 13, 23
KAISUI 18, 41, 44
KAPSCH 31
KENDO 42
KENNEDY 32, 42
KORPEL 07
KOYODA 44
LEYCO 07, 40, 46, 48
LIESENK&TTER 07
LOEWE 07
LUXOR 32, 42, 43
M-ELECTRONIC 31, 44, 45, 54, 56, 07, 36, 51
MAGNADYNE 32, 49
MAGNAFON 49
MAGNAVOX 07, 10, 03, 12, 29
MANESTH 39, 46
MARANTZ 07
MARK 07
MATSUI 07, 39, 40, 42, 44, 47, 48
MCMICHAEL 34
MEDIATOR 07
MEMOREX 44
METZ 31
MINERVA 31, 53
MITSUBISHI 09, 10, 02, 21, 31
MULTITECH 44, 49
NEC 59
NECKERMANN 31, 07
NEI 07, 42
NIKKAI 05, 07, 41, 46, 48
NOBLIKO 49
NOKIA 32, 42, 52
NORDMENDE 32, 36, 51, 52
OCEANIC 31, 32, 42
ORION 32, 07, 39, 40
OSAKI 41, 46, 48
OSO 41
OSUME 48
OTTO VERSAND 31, 32, 07, 42
PALLADIUM 38
PANAMA 46
PANASONIC 31, 07, 08, 42, 22
PATHO CINEMA 42
PAUSA 44
PHILCO 32, 42 03
PHILIPS 31, 07, 34, 56, 68
PHOENIX 32
PHONOLA 07
PROFEX 42, 44
PROTECH 07, 42, 44, 46, 49
QUELLE 31, 32, 07, 42, 45, 53
R-LINE 07
RADIOLA 07
RADIOSHACK 10, 23, 21, 02
RBM 53
RCA 01, 10, 15, 16, 17, 18, 61, 62, 09
REDIFFUSION 32, 42
REX 31, 46
ROADSTAR 41, 44, 46
SABA 31, 36, 42, 51
SAISHO 39, 44, 46
SALORA 31, 32, 42, 43
SAMBERS 49
SAMSUNG 07, 38, 44, 46, 69, 70
SANYO 35, 45, 48, 21, 14, 91
SBR 07, 34
SCHAUB LORENZ 42
SHARP 02, 19, 27, 67, 90
SIAREM 32, 49
SIEMENS 31
SINUDYNE 32, 39, 40, 49
SKANTIC 43
SOLAVOX 31
SONOKO 07, 44
SONOLOR 31.35
SONTEC 07
SONY 04
SOUNDWAVE 07
STANDARD 41, 44
STERN 31
SUSUMU 41
SYSLINE 07
TANDY 31, 41, 48
TASHIKO 34
TATUNG 07, 48
TEC 42
TELEAVIA 36
TELEFUNKEN 36, 37, 52
TELETECH 44
TENSAI 40, 41
THOMSON 36, 51, 52, 63
THORN 31, 07, 42, 45, 48
TOMASHI 18
TOSHIBA 05, 02, 26, 21, 53
TOWADA 42
ULTRAVOX 32, 42, 49
UNIDEN 92
UNIVERSUM 31, 07, 38, 42, 45, 46, 54
VESTEL 07
VICTOR 13
VOXSON 31
WALTHAM 43
WATSON 07
WATT RADIO 32, 42, 49
WHITE WESTINGHOUSE 07
YOKO 07, 42, 46
ZENITH 03, 20
Códigos de idioma
© 2012 PIONEER CORPORATION.
All rights reserved.
PIONEER CORPORATION
1-1, Shin-ogura, Saiwai-ku, Kawasaki-shi, Kanagawa 212-0031, Japan
PIONEER ELECTRONICS (USA) INC.
P.O. BOX 1540, Long Beach, California 90801-1540, U.S.A. TEL: (800) 421-1404
PIONEER ELECTRONICS OF CANADA, INC.
340 Ferrier Street, Unit 2, Markham, Ontario L3R 2Z5, Canada TEL: 1-877-283-5901, 905-479-4411
PIONEER EUROPE NV
Haven 1087, Keetberglaan 1, B-9120 Melsele, Belgium TEL: 03/570.05.11
PIONEER ELECTRONICS ASIACENTRE PTE. LTD.
253 Alexandra Road, #04-01, Singapore 159936 TEL: 65-6472-7555
PIONEER ELECTRONICS AUSTRALIA PTY. LTD.
5 Arco Lane, Heatherton, Victoria, 3202, Australia, TEL: (03) 9586-6300
PIONEER ELECTRONICS DE MEXICO S.A. DE C.V.
Blvd.Manuel Avila Camacho 138 10 piso Col.Lomas de Chapultepec, Mexico, D.F. 11000 TEL: 55-9178-4270
K002_B3_En
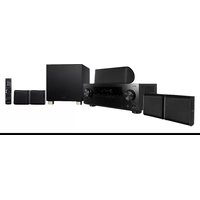

- IMPORTANT
- CAUTION
- CAUTION:
- WARNING
- VENTILATION CAUTION
- Operating Environment
- POWER-CORD CAUTION
- Safe way to remove the battery or the battery from the equipment:
- Copyrights
- Notes on Copyrights
- 1
- Safety Information
- 2
- Preparation
- 3
- Installation
- 4
- Operation
- Maintenance
- Troubleshooting
- Appendix
- Unique Features
- Portable In
- USB Direct Recording
- Discs that cannot be played
- Supplied Accessories
- Symbol Used in this Manual
- NOTE
- Regional Codes
- playable files
- Supported video file formats DivX
- Displaying external subtitle files
- Supported image file formats JPEG
- Supported audio file formats
- Windows Media™ Audio (WMA)
- MPEG-1 Audio Layer 3 (MP3)
- Compatible USB Devices
- USB device requirement
- Front panel
- Rear panel
- Remote Control
- Controlling the TV
- Put the battery into the remote control
- Installation
- Assemble the speakers
- Speaker Setup
- Wall mounting
- Before mounting
- Additional notes on speaker
- Precautions:
- Positioning the System
- Connections to Your TV
- Component Video Connection
- HDMI OUT Connection
- TIP
- Video Connection
- Optional Equipment Connection
- AUX IN Connection
- PORTABLE IN Connection
- USB Connection
- Removing the USB Device from the unit
- Antenna Connection
- Adjust the Initial Settings
- To display and exit the Initial Settings Menu
- Initial Settings Menu
- Digital Audio Out settings
- HDMI Out
- Video Output settings
- TV Screen
- Component Out
- HDMI Resolution
- HDMI Color
- Deep Color
- Language settings
- Audio Language
- Subtitle Language
- DVD Menu Lang.
- Subtitle Display
- Display settings
- OSD Language
- Angle Indicator
- On Screen Display
- Options settings
- Parental Lock
- DivX VOD
- Auto Power Off
- Load Default
- Basic Operations
- Other Operations
- Displaying Disc Information on-screen DVD ACD VCD DivX
- To display the DVD Menu DVD
- To display the DVD Title DVD
- Selecting a subtitle language DVD DivX
- Switches Audio DVD ACD VCD
- Switches Angle DVD
- times speed playback DVD
- Last Scene Memory DVD
- A-B Repeat DVD VCD ACD
- Creating a program list
- DVD ACD VCD
- Other functions available from the program menu
- Searching a disc
- DVD ACD VCD DivX
- Viewing photo files as a slide show JPEG
- Listening to music during slide show JPEG
- Radio Operations
- Listening to the Radio
- Presetting the Radio Stations
- Deleting all the saved stations
- Improving poor FM reception
- Audio Settings
- To display Audio Settings Menu
- Audio Settings parameters
- Sound Retriever (High/Low/Off)
- About Sound Retriever function
- Equalizer (Off/Rock/Pop/Live/Dance/Techno/Classic/Soft)
- Surround (Off/5 Speaker Mode1/5 Speaker Mode2/Dolby PL II Movie/Dolby PL II Music)
- Night Mode (Off/On)
- Video Adjust
- To display Video Adjust Menu
- Video Adjust parameters
- Sharpness (Fine/Standard/Soft)
- Brightness (-20 to +20)
- Contrast (-16 to +16)
- Gamma (-3 to +3)
- Hue (green 9 to red 9)
- Chroma Level (-9 to +9)
- Advanced Operations
- Sleep Timer Setting
- Dimmer
- Screen Saver
- Turn off the sound temporarily
- Audio Sync
- Listening to music from your portable player or external device
- Setting the TV system
- Copying files on to USB devices
- JPEG DivX WMA MP3
- Recording audio CD tracks on to USB devices
- Karaoke
- Using karaoke
- To adjust the echo
- To adjust the key
- Extra functions for karaoke
- Scoring your karaoke DVD VCD
- Recording your karaoke tracks on to USB devices VCD
- Notes on Discs
- Storing Discs
- Handling the Unit
- When shipping the unit
- Cleaning the unit
- Maintaining the Unit
- 6
- Troubleshooting
- Operating the TV with the player's remote control
- TV Preset code list
- Manufacturer Code(s)
- Language Codes
- Area Codes
- Trademarks and Licences
- HDMI
- DIVX™
- Specifications (HTZ-421DVD)
- General
- Inputs/Outputs
- Tuner
- Amplifier
- System
- Speakers
- Specifications (HTZ-221DVD)
- ADVERTENCIA
- PRECAUCIÓN
- Nota
- Códigos de idioma
- PIONEER CORPORATION
Brand : PIONEER
Model : HTZ-221DVD
Category : Home Theater System