DTT-nano - Digital decoder HUMAX - Free user manual and instructions
Find the device manual for free DTT-nano HUMAX in PDF.

User questions about DTT-nano HUMAX
0 question about this device. Answer the ones you know or ask your own.
Ask a new question about this device
Download the instructions for your Digital decoder in PDF format for free! Find your manual DTT-nano - HUMAX and take your electronic device back in hand. On this page are published all the documents necessary for the use of your device. DTT-nano by HUMAX.
USER MANUAL DTT-nano HUMAX
Digital Terrestrial MHP Receiver

text_image
EMERONIO EMERONIO RS-222C R SPUI SNC-1.0A ANTENIA IN TAYOR The default PIN Code is set to 0000.User's Manual
DTT nano
Notice

natural_image
Generic document icon with exclamation mark, no text or symbols presentNegation of responsibility
The information contained in this user's manual is based on the characteristics of the product at the time the initial draft was made. Despite effort to provide information on the specific features and functions of the product, details of the hardware and software are not provided. The features relevant to installation and maintenance are not described. Functions that are not seen in the hardware and software may appear in the manual. Humax srl has no obligation of prior notice for additions or changes that may occur in the future.
The information and features of the product in this user's manual are subject to change without prior notice.
Note: You can download the electronic version of the user's manual from the website www.humaxdigital.com.
Warranty
The warranty does not cover parts which may become defective due to misuse of the information contained in this manual.
Trademarks
- Irdeto is a trademark of Mindport BV.
• Nagravision is a registered trademark of KUDELSKI S.A.
• Conax is a trademark of Telenor Conax AS.
Warnings, Cautions and Notes
Throughout the whole manual, pay special attention to the following marks that indicate hazardous situations.
- Warning
Indicates a hazardous situation which could result in serious injury. - Caution
Indicates a situation which could damage the equipment or other apparatus.
Note
Indicates additional information to make the user aware of possible problems and information of any importance to help understand, use and maintain the installation.
Meaning of Symbols

To reduce the risk of electric shock, do not remove cover (or back). No user serviceable parts inside. Refer servicing to qualified service personnel.

This symbol indicates dangerous voltage inside the product that presents a risk of electric shock or personal injury.

This symbol indicates important instructions accompanying the product.
Customer information
According to art. 13 of the Legislative Decree 25th July 2005, no. 15 „Application of the Directives 2002/95/CE, 2002/96/CE and 2003/108/CE, regarding the reduction of dangerous substances in electric and electronic products, as well as the waste disposal“.

The symbol with the crossed refuse bin, present on the product, indicates that the product must be collected separately from other refuse after his lifetime is expired.
This means that the customer must hand over the product at the end of the lifetime to an authorized collection center for electronic and electro technical refuse. As an alternative the customer can hand over the product to a dealer when he purchases an equivalent product, accordingly to the principle one in return for one.
A professional differentiated collection of no longer used products for recycling, utilization or disposal, helps to reduce negative consequences for the environment and the health. In addition the utilization of materials composing the product will be supported.
The illegal disposal of the product by the customer results in the application of the administrative fines according to Legislative Decree no. 22/1997 (article 50 and followings of Legislative Decree no. 22/1997).
Security notice
This product has been manufactured to comply with international safety standards. Please read the following safety precautions carefully.
Safety Instructions and Precautions
1. MAINS SUPPLY
100-240V a.c., 50/60Hz
- Operate this product only from the type of power supply indicated on the marking label. If you are not sure of the type of power supplied to your home, consult your local power company.
- Disconnect the product from the mains before you start any maintenance or installation procedures.
2. OVERLOADING
- Do not overload a wall outlet, extension cord or adapter as this may result in electric fire or shock.
3. LIQUID
- The product should not be exposed to liquid of any kind. In addition, no objects filled with liquid should be placed on the apparatus.
4. CLEANING
- Disconnect the product from the wall outlet before cleaning.
• Use a light damp cloth (no solvents) to dust the product.
5. VENTILATION
• The slots on top of the product must be left uncovered to allow proper airflow into the unit.
• Do not stand the product on soft furnishings or carpets.
• Do not stack electronic equipments on top of the product.
6. ATTACHMENTS
- Do not use any unsupported attachments as these may be hazardous or cause damage to the product.
7. CONNECTION TO THE AERIAL
- Disconnect the product from the mains before connecting or disconnecting the cable from the aerial. Failure to do so can damage the aerial.
8. CONNECTION TO THE TV
- Disconnect the product from the mains before connecting or disconnecting the cable from the TV. Failure to do so can damage the TV.
9. LOCATION
- Place the product indoors to avoid exposing it to lightning, rain or sun.
• Do not place it near a radiator or heat register. - Make sure it has more than 10 cm clearance from any appliances susceptible to electromagnetic influences, such as a TV or a VCR.
- Do not block the openings with any object, and do not place the product on a bed, sofa, rug, or other similar surface.
Safety Warning
- If you place the product on a rack or a bookcase, ensure that there is adequate ventilation and that you have followed the manufacturer's instructions for mounting.
• Do not place the product on an unstable cart, stand, tripod, bracket, or table where it can fall.
• A falling product can cause serious injury to a child or adult, and serious damage to the appliance.
10. LIGHTNING, STORM or NOT IN USE
- Unplug the product from the wall outlet and disconnect the antenna during a thunderstorm or when left unattended and unused for long periods of time. This will prevent damage to the unit due to lightning and power-surges.
11. EXTRANEOUS OBJECTS
- Do not insert anything through the openings in the unit, where they can touch dangerous voltage points or damage parts.
12. REPLACEMENT of PARTS
- When replacement of parts is required, be sure the service technician uses replacement parts specified by the manufacturer or those that have the same characteristics as the original part. Unauthorized substitution may result in additional damage to the unit.
Warning
1. To avoid damage of the power cord or plug;
- Do not modify or process the power cord or plug arbitrarily.
• Do not bend or twist the power cord.
• Make sure to disconnect the power cord holding the plug. - Keep heating appliances as far as possible from the power cord in order to prevent the cover vinyl from melting.
• The mains plug, as a disconnection device, shall remain readily accessible by the user.
2. To avoid electrical shock;
• Do not open the main body.
• Do not insert metal or inflammable objects inside the product.
• Do not touch the power plug with wet hands.
• Disconnect the power cord in case of lightning.
3. To avoid damage of product;
- Do not use the product when it is out of order. If you continue to use the product when defective, serious damage can be caused to it. Make sure to contact your local product distributor if the product is out of order.
- Do not insert metal or alien substance into the slots for the modules or Smartcards. It may cause damage to the product and reduce its life span.
Attention
It is recommended to make sure the power connection, on the side of the product, is easily accessible when connecting or disconnecting the power.

Contents

natural_image
Illustration of a document with an exclamation mark (no text or symbols present)1. Before Using the Product GB7
1.1 Package Contents GB7
1.2 Setup GB8
1.3 Remote Control GB9
2. Basic Operation....GB11
2.1 Installation Wizard. . . . . . . . . . . . . . . . . . . . . . . . . . . . . . . . . . . . . . . . . . . . . . . . . . . . . . . . . . . . . . . . . . . . . . . . . . . . . . . . . . . . . . . . GB11
2.2 Basic Function . . . . . . . . . . . . . . . . . . . . . . . . . . . . . . . . . . . . . . . . . . . . . . . . . . . . . . . . . . . . . . . . . . . . . . . . . . . . . . . . . . . . . . . . . . GB12
3. Menu . . . . . . . . . . . . . . . . . . . . . . . . . . . . . . . . . . . . . . . . . . . . . . . . . . . . . . . . . . . . . . . . . . . . . . . . . . . . . . . . . . . . . . GB16
3.1 Channel . . . . . . . . . . . . . . . . . . . . . . . . . . . . . . . . . . . . . . . . . . . . . . . . . . . . . . . . . . . . . . . . . . . . . . . . . . . . . . GB16
3.2 Preference. . . . . . . . . . . . . . . . . . . . . . . . . . . . . . . . . . . . . . . . . . . . . . . . . . . . . . . . . . . . . . . . . . . . . GB18
3.3 System . . . . . . . . . . . . . . . . . . . . . . . . . . . . . . . . . . . . . . . . . . . . . . . . . . . . . . . . . . . . . . . . . . . . . . . . . . . . . . . . GB21
3.4 Pay Per View Services . . . . . . . . . . . . . . . . . . . . . . . . . . . . . . . . . . . . . . . . . . . . . . . . . . . . . . . . . . . . . . . . . . . . . . . . . . . . . . . . . . . . . . GB24
4. Software Update . . . . . . . . . . . . . . . . . . . . . . . . . . . . . . . . . . . . . . . . . . . . . . . . . . . . . . . . . . . . . . . . . . . . . . . . . . . . . . . . . . GB25
4.1 OTA (Over the Air) . . . . . . . . . . . . . . . . . . . . . . . . . . . . . . . . . . . . . . . . . . . . . . . . . . . . . . . . . . . . . . . . . . . . . . . . . . . . . . . . . . . . . . . . . . . GB25
5. Trouble Shooting. . . . . . . . . . . . . . . . . . . . . . . . . . . . . . . . . . . . . . . . . . . . . . . . . . . . . . . . . . . . . . . . . . . . . . . . . . . . . . GB26
5.1 Trouble Shooting . . . . . . . . . . . . . . . . . . . . . . . . . . . . . . . . . . . . . . . . . . . . . . . . . . . . . . . . . . . . . . . . . . . . . . . . . . . . . . . . . . . . . . . . . . . . GB26
5.2 Error Message . . . . . . . . . . . . . . . . . . . . . . . . . . . . . . . . . . . . . . . . . . . . . . . . . . . . . . . . . . . . . . . . . . . . . . . . . . . . . . . . . . . . . . . . . . . . . . . . . . GB27
6. Specification. . . . . . . . . . . . . . . . . . . . . . . . . . . . . . . . . . . . . . . . . . . . . . . . . . . . . . . . . . . . . . . . . . . . . . . . . . . . . . . GB29
7. Service and Support....GB31
1. Before Using the Product

natural_image
Illustration of a vintage television set with antenna and power button (no text or symbols)1.1 Package Contents
When you unpack your package contents, make sure you have all the necessary items shown in figure below. If any of items is missing or damaged, please contact your product dealer for replacement.


Quick GuideRemote Control Batteries

natural_image
Coiled cable with a plug and connector (no text or symbols visible)Adapter

natural_image
Coiled electrical plug with a terminal connector (no text or symbols visible)External IR Module

natural_image
Illustration of two connected electrical connectors (no text or symbols)Scart Cable
Note:
• Faults may occur if the remote control is left without battery for a long time.
Always keep the battery inserted in the remote control.
• Package contents may vary according to area.
1. Before Using the Product
natural_image
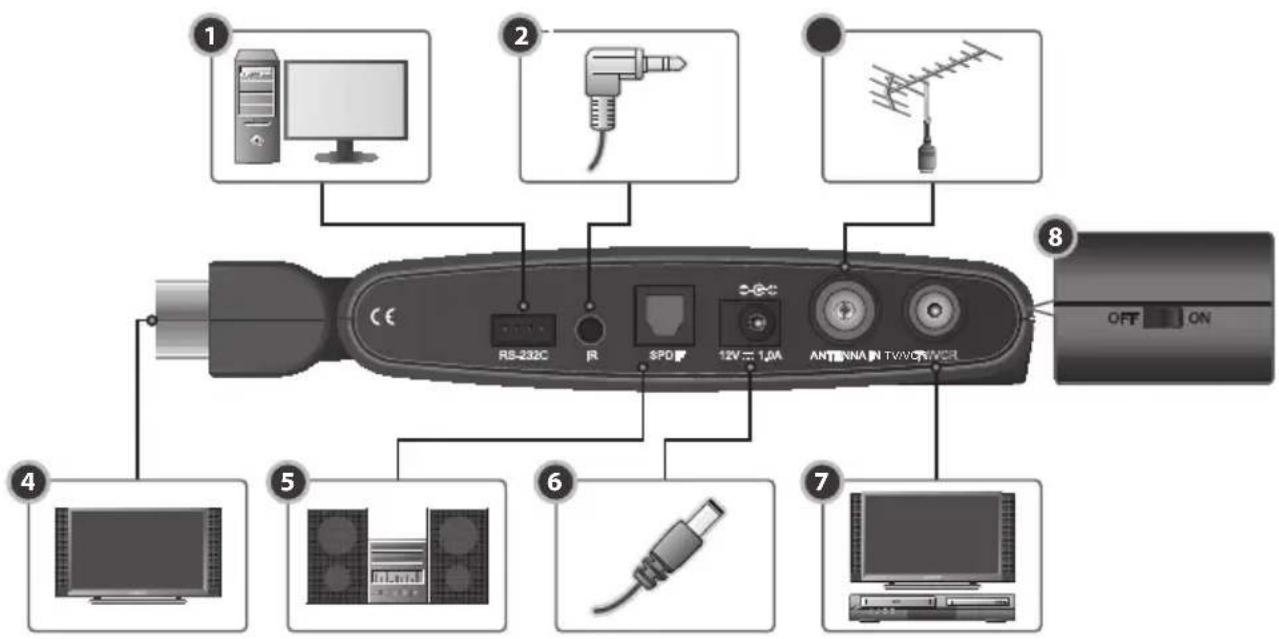
Illustration of a portable radio with antenna and control panel (no text or symbols)1.2 Setup
text_image
1 2 3 4 5 6 7 8 RS-232C R SPD 12V = 1.0A ANTenna IN TWV/RIVER OFF ON1. RS-232C
Connects to the PC to update software.
2. IR
Connects to the external IR module.
3. ANTENNA IN
Connects the aerial cable.
4. TV SCART
Connects to the TV using a TV SCART cable.
5. S/PDIF
Connects to the audio system using an S/PDIF cable. (digital audio)
6. Power Adapter
Connects to the power adapter.
7. TV/VCR
Connects to the RF IN of the TV or VCR using an RF cable.
8. POWER SWITCH
Power on/off.
Note: The product is subject to change without notice.
1. Before Using the Product

natural_image
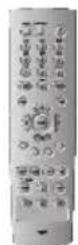
Illustration of a radio receiver with antenna array (no text or symbols)1.3 Remote Control

text_image
1 2 3 4 LIST 5 6 7 8 9 10 11 RT-517 MUTE TV/RADIO abc def ghl kl mno 4 5 6 pqrs tuv wxyz 7 8 9 LIST 0 GUIDE BACK EXIT OK CH- CH+ V- V+ PAGE MENU i TEXT APP ?Note: The remote control is subject to change without notice.
-
TV/RADIO Switches between TV and radio modes.
-
MUTE Mutes or unmutes the audio temporarily.
-
NUMERIC(0-9) BUTTONS Enters a TV/radio channel number.
-
LIST Displays the channel list.
-
BACK Closes and returns to the previous menu and screen.
-
ARROW BUTTONS Changes the channel or moves the cursor up, down, left or right.
-
COLOUR BUTTONS(R/G/Y/B) Select the colour keys for interactive applications.
-
CH-/CH+ or PAGE-/PAGE+ Changes the channel or page.
-
MENU Displays the main menu.
-
i (INFORMATION) Displays the channel and programme information.
-
APP Displays application list.
1. Before Using the Product
natural_image
Illustration of a portable air conditioner with a triangular roof and control panel (no text or symbols)
text_image
MUTE TV/RADIO 1 abc def ghl jkl mno 4 5 6 pqrs tuv wxyz 7 8 9 LIST 0 GUIDE BACK EXIT OK CH CH+ V- V+ PAGE i TEXT MENU APP RT-51712. STANDBY
Switches between operation and standby modes.
13. GUIDE
Displays the programme guide.
14. EXIT
Exits all On-Screen Display (OSD) screens.
15. OK
Selects a menu or confirms the selected operation.
16. V-/V+
Adjusts the audio volume.
17. TEXT
Switches between the teletext and TV modes.
18. SOUNDTRACK
Displays the soundtrack list.
19. SUBTITLE
Displays the subtitle language list.
2. Basic Operation
2.1 Installation Wizard
When powering on your product for the first time after purchasing, the Installation Wizard is automatically started.
You can easily set-up using simple organization and options, and watch the broadcasting after completing the set-up procedure.
Note: The default PIN Code is set to 0000.
1. Language
You can select menu, audio, and the subtitle language. Select the appropriate language from the list and press the OK button to save the selected language as a default language.

text_image
First Installation 45/01/01/22 Systems Language Options Menu English Primary Audio Passive Start to Options Go Save Help Back2. Search Channel
You can search channels by selecting Channel, Frequency and Bandwidth.
You can set whether to use the LCN using the ◀/▶ button. Enter your desired channel, frequency and Bandwidth to search directly. Then press the OK button.
If you press the RED button, you can automatically search channels without entering any other information.

text_image
First Installation 01:01 01:34 System Search Channel Channel Temp Use ICM Base Yes Remote Auto Search Auto Search Auto Back2. Basic Operation

natural_image
Illustration of a vintage television with a jagged top and stand (no text or symbols)Select the channel you want to apply to the LCN using the RED button. Press the OK button to move to the next. Press the RED button to add a channel. Press the GREEN button to add all channels. Press the OK button to save.
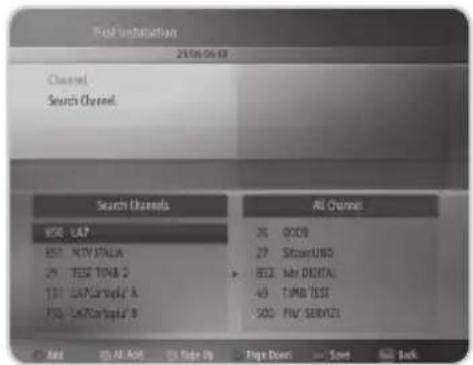
text_image
Search Unisaturation 20:06:06:32 Channel Search Channel Search Channels H58 - LAP B51 - NTV ITALIA 29 - TSS TIMB 2 131 - LATCarTopi A F53 - S&TCarTopi B All Channels 36 - GOOD 27 - SICARUBS B52 - My DIGITAL 43 - TIMB TSS SOC - PIV SERVICE Page Down Save Back2.2 Basic Function
1. Program Banner
General Information
Program Banner is always displayed for a specific period of time whenever you switch channels. You can view the program banner by pressing the i button while watching a program. Press the EXIT button to hide the Program Banner.
The General Information is displayed as following on the screen.

text_image
1 2 3 4 5 SitcomUNO L'Amore vero non si compra - Puntata ... 09:00 09:45 29/08 04:18 Subtitle Languages 7 8 9 10 11 OK i- Channel number
- The information of the previous or next channel
- Channel name
- Program name
2. Basic Operation
- Program broadcasting time and progress bar: displays program playing time and progress bar.
- Current time and date
- Subtitle Language
- Next program Information: displayed if next program information is provided. Press the button to display the next program information.
- Icons

Represents parental level.

Displayed only when there is any MHP application.

Displayed only when there is any teletext information.

Displayed only when subtitle information is available.
-
Confirm the selected operation.
-
Detailed program information
Note: If there is no available program information, program information is not displayed.
Detailed Program Information
You can see detailed information about the current program. Press the i button again while the program banner is displayed to view detailed information. Press the i button again to hide the information box.

text_image
Topical debate from Burton upon Term, chaired by David Dimblety. The panel includes former Foreign Secretary Sir Malcolm Riffinder and the writer and broadcaster Rajen Crinak. [S] 27 Sitzand/NO L'Ansev vena ma si campus - Puavita ... 08:00 08:452. Volume Control/Mute
Press the V-/V + buttons to adjust the audio volume. Press the MUTE button to disables the sound temporarily.

natural_image
Gray bar with speaker icon and sound waves, no text or symbols presentNote: The mute function remains enabled while you change the channel.
2. Basic Operation

natural_image
Illustration of a vintage television with a stand and antenna (no text or symbols)3. Channel Change
You can switch the current channel using one of the following methods.
- Press the CH-/CH+ button.
- Enter your desired channel numeric using the NUMERIC(0-9) button to move to the channel directly.
- Press the TV/RADIO button to switch between TV channel and Radio channel.
Note: You can switch channel using the channel list or program guide. Please refer to 2.2.6 TV Guide and 2.2.7 Channel List for more information.
4. Subtitle
If the current program provides Subtitle information, you can select the language for the Subtitle.
- Press the SUBTITLE button to display the subtitle language list.
- You can also display the subtitle language list by pressing the GREEN button while the program banner is displayed.
- Select your desired subtitle language. Then the subtitle will be displayed in the selected language at the bottom of the screen.
Note: Please refer to 3.2.6 Subtitle and 3.3.2 Language Options for more information.
5. Soundtrack
If the current program is available in multiple audio languages, you can select the language that you wish to listen to.
- Press the SOUNDTRACK button to display soundtrack list and select your desired audio language.
- Press the EXIT or SOUNDTRACK button to exit from the soundtrack list.
2. Basic Operation
6. TV Guide
The Program Guide displays program information about each channel, based on the date and time.
Press the GUIDE button.
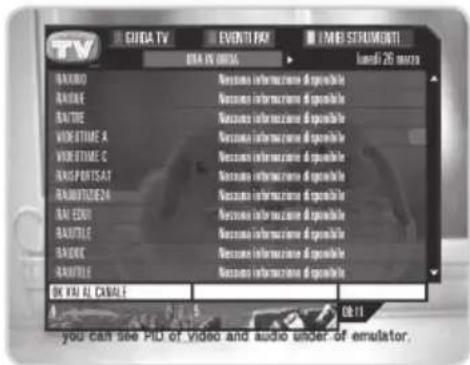
text_image
TV GHOA TV EVENTI PAY IMBI SERUMENTI DATA VS 0016 liandì 26 mars BANONE BANONE BANONE WORKTIME A WORKTIME C BANONE BANONE BANONE BANONE BANONE BANONE BANONE BANONE BANONE BANONE BANONE BANONE BANONE BANONE BANONE BANONE BANONE BANONE BANONE BANONE BANONE BANONE BANONE BANONE BANONE BANOne BANOne BANOne BANOne BANOne BANOne BANOne BANOne BANOne BANOne BANOne BANOne BANOne BANOne BANOne BANOne BANOne BANOne BANOne BANOne BANOne BANOne BANOne BANOne BANOne BANOLO BANOLO BANOLO BANOLO BANOLO BANOLO BANOLO BANOLO BANOLO BANOLO BANOLO BANOLO BANOLO BANOLO BANOLO BANOLO BANOLO BANOLO BANOLO BANOLO BANOLOWE BANOLOWE BANOLOWE BANOLOWE BANOLOWE BANOLOWE BANOLOWE BANOLOWE BANOLOWE BANOLOWE BANOLOWE BANOLOWE BANOLOWE BANOLOWE BANOLOWE BANOLOWE BANOLOWE BANONOWE BANONOWE BANONOWE BANONOWE BANONOWE BANONOWE BANONOWE BANONOWE BANONOWE BANONOWE BANONOWE BANONOWE BANONOWE BANONOWE
text_image
TV BRANDRO BRANDE BRANTILE BRANDRO 27 MARZO BRANDE 28 MARZO BRANTILE 29 MARZO BRANDRO 30 MARZO BRANDE 31 MARZO BRANTILE 32 MARZO BRANDRO 33 MARZO BRANTILE 34 MARZO BRANDRO 35 MARZO BRANTILE 36 MARZO BRANDRO 37 MARZO BRANTILE 38 MARZO BRANDRO 39 MARZO BRANTILE 40 MARZO BRANDRO 41 MARZO BRANTILE 42 MARZO BRANDRO 43 MARZO BRANTILE 44 MARZO BRANDRO 45 MARZO BRANTILE 46 MARZO BRANDRO 47 MARZO BRANTILE 48 MARZO BRANDRO 49 MARZO BRANTILE 50 MARZO BRANDRO 51 MARZO BRANTILE 52 MARZO BRANDRO 53 MARZO BRANTILE 54 MARZO BRANDRO 55 MARZO BRANTILE 56 MARZO BRANDRO 57 MARZO BRANTILE 58 MARZO BRANDRO 59 MARZO BRANTILE 60 MARZO BRANDRO 61 MARZO BRANTILE 62 MARZO BRANDRO 63 MARZO BRANTILE 64 MARZO BRANDRO 65 MARZO BRANTILE 66 MARZO BRANDRO 67 MARZO BRANTILE 68 MARZO BRANDRO 69 MARZO BRANTILE 70 MARZO BRANDRO 71 MARZO BRANTILE 72 MARZO BRANDRO 73 MARZO BRANTILE 74 MARZO BRANDRO 75 MARZO BRANTILE 76 MARZO BRANDRO 77 MARZO BRANTILE 78 MARZO BRANDRO 79 MARZO BRANTILE 80 MARZO BRANDRO 81 MARZO BRANTILE 82 MARZO BRANDRO 83 MARZO BRANTILE 84 MARZO BRANDRO 85 MARZO BRANTILE 86 MARZO BRANDRO 87 MARZO BRANTILE 88 MARZO BRANDRO 89 MARZO BRANTILE 90 MARZO BRANDRO 91 MARZO BRANTILE 92 MARZO BRANDRO 93 MARZO BRANTILE 94 MARZO BRANDRO 95 MARZO BRANTILE 96 MARZO BRANDRO 97 MARZO BRANTILE 98 MARZO BRANDRO 99 MARZO BRANTILE 100 MARZO7. Channel List
Three types of channel lists are provided for easy and quick channel searching. (All TV, All Radio, Favorite Channels)
- Press the LIST button while watching a program to display the selected channel list.
- Select your desired channel and press the OK button to change the channel. You can switch into other channel on the channel list using the ◀/▶ button.
- Press the EXIT or LIST button to exit the channel list screen.
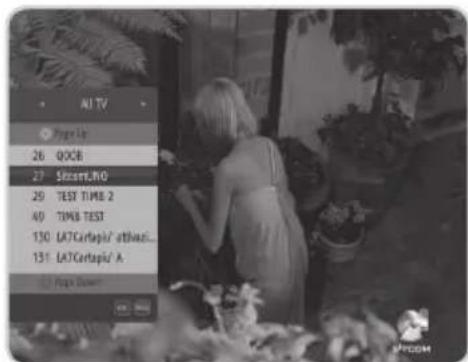
text_image
AI TV Page Up 26 QQCB 27 STMicro/IV0 29 TEST TIME 2 40 TIME TEST 130 LATCartapio/ attVazi... 131 LATCartapio/ A Page Down3. Menu
You can easily navigate the menu using the following instructions:
- Press the MENU button to display the main menu screen.
- Select a item using the ▲/▼ button.
- Press the OK button to move from the menu to the sub-menu.
- Press the ◀/▶ button to select option values.
- Press the OK button to save your selection.
- Press the BACK button to return to the previous-menu.
- Press the EXIT button to close the MENU.
Note:
- Some menu items are access controlled. When accessing to the protected menu, you will be prompted to input the PIN Code. Input your PIN Code using the NUMERIC(0-9) button.
• The default PIN Code is set to 0000.
Main Menu shows the following information :
| Channel Favorite | Channel, Block Channel, Change Channel No, Delete Channel |
| Preference | Parental Rating, Banner Duration, Change PIN Code, Application Auto-start, Channel Change Mode, Subtitle, Use LCN |
| System | A/V Setting, Language Options, Upgrade Software, Search Channel, System Status, Signal Detection, Timezone, Factory Reset |
| Pay per View Services | Mediaset Premium, Iredeto Conditional Access, Conax Conditional Access, Pangea |
3.1 Channel
1. Favorite Channel
You can create the favorite group.
- Select the channel you want and press the RED button to add to the favorite list.
- Press the GREEN button to switch from TV to Radio channel list.
- Select the channel on the favorite list and press the RED button to delete the channel.

text_image
20/08/04:22 Channel Favorite Channel 1 TV Channels 26 00GB 27 StoveriWD 28 TEST TIME 2 49 TIME TEST 50 LRTChagul's orthoclave Favorite Channel 1 26 00GB 27 StoveriWD 28 TEST TIME 2 49 TIME TEST © NC @ PKRade @ Page 10 Page Down Save Back3. Menu
2. Block Channel
You can lock or unlock channels.
- Press the RED button to lock or unlock.
- Press the GREEN button to switch from TV to Radio channel list.
When switching to the locked channel, you must enter the PIN Code to watch a program. The Default PIN Code is 0000. If you have forgotten your PIN Code, please contact your local product distributor.

text_image
20:00:06:26 Channel Black Channel TV Channels 8: $000 7: SitsunUND 29 TEST TAMB 2 43 TML TEST 701 UK/Cartographic Advertising Select TV Radio Page 21 Page Down Save Back3. Change Channel No
You can change the channel number.
Select a channel you want and press the RED button.
Enter the channel number using the NUMERIC(0-9) buttons and press the OK button to save.
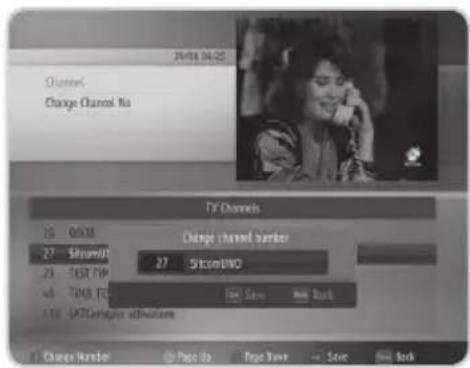
text_image
24/01/04:25 Channel Change Channel No TV Channels 16 0638 Change channel number 27 StComU 27 StComUO 23 TEST TIP 4 TMX ITS 110 SATGARPUA Change Number Page 1x Page 2x Save Fill Back4. Delete Channel
You can delete one or all channels.
Press the RED button to delete one and press the GREEN button to delete all channels.
If you press the RED button again, it will be canceled.
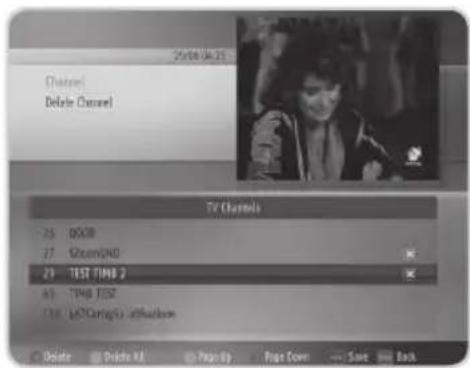
text_image
25/08/04:25 Channel Delete Channel TV Channels - 25 05CIB - 27 ShowGND 29 TEST TIME 2 - 63 TIME TEST - 100 LSCamp/U unticulink Delete Delete AI Page Up Page Down Save Back3. Menu

natural_image
Illustration of a vintage television with a jagged top and stand (no text or symbols)3.2 Preference
1. Parental Rating
You can block programs according to the age level you have set. Select the age level. (No Control, 7 years, 12 years, 14 years, 18 years, Lock All)
Note:
- You have to enter PIN Code to watch the program which is blocked by the age level.
• The default PIN Code is 0000.
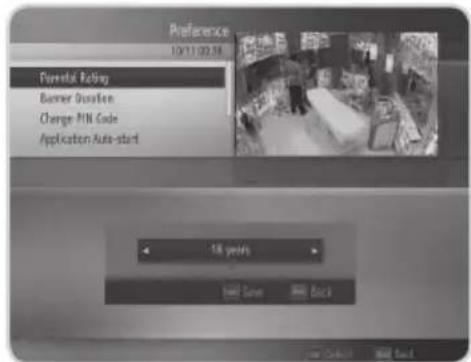
text_image
Preference 10/11/02:56 Parental Rating Burner Duration Change PIN Code Application Auto-start 18 years Save Back2. Banner Duration
You can set the duration of the mini EPG to be automatically displayed when you switch the channel. (0 sec, 3 sec, 5 sec, 10 sec, 15 sec)

text_image
Preference 14/11/20:39 Parental Rating Barrier Duration Change FPK Code Application Auto-start 15 sec OK Cancel Help3. Menu
3. Change PIN Code
You can change the existing PIN Code into a new one. Input your PIN Code. Input the New PIN Code and re-input to confirm.
Note:
• The default PIN Code is 0000.
- If you have forgotten your PIN Code, please contact your local product distributor.

text_image
10/11/20:48 Preference Change PNN Code New PNN Code Confirm PNN Code OK Save Roll Back4. Application Auto-start
You can select Yes or No to set the MHP application starting attributes. If it is selected, all interactive application in auto-start mode will be started automatically at every modification of program.
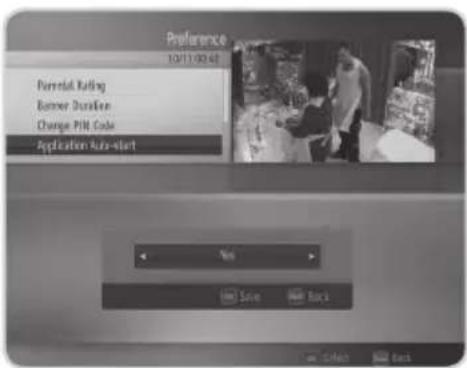
text_image
Preference 10/11/00:45 Personal Rating Business Duration Change PMI Code Application Auto-start Yes Save Back5. Channel Change Mode
You can choose the channel navigation mode among All TV, All Radio and Favorite Channels.
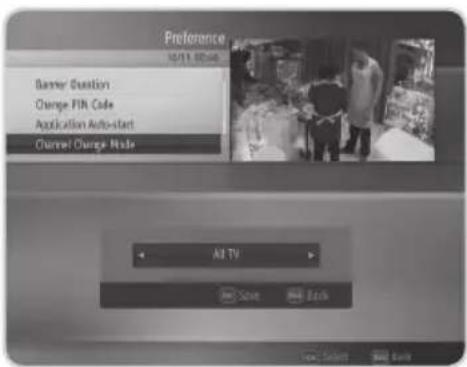
text_image
Preference 10/11/2016 Banner Question Change Pin Code Application Auto-start Channel Change Mode All TV Save Back3. Menu

natural_image
Illustration of a vintage television with a jagged top and stand (no text or symbols)6. Subtitle
You can select the subtitle On or Off.

text_image
Preference 10/11/20:45 Change PMI Code Application Auto-start Channel Change Mode Subtile On Save Back Save Select Back7. Use LCN
You can select the LCN Yes or No.

text_image
Preference 10/11:00 am Application Auto-start Channel Change Mode Subtle Use LCN Add Screen Add Back3. Menu
3.3 System
1. A/V Setting
You can set the audio or video output control.
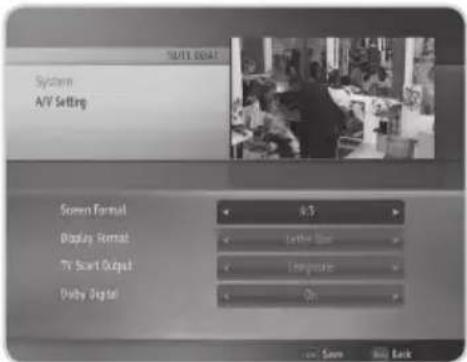
text_image
System A/V Setting Screen Format 4:3 Display Format Latte Bar TV Start Output Lampout Duty Digital On Save Build Back2. Language Options
You can set the language for the menu, primary audio and subtitle.
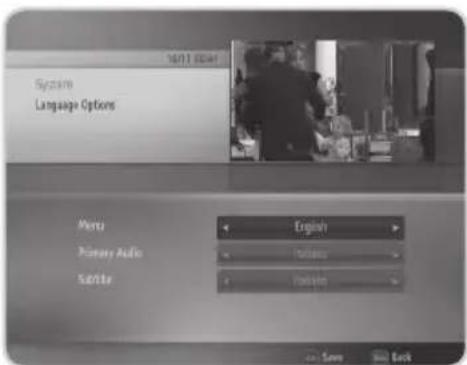
text_image
16/17 00:44 System Language Options Menu English Primary Audio Translation Sender Translation Save Sell Back3. Upgrade Software
You can set the software upgrade attributes. Please refer to 4.1 OTA for more information.

text_image
System Upgrade Software 16/11/2017 In Sunday mode Yes In Operable mode Yes Check Time 18:00 Check Frequency 18:00/ Online Now Save Build Back3. Menu

natural_image
Illustration of a vintage television with a jagged top and stand (no text or symbols)4. Search Channel
You can search channels by selecting the channel, frequency and bandwidth. Enter your desired channel, frequency and bandwidth to search directly. Then press the OK button.
If you press the RED button, you can automatically search channels without entering any other information.
- Press the RED button to add a channel.
- Press the GREEN button to add all channels.
- Press the OK button to save.
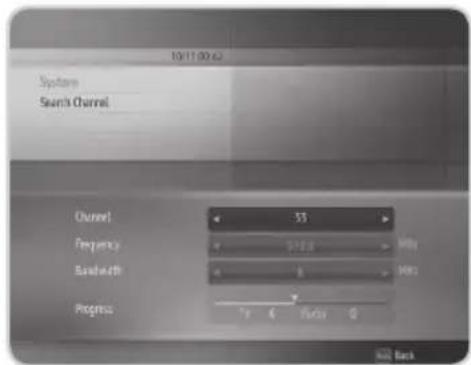
text_image
10(11:00:62) Stream Stream Channel Channel 35 Frequency 278.4 Bandwidth 6 Progress 7 P 6 P/10 Q Add Back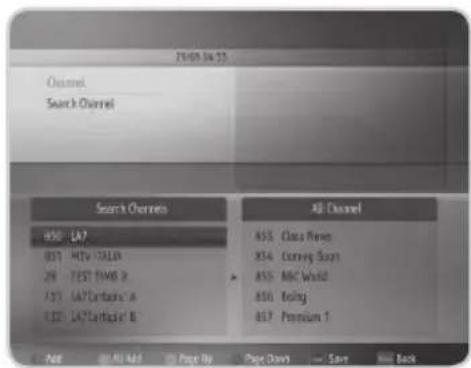
text_image
2019.04.23 Channel Search Channel Search Channels 850 LA7 851 MTV: TALIA 29 TEST: FMBS 2 431 GA7 Cartabs' A 432 LA7 Cartabs' B All Channels 851 Class Files 854 Corning Bars 855 MIC World 856 Being 857 Premium 1 Add Add Add Add Page Up Page Down Save Build Back5. System Status
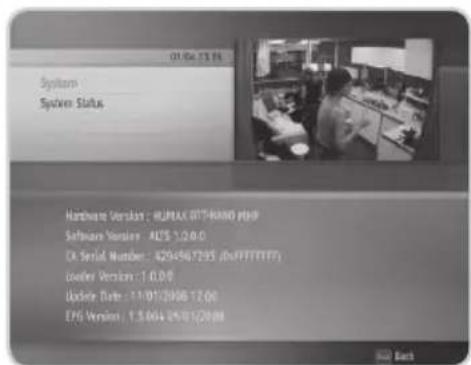
You can view System information.
Confirm the information about Hardware Version, Software Version, CA Serial Number, Loader Version, Update Date and EPG Version.
text_image
01/04/15 16 System System Status Hardware Version: RUMAX 07THAND PHP Software Version: ALS 1.0.0.0 D:\Serial Number: 429+567295 (xFPTTFTF) Loader Version: 1.0.0.0 Update Date: 11/01/2006 12:00 EPS Version: 1.3.044 05/01/2008 Back3. Menu
6. Signal Detection
You can view the strength and quality of the signal of the channel that is currently on AV.

text_image
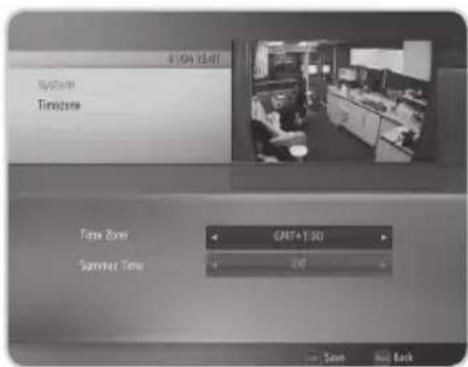
System Signal Detection Channel 30 (549982) Supply Si' power Strength 0% 50% 100% Quality 0% 50% 100%7. Timezone
You can set the GMT Offset for current time and select the Summer Time On or Off.
text_image
41/04 15:07 System Timeline Time Zone QRET+1:00 Summer Time 4 2:07 Back8. Factory Reset
You can reset factory information. Input your PIN Code. All the stored data can be initialized.
Note: The default PIN Code is 0000.
Warning: Please note that once you perform Factory Reset, all the stored data will be deleted.

text_image
System 01/06/2007 System Status Signal Detection Timeframe Factory Reset Do you want to reset all waiting values? Send to Back One Cancel Back3. Menu

natural_image
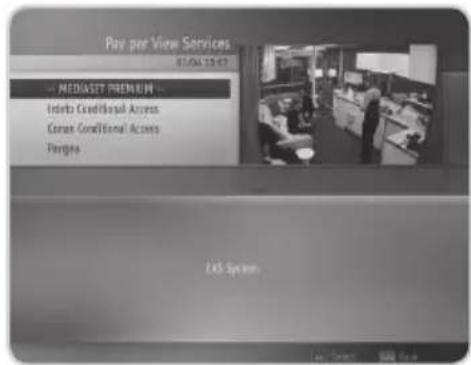
Illustration of a vintage television with a jagged top and stand (no text or symbols)3.4 Pay Per View Services
- Mediaset Premium
- Irdeto Conditional Access
- Conax Conditional Access
- Pangea
text_image
Pay pre View Services 01.04.13:47 MEDIASET PREMIUM Initio Conditional Access Contact Conditional Access Perigms Lot System4. Software Update
In order to maintain proper performance of this product, it is essential to have the most up-to-date software. Please refer to http://www.humaxdigital.com for software update.
It is recommended that you upgrade your software at regular intervals.
4.1 OTA (Over the Air)
OTA, an abbreviation of "over the air", means downloading the software where the manufacturer reserves the right to decide when and where to release through aerial.
Over the Air(OTA) is simply another alternative for downloading software versions. However, the manufacturer reserves the right to decide when and where this software update can take place by "beaming" latest software versions over the air via aerial. The software update via aerial will only occur under the following circumstances.
- The equipment should have appropriate loader software.
Caution: Please note that if you don't have normal loader software, the equipment may not be updated or operate after software update.
- The manufacturer decides to release software downloading via a designated aerial
- The equipment must be "tuned" properly to the same aerial that the manufacturer uses.
- Update software when the quality of receiving signal strength is high. If the quality of receiving signal strength is not recommendable due to bad weather, perform the software upgrade later.
Caution:
- Please be careful to keep the power on and the power cord plugged in during software update. If the power is off during software update, it may cause fatal damage to the product.
- Please be careful not to pull out the Signal line (co-axial Cable) during software update. Update may be interrupted and the product may not work.
Note:
• The product cannot work at all during software update.
• It may take 5\~10 minutes to update software.
• Scheduling operation cannot work during software update.
5. Trouble Shooting

natural_image
Illustration of a vintage television with a stand and antenna (no text or symbols)5.1 Trouble Shooting
Before contacting your local service, please read the following instructions. If the product does not work normally after completing the following trouble shooting, please contact your local product distributor or service center.
1. No message is displayed on the front panel or product has no power
- Check the main power cable and check if it is plugged into a suitable power outlet.
• Check if Power Switch is On.
2. No picture
• Make sure that the product is in Operation Mode.
• Make sure that the AV Cable is firmly connected to the TV.
• Make sure that aerial line is correctly connected to the equipment.
• Check the brightness level of TV.
• Check the channel is on air.
3. Poor picture & sound quality
• Install aerial where there is no obstacle ahead.
• Make sure to avoid putting mobile phone or microwave oven near around the equipment.
• Use 75 coaxial cable to connect TV and aerial.
4. No or poor sound
• Check the volume level of the TV.
• Check the Mute status of the TV and product.
- Press the Audio button to change the Sound Track type.
5. Remote control does not operate
- To manipulate the equipment with remote control, the remote control's emitting part should directly point towards the receiving part of receiver's remote control.
• Check the battery of remote control.
5. Trouble Shooting
5.2 Error Message
- OSD Messages
| Error message in full AV mode | Error Message in scaled AV mode | Possible causes What to do | |
| Signal is weakPlease check antenna and RF cableUnplug and plug power cord | Signal is weakPlease select other channels | Antenna cable is unplugged. | Check if the antenna cable is plugged in. |
| Service not available Failed channel tuning. | Reactivate Channel Search. | ||
| No Channels | No search results(channels). | Reactivate Channel Search. | |
| Blocked by parental rating | Blocked by parental rating | User has set rating limits. | Enter password to cancel blocking. |
| Blocked by user Blocked by user | User has set as blocked channel. | Enter password to cancel blocking. | |
- Mediaset MMI Message
| Error message in full AV mode | Error Message in scaled AV mode | Possible causes What to do | |
| You insert ticket mediaset premium | Smartcard has not been inserted. | Insert Smartcard. | |
| Ticket not legible verification the insertion back | Smartcard may be damaged or the Smartcard in use is not a NAGRA. | Consult distributor. | |
| Smart card blocked Invalid card. Insert Smartcard. | |||
| Smart card expired Valid date has expired. Insert Smartcard. | |||
| Purchase period already ended | Period for purchasing programmes has ended. | ||
| Illegal card | Smartcard may be damaged. | Consult distributor. | |
5. Trouble Shooting

natural_image
Illustration of a vintage television with a musical note on top (no text or symbols)- Irdeto MMI Message
| Error message in full AV mode | Error Message in scaled AV mode | Possible causes What to do |
| E04 - Smart Card not inserted | Smartcard has not been inserted. | |
| E05 - Invalid Smart Card | Invalid Smartcard has been inserted. | |
| E07 - Verifying Smart Card | Displays while verifying Smartcard. | |
| E16 - No rights on Smart Card | No authority given to access programme. | |
6. Specification
| Tuner & Channel | |
| Input Connector IEC-Type, IEC 169-2, Female | |
| RF Loop through Output connector | IEC-Type, IEC 169-2, male |
| Frequency Range | 174MHz to 230MHz (VHF)470MHZ to 862MHz (UHF) |
| Signal Level -10 to -70dBm | |
| Demodulation OFDM | |
| Mode 2K, 8K | |
| FEC mode 1/2, 2/3, 3/4, 5/6 & 7/8 | |
| Guard Intervals 1/4, 1/8, 1/16 & 1/32 | |
| MPEG Transport Stream A/V Decoding | |
| Transport Stream MPEG-2 ISO/IEC 13818 | |
| Profile Level MPEG2 MP@ML | |
| Input Rate 15 Mbit/s Max | |
| Aspect Ratio 4:3, 16:9 | |
| Video Resolution 720x576 | |
| Audio Decoding MPEG/MusiCam Layer I & II | |
| Audio Mode Single /Dual mono/ Stereo /Joint stereo | |
| Memory | |
| Flash Memory 8 Mbytes | |
| Graphics (MPEG) & System Memory | 64 Mbytes |
| EEPROM 8 Kbytes | |
| A/V & Data In/Out | |
| Video | TV-SCART (CVBS, RGB) |
| Audio | TV-SCART |
| Digital Audio Out 1SPDIF | |
| Data port | 1 RS-232C (4pin) |
6. Specification

natural_image
Illustration of a vintage television with a jagged top and stand (no text or symbols)| Power Supply | |
| Input Voltage DC 12V 1.0A | |
| Power consumption | Operation: Max. 7WStandby: Max. 6W |
| AC Power Adaptor AC 100~240V | 50/60Hz Max 1.0A |
| Physical Specification | |
| Size (W×H×D) 64x146.2x24(mm) | |
| Weight (Net) 135g | |
| Operating Temperature 0 °C to | +45 °C |
| Storage Temperature -10 °C to | +70 °C |
7. Service and Support

natural_image
Illustration of a vintage flat-screen TV with a jagged top line (no text or symbols)Information concerning troubleshooting, software upgrade and product support is provided in the following website. Should your product require warranty service, please contact the customer service center of which telephone number is on the website.
HUMAX
| Italia | Website:E-mail: | www.humaxdigital.com/italyservizioclienti@humaxdigital.com |
Note: For hardware repair, please visit our website.
Humax Srl
Via Brescia 28
20063 Cernusco S/N (MI)
Fax. +39 02 99765669
www.humaxdigital.com