Juli@ - Soundcard ESI - Free user manual and instructions
Find the device manual for free Juli@ ESI in PDF.

User questions about Juli@ ESI
0 question about this device. Answer the ones you know or ask your own.
Ask a new question about this device
Download the instructions for your Soundcard in PDF format for free! Find your manual Juli@ - ESI and take your electronic device back in hand. On this page are published all the documents necessary for the use of your device. Juli@ by ESI.
USER MANUAL Juli@ ESI
High Quality 24-bit 192kHz 4x4 reference audio interface with swappable I/O socket

text_image
Juli@User's Guide

natural_image
Abstract metallic logo design with stylized 'EST' letters (no text or symbols)ESI - Copyright © 2004, 2005, 2006
Revision 5, November 2006
INDEX
1. Introduction......5
Key Features....5
2. Description of Juli@ 6
* TIP. How to swap the Connectors?......8
3. Hardware Installation .... 12
- System Recommendation.... 12
Minimum System Requirement 12
- Preparation for Hardware Installation....13
4. Driver Installation.... 15
-
PC 15
-
Macintosh 21
5. Juli@ Console....24
-
PC 24
-
Pull down Menu....24
-
Input Panel 26
-
Output Panel....27
-
Sample Rate and Clock....28
-
Macintosh 29
-
Pull down Menu....29
5. Block Diagram....30
6. Setting in Applications....31
-
PC 31
-
Windows Multimedia setup....31
-
Tracktion....32
-
Cubase....33
-
Cakewalk SONAR....34
-
Wavelab 37
-
Giga Studio (v. 2.20.42 or higher)....37
-
Macintosh 38
-
Audio MIDI setup....38
-
Cubase SX....38
-
Tracktion....39
-
Tassman ESI 39
ESI Juli@
- DSP Quattro SE .... 40
- DirectWIRE 3.0 (PC only)....41
- Specifications 44
-
General Information......45
-
Trademarks 45
-
The FCC and CE Regulation Warning 45
-
Correspondence....45
-
Disclaimer....45
1. Introduction
Congratulations on your purchase of Juli@ by ESI – High Quality 24-bit 192kHz 4x4 reference audio/MIDI interface with swappable I/O socket.
Juli@ is the perfect reference audio interface for home studio recording applications.
This audio card provides support for 24-bit 192kHz on 2 analog input and 2 analog output channels with a special swappable I/O socket. You can choose between -10 dBV RCA type unbalanced I/O and +4 dBu quarter inch TRS balanced I/O - depending on your requirement. Others features are S/PDIF input clock detection, auto sync and individual real time monitoring support for analog and digital input signals. Juli@ provides 24bit 192kHz coaxial digital I/O and a 24-bit 96 kHz optical output, 16 channel MIDI I/O and an EWDM driver with DirectWIRE 3.0 functionality.
Key Features
- Depending on the I/O requirements, the user can select between balanced (+4dBu nominal) and unbalanced (-10dBV nominal) connectors (both cannot be used simultaneously).
- S/PDIF digital signal input clock detection
- Shutter type optical output jack
- DirectWIRE 3.0 (PC only)
- 4x4 up to 24-bit/192kHz, full-duplex recording interface with MIDI I/O
- Universal Board (compatible for both of 3.3V and 5V PCI slots)
- Independent monitoring control for analog in, digital in and digital out signals
- 16 Channel MIDI I/O
- 5.1 channel Digital Pass thru
- Supports EWDM driver: MME, DirectSound, ASIO 2.0 and GigaStudio support
- OS: Microsoft Windows® XP/2000/ME/98SE, Mac OS 10.2 or better
2. Description of Juli@
Here is a short description of Juli@'s connectors.

text_image
1 2 3 4-
- Analog Inputs 1/2 (top) and Analog Outputs 1/2 (bottom)
These are analog Line inputs and outputs. Depending on the your requirements, you can select between balanced (+4dBu nominal TRS) and unbalanced (-10dBV nominal RCA) connectors (both cannot be used simultaneously).
- Breakout cable connection
This port allows you to connect Juli@’s breakout cable.
- S/PDIF Optical Output
This port allows you to transfer Juli@’s audio data digitally without loss, directly to devices like a DAT, MD, CD-recorder with digital input. The optical output sends out signals from output channel 3/4 ('Juli@ 3/4') from your audio applications. The maximum sample rate for the optical output is 96kHz.
ESI Juli@
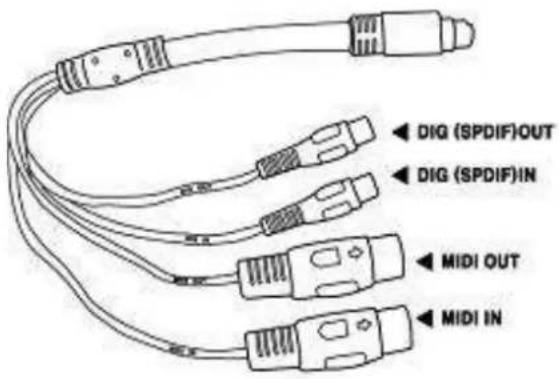
5. Juli@ breakout cable
text_image
DIG (SPDIF)OUT DIG (SPDIF)IN MIDI OUT MIDI INThe Juli@ PCI card comes with a special breakout cable.
This cable provides 24bit/192kHz coaxial inputs and outputs and 16 MIDI I/O channels. The coaxial I/O port sends and receives the signals from channel 3/4 ('Juli@ 3/4') from your audio applications. These coaxial connectors fully support up to 192 kHz.
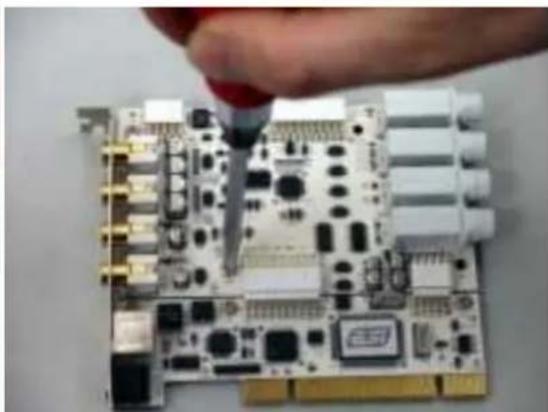
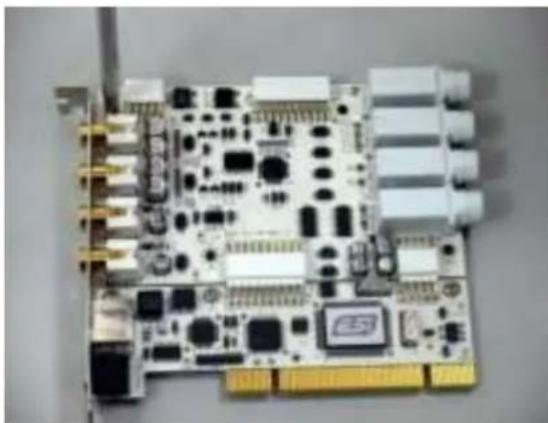
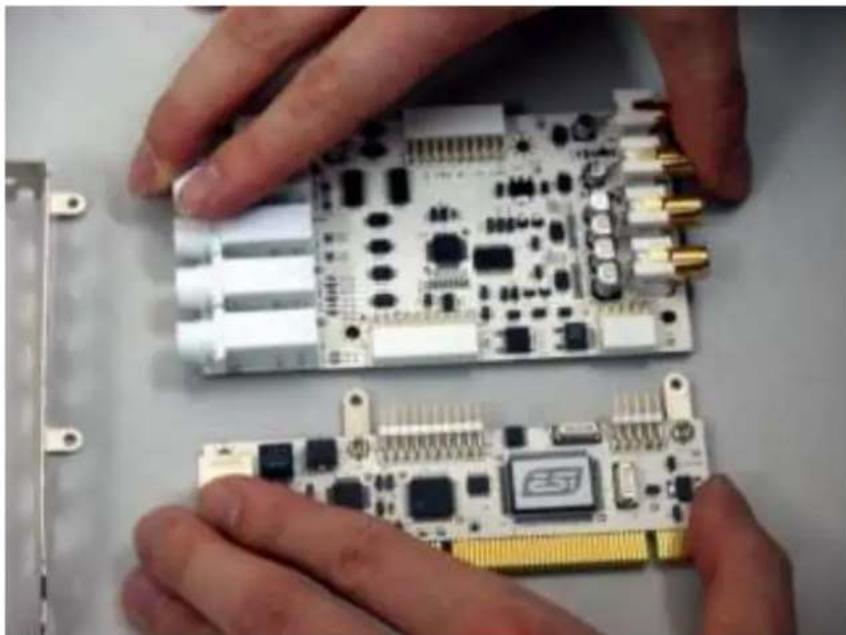
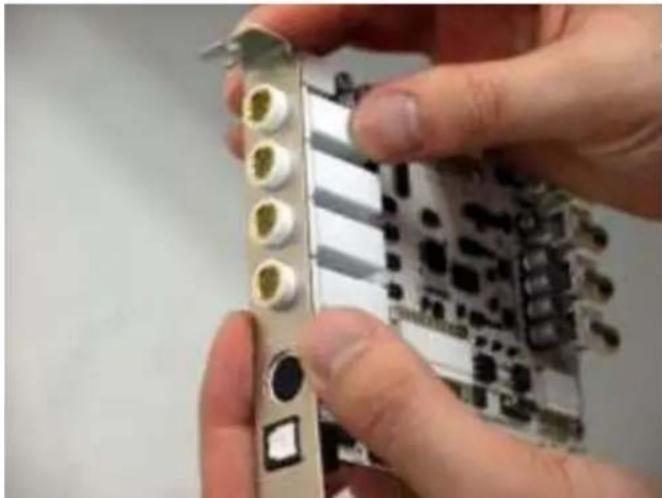
\* TIP. How to swap the Connectors?
The following example shows you how to change from RCA I/O to TRS I/O connectors. Usually you change the setup of the card once before you install it and before you start to use it (both I/O connector types cannot be used simultaneously).
- First, follow the order of the pictures below to remove the 4 screws carefully.

text_image
Labeled diagram of an electronic circuit board with numbered components and component layouts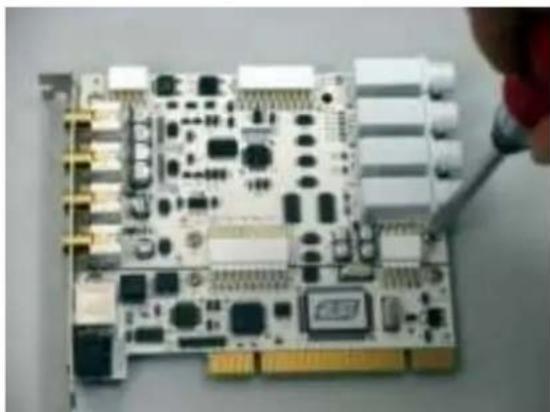
natural_image
Close-up of a computer motherboard with visible circuitry and connectors, being adjusted by a red tool (no text or symbols)(Pic 1)
natural_image
Close-up of a hand using a tool to inspect or install electronic circuit boards (no visible text or symbols)(Pic 2)
natural_image
Close-up of a printed circuit board with various electronic components and connectors (no visible text or labels)(Pic 3)

natural_image
Close-up of a printed circuit board with various electronic components and connectors, no visible text or symbols.(Pic 4)
ESI Juli@
- Detach the metal bracket from the card.

natural_image
Close-up of a printed circuit board with various components and connectors (no visible text or symbols)- Hold the edges of the card and carefully separate the PCI card like shown on this picture.

natural_image
Close-up of hands installing a circuit board component with a highlighted circular area (no text or symbols visible)Caution: Don't touch the chipsets on the card like shown on the following picture. Otherwise the card could be damaged.

natural_image
Close-up of hands assembling a circuit board with connectors and components (no visible text or symbols)ESI Juli@
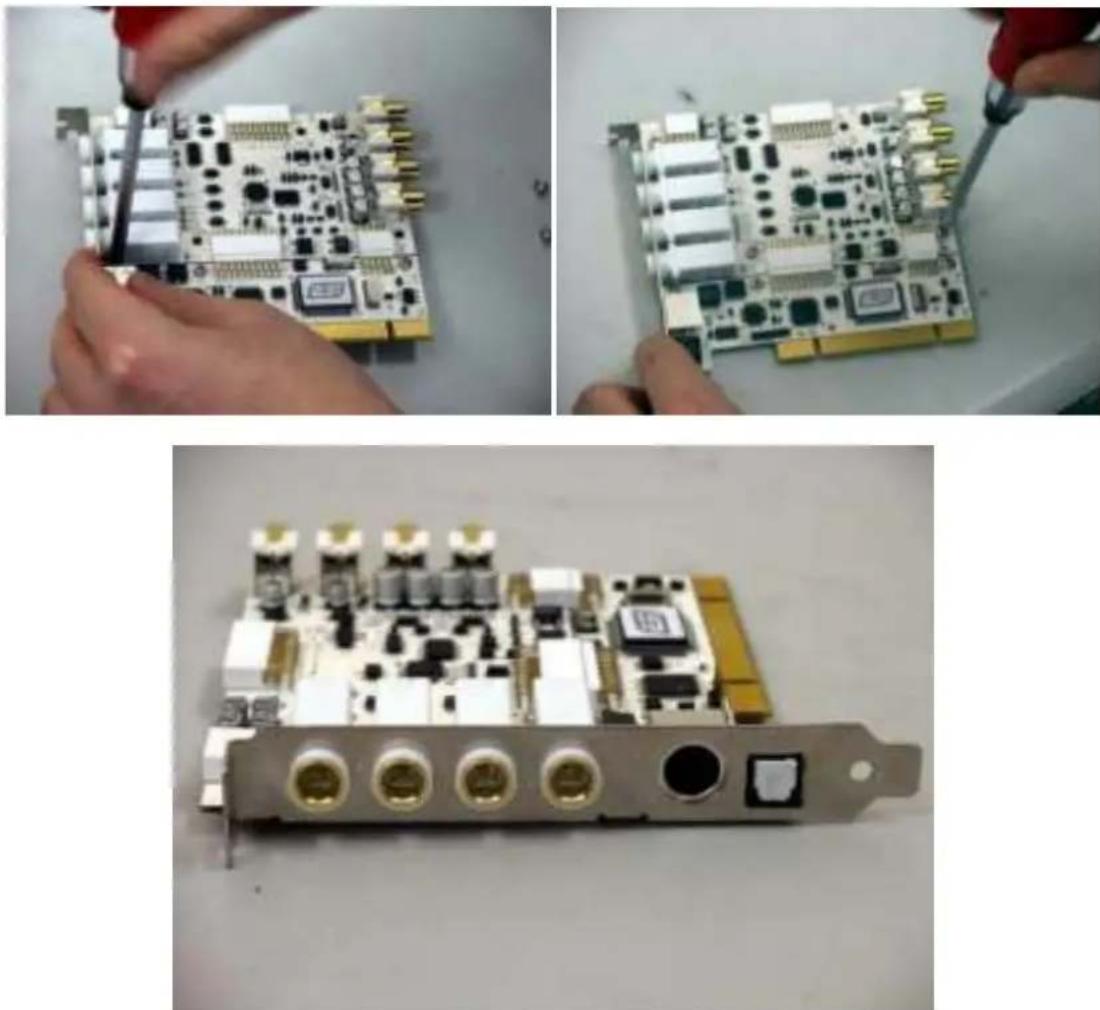
- Turn the TRS connector parts toward to the bracket.
Hold the edges of the card and carefully combine PCI card like shown on the pictures below.
natural_image
Close-up of hands assembling a circuit board with visible components and connectors (no text or symbols)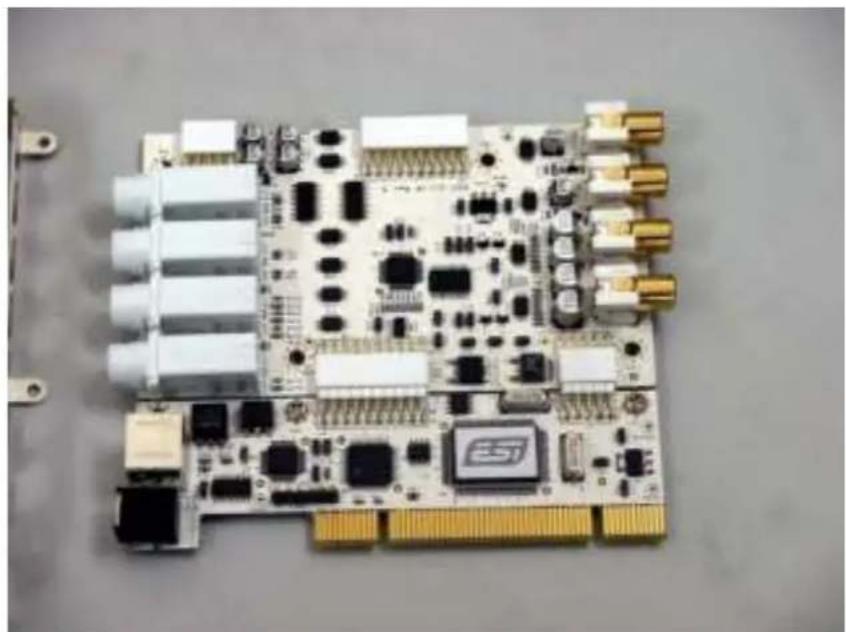
natural_image
Close-up of a printed circuit board with various electronic components and connectors (no visible text or symbols)ESI Juli@
- Put the metal bracket to the card.
natural_image
Close-up of hands holding a computer motherboard with multiple ports and connectors (no visible text or symbols)- Tighten screws again (in opposite order).
natural_image
Three-panel photo showing hands installing a circuit board with connectors and a card on a device (no visible text or symbols)3. Hardware Installation
1. System Recommendation
Juli@ is not simply a standard digital audio interface card, but a high-resolution device capable of advanced processing of audio content. Even though Juli@ is built to have low-CPU resource dependability, system specifications play a key part in the Juli@'s performance. Systems with more advanced components are generally recommended.
Minimum System Requirement
PC
- Intel Pentium III CPU or equivalent CPU
- Motherboard with Pentium III support (ex: Intel 815 / 845 / 865 / 875, VIA694 / KT133 / KT266 / KT333 / KT600, etc.)
- At least 256MB of RAM
- One available PCI slot
- Microsoft Windows 98SE/ME/2000/XP operating system
- Hard Driver supporting UDMA 66/100 and 5400rpm
- Active speakers or speakers with powered amplifier
Mac
- Mac OS 10.2 or higher only
- Macintosh with G3 or better processor
- One available PCI slot
- At least 256MB of RAM
- Active speakers or speakers with powered amplifier
2. Preparation for Hardware Installation
The Juli@ and other components in the computer could easily be damaged by electrical shocks. You should use an anti-static device that can discharge the static electricity of your body to avoid potential static damage to the cards.
The Juli@ card is shipped in an anti-static plastic pouch to protect it from static electricity - do not open the pouch before you install the card.
- Turn off the computer power and remove the power cable from your computer power supply.
text_image
Diagram showing a hand interacting with a device and a screen, with Chinese text labels and arrows indicating interaction.Figure 1. Disconnecting the Power Cord
- Refer to your computer user's manual and remove the computer cover. Make sure that you have an available PCI slot on your motherboard to install the Juli@.

natural_image
Simple line drawing of a rectangular container with a side outlet and an arrow pointing upward (no text or symbols)Figure 2. Removing the computer cover
To avoid possible static shock damage to the computer parts, discharge it by touching the computer case or something grounded. We recommend you use an anti-static device such as an anti-static wristband.
When holding the Juli@ card, touch only the guide or the edge of card. Do not grab the card by the board or connector.
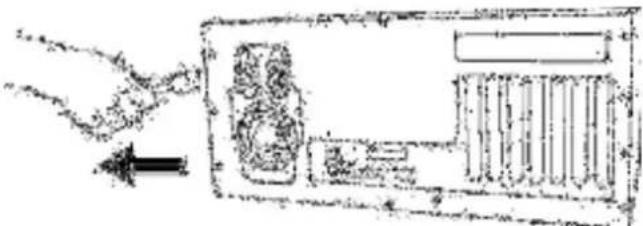
- Find an empty PCI slot on the motherboard

text_image
Diagram showing various vertical and horizontal structures with Chinese labels, likely representing architectural or mechanical components.Figure 3. Typical PC Motherboard Slot Configuration
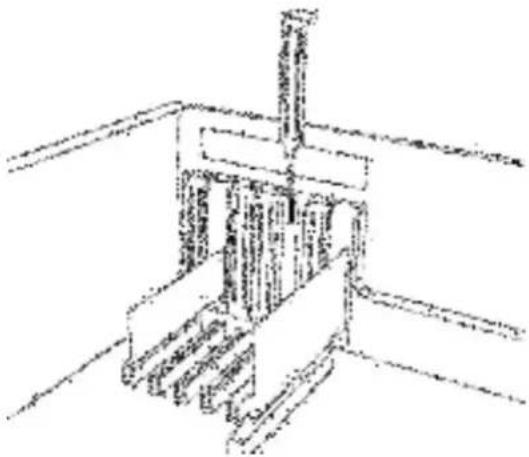
natural_image
Technical line drawing of a mechanical assembly or lifting device (no text or symbols visible)Figure 4. Removing the PCI Slot faceplate
If the PCI slot is covered by a faceplate, you can remove it by removing the screw holding it in place or by prying it off with a screwdriver.
Insert the Juli@ card into the PCI slot, firmly pushing the card into the slot until it is seated securely. Replace the screw, and tighten it.
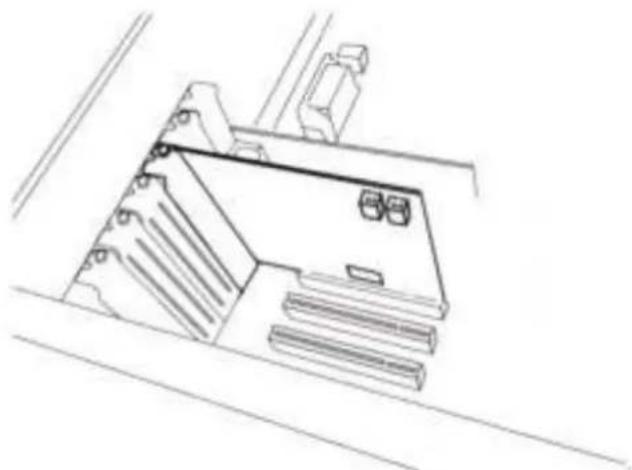
natural_image
Line drawing of a mechanical component or housing with no visible text, numbers, or symbolsFigure 5. Juli@ Installed in a PCI slot
- Close the computer case.
4. Driver Installation
1. PC
After completing the hardware installation for Juli@, you need to install its driver software to use it. The software installation is not very complicated, even for computer beginners. Just follow the steps below and you will complete it without hassle. The installation steps under Windows 98SE, Windows ME, Windows 2000 and XP are a little bit different from each other. The installation procedure below was written for Windows XP. However, the driver installation procedure is similar in other Windows version.
* Caution: Depend on your operating system, you may need your Windows install CD.
Please prepare your Windows installation CD before the installation procedure begins.
* Caution: Because of the driver characteristic, Juli@ installs several drivers and in some cases continuously tries to reboot your system. Unless the driver installation is completely finished until the system does not detect any new devices, DO NOT reboots the system. After the drivers are installed completely, restart your computer.
1 Turn on the main power of your computer. Windows will automatically detect that a new device has been installed and shows the 'Found New Hardware Wizard'.
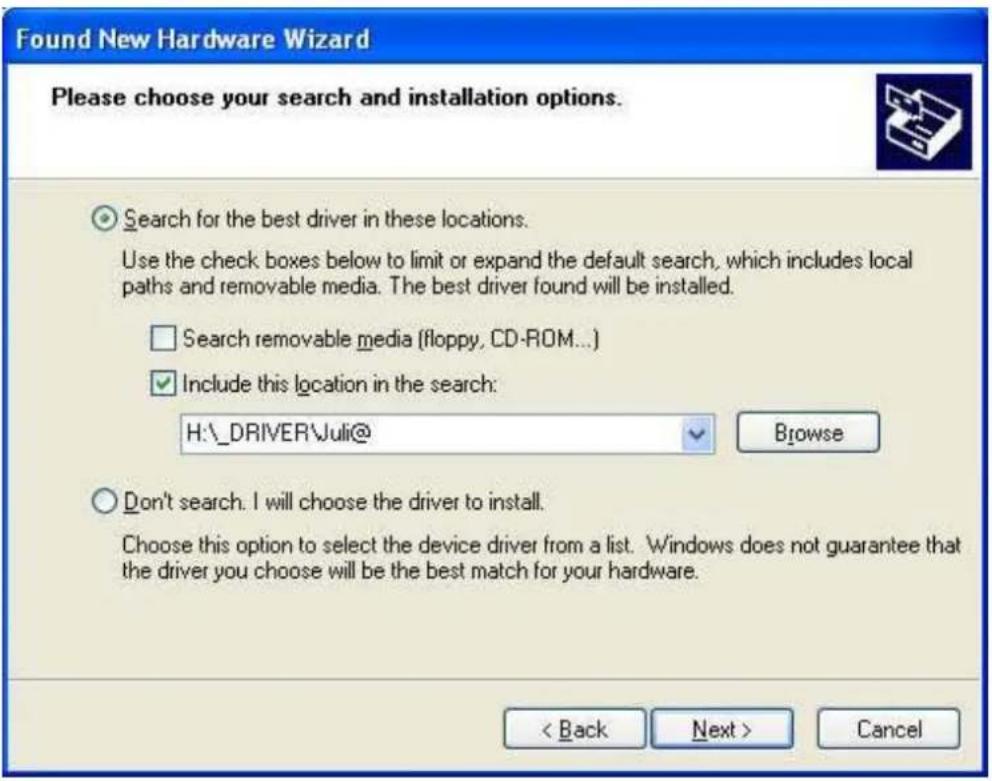
Choose 'Install from a list or specific location' and click next.

text_image
Found New Hardware Wizard Welcome to the Found New Hardware Wizard This wizard helps you install software for: Multimedia Audio Controller If your hardware came with an installation CD or floppy disk, insert it now. What do you want the wizard to do? ○ Install the software automatically (Recommended) ● Install from a list or specific location (Advanced) Click Next to continue. < Back Next > Cancel- Choose 'Search for the best driver in these locations' and Specify the location of the driver. Insert the provided Driver CD into the CD-Rom drive and select 'Include this location in the
search' and click 'Browse' to find the accurate location of the driver. Then confirm your selection with 'Next >'.
text_image
Found New Hardware Wizard Please choose your search and installation options. Search for the best driver in these locations. Use the check boxes below to limit or expand the default search, which includes local paths and removable media. The best driver found will be installed. Search removable media (floppy, CD-ROM...) Include this location in the search: H:\DRIVER\Juli@ Browse Don't search. I will choose the driver to install. Choose this option to select the device driver from a list. Windows does not guarantee that the driver you choose will be the best match for your hardware. < Back Next > Cancel
text_image
Found New Hardware Wizard Please wait while the wizard installs the software... Juli@ Controller ks.sys To D:\WINDOWS\system32\drivers < Back Next > Cancel- On Windows 2000 and XP, there might appear a message about the “Windows Logo” test. You can simply ignore it and just select ‘Continue Anyway’. Even if Windows displays this message, the driver is completely tested and verified by us (ESI), so it is safe to use it.

text_image
Hardware Installation The software you are installing for this hardware: Juli@ Controller has not passed Windows Logo testing to verify its compatibility with Windows XP. (Tell me why this testing is important.) Continuing your installation of this software may impair or destabilize the correct operation of your system either immediately or in the future. Microsoft strongly recommends that you stop this installation now and contact the hardware vendor for software that has passed Windows Logo testing. Continue Anyway STOP Installation- Juli@ controller driver will be installed.

text_image
Found New Hardware Wizard Completing the Found New Hardware Wizard The wizard has finished installing the software for: Juli@ Controller Click Finish to close the wizard. < Back Finish Cancel
text_image
Found New Hardware Wizard Welcome to the Found New Hardware Wizard This wizard helps you install software for: Juli@Audio If your hardware came with an installation CD or floppy disk, insert it now. What do you want the wizard to do? Install the software automatically (Recommended) Install from a list or specific location (Advanced) Click Next to continue. < Back Next > Cancel- Windows will automatically install the Juli@Audio driver now, with the same procedure.
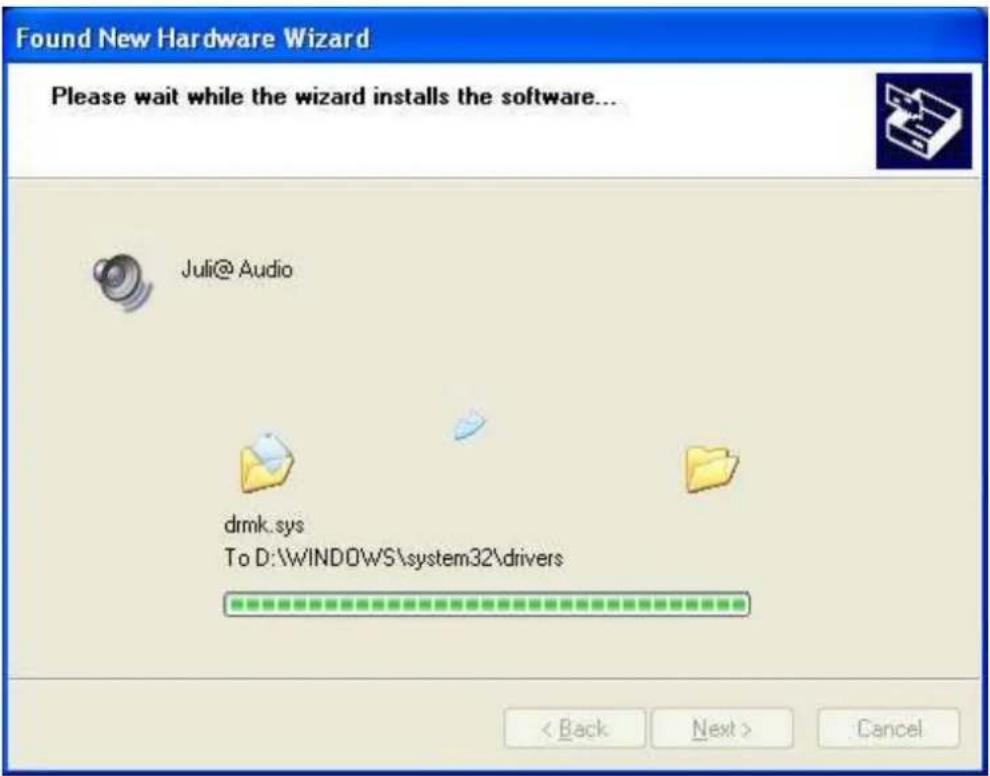
text_image
Found New Hardware Wizard Please wait while the wizard installs the software... Juli@Audio drmk.sys To D:\WINDOWS\system32\drivers < Back Next > Cancel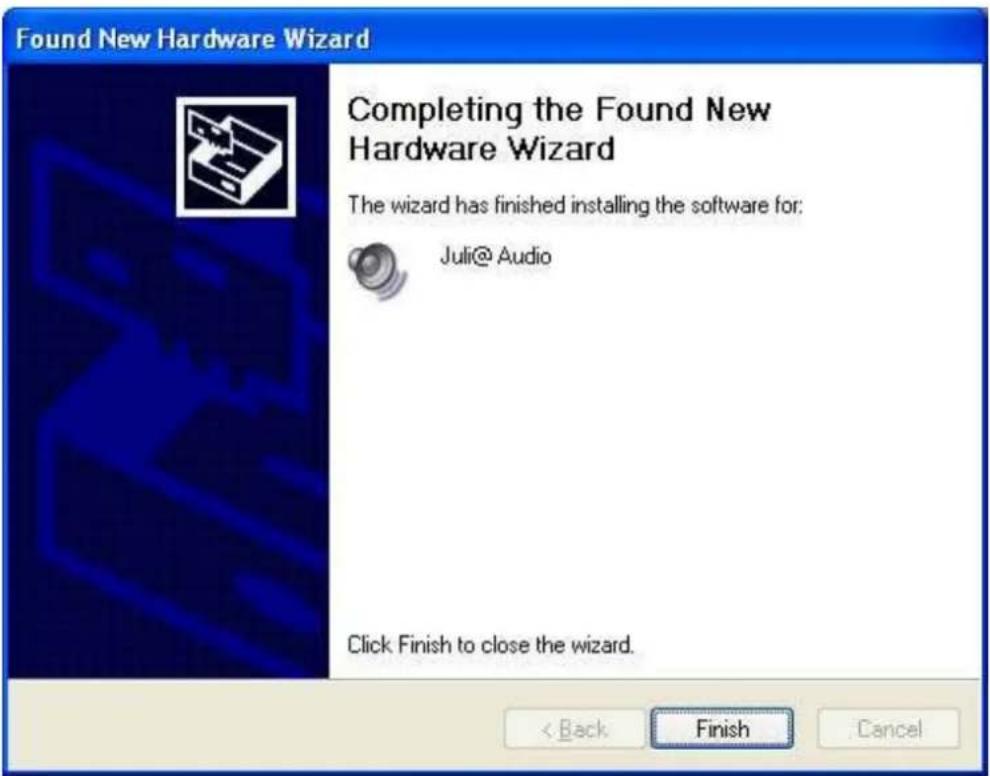
text_image
Found New Hardware Wizard Completing the Found New Hardware Wizard The wizard has finished installing the software for: Juli@Audio Click Finish to close the wizard. < Back Finish CancelWhen your system keeps asking restart the computer, just ignores that and continue to install. When all the necessary device drivers are installed and the system is not asking you to install any further drivers, restart the computer.
- Checking your system.
After you restart Windows, please confirm if the 'ESI' icon is on the system tray.

Go to 'My computer -> Console -> System -> Device Manager'. Check the devices under 'Sound, video and game controllers', if they are installed correctly.

text_image
Device Manager File Action View Help Floppy disk drives Human Interface Devices IDE ATA/ATAPI controllers Keyboards Nice and other pointing devices Monitors Network adapters Ports (COM & LPT) Processors Sound, video and game controllers Audio Codes Juli Audio Juli Controller Legacy Audio Drivers Legacy Video Capture Devices Media Control Devices USB Audio Device Video Codes Syncrosoft Protection Device System devices Universal Serial Bus controllers2. Macintosh
-
After completing the hardware installation for Juli@, you need to install its driver software to use it. Drag "ESI192Driver-2.0.0.dmg" from your driver CD:\ESI\Juli@\MAC directory to the Macintosh.
-
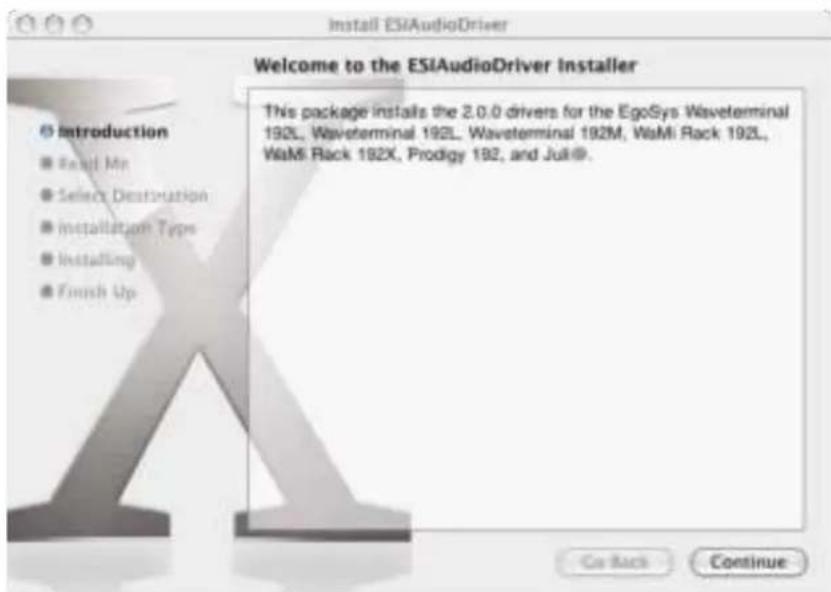
Double click "ESI192Driver-2.0.0.dmg" file to expand the file. Then, Open "ESI192Driver-2.0.0" and double click the .pkg file inside.
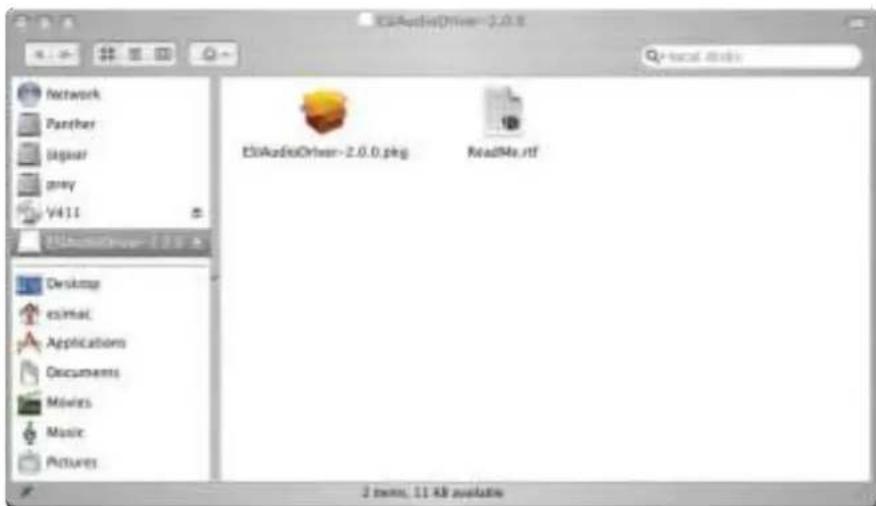
text_image
EditAudioDriver-2.0.0.png EditAudioDriver-2.0.0.png ReadMe.rtf 2 items, 11 KB available- Doubleclicking on the "ESIAudioDriver-2.0.0.pkg" file launches the driver installation. You can see the ESIAudioDriver installer. Select the Continue button.
text_image
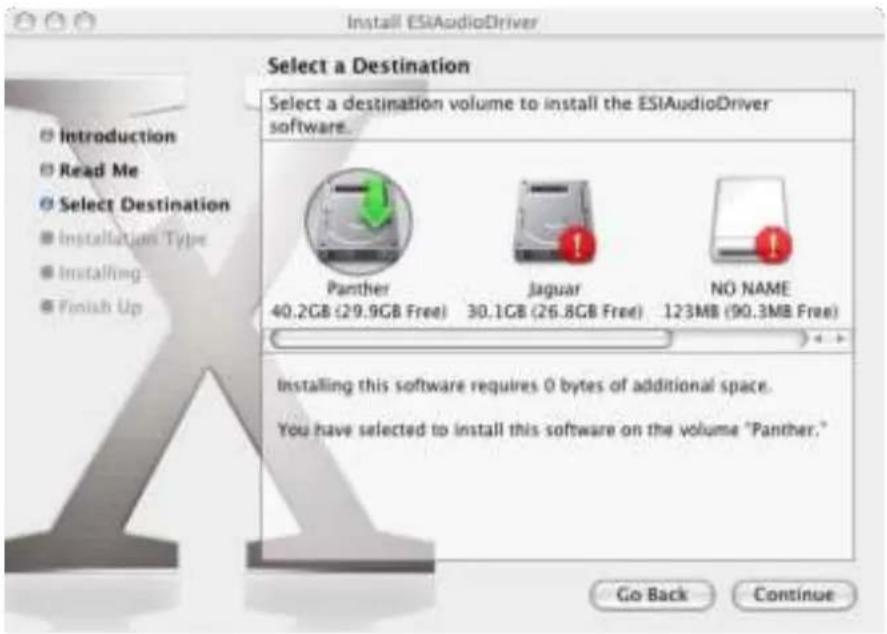
Install ESIAudioDriver Welcome to the ESIAudioDriver Installer This package installs the 2.0.0 drivers for the EgoSys Waveterminal 192L, Waveterminal 192L, Waveterminal 192M, WaMi Rack 192L, WaMi Rack 192X, Prodigy 192, and Juli®. Introduction Read Mt Select Destination Installation Type Installing Finish Up Go Back Continue- Select Continue again on the Read Me tab. The Select a Destination screen will appear. Please select the destination disk to install the drivers. You should use the same volume that you use for the system installation. Usually this volume is called Macintosh HD. Then select Continue button.
text_image
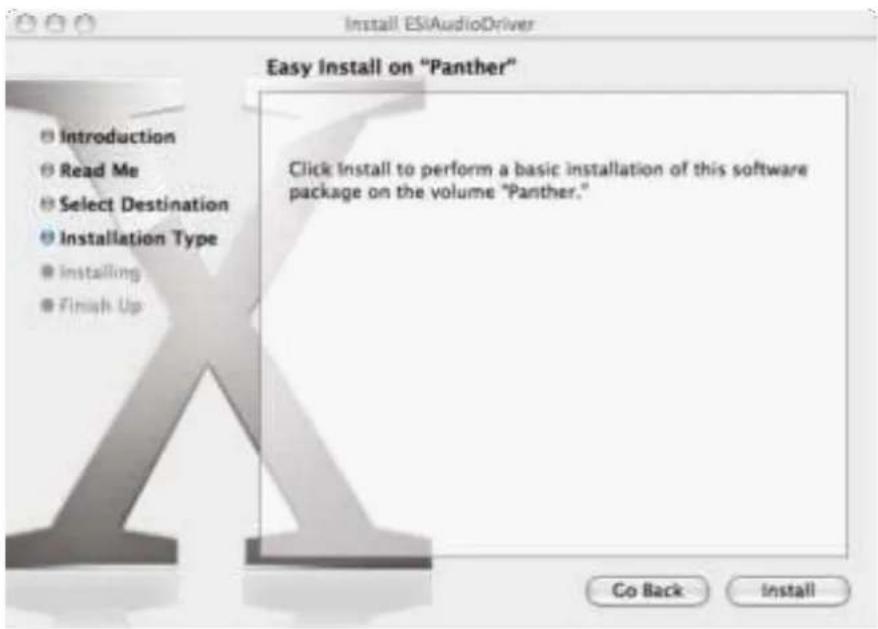
Install ESIAudioDriver Select a Destination Select a destination volume to install the ESIAudioDriver software. Panther 40.2GB (29.9GB Free) Jaguar 30.1GB (26.8GB Free) NO NAME 123MB (90.3MB Free) Installing this software requires 0 bytes of additional space. You have selected to install this software on the volume "Panther." Go Back Continue- Please follow the instructions on screen. Then select Continue button.
text_image
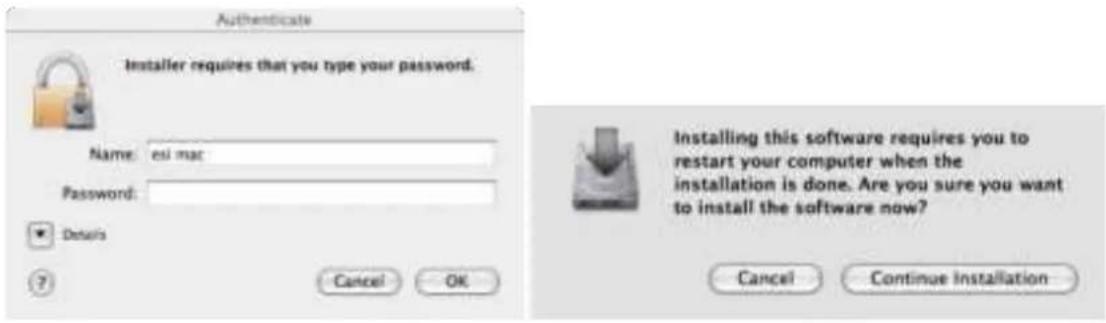
Install ESIAudioDriver Easy Install on "Panther" Introduction Read Me Select Destination Installation Type Installing Finish Up Click Install to perform a basic installation of this software package on the volume "Panther." Co Back Install- The Authenticate windows will appear. Then please enter your Password and select OK button. Then you can see also restart information window. And select Continue Installation button for driver installation. Then files are now copied to your system.
text_image
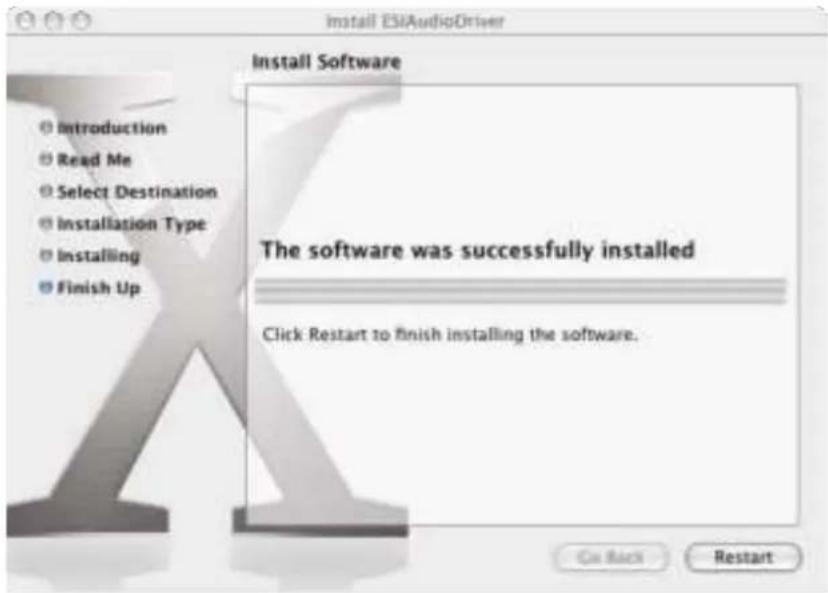
Authenticate Installer requires that you type your password. Name: esi mac Password: Details Cancel OK Installing this software requires you to restart your computer when the installation is done. Are you sure you want to install the software now? Cancel Continue Installation- After the software has been installed you must select the Restart button.
text_image
Install ESIAudioDriver Install Software The software was successfully installed Click Restart to finish installing the software. On Back Restart- After the reboot, you can find the Ego Systems Control icon in the Applications directory of your HDD. It is the main control panel of Juli@.

Ego Systems Control
5. Juli@ Console
1. PC
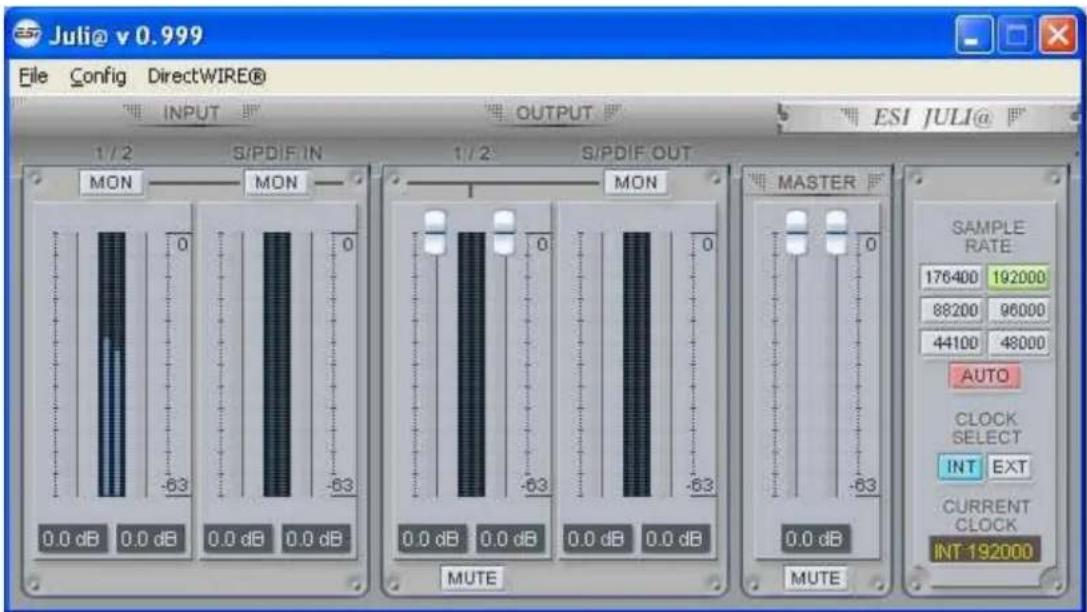
After you completed the hardware and driver installation for Juli@, you need to learn about the Juli@ Console. This console allows you to control your setup for Juli@.
Juli@ is built for easy usage. All input and output controls in the console software are the same. So, if you learn about one control, you can use the others easily.
After successfully installing Juli@’s hardware and driver, you can see the ESI logo icon on the system tray. It is the Juli@ icon and clicking on this icon will launch the console.

text_image
Juli@ v 0.999 File Config DirectWIRE® INPUT OUTPUT 1/2 S/PDIF IN MON MON 0 0 0 0 0.0 dB 0.0 dB 0.0 dB 0.0 dB S/PDIF OUT 1/2 S/PDIF OUT MON 0 0 0 0 0.0 dB 0.0 dB 0.0 dB 0.0 dB MUTE MASTER 0 0 -63 -63 -63 0.0 dB MUTE ESI JULI@ SAMPLE RATE 176400 192000 88200 96000 44100 48000 AUTO CLOCK SELECT INT EXT CURRENT CLOCK INT 1920001. Pull down Menu
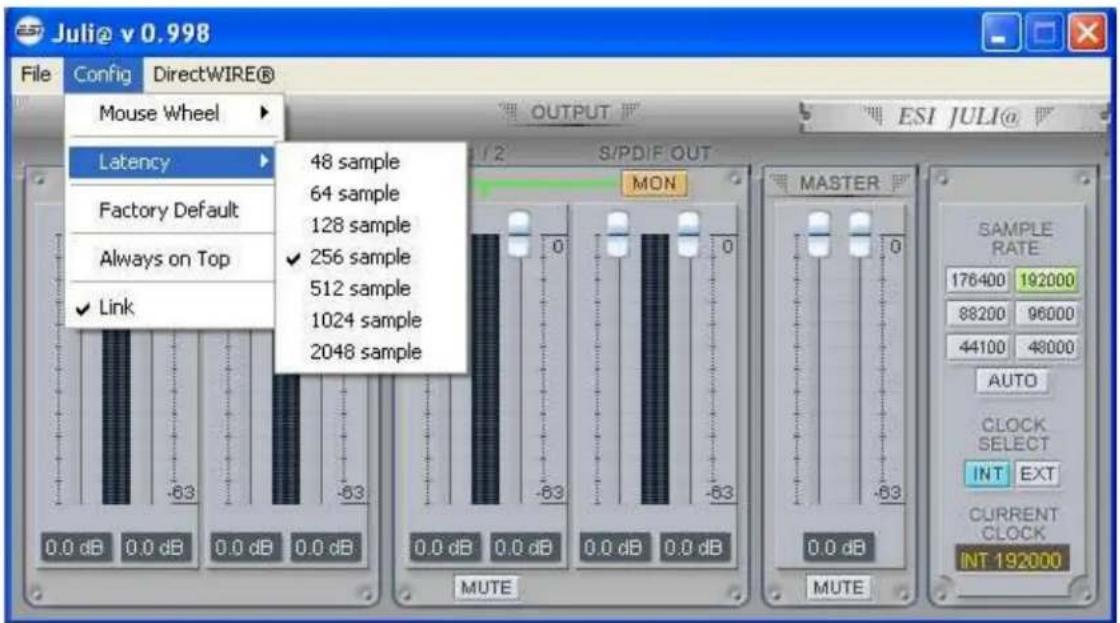
The Juli@ console includes a pull down menu bar that contains the configuration menus for Juli@.
text_image
Juli@ v 0.998 File Config DirectWIRE® Mouse Wheel Latency Factory Default Always on Top ✓ Link 48 sample 64 sample 128 sample ✓ 256 sample 512 sample 1024 sample 2048 sample 0.0 dB 0.0 dB 0.0 dB 0.0 dB 0.0 dB 0.0 dB 0.0 dB 0.0 dB S/PDIF OUT MON MASTER SAMPLE RATE 176400 192000 88200 96000 44100 48000 AUTO CLOCK SELECT INT EXT CURRENT CLOCK INT 192000 MUTE MUTE1. File - Exit
File – Exit will close the Juli@ Console window but it will not shut down the Console. You can always launch the Console by clicking ‘ESI’ icon on the system tray.
2. Config - Mouse Wheel
Controls the increment at which the volume is adjusted when using a mouse wheel. The adjustment step is from 1 to 8.
3. Config - Latency
Adjust the latency (also often referred as buffer size) of the Juli@. A faster latency is achieved by selecting smaller sample size which is ideal for software synthesizer and precise timing recording. However, the latency is also limited by your system performance. For recording, select a sample size between 64 \~ 512, and select 128 or 256 for Pentium 4 systems. Sample sizes of 48, 1024 and 2048 are used in special circumstances of which 48 is reserved for very fast and reliable ASIO driver working environments. The factory default setting is 256.
4. Config - Factory Default
It resets the Console to default settings.
5. Config - Always On Top
This enables to place the Console on top of every open window, which makes it easy to work with Juli@ and other music software simultaneously.
6. Config - Link
Links the L-R faders for stereo operation. Un-select the button, if you need to control the left and right levels independently.
7. DirectWire
(explained later in detail)
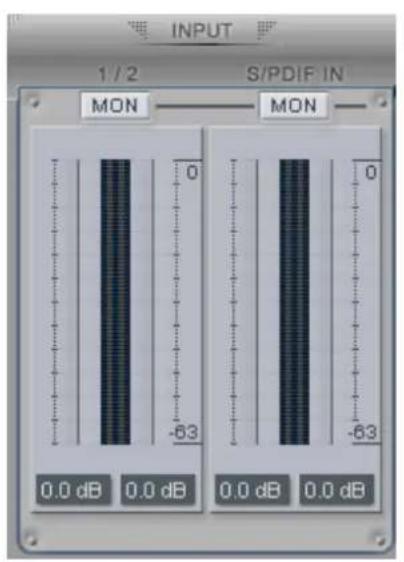
2. Input Panel
text_image
INPUT 1/2 S/PDIF IN MON MON 0 -63 0.0 dB 0.0 dB 0.0 dB 0.0 dB
text_image
INPUT 1/2 S/PDIF IN MON MON 0 -63 0.0 dB 0.0 dB 0.0 dB 0.0 dBAnalog Input 1/2
This is where you can adjust the input monitoring level for the analog input 1/2. When you active 'MON' button of 1/2, the input monitoring level fader appears (displayed on the right picture). Now the analog input signal is routed to output 1,2 and you can monitor (listen to) the analog input signal in real-time. The monitoring level can be set using the mouse, mouse wheel, or cursor keys.
S/PDIF Input
This is where you can adjust the input monitoring level of the S/PDIF input. When you active the 'MON' button of S/PDIF, the input monitoring level fader appears (displayed on the right picture). The S/PDIF input signal is then routed to output 1,2 and you can monitor the S/PDIF input signal in real-time. The monitoring level can be set using the mouse, mouse wheel, or cursor keys.
MON
When you activate this button, input monitoring (for monitoring via the analog output 1,2) level fader will appear for this channel.
MUTE
Select this button to mute each signal source.
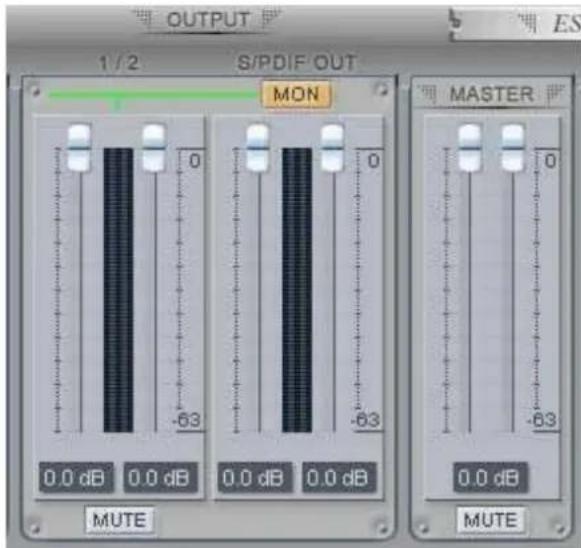
3. Output Panel

text_image
OUTPUT 1/2 S/PDIF OUT MON 0.0 dB 0.0 dB 0.0 dB 0.0 dB MUTE MASTER 0.0 dB MUTEAnalog Output 1/2
This is where you can control the output signal. The level can be set using the mouse, mouse wheel, or cursor keys.
S/PDIF Out
This is where you can adjust output-monitoring level of the S/PDIF out/playback signal. When you active 'MON' button of S/PDIF Out, the S/PDIF output level fader will appear (displayed on the next picture). Now the S/PDIF out/playback signal will be routed to the analog output 1/2 and you can listen to the signal via the analog output in real-time. The monitoring level can be set using the mouse, mouse wheel, or cursor keys.
text_image
OUTPUT 1/2 S/PDIF OUT MON 0.0 dB 0.0 dB 0.0 dB 0.0 dB MUTE MASTER 0.0 dB MUTEMASTER FADER
Allows you to change the level of the final output signal. The level can be set using the mouse, mouse wheel, or cursor keys.
MUTE
Select this button to mute each signal source.
4. Sample Rate and Clock
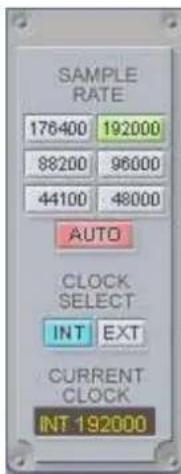
text_image
SAMPLE RATE 176400 192000 88200 96000 44100 48000 AUTO CLOCK SELECT INT EXT CURRENT CLOCK INT 192000Sample Rate
Selects the sample rate for Juli@. The green lit will indicate current sample rate. Juli@ supports 44.1, 48, 88.2, 96, 176.4, 192 (kHz) as sample rates. Select ‘AUTO’ to match the sample rate of the played audio source automatically (a red light shows that AUTO is on). Deselecting Auto mode allows you to set the sample rate manually (red light AUTO is off).
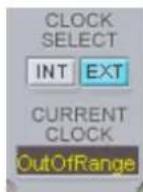
Clock Select
Selects the digital clock source for the Juli@.
(INT): Selects Juli@’s internal clock, which becomes the master clock. This mode must be selected when Juli@ is used alone or any other digital device is configured as slave device.
(EXT): Selects the digital clock or audio data from an external device as the clock source. The external device will be set as the Master device and the Juli@ will be set and operate as the Slave device.
* In the EXT clock mode, Juli@ can detect the external clock automatically. If the external clock is not correct, the Console displays the message ‘Out Of Range’ like shown below.
2. Macintosh
After you completed the hardware and driver installation for Juli@, you need to learn about the Ego Systems Control utility for Juli@ which allows you to control the settings of the hardware.
The software is built for easy usage. All input and output controls for each channel in the panel are similar. So, if you know how to control one channel, you can do that for the other channels easily as well.

text_image
Ego Systems Control Edit Configuration Cards Window Help1. Pull down Menu
Ego Systems Control
About: Ego System Control version information.
Configuration
Arrow key: Defines how much you can move the sliders (±1.4dB to ±12.0dB) with arrow keys.
Clock Source: Allows you to select the master clock source.
Sample Rate: You can select the sample rate for Juli@, the supported rates are 44.1, 48, 88.2, 96, 176.4, and 192 (kHz)
Cards
Juli@: Normally you can select Juli@ only, however if you have installed another ESI PCI card, then you can choose the card which you want to control. When you select an entry, the control panel will be displayed:
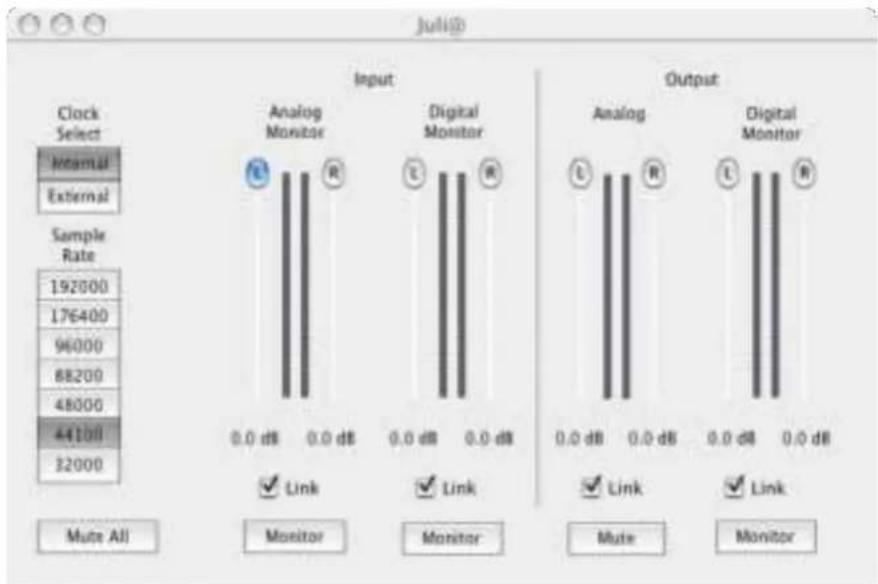
text_image
Juli@ Clock Select Internal External Sample Rate 192000 176400 96000 88200 48000 44100 32000 Input Analog Monitor Digital Monitor Output Analog Digital Monitor 0.0 dB 0.0 dB 0.0 dB 0.0 dB 0.0 dB 0.0 dB 0.0 dB 0.0 dB Mute All Monitor Monitor Mute Monitor Mute All MonitorYou can control input and output level via the faders. The link check box allows you to control the left and right audio channels simultaneously or independently.
5. Block Diagram
flowchart
graph TD
    A["Input 1"] --> B["ADC"]
    C["Input 2"] --> B
    D["Input 3"] --> B
    E["Input 4"] --> F["4x DAC"]
    G["Input 5"] --> F
    H["Input 6"] --> F
    I["Input 7"] --> F
    J["Input 8"] --> F
    K["Input 9"] --> F
    L["Input 10"] --> F
    M["Input 11"] --> F
    N["Input 12"] --> F
    O["Input 13"] --> F
    P["Input 14"] --> F
    Q["Input 15"] --> F
    R["Input 16"] --> F
    S["Input 17"] --> F
    T["Input 18"] --> F
    U["Input 19"] --> F
    V["Input 20"] --> F
    W["Input 21"] --> F
    X["Input 22"] --> F
    Y["Input 23"] --> F
    Z["Input 24"] --> F
    AA["Input 25"] --> F
    AB["Input 26"] --> F
    AC["Input 27"] --> F
    AD["Input 28"] --> F
    AE["Input 29"] --> F
    AF["Input 30"] --> F
    AG["Input 31"] --> F
    AH["Input 32"] --> F
    AI["Input 33"] --> F
    AJ["Input 34"] --> F
    AK["Input 35"] --> F
    AL["Input 36"] --> F
    AM["Input 37"] --> F
    AN["Input 38"] --> F
    AO["Input 39"] --> F
    AP["Input 40"] --> F
    AQ["Input 41"] --> F
    AR["Input 42"] --> F
    AS["Input 43"] --> F
    AT["Input 44"] --> F
    AU["Input 45"] --> F
    AV["Input 46"] --> F
    AW["Input 47"] --> F
    AX["Input 48"] --> F
    AY["Add to MON"]
    AZ["Add to MON"]
    BA["Add to MON"]
    BB["Add to MON"]
    BC["Add to MON"]
    BD["Add to MON"]
    BE["Add to MON"]
    BF["Add to MON"]
    BG["Add to MON"]
    BH["Add to MON"]
    BI["Add to MON"]
    BJ["Add to MON"]
    BK["Add to MON"]
    BL["Add to MON"]
    BM["Add to MON"]
    BN["Add to MON"]
    BO["Add to MON"]
    BP["Add to MON"]
    BPB["Add to MON"]
    BPBb["Add to MON"]
    BPc["Add to MON"]
    BPcB["Add to MON"]
    BPcC["Add to MON"]
    BPcD["Add to MON"]
    BPcE["Add to MON"]
    BPcF["Add to MON"]
    BPcG["Add to MON"]
    BPcH["Add to MON"]
    BPcI["Add to MON"]
    BPcJ["Add to MON"]
    BPcK["Add to MON"]
    BPcL["Add to MON"]
    BPcM["Add to MON"]
    BPcN["Add to MON"]
    BPcO["Add to MON"]
    BPcP["Add to MON"]
    BPcQ["Add to MON"]
    BPcR["Add to MON"]
    BPcS["Add to MON"]
    BPcT["Add to MON"]
    BPcU["Add to MON"]
    BPcV["Add to MON"]
    BPcW["Add to MON"]
    BPcX["Add to MON"]
    BPcY["Add to MON"]
    BPcZ["Add to MON"]
    BPcWb["DIN JACK"]
    BPcWb["DIN JACK"]
    BPcWb["DIN JACK"]
    BPcWb["DIN JACK"]
    BPcWb["DIN JACK"]
    BPcWb["DIN JACK"]
    BPcWb["DIN JACK"]
    BPcWb["DIN JACK"]
    BPcWb["DIN JACK"]
    BPcWb["DIN JACK"]
    BPcWb["DIN JACK"]
    BPcWb["DIN JACK"]

    subgraph PCI_CONTROLLER
        direction TB
        direction LR
        direction BS
        direction BSML
        direction BSMLML
        direction BSMLMLML
        direction BSMLMLMLMLMLMLMLMLMLMLMLMLMLMLMLMLMLMLMLMLMLMLMLMLMLMLMLMLMLMLMLMLMLMLMLMLMLMLMLMLMLMLMLMLMLMLMLMLMLMLMLMLMLMLMLMLMLMLMLMLMLMLMLMLMLMLMLMLMLMLMLMLMLMLMLMLMLMLMLMLMLMLMLMLMLMLMLMLMLMLMLMLMLMLMLMLMLMLMLMLLL

        direction TB
        direction LR
        direction BS
        direction BSMLL
        direction BSMLLMLL
        direction BSMLLMLLMLL
        direction BSMLLMLLMLL
        direction BSMLLMLLMLL
        direction BSMLLMLLMLL
        direction BSMALEMSL
        direction BSMALEMSLRL
        direction BSMALEMSLRLMCL
        direction BSMALEMSLRLMCLMCL
        direction BSMALEMSLRLMCLMCLMCLMCLMCLMCLMCLMCLMCLMCLMCLMCLMCLMCLMCLMCLMCLMCLMCLMCLMCLMCLMCLMCLMCLMCLMCLMCLMCLMCLMCLMCLMCLMCLMCLMCLMCLMCLMCLMCLMCLMCLMCLMCLMCLMCLMCLMCLMCLMCLMGLMCLMGLMGLMGLMGLMGLMGLMGLMGLMGLMGLMGLMGLMGLMGLMGLMGLMGLMGLMGLMGLMGLMGLMGLMGLMGLMGLMGLMGLMGLMGLMGLMGLMGLMGLMGLMGLMGLMGLMGLMGLMGLMGLMGLMGLMGLMGLMGLMGLMGLMGLMQLMQLMQLMQLMQLMQLMQLMQLMQLMQLMQLMQLMQLMQLMQLMQLMQLMQLMQLMQLMQLMQLMQLMQLMQLMQLMQLMQLMQLMQLMQLMQLMQLMQLMQLMQLMQLMQLMQLMQLMQLMQLMQLMQLMQL MLO MLO MLO MLO MLO MLO MLO MLO MLO MLO MLO MLO MLO MLO MLO MLO MLO MLO MLO MLO MLO MLO MLO MLO MLO MLO MLO MLO MLO MLO MLO MLO MLO MLO MLO MLO MLO MLO MLO MLO MLO MLO MLO MLO MLO MLO MLO MLO MLO MLO MOL MLO MLO MLO MLO MLO MLO MLO MLO MLO MLO MLO MLO MLO MLO MLO MLO MLO MLO MLO MLO MLO MLO MLO MLO MLO MLO MLO MLO MLO MLO MLO MLO MLO MLO MLO MLO MLO MLO MLO MLO MLO MLO MLO MLO MLO MLO MLO MLO MLO MLC |
6. Setting in Applications
This chapter contains basic configuration examples for some popular software applications. Please also refer to the manual of every audio software you use for detailed information.
1. PC
1. Windows Multimedia setup
The Windows Multimedia setup is required if you want to use Juli@ as the main sound device for Windows multimedia applications.
Go to ‘My computer-> Console -> Sounds and Audio Device Properties -> Audio’. Select the Juli@ driver as your playback device. Juli@ Ch12 needs to be selected to use the analog input or output. Juli@ Ch34 needs to be used to use the S/PDIF I/O.

text_image
Sounds and Audio Devices Properties Volume Sounds Audio Voice Hardware Sound playback Default device: Juli@ Ch12 Juli@ Ch1234 Juli@ Ch12 Juli@ Ch34 Sound recording Default device: Juli@ Ch12 Volume... Advanced... MIDI music playback Default device: Juli@ MIDI Volume... About... Use only default devices OK Cancel Apply2. Tracktion
Juli@ comes bundled with Tracktion.
In Tracktion, select ‘Settings’ then go to the ‘audio devices’ tab. Choose ‘Juli@’ as Playback and Record device. You can use Tracktion as ASIO or MME/Direct sound application.
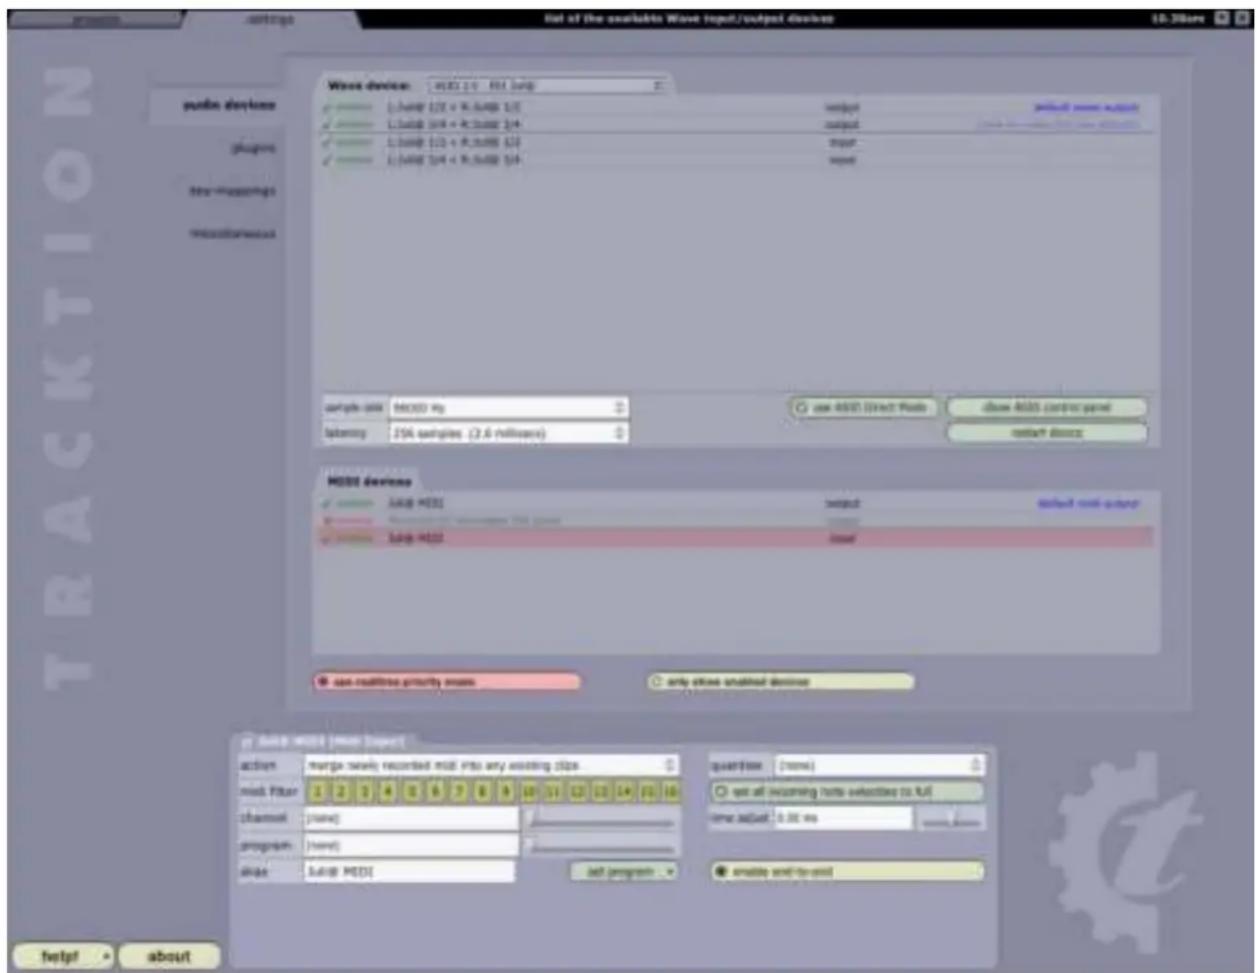
text_image
List of the available Wave input/output devices 10.36ure wave device: MSCI 2.01 Reli loop L_Lamp 1/2 + R_Lamp 2/5 L_Lamp 2/4 + R_Lamp 3/4 L_Lamp 1/2 + R_Lamp 5/4 L_Lamp 2/4 + R_Lamp 5/4 input output select mode output select mode output select mode output select mode output select mode output select mode output select mode output select mode output select mode output select mode output select mode output select mode output select mode output select mode output select mode output select mode output select mode output select mode output select mode output select mode output select mode output select mode output select mode output select mode output select mode output select mode输出 select mode output select mode output select mode output select mode output select mode output select mode output select mode output select mode output select mode output select mode output select mode output select mode output select mode output select mode output select mode output select mode output select mode output select mode output select mode output select mode output select mode output select mode output select mode output select mode output select mode outputs select mode outputs select mode outputs select mode outputs select mode outputs select mode outputs select mode outputs select mode outputs select mode outputs select mode outputs select mode outputs select mode outputs select mode outputs select mode outputs select mode outputs select mode outputs select mode outputs select mode outputs select mode outputs select mode outputs select mode outputs select mode outputs select mode outputs select mode outputs select mode outputs select mode inputs: select modes: select modes: select modes: select modes: select modes: select modes: select modes: select modes: select modes: select modes: select modes: select modes: select modes: select modes: select modes: select modes: select modes: select modes: select modes: select modes: select modes: select modes: select modes: select modes: select modes: select modes: select modes: select modes: select modes: select modes: select modes: select modes: select modes: select modes: new user. Select modes: new user. Select modes: new user. Select modes: new user. Select modes: new user. Select modes: new user. Select modes: new user. Select modes: new user. Select modes: new user. Select modes: new user. Select modes: new user. Select modes: new user. Select modes: new user. Select modes: new user. Select modes: new user. Select modes: new user. Select modes: new user. Select modes: new users. Select modes: new users. Select modes: new users. Select modes: new users. Select modes: new users. Select modes: new users. Select modes: new users. Select modes: new users. Select modes: new users. Select modes: new users. Select modes: new users. Select modes: new users. Select modes: new users. Select modes: new users. Select modes: new users. Select modes: new users. Select modes: new users. Select modes: select modes: select modes: select modes: select modes: select modes: select modes: select modes: select modes: select modes: select modes: select modes: select modes: select modes: select modes: select modes: select modes: select modes: select modes: select modes: select modes: select modes: select modes: select modes: select modes: select modes: select modes: select modes: select modes: select modes: select modes: select modes: select modes: select models: select models: select models: select models: select models: select models: select models: select models: select models: select models: select models: select models: select models: select models: select models: select models: select models: select models: select models: select models: select models: select models: select models: select models: select models: select models: select models: select models: select models: select models: Select model: new user. Select model: new user. Select model: new user. Select model: new user. Select model: new user. Select model: new user. Select model: new user. Select model: new user. Select model: new user. Select model: new user. Select model: new user. Select model: new user. Select model: new user. Select model: new user. Select model: new user. Select model: new user. Select model: new user. Select model: newuser; Select model: newuser; Select model: newuser; Select model: newuser; Select model: newuser; Select model: newuser; Select model: newuser; Select model: newuser; Select model: newuser; Select model: newuser; Select model: newuser; Select model: newuser; Select model: newuser; Select model: newuser; Select model: newuser; Select model: newuser; Select model: newuser; Select model: Newuser; Select model: Newuser; Select model: Newuser; Select model: Newuser; Select model: Newuser; Select model: Newuser; Select model: Newuser; Select model: Newuser; Select model: Newuser; Select model: Newuser; Select model: Newuser; Select model: Newuser; Select model: Newuser; Select model: Newuser; Select model: Newuser; Select model: Newuser; Select model: Newuser; Select models:3. Cubase
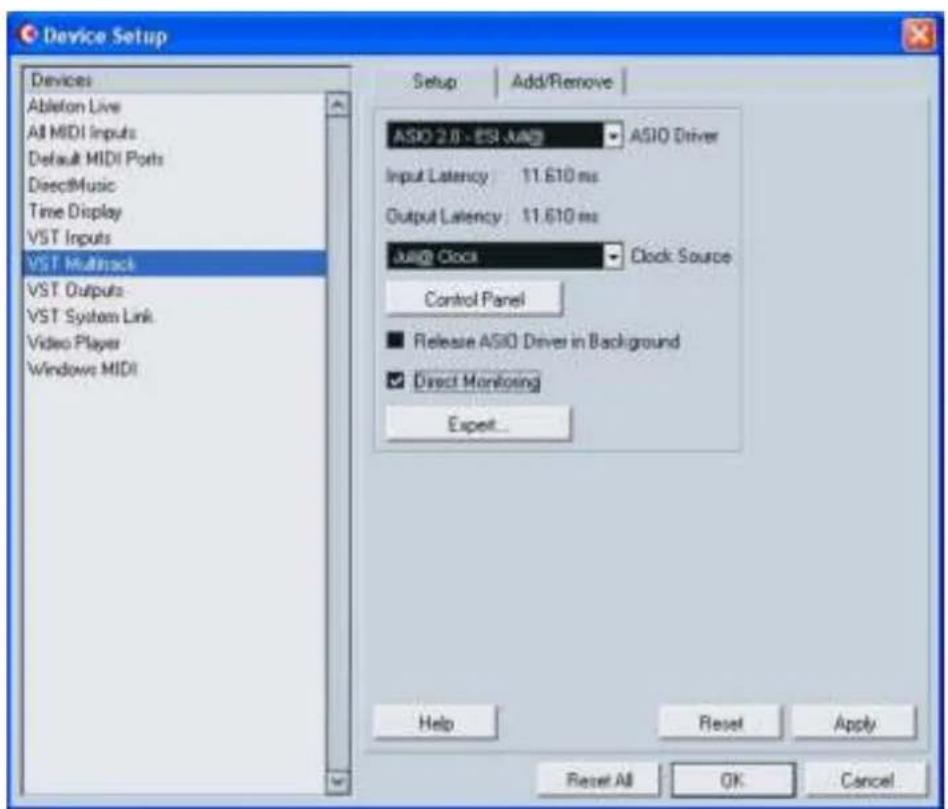
After launching Cubase, go to 'Device -> Device Setup -> VST Multitrack'. Select 'ASIO 2.0 - Juli@' as ASIO device. Then go to 'Default MIDI Ports' and select Juli@ MIDI. Note: clicking ASIO Control Panel will not do anything here. Make sure you click the 'Apply' button after changing the settings.
text_image
Device Setup Devices Ableton Live All MIDI Inputs Default MIDI Ports DirectMusic Time Display VST Inputs VST Multifock VST Outputs VST System Link Video Player Windows MIDI Setup | Add/Remove | ASIO 2.0 - ESI - JAGI ASIO Driver Input Latency 11.610 ms Output Latency 11.610 ms Jag@ Clock Clock Source Control Panel ■ Release ASIO Driver in Background ✓ Direct Monitoring Expect... Help Reset Apply Reset All OK Cancel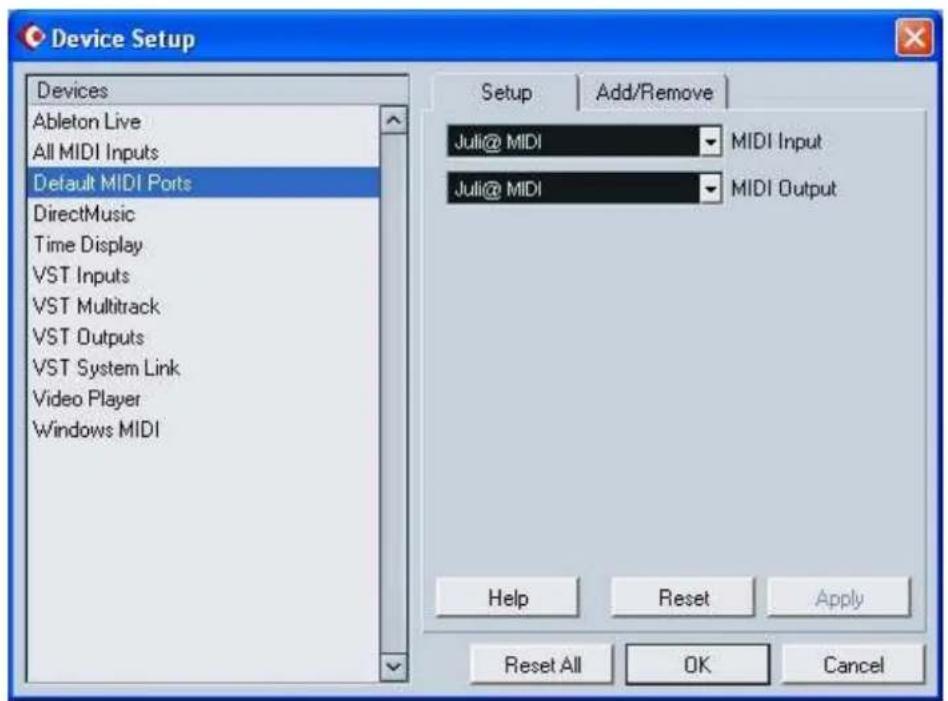
text_image
Device Setup Devices Ableton Live All MIDI Inputs Default MIDI Ports DirectMusic Time Display VST Inputs VST Multitrack VST Outputs VST System Link Video Player Windows MIDI Setup Add/Remove Juli@ MIDI Mali Input Juli@ MIDI MIDI Output Help Reset Apply Reset All OK Cancel4. Cakewalk SONAR
There are few steps to configure SONAR, which supports either WDM or ASIO drivers. After launching SONAR, go to 'Options > Audio' ...
- WDM/KS mode - Change the settings as shown below.
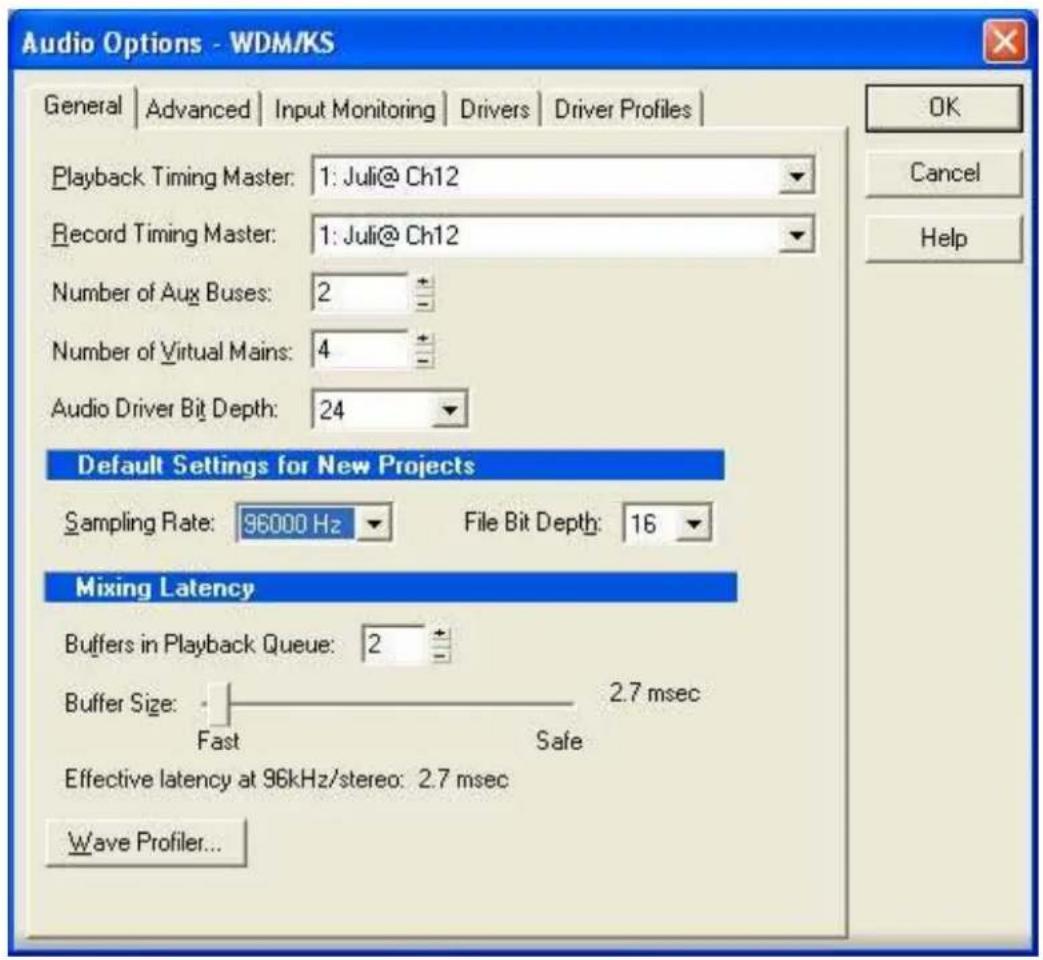
text_image
Audio Options - WDM/KS General | Advanced | Input Monitoring | Drivers | Driver Profiles | Playback Timing Master: 1: Juli@ Ch12 Record Timing Master: 1: Juli@ Ch12 Number of Aux Buses: 2 Number of Virtual Mains: 4 Audio Driver Bit Depth: 24 Default Settings for New Projects Sampling Rate: 96000 Hz File Bit Depth: 16 Mixing Latency Buffers in Playback Queue: 2 Buffer Size: Fast Safe Effective latency at 96kHz/stereo: 2.7 msec Wave Profiler...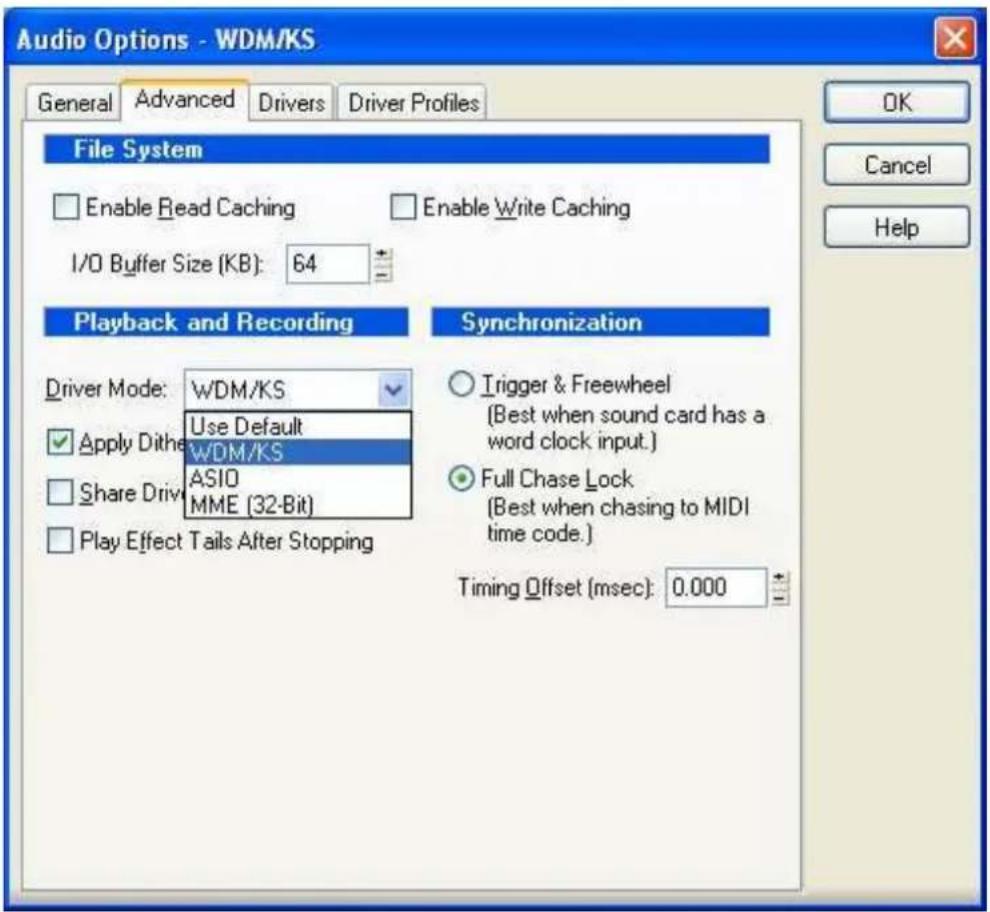
text_image
Audio Options - WDM/KS General Advanced Drivers Driver Profiles File System Enable Read Caching Enable Write Caching I/O Buffer Size (KB): 64 Playback and Recording Synchronization Driver Mode: WDM/KS Use Default WDM/KS ASIO MME (32-Bit) Apply Dither Share Drive Play Effect Tails After Stopping Trigger & Freewheel (Best when sound card has a word clock input.) Full Chase Lock (Best when chasing to MIDI time code.) Timing Offset (msec): 0.000 OK Cancel HelpThe input and output drivers have to matching each other. Restart SONAR after the settings have changed.
2. ASIO mode
*SONAR 2.2 and newer supports ASIO. With Juli@, ASIO is recommended instead of WDM when you use SONAR.
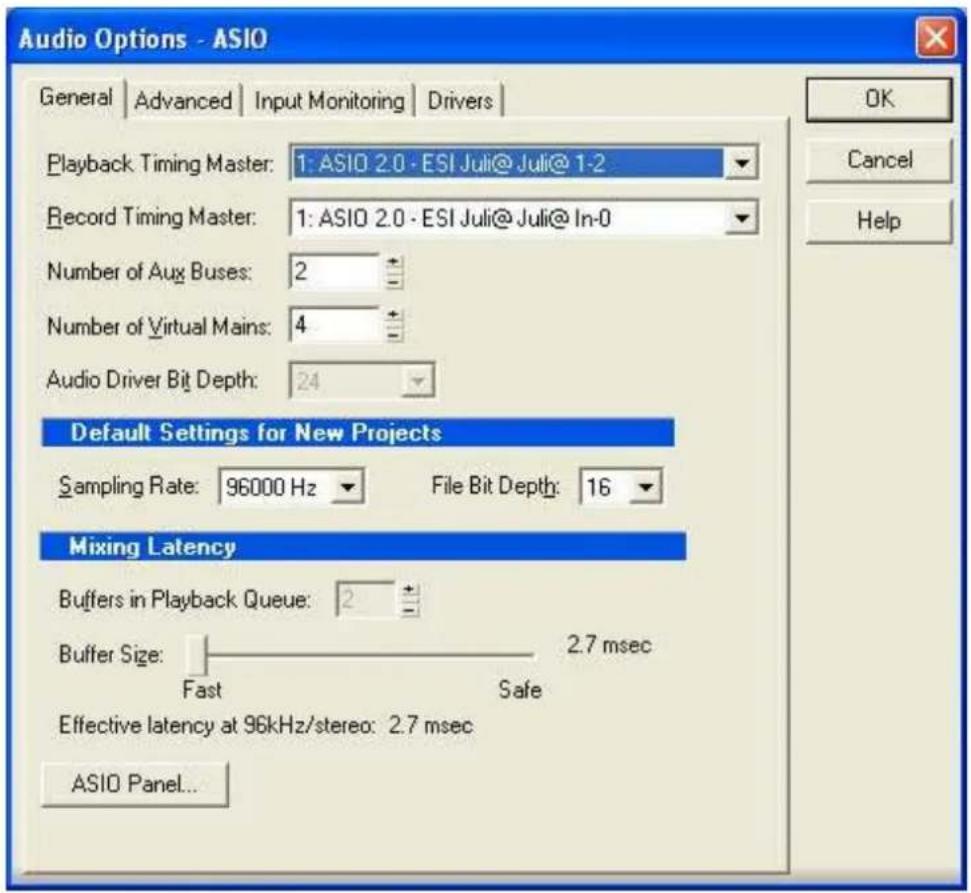
First, change the ‘Driver Mode’ to ASIO on the ‘Advanced’ tab of as shown below. Then, restart SONAR.
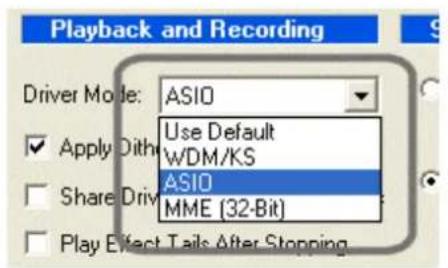
text_image
Playback and Recording Driver Mode: ASIO Use Default WDM/KS ASIO MME (32-Bit) Apply Dith Share Driv Play Effect Tails After StoppingThen, change the settings as shown below.
text_image
Audio Options - ASIO General | Advanced | Input Monitoring | Drivers | Playback Timing Master: 1: ASIO 2.0 - ESI Juli@Juli@1-2 Record Timing Master: 1: ASIO 2.0 - ESI Juli@Juli@In-0 Number of Aux Buses: 2 Number of Virtual Mains: 4 Audio Driver Bit Depth: 24 Default Settings for New Projects Sampling Rate: 96000 Hz File Bit Depth: 16 Mixing Latency Buffers in Playback Queue: 2 Buffer Size: Fast Safe Effective latency at 96kHz/stereo: 2.7 msec ASIO Panel... OK Cancel Help*Warning: Enabling SONAR's software Input monitoring may introduce feedback loops. You MUST disable/mute Juli@ input monitoring before using SONAR's software input monitoring.
5. Wavelab
After launching Wave Lab, go to 'Options -> Preference -> Audio Card'. Select either 'MME-WDM 1-Juli@ Ch12' or 'ASIO 2.0 -Juli@'.

text_image
Preferences Tempo/Time code Audio Database CD Burning Sync General Audio Card File Appearance Editing Display Playback MME wDM.Jub@Ch12 Buffer Number 6 Buffer Size 16384 Latency (16bit/44.1kHz stereo): 557 ms Convert mono to stereo Recording MME wDM.Jub@Ch12 Buffer Number 6 Buffer Size 16384 Preferred Playback Resolution 16 bit 20 bit 24 bit 24 bit alt Perform short fade-in when starting playback Auto-Stop if drops out Threshold 20 Playback Browser [audio Res] Sensitivity 300 ms Restrict to Play Tool Playback cursor Get position from audio driver Correction (+ - 500 ms) 0 ms OK Cancel Help6. Giga Studio (v. 2.20.42 or higher)
After launching GIGASTUDIO, select 'Settings' from the menu on the left.

text_image
Port 1 Port 2 Port 3 Port 4 DSP Station Settings Diagnostics HelpOn the right section, select 'Juli@ -GSIF' for the hardware. Also, make sure to use the same sample rate and bit depth as in your sequencer software.

text_image
File Edit View Insert Help File Edit -0.05 1 File Edit -41 sec File Edit -2.00 File Edit -0.05 File Edit -0.05 File Edit -0.05 File Edit -0.05 File Edit -0.05 File Edit -0.05 File Edit -0.05 File Edit -0.05 File Edit -0.05 File Edit -0.05 File Edit -0.05 File Edit -0.05 File Edit -0.05 File Edit - File Edit -0.05 File Edit -0.05 File Edit -0.05 File Edit -0.05 File Edit -0.05 File Edit -0.05 File Edit -0.05 File Edit -0.05 File Edit -0.05 File Edit -0.05 File Edit -0.05 File Edit -0.05 File Edit -1.00 File Edit -1.00 File Edit -1.00 File Edit -1.00 File Edit -1.00 File Edit -1.00 File Edit -1.00 File Edit -1.00 File Edit -1.00 File Edit -1.00 File Edit -1.00 File Edit -1.00 File Edit -1.00 File Edit 1: 1: 1: 1: 1: 1: 1: 1: 1: 1: 1: 1: 1: 1: 1: 1: 1: 1: 1: 1: 1: 1: 1: 1: 1: 1: 1: 1: 1: 1: 1: 1: 1: 1: File Edit -0.05 1 File Edit -41 sec File Edit -2.00 File Edit -1.00 File Edit -1.00 File Edit -1.00 File Edit -1.00 File Edit -1.00 File Edit -1.00 File Edit -1.00 File Edit -1.00 File Edit -1.00 File Edit -1.00 File Edit -1.00 File Edit -1.002. Macintosh
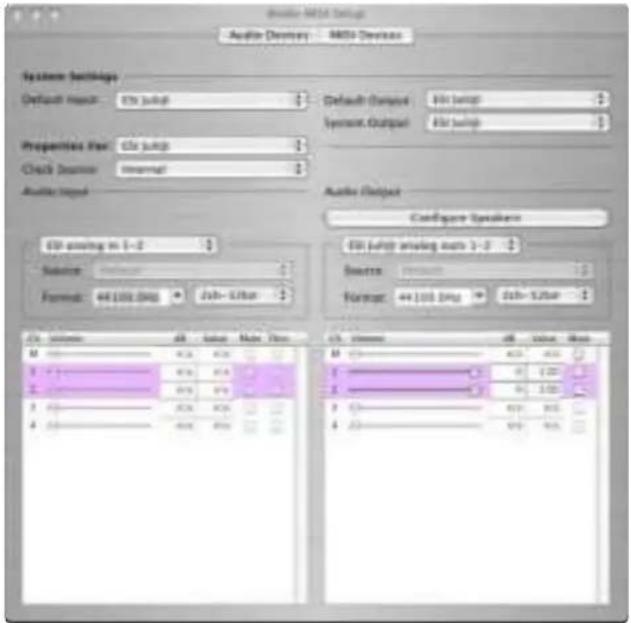
1. Audio MIDI setup
You can find AudioMIDI Setup on your HDD in the Applications\Utilities directory. It is a basic application for audio input, output and MIDI configuration. Select ESI Juli@ device as the default audio input/output device as shown below.
text_image
Audio MDA Setup Audio Directory - MDA Devices System Settings Default mode: 10x jump Default Compact: 10x jump System Output: 10x jump Properties Set: 10x jump Check Source: Internal Audio Input Audio Output Certificate Speaker 10x jump in 1-2 Source: Default Format: 44.106 dBg Jsh-1/10ar 10x jump driving mode 1-2 Source: Default Format: 44.106 dBg Jsh-1/10ar 10x M 1 2 3 4 5 6 7 8 9 10 11 12 13 14 15 16 17 18 19 20 21 22 23 24 25 26 27 28 29 30 31 32 33 34 35 36 37 38 39 40 41 42 43 44 45 46 47 48 49 50 51 52 53 54 55 56 57 58 59 60 61 62 63 64 65 66 67 68 69 70 71 72 73 74 75 76 77 78 79 802. Cubase SX
After launching Cubase, go to 'Device Setup' ->'VST Multitrack'. Select 'ESI Juli@' as ASIO Driver for ASIO driver.
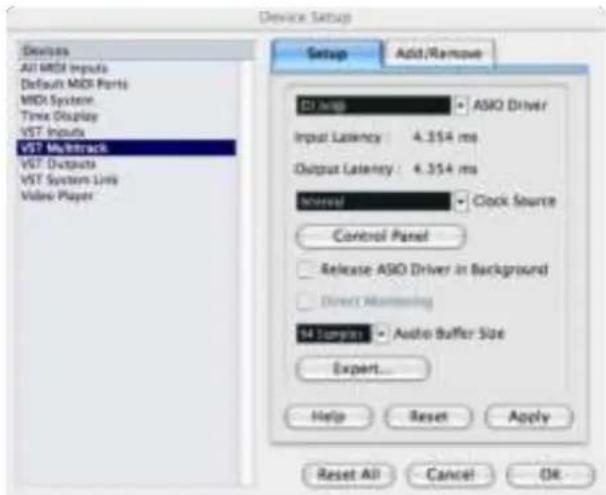
text_image
Device Setup Devices All MDI Inputs Default MDI Ports MDI System Time Display VST Inputs VST Mkttrack VST Outputs VST System Link Video Player Setup Add/Remove DI Help ASIO Driver Input Latency 4.354 ms Output Latency 4.354 ms Interval Clock Source Control Panel Release ASD Driver in Background Direct Monitoring M1 Options Audio Buffer Size Expert... Help Reset Apply Reset All Cancel OK3. Tracktion
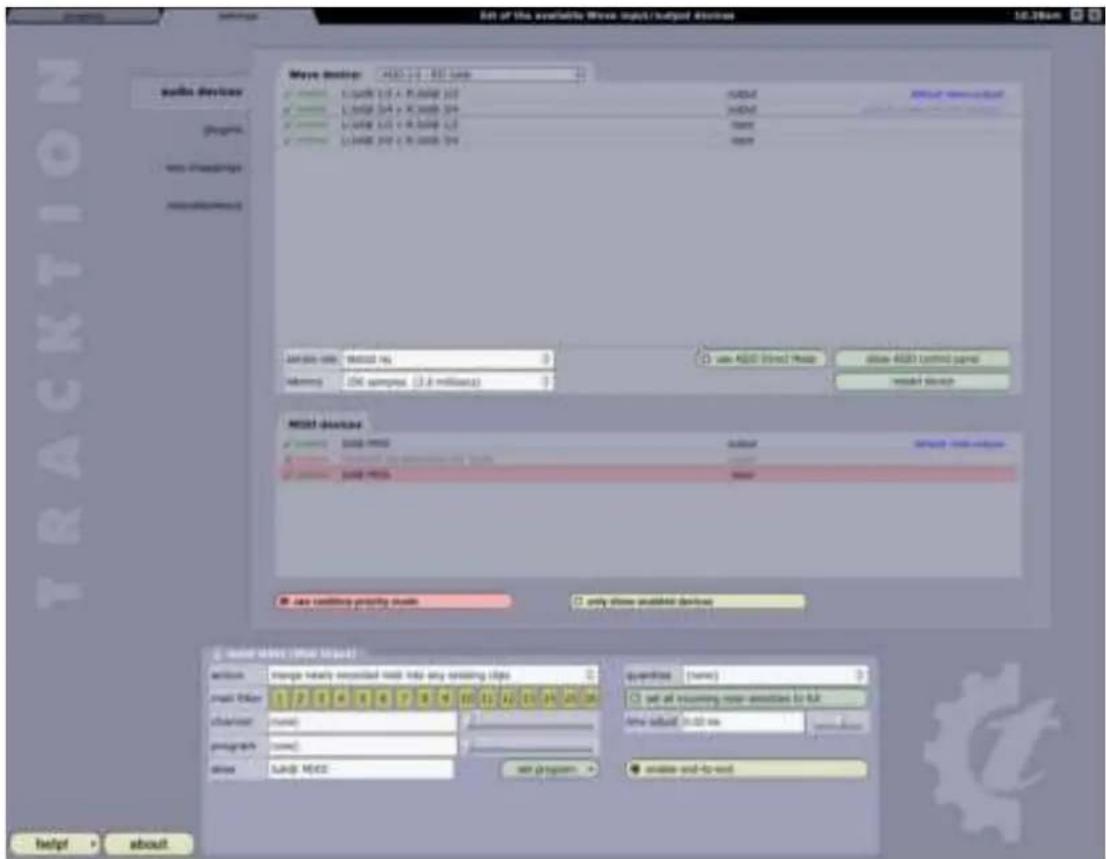
We provide Traction as bundle software. In Tracktion, select ‘Settings’ then ‘audio devices’ tab. Choose ‘ESI Juli@’ as Output and Input Device.
text_image
Set of the availability: Wave Input/output devices Myst device: AEC 1.0 - AEC typevalue: 1.0 + 1.0
value: 1.0 + 1.0
value: 1.0 + 1.0
value: 1.0 + 1.0
value: 1.0 + 1.0
value: 1.0 + 1.0
value: 1.0 + 1.0
value: 1.0 + 1.0
value: 1.0
value: 1.0
value: 1.0
value: 1.0
value: 1.0
value: 1.0
value: 1.0
value: 1.0
value: 1.0
value: 1.0
value: 1.0
value: 1.0
value: 1.5
value: 1.5
value: 1.5
value: 1.5
value: 1.5
value: 1.5
value: 1.5
value: 1.5
value: 1.5
value: 1.5
value: 1.5
value: 1.5
value: 1.5
value:
value:
value:
value:
value:
value:
value:
value:
value:
value:
value:
value:
value:
value:
value:
value:
value:
value:
value:
value:
value:
value:
value:
value:
value:
value:
value:
value:
value:
value:
value:
value:
value:
value:
48,000 /m % = 0 48,000 /m % = 2.8 million(a) = 0 use AEC Direct Mode use AEC Control mode use AEC Storage Host devices use network property mode use network property mode use network property mode use network property mode use network property mode use network property mode use network property mode use network property mode use network property mode use network property mode use network property mode use network property mode use network property mode use network property mode use network property mode use network property mode use network property mode use network property mode use network property mode use network property mode use network property-mode use network property-mode use network property-mode use network property-mode use network property-mode use network property-mode use network property-mode use network property-mode use network property-mode use network property-mode use network property-mode use network property-mode use network property-mode use network property-mode use network property-mode use network property-mode use network property-mode use network property-mode use network property-mode use network property-mode use network property-cycle use network property-cycle use network property-cycle use network property-cycle use network property-cycle use network property-cycle use network property-cycle use network property-cycle use network property-cycle use network property-cycle use network property-cycle use network property-cycle use network property-cycle use network property-cycle use network property-cycle use network property-cycle use network property-cycle use network property-cycle use network property-cycle use network property-cycle use network property cyclical key to any existing type (e.g. user type: C) user type: C# other type: C# program type: C# time: time:4. Tassman ESI
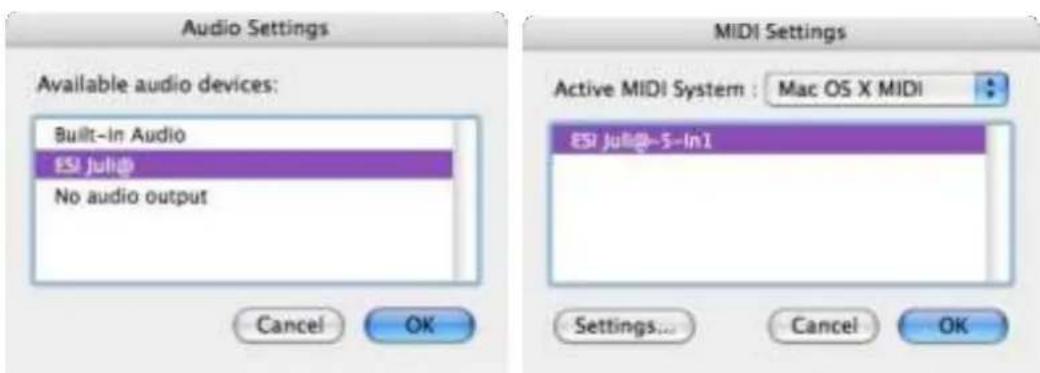
We provide Tassman ESI as bundle software. In Tassman ESI, select ‘Preferences’ then you can setup ‘Audio Settings’ and ‘MIDI Settings’. Choose ‘ESI Juli@’ as Audio and MIDI device.
text_image
Audio Settings Available audio devices: Built-in Audio ESI julid No audio output Cancel OK MIDI Settings Active MIDI System : Mac OS X MIDI ESI julid@-5-In1 Settings... Cancel OK5. DSP Quattro SE
We provide i3 S.r.l's DSP-Quattro as bundle software. In DSP-Quattro, select 'Option' then 'Audio setting'. Choose 'ESI Juli@' as Playback and Record device.

text_image
About OTP-Quattro nab-QUATTRO BSP-Quattro.com 3 13.162 Software Engineering ESI Ris Systems Inc. Special Edition OTP-Quattro 1 & 2 (Ris Systems) #Developed Tools: Dhanan Ries, Shenyi Sipin, Danube Brill, Hano Charter, Fina/Net Krasin, Divasal in Square Graphic Designer: video format address Support: info & Wants, Home or Home and may offer signed 8 sets AHD 3.007 Bits Linear Technologies by Drilling both software are and other Copyrights and Trademarks are listed by their requests to listen Web Site OK CoreAudio I/O Audio Devices Input Device: ESI jul@ Output Device: ESI jul@ Sync menu selection Audio Device Settings: ESI jul@ Input Buffer Size: $12 Input Source: Unrewhable Clock Source: Internal Direct audio monitor Input Channel: Input Channel 1 (Sherout) Channel Format: 2Ch-44100-50bit/1pcw/ Format: 32-Bits Linear PCM Num. Of Channels: 2 Sample Rate: 44100 Hz Output Buffer Size: $12 Output Source: Unrewhable Clock Source: Internal Output Channel: Output Channel 1 (Star... Channel Format: 2Ch-44100-50bit/1pcw/ Format: 32-Bits Linear PCM Num. Of Channels: 2 Sample Rate: 44100 Hz Note: 9. It always highly recommended to set the same mouse by both inputs and outputs. Please consider also that several devices do not allow the buffer extensions without producing corrupted audio or drive audio. In this case, please use higher values. (44100Hz), the BIPTSO G302 of the input and output devices MUST (44100) the same value. Please consider the same footprinting USB services, which may appear as 2 different devices, are for input and use for audio. OK7. DirectWIRE 3.0 (PC only)
1. What is DirectWIRE?
DirectWIRE is a 100% purely digital wire!
DirectWIRE is a driver technology, developed by ESI, which can be used for routing audio streams internally within applications using EWDM Audio MIDI Drivers exclusively developed by ESI.
With the DirectWIRE router, an application can record from other application's audio outputs without external wiring or any loss of data when they are running at the same time.
DirectWIRE also allows you to easily rip any audio stream in real time by transferring data thru DirectWIRE from MP3s, live On-line Broadcast and On-demand content, and more.
2. DirectWIRE Panel
Click on DirectWIRE on the Juli@ console. The DirectWIRE panel window as shown below will appear. DirectWIRE digital virtual wiring technology, developed by ESI, routes audio streams internally within applications using standard audio drivers such as WDM, ASIO and MME, even when they are running at the same time.
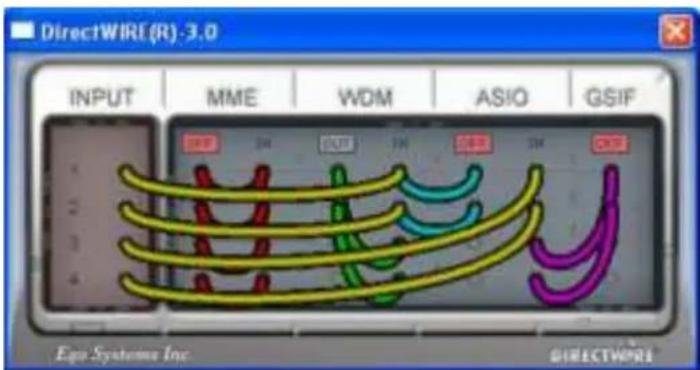
text_image
DirectWIRE(R)-3.0 INPUT MME WDM ASIO GSIF Egg Systems Inc DIRECTWIREThe number on the row represents the input or output port.
The columns represent ins and outs (on and off) of the respected drivers.
Patch the virtual cables from one point to another as you drag your mouse point.
INPUT section is a new feature of DirectWIRE 3.0. It's used to route signals from the card's hardware inputs. With Juli@, INPUT 1 and 2 are identical to the left and right channels of the analog input signal. INPUT 3 and 4 are the left and right channels of the digital input.
MME section represents general application's I/O:
Ex.) WinAmp, WaveLab (non ASIO mode), Cakewalk, Audition, Vegas, etc.
WDM section represents Multi-MME application's I/O:
Ex.) SONAR (when using WDM/KS), PowerDVD, WinDVD, etc.
ASIO section represents ASIO application's I/O:
Ex.) Cubase, Logic, Reason, Nuendo, SONAR (when using ASIO), Samplitude, etc.
ESI Juli@
GSIF section represents GSIF application like GigaStudio.
* Some applications support multiple driver modes.
3. DirectWIRE Examples
EX1. Recording from WinAmp(MME) to WaveLab(MME)

text_image
DirectWIRE(R)-3.0 INPUT MME WDM ASIO GSIF 1 0 14 19 18 14 0 2 0 0 0 0 0 3 0 0 0 0 0 4 0 0 0 0 0 Egg Systems Inc. DIRECTWIRECaution; If you want to record what's played back in Winamp, but don't want to hear the sound, you should click the OUT button in the MME section so it'll change to OFF, e.g.:
EX2. Recording from WinAmp(MME) to SONAR(WDM)
text_image
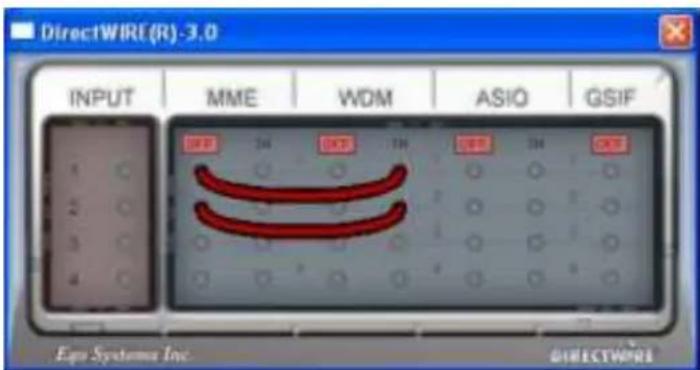
DirectWIRE(R)-3.0 INPUT MME WDM ASIO GSIF 1 0 0 0 0 0 2 0 0 0 0 0 3 0 0 0 0 0 4 0 0 0 0 0 Eco Systems Inc. DIRECTWIREEX3. Recording from WinAmp(MME) to Cubase, Logic, Nuendo(ASIO)
text_image
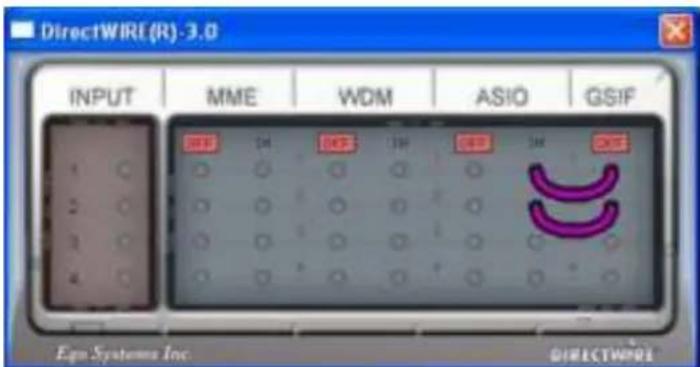
DirectWIRE(R)-3.0 INPUT MME WDM ASIO GSIF Ego Systems Inc DIRECTWIREEX4. Recording from GigaStudio(GSIF) to SONAR(WDM)

text_image
DirectWIRE (R): 3.0 INPUT MME WOM ASIO GSIF Egg Systems Inc DIRECTWIREEX5. Recording from GigaStudio(GSIF) to Cubase(ASIO)
text_image
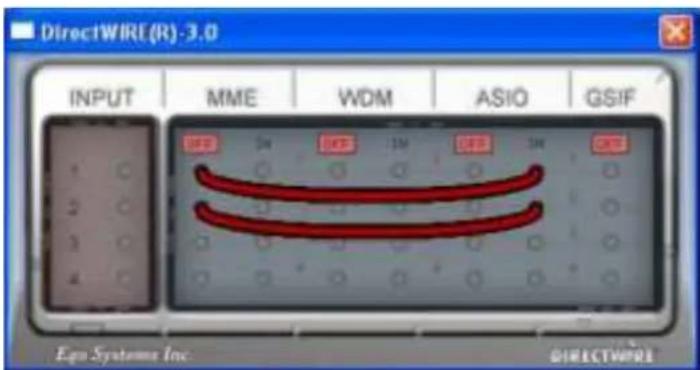
DirectWIRE(R)-3.0 INPUT MME WDM ASIO GSIF 1 0 0 0 0 0 0 2 0 0 0 0 0 0 3 0 0 0 0 0 0 4 0 0 0 0 0 0 Ego Systems Inc. DIRECTWIREEX6. Let's say you want to quickly dub some vocal over an audio track. It's very simple with DirectWIRE 3.0, you just have to make connections similar to these.

text_image
DirectWIRE(R)-3.0 INPUT MME WDM ASIO GSIF Ego Systems Inc. DIRECTWIRE8. Specifications
1. Analog Inputs
* Unbalanced Part
1) Connector Type : Gold-plated RCA female (line in 1 and 2)
2) Peak level : 0dBFS @ +6dBV (-10dBV nominal)
3) Impedance : 10k ohms minimum
* Balanced Part
1) Connector Type : 1/4" female TRS-type, balanced or unbalanced(line in 1 and 2)
2) Peak level : 0dBFS @ +20dBu (+4dBu nominal)
3) Impedance : 10k ohms minimum
2. Analog Ouputs
* Unbalanced Part
1) Connector Type : Gold-plated RCA female (line out 1 and 2)
2) Peak level : +6dBV @ 0dBFS (-10dBV nominal)
3) Impedance : 100 ohms minimum
4) Attenuation Control : -63dB \~ 0dB (0.5dB step size)
* Balanced Part
1) Connector Type: 1/4" female TRS-type, balanced or unbalanced(line out 1 and 2)
2) Peak level : +20dBu @ 0dBFS (+4dBu nominal)
3) Impedance : 100 ohms minimum
4) Attenuation Control : -63dB \~ 0dB (0.5dB step size)
- Monitor
1) Monitor Control: Analog input, Digital input, Digital output
2) Attenuation Control : -63dB \~ 0dB (0.5dB step size)
-
Sample rate : 44.1, 48, 88.2, 96, 176.4, 192KHz
-
A/D Converter (AK5385A)
1) Signal to Noise Ratio : 114dB (A-weighted) @ fs=48kHz
2) Dynamic Range : 114dB (-60dBFS with A-weighted) @ fs=48kHz
3) Inter channel Isolation : -120dB
4) Resolution : 24-Bit
- D/A Converter (AK4358)
1) Signal to Noise Ratio: 112dB (A-weighted) @ fs=44.1kHz
2) Dynamic Range (S/N) : 112dB (60dBFS with A-weighted)@ fs=44.1kHz
3) THD+N : -94dB @ fs=44.1kHz
4) Inter channel Isolation : -100dB
5) Attenuation Control : -63dB \~ +0dB (0.5dB Step Size)
6) Resolution : 24-Bit
- Digital Input
1) Connector Type : RCA(provided via breakout cable)
2) Format : IEC-60958 Consumer(S/PDIF coaxial)
3) Sampling Rate : 44.1,48,88.2,96,176.4,192KHz
4) Resolution : 24-Bit
8. Digital Output
1) Connector Type : RCA(provided via breakout cable), Optical(on board)
2) Format : IEC-60958 Consumer(S/PDIF coaxial)
3) Sampling Rate : 44.1,48,88.2,96,176.4,192KHz(176.4,192kHz only coaxial)
4) Resolution : 24-Bit
- MIDI I/O
1) 1-in, 1-out; 16 MIDI channels in and out Connector Type : Standard MIDI 5-pin DIN (provided via breakout cable)
9. General Information
1. Trademarks
ESI, and Juli@ are trademarks of Ego Systems Inc. and ESI Audiotechnik GmbH. Windows is a trademark of Microsoft Corporation. Other product and brand names are trademarks or registered trademarks of their respective companies.
2. The FCC and CE Regulation Warning
This device complies with Part 15 of the FCC Rules. Operation is subject to the following two conditions: (1) this device may not cause harmful interference, and (2) this device must accept any interference received, including interference that may cause undesired operation. Caution: Any changes or modifications in construction of this device with are not expressly approved by the party responsible for compliance, could void the user's authority to operate equipment.
Note: This equipment has been tested and found to comply with the limits for a Class A digital device, pursuant to Part 15 of the FCC Rules. These limits are designed to provide reasonable protection against harmful interference when the equipment is operated in a commercial environment. This equipment generates, uses, and can radiate radio frequency energy and, if not installed and used in accordance with the instruction manual, may cause harmful interference to radio communications. Operation of this equipment in a residential area is likely to cause harmful interference in which case the user will be required to correct the interference at his own expense. If necessary, consult an experienced radio/television technician for additional suggestions.
3. Correspondence
For technical support inquiries, contact your nearest dealer, local distributor or ESI support online at www.esi-audio.com.
4. Disclaimer
All features and specifications subject to change without notice.
Parts of this manual are continually being updated. Please check our web site www.esi-audio.com occasionally for the most recent update information.