EW-7438RPn - Wi-Fi repeater Edimax - Free user manual and instructions
Find the device manual for free EW-7438RPn Edimax in PDF.

User questions about EW-7438RPn Edimax
0 question about this device. Answer the ones you know or ask your own.
Ask a new question about this device
Download the instructions for your Wi-Fi repeater in PDF format for free! Find your manual EW-7438RPn - Edimax and take your electronic device back in hand. On this page are published all the documents necessary for the use of your device. EW-7438RPn by Edimax.
USER MANUAL EW-7438RPn Edimax
No.3, Wu-Chuan 3rd Road, Wu-Gu, New Taipei City 24891, Taiwan
Email: support@edimax.com.tw
Edimax Technology Europe B.V.
Fijenhof 2, 5652 AE Eindhoven, The Netherlands
Email: support@edimax.nl
Edimax Computer Company
3350 Scott Blvd., Bldg.15 Santa Clara, CA 95054, USA
Live Tech Support: 1(800) 652-6776
Email: support@edimax.com
CONTENTS
I. Product Informaon.... 1
I-1. Package Contents ....1
I-2. System Requirements....1
I-3. LED Status ....1
I-4. Hardware Overview....3
I-5. Safety Informaon....4
II. Installaon....5
II-1. Wi-Fi Extender Mode....8
II-2. Wi-Fi Adapter/Bridge Mode 13
II-3. Wi-Fi Access Point Mode 17
II-4. WPS Setup....20
II-5. Reset to Factory Default Sengs 22
III. Browser Based Conguraon Interface....23
III-1. Login....23
III-2. Save Sengs....25
III-3. Main Menu 26
IV. Extender Mode ......27
IV-1. Home....27
IV-2. iQ Setup 29
IV-3. WPS Sengs....30
IV-4. Advanced Seng....31
IV-4-1. WLAN 2.4GHz Security....32
IV-4-2. Time Sengs 34
IV-4-3. Scheduling Seng 35
IV-4-4. Administraon Ulity 37
IV-4-5. Conguraon Tools....38
V. Wi-Fi Adapter/Bridge Mode ....42
V-1. Home....42
V-2. iQ Setup 44
V-3. Wireless Advanced 45
V-3-1. Time Sengs 46
V-3-2. Administraon Utility 47
V-3-3. Conguraon Tools....48
VI. Access Point Mode....52
VI-1. Home....52
VI-2. iQ Setup 54
VI-3. Basic Sengs ....55
VI-4. WPS Sengs....58
VI-5. Wireless Advanced 60
VI-5-1. Security 62
VI-5-1-1. Disable 63
VI-5-1-2. WEP....63
VI-5-1-3. WPA pre-shared key 64
VI-5-1-4. WPA RADIUS 65
VI-5-2. MAC Filtering 66
VI-5-3. Time Sengs 68
VI-5-4. Scheduling Seng 69
VI-5-5. Administraon Utility 71
VI-5-6. Conguraon Tools....73
VII. EdiRange App....77
VII-1. Login....77
VII-2. Main Menu 79
VII-3. Parental Control....80
VII-4. Wi-Fi Scheduling 80
VII-5. Admin....81
VIII. Appendix....82
VIII-1. Conguring your IP address....82
VIII-1-1. How to check that your computer uses a dynamic IP address ....83
VIII-1-1-1. Windows XP 83
VIII-1-1-2. Windows Vista 85
VIII-1-1-3. Windows 7....87
VII-1-1-4. Windows 8....90
VIII-1-2. How to modify the IP address of your computer 96
VIII-1-4. How to Find Your Router's IP Address....116
VIII-1-4-1. Windows XP, Vista & 7....116
VIII-1-4-2. Windows 8....118
VIII-1-4-3. Mac 121
VIII-2. Connecng to a Wi-Fi network....123
VIII-3. Troubleshoong....125
VIII-4. Glossary....128
I. Product Informaon
I-1. Package Contents

text_image
EDiMAX W79
natural_image
Simple line drawing of a CD or DVD disc (no text or symbols)
text_image
TDIMAX Quick Installation Guide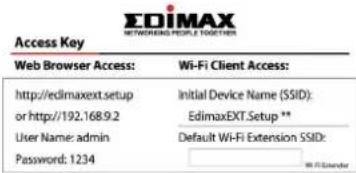
text_image
Access Key Web Browser Access: Wi-Fi Client Access: http://edimaxext.setup Initial Device Name (SSID): or http://192.168.9.2 EdimaxEXT.Setup ** User Name: admin Default Wi-Fi Extension SSID: Password: 1234- EW-7438RPn Mini
- CD with mul-language QIG & user manual
- Quick installaon guide (QIG)
- Access key card
I-2. System Requirements
- Wi-Fi extender/Wi-Fi bridge mode: Exisng 2.4GHz wireless network
- Access point mode: Cable/DSL modem router
- Computer with 2.4GHz 802.11/b/g/n Wi-Fi adapter, and web browser for soware conguraon (Internet Explorer 8 or above, Google Chrome, Firefox or Safari latest version)
- Smartphone setup: iOS 4.3 or Android 4.x and above
I-3. LED Status
| LED | Color | Status | Descripon |
Signal Strength  2.4GHz 2.4GHz | Amber | On | Excellent signal Signal strength: 60 – 100% |
| Slow Flashing | Good signal Signal strength: 40 – 60% | ||
| Quick Flashing | Poor signal Signal strength: 0 – 40% | ||
| O | No signal detected, disconnected, or in LED o mode | ||
Wi-Fi | Green | Flashing | Transferring data |
| Off | Wi-Fi not acve or in LED o mode | ||
Power | Green | On | Extender is on |
| Flashing | Reseng to factory default sengs, or system is boong up | ||
| O | Extender is o or in LED o mode | ||
WPS | Green | On | WPS conncon established (LED will remain on for 5 minutes to indicate a successful conncon) |
| Flashing | WPS in progress (waing for another WPS device) | ||
| O | No WPS in progress or in LED o mode | ||
LAN | Green | On | LAN port connected |
| Flashing | LAN acvity (transferring or receiving data) | ||
| O | LAN port not connected |
I-4. Hardware Overview

text_image
1 EDiMAX 3 WPS- LEDs
- WPS/Reset Buon

natural_image
Technical line drawing of a mechanical or electrical component with labeled part '2' and connector symbol (no text or symbols beyond the number)- Ethernet Port
I-5. Safety Informaon
In order to ensure the safe operaon of the device and its users, please read and act in accordance with the following safety instrucons.
- The device is designed for indoor use only; do not place it outdoors.
- Do not place the device in or near hot/humid places, such as a kitchen or bathroom.
- Do not pull any connected cable with force; carefully disconnect it from the EW-7438RPn Mini.
- Handle the device with care. Accidental damage will void the warranty of the device.
- The device contains small parts which are a danger to small children under 3 years old. Please keep the device out of reach of children.
- Do not place the device on paper, cloth, or other ammable materials. The device may become hot during use.
- There are no user-serviceable parts inside the device. If you experience problems with the device, please contact your dealer of purchase and ask for help.
- The device is an electrical device and as such, if it becomes wet for any reason, do not aempt to touch it without switching the power supply o. Contact an experienced electrical technician for further help.
- If you smell burning or see smoke coming from the EW-7438RPn Mini then unplug the device immediately, as far as it is safely possible to do so. Call your dealer of purchase for help.
- This product should work for a long me, and provide round-the-clock Wi-Fi service.
The EW-7438RPn Mini has three dierent operang modes which you can choose depending on your network requirements. Each mode is described below:
| Wi-Fi Extender | The device connects wirelessly to your exisng network and repeats the wireless signal. Locaon: The best locaon for your extender is roughly in the middle between your exisng wireless router/access point and the dead zone. The extender needs to receive a good Wi-Fi signal from your router/access point. |
| Wi-Fi Adapter/ Wi-Fi Bridge | The device connects to an Ethernet device such as a games console or smart TV via Ethernet cable and provides wireless Internet access for that device. Locaon: Within Wi-Fi coverage, close to your wired network device. |
| Wi-Fi Access Point | The device connects to an exisng router via Ethernet cable and provides wireless Internet access for your network devices. Locaon: Connected to your router via Ethernet cable. |
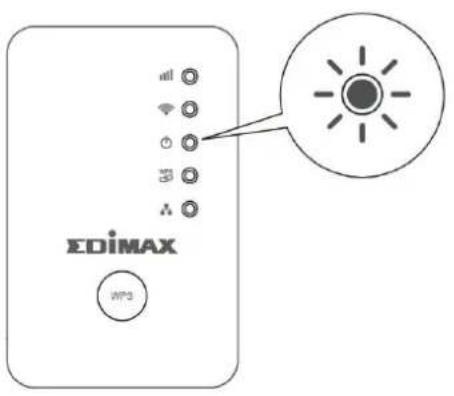
- Plug the EW-7438RPn Mini into a power socket.

text_image
EDiMAX WPS- The green power LED will flash while the system is boong up. The device is ready when the green power LED displays on.
text_image
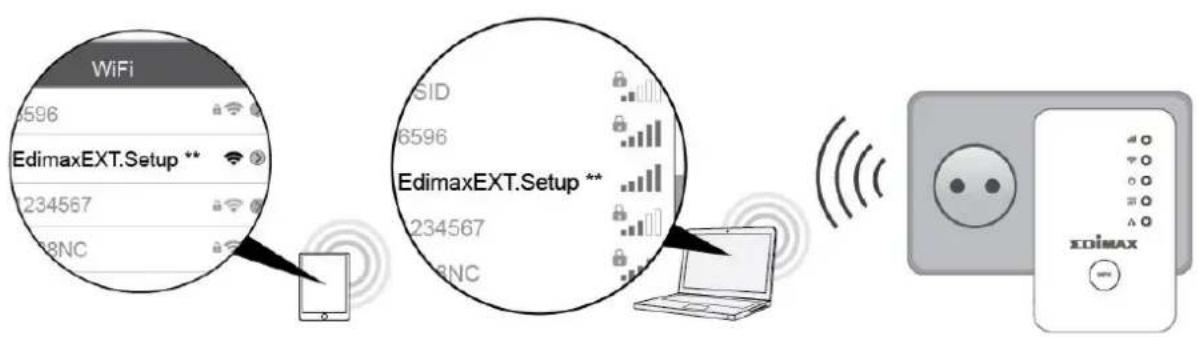
EDiMAX WP3- Use a Wi-Fi device (e.g. computer, tablet, smartphone) to search for a Wi-Fi network with the SSID EdimaxEXT.Setup ** and connect to it.

If you are using a computer, please disconnect any Ethernet cables. For mobile devices, iOS 4.3 or Android 4.x or above is required.

The last two characters of the SSID (Edimaxext.Setup**) will be unique numbers according to your device e.g. "EdimaxEXT.Setup c1". Your unique SSID is displayed on the product label along with the included access key card.
text_image
WiFi 596 EdimaxEXT.Setup ** 234567 8NC SID 6596 EdimaxEXT.Setup ** 234567 8NC EDIMAX xdimax
text_image
EDIMAX NETWORKING PEOPLE TOGETHER Access Key Web Browser Access: Wi-Fi Client Access: http://edimaxext.setup Initial Device Name (SSID): or http://192.168.9.2 EdimaxEXT.Setup ** User Name: admin Default Wi-Fi Extension SSID: Password: 1234 Wi-Fi Extender Note: Please keep this card for future use.- Open a web browser and if you do not automacally arrive at the "Get Started" screen shown below, enter the URL hp://edimaxext.setup and click "Get Started" to begin the setup process.


text_image
EDiMAX N300 Mini Wi-Fi Extender / Access Point / Wi-Fi Bridge EW-7438RPn Mini English EDiMAX Get Started
If you cannot access hp://edimaxext.setup, please make sure your computer is set to use a dynamic IP address. For more informaon please refer to VIII-1. Conguring your IP address.
- Select an operang mode for your EW-7438RPn Mini.
Change Mode
The device has three different operating modes. Please select a mode below.


Wi-Fi Extender: The device connects wirelessly to your existing network and repeats the wireless signal.


Wi-Fi Adapter/Wi-Fi Bridge: The device connects to an Ethernet device such as a games console or smart TV via Ethernet cable and provides wireless Internet access for that device.


Wi-Fi Access Point: The device connects to an existing router via Ethernet cable and provides wireless Internet access for your network devices.
II-1. Wi-Fi Extender Mode
- Please read the on screen instrucons about selecng a good locaon for your wireless extender and then click "NEXT" to connue. You can check your signal strength on the next page.
Recommended Location
Do not place the extender in your Wi-Fi dead zone!
The extender needs to receive a good Wi-Fi signal in order to repeat the signal and provide Wi-Fi coverage for your dead zone. The best location for your extender is roughly in the middle between your existing wireless router/access point and the dead zone. It is recommended that your extender can receive at least 60% signal strength from your existing Wi-Fi.

natural_image
Illustration of a router connected to a device via signal waves, with no text or symbols present.BACK
NEXT
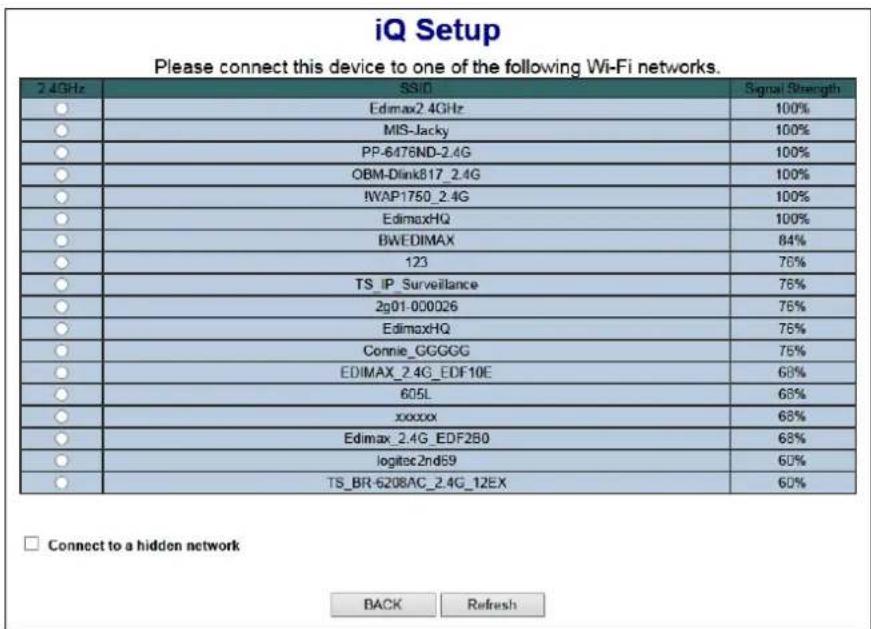
- Select your Wi-Fi network from the list.
iQ Setup
Please connect this device to one of the following Wi-Fi networks.
| 2.4GHz | SSID | Signal Strength |
| Edimax2.4GHz | 100% | |
| MIS-Jacky | 100% | |
| PP-6476ND-2.4G | 100% | |
| OBM-Dlink817_2.4G | 100% | |
| IWAP1750_2.4G | 100% | |
| EdimaxHQ | 100% | |
| BWEDIMAX | 84% | |
| 123 | 76% | |
| TS_IP_Surveillance | 76% | |
| 2g01-000026 | 75% | |
| EdimaxHQ | 75% | |
| Connie_GGGGG | 75% | |
| EDIMAX_2.4G_EDF10E | 68% | |
| 605L | 68% | |
| xxxxxx | 68% | |
| Edimax_2.4G_EDF2B0 | 68% | |
| logitec2nd59 | 60% | |
| TS_BR-6208AC_2.4G_12EX | 60% |

Connect to a hidden network
BACK
Refresh

A hidden SSID is one that is not publicly displayed when scanning for available Wi-Fi networks. Hidden SSID sengs are
usually available in the conguraon opons of your router. If you use a hidden SSID, check the "Connect to a hidden network" box and enter the informaon manually.
text_image
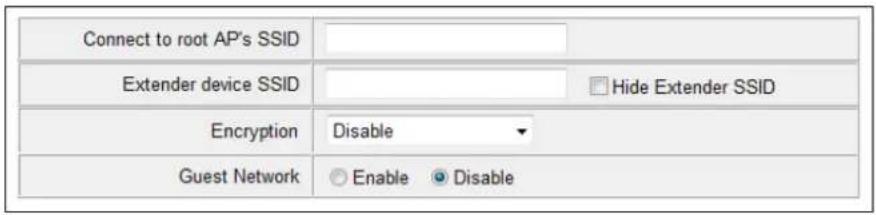
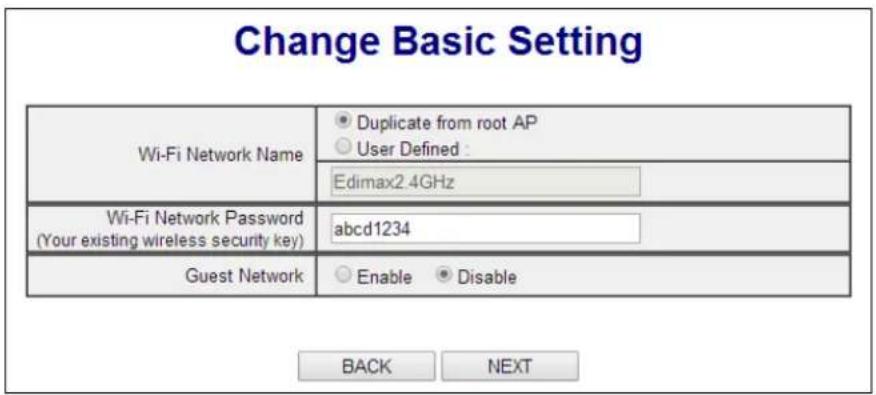
Connect to root AP's SSID Extender device SSID Hide Extender SSID Encryption Disable Guest Network Enable Disable- Select whether to use the same SSID ("Duplicate from root AP") or a dierent SSID ("User Dened") for your extender, and enter your existing Wi-Fi password. Click "Next" to connue.

For "User Dened" the Wi-Fi extender's default wireless network name (SSID) is your existing router/access point's SSID + _2EX. For example if your router's SSID is "Your SSID" then the EW-7438RPn Mini's SSID will be "Your SSID_2EX". You can change the extender's SSID if you wish.
text_image
Change Basic Setting Wi-Fi Network Name Duplicate from root AP User Defined : Edimax2.4GHz Wi-Fi Network Password (Your existing wireless security key) abcd1234 Guest Network Enable Disable BACK NEXT
You can also enable an additional guest Wi-Fi network. A guest Wi-Fi network is another SSID with a dierent name and password. Select "Enable" and enter a guest network name and password if you wish.

text_image
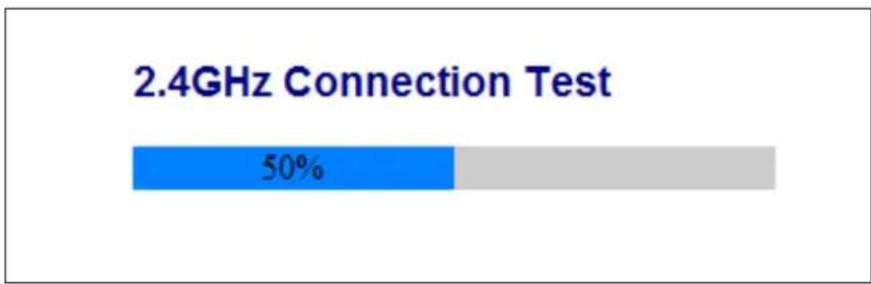
Guest Network Enable Disable Guest Network Name Guest Wi-Fi Password Enable Enable Disable- Please wait while the EW-7438RPn Mini tests the conncon.
2.4GHz Connection Test


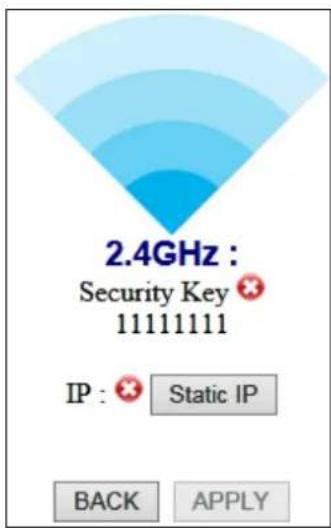
If your Wi-Fi extender fails to connect (below) to your existing router/access point, click the "BACK" buon and ensure you entered the correct Wi-Fi network password.
text_image
2.4GHz : Security Key 11111111 IP : Static IP BACK APPLY
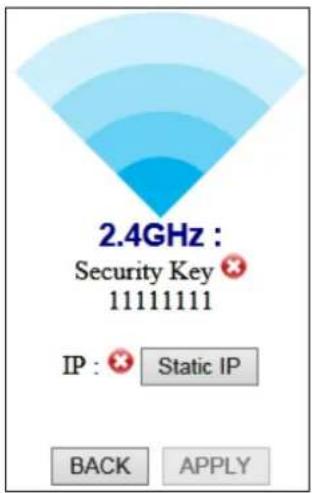
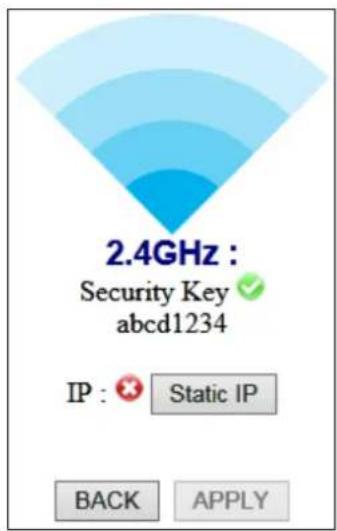
If your Wi-Fi extender cannot obtain an IP address (below) from your exisng router/access point then click the "Stac IP" buon to assign an IP address to the extender. For more guidance please refer to the VIII-1. Conguring your IP address.

text_image
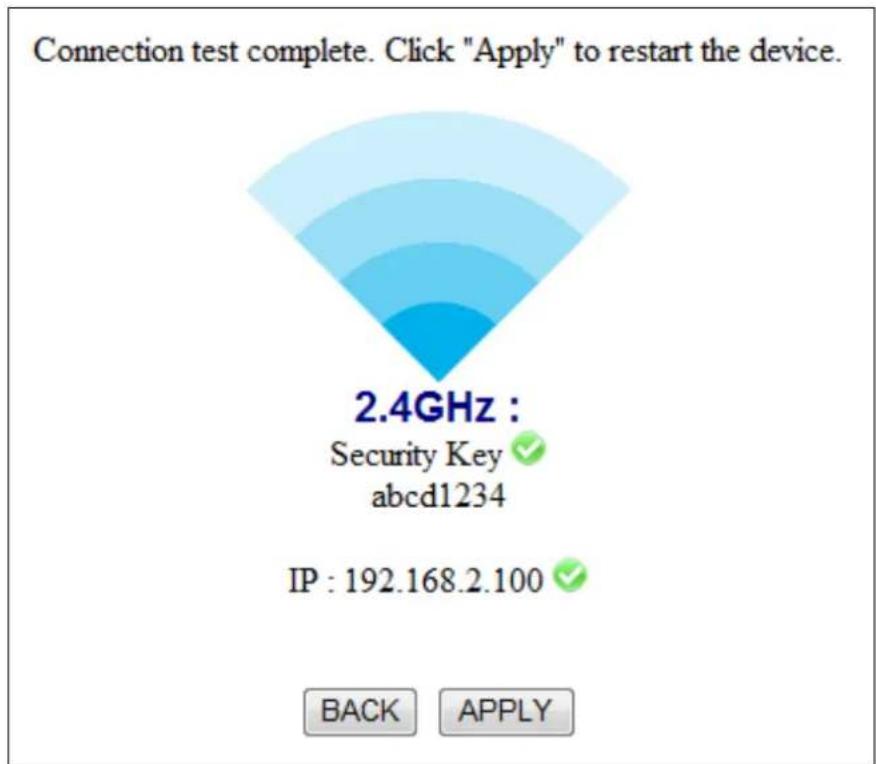
2.4GHz : Security Key abcd1234 IP : ✗ Static IP BACK APPLY- When the connection test is complete, click "Apply" to restart the extender.

text_image
Connection test complete. Click "Apply" to restart the device. 2.4GHz : Security Key abcd1234 IP : 192.168.2.100 BACK APPLY- Please wait a moment until the extender is ready.
System is restarting. Please wait for a moment.
11%
Remind: Your Wi-Fi will disconnect from the extender during the system restart (approximately 1 minute). When the system is complete, please connect to the extender's new SSID and password as below.
Extender Name : Edimax2.4GHz
Security Key: abcd1234
- A nal congratulaons screen will indicate that setup is complete. The EW-7438RPn Mini is working and ready for use - the amber signal strength LED should display on or ash depending on your signal strength. To download the EdiRange app, scan the QR code.

text_image
Hand holding smartphone displaying a QR code, with a separate QR code shown on the screen behind it.Android:
iOS:

text_image
QR code image containing encoded data, no visible human-readable text
text_image
QR code image containing encoded data, no visible human-readable text- Please close the browser window. You can now connect to the extender's new SSID on a wireless device within range such as a computer, smartphone or tablet.

The password for your Wi-Fi extender's SSID is the same as for your router's SSID.
For more advanced conguraons, use the browser based conguraon interface (refer to III. Browser Based Conguraon Interface).

II-2. Wi-Fi Adapter/Bridge Mode
- Select your Wi-Fi network from the list and enter the security key/password.
text_image
iQ Setup Please connect this device to one of the following Wi-Fi networks. 2.4GHz SSiO Signal Strength Edimax2.4GHz 100% MIS-Jacky 100% PP-6476ND-2.4G 100% OBM-Dlink817_2.4G 100% IWAP1750_2.4G 100% EdimaxHQ 100% BWEDIMAX 84% 123 76% TS_IP_Surveillance 76% 2g01-000026 76% EdimaxHQ 76% Connie_GGGGG 76% EDIMAX_2.4G_EDF10E 68% 605L 68% xxxxxx 68% Edimax_2.4G_EDF280 68% logitec2nd69 60% TS_BR-6208AC_2.4G_12EX 60% Connect to a hidden network BACK Refresh
If the Wi-Fi network you wish to connect to does not appear, try clicking "Refresh".

Do not check "Connect to a hidden network" unless you wish to connect to a hidden SSID instead.

text_image
Change Basic Setting Connect to root AP's SSID Encryption Disable WEP WPA pre-shared key BACK NEXT- Enter the security key/password for your exisng Wi-Fi.

text_image
Change Basic Setting Wi-Fi Network Password (Your existing wireless security key) abcd1234 × BACK NEXT- Please wait while the EW-7438RPn Mini tests the conncon.
bar
2.4GHz Connection Test | Category | Value (%) | |---|---| | Blue Bar | 50 | | Grey Bar | (implied) |
If your Wi-Fi extender fails to connect (below) to your existing router/access point, click the "BACK" buon and ensure you entered the correct Wi-Fi network password.
text_image
2.4GHz : Security Key 11111111 IP : × Static IP BACK APPLY
If your Wi-Fi extender cannot obtain an IP address (below) from your existing router/access point then click the "Stac IP" buon to assign an IP address to the extender. For more guidance please refer to the VIII-1. Conguring your IP address.
text_image
2.4GHz : Security Key abcd1234 IP : Static IP BACK APPLY- When the connection test is complete, click "Apply" to restart the extender.
text_image
Connection test complete. Click "Apply" to restart the device. 2.4GHz : Security Key abcd1234 IP : 192.168.2.100 BACK APPLY- Please wait a moment until the EW-7438RPn Mini is ready.
System is restarting. Please wait for a moment.
20%
Device will take about 1 minute to save setting and restart, the initial configuration SSID "Edimax.Setup" will be off.
Your Wi-Fi may disconnect it's connection with Extender.
Extender Name : Edimax2.4GHz
Security Key: abcd1234
- A nal congratulaons screen will indicate that setup is complete. Please close the browser window.
Congratulations.
"Your extender has successfully established a connection. You can close this browser and let your wireless device connect back to existing Wi-Fi network."
Extender Name : Edimax2.4GHz
Security Key: abcd1234
Starting connecting Wi-Fi extender's Ethernet port to any
Ethernet device for wireless connectivity.
- The EW-7438RPn Mini is working and ready for use as a wireless bridge. Use an Ethernet cable to connect the EW-7438RPn Mini to the Ethernet port on your network device.
- Ensure the EW-7438RPn Mini is on and then use your network device to connect to your network as usual.
II-3. Wi-Fi Access Point Mode
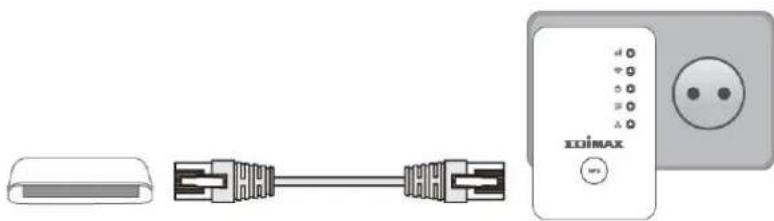
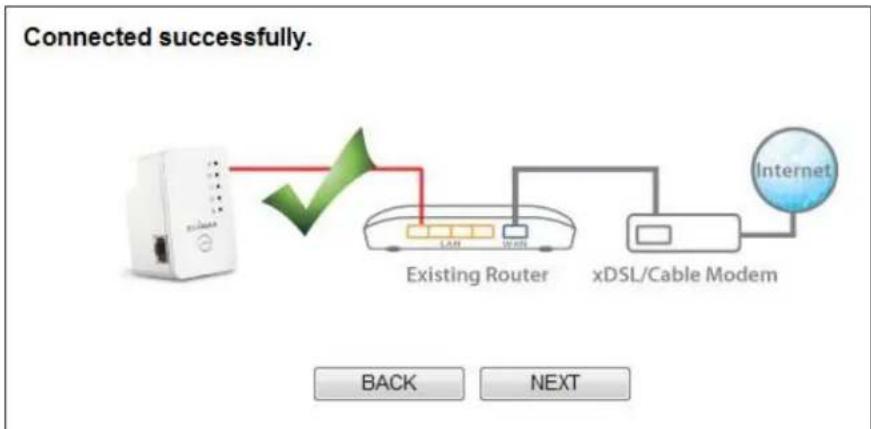
- Connect the LAN port of your EW-7438RPn Mini to the LAN port of your existing router using an Ethernet cable, and then click "Next".
natural_image
Diagram showing a connector connected to an XOIMAX power outlet (no text or symbols on components)- Click "Next" to connue.
flowchart
graph LR
    A["Router"] -->|Back| B["Existing Router"]
    B -->|Next| C["xDSL/Cable Modem"]
    C --> D["Internet"]
- Select “Obtain an IP address automacally” or “Use the following IP address” for your EW-7438RPn Mini. If you are using a stac IP, enter the IP address, subnet mask, default gateway and DNS. Click “Next” to proceed to the next step.

"Obtain an IP address automacally" is the recommended seng for most users. For more guidance on stac IP addresses, please refer to VIII-1. Conguring your IP address.
Management IP
Please set the IP address of the access point. If you are using a static IP, enter the IP address, subnet mask and default gateway. Click Next to proceed to the next step.
Obtain an IP address automatically.
Use the following IP address.
IP Address :

Subnet Mask :

Gateway Address :

Back
NEXT
- Enter a name and password for your wireless network, then click "Next" to connue.
Change Basic Setting

text_image
Wi-Fi Network Name EdimaxAPd7 Wi-Fi Network Password Enabled ▼ abcd1234 Enable Guest Network Yes No BACK NEXT
You can also enable an additional guest Wi-Fi network. A guest Wi-Fi network is another SSID with a dierent name and password. Select "Enable" and enter a guest network name and password if you wish.

text_image
Guest Network Enable Disable Guest Network Name Guest Wi-Fi Password Enable ✓- A summary of your conguraon will be displayed, as shown below. Check that all of the details are correct and then click "Apply" to restart the EW-7438RPn Mini.
Settings saved successfully!
Please click APPLY to restart the system and make the changes take effect.
Wi-Fi Network Name
Wi-Fi Network Password :
EdimaxAPd7
abcd1234
BACK
APPLY
- Please wait a moment until the EW-7438RPn Mini is ready.
System is restarting. Please wait for a moment.
34%
Remind: Your Wi-Fi will disconnect from the extender during the system restart (approximately 1 minute). When the system is complete, please connect to the extender's new SSID and password as below.
Wi-Fi Network Name : EdimaxAPd7
Wi-Fi Network Password: abcd1234
- A nal congratulaons screen will indicate that setup is complete. Please close the browser window. The EW-7438RPn Mini is working and ready for use. You can now connect to the device's new SSID.
Congratulations.
You have successfully completed the configuration. You can close this browser window and reconnect to this AP device with new wireless security key now.
Wi-Fi Network Name : EdimaxAPd7
Wi-Fi Network Password: abcd1234
II-4. WPS Setup
The WPS buon is a quick and easy method to establish a secure conncon between your EW-7438RPn Mini and wireless router/access point.
If your wireless device supports WPS (Wi-Fi Protected Setup) then you can use this method to setup the EW-7438RPn Mini in extender or adapter/bridge mode, instead of the setup wizard described in II. Installaon.

Please do not hold the WPS buon for too long – this may reset your device.
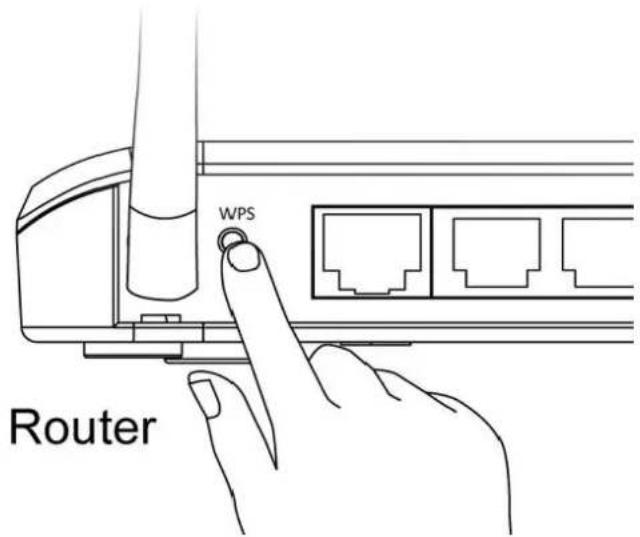
- Press the WPS button on your wireless router/access point for the correct length of me to acvate its WPS.

Please check the instrucons for your wireless device for how long you need to hold down its WPS buon to acvate WPS.
text_image
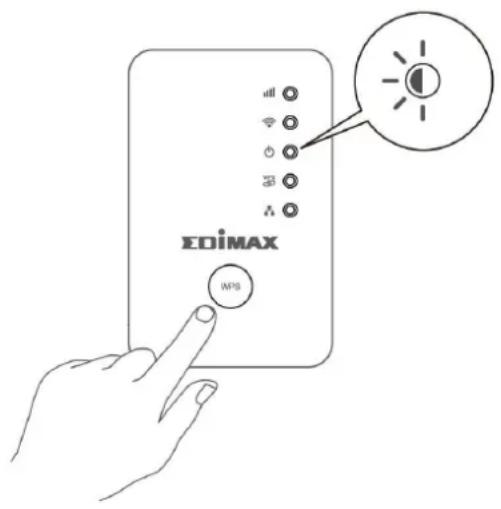
WPS Router- Within two minutes, press the WPS buon on the EW-7438RPn Mini for 2 – 5 seconds to acvate WPS. The green WPS LED will ash to indicate that WPS is acve.

text_image
EDiMAX Press for two seconds- The devices will establish a conncon. The green WPS LED on the EW-7438RPn Mini will display on for 5 minutes to indicate a successful conncon.
II-5. Reset to Factory Default Sengs
If you experience problems with your extender or if you want to change the extender to a dierent operang mode, you can reset the device back to its factory sengs. This resets all sengs back to default.
- Press and hold the WPS/Reset buon for at least 10 seconds and release when the green power LED is ashing.
- Wait for the extender to restart. The extender is ready for setup when the green power LED displays on.
text_image
EDiMAX WPSIII. Browser Based Conguraon Interface
Aer you have setup the EW-7438RPn Mini as detailed in II. Installaon or the included Quick Installaon Guide, you can use the browser based conguraon interface to congure advanced sengs.

Please ensure that your computer is set to use a dynamic IP address. Refer to VIII-1. Conguring your IP address for more informaon.
III-1. Login
- To access the browser based conguraon interface enter hp://edimaxext.setup into the URL bar of a browser on a network device connected to the same Wi-Fi network as the EW-7438RPn Mini.

text_image
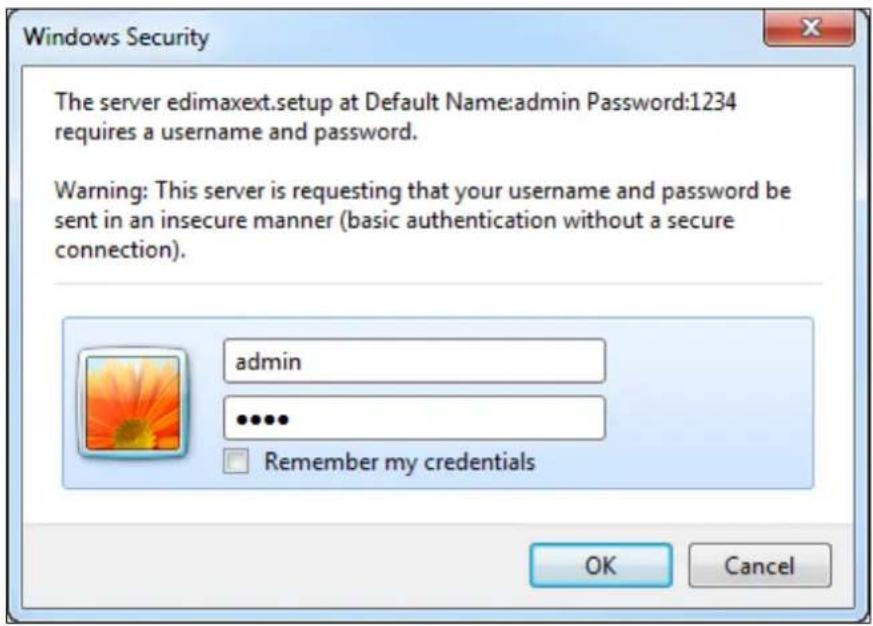
http://edimaxext.setup/- You will be prompted for a username and password. The default username is “admin” and the default password is “1234”.
text_image
Windows Security The server edimaxext.setup at Default Name:admin Password:1234 requires a username and password. Warning: This server is requesting that your username and password be sent in an insecure manner (basic authentication without a secure connection). admin ...... Remember my credentials OK Cancel3. You will arrive at the "Status and Informaon" screen. Use the menu down the le side to navigate.
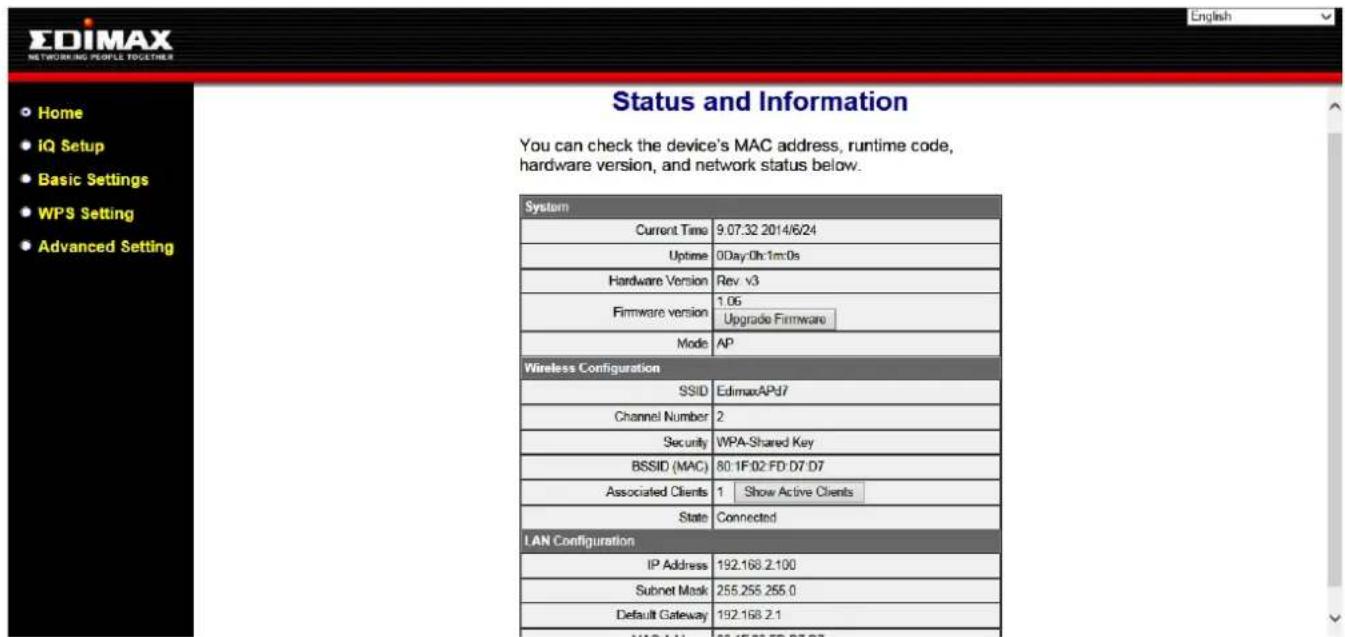
text_image
EDIMAX NETWORKING PEOPLE TOGETHER Home IQ Setup Basic Settings WPS Setting Advanced Setting Status and Information You can check the device's MAC address, runtime code, hardware version, and network status below. System Current Time 9.07:32 2014/6/24 Uptime 0Day:0h:1m:0s Hardware Version Rev v3 Firmware version 1.05 Upgrade Firmware Mode AP Wireless Configuration SSID EdimaxAPd7 Channel Number 2 Security WPA-Shared Key BSSID (MAC) 80.1F:02 FD: D7 D7 Associated Clients 1 Show Active Clients State Connected LAN Configuration IP Address 192.168.2.100 Subnet Mask 255.255.255.0 Default Gateway 192.168.2.1III-2. Save Sengs
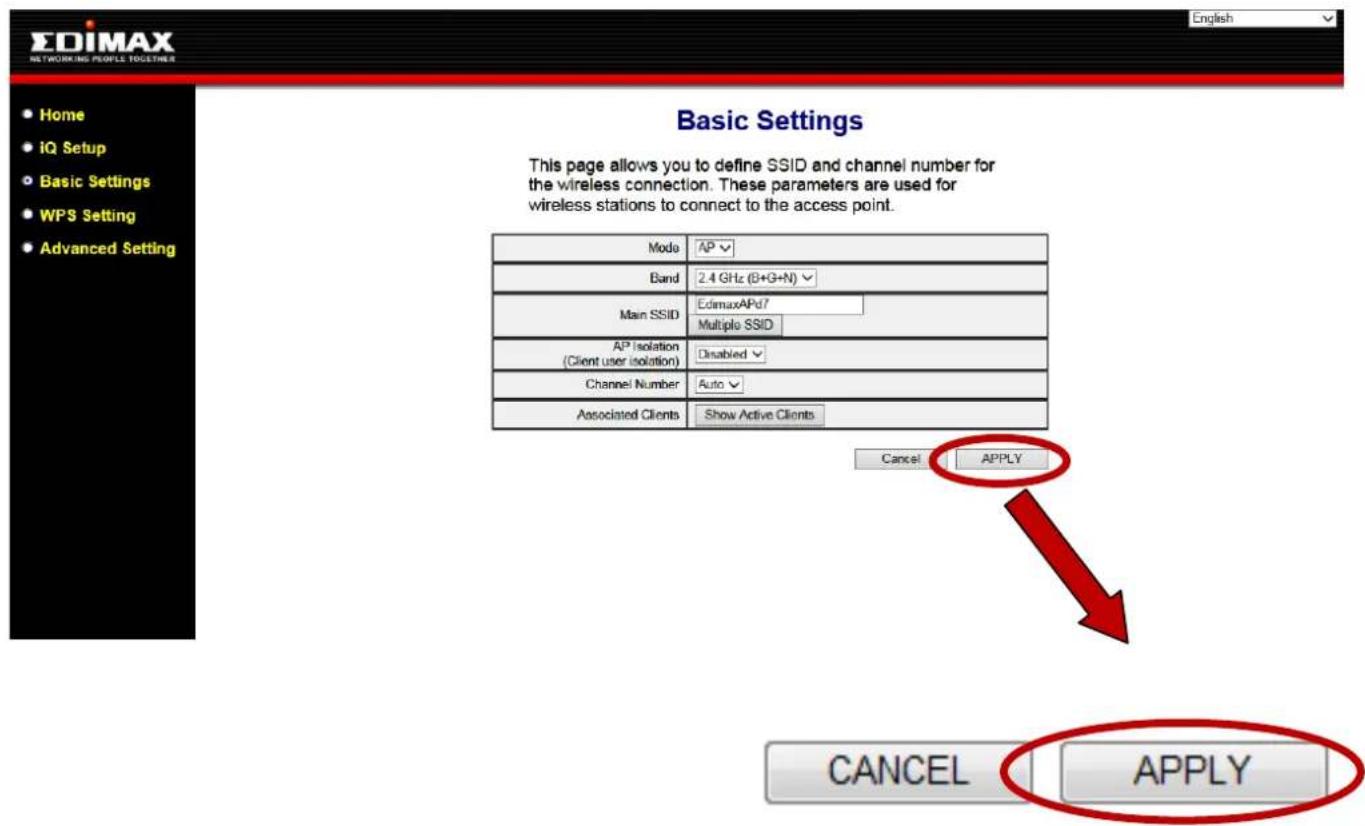
- Aer you make any changes to the EW-7438RPn Mini's sengs, please click "APPLY".
text_image
EDIMAX NETWORKING PEOPLE TOGETHERS Home iQ Setup Basic Settings WPS Setting Advanced Setting Basic Settings This page allows you to define SSID and channel number for the wireless connection. These parameters are used for wireless stations to connect to the access point. Mode AP Band 2.4 GHz (B+G+N) Main SSID EdimaxAPd7 Multiple SSID AP Isolation (Client user isolation) Disabled Channel Number Auto Associated Clients Show Active Clients Cancel APPLY CANCEL APPLY- Then, select "CONTINUE" to save changes but not apply them yet, or select "APPLY" to restart the EW-7438RPn Mini and bring the changes into eect.
Settings saved successfully!
Click CONTINUE to continue other configuring settings, or click APPLY to restart the system and make the changes take effect.
CONTINUE
APPLY

The EW-7438RPn Mini needs to restart in order to apply and bring any changes into eect. Use the “CONTINUE” buon to make several changes and apply them all together in one restart.
III-3. Main Menu
The main menu displays dierent opons depending on your device's operang mode. Please refer to the following chapters for guidance on each mode.
Wi-Fi Extender

Home

iQ Setup

WPS Setting

Advanced Setting
Wi-Fi Adapter/Bridge

Home

iQ Setup

Advanced Setting
Access Point

Home

iQ Setup

Basic Settings

WPS Setting

Advanced Setting
IV-1. Home
Home
The "Status and Informaon" page displays basic system informaon about the device, arranged into
three categories: system, wireless conguraon & LAN conguraon.

Screenshots displayed are examples. The informaon shown on your screen will vary depending on your conguraon.
Status and Information
You can check the device's MAC address, runtime code, hardware version, and network status below.
| System | |
| Current Time | 13:22:55 2014/6/23 |
| Uptime | 0Day:0h:4m:4s |
| Hardware Version | Rev. v3 |
| Firmware version | 1.06Upgrade Firmware |
| Mode | Range Extender |
| Wireless Configuration | |
| SSID | Edimax2.4GHz_2EX |
| Channel Number | 10 |
| Security | WPA-Shared Key |
| BSSID (MAC) | 80:1F:02:FD:D7:D7 |
| Associated Clients | 0 Show Active Clients |
| State | Connected |
| Signal Strength | 100% |
| LAN Configuration | |
| IP Address | 192.168.2.100 |
| Subnet Mask | 255.255.255.0 |
| Default Gateway | 192.168.2.1 |
| MAC Address | 80:1F:02:FD:D7:D7 |
| Current Time | Current me and date. |
| Upme | Displays the total me since the device was turned on. |
| Hardware Version | Displays the hardware version. |
| Firmware Version | Displays the rmware version. |
| Mode | Displays the operang mode. |
| SSID | Displays the EW-7438RPn Mini's SSID. The SSID is the name used to identify a wireless network. |
| Channel Number | Displays the current wireless channel number. |
| Security | Displays the current wireless security seng. |
| BSSID (MAC) | Displays the device's BSSID. The BSSID idenes the EW-7438RPn Mini in the network, and is the same as the device's MAC address. |
| Associated Clients | Displays the number of clients connected to the EW-7438RPn Mini. Click "Show Acve Clients" to display a new window showing informaon about wireless clients. |
| State | Displays the current conncon status of the EW-7438RPn Mini. |
| Signal Strength | Displays the signal strength for the specied SSID. |
| IP Address | Displays the IP address of this device. |
| Subnet Mask | Displays the subnet mask of the IP address. |
| Default Gateway | Displays the IP address of the default gateway. |
| MAC address | Displays the device's MAC address. The MAC address is a unique, xed ID for this device, it cannot be modified. |
IV-2. iQ Setup

You can run the setup wizard again to reconfigure the basic sengs of the device. Please refer to II-1. Wi-Fi
Extender Mode Step 2 onwards for guidance.

If you wish to change the operang mode, please reset the EW-7438RPn Mini back to factory default sengs.
IV-3. WPS Sengs
WPS Setting
Wi-Fi Protected Setup is a simple way to establish connecons between WPS compatible devices. When
WPS is acvated in the correct manner and at the correct me for two compatible devices, they will automacally connect. PIN code WPS includes the use of a PIN code between the two devices for vericaon.
The WPS Sengs page displays sengs for WPS between your extender and a wireless client. For WPS Setup between your extender and router/access point, please use the WPS buon as described in II-4. WPS Setup.
• 2.4G Wi-Fi Protected Setup Information
| WPS Status | Configured |
| Self PinCode | 01902952 |
• Device Configure
| Configuration Mode Device is as an AP | Registrar | |
| Configure via Push Button | Start PBC | |
| Input Client PIN Code | Send PIN | |
| WPS Status | Displays “Congured” or “unCongured” depending on whether WPS and SSID/security sengs for the device have been congured or not, either manually or using the WPS buon. |
| Self PIN Code | Displays the WPS PIN code of the device. |
| Conguraon Mode | The conguraon mode of the device’s WPS seng is displayed here. “Registrar” means the device acts as an access point for a wireless client to connect to and the wireless client(s) will follow the device’s wireless sengs. |
| Congure via Push Buon | Click “Start PBC” (Push-Buon Conguraon) to acvate WPS on the access point. WPS will be acve for 2 minutes. |
| Input Client PIN Code | Enter the wireless client’s PIN code here and click “Start PIN” to acvate PIN code WPS.Refer to your wireless client’s documentaon if you are unsure of its PIN code. |
IV-4. Advanced Seng

text_image
Advanced Setting ► WLAN 2.4GHz Security ► Time Settings ► Scheduling setting ► Administration Utility ► Configuration ToolsIn “Advanced Seng” you can adjust the power output of the EW-7438RPn Mini. The submenu also allows you to congregate security, me sengs and scheduling sengs as well as various administrave and management funcons.
Advanced Setting
Advanced functions of the extender can be configured below.
| Tx Power | 100 % |
| Tx Power | You can adjust the level of wireless output power as a percentage. Depending on the size of your locaon and required coverage, you may not require 100% output power.Reducing the output power can enhance security since your Wi-Fi signal will not extend to potenal malicious/unknown users in distant areas. |
IV-4-1. WLAN 2.4GHz Security
| Broadcast SSID | Enable Disable |
| Device SSID | Edimax2.4GHz_2EX |
| Security Type | WPA pre-shared key |
| Security Key | abcd1234 |
| Guest Network | Enable Disable |
| Guest Network Name | Guest Network |
| Guest Wi-Fi encryption | WPA pre-shared key ▼ |
| WPA Unicast Cipher Suite | DisableWPA pre-shared key |
| Pre-Shared Key Format | Passphrase ▼ |
| Guest Wi-Fi Password |
| Broadcast SSID | Enable or disable SSID broadcast. When enabled, the SSID will be visible to clients as an available Wi-Fi network. When disabled, the SSID will not be visible as an available Wi-Fi network to clients – clients must manually enter the SSID in order to connect. A hidden (disabled) SSID is typically more secure than a visible (enabled) SSID. WPS (Wi-Fi Protected Setup) is also disabled when SSID broadcast is disabled. |
| Device SSID | This is the name of your Wi-Fi network for idencaon, also somemes referred to as “SSID”. The SSID can consist of any combinaon of up to 32 alphanumerical characters. |
| Security Type | The security/encrypon type of your EW-7438RPn Mini’s wireless network is displayed here. The security/encrypon type is the same as your exisng router/access point. |
| Security Key | This is the security key for your EW-7438RPnMini. |
| Guest Network | You can also enable an additional guest Wi-Fi network. A guest Wi-Fi network is another SSID with a dierent name and password. Select enable or disable. |
| Guest Network Name | Enter a name (SSID) for your guest Wi-Fi network. |
| Guest Wi-Fi Encrypon | Select whether to disable encrypon for your guest Wi-Fi or use WPA pre-shared key encrypon. |
| WPA Unicast Cipher Suite | WPA2(AES) is selected automacally and is the most secure type. |
| Pre-Shared Key Format | Choose a format for your pre-shared key (Wi-Fi password). Select from “passphrase” (any alphumeric characters 0-9 a-z A-Z) or “Hex” (limited to characters 0-9 a-f A-F). |
| Guest Wi-Fi Password | Enter or modify the password for your guest Wi-Fi network here. |
IV-4-2. Time Sengs
Time Zone
Set the time zone of the extender by synchronizing with Network Time Protocol server, the time will be used for Wi-Fi scheduling function.
| Set Time Zone | (GMT+08:00)Taipei |
| Time Server Address | pool.ntp.org |
| Daylight Savings | Enable FunctionJanuary 1 To January 1 |
| Set Time Zone | Select the me zone of your country or region. |
| Time Server Address | The extender supports NTP (Network Time Protocol), select a me server from the drop down menu. |
| Daylight Savings | If your country/region uses daylight saving me, please check the “Enable Funcon” box, and select the start and end date. |
IV-4-3. Scheduling Seng
Scheduling setting
Scheduling function can be configured below for specific service.
Schedule Table (Up to 10 sets): ☐ Enable ☑ Disable
| NO. | Service | Schedule description | Schedule | Select |
| 1 | Wireless off | Edit | Delete |
Add
Cancel
APPLY
| Add | Click to add a new schedule in a new window (see below). |
| Edit | Edit an exisng schedule in a new window. |
| Delete | Delete the specied schedule. |
Add
When you click "Add" to add a new schedule, a new window will open as shown below:
Service : Wireless off ▼
Schedule description :
- Select which funcon to schedule using the "Service" menu and enter a name for the schedule in the "schedule descripon" box.
- Specify a start and end me (hours and minutes) using the drop-down menus for your required day.
- Select the schedule in the "Select" column and click "APPLY" to save the schedule, or "Back" to cancel and go back to the previous screen.

If you need to use the extender during a scheduled o period, press the WPS/Reset buon once to "wake up" the extender and resume Wi-Fi coverage.
IV-4-4. Administraon Ulity
You can change the password used to login to the browser-based conguraon interface here. It is advised to do so for security purposes. You can also conjure the EW-7438RPn Mini's IP address.

Please make a note of the new password. In the event that you forget the password and are unable to login to the browser based conguraon interface, see II-5. Reset to factory default sengs for how to reset the device.
- Password Settings
| Current Password | |
| New Password | |
| Re-Enter Password |
- Management IP
| Obtain an IP address automatically | |
| Use the following IP address | |
| IP Address | 192.168.9.2 |
| Subnet Mask | 255.255.255.0 |
| Default Gateway | |
| DNS | |
| Current Password | Enter your current password. |
| New Password | Enter your new password. |
| Conrmed Password | Conrm your new password. |
| IP Address | Specify an IP address here. This IP address will be assigned to yourEW-7438RPn Mini. |
| Subnet Mask | Input the subnet mask of the new IP address. |
| Gateway Address | Input the network’s gateway IP address. |
| DNS | Enter the DNS address here. |
IV-4-5. Conguraon Tools
The “Conguraon Tools” menu allows you to backup the EW-7438RPn Mini’s sengs, restore the sengs to a previous version or restore the EW-7438RPn Mini back to its factory default state. You can also upgrade the rmware, reboot the device and export the system log.
Manage Settings
Save the current settings of the device to a .bin file, restore the settings of the device to a previously saved .bin file or reset the device to its factory default settings.
Backup Settings : Save
Restore Settings : Browse... Upload
Restore to Factory Defaults : Reset
| Backup Sengs | Click “Save” to save the current sengs on your computer as cong.bin le. |
| Restore Sengs | Click “Browse” to nd a previously saved cong.bin le and then click “Upload” to replace your current sengs. |
| Restore to Factory Default | Click “Reset” to restore sengs to the factory default. A pop-up window will appear and ask you to conrm and enter your log in details.Enter your username and password and click “Ok”. See below for more informaon. |
Upgrade Firmware
You can upgrade the system rmware to a more recent version. You can download the latest rmware from the Edimax website. Aer the upgrade, the system will restart.
Upgrade Firmware
Upgrade the firmware to the most recent version - it is recommended that you use a wired connection for the procedure.
Browse...
CANCEL
APPLY

Do not unplug or disconnect the device during a rmware upgrade, as this could damage the device. It is recommended that you use a computer for a rmware upgrade.
| Browse | Open a new window to locate and select the rmware le in your computer. |
Reboot
In the event that the router malfuncons or is not responding, then it is recommended that you restart the device.
Reboot
In the event that the device malfunctions or is not responding, you can perform a system reboot. Click on Apply - this will reboot the device, without affecting your existing settings.
APPLY

Reboong the EW-7438RPn Mini will not act the current conguraon/sengs of the device.
| Apply | Click “Apply” to reboot the device. A status bar will indicate the progress of the reboot and you will see a conrmaon screen when the reboot is complete. |
System Log
You can export the system log to a separate le if you require.
System Log
Export system log
| Export system log | Click to open a new window and select a locaon to save the log le. |
V-1. Home
Home
The "Status and Informaon" page displays basic system informaon about the device, arranged into
three categories: system, wireless conguraon & LAN conguraon.

Screenshots displayed are examples. The informaon shown on your screen will vary depending on your conguraon.
| System | |
| Current Time | 14:12:17 2014/6/23 |
| Uptime | 0Day:0h:1m:17s |
| Hardware Version | Rev. v3 |
| Firmware version | 1.06Upgrade Firmware |
| Mode | Wi-Fi Bridge |
| Wireless Configuration | |
| SSID | Edimax2.4GHz |
| Channel Number | 10 |
| Security | WPA-Shared Key |
| BSSID (MAC) | 80:1F:02:FD:D7:D7 |
| State | Connected |
| Signal Strength | 100% |
| LAN Configuration | |
| IP Address | 192.168.2.100 |
| Subnet Mask | 255.255.255.0 |
| Default Gateway | 192.168.2.1 |
| MAC Address | 80:1F:02:FD:D7:D7 |
| Current Time | Displays the current me and date. |
| Upme | Displays the total me since the device was turned on. |
| Hardware Version | Displays the hardware version. |
| Firmware Version | Displays the rmware version. |
| Mode | Displays the operang mode. |
| SSID | Displays your router/access point's SSID, somemes also known as SSID. The SSID is the name used to identify a wireless network. |
| Channel Number | Displays the current wireless channel number. |
| Security | Displays the current wireless security seng. |
| BSSID (MAC) | Displays the device's BSSID. The BSSID idenes this device in the network, and is the same as the device's MAC address. |
| State | Displays the current conncon state of the EW-7438RPn Mini. |
| Signal Strength | Displays the signal strength for the specied Wi-Fi network. |
| IP Address | Displays the IP address of this device. |
| Subnet Mask | Displays the subnet mask of the IP address. |
| Default Gateway | Displays the IP address of the default gateway. |
| MAC address | Displays the device's MAC address. The MAC address is a unique, xed ID for this device, it cannot be modified. |
V-2. iQ Setup

You can run the setup wizard again to reconfigure the basic sengs of the device. Please refer to II-2. Wi-Fi
Adapter/Bridge Mode for guidance.

If you wish to change the operang mode, please reset the EW-7438RPn Mini back to factory default sengs.
V-3. Wireless Advanced
Advanced Setting
▶ Time Settings
▶ Administration Utility
Configuration Tools
In "Wireless Advanced" you adjust the power output of the EW-7438RPn Mini. The submenu also allows you to congregate me sengs and various administrave and management funcons.
Advanced Setting
Advanced functions of the extender can be configured below.
| Tx Power | 100 % |
| Tx Power | You can adjust the level of wireless output power as a percentage. Depending on the size of your locaon and required coverage, you may not require 100% output power.Reducing the output power can enhance security since your Wi-Fi signal will not extend to potential malicious/unknown users in distant areas. |
V-3-1. Time Sengs
Time Zone
Set the time zone of the extender by synchronizing with Network Time Protocol server, the time will be used for Wi-Fi scheduling function.
| Set Time Zone | (GMT+08:00)Taipei |
| Time Server Address | pool.ntp.org |
| Daylight Savings | Enable FunctionJanuary 1 To January 1 |
| Set Time Zone | Select the me zone of your country or region. |
| Time Server Address | The extender supports NTP (Network Time Protocol), select a me server from the drop down menu. |
| Daylight Savings | If your country/region uses daylight saving me, please check the “Enable Funcon” box, and select the start and end date. |
V-3-2. Administraon Ulity
You can change the password used to login to the browser-based conguraon interface here. It is advised to do so for security purposes. You can also conjure the EW-7438RPn Mini's IP address.

Please make a note of the new password. In the event that you forget the password and are unable to login to the browser based conguraon interface, see II-5. Reset to factory default sengs for how to reset the device.
- Password Settings
| Current Password | |
| New Password | |
| Re-Enter Password |
- Management IP
| Obtain an IP address automatically | |
| Use the following IP address | |
| IP Address | 192.168.9.2 |
| Subnet Mask | 255.255.255.0 |
| Default Gateway | |
| DNS | |
| Current Password | Enter your current password. |
| New Password | Enter your new password. |
| Conrmed Password | Conrm your new password. |
| IP Address | Specify an IP address here. This IP address will be assigned to yourEW-7438RPn Mini. |
| Subnet Mask | Input the subnet mask of the new IP address. |
| Gateway Address | Input the network’s gateway IP address. |
| DNS | Enter the DNS address here. |
V-3-3. Conguraon Tools
The “Conguraon Tools” menu allows you to backup the EW-7438RPn Mini’s sengs, restore the sengs to a previous version or restore the EW-7438RPn Mini back to its factory default state. You can also upgrade the rmware, reboot the device and export the system log.
Manage Settings
Save the current settings of the device to a .bin file, restore the settings of the device to a previously saved .bin file or reset the device to its factory default settings.
Backup Settings : Save
Restore Settings : Browse... Upload
Restore to Factory Defaults : Reset
| Backup Sengs | Click “Save” to save the current sengs on your computer as cong.bin le. |
| Restore Sengs | Click “Browse” to nd a previously saved cong.bin le and then click “Upload” to replace your current sengs. |
| Restore to Factory Default | Click “Reset” to restore sengs to the factory default. A pop-up window will appear and ask you to conrm and enter your log in details.Enter your username and password and click “Ok”. See below for more informaon. |
Upgrade Firmware
You can upgrade the system rmware to a more recent version. You can download the latest rmware from the Edimax website. Aer the upgrade, the system will restart.
Upgrade Firmware
Upgrade the firmware to the most recent version - it is recommended that you use a wired connection for the procedure.
Browse...
CANCEL
APPLY

Do not switch o or disconnect the device during a rmware upgrade, as this could damage the device. It is recommended that you use a computer for a rmware upgrade.
| Browse | Open a new window to locate and select the rmware le in your computer. |
Reboot
In the event that the router malfuncons or is not responding, then it is recommended that you restart the device.
Reboot
In the event that the device malfunctions or is not responding, you can perform a system reboot. Click on Apply - this will reboot the device, without affecting your existing settings.
APPLY

Reboong the EW-7438RPn Mini will not act the current conguraon/sengs of the device.
| Apply | Click “Apply” to reboot the device. A status bar will indicate the progress of the reboot and you will see a conrmaon screen when the reboot is complete. |
System Log
You can export the system log to a separate le if you require.
System Log
Export system log
| Export system log | Click to open a new window and select a locaon to save the log le. |
VI-1. Home
Home
The "Status and Informaon" page displays basic system informaon about the device, arranged into
three categories: system, wireless conguraon & LAN conguraon.

Screenshots displayed are examples. The informaon shown on your screen will vary depending on your conguraon.
| System | |
| Current Time | 14:21:41 2014/6/23 |
| Uptime | 0Day:0h:0m:55s |
| Hardware Version | Rev. v3 |
| Firmware version | 1.06Upgrade Firmware |
| Mode | AP |
| Wireless Configuration | |
| SSID | EdimaxAPd7 |
| Channel Number | 2 |
| Security | WPA-Shared Key |
| BSSID (MAC) | 80:1F:02:FD:D7:D7 |
| Associated Clients | 0 Show Active Clients |
| State | Connected |
| LAN Configuration | |
| IP Address | 192.168.2.100 |
| Subnet Mask | 255.255.255.0 |
| Default Gateway | 192.168.2.1 |
| MAC Address | 80:1F:02:FD:D7:D7 |
| Current Time | Displays the current me and date. |
| Upme | Displays the total me since the device was turned on. |
| Hardware Version | Displays the hardware version. |
| Firmware Version | Displays the rmware version. |
| Mode | Displays the operang mode. |
| SSID | Displays the access point's SSID, somemes also known as SSID. The SSID is the name used to identify a wireless network. |
| Channel Number | Displays the current wireless channel number. |
| Security | Displays the current wireless security seng. |
| BSSID (MAC) | Displays the device's BSSID. The BSSID idenes this access point in the network, and is the same as the device's MAC address. |
| Associated Clients | Displays the number of clients connected to the access point. Click “Show Acve Clients” to display a new window showing informaon about wireless clients. |
| State | Displays the current conncon state of the EW-7438RPn Mini. |
| IP Address | Displays the IP address of this device. |
| Subnet Mask | Displays the subnet mask of the IP address. |
| Default Gateway | Displays the IP address of the default gateway. |
| MAC address | Displays the device's MAC address. The MAC address is a unique, xed ID for this device, it cannot be modified. |
VI-2. iQ Setup
iQ Setup
You can run the setup wizard again to reconfigure the basic sengs of the device. Please refer to II-3. Wi-Fi
Access Point Mode Step 3 onwards for guidance.

If you wish to change the operang mode, please reset the EW-7438RPn Mini back to factory default sengs.
VI-3. Basic Sengs
Basic Settings
The "Basic Seings" screen displays various sengs for your wireless network.
| Mode | AP ▼ |
| Band | 2.4 GHz (B+G+N) ▼ |
| Main SSID | EdimaxAPd7Multiple SSID |
| AP Isolation(Client user isolation) | Disabled ▼ |
| Channel Number | Auto ▼ |
| Associated Clients | Show Active Clients |
| Mode | The EW-7438RPn Mini's mode is displayed here. |
| Band | Displays the wireless standard used for the EW-7438RPn Mini. “2.4GHz (B+G+N)” means that 802.11b, 802.11g, and 802.11n wireless clients can connect to the EW-7438RPn Mini. |
| MAIN SSID | This is the name of your Wi-Fi network for idencaon, also known as “SSID”. The SSID can consist of any combinaon of up to 32 alphanumerical characters. |
| Mulple SSID | Click “Mulple SSID” to open a new window and assign up to four SSIDs to this access point. Please see the following page for more details. |
| AP Isolaon | When “Enabled”, wireless clients will be able to access the Internet, but will not be able to communicate with each other. This applies to clients connected to the MAIN ESSID only. |
| Channel Number | Select a wireless radio channel or use the default “Auto” seng from the drop-down menu. |
| Associated Clients | Click “Show list” to display a new window showing informaon about wireless clients. Please disable any pop-up blockers if you have diculty using this funcon. |
Mulple SSID
This page allows you to congregate the wireless seings for mulple ESSID's.
Multiple SSID
This page allows you to configure the wireless settings for Multiple SSIDs. The wireless security settings for these SSIDs can be configured in Security page.
| No. | Enabled | Associated Clients | Basic Settings | Advanced Setting | ||||
| SSID | Broadcast SSID | WMM | Band | AP Isolation (Client user isolation) | SSID isolation | |||
| SSID1 | √ | Show Active Clients | Guest Netwo | Enabled √ | Disabled √ | 2.4 GHz (B+G+N) √ | Disabled √ | Disabled √ |

| No. | Idencaon number of each additional SSID. |
| Enable | Check the box to enable or disable an SSID. |
| SSID | Enter the SSID (the name used to identify this wireless access point) here. You can input up to 32 alphanumerical characters. Please note that the SSID is case sensitive. |
| Broadcast SSID | Enable or disable SSID broadcast. When enabled, the ESSID will be visible to clients as an available Wi-Fi network. When disabled, the SSID will not be visible as an available Wi-Fi network to clients – clients must manually enter the SSID in order to connect. A hidden (disabled) SSID is typically more secure than a visible (enabled) SSID. |
| WMM | WMM (Wi-Fi Mulmedia) technology can improve the performance of certain network applicaons, such as audio/video streaming, network telephony (VoIP), and others. When WMM is enabled, the access point will prioritize dierent kinds of data and give higher priority to applicaons which require instant responses. This improves the performance of such network applicaons. |
| Band | Select the wireless band you wish to use for the access point: 802.11b, 802.11g, 802.11nor selected combinaons of each. Only wireless clients of the same band(s) as you select will be able to connect. |
| AP Isolaon | When “Enabled”, wireless clients will be able to access the Internet, but will not be able to communicate with each other. |
| SSID Isolaon | When “Enabled”, wireless clients that connect to main SSID and mulple SSID will not be able to communicate with each other. |
VI-4. WPS Sengs
WPS Setting
Wi-Fi Protected Setup is a simple way to establish conncons between WPS compatible devices. When
WPS is acvated in the correct manner and at the correct me for two compatible devices, they will automacally connect. PIN code WPS includes the use of a PIN code between the two devices for vericaon.
The WPS Sengs page displays sengs for WPS between your extender and a wireless client.

Do not use the physical WPS buon (described in II-4. WPS Setup) in access point mode. Use the sengs below instead.
• 2.4G Wi-Fi Protected Setup Information
| WPS Status | Configured |
| Self PinCode | 01902952 |
| Device SSID | EdimaxAPd7 |
| Security Type | WPA pre-shared key |
| Passphrase Key | abcd1234 |
• Device Configure
| Configuration Mode Device is as an AP | Registrar | |
| Configure via Push Button | Start PBC | |
| Input Client PIN Code | Send PIN | |
| WPS Status | Displays “Congured” or “unCongured” depending on whether WPS and SSID/security sengs for the device have been congured or not, either manually or using the WPS buon. |
| Self PIN Code | Displays the WPS PIN code of the device. |
| Device SSID | Displays the SSID of the device. |
| Security Type | Displays the wireless security authencaon mode of the device. |
| Passphrase Key | Displays the wireless security authencaon key. |
| Conguraon Mode | The conguraon mode of the device’s WPS seng is displayed here. “Registrar” means the device acts as an access point for a wireless client to connect to and the wireless client(s) will follow the device’s wireless sengs. |
| Congure via Push Buon | Click “Start PBC” (Push-Buon Conguraon) to acvate WPS on the EW-7438RPn Mini. WPS will be acve for 2 minutes. |
| Input Client PIN Code | Enter the wireless client’s PIN code here and click “Start PIN” to acvate PIN code WPS. Refer to your wireless client’s documentaon if you are unsure of its PIN code. |
VI-5. Wireless Advanced
Advanced Setting
▶ Security
▶ MAC Filtering
▶ Time Settings
▶ Scheduling setting
▶ Administration Utility
Configuration Tools
Using the "Advanced Seng" menu, you can congregate security, MAC Itering and various other sengs.
The sengs on the “Advanced Seng” page shown below are for experienced users only. Please do not change any of the values on this page unless you are already familiar with these funcons.

Changing these sengs can adversely act the performance of your access point.
| Fragment Threshold | 2346 | (256-2346) |
| RTS Threshold | 2347 | (0-2347) |
| Beacon Interval | 100 | (20-1024 ms) |
| DTIM Period | 3 | (1-10) |
| Data Rate | Auto ▼ | |
| N Data Rate | Auto ▼ | |
| Channel Width | ○ Auto 20/40MHz ○ 20MHz | |
| Preamble Type | ○ Short Preamble ○ Long Preamble | |
| Broadcast SSID | ○ Enabled ○ Disabled | |
| CTS Protect | ○ Auto ○ Always ○ None | |
| Tx Power | 100 % ▼ | |
| Fragment Threshold | Set the Fragment threshold of the wireless radio. The default value is 2346. |
| RTS Threshold | Set the RTS threshold of the wireless radio. The default value is 2347. |
| Beacon Interval | Set the beacon interval of the wireless radio. The default value is 100. |
| DTIM Period | Set the DTIM period of wireless radio. The default value is 3. |
| Data Rate | Set the wireless data transfer rate. The default is set to auto. |
| N Data Rate | Set the data rate of 802.11n. The default is set to auto. |
| Channel Width | Select wireless channel width (bandwidth used by wireless signals from the device) – the recommended value is Auto 20/40MHz. |
| Preamble Type | Set the wireless radio preamble type. The default value is “Short Preamble”. |
| Broadcast SSID | Enable or disable SSID broadcast. When enabled, the SSID will be visible to clients as an available Wi-Fi network. When disabled, the SSID will not be visible as an available Wi-Fi network to clients – clients must manually enter the SSID in order to connect. A hidden (disabled) SSID is typically more secure than a visible (enabled) SSID. WPS (Wi-Fi Protected Setup) is also disabled when SSID broadcast is disabled. |
| CTS Protect | Enabling this seng will reduce the chance of radio signal collisions between 802.11b and 802.11g wireless access points. It's recommended to set this opon to “Auto”. |
| Tx Power | Set the power output of the wireless radio. You may not require 100% output power. Seng a lower power output can enhance security since potenally malicious/unknown users in distant areas will not be able to access your signal. |
VI-5-1. Security
The access point provides a variety of wireless security opons (wireless data encrypon). When data is encrypted, informaon transmied wirelessly cannot be read by anyone who does not know the encrypon key. The “Security” screen displays security sengs for your EW-7438RPn Mini.
- Select SSID
| Device SSID | EdimaxAPd7 |
• Security Settings
| Security Type | WPA pre-shared key |
| WPA Unicast Cipher Suite | ○WPA(TKIP) ●WPA2(AES) ○WPA2 Mixed |
| Pre-Shared Key Format | Passphrase |
| Security Key | abcd1234 |
| SSID choice | Select which SSID to congregate security sengs for. |
| Encrypon | Select an SSID from the drop down menu to congregate security for. Refer to the next seconds for more details about each security type. |
VI-5-1-1. Disable
Encrypon is disabled and no password/key is required to connect to the EW-7438RPn Mini.

Disabling wireless encrypon is not recommended. When disabled, anybody within range can connect to your device's SSID.
• Security Settings
| Security Type | Disable |
Enable 802.1x Authentication
| Enable 802.1xAuthencaon | Check the box to enable the 802.1x authencaon. A RADIUS server is required to perform 802.1x authencaon. |
VI-5-1-2. WEP
WEP (Wired Equivalent Privacy) is a basic encrypon type. For a higher level of security consider using WPA encrypon.

WEP supports data rates up to 54Mbps.
• Security Settings
| Security Type | WEP |
| Key Length | 64-bit |
| Key Format | HEX (10 Characters) |
| Default Key | Key 1 |
| Security Key |
Enable 802.1x Authentication
| Key Length | Select 64-bit or 128bit. 128-bit is more secure than 64-bit. |
| Key Format | Choose from “ASCII” (any alphanumeric character 0-9, a-z and A-Z) or “Hex” (anycharacters from 0-9, a-f and A-F). |
| Encrypon Key | Enter your encrypon key/password according to the format you selected above. A complex, hard-to-guess key is recommended. Check the “Hide” box to hide your password from being displayed on-screen. |
| Enable 802.1x Authencaon | Check the box to enable the 802.1x authencaon. A RADIUS server is required to perform 802.1x authencaon. |
VI-5-1-3. WPA pre-shared key
WPA pre-shared key is the recommended and most secure encrypon type.

WPA (TKIP) supports data rates up to 54Mbps.
• Security Settings
| Security Type | WPA pre-shared key ▼ |
| WPA Unicast Cipher Suite | ○ WPA(TKIP) ○ WPA2(AES) ○ WPA2 Mixed |
| Pre-Shared Key Format | Passphrase ▼ |
| Security Key | abcd1234 |
| WPA Unicast Cipher Suite | Select from WPA (TKIP), WPA2 (AES) or WPA2 Mixed. WPA2 (AES) is safer than WPA (TKIP). Please make sure your wireless client supports your selecon. WPA2 (AES) is recommended followed by WPA2 Mixed if your client does not support WPA2 (AES). |
| Pre-shared Key Format | Choose from “Passphrase” (8 – 63 alphanumeric characters) or “Hex” (up to 64 characters from 0-9, a-f and A-F). |
| Pre-shared Key | Please enter a key according to the format you selected above. A complex, hard-to-guess key is recommended. Check the “Hide” box to hide your password from being displayed on-screen. |
VI-5-1-4. WPA RADIUS
WPA RADIUS is a combinaon of WPA encrypon and RADIUS user authencaon. If you have a RADIUS authencaon server, you can authenticate the identity of every wireless client against a user database.
• Security Settings
| Security Type | WPA RADIUS |
| WPA Unicast Cipher Suite | ○ WPA(TKIP) ○ WPA2(AES) ○ WPA2 Mixed |
| RADIUS Server IP Address | |
| RADIUS Server Port | 1812 |
| RADIUS Server Password |
| WPA Unicast Cipher Suite | Select from WPA (TKIP), WPA2 (AES) or WPA2 Mixed. WPA2 (AES) is safer than WPA (TKIP). Please make sure your wireless client supports your selecon. WPA2 (AES) is recommended followed by WPA2 Mixed if your client does not support WPA2 (AES). |
| RADIUS Server IP address | Input the IP address of the RADIUS authencaon server here. |
| RADIUS Server Port | Input the port number of the RADIUS authencaon server here. The default value is 1812. |
| RADIUS Server Password | Input the password of the RADIUS authencaon server here. |
VI-5-2. MAC Filtering
The MAC Itering feature allows you to denote a list of wireless devices permied to connect to this access point, idened by their unique MAC address. When this feature is enabled, devices which are not on the list of permied MAC addresses cannot connect to the access point.
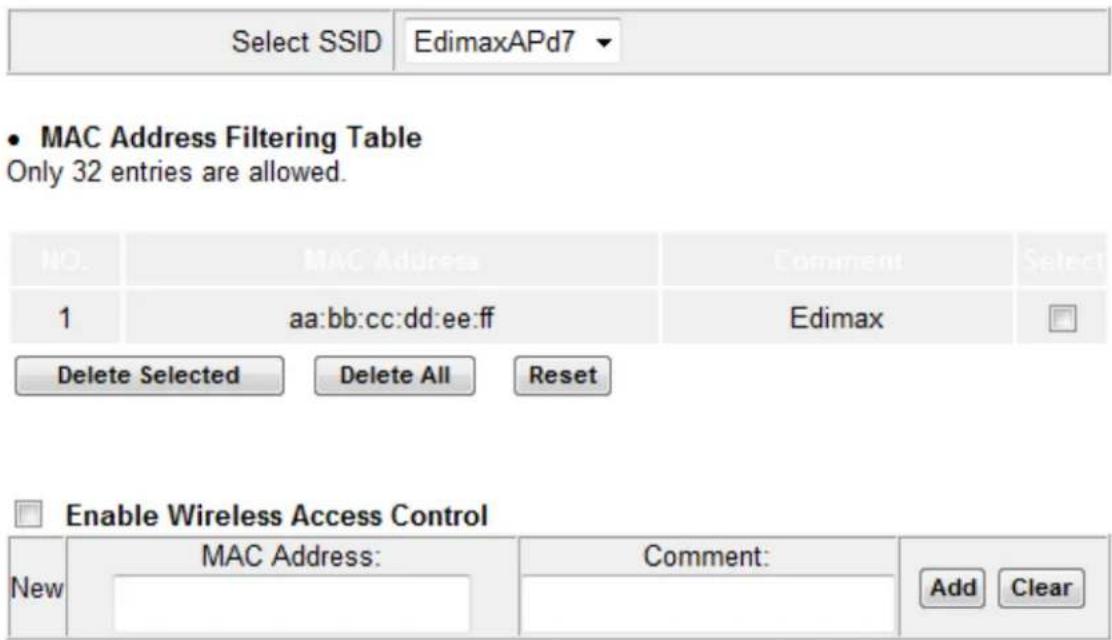
text_image
Select SSID EdimaxAPd7 • MAC Address Filtering Table Only 32 entries are allowed. NO. MAC Address Comment Select 1 aa:bb:cc:dd:ee:ff Edimax Delete Selected Delete All Reset Enable Wireless Access Control New MAC Address: Comment: Add Clear NewMAC address entries will be listed in the “MAC Address Filtering Table”. Select an entry using the “Select” checkbox.
| Delete Selected/ Delete All | Delete selected or all entries from the table. |
| Reset | De-select all selected entries. |
To enable the MAC Itering funcon, check the box labeled "Enable Wireless Access Control".
| MAC address | Enter a MAC address of computer or network device without dashes or colons e.g. for MAC address ‘aa-bb-cc-dd-ee-ff’ enter ‘aabbccddee’. |
| Comment | Enter a comment for reference/idencaon consisng of up to 16 alphanumerical characters. |
| Add | Click “Add” to add the MAC address to theMAC address ltering table. |
| Clear | Clear all elds. |
VI-5-3. Time Sengs
Time Zone
Set the time zone of the extender by synchronizing with Network Time Protocol server, the time will be used for Wi-Fi scheduling function.
| Set Time Zone | (GMT+08:00)Taipei |
| Time Server Address | pool.ntp.org |
| Daylight Savings | Enable FunctionJanuary 1 To January 1 |
| Set Time Zone | Select the me zone of your country or region. |
| Time Server Address | The extender supports NTP (Network Time Protocol), select a me server from the drop down menu. |
| Daylight Savings | If your country/region uses daylight saving me, please check the “Enable Funcon” box, and select the start and end date. |
VI-5-4. Scheduling Seng
Scheduling setting
Scheduling function can be configured below for specific service.
Schedule Table (Up to 10 sets) : ☐ Enable ☑ Disable
| NO. | Service | Schedule description | Schedule | Select |
| 1 | Wireless off | Edit | Delete |


| Add | Click to add a new schedule in a new window (see below). |
| Edit | Edit an exisng schedule in a new window. |
| Delete | Delete the specied schedule. |
Add
When you click "Add" to add a new schedule, a new window will open as shown below:
Service : Wireless off ▼ Schedule description :
| Start Time (hh.mm) | End Time (hh.mm) | Select | |
| Sunday | 0 ▼: 0 ▼ | 0 ▼: 0 ▼ | □ |
| Monday | 0 ▼: 0 ▼ | 0 ▼: 0 ▼ | □ |
| Tuesday | 0 ▼: 0 ▼ | 0 ▼: 0 ▼ | □ |
| Wednesday | 0 ▼: 0 ▼ | 0 ▼: 0 ▼ | □ |
| Thursday | 0 ▼: 0 ▼ | 0 ▼: 0 ▼ | □ |
| Friday | 0 ▼: 0 ▼ | 0 ▼: 0 ▼ | □ |
| Saturday | 0 ▼: 0 ▼ | 0 ▼: 0 ▼ | □ |
| Every day | 0 ▼: 0 ▼ | 0 ▼: 0 ▼ | □ |

- Select which funcon to schedule using the "Service" menu and enter a name for the schedule in the "schedule descripon" box.
- Specify a start and end me (hours and minutes) using the drop-down menus for your required day.
- Select the schedule in the "Select" column and click "APPLY" to save the schedule, or "Back" to cancel and go back to the previous screen.

If you need to use the extender during a scheduled o period, press the WPS/Reset buon once to “wake up” the extender and resume Wi-Fi coverage.
VI-5-5. Administraon Ulity
You can change the password used to login to the browser-based conguraon interface here. It is advised to do so for security purposes. You can also conjure the EW-7438RPn Mini's IP address.

Please make a note of the new password. In the event that you forget the password and are unable to login to the browser based conguraon interface, see II-5. Reset to factory default sengs for how to reset the device.
- Password Settings
| Current Password | |
| New Password | |
| Re-Enter Password |
- Management IP
| Obtain an IP address automatically | |
| Use the following IP address | |
| IP Address | 192.168.9.2 |
| Subnet Mask | 255.255.255.0 |
| Gateway Address | |
| DNS | |
- DHCP Server
| DHCP Server | Disabled √ |
| Default Gateway | 192.168.9.2 |
| Start IP | 192.168.9.100 |
| End IP | 192.168.9.200 |
| Lease Time | Forever √ |
| Current Password | Enter your current password. |
| New Password | Enter your new password. |
| Conrmed Password | Conrm your new password. |
| IP Address | Specify an IP address here. This IP address will be assigned to your EW-7438RPn Mini. |
| Subnet Mask | Input the subnet mask of the new IP address. |
| Gateway Address | Input the network’s gateway IP address. |
| DNS | Enter the DNS address here. |
| DHCP Server | Enable or disable the DHCP server. |
| Default Gateway | Input the network’s gateway IP address. |
| Start IP | Enter the start IP address for the DHCP server’s IP address leases. |
| End IP | Enter the end IP address for the DHCP server’s IP address leases. |
| Lease Time | Select a lease me for the DHCP leases here.The DHCP client will obtain a new IP address aer the period expires. |

Please refer to VIII-1. Concuring your IP address for more informaon about changing the access point's IP address.
VI-5-6. Conguraon Tools
The “Conguration Tools” menu allows you to backup the EW-7438RPn Mini’s sengs, restore the sengs to a previous version or restore the EW-7438RPn Mini back to its factory default state. You can also upgrade the rmware, reboot the device and export the system log.
Manage Settings
Save the current settings of the device to a .bin file, restore the settings of the device to a previously saved .bin file or reset the device to its factory default settings.
Backup Settings : Save
Restore Settings : Browse... Upload
Restore to Factory Defaults : Reset
| Backup Sengs | Click “Save” to save the current sengs on your computer as cong.bin le. |
| Restore Sengs | Click “Browse” to nd a previously saved cong.bin le and then click “Upload” to replace your current sengs. |
| Restore to Factory Default | Click “Reset” to restore sengs to the factory default. A pop-up window will appear and ask you to conrm and enter your log in details. Enter your username and password and click “Ok”. See below for more informaon. |
Upgrade Firmware
You can upgrade the system rmware to a more recent version. You can download the latest rmware from the Edimax website. Aer the upgrade, the system will restart.
Upgrade Firmware
Upgrade the firmware to the most recent version - it is recommended that you use a wired connection for the procedure.
Browse...
CANCEL
APPLY

Do not switch o or disconnect the device during a rmware upgrade, as this could damage the device. It is recommended that you use a wired Ethernet conncon for a rmware upgrade.
| Browse | Open a new window to locate and select the rmware le in your computer. |
Reboot
In the event that the router malfuncons or is not responding, then it is recommended that you restart the device.
Reboot
In the event that the device malfunctions or is not responding, you can perform a system reboot. Click on Apply - this will reboot the device, without affecting your existing settings.
APPLY

Reboong the EW-7438RPn Mini will not act the current conguraon/sengs of the device.
| Apply | Click “Apply” to reboot the device. A status bar will indicate the progress of the reboot and you will see a conrmaon screen when the reboot is complete. |
System Log
You can export the system log to a separate le if you require.
System Log
Export system log
| Export system log | Click to open a new window and select a locaon to save the log le. |

The EdiRange app is for use with range extender mode only.
The EdiRange app is a free smartphone app from which you can manage the extender's funcons and check your local Wi-Fi environment.

Please ensure that your smartphone/tablet is connected to your extender's Wi-Fi (SSID).
VII-1. Login
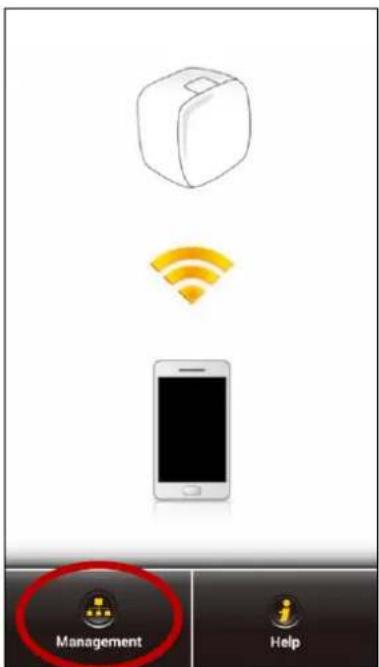
- Open the EdiRange app.

text_image
EDIMAX EdiRange- Select "Management".
text_image
Mobile app interface screenshot showing a 3D cube icon with Wi-Fi signal, smartphone, and two UI buttons labeled 'Management' and 'Help'.- Enter the username and password (default username: admin, default password: 1234).

The admin password is the same password used for the browser based conguraon interface. It is recommended that you change the password from the default "1234". You can change the password in the "admin" page from the main menu.

text_image
Login Please Login (Default Password : 1234) User Name : admin Password : Cancel Login- Wait for the app to log in.

text_image
Login Please Login (Default Password : 1234) User Name : admin Password : ***** Cancel Login Please wait a moment...VII-2. Main Menu
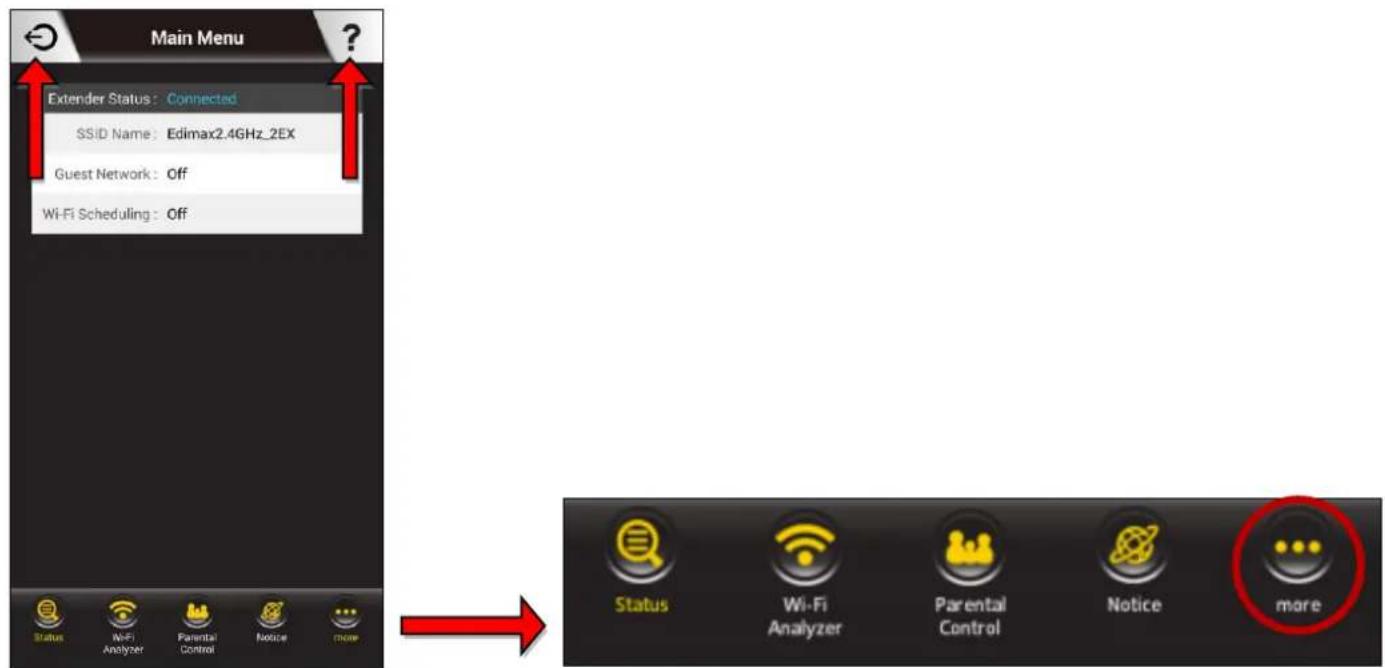
Aer you log in, the “Status” page will be displayed. You can see the extender status, SSID name, and guest network and schedule status here. Use the menu of icons across the boom of the screen to navigate around the app.
text_image
Main Menu Extender Status: Connected SSID Name: Edimax2.4GHz_2EX Guest Network: Off Wi-Fi Scheduling: Off Status WiFi Analyzer Parental Control Notice more Status Wi-Fi Analyzer Parental Control Notice more
Logout
Click the logout icon in the top le corner of the app anytime to log out from the app.

Help
Click the help icon in the top right corner of the app anymore to display help and ps about using the app.

More
Click the “more” icon in the main menu to display an additional menu with more opons:
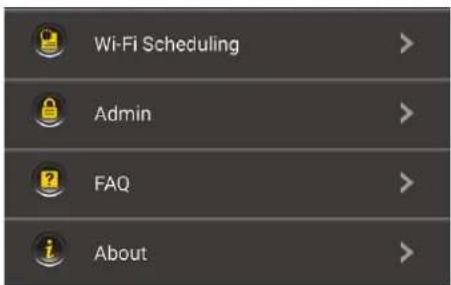
text_image
Wi-Fi Scheduling Admin FAQ AboutVII-3. Parental Control
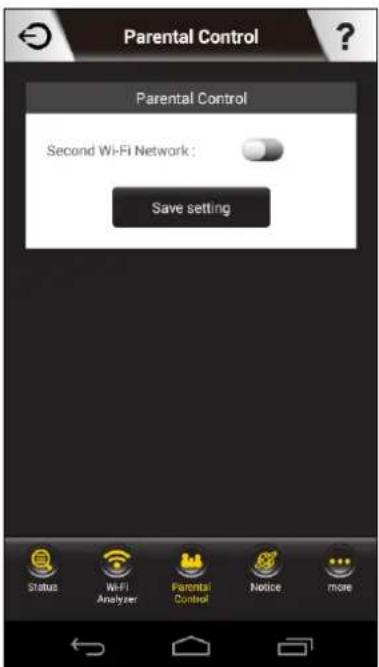
The parental control funcon is a guest Wi-Fi network (SSID) which can be used for children, and switched on or o remotely using the EdiRange app independent from your extender's primary Wi-Fi network. Select “Second Wi-Fi Network” and then enter a name and password for the network.
text_image
Parental Control Parental Control Second Wi-Fi Network : Save setting Status Wi-Fi Analyzer Parental Control Notice more
text_image
Parental Control Second Wi-Fi Network : Guest SSID : "Guest Network" Password : password (WPA2, at least 8 characters) Save setting Status Wi-Fi Analyzer Parental Control Notice more
text_image
Parental Control Second Wi-Fi Network: Guest SSID: "Guest Network" Password: password Please wait a moment... Waiting... 55sVII-4. Wi-Fi Scheduling
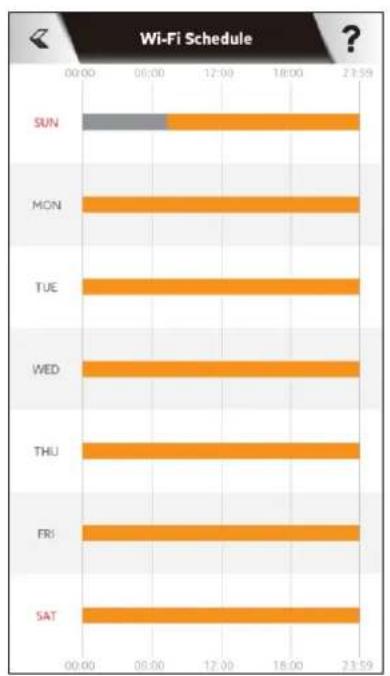
Wi-Fi can be scheduled to switch o according to your preference. Your current schedules are displayed in the table: grey areas indicate Wi-Fi is o and orange areas indicate Wi-Fi is on.
Touch the me bars on the screen to open the schedule sengs, and then click “Add” or “Edit” to add a new or edit an exisng schedule for Wi-Fi o. Daylight Savings can also be congured here.
bar
| Day | Wi-Fi Schedule | |-------|----------------| | SUN | 12:00 | | MON | 23:59 | | TUE | 23:59 | | WED | 23:59 | | THU | 23:59 | | FRI | 23:59 | | SAT | 23:59 |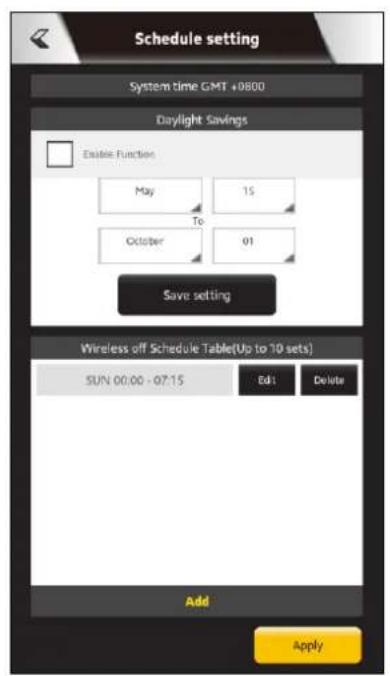
text_image
Schedule setting System time GMT +0800 Daylight Savings Enable Function May 15 To October 01 Save setting Wireless off Schedule Table(Up to 10 sets) SUN 00:00 - 07:15 Edit Delete Add Apply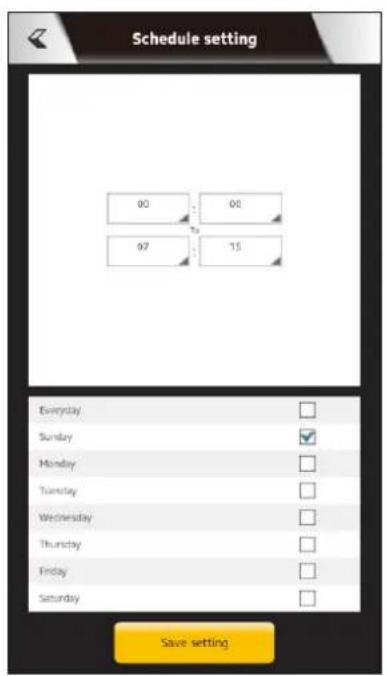
text_image
Schedule setting 00 00 07 15 Everyday Sunday Monday Tuesday Wednesday Thursday Friday Saturday Save settingVII-5. Admin
You can change the extender's administrave password on the Admin page. This is the password to login to the EdiRange app and the browser based conguraon interface.

text_image
admin Admin Password User Name: Admin Password: default 1234 Save settingVIII-1. Conguring your IP address
For rst me access to the URL hp://edimaxext.setup please ensure your computer is set to use a dynamic IP address. This means your computer can obtain an IP address automacally from a DHCP server. You can check if your computer is set to use a dynamic IP address by following VII-1-1. How to check that your computer uses a dynamic IP address.
Stac IP users can also temporarily modify your computer's IP address to be in the same IP address subnet e.g. 192.168.9.x (x = 3 - 254) as the EW-7438RPn Mini in order to access hp://edimaxext.setup.

The EW-7438RPn Mini's default IP address is 192.168.9.2.
The procedure for modifying your IP address varies across dierent operang systems; please follow the guide appropriate for your operang system in VIII-1-2. How to modify the IP address of your computer.

Stac IP users please make a note of your stac IP before you change it.
You can assign a new IP address to the device which is within the subnet of your network during setup or using the browser based conguraon interface, so that you can access the URL hp://edimaxext.setup in future without modifying your IP address.

Please remember to change your IP address back to its original value aer the device is properly congured.
VIII-1-1. How to check that your computer uses a dynamic IP address Please follow the instrucons appropriate for your operang system.
VIII-1-1-1. Windows XP
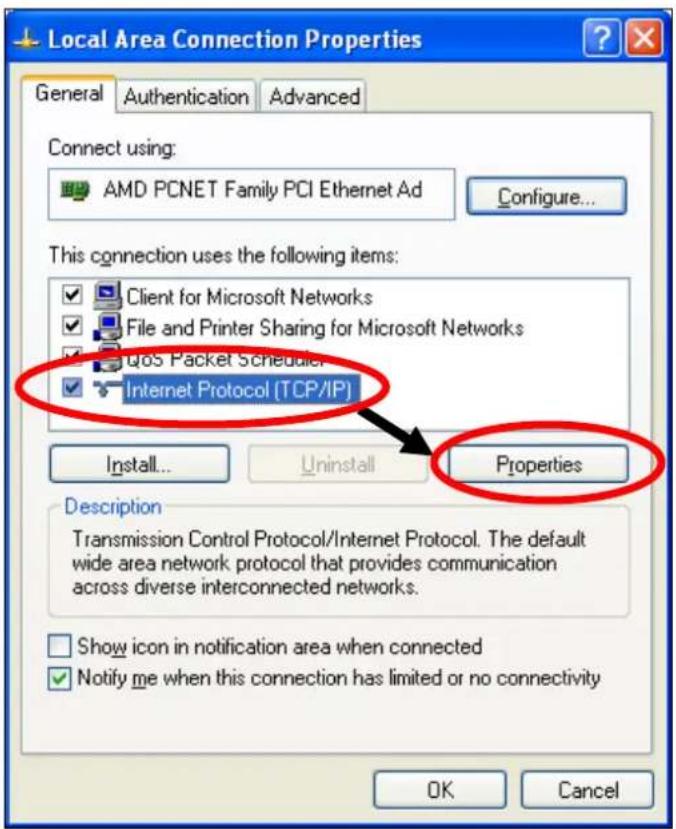
- Click the "Start" buon (it should be located in the lower-le corner of your computer), then click "Control Panel". Double-click the "Network and Internet Connecons" icon, click "Network Connecons", and then double-click "Local Area Connecon". The "Local Area Connecon Status" window will then appear, click "Properes".
text_image
Local Area Connection Properties General Authentication Advanced Connect using: AMD PCNET Family PCI Ethernet Ad Configure... This connection uses the following items: Client for Microsoft Networks File and Printer Sharing for Microsoft Networks QoS Packet Scheduler Internet Protocol (TCP/IP) Install... Uninstall Properties Description Transmission Control Protocol/Internet Protocol. The default wide area network protocol that provides communication across diverse interconnected networks. Show icon in notification area when connected Notify me when this connection has limited or no connectivity OK Cancel- “Obtain an IP address automacally” and “Obtain DNS server address automacally” should be selected.
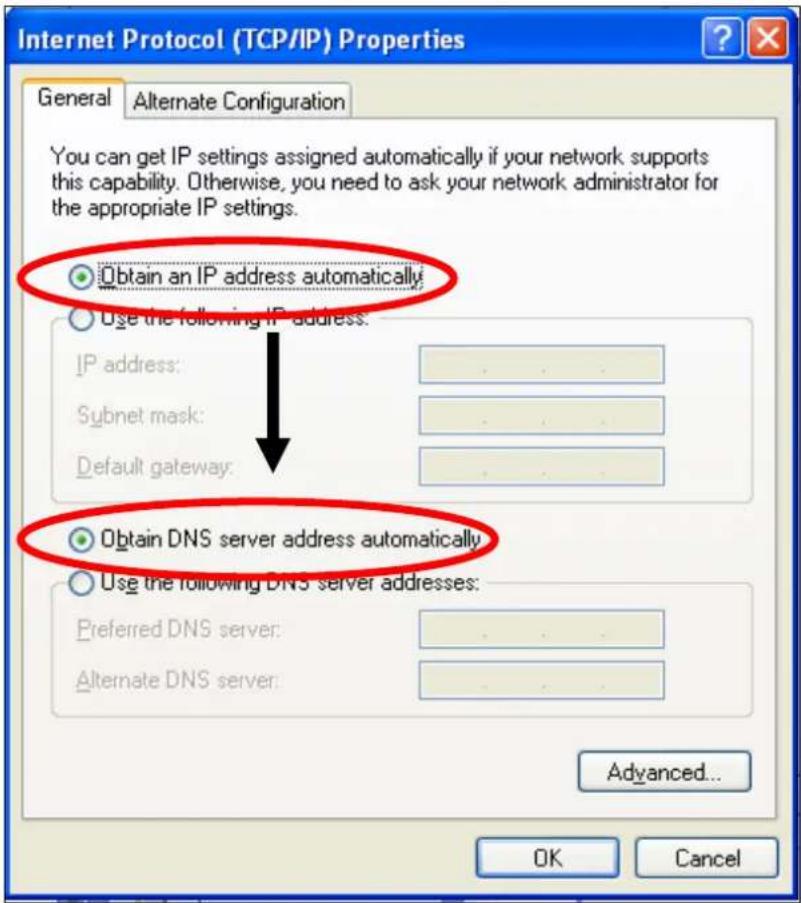
text_image
Internet Protocol (TCP/IP) Properties General Alternate Configuration You can get IP settings assigned automatically if your network supports this capability. Otherwise, you need to ask your network administrator for the appropriate IP settings. Obtain an IP address automatically Use the following IP address: IP address: Subnet mask: Default gateway: Obtain DNS server address automatically Use the following DNS server addresses: Preferred DNS server: Alternate DNS server: Advanced... OK CancelVIII-1-1-2. Windows Vista
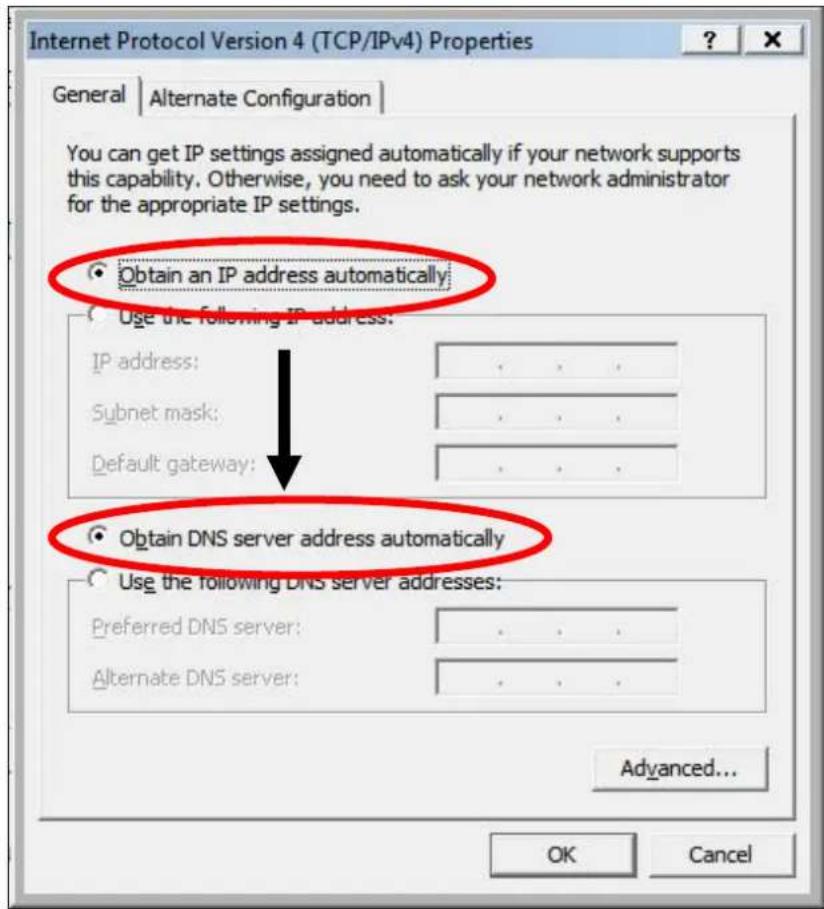
- Click the “Start” buon (it should be located in the lower-le corner of your computer), then click “Control Panel”. Click “View Network Status and Tasks”, then click “Manage Network Connecons”. Right-click “Local Area Network”, then select “Properes”. The “Local Area Connecon Properes” window will then appear, select “Internet Protocol Version 4 (TCP / IPv4)”, and then click “Properes”.

text_image
Local Area Connection Properties Networking Connect using: Intel(R) PRO/1000 MT Network Connection Configure... This connection uses the following items: Client for Microsoft Networks QoS Packet Scheduler File and Printer Sharing for Microsoft Networks Internet Protocol Version 3 (TCP/IPv6) Internet Protocol Version 4 (TCP/IPv4) Link-Layer Topology Discovery Manager/OS Driver Link-Layer Topology Discovery Responder Install... Uninstall Properties Description Transmission Control Protocol/Internet Protocol. The default wide area network protocol that provides communication across diverse interconnected networks. OK Cancel- Select "Obtain an IP address automacally" and "Obtain DNS server address automacally" should be selected.
text_image
Internet Protocol Version 4 (TCP/IPv4) Properties General | Alternate Configuration | You can get IP settings assigned automatically if your network supports this capability. Otherwise, you need to ask your network administrator for the appropriate IP settings. Obtain an IP address automatically Use the following IP address: IP address: Subnet mask: Default gateway: Obtain DNS server address automatically Use the following DNS server addresses: Preferred DNS server: Alternate DNS server: Advanced... OK CancelVIII-1-1-3. Windows 7
- Click the "Start" buon (it should be located in the lower-le corner of your computer), then click "Control Panel".
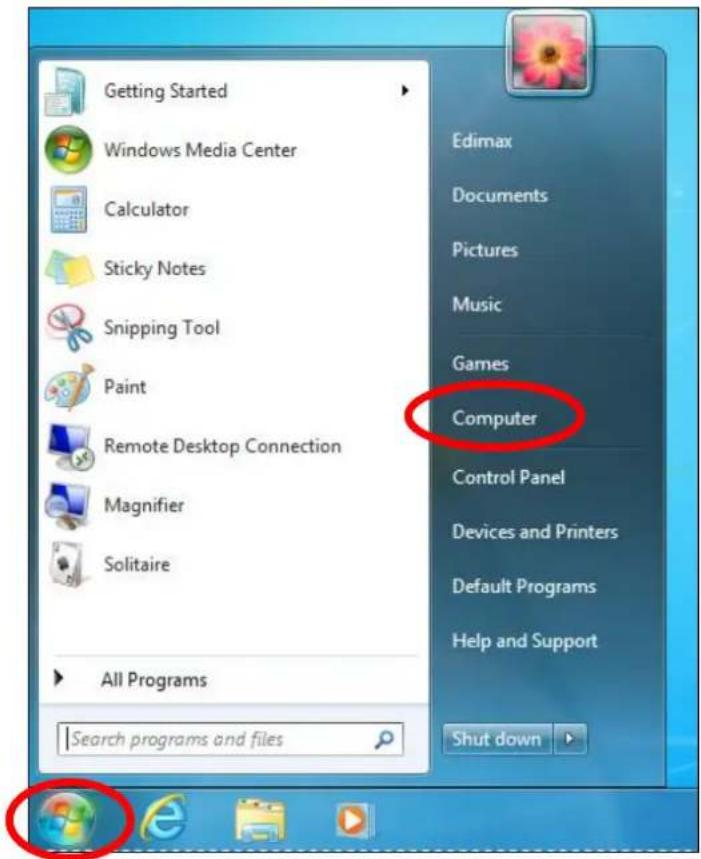
text_image
Getting Started Windows Media Center Calculator Sticky Notes Snipping Tool Paint Remote Desktop Connection Magnifier Solitaire All Programs Search programs and files Edimax Documents Pictures Music Games Computer Control Panel Devices and Printers Default Programs Help and Support Shut down- Under "Network and Internet" click "View network status and tasks".

text_image
Adjust your computer's settings System and Security Review your computer's status Back up your computer Find and fix problems Network and Internet View network status and tasks Choose homegroup and sharing options Hardware and Sound View devices and printers Add a device Programs Uninstall a program View by: Category User Accounts and Family Safety Add or remove user accounts Set up parental controls for any user Appearance and Personalization Change the theme Change desktop background Adjust screen resolution Clock, Language, and Region Change keyboards or other input methods Change display language Ease of Access Let Windows suggest settings Optimize visual display- Click "Local Area Connecon".

text_image
View your basic network information and set up connections TS-WIN7 (This computer) Home network Internet See full map View your active networks Connect or disconnect Home network Home network Access type: No Internet access HomeGroup: Ready to create Connections: Local Area Connection4. Click "Properes".
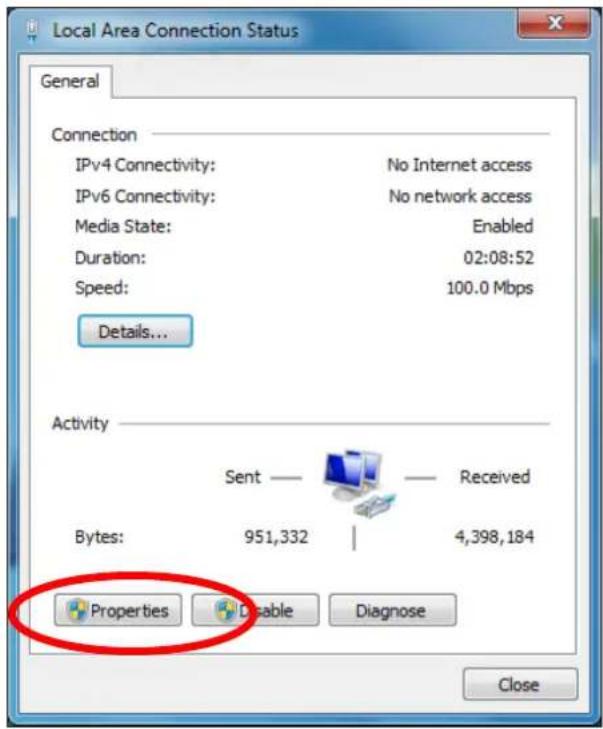
text_image
Local Area Connection Status General Connection IPv4 Connectivity: No Internet access IPv6 Connectivity: No network access Media State: Enabled Duration: 02:08:52 Speed: 100.0 Mbps Details... Activity Sent — Received Bytes: 951,332 | 4,398,184 Properties Disable Diagnose Close5. Select "Internet Protocol Version 4 (TCP/IPv4) and then click "Properes".

text_image
Local Area Connection Properties Networking Connect using: Broadcom 440x 10/100 Integrated Controller Configure... This connection uses the following items: ✓ Client for Microsoft Networks ✓ QoS Packet Scheduler ✓ File and Printer Sharing for Microsoft Networks ✓ Internet Protocol Version 6 (TCP/IPv6) ✓ - Internet Protocol Version 4 (TCP/IPv4) ✓ Link-Layer Topology Discovery Mapper I/O Driver ✓ Link-Layer Topology Discovery Responder Install... Uninstall Properties Description TCP/IP version 6. The latest version of the internet protocol that provides communication across diverse interconnected networks. OK Cancel- Select "Obtain an IP address automacally" and "Obtain DNS server address automacally" should be selected.

text_image
Internet Protocol Version 4 (TCP/IPv4) Properties General You can get IP settings assigned automatically if your network supports this capability. Otherwise, you need to ask your network administrator for the appropriate IP settings. Obtain an IP address automatically Use the following IP address: IP address: 192 . 168 . 2 . 10 Subnet mask: 255 . 255 . 255 . 0 Default gateway: . Obtain DNS server address automatically Use the following DNS server addresses: Preferred DNS server: . Alternate DNS server: . Validate settings upon exit Advanced... OK CancelVII-1-1-4. Windows 8
- From the Windows 8 Start screen, you need to switch to desktop mode. Move your cursor to the boom le of the screen and click.
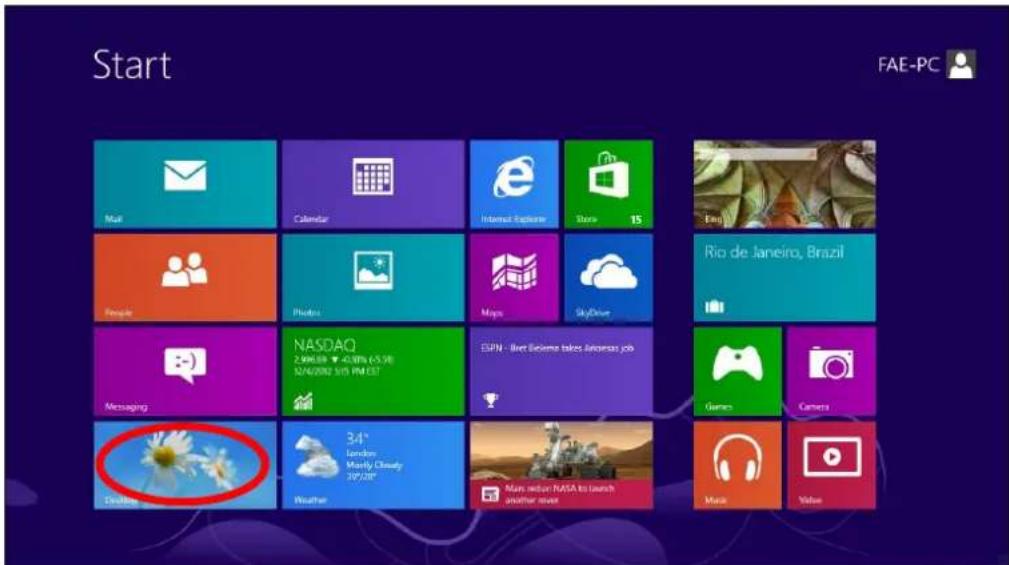
text_image
Start FAE-PC Mail Calendar Internet Explorer Starix 15 Engi People Photos Maps SkyDrive Rio de Janeiro, Brazil Messaging NASDAQ 2.9M/6.08 - 43.08% (5.9) 32/4/2002 5/05 PM/EST ESPN - Alert Believe takes Amuseas job Game Camera Disksing Weather 34° L Gaming Mostly Cloudy 3P/20" Main menu NASA to launch another server Music Video- In desktop mode, click the File Explorer icon in the boom le of the screen, as shown below.

natural_image
Close-up of white daisies against a blue sky, no text or symbols visible on the daisies or background.- Right click "Network" and then select "Properes".
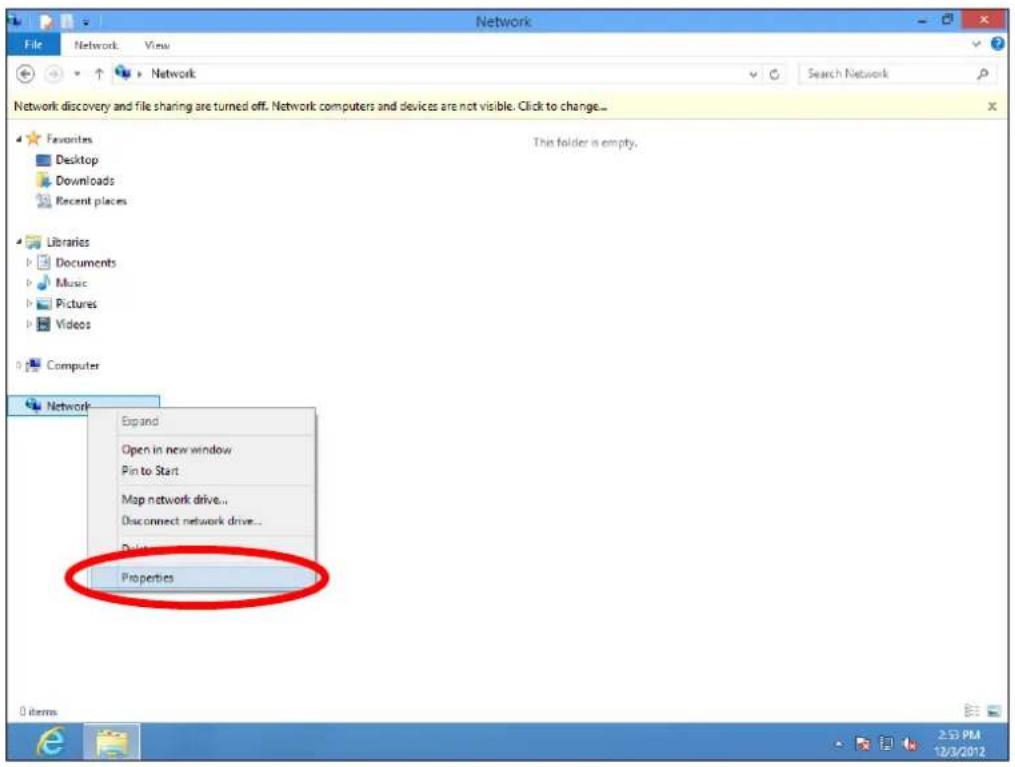
text_image
Network File Network: View Network Search Network Network discovery and file sharing are turned off. Network computers and devices are not visible. Click to change... Favorites Desktop Downloads Recent places Libraries Documents Music Pictures Videos Computer Network Expand Open in new window Pin to Start Map network drive... Disconnect network drive... Prints... Properties 0 items 2:53 PM 12/3/2012- In the window that opens, select "Change adapter setngs" from the le side.
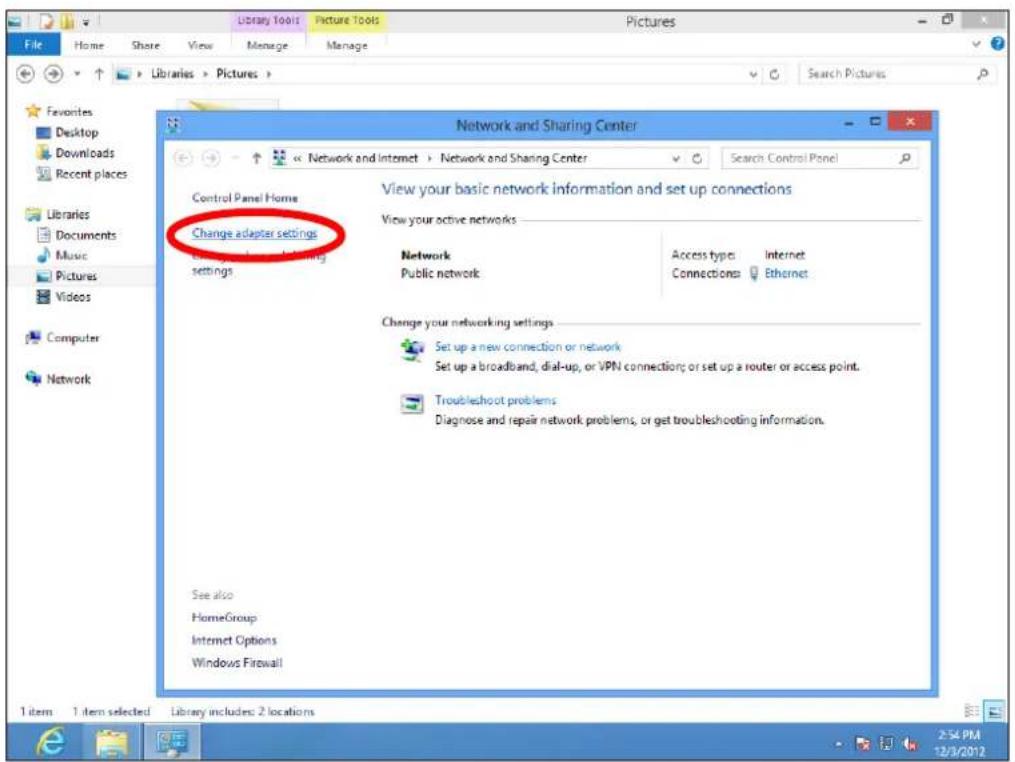
text_image
Library Tools Picture Tools Pictures File Home Share View Manage Manage Favorites Desktop Downloads Recent places Libraries Documents Music Pictures Videos Computer Network Network and Sharing Center View your basic network information and set up connections Change adapter settings View your active networks Network Public network Access types Internet Connections Ethernet Change your networking settings Set up a new connection or network Set up a broadband, dial-up, or VPN connection; or set up a router or access point. Troubleshoot problems Diagnose and repair network problems, or get troubleshooting information. See also HomeGroup Internet Options Windows Firewall 1 item 1 item selected Library includes: 2 locations- Choose your conneccon and right click, then select "Properes".
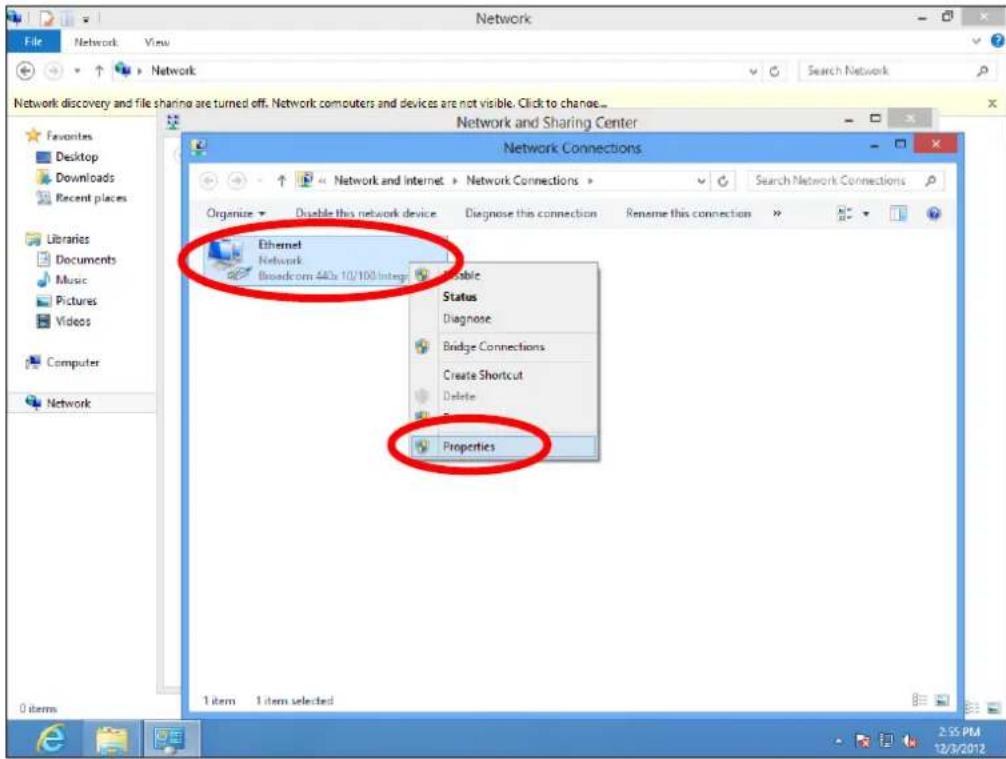
text_image
Network File Network View Network Search Network Network discovery and file sharing are turned off. Network computers and devices are not visible. Click to change... Favorites Desktop Downloads Recent places Libraries Documents Music Pictures Videos Computer Network Network and Sharing Center Network Connections Organize Disable this network device Diagnose this connection Rename this connection Ethernet Network Biosedcom 440x 10/100.Integr Accessible Status Diagnose Bridge Connections Create Shortcut Delete Properties 1 item 1 item selected 2:55 PM 12/3/2012- Select "Internet Protocol Version 4 (TCP/IPv4) and then click "Properes".
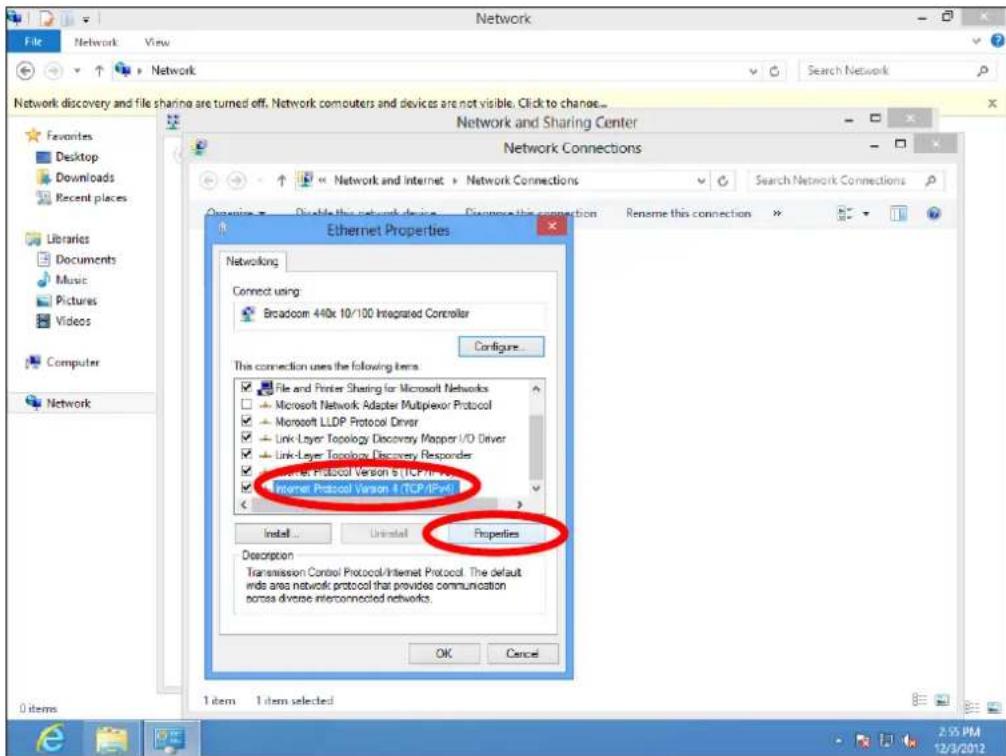
text_image
Network and Sharing Center Network Connections Network discovery and file sharing are turned off. Network computers and devices are not visible. Click to change... Favorites Desktop Downloads Recent places Libraries Documents Music Pictures Videos Computer Network Ethernet Properties Networking Connect using: Broadcom 440k 10/100 Integrated Controller Configure... This connection uses the following items: File and Printer Sharing for Microsoft Networks Microsoft Network Adapter Multiplexor Protocol Microsoft LLDP Protocol Driver Link Layer Topology Discovery Mapper I/O Driver Link Layer Topology Discovery Responder Internet Protocol Version 5 (TCP/IPv6) Internet Protocol Version 4 (TCP/IPv6) Properties Description Transmission Control Protocol/Internet Protocol. The default inds area network protocol that provides communication porses diverse interconnected networks. OK Cancel 1 item 1 item selected 2:55 PM 12/3/2012- Select "Obtain an IP address automacally" and "Obtain DNS server address automacally" should be selected.

text_image
Network File Network View Network Network discovery and file sharing are turned off. Network computers and devices are not visible. Click to change... Favorites Desktop Downloads Recent places Libraries Documents Music Pictures Videos Computer Network Network and Sharing Center Network Connections Network and Internet > Network Connections Search Network Connections Ethernet Properties Internet Protocol Version 4 (TCP/IPv4) Properties ? General Alternate Configuration You can get IP settings assigned automatically if your network supports this capability. Otherwise, you need to ask your network administrator for the appropriate IP settings. Obtain an IP address automatically Use the following IP address: IP address: .... Subnet mask: .... Default gateway: .... Obtain DNS server address automatically Use the following DNS server addresses: Preferred DNS server: .... Alternate DNS server: .... Validate settings upon exit Advanced... OK Cancel 1 item 2:55 PM 12/3/2012VIII-1-1-5. Mac OS
- Have your Macintosh computer operate as usual, and click on "System Preferences".

text_image
System Preferences 1- In System Preferences, click on "Network".
text_image
Internet & Network MobileMe Network QuickTime Sharing- Click on "Wi-Fi" in the le panel and then click "Advanced" in the lower right corner.

text_image
Network Show All Location: Automatic Wi-Fi Connected Ethernet Not Connected AX881...thernet Not Connected 802.11 n WLAN Not Connected FireWire Not Connected Bluetooth PAN Not Connected Status: Connected Turn Wi-Fi Off Wi-Fi is connected to OBM-AirPort-2.4G and has the IP address 192.168.77.119. Network Name: OBM-AirPort-2.4G ✓ Ask to join new networks Known networks will be joined automatically. If no known networks are available, you will be asked before joining a new network. ✓ Show Wi-Fi status in menu bar Advanced... Click the lock to prevent further changes. Assist me... Revert Apply- Select "TCP/IP" from the top menu and "Using DHCP" in the drop down menu labeled "Congure IPv4" should be selected.

text_image
Network Show All Wi-Fi Wi-Fi TCP/IP WINS WINS 802.1X Proxies Hardware Configure IPv4 ✓ Using DHCP Using DHCP with manual address Using BootP Manually Off Router Subnet Mask ID: Renew DHCP Lease (If required ) Configure IPv6: Automatically Router: IPv6 Address: Prefix Length: Cancel OKVIII-1-2. How to modify the IP address of your computer
Please follow the instrucons appropriate for your operang system. In the following examples we use the IP address 192.168.9.20 though you can use any IP address in the range 192.168.9.x (x = 3 - 254) in order to access iQ Setup/browser based conguraon interface.

Please make a note of your stac IP before you change it.
- Click the "Start" buon (it should be located in the lower-le corner of your computer), then click "Control Panel". Double-click the "Network and Internet Connecons" icon, click "Network Connecons", and then double-click "Local Area Connecon". The "Local Area Connecon Status" window will then appear, click "Properes".

text_image
Local Area Connection Properties General Authentication Advanced Connect using: AMD PCNET Family PCI Ethernet Ad Configure... This connection uses the following items: Client for Microsoft Networks File and Printer Sharing for Microsoft Networks QOS Packet Scheduler Internet Protocol (TCP/IP) Install... Uninstall Properties Description Transmission Control Protocol/Internet Protocol. The default wide area network protocol that provides communication across diverse interconnected networks. Show icon in notification area when connected Notify me when this connection has limited or no connectivity OK Cancel- Select "Use the following IP address", then input the following values:

Your exisng stac IP address will be displayed in the "IP address" eld before you replace it. Please make a note of this IP
address, subnet mask, default gateway and DNS server addresses.
IP address: 192.168.9.20
Subnet Mask: 255.255.255.0
Click 'OK' when nished.

text_image
Internet Protocol (TCP/IP) Properties General You can get IP settings assigned automatically if your network supports this capability. Otherwise, you need to ask your network administrator for the appropriate IP settings. Obtain an IP address automatically Use the following IP address: IP address: 192 . 168 . 9 . 20 Subnet mask: 255 . 255 . 255 . 0 Default gateway: Obtain DNS server address automatically Use the following DNS server addresses: Preferred DNS server: . Alternate DNS server: . . . . Advanced... OK CancelVIII-1-2-2. Windows Vista
- Click the “Start” buon (it should be located in the lower-le corner of your computer), then click “Control Panel”. Click “View Network Status and Tasks”, then click “Manage Network Connecons”. Right-click “Local Area Network”, then select “Properes”. The “Local Area Connecon Properes” window will then appear, select “Internet Protocol Version 4 (TCP / IPv4)”, and then click “Properes”.
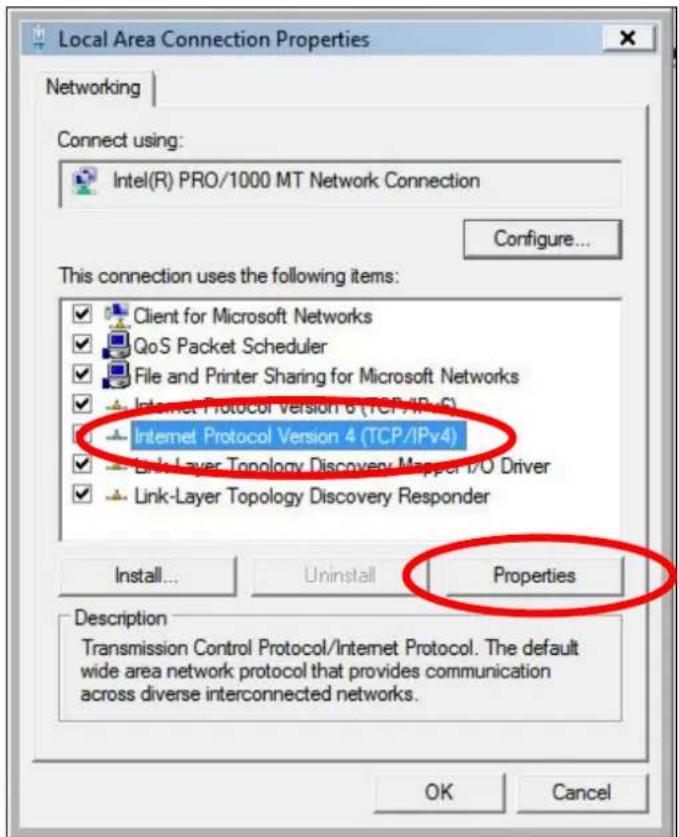
text_image
Local Area Connection Properties Networking Connect using: Intel(R) PRO/1000 MT Network Connection Configure... This connection uses the following items: Client for Microsoft Networks QoS Packet Scheduler File and Printer Sharing for Microsoft Networks Internet Protocol Version 6 (TCP/IPv4) Internet Protocol Version 4 (TCP/IPv4) Link-Layer Topology Discovery Mapper 1/O Driver Link-Layer Topology Discovery Responder Install... Uninstall Properties Description Transmission Control Protocol/Internet Protocol. The default wide area network protocol that provides communication across diverse interconnected networks. OK Cancel- Select "Use the following IP address", then input the following values:

Your exisng stac IP address will be displayed in the "IP address" eld before you replace it. Please make a note of this IP address, subnet mask, default gateway and DNS server addresses.
IP address: 192.168.9.20
Subnet Mask: 255.255.255.0
Click 'OK' when nished.

text_image
Internet Protocol Version 4 (TCP/IPv4) Properties General You can get IP settings assigned automatically if your network supports this capability. Otherwise, you need to ask your network administrator for the appropriate IP settings. Obtain an IP address automatically Use the following IP address: IP address: 192 . 168 . 9 . 20 Subnet mask: 255 . 255 . 255 . 0 Default gateway: | Obtain DNS server address automatically Use the following DNS server addresses: Preferred DNS server: . . . . Alternate DNS server: . . . . Advanced... OK CancelVII-1-2-3. Windows 7
- Click the "Start" buon (it should be located in the lower-le corner of your computer), then click "Control Panel".
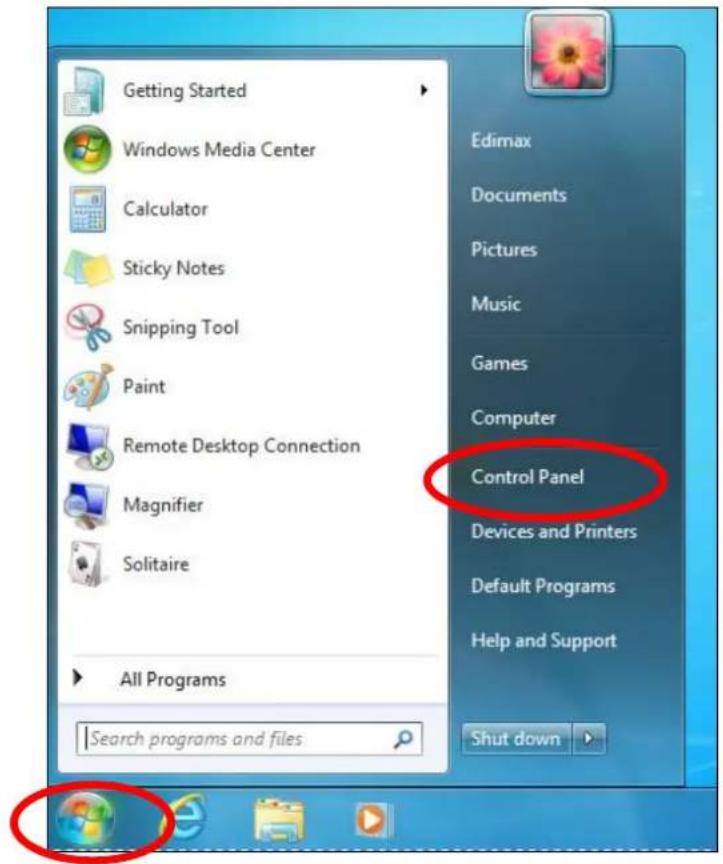
text_image
Getting Started Windows Media Center Calculator Sticky Notes Snipping Tool Paint Remote Desktop Connection Magnifier Solitaire All Programs Search programs and files Edimax Documents Pictures Music Games Computer Control Panel Devices and Printers Default Programs Help and Support Shut down- Under "Network and Internet" click "View network status and tasks".
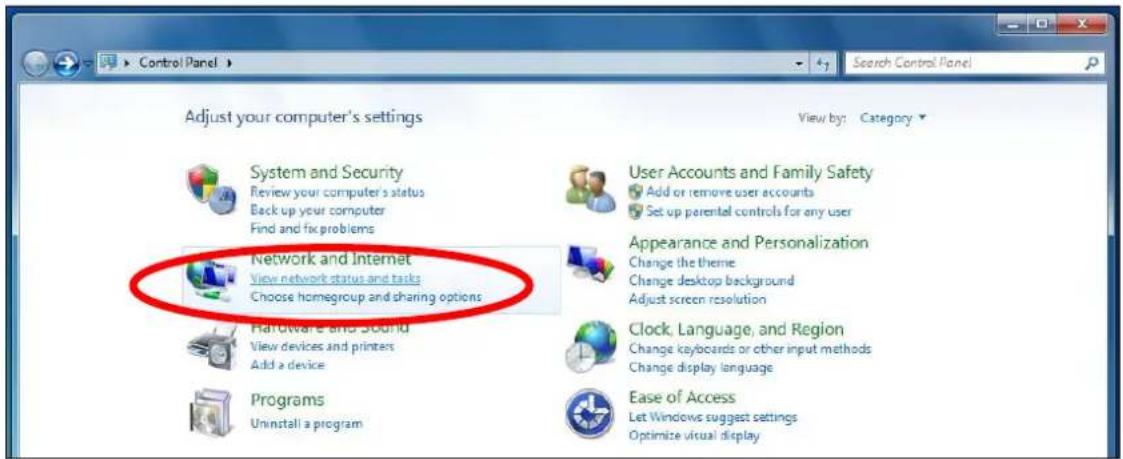
text_image
Adjust your computer's settings System and Security Review your computer's status Back up your computer Find and fix problems Network and Internet View network status and tasks Choose homegroup and sharing options Hardware and Sound View devices and printers Add a device Programs Uninstall a program View by: Category User Accounts and Family Safety Add or remove user accounts Set up parental controls for any user Appearance and Personalization Change the theme Change desktop background Adjust screen resolution Clock, Language, and Region Change keyboards or other input methods Change display language Ease of Access Let Windows suggest settings Optimize visual display- Click "Local Area Connecon".
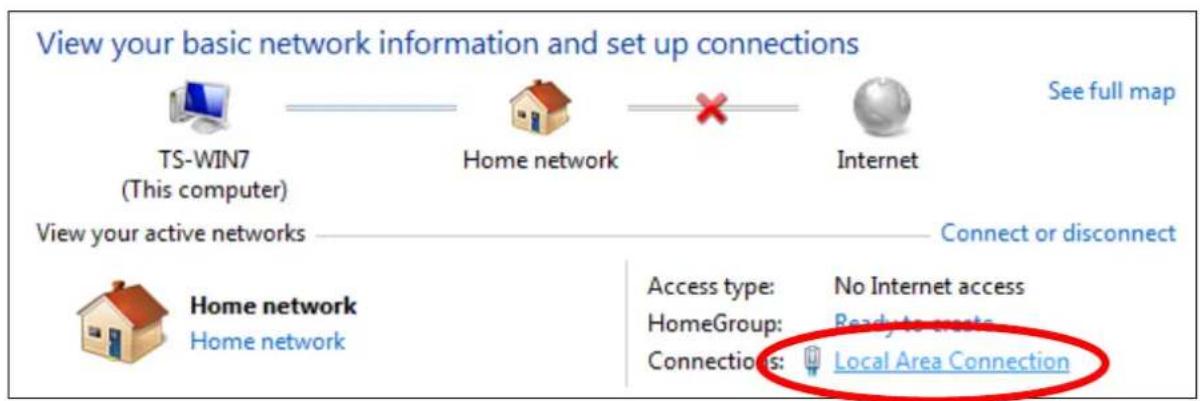
text_image
View your basic network information and set up connections TS-WIN7 (This computer) Home network Internet See full map View your active networks Connect or disconnect Home network Home network Access type: No Internet access HomeGroup: Ready to create Connections: Local Area Connection4. Click "Properes".
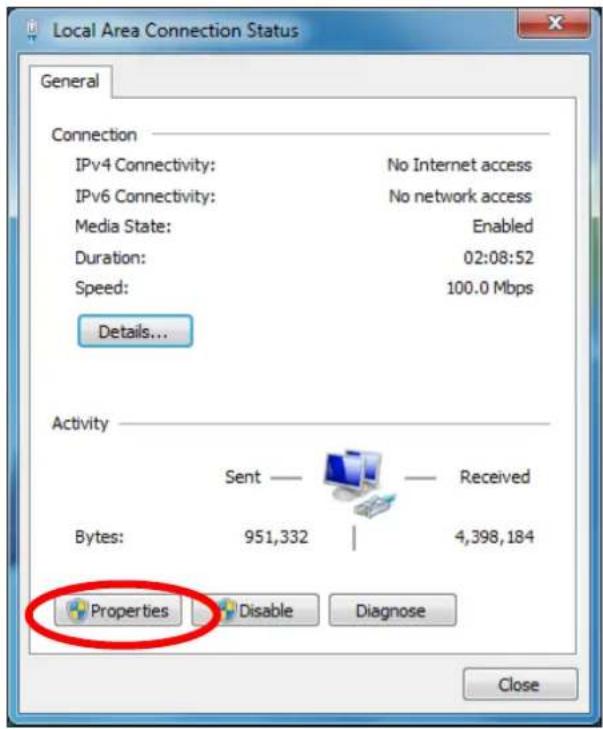
text_image
Local Area Connection Status General Connection IPv4 Connectivity: No Internet access IPv6 Connectivity: No network access Media State: Enabled Duration: 02:08:52 Speed: 100.0 Mbps Details... Activity Sent — Received Bytes: 951,332 | 4,398,184 Properties Disable Diagnose Close5. Select "Internet Protocol Version 4 (TCP/IPv4) and then click "Properes".
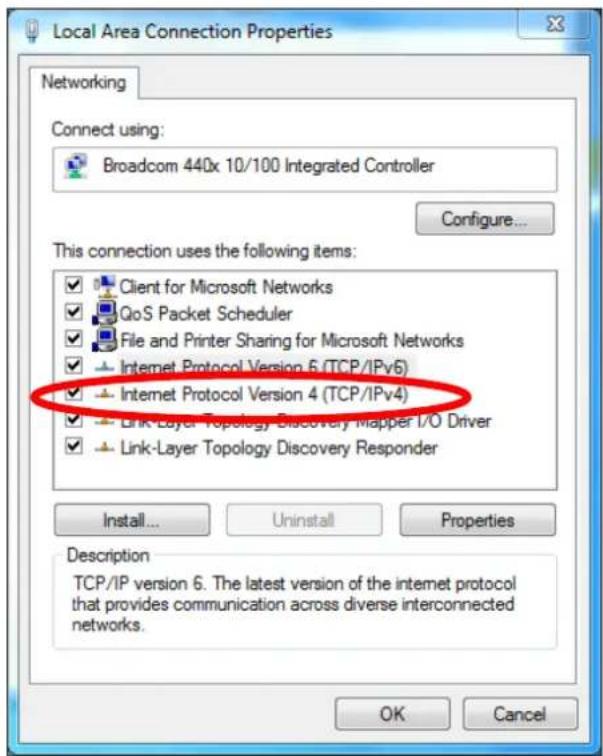
text_image
Local Area Connection Properties Networking Connect using: Broadcom 440x 10/100 Integrated Controller Configure... This connection uses the following items: ✓ Client for Microsoft Networks ✓ QoS Packet Scheduler ✓ File and Printer Sharing for Microsoft Networks ✓ Internet Protocol Version 6 (TCP/IPv6) ✓ - Internet Protocol Version 4 (TCP/IPv4) ✓ Link-Layer Topology Discovery Mapper I/O Driver ✓ Link-Layer Topology Discovery Responder Install... Uninstall Properties Description TCP/IP version 6. The latest version of the internet protocol that provides communication across diverse interconnected networks. OK Cancel- Select "Use the following IP address", then input the following values:

Your exisng stac IP address will be displayed in the "IP address" eld before you replace it. Please make a note of this IP address, subnet mask, default gateway and DNS server addresses.
IP address: 192.168.9.20
Subnet Mask: 255.255.255.0
Click 'OK' when nished.

text_image
Internet Protocol Version 4 (TCP/IPv4) Properties General You can get IP settings assigned automatically if your network supports this capability. Otherwise, you need to ask your network administrator for the appropriate IP settings. Obtain an IP address automatically Use the following IP address: IP address: 192 . 168 . 9 . 20 Subnet mask: 255 . 255 . 255 . 0 Default gateway: | Obtain DNS server address automatically Use the following DNS server addresses: Preferred DNS server: . . . . Alternate DNS server: . . . . Advanced... OK CancelVIII-1-2-4. Windows 8
- From the Windows 8 Start screen, you need to switch to desktop mode. Move your cursor to the boom le of the screen and click.

text_image
Start FAE-PC Mail Calendar Internet Explorer Store 15 People Photos Maps SkyDrive Río de Janeiro, Brazil Messaging NASDAQ 2.98/0.69 - 4.38% (-5.57) 12/4/2012 3:05 PM EST ESPN - Bret Dilema takes Artanjos job 34° London Modify Cloudy 3P/28" Weather Mars reduce NASA to launch another river Games Camera Music Video- In desktop mode, click the File Explorer icon in the bottom le of the screen, as shown below.

natural_image
Close-up of white daisies against a blue sky, no text or symbols visible on the daisies or background.3. Right click "Network" and then select "Properes".
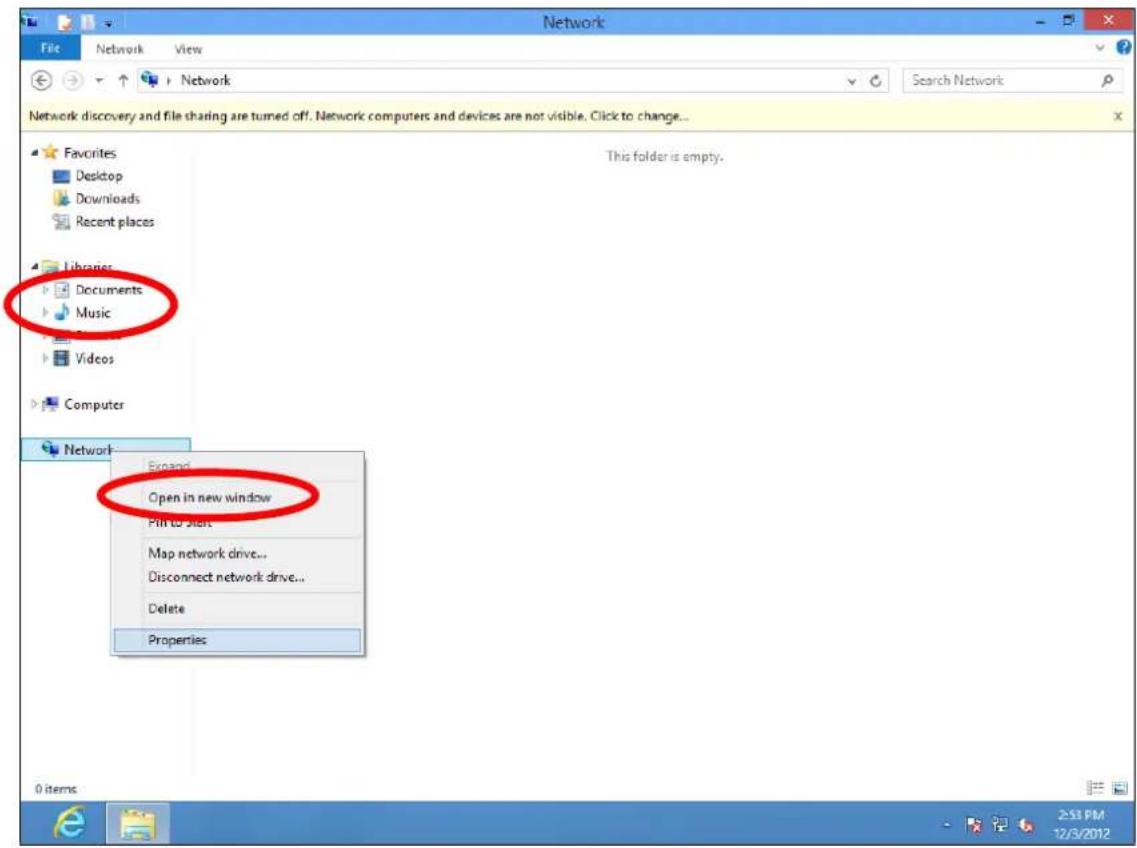
text_image
Network File Network View Network Search Network Network discovery and file sharing are turned off. Network computers and devices are not visible. Click to change... Favorites Desktop Downloads Recent places Libraries Documents Music Videos Computer This folder is empty. Network Expand Open in new window Find to start Map network drive... Disconnect network drive... Delete Properties 0 items 2:33 PM 12/3/20124. In the window that opens, select "Change adapter sengs" from the le side.

text_image
Library Tools Picture Tools Pictures File Home Share View Manage Manage Favorites Desktop Downloads Recent places Libraries Documents Music Pictures Videos Computer Network Network and Sharing Center Control Panel Home View your basic network information and set up connections Change adapter settings View your active networks Change advanced sharing Network Public network Access type: Internet Connections: Ethernet Change your networking settings Set up a new connection or network Set up a broadband, dial-up, or VPN connection; or set up a router or access point. Troubleshoot problems Diagnose and repair network problems, or get troubleshooting information. See also HomeGroup Internet Options Windows Firewall 1 item 1 item selected Library includes: 2 locations- Choose your conncon and right click, then select "Properes".
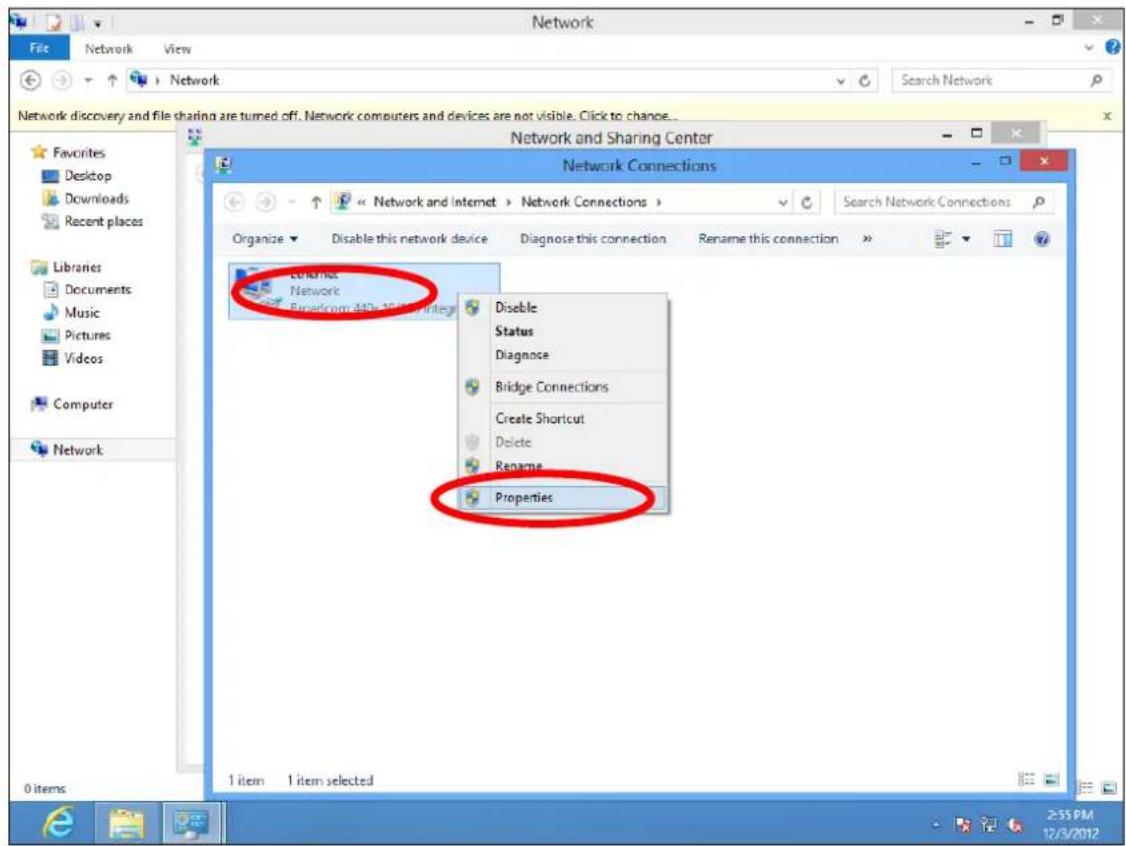
text_image
Network Network and Sharing Center Network Connections Organize Disable this network device Diagnose this connection Rename this connection Edit into Network Spread from 440x 10 items Disable Status Diagnose Bridge Connections Create Shortcut Delete Rename Properties 1 item 1 item selected 2:55 PM 12/3/2012- Select "Internet Protocol Version 4 (TCP/IPv4) and then click "Properes".

text_image
Network Network and Sharing Center Network Connections Organize Disable this network device Diagnose this connection Rename this connection Ethernet Properties Networking Connect using: Broadcom 440x 10/100 Integrated Controller Configure... This connection uses the following items: File and Printer Sharing for Microsoft Networks Microsoft Network Adapter Multiplexor Protocol Microsoft LLDP Protocol Driver Link-Layer Topology Discovery Mapper I/O Driver Link-Layer Topology Discovery Responder Internet Protocol Version 4 (TCP/IPV4) Internet Protocol Version 4 (TCP/IPV4) Install Uninstall Properties Description Transmission Control Protocol/Internet Protocol. The default wide area network protocol that provides communication across diverse interconnected networks. OK Cancel 1 item 1 item selected 2:55 PM 12/3/2012- Select "Use the following IP address", then input the following values:

Your exisng stac IP address will be displayed in the "IP address" eld before you replace it. Please make a note of this IP address, subnet mask, default gateway and DNS server addresses.
IP address: 192.168.9.20
Subnet Mask: 255.255.255.0
Click 'OK' when nished.
VIII-1-2-5. Mac
- Have your Macintosh computer operate as usual, and click on "System Preferences"

text_image
System Preferences 1- In System Preferences, click on "Network".

text_image
Internet & Network MobileMe Network QuickTime Sharing- Click on "Wi-Fi" in the le panel and then click "Advanced" in the lower right corner.
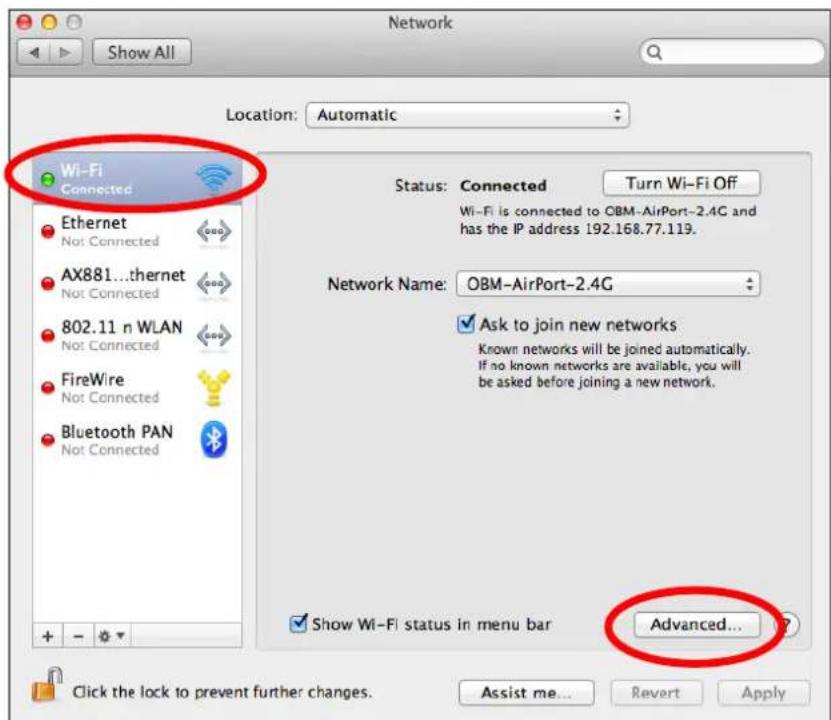
text_image
Network Show All Location: Automatic Wi-Fi Connected Ethernet Not Connected AX881...thernet Not Connected 802.11 n WLAN Not Connected FireWire Not Connected Bluetooth PAN Not Connected Status: Connected Turn Wi-Fi Off Wi-Fi is connected to OBM-AirPort-2.4G and has the IP address 192.168.77.119. Network Name: OBM-AirPort-2.4G ✓ Ask to join new networks Known networks will be joined automatically. If no known networks are available, you will be asked before joining a new network. ✓ Show Wi-Fi status in menu bar Advanced... Click the lock to prevent further changes. Assist me... Revert Apply- Select "TCP/IP" from the top menu and select "Manually" from the drop down menu labeled "Congure IPv4", then click "OK".

text_image
Network Show All Wi-Fi Using DHCP Using DHCP with manual address Using RootP Configure IPv4 ✓ Manually IPv4 Address: Off Subnet Mask: 255.255.255.0 Router: 192.168.77.1 Configure IPv6: Automatically Router: IPv6 Address: Prefix Length: Cancel OK
Your exisng stac IP address will be displayed in the "IP address" eld before you replace it. Please make a note of this IP address, subnet mask, default gateway and DNS server addresses.
- In the "IPv4 Address" and "Subnet Mask" eld enter IP address 192.168.9.20 and subnet mask 255.255.255.0. Click on "OK".

text_image
Network Show All Wi-Fi Wi-Fi TCP/IP DNS WINS 802.1X Proxies Hardware Configure IPv4: Manually IPv4 Address: 192168.9.20 Subnet Mask: 255.255.255.0 Router: 192.168.77.1 Configure IPv6: Automatically Router: IPv6 Address: Prefix Length: Cancel OK6. Click "Apply" to save the changes.
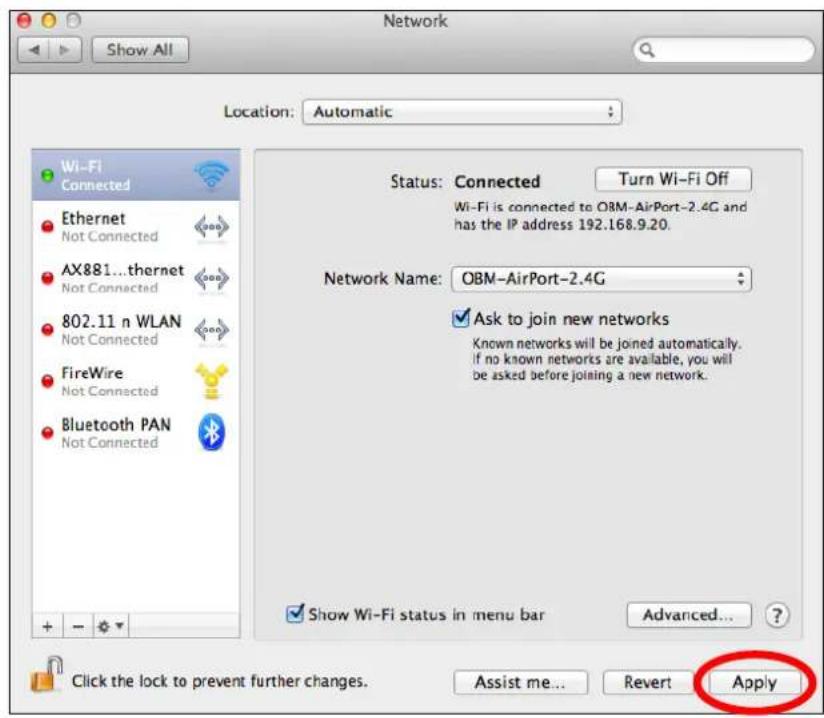
text_image
Network Show All Location: Automatic Wi-Fi Connected Ethernet Not Connected AX881...thernet Not Connected 802.11 n WLAN Not Connected FireWire Not Connected Bluetooth PAN Not Connected Status: Connected Turn Wi-Fi Off Wi-Fi is connected to OBM-AirPort-2.4G and has the IP address 192.168.9.20. Network Name: OBM-AirPort-2.4G ✓ Ask to join new networks Known networks will be joined automatically. If no known networks are available, you will be asked before joining a new network. ✓ Show Wi-Fi status in menu bar Advanced... Click the lock to prevent further changes. Assist me... Revert ApplyVIII-1-3. How to Find Your Network Security Key
To nd your network security key, please follow the instrucons appropriate for your operang system.

If you are using Windows XP or earlier, please contact your ISP or router manufacturer to nd your network security key.
VIII-1-3-1. Windows 7 & Vista
- Open "Control Panel" and click on "Network and Internet" in the top menu.

text_image
Control Panel > Network and Internet > Network Connections > File Edit View Tools Advanced Help Organize Local Area Connection Wireless Network Connection 19- Click on "View network status and tasks" which is under the heading "Network and Sharing Center".

text_image
Control Panel Network and Internet File Edit View Tools Help Control Panel Home System and Security • Network and Internet Hardware and Sound Programs User Accounts and Family Safety Appearance and Personalization Network and Sharing Center View network status and tasks Connect to a network View Network computers and devices Add a wireless device to the network HomeGroup Choose homegroup and sharing options Internet Options Change your homepage | Manage browser add-ons Delete browsing history and cookies- Click on "Manage wireless networks" in the le menu.

text_image
Network an... > Network and Sharing Center File Edit View Tools Help Control Panel Home Manage wireless networks Change adapter settings Change advanced sharing settings See also HomeGroup Internet Options View your basic network information and set up connections See full map TS-PC HomeNetwork 2 Internet (This computer) View your active networks Connect or disconnect Access type: Internet Connections: Wireless Network HomeNetwork 2- You should see the prole of your Wi-Fi network in the list. Right click on your Wi-Fi network and then click on "Properes".
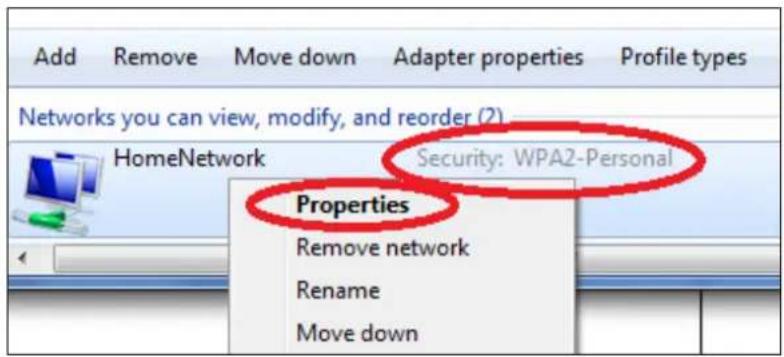
text_image
Add Remove Move down Adapter properties Profile types Networks you can view, modify, and reorder (2) HomeNetwork Security: WPA2-Personal Properties Remove network Rename Move down- Click on the "Security" tab, and then check the box labeled "Show characters". This will show your network security key. Click the "Cancel" buon to close the window.
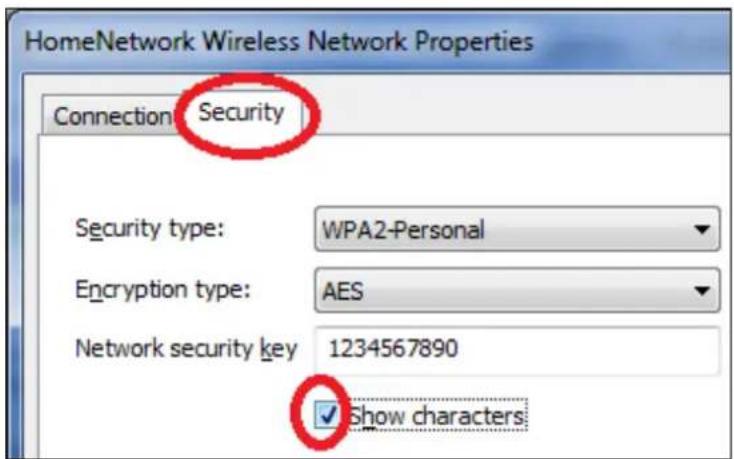
text_image
HomeNetwork Wireless Network Properties Connection Security Security type: WPA2-Personal Encryption type: AES Network security key 1234567890 ✓ Show charactersVIII-1-3-2. Mac
- Open a new Finder window, and select "Applications" from the menu on the le side. Open the folder labeled "Ulies" and then open the applicaon "Keychain Access".
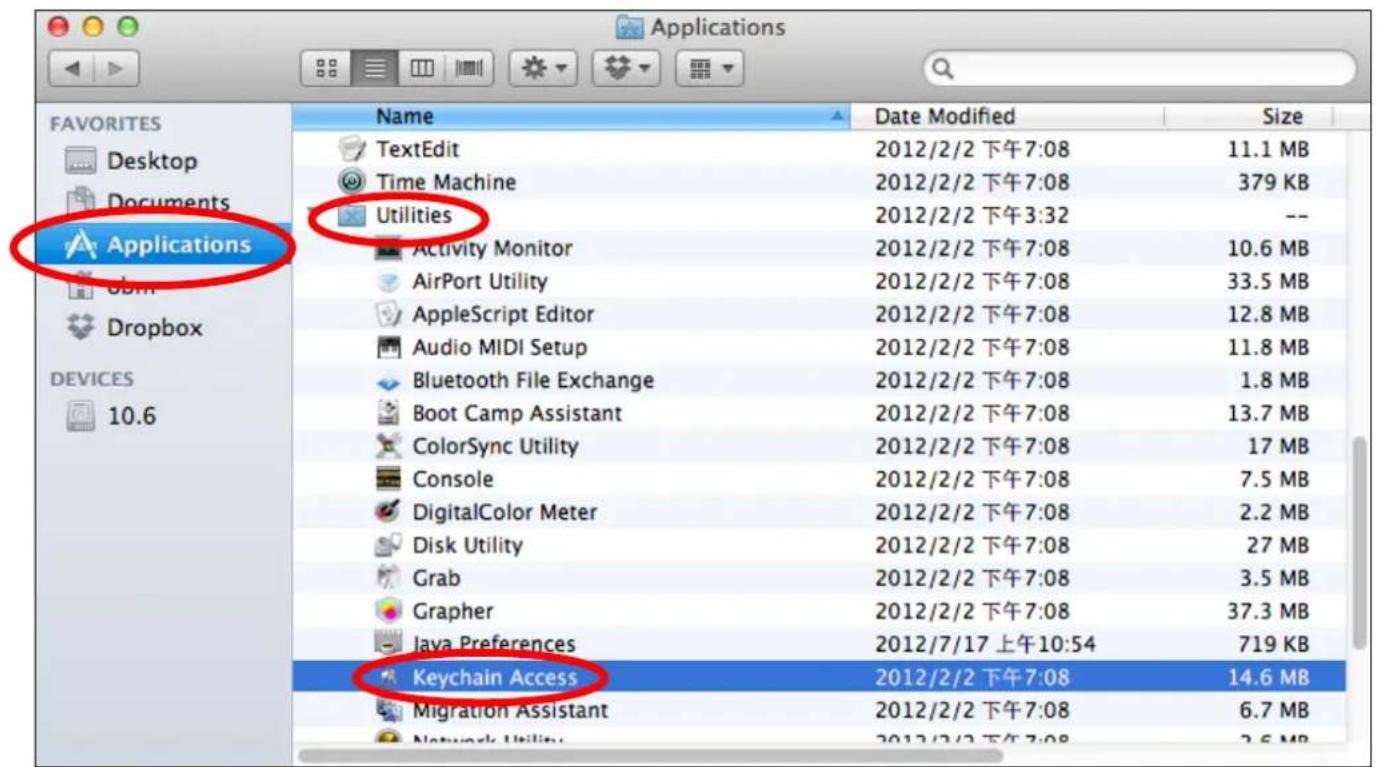
text_image
Applications FAVORITES Desktop Documents Applications Dropbox 10.6 Name TextEdit Time Machine Utilities Activity Monitor AirPort Utility AppleScript Editor Audio MIDI Setup Bluetooth File Exchange Boot Camp Assistant ColorSync Utility Console DigitalColor Meter Disk Utility Grab Grapher Java Preferences Keychain Access Migration Assistant Network Utility Date Modified 2012/2/2 下午7:08 2012/2/2 下午7:08 2012/2/2 下午3:32 2012/2/2 下午7:08 2012/2/2 下午7:08 2012/2/2 下午7:08 2012/2/2 下午7:08 2012/2/2 下午7:08 2012/2/2 下午7:08 2012/2/2 下午7:08 2012/2/2 下午7:08 11.1 MB 379 KB -- 10.6 MB 33.5 MB 12.8 MB 11.8 MB 1.8 MB 13.7 MB 17 MB 7.5 MB 2.2 MB 27 MB 3.5 MB 37.3 MB 719 KB 14.6 MB- Select "Passwords" from the sub-menu labeled "Category" on the le side, as shown below. Then search the list in the main panel for the SSID of your network. In this example, the SSID is "EdimaxWireless" – though your SSID will be unique to your network.
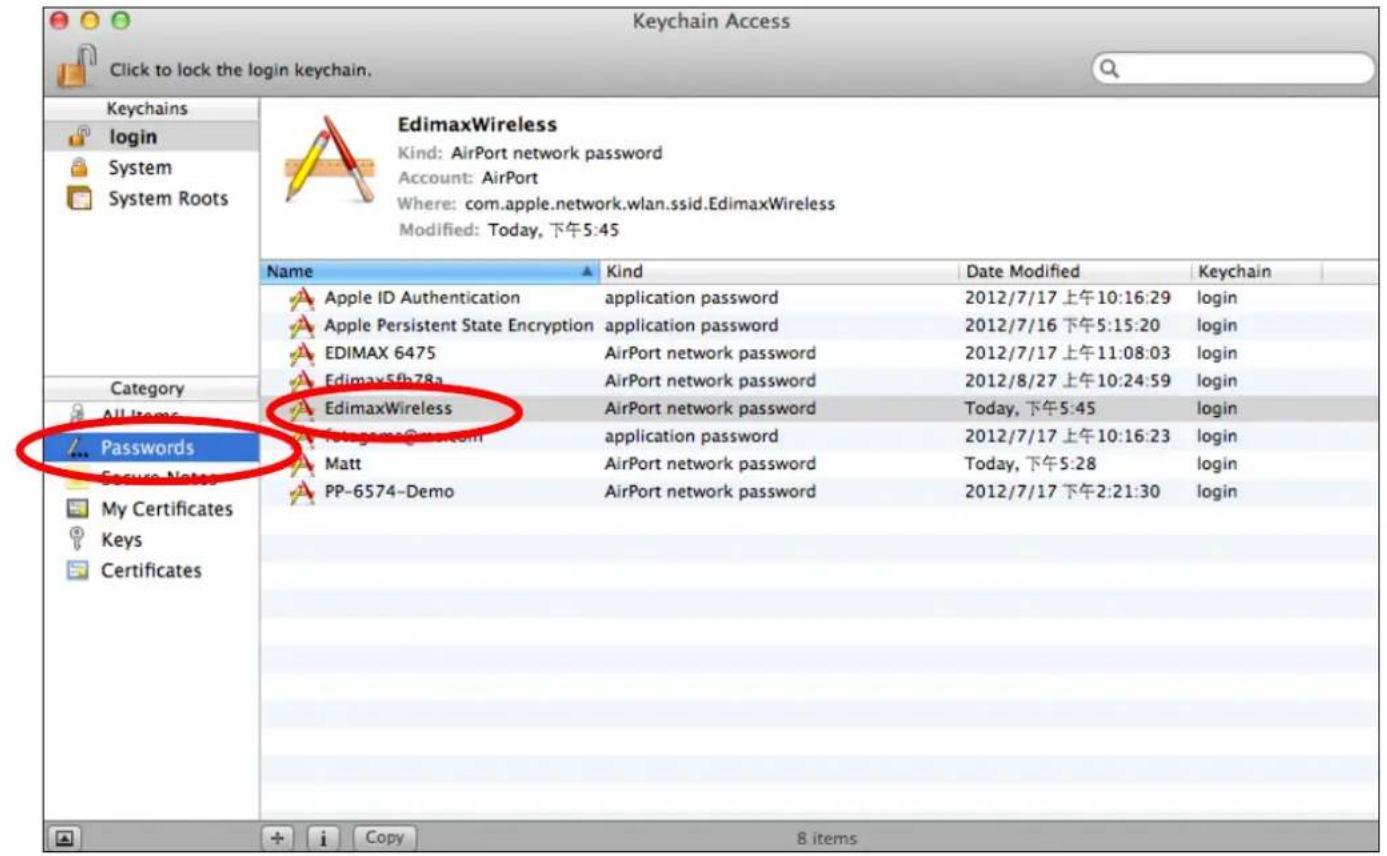
text_image
Keychain Access Click to lock the login keychain. Keychains login System System Roots EdimaxWireless Kind: AirPort network password Account: AirPort Where: com.apple.network.wlan.ssid.EdimaxWireless Modified: Today, 下午5:45 Name Kind Data Modified_Keychain Apple ID Authentication application password 2012/7/17 上午10:16:29 hem Apple Persistent State Encryption application password 2012/7/16 下午5:15:20 hem EDIMAX 6475 AirPort network password 2012/7/17 上午11:08:03 hem Edimax5fb78a AirPort network password 2012/8/27 上午10:24:59 hem EdimaxWireless AirPort network password Today, 下午5:45 hem Fot- games@m.com application password 2012/7/17 上午10:16:23 hem Matt AirPort network password Today, 下午5:28 hem PP-6574-Demo AirPort network password 2012/7/17 下午2:21:30 hem Passwords My Certificates Keys Certificates + i Copy 8 items- Double click the SSID of your network and you will see the following window.

text_image
EdimaxWireless Attributes Access Control Name: EdimaxWireless Kind: AirPort network password Account: AirPort Where: com.apple.network.wlan ssid.EdimaxWireless Comments: Show password: Save Changes- Check the box labeled "Show password" and you will be asked to enter your administrave password, which you use to log into your Mac. Enter your password and click "Allow".

text_image
Keychain Access wants to use your confidential information stored in "EdimaxWireless" in your keychain. To allow this, enter the "login" keychain password. Password: Always Allow Deny Allow Account: AirPort Where: com.apple.network.wlan.ssid.EdimaxWireless Comments: ✓ Show password: Save ChangesYour network security password will now be displayed in the eld next to the box labeled “Show password”. In the example below, the network security password is “edimax1234”. Please make a note of your network security password.
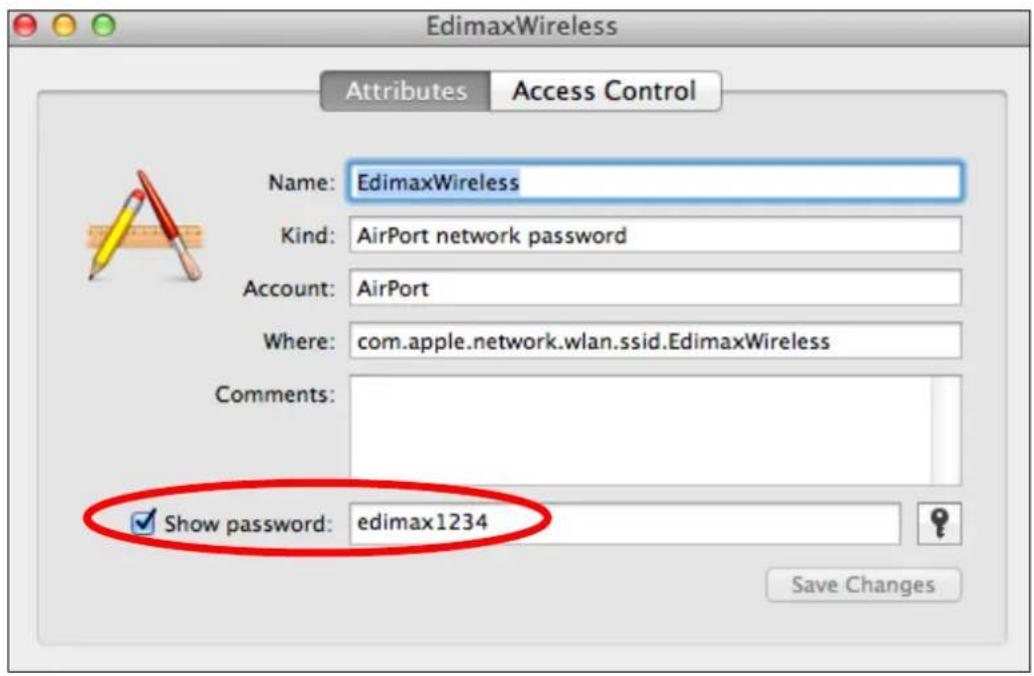
text_image
EdimaxWireless Attributes Access Control Name: EdimaxWireless Kind: AirPort network password Account: AirPort Where: com.apple.network.wlan ssid.EdimaxWireless Comments: ✓ Show password: edimax1234 Save ChangesVIII-1-4. How to Find Your Router's IP Address
To nd your router's IP address, please follow the instrucons appropriate for your operang system.
VIII-1-4-1. Windows XP, Vista & 7
- Go to "Start", select "Run" and type "cmd", then press Enter or click "OK".

text_image
Internet Mozilla Firefox E-mail Microsoft Office Outlook Internet Explorer XnView Microsoft Office Word 2007 Google Chrome Microsoft Office PowerPoint 2007 Adobe Reader 9 Command Prompt 開啟 Microsoft Office 文件 Audacity All Programs Start Search AlanChiu Documents Pictures Music Recent Items Computer Network Connect To Control Panel Default Programs Run... Run Type the name of a program, folder, document, or Internet resource, and Windows will open it for you. Open cmd This task will be created with administrative privileges. OK Cancel Browse...- A new window will open, type "ipcong" and press Enter.

text_image
Microsoft Windows [Version 6.0.6002] Copyright (c) 2006 Microsoft Corporation. All rights reserved. C:\Users\AlanChiu>ipconfig- Your router's IP address will be displayed next to "Default Gateway".

text_image
Administrator: C:\Windows\system32\cmd.exe Ethernet adapter 區域連線: Connection-specific DNS Suffix . : Link-local IPv6 Address . . . . . : fe80::4cdc:3e90:ba56:1722x9 IPv4 Address. . . . . . . . . . . : 192.168.10.14 Subnet mask . . . . . . . . . . : 255.255.255.0 Default Gateway . . . . . . . . . : fe80::1067a1b:e9c2:e57bx9 192.168.10.254 Wireless LAN adapter 無線網路連線: Media State . . . . . . . . . . : Media disconnected Connection-specific DNS Suffix . : edimax.com Tunnel adapter 區域連線* 6: Media State . . . . . . . . . . : Media disconnected Connection-specific DNS Suffix . Tunnel adapter 區域連線* 7: Media State . . . . . . . . . : Media disconnected Connection-specific DNS Suffix . C:\Users\AlanChiu>VIII-1-4-2. Windows 8
- From the Windows 8 Start screen, move your cursor to the top right corner of the screen to display the Charms bar.
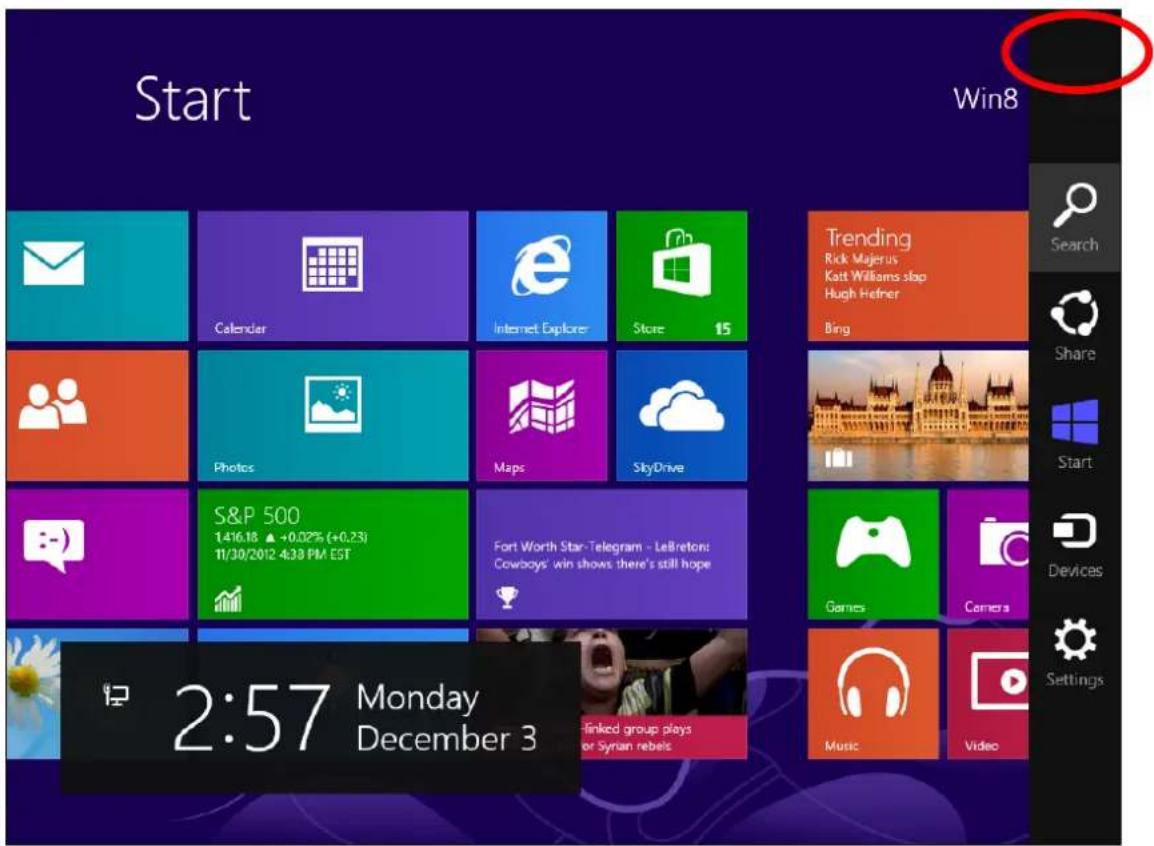
text_image
Start Win8 Calendar Internet Explorer Store 15 Trending Rick Majerus Katt Williams slap Hugh Hefner Bing Photos Maps SkyDrive S&P 500 1:416.18 ▲+0.02% (+0.23) 11/30/2012 4:38 PM EST Fort Worth Star-Telegram - LeBreton: Cowboys' win shows there's still hope Games Camers Music Video 2:57 Monday December 3 Linked group plays or Syrian rebels- Click "Search" and enter "cmd" into the search bar. Click the "Command Prompt" app which be displayed on the le side.
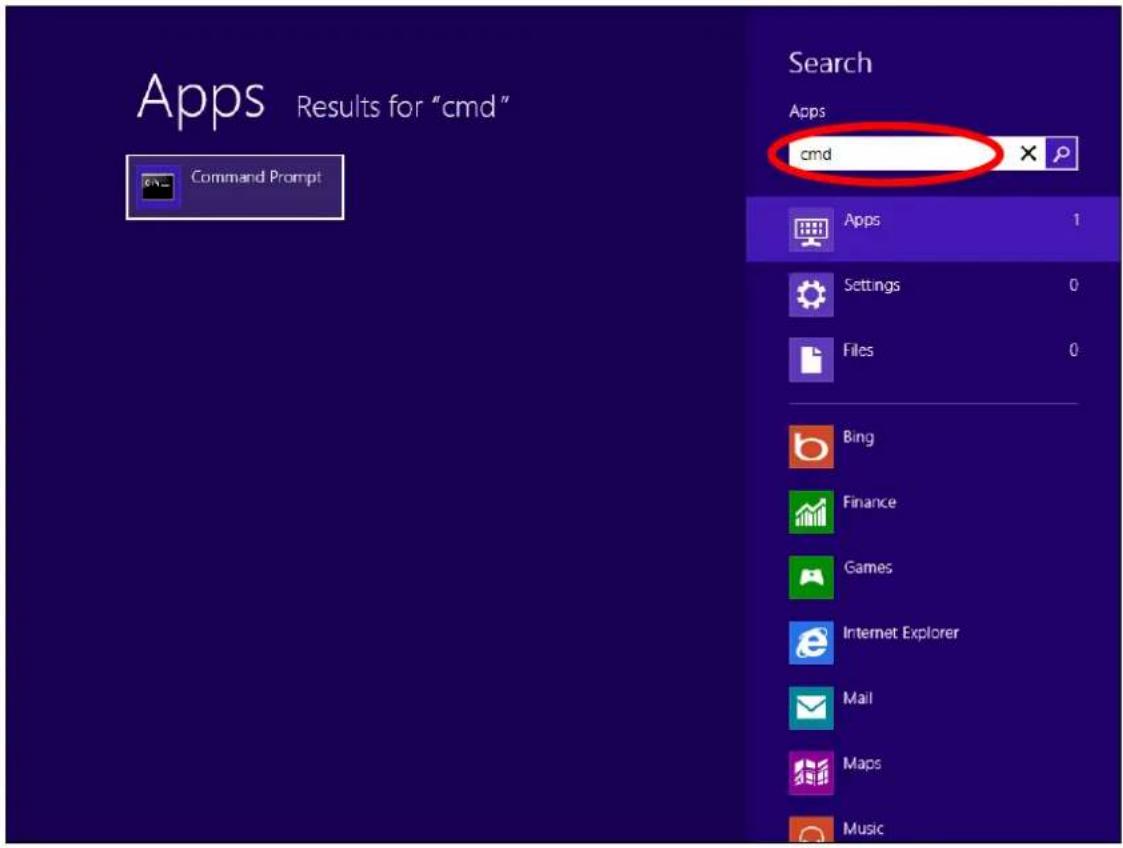
text_image
Apps Results for "cmd" Command Prompt Search Apps cmd Apps 1 Settings 0 Files 0 Bing Finance Games Internet Explorer Mail Maps Music- A new window will open, type "ipconfig" and press Enter.

text_image
Microsoft Windows [Version 6.2.9200] (c) 2012 Microsoft Corporation, All rights reserved. C:\Users\win8>ipconfig4.Your router's IP address will be displayed next to "Default Gateway".
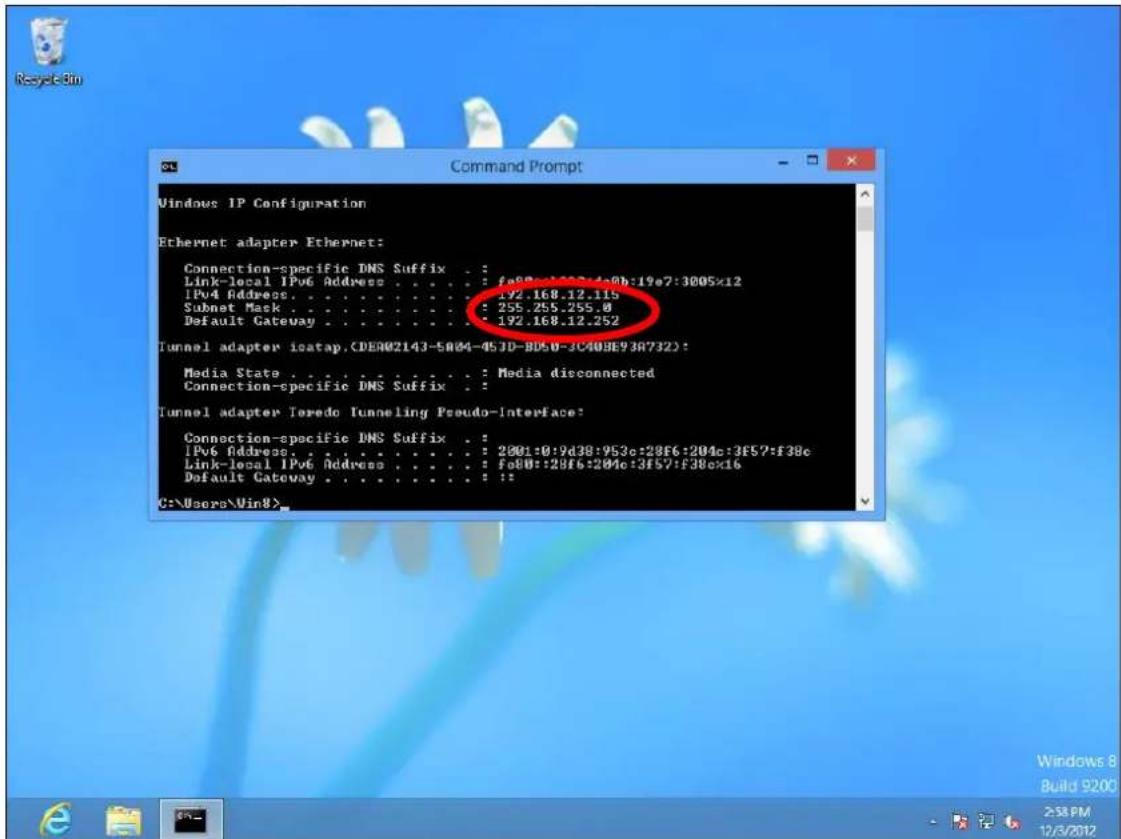
text_image
Windows IP Configuration Ethernet adapter Ethernet: Connection-specific DNS Suffix . . . Link-local IPv6 Address . . . . . . . : fe8Rc:1024b:19e7:3005x12 IPv4 Address. . . . . . . . . . . . : 192.168.12.115 Subnet Mask . . . . . . . . . . . : 255.255.255.0 Default Gateway . . . . . . . . . . . : 192.168.12.252 Tunnel adapter isatap.(DE002143-5004-453D-8050-3C408E938732): Media State . . . . . . . . . : Media disconnected Connection-specific DNS Suffix . Tunnel adapter Teredo Tunneling Pseudo-Interface: Connection-specific DNS Suffix . . IPv6 Address. . . . . . . . . . : 2801:0:9d38:953c:28f6:204c:3f57:f38c Link-local IPv6 Address . . . . . . . : fe8U::28f6:204c:3f57:f38c|x6 Default Gateway . . . . . . . . : : : C:\Users\Win8>VIII-1-4-3. Mac
- Launch "System Preferences" and click on "Network".
- If you are using an Ethernet cable to connect to your network, your router's IP address will be displayed next to "Router".
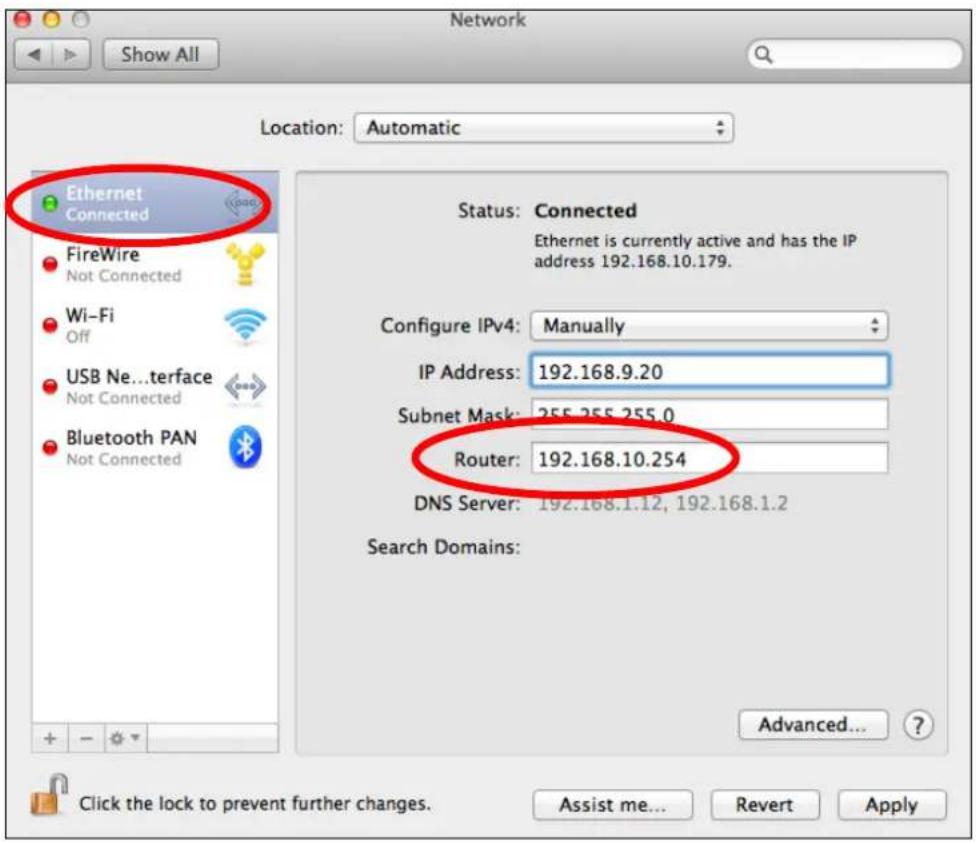
text_image
Network Show All Location: Automatic Ethernet Connected FireWire Not Connected Wi-Fi Off USB Ne...terface Not Connected Bluetooth PAN Not Connected Status: Connected Ethernet is currently active and has the IP address 192.168.10.179. Configure IPv4: Manually IP Address: 192.168.9.20 Subnet Mask: 255.255.255.0 Router: 192.168.10.254 DNS Server: 192.168.1.12, 192.168.1.2 Search Domains: Advanced... Click the lock to prevent further changes. Assist me... Revert Apply- If you are using Wi-Fi, click "Wi-Fi" in the le panel, and then "Advanced" in the boom right corner.
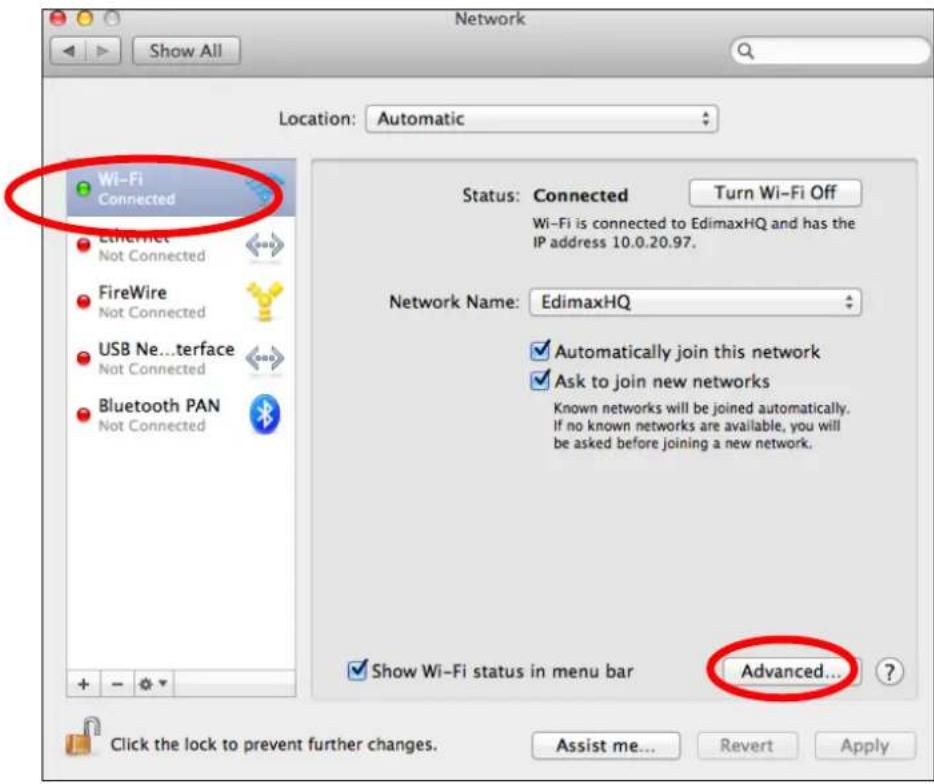
text_image
Network Show All Location: Automatic Wi-Fi Connected Ethernet Not Connected FireWire Not Connected USB Ne...terface Not Connected Bluetooth PAN Not Connected Status: Connected Turn Wi-Fi Off Wi-Fi is connected to EdimaxHQ and has the IP address 10.0.20.97. Network Name: EdimaxHQ ✓ Automatically join this network ✓ Ask to join new networks Known networks will be joined automatically. If no known networks are available, you will be asked before joining a new network. ✓ Show Wi-Fi status in menu bar Advanced... Click the lock to prevent further changes. Assist me... Revert Apply- Click the "TCP/IP" tab and your router's IP address will be displayed next to "Router".
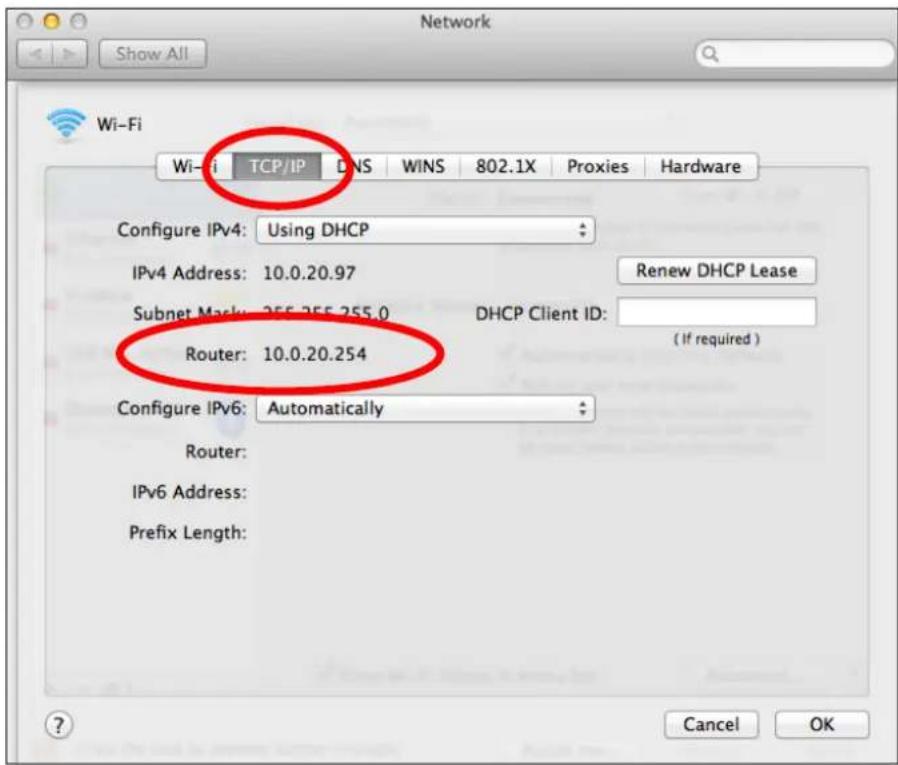
text_image
Network Show All Wi-Fi Wi-fi TCP/IP DNS WINS 802.1X Proxies Hardware Configure IPv4: Using DHCP IPv4 Address: 10.0.20.97 Renew DHCP Lease Subnet Mask: 355.355.255.0 DHCP Client ID: Router: 10.0.20.254 (If required) Configure IPv6: Automatically Router: IPv6 Address: Prefix Length: Cancel OKVIII-2. Connecng to a Wi-Fi network
For help connecng to your device's edimaxext.setup SSID for inial setup, or to connect to your device's new Wi-Fi network (SSID) aer setup is complete, follow the guide below:

Below is an example of how to connect using Windows Vista – the process may vary slightly for other versions of Windows.
- Click the network icon (icon, or icon) in the system tray and select "Connect to a network".

text_image
Not Connected Wireless networks are available. Connect to a network Network and Sharing Center 下午 06:29- Search for the SSID of your EW-7438RPn Mini and then click "Connect". If you set a password for your network, you will then be prompted to enter it.
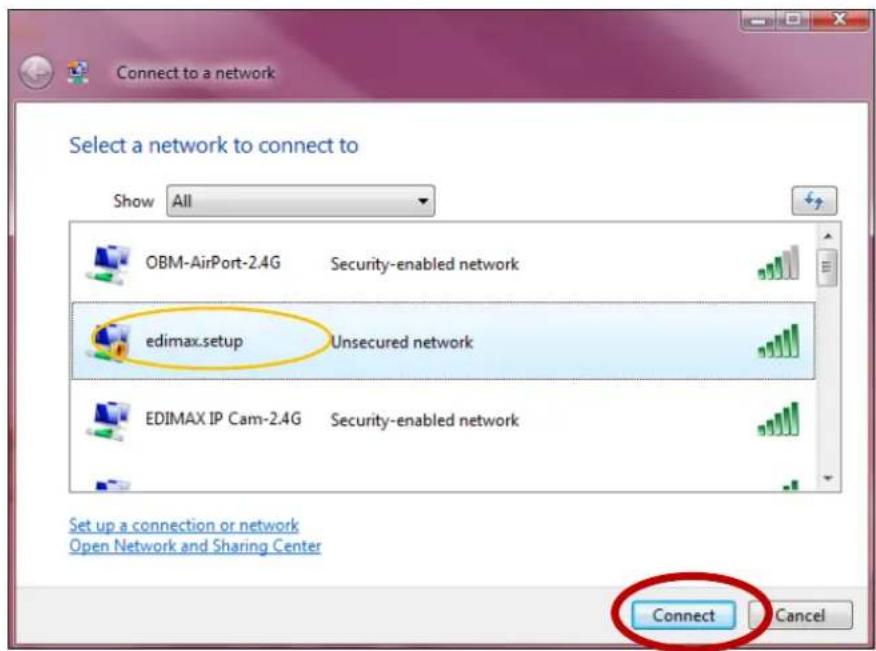
text_image
Connect to a network Select a network to connect to Show All OBM-AirPort-2.4G Security-enabled network edimax.setup Unsecured network EDIMAX IP Cam-2.4G Security-enabled network Connect Cancel Set up a connection or network Open Network and Sharing Center- Aer correctly entering your password, you will be successfully connected to the EW-7438RPn Mini's wireless network.

text_image
Connect to a network Successfully connected to edimax.setup ✓ Save this network ✓ Start this connection automatically CloseVIII-3. Troubleshoong
If you are experiencing problems with your wireless extender, please refer to this troublesome guide before contacting your dealer of purchase for help.
| Scenario | Soluon |
| I can’t log onto the browser-based conguraon interface. | a. Please check that the extender is correctly inserted into a power socket and check the LEDs on the front panel. If the extender is inializing aer being switched o or restarted, wait for a 2 minutes and try again.b. Make sure you are using the full, correct URL:hp://edimaxext.setupc. If you are using a MAC or IP address lter, try to connect the wireless extender using a dierent computer.d. Set your computer to obtain an IP address automacally (DHCP), and see if your computer can obtain an IP address.e. Ensure that all other Wi-Fi/Ethernet adapters are disabled or disconnected.f. Password is case-sensitive. Make sure the “Caps Lock” light is not illuminated.g. b. If you do not know your password, restore the device to factory sengs. |
| I can’t establish a conncon to my wireless extender. | a. If encrypon is enabled, please re-check WEP or WPA passphrase sengs on your wireless client. The password is case-sensitive. Make sure the “Caps Lock” light is not illuminated.b. Try moving closer to the wireless extender.c. Switch o the extender and switch it back on aer 10 seconds.h. Please check that the extender is correctly inserted into a power socket and check the LEDs on the front panel. |
| File downloads are very slow or frequently interrupted. | a. Reset the wireless extenderb. Try again later. Your local network may be experiencing technical dicules or very high usage.c. Change channel number. |
| The wireless extender | a. It is normal for the wireless extender to heat up |
| is extremely hot. | during frequent use. If you can safely place your hand on the wireless extender, the temperature of the device is at a normal level.b. If you smell burning or see smoke coming from wireless extender then disconnect the extender immediately, as far as it is safely possible to do so. Call your dealer of purchase for help. |
| My network device can’t access the Internet. | a. Ensure that your broadband router is fully funconal.b. Power o both your network device and wireless extender and switch back on again.c. Ensure that the wireless extender is powered on (check the PWR LED).d. On the browser based conguraon interface home page, check “Status” under “Wireless Conguraon”. It should be “Connected” – if it is “Disconnected” then this means the wireless extender is not connected to your router/access point. |
| My wireless extender has a poor signal from my access point/router. | The best locaon to place the Wi-Fi extender is one which is an open space, roughly in the middle between your router and the Wi-Fi dead zone, and where the Wi-Fi extender LED displays “Excellent” signal strength.a. Keep the extender away from other radio devices such as microwaves or wireless telephones.b. Do not put the extender in the corner of a room or under/nearby metal.c. It is recommended to plug the extender directly into a wall socket.d. Ensure there are as few obstacles as possible between the extender and the access point/router. |
| Can I use the same SSID as my current gateway router for my Wi-Fi extender? | Yes, but it is not recommended as it will be dicult to disnguish between two SSIDs with the same name. |
| A rmware upgrade failed and the EW-7438RPn Mini isn’t working. | Firmware upgrade failures can happen occasionally due to power cuts or unstable conncons. In this scenario, you need to rst connect a computer to one of your EW-7438RPn Mini’s LAN ports using an Ethernet cable. |
Then you need to modify your computer's IP address to 192.168.2.x where x is any value between 3 and 254. Refer to VIII-1-2. How to modify the IP address of your computer if you need guidance to do so.
From there, you need to go to 192.168.2.1 in a web browser, and you will see the page below:
Firmware Recovery Mode
Please select the correct firmware file than click Upload once and wait for the next screen to display that the upgrade is in progress.
Browse
Upload
Click "Browse" to locate the rmware le on your computer and then click "Upload" to upload the new rmware. It may take several minutes to complete, please wait and follow the instrucons on screen.
VIII-4. Glossary
Default Gateway (Wireless bridge): Every non-access point IP device needs to congregate a default gateway's IP address. When the device sends out an IP packet, if the desnaon is not on the same network, the device has to send the packet to its default gateway, which will then send it out towards the desnaon.
DHCP: Dynamic Host Conguraon Protocol. This protocol automacally gives every computer on your home network an IP address.
DNS Server IP Address: DNS stands for Domain Name System, which allows Internet servers to have a domain name (such as www.Broadbandaccess point.com) and one or more IP addresses (such as 192.34.45.8). A DNS server keeps a database of Internet servers and their respective domain names and IP addresses, so that when a domain name is requested (as in typing "Broadbandaccess point.com" into your Internet browser), the user is sent to the proper IP address. The DNS server IP address used by the computers on your home network is the location of the DNS server your ISP has assigned to you.
DSL Modem: DSL stands for Digital Subscriber Line. A DSL modem uses your existing phone lines to transmit data at high speeds.
Ethernet: A standard for computer networks. Ethernet networks are connected by special cables and hubs, and move data around at up to 10/100 million bits per second (Mbps).
IP Address and Network (Subnet) Mask: IP stands for Internet Protocol. An IP address consists of a series of four numbers separated by periods, that idenes a single, unique Internet computer host in an IP network. Example: 192.168.2.1. It consists of 2 porons: the IP network address, and the host idener.
The IP address is a 32-bit binary paern, which can be represented as four cascaded decimal numbers separated by “.”: aaa.aaa.aaa.aaa, where each “aaa” can be anything from 000 to 255, or as four cascaded binary numbers separated by “.”: bbbbbbbb.bbbbbbbb.bbbbbbbb.bbbbbbbb, where each “b” can either be 0 or 1.
A network mask is also a 32-bit binary paern, and consists of consecutive leading 1's followed by consecutive trailing 0's, such as 11111111.11111111.11111111.00000000. Therefore sometimes a network mask can also be described simply as "x" number of leading 1's. When both are represented side by side in their binary forms, all bits in the IP address that correspond to 1's in the network mask become part of the IP network address, and the remaining bits correspond to the host ID.
For example, if the IP address for a device is, in its binary form, 11011001.10110000.10010000.00000111, and if its network mask is, 11111111.11111111.11110000.00000000 It means the device's network address is 11011001.10110000.10010000.00000000, and its host ID is, 00000000.00000000.00000000.00000111. This is a convenient and ecient method for access points to route IP packets to their desnaon.
ISP Gateway Address: (see ISP for denion). The ISP Gateway Address is an IP address for the Internet access point located at the ISP's oce.
ISP: Internet Service Provider. An ISP is a business that provides connectivity to the Internet for individuals and other businesses or organizaons.
LAN: Local Area Network. A LAN is a group of computers and devices connected together in a relatively small area (such as a house or an oce). Your home network is considered a LAN.
MAC Address: MAC stands for Media Access Control. A MAC address is the hardware address of a device connected to a network. The MAC address is a unique idener for a device with an Ethernet interface. It is comprised of two parts: 3 bytes of data that corresponds to the Manufacturer ID (unique for each manufacturer), plus 3 bytes that are oen used as the product's serial number.
NAT: Network Address Translaon. This process allows all of the computers on your home network to use one IP address. Using the broadband access point's NAT capability, you can access the Internet from any computer on your home network without having to purchase more IP addresses from your ISP.
Port: Network Clients (LAN PC) uses port numbers to disnguish one network applicaon/protocol over another. Below is a list of common applicaons and protocol/port numbers:
| Applicaon | Protocol | Port Number |
| Telnet | TCP | 23 |
| FTP | TCP | 21 |
| SMTP | TCP | 25 |
| POP3 | TCP | 110 |
| H.323 | TCP | 1720 |
| SNMP | UCP | 161 |
| SNMP Trap | UDP | 162 |
| HTTP | TCP | 80 |
| PPTP | TCP | 1723 |
| PC Anywhere | TCP | 5631 |
| PC Anywhere | UDP | 5632 |
Access point: A access point is an intelligent network device that forwards packets between dierent networks based on network layer address informaon such as IP addresses.
Subnet Mask: A subnet mask, which may be a part of the TCP/IP informaon provided by your ISP, is a set of four numbers (e.g. 255.255.255.0) congured like an IP address. It is used to create IP address numbers used only within a parcular network (as opposed to valid IP address numbers recognized by the Internet, which must be assigned by InterNIC).
TCP/IP, UDP: Transmission Control Protocol/Internet Protocol (TCP/IP) and Unreliable Datagram Protocol (UDP). TCP/IP is the standard protocol for data transmission over the Internet. Both TCP and UDP are transport layer protocol. TCP performs proper error detection and error recovery, and thus is reliable. UDP on the other hand is not reliable. They both run on top of the IP (Internet Protocol), a network layer protocol.
WAN: Wide Area Network. A network that connects computers located in geographically separate areas (e.g. dierent buildings, cies, countries). The Internet is a wide area network.
Web-based management Graphical User Interface (GUI): Many devices support a graphical user interface that is based on the web browser. This means the user can use the familiar Netscape or Microso Internet Explorer to Control/congure or monitor the device being managed.
COPYRIGHT
Copyright © Edimax Technology Co., Ltd. all rights reserved. No part of this publicaon may be reproduced, transmied, transcribed, stored in a retrieval system, or translated into any language or computer language, in any form or by any means, electronic, mechanical, magnec, opcal, chemical, manual or otherwise, without the prior written permission from Edimax Technology Co., Ltd.
Edimax Technology Co., Ltd. makes no representaons or warranes, either expressed or implied, with respect to the contents hereof and specifically disclaims any warranes, merchantability, or tness for any parcular purpose. Any soware described in this manual is sold or licensed as is. Should the programs prove defecve following their purchase, the buyer (and not this company, its distributor, or its dealer) assumes the enre cost of all necessary servicing, repair, and any incidental or consequential damages resulting from any defect in the soware. Edimax Technology Co., Ltd. reserves the right to revise this publicaon and to make changes from me to me in the contents hereof without the obligaon to nofy any person of such revision or changes.
The product you have purchased and the setup screen may appear slightly dierent from those shown in this QIG. The soware and specicaons are subject to change without noce. Please visit our website www.edimax.com for updates. All brand and product names menoned in this manual are trademarks and/or registered trademarks of their respective holders.
Federal Communicaon Commission Interference Statement
This equipment has been tested and found to comply with the limits for a Class B digital device, pursuant to Part 15 of FCC Rules. These limits are designed to provide reasonable protecon against harmful interference in a residential installaon. This equipment generates, uses, and can radiate radio frequency energy and, if not installed and used in accordance with the instrucons, may cause harmful interference to radio communicaons. However, there is no guarantee that interference will not occur in a parcular installaon. If this equipment does cause harmful interference to radio or television recepon, which can be determined by turning the equipment o and on, the user is encouraged to try to correct the interference by one or more of the following measures:
- Reorient or relocate the receiving antenna.
- Increase the separaon between the equipment and receiver.
- Connect the equipment into an outlet on a circuit dierent from that to which the receiver is connected.
- Consult the dealer or an experienced radio technician for help.
FCC Cauon
This device and its antenna must not be co-located or operang in conjuncon with any other antenna or transmier. This device complies with Part 15 of the FCC Rules. Operaon is subject to the following two conditions: (1) this device may not cause harmful interference, and (2) this device must accept any interference received, including interference that may cause undesired operaon. Any changes or modicaons not expressly approved by the party responsible for compliance could void the authority to operate equipment.
Federal Communicaons Commission (FCC) Radiaon Exposure Statement
This equipment complies with FCC radiaon exposure set forth for an uncontrolled environment. In order to avoid the possibility of exceeding the FCC radio frequency exposure limits, human proximity to the antenna shall not be less than 2.5cm (1 inch) during normal operaon.
Federal Communications Commission (FCC) RF Exposure Requirements
SAR compliance has been established in the laptop computer(s) conguraons with PCMCIA slot on the side near the center, as tested in the applicaon for cercaon, and can be used in laptop computer(s) with substantially similar physical dimensions, construcon, and electrical and RF characteriscs. Use in other devices such as PDAs or lap pads is not authorized. This transmier is restricted for use with the speci antenna tested in the applicaon for cercaon. The antenna(s) used for this transmier must not be co-located or operang in conjuncon with any other antenna or transmier.
R&TTE Compliance Statement
This equipment complies with all the requirements of DIRECTIVE 1999/5/EC OF THE EUROPEAN PARLIAMENT AND THE COUNCIL of March 9, 1999 on radio equipment and telecommunicaon terminal equipment and the mutual recognition of their conformity (R&TTE). The R&TTE Directive repeals and replaces in the directive 98/13/EEC (Telecommunicaons Terminal Equipment and Satellite Earth Staon Equipment) As of April 8, 2000.
Safety
This equipment is designed with the utmost care for the safety of those who install and use it. However, special aenon must be paid to the dangers of electric shock and stac electricity when working with electrical equipment. All guidelines of this and of the computer manufacture must therefore be allowed at all mes to ensure the safe use of the equipment.
EU Countries Intended for Use
The ETSI version of this device is intended for home and oce use in Austria, Belgium, Bulgaria, Cyprus, Czech, Denmark, Estonia, Finland, France, Germany, Greece, Hungary, Ireland, Italy, Latvia, Lithuania, Luxembourg, Malta, Netherlands, Poland, Portugal, Romania, Slovakia, Slovenia, Spain, Sweden, Turkey, and United Kingdom. The ETSI version of this device is also authorized for use in EFTA member states: Iceland, Liechtenstein, Norway, and Switzerland.
EU Countries Not Intended for Use
None
EU Declaraon of Conformity
English: This equipment is in compliance with the essenal requirements and other relevant provisions of Direcve 2006/95/EC, 2011/65/EC.
At the end of its serviceable life, this product should not be treated as household or general waste. It should be handed over to the applicable collecon point for the recycling of electrical and electronic equipment, or returned to the supplier for disposal.
Declaraon of Conformity
We, Edimax Technology Co., Ltd., declare under our sole responsibility, that the equipment described below complies with the requirements of the European R&TTE directives.
Equipment: N300 Mini Wi-Fi Extender/Access Point/Wi-Fi Bridge
Model No.: EW-7438RPn Mini
The following European standards for essenal requirements have been followed:
Spectrum: ETSI EN 300 328 V1.8.1
EMC: EN 301 489-1 V1.9.2 (2011-09);
EN 301 489-17 V2.2.1 (2012-09)
EMF: EN 62311:2008
Safety (LVD): IEC 60950-1:2005 (2nd Edion);
EN-60950-1:2006+A11:2009+A1:2010+A12:2011
Edimax Technology Co., Ltd.
No. 3, Wu Chuan 3 ^rd Road,
Wu-Ku Industrial Park,
New Taipei City, Taiwan

Date of Signature: July, 2014
Signature:

Printed Name: Albert Chang
Title: Director
Edimax Technology Co., Ltd.
Noce According to GNU General Public License Version 2
This product includes soware that is subject to the GNU General Public License version 2. The program is free soware and distributed without any warranty of the author. We oer, valid for at least three years, to give you, for a charge no more than the costs of physically performing source distribuon, a complete machine-readable copy of the corresponding source code.
Version 2, June 1991
Copyright (C) 1989, 1991 Free Soware Foundaon, Inc. 51 Franklin Street, Fih Floor, Boston, MA 02110-1301, USA Everyone is permitted to copy and distribute verbam copies of this license document, but changing it is not allowed.
Preamble
The licenses for most soware are designed to take away your freedom to share and change it. By contrast, the GNU General Public License is intended to guarantee your freedom to share and change free soware--to make sure the soware is free for all its users. This General Public License applies to most of the Free Soware Foundaon's soware and to any other program whose authors commit to using it. (Some other Free Soware Foundaon soware is covered by the GNU Lesser General Public License instead.) You can apply it to your programs, too.
When we speak of free soware, we are referring to freedom, not price. Our General Public Licenses are designed to make sure that you have the freedom to distribute copies of free soware (and charge for this service if you wish), that you receive source code or can get it if you want it, that you can change the soware or use pieces of it in new free programs; and that you know you can do these things.
To protect your rights, we need to make restricons that forbid anyone to deny you these rights or to ask you to surrender the rights. These restricons translate to certain responsibilities for you if you distribute copies of the soware, or if you modify it.
For example, if you distribute copies of such a program, whether gras or for a fee, you must give the recipients all the rights that you have. You must make sure that they, too, receive or can get the source code. And you must show them these terms so they know their rights.
We protect your rights with two steps: (1) copyright the soware, and (2) oer you this license which gives you legal permission to copy, distribute and/or modify the soware.
Also, for each author's protecon and ours, we want to make certain that everyone understands that there is no warranty for this free soware. If the soware is modified by someone else and passed on, we want its recipients to know that what they have is not the original, so that any problems introduced by others will not react on the original authors' reputaons.
Finally, any free program is threatened constantly by soware patents. We wish to avoid the danger that redistributors of a free program will individually obtain patent licenses, in eect making the program proprietary. To prevent this, we have made it clear that any patent must be licensed for everyone's free use or not licensed at all.
The precise terms and conditions for copying, distribuon and modicaon follow.
TERMS AND CONDITIONS FOR COPYING, DISTRIBUTION AND MODIFICATION
- This License applies to any program or other work which contains a noce placed by the copyright holder saying it may be distributed under the terms of this General Public License. The “Program”, below, refers to any such program or work, and a “work based on the Program” means either the Program or any derivative work under copyright law: that is to say, a work containing the Program or a poron of it, either verbam or with modicaons and/or translated into another language. (Hereinaer, translaon is included without limitaon in the term “modicaon”.) Each licensee is addressed as “you”.
Acvies other than copying, distribuon and modicaon are not covered by this License; they are outside its scope. The act of running the Program is not restricted, and the output from the Program is covered only if its contents constute a work based on the Program (independent of having been made by running the Program). Whether that is true depends on what the Program does.
- You may copy and distribute verbam copies of the Program's source code as you receive it, in any medium, provided that you conspicuously and appropriately publish on each copy an appropriate copyright noce and disclaimer of warranty; keep
intact all the noces that refer to this License and to the absence of any warranty; and give any other recipients of the Program a copy of this License along with the Program.
You may charge a fee for the physical act of transferring a copy, and you may at your opon oer warranty protecon in exchange for a fee.
- You may modify your copy or copies of the Program or any poron of it, thus forming a work based on the Program, and copy and distribute such modicaons or work under the terms of Secon 1 above, provided that you also meet all of these conditions:
a) You must cause the modified les to carry prominent noces stang that you changed the les and the date of any change.
b) You must cause any work that you distribute or publish, that in whole or in part contains or is derived from the Program or any part thereof, to be licensed as a whole at no charge to all third pares under the terms of this License.
c) If the modified program normally reads commands interactively when run, you must cause it, when started running for such interactive use in the most ordinary way, to print or display an announcement including an appropriate copyright notice and a notice that there is no warranty (or else, saying that you provide a warranty) and that users may redistribute the program under these conditions, and telling the user how to view a copy of this License. (Excepon: if the Program itself is interactive but does not normally print such an announcement, your work based on the Program is not required to print an announcement.)
These requirements apply to the modified work as a whole. If idenable sections of that work are not derived from the Program, and can be reasonably considered independent and separate works in themselves, then this License, and its terms, do not apply to those seconds when you distribute them as separate works. But when you distribute the same seconds as part of a whole which is a work based on the Program, the distribution of the whole must be on the terms of this License, whose permissions for other licensees extend to the entire whole, and thus to each and every part regardless of who wrote it.
Thus, it is not the intent of this secon to claim rights or contest your rights to work wrien enrely by you; rather, the intent is to exercise the right to control the distribuon of derivave or collecve works based on the Program.
In addition, mere aggregaon of another work not based on the Program with the Program (or with a work based on the Program) on a volume of a storage or distribuon medium does not bring the other work under the scope of this License.
- You may copy and distribute the Program (or a work based on it, under Secon 2) in object code or executable form under the terms of Secons 1 and 2 above provided that you also do one of the following:
a) Accompany it with the complete corresponding machine-readable source code, which must be distributed under the terms of Secons 1 and 2 above on a medium customarily used for soware interchange; or,
b) Accompany it with a wrien oer, valid for at least three years, to give any third party, for a charge no more than your cost of physically performing source distribuon, a complete machine-readable copy of the corresponding source code, to be distributed under the terms of Secons 1 and 2 above on a medium customarily used for soware interchange; or,
c) Accompany it with the informaon you received as to the oer to distribute corresponding source code. (This alternate is allowed only for noncommercial distribuon and only if you received the program in object code or executable form with such an oer, in accord with Subsecon b above.)
The source code for a work means the preferred form of the work for making modicaons to it. For an executable work, complete source code means all the source code for all modules it contains, plus any associated interface denion les, plus the scripts used to control compilaon and installaon of the executable. However, as a special exception, the source code distributed need not include anything that is normally distributed (in either source or binary form) with the major components (compiler, kernel, and so on) of the operang system on which the executable runs, unless that component itself accompanies the executable.
If distribuon of executable or object code is made by oering access to copy from a designated place, then oering equivalent access to copy the source code from the same place counts as distribuon of the source code, even though third pares are not compelled to copy the source along with the object code.
-
You may not copy, modify, sublicense, or distribute the Program except as expressly provided under this License. Any aempt otherwise to copy, modify, sublicense or distribute the Program is void, and will automatically terminate your rights under this License. However, pares who have received copies, or rights, from you under this License will not have their licenses terminated so long as such pares remain in full compliance.
-
You are not required to accept this License, since you have not signed it. However, nothing else grants you permission to modify or distribute the Program or its derivative works. These acons are prohibited by law if you do not accept this License. Therefore, by modifying or distribution the Program (or any work based on the Program), you indicate your acceptance of this License to do so, and all its terms and conditions for copying, distribution or modifying the Program or works based on it.
-
Each me you redistribute the Program (or any work based on the Program), the recipient automatically receives a license from the original licensor to copy, distribute or modify the Program subject to these terms and conditions. You may not impose any further restricons on the recipients' exercise of the rights granted herein. You are not responsible for enforcing compliance by third pares to this License.
-
If, as a consequence of a court judgment or allegaon of patent infringement or for any other reason (not limited to patent issues), condions are imposed on you (whether by court order, agreement or otherwise) that contradict the condions of this License, they do not excuse you from the condions of this License. If you cannot distribute so as to sasfy simultaneously your obligaons under this License and any other pernent obligaons, then as a consequence you may not distribute the Program at all. For example, if a patent license would not permit royalty-free redistribution of the Program by all those who receive copies directly or indirectly through you, then the only way you could sasfy both it and this License would be to refrain enrely from distribution of the Program.
If any poron of this secon is held invalid or unenforceable under any parcular circumstance, the balance of the secon is intended to apply and the secon as a whole is intended to apply in other circumstances.
It is not the purpose of this secon to induce you to infringe any patents or other property right claims or to contest validity of any such claims; this secon has the sole purpose of protecng the integrity of the free soware distribuon system, which is implemented by public license pracces. Many people have made generous contribuons to the wide range of soware distributed through that system in reliance on consistent applicaon of that system; it is up to the author/donor to decide if he or she is willing to distribute soware through any other system and a licensee cannot impose that choice.
This secon is intended to make thoroughly clear what is believed to be a consequence of the rest of this License.
-
If the distribuon and/or use of the Program is restricted in certain countries either by patents or by copyrighted interfaces, the original copyright holder who places the Program under this License may add an explicit geographical distribuon limitaon excluding those countries, so that distribuon is permied only in or among countries not thus excluded. In such case, this License incorporates the limitaon as if wrien in the body of this License.
-
The Free Soware Foundaon may publish revised and/or new versions of the General Public License from time to me. Such new versions will be similar in spirit to the present version, but may differ in detail to address new problems or concerns.
Each version is given a disguishing version number. If the Program species a version number of this License which applies to it and “any later version”, you have the opon of following the terms and condions either of that version or of any later version published by the Free Soware Foundaon. If the Program does not specify a version number of this License, you may choose any version ever published by the Free Soware Foundaon.
- If you wish to incorporate parts of the Program into other free programs whose distribuon conditions are dierent, write to the author to ask for permission. For soware which is copyrighted by the Free Soware Foundaon, write to the Free Soware Foundaon; we somemes make excepons for this. Our decision will be guided by the two goals of preserving the free status of all derivatives of our free soware and of promong the sharing and reuse of soware generally.
NO WARRANTY
-
BECAUSE THE PROGRAM IS LICENSED FREE OF CHARGE, THERE IS NO WARRANTY FOR THE PROGRAM, TO THE EXTENT PERMITTED BY APPLICABLE LAW. EXCEPT WHEN OTHERWISE STATED IN WRITING THE COPYRIGHT HOLDERS AND/OR OTHER PARTIES PROVIDE THE PROGRAM "AS IS" WITHOUT WARRANTY OF ANY KIND, EITHER EXPRESSED OR IMPLIED, INCLUDING, BUT NOT LIMITED TO, THE IMPLIED WARRANTIES OF MERCHANTABILITY AND FITNESS FOR A PARTICULAR PURPOSE. THE ENTIRE RISK AS TO THE QUALITY AND PERFORMANCE OF THE PROGRAM IS WITH YOU. SHOULD THE PROGRAM PROVE DEFECTIVE, YOU ASSUME THE COST OF ALL NECESSARY SERVICING, REPAIR OR CORRECTION.
-
IN NO EVENT UNLESS REQUIRED BY APPLICABLE LAW OR AGREED TO IN WRITING WILL ANY COPYRIGHT HOLDER, OR ANY OTHER PARTY WHO MAY MODIFY AND/OR REDISTRIBUTE THE PROGRAM AS PERMITTED ABOVE, BE LIABLE TO YOU FOR DAMAGES, INCLUDING ANY GENERAL, SPECIAL, INCIDENTAL OR CONSEQUENTIAL DAMAGES ARISING OUT OF THE USE OR INABILITY TO USE THE PROGRAM (INCLUDING BUT NOT LIMITED TO LOSS OF DATA OR DATA BEING RENDERED INACCURATE OR LOSSES SUSTAINED BY YOU OR THIRD PARTIES OR A FAILURE OF THE PROGRAM TO OPERATE WITH ANY OTHER PROGRAMS), EVEN IF SUCH HOLDER OR OTHER PARTY HAS BEEN ADVISED OF THE POSSIBILITY OF SUCH DAMAGES.
ΣDIMAX
NETWORKING PEOPLE TOGETHER