
Akoya P9614 (MD 98320) - Desktop computer MEDION - Free user manual and instructions
Find the device manual for free Akoya P9614 (MD 98320) MEDION in PDF.


| Product Type | All-in-One PC |
| Model | Akoya P9614 (MD 98320) |
| Brand | Medion |
| Operating System | Windows 7 (pre-installed) |
| Display | Multi-touch display with native resolution 1920 x 1080 pixels |
| Optical Drive | CD/DVD-Rewriter |
| Card Reader | SD, MMC, SDHC, MS, PRO |
| Sound | Integrated stereo sound card with 16-bit and 3D spatial sound |
| Webcam | Built-in webcam |
| Microphone | Built-in microphone with amplification |
| Networking | Fast Ethernet (RJ-45), optional Wireless LAN (802.11n/b/g) and Bluetooth |
| USB Ports | USB 2.0/1.1 compatible |
| Video Output | HDMI-OUT, VGA-IN (for external sources) |
| TV Tuner | Optional (DVB-T, analog, DVB-S) |
| Remote Control | Wireless remote control (optional) |
| Power Supply | AC adapter (100-240V~, 50/60 Hz), model FSP135-ASAN1 |
| Battery (Keyboard/Mouse) | 2x AAA and 2x AA batteries respectively |
| Safety | Kensington lock slot, start-up password |
| Operating Temperature | 10°C to 35°C (41°F to 95°F) |
| Operating Humidity | 30% to 70% (non-condensing) |
| Included Accessories | Wireless keyboard, wireless mouse, remote control, USB receiver, power adapter, documentation |
Frequently Asked Questions - Akoya P9614 (MD 98320) MEDION
User questions about Akoya P9614 (MD 98320) MEDION
0 question about this device. Answer the ones you know or ask your own.
Ask a new question about this device
Download the instructions for your Desktop computer in PDF format for free! Find your manual Akoya P9614 (MD 98320) - MEDION and take your electronic device back in hand. On this page are published all the documents necessary for the use of your device. Akoya P9614 (MD 98320) by MEDION.
USER MANUAL Akoya P9614 (MD 98320) MEDION
natural_image
Hand made from a robotic device with sensor components, no text or symbols visibleMedion Electronics Ltd. 120 Faraday Park, Faraday Road, Dorcan Swindon SN3 SIF, Wiltshire
Hotline: 0871 - 376 10 20 (Costs 7p/min from a BT landline, mobile costs maybe higher)
FAX: 01793 - 715 716
www.median.co.uk
Medion AG, 45307 Essen, Germany
40034134
User manual
Notes on this Manual
Keep these instructions with your computer at all times. The proper set up, use and care can help extend the life of your computer. In the event that you transfer ownership of this computer, please provide these instructions to the new owner.
This manual is divided into sections to help you locate the information you require. Along with the Table of Contents at the beginning of this manual, an Index has been provided to help you find topical information.
If you want to start up your All-In-One PC immediately, please read the chapters Operational Safety (page 3) and Setting up and Getting Started (page 12).
We strongly recommend you read this entire manual to ensure the proper set-up and operation of your All-In-One PC.
Many application programs incorporate extensive help functions. As a general rule, you can access help functions by pressing F1 on the keyboard. These help functions will be available to you while you are using the Microsoft Windows operating system or the respective application program.
We have listed further useful sources of information in the section „Getting to know Windows 7“ starting on 57.
Audience
These instructions are intended for both the novice and advanced user. Regardless of the possible professional utilisation, this All-In-One PC is designed for day-to-day household use. The functions and applications for use with this All-In-One PC have been designed with the entire family in mind.
Purchase Details
Enter your purchase details below for quick reference.
Serial Numbers
(i.e. Microsoft * )
Place and date of Purchase ....
You will find the All-In-One PC serial number on the rear of the All-In-One PC. Also copy this number into your guarantee documents, if necessary.
Quality
Medion has selected the components in this computer for their high level of functionality, ease of use, safety and reliability.
Through balanced hardware and software design we are able to provide you with an innovative personal computer useful for applications relating to both work and leisure.
We are pleased to welcome you as our newest customer. Thank you for choosing our products.
© 2010 Medion*. All rights reserved. Microsoft®, MS-DOS®, and Windows are registered trademarks of Microsoft Corporation in the U.S. and other countries. Pentium® is a registered trademark of Intel Corporation. The names of actual companies and products mentioned herein may be the trademarks of their respective owners.

HDMI, the HDMI logo and High-Definition Multimedia Interface are registered trade marks of the HDMI Licensing LLC.
Information in this document is subject to change without notice.
Table of contents
Safety....1
Operational Safety 3
Power Supply 4
Cabling....4
Data Security 6
Battery Treatment....6
Ambient Temperature 7
Ergonomics 7
Setting Up & Getting Started 9
Included with your All-In-One PC 11
Setting Up of the All-In-One PC.... 12
Forms of setting up 12
Setting the device up with the stand 12
Attachment with a VESA support (optional) 12
Set-up Location 13
Views....14
Front View 14
Left and Right Side.... 15
Rear Side.... 16
Getting Started 17
Step 1: Inserting batteries in keyboard.... 17
Step 2: Inserting batteries in mouse....17
Step 3: Inserting batteries in the remote control .... 18
Step 4: Connecting the USB receiver.... 18
Step 5: Power on....18
Step 6: Starting Initial Setup .... 19
Step 7: Finalising ....19
Short Description of the Windows Desktop 20
Operation 23
Power Supply 25
On/Off Button 25
Power Adapter.... 26
The Multi Touch Display 27
Operation 27
Cleaning....27
Screen Resolution 27
On-Screen Keyboard.... 28
Appearance and Personalization 28
Connecting an External Monitor 29
Duplicate the Desktop 30
Extend these displays....30
Only display the Desktop on 1 30
Only display the Desktop on 2....30
The Mouse 31
The Keyboard 32
The Alt and Ctrl Keys 32
Multimedia functions....33
Setting the frequency for keyboard and mouse 34
The Hard Drive 35
Important Directories....36
The Optical Drive 37
Loading and Removing a Disc 37
Loading a Disc 37
How to Remove a Disc....38
Playing Back and Retrieving Data from Discs 39
Regional Playback Information for DVD 40
Subjects Concerning the CD/DVD-Rewriter....40
The Card Reader....41
Inserting Memory Cards....41
Removing Memory Cards....41
The Sound System....42
Configuration of the Loudspeakers 43
Webcam 45
Actual example using Windows Messenger....45
Microphone amplification....45
USB Port 46
The TV Tuner Card (optional) 47
The Remote Control (optional)......48
Button Layout 49
Programming the user-defined button....50
AV inputs....51
Connecting an external source to the All-In-One PC....51
Connecting an AV source....51
Changing the AV source 51
The Network 52
What is a Network? 52
Wireless LAN (optional) 53
Safety Note 53
Conditions....53
Troubleshooting within the Network.... 54
Bluetooth (optional) 55
Securing the All-In-One PC 56
Startup Password....56
Using a safety lock....56
Software 57
Getting to Know Windows ® 7....57
Windows ® 7 - News....57
Windows ® 7 - Help and Support .... 59
Windows ® 7 – Getting Started....60
Windows ® 7 - User Account Control....61
Windows ® 7 – Control Panel ...... 62
Windows Media Center 63
Installation of Software....66
How to Install your Software 66
Software Uninstallation 67
Windows Activation....68
Product Activation on your All-In-One PC 68
BIOS Setup 69
Execution of the BIOS Setup 69
Customer Service & Self Help 71
Data and System Security 73
Data Security 73
Maintenance Programs....73
System Restore 74
Correction 74
Windows ® Update 75
Windows Update Information for Data Security 76
System Restore 77
Limits of the Recovery....77
Carrying out a Restore 77
FAQ – Frequently Asked Questions 78
Customer Service....79
Troubleshooting....79
Localise the Cause 79
Errors and Possible Causes....80
Additional Support 81
Driver Support....81
Transporting the All-In-One PC 82
Cleaning and Care....82
Upgrades and Repairs 83
Notes for Service Engineers 83
Notes on Laser Radiation....84
Recycling and Disposal 84
Appendix 85
Information about conformity 87
ISO 13406-2 Class II 87
Information about the Regulatory Compliance according to R&TTE 89
FCC Compliance Statement 90
Restricted Warranty 91
Making Copies of this Manual....95
Index 96
Chapter 1
Safety
Subject
Page
Operational Safety 3
Power Supply 4
Data Security 6
Battery Treatment 6
Operational Safety
Please read this chapter carefully and observe all listed notes.
This ensures a reliable operation and long life expectancy of your All-In-One PC.
- Do not allow children to play unattended with electrical equipment. Children are incapable of judging potential risks properly.
- Keep the packing materials, such as plastic sheeting away from children. The danger of suffocation could arise in the case of misuse.
- Do not open the All-In-One PC casing or use the All-In-One PC with the casing removed. When the casing is open there is a danger to life from electric shock.
- Optical drives are Laser Class 1 devices. These lasers must remain in their sealed All-In-One PC casing. Do not remove the drive covers, as exposure to the lasers may prove harmful.
- Do not insert objects through the slots and openings of the All-In-One PC. This may lead to electric shock, electrical short-circuit or fire that will damage your All-In-One PC.
- Do not cover the slots and openings in the All-In-One PC casing. These openings are for ventilation purposes. Covering these vents may lead to overheating. Please keep free a minimum distance of 20 cm on all sides when setting up the All-In-One PC.
- Do not submit the device to drops of water or spray or place any containers filled with liquid, such as vases, on the device. Penetrating liquid can impair electrical safety.
Switch off your All-In-One PC immediately or do not switch it on at all and contact customer service ...
- ... if the power cord or the connectors attached to it are burnt or damaged. Replace the defective power cord with an original power cord. Under no circumstances may a defective power cord be repaired.
- ... if the housing of the All-In-One PC is damaged or fluids have leaked into it. Have the All-In-One PC checked by customer service first, because the All-In-One PC may not be safely operated otherwise and there may be a life-threatening risk of electrocution!
Power Supply
- Do not open the housing of the mains adapter. Opening the housing may cause death by electrical shock. The housing contains no parts requiring maintenance.
- The mains adapter should only be operated using earthed sockets with AC 100-240V\~, 50/60 Hz. If you are not certain of the electrical supply at the installation location, ask the power supplier.
- The socket must be located near the All-In-One PC and must be easily accessible.
- Use the enclosed mains adapter with the enclosed mains connection cable only.
- The adapter possesses of an on-/ off switch. If the switch is on OFF (0), no power is required and the All-In-One PC will not be supplied with power.
- For additional safety, we recommend the use of an overvoltage protector, in order to protect your All-In-One PC from damage by voltage peaks or lightning carried through the power network.
- If you wish to separate the mains adapter from the power network, first pull the plug out of the socket and then pull the plug on the All-In-One PC. Pulling the plugs in the wrong order may damage the mains adapter or the All-In-One PC. When pulling the plug, hold the plug itself. Never pull on the cord.
Note
Be sure to shut down the All-In-One PC properly before separating it from the power or turning it off.
Cabling
Please follow the instructions below in order to correctly connect your All-In-One PC:
- Arrange cables in such a way that no one can tread on or trip over them.
- Do not place objects on the cables.
- Do not allow any large forces to be exerted on the plug-in connections, from the side, for example. This will otherwise lead to damage to and in your device.
- Do not exert any force when connecting cables and plugs and pay attention to the correct orientation of each plug.
- Pull the connection at the plug, not at the cable, of you are detaching a connection cable from your device.
- Avoid short circuits and cable breaks by not squeezing the cable or bending it sharply.
- To avoid damage to your All-In-One PC, connect your peripherals (e.g., keyboard, mouse and monitor) whilst your All-In-One PC is powered off. Some devices can be connected whilst your All-In-One PC is in use. These devices usually
have a USB connector. Please follow the appropriate instructions for each device.
- Keep the All-In-One PC at least one meter (approximately three feet) away from high frequency and magnetic interference sources (e.g., televisions, loud-speaker cabinets, mobile telephones, etc.) in order to avoid malfunctions and/or loss of data.
- Please note that only shielded cables shorter than 3 meters (9.84 ft) should be used for the external interfaces. Please only use double screened cables for printer cables.
- Do not replace the cables supplied with the machine by any others. Use the cables belonging to the scope of the delivery exclusively, because they will have been tested extensively in our laboratories.
- Also only use the connection cable supplied with the devices for the connection of your peripheral devices.
- Make sure that all connection cables have been connected to the peripheral devices associated with them, in order to avoid disruptive radiation. Remove unneeded cables.
- The connection of devices is limited to equipment that complies with EN60950 "Safety of information technology equipment" or EN60065 "Audio, video and similar electronic apparatus. Safety requirements".
- In the first hours of operation, new devices may emit a typical, unavoidable but completely harmless smell, which will decline increasingly in the course of time. We recommend that you ventilate the room regularly, in order to counteract the formation of the smell. During the development of this product, we have made sure that the applicable limits are clearly decreased.
Note
You only need to connect those components to your computer that you require. If you do not have the described device available you may carry out the connection later.
Data Security
Attention!
Every time you update your data make back-up copies on an external storage medium. The supplier does not assume liability for data loss or damage to data storage units, and no claims can be accepted for damages resulting from the loss of data or consequential losses.
Battery Treatment
Batteries may contain combustible materials. By misuse, this may cause battery leakage, heat, explosion or ignition, bringing about injury or damage to the device.
Please observe strictly the following matters:
- Keep children away from batteries. If by any chance, the batteries are swallowed, consult a doctor immediately.
- Do not charge batteries (except rechargeable batteries).
- Do not forcibly discharge batteries.
- Do not short-circuit batteries.
- Do not heat or dispose of in fire.
- Do not disassemble or deform batteries. Your hands and fingers may be injured, or the liquid of the battery may get into your eyes or adhere to your skin. If this happens, rinse with a large quantity of water immediately and consult a doctor.
- Do not expose batteries to strong impact by dropping or throwing the batteries.
- Do not reverse the positive (+) and negative (-) terminals to avoid short-circuit.
- Do not mix used and new or different types of batteries together. Your equipment may not operate properly. In addition, the battery exhausted first may be excessively drained (over-discharged).
- Remove promptly the used batteries from the device.
- Replace all batteries with new batteries of the same type at the same time.
- Insulate the terminal parts with tape or the like when storing or disposing of batteries.
- Check that the contacts in the device and on the batteries are clean and clean them if necessary, before inserting the batteries.
- Do not throw rundown batteries in the domestic refuse! Respect the environment and throw them in the specific containers for separate collection. If necessary, turn to your retailer or to our service assistance. Thank you!
Ambient Temperature
- The All-In-One PC can be operated at an ambient temperature of between 10° and 35°C (+41° and +95°F) and at a relative humidity of between 30% and 70% (without condensation).
- When powered off, the All-In-One PC can be stored at temperatures between -20° and 50°C (-40° and +158°F).
- Unplug the cable during thunderstorms and make especially sure to remove the antenna cables, if present. We recommend the use of a surge protector for additional safety, in order to protect your All-In-One PC from being damaged by power peaks or lightning strikes through the power network.
- Delay operating a All-In-One PC after transport until the device has adjusted to the ambient temperature. In situations of large temperature or humidity differences condensation may build up moisture inside the All-In-One PC, which might cause an electrical short circuit.
Ergonomics
Note
Ensure that the monitor is set up in such a way that reflections, glare and light/darkness contrast are avoided.
You should not position the monitor in close proximity to a window as this is usually the brightest area of the room and may cause visual impairments during daylight hours.
Always position the monitor in a line of sight that runs parallel to the window front (see picture).
You should also apply a parallel line of sight with respect to artificial lighting. This means that in a room lit by artificial light essentially the same criteria and objectives apply. Should it not be possible to arrange the monitor as outlined above, the following measures might be helpful:
• Turn, lower or incline the monitor.
- Place horizontal or vertical shades at the windows.
- Work in Comfort
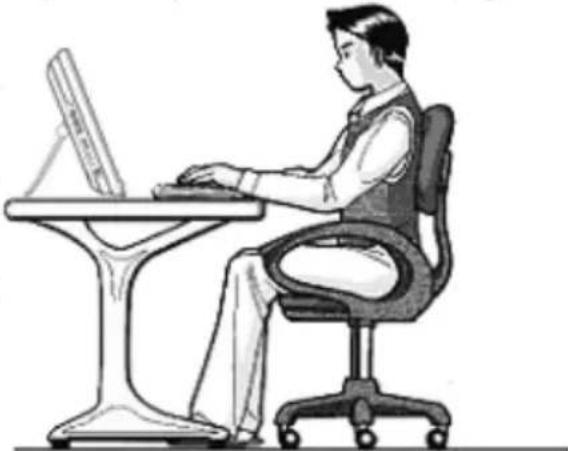
Sitting in one position for long periods can be uncomfortable. To minimize the potential for physical discomfort or injury, it's important that you maintain proper posture.
natural_image
Line drawing of a person sitting at a desk using a computer (no text or symbols present)Overall:
Change your position frequently and take regular breaks to avoid fatigue.
Back:
While sitting at your work surface, make sure your back is supported by the chair's backrest. This should be in an erect position or angled slightly backwards.
Legs:
Your thighs should be horizontal or angled slightly downward. Your lower legs should be near a right angle to your thighs. Your feet should rest flat on the floor. If necessary, use a footrest, but double check that you have your seat height adjusted correctly before getting a footrest.
Arms:
Your arms should be relaxed and loose, elbows close to your sides, with forearms and hands approximately parallel to the floor.
Wrists:
Your wrists should be as straight as possible while using the keyboard, mouse or track-ball. They should not be bent sideways, or more than 10 degrees up or down.
Head:
Your head should be upright or tilted slightly forward. Avoid working with your head or neck twisted.
Chapter 2
Setting Up & Getting Started
Subject
Page
Included with your All-In-One PC 11
Setting Up 12
Views 14
Front View 14
Left and Right Side 15
Rear Side 16
Getting Started 17
Included with your All-In-One PC
Please check that the contents listed below are supplied with your package. You MUST provide your All-In-One PC's serial number when contacting a customer service representative.
Your All-In-One PC bundle should include the following components:
- All-In-One PC
- Power adapter with connection cable (Modell: FSP, FSP135-ASAN1)
- Keyboard, mouse and remote control set containing:
- Wireless keyboard + (optional) 2 batteries type Micro LR03/AAA, 1,5V
- Wireless mouse + (optional)
2 batteries type Mignon LR6/AA, 1,5V
• 1 USB receiver for keyboard, mouse and remote control - Wireless remote control + (optional) 2 batteries type Micro LR03/AAA, 1,5V
• OEM Version of Operating System - Documentation
Note
Keep the original packing, in case the device ever requires shipment.
Setting Up of the All-In-One PC
Forms of setting up
You can set up the All-In-One PC with the stand supplied or attach the device to the wall with a VESA support.
Setting the device up with the stand
• Unfold the foot on the back of the device.
- You can position the foot in progressive angles, so that the monitor can be installed with various degrees of slant.

Attachment with a VESA support (optional)
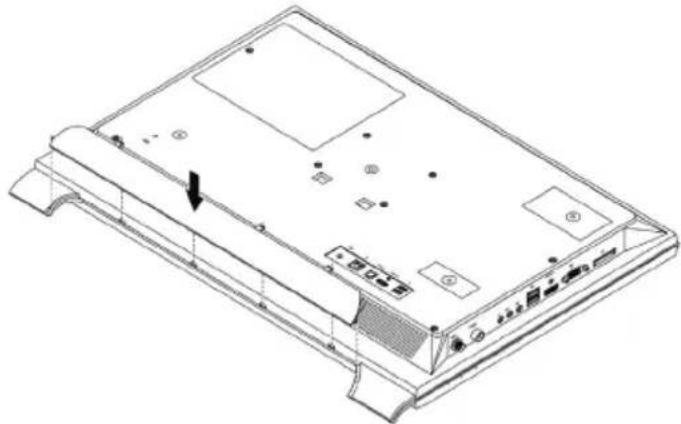
You can install the All-In-One PC to the wall with a special support (standard VESA MIS-D – available in specialist shops). Proceed as follows to do this:
- Remove the stand by loosening the screws labeled with ① in the illustration. Keep them in a secure location, in order to use them for a renewed attachment of the stand.

- Your All-In-One PC will be supplied with a decorative strip as an option. It is clicked in between the two parts of the stand.
natural_image
Line drawing of a computer monitor chassis with labeled ports and an arrow indicating a component (no text or symbols present)- Attach your All-In-One PC to the wall support. Make sure that a minimum distance of 7 mm is maintained between the wall and the All-In-One PC, in order to avoid overheating.

Set-up Location
- Keep your All-In-One PC and all units connected to it away from moisture, dust, heat and direct sunlight. Failure to observe these instructions can lead to malfunctions or damage to the All-In-One PC.
- To prevent damage to your All-In-One PC from a fall, place and operate the All-In-One PC and all connected units on a stable, balanced and vibration-free surface.
Views
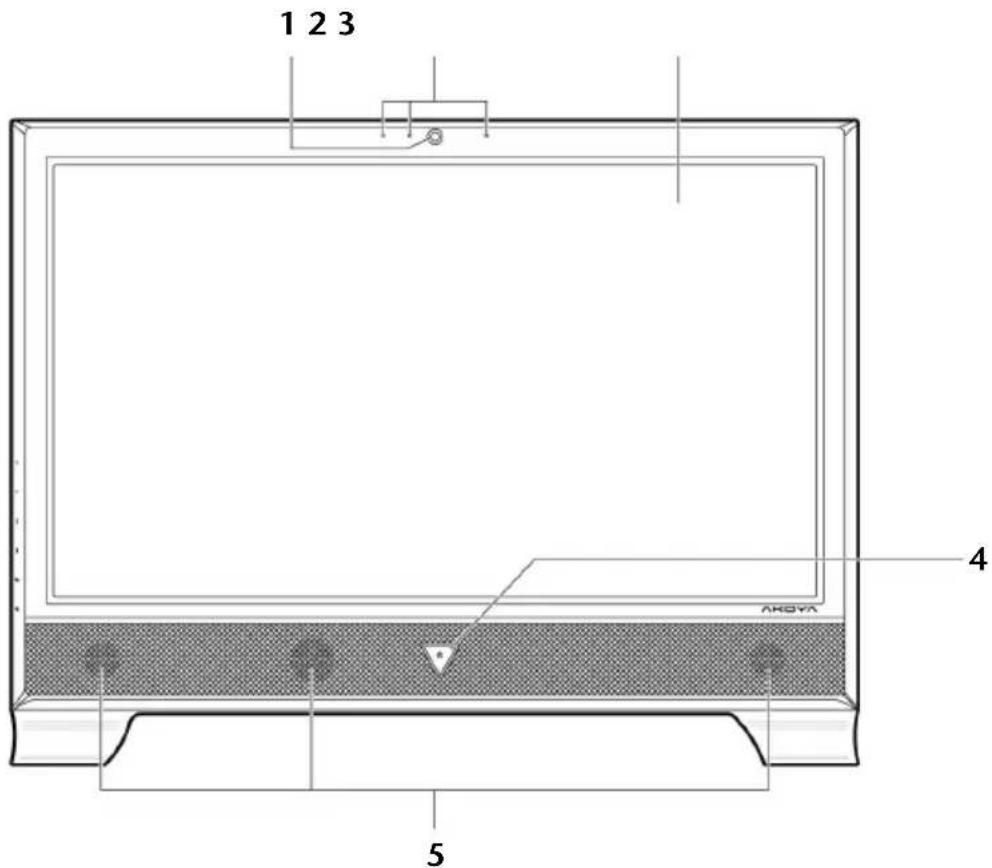
Front View
(Diagram the same)
1 - Webcam ...... (⇒ p. 45)
2 - Microphone....(⇒ p. 42)
3 - Multi Touch Display ..... (⇒ p. 27)
4 - On/Off button ..... (⇒ p. 25)
5 - Stereo speakers
Left and Right Side

6 - Multimedia card reader ....(⇒ p. 41)
7 - VGA-IN connector....(⇒ p. 29)
8 - HDMI-IN connector....(⇒ p. 29)
9 - USB port ......(⇒ p. 46)
10 - Line In* (⇒ p. 42)
11 - Line Out*......(⇒ p. 42)
12 - Microphone * ......(⇒ p. 42)
13 - DVB-T and analog aerial connection ..... (⇒ P. 47)
14 - DVB-S and DVB-S2....(⇒ p. 47)
15 - Operating button: increase the volume
16 - Operating button: decrease the volume
17 - Operating button: enhance screen brightness
18 - Operating button: reduce screen brightness
19 - Operating button: Change the mode of display between the PC and external AV sources ..... (⇔ P. 51)
20 - Operating button: switch on/off comfort light
21 - Emergency ejection .....(⇒ p. 38)
22 - Optical drive .....(⇒ p. 37)
* Ports with dual function. Configuration is set with the included software (⇒ p. 42)
Rear Side
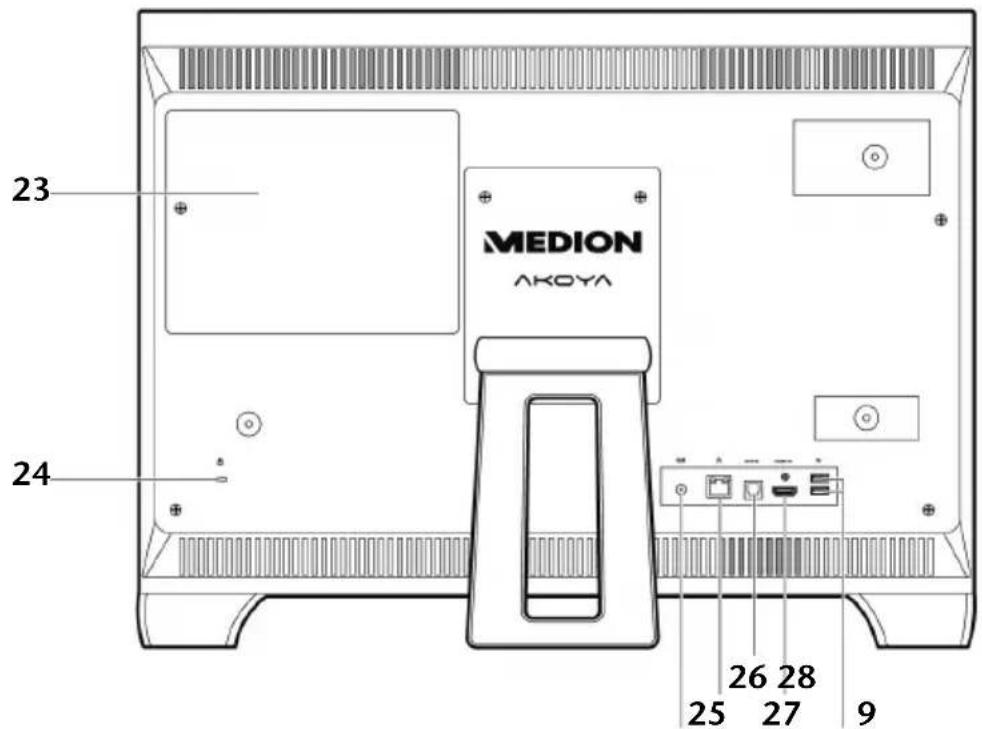
23 - Hard drive slot for a second hard drive
24 - Kensingtonlock ...... (⇒ p. 56)
14 - Power socket ...... (⇒ p. 26)
26 - LAN port (RJ-45) ..... (⇒ p. 52)
27 - Digital audio out (S/P-DIF, optical) ..... (⇒ p. 42)
28 - HDMI-OUT connector.... (⇒ p. 51)
9 - USB port ...... (⇒ p. 46)
Getting Started
The software on this All-In-One PC comes fully pre-installed. You do not have to load any of the CD's/DVD's supplied.
With many programs (e.g., telephone-CD's or encyclopaedias), however, it is necessary to insert the corresponding CD/DVD in order to call up the data which is stored on it. The software will ask you to do this as necessary. Once you have made all the connections and secured the necessary connectors you can turn on the monitor, the other peripherals and finally the All-In-One PC itself.
Step 1: Inserting batteries in keyboard
The keyboard requires 2 batteries type Micro LR03/AAA, 1.5V.
-
Remove the battery compartment cover on the bottom of the keyboard.
-
Insert 2 batteries type Micro LR03/AAA, 1.5V. The illustration on the cover shows how to insert the batteries properly.
-
Recover the battery compartment.

natural_image
Technical line drawing of a rectangular electronic device with mounting holes and internal compartments (no text or symbols)Note
Change the batteries if it is no longer possible to make entries smoothly.
The operation of the keyboard is described on page 32.
Step 2: Inserting batteries in mouse
The mouse requires two batteries type Mignon LR6/AA, 1.5V.
-
Remove the battery compartment cover on the bottom of the mouse.
-
Insert the 2 batteries type Mignon LR6/AA in the battery compartment. The illustration in the battery compartment shows how to insert the batteries properly.
-
Replace the battery compartment cover on the bottom of mouse.

natural_image
Top-down schematic of a device casing with internal components and connectors (no text or symbols)Note
Change the batteries if it is no longer possible to make entries smoothly.
The operation of the mouse is described on page 31.
Step 3: Inserting batteries in the remote control
The remote control requires 2 batteries type Micro LR03/AAA, 1.5V.
- Remove the cover from the battery compartment on the underside of the remote control.
- Insert 2 batteries type Micro LR03/AAA, 1.5V. The illustration on the cover shows how to insert the batteries properly.
- Recover the battery compartment.
Note
Change the batteries if it is no longer possible to make entries smoothly.
The operation of the remote control is described on page 48.
Step 4: Connecting the USB receiver
- Attach the receiving station for the mouse, keyboard and remote control to a free USB port on your All-In-One PC.
Step 5: Power on
- Connect the mains adapter supplied to the All-In-One PC.
Then connect the mains cable to the adapter and subsequently to a socket. - Press the On/Off switch on the front once, to switch on your All-In-One PC.
- The operating display will light up.
The On-/ Off switch function can be programmed in the Windows® Control Panel, Power Options, Hardware and Sound (please refer to on-line help). The All-In-One PC will always be switched off, if the main switch is pressed for more than 4 seconds.
Warning!
If the operating system is not shut down properly (through


), then there is a risk of data loss.
Step 6: Starting Initial Setup
The All-In-One PC starts and now goes through a number of phases:
Note
Ensure that there is no bootable CD (e.g. the Recovery-CD) in the CD-ROM drive. Such disks will prevent the operating system from loading directly off the hard drive.
The operating system is loaded from the hard disk. During the initial set-up, the loading process takes slightly longer than normal to register the operating system and the individual components completely. Your operating system is finished loading when a welcome screen is shown on your display.
Follow the instructions on the screen. Dialogue boxes will explain any steps that need to be taken. The greeting procedure will guide you through the following screens and dialogues.
Should you have any questions just click on .

License agreement
Please read through the license agreement carefully. It contains important legal information on the use of your software. In order to see the full text, use the mouse and the scroll bar to move downwards until you have reached the end of the document. You accept the agreement by clicking on the I accept the agreement option field. Only by doing so will you be entitled to use the product under lawful terms and conditions.
Step 7: Finalising
After the login procedure the Windows ® desktop appears on your screen.
This can be adjusted so that the screen of your computer looks different. The basic operation, however, is ensured.
Short Description of the Windows ® Desktop
① Start Button
Clicking the Start button brings up a menu where you can access help, software programs, files, and settings
② All Programs
All of the software programs installed on your All-In-One PC are ordinarily listed here. Click All Programs to reveal an extensive menu.
③ Taskbar
You can start programs and switch between already active programs using the taskbar beneath the screen. You can place every program in the taskbar under Windows® 7, so that you can always open it with a single click. Furthermore, you can rearrange the symbols on the taskbar by clicking on them and dragging them to the desired position. Move the cursor over the symbols, and the system will display a miniature of every file or window open in the program. When you move your cursor over the miniature, the system will display a full-screen preview of the particular window. If you move the cursor away from the miniature, the full-screen preview will close.
④ Windows Search
Windows Search helps you find almost all data located on the All-In-One PC, quickly and easily. With Windows ® 7, you get search results with greater relevance, and they are easier to understand.
⑤ Program Bar
The most commonly used software programs are listed here. The operating system recognises all this automatically. Clicking on an entry with the right mouse key enables you to decide which entry on the list to keep or to remove. The program linked to the input is not erased.
⑥ Turn Off
To turn off the All-In-One PC, click on the Shut down button with the left mouse key.
⑦ Display Desktop
Click on this Button if you would like to minimise all the windows open onto the taskbar, in order to obtain a clear view of the Desktop.
⑧ Desktop Icons
Desktop icons link to their respective programs. To start a program, double-click its desktop icon.
The desktop encompasses nearly the entire screen and acts as the shelf space for such entries or for other links, to which you would like rapid access.
⑨ Logged in User
This tells you which user is logged in to your All-In-One PC.
⑩ Control Panel
You can use the icons in Control Panel to change the appearance and functionality of Windows ® 7. These icons represent options for configuring your All-In-One PC. You should, however, consult „Help and Support“ on the potential effects of certain changes.
① System tray
System tray on the current time. When certain events occur, for example, upon receipt of an e-mail message or upon opening the task manager, it may happen that too many notification symbols are displayed in this field. Windows ® displays a notification symbol when an event occurs. After a short time, Windows ® places the symbol in the background, in order to maintain the straightforwardness of the field. You can access the symbols placed in the background by clicking on a button in the system tray.

Chapter 3
Operation
Subject
Page
Power Supply 25
Multi Touch Display 27
The Mouse 31
The Keyboard 32
Setting the frequency for keyboard and mouse 34
The Hard Drive 35
The Optical Drive 37
The Card Reader 41
The Sound Card 42
The Webcam 45
The USB Port 46
The TV-Tuner Card (optional) 47
The Remote Control (optional) 48
AV Inputs 51
Network 52
Securing the All-In-One PC 56
Software 57
Power Supply
On/Off Button
Power on or off your All-In-One PC by pressing the on/off button briefly.

natural_image
Line drawing of a flat-screen TV with a button labeled 'A' pointing to the front panel (no text or symbols on the device itself)The operational indicator will inform you about the operational status of the All-In-One PC. The All-In-One PC will always be switched off, if the main switch is pressed for more than 4 seconds.
Warning!
Do not switch off your netbook while the hard disk is running. Otherwise data may be lost. To protect the hard disk you should always wait for 5 seconds after powering down the netbook before powering it up again.
Power Adapter
Your All-In-One PC is supplied with a universal AC power adapter, which automatically adjusts to the available power source. The following levels are supported:
AC 100-240V\~/ 50-60 Hz. Please follow the power supply safety instructions found on page 4.
The power adapter is connected via a power cord to an AC outlet. The DC power lead from the power adapter is connected to the rear side of the All-In-One PC.

The adapter has an on and off switch. No electricity will be used and the netbook will not be supplied with electricity if the switch is set to OFF (0).
The adapter provides the netbook with power in the ON setting (I). The battery is also being charged when you are working on your netbook with the power adapter. You should therefore unplug the power adapter from the outlet if it is not connected to the netbook or set the adapter to OFF (O).
Warning!
Use only the power adapter and power cord supplied with your All-In-One PC.
The Multi Touch Display
Your All-In-One PC is delivered with a touch-sensitive screen. To ensure optimal use, you should pay careful attention to the following notes:
Operation
• To avoid damage, do not touch the display with sharp or sharp-edged objects.
• Use a blunt stylus or your finger.
Cleaning
- Take care to avoid water drops remain on the display. Water can cause durable discoloration.
- Clean the screen with a soft, lint-free cloth.
- Do not expose the screen to bright sunlight or ultraviolet rays.
- Never use solvents, or caustic or volatile cleansers.
- To clean the display, use only suitable cleansers such as glass cleansers or monitor cleansers (available in the retail trade).
Screen Resolution
The screen has a native resolution of 1920 x 1080 pixels. If you change to a presentation with different characteristics in the Windows „Control Panel Appearance and Personalization Display Settings Adjust screen resolution“ Help Program, the display will not appear on the whole area of the screen, among other effects. Using a higher resolution can lead to distortion of the display, especially with text. Using a lower resolution may cause the display to use only a portion of the screen area.
You can adjust the presentation to the mode supported with the Windows „Control Panel Appearance and Personalization Display Settings Adjust screen resolution Advanced Settings“ Help Program.
On-Screen Keyboard
Using the On-Screen Keyboard application displays a virtual keyboard on the screen, allowing you to input data by means of a pointer or joystick, or directly, using the touch screen.
To retrieve the on-screen keyboard, proceed as follows:
- Click on the Windows desktop with the right mouse key.
- Click on the Personalization point in the selection menu.
- Select the Ease of Access Center.
- Click on Start On-Screen Keyboard.
Appearance and Personalization
This program offers you the possibility of adjusting the presentation on your display. This includes the background image, the screensaver, Active Desktop (web) and additional settings of your display and your graphics card, for example. The program can be started in the following way:
- Right mouse click on the Windows interface (Desktop) and left mouse click on Personalization
or
- Via Start Control Panel Appearance and Personalization with a double-click with the left mouse button.
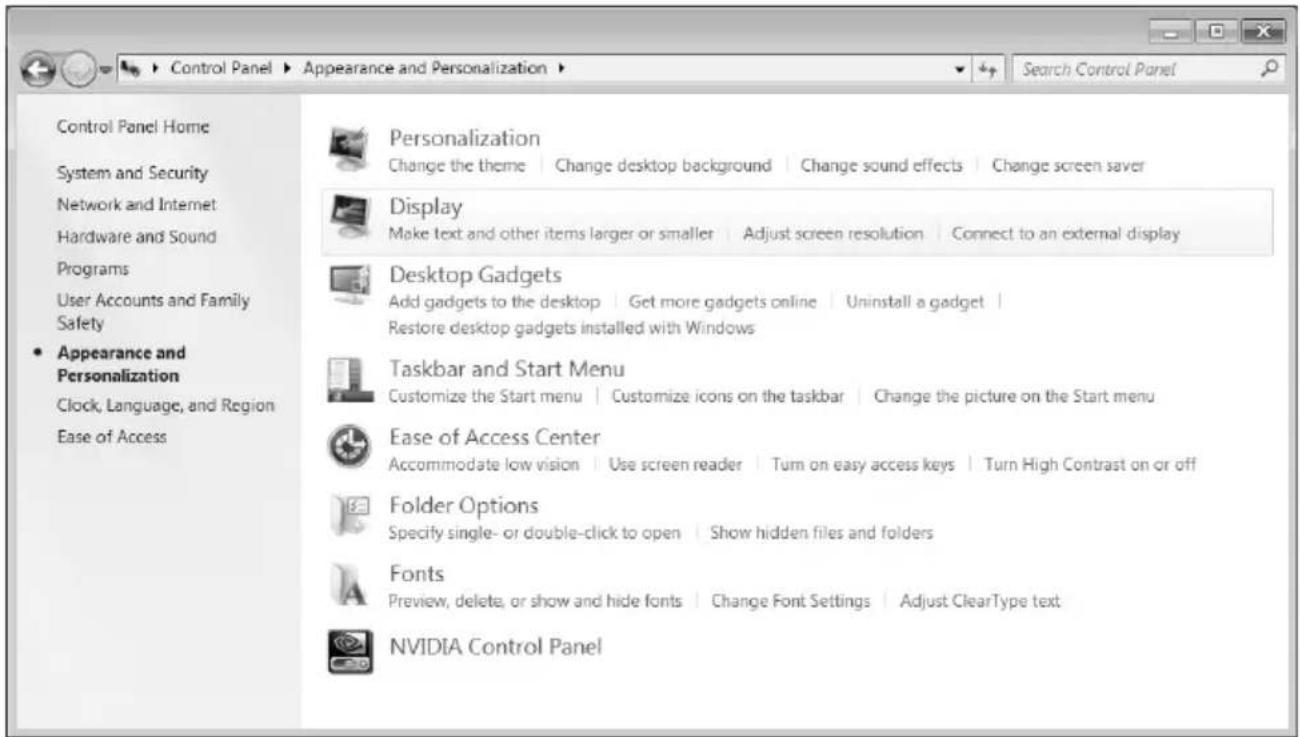
The following adjustment possibilities are available:
- Personalization
- Display
- Desktop Gadgets
• Taskbar and Start Menu - Ease of Access Center
- Folder Options
- Fonts
Connecting an External Monitor
The All-In-One PC has a HDMI-OUT port for connecting an external monitor.
- Shut down your All-In-One PC.
- Connect the video signal cable of the external monitor to the HDMI-OUT port of the All-In-One PC.
- Connect the external monitor to the electrical socket and power it up.
- Start your All-In-One PC.
The external screen will be determined after the operating system has been loaded. Several possibilities will be available to you. You will call them up as follows:
- A right click on the display.
- Select the Screen Resolution option in the selection window.
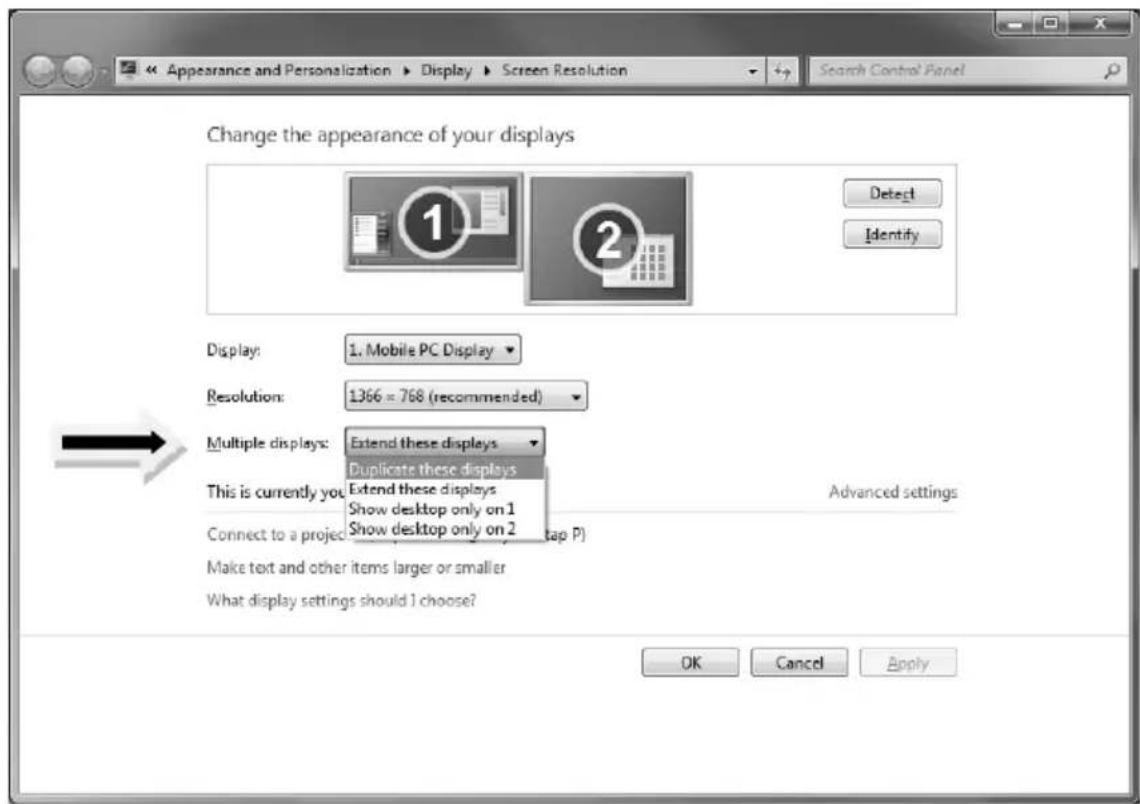
Select from the following options under Multiple displays:
- Duplicate these displays
- Extend these displays
• Show desktop only on 1
• Show desktop only on 2
Duplicate the Desktop
This Mode duplicates the display of the netbook on an external monitor.
Information
The same screen resolution must have been set on both devices in the case of this mode.
Extend these displays
An empty Desktop will be displayed on the second [external] monitor in this mode. Windows from the first screen cane shifted to the second one and vice versa.
The screen resolution and the colour quality of the individual display devices can be set under Start Control Panel Appearance and Personalization.
Only display the Desktop on 1
The Desktop will only be displayed on the main monitor 1.
Only display the Desktop on 2
The Desktop will only be displayed on the second (external) monitor.
The Mouse
The mouse has beside the two keys a wheel that can be used to scroll through a document or internet pages.

natural_image
Simple line drawing of a curved object with a circular opening and an arrow indicating rotation (no text or symbols)Note
The scroll wheel can be used as a button. The functionality depends on the application. In Word for example you can push the wheel to move up and down as a scroll function.
If the mouse course moves jerkily on the screen, try a different surface (mouse pad). Glass and metallic surfaces might cause problems.
The Keyboard
This section contains useful information on using the keyboard. All diagrams are schematic.
The Alt and Ctrl Keys
The left Alt key performs certain functions in conjunction with other keys. The application program determines these functions. In order to enter a combination of keys that include the Alt key, hold the Alt key down while pressing the other key. The right Alt key operates in a similar way but selects certain special characters. The Ctrl key, like the Alt key, carries out program functions.
Useful key combinations (software-dependent):
| Key Combination Function and Description | |
| Alt + F4 | As a rule ends the program selected or closes the window opened. |
| Alt + Print screen | Copies the image of the window currently active to the clipboard. |
| Shift + ' | Generates the @ character required for e-mails (pro-nounced: at). |
| Ctrl + Alt + Del Windows security is launched. | |
(Country-specific variances are possible.)
Multimedia functions
The allocation of a double function to certain keys provides you with a few multi-media functions. Some functions are input using the Fn-Key:
| Kombination | Description |
| Fn + ◀◀ | Previous TrackUse this key to skip backwards to the previous track/title in the active player. |
| Fn + ▶ / ■ | Play/PauseUse this key to start or pause, for a short time, the playback of a track/title just as you would with a normal CD player. |
| Fn + ■ | StopUse this key to end playback of the current track/title. |
| Fn + ➤ | Next TrackUse this key to skip forward to the next track/title in the active player. |
| Single Button Description | |
| ✕ | MuteSwitches the volume on/off. |
| ✕ | Decreases the volume. |
| ✕✕ | Increases the volume. |
Setting the frequency for keyboard and mouse
- Push the 'connect' button located on top of the receiver. The indicator will start blinking.
- Push the button on the bottom of the keyboard. The channel will be changed after the button is released.
- Push the 'connect' button located on top of the receiver. The indicator will start blinking.
- Push the button on the bottom of the mouse. The channel will be changed after the button is released.
The Hard Drive
The hard drive is the main storage medium combining large storage capacity and rapid data access.
The hard drive contains the operating system of the computer, other application programs and backup files. These programs and files are pre-installed on your All-In-One PC, so you may note that some of the space on your hard drive is already taken.
The Windows operating system cannot use the full capacity of the hard drive, which means that there will be a difference between the capacity that the BIOS displays and what the operating system displays. The operating system of the All-In-One PC, further application programs and backup files are located on the hard drive and reduce its total capacity.
The hard drive is addressed as drive C and D.
Note
Never switch off the computer while the busy indicator is lit since this may result in loss of data. A flickering hard drive display is your indication that the All-In-One PC is accessing the hard drive.
Usually your hard disk is divided into more partitions. The configuration of your hard drive can be displayed and configured under "Disk Management". To familiarise yourself with the hard drive configuration, search Windows Help for the key word "Disk Management".
In your first partition (C:) you will find the operating system, application programs and the users' documents.
The second partition (D:) serves for data security and contains additional drivers (D:\Driver) and tools (D:\Tools) for your All-In-One PC.
Note
You will also find in two otherwise non-overwriteable partitions the system restoration start files ( p. 77), as well as installation files for Windows ® 7. These partitions are not visible and should not be erased.
Important Directories
In the following we have listed the most important directories and described their content.
Attention!
Do not delete or modify these directories or their contents since data could be lost or the functionality of the system could be at risk.
C:\ The master directory of drive C: includes important files required to start Windows®. In the factory setting these files are hidden for safety reasons.
C:\Programs As the name suggests, in this directory programs install the files belonging to the application.
C:\Windows The main directory of Windows®. This is where the files of the operating system are saved.
D:\Driver This folder includes the drivers required by your computer (pre-installed).
D:\Tools Here you find additional programs and other documentation for your All-In-One PC.
The Optical Drive
Loading and Removing a Disc
In contrast to optical drives in a desktop All-In-One PC, your All-In-One PC uses a holder to lock the disk.
Attention!
Do not place protective foils or other stickers on your CD's. To avoid damage to your drive, do not use deformed or damaged CD's. Attention: Do not use scratched or dirty discs, discs with pieces broken off or discs of poor quality. Because of the high speeds in the drive the discs might break and damage your data as well as your drive. Examine the discs before you enter them. If damage or dirt is visible, you should not use them.
Damage caused by faulty media is excluded from warranty and any repair will be charged.
Loading a Disc
-
With the device turned on, press the eject button on the optical drive to open the tray.
-
Pull the tray out completely with care.
-
Place the disc on the tray so that it lays flat with the label facing forward. push the disc right onto the locking mechanism so that it can lock in position.
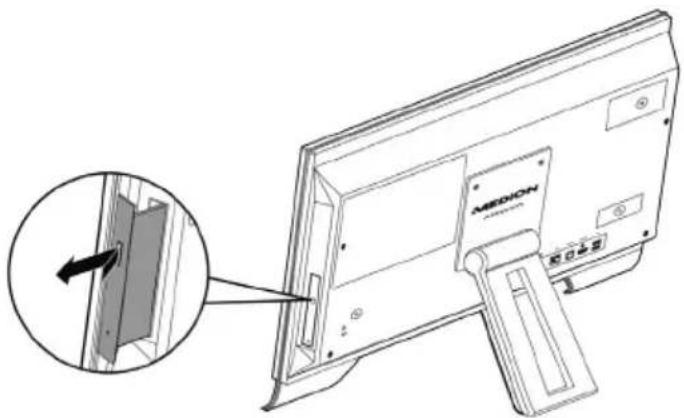

Attention!
The disc can be damaged when the drive drawer is pushed in, if it has not been positioned on the support correctly.
- Push the tray back into the optical drive carefully.
The 'E' drive letter will have been allocated to your optical drive in the delivery status. You will have easy access to your files on your disks with Windows Explorer (Computer). Start the Computer Help Program by means of the Desktop link or by pressing the Windows key and the 'E' key at the same time. Open Windows Explorer by means of Start All Programs Accessories. The pre-installed media reproduction will be used automatically during access to DVD videos (or audio and video files on normal data CDs)..
Attention!
While the der All-In-One PC is accessing the optical drive the media acitivity indicator is lit. Do not try to remove the disc from the drive while this LED is lit.
How to Remove a Disc
- To remove a disc push the eject button again to open the drawer.
- Remove the disc and store it at a safe place.
- Shut the drawer.
Playing Back and Retrieving Data from Discs
Note
Some disks start automatically upon insertion. This depends on the operating system and the related settings.
Your All-In-One PC is able to playback and to retrieve Audio CDs, DVD Movies and Data discs.
After loading the disc your operating system will open a selection window with different options for playback.
If your operating system doesn't open the selection window you still have the possibility of access to the optical drive via the Windows Explorer or the Com-
puter

Regional Playback Information for DVD
The playback of DVD movies includes the decoding of MPEG2 videos, digital AC3 audio data and the deciphering of CSS protected contents.
CSS (sometimes called copy guard) is the name of a data protection program incorporated by the movie industry as an action against illegal copies.
Among the numerous regulations for CSS licensees the most important ones are the country specific playback restrictions.
In order to facilitate the geographically restricted release of movies, DVD titles are released for certain regions.
Copyright laws require the restriction of each DVD movie to a certain region (usually the region, in which it is sold).
DVD movie versions can be published in several regions but the CSS regulations require that each CSS decipherable system may only be used in one region.
Attention!
The decoding software included with your All-In-One PC may be changed for regional DVD decoding up to five times, after which the drive will only play DVD movies for the region setting last entered. Changing the region code after that will require factory resetting which is not covered by warranty. If resetting is desired, shipping and resetting costs will be billed to the user.
Subjects Concerning the CD/DVD-Rewriter
Normal Discs are pressed from a digital, glass master and then sealed. In the case of blank disc, the information is burnt onto the disc with the laser of the Rewriter. Therefore these discs are more sensitive than normal CDs.
Please avoid the following when using recordable/rewriteable discs - especially blanks - that have never before been used:
- radiation by direct sunlight (UVA/UVB)
• scratches and damage to the disk surface
• extreme temperatures
The Card Reader
If your All-In-One PC is equipped with a card reader, you can handle different memory card types. The following table refers to the use of the card reader:
• SD: Secure Digital Memory Card
- MMC: Multimedia Card
• SDHC: Secure Digital High Capacity Card
- MS: Memory Stick
• PRO: Memory Stick pro
For other types of cards, you may need a corresponding adapter (not included in the scope of delivery).
Inserting Memory Cards
Note
Memory cards can only be installed in one direction. Do not attempt to insert a card by force. This can damage the card reader and/or the card.
- Inscribe the card in such a way that the contacts point backwards when the All-In-One PC is upright.
- Push the memory card into the slot.
If a card is inserted, a free drive letter will be allocated to it in the workstation.
Removing Memory Cards
In order to remove a memory card or a memory stick, first push it into the contact to unlock it. Pull the card from the bay and store it securely.
The Sound System
Your All-In-One PC has an integrated stereo sound card (on-board) with 16-bit and 3D spatial sound effects (3D). The sound card is compatible with the industry standard Sound Blaster and Microsoft Sound System Version 2.0. This guarantees optimal support for all popular programs and games. If you wish to alter the base volume, click on the loudspeaker symbol in the task bar.

natural_image
Diagram of a mixer device with no visible text or symbols on the device itselfClick on Mixer, in order to open the volume mixer.

By using the keys 📋 and 📋 you have also the possibility to regulate the volume. You can change the function of the audio sockets using the pre-installed "Realtek" driver software. The connections can be configured in such a way as to connect to a surround sound system.
Configuration of the Loudspeakers
Connect the plug of one audio device with one of the audio sockets. The device will be recognised.

In the Speakers dialogue, you can select the following settings under Speaker Configuration:

Stereo: the audio sockets possess their basic functions.
5.1 Loudspeaker: The audio input is the loudspeaker output on the back; The audio output is the loudspeaker output on the front;
The microphone connection is for the central location and the subwoofer.
Dragging the cursor over the socket illustrations displays the actual functions.
Webcam
The built-in Webcam and associated microphone permit the use of various services, such as Windows® Messenger.
Actual example using Windows Messenger
- Start Windows Messenger and create a user account if you do not already have one. This service is free of charge. You only pay the cost of your Internet connection.
- Select your contact from the list and click on the camera icon below your display image.
A wizard helps you optimize the settings of your speakers, microphone and webcam. Follow the instructions on your screen.
-
Click on Finish to transmit your image via the webcam.
-
If your contact also has a webcam, click on the camera icon below the display image of your contact to receive the live image.
Microphone amplification
You are also able to amplify the built-in microphone. To do this, start the Realtek HD Audio-Manager by double clicking on the loudspeaker in the Infobar.
In the Microphone dialogue, you can adjust or change the value of the microphone amplification.
USB Port
Note
Devices connected directly to the USB bus should not draw more than 500 mA. The voltage output is protected by a fuse (Limited Power Source according to EN 60950). Should the devices need more power than this, it will be necessary to provide a hub (distributor / booster).
On the USB it is possible to connect up to 127 devices which correspond to the USB standard (1.1 and 2.0 supported).
The data transfer speed is 1.5 Mbit/s or 12 Mbit/s, depending on the device connected. USB 2.0 can reach up to 480 Mbit/s.

Note
If possible, always connect your USB devices to the same port where it has been installed. Otherwise you will get a new ID and your operating system will ask for a new installation of the driver.
The TV Tuner Card (optional)
The All-In-One PC is equipped with a TV card. Connect an aerial cable, in order to receive television channels on the All-In-One PC.
An analog or DVB-T aerial or a digital SAT device must have been connected, in order to receive a TV signal with the TV tuner.
Analog TV reception
- Connect a terrestrial aerial or cable television to the TV socket of your TV card.
DVB-T TV reception
You will have the possibility of using such services with an appropriate aerial, if DVB-T or digital services are offered at your location.
- Connect a DVB-T aerial to the TV socket or your TV card.
DVB-S TV reception
You will be able to watch television with your digital satellite equipment by means of the DVB-S* connection.
Attention!
Pull the antenna out when the device is not being used, particularly during bad weather. This protects your device from lightning.
Windows® Media Center is the optimal software for digital television, digital photographs and digital music.
- Start the Media Center using the program bar (in this regard, see also page 63)
- A assistant will guide you through the installation of your TV tuner.
Attention!
Audio or video recordings need a great deal of memory (up to 2.4 GB/hour). Safeguard files that you do not need on external media, such as DVD/CD-Rs or hard drives.
The Remote Control (optional)
This wireless remote control set can only be used to control the Media Center program on your All-In-One PC. In order for it to work, the following conditions must be met:
• The All-In-One PC must be booted up.
- Windows must be fully loaded.
- The driver software must be installed *.

(fig. remote control)
Button Layout
Note
The functions described here are standard functions. These Buttons can differ according to the operating mode (TV, video, photo, etc.).
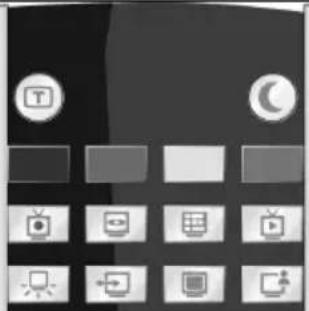 | Start video text application. | |
| Activate the Energy-saving mode | ||
| Special function Buttons red, green, yellow and blue (e.g.: for video text) | ||
| TV recordings | ||
| DVD Menu | ||
| EPG function (Electronic Program Guide) | ||
| Live TV – Starts the full image television mode | ||
| Switch the Comfort Light On/Off | ||
| Switch to AV source | ||
| Switch the screen On/Off | ||
| User-defined button | ||
 | Press + to increase the volume. Press - to lower the volume. | |
| With these navigation keys, you can navigate between selection and menu elements.Press the OK button to confirm. | ||
| +▲-▼Press + to select the next channel. You select the previous channel with -. | ||
 | Mute Switch (switches the sound output off). | |
| Reverts to the point selected previously. | ||
| Application-related information function. | ||
| Previous title/images/chapter | ||
| Next title/images/chapter | ||
| Starts Media Center. | ||
| Start recording | ||
| Pauses the playback at the selected point. | ||
| Ends the playback/recording |
 | ◀ | Rewind | |
| ▶ | Starts playback. | ||
| ▶ | Fast forward | ||
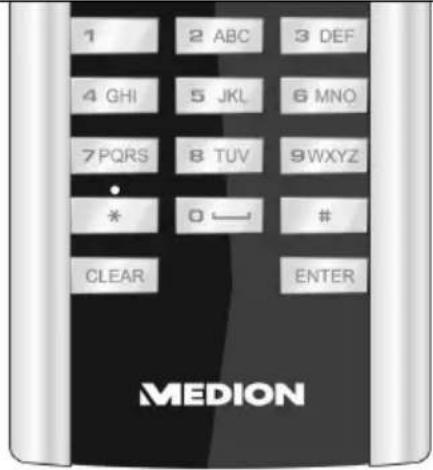 | Direct selection of the TV channels by means of numbers. Number entry in the case of some functions (video text, etc.). | ||
Programming the user-defined button
You can place any application that you would like to start directly by pressing a button on the user-defined button of the remote.
Proceed a follows to program the button:
- Click on the ☐ symbol in the information area of the Task Strip with a right mouse-click. A new window will open.
- Select the application that you would like to allocate to the button by means of the Search interface.
- Click on Save and confirm with OK after you have selected an application.
- Click on Quit, in order to close the program.
AV inputs
Connecting an external source to the All-In-One PC
You will also have the possibility of using the All-In-One PC as an output device through the back HDMI and VGA outputs. Connect a fixed disk external DVD recorder, an HD multi-media player, a PC and/or another All-In-One PC. Proceed as follows to do this:
Connecting an AV source
- With an HDMI cable
Connect an HDMI cable (not in the scope of supply) to the HDMI-IN of the the All-In-One PC and the HDMI output of the respective external device, provided that your AV device has an HDMI output.
No additional cble to transmit sound will be necessary, because this will take place through the HDMI cable.
- With a VGA cable
Connect a VGA cable (monitor cable; not supplied) to the VGA-IN of the All-In-One PC and the graphics card output of the PC or All-In-One PC.
Connect an audio cable to the audio output of the All-In-One PC and the audio output of the PC/laptop, if you also wish to transmit sound.
Changing the AV source
- Switch to the AV mode after you have made all the connections. Press the MODE operating button to do this.
- Press the MODE operating button several times to switch between the sources. The sources will be displayed in the following sequence:
HDMI IN → VGA IN → All-In-One PC → HDMI IN, etc.
The Network
Your All-In-One PC is provided with a Fast Ethernet-Network connector
You will find further information about networking in the Help section within the Start menu.
What is a Network?
A network means connecting your All-In-One PC to another or several other All-In-One PCs. Users can transfer information and data between computers and share resources such as printers, modems and hard disk drives.
Here are some practical examples:
- You can exchange Email and manage appointments in an office.
- Users share a printer in a network and save their data on a central server.
- Two or more All-In-One PCs can be connected to play network games or share data.

natural_image
Line drawing of a computer monitor with an attached device labeled 'MEDION AMOYA' and connected to a power outlet (no text or symbols on the device itself)Wireless LAN (optional)
Your All-In-One PC is equipped with WLAN. The components (Module, antenna) are already integrated and activated in your computer. You can turn off the wireless LAN function with the help of the Windows ® Device Manager.
This function allows you to create a wireless network link with a partner.
Safety Note
Attention!
Don't use this feature in environments where highly sensitive devices are placed such as in hospitals etc. To avoid any interference disable this option in your device manager.
Conditions
The partner used can be a wireless access point. An access point is a wireless transmitter that communicates with your notebook and controls access to the network connection (e.g., a home network or a broadband connection such as DSL).
Wireless access points are often found in offices, airports, universities or Internet cafés. They offer access to enterprise services and networks or to the Internet.
Access authorizations are normally needed. A fee may be required to use a public access point. To set up a wireless network to share Internet access, files, and printers at home, you will need an access point, a router, and a broadband (DSL or cable) modem. Some access points can also serve as a router and/or a broadband modem. Check with your retailer to find the best solution for your needs.
A link to another computer with wireless LAN functionality can also be created without an access point. This will allow you to share files, but you will need an access point and a router to share an Internet connection. The wireless network link works according to standard IEEE 802.11n and is compatible to standard IEEE 802.11 b/g. Other standards (802.11a etc.) are not supported.
The transmission speed (max. 300 Mbp/s * ) can vary according to distance and other factors. If for example the other devices support the 802.11b standard the transmission speed can be max. 11 Mbp/s.
Search for “wireless networking” in Windows Help and Support for more information.
Troubleshooting within the Network

Why does the network environment not show the releases?

The network environment is delayed in time. Check the release by searching for the respective computer name.

Why does an error message appear when I click on the network environment?

The computer name must be unique on the network and may not be the same as the task group.

It appears that the network boards are unable to communicate. What might be the problem?

Maybe one of the used network boards works with a different speed (e.g. 10 instead 100 Mbit) and your network computer is unable to recognize this. If necessary, set the network driver to the compatible speed.

If two All-In-One PCs should be linked you require a cross-link cable, otherwise use a patch cable.

In addition, check the protocols and the configuration.

The data transmission is incorrect or very slow. What might be the problem?

Maybe you have the wrong cable (UTP / CAT3 or lower) or the problem is the proximity of a power cord or another source of interference.
For further hints on troubleshooting refer to the Windows help under “Network errors”.
Bluetooth (optional)
Bluetooth wireless technology is designed to replace cables between devices, such as your printer, keyboard, and mouse.
Bluetooth wireless technology operates over a short distance. Bluetooth devices use radio transmission, which enables your computer, mobile phone, printer, keyboard, mouse, and other devices to communicate with each other without cables.
There are several uses for Bluetooth wireless technology, including, but not limited to:
- Creating a wireless connection to the Internet with a mobile phone.
- Transferring files between computers or between a computer and another device.
- Printing to a Bluetooth wireless printer.
- Using a Bluetooth wireless keyboard and mouse.
- Joining a personal area network (PAN).
- Synchronizing a personal digital assistant (PDA) to a computer or another device using Bluetooth wireless technology.
The data transfer speed for Bluetooth wireless technology can be up to 700 kilobits (Kbp/s) per second. The data transfer speed can vary depending on the device or environmental factors. A Bluetooth device can transmit through walls, pockets, and brief-cases.
Since Bluetooth is using the same frequency range as WLAN, simultaneous use might cause interference. If this should happen you can disable one service temporary.
The Bluetooth function can be activated/deactivated via the symbol ✝ in the taskbar.
Attention!
Don't use this feature in environments where highly sensitive devices are placed such as in hospitals etc. To avoid any interference disable this option in your device manager.
Securing the All-In-One PC
Unauthorized access to software and hardware solutions will be made available to you with your new All-In-One PC.
Startup Password
You can protect your All-In-One PC against unauthorized use with a switching on password. Then, an invitation to enter the password will appear on the screen when the All-In-One PC is switched on. The password will be set up in BIOS.
Warning!
Keep your password in a safe place. You will not be able to delete your password if you forget it. Contact your customer Service if you lose your password.
You can also use the security options of Windows ® , in order to protect your data against unauthorized access. You will find further information in the chapter “Data and System Security” starting on page 73.
Using a safety lock
You can prevent theft by using a so called Kensington® lock, which can be bought at your local retailer.
The cable wraps around an object and the "T" shaped end inserts into the Kensington lock port and a key or combination dial is used to secure the lock in place. Please keep your key in a safe place.

natural_image
Line drawing of a computer monitor with an attached cable, showing no text or symbols on the device itself.Software
This section concerns itself with software. We make a distinction between the operating system, the software (application program), Windows activation, BIOS and the security package BullGuard, which is delivered with the device.
Getting to Know Windows® 7
With Windows ® 7, is launching the new operating system and successor to Vista ® . Windows ® 7 contains a number of innovative functions and technologies, enabling your All-In-One PC to work quickly and reliably, while being easy to use.
Windows ® 7 - News
Improved Taskbar
The Taskbar at the bottom of the screen enables you to start programs and change between programs which are already running. Using Windows ® 7, you can place any program in the Taskbar, so that it will always open with one single click. You can also arrange the symbols on the Taskbar simply by clicking on them and dragging them to the desired position. The symbols are also considerably bigger, so that they are easier to use. Moving the cursor over the symbols will display miniatures of each file or each window open in the program. Moving the cursor over the miniature displays a full-screen preview of the particular window. Moving the cursor away from the miniature closes the full-screen preview.
Jump lists
Jump lists offer a practical possibility when opening files which you have recently worked on. To display recently used files, just right-click the application symbol on the Taskbar. Right-clicking on the Word symbol will display recently used Word documents. You can also easily place other files in the jump list if you would like to have them readily at hand, in which case they will always be displayed. This allows you to access documents which you use more frequently, with just a few mouse clicks.
The jump lists from a few programs, such as Windows ® Media Player, can be filled in advance with frequently used commands. Thus, for example, the Windows ® Media Player jump list might contain options to play all music or to re-open the latest play list.
The Internet Explorer jump list displays frequently and most recently visited websites. For certain programs, this enables rapid access commands which, in the past, could only be retrieved from the program itself, such as the command to create a new e-mail message.
Improved Desktop
Windows ® 7 simplifies working with the windows on the Desktop. This provides you with more intuitive possibilities for opening and closing, as well as for changing the size and for rearranging.
Windows ® 7 makes the performance of everyday tasks even simpler. For example, the Snaps function makes it easier than ever to compare two open windows. You do not need to adjust the size of the open window for comparison. Simply pull the window, using the mouse, to one of the edges at the side of the screen, and it will fill half the screen. Snap the window on both sides, and it is already easier than ever to compare two windows.
If you would like to display all Desktop mini-applications, simply move the mouse into the lower right hand corner of the Desktop. This makes all open windows transparent, so that the Desktop and all the mini-applications located on it will be instantly visible.
Click on the Titlebar of the window, "shake" it, and all open windows will be displayed as symbols on the Taskbar. "Shake" the window again, and the other windows will be displayed again.
Better device management
Windows ® 7 enables you to close, manage and use all devices through the "Devices and Printers" central function.
All devices are displayed in a central position.
With the new Device Stage Technology, Windows ® 7 even goes one step further in device management. Device Stage helps you use all compatible devices connected to your computer. Thanks to Device Stage, now you display the device status in one single window and carry out often-used commands. You will even find pictures of the devices here, easily enabling you to see which devices are connected. The manufacturer of the devices can even adapt Device Stage. If the manufacturer of your camera, for example, prepares an adapted version of Device Stage, you can see the number of photos on the camera and receive links to useful information when you link the camera to the All-In-One PC.
Homegroup
With homegroups, a new function of Windows ® 7, the linking of home computers is really simple. A home network group is created automatically, for example, when you link the first All-In-One PC under Windows ® 7 with the home network. The addition of additional All-In-One PCs with Windows ® 7 to the home network group is quickly accomplished. You can indicate exactly what should be released on each All-In-One PC for all other All-In-One PCs in the home network group. Finally, the shared use of files on the various home All-In-One PCs, and on many other devices, is so simple that it is as if all files were located on one single hard drive. This allows you to store digital photos on the computer in your home office and then enjoy easy access to them from a laptop in any other room in the house. Similarly, the printer in home office is automatically released for all All-In-One PCs in the house, as long as they are all in the home network group.
Beginners and persons changing from other Windows versions systems are advised to read this material carefully.
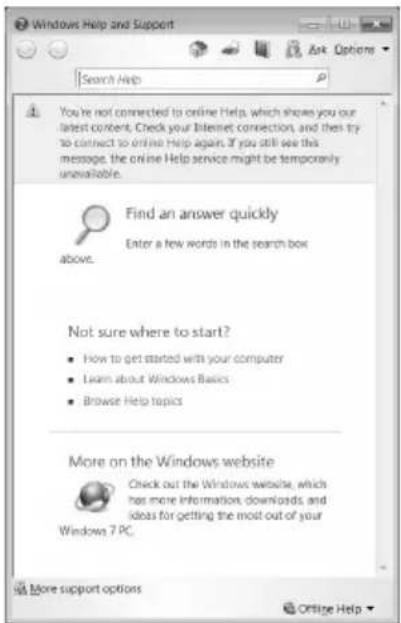
Windows ® 7 - Help and Support
An answer to almost every question can be found in this program.
This help function fully covers the Windows operating system.
It is helpful for both beginners and professionals. You can print or bookmark the information, which is categorized into topics. You start like this:
- Click on Start

- Now select Help and Support

Windows ® 7 – Getting Started
Learn everything you need to know about the features of the All-In-One PC.
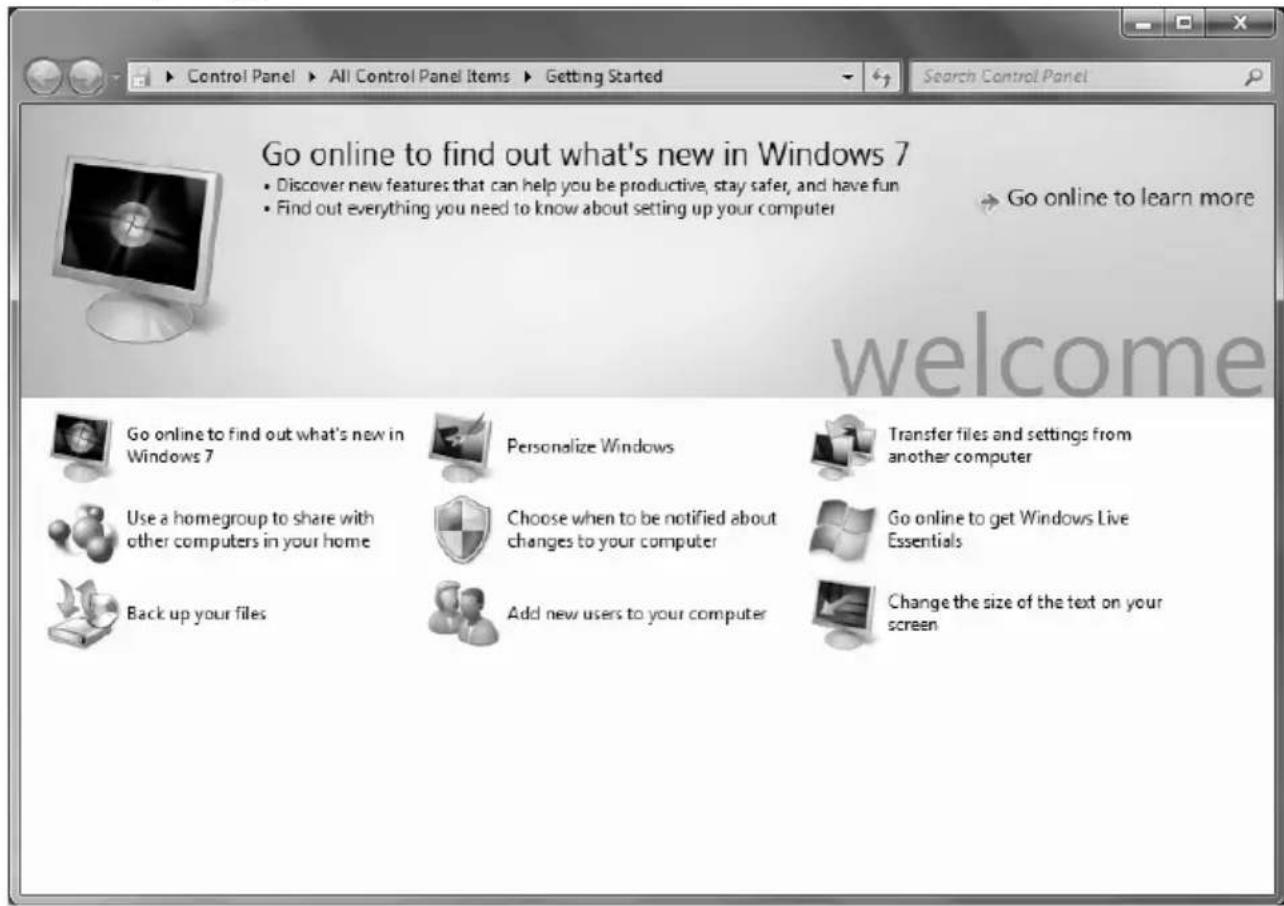
It is the aim of this feature to enable both beginners and experienced users to make additional setting for the optimal use of Windows®7 after first bringing the Notebook into operation.
Getting Started has been subdivided into many small groups of subjects, so that the user will have the possibility of adjusting the content optimally to his or her knowledge. There are some of the links in the following:
- Go online to find out what's new in Windows®7
- Personalize Windows
- Transfer files and settings from another computer
- Use a homegroup to share with other computers in your home
- Choose when to be notified about changes to your computer
- Back up your files
- Add new users to your computer
- Change the size of the text on your screen
Use Getting Started to understand your All-In-One PC better and in order to be able to use it optimally. It will also serve you as an additional source of information for recognizing and removing potential problems.
You will call up Getting Started as follows:
- Click on Start

- Select

Getting Started in the Program List.
Windows ® 7 - User Account Control
The User Account Control contributes to the prevention of unauthorized changes to the All-In-One PC.
A window with the message “Do you want to allow the following program to make changes to this computer?” will appear as soon as you carry out an unauthorized change.
- Click on Continue, in order to continue the procedure.
- Click on Cancel, in order to end the procedure.
Windows ® 7 - Control Panel
You can change Windows settings using the control panel. The settings control almost everything relating to Windows displays and functionalities, and they enable you to organise Windows according to your requirements.
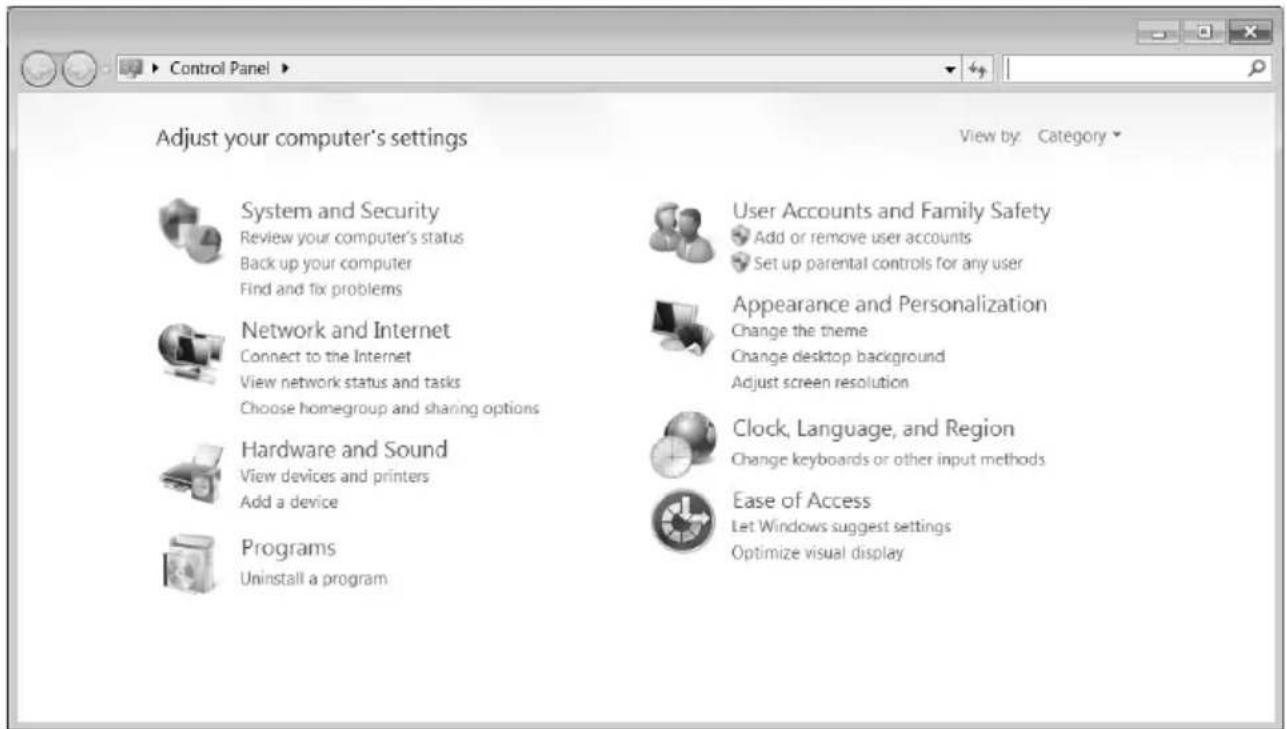
When you first open the Control Panel, a few of the most frequently used elements of the Control Panel are displayed by category.
For further information on any element in the Control Panel category view, hold the cursor over the symbol or category name and read the pop-up display text.
To open one of these elements, click on the associated symbol or category name.
For a few of these elements, a list, with executable tasks will open, with a selection of individual Control Panel elements.
Searching for the desired control elements may be effected in the following ways:
- Enter a word or expression in the search field.
- Click on Large Icons or Small Icons under Display Settings to display a list of all Control Panel elements.
Windows Media Center
The Windows Media Center is the platform for your individual home entertainment in Windows Vista. You will be able to record television, TV broadcasts, DVDs and music, look at photos and much more by a remote (not included in the scope of the delivery) or by a click of the mouse, with the Windows Media Center.
You will start your individual entertainment as follows:
- Turn on your All-In-One PC.
- Click on Start
- Click on Windows Media Center.
An overview of the Windows Media Center functions is below:
| Main menu Sub-menu | |
| TV + Films Recordings | You will have the possibility of recording broadcasts if you connect a TV tuner. You can play back the broadcasts recorded, delete them or burn them on external media through this Menu point. |
| Play back DVDYou will play DVDs through this Menu point. | |
| Set up TVYou will have the possibility of configuring the TV signal here, if you have an external TV tuner available. | |
| Online Media Programmes | This library of programmes offers a listing of various online media. You will call up content through the Internet, from the online video library, through news portals to the music shop, by means of the online media. An existing Internet connection is the requirement for the use of this function. |
| Tasks | SettingsAdapt the Windows Media Center to your requirements and needs here. For example, make the settings for the protection of children here. |
| Stand byYou will not only close the Windows Media Center but you will be able to put the whole operating system in stand-by through this sub-menu. Pay attention that all applications have been already closed before putting the system into stand-by. | |
| Burn CD/DVDCall up your burning software to start a burning process through this sub-menu | |
| SynchronisingIf you connect an external device, such as an MP3 player or a digital camera; you will be able to synchronise the respective data to an external device with the notebook through this sub-menu. | |
| Extension set-upYou will be able to set up a Windows Media Center extension by means of this sub-menu. You will be able to access the data on your notebook by means of a cable or wireless network. | |
| ‘Only media’You will switch to the full image of the Media Center by means of this sub-menu. | |
| Images + Videos Library of imagesAll the images stored in your notebook will be located in the library of images. Start the playback in a slide show here. | |
| Main menu Sub-menu | |
| Music | Music libraryAll the music titles stored in your notebook will be located in the music library. You will be able to start the selected play-back of an album, an artist or a selected title here. |
| Play back everythingYou will start the playback of all the files stored in your music library by means of this sub-menu. | |
| RadioYou will have the possibility of listening to a radio broadcaster and to administrate it, if you have external radio tuner hardware available. | |
| SearchYou will be able to search for music titles, composers, artists, albums, etc. in a targeted way by means of this sub-menu.The search will start as soon as you have entered the first letters. | |
Installation of Software
Note
If your operating system is configured so that the installation procedure accepts only signed drivers (default) and software an information screen will appear.
The software included in delivery is already pre-installed in the factory.
Attention!
You may find that during the installation procedure important files may be changed or even cancelled. To avoid further problems in using older files after an installation, make sure you safeguard your hard disk. See page 73 for further information regarding data backup.
How to Install your Software
Please follow the instruction of the software vendor. We will describe a typical installation. Once you insert a CD, the installation menu is started automatically.
Note
If the automatic start does not work, it is likely that the so-called Autorun function has been deactivated. Read the respective chapter in Windows Help on how to activate this function.
An example for the manual installation without the autorun function:
- Click on Start
- Click on ▶ All Programs.
- Open the Accessories program point.
- Select the item Run.
- Now enter the letter of the CD-ROM drive followed by a colon and the program name setup:

- Click on "OK".
- Follow the instruction given by the program.
Software Uninstallation
In order to remove installed software from your All-In-One PC, follow the next steps:
- Click on Start
- Click on Control Panel.
- Then select the Programs option.
- Select the respective program, start the uninstallation and follow the instructions on the screen.
Windows Activation
Microsoft is committed to the protection of intellectual property rights and the reduction of software piracy. Therefore Windows ® 7 contains software-based product activation technology. Your copy of Windows ® 7 has already been activated for your All-In-One PC.
Product activation is needed if some components of your All-In-One PC have been replaced or you use a non-authorized BIOS. If necessary you can activate Windows Vista * as often as requested.
You will probably need to activate Windows ® 7 by telephone even if Internet Activation is available. This is due to the pre-activated SLP version which runs with a special Product-ID. However, activation needs your unique Product ID which can be found on the Certificate of Authenticity sticker on your All-In-One PC housing. When you call, please inform your agent that you are running an OEM-(SLP) version of the software.
Product Activation on your All-In-One PC
In few cases it may still be required to activate Windows ® 7. If an activation via the internet is acknowledged with an error message you should perform the following steps.
- Please select the telephone activation and click until the related screen appears.
- Now click on change product key. A new window appears. Enter the product key. This is located on the Certificate of Authenticity (COA), on the computer's casing.
- Acknowledge your entry and follow the instructions on the screen. Notify your Microsoft consultant, if necessary, that you have an OEM license in connection with your All-In-One PC.
BIOS Setup
In the BIOS set up (your All-In-One PC's Basic Configuration) you have a number of parameter settings available for your All-In-One PC. For example, you can change the operating mode of the interfaces, security features or power management.

The All-In-One PC is factory pre-set to guarantee optimum operation. Please only modify the parameters if this is absolutely essential and if you are familiar with the configuration possibilities.
Execution of the BIOS Setup
You can only execute the configuration program when starting the system. If the All-In-One PC has already been started exit Windows 4 and reboot. Prior to rebooting the All-In-One PC press the key “F2” and keep it pressed until the message “Entering Setup” appears.
Chapter 4
Customer Service & Self Help
Subject
Page
Data and System Security 73
System Restore 74
FAQ – Frequently Asked Questions 77
Customer Service 79
Upgrades and Repairs 83
Recycling and Disposal 84
Data and System Security
The programs described below are part of your Windows operating system. You can find additional information on these programs in the Windows Help file.
Please also read the notes on page 4.
Data Security
Back up data regularly on external media such as a CD-R or CD-RW. Windows offers Backup Status and Configuration.
This program is found in Accessories System Tools within the Start menu. You should make a backup disk with all your passwords and the operating system's original configuration.
Maintenance Programs
You can avoid some hardware and software errors with the help programs such as Disk Defragmenter and Disk Cleanup. The help program System Information can also be helpful as it gives you detailed information about your system configuration. You can also find these programs in Accessories System Tools too.
System Restore
Windows ® 7 provides a useful function (System Restore) enabling the storage of the so-called Recovery points.
The system remembers the current configuration as a snapshot and returns to this, if necessary. The advantage is that an unsuccessful installation can be cancelled.
Recovery points are created automatically by the system, but they can also be set manually.
You can determine and configure yourself the maximum memory taken up by this. You find this program in the program file under Accessories System Tools.
We recommend setting a recovery point before installing new software or drivers. At this point if the system does not run properly this recovery point should enable you to return to a workable configuration without deleting newly created documents. In the next paragraph you will find your options for the repair of an incorrect installation.
Correction
Windows ® 7 includes various functions ensuring that the All-In-One PC as well as the installed applications and devices work correctly.
These functions assist you in solving the problems which might occur by adding, deleting or replacing files required for the functionality of the operating system, the applications and devices. The recovery function or functions you use depend on the type of occurring problem or error. For detailed information refer to the Windows help.
Windows® Update
Windows Update is the online updating of Windows. Use Windows Update to download elements such as security updates, important updates, the newest help files, drivers and Internet products from the Internet.
The website is regularly augmented by new content, so that you can download the newest updates and error corrections at any time, to protect the All-In-One PC and guarantee its functioning.
Windows Update will search through the All-In-One PC and provide a list of individual updates especially for the configuration of your All-In-One PC.
Each update that Microsoft regards as important for the operation of the operating system, programs or hardware components will be classified as an “important update” and automatically selected for installation for you.
Important updates will be provided to remove known problems and to protect the All-In-One PC against known security risks.
Carry out four simple steps, to download the updates needed and to keep your computer on the current status of technology:
- Click on Start
- Click on ▶ All Programs.
- Open Windows Update.
-
Click on Check for update.
-
Click on Add to select the desired update and to add it to the updates to be installed, while you are searching through the available updates in each category. You can also read a complete description of each individual element by clicking on the Read further Link.
-
Click on Check and install updates, when you have selected all the desired updates, and then click on Install now.
Windows Update Information for Data Security
Windows Update needs certain information about the respective All-In-One PC, so that a suitable list with updates can be provided for you. This information will include the following:
- Version number of the operating system
• Version number of Internet Explorer - Version numbers of additional software programs
- Plug & Play identification key of the hardware devices
Windows Update will stand up for the protection of your private data and will not record your name, address, email address or other forms of personal data. The information collected will only be used during the time that you are visiting the website. It will also not be stored.
The update can only be executed via the Internet. Ensure that you are on-line with your All-In-One PC when downloading the updates.
System Restore
If your system is not functioning properly, you should use the Application Support Disc to restore your system.
Limits of the Recovery
- Changes made to the original configuration (RAS, Desktop or Internet settings) and installed Software will be ignored by this Recovery and will not be re-loaded.
- Driver Updates or hardware installed by you will be ignored by this Recovery.
Carrying out a Restore
- Remove any mass storage devices you may be using (memory cards, USB sticks, etc.).
- Switch on the All-In-One PC.
-
Press the corresponding key when you see the message "Press F11 to run recovery" or "Press F12 to run recovery".
After a few seconds, the message "Windows is loading files" will appear. Wait until the files are loaded. The "Power Recover" menu will then appear. -
Select the language of the restoration menu.
-
Click on "Next".
-
You may now choose between two forms of restoration:
- Restore to HDD – no backup of user data All data on the All-In-One PC are irretrievably erased, restoring delivery condition.
- Restore to HDD – with backed up user data Delivery condition is restored and all user data under C:\User are preserved.
Warning!
When using the option with backed up user data, the restoration procedure takes a long time. Data are only preserved if they are located in the C:\user folder. All other data will be erased. For this reason, you must perform regular backups on external data carriers. We will not be liable for data loss and/or consequential damages.
- Click on Next and follow the further instructions, which will appear on the screen, to restore the delivery condition.
FAQ – Frequently Asked Questions

When do I have to activate Windows?

Your software has been preactivated in the factory. An activation will only be required, if ...
... several components are replaced by others.
... you install a new motherboard.
... a different BIOS version has been installed.
... you install the software to another computer.

Where do I find the necessary drives for my All-In-One PC?

The drivers are on the second partition of the hard disc in the directories Driver and Tools.

What is the Windows activation?

Your operating instructions include a chapter about this subject.

How do I perform a data backup?

Make a backup and another backup of selected data to an external medium (CD-R), to familiarise yourself with the technique.
A backup is unsuitable if you are not able to recover the data, the medium (CD-R, CD-RW) is defective or no longer available.

Do I still have to install the enclosed CDs/DVDs?

No. Basically all programs are already preinstalled. The disks are only intended as backup copies.

When is the recovery of the factory setting recommended?

This method should be chosen as the last resort. Read chapter "System Restore" on page 74 concerning the alternatives possible.
Customer Service
Troubleshooting
Errors can have simple causes, but sometimes they are caused by faulty equipment. We would like to give you some ideas to solve common problems. Should these instructions not lead to success, please feel free to call us.
Localise the Cause
Visibly check all cables and connections. Should all lights be off, check whether all equipment is supplied with power.
- Check power points, power cable and all power switches.
- Switch off the All-In-One PC and check all cable connections. Check the connections to peripherals. Do not exchange cables, even though they may look similar. The polarity in those cables may be different. When it is confirmed that the computer has power and all connections are correct, turn the computer on again.
Frequent use of the programs Disk Defragmenter and Disk Cleanup will help you to avoid problems with your operating system.
The tool "System Information", available in the program folder "System Tools" is also very useful.
Errors and Possible Causes
The monitor is blank.
- Confirm that the system is not in stand-by mode. Press any key on the keyboard to test this out.
Wrong Date and Time:
- Click the clock on the taskbar and correct the date and time.
After a system restart a new drive letter is assigned to the cards in the card slots.
- This can happen, when the card reader re-initializes the slots during a system start. New IDs might be assigned, which can lead to new drive letters for some cards.
No data can be accessed from the optical drive.
- Check whether the disc is inserted correctly.
- Is the optical drive displayed in Windows Explorer? If so, test another disc.
The mouse does not work.
- Check the cable.
- Is the mouse functioning in another application program? Is the mouse deactivated in "Device Manager"
- Are the batteries empty? Insert new batteries of the same type.
There is not enough room on the HDD.
- Audio or video recordings need a great deal of memory (between 1 and 2 GB/hour). Safeguard files that you do not need on external media, such as DVD/CD-Rs or hard drives or other external media e.g. the MEDION hard drive HDDrive 2go.
Additional Support
If the suggestions in the above section have not solved your problem, please contact the service hotline and we will attempt to help you solve the problem. Before you contact the Technology Centre, however, please have the following information available:
• How is your computer configured?
• What additional peripherals do you use?
• What messages, if any, appear on your screen?
- What software were you using when the error occurred?
• What steps have you already undertaken to solve the problem?
- Have you upgraded or removed drivers or hardware?
- Can you manually repeat the problem?
- If you have been given a customer number previously, please quote this.
Driver Support
This All-In-One PC has been extensively tested in our laboratories with a large number of compatible devices. It fulfils all required standards and complies with the standard “Designed for Windows”, which certifies utmost compatibility.
However, often the software drivers for individual components are updated from time to time. This is a regular process provided by the manufacturer to mend possible compatibility problems that may occur with components (e.g., programs or hardware) that were not tested at the time of your All-In-One PC's manufacture. Driver updates and the latest information on your product are available on the Internet.
Visit Medion on the Web at www.medion.com
Transporting the All-In-One PC
Please observe the following guidelines when transporting the All-In-One PC:
- To avoid damage during transport, store the All-In-One PC in its original packaging.
Cleaning and Care
The lifetime of the All-In-One PC can be extended by taking the following measures:
Warning!
There are no user-serviceable or user-cleanable parts inside the All-In-One PC housing.
- Before cleaning, always pull the mains cable and all connection cables. Clean the All-In-One PC with a damp, lint-free cloth.
- Dust can clog the air vents, leading to overheating and malfunctioning. Check at regular intervals (about every 3 months) that all air vents permit sufficient air circulation. Use a Hoover to keep the air vents clear of dust. If your device regularly sucks in a great deal of dust, we also recommend that the interior of the All-In-One PC housing be cleaned by a professional.
- Do not use solvents, caustic or volatile cleansers.
- Before cleaning, always remove the power plug and all connecting cables. Clean the All-In-One PC with a damp, lint-free cloth. Do not use any solvents, corrosive or gaseous cleaning agents. Do not use CD-ROM cleaning disks or similar products that clean the lens of the laser to clean your CD-/DVD-drive.
Note
Protective foil is on the surfaces to protect the device against scratching during production and transportation.
Pull off all the foil after you have set up the device correctly and before bringing it into operation.
Upgrades and Repairs
- Only a qualified engineer should perform upgrades and repairs to your All-In-One PC.
- If you do not have the necessary qualifications, go to an appropriate Service Engineer. Please contact our Service Centre if you are experiencing technical problems with your All-In-One PC.
Notes for Service Engineers
- Before opening the housing, disconnect the All-In-One PC from all power sources and remove any connecting cables. If the All-In-One PC has not been disconnected from the power outlet before being opened, there is a danger to life through electric shock. There is also a risk of damage to the components.
- Internal components of the All-In-One PC may be damaged by electrostatic discharge (ESD). Carry out system upgrades and changes in an ESD-protected workshop.
If no such workshop is available, wear an antistatic wrist strap or touch a highly conductive metal object. Medion can repair damage sustained by inappropriate handling for a fee.
- Use only original spare parts.
Caution!
Lithium batteries can not handle intense pressure, high temperatures or fire. There is a danger of explosion if replaced incorrectly. Replace batteries with a compatible type as recommended by the manufacturer.
Lithium batteries are hazardous waste and require proper disposal. Contact the Service Centre for additional information on battery disposal.
Notes on Laser Radiation
- Laser devices of Laser Class 1 to Laser Class 3b may be used in the All-In-One PC. Where the All-In-One PC housing remains closed, the device meets the requirements of Laser Class 1.
- By opening the All-In-One PC housing you will gain access to laser devices of up to Laser Class 3b.
When removing and/or opening laser devices, the following guidelines must be observed:
- The CD-ROM-/CDRW-/DVD-drives installed contain no user-serviceable parts.
- Only the manufacturer should perform repairs to the CD-ROM-/CDRW-/DVD-drives.
- Do not look into the laser beam, even while wearing optical protection.
- Do not allow yourself to be exposed to the laser beam. Avoid exposure of the eyes or skin to direct or stray radiation.
Recycling and Disposal
Device

At the end of its life, the appliance must not be disposed of in household rubbish. Enquire about the options for environmentally-friendly disposal
Batteries

Do not dispose of used batteries in the household rubbish! They must be deposited at a collection point for used batteries.
Packaging

To avoid damage during transport, the All-In-One PC is stored in protective packaging. The packaging is produced mostly from materials which can be disposed of in an environmentally friendly manner and therefore can be professionally recycled.
Should you have any questions concerning the disposal please contact your dealer or our service.
Chapter 5
Appendix
Subject
Page
Information about conformity 87
Conditions of Warranty 91
Index....96
Information about conformity
The device fulfils electromagnetic compatibility and electricity safety requirements.
Your device complies with the basic requirements and the relevant guidelines of the 2004/108/EU EMV Guidelines [electromagnetic compatibility] and the 2006/95/EU Guideline for low voltage devices.
This device fulfils the basis requirements and the relevant regulation of the Ecodesign Guideline 2009/125/EG (Commission Regulation 1275/2008).
ISO 13406-2 Class II
Active matrix LCDs (TFT) with a resolution of 1920 x 1080 pixels which are in turn composed of three sub-pixels each (red, green, blue), contain about
6.2 million addressable transistors. Because of this very high number of transistors and their extremely complex production process occasionally defective or incorrectly addressed pixels or sub-pixels may occur.
There have been several attempts in the past to define the acceptable number of defective pixels. But this can be difficult and varies widely between different manufacturers.
We, therefore, adhere to the clear and strict requirements of ISO 13406-2,
class II, for the warranty handling of all TFT display products. These requirements are summarized below.
Within ISO-standard 13406-2 the general requirements regarding pixel defects are defined. Pixel defects are classified into three failure types and four failure classes. Each individual pixel is made up of three sub-pixels in the primary colours (red, green, blue).
Pixel structure

Types of Pixel Failures:
- Type 1: A constantly lit pixel (a bright, white spot), even though it is not addressed. A white pixel is caused when all three sub-pixel are lit.
- Type 2: A pixel that does not light up (dark, black spot), although it is addressed
- Type 3: Abnormal or defective red, green or blue sub-pixels. (E.g. constantly lit with half the brightness, one colour is not shining, blinking or flickering, but not belonging to Type 1 or 2 Pixel Failures)
In addition: A cluster of type 3 (= 2 or more defective sub-pixels in an array of 5 x 5 pixel). A cluster is an array of 5 x 5 pixel (15 x 5 sub-pixel).
ISO 13406-2, Class II
| Resolution Type 1 | Type 2 | Type 3 | Cluster | Type 1, Type 2 | Cluster Type 3 |
| 1024 x 768 2 2 | 4 | 0 | 2 | ||
| 1280 x 800 3 3 | 6 | 0 | 3 | ||
| 1280 x 854 3 3 | 6 | 0 | 3 | ||
| 1280 x 1024 3 3 | 7 | 0 | 3 | ||
| 1366 x 768 3 3 | 7 | 0 | 3 | ||
| 1400 x 1050 3 3 | 8 | 0 | 3 |
Example:
A 17" (approx. 43 cm) - SXGA-display consists of 1280 horizontal and 1024 vertical picture dots (pixel), which amounts to a total of 1,31 million pixels. Based on one million pixels this translates into a factor of about 1.31.
Class II type failure consequently allows for three defects each of type 1 and type 2 and 7 defects of type 3 and 3 cluster of type 3.
These cases are normally not covered by warranty.
If the number of failures exceeds the figures of any category mentioned above then this may be covered by the warranty.
Information about the Regulatory Compliance according to R&TTE
The following remote equipments may have been supplied with this All-In-One PC:
- Wireless keyboard (optional)
- Wireless mouse (optional)
- Remote Control (optional)
- USB receiver (optional)
- Wireless LAN (optional)
- Bluetooth (optional)
Due to the capacity of the built-in wireless LAN solution (> 100 mW) the device may only be used within buildings in France.
Currently none of the other EU-countries have any restrictions. For use in other countries please obtain information about the applicable regulations locally.
The company declares herewith that these devices are in agreement with the fundamental requirements and the other relevant terms of the 1999/5/EG Guideline. Complete declarations of conformity are available under www.medion.com/conformity.

FCC Compliance Statement
This equipment has been tested and found to comply with the limits for a Class B digital device, pursuant to Part 15 of FCC Rules. These limits are designed to provide reasonable protection against harmful interference in a residential installation. This equipment generates, uses, and can radiate radio frequency energy and, if not installed and used in accordance with the instructions, may cause harmful interference to radio communications. However, there is no guarantee that interference will not occur in a particular installation. If this equipment does cause harmful interference to radio or television reception, which can be determined by turning the equipment off and on, the user is encouraged to try to correct the interference by one or more of the following measures:
- Reorient or relocate the receiving antenna.
- Increase the separation between the equipment and receiver.
- Connect the equipment into an outlet on a circuit different from that to which the receiver is connected.
- Consult the dealer or an experienced technician for help.
Changes or modifications not expressly approved by the party responsible for compliance could void the user's authority to operate the equipment. Shielded interface cables, if any, must be used in order to comply with the emission limits.
Restricted Warranty
I. General Conditions of Warranty
1. General
This warranty covers defects relating to workmanship and manufacture in MEDION products. The period during which this warranty is valid and during which claims against the warranty can be made to MEDION must be in accordance with the following terms in order to be considered eligible:
- Is effective from the date of purchase or receipt of the MEDION product from an authorised seller of MEDION products; and
- expires at the end of the warranty period specified on the warranty card provided with the product.
For the warranty to be valid, you must:
- provide suitable evidence of purchase, a copy of the original purchase receipt from an authorised seller of MEDION products is preferred; or
- register your product within 28 days of purchase either online at www.MEDION.co.uk or by completing and returning the pre-paid registration card included with the product.
Please keep the original purchase receipt and the warranty card in a safe place.
MEDION and its authorised sellers reserve the right to refuse a repair under warranty or a warranty confirmation if a proof of purchase [or registration of purchase] cannot be established, or has not been, submitted.
When it is necessary to return your product for repair please ensure that your product is suitably packed for transportation.
Provided that your product is still within warranty (please check the duration of the warranty period as described above) and is eligible for repair or replacement under the terms of the warranty, to return your product, please telephone MEDION on the service hotline number. You will be sent a pre-paid transportation box suitable for returning your product to MEDION. PLEASE MAKE SURE THAT YOU HAVE A BACKUP COPY OF ALL DATA ON THE PRODUCT BEFORE RETURNING THE PRODUCT TO MEDION.
MEDION shall bear the costs of postage and packaging for returning the product and the transportation risk. However, if following examination of the defective product in question, MEDION, in its reasonable opinion, considers that the defect has been caused by:
- your operating and/or using the product other than as instructed in the accompanying documentation;
- damage caused in transit as a result of your negligence in packaging of the product; and/or
- otherwise than in accordance with the terms of this warranty;
This warranty shall be void and you may be required by MEDION to reimburse MEDION for the reasonable costs of postage and packaging before MEDION will return the product to you. If so and you would still like MEDION to repair or replace the product, MEDION may do so but you will be charged MEDION's standard rates for repair and replacement for this service.
Before returning the product, please contact MEDION via the service hotline or via the internet (www.MEDION.co.uk). You will receive a reference number (RMA No.) on the warranty card. Please mark the outside of your package to ensure that this reference number is clearly visible. Please submit a letter containing as much detailed information as possible and, a full description of the defect or fault.
This should include:
• a description of the fault;
- when it occurred, how long it has been evident and how frequently it occurs;
- any errors message(s) displayed when using the product;
- a description of the circumstance(s) and conditions in which the fault occurs; and
- whether it is an intermittent or persistent fault;
This will greatly assist MEDION in identifying the defect, when submitted together with the defective product.
Unless otherwise instructed by a MEDION representative in all cases, the product must be returned complete with all parts which were included with the original product. Incomplete contents of the returned package may lead to a delay in the repair or replacement. MEDION does not accept any liability for any additionally submitted material(s) which were not supplied with the original MEDION product.
This warranty does not affect your statutory rights in any way and is subject to the applicable legal statutes of the country where the product was sold to you by an authorised MEDION seller.
2. Scope
Subject to any exclusions set out within this warranty, where there is a defect in your MEDION product covered by this warranty, MEDION will repair or replace the MEDION product. The decision whether to repair or replace the product will be made solely at the discretion of MEDION. MEDION may, in its own discretion, replace the product returned for repair under warranty with a replacement product that is either identical or, in the event that such product(s) are no longer available, a product of equal or superior specification and quality.
No warranty is given for batteries or rechargeable batteries or for consumable materials subject to wear and tear, i.e. for parts which have to be replaced periodically during the normal use of the product, such as video-projector lamp.
Non critical failures that fall within industry specified tolerances e.g. noise, LCD pixels are not covered by this warranty. Please consult the appropriate section in your user or instruction manual for this product for exact specifications and tolerances.
To the extent which is permitted under law, MEDION will accept no liability for burnt-in images on plasma or LCD products as a result of normal wear and tear during the operation of the product. Please refer to your user or instruction manual for this product for detailed operating instructions for your plasma or LCD product.
The warranty does not cover errors relating to the playback of data media in an incompatible format or created with unsuitable software.
If it is found during repair or assessment that the defect concerned is not covered under warranty, MEDION reserves the right to invoice you for all reasonable costs incurred by MEDION. These costs will be in relation to the return of the product, including reasonable administration costs, plus reasonable costs for materials used and labour provided when repairing or replacing the product. This is subject to MEDION providing you with an estimate for carrying out such work prior to costs being incurred and that you have accepted the estimate.
You are entitled to seek independent advice or consultation relating to your product or any of MEDION's findings. MEDION will not be liable for any costs incurred to you when doing so.
3. Exclusion from warranty
To the extent permitted by law, this warranty shall be void in the event that defects or loss caused by:
a. failure and damage resulting from the operation of the product in an environment other than that recommended in the accompanying user or instruction manual (e.g. in direct sunlight or in a damp room);
b. accidental damage;
c. use other than in accordance with the accompanying user or instruction manual;
d. modifications, conversions, expansions, maintenance and/or repairs made to the MEDION product by unauthorised repairers or use of unauthorised third party parts;
e. negligence;
f. virus attack or software errors; or
g. improper transportation or packaging during return of the product.
This warranty will also be considered void if labels or serial numbers of the product or of a component of the product are modified or made illegible.
To the extent permitted by law, MEDION shall; only be responsible for losses which are a reasonably foreseeable consequence of the relevant defect in the product; MEDION will not be responsible for any costs incurred in relation to software configuration; economic loss; loss of opportunity; loss of income; or loss of data or software arising out of its repair or replacement of a MEDION product under this warranty
4. Service Hotline
Before returning the product to MEDION you must contact us using the service hotline or via the internet (www.MEDION.co.uk). You will receive further instructions for making your claim under warranty when you call.
The service hotline is available on 362 days in the year, including Sundays and bank holidays but excluding Christmas day, New Years Day and Easter day. The service hotline is subject to [national rate] telephone call charges. These charges are subject to change. The price of your call will be stated at the beginning of the call.
II. Special warranty conditions for MEDION PC, notebook, pocket PC (PDA) and navigation devices (PNA)
The following terms apply to MEDION PC, notebook, desktop, pocket PC and laptop products and optional items included with such products. If one of these items has a fault, you also have a warranty claim for its repair or replacement, from MEDION. The warranty covers the costs of materials and labour for repairing or replacing the defective MEDION product or the optional item in question.
Hardware connected to your product that was not produced or marketed by MEDION can invalidate the warranty if MEDION can reasonably demonstrate that damage to the MEDION product or of the optional item included with the delivery was caused by such hardware. You are entitled to seek independent advice or consultation relating to your product or any of MEDION's findings. MEDION will not be liable for any costs incurred to you when doing so.
This warranty is restricted in relation to any pre-installed operating system as well as to application programme software that is included with the MEDION product in question. This warranty is restricted as follows:
For pre-installed operating system as well as to application programme software included in the MEDION product, MEDION only guarantees the data media (e.g. the diskettes and CD-ROMs) upon which this software is delivered and warrants that such data media shall be free from material and processing defects for a period of 90 days from the date of purchase of the MEDION product from an authorised seller of MEDION. MEDION will replace defective data media free of charge.
Any claims in respect of defective pre-installed operating system as well as to application programme software are hereby expressly excluded and you should contact the relevant licensor or copyright owner of the defective software in question. MEDION does not guarantee that any software supplied with MEDION products will function without interruption, will be free from errors or that it will fulfil your requirements. MEDION does not guarantee the 100% accuracy of the maps provided with the Navigation device.
It may be necessary to delete all data in the product in order to repair the MEDION product. PLEASE MAKE SURE THAT YOU HAVE A BACKUP COPY OF ALL DATA ON THE PRODUCT BEFORE RETURNING THE PRODUCT TO MEDION. To the extent permitted by law, MEDION excludes all liability for loss of data and MEDION recommends in all cases that you back up all data on your MEDION product before returning the product to MEDION.
III. Special warranty conditions for repair on site or replacement on site
If a claim for repair or replacement on site is included within the terms of the warranty card provided with the product, the special warranty conditions for repair or replacement of your MEDION product on site apply.
The following provisions must be made by you for carrying out repairs or replacements on site:
- MEDION or its authorised personnel must have unrestricted, safe and immediate access to the products.
- Telecommunication facilities required by MEDION or its authorised personnel for proper execution of your order, for testing and diagnostic purposes and for remedying faults are provided by you at your own expense.
- You are responsible yourself for restoring the application software after the repair services have been carried out by MEDION or its authorised personnel.
- You must take all other necessary steps to enable MEDION or its authorised personnel to carry out your order properly.
- You are responsible yourself for connecting and configuring any existing external peripheral products after MEDION or its authorised personnel have carried out their repairs.
- The free cancellation period for repairs or replacements on site is 24 hours, thereafter our reasonable costs resulting from late or missing cancellation shall be invoiced at your expense.
Making Copies of this Manual
This manual contains information protected by law. All rights reserved. Duplicating this information in mechanical, electronic, or any other form, without the written approval by the manufacturer, is prohibited by copyright law.
Index
A
All programs 20
Ambient temperature 7
Anpassung 29
Anzeige 29
Appearance and Personalization ..... 28
Autorun....66
AV inputs 51
B
Battery treatment 6
BIOS Setup 69
Bluetooth 55
C
Cabling....4
Card Reader 41
Care....82
Carrying out a Restore 77
CD-ROM....37
Cleaning....82
Cleaning agents 82
Cleansers 27
Connectors External monitor .... 29
Control panel 62
Disk Management 35
Customer service 79
D
Data and system security ...... 6, 73
Directories 36
Disc drive 37
Driver support 81
DVBS and DVBS2 15
DVB-T 15
E
Ergonomics 7
Errors and possible causes .... 80
External monitor 29
F
FAQ 78
FCC compliance statement ...... 90
G
Getting started Connecting USB receiver .... 18
Inserting batteries in keyboard ..... 17
Inserting batteries in mouse ..... 17
Inserting batteries in remote control....18
Power on 18
H
Hard drive 35
HD......See Hard drive
Hotline....81
|
Icons....20
Included with your All-In-One PC .... 11
Inserting Memory Cards 41
Installation of software 66
ISO 13406-2 Class II 87
K
Kensington-lock....56
Keyboard 32
Keys 32
L
Laser radiation 84
License Agreement...... 19
Localise the cause 79
M
Maintenance....82
Maintenance programs 73
Microphone amplification 45
Mouse 31
Multi Touch Display 27
Multimedia functions 33
N
Network....52
LAN Access Point 53
Troubleshooting 54
What is a network? 52
Wireless LAN 53
0
On/Off Button 25
On-Screen Keyboard 28
Operation
Keyboard......32
Mouse 31
Operational safety
Data security 6
Cabling 4
Ambient temperature 7
Set-up location 13
Power supply 4
Optical disc drive 37
P
Power Adapter 26
Power Supply 25
Program bar 20
Programming the user-defined button....50
R
R&TTE....89
Recycling and disposal 84
Remote control 48
Removing Memory Cards 41
S
Safety lock 56
Screen Resolution 27
Securing the Notebook Startup Password .... 56
Service engineers 83
Setting the frequency for keyboard and mouse 34
Setting Up of the All-In-One PC ..... 12
Set-up location 13
Software.... 57
Software uninstallation 67
Sound System 42
Standards
FCC compliance statement ..... 90
Start button 20
System restore 74
T
Transporting 82
Troubleshooting 74, 79
TV Tuner Card 47
U
Upgrades and repairs 83
USB port 46
V
Views
Comfort light 15
Display 14
HDMI-IN connector 15
HDMI-OUT connector...... 16
Kensington ® lock 16
LAN port 16
Microphone.... 15
On/Off button 14
Optical drive 15
Power socket 16
USB-Port...... 15, 16
VGA-IN connector 15
Webcam 14
W
Webcam 45
Windows activation 68
Windows Media Center 63
Windows ® 7
User account control 61
Control panel 62
Getting started 60
Help and Support 59
News 57
Windows ® Desktop 20
Windows® Update 75
Wireless LAN.... 53
- Notes on this Manual
- Audience
- Purchase Details
- Quality
- Table of contents
- Safety....1
- Setting Up & Getting Started 9
- Operation 23
- Customer Service & Self Help 71
- Appendix 85
- Chapter 1
- Safety
- Subject
- Page
- Operational Safety
- Power Supply
- Note
- Cabling
- Data Security
- Attention!
- Battery Treatment
- Ambient Temperature
- Ergonomics
- Overall:
- Back:
- Legs:
- Arms:
- Wrists:
- Head:
- Chapter 2
- Setting Up & Getting Started
- Included with your All-In-One PC
- Setting Up of the All-In-One PC
- Forms of setting up
- Setting the device up with the stand
- Attachment with a VESA support (optional)
- Set-up Location
- Views
- Left and Right Side
- Rear Side
- Getting Started
- Step 1: Inserting batteries in keyboard
- Step 2: Inserting batteries in mouse
- Step 3: Inserting batteries in the remote control
- Step 4: Connecting the USB receiver
- Step 5: Power on
- Warning!
- Step 6: Starting Initial Setup
- License agreement
- Step 7: Finalising
- Short Description of the Windows ® Desktop
- ① Start Button
- ② All Programs
- ③ Taskbar
- ④ Windows Search
- ⑤ Program Bar
- ⑥ Turn Off
- ⑦ Display Desktop
- ⑧ Desktop Icons
- ⑨ Logged in User
- ⑩ Control Panel
- Chapter 3
- Operation
- On/Off Button
- Power Adapter
- The Multi Touch Display
- Cleaning
- Screen Resolution
- On-Screen Keyboard
- Appearance and Personalization
- or
- Connecting an External Monitor
- Duplicate the Desktop
- Information
- Extend these displays
- Only display the Desktop on 1
- Only display the Desktop on 2
- The Mouse
- The Keyboard
- The Alt and Ctrl Keys
- Multimedia functions
- Setting the frequency for keyboard and mouse
- The Hard Drive
- Important Directories
- The Optical Drive
- Loading and Removing a Disc
- Loading a Disc
- How to Remove a Disc
- Playing Back and Retrieving Data from Discs
- Regional Playback Information for DVD
- Subjects Concerning the CD/DVD-Rewriter
- The Card Reader
- Inserting Memory Cards
- Removing Memory Cards
- The Sound System
- Configuration of the Loudspeakers
- Webcam
- Actual example using Windows Messenger
- Microphone amplification
- USB Port
- The TV Tuner Card (optional)
- Analog TV reception
- DVB-T TV reception
- DVB-S TV reception
- The Remote Control (optional)
- Button Layout
- Programming the user-defined button
- AV inputs
- Connecting an external source to the All-In-One PC
- Connecting an AV source
- - With an HDMI cable
- - With a VGA cable
- Changing the AV source
- The Network
- What is a Network?
- Wireless LAN (optional)
- Safety Note
- Conditions
- Troubleshooting within the Network
- Bluetooth (optional)
- Securing the All-In-One PC
- Startup Password
- Using a safety lock
- Software
- Getting to Know Windows® 7
- Windows ® 7 - News
- Improved Taskbar
- Jump lists
- Improved Desktop
- Better device management
- Homegroup
- Windows ® 7 - Help and Support
- Windows ® 7 – Getting Started
- Windows ® 7 - User Account Control
- Windows ® 7 - Control Panel
- Windows Media Center
- Installation of Software
- How to Install your Software
- Software Uninstallation
- Windows Activation
- Product Activation on your All-In-One PC
- BIOS Setup
- Execution of the BIOS Setup
- Chapter 4
- Customer Service & Self Help
- Data and System Security
- Maintenance Programs
- System Restore
- Correction
- Windows® Update
- Windows Update Information for Data Security
- Limits of the Recovery
- Carrying out a Restore
- FAQ – Frequently Asked Questions
- Customer Service
- Troubleshooting
- Localise the Cause
- Errors and Possible Causes
- The monitor is blank.
- Wrong Date and Time:
- After a system restart a new drive letter is assigned to the cards in the card slots.
- No data can be accessed from the optical drive.
- The mouse does not work.
- There is not enough room on the HDD.
- Additional Support
- Driver Support
- Transporting the All-In-One PC
- Cleaning and Care
- Upgrades and Repairs
- Notes for Service Engineers
- Caution!
- Notes on Laser Radiation
- Recycling and Disposal
- Device
- Batteries
- Packaging
- Chapter 5
- Appendix
- Information about conformity
- ISO 13406-2 Class II
- Pixel structure
- Types of Pixel Failures:
- Example:
- Information about the Regulatory Compliance according to R&TTE
- FCC Compliance Statement
- Restricted Warranty
- General Conditions of Warranty
- General
- Scope
- Exclusion from warranty
- Service Hotline
- Special warranty conditions for MEDION PC, notebook, pocket PC (PDA) and navigation devices (PNA)
- Special warranty conditions for repair on site or replacement on site
- Making Copies of this Manual
- Index
- A
- B
- C
- D
- E
- F
- G
- H
- |
- K
- L
- M
- N
- 0
- P
- R
- S
- T
- U
- V
- W
Brand : MEDION
Model : Akoya P9614 (MD 98320)
Category : Desktop computer