Spirit TopLine TW 7335i - Tumble drier Schulthess - Free user manual and instructions
Find the device manual for free Spirit TopLine TW 7335i Schulthess in PDF.

User questions about Spirit TopLine TW 7335i Schulthess
0 question about this device. Answer the ones you know or ask your own.
Ask a new question about this device
Download the instructions for your Tumble drier in PDF format for free! Find your manual Spirit TopLine TW 7335i - Schulthess and take your electronic device back in hand. On this page are published all the documents necessary for the use of your device. Spirit TopLine TW 7335i by Schulthess.
USER MANUAL Spirit TopLine TW 7335i Schulthess
Instructions for the use
of heat pump dryers in private homes

Follow the safety instructions!

Only use appliance after first reading
these instructions!

Produkte-Nr.
We are pleased that you have chosen a Schulthess dryer.
Your new dryer is the result of many years of development work. The highest quality requirements, both in development and manufacture, guarantee a long lifetime.
Its design meets all the current and future demands of modern laundry care. It offers you a varied and individual choice of programmes.
Sparing use of energy and short drying times help to ensure that you can use your dryer as economically as possible.
Please read these instructions carefully to enable you to use all the possibilities and advantages of your new dryer. Please note in particular the chapter «Safety information» and the enclosed guarantee and customer services booklet.
We hope you will be very happy with your new Schulthessmachine.
Yours
text_image
Technical diagram of a device inside a circular chamber with labeled components A and Bnatural_image
Line drawing of a hand inserting a component into a circular device (no text or symbols)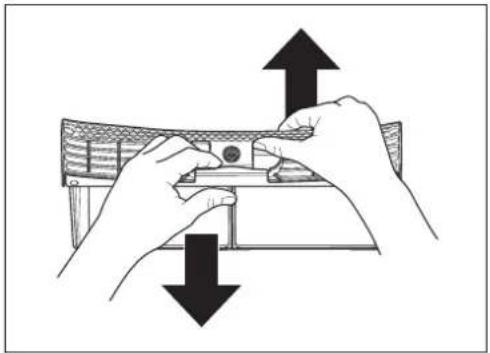
natural_image
Illustration of hands holding a device with two arrows indicating upward and downward motion (no text or symbols)natural_image
Illustration of hands holding a tray with arrows indicating upward and downward motion (no text or symbols)Gerät ausschalten
text_image
Technical diagram of a solar panel installation with labeled components A and Bnatural_image
Diagram of a mechanical device with a downward arrow indicating force or direction (no text or symbols present)natural_image
Line drawing of a kitchen appliance with a black arrow pointing to the lid area (no text or symbols)text_image
Technical diagram of a device inside a circular chamber with labeled components A and Bnatural_image
Line drawing of a hand opening a circular device with a lid and internal components (no text or symbols)
natural_image
Illustration of hands holding a device with arrows indicating movement or force (no text or symbols)natural_image
Illustration of hands holding a device with two arrows indicating upward and downward motion (no text or symbols)text_image
Technical diagram of a device inside a circular housing, labeled with points A and B indicating components.natural_image
Diagram of a mechanical device with a downward arrow indicating force or direction (no text or symbols present)natural_image
Line drawing of a kitchen appliance with a mounted fan and door (no text or symbols)text_image
Technical diagram of a solar panel installation with labeled components A and Bnatural_image
Line drawing of a washing machine interior showing the blade and handle (no text or symbols)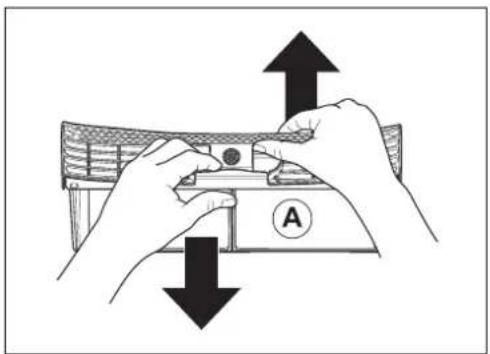
natural_image
Illustration of hands holding a device with arrows indicating upward and downward movement (no text or symbols)natural_image
Illustration of hands holding a device with two arrows indicating upward and downward motion (no text or symbols)text_image
Technical diagram of a device inside a circular chamber with labeled components A and Bnatural_image
Diagram of a device with a black downward arrow indicating compression or disassembly (no text or symbols present)natural_image
Line drawing of a kitchen appliance with a black arrow pointing to the lid area (no text or symbols)Waste disposal advice
▶ Packaging from your new machine 48
▶ Disposal of your old machine 48
Safety information
▶ General safety information 48
▶ Observe before start-up 48
▶ Observe when drying 48/49
▶ When transporting your machine 49
How to dry correctly and environmentally friendly
▶ Sorting the laundry 49
▶ Load
▶ Tips for drying 49
▶ Do not dry the following fabrics in the
machine 49
Machine description
▶ Control and display area 50
Start up
▶ Preparation
▶ Opening the door 51
▶ Closing the door 51
Programme table 52/53
Selecting programmes
▶ myTop5 54
▶ Selecting standard programmes 54
▶ Special programmes 54
Additional functions
▶ Easy care 54
▶ Mixed wash 54
▶ Time selection 54
▶ Start time preselection 54
▶ Fast forward 54
Starting the programme
▶ Selecting programmes 55
▶ Selecting additional functions 55
▶ Changing the programme before the start 55
▶ Adding laundry 55
▶ Start the programme 55
▶ Programme progress/Programme status 55
▶ Adding more laundry 55
▶ Interrupting the programme 55
▶ Programme end 55
▶ Removing the laundry 55
▶ Cleaning the filters 55/56
▶ Switch off the machine 56
Basic settings
▷ Initial moisture content 57
▷ Drying level 57
▷ Crease protection 57
▷ Time 57
▷ Language 57
▶ Extended basic settings
▷ Child lock 57
▷ Memory function 57
▷ LCD Brightness 57
▷ LCD Contrast 57
▷ Alarm volume 58
▷ Standby function 58
▷ Optical interface 58
▷ Default language 58
▷ Delete myTop5 58
Cleaning and Care
▶ Cleaning the filter support 58
▶ Cleaning the moisture sensor 58
▶ Cleaning the machine 59
▶ Emptying for frost protection or transport 59
Problems
▶ Error messages 59
▶ Troubleshooting 59/60
Customer services
▶ Product and machine numbers 60
Guarantee subscription 60
Notes 61/62
⚠️ Safety information and warnings
indicates work steps which must be executed one after the other
● enumerations, general useful hints
Waste Disposal Advice
Packaging from your new machine
Dispose of all packaging materials properly.
⚠️ Packaging materials are not toys.
Processing and reuse saves raw materials and reduces waste volumes.
The packaging can be returned to the retailer or supplier. All packaging materials used are environmentally friendly and reusable. All card is made of 80-100% recycled paper. Wood is not chemically treated. Films are made of polyethylene (PE), banding is made of polypropylene (PP). These materials are pure hydrocarbon compounds and are recyclable.
Disposal of your old machine
⚠️ Worn out machines should be made unusable:
After unplugging the machine or after an electrician has removed the connection, cut through and remove the mains cable. Destroy or remove the door lock so that playing children cannot become locked in and put their lives at risk.
Components from your old machine must not be reused. The old machine contains valuable materials which should be sent for recycling.
Please ensure that your old machine is disposed of properly.
⚠️ Please do not keep your old machine and under no circumstances dispose of it in your normal waste. ⚙ Additional information on the recyc ling of this product can be obtained from your commune, your waste disposal contractor or the shop in which you bought the product.
In this way you can help to ensure environmentally friendly disposal and/or recycling methods.
Safety Information
This machine meets the stringent safety regulations for electronic devices. It is not intended for use by persons (including children) with reduced physical, sensory or mental capabilities, or lack of experience and knowledge. Please observe the safety instructions in these operating instructions and the appurtenant mounting instructions.
General safety information:
Do not stand on the machine.
⚠ Do not sit, lean or support yourself on the loading door. (danger of tipping!)
⚠️ Under no circumstances spray the machine with water or clean it with a steam cleaner.
⚠️ If the machine is not needed for a longer period of time, disconnect it from the power supply.
⚠️ Touch the power plug with dry hands only. Only pull the plug, do not pull the cable.
⚠️ Repair work may only be executed by qualified and trained personnel and defective components may only be replaced with original spare parts by the original equipment manufacturer.
Inexpert repairs can cause considerable damage and risk to the user. Modifications to the appliance are only admissible after consultation with the manufacturer.
If the mains lead to this device becomes damaged, it must be replaced with a special lead available from the manufacturer or the manufacture's customer service.
Observe before start-up:
Read the enclosed documents carefully before using your dryer. They contain important information on the installation, use and safety of the machine. Keep the documents safe for other users or subsequent owners.
⚠️ Have the machine installed according to the mounting instructions by qualified and trained personnel. Do not connect an appliance which displays visible damage.
⚠️ The lint must not to be allowed to accumulate around the tumble dryer.
Observe when drying:
⚠️ Before loading the machine make sure that there is no foreign body or maybe a trapped animal in the drum.
⚠️ Dry clean laundry in the dryer only.
The tumbler dryer is not to be used if chemicals have been used for cleaning. Items that have been soiled with substances such as cooking oil, acetone, alcohol, petrol, kero sene, spot removers, turpentine, waxes and wax removers should be washed in hot water with an extra amount of detergent before being dried in the tumble dryer.
⚠️ Items such as foam rubber (latex foam), shower caps, water proof textiles, rubber backed articles and clothes or pillows fitted with foam rubber pads should not be dried in the tumble dryer.
⚠️ Fabric softeners, or similar products, should be used as specified by the fabric softener instructions.
A drying procedure should always end with fully completed cooling-off, so that the laundry remains at a temperature that does not damage them. If the drying procedure is ended prematurely without cooling-off, all of the laundry must be removed quickly and spread out so that the heat can be given off. Here one should be aware that the laundry can cause burns upon contact with skin due to its temperature and moisture. Appropriate hand protection is therefore to be worn.
⚠️ Keep pets away from the machine.
⚠️ Only use the machine in the home for drying textiles.
⚠️ Do not reach into the rotating drum after the end of the programme.
When transporting your machine:
⚠️ Take care when transporting the machine! (risk of injury!) Do not lift the machine by the fittings on the front!
How to dry correctly and environmentally friendly
Sorting the laundry
Pay attention to the drying symbols on your fabrics.

Dry at normal temperature.

Dry at low temperature

Do not tumble dry.
Dry textiles only which have been washed in water. To achieve even drying results, sort the laundry by fabric type and desired level of dryness.
Load
- Your dryer will be most environmentally friendly and economical if you fill the machine with the maximum laundry load (see chapter «Programme table»).
- Do not exceed the maximum load, because overfilling affects the drying result and severely creases the laundry.
- Remove as much water as possible from the laundry before drying by spinning in a washing machine or spin dryer. The higher the spin speed, the shorter the drying time and lower the energy consumption.
- You should also spin easy care laundry.
Tips for drying
- Do up all zips, hooks and eyes. Button up duvet covers and pillowcases. Tie together loose belts, apron strings etc.
- Remove easy care laundry from the dryer in a slightly damp state if possible (select target dryness «Slightly drying») and allow to finish drying in the air. Over drying causes creases.
- Laundry which is still too damp after drying a load of widely varying fabrics can be dried further using the programme «Time drying».
- Knitted fabrics, e.g. jersey underwear, can shrink slightly during drying. Do not use the «Extra Dry» programme for these fabrics.
- Dry wool or textiles containing wool with the special programme «Wool Finish» only: risk of felting!
- If one single piece is to be dried in the dryer, it will be dried more evenly by adding additional pieces as ballast, e.g. two terry towels.
Do not dry the following fabrics in the machine:
● Wringing wet laundry: waste of energy!
- Do not dry laundry in the machine which was treated with inflammable solvents, e.g. with stain remover or spirit vinegar (explosion hazard!).
- Do not dry textiles in the dryer which contain any foam rubber or have been in contact / covered with setting lotion, nail polish remover or similar agents (fire hazard!).
Control and display area

text_image
8 7 14 Mix 10 9 13 12 15 myTop5 1 2 3 4 5 6 11 Start Spirit eMotion TW 7335iProgrammes
1 Special programmes
2 Iron damp
3 Slightly dry
4 Cabinet dry
5 Extra dry
6 Your five most popular programmes
Displays
14Display
Interfaces
15 SCS - Schulthess Control System (PC-Interface)
Additional functions
7 Time selection
8 Start time preselection
9 Easy care
10Mixedwash
11Programmestart
120pendoor
13Fastforward

text_image
Control and display area Filter Door Cooling gridStart-up
⚠️ Install the machine according to the installation instructions.
Before using the machine for the first time, wipe the in side of the drum with a damp cloth.
Preparation
Check whether:
The fluff filter is in place (see chapter «Starting the programme»).
The machine is plugged in or switched on at the wall.
The machine is ready for use if all the control lights are flashing or have gone out in sleep mode.
If one of the control lights stays on, press the «Fast forward» button until the message «Please select programme» is displayed.
Open the door

▶ Press the «Open door» button.
● The door pops open.
▶ Caution: The door only pops open if the mains power supply is switched on. If there is no power to open the door, the door can be opened manually by pressing next to the lock.
● The drum light comes on when the door is opened.
Close the door
▶ Close the door by pushing it until the lock audibly engages.
⚠ Ensure when closing the door that no laundry gets shut in it.
If the door is not closed, the safety switch will prevent the machine from operating.
Programme table
| Care Symbol | Max. Load | △ Always check the care symbols on the fabrics Textile/Wash Type | Programmes drying target | Programme selection button | Spun in washing machine at rpm | Approx. power cons. kWh | Approx. duration min. | |
| Boil and coloured wash, cotton or linen | ||||||||
| 7 kg | ● Bed and table linen, towels, T-shirts, polo shirts, work wear | ► for laundry to be ironed Iron damp | 1600 1200 | 1,2 1,5 | 80 96 | |||
| ● T-shirts, polo shirts, dresses, trousers, work wear, underwear | ► for laundry which will not be ironed or only Slightly dry lightly ironed | 1600 1200 | 1,4 1,7 | 97 113 | ||||
| ● Flannels, tea towels and towels, bed linen, underwear, cotton socks | ► for laundry which will not be ironed Cabinet dry | 1600 1200 | 1,6 2,0 | 112 128 | ||||
| ● Towelling bathrobs and bed linen no underwear or socks | ► for particularly thick or multilayered fabrics Extra dry | 1600 1200 | 1,8 2,2 | 120 137 | ||||
| Easy care (non-iron) laundry made of synthetic and mixed fibres and cotton with non-iron trim, e.g. viscose, cupro, modal, polyester | ||||||||
| 3,5 kg | ● Trousers, dresses, skirts, shirts | ► for laundry to be ironed | Iron damp | 800 600 | 0,4 0,5 | 34 40 | ||
| ● Trousers, dresses, skirts, shirts, blouses, corsetry, leggings, sportswear with large proportion of synthetic fibres | ► for laundry which will not be ironed or only Slightly dry lightly ironed | 800 600 | 0,5 0,6 | 44 51 | ||||
| ● Over shirts, blouses, sportswear, bed and table linen, tracksuits | ► for laundry which will not be ironed Cabinet dry | 800 600 | 0,6 0,7 | 51 59 | ||||
| ● Anoraks, covers | ► for particularly thick or multilayered fabrics | Extra dry | 800 600 | 0,8 0,9 | 58 66 | |||
| Mixed laundry made of cotton and easy care fibres | ||||||||
| 3,5 kg | ● Trousers, dresses, skirts, shirts | ► for laundry to be ironed | Iron damp | 800 | 0,6 | 48 | ||
| ● Trousers, dresses, skirts, shirts, blouses, corsetry, leggings, sportswear with large proportion of synthetic fibres | ► for laundry which will not be ironed or only Light dry | Light dry | 800 | 0,8 | 58 | |||
| ● Over shirts, blouses, sportswear, bed and table linen, tracksuits | ► for laundry which will not be ironed Cabinet dry | 800 | 1,0 | 65 | ||||
| ● Anoraks, covers | ► for particularly thick or multilayered fabrics | Extra dry | 800 | 1,2 | 73 | |||
| Care Symbol | Max. Load | Always check the care symbols on the fabrics Textile/Wash Type | Programmes drying target | Programme selection button | Spun in washing machine at rpm | Approx. power cons. kWh | Approx. duration min. | |
| Special programmes | ||||||||
| 1,5 kg | ● Reconditioning | ► The laundry is aired without adding additional temperature. | Reconditioning Time drying cold 20-90min | 1x Special + | ||||
| 7,0 kg | ● Boil and coloured wash | ► The laundry is dried for the set time period without checking the residual moisture. | Time drying warm 20-150min | 2x Special + | ||||
| 3,5 kg | ● Easy care | ► The laundry is dried for the set time period without checking the residual moisture. | Time drying warm 20-150min | 2x Special + + | ||||
| 3,5 kg | ● Shirts/blouses | ► Shirts and blouses are dried «Iron dry». The programme reduces creasing, is gentle to the laundry and facilitates ironing. | Shirts/blouses Iron damp | 3x Special | 400 0,9 55 | |||
| 4,5 kg | ● Jeans | ► Jeans are dried completely. | Jeans Cabinet dry | 4x Special | 800 600 | 1,8 2,0 | 119 132 | |
| 2,3 kg | ● Synthetics | ► Drying of silk, delicates, lingerie, curtains and the likes. | Synthetics Cabinet dry | 5x Special | 200 1,0 49 | |||
| 3,5 kg | ● Washable wool | ► The laundry becomes more fluffy, but is not dried. Remove the laundry immediately after the programme has ended and place it on a flat terry towel for drying. | Wool finish Tumble Dry (only part-dried) | 6x Special | 800 0,1 7 | |||
| 2,3 kg | ● Outdoor clothing | ► To dry outdoor clothing, down jackets, etc. | Outdoor Cabinet dry | 7x Special | 600 1,2 82 | |||
| 2,3 kg | ● Impregnation | ► After impregnation in the washing machine, we recommend to fix the impregnation in the laundry. | Impregnation Extra dry | 8x Special | 600 1,2 90 | |||
Selecting programmes
myTop5
Your most frequently used programmes are automatically saved here.
▶ Just press ^5 and select your favourite programme.
The list of the 5 saved programmes can be deleted (See chapter «Extended basic settings»).
Selecting standard programmes
The electronic sampling system continually checks the current level of dryness of your laundry and automatically stops the programme when it reaches the specified level of dryness.

text_image
Special myTop5▶ Press the programme button corresponding to the desired drying level.
● The control light for the selected programme lights up.
For easy care fabrics, select the additional «Easy care» function.
▶ For mixed items select the additional function «Mixed wash».
Special programmes
Using the special programmes, certain textiles can be dried especially adapted to the laundry.
Tip the button Special repeatedly until the desired programme appears on the display (see programme table).
Additional Functions
Alongside the various standard programmes, your dryer also offers you the opportunity to design your own programmes.
Select first a standard or special programme. By selecting one or more additional functions, you can tailor this drying programme to the specifics of your laundry. These additional functions are only active for this one drying programme.
▶ You have the opportunity to tailor your dryer to your needs by changing the basic settings (see chapter «Basic settings»). Adjustments to basic settings remain active until you change them again.
Easy care

For easy care fabrics made of synthetic or mixed fibres, and cotton with a non-iron finish.
Mixed wash

For mixed items containing easy care fabrics made of synthetic or mixed fibre as well as cotton.
Time selection

If you have chosen a time-controlled drying programme from the special programmes you can set the length of the programme with the «Time selection» button.
The drying time required depends on the type and amount of laundry and how damp it is.
▶ Press the programme button.
- The «Time selection» control light flashes and the mini mum drying time is displayed.
▶ Select the drying time by repeatedly pressing the button «Time selection».
Start time preselection

By pressing the «Start time preselection» button one or more times, the programme start time can be delayed by up to 23.5 hours.
This makes it possible to take advantage of cheaper night-time electricity, for example. The start time and consequently also the end time of a programme can be tailored to your individual lifestyle.
The display shows the start time and anticipated programme time end.
The preselected time starts when the start button is pressed.
When the start time is reached, the selected programme starts automatically. The current programme duration will be displayed.
- In the event of a power cut, the current time is stored.
The duration of the power cut is not taken into account.
Fast forward

The programme can be shortened or interrupted by pressing the fast forward button.
Starting the programme
Selecting programmes
See chapter «Selecting programmes»
Selecting additional functions
See chapter «Additional functions»
Changing a programme before the start
▶ Press the desired programme button again.
● All control lights for the available additional functions flash again and all settings are deleted.
▶ Select any additional functions.
Adding laundry
⚠️ Only dry fabrics which have been washed with water in the dryer.
▶ Place the laundry loosely in the drum, mixing large and small items
Start programme

Start
▶ Press the start button.
● The control light is illuminated and the programme starts automatically.
If the child lock is activated:
▶ Hold the start button down.
▶ Simultaneously tip the fast forward button.
Programme progress / Programme status

text_image
BOIL/COLOURED 00:25h DRYING Mix
text_image
Special myTop5▶ With the moisture controlled programmes the dampness of the laundry is continually monitored by an electronic sampling system.
- The programme time remaining is displayed. This remaining time is recalculated several times during drying, so the effective programme end will therefore vary by a few minutes.
▶ For time programmes, the time remaining to the end of the programme is displayed.
Adding more laundry
This is possible at any time.

Press the «Open door» button.
- Wait for the drum to stop.
▶ Add your laundry.
▶ Close the door again.
▶ Press the start button.
If the child lock is activated:
▶ Hold the start button down.
▶ Simultaneously tip the fast forward button.
● The drying process is continued.
Interrupting the programme

▶ Interrupt the programme by pressing the fast forward button repeatedly, until «Programme end» appears on the display.
If the child lock is activated:
▶ Hold the start button down.
▶ Simultaneously tip the fast forward button.
Programme end
The programme end is indicated by the display value «00:00h», the display of «Programme end» as well as a flashing control light.
● An audible signal (only if summer function is switched on).
● The drum continues to rotate periodically after the programme has ended to prevent the laundry from creasing (only if crease protection has been switched on, for 30 or 60 minutes).
The washing should be taken out now at the latest.
Remove the laundry

▶ Press the «Open door» button.
• The drum light comes on.
▶ Remove the laundry.
▶ Clean the filters.
Cleaning the filters
When fabrics are used, the fibres are rubbed (laundry fluff), which are released when the fabrics are dried, collecting in the filter in the door opening.
The inner, fine filter (A) must therefore be cleaned after each drying process.

text_image
A BCleaning the filter A / Clean after every drying programme
▶ Press the «Open door» button..
▶ Pull out the inner, fine filter and swing it open.
natural_image
Line drawing of a door with a handle opening, showing internal components and no text or symbols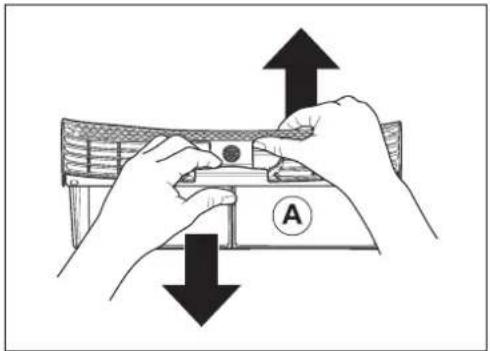
natural_image
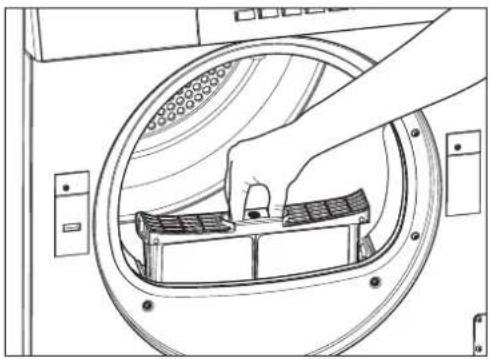
Illustration of hands holding a device with arrows indicating movement or force (no text or symbols)▶ Rub your hand over the filter and remove the fluff.
It may happen that a supposedly proper cleaned filter becomes impermeable, due to a fine, invisible coat remaining in the filter meshes.
▶ Hold the filter with one flat surface up wards and pour a little water on to it. If it is impermeable, clean the filter with a brush under running water.
- If the coat cannot be brushed away, a commercial descaler spray must be used to dissolve it.
Spray the descaler on the entire filter surface and leave it to take effect. In case of stubborn coats place one layer of kitchen roll onto the filter surface and spray descaler on it to ensure the filter is moist. Leave the descalerto take effect overnight. Then clean the filter under running water with a fine brush.
Cleaning the filter B / Clean daily
The outer coarse filter (B) must be removed and cleaned every day.
The outer coarse filter (B) must only be removed and cleaned once a week.

natural_image
Illustration of hands holding a device with two arrows indicating upward and downward motion (no text or symbols)Switching off the machine
▶ Close the door.
▶ Switch the machine off at the wall.
- If there is not wall switch, the display field will automatically go out, and the dryer will switch to standby mode (only if the standby function is switched on).
Basic Settings
The machine has basic settings from the factory. It can be adapted to the user's individual needs either when first used or later using the following functions.
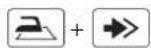
The basic settings can only be changed if no dry programme is running. To change a basic setting, it is first necessary to hold the programme button pressed and then press the fast forward button. The corresponding function is shown on the digital display. The display changes when the fast forward button is pressed repeatedly with the programme button held down.
Example:
text_image
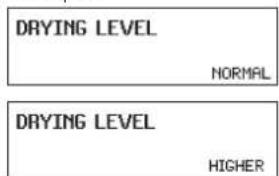
DRYING LEVEL NORMAL DRYING LEVEL HIGHERFunction switched off
Function switched on
Initial dampness (ex factory 50%)

The accuracy of the time remaining is increased if the dryer is adjusted to the spin speed of your washing machine.
Spin speed 1600 rpm - 50% residual moisture
Spin speed 1200 rpm - 60% residual moisture
Drying level (ex factory NORMAL)
If the drying level is set to «Higher», with the moisture controlled programmes «Cabinet dry» and «Extra dry» the laundry will be slightly drier.
Crease protection (ex factory 30MIN)

When this function is switched on, a crease protection phase of max. 60 minutes begins at the end of the programme.
Time (the time is not set ex factory)

The hours can be set using the 🧑 button and the minutes using the ⚙ button.
Language (ex factory DEUTSCH)

This setting is temporarily valid for the selected programme and reverts back to the default language a few minutes after completion of the programme.
See chapter «Advanced basic settings/Default language»
Extended basic settings

By pressing these three buttons at the same time, the display shows the extended basic settings.
▶ Repeatedly pressing the button shows the possible settings.
▶ Pressing the button allows the settings to be changed.
▶ Pressing the button ends the display of the settings.
Child lock (ex factory OFF)
Select «Extended basic settings»!
The child lock is to prevent accidental starting, changing or deletion of a programme by small children.
Start a programme with the child lock switched on:

Hold the start button down and press the fast forward button.
Memory function (ex factory OFF)
Select «Extended basic settings»!
With switched on memory button function, the special programme last used is stored and appears again as first on the display when next pressing the Special button.
Following this, the consecutive programmes can then be selected through repeatedly pressing the button.
This way, a frequently used special programme can be called up with only one press of the button.
With switched off function the «Reconditioning» programme appears as first.
LCD Brightness (ex factory 150)
Select «Extended basic settings»!
The 🧑 button can be used to alter the brightness of the text on the display.
LCD Contrast (ex factory 26)
Select «Extended basic settings»!
The 🧑 button can be used to alter the contrast on the display.
Alarm volume (ex factory VOLUME 2)
Select «Extended basic settings»!
With the alarm setting switched on, a signal sounds at regular intervals at the end of the programme.
The level can be adjusted in 3 steps.
Off
Level 1
Level 2
Level 3
Standby function (ex factory ON)
Select «Extended basic settings»!
When the standby function is switched on, the controls switch off in energy saving mode when no drying programme is running. The display will show «ZZZ».
Optical interface (ex factory OFF)
Select «Extended basic settings»!
If the optical interface (SCS) is switched on, customer services can communicate with the machine by PC.
Default language (ex factory DEUTSCH)
Select «Extended basic settings»!
If another language is temporarily selected via the buttons myTop5 and after programme end, in standby mode or after a long standstill, the setting reverts back to the default language.
Delete myTop5
Select «Extended basic settings»!
When calling this function, it is always set to «OFF». To delete the favourite programmes saved in «myTop5», this function must be set to «ON» and the basic setting must be quit using the fast forward button ➞.
This will delete the programmes saved in «myTop5», the basic setting is set to «OFF» again and resaves your «myTop5» favourite programmes.
Cleaning and Care
Cleaning the filters
See chapter «Start programme».
Cleaning the filter support
From time to time it is necessary to remove fluffs that have accumulated inside the filter support. To do so, use a vacuum cleaner or a cleaning brush.
▶ Pull the filters A and B out of the filter support in the door opening.

text_image
Technical diagram of a device inside a circular chamber with labeled components A and B▶ Run the pipe of the vacuum cleaner or the brush around the well of the filter support.

natural_image
Diagram of a device with a black arrow pointing downward through a circular component (no text or symbols)▶ Remove any residual fluff.
▶ Replace the two filters properly.
▶ Close the door.
Cleaning the moisture sensor

natural_image
Line drawing of a microwave oven with an arrow pointing to the interior (no text or symbols)After longer operation, small deposits (lime, fabric refiner) can form on the front inner side of the drum on both sides of the longish moisture sensors. With moisture controlled programmes, this can result in the desired level of dryness not being reached.
Wipe deposits away with a cloth soaked in vinegar.
Cleaning the machine
⚠ Ensure that the power supply is switched off before any cleaning, care or maintenance work.
⚠️ Under no circumstances spray the machine with water or clean it with a steam cleaner.
Do not use solvents! These substances can damage parts of the machine, produce poisonous vapour and carry the risk of explosion!
Casings and control areas should only be cleaned with soap or a commercially available, solvent-free, non-ab rasive cleaning product.
Emptying for frost protection or transport
If the machine is in a room susceptible to frost or is to be transported, it must be completely emptied.
- With drum empty, start program «Boil and coloured wash, iron damp».
- Press the fast forward button once to shorten the programme.
- During the last 4 minutes of the programme, any water will be pumped out of the machine.
Problems
Error messages
If the following error messages are displayed, the programme can be restarted by pressing the start button once the error has been rectified.
«CHILD LOCK ACTIVE»
▶ Hold the start button down and press the fast forward button (see chapter «Basic settings»).
«PLEASE CLOSE DOOR»
▶ Push door closed until lock engages.
«COND. WATER FULL»
▶ Condensate water pump is not running. Check if the water discharge hose is bent or the water discharge provided by the customer is clogged.
▶ Press the start button to acknowledge the message.
▶ The programme continues.
If the machine displays an F -- error message:
▶ Interrupt the programme using the fast forward button and select a new programme.
If error messages appear repeatedly:
▶ Switch off the power for around 1 minute and switch it back on again (pull out the plug or switch off at the wall).
● The machine is ready for use again when the programme control lights flash.
▶ Select a new programme.
If an error message appears again:
▶ Make a note of the error message.
▶ Unplug the machine or switch it off at the wall.
▶ Notify customer services.
Troubleshooting
⚠️ Repairs, alterations or intervention on electronic equipment should only be carried out by qualified specialists. Inexpert repairs can cause considerable damage and risk to the user.
⚠️ Only original spare parts should be used for repairs.
Rectifying minor faults yourself
The machine does not start after pressing a programme button:
▶ Check whether the mains power is switched on at the wall and the plug is in.
▶ Check whether all the fuses are intact or the safety switch has tripped.
The display is dark:
▶ The machine is in standby mode. No error. To operate the machine press any button.
The machine does not start:
▶ The start button has not been pressed.
▶ Start time preselect has been set. Only starts at the preselected start time.
The machine cannot be switched on, display remains dark even after pressing a button:
▶ Check whether the mains power is switched on at the wall and the plug is in.
▶ Check whether all the fuses are intact or the safety switch has tripped.
▶ Mains blockage, generally at noon. Operate the machine after the mains blockage has ended.
The drying target was not achieved:
When warm, laundry feels more moist than it actually is! Remove the laundry from the dryer and let it cool. When still moist:
▶ Clean filter (see chapter «Starting the programme»).
▶ Increase degree of drying (see chapter «Basic settings»).
▶ Clean moisture sensor (see chapter «Cleaning and Care»).
The individual laundry piece does not reach the set drying target:
▶ If one single piece is to be dried in the dryer, it will be dried more evenly by adding additional pieces as ballast, e.g. two terry towels.
The drying takes too long:
▶ Clean filter (see chapter «Starting the programme»).
▶ Power failure (note lock times of EW).
The laundry is not dry after the maximum possible settings:
▶ Drum is overloaded (see chapter «Programme table»).
▶ Laundry not sufficiently spun.
▶ Insufficient room ventilation (open a window or door).
The filter is blocked with fluff or scale deposits (see chapter «Starting the programme»).
The machine makes a short loud noise :
Towards the middle and the end of a drying programme, the heat exchanger is cleaned. The lifting magnet, triggering the cleaning process, is clearly audible. This is no error, but quite normal. During cleaning the message «Cleaning in process» is displayed.
Drum lighting does not work:
▶ Faulty light bulb. For safety reasons, the lamp should only be replaced by customer services or a specialist.
Dampness in the room increases significantly:
▶ The room does not have sufficient ventilation. Ensure adequate ventilation.
Door does not open:
▶ If no power is available to open the door, you can open the door manually by pressing next to the door lock.
Customer Services
Before you call customer services, check whether you can rectify the problem yourself (see chapter «Problems»). If advice is required, costs may be incurred if a service technician is required, even during the guarantee period.
If you cannot rectify a problem yourself, unplug the machine or switch it off at the wall and call customer services. Dial the central customer services number (see back cover). You will be automatically connected to the customer services branch for your region. Give customer services product and machine numbers. You will find this information on the type label on the inside of the door. Note the numbers for your machine here.
Product No.
Machine No.
Guarantee subscription
After the end of the normal 2 years guarantee period, this can be extended if required with a guarantee sub scription. We will be happy to send you the relevant documents. Please see also the enclosed guarantee and customer services booklet.
Notizen / Notes / Note
Notizen / Notes / Note

Service après-vente Tel. 0844 888 222
Central Customer Service numbers for Switzerland
Fax 0844 888 223
