
PABH 18 LI A1 - Drill PARKSIDE - Free user manual and instructions
Find the device manual for free PABH 18 LI A1 PARKSIDE in PDF.


| Product type | Cordless hammer drill (impact drill) |
| Brand | Parkside |
| Model | PABH 18 LI A1 |
| Motor voltage | 18 V DC |
| Battery capacity | 1.5 Ah (Li-ion) |
| No-load speed (speed 1) | 0 - 300 rpm |
| No-load speed (speed 2) | 0 - 900 rpm |
| Direction of rotation | Left / Right |
| Functions | Screwing, drilling, impact drilling |
| Tool holder | SDS-Plus |
| Weight | 1.7 kg |
| Charger mains voltage | 230-240 V~, 50-60 Hz |
| Charging current | 1500 mA |
| Sound pressure level (impact drilling) | 80.62 dB(A) |
| Sound power level (impact drilling) | 91.62 dB(A) |
| Vibration emission value (impact drilling) | 5.767 m/s² |
| Battery type | Lithium-Ion |
| Charging time (empty) | Approximately 1 hour |
| Delivery contents | Drill, charger, battery, 3 SDS-Plus drill bits (6/8/10 mm), 3 wood drill bits, SDS-Plus adapter, instruction manual |
| Warranty | 3 years |
Frequently Asked Questions - PABH 18 LI A1 PARKSIDE
User questions about PABH 18 LI A1 PARKSIDE
0 question about this device. Answer the ones you know or ask your own.
Ask a new question about this device
Download the instructions for your Drill in PDF format for free! Find your manual PABH 18 LI A1 - PARKSIDE and take your electronic device back in hand. On this page are published all the documents necessary for the use of your device. PABH 18 LI A1 by PARKSIDE.
USER MANUAL PABH 18 LI A1 PARKSIDE
Operation and Safety Notes
Original operating instructions
IAN 73384
FR BE

FR BE
Before reading, unfold the page containing the illustrations and familiarise yourself with all functions of the device.
GB Operation and Safety Notes Page 54
-2-


natural_image
Close-up of a black electronic device with labeled parts (10 and 13), no visible text or symbols beyond labels


natural_image
Close-up of a drill bit with two arrows indicating motion, labeled parts 1 and 2 (no text or symbols on the tool itself)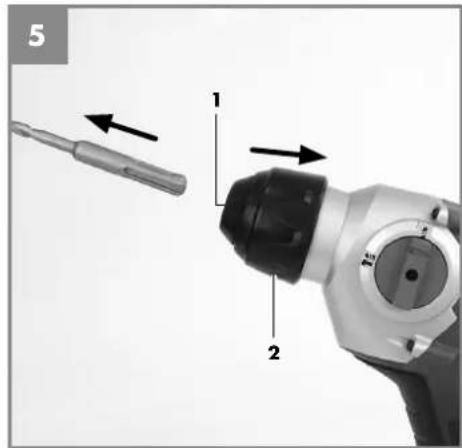


-4-
FR/BE
Sommaire
Avertissements....6
87/404/EC_2009/105/EC
2005/32/EC_2009/125/EC
2006/95/EC
2006/28/EC
X 2004/108/EC
2004/22/EC
□1999/5/EC
97/23/EC
□ 90/396/EC_2009/142/EC
89/686/EC_96/58/EC
X 2011/65/EC
X 2006/42/EC
Annex IV
Notified Body:
Notified Body No.:
Reg. No.:
□ 2000/14/EC_2005/88/EC
Annex V
Annex VI
Noise measured: LWA = dB (A); guaranteed LWA = dB (A)
P = KW; L/∅ = cm
Notified Body:
2004/26/EC
Emission No.:
Standard references: EN 60745-1; EN 60745-2-6; EN 55014-1; EN 55014-2; EN 61000-3-2; EN 61000-3-3; EN 60335-1; EN 60335-2-29; EN 62233
Subject to change without notice
Archive-File/Record: NAPR004971
Documents registrar: Georg Riedel
Wiesenweg 22, D-94405 Landau/Isar
FR/BE
12. Bon de garantie
Chère Cliente, Cher Client,
87/404/EC_2009/105/EC
2005/32/EC_2009/125/EC
2006/95/EC
2006/28/EC
X 2004/108/EC
2004/22/EC
□1999/5/EC
97/23/EC
□ 90/396/EC_2009/142/EC
89/686/EC_96/58/EC
X 2011/65/EC
X 2006/42/EC
Annex IV
Notified Body:
Notified Body No.:
Reg. No.:
□ 2000/14/EC_2005/88/EC
Annex V
Annex VI
Noise measured: LWA = dB (A); guaranteed LWA = dB (A)
P = KW; L/∅ = cm
Notified Body:
2004/26/EC
Emission No.:
Standard references: EN 60745-1; EN 60745-2-6; EN 55014-1; EN 55014-2; EN 61000-3-2; EN 61000-3-3; EN 60335-1; EN 60335-2-29; EN 62233
Subject to change without notice
Archive-File/Record: NAPR004971
Documents registrar: Georg Riedel
Wiesenweg 22, D-94405 Landau/Isar
NL/BE
12. Garantiebewijs
Geachte klant,
87/404/EC_2009/105/EC
2005/32/EC_2009/125/EC
2006/95/EC
2006/28/EC
X 2004/108/EC
2004/22/EC
□1999/5/EC
97/23/EC
□ 90/396/EC_2009/142/EC
89/686/EC_96/58/EC
X 2011/65/EC
X 2006/42/EC
Annex IV
Notified Body:
Notified Body No.:
Reg. No.:
□ 2000/14/EC_2005/88/EC
Annex V
Annex VI
Noise measured: LWA = dB (A); guaranteed LWA = dB (A)
P = KW; L/∅ = cm
Notified Body:
2004/26/EC
Emission No.:
Standard references: EN 60745-1; EN 60745-2-6; EN 55014-1; EN 55014-2; EN 61000-3-2; EN 61000-3-3; EN 60335-1; EN 60335-2-29; EN 62233
Subject to change without notice
Archive-File/Record: NAPR004971
Documents registrar: Georg Riedel
Wiesenweg 22, D-94405 Landau/Isar
DE/AT/CH
12. Garantieurkunde
- Introduction......57
- Safety regulations....57
- Layout and items supplied....61
- Proper use....62
- Technical data....62
- Before starting the equipment....63
- Operation....63
- Cleaning, maintenance and ordering of spare parts....65
- Disposal and recycling....65
- Charger indicator....67
- Declaration of conformity....68
- Warranty certificate....69
The reprinting or reproduction by any other means, in whole or in part, of documentation and papers accompanying products is permitted only with the express consent of the iSC GmbH.
Subject to technical changes
GB
Warnings

Caution - Read the operating instructions to reduce the risk of inquiry

Wearear-muffs. The impact of noise can cause damage to hearing.

Wear a breathing mask. Dust which is injurious to health can be generated when working on wood and other materials. Never use the device to work on any materials containing asbestos!

Wear safety goggles. Sparks generated during working or splinters, chips and dust emitted by the device can cause loss of sight.

Select between the individual functions only when the equipment is at a standstill. If you fail to observe this point, the equipment may be damaged.
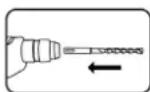
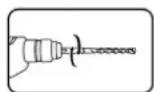

Turn and push the SDS-Plus drill bit into the tool chuck as far as it will go. The tool will lock automatically.

- Pull back and hold the locking sleeve
- Remove the tool
GB
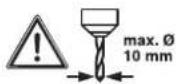
The diameter of the drill bit must not exceed 10mm.

Store the batteries only in dry rooms with an ambient temperature of +10ircC to +40ircC . Place only fully charged batteries in storage (charged at least 40% ).
GB
1. Introduction
Congratulations on your new purchase.
You have decided in favor of a high-quality product. The operating instructions are a part of this product. They contain information of importance for your safety, for the use of the product and for its disposal. Before you use the product, acquaint yourself with all the information concerning its operation and safety. Use the product only as described and only for the listed areas of application. If you hand on the product to other people, give them all the documentation as well.
2. Safety regulations
Caution!
Read all safety regulations and instructions.
Any errors made in following the safety regulations and instructions may result in an electric shock, fire and/or serious injury.
Keep all safety regulations and instructions in a safe place for future use.
The term "electric tool" used in the safety instructions refers to electric tools operated from the mains power supply (with a power cable) and to battery operated electric tools (without a power cable).
1. Workplace safety
a) Keep your work area clean and well illuminated. Untidy or unlit work areas can result in accidents.
b) Do not operate the electric tool in an environment where there is a risk of explosions and where there are infl ammable liquids, gases or dust. Electric tools produce sparks which could set the dust or vapours alight.
c) Keep the electric tool out of the reach of children and other persons. If there is a distraction, you may lose control of the appliance.
2. Electrical safety
a) The connector plug from this electric tool must fit into the socket. The plug should never be altered in any way. Never use adapter plugs together with earthed electric tools. Unaltered plugs and correct sockets reduce the risk of an electric shock.
b) Avoid bodily contact with earthed surfaces such as pipes, heating, ovens and fridges. The risk of electric shock is increased if your body is earthed.
c) Keep the tool out of the rain and away from moisture. The ingress of water into an electric tool increases the risk of an electric shock.
d) Do not use the cable to carry the electric tool, to hang it up or to pull it out of the socket. Keep the cable away from heat, oil, sharp edges and moving parts of the appliance. Damaged or entangled cables increase the risk of an electric shock.
e) If you are working outdoors with an electric tool, only use extension cables which are designed specifically for this purpose. Using specially designed outdoor extension cables, the risk of electric shock is reduced.
f) If operation of the electric tool in a damp environment can not be avoided, use a earth-leakage circuit-breaker. The earth-leakage circuit-breaker reduces the risk of an electric shock.
3. Safety of persons
a) Be careful, watch what you are doing and use an electric tool sensibly. Do not use the tool if you are tired or under the influence of drugs, alcohol or medication. A moment of inattention when using the electric tool can result in serious injuries.
b) Wear personal protection equipment and always wear safety goggles.
Wearing personal protection (such as dust masks, non-slip safety shoes, safety helmet or ear protection, depending upon the type
GB
and use of the electric tool) reduces the risk of injury.
c) Make sure that the appliance cannot start up accidentally. Ensure that the electric tool is switched off before you connect it to the power supply and/or insert the battery, or pick up or carry the tool. If your finger is on the switch whilst carrying the electric tool or if you connect the appliance to the mains when it is switched on, this can lead to accidents.
d) Remove keys and wrenches before switching on the electric tool. A tool or key which comes into contact with rotating parts of the appliance can lead to injuries.
e) Avoid abnormal working postures. Make sure you stand squarely and keep your balance at all times. In this way, you can control the electric tool better in unexpected circumstances.
f) Wear suitable work clothes. Do not wear loose clothing or jewellery. Keep hair, clothes and gloves away from moving parts. Loose clothing, jewellery or long hair can get trapped in moving parts.
g) If vacuuming devices and draining devices can be fitted, make sure that these are correctly attached and correctly used. The use of a dust extraction system can reduce the danger posed by dust.
4. Usage and treatment of the electric tool
a) Do not overload the appliance. Use the correct tool for your work. You will be able to work better and more safely within the given performance boundaries.
b) Do not use an electric tool with a defective switch. An electric tool that cannot be switched on or off is dangerous and must be repaired.
c) Pull the plug out of the socket and/or remove the battery before making any adjustments to the appliance, changing accessories or put the appliance down. This safety measure prevents starting the electric tool unintentionally.
d) Keep unused electric tools out of the reach of children. Do not allow people who are not familiar with the appliance or who have not read these instructions to use the appliance. Electric tools are dangerous if they are used by inexperienced people.
e) Clean your electric tool carefully. Check whether moving parts are functioning properly and not jamming, whether parts are broken or damaged enough that the functioning of this electric tool is affected. Have damaged parts repaired before using the appliance. Many accidents are caused by badly maintained electric tools.
f) Keep your cutting tools sharp and clean. Carefully maintained cutting tools with sharp cutting edges will jam less and are easier to control.
g) Make sure to use electric tools, accessories, attachments, etc. in accordance with these instructions. Take the conditions in your work area and the job in hand into account. Using electric tools for any purpose other than the one for which they are intended can lead to dangerous situations.
- Using and handling the cordless tool
a) Only charge the batteries in chargers that are recommended by the manufacturer. A charger that is designed for a certain type of battery may pose a fire risk if it is used with other types of battery.
b) Use only the correct batteries in the electric tools. The use of other batteries may result in injuries and a fire risk.
c) Keep unused batteries away from paper clips, coins, keys, nails, screws and other metallic objects that could cause a short circuit between the contacts. A short circuit between the battery contacts may cause burns or a fire.
d) In case of incorrect use, fluid may escape from the battery. Avoid contact with it. If you touch it by accident, rinse the affected area with water. If you
GB
get the fluid in your eyes, also seek medical advice. Leaking battery fluid can cause skin irritation or burns.
6. Service
a) Have your electric tool repaired only by trained personnel using only genuine spare parts. This will ensure that your electric tool remains safe to use.
7. Safety information for hammers
a) Hold the equipment by the insulated handles when carrying out work during which the plug-in tool could strike concealed power cables. Contact with a live cable may also make the metal parts of the equipment live and cause an electric shock.
b) Wear ear protection! The impact of noise can cause damage to hearing.
c) Use the additional handles supplied with the equipment. Losing control of the equipment can result in injuries.
Additional safety instructions
We pay a great deal of attention to the design of every battery pack to ensure that we supply you with batteries which feature maximum power density, durability and safety. The battery cells have a wide range of safety devices. Each individual cell is initially formatted and its electrical characteristic curves are recorded. These data are then used exclusively to be able to assemble the best possible battery packs. Despite all the safety precautions, caution must always be exercised when handling batteries. The following points must be obeyed at all times to ensure safe use.
Safe use can only be guaranteed if undamaged cells are used. Incorrect handling can cause cell damage.
Important: Analyses confirm that incorrect use and poor care are the main causes of the damage caused by high performance batteries.
Information about the battery
- The battery pack supplied with your cordless tool is not charged. The battery pack has to be charged before you use the tool for the first time.
- For optimum battery performance avoid low discharge cycles. Charge the battery pack frequently.
- Store the battery pack in a cool place, ideally at 15°C and charged to at least 40%.
- Lithium-ion batteries are subject to a natural ageing process. The battery pack must be replaced at the latest when its capacity falls to just 80% of its capacity when new. Weakened cells in an aged battery pack are no longer capable of meeting the high power requirements and therefore pose a safety risk.
- Do not throw battery packs into an open fire. There is a risk of explosion!
- Do not ignite the battery pack or expose it to fire.
- Do not exhaustively discharge batteries. Exhaustive discharge will damage the battery cells. The most common cause of exhaustive discharge is lengthy storage or non-use of partly discharged batteries. Stop working as soon as the performance of the battery falls noticeably or the electronic protection system triggers. Place the battery pack in storage only after it has been fully charged.
- Protect batteries and the tool from overloads. Overloads will quickly result in overheating and cell damage inside the battery housing without this overheating actually being apparent externally.
- Avoid damage and shocks. Replace batteries which have been dropped from a height of more than one meter or which have been exposed to violent shocks without delay, even if the housing of the battery pack appears to be undamaged. The battery cells inside the battery may have suffered serious damage. In this respect, please also read the waste disposal information.
- If the battery pack suffers overloading and overheating, the integrated protective cut-off will switch off the equipment for safety reasons. Important. Do not press the ON/OFF
GB
switch any more if the protective cut-off has actuated. This may damage the battery pack.
- Use only original battery packs. The use of other batteries may result in injuries, explosion and a fire risk.
Information on chargers and the charging process
- Do not use the supplied battery charger to charge non-rechargeable batteries.
- Please check the data marked on the rating plate of the battery charger. Be sure to connect the battery charger to a power supply with the voltage marked on the rating plate. Never connect it to a different mains voltage.
- Protect the battery charger and its cable from damage and sharp edges. Have damaged cables or plugs repaired without delay by a qualified electrician.
- This battery charger is not designed to be used by people (including children) with limited physical, sensory or mental capacities or those with no experience and/or knowledge unless they are supervised by a person who is responsible for their safety or they have received instructions from such a person in how to use the equipment safely.
• Children must always be supervised in order to ensure that they do not play with the equipment.
• Do not use damaged battery chargers. - Do not use the supplied battery charger to charge other cordless tools.
- In heavy use the battery pack will become warm. Allow the battery pack to cool to room temperature before commencing with the charging.
- Do not over-charge batteries. Do not exceed the maximum charging times. These charging times only apply to discharged batteries. Frequent insertion of a charged or partly charged battery pack will result in over-charging and cell damage. Do not leave batteries in the charger for days on end.
- Never use or charge batteries if you suspect that the last time they were charged was more than 12 months previously. There is a high probability that
the battery pack has already suffered dangerous damage (exhaustive discharge).
- Charging batteries at a temperature below 10°C will cause chemical damage to the cell and may cause a fire.
- Do not use batteries which have heated during the charging process, as the battery cells may have suffered dangerous damage.
- Do not use batteries which have suffered curvature or deformation during the charging process or which show other non-typical symptoms (gassing, hissing, cracking,...)
- Never fully discharge the battery pack (recommended depth of discharge max. 80%) A complete discharge of the battery pack will lead to premature ageing of the battery cells.
• Never charge the batteries unsupervised.
Protection from environmental influences
- Wear suitable work clothes. Wear safety goggles.
- Protect your cordless tool and the battery charger from moisture and rain. Moisture and rain can cause dangerous cell damage.
- Do not use the cordless tool or the battery charger near vapors and inflammable liquids.
- Use the battery charger and cordless tools only in dry conditions and an ambient temperature of 10-40°C.
- Do not keep the battery charger in places where the temperature is liable to reach over 40°C. In particular, do not leave the battery charger in a car that is parked in the sunshine.
- Protect batteries from overheating. Overloads, over-charging and exposure to direct sunlight will result in overheating and cell damage. Never charge or work with batteries which have been overheated – replace them immediately if possible.
- Storage of batteries, battery chargers and cordless tools. Store the charger and your cordless tool only in dry places with an ambient temperature of 10-40°C. Store your lithium-ion battery pack in a cool, dry place at a temperature of 10-20°C. Protect them from humidity and direct sunlight. Only place fully charged batteries in storage (charged at
GB
least 40%).
- Prevent the lithium-ion battery pack from freezing. Battery packs which were stored below 0°C for more than 60 minutes must be disposed of.
- When handling batteries beware of electrostatic charge: Electrostatic discharges cause damage of the electronic protection system and the battery cells. Avoid electrostatic charging and never touch the battery poles.

flowchart
graph TD
    A["Warning"] --> B["Environment"]
    B --> C["ISC"]
    D["Injury"] --> B
    E["Cross Symbol"] --> B
Rechargeable batteries and cordless electric machines and tools contain materials that are potentially harmful to the environment. Never place any cordless electric machines or tools in your household refuse. When cordless electric machines or tools become defective or worn, remove the rechargeable batteries and return them to iSC GmbH (address: Eschenstrasse 6, D-94405, Germany). If the rechargeable batteries cannot be removed, return the complete cordless machine or tool.
You can then be sure that the equipment will be correctly disposed of by the manufacturer.
When shipping or disposing of batteries and cordless tools, always ensure that they are packed individually in plastic bags to prevent short circuits and fi res.
Do not lose these safety instructions.
3. Layout and items supplied
3.1 Layout (Fig. 1)
-
Tool chuck
-
Locking sleeve
-
Screw/Drill/Hammer drill selector switch
-
Gear selector switch
-
Battery capacity indicator / LED indicator for counter-clockwise/clockwise
-
Switch for battery capacity indicator
-
Changeover switch
-
On/Off switch
-
Handles
-
Battery
-
Battery release button
- LED light
- Charging unit
3.2 Items supplied
- Open the packaging and take out the equipment with care.
- Remove the packaging material and any packaging and/or transportation braces (if available).
- Check to see if all items are supplied.
- Inspect the equipment and accessories for transport damage.
- If possible, please keep the packaging until the end of the guarantee period.
Important!
The equipment and packaging material are not toys. Do not let children play with plastic bags, foils or small parts. There is a danger of swallowing or suffocating!
• Cordless hammer drill
- Charging unit
Battery
• 3 SDS-Plus drill bits (∅ 6/8/10 mm)
- 3 wood drill bits with bit mount (∅ 6/8/10 mm)
SDS-Plus bit adapter
• Original operating instruction
GB
4. Properuse
The equipment is designed for drilling work with hammer action in concrete, rock and brick, always using the correct drill bit. The equipment is also suitable for screwdriving and drilling in wood and steel.
The equipment is to be used only for its prescribed purpose. Any other use is deemed to be a case of misuse. The user / operator and not the manufacturer will be liable for any damage or injuries of any kind caused as a result of this.
Please note that our equipment has not been designed for use in commercial, trade or industrial applications. Our warranty will be voided if the machine is used in commercial, trade or industrial businesses or for equivalent purposes.
5. Technical data
Motor power supply: 18 V DC
Idling speed 1st gear: 0-300 min -1
Idling speed 2nd gear: 0-900 min -1
Battery capacitance: 1.5 Ah
Clockwise/counter-clockwise:......Yes
Battery charge voltage: 18 V DC
Battery charge current: 1500 mA
Charging unit supply
voltage: 230-240V\~50-60Hz
Weight: 1.7 kg
Sound and vibration
Sound and vibration values were measured in accordance with EN 60745.
No-load operation
LpA sound pressure level .....78,63 dB(A)
KpA uncertainty 3 dB
LWA sound power level .....89,63 dB(A)
KWA uncertainty 3 dB
Hammer drilling in concrete
LpA sound pressure level .....80,62 dB(A)
KpA uncertainty 3 dB
LWA sound power level .....91,62 dB(A)
KWA uncertainty 3 dB
Wear ear-muffs.
The impact of noise can cause damage to hearing.
Total vibration values (vector sum of three directions) determined in accordance with EN 60745.
No-load operation
Vibration emission value ab<2.5m/s2
K uncertainty = 1.5 m/s 4
Hammer drilling in concrete
Vibration emission value ah=5.767\ m/s2
K uncertainty = 1.5 m/s 2
Warning!
The specified vibration value was established in accordance with a standardized testing method. It may change according to how the electric equipment is used and may exceed the specified value in exceptional circumstances.
The specified vibration value can be used to compare the equipment with other electric power tools.
The specified vibration value can be used for initial assessment of a harmful effect.
For the protection of the operator it is essential to specify safety measures which are based on an estimate of the exposure during the actual conditions of use (all stages of the operating cycle must be considered, e.g. times in which the electric tools are switched off and times in which the tool is switched on but operates without load).
GB
Keep the noise emissions and vibrations to a minimum.
- Only use appliances which are in perfect working order.
• Service and clean the appliance regularly. - Adapt your working style to suit the appliance.
• Do not overload the appliance. - Have the appliance serviced whenever necessary.
- Switch the appliance off when it is not in use.
• Wear protective gloves.
Residual risks
Even if you use this electric power tool in accordance with instructions, certain residual risks cannot be rules out. The following hazards may arise in connection with the equipment's construction and layout:
- Lung damage if no suitable protective dust mask is used.
- Damage to hearing if no suitable ear protection is used.
- Health damage caused by hand-arm vibrations if the equipment is used over a prolonged period or is not properly guided and maintained.
Warning! This electric power tool generates an electromagnetic fi eld during operation. Under certain circumstances this fi eld may actively or passively impede medical implants. To reduce the risk of serious or fatal injuries, we recommend persons with medical implants to consult their doctor and the manufacturer of the medical implant prior to using the equipment.
6. Before starting the equipment
Be sure to read the following information before you put the cordless screwdriver into operation:
- Charge the battery pack with the charger supplied. An empty battery pack requires a charging period of approximately 1 hour.
- Only ever use sharp drill bits and screwdriver bits which are suitable for the purpose and in faultless condition.
- Always check for concealed electric cables and gas and water pipes when drilling and screwdriving in walls.
7. Operation
7.1 Charging the LI battery pack (Fig. 2-3)
The battery is protected from exhaustive discharge. An integrated protective circuit automatically switches off the equipment when the battery is fl at. In this case the chuck will cease to turn. Warning! Do not actuate the On/Off switch any more if the protective circuit has tripped. This may damage the battery.
- Pull the battery pack (10) out of the handle, pressing the pushlock button (11) as you do so.
- Check that your mains voltage is the same as that marked on the rating plate of the battery charger. Insert the power plug of the charger (13) into the mains socket outlet. The green LED will then begin to flash.
- Insert the battery pack (10) into the battery charger (13).
- In section 10 (Charger indicator) you will find a table with an explanation of the LED indicator on the charger.
If the battery pack fails to charge, check for the following:
• Voltage at the power socket
- Good contact at the charging contacts of the charging unit (13)
GB
If the battery pack still fails to charge, send
• the charger and charging adapter
• and the battery pack
to our customer service center.
To ensure that the LI battery pack provides long service you should take care to recharge it promptly. You must recharge the battery pack when you notice that the power of the cordless hammer drill drops.
7.2. Inserting a tool (Fig. 4)
Important. Set the changeover switch (7) to its center position whenever you carry out any work (for example changing the tool, maintenance work, etc.) on the equipment.
- Clean the tool before fitting it and apply a thin coating of bit grease to the tool shaft.
- Turn and push the dust-free tool into the tool chuck (1) as far as it will go. The tool will lock automatically.
- Check that the bit is locked in placed by pulling on it.
7.3. Removing a tool (Fig. 5)
Pull back and hold the locking sleeve (2) and remove the tool.
7.4 Screw/Drill/Hammer drill selector switch (Fig. 6/Item 3)
Change the switch position only when the equipment is at a standstill!
Drilling/screwdriving:
For drilling/screwdriving, press the button (C) on the selector switch (3) and simultaneously turn the selector switch (3) to position A.
Hammer drilling:
For hammer drilling, press the button (C) on the selector switch (3) and simultaneously turn the selector switch (3) to position B.
Important.
The 2nd gear must be selected for hammer drilling. See point 7.7 Selecting the gear.
Important.
You only require slight contact pressure for hammer drilling. Excessive contact pressure will place unnecessary strain on the motor. Check drill bits at regular intervals. Sharpen or replace blunt drill bits.
7.5 Changeover switch (Fig. 7/Item 7)
Using the slide switch above the On/Off switch you can select the direction of rotation of the equipment and lock the equipment so that it cannot be switched on accidentally. You can select between clockwise and counter-clockwise rotation. To avoid causing damage to the gearing, the direction of rotation must only be changed when the equipment is at a standstill. When the slide switch is in the middle position, the On/Off switch is blocked.
Important.
To avoid danger, the machine must only be held using the two handles (9).
Otherwise you may suffer an electric shock if you drill into electric cables!
7.6 On/Off switch (Fig. 7/Item 8)
Infinitely variable speed control is possible with the On/Off switch. The further you push the switch, the higher the speed of the equipment.
7.7 Selecting the gear (Fig. 8/Item 4)
The gear selector switch (4) enables you to work within a specific speed range.
Switch position setting 1
Speed range: High torque, low speed
Switch position setting 2
Speed range: Low torque, high speed
7.8 LED indicator for counter-clockwise/ clockwise (Fig. 8/Item 5)
The LED display for counter-clockwise/clockwise (5) indicates the position of the changeover switch (7).
Blue LED is lit: Clockwise
Red LED is lit: Counter-clockwise
GB
7.9 Battery capacity indicator (Fig. 8 / Item 5)
Press the button for the battery capacity indicator (6). The battery capacity indicator (5) indicates the charge state of the battery on 3 colored LEDs.
All LEDs are lit:
The battery is fully charged.
The yellow and red LEDs are lit:
The battery has an adequate remaining charge.
Red LED:
The battery is empty, recharge the battery.
7.10 Screwdriving
It is advisable to use self-centering screws (e.g. Torx, cross recessed head) as these will enable you to work safely and reliably. Always make sure that the bit used is of the same size and shape as the screw.
7.11 LED light (Fig. 1/Item 12)
The LED light (12) can be used in poor lighting conditions to illuminate the area where you want to drill or screw. The LED light (12) will come on automatically as soon as you press the On/Off switch (8).
8. Cleaning, maintenance and ordering of spare parts
Always pull out the mains power plug before starting any cleaning work.
8.1 Cleaning
- Keep all safety devices, air vents and the motor housing free of dirt and dust as far as possible. Wipe the equipment with a clean cloth or blow it with compressed air at low pressure.
• We recommend that you clean the device immediately each time you have finished using it. - Clean the equipment regularly with a moist cloth and some soft soap. Do not use cleaning agents or solvents; these could attack the
plastic parts of the equipment. Ensure that no water can seep into the device.
8.2 Maintenance
There are no parts inside the equipment which require additional maintenance.
8.3 Ordering replacement parts:
Please quote the following data when ordering replacement parts:
• Type of machine
• Article number of the machine
• Identification number of the machine
For our latest prices and information please go to www.isc-gmbh.info
9. Disposal and recycling
The unit is supplied in packaging to prevent its being damaged in transit. This packaging is raw material and can therefore be reused or can be returned to the raw material system.
The unit and its accessories are made of various types of material, such as metal and plastic. Defective components must be disposed of as special waste. Ask your dealer or your local council.

For EU countries only
Never place any electric power tools in your household refuse.
To comply with European Directive 2002/96/EC concerning old electric and electronic equipment and its implementation in national laws, old electric power tools have to be separated from other waste and disposed of in an environment-friendly fashion, e.g. by taking to a recycling depot.
GB
Recycling alternative to the return request:
As an alternative to returning the equipment to the manufacturer, the owner of the electrical equipment must make sure that the equipment is properly disposed of if he no longer wants to keep the equipment. The old equipment can be returned to a suitable collection point that will dispose of the equipment in accordance with the national recycling and waste disposal regulations. This does not apply to any accessories or aids without electrical components supplied with the old equipment.
GB
10. Chargerindicator
| Indicatorstatus | Explanations and actions | |
| RedLEDGreenLED | ||
| OffFlashingReadyforuse | The charger is connected to the mains and is ready for use; there is no battery pack in the charger. | |
| OnOffCharging | The charger is charging the battery pack in quick charge mode. | |
| Off On The battery pack is fully charged (charging completed).Action:Take the battery pack out of the charger. Disconnect the charger from the mains supply. | ||
| Flashing OffAdapted charging | The charger is in gentle charging mode. For safety reasons the charging is performed less quickly and takes more than 1 hour. The reasons can be:- The battery pack has not been used for a very long time or an already fl at battery was further discharged (exhaustive discharge).- The battery pack temperature is outside the ideal range (between 10irc C and 45irc C).Action:Wait for the charging to be completed; you can still continue to charge the battery pack. | |
| Flashing FlashingFault | Charging is no longer possible. The battery pack is defective.Action:Never charge a defective battery pack. Take the battery pack out of the charger. | |
| OnOnTemperature fault | The battery pack is too hot (e.g. due to direct sunshine) or too cold (below 0irc C).Action:Remove the battery pack and keep it at room temperature (approx. 20irc C) for one day. | |
11. Declaration of conformity
87/404/EC_2009/105/EC
2005/32/EC_2009/125/EC
2006/95/EC
2006/28/EC
X 2004/108/EC
2004/22/EC
□1999/5/EC
97/23/EC
□90/396/EC_2009/142/EC
89/686/EC_96/58/EC
X 2011/65/EC
X 2006/42/EC
Annex IV
Notified Body:
Notified Body No.:
Reg. No.:
□ 2000/14/EC_2005/88/EC
Annex V
Annex VI
Noise measured: LWA = dB (A); guaranteed LWA = dB (A)
P = KW; L/∅ = cm
Notified Body:
2004/26/EC
Emission No.:
Standard references: EN 60745-1; EN 60745-2-6; EN 55014-1; EN 55014-2; EN 61000-3-2; EN 61000-3-3; EN 60335-1; EN 60335-2-29; EN 62233
Subject to change without notice
Archive-File/Record: NAPR004971
Documents registrar: Georg Riedel
Wiesenweg 22, D-94405 Landau/Isar
GB
12. Warranty certifi cate
Dear Customer,
All of our products undergo strict quality checks to ensure that they reach you in perfect condition. In the unlikely event that your device develops a fault, please contact our service department at the address shown on this guarantee card. Of course, if you would prefer to call us then we are also happy to offer our assistance under the service number printed below. Please note the following terms under which guarantee claims can be made:
- These guarantee terms cover additional guarantee rights and do not affect your statutory warranty rights. We do not charge you for this guarantee.
- Our guarantee only covers problems caused by material or manufacturing defects, and it is restricted to the rectification of these defects or replacement of the device. Please note that our devices have not been designed for use in commercial, trade or industrial applications. Consequently, the guarantee is invalidated if the equipment is used in commercial, trade or industrial applications or for other equivalent activities. The following are also excluded from our guarantee: compensation for transport damage, damage caused by failure to comply with the installation/assembly instructions or damage caused by unprofessional installation, failure to comply with the operating instructions (e.g. connection to the wrong mains voltage or current type), misuse or inappropriate use (such as overloading of the device or use of non-approved tools or accessories), failure to comply with the maintenance and safety regulations, ingress of foreign bodies into the device (e.g. sand, stones or dust), effects of force or external influences (e.g. damage caused by the device being dropped) and normal wear resulting from proper operation of the device. This applies in particular to rechargeable batteries for which we nevertheless issue a guarantee period of 12 months. The guarantee is rendered null and void if any attempt is made to tamper with the device.
- The guarantee is valid for a period of 3 years starting from the purchase date of the device. Guarantee claims should be submitted before the end of the guarantee period within two weeks of the defect being noticed. No guarantee claims will be accepted after the end of the guarantee period. The original guarantee period remains applicable to the device even if repairs are carried out or parts are replaced. In such cases, the work performed or parts fitted will not result in an extension of the guarantee period, and no new guarantee will become active for the work performed or parts fitted. This also applies when an on-site service is used.
- In order to assert your guarantee claim, please send your defective device postage-free to the address shown below. Please enclose either the original or a copy of your sales receipt or another dated proof of purchase. Please keep your sales receipt in a safe place, as it is your proof of purchase. It would help us if you could describe the nature of the problem in as much detail as possible. If the defect is covered by our guarantee then your device will either be repaired immediately and returned to you, or we will send you a new device.
Of course, we are also happy offer a chargeable repair service for any defects which are not covered by the scope of this guarantee or for units which are no longer covered. To take advantage of this service, please send the device to our service address.
IAN 73384

natural_image
Two horizontal grayscale color swatches with no text or symbols, showing contrast between dark and light shades (no text or symbols)
-70-



-71-


-72-


IAN: 73384 PABH 18 LI A1
Einhell Germany AG
Wiesenweg 22
D-94405 Landau/Isar
Version des Informations · Stand van de Informatie


- FR BE
- FR/BE
- Sommaire
- Standard references: EN 60745-1; EN 60745-2-6; EN 55014-1; EN 55014-2; EN 61000-3-2; EN 61000-3-3; EN 60335-1; EN 60335-2-29; EN 62233
- Bon de garantie
- NL/BE
- Garantiebewijs
- Geachte klant,
- DE/AT/CH
- Garantieurkunde
- GB
- Warnings
- Introduction
- Safety regulations
- Caution!
- Workplace safety
- Electrical safety
- Safety of persons
- Service
- Safety information for hammers
- Additional safety instructions
- Information about the battery
- Information on chargers and the charging process
- Protection from environmental influences
- Layout and items supplied
- Layout (Fig. 1)
- Items supplied
- Important!
- Properuse
- Technical data
- Sound and vibration
- No-load operation
- Hammer drilling in concrete
- Wear ear-muffs.
- Warning!
- Keep the noise emissions and vibrations to a minimum.
- Residual risks
- Even if you use this electric power tool in accordance with instructions, certain residual risks cannot be rules out. The following hazards may arise in connection with the equipment's construction and layout:
- Before starting the equipment
- Operation
- Charging the LI battery pack (Fig. 2-3)
- Inserting a tool (Fig. 4)
- Removing a tool (Fig. 5)
- Screw/Drill/Hammer drill selector switch (Fig. 6/Item 3)
- Change the switch position only when the equipment is at a standstill!
- Drilling/screwdriving:
- Hammer drilling:
- Important.
- Changeover switch (Fig. 7/Item 7)
- To avoid danger, the machine must only be held using the two handles (9).
- On/Off switch (Fig. 7/Item 8)
- Selecting the gear (Fig. 8/Item 4)
- Switch position setting 1
- Switch position setting 2
- LED indicator for counter-clockwise/ clockwise (Fig. 8/Item 5)
- Battery capacity indicator (Fig. 8 / Item 5)
- All LEDs are lit:
- The yellow and red LEDs are lit:
- Red LED:
- Screwdriving
- LED light (Fig. 1/Item 12)
- Cleaning, maintenance and ordering of spare parts
- Cleaning
- Maintenance
- Ordering replacement parts:
- Disposal and recycling
- Chargerindicator
- Declaration of conformity
- Warranty certifi cate
Brand : PARKSIDE
Model : PABH 18 LI A1
Category : Drill