Saeco Armonia SIN024X - Coffee machine PHILIPS - Free user manual and instructions
Find the device manual for free Saeco Armonia SIN024X PHILIPS in PDF.

User questions about Saeco Armonia SIN024X PHILIPS
0 question about this device. Answer the ones you know or ask your own.
Ask a new question about this device
Download the instructions for your Coffee machine in PDF format for free! Find your manual Saeco Armonia SIN024X - PHILIPS and take your electronic device back in hand. On this page are published all the documents necessary for the use of your device. Saeco Armonia SIN024X by PHILIPS.
USER MANUAL Saeco Armonia SIN024X PHILIPS
natural_image
Exterior view of a Saeco armónia coffee machine with two cups (no text or symbols visible on the device itself)Type SIN024X
ISTRUZIONI PER L'USO
OPERATING INSTRUCTIONS
MODE D'EMPLOI
BEDIENUNGSANLEITUNG
INSTRUÇÕES PARA O USO
We congratulate you for purchasing this superior quality espresso coffee machine and thank you for placing your confidence in us. Before starting the machine, we recommend that you carefully read these operating instructions, as they explain how to use it, clean it and keep it in perfect working order. If you have any further questions, contact your dealer or our office directly. We will be happy to provide you any information you need.
Félicitations!
natural_image
Close-up of a hand pouring liquid from a saeco Armóna water dispenser into a digital device (no visible text or symbols on the device itself)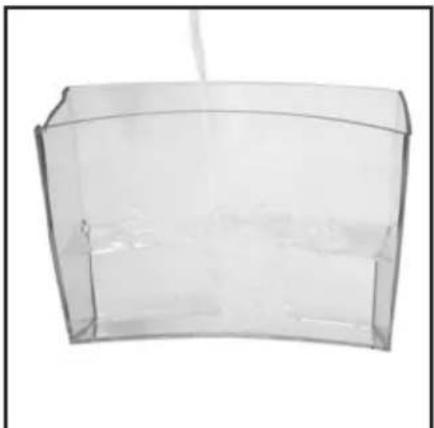
natural_image
Transparent rectangular container with a thin wire extending from its side (no text or symbols visible)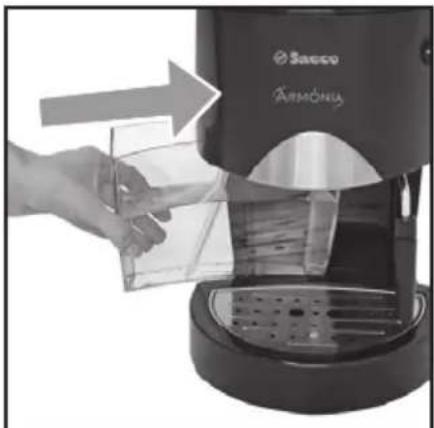
natural_image
Hand using a Sacco Armonia coffee maker to clean or prepare it, with no visible text or symbols on the device itself.Fig.1 - Abb.1 - Afb.1 Fig.2 - Abb.2 - Afb.2 Fig.3 - Abb.3 - Afb.3
natural_image
Two-step diagram showing a hand inserting cable to a device labeled A and pointing at a button labeled B (no text or symbols on the devices themselves)
natural_image
Close-up of a Sacco coffee maker with a cup and teapot, showing a hand pouring liquid from a cup into a container (no text or symbols visible)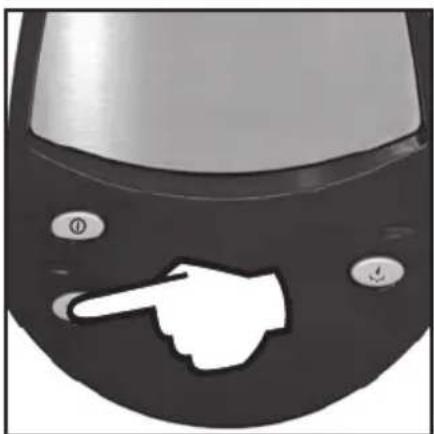
natural_image
Close-up of a car's front panel with a hand pointing at the button (no text or symbols visible)Fig.4 - Abb.4 - Afb.4 Fig.5 - Abb.5 - Afb.5 Fig.6 - Abb.6 - Afb.6

natural_image
Close-up of a coffee maker with saeco branding and a cup pouring liquid, no visible text or symbols
natural_image
Two-panel image showing a hand holding a metal container and a mechanical component, with no visible text or symbols.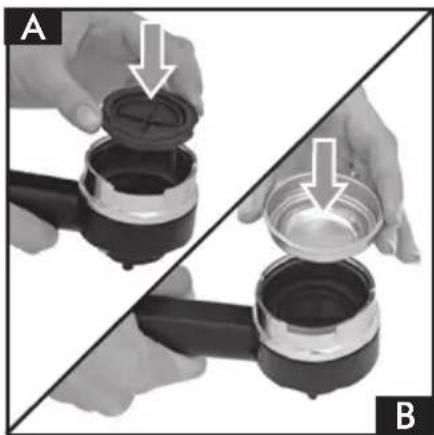
natural_image
Two hands holding a mechanical device with a lid, showing a close-up of the lid and handle (no text or symbols visible)Fig.7 - Abb.7 - Afb.7 Fig.8 - Abb.8 - Afb.8 Fig.9 - Abb.9 - Afb.9
natural_image
Close-up of a Sacco Armônia coffee maker with a hand using a pen to press the cup (no visible text or symbols)
natural_image
Close-up of a hand using a Sanco Arhônia coffee maker to press or export a bag (no visible text or symbols)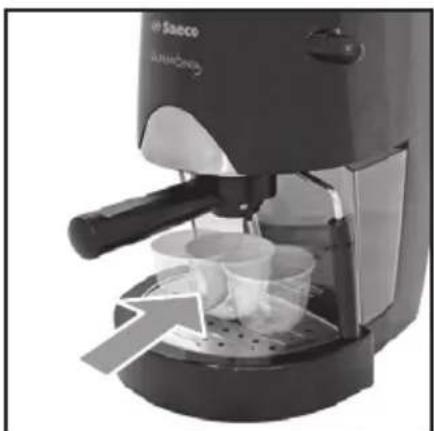
natural_image
Exterior view of a Sanco coffee maker with a hand pump and cup holder (no text or symbols visible)Fig.10 - Abb.10 - Afb.10 Fig.11 - Abb.11 - Afb.11 Fig.12 - Abb.12 - Afb.12

natural_image
Close-up of a car's head with a white hand pointing at the nose (no text or symbols visible)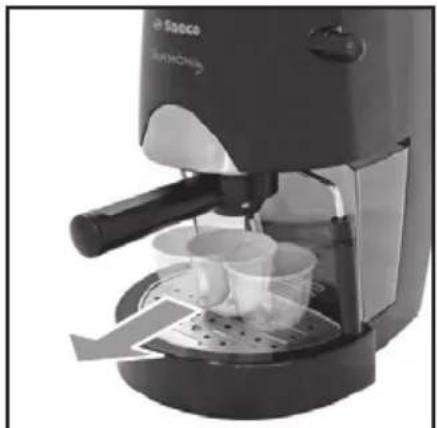
natural_image
Exterior view of a modern coffee maker with a glass cup and side arm (no visible text or symbols)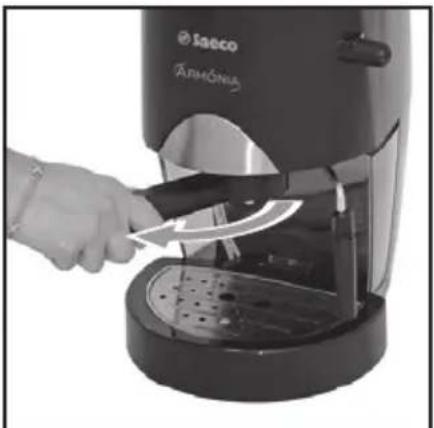
natural_image
Close-up of a hand using a saeco Armonia coffee maker to clean or store it, no visible text or symbols on the device itself.Fig.13 - Abb.13 - Afb.13 Fig.14 - Abb.14 - Afb.14 Fig.15 - Abb.15 - Afb.15

natural_image
Two-panel black-and-white photo showing a hand pouring liquid from a water tap into a sink, with no visible text or symbols.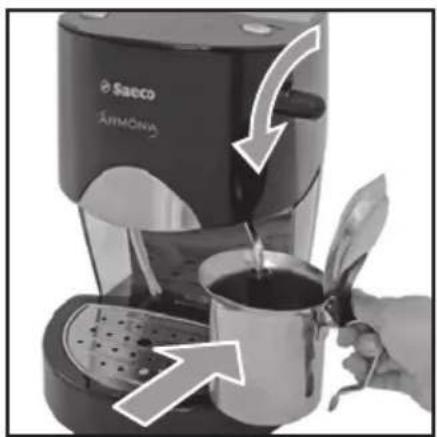
natural_image
Close-up of a Saeco Armonia coffee maker with a hand pouring liquid from a cup (no text or symbols visible)
natural_image
Close-up of a black car's front panel with a white hand pointing at the button (no text or symbols visible)Fig.16 - Abb.16 - Afb.16 Fig.17 - Abb.17 - Afb.17 Fig.18 - Abb.18 - Afb.18

natural_image
Close-up of a Sanco coffee maker with a hand holding a cup, showing its side profile and processing arrows (no text or symbols on the device itself)
natural_image
Close-up of a hand pointing at a button on a device (no text or symbols visible)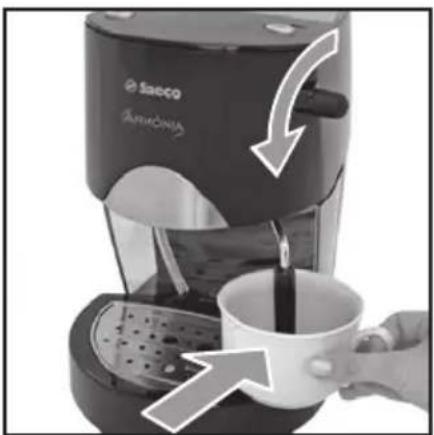
natural_image
Close-up of a Saeco coffee maker with a hand holding a cup, showing its side profile and a white arrow indicating the process (no text or symbols on the device itself)Fig.19 - Abb.19 - Afb.19 Fig.20 - Abb.20 - Afb.20 Fig.21 - Abb.21 - Afb.21

natural_image
Close-up of a coffee maker with a hand pouring liquid into a cup, showing mechanical components and motion arrows (no text or symbols)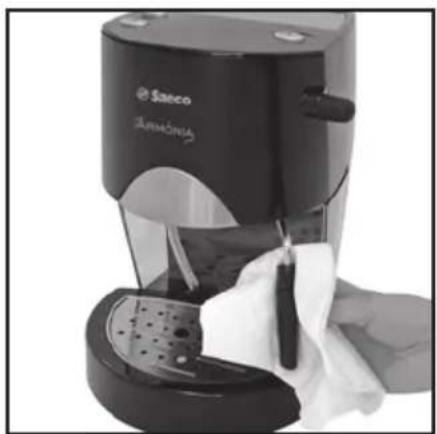
natural_image
Close-up of a Sanco Harmonia coffee maker with a cloth cleaning the cup (no visible text or symbols)
natural_image
Close-up of a black saeco coffee maker with a hand adjusting its lid (no visible text or symbols)Fig.22 - Abb.22 - Afb.22 Fig.23 - Abb.23 - Afb.23
Fig.24 - Abb.24 - Afb.24
INDICE
1 GENERALITÀ ......6
2 DATI TECNICI 7
3 NORME DI SICUREZZA 9
4 INSTALLAZIONE ......11
5 EROGAZIONE DEL CAFFÈ ......12
6 SCELTA DEL TIPO DI CAFFÈ - CONSIGLI 13
7 EROGAZIONE DELL'ACQUA CALDA .....13
8 EROGAZIONE DEL VAPORE/
PREPARAZIONE DEL CAPPUCCINO .....14
9 PULIZIA 14
10 DECALCIFICAZIONE ......14
11 SERVIZIO AD INTERVALLI REGOLARI .....15
12 INFORMAZIONI DI CARATTERE
GIURIDICO ....15
13 SMALTIMENTO ....16
INCONVENIENTI - CAUSE E RIMEDI ......17
1 GENERALITÀ
text_image
E MICO PARISONIA ⚠️ →3 NORME DI SICUREZZA

This coffee machine is ideal for making 1 or 2 cups of espresso coffee and features an adjustable tube for dispensing steam and hot water. All commands on the upper part of the unit are marked with symbols easy to be understood.
The machine is designed for household use only. It is not suitable for continuous professional-type use.

Warning. The manufacturer shall accept no liability for damage or injury caused by:
- Improper use or use for other than the intended purposes;
• Repairs carried out by anyone other than an authorised service centre; - Tampering with the power cord;
- Tampering with any machine component;
- Use of spare parts and accessories other than those supplied by the manufacturer. The warranty will be invalidated in such cases.
1.1 To facilitate interpretation

A warning triangle draws attention to the instructions that are important for user safety. Please carefully abide by these instructions to avoid serious injury!
Fig.1
Illustrations, parts of the appliance and control functions, etc. are referred to by number or letter; in this case reference is made to the illustration.

This symbol is used to highlight information that is especially important for ensuring optimal use of the machine.

The illustrations corresponding to the text may be found on the inside cover flap. Keep this page open while reading the operating instructions.
1.2 How to use these operating instructions
Keep these operating instructions in a safe place and make them available to anyone else who should use the coffee machine.
For further information or in case of problems, contact an authorised service centre.
2 TECHNICAL SPECIFICATIONS
Voltage rating See rating plate on appliance
Power rating See rating plate on appliance
Casing material Thermoplastic
Size (w x h x d) 220 x 300 x 270
Weight 4 Kg
Cord length 1.2 m
Control panel On the upper part
Filter holder "Crema"
"Pannarello" Special steam tube attachment for cappuccino
Water tank Extractible
Power supply See rating plate on appliance
Water tank capacity 1 litre
Pump pressure 15 bars
Boiler INOX Steel
Safety devices Boiler pressure safety valve
Thermostat with manual reset
The producer reserves the right to change the technical characteristics of the product.
Machine in conformity with European Directive 89/336/EEC (Italian Legislative Decree 476 of 04/12/92) concerning electromagnetic compatibility.
3 SAFETY RULES

Never place live parts in contact with water: danger of short circuit! Hot steam and hot water can cause scalding! Never aim the steam or hot water flow towards parts of your body, use caution when touching the steam / hot water nozzle: danger of scalding!
Intended use
This coffee machine is designed for home use only.
Do not make any technical changes or use the machine for purposes other than those stated since this would create serious hazards! The coffee machine may be used only by adults.
Power supply
Plug the coffee machine into a suitable mains socket.
The voltage must match the rating on the appliance identification plate.
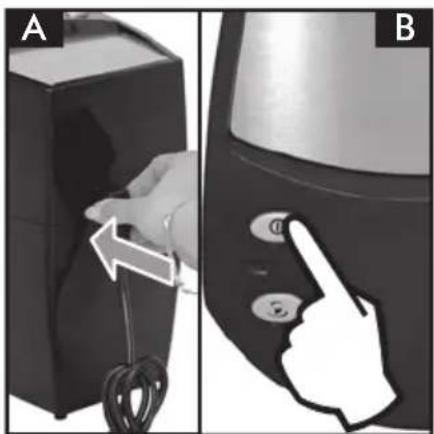
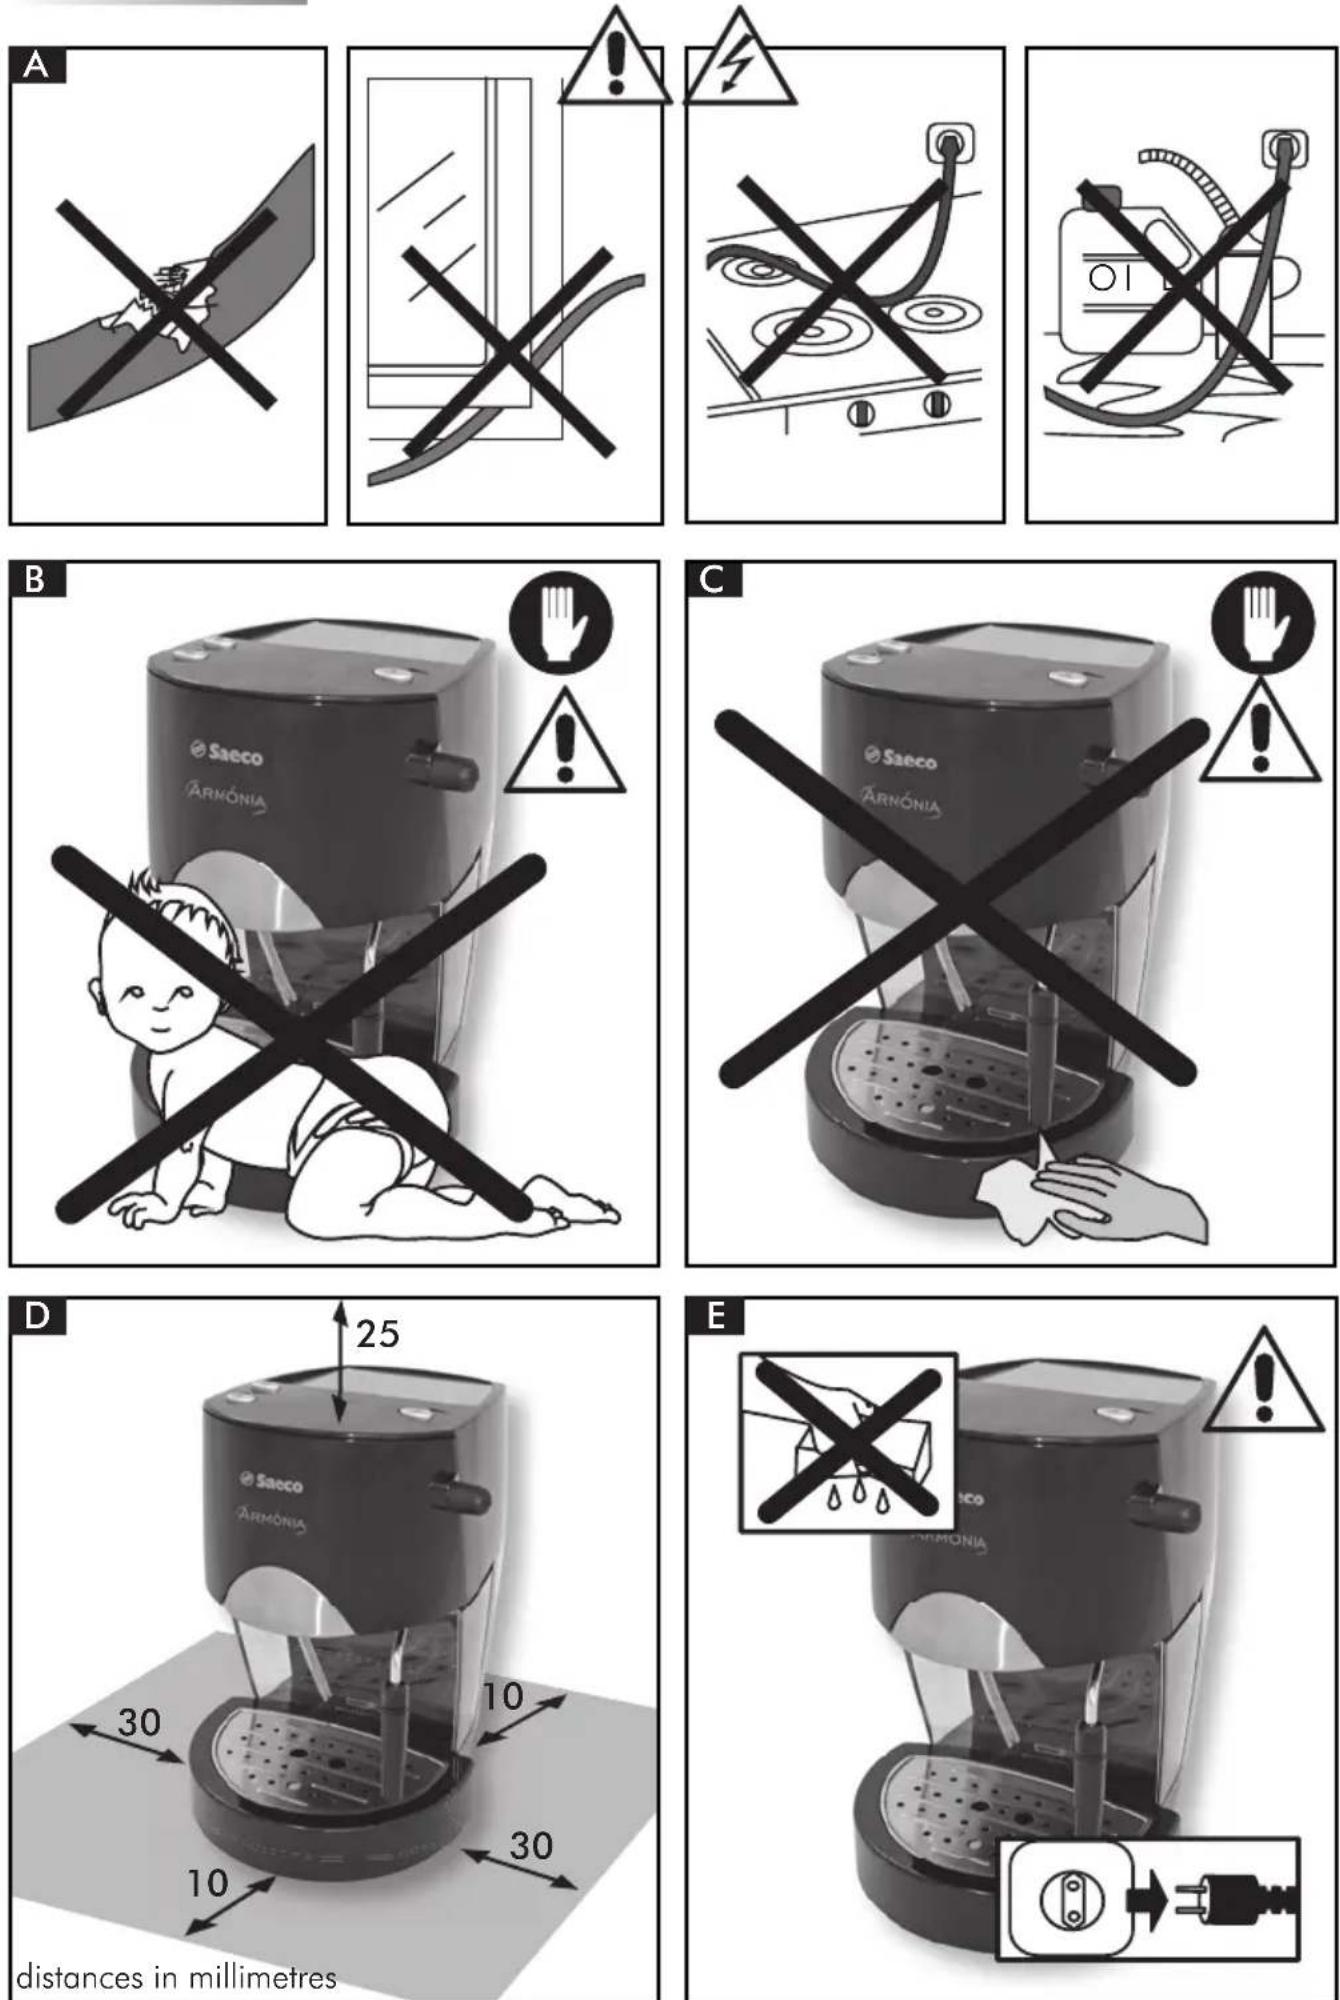
Power cord (Fig.A)
Never use the coffee machine if the power cord is defective.
You should have any defective cords or plugs immediately replaced by an Authorized Service Centre.
Do not pass the cord around corners, over sharp edges or over hot objects and keep it away from oil.
Do not use the power cord to carry or pull the coffee machine.
Do not unplug the appliance by yanking at the power cord or touch the plug with wet hands.
Do not let the power cord hang freely from tables or shelves.
Protecting others (Fig.B)
Make sure that children are not allowed to play with the coffee machine.
Children are not aware of the dangers connected with household appliances.
Do not leave the materials used to pack the appliance within children's reach.
Danger of burns (Fig.C)
Avoid aiming a jet of hot steam and/or hot water at yourself and/or at others.
Always use the handles or knobs provided.
Never attempt to remove the "Crema" filter holder while dispensing coffee.
While the machine is heating up, drops of hot water may be discharged from the brewing head.
Siting (Fig.D)
Place the coffee machine in a safe place where no one can tip it over or be injured by it.
Hot water or steam could be discharged: danger of scalding!
Do not keep the machine at a temperature below 0^ C; frost may damage the machine.
Do not use the coffee machine outdoors.
To prevent the casing from melting or being damaged, avoid resting the machine on very hot surfaces or near open flames.
Cleaning (Fig.E)
Before cleaning the machine, it is indispensable to turn off all the controls and remove the plug from the socket.
Then wait for the machine to cool down.
Never immerse the machine in water! It is strictly forbidden to attempt to access internal machine parts.
Space for use and maintenance (Fig.D)
To ensure that the coffee machine works properly and efficiently, you are advised to:
- Rest it on a perfectly level surface;
- Place it an adequately lit, hygienic location within easy reach of an electric socket;
- Ensure a minimum clearance between the machine and walls as shown in the illustration.
Storing the machine
If the machine is to remain out of use for a long time, it should be switched off and unplugged.
Store it in a dry place out of children's reach.
Keep it protected from dust and dirt.
Servicing / Maintenance
In the event of a breakdown, fault or suspected damage after a fall, immediately unplug the machine.
Never attempt to operate a faulty machine. Maintenance and repairs are to be carried out exclusively by Authorized Service Centres. The manufacturer will accept no liability for any damage caused by improper or unauthorized servicing.
Fire safety
In the event of a fire, use carbon dioxide ( CO_2 ) extinguishers. Do not use water or powder extinguishers.
Key to machine components (Pg.3)
1 Water tank
2 ON/OFF switch
3 Power ON light
4 Coffee switch
5 Temperature ready light
6 Steam switch
7 Hot water/steam knob
8 Brew unit
9 Steam tube ("pannarello")
10 Power cord
11 Drip tray + grill
12 Level indicator for the tank
13 Cup-warming plate
14 "Crema" filter holder
15 Filter for "Crema" filter holder (For making either 1 or 2 coffees)
16 Coffee measure
17 Filter for pods
18 Adaptor for pods
4 INSTALLATION
For your own safety and the safety of others, you must strictly comply with the "Safety Rules" described in section 3.
4.1 Packaging
The original packaging was designed and made to protect the machine during shipping. We recommend keeping it for future transport purposes.
4.2 Installation precautions
Before installing the machine, make sure to follow these safety precautions:
- put the machine in a safe place;
• make sure that children are not allowed to play with the machine; - avoid placing the machine on very hot surfaces or near open flames.
Now the coffee machine is ready to be connected to the mains power supply.
4.3 Mains connection
Electricity can be dangerous! Therefore, always strictly abide by the safety rules.
Never use defective cords! Defective cords and plugs must be immediately replaced by an Authorised Service Centre.
The coffee machine must be plugged into a suitable electric socket.
The voltage of the appliance is factory set. Check that the mains voltage matches the rating specified on the identification plate on the bottom of the appliance.
- Before plugging in the machine, make sure the ON/OFF switch is not pressed (2).
- (Fig.4A) - Put the socket into the outlet on the rear of the machine.
- Connect the other socket to a wall outlet having the proper voltage.
4.4 Filling the water tank
• (Fig.1) - Remove the water tank (1) taking care not to damage the water suction tube.
• (Fig.2) - Rinse out the tank and fill it with fresh drinking water, taking care not to overfill.
• (Fig.3) - Fit the tank again in its position, and place the tube previously removed.
Always fill the tank with fresh, still drinking water.
Hot water and/or other liquids may damage the tank. Always make sure that there is sufficient water in the tank before starting the machine.
4.5 Loading the circuit
Before starting the machine, if it has been inoperative for a long time and all the water has been used up, you must reload the circuit.
- (Fig.4B) - Press the ON/OFF switch (2). The light (3) will go on.
- (Fig.5) - Place a container beneath the steam tube. Turn the "hot water/steam" knob (7) counterclockwise to open.
• (Fig.6) - Press the coffee switch (4). - Wait until a steady stream of water flows from the steam tube ("pannarello").
- Press the coffee switch (4) again. Turn the "hot water/steam" knob (7) clockwise to shut off flow (Fig.7). Remove the container.
The machine is now ready to dispense coffee and steam; for a description of machine functions, see the specific sections.
5 MAKING COFFEE
Warning! While the brew unit is operating it is forbidden to remove the "Crema" filter holder by manually turning it clockwise. Danger of burns!
- During this operation the temperature ready light (5) may go on and off; this is normal and not to be considered a fault.
- Before using the machine, make sure that the hot water/steam knob (7) is closed and that there is a sufficient amount of water in the tank.
- (Fig.4B) - If the machine is off, turn it on by pressing the ON/OFF switch (2); the light (3) will go on.
- Wait until the temperature ready light (5) goes on; now the machine is ready to dispense coffee.
5.1 With ground coffee
- (Fig.8A) - Place the filter (15) inside the "Crema" filter holder (14).
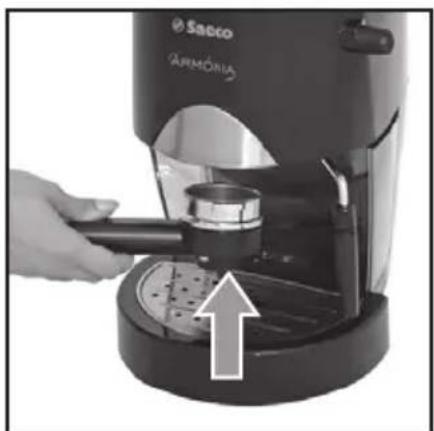
- (Fig.10) - Fit the "Crema" filter holder into the brew unit (8) from below.
• (Fig.11) - Turn the filter holder from left to right until it locks into place.
- Let go of the handle of the "Crema" filter holder. An automatic system will now cause the handle to shift slightly back to the left. This serves to ensure that the "Crema" filter will function perfectly.
- (Fig.13) - Preheat the "Crema" filter holder by pressing the coffee switch (4); water will start to come out of the "Crema" filter holder (this operation is only necessary for the first cup of coffee).
- After allowing 50cc of water to flow out, press the coffee switch (4) again to shut off the flow of hot water.
- (Fig.15) - Remove the "Crema" filter holder from the machine by turning it from right to left and empty out any water inside it.
- Thanks to the special "Crema" filter holder (14) supplied with your machine, you need not change the filter when you switch between one and two cups of coffee.
- (Fig.8B) - Pour 1 or 2 level measures of ground coffee in the filter, depending on whether you want to make one or two cups of coffee; wipe the edge of the filter holder clean of any coffee grounds.
- (Fig.10) - Fit the "Crema" filter holder into the brew unit (8) from below.
• (Fig.11) - Turn the filter holder from left to right until it locks into place. - (Fig.12) - Place 1 or 2 preheated cups beneath the "Crema" filter; make sure that you position them properly under the coffee outlets.
• (Fig.13) - Press the coffee button (4). - When you have dispensed the desired amount of coffee, press the coffee button (4) again to stop flow and remove the cups containing the coffee (Fig.14).
- (Fig.15) - After making coffee, wait a few seconds, remove the "Crema" filter holder and empty out the used grounds.
i Cleaning note: keep the coffee filter clean by detaching it from the
"Crema" filter holder and washing it with drinking water (Fig.16).
5.2 With coffee pods
- (Fig.9) - Fit the adaptor for pods (18) into the "Crema" filter holder (14), then also put the filter (17).
- (Fig.10) - Fit the "Crema" filter holder into the brew unit (8) from below.
• (Fig.11) - Turn the filter holder from left to right until it locks into place.
- Let go of the handle of the "Crema" filter holder. An automatic system will now cause the handle to shift slightly back to the left. This serves to ensure that the "Crema" filter will function perfectly.
- (Fig.13) - Preheat the "Crema" filter holder by pressing the coffee switch (4); water will start to come out of the "Crema" filter holder (this operation is only necessary for the first cup of coffee).
- After allowing 50cc of water to flow out, press the coffee switch (4) again to shut off the flow of hot water.
- (Fig.15) - Remove the "Crema" filter holder from the machine by turning it from right to left and empty out any water inside it.
- Fit the pod into the filter holder; make sure the pod paper does not come out from the filder holder.
- (Fig.10) - Fit the "Crema" filter holder into the brew unit (8) from below.
• (Fig.11) - Turn the filter holder from left to right until it locks into place. - (Fig.12) - Take 1 pre-warmed cup and put it beneath the filter holder; make sure it is correctly positioned beneath the coffee dispensing nozzles.
• (Fig.13) - Press the coffee button (4). - When you have dispensed the desired amount of coffee, press the coffee button (4) again to stop flow and remove the cup containing the coffee (Fig.14).
• (Fig.15) - After dispensing, wait some seconds, remove the filter holder, and dispose of the pod used.
i Cleaning note: keep the coffee filter clean by detaching it from the "Crema" filter holder and washing it with drinking water (Fig.16).
6 CHOOSING THE TYPE OF COFFEE - TIPS
Generally speaking, you can use any type of commercially available coffee.
However, coffee is a natural product and its flavour will vary depending on where it comes from and the blend used; it is thus a good idea to try out different types until you find the one that best suits your personal taste.
For best results you should use blends specifically prepared for espresso coffee machines.
Coffee should flow out smoothly from the "Crema" filter holder without dripping.
The speed of flow can be adjusted by slightly changing the amount of coffee in the filter and/or using coffee with a finer or coarser grind.
BEFORE ATTEMPTING ANY OPERATION INVOLVING THE RELEASE OF STEAM OR HOT WATER, MAKE SURE THAT THE STEAM TUBE ("PANNARELLO") IS POSITIONED OVER THE DRIP TRAY.
7 DISPENSING HOT WATER
Danger of scalding! Brief sprays of hot water may be discharged at first. The dispensing tube can reach very high temperatures: avoiding touching it directly with your hands.
- (Fig.4B) - If the machine is off, turn it on by pressing the ON/OFF switch (2); the light (3) will go on.
- Wait until the temperature ready light (5) goes on.
- (Fig.17) - Place a container or mug beneath the steam tube ("pannarello"). Turn the "Hot water/steam" knob (7) counterclockwise to open.
• (Fig.18) - Press the coffee button (4) to dispense hot water.
- When you have dispensed the desired quantity of hot water, press the coffee button (4) again.
• (Fig.19) - Turn the knob (7) clockwise to close. Remove the container of hot water.
8 DISPENSING STEAM/MAKING CAPPUCCINO
Danger of scalding! The steam may be preceded by brief sprays of hot water. The dispensing tube can reach very high temperatures: avoiding touching it directly with your hands.
- (Fig.4B) - If the machine is off, turn it on by pressing the ON/OFF switch (2); the light (3) will go on.
• (Fig.20) - Press the (6) steam switch. The temperature ready light will go off (5). - Wait until the temperature ready light (5) goes back on. Now the machine is ready to
dispense steam.
- (Fig.17) - Place a container beneath the steam tube and open the "Hot water/steam" knob (7) for a few seconds to discharge residual water from the steam tube ("pannarello"). Shortly only steam will issue from the tube.
• (Fig.19) - Close the knob (7) and remove the container. - Fill the container you want to use for making cappuccino to 1/3 with cold milk.

For best results, use only cold milk when making cappuccino.
- (Fig.21) - Place the tip of the steam tube in the milk to be heated and turn the knob (7) counterclockwise; move the container slowly up and down and in circles to heat the milk evenly.
- (Fig.22) - After frothing the milk as desired, turn the knob (7) clockwise to shut off steam. Remove the cup with frothed milk.
• (Fig.20) - Press the steam switch (6) again. - Load the circuit as directed in section 4.5 to prepare the machine for use.

The same method may be used to heat other beverages.
- (Fig.23) - After completing this operation, wipe the steam tube clean with a damp cloth.
9 CLEANING
Maintenance and cleaning jobs may be carried out only when the machine is cold and disconnected from the power supply.
- Do not immerse the machine in water nor place any of its components in a dish-washer.
- Do not use sharp objects or harsh chemical products (solvents) for cleaning.
- It is recommended to clean the water tank daily and refill it with fresh water.
• (Fig.23) - After heating milk, release a small
quantity of hot water to clean out the tube. Wipe the outside of the tube clean with a damp cloth.
• (Fig.24) - Everyday you should empty and wash the drip tray.
- Use a soft cloth dampened with water to clean the machine body.
- (Fig.16) - To clean the "Crema" filter holder:
- Remove the filter, immerse it in hot water and wash it thoroughly.
- Wash out the inside of the "Crema" filter holder.
- Never dry the machine and/or its components in a microwave or conventional oven.
10 DESCALING
Scale normally forms inside the machine with use; descaling is necessary every 3-4 months or whenever you observe a decrease in water flow.

If you wish to descale the machine yourself, you can use any commercially able non-toxic, non-harmful descaling act for coffee machines.
We recommend using Saeco descaler.

Warning! Never use vinegar as a descaling agent.
- Remove the water tank and empty out any water left inside it.
- (Fig.2) - Mix the descaling agent with water as directed on the package and pour all the solution into the tank. Place the tank inside the machine
- (Fig.4B) - Turn on the machine by pressing the ON/OFF switch (2).
• (Fig.5) - Place a container beneath the steam tube. - Empty the entire contents from the water tank at intervals (one cup at a time): turn the steam knob (7) counterclockwise and press the coffee switch (4) to activate flow and then press the coffee switch (4) again and turn the
steam knob (7) clockwise to shut off flow.
- (Fig.4B) - You should allow the descaling agent to act for about 10-15 minutes during each interval; in the meantime, turn off the machine by pressing the ON/OFF switch (2). Empty out the container.
- (Fig.2) - When all the descaling solution has been run through the machine, take out the water tank, rinse it out and refill it with fresh drinking water.
- (Fig.3; Fig.5) - Place the tank back inside the machine. Empty out 2/3 of the water in the tank by turning the steam knob (7) counterclockwise and pressing the coffee switch (4); to shut off flow press the coffee switch (4) again and turn the steam knob (7) clockwise.
- Let the machine heat up and empty out the remaining water in the tank by turning the steam knob (7) counterclockwise and pressing the coffee switch (4); to shut off flow press the coffee switch (4) again and turn the steam knob (7) clockwise.
i Should you use a descaling product other than the one recommended, make sure in any case to follow the manufacturer's directions on the package.
11 REGULAR SERVICING
Having your machine regularly serviced by an Authorised Service Centre will extend its life and keep it performing reliably.
Keep the original packing container to protect the machine during transport.
12 LEGAL INFORMATION
• These operating instructions contain all the necessary information for proper use, operation and upkeep of the appliance.
- The user must be acquainted with these instructions and observe them carefully in order to operate and maintain the appliance safely and avoid hazards.
- If you wish to receive further information
or encounter any particular problems you feel have not been explained with sufficient clarity in these operating instructions, please contact your local dealer or the manufacturer directly.
- You should note, moreover, that the contents herein do not form part of a previous or already existing agreement or legal contract and thus do not affect the substance of the latter.
- All the manufacturer's obligations are based on the conditions set forth in the contract of sale, which also contains complete and exclusive terms with regard to warranty services.
- The warranty terms specified in the contract are neither limited nor extended by the explanations provided herein.
• These operating instructions contain information protected by copyright. - They may not be photocopied or translated into another language without the Manufacturer's prior written consent.
13 DISPOSAL
- Appliances no longer in use should be rendered unusable.
- Unplug the machine, and remove the electric cable.
- At the end of their life appliances should be taken to a suitable waste collection facility.
| Problem Possible causes Remedy | ||
| The machine does not turn on The | machine is not connected to the power supply | Connect the machine to the power supply |
| The pump is very noisy W | ater level in tank too low Add water | (section 4.4) |
| The coffee is too cold The | temperature ready light (5) was off when you pressed the switch (4) | Wait until the light goes on |
| Filter holder not inserted for pre-heating (section 5). | Pre-heat the filter holder | |
| The milk does not froth properly W | rong kind of milk Check the fat content | |
| The coffee flows out too fast and no creamy froth forms on the surface | Not enough coffee in the filter holder A | add some coffee (section 5) |
| Coffee ground too coarsely Use a diffrent blend (section 6) | ||
| Stale or unsuitable coffee. | Use a different blend (section 6). | |
| No coffee flows out or it just drips out slowly | Water level in tank too low Add water | (section 4.4) |
| Coffee ground too finely | Use a different blend (section 6) | |
| Coffee compressed too firmly in the filter | Loosen the ground coffee | |
| Too much coffee in the filter | Reduce the amount of coffee in the filter holder | |
| "Hot water/steam" knob (7) open. | Turn the knob (7) clockwise to close | |
| Excessive buildup of scale | Descale the machine (section 10) | |
| Filter in filter holder clogged | Clean the filter (section 9) | |
| Coffee leaks outside the rim | Filter holder not properly fit into brew unit | Fit the filter holder properly in place (section 5) |
| Upper rim of filter holder dirty | Clean the filter holder rim | |
| Boiler gasket dirty or worn | Clean or replace gasket | |
| Too much coffee in the filter holder | Reduce the amount of coffee.Use the measure for the right amount. | |
Should any problems occur that are not included in the above table or cannot be resolved using the remedies suggested contact an authorised service centre.