EFG669VRVS - Cooker ETNA - Free user manual and instructions
Find the device manual for free EFG669VRVS ETNA in PDF.

User questions about EFG669VRVS ETNA
0 question about this device. Answer the ones you know or ask your own.
Ask a new question about this device
Download the instructions for your Cooker in PDF format for free! Find your manual EFG669VRVS - ETNA and take your electronic device back in hand. On this page are published all the documents necessary for the use of your device. EFG669VRVS by ETNA.
USER MANUAL EFG669VRVS ETNA
fornuis (EFG609/EFG659/EFG669)
A - sierdeksel
B - bedieningspaneel
C - oven
D - opbergvak (EFG669)
E - stelvoeten
bedieningspaneel (EFG609/EFG659/EFG669)
natural_image
Prohibition sign showing a crossed-out fence with leaves, no text or symbols presentnatural_image
Simple diagram of a circular object with internal lines and directional arrows, no text or symbols present.fig. 2
De vlambeveiliging schakelt in.
Pannen
natural_image
Illustration of a cooking pot with steam rising from its side (no text or symbols)fig. 3
Fout:
Er ontsnapt veel warmte langs de pan.
natural_image
Illustration of a stainless steel cooking pot with lid and side legs (no text or symbols)Goed:
natural_image
Circular metallic object with reflective surface and surrounding small square icons (no text or symbols)fig. 7 - EFG609/659/669
natural_image
Circular diagram with a central screen and surrounding icons (no text or labels)fig. 8a - EFG679

natural_image
Circular device with indicator lights and a black dot on top, no visible text or symbolsfig. 8b - EFG689
natural_image
Pure diagram of a mechanical or structural component with no text, numbers, or symbolsfig. 12
natural_image
Blank gray image with no visible content, text, or symbolsIntroduction
When you have read these instructions for use, you will quickly be aware of all the facilities the appliance can offer you. You can read about safety and how you should look after the appliance. In addition you will find environmental tips and instructions that can help to save energy.
Keep the instructions for use and the installation instructions. Any later user of this appliance could benefit from them.
Enjoy your cooking!
Table of contents
■ Introduction.... GB 3
■ Appliance description .... GB 4
Safety GB 6
Things to watch for . . . . . . . . . . . . . . GB 6
■ Preparations GB 8
Before using your appliance ..... GB 8
Use GB 9
Lighting the burners GB 9
Switching on the oven . . . . . . . . . . GB 10
Switching on the oven with timer clock function ...... GB 13
■ Application GB 15
Baking-, roasting- and grilling tips . GB 15
Table for grilling GB 16
Table for baking. GB 17
■ Maintenance GB 18
Cleaning the cooker . . . . . . . . . . GB 18
Cleaning the oven GB 18
■ Installation. GB 19
■ Disposal of appliance and packaging GB 21
This appliance complies with the CE directives

text_image
2 3 1 4 5 6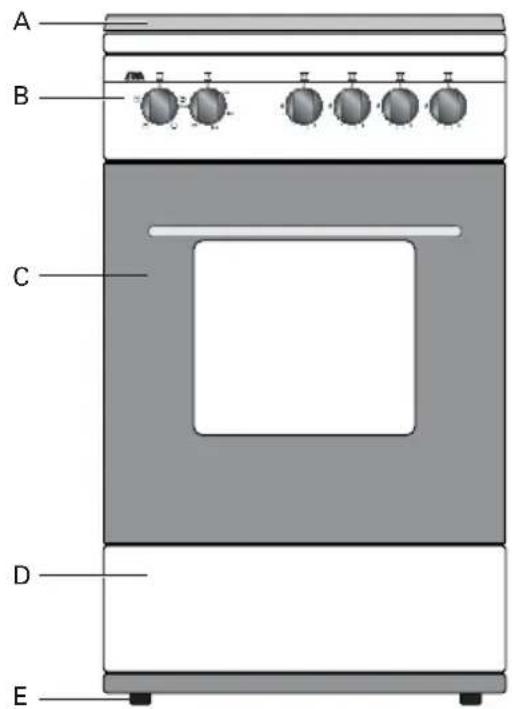
text_image
A B C D EAppliance description
Type
gashob (EFG609/EFG659/EFG669/EFG679)
1 - rapid burner
2 - semi-rapid burner
3 - semi-rapid burner
4 - simmer burner
5 - saucepan supports
6 - drip tray
cooker (EFG609/EFG659/EFG669)
A - cover
B - control panel
C - oven
D - storage space (EFG669)
E - adjustable feet
control panel (EFG609/EFG659/EFG669)
7 - control knob for oven functions
8 - control knob for oven temperature
9 - control knob for semi-rapid burner 2
10 - control knob for rapid burner 1
11 - control knob for simmer burner 4
12 - control knob for semi-rapid burner 3

text_image
ETNA 7 8 9 10 11 12
text_image
1 2 3 4 5 6 A B C D EAppliance description
gashob (EFG689)
1 - wok burner
2 - semi-rapid burner
3 - semi-rapid burner
4 - simmer burner
5 - saucepan supports
6 - drip tray
cooker (EFG689/EFG679)
A - cover
B - control panel
C - oven
D - storage space
E - adjustable feet
control panel (EFG689/EFG679)
7 - digital timer clock
8 - control knob for oven functions
9 - control knob for oven temperature
10- control knob for semi-rapid burner 2
11 - control knob for wok burner 1 (EFG689)
11 - control knob for rapid burner 1 (EFG679)
12 - control knob for simmer burner 4
13- control knob for semi-rapid burner 3

text_image
ETNA °C 1245 mode 8 9 7 1 0 1 1 1 2 1 3Things to watch for
The appliance may only be connected by an authorised service technician.
This appliance is not intended for use by persons (including children) with reduced physical, sensory or mental capabilities, or lack of experience and knowledge, unless they have been given supervision or instruction concerning use of the appliance by a person responsible for their safety.
The furniture that is in contact with the appliance must be heat resistant (T 90 °C).
During repair and cleaning the appliance needs to be disconnected from the power supply (electricity and gas). Remove the plug from the wall socket or turn the switch in the metre cupboard to zero. Turn off the gas tap in the feeder pipe.
- Do not use the appliance if it is damaged.
This appliance must only be used for the purpose for which it is designed, i.e. the preparation of food. Use for any other purpose should be considered to be improper and dangerous. We accept no responsibility whatsoever for damage caused by incorrect, improper or irrational use of the appliance.
- When boiling and frying the hob gets hot. Please pay close attention to small children.
■ Grease and oil are flammable when overheated. Stay near the appliance when preparing dishes. - Never cover the base of the oven with aluminium foil and do not put baking tins on the base of the oven. The foil will block the heat, damaging the enamel, and the baking result will therefore not be satisfactory.
- Do not use the appliance to heat the kitchen. This will produce a damp atmosphere.
When a gas cooking appliance is being used heat and moisture is produced in the area where the appliance is situated. Make sure that the area is sufficiently ventilated: open natural ventilation openings or fit a mechanical ventilator (extractor). When the hob is used for longer periods extra ventilation may be needed, such as an open window or a higher setting on the ventilator (extractor). - When the cable is damaged it may only be replaced by the manufacturer, its service organization or equally qualified persons, to avoid dangerous situations.
The glass oven door can heat up when using the oven at maximum temperature for a long time (e.g. during grilling). Act with care if children are nearby.
- Cords to electrical appliances - e.g. a mixer - can get caught between the door of the convector oven or may accidentally touch the cooking zones.
- Easy accessible parts of the hob can get hot. Please pay close attention to small children.
- Do not use the unit as a toy.
The inside of the storage compartment becomes hot when the oven is used. Do not use the storage compartment for flammable materials or materials that may become distorted by heat.
- Do not place any flammable materials in the oven.
- Never pour water directly in the hot oven, as it can damage the enamel.
- Never sit or stand on the open oven door.
- Do not clean the oven with a high pressure hose. This could cause a short circuit in the electric wiring.
■ Always cool the oven with a closed oven door.
■ Any spillage should be removed immediately, particularly red cabbage, apple sauce and rhubarb. These can leave permanent spots on the enamel or on stainless steel.
■ Always raise the decorative cover when using the burners on the hob or the oven. Do not use the decorative cover as a surface for cooking on.
■ Caution: glass lids may shatter when heated. Turn off all burners before shutting the lid.

natural_image
Prohibition sign showing a crossed-out line crossing over leafy plants (no text or symbols)Before using your appliance
Gashob
Burning in of the enamel
The burners cause the saucepan supports to get extremely hot. In time the enamel on the support points can burn in. This cannot be prevented and is not covered by the guarantee.
Burner caps
- Check regularly whether the caps of the burners are properly in position on the burner depressions. Improper positioning can make it difficult to light the burners, give rise to an irregular gas flame, or damage the burner caps.
Oven
Prepare for use

When the oven is heated to a high temperature for the first time, you will smell a “new appliance” odour. This is to be expected.
■ Remove the sticker from the glass panel in the oven door.
■ Remove the protective foil from stainless steel doors.
■ Remove all accessories from the oven and clean them thoroughly using a dish-washing detergent.
Switch on the closed, empty oven at the maximum temperature for about thirty minutes, after which the grilling element should be switched on for a period of fifteen minutes. Let the oven cool off and clean it with warm water.
Clock (EFG679/EFG689)
text_image
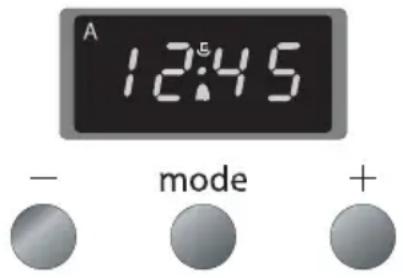
A 12:45 - mode +fig. 1
The "A" symbol flickers if you have not yet set the time of day.
Setting the time of day
There is a 24-hour clock on the display that indicates the time of day. Press the + and – keys simultaneously. The point in the middle of the clock flickers. You can now set the time of day.
- Press the - / + keys until the right time is reached. Now wait 5 seconds. The time of day is automatically set.
Lighting the burners
Press the knob of burner in and turn it to the left and ignite the burner with a match.
The gas flame can be smoothly adjusted from high to low (EFG609H).
Electrical spark ignition
Press the knob of burner in and turn it to the left, to the full-on position (see fig. 2). Sparks appear around the burner which then ignites. The gas flame can be smoothly adjusted from high to low. If the burner fails to light after repeated attempts, check to ensure that the burner cap is properly positioned.
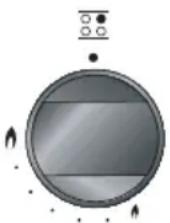
fig. 2
Wok burner ignition (EFG689)
The wok burner in this appliance is equipped with an additional safety feature. This feature allows the ignition of the wok burner only in the max. position, preventing inadvertent ignition in minimum position.
The burner is ignited as described below:
- Push the knob down when the knob is in "off" position. Turn the knob counterclockwise and keep pushing the knob. You will feel that the knob goes further down just at max. position. Sparks appear around the burner which then ignites. The gas flame can be smoothly adjusted from high to low.
In case the flames are accidentally put out, turn the knob to the "off" position, wait for 60 seconds and re-ignite the burner again as described.
Flame failure device
The flame failure device ensures that the gas supply is closed if the flame goes out during the cooking process.
Hold the control knob pressed in in the full position for approximately 5 seconds.
The flame failure device will switch on.
Saucepans
The recommended pan sizes are:
For the wok burner, min. 28-34 cm;
■ For the rapid burner, min.22-26 cm;
For the semi-rapid burner, min.16-20 cm;
■ For the simmer burner, min. 12-14 cm.

natural_image
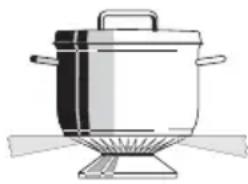
Illustration of a cooking pot with steam rising from its side (no text or symbols)fig. 3
Wrong :
A great deal of heat is lost along the sides of the saucepan.
natural_image
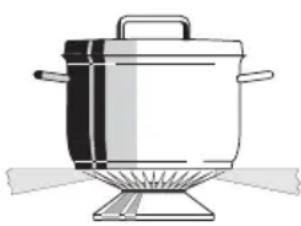
Illustration of a cooking pot with lid and side legs, no text or symbols presentRight:
The heat is evenly distributed over the base of the saucepan.
fig. 4
Tip
Keep the lid on the cooking pan while cooking and save energy.
Clean saucepans absorb heat more efficiently.
Switching on the oven
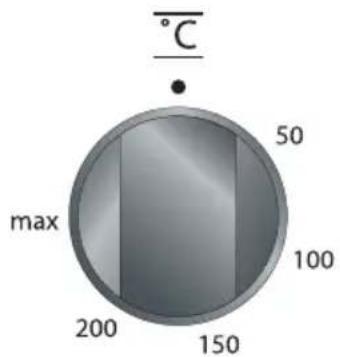
Thermostat control knob
You use the thermostat control knob to set the temperature. The temperature range is continuous.
text_image
°C 50 max 100 200 150fig. 6
Kitchen timer
The kitchen timer goes off after a pre-set time has elapsed. The kitchen timer does not turn the oven off.

text_image
A 12:45 - mode +fig. 5
- Press the 'mode' key until appears in the display. The point in the middle of the clock flickers.
- Set the cooking time using the - / + keys. Now wait 5 seconds. The cooking time is set automatically.
The alarm goes off after the pre-set time has elapsed. The symbol in the display flickers. Turn the alarm off using the 'mode' key.
Switching on the oven without timer clock function
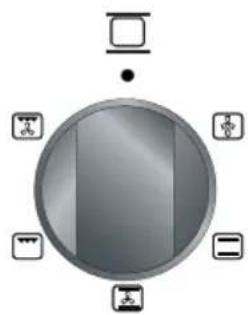
Choose an oven function by turning the knob to the desired symbol. Choose the desired temperature. The temperature can be adjusted continuously.
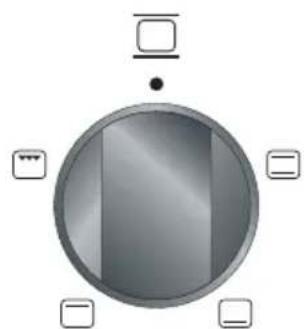
Function knob
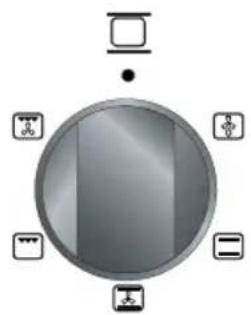
natural_image
Circular metallic object with reflective surface and four small square buttons at corners (no text or symbols)fig. 7 - EFG609/659/669
natural_image
Circular device with a screen and four labeled icons (no text or symbols)fig. 8a - EFG679

natural_image
Circular diagram with a central screen and eight surrounding icons (no text or labels)fig. 8b - EFG689V
| Symbol | Description |
| thawing | |
| conventional | |
| hot air | |
| grill | |
| bottom heat | |
| upper heat | |
| ventilation + grill | |
| fan + bottom heat | |
| grill + upper heat | |
| grill + upper heat + fan |
Remove from the oven everything which you are not using to prepare the dish. Slide the dish into the oven if it is not necessary to pre-warm the oven.
Thawing
You can thaw food using the hot air fan. Remove the wrapping and put the frozen food in a dish. Put the dish on ridge 1. Set the function knob of the hot air oven to ⏻ (the fan will now blow cold air).
Conventional
The dish is heated by the radiation heat of the upper and lower elements. Always place the dish in the centre of the oven. See the temperature table on p. 18 to determine the height of the ridge. This setting is ideal for the traditional way of preparing dishes. Dishes rise well and brown nicely.
Hot air
The air in the oven is heated by the hot air element. The fan in the back of the oven blows hot air into the oven. This is used to heat the dishes.
Grill
The dishes are heated by the radiation heat of the combined grillelement. Flat pieces of meat, chicken or other poultry may be grilled directly on the grid shelf. This grill setting is also suitable for toasting bread.
Bottom heat
Only the heating element at the bottom of the oven radiates heat. This method is especially useful for baking low pastries and for preserving fruit and vegetables. Use the lowest oven shelf support and not-too-high baking tins, so that the warm air can also circulate over the top of the dish.
Upper heat
Only the uppermost heating element comes on with this heating method. This method is suitable for cooking meat and pastries, except for pastries with a fruit filling. Information on pre-heating, the level choice and the baking/cooking time are given in the conventional heating method table on p. 17.
Ventilation + grill
Turn the oven function knob on setting 📁 for grilling with ventilation. The ventilator ensures you that the heat is distributed evenly.
Fan + bottom heat
In this setting, the dish is heated by the lower heating element together with the fan.
This is the ideal setting for rapidly heating cold dishes.
Double grill (grill + upper heat)
The double grill setting is used for speed grilling. This setting provides a larger grill area than the conventional grill setting.
Preheat the oven for 5 minutes. Then place the dish on the upper ridge. Place the oven tray onto the third shelf for collecting oils that may drip from the food.
Double grill + fan
(grill + upper heat + fan)
The double grill together with the fan provides the ideal setting for roasting and ensures optimal crispness of your dish.
Preheat the oven for 5 minutes. Then place the dish on the upper ridge. Place the oven tray onto the third shelf for collecting oils that may drip from the food.
Switching on the oven with timer clock function

text_image
A 12:45 - mode +fig. 9
Turn off automatically with cooking time function
The cooking time is the time that is required to prepare the dish. By setting the cooking time with this function, you can set the oven to turn off automatically after the pre-set cooking time has elapsed. The maximum cooking time that you can set is 10 hours.
- Choose an oven function by turning the knob to the desired symbol.
- Choose the desired temperature. The temperature can be adjusted continuously.
- Press the ‘mode’ key until ‘Dur’ appears in the display.
- Press on the - / + keys until the right cooking time is reached.
The time of day reappears five seconds after releasing the key. "A" and 📄 light up.
The oven is on and gives a signal after the cooking time has elapsed. The oven automatically switches off. Turn the signal off by pressing one of the 3 keys.
Turn the oven off fully by turning the function knob and thermostat knob to zero.
Turn off automatically with end time function
The end time is the time when the dish must be ready. By setting the end time with this function, you can set the oven to turn off automatically after the pre-set end time has elapsed.
- Choose an oven function by turning the knob to the desired symbol.
- Choose the desired temperature. The temperature can be adjusted continuously.
- Press the 'mode' key until 'End' appears in the display.
- Press on the - / + keys until the right cooking time is reached.
The time of day reappears five seconds after releasing the key. "A" and 📄 light up.
The oven is on and gives a signal after the cooking time has elapsed. The oven automatically switches off. Turn the signal off by pressing one of the 3 keys.
Turn the oven off fully by turning the function knob and thermostat knob to zero.
Turn off automatically with end time and cooking time function
The cooking time is the time that is required to prepare the dish. The end time is the time when the dish must be ready. By setting the cooking time and end time with this function, you can set the oven to turn on and off automatically. The oven switches off after the cooking time has elapsed. The maximum cooking time that you can set is 10 hours.
- Choose an oven function by turning the knob to the desired symbol.
- Choose the desired temperature. The temperature can be adjusted continuously.
- Press the 'mode' key until 'Dur' appears in the display.
Press on the - / + keys until the right cooking time is reached. The time of day reappears five seconds after releasing the key. "A" and 📋 light up. The oven is switched on. - Press the 'mode' key until 'End' appears in the display. The earliest possible end time appears in the display.
- Press on the - / + keys until the right end time is reached.
The oven automatically switches on and off and gives a signal after the cooking time has elapsed. Turn the signal off by pressing one of the 3 keys.
Turn the oven off fully by turning the function knob and thermostat knob to zero.
Baking-, roasting- and grilling tips
Oven levels
Depending on the height of the pastry or cookies, place the baking sheet on the second or third level from the bottom. Tins should be placed on a rack on the first or second level from the bottom.
Tins are important
In particular in ovens with upper and lower heating elements, the material from which the tin is made is extremely important. The best tins are made from black tin or are lined with a special synthetic material: these tins absorb the heat the quickest and can shorten the baking time.
How to test whether or not a cake is cooked
Prick a skewer into the cake at its thickest point about 10 minutes before the end of the given baking time. If the skewer remains dry and no cake mixture sticks to it you can turn off the oven and use the residual heat to let the cake cook thoroughly.
The cake has not risen properly
Use less liquid next time or set the oven to a temperature 10 °C lower. You should adhere exactly to the mixing times given in your cookery book.
The cake has sunk in the middle
The cake has risen beautifully at the edges but sunk in the middle. Do not grease the sides of the cake tin. Loosen the cake carefully with a knife after baking.
The cake is too dark on the top
Put the cake on a lower ridge in the oven, set a lower temperature, bake the cake for a little longer and, perhaps, use black baking tins.
The cake is too dark on the bottom
Put the cake on a higher ridge in the oven and set a lower temperature.
The soufflé is much too dark on top
Remove the crust. Grill the top for a moment to give a golden brown crust to the soufflé. Do not use Parmesan cheese: this type of cheese browns too quickly and will taste bitter. Next time put the dish a little lower in the oven and set the temperature 10 °C lower.
The biscuits stick to the baking sheet
Slide the baking sheet back into the oven for a moment and then remove the biscuits immediately.
The cake will not turn out of the tin.
Carefully loosen the edge with a sharp knife. Turn the tin upside down again and cover with a cold, damp cloth a couple of times. Next time grease and flour the tin well.
Oven levels
When grilling smaller quantities, place the roasting tin at the top of the oven (ridge 4). Dishes which require a longer cooking time should be placed lower in the oven (ridge 3). This also applies when grilling dishes with larger surface areas.
Table for grilling
| Grill meat Temp. Ridge | Temp. Ridge Time in °C | level* | °C |
| Thin items | |||
| Steak 180 - 200 4 10 - 12 | |||
| Schnitzel/chops 180 - 200 4 12 - 16 | |||
| Meatballs 180 - 200 3 | 14 - 18 | ||
| Bratwurst 180 - 200 3 | 16 - 20 | ||
| Fillet of fish | 180 - 200 4 14 - 16 | ||
| Toast | 180 - 200 4 2 - 4 | ||
| Toast, sandwich 180 - 200 3 2 - 4 | |||
| Kebab | 180 - 200 4 | 6 - 10 | |
| Thicker items | |||
| Chicken, approx. 1 kg | 200 3 | 50 - 60 | |
| Rolled meat, approx. 1 kg | 200 2 | 50 - 60 | |
| Casseler rib | 200 2 | 60 - 70 |
The figures in this table are guidelines.
* shelf height from the bottom
Table for baking
| Conventional | ||
| Dish Temp Ridge- Time in | ||
| in | °C | |
| Stir dough | ||
| Shortbread 160 - 180 2 50 - 60 | ||
| Fruit-cake 160 - 180 2 70 - 80 | ||
| Cake with nuts 160 - 180 2 60 - 70 | ||
| Fruit pie baking tin 180 - 200 2,3 35 - 45 | ||
| Fruit-pie cake tin 160 - 180 3 45 - 55 | ||
| Pie base 180 - 200 3 20 - 30 | ||
| Small pastries | 180 - 200 3 15 - 25 | |
| Sponges | ||
| Pie base 180 - 200 3 25 - 35 | ||
| Sponges | 190 - 210 3 25 - 30 | |
| Kneading dough | ||
| Cheesecake | 180 - 200 2 | 70 -80 |
| Biscuits | 175 - 200 3 15 - 20 | |
| Crumble | 180 - 200 3 40 - 50 | |
| Pie base 180 - 200 3 20 - 25 | ||
| Dough with yeast | ||
| Fruit pie baking tin 190 - 210 3 40 - 50 | ||
| Crumble | 190 - 210 3 35 - 45 | |
| Pizza | 190 - 210 2 20 - 35 | |
| Choux pastry | 190 - 210 3 20 - 30 | |
| Puff pastry | 200 - 220 3 15 - 25 | |
| Apple pastry | 200 - 220 3 20 - 25 | |
The figures in this table are guidelines.
When baking with hot air set the oven to a temperature about 20 °C lower.
*ridge height from the bottom
Cleaning the cooker
Clean the appliance after use. This will prevent food debris from becoming burnt onto the appliance and causing stubborn stains.
Daily
Clean the appliance daily with water and a detergent or all purpose cleaner.
Stubborn stains on enamelled parts
Remove stubborn stains on enamel with a non-abrasive cream or a soft sponge.
Never use scouring powders, aggressive cleaning agents, green scours.
Stubborn stains on stainless steel
(if applicable)
Remove stubborn stains with a special cleaner for stainless steel. Always clean in the direction of the structure of the steel in order to avoid shiny spots
Clean afterwards with a polish or maintenance product for stainless steel.
Burner caps
Do not drop hot burner caps in cold water.
Because of the strong cooling they might get damaged.
This damage is not covered by the guarantee.
Damage to the screen or pan support is not covered by the guarantee.
Cleaning the oven
Please note:
Disconnect the appliance before starting with cleaning or reparation. Preferably by taking the plug out of the socket or by turning off the mains switch.
Enamelled parts
The inside of the oven door, the base of the oven, the baking sheet and the roasting tin are all completely enamelled. These are best cleaned with hot, soapy water or a little liquid detergent (Jif); rinse well with clean water.
Outside
Clean the outside of the oven with warm soapy water or liquid soap. Rinse with clean water.
Glass
Clean the glass in the oven door with soapy water or with a glass-cleaning product.
Installation
General
The fitting of the appliance should only be carried out by a registered Corgi gas fitter. The appliance is not connected to the flue gas outlet channel.
Electrical connection 230 V - 50 Hz.
The electrical connection must comply with national and local regulations. For the Netherlands this includes the NEN 1010 amongst other standards.
■ Wall socket and plug must be accessible at all times.
Gasconnection: RC 1/2" (ISO 7/1-RC 1/2)
The gas connection must comply with national and local regulations. For the Netherlands this includes the GAVO regulations (NEN 1078). Amongst other things these regulations instruct that: – only approved materials are to be used.
Attention:
The type of gas and the country for which the appliance has been designed are indicated on the ratings plate. The appliance is set in the factory for G25 (natural gas) with a pressure of 25 mbar. Appliance category 12L.
Table burner information
Combustion with G25 low setting
| Rating nominal | |||||
| Burner position | Rear left | Rear right | Front right | Front left | FL (EFG689) |
| Burner | Semi rapid | Semi rapid | Simmer | Rapid | Wok |
| Diameter [mm] | 94 | 94 | 72 | 125 | 148 |
| Flow [l/h] | 193,8 | 193,8 | 110,7 | 332,2 | 420,82 |
| Gas type | G25/25mbar | G25/25mbar | G25/25mbar | G25/25mbar | G25/25mbar |
| Rating nominal (kW) | 1,75 | 1,75 | 1,00 | 3,00 | 3,8 |
| Rating minimal (kW) | 0,52 | 0,52 | 0,30 | 0,75 | 1,6 |
■ Connect the oven directly to the mains. This is because the oven can reach high temperatures. It can also be connected with a specially designed gas hose. Attach this hose at the side of the oven to prevent it touching any hot parts. A gas tap, which is easily accessible, should always be used for the appliance.
Dimensions

text_image
500 (EFG609) 600 850 600 front view side viewfig. 10
Attention:
When the oven is placed next to a high cupboard or another wall made of flammable material the minimum distance between the cooker and walls should be at least 50 mm. The minimum distance between the hotplate and a cooker hood installed above it should be at least 650 mm.
If the oven is to be installed in a piece of kitchen furniture, the minimum space indicated in fig. 11 must be observed.

If the oven is to be installed between kitchen cupboards, the panelling of the adjacent kitchen units must be able to withstand temperatures of at least 90 °C.
Levelling
The height of the oven can be adjusted with the adjustable feet (see figure 12).
Before using the appliance for the first time check the connections using water and washing-up liquid to ensure that there are no gas leaks.
■ After installation check that the appliance and the burners are working properly. The gas flames should be regular and stable when full on and the burners should not go out when turned to the lowest setting.

natural_image
Pure diagram of a mechanical or structural component with no text, numbers, or symbolsfig. 12
Disposal of appliance and packaging
The packaging of this appliance is recyclable and could be made of:
cardboard;
■ polythene (PE) film;
■ CFC-free polystyrene (PS – hard foam).
These materials are to be disposed of responsibly and in accordance with government regulations.
To draw attention to the obligation to process electrical household appliances separately, the product carries the symbol of a dustbin with a cross through it:

This means that at the end of its working life the product may not be disposed of as household waste, but must be taken to a segregated waste collection centre run by the local authorities or to a dealer providing this service.
Processing household appliances such as this hob separately prevents negative impacts on the environment and public health, which might otherwise result from inappropriate processing.
It also enables the recovery of materials used in the production of the appliance, thus realising considerable savings in terms of both raw materials and energy.
Declaration of conformity
We declare that our products meet the applicable European Directives, Decisions and Regulations and the requirements listed in the standards referenced.
