
BMR102 - Radio MAKITA - Free user manual and instructions
Find the device manual for free BMR102 MAKITA in PDF.


| Product Type | Synthesized stereo AM/FM radio |
| Brand | Makita |
| Model | BMR102 |
| Dimensions (L x H x D) | 280 × 302 × 163 mm |
| Weight (without battery) | 4.0 kg |
| Main power supply | Makita battery pack (7.2 V - 18 V) or 12 V DC 700 mA AC adapter (center pin positive) |
| Backup batteries | 2 UM-3 (AA) batteries |
| Frequency ranges | FM: 87.50 - 108 MHz (0.05 MHz step); AM (MW): depending on version |
| Speakers | 2 × 3 inches (8 ohms) |
| Output power (depending on battery voltage) | 7.2 V: 2 × 0.5 W; 9.6 V: 2 × 1 W; 10.8 V: 2 × 1.2 W; 12 V: 2 × 1.5 W; 14.4 V: 2 × 2.2 W; 18 V: 2 × 3.5 W |
| Auxiliary inputs | 2 AUX IN jacks (3.5 mm): AUX 1 on front panel, AUX 2 in battery compartment |
| FM antenna system | Curved flexible rod antenna |
| AM antenna system | Built-in ferrite bar antenna |
| Display | Large LCD screen with backlight |
| Main functions | AM/FM stereo radio, manual tuning/scan/presets, clock, 2 alarms (radio and HWS vibrator), snooze, adjustable sleep timer |
| Presets | 5 stations per band (FM/AM) |
| Protection | IPX4 waterproof rating |
| Construction | Robust design with handle and support bar |
| Maintenance and cleaning | Clean with a dry cloth only. Do not use solvents. |
| Safety | Do not expose to water, do not short-circuit the battery, use only specified accessories |
Frequently Asked Questions - BMR102 MAKITA
User questions about BMR102 MAKITA
0 question about this device. Answer the ones you know or ask your own.
Ask a new question about this device
Download the instructions for your Radio in PDF format for free! Find your manual BMR102 - MAKITA and take your electronic device back in hand. On this page are published all the documents necessary for the use of your device. BMR102 by MAKITA.
USER MANUAL BMR102 MAKITA
GB Radio Instruction manual

2

3

4

5

6

7

8
9

10 11

12
Symbols
The following show the symbols used for the equipment. Be sure that you understand their meaning before use.
Symboles
Read instruction manual.
Only for EU countries
Do not dispose of electric equipment or battery pack together with household waste material!
In observance of European Directive 2002/96/EC on waste electric and electronic equipment, 2006/66/EC on batteries and accumulators and waste batteries and accumulators and their implementation in accordance with national laws, electric equipment and battery pack that have reached the end of their life must be collected separately and returned to an environmentally compatible recycling facility.
Gjelder bare for EU-land
Kast aldri elektriske produkter eller batterier i husholdningsavfallet!
ENGLISH (Original instructions)
IMPORTANT SAFETY INSTRUCTIONS
WARNING:
When using electric tools, basic safety precautions should always be followed to reduce the risk of fire, electric shock, and personal injury, including the following:
- Read this instruction manual and the charger instruction manual carefully before use.
- Clean only with dry cloth.
- Do not block any ventilation opening. Install in accordance with the manufacturer's instruction.
- Do not install near any heat sources such as radiators, heat registers, stoves, or other apparatus (including amplifiers) that produce heat.
- Only use attachments/accessories specified by the manufacturer.
- Unplug this apparatus during lighting storms or when unused for long periods of time.
- A battery operated radio with integral batteries or a separate battery pack must be recharged only with the specified charger for the battery. A charger that may be suitable for one type of battery may create a risk of fire when used with another battery.
- Use battery operated radio only with specifically designated battery packs. Use of any other batteries may create a risk of fire.
- When battery pack is not in use, keep it away from other metal objects like: paper clips, coins, keys, nails, screws, or other small metal objects that can make a connection from one terminal to another. Shorting the battery terminals together may cause sparks, burns, or a fire.
- Avoid body contact with grounded surfaces such as pipes, radiators, ranges and refrigerators. There is an increased risk of electric shock if your body is grounded.
- Under abusive conditions, liquid may be ejected from the battery; avoid contact. If contact accidentally occurs, flush with water. If liquid contacts eyes, additionally seek medical help. Liquid ejected from the battery may cause irritation or burns.
SPECIFIC SAFETY RULES
SAVE THESE INSTRUCTIONS.
FOR BATTERY CARTRIDGE
- Before using battery cartridge, read all instructions and cautionary markings on (1) battery charger, (2) battery, and (3) product using battery.
- Do not disassemble battery cartridge.
- If operating time has become excessively shorter, stop operating immediately. It may result in a risk of overheating, possible burns and even an explosion.
-
If electrolyte gets into your eyes, rinse them out with clear water and seek medical attention right away. It may result in loss of your eyesight.
-
Do not short the battery cartridge:
(1) Do not touch the terminals with any conductive material.
(2) Avoid storing battery cartridge in a container with other metal objects such as nails, coins, etc.
(3) Do not expose battery cartridge to water or rain. A battery short can cause a large current flow, overheating, possible burns and even a breakdown.
- Do not store the tool and battery cartridge in locations where the temperature may reach or exceed 50° C ( 122° F)
- Do not incinerate the battery cartridge even if it is severely damaged or is completely worn out. The battery cartridge can explode in a fire.
- Be careful not to drop or strike battery.
- Do not use dropped or struck battery. (Do not use a damaged battery.)
Features:
• AM/FM-stereo PLL Synthesized
• Large LCD display with illumination
- Manual/Preset/Scan tuning
- Rotary tuning and volume control
- 5 preset stations each band
- Time and 2 alarm timers (radio and HWS buzzer) with Snooze
- Adjustable sleep (auto shut off) timer
- Stereo speaker for rich sound performance
- Ultra rugged design
• Water resistant to IPX 4
- Powered by both Makita battery pack and supplied power adaptor
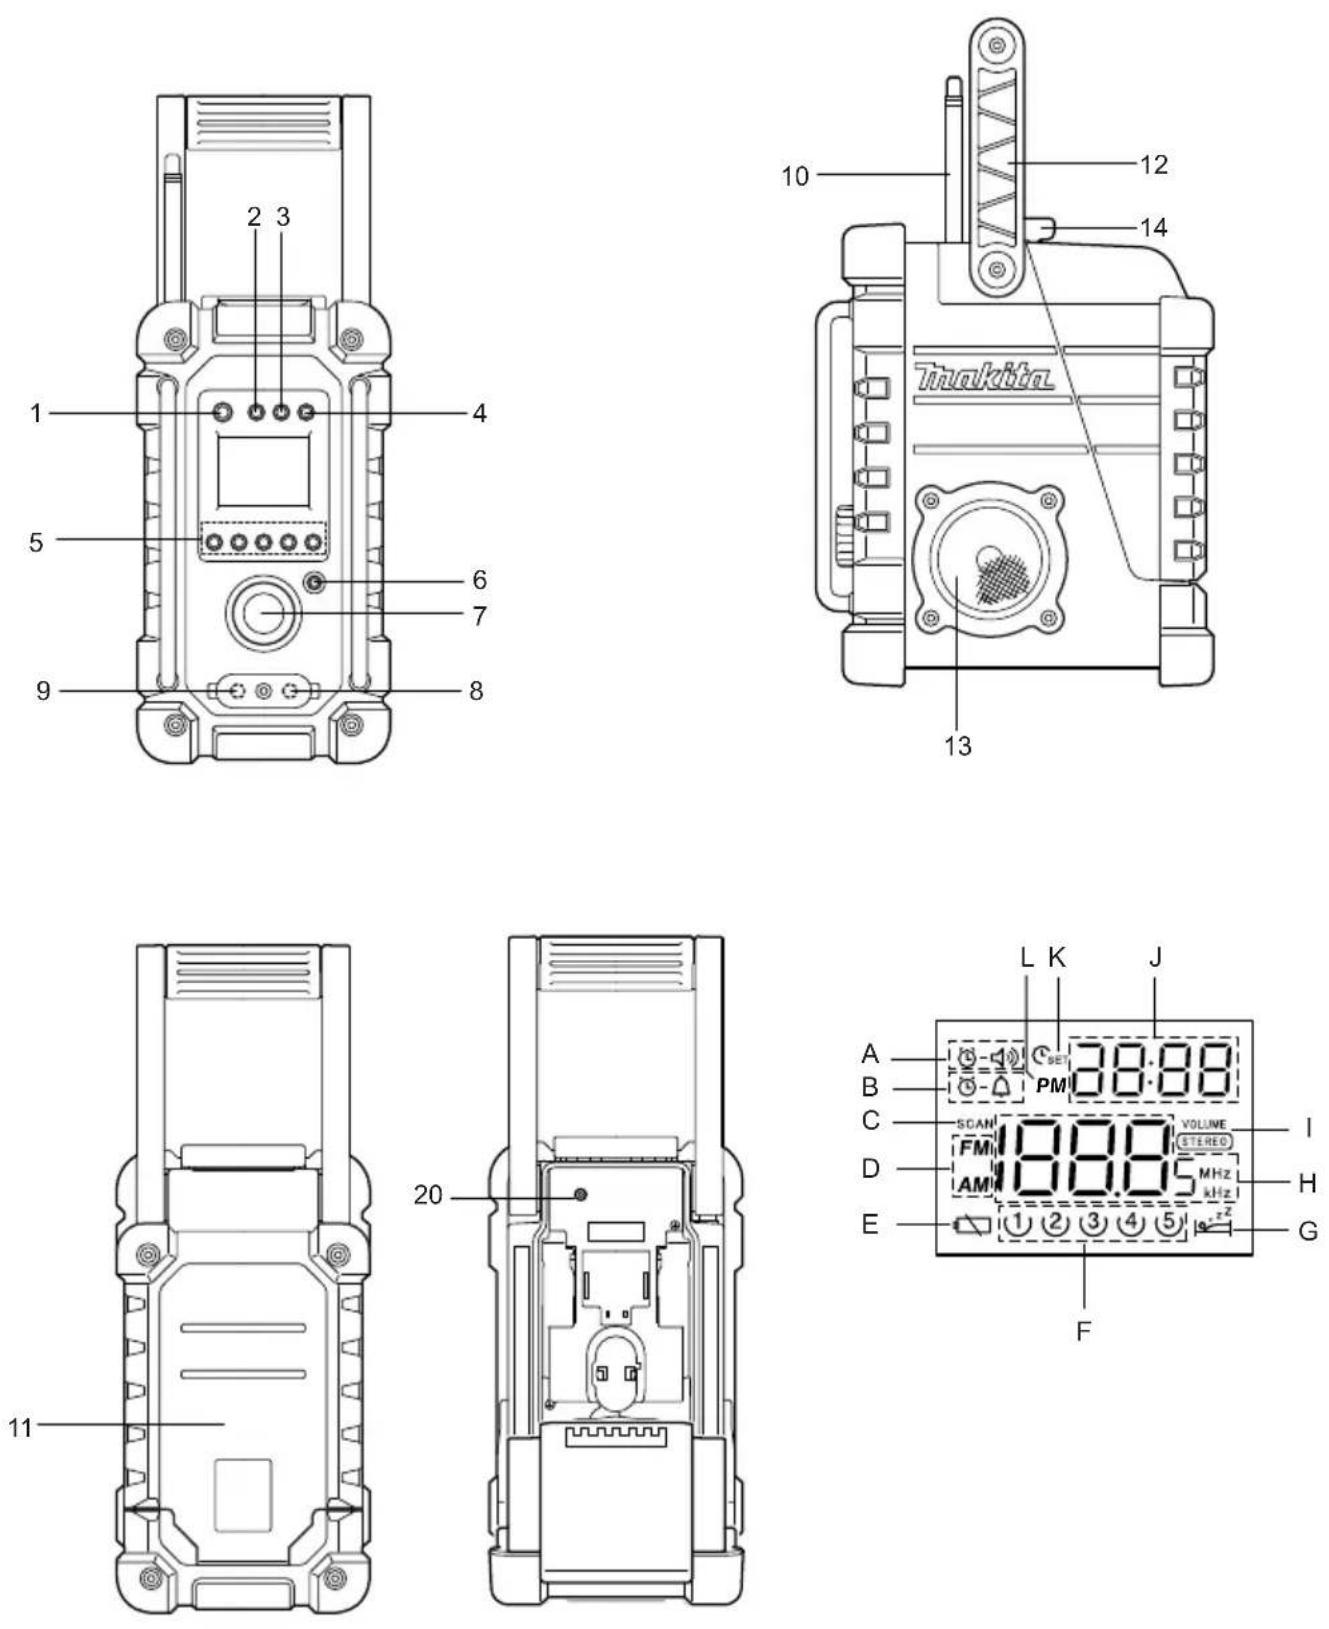
Explanation of general view (Fig. 1)
Controls:
- Power and Sleep timer
- Band and Mono button
- Radio alarm set
- Buzzer alarm set
- Preset stations
- Scan tuning and Time set
- Tuning/Volume control knob
- DC IN socket
- Input terminal (AUX IN1)
- Soft bended rod antenna
- Battery compartment (covering main battery pack and back up batteries)
- Handle
- Speaker
- Battery compartment locker
- Main battery compartment
- Back up battery compartment
- Red indicator
- Button
- Battery cartridge
- Input terminal (AUX IN2)
- Supporting bar
LCD Display:
A. Radio alarm
B. HWS buzzer alarm
C. Scan tuning
D. Band Indicator
E. Low battery indicator
F. Preset stations
G. Sleep and Snooze status
H. Frequency
I. Stereo symbol and Volume
J. Clock
K. Time set
L. PM for clock
Battery Installation
Note:
Keeping back up batteries inside the compartment prevent stored data in preset memories from being lost.
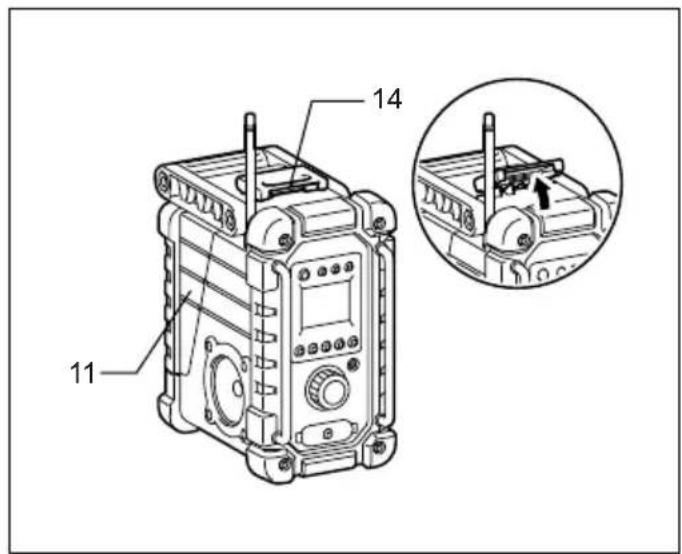
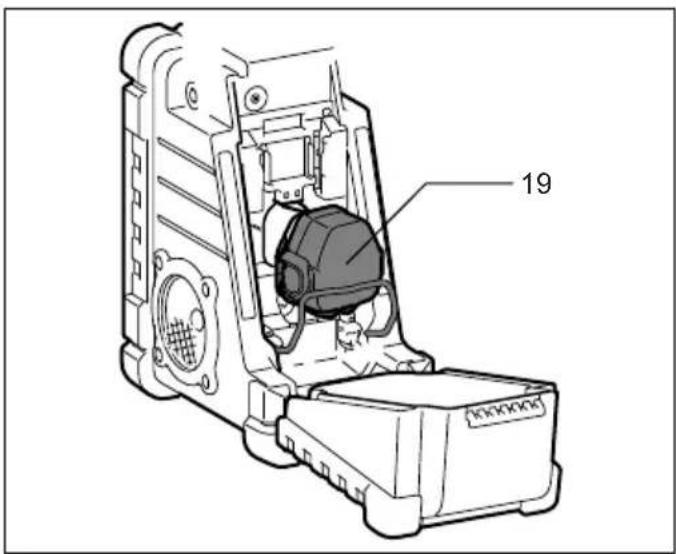
- Pull out the battery compartment locker to release battery compartment. There are main battery pack compartment and back up battery compartment.
(Fig. 2 & 3)
- Remove back up battery compartment cover and insert 2 fresh UM-3 (AA sizes). Make sure the batteries are with correct polarity as shown inside the compartment. Replace the battery cover.
- After back up batteries are inserted, insert the main battery pack to power radio. The suitable battery packs for this radio listed as the following table.
The following tables indicate the operating time on a single charge.
| Battery Cartridge Voltage | AT SPEAKER OUTPUT=50 mW + 50 mWunit: Hour | |||||
| 7.2 V 9.6 | V 10.8 V 12 V | 14.4 V 18 V | ||||
| BL7010 Approx. 7.0 | ||||||
| PA09 PA12 | PA14 | PA18 | Approx. 8.0 | |||
| 9050 | 1250 | 1450 | 1850 | |||
| 9100 | 1200 | 1420 | BL1815 | |||
| 9120 | BL1013 | 1220 | BL1415 | |||
| 9100A | 1200A | |||||
| 9102 | 1202 | 1422 | 1822 | Approx. 12.5 | ||
| 9122 | 1222 | BH1420 | ||||
| 9102A | 1202A | |||||
| BH9020 | BH1220 | |||||
| BH9020A | BH1200C | |||||
| 9134 | 1234 | 1434 | 1834 | Approx. 16.5 | ||
| BH1427 | Approx. 17.0 | |||||
| 9135 | 1235 | 1435 | 1835 | Approx. 19.0 | ||
| 1435F | BL1830 | |||||
| 1235F | BL1430 | |||||
| BH9033 | BH1233 | BH1433 | Approx. 21.0 | |||
| BH9033A | BH1233C | |||||
□: Cluster Battery
: Slide Battery

WARNING:
Do not use two main batteries at the same time.
3-1. Installing or removing Slide battery cartridge (Fig. 4)
- To install the battery cartridge, align the tongue on the battery cartridge with the groove in the housing and slip it into place. Always insert it all the way until it locks in place with a little click.
- If you can see the red indicator on the upper side of the button, it is not locked completely. Install it fully until the red indicator cannot be seen. If not, it may accidentally
fall out of the tool, causing injury to you or someone around you.
- Do not use force when installing the battery cartridge. If the cartridge does not slide in easily, it is not being inserted correctly.
- To remove the battery cartridge, slide it from the tool while sliding the button on the front of the cartridge or pressing the buttons on both sides of the cartridge.

WARNING:
Do not use two main batteries at the same time.
3-2. Installing or removing Cluster battery cartridge (Fig. 5 - 9)
- Pull the supporting bar to allow the battery to insert to the terminal.
- To insert the battery cartridge, align the tongue on the battery cartridge with the groove in the housing and slip it into place.
- Release the supporting bar.
- To remove the battery cartridge, pull the supporting bar and take the battery out of the terminal.
-
Return the battery compartment locker to the original position.
-
Reduced power, distortion and a "stuttering sound" or low battery sign that appears on the display are all the signs that the main battery pack needs to replace.
Note:
The battery pack can't be charged via the supplied AC power adaptor.
- When low battery sign appears and an "E" keeps on flashing is the time to replace the back up batteries.
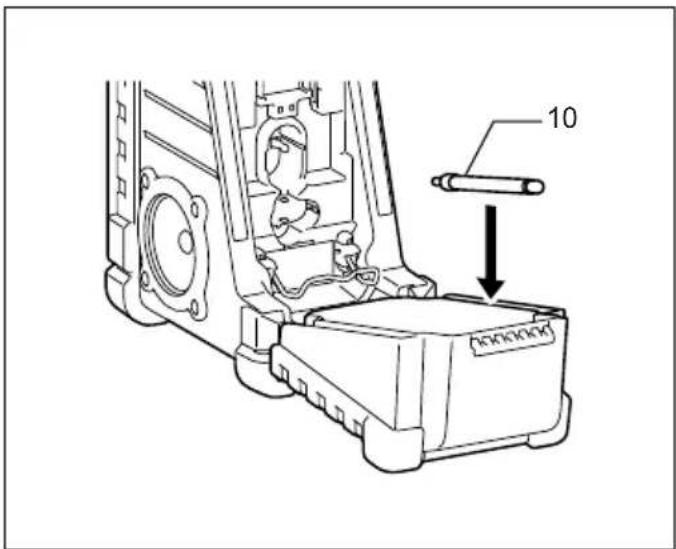
Installing the Soft bended rod antenna (Fig. 10 & 11)
Install the Soft bended rod antenna as shown in the figure.
Note:
There is a click in the battery compartment designed to store the removed antenna.
Using Supplied AC power adaptor (Fig. 12)
Remove the rubber protector and insert the adaptor plug into the DC socket on the front side of the radio. Plug the adaptor into a standard mains socket outlet. Whenever the adaptor is used, the battery pack is automatically disconnected. The AC adaptor should be disconnected from the main supply when not in use.
Note:
When your radio has any interference in AM band by its adaptor, please move your radio away from its AC adaptor over 30 cm.
Setting the clock
-
Clock can be set either when the radio is power on or off.
-
Display will show “-:- -” when the back up batteries are installed.
-
Long press the time set button for more than 2 seconds, display will flash time set symbol and also the hour digit, followed by a beep.
-
Rotate Tuning/Volume control knob to set the required hour.
-
Press button to confirm hour setting, the minute digit will flash.
- Rotate Tuning/Volume control knob to set the required minute.
- Press the button again to complete clock setting.
Operating the radio
This radio equips with three tuning methods - Scan tuning, Manual tuning and Memory presets recall.
Scan Tuning
- Press the Power button to turn on the radio.
- Select the required waveband by pressing the Band button. Make sure the rubber bended rod antenna has been well placed for best FM reception. For AM (MW) band, rotate the radio to get best signal. Try to avoid to operate the radio next to computer screen and other equipment which will cause interference to the radio.
- Press and release Scan button (long press Scan button more than 2 seconds will activate time setting), LCD display will flash Scan symbol and the radio will search and stop automatically when it finds a radio station. Press the Scan button again to pick up the found station.
Note:
A stereo symbol will appear on the display, if the station found is a stereo station.
Note:
The radio will continue to search next available stations if you do not press Scan button again when it finds a radio station.
- Rotate the Tuning/Volume control knob to get required sound level. LCD display will show sound level changes.
Note:
During operating volume control, you can press in Tuning/Volume control knob to change volume control to tuning control status.
- To turn off the radio, press the Power button. Display will show OFF.
Manual Tuning
- Press the Power button to turn on the radio.
- Select the required waveband by pressing the Band button. Adjust the antenna as described above.
- A single rotary to the Tuning/Volume control knob will change the frequency in the following increment: FM: 50 or 100 kHz AM (MW): 9 or 10 kHz
Note:
If the radio is in volume control status, press in the tuning/volume control to become Tuning status.
- Keep on rotating the Tuning/Volume control knob until the required frequency shown on the display.
-
Rotate the Tuning/Volume control knob to get required sound level.
-
To turn off the radio, press the Power button. Display will show OFF.
Storing stations in preset memories
There are 5 memory presets for each waveband.
- Press the Power button to turn on the radio.
- Tune to required station using one of the methods previously described.
- Press and hold down the required preset until radio beeps. The preset number will appear in the display and the station will be stored under chosen preset button.
- Repeat this procedure for the remaining presets.
- Stations stored in preset memories can be overwritten by following above procedures.
Recall stations from preset memories
- Press the Power button to turn on the radio.
- Select the required waveband.
- Momentarily press the required Preset button, the preset number and station frequency will appear in the display.
Setting the radio alarm
When the radio alarm is selected, the radio will turn on and play the chosen radio station at the chosen alarm time. The radio alarm will continue for one hour unless turned off by pressing the Power button. Pressing the Power button whilst the alarm is activated will cancel the alarm for 24 hours.
Note:
When the radio is in low battery status, the radio alarm can't be activated.
a. Setting radio alarm time:
- The radio alarm can be set either when radio is on or off.
- Press and release radio alarm button, the radio alarm symbol will flash.
- During radio alarm symbol flashing, press button for more than 2 seconds followed by a beep.
- Display Hour will flash, rotate Tuning/Volume control knob to select the hour then press button again to confirm hour setting.
- Follow same procedures of setting hour to set required minute. Press button to complete alarm time setting.
b. Setting radio alarmed station
-
During setting radio alarm time and radio alarm symbol is flashing, press Band button to activate the radio to select required wake-up band and station by manual tuning and recall the preset stations. Press 📞-◀◀ button to complete radio alarm setting. Display will show 🕒-◀◀
-
When above radio alarm time and station are set, press and hold down radio alarm button for 2 seconds followed by a beep to switch alarm on or off. Display will show when radio alarm is set.
Note:
If new radio alarm station is not selected, it will select the last alarm station.
Setting the HWS (Humane Wake System) buzzer alarm
A beep tone will activate when selecting the HWS buzzer alarm.
The alarm beep will become shorter every 15 seconds for one minute followed by one minute silence before repeating the cycle.
The HWS alarm will sound for one hour until turning off by pressing the Power button. Press the Power button whilst the alarm is activated will cancel the alarm for 24 hours.
- The HWS buzzer alarm can be set either radio is on or off.
- Press and release the HWS buzzer alarm button Ⓤ-△, the symbol will flash.
- During the symbol flashes, long pressing the CSET button for more than 2 seconds followed by a beep and display Hour digit will flash.
- Rotate Tuning/Volume control knob to select required alarm hour, then press time set button again. The minute digit will then flash.
- Rotate Tuning/Volume control knob to select required alarm minute, the press time set button again to complete HWS buzzer alarm setting.
- Press and hold down buzzer alarm button for more than 2 seconds followed by a beep to switch on or off the HWS buzzer alarm. Display will appear when buzzer alarm has been set.
Snooze function
- Whilst the alarm is activated, pressing any buttons except the Power button will activate the snooze function. The radio or HWS buzzer alarm will be silenced with interval of 5 minutes.
- The display will flash both the snooze symbol and the alarm symbol. The snooze function can be repeatedly during one hour that the alarms are active.
Sleep function
The sleep timer will automatically switched off the radio after a preset time has elapsed.
- Press and continue to hold down the Power button for more than 2 seconds, followed by a beep tone, the display will cycle through the available sleep times in the order 60-45-30-15-120-90-60.
Release the Power button when the required sleep time appears in the display. The symbol will appear in the display and the radio will play the last station selected.
- To cancel the sleep function, press the Power button. The Symbol will disappear and radio is off.
Display illumination
Press any buttons or rotate Tuning/Volume control knob will illuminate the LCD display for approx. 15 seconds. During scanning stations and alarm activated, will also automatically illuminate the display.
Change Stereo to Mono
When the stereo FM station reception is weak, you can improve it by pressing Mono button for 2 seconds. The sound is no longer in stereo and stereo indicator disappears.
How to play other audios
CAUTION:
Unplug this apparatus before connecting other audios.
- There are 2 AUX in sockets. AUX 1 is located on the front panel, and AUX 2 is located in the battery compartment.
- Connect a stereo or mono source (i.e. iPod, MP3, or CD player) to either AUX 1 or AUX 2 by audio cord.
- Repeatedly press and release the Band button until "AU1" or "AU2" is displayed, then AUX function is activated.
- AUX can't be activated as alarm source.
MAINTENANCE
CAUTION:
- Never use gasoline, benzine, thinner, alcohol or the like. Discoloration, deformation or cracks may result.
Specifications:
Power Requirements
AC power adaptor DC12 V 700 mA, center pin positive
Battery UM-3 (AA size) x 2 for back up Cluster battery: 7.2 V - 18 V Slide battery: 9.6 V - 18 V
Frequency coverage FM 87.50 - 108 MHz (0.05 MHz/step) AM (MW) 522 - 1,629 kHz (9 kHz/step)
Circuit feature
Loudspeaker 3 inches 8 ohm
Output Power 7.2 V: 0.5 W x 2, 9.6 V: 1 W x 2 10.8 V: 1.2 W x 2, 12 V: 1.5 W x 2 14.4 V: 2.2 W x 2, 18 V: 3.5 W x 2
Input terminal 3.5 mm dia. (AUX IN1/AUX IN2)
Antenna system FM: soft bended rod antenna AM: bar antenna
Dimension (W x H x D) in mm 280 x 302 x 163 Weight (without battery) 4.0 kg
AM (MW) 522 - 1 629 kHz
(9 kHz/pas)
Fonction du circuit
Abmessung (B x H x T) in mm
280 × 302 × 163
Antenna FM: Antenna a debole frequenza AM: Antenna
AM (MW): 9 of 10 kHz
Opmerking:
AM (MW) 522 - 1.629 kHz
(9 kHz/stap)
Circuitfunctie
Luidspreker 3" 8 ohm
Uitgangsvermogen 7,2 V: 0,5 W x 2, 9,6 V: 1 W x 2
AM (MW) 522 - 1.629 kHz
(9 kHz/paso)
AM (MW) 522 - 1.629 kHz
(9 kHz/passo)
AM (MW): 522 - 1 629 kHz
(9 kHz/steg)
Egenskaper
Högtalare 3 tum 8 ohm
Uteffekt 7,2 V: 0,5 W x 2, 9,6 V: 1 W x 2
AM (MW) 522 - 1 629 kHz
(9 kHz/trinn)
Kretsløpsfunksjon
AM (MW) 522-1 629 kHz
(9 kHz/skok strojenia)


- SYMBOLS
- SYMBOLES
- GJELDER BARE FOR EU-LAND
- ENGLISH (ORIGINAL INSTRUCTIONS)
- IMPORTANT SAFETY INSTRUCTIONS
- WARNING
- SPECIFIC SAFETY RULES
- SAVE THESE INSTRUCTIONS
- FOR BATTERY CARTRIDGE
- FEATURES
- EXPLANATION OF GENERAL VIEW (FIG. 1)
- CONTROLS
- LCD DISPLAY
- BATTERY INSTALLATION
- NOTE
- (FIG. 2 & 3)
- INSTALLING THE SOFT BENDED ROD ANTENNA (FIG. 10 & 11)
- USING SUPPLIED AC POWER ADAPTOR (FIG. 12)
- SETTING THE CLOCK
- OPERATING THE RADIO
- SCAN TUNING
- MANUAL TUNING
- STORING STATIONS IN PRESET MEMORIES
- RECALL STATIONS FROM PRESET MEMORIES
- SETTING THE RADIO ALARM
- SETTING RADIO ALARM TIME
- SETTING RADIO ALARMED STATION
- SETTING THE HWS (HUMANE WAKE SYSTEM) BUZZER ALARM
- SNOOZE FUNCTION
- SLEEP FUNCTION
- DISPLAY ILLUMINATION
- CHANGE STEREO TO MONO
- HOW TO PLAY OTHER AUDIOS
- CAUTION
- UNPLUG THIS APPARATUS BEFORE CONNECTING OTHER AUDIOS
- MAINTENANCE
- SPECIFICATIONS
- OPMERKING
Brand : MAKITA
Model : BMR102
Category : Radio