EWM146L - Washing machine ETNA - Free user manual and instructions
Find the device manual for free EWM146L ETNA in PDF.

User questions about EWM146L ETNA
0 question about this device. Answer the ones you know or ask your own.
Ask a new question about this device
Download the instructions for your Washing machine in PDF format for free! Find your manual EWM146L - ETNA and take your electronic device back in hand. On this page are published all the documents necessary for the use of your device. EWM146L by ETNA.
USER MANUAL EWM146L ETNA
text_image
Technical diagram of a washing machine with numbered parts labeled for identification.
natural_image
Diagram of a hand drawer with a handle and control knob, labeled with number 7 (no text or symbols on the diagram itself)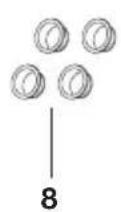
natural_image
Illustration of a hand using a tool to lift a circular component (no text or symbols visible)natural_image
Three-step diagram showing a mechanical device moving through a container, with arrows indicating motion direction (no text or symbols)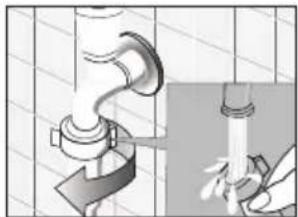
natural_image
Illustration of a hand pouring liquid into a pipe fitting (no text or symbols)natural_image
Mechanical pipe assembly diagram showing a valve inserted into a housing (no text or symbols visible)natural_image
Diagram showing plumbing pipe installation and drain valve assembly (no text or labels)natural_image
Illustration of a hand turning a circular component with a ring, no text or symbols present
natural_image
Symbol of a trash bin with crossed x's and no accompanying text or labelsnatural_image
Diagram of a mechanical or fluidic component with no visible text, numbers, or symbolsnatural_image
Diagram of a U-shaped pipe with a submerged object and a vertical rod with an asterisk, no text or symbols present.Correct
natural_image
Pure diagram of U-shaped pipes with cross-sectional lines, no text or symbols presentFout
* Stankafsluiter

Description of the appliance
Description 5 Control panel 6
Safety
Before you start to use the washing machine 8 Safety precautions 8 Safety precautions when washing 9 Protecting the washing machine 10 Safety precautions during transportation 10 Safety precautions in relation to electricity 10 Service visit 11
Commissioning
Before using the appliance 12
Operation
Checklist and preparation for washing 13 The first wash 16 Completing a wash program 16 Selecting wash programs using the program selector dial 17 Adapting wash programs using the option buttons 19 Aborting a wash program 20 Reducing foam 20 Child lock 20 Delayed start time (EWM126L/EWM146L) 21 Table of wash programs 21 Table of washing instructions 23
Maintenance
Before starting maintenance 24
General 24
Faults
Fault table 28 Troubleshooting 30
Environmental considerations
Disposing of the appliance and packaging 31
Installation
Unpacking and positioning your washing machine 32
Connecting the fill hose 33
Drain hose 34
Electrical connection 35
Technical data 36
Congratulations on the purchase of your washing machine. These user instructions contain important information about commissioning, operating and maintaining the appliance.
These instructions describe how you can most efficiently use your washing machine. In addition to information about its operation, you will also find background information that may assist you when using this appliance.
First read the user instructions carefully and completely before starting to use the appliance, and keep them carefully for future reference.
Description

text_image
Technical diagram of a washing machine with numbered parts labeled for identification.
natural_image
Diagram of a car drawer with handle and control knob, labeled with number 7 (no text or symbols beyond label)


- Detergent drawer
- Control panel
- Door
- Service panel
- Drain hose
- Plug
- Detergent compartment
- Transport plugs
- Fill hose
- Drain hose clamp
Control panel
EWM126L / EWM146L

text_image
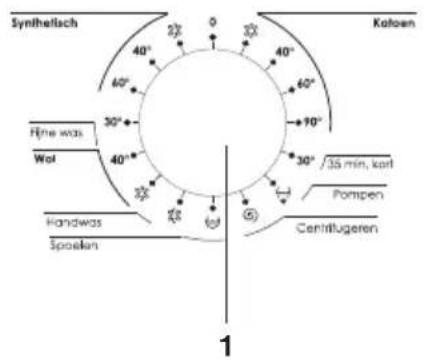
Synthetsch 0 40° 40° 60° 90° Katoen Ryne was Wol 30° 40° 60° Voorwas 35 min. kort Handwas Spoeken Centilfugeren 1
flowchart
graph TD
    A["Extra water"] --> B["Optics"]
    C["ECO"] --> D["Toerental"]
    E["Antiferaut"] --> F["Starten over..."]
    G["Intensified"] --> H["Start/Pause"]
    style A fill:#fff,stroke:#000
    style C fill:#fff,stroke:#000
    style E fill:#fff,stroke:#000
    style G fill:#fff,stroke:#000
    style B fill:#fff,stroke:#000
    style D fill:#fff,stroke:#000
    style F fill:#fff,stroke:#000
    style H fill:#fff,stroke:#000
- Program selector dial
- Option buttons
- Button for spin speed
- Button for delayed start
- LED display
- Start/Pause button
LED display

text_image
1 2 3 4- Prewash LED: the LED is illuminated while this function is being set, and goes out following completion.
- Time display LED: the LED is illuminated when the washing machine is in operation and turns off when the spin speed is displayed.
- Door lock LED: the LED is illuminated when the door is locked and goes out when the door is unlocked.
- Child lock: this function can be enabled to prevent children from starting to play with the buttons on the machine.

Note: the control panel may be changed without prior written notification. Visit the web site www.atag.nl or call the service line for details.
EWM125B
text_image
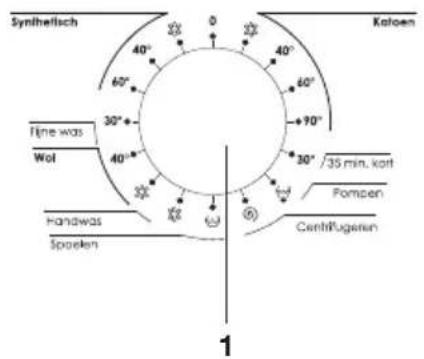
Synthellsch 40° 60° 30° Wol Handwas Spoeken Koaloen 40° 60° 70° 30° 35 min, kert Pompen Centrifugeren 1
text_image
1300 800 400 400 Extra water FCO geen Anti kreech Intensiel Toerental Optics Voorwas Start Pouze 2 34
- Program selector dial
- Spin speed button (1200/800/400/none)
- Option buttons
- Prewash button
- Start/Pause button
EWM146B
text_image
Synthellsch 40° 60° 30° 40° 90° Kaloen Time was Wol Handwas Spaslen 35 min. kort Pompen Centrifugenan 1
text_image
1400 Wassen Spoelen Centrifugeren 1000 600 Ibero water ECO geoen Anilineux Intensel Toerental Optika Voorwas Start/Pouze 2 34
- Program selector dial
- Spin speed button (1400/1000/600/none)
- Option buttons
- Prewash button
- Start/Pause button

Note: the control panel may be changed without prior written notification. Visit the web site www.atag.nl or call the service line for details.
Before you start to use the washing machine

- Packaging materials can be hazardous for children. Keep packaging materials (plastic bags, polystyrene etc.) out of reach of children.
- Make sure that the voltage and frequency are the exact match of those for the washing machine.
- Do not use a socket with a rated current lower than that of the washing machine.
- The water supply connection and electrical installation must be performed by a qualified person in accordance with the manufacturer's instructions (see Page 32 to 36: 'Installation') and valid local safety regulations.
- Before starting to use this machine, all packaging material and transport bolts need to be removed to avoid serious damage from occurring whilst washing (see page 32: 'Removing the transport bolts').
- Before you start to use this machine, the washing machine must complete the main wash program with an empty drum (see page 16: 'The first wash').
- This washing machine is only suitable for indoor use.
Safety precautions

- Unplug the mains lead from the socket before cleaning or maintenance.
- Never pull the plug out of the socket with wet hands.
- The washing machine is not a toy. Always ensure there is the required level of supervision when the device is on and do not allow children to play with the machine.
- Keep pets away from the washing machine.
- Pets and children can climb into the washing machine. Every time you go to use the washing machine, check that it is empty.
- The glass on the door can be very hot when the washing machine is in use. Keep children and pets away from the washing machine when it is in operation.
- After the wash program has finished, check that all the water has drained before opening the washing machine door. Keep the door closed if water is visible in the drum.
-
Unplug the mains lead from the socket and turn off the water supply after use.
-
This washing machine is not intended for use by persons (including children) with reduced physical, sensory or mental capacity or with a lack of experience and knowledge, unless they are supervised or instructed in how to use the appliance by a person, who is responsible for their safety.
- Do not attempt to carry out repairs yourself. The washing machine may be damaged, the fault may be exacerbated and hazardous operation of the machine may even occur if it is repaired by an inexperienced or unqualified person.
- If the plug (mains lead) is damaged, it must be replaced by the manufacturer or an authorised dealer to prevent any possible risk.
- Always plug the plug into an earthed, three-pin socket for your own safety. Check carefully that your socket is properly earthed and reliable.
- This washing machine should only be repaired by an authorized dealer or service representative. Only use original parts.
Safety precautions when washing

- Make sure that all pockets in garments are empty before you put them in the washing machine. Sharp and rigid objects such as coins, pins, screws and stones may cause serious damage to the washing machine.
- Use cold tap water.
- Your washing machine is designed for home use and is intended for fabrics that are suitable for machine washing.
- Use of flammable or explosive or toxic solvents is prohibited. Petrol, alcohol, etc. may not be used as a detergent. Use only detergents suitable for machine washing.
- It is not permitted to clean carpets in the washing machine.
- Make sure you do not burn yourself when hot water is draining from the washing machine.
- Never manually fill the washing machine with water while washing.
- Once the program has finished, you can open the door for up to two minutes after the program selector dial has been turned to '0', or the power supply to the washing machine has been switched off.
- Do not forget to shut off the water and power supply, immediately after the washing program has finished.
Protecting the washing machine
- Do not climb or sit on the washing machine.
- Do not lean against the door of the washing machine.
- Do not close the door using excessive force. If it proves difficult to close the door, then check that the drum is not overloaded and/or that the laundry is evenly distributed in the drum.
Safety precautions during transportation
- Any excess water should be drained.
- The transport bolts should be re-fitted by a qualified person.
- Handle the machine with care. Do not use any protruding parts on the washing machine to lift it. Do not use the washing machine door as a (lifting) handle.
Safety precautions in relation to electricity
Warnings to prevent fire, electric shock and other accidents:
- Only the voltage indicated on the energy label should be used. If you are unsure about the voltage level at home, you should contact your energy supplier.
- When the machine is heating the water, the appliance has a maximum load of 10 A. Make sure the circuit(s) cannot be overloaded and that it has a 16 A fuse.
- Make sure the mains lead is not damaged. The mains lead must be properly connected, so that no one can trip over it. Extra attention should be paid to the socket. It must be possible to easily plug the plug into the socket and attention should be paid to the location of the plug.
- Do not overload the wall socket and do not extend the cable. Overloading the wiring can result in a fire or an electric shock. Never pull the plug out of the socket with wet hands.
- Always plug the plug into an earthed, three-pin socket for your own safety Check carefully that your socket is properly earthed.
Service visit
Make sure that the appliance is freely accessible and that no appliance is on top when you receive a service call. The plug should also be accessible.
Make sure the unit has been installed and connected according to the instructions in the installation instructions at the back of this manual.
When delivering the appliance in winter at temperatures below zero: allow the washing machine to stand for 24 hours at room temperature before you attempt to use it.
Before using the appliance
Before you start to use the washing machine, the washing machine must complete a wash at the highest temperature and with an empty drum. This removes any residues from the manufacturing process that are left in the drum and the tub. See page 16 ('The first wash') for instructions on how to do this.
Checklist and preparation for washing
Read these procedures carefully to prevent problems from occurring with the washing machine and your laundry from getting damaged.
- Check whether new laundry discolours. Dip the tip of a white towel in liquid detergent and rub the inside of sections of the laundry that is being washed. Check that the white towel does not pick up any of the original colour of the clothing.
- Wash new clothes and colours once separately, before washing them with other clothes.
- For better washing results, rub stains, stained collars and trouser pockets lightly with liquid detergent before putting them into the washing machine.
- Wash temperature-sensitive clothing according to the washing instructions on the label. If you do not follow these instructions, it may result in the clothing shrinking or discolouring.
- Do not leave the laundry in the washing machine for lengthy periods of time. This can cause mould and stains.
Laundry that cannot be washed in the washing machine
Some garments and fabrics can lose their shape or discolour when they come into contact with (hot) water in the washing machine. Take, for example, ties, waistcoats, leather clothing, jackets, clothes made of synthetic fabrics, fashion creased clothing, clothes accessorised (with beads), pure cotton, wool, silk, furs and clothing with fur accessories, long dresses and traditional clothing. Always check the washing instructions on the label.
Things to consider when choosing a detergent
- Use a 'low-foaming' detergent specially designed for washing machines.
- Choose a detergent based on the fabrics being washed (cotton, synthetic fibres, wool), colours, washing temperature and degree of soiling. Using the wrong detergent can cause excessive foaming, which can flow out through the detergent drawer.
- Bleach can damage clothing. Use as little as possible.
-
Laundry detergent can leave residues on the laundry and can cause an unpleasant odour. Consequently, rinse clothes properly.
-
Detergent may not dissolve completely if too much is used or the washing temperature is too low. It can remain in fabrics, pipes and in the washing machine, thereby affecting the laundry.
- Always follow the recommendations on the detergent packet and take account of the weight and degree of soiling of the laundry. Consult your local water company if you are uncertain about the hardness of the water.
• Note: store detergent in a safe, dry place, out of reach of children.
Preparation for washing clothes
- Make sure all (trouser) pockets are empty. Sharp and rigid objects such as coins, brooches, nails, screws and stones may cause serious damage to the washing machine.
- The clothing being washed is sorted according to the following characteristics:
The symbols on the care labels: fabrics are divided into cotton, mixed fabrics, synthetic fabrics, silk and wool.
▶Colour: whites, coloureds. New coloured clothing should be washed separately.
Sensitivity: Delicates should be washed separately. The delicate wash cycle should be used for wool, curtains and silk. Always check the care label.
- Accessories on clothing may damage the washing machine. Turn these garments inside out.
- Remove curtain hooks before you wash curtains.
- Close fasteners. Close all zips, buttons and hooks. Tie all loose strings together and tie ribbons.
- Put underwired bras in a laundry net or closed pillowcase. The wires may damage the washing machine.
- Put extra delicate fabrics in a laundry net. Take, for example, net curtains, lingerie and small objects (such as socks, handkerchiefs and ties).
-
Spread the laundry evenly in the drum. Washing one large or heavy item of clothing (jeans, padded jackets) can unbalance the drum and make the washing machine shake. Consequently, always wash several garments at the same time and spread them evenly in the drum.
-
Protecting sensitive baby skin. Baby products, including clothing, nappies and bibs should be washed separately. The rinse time should be extended to prevent any residues of detergent from remaining in the laundry.
- For best results, we recommend first hand-washing heavily soiled articles such as collars and cuffs, etc. before putting them in the washing machine. Soap residues can be left in the laundry when using ordinary soap.
- Prewash. A new washing machine with the correct detergent is the perfect washing combination saving you energy, time, water and detergent. Yet it may be necessary to put heavily soiled clothing through a prewash.
- Do not put too many garments into the drum. This can affect the washing results. Check the maximum permissible quantity of washing according to the following table.
| Type of fibre Maxi | mum load capacity for | |
| EWM126L/146B/146L | EWM125B | |
| Cotton 6.0 kg 5.0 kg | ||
| Synthetic wash 3.0 kg 2.5 kg | ||
| Delicates 1.5 kg 1.5 kg | ||
| Wool 1.5 kg 1.5 kg | ||
- Fluffy clothing. Clothes that pill easily should be turned inside out. Fluffy clothing should be washed separately, otherwise other garments may be covered in fabric and fluff. Black clothes should preferably be washed separately, because fabric and fluff from other laundry may be visible on the black laundry. Check this before washing.
- Waterproof fabrics. Do not wash waterproof fabrics in the washing machine (ski clothes, curtains, raincoats, car covers, sleeping bags, etc.). Do not wash any fabrics that do not absorb water in the washing machine. The washing machine may start to 'walk' and vibrate, and this can seriously damage the the fabrics and the washing machine.
- Warnings about spinning:
▶ Spinning normal washing: the water is drained through the drain hose.
▶Spinning waterproof clothing and fibre products: when spinning all of the water collects in the middle, the washing machine can start to 'walk' and vibrate, and this can seriously damage the fabrics and the washing machine.
The first wash
Before you start to use the washing machine, the washing machine must complete a wash at the highest temperature and with an empty drum. Proceed as follows:
- Connect the machine to the mains power supply.
- Open the tap fully and check that the fill and drain pipes are connected.
- Pour a little detergent into the detergent drawer and close it.
- Select 'Cotton 90°'.
- Press the Start/Pause button.
The LED above the Start/Pause button lights up; the selected program starts.
▶EWM126L/EWM146L: the remaining program time is shown on the display.
▶EWM125B/EWM146B: the LEDs above 'Wash/Rinse/Spin' indicate at what stage the program is.
When the program has completely finished, the LED above the Start/Pause button goes out.
Completing a wash program
- Connect the machine to the mains power supply.
- Open the tap fully.
- Fill the washing machine with laundry.
- Put detergent into the detergent dispenser:
▶Pull the drawer out.
▶Put prewash detergent in compartment I.
▶Put main wash detergent in compartment II.
▶Put fabric softener in the 'flower' compartment.

text_image
Diagram showing a mechanical or electrical component with labeled parts I and II, featuring symbols like a flower and a downward arrow.- Select the desired program using the program selector dial.
▶Turn the program selector dial to the desired program based on the type of fabric and select the correct temperature based on the degree of soiling. A higher temperature usually consumes more energy.
Set the correct spin speed by (repeatedly) pressing the spin speed button. The higher the speed, the dryer the laundry will be when it comes out of the machine. It will also be a bit more creased.
Note: To protect your clothing it is advisable to select the lowest spin speed for delicates.
-
You can still further adjust the selected washing program using the option buttons, by pressing the option key (several times), you can select 'Extra water', 'ECO', 'Anti-crease' or 'Intensive'. For more information about these additional options, see page 19.
-
Finally, press the Start/Pause button.
The LED above the Start/Pause button lights up; the selected program starts. When the program has completely finished, the LED above the Start/Pause button goes out.
Selecting wash programs using the program selector dial
The correct program is selected based on fabric type, quantity and degree of soiling, combined with the temperature table set out below.
| 90°C Heavily soiled pure white cotton or linen (tablecloths, towels, sheets, for example) | |
| 60°C Moderately soiled, coloured cotton and synthetic fabrics with a certain degree of discoloration (for example: shirts, pyjamas).Lightly soiled cotton (for example: underwear) | |
| 40°C,30°C,cold water | Laundry with a normal degree of soiling (including synthetic fabrics and wool). |
The wash program depends on the laundry being washed. The programs that you can set are below:
- Cotton
This long, intensive program is intended for clothing that may be washed every day. This includes cotton sheets, duvet covers, pillowcases, clothing, underwear etc.
- Synthetics
This program is shorter and less intense than the cotton program and is intended for synthetic washing, such as shirts and jackets. For curtains and textiles containing lace select the synthetics 40°C program. When you wash knitwear, use less detergent because of the loose yarn structure and increased foaming.
- Delicates
▶Use this program for delicates. This program is less intensive and has a lower spin speed than the synthetics program. It is intended for garments, which need to be washed gently.
- Wool
Use this program for woollens with the 'machine wash' on the care label. Select the washing temperature according to the care label. In addition, use a suitable wool detergent.
• 35 min short
This program is suitable for a quick wash of lightly soiled laundry.
- Prewash (only for EWM126L and EWM146L)
▶Select this program before the main wash to improve washing results. When the prewash program has finished, then select the main program using the program selector dial.
There is a separate prewash button on the control panel for EWM125B and EWM146B. In order to improve washing results this program adds an additional wash cycle before the main wash. The prewash program must be combined with the cotton program.
- Pumps (only for EWM125B and EWM146B)
▶ Only the rinse water is pumped out, the laundry is not spun. This function is intended for delicates.
- Hand wash
This is a short program lasting about 30 minutes with cold water and an adjustable spin speed.
- Rinse
▶A separate rinse program.
- Spin
▶A separate spin program. Soapy water and rinse water are pumped out before spinning.
Adapting wash programs using the option buttons
You can still further adjust the selected washing program using the option buttons, by pressing the option key (several times), you can select 'Extra water', 'ECO', 'Anti-crease' or 'Intensive'.
- Extra water (baby program)
More rinse water is used in this program. This reduces the risk of soap residues on clothing and is better for sensitive baby skin. Except for the 'Wash', 'Rinse', 'Pump' and 'Spin' programs, all programs can be combined with this function.
• ECO
When you set this function, the water temperature is reduced and the quantity of water is reduced during the 'Prewash' and 'Wash' program. The program is only effective when it is set before starting the wash. As soon as the program starts to run, it cannot be changed.
The eco function can only be set for the 'Cotton' and 'Synthetics' wash program. It is advisable not to use this function with a fully loaded drum.
Note: functions 'Eco' + 'Extra water', 'Eco' + 'Intensive' or 'Eco' + 'Prewash' cannot be selected at the same time.
- Anti-crease
There is no spin following the final rinse and no water is pumped out. The anti-crease function can be used for all programs except 'Wash', 'Rinse', 'Pump' and 'Spin'.
▶ Note: If you want to completely remove all creases from clothing, then ironing is required.
- Intensive
To improve washing results, the length of the main wash is extended. This function can be combined with all programs, except for 'Quick wash', 'Wash', 'Pump' and 'Spin'. Use this function for baby clothing or clothing of people with an allergy to detergents.
Aborting a wash program
If you want to interrupt a wash program, turn the program selector dial to position '0'. Where required, start the spin program to pump out the remaining water.
Reducing foam
This program will start automatically when excessive foaming is detected. You will be advised to use less detergent for any similar washes in the future. Excessive foaming occurs when too much detergent is used. This has an adverse effect on washing and rinsing results.
Child lock
You can set this function to prevent it being possible to operate the buttons (e.g. children) when the washing machine is running. All buttons are now disabled, except for the program selector dial.
Switch child lock on/off (EWM126L/EWM146L)
- Press the 'Spin speed' and 'Start in...' buttons together for 2.5 seconds while the program is running.
You will hear a beep; all buttons are now locked.
- Press the 'Spin speed' and "Start in ..." buttons together for a further 2.5 seconds.
A beep sounds and the child lock is unlocked.
The child lock function automatically unlocks after the wash program has completed in full.
Switch child lock on/off (EWM125B/EWM146B)
- Press the right-hand option button and the prewash button together for 2.5 seconds while the program is running.
You will hear a beep; all buttons are now locked.
- Press the right-hand option button and prewash button together for a further 2.5 seconds.
A beep sounds and the child lock is unlocked.
The child lock function automatically unlocks after the wash program has completed in full.
Delayed start time (EWM126L/EWM146L)
You can set a time by pressing the 'Start in...' button, after selecting the desired program. The washing machine will only start the program after the set time.
Table of wash programs for EWM126L/EWM146L
| Program Load (kg) | Material Detergent | drawer | Time(min.) | Standard spin speed(RPM) | ||
| II | * | 126L 146L | ||||
| Cotton cool 6.0 Cotton | ● | ○ | 100 1,200 | 0 1,400 | ||
| Cotton 40°C 6.0 Cotton | ● | ○ | 110 1,200 | 0 1,400 | ||
| Cotton 60°C 6.0 Cotton | ● | ○ | 120 1,200 | 0 1,400 | ||
| Cotton 90°C 6.0 Cotton | ● | ○ | 150 1,200 | 0 1,400 | ||
| Synthetics cool 3.0 Synthetics | ● | ○ | 70 800 | 800 | ||
| Synthetics 40°C 3.0 Synthetics | ● | ○ | 90 800 | 800 | ||
| Synthetics 60°C 3.0 Synthetics | ● | ○ | 110 | 800 800 | ||
| Delicates 30°C, 1.5 Delicates | ● | ○ | 90 400 | 400 | ||
| Wool cool | 1.5 Wool | ● | ○ | 55 600 | 600 | |
| Wool 40°C | 1.5 Wool | ● | ○ | 80 600 | 600 | |
| 35 min. short 30°C | 3.0 All | ● | ○ | 35 800 | 800 | |
| Hand wash | 6.0 All | ● | ○ | 40 800 | 800 | |
| Rinse | 6.0 All | × | × | 25 800 | 800 | |
| Cotton 60°Cprewash | 6.0 All | ● | ○ | 145 1,200 | 0 1,400 | |
| Spin | 6.0 All | × | × | 15 800 | 800 | |
Energy test program cotton 60°C, intensive.
Standard wool program: wool 40°C
●: 'required' ○: 'optional' ✕: 'not required'
Comment: the parameters in this table are only intended for the user.
Table of wash programs for EWM125B/EWM146B
| Program Load (kg) | Material Detergent | drawer | Time (min.) | Standard spin speed (RPM) | ||||
| 125B 146B II | * | 125B 146B | ||||||
| Cotton cool 5.0 6.0 | Cotton | ● | ○ | 90 1,200 | 1,400 | |||
| Cotton 40°C 5.0 6.0 | Cotton | ● | ○ | 90 1,200 | 1,400 | |||
| Cotton 60°C 5.0 6.0 | Cotton | ● | ○ | 100 1,200 | 1,400 | |||
| Cotton 90°C 6.0 6.0 | Cotton | ● | ○ | 135 1,200 | 1,400 | |||
| Synthetics cool 2.5 | 3.0 Synthetics | ● | ○ | 73 800 | 800 | |||
| Synthetics 40°C 2.5 | 3.0 Synthetics | ● | ○ | 75 800 | 800 | |||
| Synthetics 60°C 2.5 | 3.0 Synthetics | ● | ○ | 95 800 | 800 | |||
| Delicates 30°C, 1.5 | 1.5 Delicates | ● | ○ | 65 400 | 400 | |||
| Wool cool 1.5 1.5 Wool | ● | ○ | 45 600 | 600 | ||||
| Wool 40°C | 1.5 1.5 | Wool | ● | ○ | 65 600 | 600 | ||
| 35 min. short 30°C | 2.5 3.0 | All | ● | ○ | 35 800 | 800 | ||
| Hand wash | 5.0 6.0 | All | ● | ○ | 33 800 | 800 | ||
| Rinse | 5.0 6.0 | All | × | × | 18 800 | 800 | ||
| Pump | - | - | - | × | × | 3 | - | - |
| Spin | 5.0 6.0 | All | × | × | 15 800 | 800 | ||
Energy test program cotton 60°C, intensive.
Standard wool program: wool 40°C
●: 'required' ○: 'optional' ✕: 'not required'
Comment: the parameters in this table are only intended for the user.
Table of washing instructions
| Symbol | Description Symbol | Description | |
| [H6CB] | Hand wash Not machine-washable | [CBH6] | |
| [YKCB] | Wash (including machine wash and hand wash) | [IZYT] | Do not wash |
| [YHAZ] | Dry-clean Do not dry-clean |  | |
 | Hot steam Do not wring | [YW03] | |
 | Bleach | [HT74] | Do not bleach |
| [8STD] | Tumble dry Do not tumble dry |  | |
| [17XC] | Iron Do not iron |  | |
 | Iron with steam Iron with cloth | [CO3X] | |
| [459G] | Iron (Medium Heat) (150°C) / Iron (Low Heat) (110°C) / | [AB4C] | Dry after washing |
 | Cupboard Dry Dry in shade | [W6CG] |
Before starting maintenance

- Remove the mains lead or turn off the power supply.
- Switch off the tap.
Warning!
- To avoid damaging the machine solvents are not allowed.
- Do not spray or rinse the washing machine with water. Risk of short circuit!
General
Cleaning and maintaining the machine housing
Proper maintenance of the washing machine extends its service life. The surface can be cleaned with a mild detergent solution. If any water overflows, use a damp cloth to remove it. Sharp objects should not touch the housing.
Clean drum
Immediately remove any rust stains caused by accidental inclusion of any metal objects with a chlorine-free detergent. Never use steel wool.
A frozen washing machine
If the temperature drops below zero and your washing machine freezes, you can:
- Disconnect the power supply to the washing machine.
- Rinse the tap with warm water to release the fill hose.
- Remove the fill hose and submerge in hot water.
- Pour hot water into the drum and wait for ten minutes.
- Re-connect the fill hose to the tap and check that the fill and drain hose are working properly.

Note: do not use the washing machine again until the ambient temperature is above 0^ C.
Frost prevention
If your washing machine is fitted in a room where there is an increased risk of freezing, make sure that there is no residual water in the fill and drain hose.
Removing the remaining water in the fill hose:
- Switch off the tap
- Unscrew the fill hose from the tap and insert the end into a bucket or container.
- Start any program except for 'Wash' or 'Pump'. If there is any water present in the fill hose it will be pumped out for 40 seconds.
- Connect the fill hose back on to the tap.
natural_image
Illustration of a hand holding a circular object with a ring, partially submerged in a bowl (no text or symbols visible)
Removing the remaining water in the drain pump
Unscrew the pump/filter cover and allow the water to drain out.
Warning!
Do not do this until the hot water in the washing machine has cooled down to avoid burning yourself.
Cleaning the detergent drawer and compartments
- Depress the arrow on the cover of the fabric softener compartment inside the drawer.
- Lift the clip up, remove the cover and clean all of the channels with water.
- Replace the cover and slide the detergent drawer back inside.

natural_image
Three-step diagram showing a mechanical assembly with arrows indicating motion, no text or symbols present.
natural_image
Illustration of a hand pouring liquid into a pipe fitting (no text or symbols)Cleaning the inlet filter
The inlet filter should be cleaned if there is no water or insufficient water when the tap is switched on.
- Switch off the tap.
- Select any program except for 'Wash' or 'Pump'.
- Select the 'START/PAUSE' button and allow the program to run for 40 seconds.
- Remove the hose from the tap.
- Clean the filter with water.
- Re-connect the fill hose.
natural_image
Pure diagram of a pipe fitting with a valve, no text or symbols presentCleaning the filter in the washing machine
- Unscrew the fill hose from the back of the washing machine.
- Extract the filter using a pair of long-nose pliers and refit it after cleaning.
- Re-connect the fill hose.
- Switch on the tap and check that no water is leaking.
- Switch off the tap.
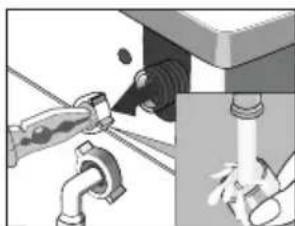
natural_image
Illustration of a pipe repair operation with a tool and valve (no text or symbols)Note: the filter for the first valve is usually cleaned before the filter is cleaned in the washing machine. If only the filter in the washing machine has been cleaned, steps 1 to 3 of cleaning the inlet filter need to be repeated.

Warning!
- Before cleaning, unplug from the socket to prevent any risk of electric shock.
- After using the washing machine, unplug the mains lead from the socket and close the door firmly to prevent children from being able to get into the appliance.
Remove any unwanted items from the drain pump filter
The filter for the drain pump collects threads and other small objects from the wash cycles. Clean the filter regularly to guarantee normal operation of the washing machine.

Warning!
The filter should be cleaned regularly depending on the degree of soiling and washing frequency.

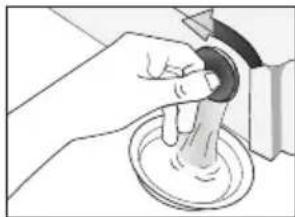
natural_image
Illustration of a hand turning a circular component with a ring, no text or symbols present
The drain pump must be inspected if:
• the water is not draining,
- the washing machine is not spinning, or,
- unusual noises can be heard when pumping out water due to objects such as safety pins and coins, which are blocking the pump.
Cleaning the drain pump filter
- Switch off the power and then open the service panel (where applicable, with a coin or a screwdriver).
- Where applicable: wait until the water has cooled down.
- Put a container close to it to collect the water. Always keep a cloth handy to clean up any spilled water.
- Unscrew the pump/filter cover. Remove any objects from the filter/from the pump screw (turn the pump screw using a pencil, for example).
- Refit the pump/filter cover after the objects have been removed and close the service panel.
Warning!
- When the washing machine is in use and depending on the selected program, there may be hot water standing in the pump. Never remove pump/filter cover during a wash program. Always wait until the machine is ready and has been completely pumped out.
- When refitting the pump-filter cover make sure that it is securely attached so that no leak can occur and children cannot remove it.
Fault table
If you have any doubts about whether your washing machine is working properly, this does not automatically mean that there is a problem. If in doubt, check the points set out in the following table or for more information visit the web site 'www.etnaservice.nl'.
| Problem Cause Solution | ||
| Washing machine is not working. | Check that the door is properly closed.Check that the plug is properly plugged in at the socket. Check that the tap is switched on.Check that the 'START/PAUSE' button has been pressed. | |
| Door cannot be opened. The w | washing machine protection system is in operation. | Unplug the mains lead from the socket. |
| Heating fault. The temperature | sensor is damaged and the heating element is faulty. | The washing machine is working, but it is no longer able to complete a hot wash.Please contact the service department immediately. |
| Water leak. There is a poor con | connection between the fill or drain hose and the tap. | Check the connections and tighten if necessary. |
| The drain is blocked. Clean the | drain hose or, if necessary, arrange for it to be repaired by a qualified service technician. | |
| Water is flowing out of the bottom of the washing machine. | The fill hose is not properly connected. The drain hose is leaking. | Attach the fill hose. Replace the drain hose. |
| The LEDs or display do not light up. | The power supply is switched off. There is a problem with the PCB. | Check whether the power is switched off and the plug is connected. Otherwise, please call the service line. |
| There are detergent residues in the detergent drawer. | The washing powder is wet and in clumps. | Clean the detergent drawer. Use liquid detergent or detergent specially designed for washing machines with a drum. |
| The washing results are poor. | The washing is too dirty. Insufficient or too much detergent used. | Select the correct wash program. Add the correct amount of detergent according to the instructions on the detergent packaging. |
| The washing machine vibrates or makes unusual noises. | Check whether:- The transport bolts have been removed.- The washing machine is positioned on a firm, flat surface.- There are no hairpins or other metal objects inside the drum.- The washing machine feet have been set level (see page 33). | |
| The washing machine smells. | Washed for too long at a low temperature. | Wash at 90° once a month and use a washing machine cleaner. |
| The wash is too wet when it comes out of the washing machine. | The washing machine has not spun because it is imbalanced. | The washing machine has an imbalance protection system. Put the laundry back into the machine and re-spin. |
| There are white stripes on the laundry. | These are soap residues left behind due to the wash being too short / temperature being too low. | Use a liquid detergent. |
Troubleshooting
| Fault code | Description Cause Solution | ||
| E1 Problem | with door lock. The door is not closed properly. | Not closed properly. | Restart the program after the door has been closed. Call the service line if the problem persists. |
| E2 Water fill | problem during the wash (the water fill takes longer than 5 minutes). | The tap has not been opened (sufficiently). The inlet valve is blocked. | Open the tap or wait until the water fill is once again normal. Check the filter for the inlet valve.Pull the fill hose straight.Check other taps in the room.Call the service line if the problem persists. |
| E3 Drainage | problem during washing (The drainage time takes longer than 7 minutes). | The drain hose is blocked or twisted.Drain pump is blocked. | Clean the drain hose and pull it straight.Clean the filter in the drain pump.Call the service line if the problem persists. |
| E8 Excessive | foaming. Too much detergent | being used.Improper use of detergent. | Use less detergent.Only use detergents that are intended for machine washing (and follow the instructions on the packing).Call the service line if the problem persists. |
Disposing of the appliance and packaging
Sustainable materials have been used when manufacturing this appliance. This appliance must be disposed of responsibly at the end of its service life. The government can provide you with information about this.
The packaging of the appliance is recyclable. The following can be used:
- cardboard;
• polyethylene film (PE);
• CFC-free polystyrene (PS rigid foam).
You should dispose of these materials responsibly and in accordance with government regulations.

natural_image
Symbol of a trash bin with crossed lines indicating no waste or discharge (no text or numbers present)To designate the requirement for separate collection of household electrical appliances, the symbol of a dustbin with a cross through it is applied to the product. This means that the appliance may not be included with normal domestic refuse at the end of its service life. The appliance must be taken to a special municipal waste collection centre or to a point of sale provided by this service.
Separate collection of household appliances helps to prevent potential negative impact on the environment and human health caused by improper disposal. It ensures that the materials that make up the unit can be recycled to achieve a significant saving in terms of energy and raw materials.
Unplug the mains lead from the socket and cut the cord before you dispose of the appliance.
Unpacking and positioning your washing machine
- Remove the packaging and check whether any damage has been caused in transit.
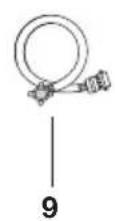
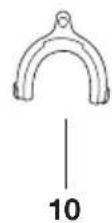
- Check that all components (as shown on page 5) are in the supplied bag.
- Immediately contact your local dealer if you identify any damage in transit or missing parts.
Dispose of the packaging material
- The packaging material for this appliance may be hazardous to children. Throw it away immediately and keep it out of the reach of children.
- Sort the packaging material according to local regulations. Do not throw it away with the household refuse.

natural_image
Diagram of a mechanical joint or connector with a central pin and arrow indicator (no text or symbols)Removing the transport bolts
Before starting to use the washing machine, remove the transport bolts from the back of the machine:
- Loosen and remove all bolts.
- Fit the transport hole plugs into the vacant holes.
- Keep the transport bolts for future use.
Choosing a suitable location
Before you install the washing machine, you must choose a spot offering the following features:
- A rigid, dry, flat surface (if the surface is uneven, this can be overcome using the adjustable levelling feet, see page 33 'Setting the adjustable feet').
- No direct sunlight.
- Adequate ventilation.
• Room temperature higher than 0^ C. - At some distance from heat sources.
- No floor covering as a base.
Make sure the washing machine is not placed on the mains lead.
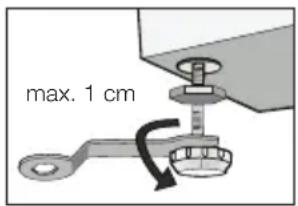
text_image
max. 1 cmSetting the adjustable levelling feet
- Before you fit the washing machine, check that the adjustable levelling feet are in their original position, tightened as far into the machine as possible. If this is not the case, you need to tighten them by hand or with a spanner.
- After positioning the washing machine, push on the four corners on the top of the washing machine in turn. If the machine shakes when pressing one of the corners, the adjustable levelling foot needs to be set under this corner.
- Ensure that the washing machine is in the correct location. Loosen the lock nut with the wrench and turn the adjustable levelling foot by hand until it is touching the ground. With one hand push the adjustable levelling foot against the ground, while the other hand is tightening the locknut against the washing machine.
- After levelling the washing machine, once again press on all four corners to make sure that the washing machine is stable. If the washing machine still wobbles, then repeat steps 2 and 3.
- Place a cylindrical object (e.g. a fizzy drinks can), so that it is lying on the top of the washing machine and aim it in all possible directions. If the can does not move, then the washing machine is level. If it rolls, then the washing machine is at an angle. The direction in which the can starts to roll is towards the lower surface. Where this is the case, both adjustable levelling feet should be unscrewed on the same side until the washing machine is level. Repeat steps 1 to 3, ensuring the adjustable levelling feet are turned so that they are tight against the ground and the locking nuts are properly tightened.
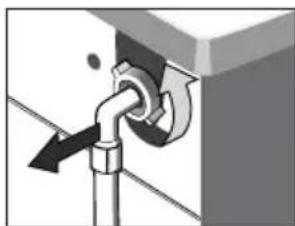
Connecting the fill hose
- Connect the fill hose to the washing machine with the elbow connection. Do not allow the fill hose to hang straight down, but turn it to the left or the right. Tighten the hose fitting by hand only.
- Then connect the straight connection to a water tap with an R 3/4 (inch) screw thread. Attention! Only tighten the hose coupling by hand.
- Before commissioning the machine, check that the connection is tight by slowly opening the water tap.

Note:
- If after connecting there is a leak from the fill hose, then repeat steps 1 and 2 to fasten the fill hose properly.
- A standard valve should be used for the water supply. If the tap is square or too large, the standard valve needs to be changed.
Drain hose
There are different ways of draining the washing water:
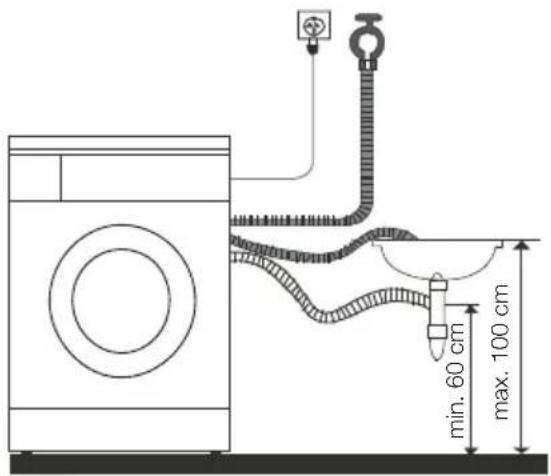
text_image
min. 60 cm max. 100 cm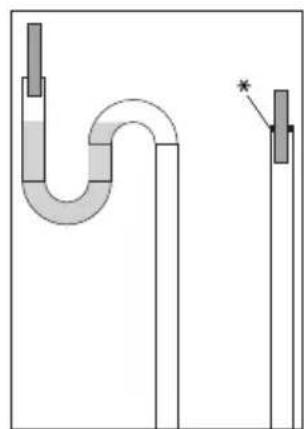
natural_image
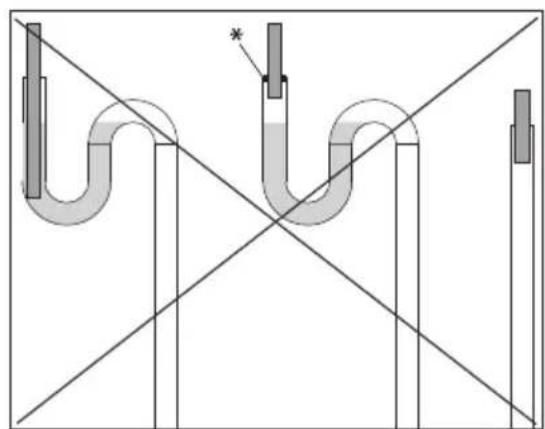
Diagram of a U-shaped pipe with a submerged object and a vertical support, showing no text or symbols.Right

natural_image
Pure diagram of U-shaped pipes with cross-sectional lines, no text or symbols presentWrong
* Drain trap

▶ Small sinks or basins are not suitable for draining the water. The water could overflow!
The drain hose can drain water up and down. The drain hose should be placed no higher than 100 cm and no lower than 60 cm.
The end of the drain hose should not hang in the water that is being pumped away. Otherwise water could be sucked back into the appliance!
If the drain hose is too long, then do not force it into the washing machine. This causes unwanted noises.
Attention! The drain hose should never be kinked.
Electrical connection

- When you use the heating function, the washing machine has a maximum charge of 10 A. Make sure the circuit(s) cannot be overloaded and that it has a 16 A fuse.
- Plug the plug into a socket, which has been properly fitted and earthed.
- Make sure your domestic mains voltage is equal to the values on the energy label.
- Do not use multi-gang adapters as an extension lead.
- Never insert the plug or remove it into or from the mains socket with wet hands.
- When plugging and unplugging the plug, hold the plug firmly and then remove it.
- If the mains lead is damaged, it must be replaced.
Warning
- The washing machine must be connected to an earthed plug socket. This washing machine is fitted with a mains lead with an earthed plug.
- The washing machine must be connected to a dedicated circuit. Otherwise, the fuse may blow.
- Make sure the connecting lead remains intact at all times.
Technical data
| Specifications EWM125B EWM126L EWM146B EWM146L | ||||
| Power supply 220-240V 50HZ 220-240V 50HZ 220-240V 50HZ | ||||
| Dimensions in mm(W x D x H) | 595 x 523 x 850 595 x 495 x 855 595 x 530 x 850 595 x 530 x 850 | |||
| Weight in kg 50 56 65 65 | ||||
| Number of revolutions (rpm) 1,200 1,400 1,400 1,400 | ||||
| Washing capacity in kg 5.0 6.0 6.0 6.0 | ||||
| Water consumption in litres 38 43 43 43 | ||||