hobbylock 4752 - Sewing machine PFAFF - Free user manual and instructions
Find the device manual for free hobbylock 4752 PFAFF in PDF.

User questions about hobbylock 4752 PFAFF
0 question about this device. Answer the ones you know or ask your own.
Ask a new question about this device
Download the instructions for your Sewing machine in PDF format for free! Find your manual hobbylock 4752 - PFAFF and take your electronic device back in hand. On this page are published all the documents necessary for the use of your device. hobbylock 4752 by PFAFF.
USER MANUAL hobbylock 4752 PFAFF
natural_image
White PFAFF hobbylock 4752 sewing machine with control knobs and a high back (no visible text or symbols on the device body)Instruction Manual
Parts of the hobbylock 4752
text_image
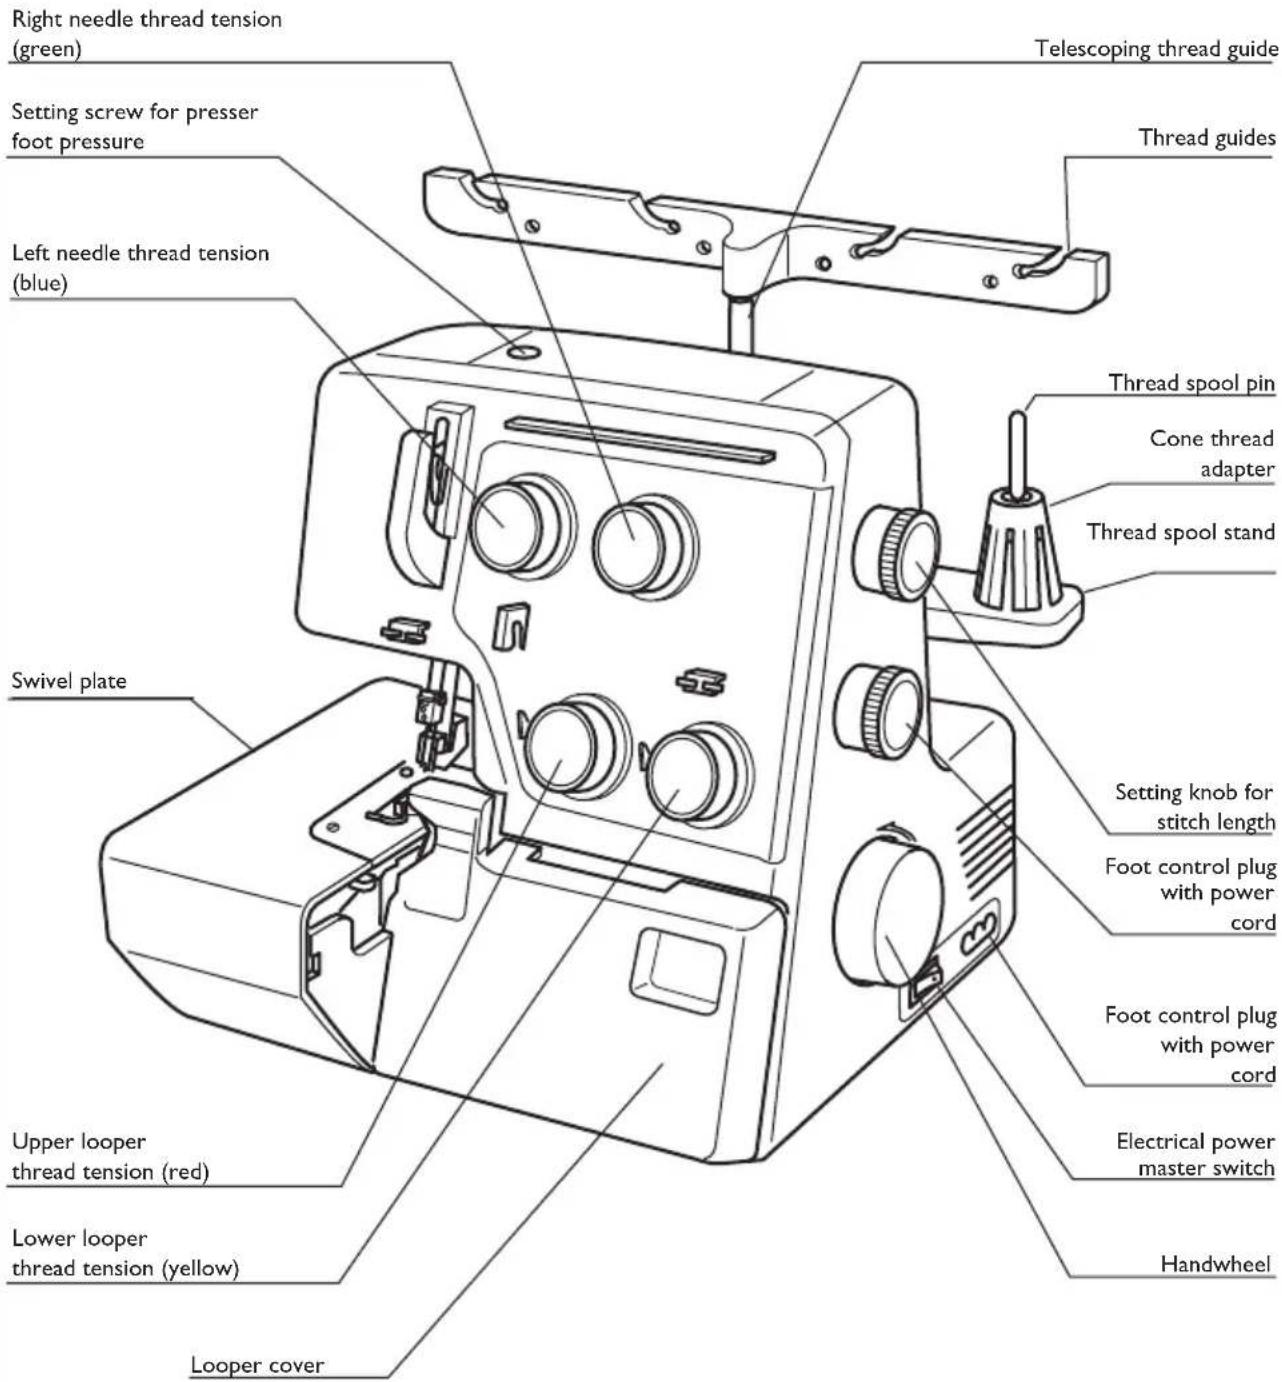
Right needle thread tension (green) Setting screw for presser foot pressure Left needle thread tension (blue) Swivel plate Upper looper thread tension (red) Lower looper thread tension (yellow) Looper cover Telescoping thread guide Thread guides Thread spool pin Cone thread adapter Thread spool stand Setting knob for stitch length Foot control plug with power cord Foot control plug with power cord Electrical power master switch HandwheelThis household sewing machine is designed to comply with IEC/EN 60335-2-28 and UL1594
IMPORTANT SAFETY INSTRUCTIONS
When using an electrical appliance, basic safety precautions should always be followed, including the following:
Read all instructions before using this household sewing machine.
DANGER - To reduce the risk of electric shock:
- A sewing machine should never be left unattended when plugged in. Always unplug this sewing machine from the electric outlet immediately after using and before cleaning.
• Always unplug before relamping. Replace bulb with same type rated 15 Watt.
WARNING - To reduce the risk of burns, fire, electric shock, or injury to persons:
- Do not allow to be used as a toy. Close attention is necessary when this sewing machine is used by or near children or infirm person.
- Use this sewing machine only for its intended use as described in this manual. Use only attachments recommended by the manufacturer as contained in this manual.
- Never operate this sewing machine if it has a damaged cord or plug, if it is not working properly, if it has been dropped or damaged, or dropped into water. Return the sewing machine to the nearest authorised dealer or service center for examination, repair, electrical or mechanical adjustment.
- Never operate the sewing machine with any air openings blocked. Keep ventilation openings of the Sewing machine and foot controller free from the accumulation of lint, dust, and loose cloth.
- Keep fingers away from all moving parts. Special care is required around the Sewing machine needle.
• Always use the proper needle plate. The wrong plate can cause the needle to break.
• Do not use bent needles. - Do not pull or push fabric while stitching. It may deflect the needle causing it to break.
- Switch the sewing machine off ("0") when making any adjustment in the needle area, such as threading needle, changing needle, threading bobbin, or changing presser foot, etc.
• Always unplug the sewing machine from the electrical outlet when removing covers, lubricating, or when making any other user servicing adjustments mentioned in the instruction manual.
• Never drop or insert any object into any opening.
• Do not use outdoors. - Do not operate where aerosol (spray) products are being used or where oxygen is being administrated.
• To disconnect, turn all controls to the off ("0") position, then remove plug from outlet. - Do not unplug by pulling on cord. To unplug, grasp the plug, not the cord.
- Hold plug when rewinding into cord reel. Do not allow plug to whip when rewinding.
- Keep fingers away from moving parts, especially the area near the blades.
SAVE THESE INSTRUCTIONS
Simple, up-to-date sewing
Congratulations! You have bought a high-quality product that provides unique advantages. Your new hobbylock 4752 can take any material in its stride and will sew through thick and thin for you.
Your PFAFF hobbylock features the very latest in design and technology, and it is just as simple to operate as this instruction manual is to follow.
Before you start sewing, please take the time to read these instructions carefully. It is certainly time well spent, and is the best way to find out just what your machine can do and make full use of all its features.
If you have any further questions, just ask your authorized PFAFF dealer. Your dealer is happy to be of service with any help or advice.
Let's get started! We wish you many enjoyable hours creating your very own fashions and projects!
Contents
Page
Accessories 6
Accessories, optional 37
Accessory box....6
Changing a spool on a threaded machine 11
Cleaning the machine. 38
Cone thread adapter....9
Connecting the machine 7
Differential feed 20
Electrical power master switch 7
Foot control....7,8
Handwheel 8
Light bulb (sewing lamp), changing 41
Looper cover 8
Lubricating the machine 39
Maintenance 38 - 41
Needle holder 22
Needle plate, removing 38
Needle position....23
Needle, changing 22
Oiling the machine 39
Presser foot 9,21
Presser foot lifter 9
Presser foot pressure 21
Presser foot, changing 21
Program overview 30, 31
Safety notes 2,7
Seam guidelines 26
Seam width setting knob 19
Seam width, setting 19
Securing the seam 27, 28
Sewing....26
Sewing light cover 41
Sewing problems and their solutions.... 42, 43
Specifications 44
Stitch formation correction measures 32 - 36
Stitch length setting knob 20
Stitch length, setting 20
Stitch width latch 25
Swivel plate....8
Telescoping thread guide....9
Thread chain cutter....26
Thread net 9
Thread tensions, setting....29
Thread unreeling disc....9
Threading aid for looper thread 13, 15
Threading aid for needle thread 16, 18
Threading paths/overview 0
Threading the lower overedge looper (yellow) ..... 14, 15
Threading the machine 10
Threading the needle(s)....16, 17, 18
Threading the upper overedge looper (red)....12, 13
Threading, important note.... 18
Threads and needles chart....29
Upper blade, changing....40
Upper blade, disengaging 24
Waste container 6

text_image
lug groove looper cover waste containerAttaching the waste container
Guide the lug into the groove on the looper cover.

text_image
waste container accessory boxStoring the accessory box
Place the accessory box in the waste container.

text_image
Accessories screw driver tweezers thread nets thread unreeling discs needle system wrench looper threading aid cleaning brush machine oil replacement upper blade needle threading aid
text_image
wall socket lead cord/plug connection socket foot control plug main switch OFF ON foot control main switchConnecting the machine to the mains power supply

Switch the main switch to OFF.
Plug the foot control plug into the connection socket on the machine.
Plug the lead cord/plug into the wall socket.
Switch the main switch to ON.
Notes on safety
This appliance has a polarized plug (one blade wider than the other).
To reduce the risk of electric shock, it is designed to fit into a polarized outlet only one way. If the plug does not fit correctly into the outlet, reverse the plug. If it still does not fit, contact a qualified electrician to install the proper outlet.
Do not modify the plug in any way.
Foot controller type YC-482J (120 V)/YC-550 (230 V)/YC-551 (240 V) has to be used with this overlock machine.
For the USA and Canada
This sewing machine has a polarized plug (one blade wider than the other). To reduce the risk of electric shock, this plug is intended to fit in a polarized outlet only one way. If the plug does not fit fully in the outlet, reverse the plug. If it still does not fit, contact a qualified electrician to install the proper outlet. Do not modify the plug in any way.

text_image
foot controlSewing speed
The sewing speed is regulated by activating the foot control. The further you press the foot control down, the faster the machine will sew.
text_image
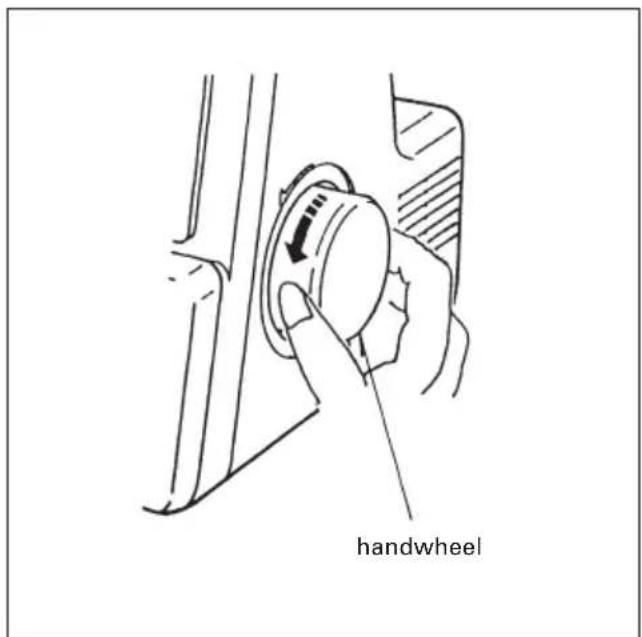
handwheelDirection of rotation of the handwheel
Always turn the handwheel towards you, as shown in the illustration (i.e. counterclockwise).
text_image
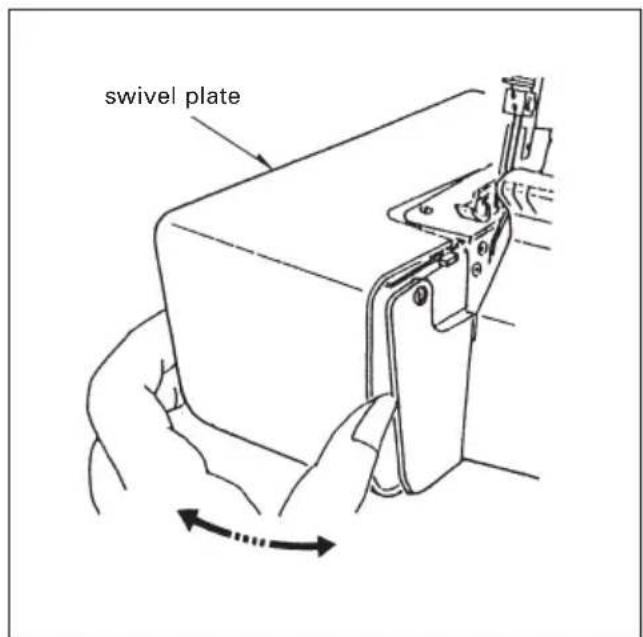
swivel plateOpening and closing the swivel plate
Opening: press the swivel plate towards the left.
Closing: press the swivel plate towards the right and slightly towards the machine.
Safety note: the swivel plate and the loo-per cover must always be closed when the machine is used.
text_image
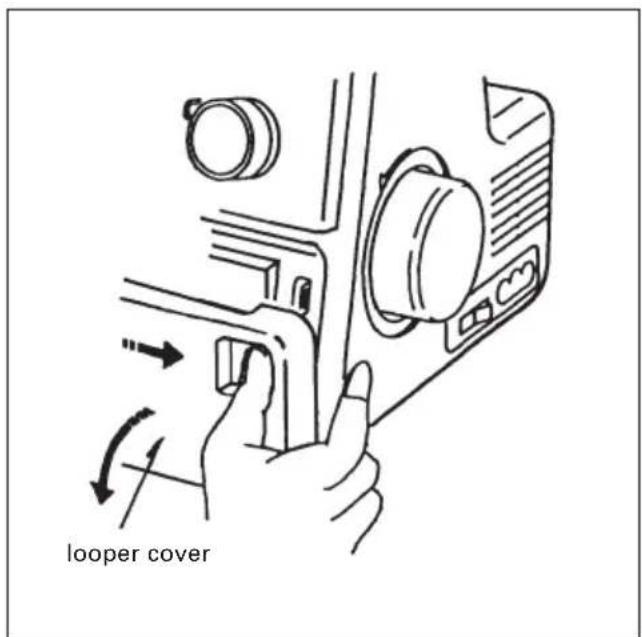
looper coverOpening and closing the looper cover
Opening: Push the looper cover fully to the right and then swivel it down.
Closing: raise the looper cover and press it towards the machine. The looper cover snaps into place automatically.

text_image
telescoping thread guide thread guides stops spool pinTelescoping thread guide
Pull the telescoping thread guide upward to its highest position.
The two upper telescopes must be rotated slowly until their locking balls are heard to lock into place.
text_image
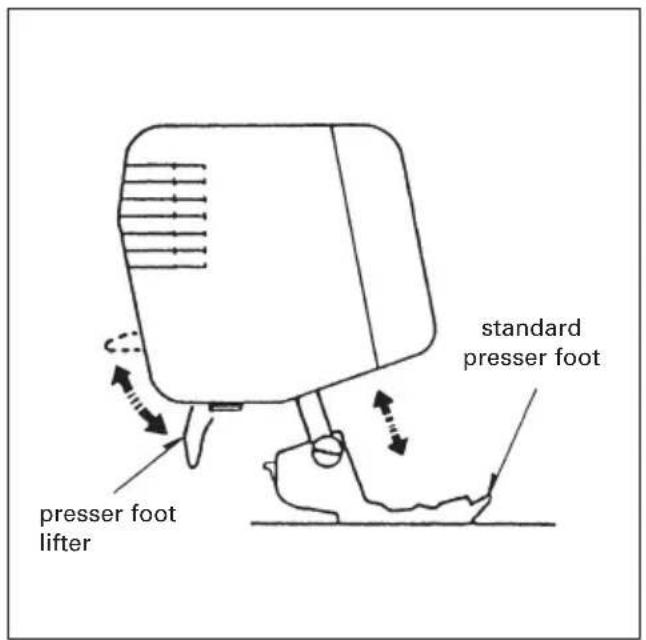
standard presser foot lifter presser foot lifterPresser foot lifter
The presser foot can be raised and lowered using the presser foot lifter.
The presser foot must always be lowered when the machine is used.
flowchart
graph TD
    A["cone thread adapter"] --> B["thread unreeling discs"]
    B --> C["slit"]
    C --> D["spool pin"]
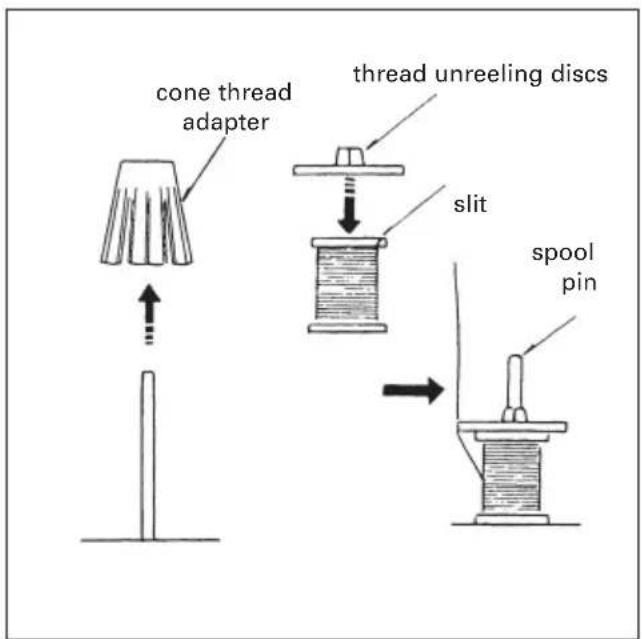
Attaching the thread unreeling discs and the thread nets
Pull the cone thread adapter off the spool pin when using a small spool. Place the spool on the spool pin in such a way that the slit is at the top and place the thread unreeling disc on top of the spool.
text_image
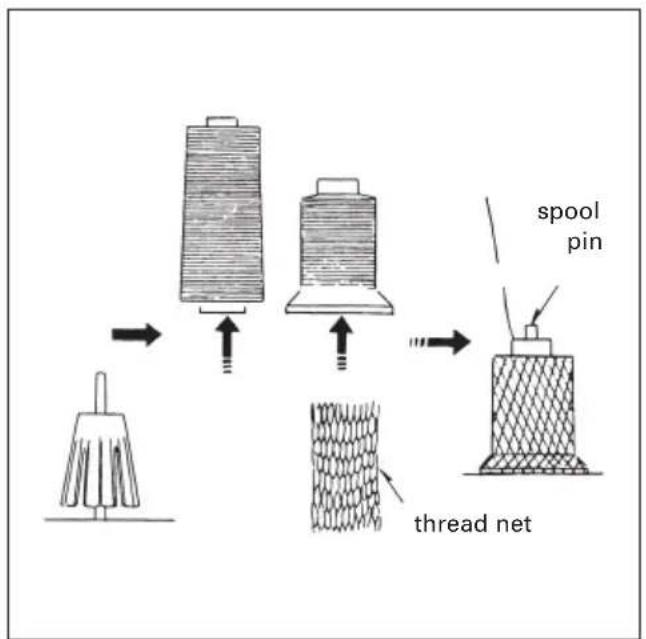
spool pin thread netIf the thread jumps off the spool during threading or sewing or if it slips out of the thread tensioners when sewing rolled hems, pull the enclosed net over the spool, as shown in the illustration. In this way, you can prevent the thread from jamming.
Threading the machine
text_image
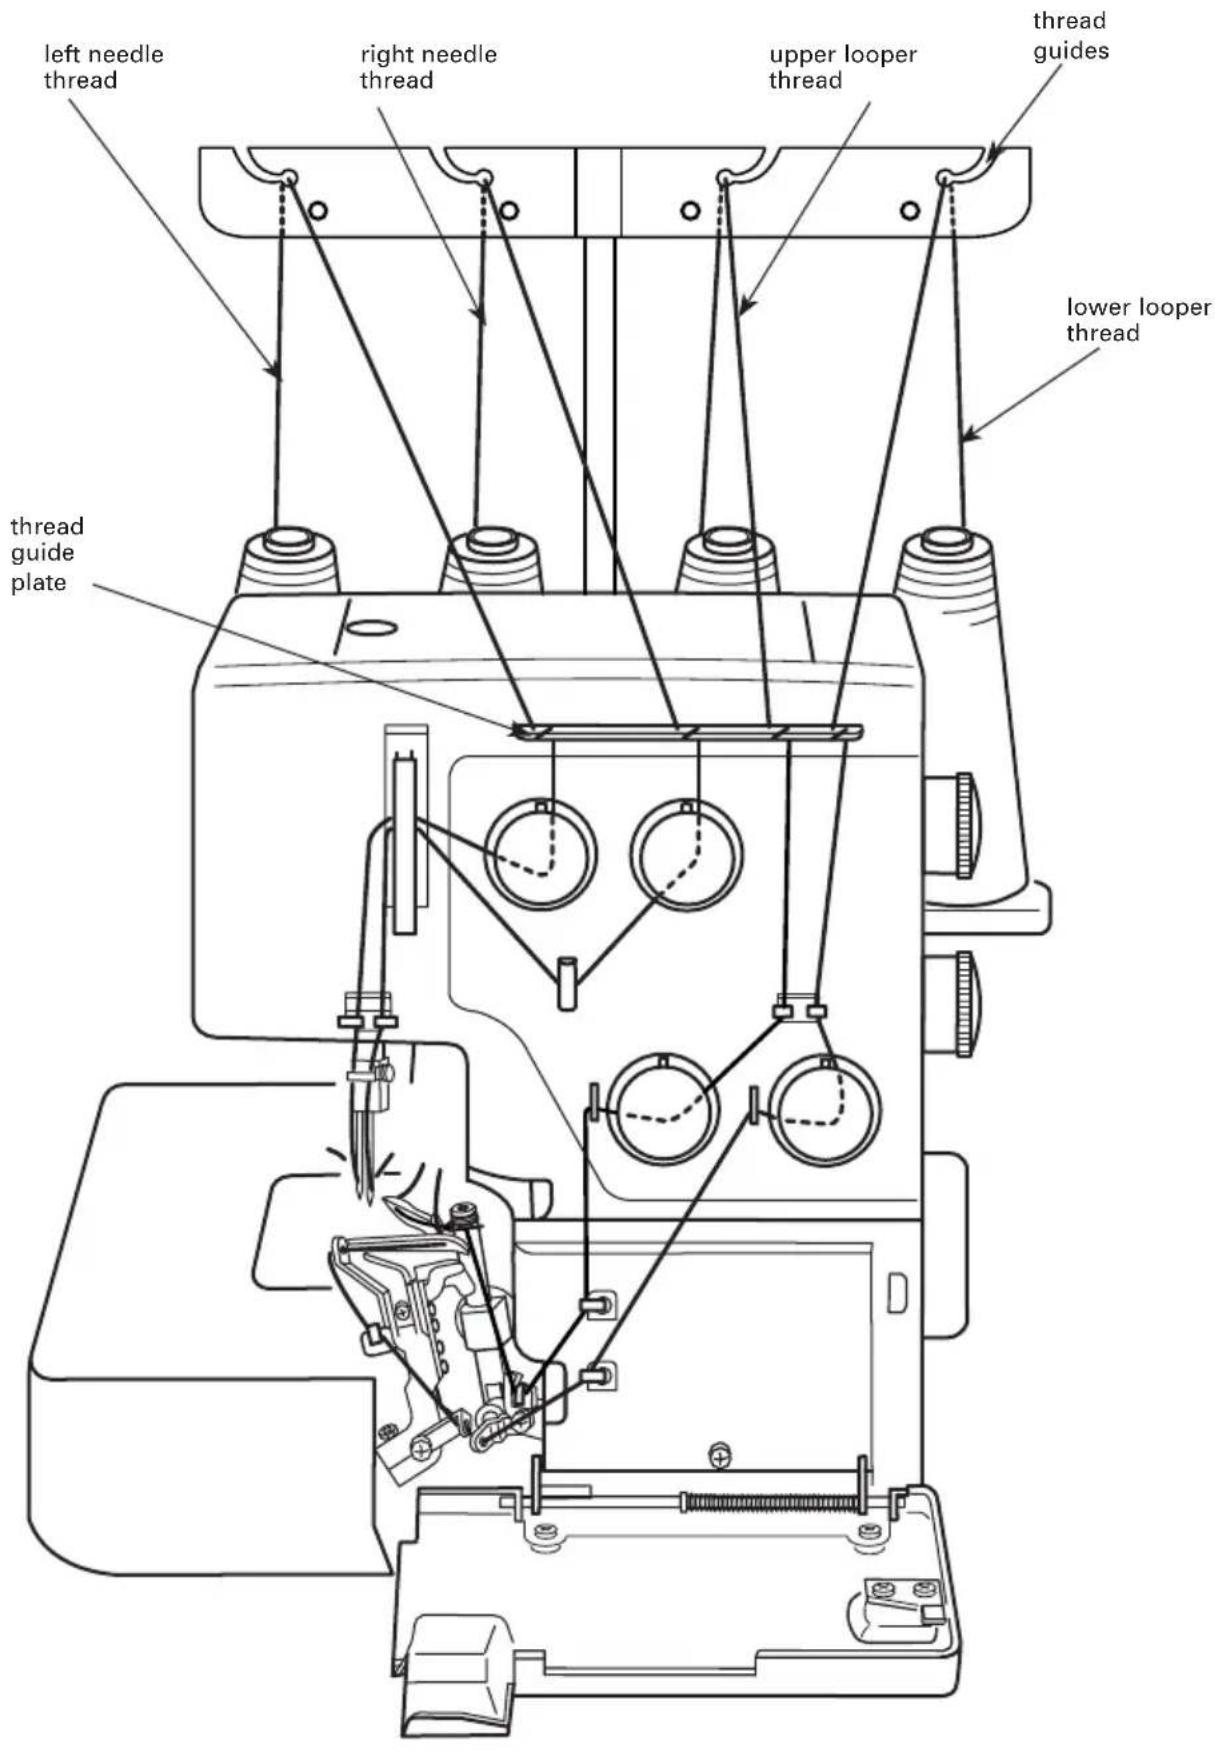
left needle thread right needle thread upper looper thread thread guides lower looper thread thread guide plate
natural_image
Line drawing of a sewing machine needle with thread spools and a hand adjusting the thread (no text or symbols)Before the machine leaves the factory, threads are already threaded and their ends are cut off. Tie one of these thread ends to the thread from a spool with an overhand knot, raise the presser foot and pull the new threads through the loopers. In order to thread the needle threads, pull the thread ends through until the knots reach the needle eye. Cut the threads on both sides of the knots. Rethread the eye of the needle with the needle threading aid (see Pages 16, 18). With this procedure, you can save a great deal of time when threading.
If the threads are not threaded in the machine, thread the upper looper thread (red) first, then the lower looper thread (yellow), the left needle thread (blue) and finally the right needle thread (green). Two threading diagrams are located behind the looper cover to help you correctly thread the machine.
Threads that are threaded incorrectly will lead to irregular (skipped) stitches, broken needles and uneven thread tension. Therefore always make sure that all the threads are perfectly threaded before beginning to sew.

natural_image
Technical line drawing of a mechanical tool with scissors and three separate blades (no text or symbols)In order to replace spools, cut the threads between the thread guides and the thread guide plate. Thread the new threads in the manner described opposite.
In order to make threading easier, set the thread tension to "0". After threading, reset the thread tension to the desired number (see Pages 30, 31).

text_image
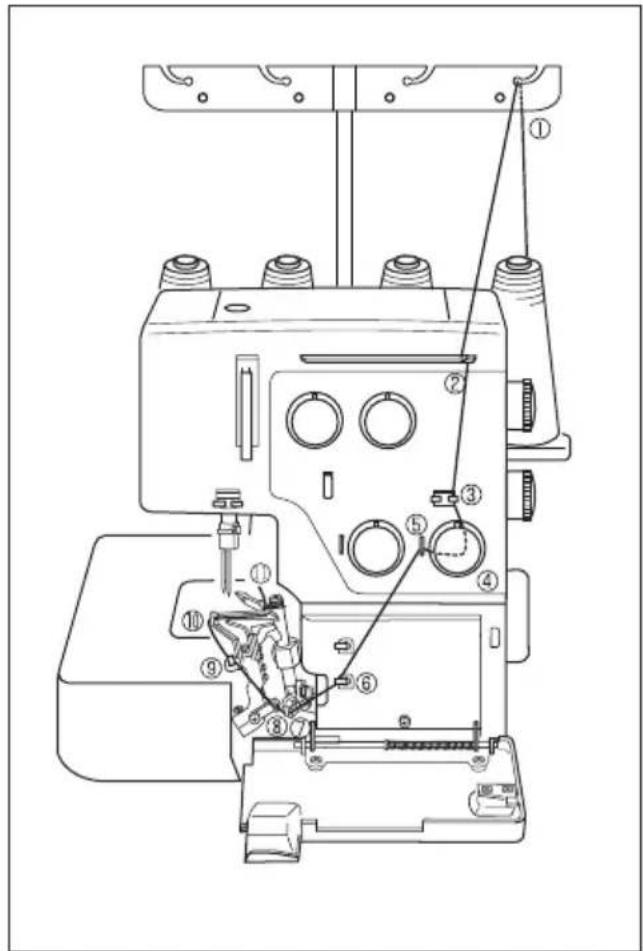
Technical diagram of a sewing machine with numbered components for identificationThreading the upper looper (red)
Open the looper cover and the swivel plate. Place the spool on the second spool pin from the right. The guide points for the upper looper thread are marked in red. Two threading diagrams are located behind the looper cover to help you with the threading.

text_image
thread guidesGuide the thread from the rear through the second thread guide from the right.

text_image
guide plate guide (3) for the upper looper threadGuide the thread through the fourth and the third hole from the right on the thread guide plate, as shown in the illustration.
Guide the thread from the right to the left into the left guide (3).
text_image
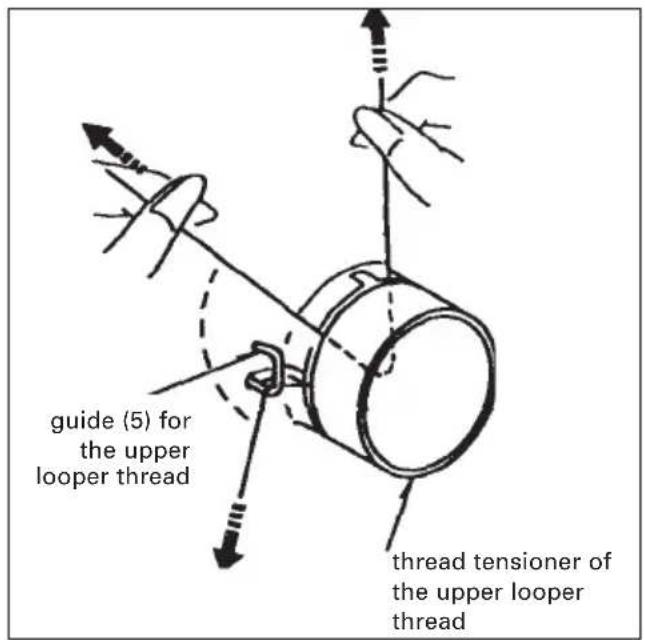
guide (5) for the upper looper thread thread tensioner of the upper looper threadGuide the thread through from the right between the tension discs and pull the thread tight from both sides.
Feed the thread into the guide (5) for the upper looper thread.

text_image
take-up lever (7) of the upper looper thread guide (6) for the upper looper threadFeed the thread into the guide (6) for the upper looper thread. Guide the thread into the take-up lever (7) of the upper looper thread.

text_image
looper threading aid upper looper guide (8) for the upper looperFeed the thread into the guide (8) of the upper looper. Feed the looper threading aid through the eye in the upper looper. Then hook the thread end into the looper threading aid and pull the latter with the thread through the eye. Remove the thread from the looper threading aid and pull on the free thread end until at least 10 cm (4") is showing beyond the eye. Lay the thread to the left under the presser foot. Close the swivel plate and the looper cover.
text_image
Technical diagram of a sewing machine with numbered parts for identification and assembly reference.Threading the lower looper (yellow)
Open the looper cover and the swivel plate. Place the spool on the second spool pin. The guide points for the lower looper thread are marked in yellow. Two threading diagrams are located behind the looper cover to help you with the threading.

text_image
thread guide (1)Guide the thread from the rear through the right thread guide (1).

text_image
guide plate (2) guide (3) for the lower looper threadGuide the thread through both the right holes on the thread guide plate (2), as shown in the illustration.
Guide the thread from the left to the right into the right guide (3).
text_image
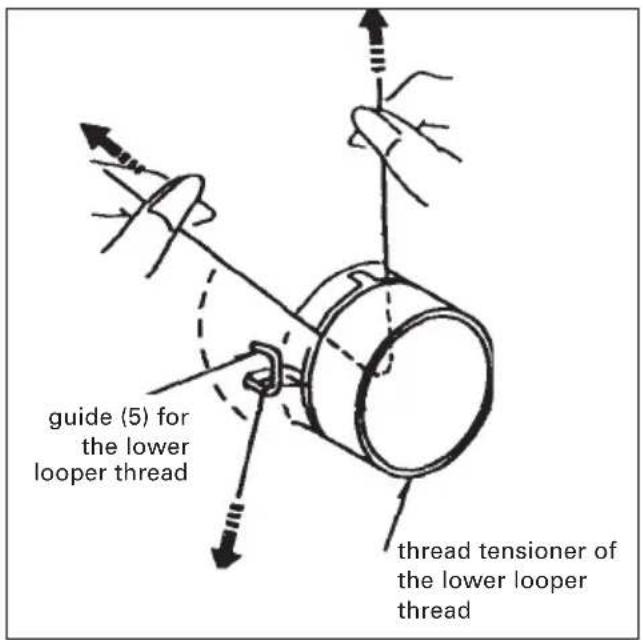
guide (5) for the lower looper thread thread tensioner of the lower looper threadGuide the thread through from the right between the tension discs and pull the thread tight from both sides.
Feed the thread into the guide (5) for the lower looper thread.
text_image
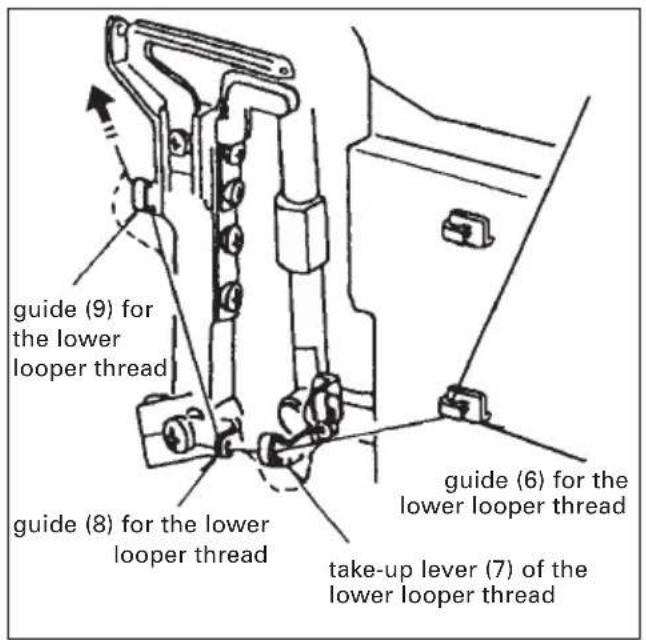
guide (9) for the lower looper thread guide (8) for the lower looper thread guide (6) for the lower looper thread take-up lever (7) of the lower looper threadFeed the thread into the guide (6) for the lower looper thread.
Guide the thread into the take-up lever (7) of the lower looper thread.
Feed the thread into the guide (8) for the lower looper thread.
Feed the thread into the guide (9) for the lower looper thread.

text_image
guide (10) for the lower looper thread footer looper threading aid footer looper threading aidTurn the handwheel towards you (counterclockwise), until the looper is on the extreme right. Feed the looper threading aid through the eye of the guide (10) for the lower looper. Then hook the thread end into the looper threading aid and pull the latter with the thread through the eye of the guide (10).

text_image
looper threading aid lower looper tweezersRemove the thread from the looper threading aid and using the tweezers pull on the free thread end until at least 10 cm (4") is showing beyond the eye of the lower looper. Lay the thread to the left under the presser foot. Close the swivel plate and the looper cover.
text_image
Technical diagram of a sewing machine with numbered parts for identification and assembly reference.Threading the left needle (blue)
Place the spool on the left spool pin. The guide points for the left needle thread are marked in blue. Two threading diagrams are located behind the looper cover to help you with the threading.
Guide the thread from the rear through the left thread guide (1) and both the left holes on the thread guide plate (2).
text_image
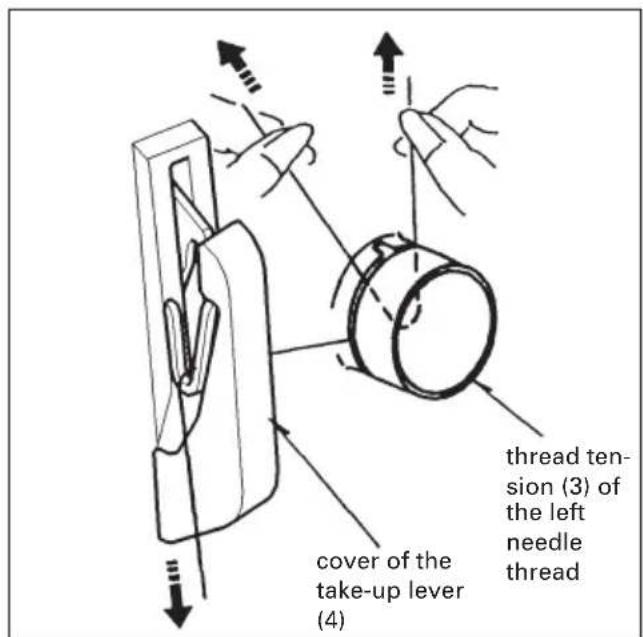
cover of the take-up lever (4) thread tension (3) of the left needle threadGuide the thread from the right between the tension discs and pull the thread tight from both sides. Raise the needle(s) to the high-est position by turning the handwheel towards you. Guide the thread into the take-up lever (4). Feed the thread from the right to the left into the left guide (5) for the needle thread.

text_image
guide (5) for the needle thread thread guid (6) on the needle barFeed the thread from the left to the right into the thread guide (6). Feed the needle threading aid through the needle eye from the rear. Then hook the thread end into the needle threading aid and pull the needle threading aid with the thread through the needle eye. Pull on the free thread end until at least 10 cm (4") is showing beyond the needle eye. Lay the thread to the left under the presser foot.

text_image
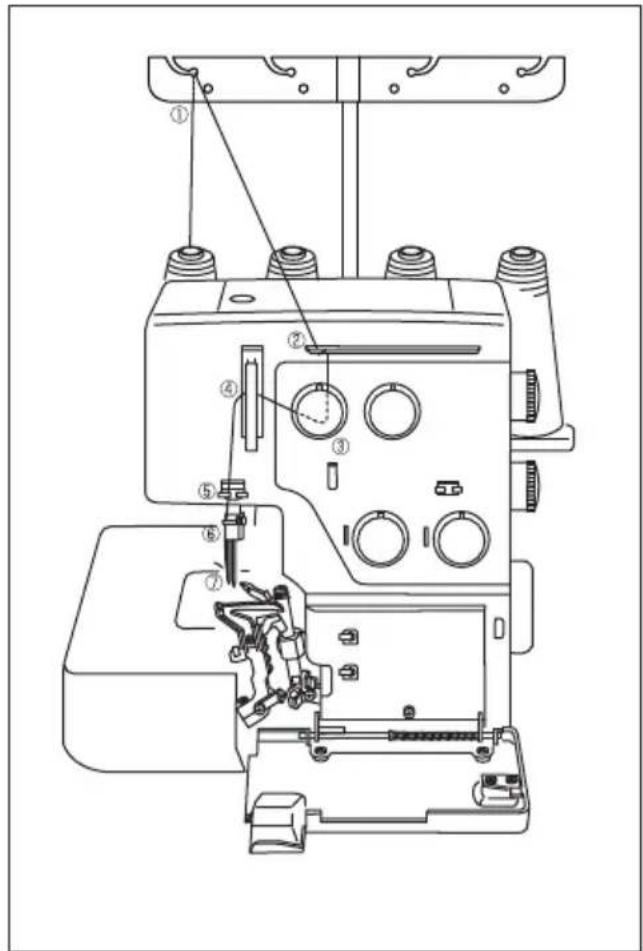
Technical diagram of a sewing machine with numbered components for identification and assembly reference.Threading the right needle (green)
Place the spool on the second spool pin from the left. The guide points for the right needle thread are marked in green. Two threading diagrams are located behind the looper cover to help you with the threading.
Guide the thread from the rear through the second thread guide (1) from the left. Guide the thread through the fourth and the third hole from the left on the thread guide plate (2).
text_image
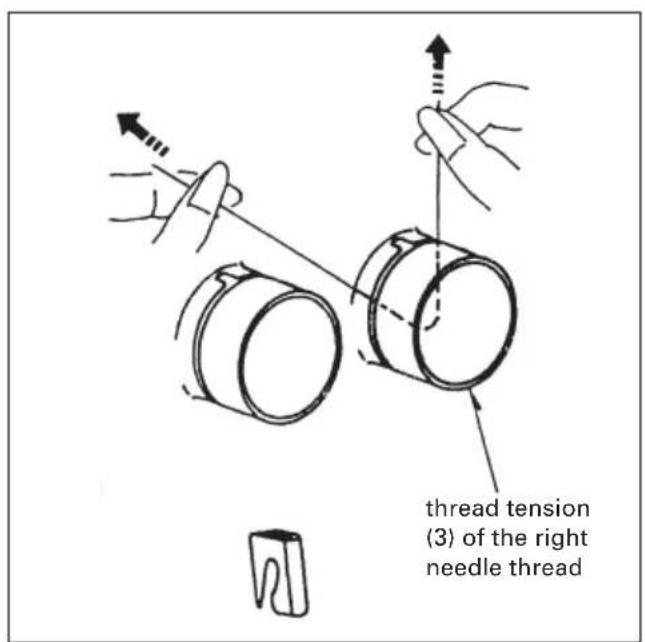
thread tension (3) of the right needle threadGuide the thread from the right between the tension discs and pull the thread tight from both sides.
text_image
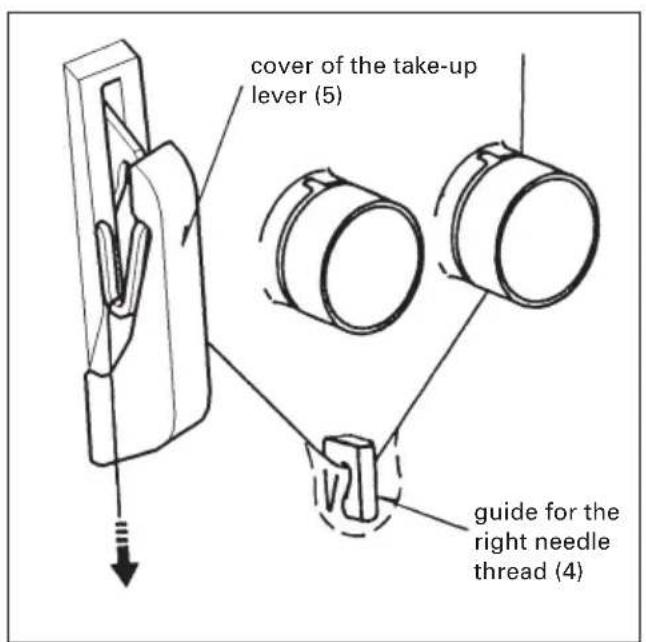
cover of the take-up lever (5) guide for the right needle thread (4)Raise the needle(s) to the highest position by turning the handwheel towards you. Guide the thread through the guide (4) for the right needle thread and through the take-up lever (5)

text_image
guide (6 for the needle thread thread guide (7) L RFeed the thread from the left to the right into the right guide (6) for the needle thread.
Feed the thread from the left to the right into the thread guide (7).
Feed the needle threading aid through the needle eye from the rear. Then hook the thread end into the needle threading aid and pull the needle threading aid with the thread through the needle eye. Pull on the free thread end until at least 10 cm (4") is showing beyond the needle eye. Lay the thread to the left under the presser foot.

natural_image
Technical line drawing of a mechanical assembly with no visible text or symbolsImportant note on threading
The needle(s) must always be threaded last so that the needle threads do not run under the looper thread as seen in drawing 1, but instead over the looper thread as depicted in drawing 2. Should this sequence not be followed, thread breakage or skipped stitches can occur.

natural_image
Technical line drawing of a mechanical assembly with labeled parts (no readable text or symbols)If the looper threads break, you must pull the needle threads out of the needle eye, rethread the looper thread and then rethread the needle threads.

text_image
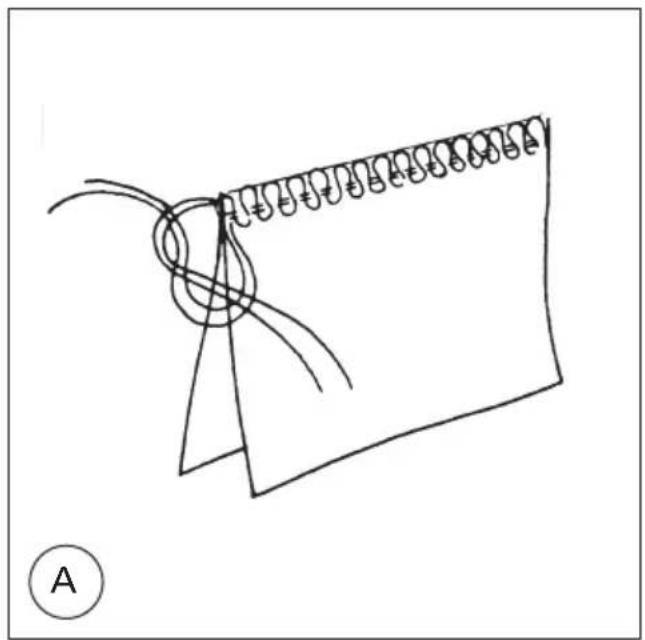
(A) (B) the right seam width (B)Setting the seam width
Set the seam width as follows:
- Switch the main switch to OFF and pull out the lead cord/plug.
- Open the looper cover and the swivel plate.
- Move the upper blade to its lower position (see Page 24).
- Adjust the setting knob until the lower blade is in the desired position.
(A) The seam width is too small - there are extra loops.
Turn the setting knob clockwise. The lower blade moves to the right.
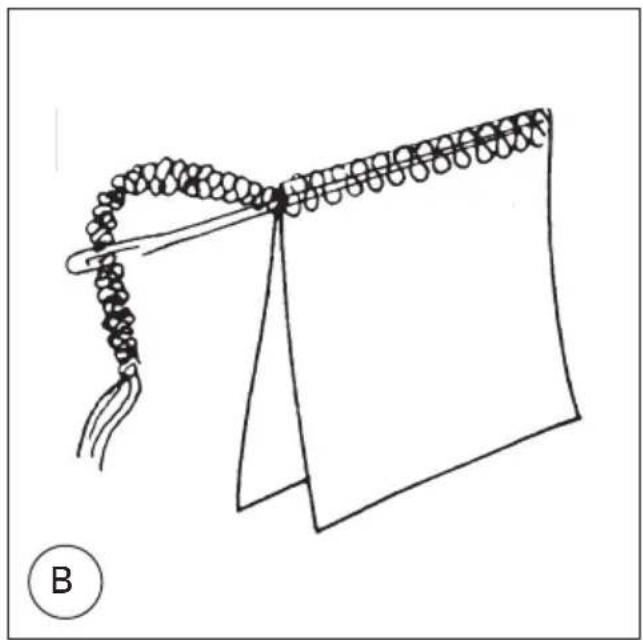
(B) The seam width is too large - the edge is rolling up.
Turn the setting knob counterclockwise. The lower blade moves to the left.
- Move the upper blade to its upper position.
- Close the looper cover and the swivel plate.
Setting the seam width for rolled hems (Programs 05, 06)
Turn the setting knob counterclockwise to an extremely narrow setting.
text_image
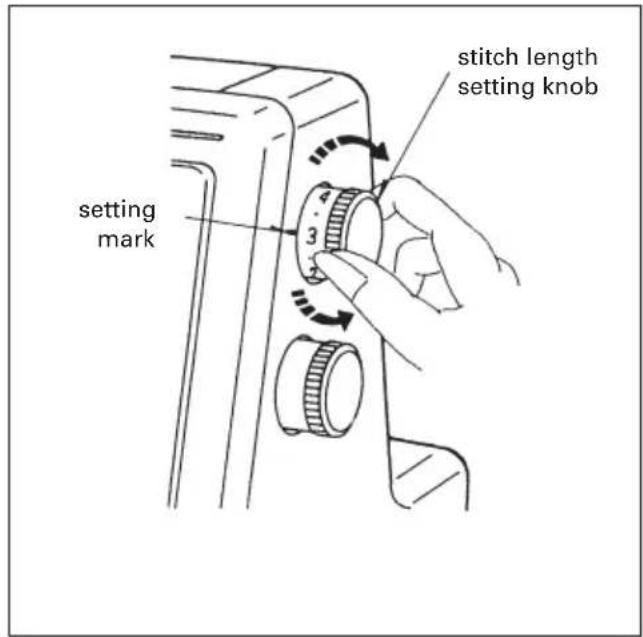
setting mark 4 3 2 stitch length setting knobSetting the stitch length
Turn the stitch length setting knob in such a way that the desired stitch length is indicated at the setting mark. The higher the number, the longer the stitch. The stitch length can be adjusted between 1 and 5 mm.
The setting R is used for sewing rolled hems.

text_image
setting knob for differential feed setting mark
text_image
stretched contractedSetting the differential feed ratio
The differential feed ratio can be altered by turning the setting knob. The number at the setting mark shows the ratio between the two feed dogs arranged behind each other. The normal setting is 1.0.
The maximum differential feed ratio (2.0) is only fully effective within the setting range from 1 to 3.3 on the stitch length setting knob. If the stitch length setting knob is set to a value between 3.3 and 5.0, the differential feed ratio is automatically adjusted to a value between 2.0 and 1.3.
Setting:
- Turn the setting knob counterclockwise (towards 2.0) to achieve gathering effects on lightweight fabric or to smooth fabric that is being overly stretched out of shape.
- Turn the setting knob clockwise (towards 0.7) to achieve a ruffled (lettuce) effect on knit or bias-cut fabrics or to smooth fabric that is being contracted while sewing.

text_image
Standard setting Top side of the machine 2 mm adjusting screw to increase to reducePresser foot pressure
The presser foot pressure does not need to be adjusted for most fabrics. If you are working with light or heavy fabrics then you may need to adjust the pressure. In this case set the adjusting screw as follow:
- for heavyweight fabrics increase pressure by turning the adjusting screw to the right
- for lightweight fabrics reduce pressure by turning the adjusting screw to the left
Adjust the adjusting screw for normal sewing work in such a way that its upper edge protrudes 2 mm out from the top side of the machine (see illustration).
text_image
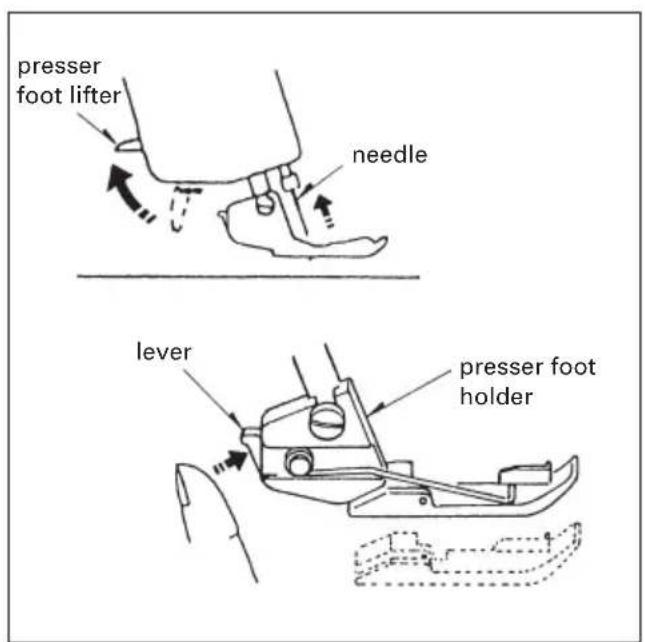
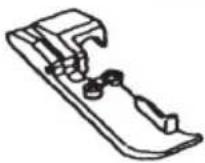
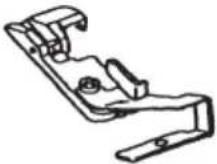
presser foot lifter needle lever presser foot holderRemoving the presser foot

Turn the machine off.
Raise the needle(s) to the highest position. Raise the presser foot and press the lever at the rear of the presser foot holder. The presser foot will be released automatically from the holder.
text_image
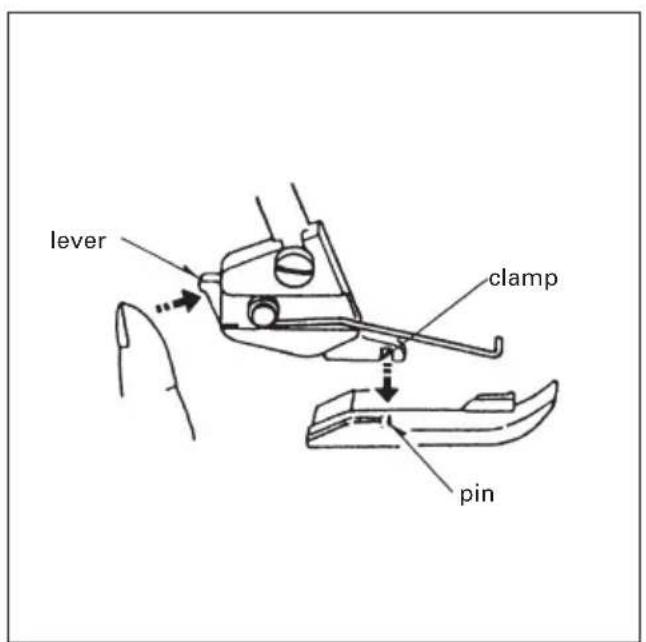
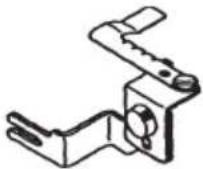
lever clamp pinAttaching the presser foot
Place the presser foot beneath the presser foot holder, until the pin of the foot is directly under the presser foot holder clamp. Lower the presser foot holder and press lever until the foot then clicks into place. Lift the presser foot lever to check that the presser foot is properly locked into place.
text_image
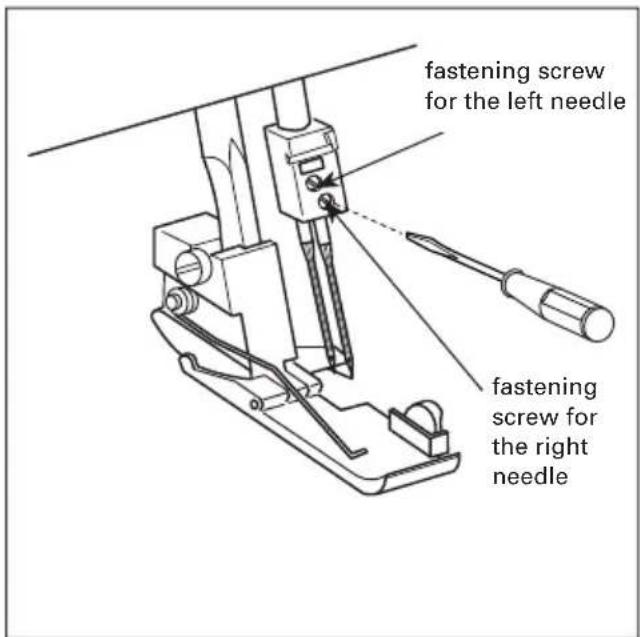
fastening screw for the left needle fastening screw for the right needleChanging the needle

Switch the main switch to OFF.
Move the needle(s) to the highest position. Loosen the fastening screw of the needle that is to be changed.
Needle system HA X 1SP (130/705 H-PS) is required for this machine.

natural_image
Three hand-drawn illustrations of a pen-like tool with cross marks, showing different tip positions (no text or symbols)Do not use bent or blunt needles.
text_image
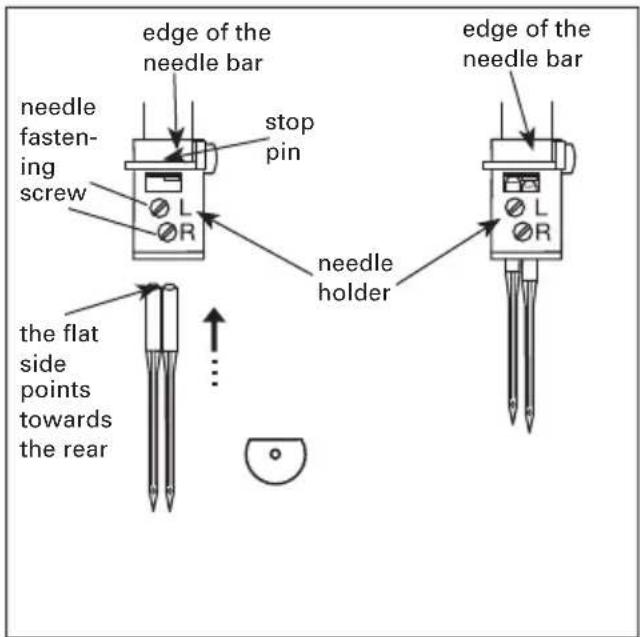
edge of the needle bar needle fastening screw stop pin the flat side points towards the rear needle holder edge of the needle barInserting the right needle
Insert the new needle in such a way that the flat side points towards the rear. Push the needle upward until it touches the stop pin. Tighten the fastening screw of the right needle.
Inserting the left needle
Insert the new needle into the needle holder in such a way that the flat side points towards the rear. Push the needle upward until it touches the edge of the needle bar. Tighten the fastening screw of the left needle.
- If the needles are inserted correctly, the position of the left needle should be slightly higher than that of the right needle.
natural_image
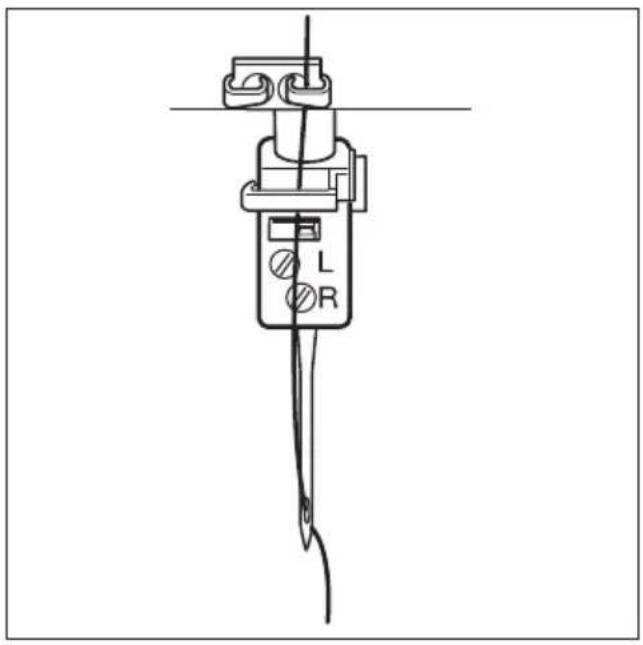
Technical line drawing of a mechanical device with labeled ports (L, R) and a coiled cable (no text or symbols beyond labels)Use of the right needle only (for 3-thread seams with a narrow seam width)

Turn the machine off.
Remove the left needle and the left needle thread. Tighten the left needle fastening screw again slightly so it does not fall out.
natural_image
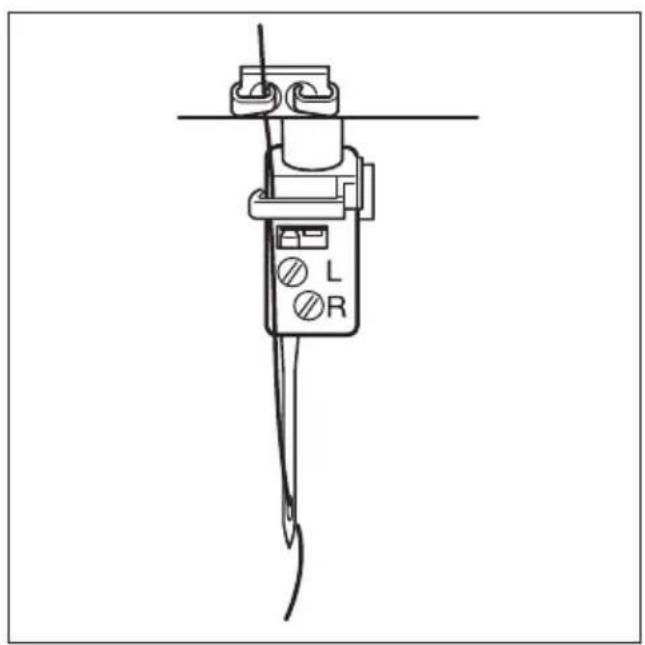
Line drawing of a mechanical device with labeled ports L and R, no text or symbols presentUse of the left needle only (for 3-thread seams with a wide seam width)

Turn the machine off.
Remove the right needle and the right needle thread. Tighten the right needle fastening screw again slightly so it does not fall out.
Changing the needle when sewing with three threads
Undo both needle fastening screws and remove the old needle. Insert the new needle as far as it will go and tighten the relevant fastening screw. Also tighten the other fastening screw slightly so it does not fall out.
text_image
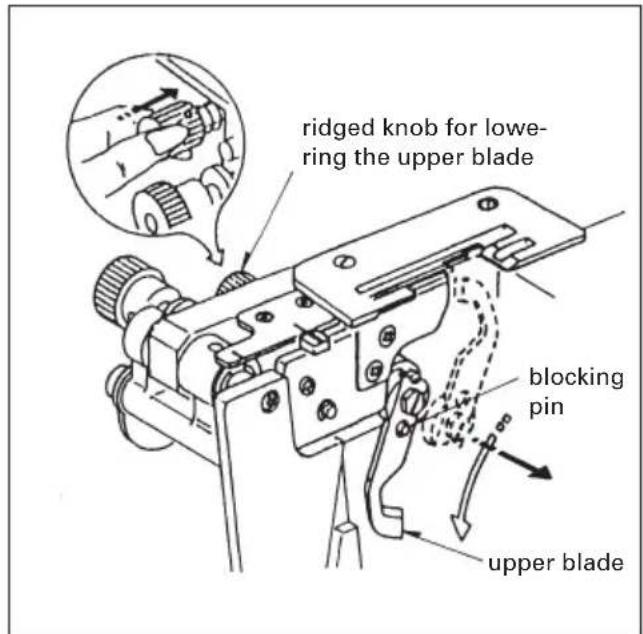
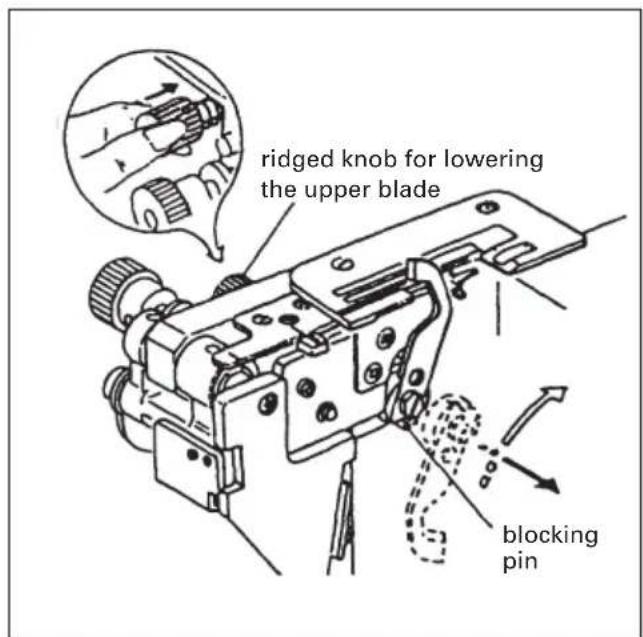
ridged knob for lower- ring the upper blade blocking pin upper bladeDisengaging the upper blade

Turn the machine off.
- Open the looper cover and the swivel plate.
- Push the ridged knob for lowering the upper blade to the right and turn it towards you. Guide the upper blade over the blocking pin so that the upper blade engages in its lower position.
- Close the looper cover and the swivel plate.
text_image
ridged knob for lowering the upper blade blocking pinEngaging the upper blade

Turn the machine off.
- Open the looper cover and the swivel plate.
- Push the ridged knob for lowering the upper blade to the right and turn it away from you. Guide the upper blade over the blocking pin so that the upper blade engages in its upper position again.
- Close the looper cover and the swivel plate.

text_image
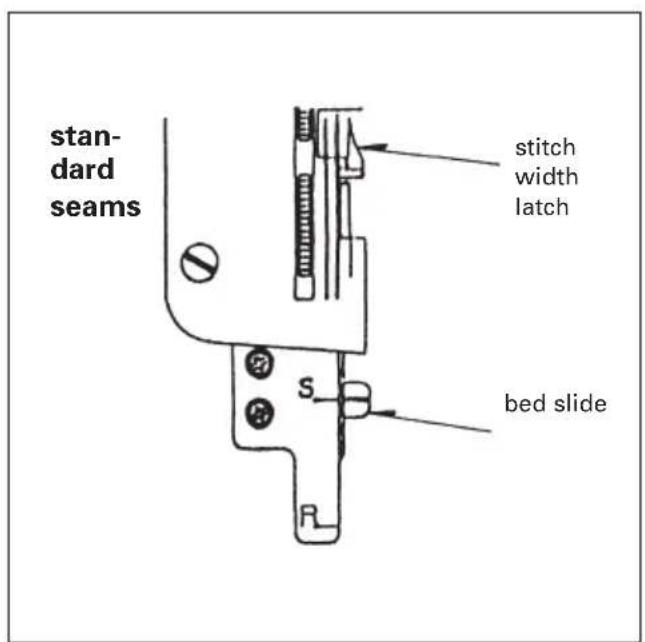
stitch width latch setting marks setting knobSetting the stitch width latch (for standard overlock seams or rolled hems)

Switch the main switch to OFF.
- Open the looper cover and the swivel plate.
- Disengage the upper blade (see Page 24).
- Press the stitch width setting knob towards the right and push the bed slide of the stitch width latch to the setting mark S (standard) or R (rolled hem). Then release the setting knob again slowly.
- Move the upper blade to its upper position.
- Close the looper cover and the swivel plate.
text_image
standard seams stitch width latch bed slide SSet the bed slide for the stitch width latch to position S. The stitch width latch will be pushed forward. This setting allows you to sew all types of standard overlock seams.

text_image
rolled hems stitch width latch bed slideSet the bed slide for the stitch width latch to position R. The stitch width latch will be pushed backward. This setting allows you to sew all types of rolled hems.

natural_image
Line drawing of a sewing machine needle stitching a fabric (no text or symbols)Starting sewing
Lay the sewing material under the front of the presser foot (it is not necessary to raise the presser foot). Turn the handwheel carefully a few revolutions towards you and check the thread chain. Start sewing slowly. The sewing material is fed automatically. Guide the sewing material in the desired direction.

natural_image
Line drawing of a sewing machine needle stitching (no text or symbols)Using the seam guidelines
On the top side of the looper cover, you will find seam guidelines which indicate the distance from the needles. These guidelines should help you to properly position your fabric when sewing.

natural_image
Line drawing of a sewing machine needle stitching fabric (no text or symbols)Finishing sewing
When you have completed your seam, allow the machine to continue to sew slowly until the thread chain has attained a length of approx. 12 cm (4 3/4"). At the same time, pull the thread chain gently towards the rear.

natural_image
Line drawing of a sewing machine needle stitching a thread, with no text or symbols presentCut the threads off using the thread cutter, as shown in the illustration. Leave a thread chain approx. 5 cm (2") long beyond the end of the fabric.
natural_image
Simple line drawing of a rope tied with a ribbon, forming a loop around a piece of paper (no text or symbols)Securing the seam ends
Leave a thread chain of approx. 5 cm (2") in length extending at the beginning and the end of the seam to prevent the seam from coming undone. Secure the thread chain at the beginning and end of the seam using one of the following methods.
Separate the individual thread ends and knot them together.
natural_image
Simple line drawing of a tassel tied with a string attached to a piece of paper, labeled 'B' (no text or symbols on the diagram itself)Thread the thread chain into a needle with a large eye and pull the thread chain into the overlock stitches of the sewing fabric.
natural_image
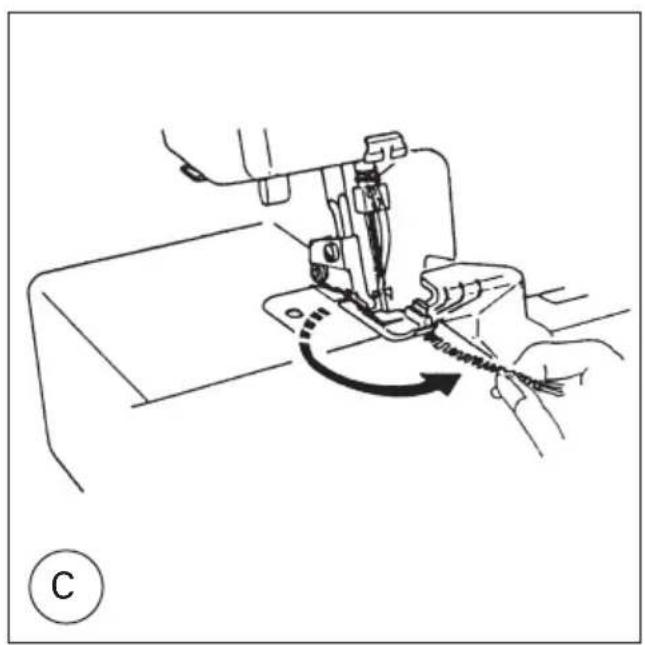
Line drawing of a sewing machine needle stitching a fabric, with no text or symbols presentStitching the beginning of the seam
- Before inserting fabric under the presser foot, serge a thread chain of approx. 5 cm (2") in length.
- Insert the sewing fabric into the machine and sew 2-3 stitches into the fabric.
- Raise the presser foot, guide the thread chain to the left around the presser foot towards the front and lay the thread chain under the presser foot.
natural_image
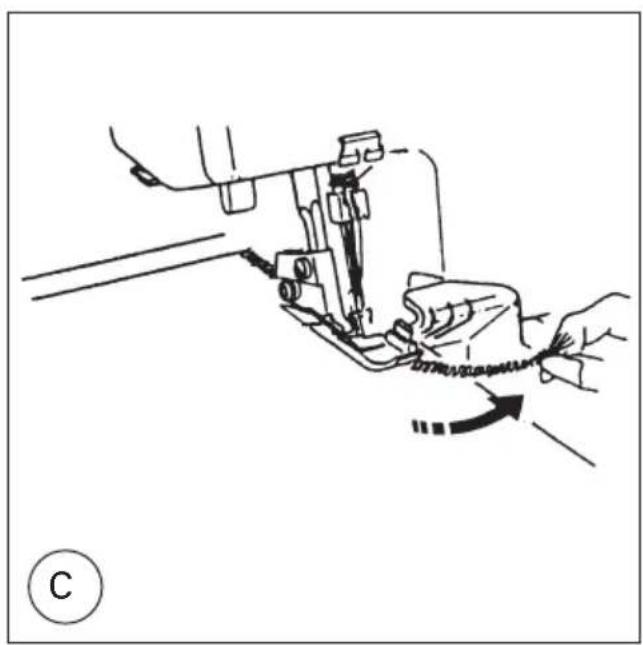
Line drawing of a sewing machine needle stitching fabric, with a hand operating the process (no text or symbols)-
Pull the thread chain slightly taught towards the upper blade. Lay the thread chain under the upper blade. Hold the thread chain firmly in this position, lower the presser foot and begin to sew.
-
The upper blade will cut off the excess thread chain, leaving an overstitched seam of approx. 2.5 cm (1").
natural_image
Line drawing of a sewing machine needle stitching fabric (no text or symbols)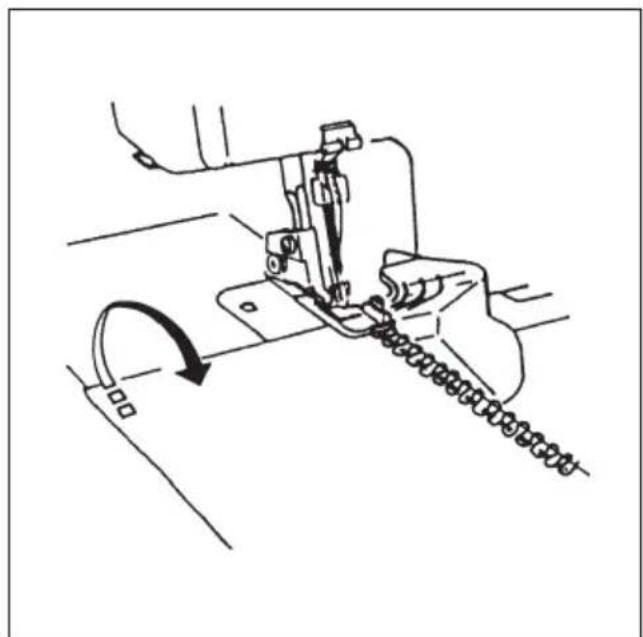
natural_image
Line drawing of a sewing machine needle stitching a chain (no text or symbols)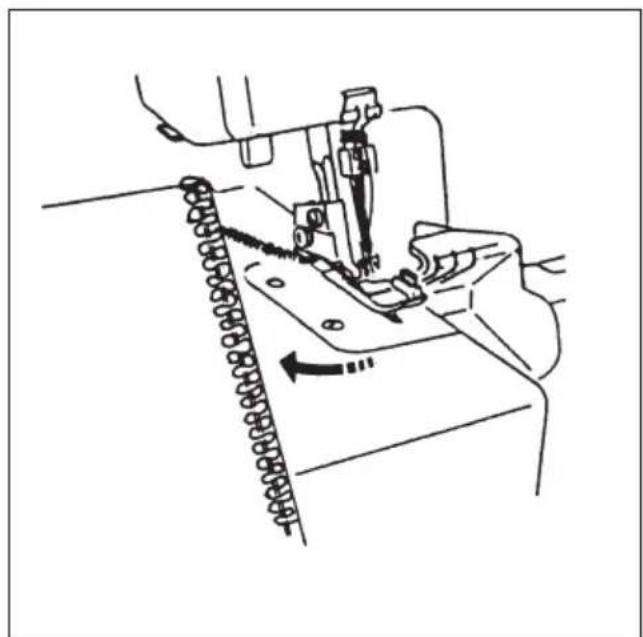
natural_image
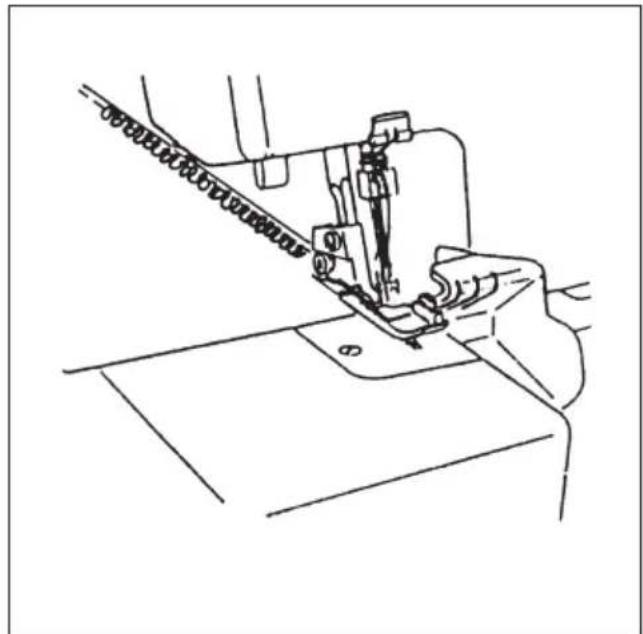
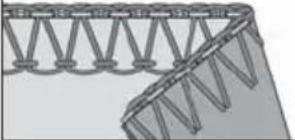
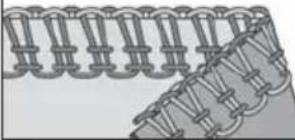
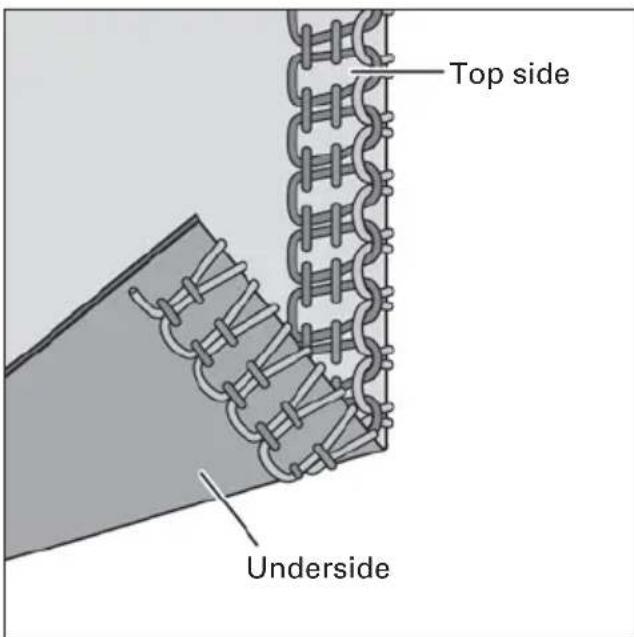
Line drawing of a sewing machine needle stitching a thread, showing mechanical components and a directional arrow (no text or symbols)Stitching the end of the seam
- Sew 2-3 stitches off the end of your fabric.
-
Turn the needles to their highest position and raise the presser foot.
-
Flip the fabric over so the bottom side is now on the top. Pull the fabric around so it is positioned under the presser foot and in front of the needles. Make sure the fabric is not positioned in the path of the upper blade.
-
Lower the presser foot, sew approx. 2.5 cm (1") over the seam and pull the fabric away to the side at an angle, sewing off the fabric.
Threads and needles chart
| Fabric | Light fabrics | Medium-heavy fabrics | heavy fabrics | Knitwear |
| organdy, cotton, tweed, knitwear georgette, linen, satin, upholstery batiste, standard fabric, denim, crepe-de-Chine, lining fabrics | fabrics heavy cloth | |||
Thread | cotton: no. 80 - 100 silk: no. 80 - 100 synthetic thread: No. 80 - 100 | cotton: cotton: no. 50 - 100 silk: no. 50 - 100 synthetic thread: No. 50 - 100 No. 50 - 60 | cotton: no. 50 - 60 silk: no. 50 - 60 synthetic thread: 50 - 60 | no. 50 - 60 synthetic thread: no. 50 - 60 cotton nylon + polyester thread (looper thread) |
 | 130/705 H-PS 70/80 | 130/705 H-PS 80/90 | 130/705 H-PS 80/90 | 130/705 H-PS 90 |

text_image
Thread tension setting mark to increaseto rSetting thread tension
The following pages contain directions for setting thread tensions for all programs. Adjust the tension by turning the tensioning wheel until the dot marker is at the desired setting.
The settings for adjusting thread tension are recommendations. Fabric type, thread quality and needle gauge will influence seam results. Always sew off a test seam onto a piece of scrap fabric and check the thread loops. Adjust the thread tension if necessary.
Tip: as practice, use threads that match the tension dials, e.g. thread the upper looper with red thread, the lower looper with yellow thread, etc.
Note: in the program overview on Pages 30 and 31, you will find the appropriate settings for each individual program.
Program overview
| Program Application Needle | positionL = leftR = right | ||
| Program 01 | 3-thread overedge, narrow | Serging light (easily frayed) fabrics. | R |
 | |||
| Program 02 | 3-thread overedge, wide | Serging tightly woven (easily frayed) fabrics. | L |
 | |||
| Program 03 | 3-thread flatlock, narrow | Serging medium-heavy fabrics. As a flatlock seam, for joining stretch fabrics and decorative finished edges. | R |
 | |||
| Program 04 | 3-thread flatlock, wide | Serging medium-heavy fabrics. As a flatlock seam, for joining stretch fabrics and decorative finished edges. | L |
 | |||
| Program 05 | 3-thread rolled hem | Serging light to medium-heavy fabrics. Decorative edges. | R |
 | |||
| Program 06 | Folded 3-thread rolled hem | Serging light to medium-heavy fabrics. Decorative edges. | R |
 | |||
| Program 07 | 4-thread overedge | Joining and simultaneous serging of all fabrics, in particular stretchy fabrics. | LR |
 | |||
| Thread tension: The values refer to medium-heavy fabrics and normal polyester thread | Stitch length | Position of stitch width latch | |||
| blue | green | red | yellow | ||
| 3 | 3 | 3 | 3 | ||
| 3 | 3 | 3 | 3 | 3 | |
| 0 | 2 | 3 | 3 | ||
| 0 | 2 | 3 | 3 | 3 | |
| 4 | 3 | 3 | R | ||
| 4 3 8 - 9 R R | |||||
| 3 | 3 | 3 | 3 | 3 | |
Seam pattern

text_image
Top side UndersideStitch formation correction measures 4-thread overedge seam (program 07)
| blue | green | red | yellow |
| 3 | 3 | 3 |
When all tensions are correctly set, the loops of both looper threads are directly on the edge of the fabric.

text_image
Top side UndersideThe left needle thread (blue) is too loose.
Set the blue thread tension to a higher value.
3

text_image
Top side UndersideThe upper looper thread (red) appears on the underside of the fabric.
Set the red thread tension to a higher value and/or the yellow thread tension to a lower value.
text_image
Top side UndersideThe lower looper thread (yellow) appears on the top side of the fabric.
Set the yellow thread tension to a higher value and/or the red thread tension to a lower value.
Seam pattern
text_image
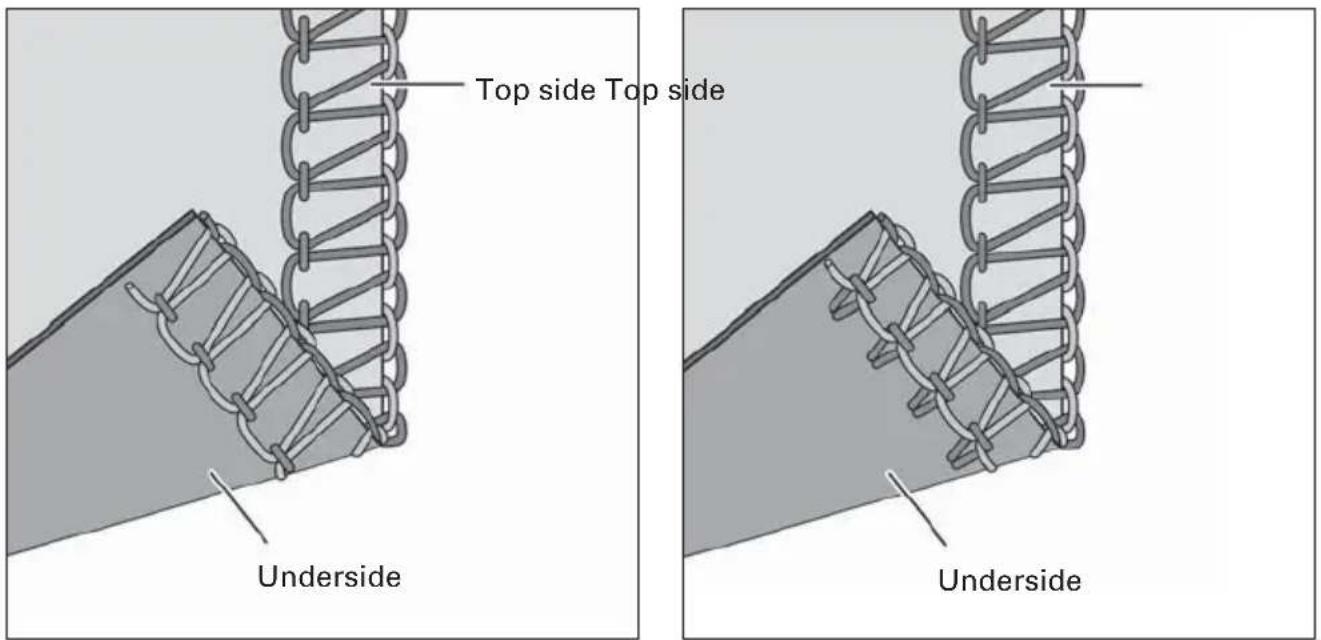
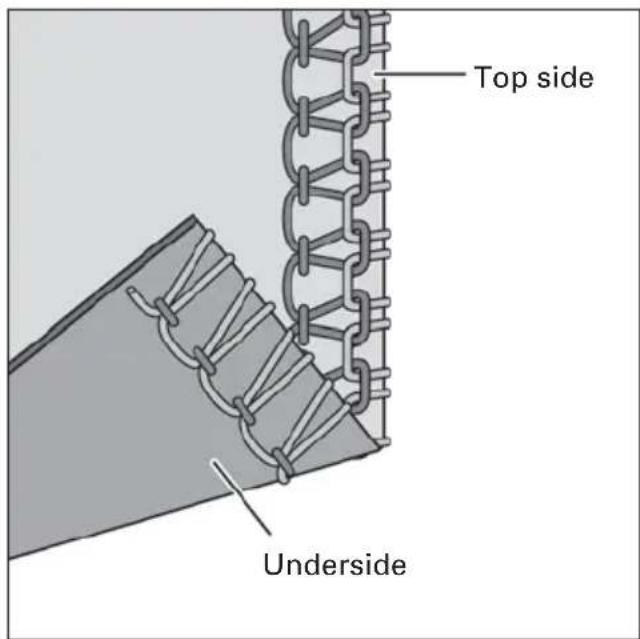
Top side Top side Underside Underside3-thread overedge seam (progr. 01, 02)
| wide | blue | green | red | yellow |
| 3 | 3 | 3 |
| narrow | blue | green | red | yellow |
| 3 | 3 | 3 |
The needle thread is too loose.
Set the relevant needle thread tension to a higher value.

text_image
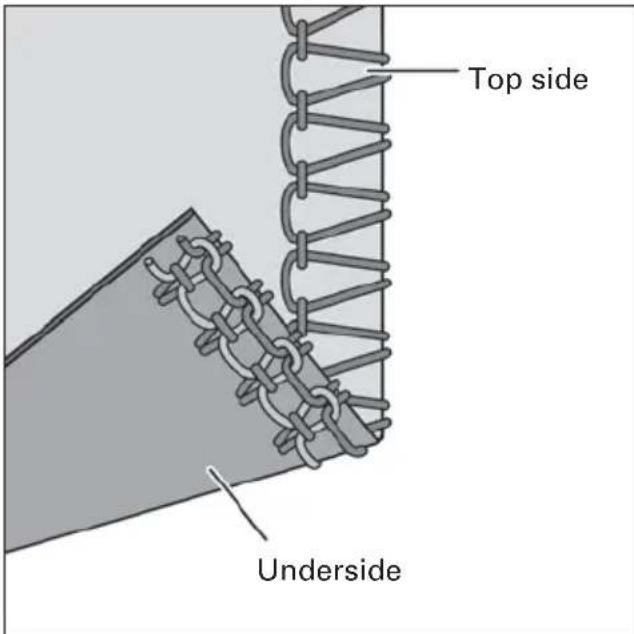
Top side UndersideThe upper looper thread (red) appears on the underside of the fabric.
Set the red thread tension to a higher value and/or the yellow thread tension to a lower value.
text_image
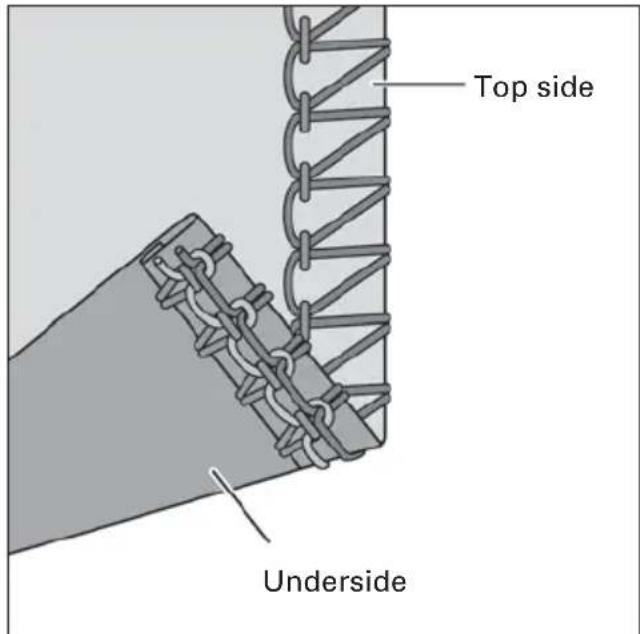
Top side UndersideThe lower looper thread (yellow) appears on the top side of the fabric.
Set the yellow thread tension to a higher value and/or the red thread tension to a lower value.
Seam pattern

text_image
Top side Underside3-thread flatlock seam (progr. 03, 04)
| wide | blue | green | red | yellow |
| 0 | 2 | |||
| narrow | blue | green | red | yellow |
| 0 | 2 | 3 |
text_image
Top side UndersideThe needle thread is too tight.
Set the relevant needle thread tension to a lower value.
3

text_image
Top side UndersideThe upper looper thread (red) appears on the underside of the fabric.
Set the red thread tension to a higher value.

text_image
Top side UndersideThe lower looper thread (yellow) is too loose.
Set the yellow thread tension to a higher value.
Seam pattern

text_image
Top side Underside3-thread rolled hem (progr. 05)
| blue | green | red | yellow |
| 4 | 3 |
text_image
Top side UndersideThe right needle thread (green) is too loose.
Set the green thread tension to a higher value.
3

text_image
Top side UndersideThe upper looper thread (red) appears on the underside of the fabric.
Set the red thread tension to a higher value and/or the yellow thread tension to a lower value.

text_image
Top side UndersideThe lower looper thread (yellow) appears on the top side of the fabric.
Set the yellow thread tension to a higher value and/or the red thread tension to a lower value.
Seam pattern

text_image
Top side Top UndersideFolded 3-thread rolled hem (progr. 06)
| blue | green | red | yellow |
| 4 3 8-9 |

text_image
Side UndersideThe right needle thread (green) is too loose.
Set the green thread tension to a higher value.

text_image
Top side UndersideThe upper looper thread (red) only partly loops around the fabric edge.
Set the red thread tension to a lower value and/or the yellow thread tension to a higher value.

text_image
Top side UndersideThe lower looper thread (yellow) appears on the top side of the fabric.
Set the yellow thread tension to a higher value and/or the red one to a lower value.
| Optional accessories Order No. | ||
 | 98-200 277-10/900 | 1 Blindstitch footFor serging blind hems on medium-heavy and thick fabrics. |
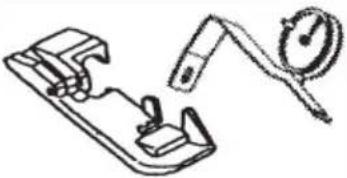 | 98-200 278-1098-200 278-10 | 2/3 Taping attachment with tape guideUse to protect knit and other stretchy fabric from stretching out of shape when you sew a shoulder. |
 | 98-200 279-10/100 | 4 Cording foot type AFor sewing on cords, elastic thread and fishing line on the top side of the fabric and for decorative cording. |
 | 98-200 280-10/500 | 5 Cording foot type BFor sewing on cords and yarn on the top or on the underside of the fabric and for decorative cording. |
 | 98-200 281-10/600 | 6 Piping footFor sewing together two pieces of fabric with a piping tape between them, in one operation. |
 | 98-200 282-10/700 | 7 Beading attachment with beading guideFor serging on beading and sequins. |
 | 98-200 283-10/800 | 8 Shirring/Gathering attachmentFor shirring/gathering and joining two pieces of fabric simultaneously. |
 | 98-200 284-10/900 | 9 Elastic tape attachmentFor sewing on elastic. |
 | 98-200 285-10 | 10 Edge guideFor guiding the fabric edge and measuring cut widths and seam widths simultaneously. |
 | 98-200 286-10/100 | 11 Needle threaderFor easy threading of the needle. |

natural_image
Technical line drawing of a mechanical assembly with no visible text or symbolsMachine maintenance
Cleaning the machine

Switch the main switch to OFF.
Open the looper cover and swivel plate. Use the cleaning brush provided to remove any waste thread.
In order to clean the upper blade and the feed dog, you may also use a vacuum cleaner.

text_image
fastening screw of the needle plate
natural_image
Line drawing of hands using a tool to adjust or install a mechanical component (no text or symbols visible)Cleaning the feed dog

Switch the main switch to OFF.
Open the looper cover and the swivel plate.
Remove the needles and the presser foot.
Loosen the fastening screw of the needle plate and remove the needle plate.
Remove any waste thread from the feed dog towards the front using the cleaning brush.
Fasten the needle plate, attach the presser foot, insert the needles and close the looper cover and the swivel plate.
natural_image
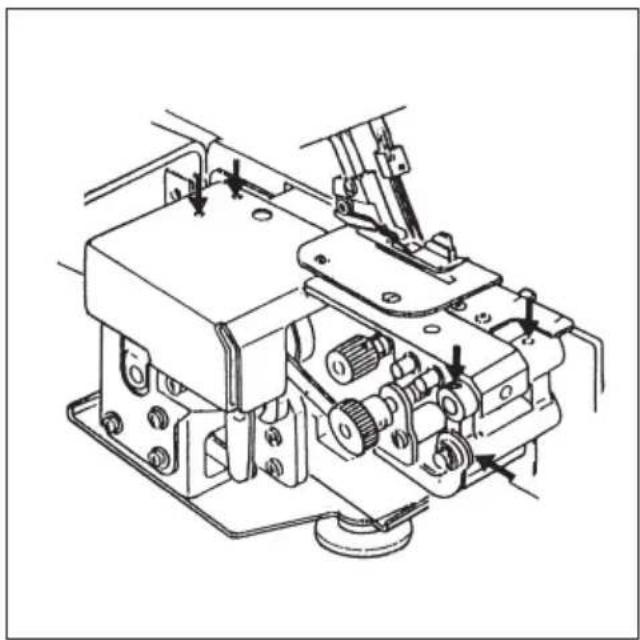
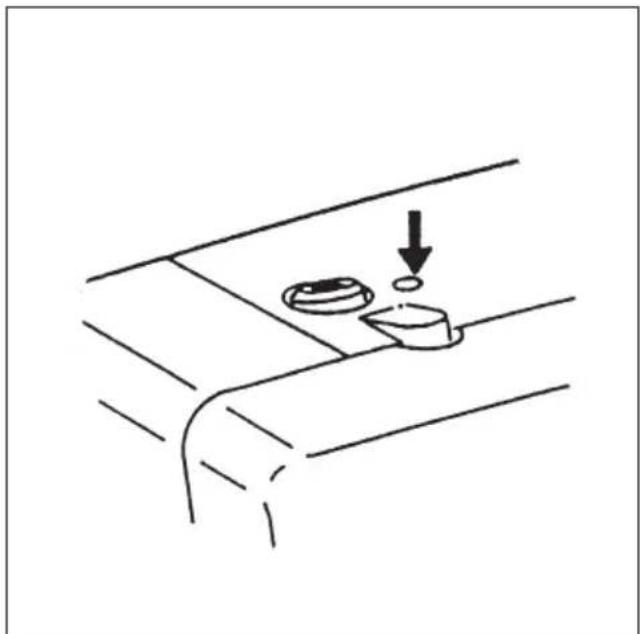
Technical line drawing of a mechanical assembly with no visible text or symbolsLubricating the machine

Switch the main switch to OFF.
Open the swivel plate. Apply a few drops of high-quality machine oil to the points marked with arrows.
Oil the machine once a week for normal operation or every ten hours for continuous operation.
natural_image
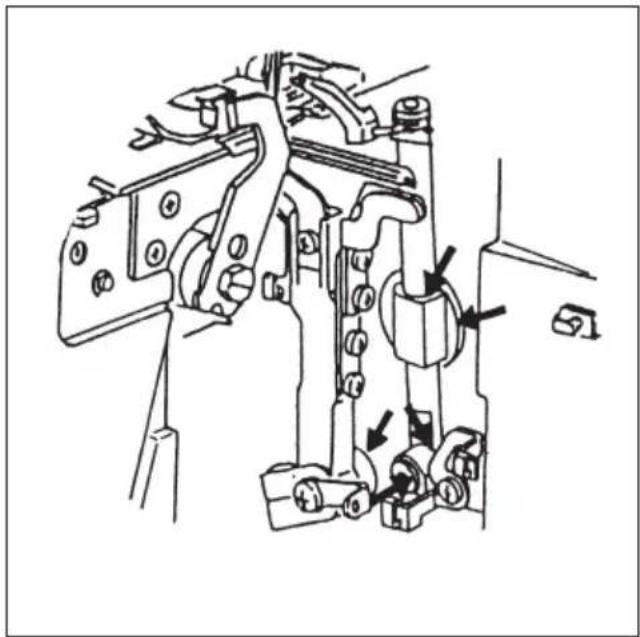
Mechanical assembly diagram showing interconnected components with arrows indicating motion direction (no text or labels)Open the looper cover and oil the marked points.
natural_image
Simple line drawing of a car dashboard with a handle and seat, no text or symbols presentOil the marked point on the top of the machine.
text_image
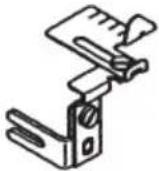
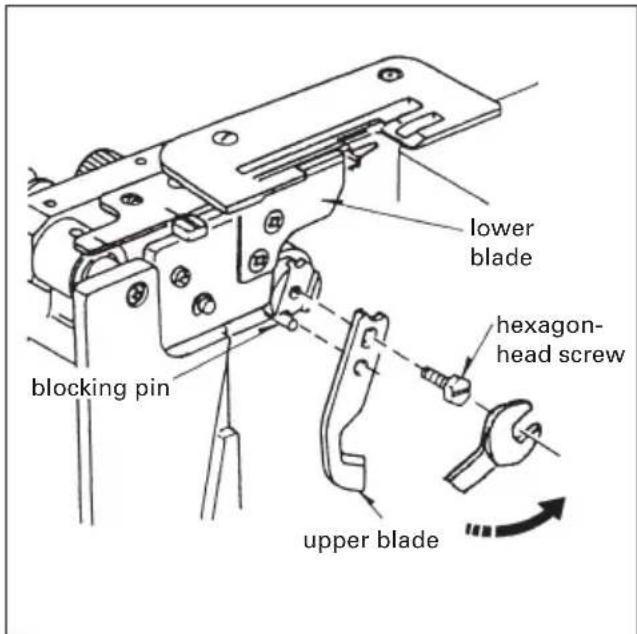
lower blade hexagon- head screw upper blade blocking pinChanging the upper blade

Switch the main switch to OFF.
Open the looper cover and the swivel plate.
Move the upper blade to its lower position (see Page 24).
Undo the hexagon-head screw of the upper blade and remove the upper blade.
Insert the new upper blade into the blade holder in such a way that the blocking pin engages in the groove. Tighten the hexagon-head screw slightly.
Move the upper blade to its upper position.
text_image
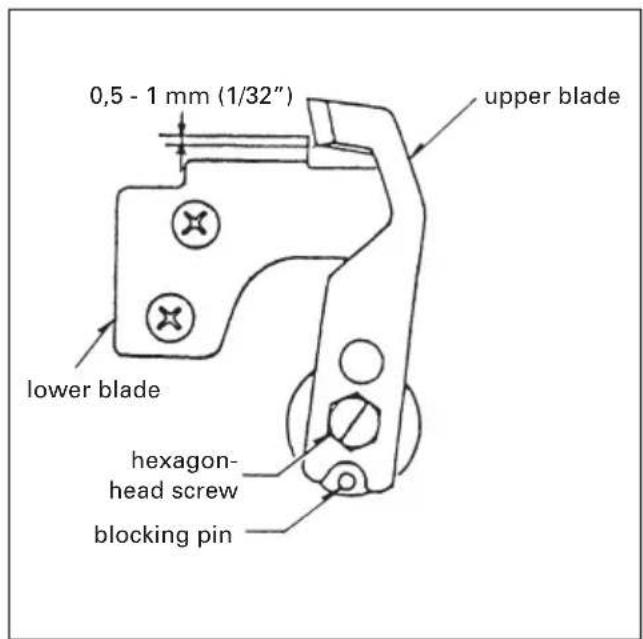
0,5 - 1 mm (1/32") upper blade lower blade hexagon- head screw blocking pinTurn the handwheel towards you until the upper blade has reached its lowest position. Undo the hexagon-head screw and adjust the position of the upper blade so that the edges of the upper blade and of the lower blade overlap by about 0.5 to 1 mm (1/32") (see illustration). Tighten the hexagon-head screw.
- Close the looper cover and the swivel plate.

text_image
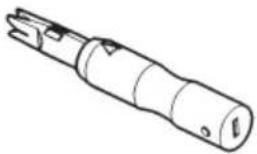
fastening screw sewing light coverChanging the light bulb

Switch the main switch to OFF.
Loosen the fastening screw to the sewing light cover until the cover can be removed.

text_image
light bulb to re- move to insertRemoving the light bulb
Bayonet holder: press the lamp in and turn to the left.
Inserting the light bulb
Bayonet holder: press the lamp in and turn to the right.
Replace the sewing lamp cover and tighten the fastening screw.
Safety notes
Only use bulbs with a maximum output of 15 Watt.
The bulb becomes very hot. Never touch the bulb with bare hands.

natural_image
Line drawing of a hand pressing down on a mechanical component (no text or symbols)Transporting the machine
Position your fingers in the cutout on the rear side of the machine, as shown in the illustration.
Sewing problems and their solutions
This machine has been developed with ease of operation in mind. No difficult or tricky settings need to be made. Sewing problems of the kind described below may occur as a result of minor adjustment and operating errors. They can be easily adjusted by following the instructions.
| Problem Cause | Solution | |
| Needle breakage The needle was bent or the Insert new needle point damaged. (see Page 22).The needle was not fully inserted. Insert needle fully (see Page 22).The fabric was pulled too firmly. Do not pull on the fabric when sewing. | ||
| Thread breaks Incorrectly threaded. Thread properly (see Page 10 - 18).Thread has caught. Check if the thread is caught on the spool stand etc.Thread tension is too tight. Correct the tension (see Page 32 - 36).Needle not fully inserted. Insert needle correctly (see Page 22).Incorrect needle used. Use needle system HAx1SP(130/705 PS). | ||
| Skipping stitches (see Page 22).Needle not fully inserted. Insert needle correctly (see Page 22).Incorrect needle used. Use needle system HAx1SP (130/705 H-PS).Incorrectly threaded. Thread correctly (see Page 10 - 18). | Insert new needle | |
| Stitch formation faulty | Incorrect setting of thread tensions (see Page 32 - 36). | Re-set thread tensions |
| Fabric not neatly W trimmed and lower Clean blades. Replace upper blade (see Page 40). | Waste thread between upper Upper blade is blunt. blade. | |
| Puckered seams Thread tension too tight. Reduce thread tension. Incorrect setting of differential feed. Re-adjust differential feed (see Page 20) Thread has caught due to incorrect Thread correctly threading. (see Pages 10 - 18). | ||
| Fabric not fed Stitches too short. Increase stitch length through evenly (see Page 20). Sewing foot pressure too low for Increase sewing foot pressure heavy fabrics. (see Page 21). Sewing foot pressure too high for Reduce sewing foot pressure lightweight fabrics. (see Page 21). Waste thread in the feed dog. Clean the feed dog. | ||
| Machine will not operate The lead cord/plug is not seated properly in the socket. (see Page 7). The main switch is not switched on. (see Page 7). | ||
Specifications
Maximum sewing speed 1200 stitches/min.
Seam width 3.0 mm - 6.7 mm
Stitch length 1.0 mm - 5.0 mm
Presser foot exchangeable
Lubrication manual
Presser foot height 4.5 mm
Overedge stroke 2.0 mm
Needle system HAx1SP (130/705 H-PS)
Needle size 80/12, 90/14
Number of threads 3,4
Dimensions(width x height x depth) 310 x 280 x 270 mm
Weight 7.1 kg
Packing contents
1 machine
1 foot control
1 instruction manual/guarantee card
1 machine cover
1 accessory box
1 waste container
Notes
Notes
Notes

natural_image
Symbol of a trash bin crossed with no visible text or labelsPlease note that on disposal, this product must be safely recycled in accordance with relevant National legislation relating to electrical/electronic products. If in doubt please contact your retailer for guidance.
Intellectual property
Patents protecting this product are listed on a label positioned underneath the sewing machine.
PFAFF is a registered trademark of VSM Group AB.
Parts of the hobbylock 4752

text_image
Movable up- per blade Upper overedge looper (red) Lower overedge looper (yellow) Fixed lower blade