creative grand hoop - Sewing machine PFAFF - Free user manual and instructions
Find the device manual for free creative grand hoop PFAFF in PDF.

User questions about creative grand hoop PFAFF
0 question about this device. Answer the ones you know or ask your own.
Ask a new question about this device
Download the instructions for your Sewing machine in PDF format for free! Find your manual creative grand hoop - PFAFF and take your electronic device back in hand. On this page are published all the documents necessary for the use of your device. creative grand hoop by PFAFF.
USER MANUAL creative grand hoop PFAFF
natural_image
Pencil sketch of a floral arrangement with leaves and blossoms, placed on a draped surface (no text or symbols)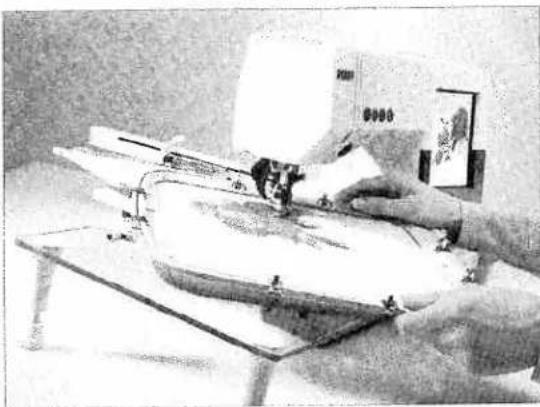
natural_image
Person operating a sewing machine in a workshop (no visible text or symbols)
text_image
3 5 1 4 a b a 2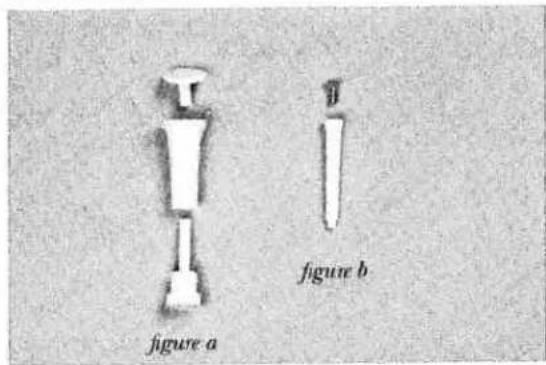
text_image
figure a figure b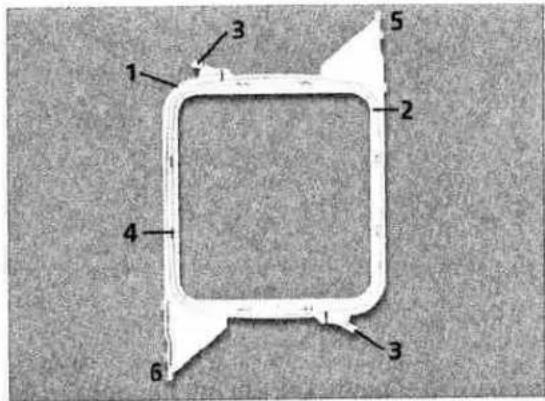
text_image
1 2 3 4 5 6 3creative Grand Hoop
The creative Grand Hoop offers an embroidery area of 250 x 225 mm, nearly twice as large as a standard hoop without rehooping.
You can start embroidering right away using the three enclosed designs created especially for the creative Grand Hoop. For more Embroidery Collections visit your local authorized Pfaff dealer. You can see these collections at www.pfaff.com.
To transfer files between your computer and your creative 2144 you will need to have version 7.0 or later of the 3D File Assistant.
To transfer files using a creative smart card station you will need to have version 7.0 or later of the 3D File Assistant.
If you have a Pfaff creative 2144 make sure it has firmware version 01.03.00 or later.
Contents
- Creative Grand Hoop
- Support table. The table is necessary to give support for the hoop when embroidering.
- Template. The overlap area is marked with bold black lines on the template. Use the template to easily position the fabric in the hoop.
- 8 metal clips. The clips are necessary to secure the fabric in the hoop during embroidery.
- CD with 3 creative Grand Hoop designs and 3D File Assistant
Support Table assembly
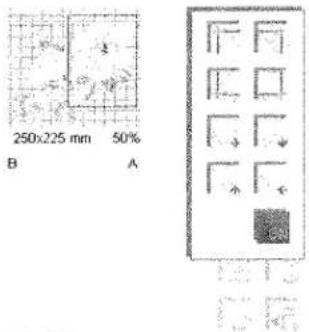
- Attach the three table legs in the holes marked a on the table. Assemble as illustrated in figure a.
- Place the pin in the hole marked b on the table. Assemble as illustrated in figure b.
Parts of the hoop
- Outer hoop
- Inner hoop
- Retaining screws
- Clip spaces
- A-side (marked on the hoop)
- B-side (marked on the hoop)
Embroidery area
The creative Grand Hoop has an embroidery area of 250 mm width and 225 mm hight. It has an A-side and a B-side which are clearly marked on the hoop. In the middle of the hoop is an overlap area of 30 mm.
Preparations for embroidering with the creative Grand Hoop
- Remove the accessory tray. Put on the support table. Use the hole for the accessory tray (a) to attach the pin on the support table (b).
- Attach the embroidery unit.
- Attach the embroidery foot.
- Hoop the fabric and stabilizer. It is very important that you use stabilizer when embroidering with the creative Grand Hoop. Place all 8 hoop clips in the clip spaces with the little handle facing up and over the outside hoop.
Note: Ensure that you have tightened both retaining screws equally. - Turn on the sewing machine.
Pfaff creative 2144
All the features and functions in the embroidery mode are available when using the creative Grand Hoop.
Note: If you place a single design thats extends on each side of the overlap area you will see two red lines and the machine will not be able to embroider.
Embroidering creative Grand Hoop designs
- Attach the A-side of the hoop to the embroidery unit.
- Select the desired design. See page 5 for more details.
- You will see the full view picture on screen of your selected design. Touch "OK".
- Press the reverse button for a few seconds to start.
Calibration stitches
The design on the A-side starts and ends with a calibration stitch in the middle of the overlap area. The B-side design will start with a stitch in the same position as the end stitch of the A-side design. These stitches are used for the calibration of the hoop.
Note: The calibration stitch is only included on Pfaff creative Grand Hoop designs.
- Press the reverse button to start embroidering. After a few stitches the machine will stop and a message will appear on screen prompting you to trim the thread. Trim the thread and touch "OK". Press the reverse button to continue embroidering.

text_image
b a
text_image
Auto 80x80 mm 120x115 mm 225x140 mm Hoop-Adapter Hoop selection
text_image
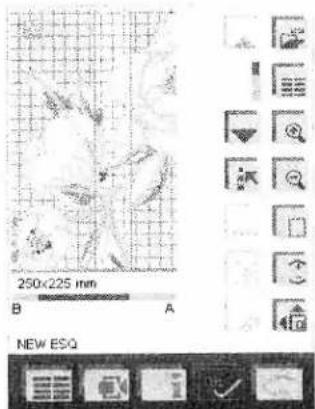
250x225 mm B NEW ESQ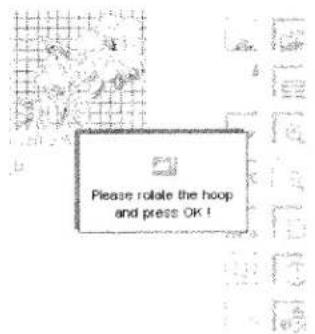
text_image
Please rotate the hoop and press OK!
text_image
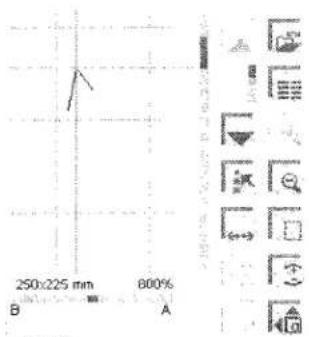
250x225 mm 50% B A
The orbiting function is activated.
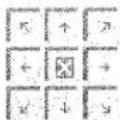
Figure c
text_image
250x225 mm 800% B A
Zoomed example of a calibration stitch with the orbiting function activated.
-
When the machine has finished embroidering the A-side it will stop and a message telling you to rotate the hoop appears.
-
Rotate the hoop and make sure that the B-side is attached to the embroidery unit. Touch "OK".
-
Check that the calibration stitch is in the exact same position as the one for the A-side. The calibration stitch is the stitch closest to the inner edge of the hoop placed in the overlap area.
Hint: For easier positioning of the calibration stitch use the zoom in function.
Touch ⇧. Find the calibration stitch by stepping forward a few stitches with the ➕ icon. Touch "OK". Activate the orbiting function ➕ under More Options by touching ➕. Move the cross hair cursor to the calibration stitch on the screen with the ➕ arrows. Check the position by bringing down the hand wheel. If needed, move the hoop and the design with the "Move designs" icons (figure c) to get the needle in the exact position as the first stitch.
Note: You can use the orbiting function to calibrate the A and B-side also when you have created your own designs. Just make sure that all the designs or parts of a design you want to move are selected.
-
Press the reverse button to continue embroidering.
-
The message prompting to trim the thread appears after a few stitches. Trim the thread and touch "OK".
-
Press the reverse button to finish the embroidery.
Zoom in embroidery combination
While in Embroidery Combination mode you have the ability to zoom from 50% to 800% by using the 🔒 🔒 icons.
At 50% magnification the whole design area for the creative Grand Hoop is visible.
Scrollbars allow you to view all areas of the hoop at a magnification of 75% or larger.
Basting
If needed you can use the basting function before starting to embroider.
The basting will be done as two vertically mirrored c's.
Attach the A-side of the hoop to the embroidery unit. Touch the basting icon and then press the reverse button. After basting the A-side a message will appear on the screen prompting you to rotate the hoop. Rotate the hoop, touch "OK", then press the reverse button to do the basting on the B-side. The message "Finished" will appear on screen.
Changing the bobbin
To change the bobbin while embroidering touch Context Menu choose Move Hoop and then Change bobbin position. After the hoop move swing out the support table and change the bobbin. Touch "OK" twice. Press the reverse button to continue embroidering.
natural_image
Exterior view of a laboratory instrument with control panel and base plate (no visible text or symbols)Design placement
On the touch screen you see the overlap area as a white field. If a design is placed over the overlap area or outside the embroidery area it's indicated with red lines. You can touch the reposition icon to move the design to the side of the hoop that is most visible on the screen. If both sides are fully or equally visible the design will be placed on the A-side.
When combining several designs into a larger design or touching the move to center icon, the design will be placed on the side of the hoop that is most visible on the screen. If both sides are fully or equally visible the design will be placed on the right side of the screen.
text_image
250x225 mm B A NEW ESQThe design is placed crossing the overlap area and outside the bottom of the hoop.
text_image
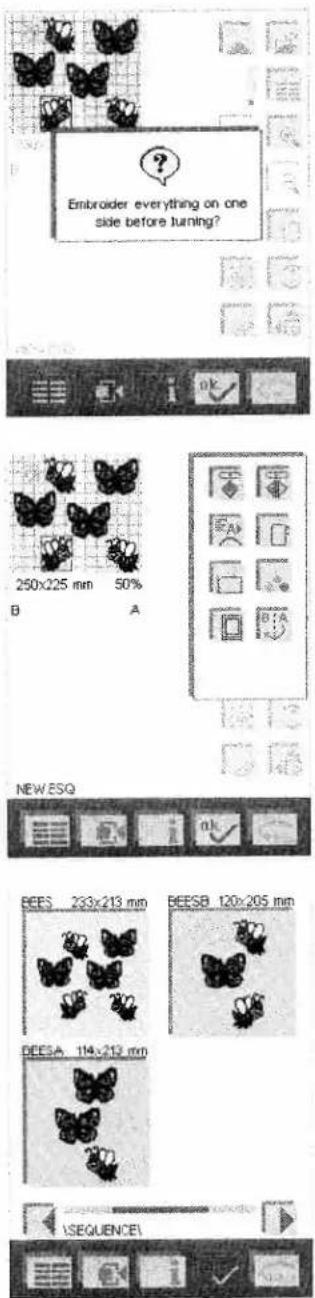
Embraeder everything on one side before turning? 250x225 mm 50% NEW ESG BEES 233x213 mm BEESB 120x205 mm BEESA 114x212 mm SEQUENCEIThe ESQ file has a pink background and the EMB files a blue one.
Design sorting
If you have combined several designs in the hoop you will be able to do Design sorting. This means that the machine will embroider all designs on the A-side before rotating the hoop and continuing on the B-side. A message asking if you want to embroider everything on one side before rotating will appear on the screen after pressing the reverse sewing button and before the machine starts to embroider. If you want to do a Design sort touch "OK". If you do not want to do Design sorting touch "ESC".
If you choose not to use Design sorting function the machine will embroider the designs in the order they were placed on screen.
Note: The machine will start to embroider on the side of the hoop where you have placed the first design.
Before starting your embroidery you can undo Design sorting by touching the icon that you find under the More Options icon.
Note: The Design sorting message and /A are only active if the creative Grand Hoop is selected.
Reading Pfaff creative cards and CD's
When loading designs from a CD or a creative card each design for the creative Grand Hoop is stored as three files (one ESQ file and two EMB files). When using the CD all three files need to be transferred to the machine via the 3D File Assistant (version 7.0 or later) and placed in the same folder.
To be able to get the creative Grand Hoop designs placed correctly on the screen you need the file with the ending .ESQ. The ESQ file (or sequence file) contains the information of where the designs (the two EMB files) are to be placed on the screen. You open a Grand Hoop design by loading the ESQ file.
The EMB files contain the design data, one file for each side of the hoop. You do not have to open the EMB files, the machine will just fetch the necessary information from them. If the EMB files are not saved in the same folder as the ESQ file a pop up will appear asking for those files.
Saving creative Grand Hoop designs
The default for saving a design is as an ESQ file, however it is possible to save the design as two EMB files. If saved as two EMB files the file names are limited to seven characters and the machine will add an A and a B to the filename, e.g. xxxxxxxA.EMB and xxxxxxxB.EMB. You must store the two EMB files and the ESQ file in the same folder. In the Data manager you will see the filenames with the added A and B.
To open and embroider the design choose the ESQ file.
natural_image
Black-and-white sketch of a person standing beside a vase with flowers, no visible text or symbolsPfaff creative 2124
creative smart cards
On the creative smart cards the Grand Hoop designs are divided into separate parts, the A- and the B-side. Consult the booklet that comes with the CD or smart card to determine which design you need first.
Embroidering creative Grand Hoop designs
- Attach the A-side of the hoop to the embroidery unit.
- Select the A-side of the desired design. The Pfaff creative 2124 will recognize the creative Grand Hoop as hoop 1.
- Step forward a few stitches with the Stitch stepping button (b) to find the calibration stitch.
Calibration stitches
The design on the A-side starts and ends with a calibration stitch in the middle of the overlap area. The B-side design will start with a stitch in the same position as the end stitch of the A-side design. These stitches are used for the calibration of the hoop. The calibration stitch is the stitch closest to the inner edge of the hoop placed in the overlap area.

text_image
a b cNote: The calibration stitch is only included on Pfaff creative Grand Hoop designs.
- Turn the hand wheel forward one full revolution creating the calibration stitch. Do not cut the thread.
- Start to embroider your design by pressing the reverse button.
- When the machine has finished embroidering the A-side of the design the symbol for thread color no. I will flash on the screen.
- Rotate the hoop and attach the B-side to the embroidery unit.
- Select the B-side of the design. Rotate the design 180" by pressing the rotate button (a) once. On the screen the symbol will be visible.
- Use the Embroidery position buttons (c) to get to the exact position as the first calibration stitch and check this by turning the needle down with the hand wheel.
- Press the reverse button to start the machine and finish the embroidery.
natural_image
Black-and-white line drawing of floral and vine patterns with no text or symbols
chemical
Hand-drawn molecular structure diagram showing carbon, hydrogen, and oxygen atoms in a chain arrangement