creative designer - Sewing machine PFAFF - Free user manual and instructions
Find the device manual for free creative designer PFAFF in PDF.

User questions about creative designer PFAFF
0 question about this device. Answer the ones you know or ask your own.
Ask a new question about this device
Download the instructions for your Sewing machine in PDF format for free! Find your manual creative designer - PFAFF and take your electronic device back in hand. On this page are published all the documents necessary for the use of your device. creative designer by PFAFF.
USER MANUAL creative designer PFAFF
text_image
PFAFF creative designer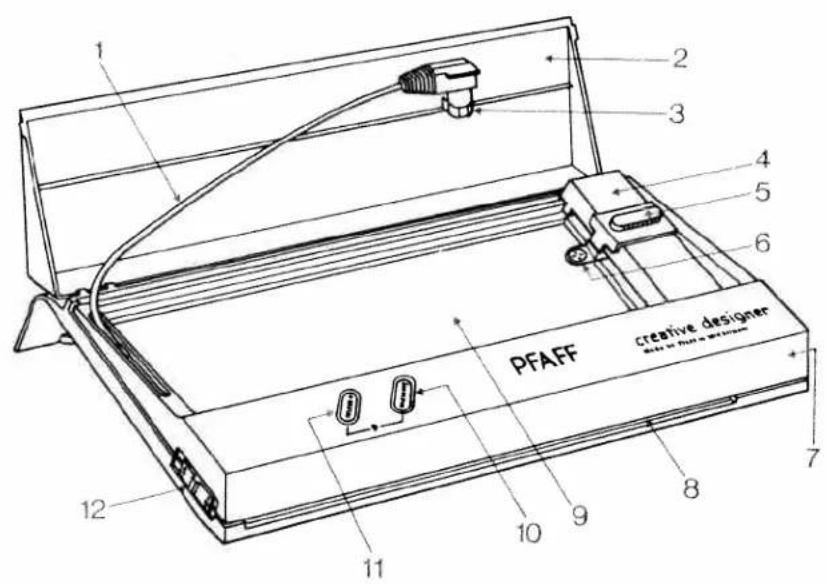
text_image
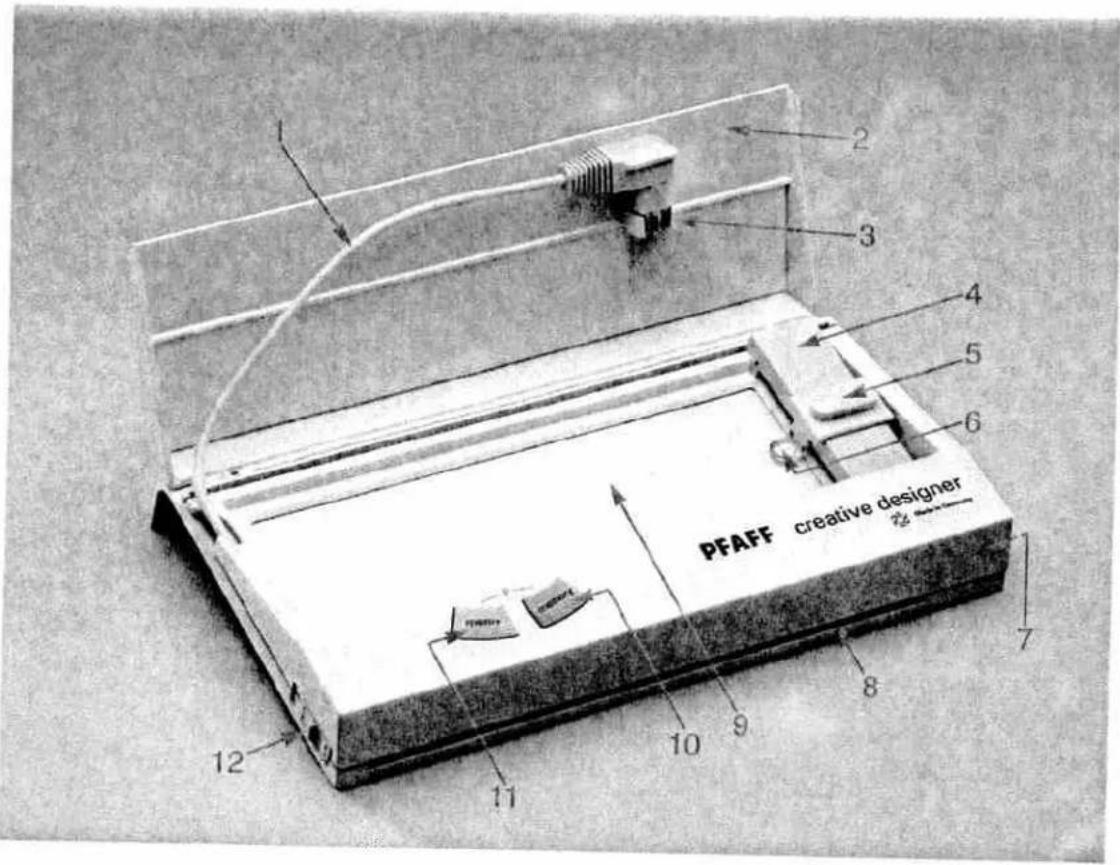
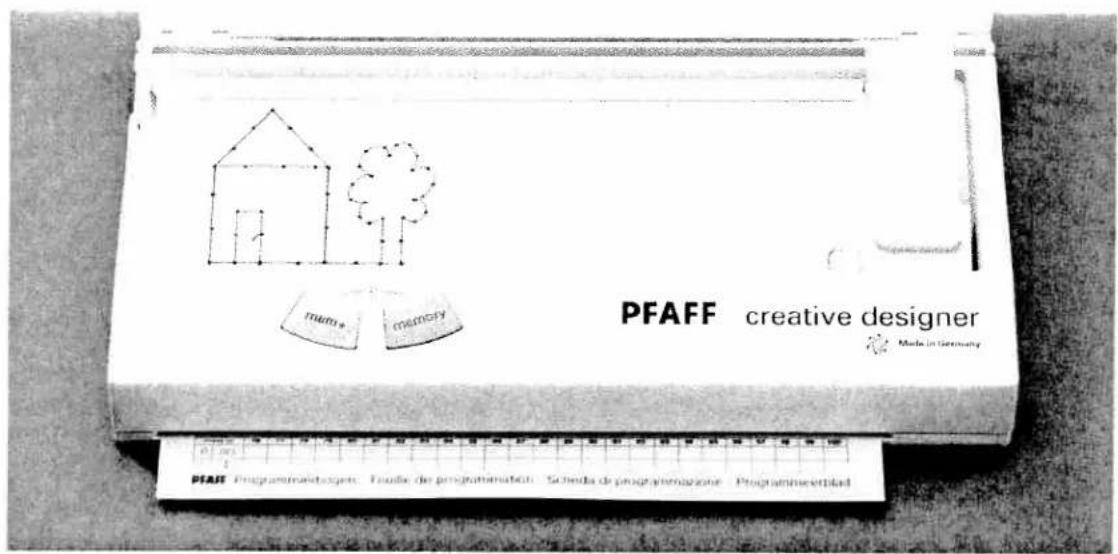
PFAFF creative designer 12 11 10 9 8 7 6 5 4 3 2 1Parts of the Designer
1 Connection lead with plug
2 Cover
3 Lead retainer
4 Adjustable slide
5 Magnifying slide (with wire-cross magnifier)
6 Wire-cross magnifier
7 Clip slide, right
8 Slot
9 Programming area
10 "Call stitch" key (memory)
11 "Program input" key (mem+)
12 Clip slide, left
The top illustration shows how the unit is stored on the rear side of the carrying case.
Creative designer
The Creative Designer belongs to the equipment of the Pfaff Creative 1473 CD.
This appliance is used for entering motifs of your own design in the P-memories of the sewing machine computer. They can be recalled for sewing whenever required.
The motifs are drawn and the stitch points marked out in the matrix of a programming card.
- There are 16 programming memories available from P 0 to P 15, each of which holds a maximum of 999 stitches. Altogether you can input 3,260 stitches, distributed over various P-memories.
- When the machine is switched off, the stored programs are preserved.
- You will find examples for free programming at the end of these instructions.
The Creative Designer is provided with a pad of programming cards. Further pads can be obtained from the Pfaff dealer against charge.
Matrix Cuadro reticulado · Ruteark · Rüðureitur
Number chart · Cuadro de cifras · Tailfeltet · Tölureitur
| R = (≥) Width · Anchura · Bredde · Breidd |
| = ↑ Length · Largura · Lengde · Lengd |
| M | P |
| Stach No | 1 | 2 | 3 | 4 | 5 | 6 | 7 | 8 | 9 | 10 | 11 | 12 | 13 | 14 | 15 | 16 | 17 | 18 | 19 | 20 | 21 | 22 | 23 | 24 | 25 |
| (3) | |||||||||||||||||||||||||
| ‡ | |||||||||||||||||||||||||
| Nid puntada | 26 | 27 | 28 | 29 | 30 | 31 | 32 | 33 | 34 | 35 | 36 | 37 | 38 | 39 | 40 | 41 | 42 | 43 | 44 | 45 | 46 | 47 | 48 | 49 | 50 |
| (8) | |||||||||||||||||||||||||
| ‡ | |||||||||||||||||||||||||
| Team nr | 51 | 52 | 53 | 54 | 55 | 56 | 57 | 58 | 59 | 60 | 61 | 62 | 63 | 64 | 65 | 66 | 67 | 68 | 69 | 70 | 71 | 72 | 73 | 74 | 75 |
| (3) | |||||||||||||||||||||||||
| ‡ | |||||||||||||||||||||||||
| Sport Nr | 76 | 77 | 78 | 79 | 80 | 81 | 82 | 83 | 84 | 85 | 86 | 87 | 88 | 89 | 90 | 91 | 92 | 93 | 94 | 95 | 96 | 97 | 98 | 99 | 100 |
| (3) | |||||||||||||||||||||||||
| ‡ |
PFAFF* Programming card · Hoja de programación · Programeringsskjema · Forritunarblað
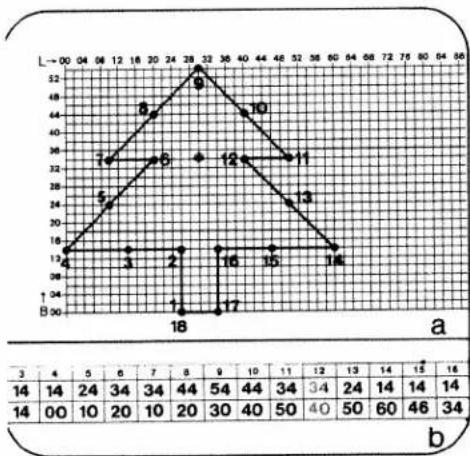
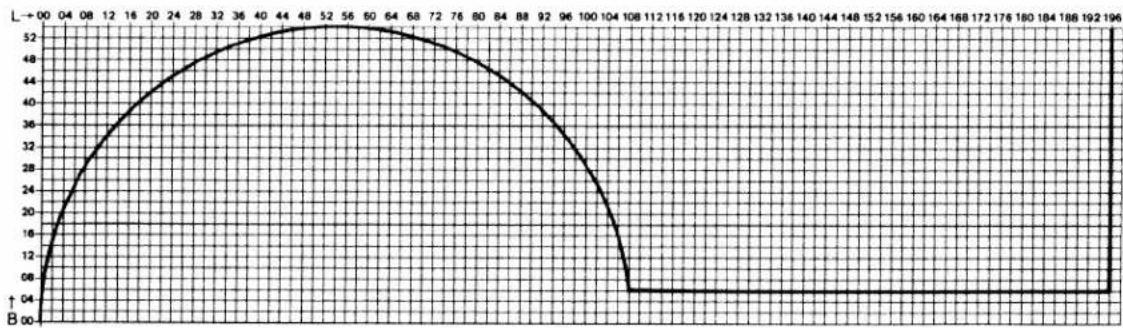
The programming card
Patterns of your own design are drawn in the matrix on the programming card.
The length data are read off scale "L" from 00 to 198, and the breadth data off scale "B" from 00 to 54. Each intersection point of the matrix lines represents a stitch point. The number charts on the front and back of the card are for entering the length and width data when the stitch points have been numbered. 300 stitch points can be entered in one card. If this is not enough, a further card can be used. A pattern may also consist of several programming cards (matrices). In this case, each matrix is entered in a P-memory and all of them together, one after the other, in an M-memory. The first card of the pad provided is a sample card which explains how to input a motif.
Number chart - Cuadro de cifras - Tallfeltet - Tölureitur
| B = (≥) Width · Anchura · Bredde · BreiddL = ! Length · Largura · Lengde · Lengd | M | P |
| Stitch No. | 101 | 102 | 103 | 104 | 105 | 106 | 107 | 108 | 109 | 110 | 111 | 112 | 113 | 114 | 115 | 116 | 117 | 118 | 119 | 120 | 121 | 122 | 123 | 124 | 125 | |
| B | (≦) | |||||||||||||||||||||||||
| L | ↓ | |||||||||||||||||||||||||
| N°d. pumtadei | 126 | 127 | 128 | 129 | 130 | 131 | 132 | 133 | 134 | 135 | 136 | 137 | 138 | 139 | 140 | 141 | 142 | 143 | 144 | 145 | 146 | 147 | 148 | 149 | 150 | |
| B | (≦) | |||||||||||||||||||||||||
| L | ↓ | |||||||||||||||||||||||||
| Sem nr.° | 151 | 152 | 153 | 154 | 155 | 156 | 157 | 158 | 159 | 160 | 161 | 162 | 163 | 164 | 165 | 166 | 167 | 168 | 169 | 170 | 171 | 172 | 173 | 174 | 175 | |
| B | (≦) | |||||||||||||||||||||||||
| L | ↓ | |||||||||||||||||||||||||
| Spor Nr. | 176 | 177 | 178 | 179 | 180 | 181 | 182 | 183 | 184 | 185 | 186 | 187 | 188 | 189 | 190 | 191 | 192 | 193 | 194 | 195 | 196 | 197 | 198 | 199 | 200 | |
| B | (≦) | |||||||||||||||||||||||||
| L | ↓ | |||||||||||||||||||||||||
| Stitch No. | 201 | 202 | 203 | 204 | 205 | 206 | 207 | 208 | 209 | 210 | 211 | 212 | 213 | 214 | 215 | 216 | 217 | 218 | 219 | 220 | 221 | 222 | 223 | 224 | 225 | |
| B | (≦) | |||||||||||||||||||||||||
| L | ↓ | |||||||||||||||||||||||||
| N°d. pumtadei | 226 | 227 | 228 | 229 | 230 | 231 | 232 | 233 | 234 | 235 | 236 | 237 | 238 | 239 | 240 | 241 | 242 | 243 | 244 | 245 | 246 | 247 | 248 | 249 | 250 | |
| B | (≦) | |||||||||||||||||||||||||
| L | ↓ | |||||||||||||||||||||||||
| Sem nr.° | 251 | 252 | 253 | 254 | 255 | 256 | 257 | 258 | 259 | 260 | 261 | 262 | 263 | 264 | 265 | 266 | 267 | 268 | 269 | 270 | 271 | 272 | 273 | 274 | 275 | |
| B | (≦) | |||||||||||||||||||||||||
| L | ↓ | |||||||||||||||||||||||||
| Spor Nr. | 276 | 277 | 278 | 279 | 280 | 281 | 282 | 283 | 284 | 285 | 286 | 287 | 288 | 289 | 290 | 291 | 292 | 293 | 294 | 295 | 296 | 297 | 298 | 299 | 300 | |
| B | (≦) | |||||||||||||||||||||||||
| L | ↓ | |||||||||||||||||||||||||
PFAFF* Programming card · Hoja de programación · Programeringsskjema · Forritunarblað
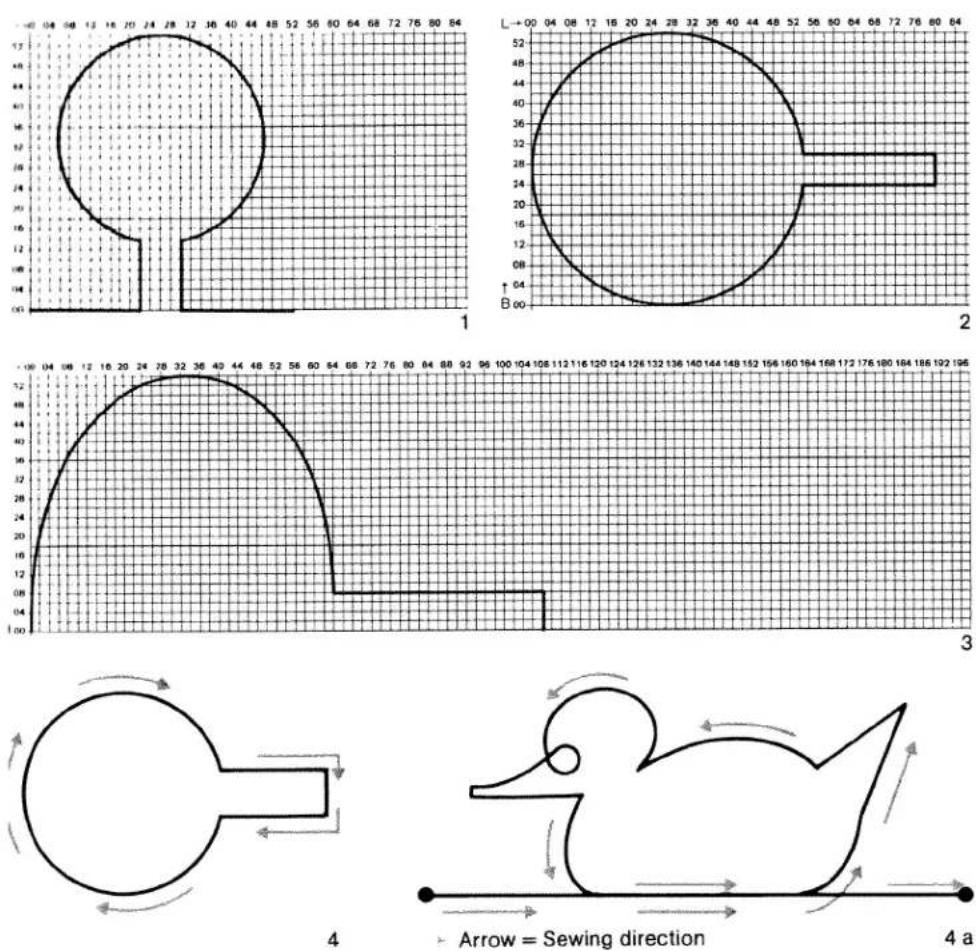
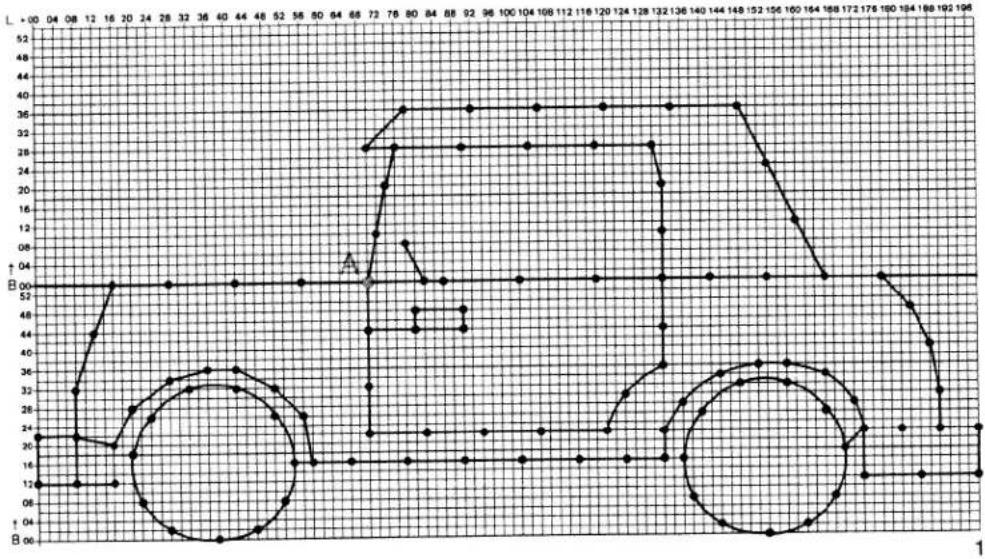
How to draw your own design
There are three possibilities of drawing a pattern in the matrix area:
- Horizontally continuous pattern or single pattern, Fig. 1.
- Vertically continuous pattern or single pattern, Fig. 2.
- Assembled pattern, as a single pattern, with a width of 18 mm, Fig. 3.
Now draw your pattern in the matrix.
The pattern should touch line 00 of length-data scale "L", see Figs. 1, 2 and 3. The motif can be designed as a single pattern (Fig. 4) or as a continuous one (Fig. 4a).
Please note:
Arrow denotes sewing direction
natural_image
Black-and-white illustration of a vertical floral border with decorative leaves, no text or symbols present.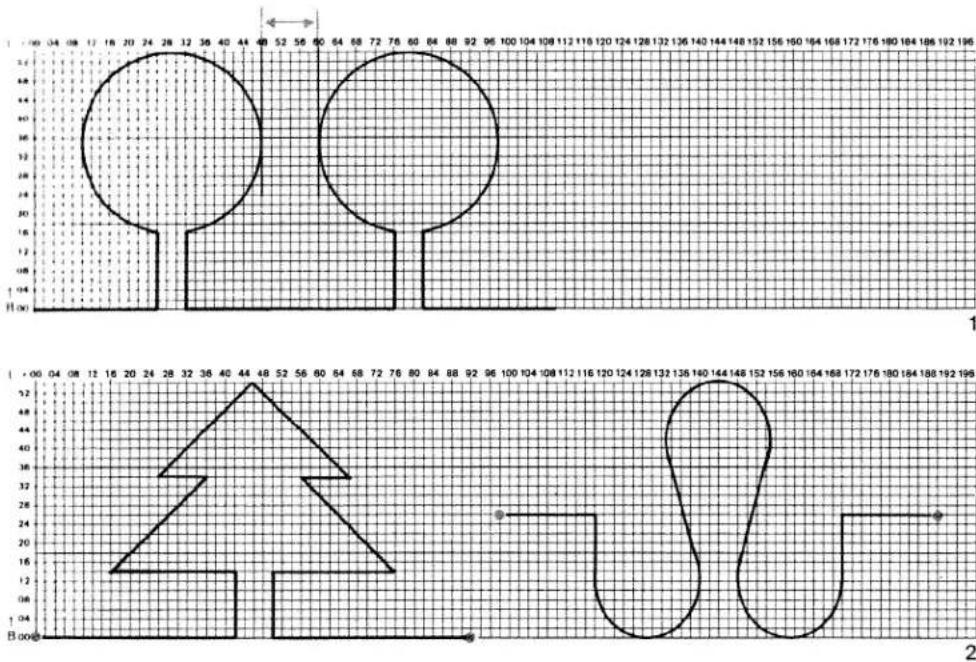
text_image
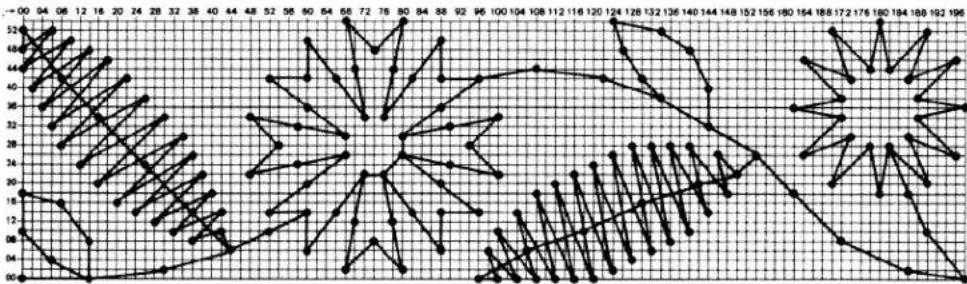
Technical drawing with dimensioned shapes and grid background, showing top and bottom views with numerical coordinates.The distance between each pattern should be five or more squares (Fig. 1). With single patterns the distance between the individual motifs can be determined by shifting the fabric.
The first and last stitch of a continuous pattern must be on the same width line, (00–54) of the matrix (Fig. 6).
Now establish length points.
Always set the points at the intersections of the lines. Every point means the needle penetration in the material. Select between 4 and 7 squares for the length and width. Only on curves should the points be drawn more densely, at a distance of roughly 2 to 5 squares, (Fig. 3).
Sewing of patterns with zigzag stitch requires a shorter length. In each case the length should be equal to one square (Fig. 4).

line
| X | Y1 | Y2 | Y3 | |---|---|---|---| | 0 | 14 | 14 | 14 | | 1 | 14 | 14 | 14 | | 2 | 14 | 14 | 14 | | 3 | 14 | 14 | 14 | | 4 | 14 | 14 | 14 | | 5 | 14 | 14 | 14 | | 6 | 14 | 14 | 14 | | 7 | 14 | 14 | 14 | | 8 | 14 | 14 | 14 | | 9 | 14 | 14 | 14 | | 10 | 14 | 14 | 14 | | 11 | 14 | 14 | 14 | | 12 | 14 | 14 | 14 | | 13 | 14 | 14 | 14 | | 14 | 14 | 14 | 14 | | 15 | 14 | 14 | 14 | | 16 | 14 | 14 | 14 | | 17 | 14 | 14 | 14 | | 18 | 14 | 14 | 14 | | 19 | 14 | 14 | 14 | | 20 | 14 | 14 | 14 | | 21 | 14 | 14 | 14 | | 22 | 14 | 14 | 14 | | 23 | 14 | 14 | 14 | | 24 | 14 | 14 | 14 | | 25 | 14 | 14 | 14 | | 26 | 14 | 14 | 14 | | 27 | 14 | 14 | 14 | | 28 | 14 | 14 | 14 | | 29 | 14 | 14 | 14 | | 30 | 14 | 14 | 14 | | 31 | 14 | 14 | 14 | | 32 | 14 | 14 | 14 | | 33 | 14 | 14 | 14 | | 34 | 14 | 14 | 14 | | 35 | 14 | 14 | 14 | | 36 | 14 | 14 | 14 | | 37 | 14 | 14 | 14 | | 38 | 14 | 14 | 14 | | 39 | 14 | 14 | 14 | | 40 | 14 | 14 | 14 | | 41 | 14 | 14 | 14 | | 42 | 14 | 14 | 14 | | 43 | 14 | 14 | 14 | | 44 | 14 | 14 | 14 | | 45 | 14 | 14 | 14 | | 46 | 14 | 14 | 14 | | 47 | 14 | 14 | 14 | | 48 | 14 | 14 | 14 | | 49 | 14 | 14 | 14 | | ... (repeated) for all series are integers between -20 and +20. The y-values represent the absolute magnitude of the series at each point. The x-values represent the index of the series from the first to the last. The y-values represent the magnitude of the series at each point in each series. There is no label for the series.
line
| X-Axis Label | Y-Axis Value | |---|---| | 04 | 12 | | 08 | 64 | | 12 | 12 | | 16 | 64 | | 20 | 38 | | 24 | 38 | | 28 | 24 | | 32 | 38 | | 36 | 24 | | 40 | 38 | | 44 | 24 | | 48 | 38 | | 52 | 24 | | 56 | 38 | | 60 | 12 | | 64 | 38 | | 68 | 12 | | 72 | 52 | | 76 | 12 | | 80 | 52 | | 84 | 12 | | 88 | 52 | | 92 | 12 | | 96 | 52 | | 100 | 12 | | 104 | 52 | | 108 | 12 | | 112 | 52 | | 116 | 12 | | 120 | 52 | | 124 | 12 | | 128 | 52 | | 132 | 12 | | 136 | 52 | | 140 | 12 | | 144 | 52 | | 148 | 12 | | 152 | 52 | | 156 | 12 | | 160 | 52 | | 164 | 12 | | 168 | 52 | | 172 | 12 | | 176 | 52 | | 180 | 12 | | 184 | 52 | | 188 | 12 | | 192 | 52 | | 196 | 12 |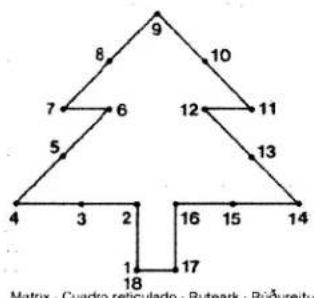
flowchart
graph TD
    A["4"] --> B["3"]
    B --> C["2"]
    C --> D["18"]
    D --> E["17"]
    E --> F["16"]
    F --> G["15"]
    G --> H["14"]
    H --> I["13"]
    I --> J["12"]
    J --> K["11"]
    K --> L["10"]
    L --> M["9"]
    M --> N["8"]
    N --> O["7"]
    O --> P["6"]
    P --> Q["5"]
Matrix - Cuadro reticulado - Ruteark - Rüðureitur
| = (≥) Width · Anchura · Bredde · Breidd= ‡ Length · Largura · Lengde · Lengd | M | P |
Number chart · Cuadro de cifras · Talifeitet · Tolureitur
| Match No | 1 | 2 | 3 | 4 | 5 | 6 | 7 | 8 | 9 | 10 | 11 | 12 | 13 | 14 | 15 | 16 | 17 | 18 | 19 | 20 | 21 | 22 | 23 | 24 | 25 |
| (≥) | 00 | 14 | 14 | 14 | 24 | 34 | 34 | 44 | 54 | 44 | 34 | 34 | 24 | 14 | 14 | 14 | 00 | 00 | |||||||
| I | 26 | 26 | 14 | 00 | 10 | 20 | 10 | 20 | 30 | 40 | 50 | 40 | 30 | 60 | 46 | 34 | 34 | 26 | |||||||
| N/d puntada | 26 | 27 | 28 | 29 | 30 | 31 | 32 | 33 | 34 | 35 | 36 | 37 | 38 | 39 | 40 | 41 | 42 | 43 | 44 | 45 | 46 | 47 | 48 | 49 | 50 |
| (≥) | |||||||||||||||||||||||||
| I | |||||||||||||||||||||||||
| Som nr | 51 | 52 | 53 | 54 | 55 | 56 | 57 | 58 | 59 | 60 | 61 | 62 | 63 | 64 | 65 | 66 | 67 | 68 | 69 | 70 | 71 | 72 | 73 | 74 | 75 |
| (≥) | |||||||||||||||||||||||||
| I | |||||||||||||||||||||||||
| Spor Nr | 76 | 77 | 78 | 79 | 80 | 81 | 82 | 83 | 84 | 95 | 96 | 87 | 88 | 89 | 90 | 91 | 92 | 93 | 94 | 95 | 96 | 97 | 98 | 99 | 100 |
| (≥) | |||||||||||||||||||||||||
| I |
PFAFF® Programming card · Hoja de programación · Programeringsskjema · Forritunarblað
1
line
| X | Y | |---|---| | 1 | 0 | | 2 | 12 | | 3-17 | 15 | | 3-17 | 13 | | 3-17 | 16 | | 4 | 25 | | 4 | 24 | | 4 | 22 | | 4 | 21 | | 5 | 26 | | 5 | 23 | | 6 | 27 | | 6 | 20 | | 6 | 11 | | 7-44 | 29 | | 7-44 | 28 | | 7-44 | 24 | | 7-44 | 21 | | 7-44 | 10 | | 7-44 | 14 | | 7-44 | 13 | | 7-44 | 9 | | 45 | 30 | | 45 | 31 | | 45 | 38 | | 45 | 32 | | 45 | 42 | | 46 | 0 |Vumbering the stitch points
The stitch points have to be numbered consecutively according to the path of the needle. Afterwards, the data for length and width are entered in the corresponding number chart, i.e. stitch 1 in square 1, 2 in 2, etc. (Fig. 1).
The advantage of numbering the stitch points is that they specify the sewing path of the needle and can thus be retraced. This is important for complicated motifs which contain a number of double sewn segments. In double sewn segments the stitch points will have several numbers (Fig. 2).

natural_image
Simple line drawing of three coffee cups on saucers (no text or symbols)Important notes
- In order to avoid mistakes while working with the wire-cross magnifier it is important to sit at the Designer in the correct position. When you align the control with a stitch point you must look vertically into the magnifier.
- When you press "mem -" key 47 BL the position of the wire-cross magnifier is automatically registered by the sewing machine computer as basic position B00/L00. For this reason, whenever you select a P-memory between 0 and 15 be sure the wire-cross magnifier is at the correct basic position 00, i.e. the far left bottom position.
● Always keep the Creative Designer in a dry place and never store it on or near a heater, stove, etc. - Do not place any objects on or in the Designer.
- If something goes wrong with the Designer it must only be repaired by the manufacturer.
● After using the Creative Designer always first insert the connection lead in retainer 3, then push adjustable slide 4 fully to the right and close cover 2.
natural_image
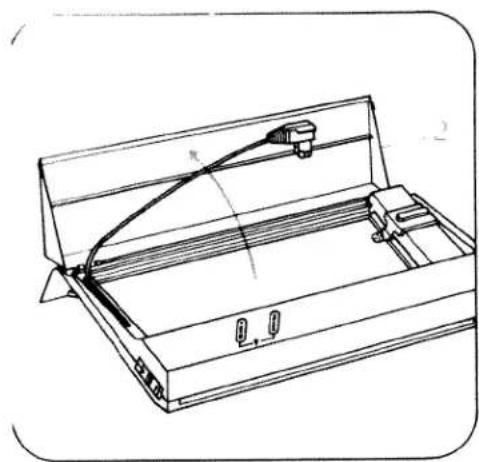
Technical line drawing of a mechanical device with internal components and a curved component (no text or symbols)To open, fold cover 2 upwards.
text_image
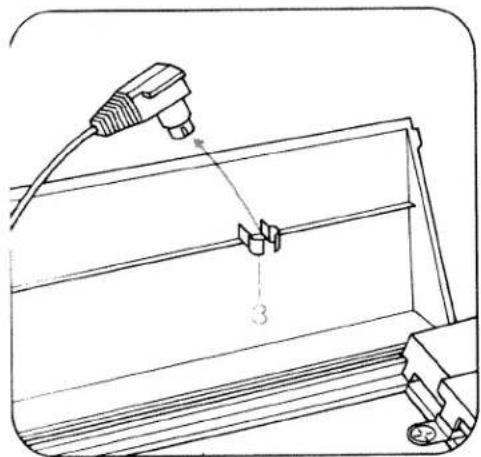
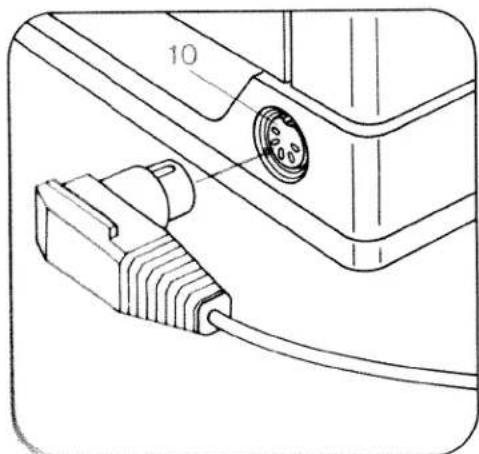
Technical diagram showing a connector or fixture with labeled parts, including a plug and part number 3.Take the connection plug out of retainer 3 and insert it in socket 10 of the sewing machine as shown in the illustration.
natural_image
Technical line drawing of a mechanical component with a labeled part (10), showing a cable and connector assembly (no text or symbols beyond the number)in

text_image
Technical diagram of a mechanical component with labeled parts and numbered featuresSwitch on the main switch of the Creative 1473 CD.
text_image
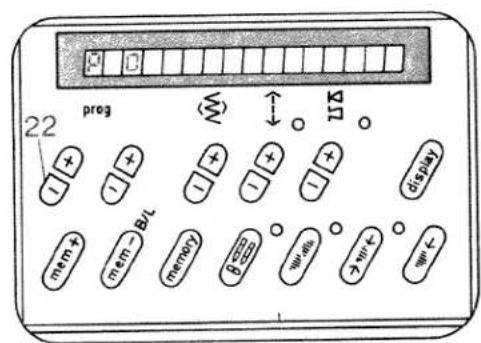
22 prog mem+ mem-B/L memory B W W- W+Select memory P 0 with left program key 22.
text_image
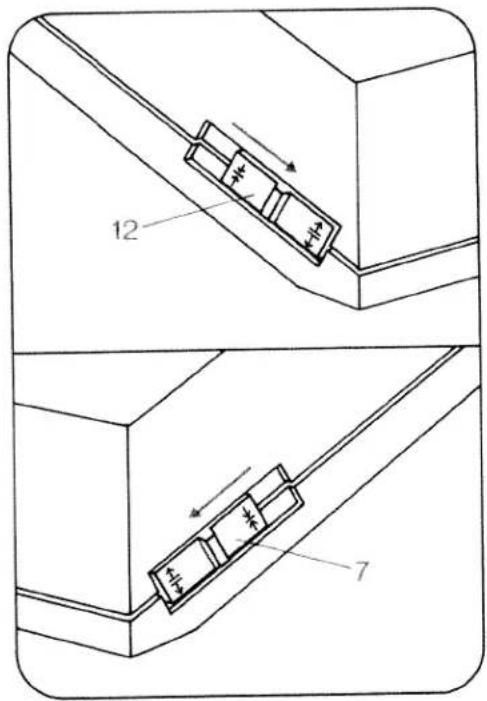
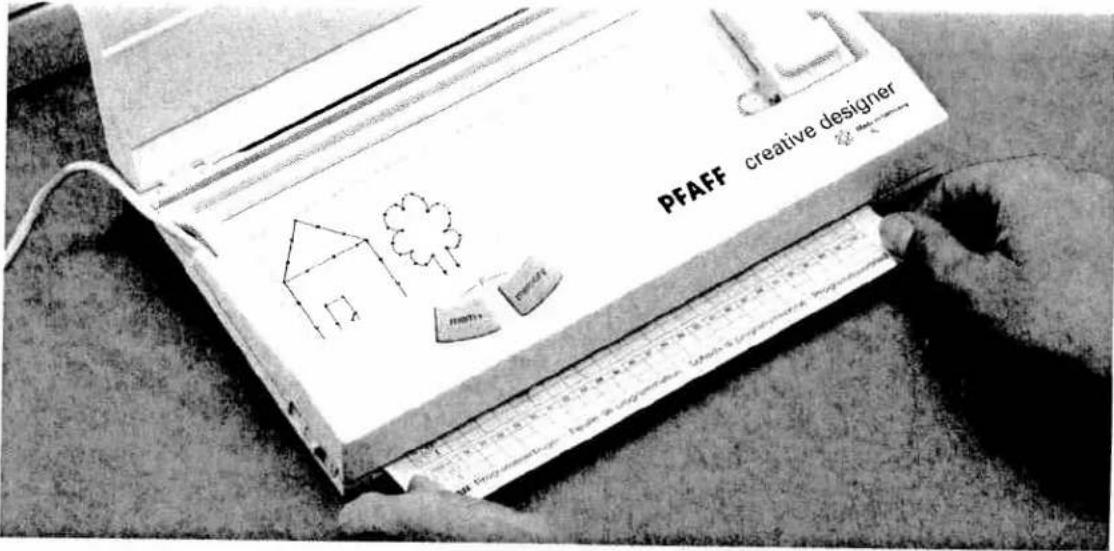
12 7To open slot 8 push slide clips 7 and 12 on both sides forward.

text_image
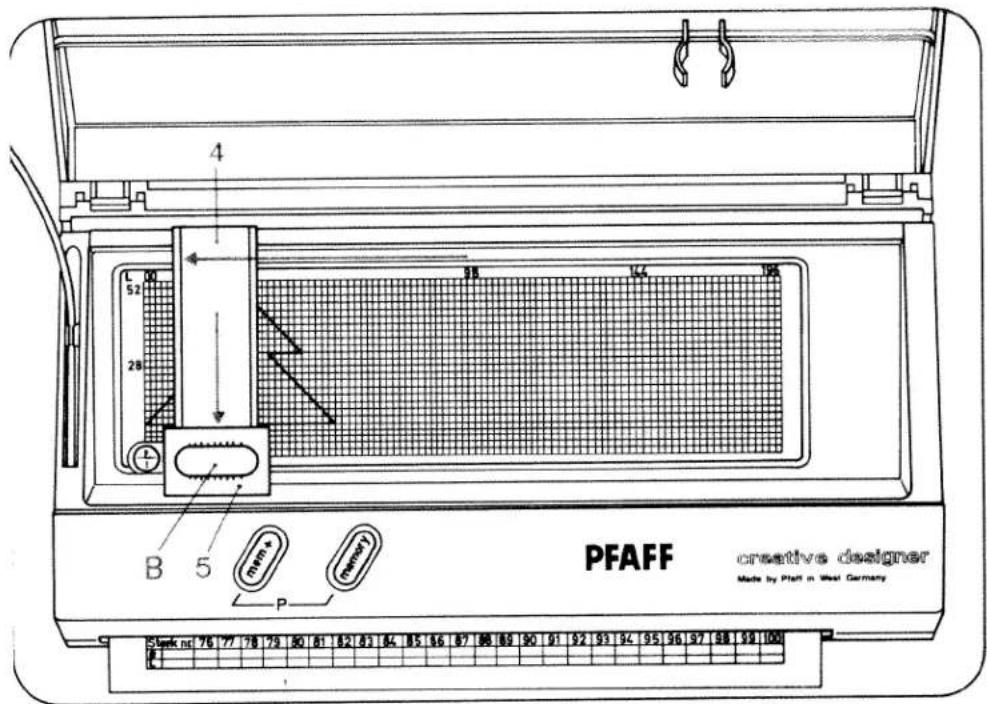
PFAFF creative designer A BInsert the programming card in slot 8. Keeping the card straight, push it in until the edge of the paper is under edge A of the unit.
text_image
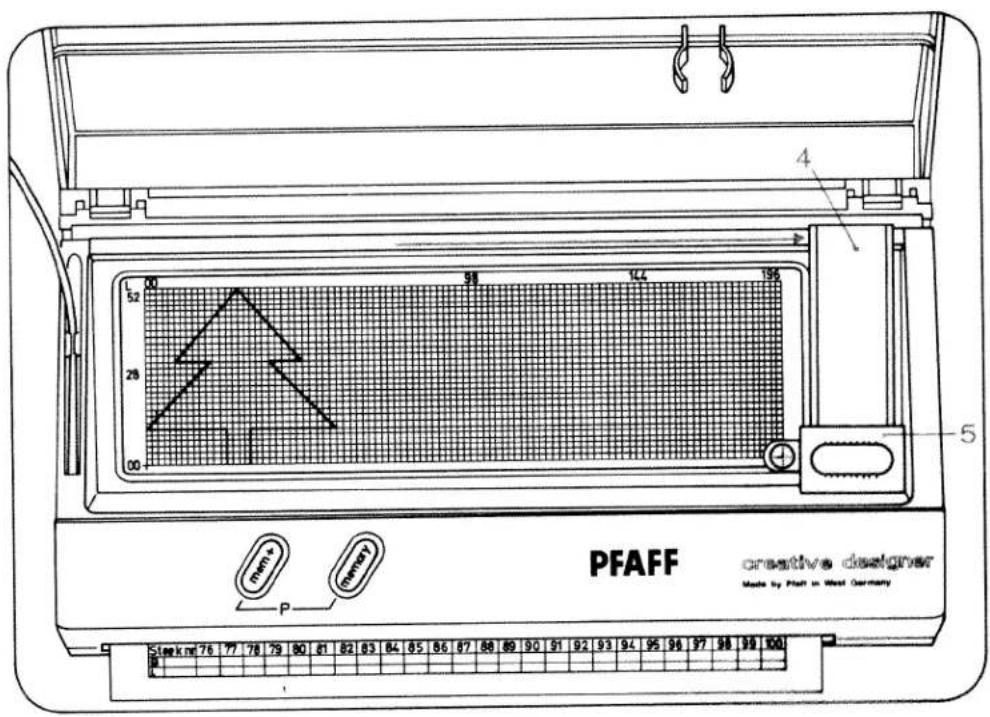
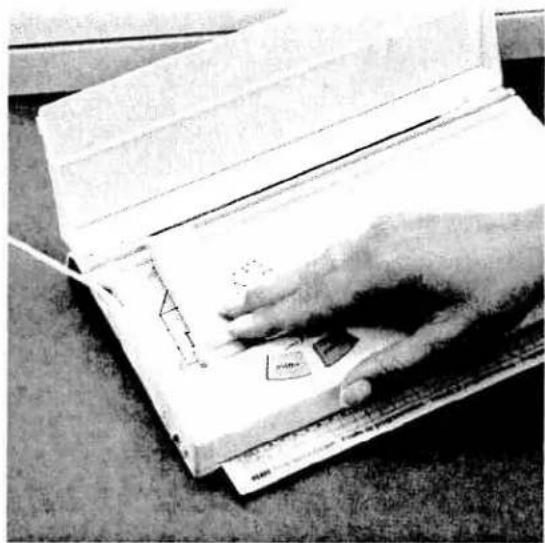
PFAFF creative designer Made by Platt in West Germany Sternk net 76 77 78 79 80 81 82 83 84 85 86 87 88 89 90 91 92 93 94 95 96 97 98 99 100Adjusting the programming card:
Magnifier slide 5 is moved up or down and slide 4 from side to side with knob B. Move slide 4 fully to the left and slide 5 fully to the bottom.

text_image
10 12 08 6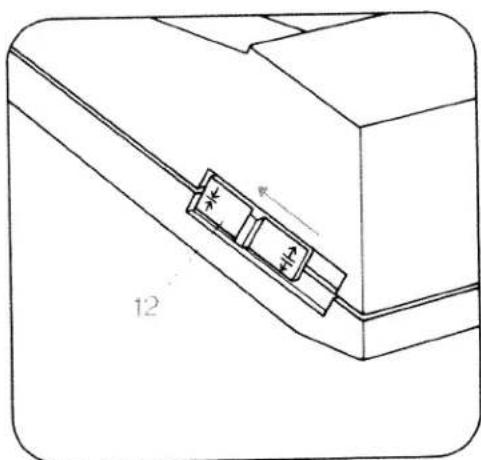
natural_image
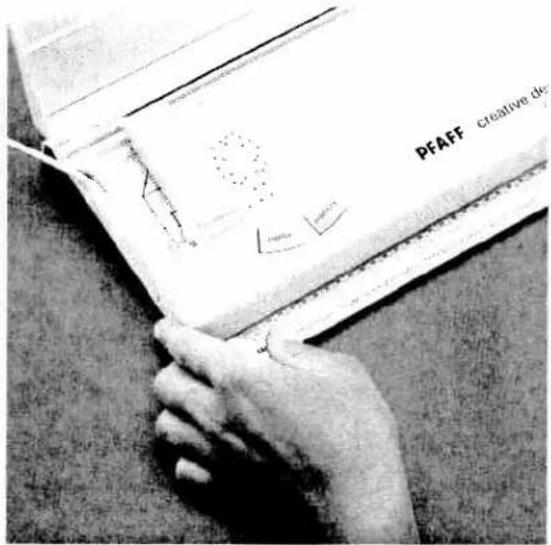
Technical line drawing of a mechanical component with a labeled section '12' (no text or symbols beyond the label)Now position the programming card so that the datum point 00 is exactly aligned with the red cross of magnifier 6 (Fig. 1), then clamp the card in this position by pushing clip slide 12 to the back (Fig. 2).
text_image
PFAFF creative designer Made by Platt in West Germany Stark m2 76 77 78 79 80 81 82 83 84 85 86 87 88 89 90 91 92 93 94 95 96 97 98 99 100 4 5 00 51 144 156 28 00 mem memory P R
text_image
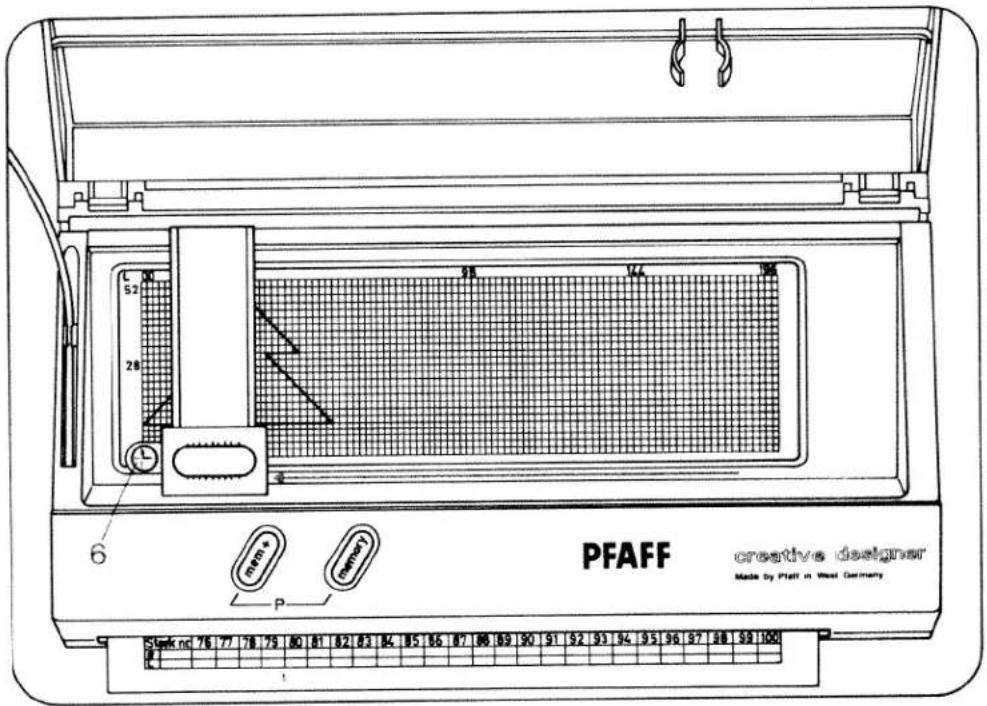
Push slide 4 fully to the bottom right with magnifier slide 5.
natural_image
Technical drawing of a mechanical component with grid pattern and labeled part '6' (no readable text or symbols beyond the number)
natural_image
Technical line drawing of a mechanical component with a labeled part (7), showing internal structure and motion arrows (no text or symbols)Move the programming card to align datum line 00 with the horizontal red line of the magnifier, then push slide clip 7 back to clamp the card in place.
text_image
PFAFF creative designer Made by Platt in West Germany Stark nc 76 77 78 79 80 81 82 83 84 85 86 87 88 89 90 91 92 93 94 95 96 97 98 99 100Checking
Push the magnifier back to the bottom left datum point 00 and check that the red horizontal line of magnifier 6 is in line with datum line 00 (adjust, if necessary).
With the magnifier fully to the left, press "mem-" key 47 of the sewing machine.
line
| Point | X | Y | |---|---|---| | 1 | 1 | 12 | | 2 | 2 | 35 | | 3 | 3 | 45 | | 4 | 4 | 60 | | 5 | 5 | 55 | | 6 | 6 | 45 | | 7 | 7 | 35 | | 8 | 8 | 25 | | 9 | 9 | 15 | | 10 | 10 | 10 | | 11 | 11 | 0 | | 12 | 12 | 2 | | 13 | 13 | 35 | | 14 | 14 | 55 | | 15 | 15 | 60 | | 16 | 16 | 55 | | 17 | 17 | 45 | | 18 | 18 | 35 |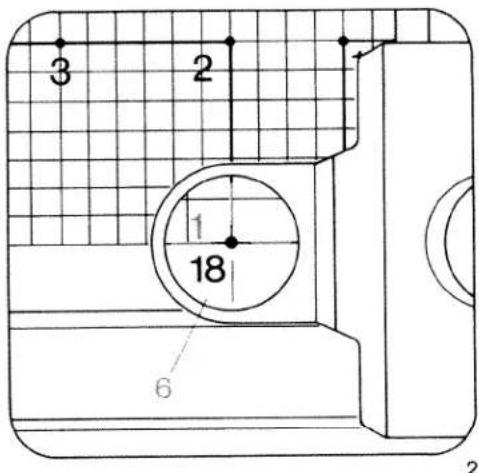
text_image
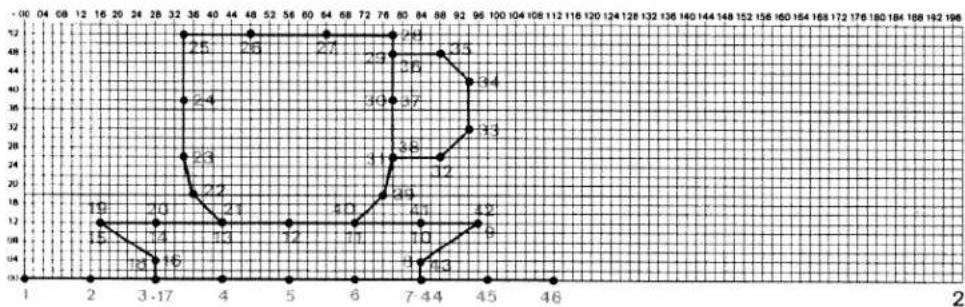
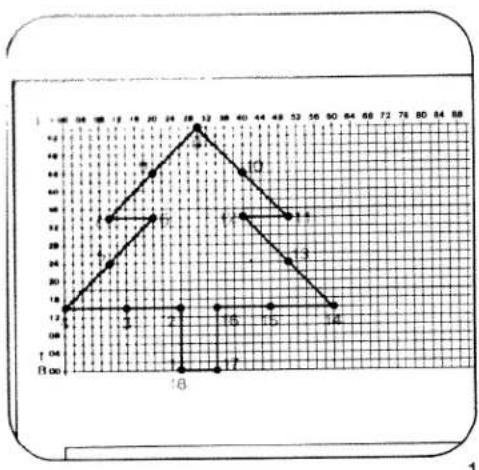
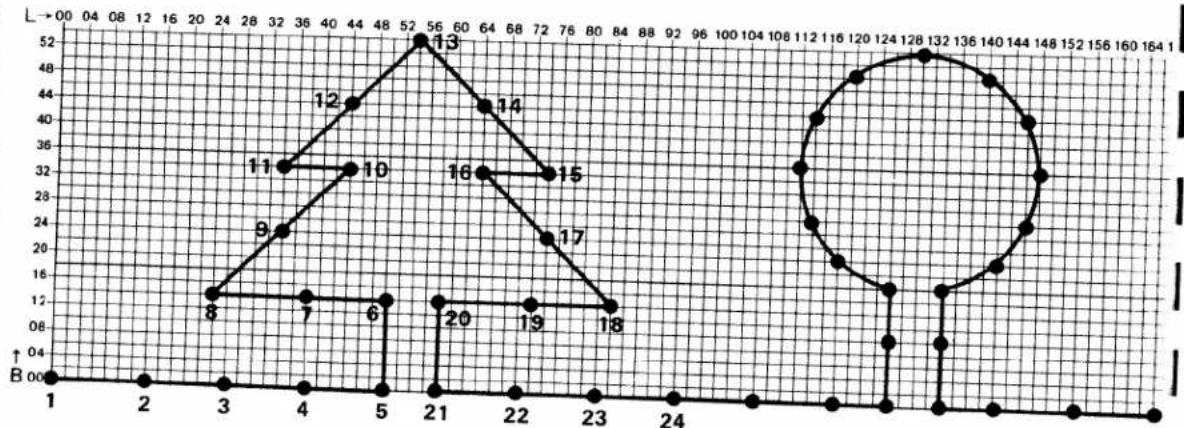
3 2 1 18 6 2Storing the stitch points
For the sake of simplicity the stitch points of the sample program card are numbered consecutively according to the sewing path from 1 to 18 (Fig. 1).
● Move magnifier 6 to stitch point 1 (Fig. 1) and
● enter it by pressing "mem+" key 11 of the Creative Designer once (Fig. 3).
● Input all of the other stitch points from 2 to 18 one by one in the same way.
- Press "memory" key 30 of the sewing machine (Fig. 3).
● Pull the plug of the Creative Designer out of the sewing machine connection.
The pattern can now be sewn.
When the entry is made, the display of the sewing machine shows the following: The co-ordinates, width data B and length data L, for each recorded stitch point. At the same time, the number of the next stitch to be input is indicated at the right of the display. Whenever "mem+" key 11 of the Designer is pressed the display moves forward by one number and a flashing point shows you that the next stitch point can be programmed (Fig. 4).

text_image
11 mem+ mem- memory P prog 30 display B/L memory P will >> will + >> will - 3
text_image
prog mem + BL mem - BCL memory 125 4.2 ↑ ↓ × × × × × × × × × × × × × × × × × × × × × × × × × × × × × × × × × × × × × × × × × × × × × × × × × × × × × × × × × × × × × × × × × × × ×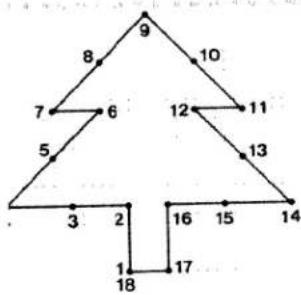
flowchart
graph TD
    A["9"] --> B["8"]
    B --> C["7"]
    C --> D["5"]
    D --> E["3"]
    E --> F["2"]
    F --> G["1"]
    G --> H["18"]
    H --> I["17"]
    I --> J["16"]
    J --> K["15"]
    K --> L["14"]
    L --> M["13"]
    M --> N["12"]
    N --> O["11"]
    O --> P["10"]
| Stitch No | 1 | 2 | 3 | 4 | 5 | 6 | 7 | 8 | 9 | 10 | 11 | 12 | 13 | 14 | 15 | 16 | 17 | 18 | 19 | 20 | 21 | 22 | 23 | 24 | 25 | |
| (5) | 00 | 14 | 14 | 14 | 24 | 34 | 34 | 44 | 54 | 44 | 34 | 34 | 24 | 14 | 14 | 14 | 00 | 00 | ||||||||
| ↑ | 26 | 26 | 14 | 00 | 10 | 20 | 10 | 20 | 30 | 40 | 50 | 40 | 50 | 60 | 46 | 34 | 34 | 26 | ||||||||
oring stitch points according to input length-ta "L" and width data "B" in the number chart a programming card
nemories are selected in the same way as M-
emories.
First select an empty P-memory between 0 and 15 in the sewing machine computer.
Position the magnifier of the Designer at the far bottom left, i. e. its basic position.
Press "mem-" key 47 (BL) of the sewing machine computer. A flashing "1" appears at the right in the display, i.e. the basic position of the Designer.
Place the sample programming card at the side of the Designer.
Read off the data of the first stitch in the number display, B00 and L26.
Move the magnifier within the area from 00 to 198 (length scale) and 00 to 54 (width scale) in the programming area to set the data of the first stitch in the display of the sewing machine.
Press "mem+" key 11 of the Creative Designer. The stitch is now entered.
Input all other stitches from 2 to 18 in the same way.
his can be carried out with or without an empty programming card in the Designer.
natural_image
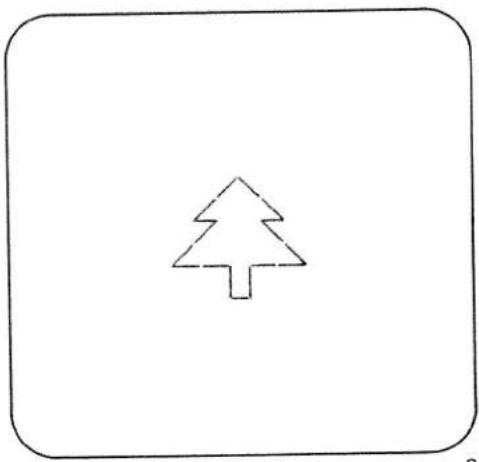
Simple line drawing of a Christmas tree inside a rounded rectangle (no text or symbols)
natural_image
Vertical arrangement of heart-shaped outlines on a black background (no text or symbols)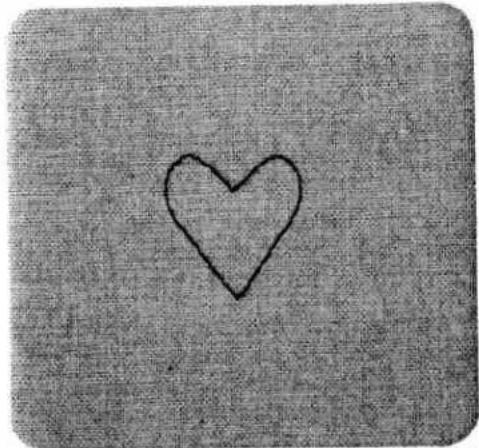
natural_image
Simple hand-drawn heart outline on textured gray background (no text or symbols)1
Vertically continuous patterns
When tracing the patterns in the matrix the required distances of 5 to 8 squares should be included (Fig. 1). For single patterns, the key "single pattern" (Fig. 1) should be pressed before sewing.
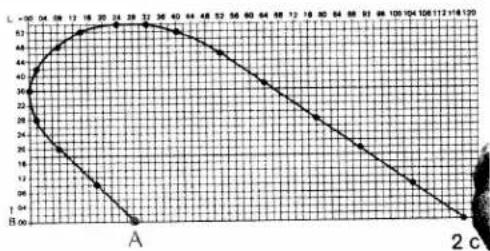
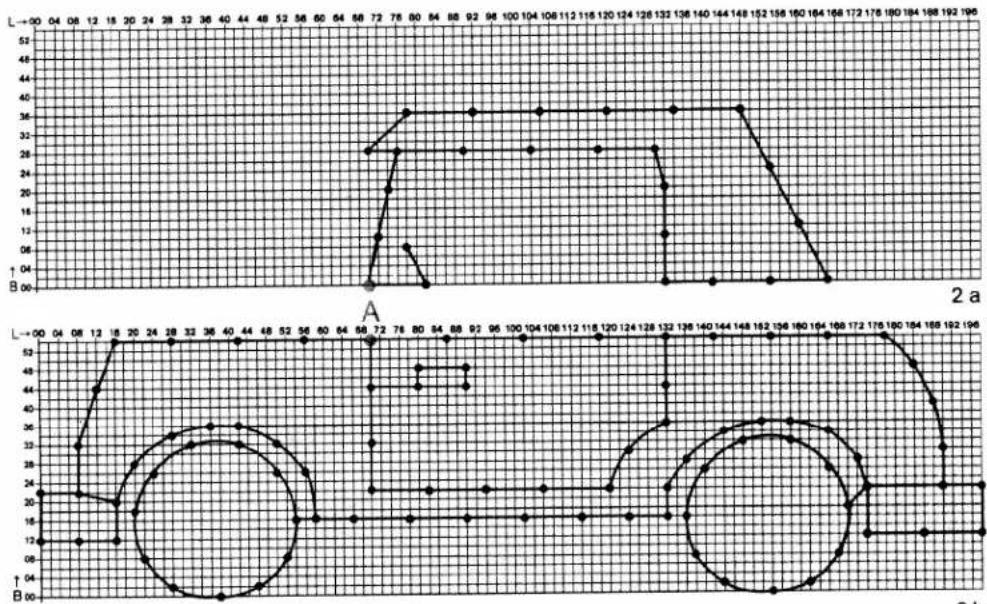
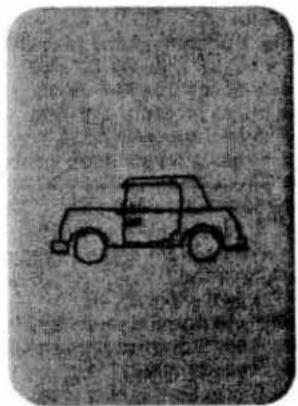
Assembled patterns
These patterns are sewn in two worksteps (Figs. 2 + 2 c).
Draw one half of the pattern on the pattern chart (Fig. 2 c).
Before beginning to sew the individual pattern, mark the beginning of pattern "A" and the sewing-direction on the material.
After inputting the needle entry points press
- "Single pattern" key 27 of the sewing machine computer.
First workstep
Sew the pattern until the machine stops (Fig. 2a).
Second workstep
- Press "pattern mirror" key of the sewing machine (This moves the needle to the other side).
- Shift the workpiece and insert the needle at the beginning of pattern "A" of the previously sewn pattern (Fig. 2 b).
- Sew the pattern until the machine stops.
line
| X | Y | |---|---| | 0 | 34 | | 1 | 36 | | 2 | 38 | | 3 | 40 | | 4 | 42 | | 5 | 44 | | 6 | 46 | | 7 | 48 | | 8 | 50 | | 9 | 52 | | 10 | 54 | | 11 | 56 | | 12 | 58 | | 13 | 60 | | 14 | 62 | | 15 | 64 | | 16 | 66 | | 17 | 68 | | 18 | 70 | | 19 | 72 | | 20 | 74 | | 21 | 76 | | 22 | 78 | | 23 | 80 | | 24 | 82 | | 25 | 84 | | 26 | 86 | | 27 | 88 | | 28 | 90 | | 29 | 92 | | 30 | 94 | | 31 | 96 | | 32 | 98 | | 33 | 100 | | 34 | 102 | | 35 | 104 | | 36 | 106 | | 37 | 108 | | 38 | 110 | | 39 | 112 | | 40 | 114 | | 41 | 116 | | 42 | 118 | | 43 | 120 | | 44 | 122 | | 45 | 124 | | 46 | 126 | | 47 | 128 | | 48 | 130 | | 49 | 132 | | 50 | 134 | | 51 | 136 | | 52 | 138 | | 53 | 140 | | 54 | 142 | | 55 | 144 | | 56 | 146 | | 57 | 148 | | 58 | 150 | | 59 | 152 | | 60 | 154 | | 61 | 156 | | 62 | 158 | | 63 | 160 | | 64 | 162 | | 65 | 164 | | 66 | 166 | | 67 | 168 | | 68 | 170 | | 69 | 172 | | 70 | 174 | | 71 | 176 | | 72 | 178 | | 73 | 180 | | 74 | 182 | | 75 | 184 | | 76 | 186 | | 77 | 188 | | 78 | 190 | | 79 | 192 | | 80 | 194 | | 81 | 196 | | 82 | 198 | | 83 | 200 | | 84 | 202 | | 85 | 204 | | 86 | 206 | | 87 | 208 | | 88 | 210 | | 89 | 212 | | 90 | 214 | | 91 | 216 | | 92 | 218 | | 93 | 220 | | 94 | 222 | | 95 | 224 | | 96 | 226 | | 97 | 228 | | 98 | 230 | | 99 | 232 | | A (bottom) | B (bottom) for the curve of L = -34. The chart displays a single data series with no explicit title or legend. The x-axis is labeled 'A', and the y-axis is labeled 'B'. The data points are connected by a straight line through the origin. There is no additional data series present in this image. The label 'A' appears twice: 'A' at the bottom left and 'A' at the top right. The label '2c' appears twice: 'A' at the bottom left and 'B' at the bottom right. The chart is saved as a PNG file named 'a.png'.
flowchart
graph TD
    A1["A"] --> 2a["2a"]
    2a --> 2b["2b"]
    2b --> 2a
    2b --> 2a
    style 2a fill:#f9f,stroke:#333
    style 2b fill:#bbf,stroke:#333
line
| L | B | |----|----| | 00 | 52 | | 04 | 52 | | 08 | 52 | | 12 | 52 | | 16 | 52 | | 20 | 52 | | 24 | 52 | | 28 | 52 | | 32 | 52 | | 36 | 52 | | 40 | 52 | | 44 | 52 | | 48 | 52 | | 52 | 52 | | 56 | 52 | | 60 | 52 | | 64 | 52 | | 68 | 52 | | 72 | 52 | | 76 | 52 | | 80 | 52 | | 84 | 52 | | 88 | 52 | | 92 | 52 | | 96 | 52 | | 100| 52 | | 104| 52 | | 108| 52 | | 112| 52 | | 116| 52 | | 120| 52 | | 124| 52 | | 128| 52 | | 132| 52 | | 136| 52 | | 140| 52 | | 144| 52 | | 148| 52 | | 152| 52 | | 156| 52 | | 160| 52 | | 164| 52 | | 168| 52 | | 172| 52 | | 176| 52 | | 180| 52 | | 184| 52 | | 188| 52 | | 192| 52 | | 196| 52 |Assembled patterns in two P-memories
Fig. 3 shows a joined pattern, 18 mm wide, which has been split among two P-memories. These patterns are sewn in two worksteps.
Preparation of the matrix
Stick two matrices (Fig. 1) one below the other and draw your pattern over both of them. After drawing and marking the points, establish sewing beginning point "A". After that, split the matrix again. You now have two pattern halves, 2 a + 2 b. Enter each part 2 a + 2 b of the separated pattern into a P-memory.
After inputting the needle entry points
- Press "single pattern" key 27 of the sewing machine
First workstep
- Select the first P-memory
● Sew the pattern until the machine stops.
Second workstep
- Select the second P-memory.
- Shift the workpiece and insert the needle at the beginning of pattern "A" of the previously sewn pattern.
● Sew the pattern until the machine stops.
2b
natural_image
Simple line drawing of a vintage car (no text or symbols)3

text_image
Lake
natural_image
Simple line drawing of a symmetrical abstract shape resembling a tree or floral pattern (no text or symbols)1
2
Transferring P-memories to M-memories
If you wish to combine your freely programmed pattern (e.g. "Lale") with programs from the stitch table (from 00 to 177), you must transfer the corresponding P-memory to an M-memory.
Example:
Fig. 1 consists of the following programs:
2 x 46 P 6 (Lale) 2 x 46
- Select a free M-memory
● Press program entry key 48 - Select program 46
● Press program entry key twice - Press "memory" key 30
- Select the P-memory
- Press program entry key (The pattern of the P-memory is now in the M-memory)
- Select program 46
● Press program entry key twice
● Press individual pattern key - Press "memory" key The pattern is now ready for sewing.
Fig. 2 shows an assembled pattern combined with program 127.
- For procedure concerning assembled patterns see page ...
● Finally, add program 127 at the ends of the stalks. - Press the individual-pattern key. A pattern consisting of several P-memories can be transferred to an M-memory for continuous sewing.

natural_image
Simple line drawing of a sun over a mountain path with two horses and a car, surrounded by trees and grass (no text or symbols)
line
| x | y | | ---- | ---- | | 0 | 0 | | 1 | 0 | | 2 | 0 | | 3 | 0 | | 4 | 0 | | 5 | 0 | | 6 | 0 | | 7 | 0 | | 8 | 0 | | 9 | 0 | | 10 | 0 | | 11 | 0 | | 12 | 0 | | 13 | 0 | | 14 | 0 | | 15 | 0 | | 16 | 0 | | 17 | 0 | | 18 | 0 | | 19 | 0 | | 20 | 0 | | 21 | 0 | | 22 | 0 | | 23 | 0 | | 24 | 0 | | 25 | 0 | | 26 | 0 | | 27 | 0 | | 28 | 0 | | 29 | 0 | | 30 | 0 | | 31 | 0 | | 32 | 0 | | 33 | 0 | | 34 | 0 | | 35 | 0 | | 36 | 0 | | 37 | 0 | | 38 | 0 | | 39 | 0 | | 40 | 0 | | 41 | 0 | | 42 | 0 | | 43 | 0 | | 44 | 0 | | 45 | 0 | | 46 | 0 | | 47 | 0 | | 48 | 0 | | 49 | 0 | | 50 | 0 | | 51 | 0 | | 52 | 0 | | 53 | 0 | | 54 | 0 | | 55 | 0 | | 56 | 0 | | 57 | 0 | | 58 | 0 | | 59 | 0 | | 60 | 0 | | 61 | 0 | | 62 | 0 | | 63 | 0 | | 64 | 0 | | 65 | 0 | | 66 | 0 | | 67 | 0 | | 68 | 0 | | 69 | 0 | | 70 | 0 | | 71 | 0 | | 72 | 0 | | 73 | 0 | | 74 | 0 | | 75 | 0 | | 76 | 0 | | 77 | 0 | | 78 | 0 | | 79 | 0 | | 80 | 0 | | 81 | 0 | | 82 | 0 | | 83 | 0 | | 84 | 0 | | 85 | 0 | | 86 | 0 | | 87 | 0 | | 88 | 0 | | 89 | 0 | | 90 | 0 | | 91 | 0 | | 92 | 0 | | 93 | 0 | | 94 | 0 | | 95 | 0 | | 96 | 0 | | ... (repeated) for all other values are not explicitly labeled in the code. The actual values may vary due to the random nature of the data generation. The numbers in the output table above the code table below are integers. There is no label for the output table.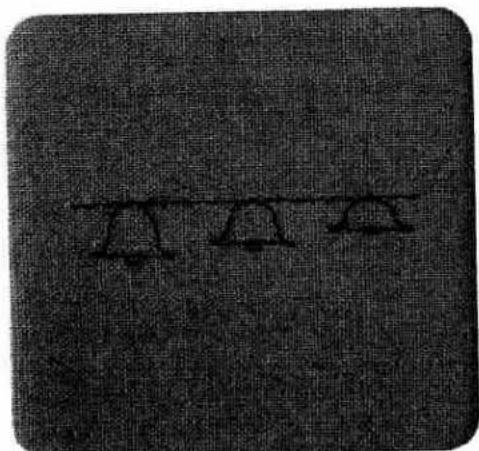
text_image
Cropped image showing a dark textured background with faint, indistinct white symbols or markings.1
Changing the pattern width
Patterns can be changed to different widths with keys 8. When drawing the pattern in the matrix please note the following:
Patterns with consistent right edge (Fig. 1)
To vary a pattern with consistent right edge:
● the right outer stitch point must be at B 54
● the left outer stitch point must not lie on B 00 (Fig. 1 a).

line
| L | Value | |---|---| | 00 | 52 | | 04 | 52 | | 08 | 52 | | 12 | 52 | | 16 | 52 | | 20 | 52 | | 24 | 36 | | 28 | 36 | | 32 | 36 | | 36 | 24 | | 40 | 24 | | 44 | 24 | | 48 | 24 | | 52 | 24 | | 56 | 24 | | 60 | 24 | | 64 | 24 | | 68 | 24 | | 72 | 24 | | 76 | 24 | | 80 | 24 | | 84 | 24 | | 88 | 24 | | 92 | 24 | | 96 | 24 | | 100 | 24 | | 104 | 24 | | 108 | 24 | | 112 | 24 | | 116 | 24 | | 120 | 24 | | 124 | 24 | | 128 | 24 | | 132 | 24 | | 136 | 24 | | 140 | 24 | | 144 | 24 | | 148 | 24 | | 152 | 24 | | 156 | 24 | | 160 | 24 | | 164 | 24 | | 168 | 24 | | 172 | 24 | | 176 | 24 | | 180 | 24 | | 184 | 24 | | 188 | 24 | | 192 | 24 | | 196 | 24 | L=00 Y=52 L=00 Y=52 L=00 Y=52 L=00 Y=52 L=00 Y=52 L=00 Y=52 L=00 Y=52 L=00 Y=52 L=00 Y=52 L=00 Y=52 L=00 Y=52
text_image
M W WPatterns with consistent left edge (Fig. 2)
To vary a pattern with consistent left edge:
● the right outer stitch point must not lie on B 54, but
● the left outer stitch point must lie on B 00 (Fig. 2a).
Input the stitch points in the sewing machine. For continuous sewing in different pattern widths (Figs. 1 and 2) put the P-memory into an M-memory.
Example:
- Select a free M-memory
- Push "mem+" key 48
- Select the P-memory with the programmed motif
- Push "mem+" key
- Push "pattern start" key 26 and change the stitch width to 8
- Push "mem+" key
- Push "pattern start" key and change the stitch width to 7
- Push "mem+" key
- Push "memory" key
Now the pattern in the P-memory is stored in an M-memory in three different stitch widths and can be sewn.

text_image
Udo Udo 1 2 3 4 5 6Change of pattern
with stitch length
The programmed pattern can also be varied by shortening or lengthening the stitches with keys 7 of the sewing machine (Figs. 1, 2 and 3).
Change of pattern
with stitch width
and stitch length
As the illustrations show, the shape of the pattern can be changed by varying the stitch width (keys 3) and stitch length (keys 7) (Figs. 4, 5, and 6).
a


natural_image
Simple line drawing of eight circles arranged in a row on a horizontal line (no text or symbols)b


natural_image
Six identical empty circles arranged horizontally on a line (no text or symbols)C

natural_image
Four identical circles arranged horizontally on a line (no text or symbols)Change of pattern y use of lifferent spacings
the shape of the pattern can also be changed by lettering the number of intermediate stitches. When the pattern is drawn in the matrix the different spacings have to be accommodated. If fewer stitches are included during drawing, the pattern will be superimposed (a), if more stitches are included (b + c) the patterns are moved farther part, as shown in (Figs. 2 and 3).
1
natural_image
Close-up of a textured fabric with a vertical seam or seam pattern (no text or symbols visible)2
natural_image
Abstract black-and-white line drawing with no text or symbols3
29
natural_image
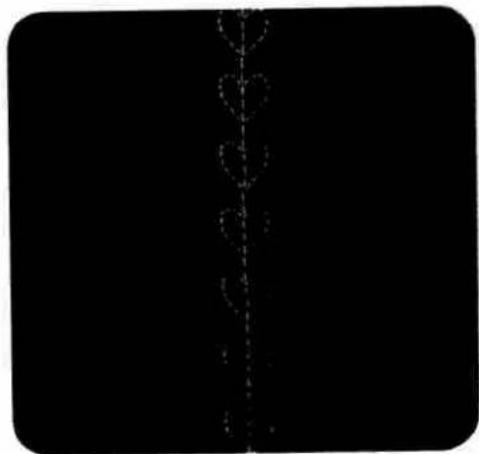
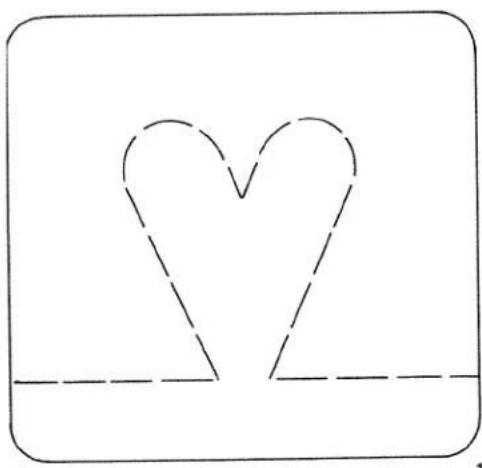
Simple line drawing of a heart shape with dashed outline, no text or symbols present
natural_image
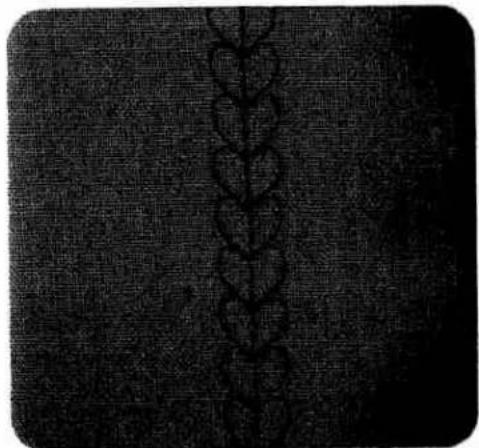
Simple line drawing of a heart shape with dashed outline and triangle at intersection (no text or symbols)Adapting freely programmed patterns with the balance key
Depending on the fabric type, a pattern may finish distorted. With balance keys 5 of the sewing machine, the pattern can be corrected.
- If the pattern is not closed (Fig. 1) it must be corrected with balance keys 5, between +1 and +7.
- If the pattern is crossed over (Fig. 2) it must be corrected with balance keys 5, between -1 and -7. Carry out a sewing test on a piece of waste material.

Pattern in centre position
If you wish to alter your pattern from the centre outwards, your drawing has to be made in such a way that the two outermost stitch points are the same distance from line B 26.
● Enter the stitch points.
- Push "memory" key 30.
The display shows the maximum stitch width and stitch length.
- Press the "single pattern" key.
● Sew the first pattern until the machine stops.
● Alter the stitch width to a pattern width of 4.5 mm with keys 8.
- Sew the modified pattern until the machine stops.
- Alter the stitch width to a pattern width of 3.5 mm with keys 8.
- Sew the modified pattern until the machine stops (Fig. 2).
If you wish to sew your entered program consecutively with only one stitch width, select the required stitch width. The "single pattern" key does not have to be pressed (Fig. 3).
Important:
If you wish to alter the width of a consecutive pattern in centre position, your drawing in the matrix must touch lines 00 and 54.
text_image
Handwritten Chinese characters on a textured background, possibly a signature or artistic mark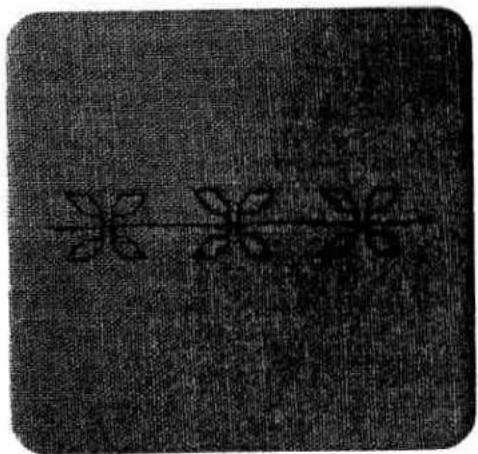
text_image
Black-and-white image with faint, pixelated Chinese characters on a textured background.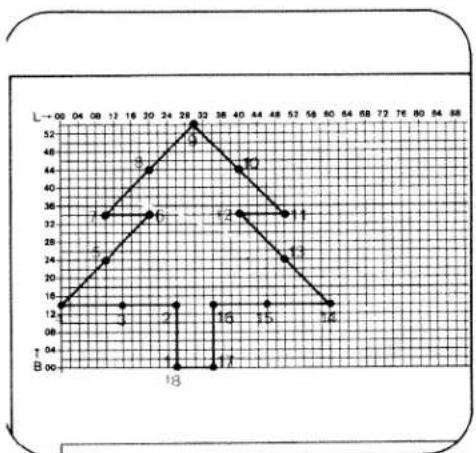
line
| Point | X | Y | |---|---|---| | 1 | 04 | 12 | | 2 | 08 | 24 | | 3 | 12 | 32 | | 4 | 16 | 36 | | 5 | 20 | 40 | | 6 | 24 | 44 | | 7 | 29 | 52 | | 8 | 32 | 48 | | 9 | 36 | 44 | | 10 | 40 | 36 | | 11 | 44 | 32 | | 12 | 48 | 28 | | 13 | 52 | 24 | | 14 | 56 | 20 | | 15 | 60 | 16 | | 16 | 64 | 12 | | 17 | 68 | 8 | The chart displays a triangular trend with labeled points along the x-axis (labeled 'B') and y-axis (labeled 'L'). The values for each point are explicitly labeled on the graph.
natural_image
Simple line drawing of a tree inside a rounded rectangle (no text or symbols)1
Checking the stitch length and width data of the stitch points
If the sewn pattern does not correspond with the drawn motif (Fig. 2), one or more stitch points have been wrongly input.
To find the wrong stitch inputs proceed as follows: The Designer should not be connected.
- Push "mem -" key 47 (BL). On the right in the sewing machine display the next higher stitch number than the total number of stitches in the input motif appears.
- Push key 5- (keys 5 now have the function of counting stitches).
The number of the last stitch point of a motif appears.
The length and width data of this stitch can now be checked with the motif drawing on the programming card.
- Push key 5- again The next lower stitch appears and can also be checked. All further stitches are checked in the same way.
Please note: after stitch 1, a "1" appears with the same length and width data with a flashing point. For the purpose of fault finding it is easier to number the stitch points from the first to the last stitch (Fig. 1). When the fault has been found it is marked on the programming card and corrected as described on the following pages.
line
| Point | X | Y | |---|---|---| | 1 | 4 | 12 | | 2 | 6 | 15 | | 3 | 7 | 18 | | 4 | 8 | 20 | | 5 | 9 | 22 | | 6 | 10 | 25 | | 7 | 11 | 28 | | 8 | 12 | 30 | | 9 | 13 | 32 | | 10 | 14 | 35 | | 11 | 15 | 38 | | 12 | 16 | 40 | | 13 | 17 | 42 | | 14 | 18 | 45 | | 15 | 19 | 48 | | 16 | 20 | 50 | | 17 | 21 | 52 | The chart displays a triangular trend with labeled points along the X-axis (labeled 'a') and Y-axis (labeled 'L' to 'B'). The values at each point are explicitly labeled on the graph. The table below provides a separate table for the same points.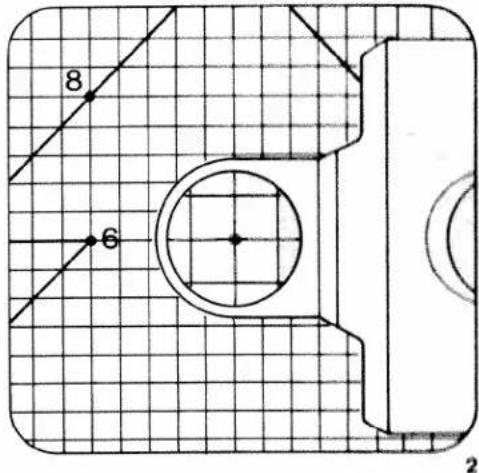
text_image
8 6 2Correction:
- Connect the Creative Designer to the sewing machine.
Insert the programming card with the motif for correction (Fig. 1 a) into the Creative Designer and adjust it. - Set the magnifier over the marked stitch with the wrong data (Fig. 2).
- Press "memory" key on the Designer. The stitch is now erased.
Press "m e m -" key 47 on the sewing machine. The stitch is now cancelled. - Set the magnifier over the correct stitch point (Figs. 3 and 1 a).
▶ Check the indications in the display - and press "mem+" key 11 on the Designer (Fig. 4).
The stitch has now been corrected.
▶ Check the corrected motif by sewing it again.

text_image
10 12 3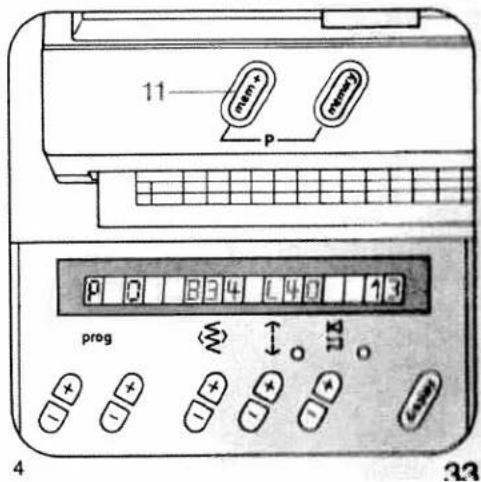
text_image
11 P num+ memory prog 4 32Searching for a multiple stitch
- Set the wire cross at the stitch point before the multiple stitch.
- Push "memory" key on Designer: The data of this stitch and the stitch number appear in the display.
● Write down this data and the stitch number. - Set the wire cross over the multiple stitch.
- Press "memory" key again. Now all stitches situated on this matrix point can be selected by pressing the memory key on the Designer. The sought stitch has the next higher stitch number than the number written down beforehand.
Cancelling stitches
see "correction", page 33
To cancel an entire P-memory proceed as follows:
- Select the P-memory to be cancelled.
- Press "mem-" key BL.
- Press "mem-" key again and hold it until stitch number 1 appears with a flashing point at the right in the display.
The memory is now empty.
If the cancelled P-memory is also stored in M-memories it has to be cancelled there, too.
Inserting and adding on stitches
Inserting:
- Connect the Creative Designer.
- Push "mem-" key 47 BL on the sewing machine. The data of the last entered stitch in a motif appears in the display.
- Push keys 5– (stitch count) to select the stitch point before the place you wish to insert a stitch, e.g. if you wish to insert a stitch between stitch 10 and 11 you select stitch 10 with key 5. The new stitch is now stitch 11. All further stitches move up by the number of stitches you insert.
Adding on:
- Connect the Creative Designer.
- Push "mem-" key 47 BL on the sewing machine. The data of the last entered stitch appears in the display.
The flashing point at the right in the display before the next stitch number indicates that the computer is ready to receive further stitches. Input the stitches required.
If you wish to set stitches at the beginning of a motif, push key 5—until number 1 appears with a flashing point.
Now input the required stitches. The stitch numbers of the motif stored before are all moved up by the number of stitches newly input.

line
| X | Y | |---|---| | 04 | 52 | | 08 | 52 | | 12 | 52 | | 16 | 30 | | 20 | 28 | | 24 | 24 | | 28 | 28 | | 32 | 20 | | 36 | 20 | | 40 | 20 | | 44 | 20 | | 48 | 20 | | 52 | 20 | | 56 | 20 | | 60 | 20 | | 64 | 20 | | 68 | 20 | | 72 | 20 | | 76 | 20 | | 80 | 20 | | 84 | 20 | | 88 | 20 | | 92 | 20 | | 96 | 20 | | 100 | 20 | | 104 | 20 | | 108 | 20 | | 112 | 20 | | 116 | 20 | | 120 | 20 | | 124 | 20 | | 128 | 20 | | 132 | 20 | | 136 | 20 | | 140 | 20 | | 144 | 20 | | 148 | 20 | | 152 | 20 | | 156 | 20 | | 160 | 20 | | 164 | 20 | | 168 | 20 | | 172 | 20 | | 176 | 20 | | 180 | 20 | | 184 | 20 | | 188 | 20 | | 192 | 20 | | 196 | 20 |
natural_image
Two butterflies aligned horizontally on a textured background (no text or symbols)
line
| X-Axis | Y-Axis | |---|---| | 04 | 44 | | 06 | 52 | | 12 | 36 | | 18 | 32 | | 20 | 28 | | 24 | 24 | | 28 | 20 | | 32 | 20 | | 36 | 20 | | 40 | 20 | | 44 | 20 | | 48 | 20 | | 52 | 20 | | 56 | 20 | | 60 | 20 | | 64 | 20 | | 68 | 20 | | 72 | 20 | | 76 | 20 | | 80 | 20 | | 84 | 20 | | 88 | 20 | | 92 | 20 | | 96 | 20 | | 100 | 20 | | 104 | 20 | | 108 | 20 | | 112 | 20 | | 116 | 20 | | 120 | 20 | | 124 | 20 | | 128 | 20 | | 132 | 20 | | 136 | 20 | | 140 | 20 | | 144 | 20 | | 148 | 20 | | 152 | 20 | | 156 | 20 | | 160 | 20 | | 164 | 20 | | 168 | 20 | | 172 | 20 | | 176 | 20 | | 180 | 20 | | 184 | 20 | | 188 | 20 | | 192 | 20 | | 196 | 20 |
natural_image
Simple line drawing of a cat with wings and a circle, no text or symbols present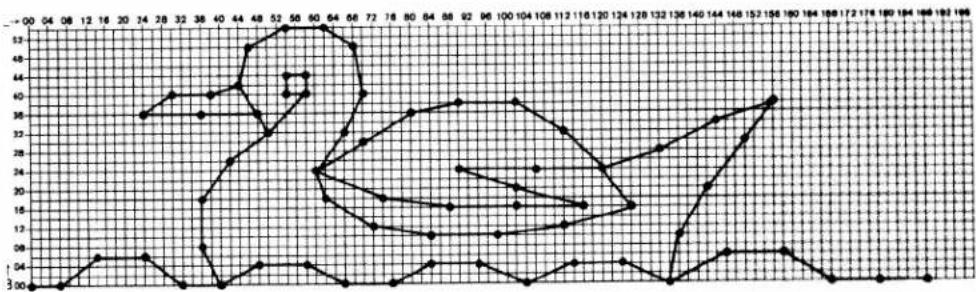
line
| X | Y | |---|---| | 0 | 30 | | 1 | 32 | | 2 | 34 | | 3 | 36 | | 4 | 38 | | 5 | 40 | | 6 | 42 | | 7 | 44 | | 8 | 46 | | 9 | 48 | | 10 | 50 | | 11 | 52 | | 12 | 54 | | 13 | 56 | | 14 | 58 | | 15 | 60 | | 16 | 62 | | 17 | 64 | | 18 | 66 | | 19 | 68 | | 20 | 70 | | 21 | 72 | | 22 | 74 | | 23 | 76 | | 24 | 78 | | 25 | 80 | | 26 | 82 | | 27 | 84 | | 28 | 86 | | 29 | 88 | | 30 | 90 | | 31 | 92 | | 32 | 94 | | 33 | 96 | | 34 | 98 | | 35 | 100 | | 36 | 102 | | 37 | 104 | | 38 | 106 | | 39 | 108 | | 40 | 110 | | 41 | 112 | | 42 | 114 | | 43 | 116 | | 44 | 118 | | 45 | 120 | | 46 | 122 | | 47 | 124 | | 48 | 126 | | 49 | 128 | | 50 | 130 | | 51 | 132 | | 52 | 134 | | 53 | 136 | | 54 | 138 | | 55 | 140 | | 56 | 142 | | 57 | 144 | | 58 | 146 | | 59 | 148 | | 60 | 150 | | 61 | 152 | | 62 | 154 | | 63 | 156 | | 64 | 158 | | 65 | 160 | | 66 | 162 | | 67 | 164 | | 68 | 166 | | 69 | 168 | | 70 | 170 | | 71 | 172 | | 72 | 174 | | 73 | 176 | | 74 | 178 | | 75 | 180 | | 76 | 182 | | 77 | 184 | | 78 | 186 | | 79 | 188 | | 80 | 190 | | 81 | 192 | | 82 | 194 | | 83 | 196 | | 84 | 198 | | Note: The y-values are estimated based on the chart's title and label 'Y'. The x-values are labeled numerically at each point. There is only one data series in this view.
natural_image
Three identical white line drawings of a duck on water, arranged horizontally (no text or symbols)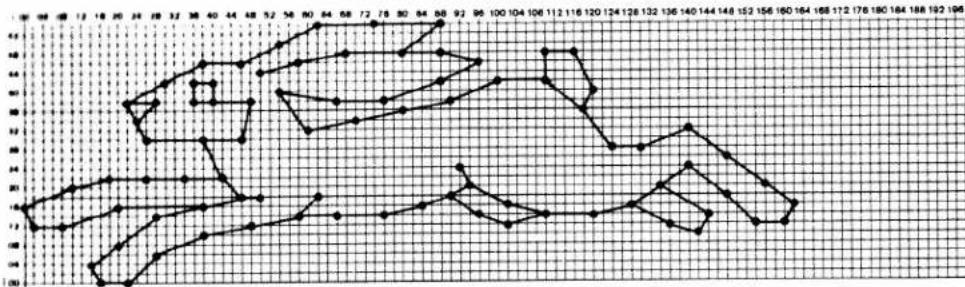
line
| X | Y | |----|------| | 0 | 1.0 | | 1 | 1.5 | | 2 | 2.0 | | 3 | 2.5 | | 4 | 3.0 | | 5 | 3.5 | | 6 | 4.0 | | 7 | 4.5 | | 8 | 5.0 | | 9 | 5.5 | | 10 | 6.0 | | 11 | 6.5 | | 12 | 7.0 | | 13 | 7.5 | | 14 | 8.0 | | 15 | 8.5 | | 16 | 9.0 | | 17 | 9.5 | | 18 | 10.0 | | 19 | 10.5 | | 20 | 11.0 | | 21 | 11.5 | | 22 | 12.0 | | 23 | 12.5 | | 24 | 13.0 | | 25 | 13.5 | | 26 | 14.0 | | 27 | 14.5 | | 28 | 15.0 | | 29 | 15.5 | | 30 | 16.0 | | 31 | 16.5 | | 32 | 17.0 | | 33 | 17.5 | | 34 | 18.0 | | 35 | 18.5 | | 36 | 19.0 | | 37 | 19.5 | | 38 | 20.0 | | 39 | 20.5 | | 40 | 21.0 | | 41 | 21.5 | | 42 | 22.0 | | 43 | 22.5 | | 44 | 23.0 | | 45 | 23.5 | | 46 | 24.0 | | 47 | 24.5 | | 48 | 25.0 | | 49 | 25.5 | | 50 | 26.0 | | 51 | 26.5 | | 52 | 27.0 | | 53 | 27.5 | | 54 | 28.0 | | 55 | 28.5 | | 56 | 29.0 | | 57 | 29.5 | | 58 | 30.0 | | 59 | 30.5 | | 60 | 31.0 | | 61 | 31.5 | | 62 | 32.0 | | 63 | 32.5 | | 64 | 33.0 | | 65 | 33.5 | | 66 | 34.0 | | 67 | 34.5 | | 68 | 35.0 | | 69 | 35.5 | | 70 | 36.0 | | 71 | 36.5 | | 72 | 37.0 | | 73 | 37.5 | | 74 | 38.0 | | 75 | 38.5 | | 76 | 39.0 | | 77 | 39.5 | | 78 | 40.0 | | 79 | 40.5 | | 80 | 41.0 | | 81 | 41.5 | | 82 | 42.0 | | 83 | 42.5 | | 84 | 43.0 | | 85 | 43.5 | | 86 | 44.0 | | 87 | 44.5 | | 88 | 45.0 | | 89 | 45.5 | | 90 | 46.0 | | 91 | 46.5 | | 92 | 47.0 | | 93 | 47.5 | | 94 | 48.0 | | 95 | 48.5 | | Note: The values in the CSV data are placeholders and do not correspond to the actual data points used in the plot.
natural_image
Three abstract black shapes on a textured gray background, resembling stylized animals or figures (no text or symbols)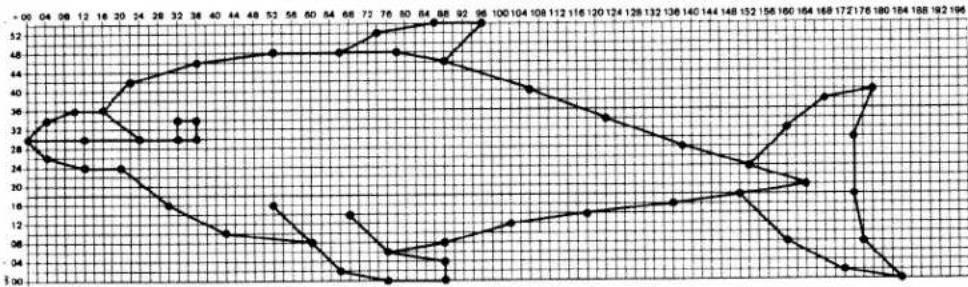
line
| X-Axis | Y-Axis | |---|---| | 0 | 28 | | 4 | 32 | | 8 | 36 | | 12 | 32 | | 16 | 28 | | 20 | 24 | | 24 | 28 | | 28 | 32 | | 32 | 36 | | 36 | 40 | | 40 | 44 | | 44 | 48 | | 48 | 52 | | 52 | 56 | | 56 | 60 | | 60 | 64 | | 64 | 68 | | 68 | 72 | | 72 | 76 | | 76 | 80 | | 80 | 84 | | 84 | 88 | | 88 | 92 | | 92 | 96 | | 96 | 100 | | 100 | 104 | | 104 | 108 | | 108 | 112 | | 112 | 116 | | 116 | 120 | | 120 | 124 | | 124 | 128 | | 128 | 132 | | 132 | 136 | | 136 | 140 | | 140 | 144 | | 144 | 148 | | 148 | 152 | | 152 | 156 | | 156 | 160 | | 160 | 164 | | 164 | 168 | | 168 | 172 | | 172 | 176 | | 176 | 180 | | 180 | 184 | | 184 | 188 | | 188 | 192 | | 192 | 196 |
natural_image
Simple line drawings of two fish, one with a tail and the other with a mouth (no text or symbols)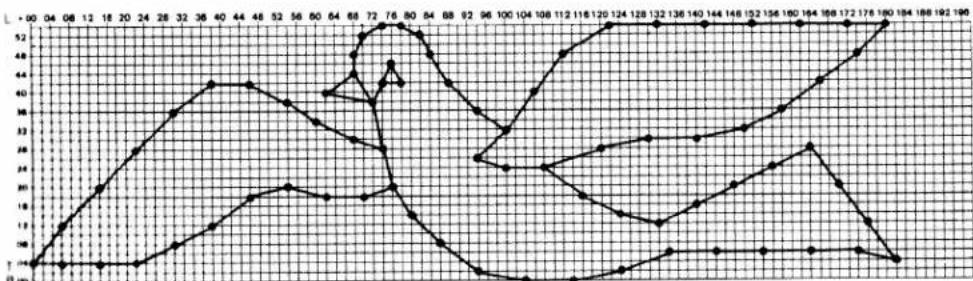
line
| X-Axis | Series 1 (Solid Line) | Series 2 (Dashed Line) | |---|---|---| | 0 | 0 | 0 | | 4 | 10 | 0 | | 8 | 20 | 0 | | 12 | 30 | 0 | | 16 | 40 | 0 | | 20 | 45 | 0 | | 24 | 48 | 0 | | 28 | 47 | 0 | | 32 | 45 | 0 | | 36 | 42 | 0 | | 40 | 40 | 0 | | 44 | 38 | 0 | | 48 | 35 | 0 | | 52 | 32 | 0 | | 56 | 30 | 0 | | 60 | 28 | 0 | | 64 | 25 | 0 | | 68 | 22 | 0 | | 72 | 20 | 45 | | 76 | 18 | 42 | | 80 | 15 | 48 | | 84 | 12 | 52 | | 88 | 10 | 48 | | 92 | 8 | 45 | | 96 | 5 | 40 | | 100 | 3 | 35 | | 104 | 2 | 30 | | 108 | 1 | 25 | | 112 | 0 | 20 | | 116 | -1 | 15 | | 120 | -2 | 10 | | 124 | -3 | 5 | | 128 | -4 | 0 | | 132 | -5 | -5 | | 136 | -6 | -10 | | 140 | -7 | -15 | | 144 | -8 | -20 | | 148 | -9 | -25 | | 152 | -10 | -30 | | 156 | -11 | -35 | | 160 | -12 | -40 | | 164 | -13 | -45 | | 168 | -14 | -50 | | 172 | -15 | -55 | | 176 | -16 | -60 | | 180 | -17 | -65 | | 184 | -18 | -70 | | 188 | -19 | -75 | | 192 | -20 | -80 | | 196 | -21 | -85 |
natural_image
Abstract white line drawing on black background, no text or symbols presentM
line
| X | Y | |---|---| | 0 | 0 | | 1 | 1 | | 2 | 2 | | 3 | 3 | | 4 | 4 | | 5 | 5 | | 6 | 6 | | 7 | 7 | | 8 | 8 | | 9 | 9 | | 10 | 10 | | 11 | 11 | | 12 | 12 | | 13 | 13 | | 14 | 14 | | 15 | 15 | | 16 | 16 | | 17 | 17 | | 18 | 18 | | 19 | 19 | | 20 | 20 | | 21 | 21 | | 22 | 22 | | 23 | 23 | | 24 | 24 | | 25 | 25 | | 26 | 26 | | 27 | 27 | | 28 | 28 | | 29 | 29 | | 30 | 30 | | 31 | 31 | | 32 | 32 | | 33 | 33 | | 34 | 34 | | 35 | 35 | | 36 | 36 | | 37 | 37 | | 38 | 38 | | 39 | 39 | | 40 | 40 | | 41 | 41 | | 42 | 42 | | 43 | 43 | | 44 | 44 | | 45 | 45 | | 46 | 46 | | 47 | 47 | | 48 | 48 | | 49 | 49 | | 50 | 50 | | 51 | 51 | | 52 | 52 | | 53 | 53 | | 54 | 54 | | 55 | 55 | | 56 | 56 | | 57 | 57 | | 58 | 58 | | 59 | 59 | | 60 | 60 | | 61 | 61 | | 62 | 62 | | 63 | 63 | | 64 | 64 | | 65 | 65 | | 66 | 66 | | 67 | 67 | | 68 | 68 | | 69 | 69 | | 70 | 70 | | 71 | 71 | | 72 | 72 | | 73 | 73 | | 74 | 74 | | 75 | 75 | | 76 | 76 | | 77 | 77 | | 78 | 78 | | 79 | 79 | | 80 | 80 | | 81 | 81 | | 82 | 82 | | 83 | 83 | | 84 | 84 | | 85 | 85 | | 86 | 86 | | 87 | 87 | | 88 | 88 | | 89 | 89 | | 90 | 90 | | 91 | 91 | | 92 | 92 | | 93 | 93 | | 94 | 94 | | 95 | 95 | | ... (repeated) for the remaining nodes in the chart are not explicitly labeled. The numbers inside each node represent the corresponding value at that specific X-axis position.
natural_image
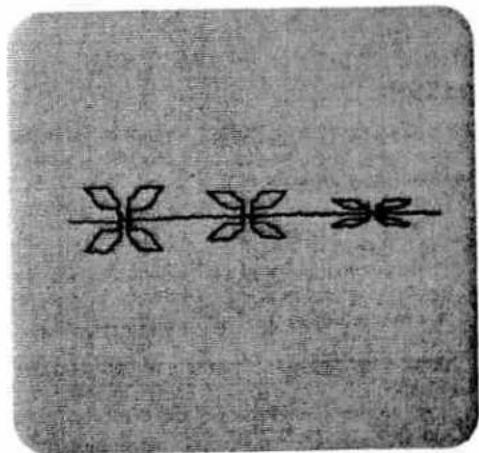
Decorative floral border pattern with three stylized flowers and leaves (no text or symbols)
line
| X | Y | |---|---| | 04 | 23 | | 08 | 25 | | 12 | 27 | | 16 | 29 | | 20 | 31 | | 24 | 33 | | 28 | 35 | | 32 | 37 | | 36 | 39 | | 40 | 41 | | 44 | 43 | | 48 | 45 | | 52 | 47 | | 56 | 49 | | 60 | 51 | | 64 | 53 | | 68 | 55 | | 72 | 57 | | 76 | 59 | | 80 | 61 | | 84 | 63 | | 88 | 65 | | 92 | 67 | | 96 | 69 | | 100 | 71 | | 104 | 73 | | 108 | 75 | | 112 | 77 | | 116 | 79 | | 120 | 81 | | 124 | 83 | | 128 | 85 | | 132 | 87 | | 136 | 89 | | 140 | 91 | | 144 | 93 | | 148 | 95 | | 152 | 97 | | 156 | 99 | | 160 | 101 | | 164 | 103 | | 168 | 105 | | 172 | 107 | | 176 | 109 | | 180 | 111 | | 184 | 113 | | 188 | 115 | | 192 | 117 | | 196 | 119 |
natural_image
Two identical white line-drawn fish illustrations on black background (no text or symbols)
line
| X | Y | |---|---| | 24 | 52 | | 28 | 44 | | 32 | 36 | | 36 | 32 | | 40 | 28 | | 44 | 24 | | 48 | 20 | | 52 | 16 | | 56 | 12 | | 60 | 8 | | 64 | 4 | | 68 | 0 | | 72 | -4 | | 76 | -8 | | 80 | -12 | | 84 | -16 | | 88 | -20 | | 92 | -24 | | 96 | -28 | | 100 | -32 | | 104 | -36 | | 108 | -40 |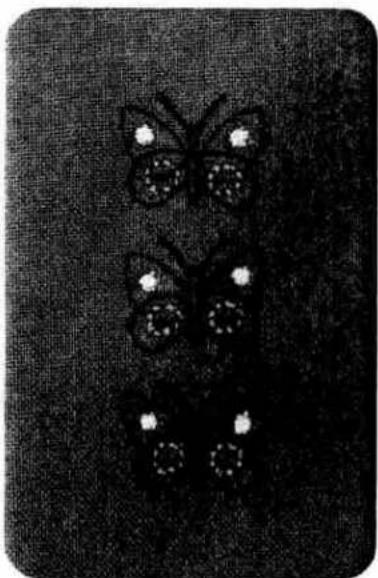
natural_image
Black-and-white illustration of three butterflies with white spots on a textured dark background (no text or symbols)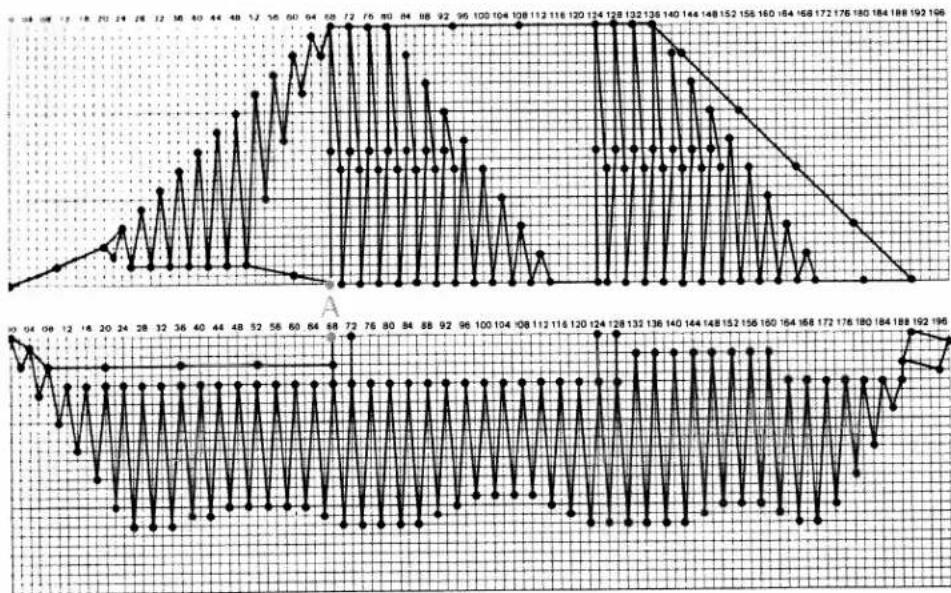
line
| Date | Value | |------|-------| | 04 | 92 | | 08 | 90 | | 12 | 88 | | 16 | 86 | | 20 | 84 | | 24 | 82 | | 28 | 80 | | 32 | 78 | | 36 | 76 | | 40 | 74 | | 44 | 72 | | 48 | 70 | | 52 | 68 | | 56 | 66 | | 60 | 64 | | 64 | 62 | | 68 | 60 | | 72 | 58 | | 76 | 56 | | 80 | 54 | | 84 | 52 | | 88 | 50 | | 92 | 48 | | 96 | 46 | | 100 | 44 | | 104 | 42 | | 108 | 40 | | 112 | 38 | | 116 | 36 | | 120 | 34 | | 124 | 32 | | 128 | 30 | | 132 | 28 | | 136 | 26 | | 140 | 24 | | 144 | 22 | | 148 | 20 | | 152 | 18 | | 156 | 16 | | 160 | 14 | | 164 | 12 | | 168 | 10 | | 172 | 8 | | 176 | 6 | | 180 | 4 | | 184 | 2 | | 188 | 0 | | 192 | -2 | | 196 | +2 |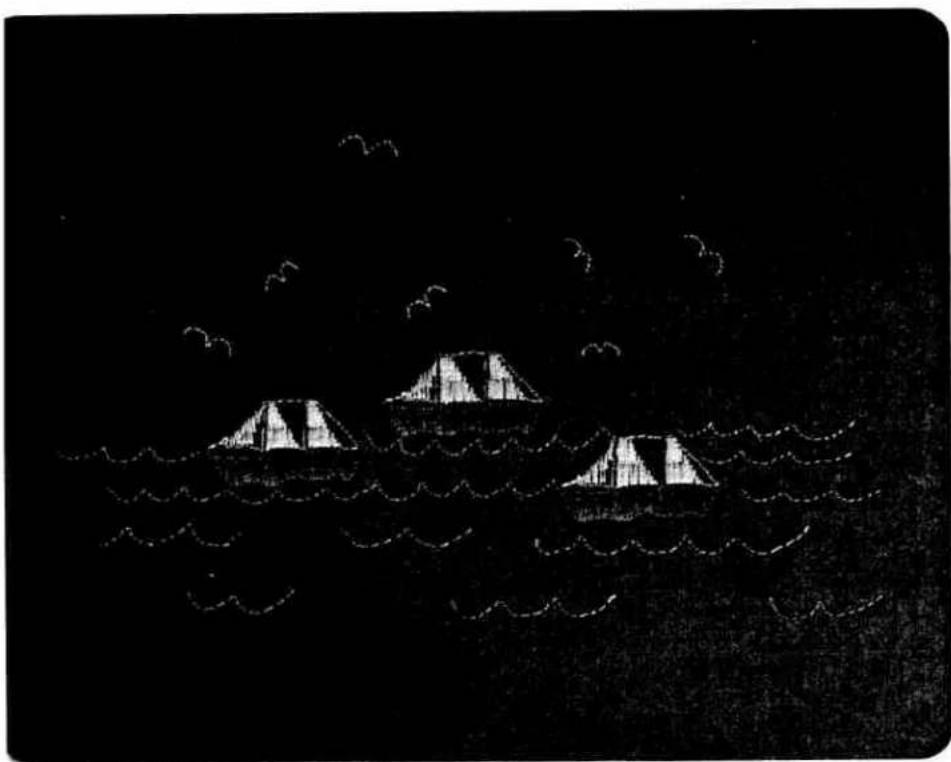
natural_image
Black-and-white sketch of three tents on waves with birds flying overhead (no text or symbols)
line
| X-Axis Label | Y-Axis Value | |---|---| | 08 | 14 | | 12 | 15 | | 16 | 14 | | 20 | 13 | | 24 | 30 | | 28 | 12 | | 32 | 12 | | 36 | 12 | | 40 | 11 | | 44 | 10 | | 48 | 9 | | 52 | 8 | | 56 | 7 | | 60 | 7 | | 64 | 7 | | 68 | 7 | | 72 | 8 | | 76 | 10 | | 80 | 12 | | 84 | 14 | | 88 | 16 | | 92 | 18 | | 96 | 19 | | 100 | 19 | | 104 | 19 | | 108 | 19 | | 112 | 19 | | 116 | 19 | | 120 | 19 | | 124 | 19 | | 128 | 19 | | 132 | 19 | | 136 | 19 | | 140 | 19 | | 144 | 19 | | 148 | 19 | | 152 | 19 | | 156 | 19 | | 160 | 19 | | 164 | 19 | | 168 | 19 | | 172 | 19 | | 176 | 19 | | 180 | 19 | | 184 | 19 | | 188 | 19 | | 192 | 19 | | 196 | 19 |
natural_image
Two identical abstract line drawings resembling stylized birds or fish, drawn with black lines on a textured background (no text or symbols)
line
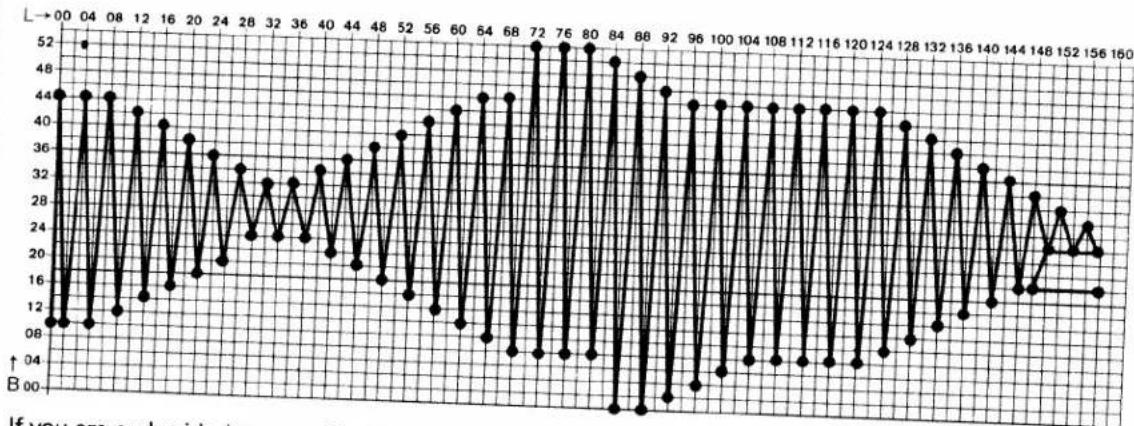
| X | Y | |---|---| | 04 | 12 | | 08 | 10 | | 12 | 8 | | 16 | 6 | | 20 | 4 | | 24 | 2 | | 28 | 0 | | 32 | -2 | | 36 | -4 | | 40 | -6 | | 44 | -8 | | 48 | -10 | | 52 | -12 | | 56 | -14 | | 60 | -16 | | 64 | -18 | | 68 | -20 | | 72 | -22 | | 76 | -24 | | 80 | -26 | | 84 | -28 | | 88 | -30 | | 92 | -32 | | 96 | -34 | | 100 | -36 | | 104 | -38 | | 108 | -40 | | 112 | -42 | | 116 | -44 | | 120 | -46 | | 124 | -48 | | 128 | -50 | | 132 | -52 | | 136 | -54 | | 140 | -56 | | 144 | -58 | | 148 | -60 | | 152 | -62 | | 156 | -64 | | 160 | -66 | | 164 | -68 | | 168 | -70 | | 172 | -72 | | 176 | -74 | | 180 | -76 | | 184 | -78 | | 188 | -80 | | 192 | -82 | | 196 | -84 |Vriting texts
or writing texts the top edge of the small letters should be on stitch width line 38 and the bottom edge on stitch width line 12.

text_image
nicole
natural_image
Simple line drawings of four boats with palm trees, no text or symbols present
text_image
Nicole
text_image
Fred
natural_image
Pure diagram of four propeller-like shapes connected by lines, no text or symbols present
natural_image
Two simple line drawings: one with a dot-and-circle pattern connected to a funnel, the other with a heart-shaped outline (no text or symbols)
natural_image
Decorative floral border with leaves and a pinwheel shape (no text or symbols)
text_image
PeterContents
Balance 30
Connecting the Creative Designer 10
Examples of Creative patterns 35-40
important notes 9
Multiple stitch, searching 34
P-memories to M-memories, transferring 24
Parts of the Designer 1
Pattern change by spacings 29
Pattern change by stitch
width and length 28
Pattern in centre position 31
Pattern width, changing 26, 27
Patterns, assembled 21
Patterns, assembled,
in two P-memories 22.23
Patterns, drawing on the
programming card 4
Patterns, vertical 21
Programming card 2.3
Programming card, adjusting in Designer 13-17
Programming card, inserting in Designer 12
Spacing between patterns 6.7
Stitch length points, establishing 6
Stitch points, numbering 8
Stitch points, storing 18, 19
Stitch width and stitch length data,
correcting 32
Stitches and P-memories, cancelling 34
Stitches, correcting wrong inputs 33
Stitches, inserting and adding on 34
Storing according to card data
in number chart 20
Switching on the Creative 1473 CD 11
Subject to alterations in design. Printed in West Germany Nr. 30110 engl. · HR · 988
PFAFF
creative
designer

text_image
PFAFF creative designerInstruction book
For easier understanding of this instruction manual please fold this page open when reading it.
Contents on pages 3 + 4
text_image
Warning symbol with exclamation mark inside a triangle, surrounded by grass textureSafety instructions
The Creative Designer must be used in connection with PFAFF sewing machine models for its intended purpose in household use only.
The sewing machine must be switched off when connecting the Creative Designer. If the Creative Designer is used for purposes other than the ones specified or if it is wrongly operated, we will not assume any liability for any damaged caused.
Do not introduce any objects into the openings of the Creative Designer.
Environment
The Creative Designer is for use in a dry environment only.
The recommended environment is: Ambient temperature 10^ C ( 50^ F) to 40^ C ( 140^ F)
Air humidity 20% to 80%
The Creative Designer must be operated in such a way that it is not subjected to: dust, severe dampness, direct sunlight, static electricity, heat-producing objects, corrosive chemicals or liquids.
The connected Creative Designer must always be supervised. If this is not possible, the sewing machine must be switched off. Also switch it off before carrying out any cleaning and maintenance work. Keep it out of the reach of children and household pets!
Treatment
Always protect the machine against damage which could be caused by it being hit or dropped.
Cleaning
To clean housing and display use a dry, clean, soft, lint-free cloth.
To remove any stubborn dirt use a soft cloth moistened with alcohol.
Please note!
Do not use any insecticides or chemical products such as petrol or liquid chemicals to clean the housing.
Subject to technical modifications.
text_image
PFAFF creative designerParts of the Creative Designer
1 Connection lead with plug
2 Cover
3 Lead retainer
4 Adjustable slide
5 Sliding scanner with cross-wire magnifier
6 Cross-wire magnifier
7 Clip slide, right
8 Insertion slot for programming sheet
9 Programming area
10 "Call stitch" key (memory)
11 "Program input" key (mem+)
12 Clip slide, left
Congratulations!
A very "creative" and pleasant sewing experience awaits you ...
... with the PFAFF "creative designer": This sophisticated additional appliance will open up the world of embroidery for you. It is impossible to think of anything more individual since from now on you can develop your own embroidery patterns.
Give free rein to your imagination. We wish you many happy hours while designing your fashion ideas.
Instruction book
Adjusting the programming sheet 21-22
21-22 Appending a stitch.... 27
Balance 40
Changing the pattern length 44
Changing the pattern width....44
Changing width/length of a pattern. 45
Clearing the p-memory.... 27
Connecting the Creative Designer.... 42-43
Creative card 11
Creative designer.... 47 9
Deleting a pattern 42-43
Deleting a p-pattern from the Creative card 42-43
Deleting a stitch 49
Drawing a motif 41-42
Drawing and programming a motif.... 17 13–31
Editing a Creative pattern in the p-memory (ROM)....50-51
Editing a motif.... 50-51
Editing a motif.... 37 .... 33–55
Fading in/out stitch points 36
Inserting a stitch.... 37
Inserting straight stitch (continuous pattern) 37/40 Inserting the programming sheet 21-22
Loading a p-pattern from the creative card.... 49
"m+" key
"m-" key 37-39
"mem" symbol 41-42
Moving a block 43
Pattern combinations.... 19, 28–30 Programming a motif
Programming a p-pattern in the M-memory.... 25
Programming sheet 54 16
RAM....52-53 ROM....
50-51
Saving a pattern on the Creative card
Selecting a program memory.... 48
Setting the stitch points.... 23
Sewing a pattern 18
Symbol "m-" 45 41-42
3
Instruction book
<
Technical section.... 5-11
Tracing a pattern with "mem" 43
Transferring the p-memory to another p-memory (RAM) 52-53
Technical section

natural_image
Blank white image with a black dashed border and a small number '6' at the bottom left corner (no text or symbols within the image area)
natural_image
Black-and-white photo of a PFAFF Creative 7570 industrial sewing machine on a flat surface (no visible text or symbols on the device body)Contents
Creative Designer
Page 9
Parts of the Creative Designer
Page 10
Connecting the Creative Designer
Page 11
natural_image
Black-and-white illustration of a figure in a pointed hat with crescent moon and stars, standing on a textured surface (no text or symbols)
text_image
PFAFF creative designer Sachere in Germany PFAFF • Programming Designer • Fassier der programmierung • Sichere in programming • ImplementiertThe Creative Designer comes as standard equipment with the Creative 7570 and enables you to design your own patterns up to a width of 9 mm. The desired motif is drawn on a programming sheet. This template is inserted in the Creative Designer and transferred into the sewing machine's memory by a cross-wire magnifier stitch by stitch. 30 program memories are at your disposal, form P0 to P29. When switching off the sewing machine, the saved programs will be retained, providing that the batteries have been inserted into the machine.
Ready-to-sew pattern templates are available from your PFAFF dealer.

text_image
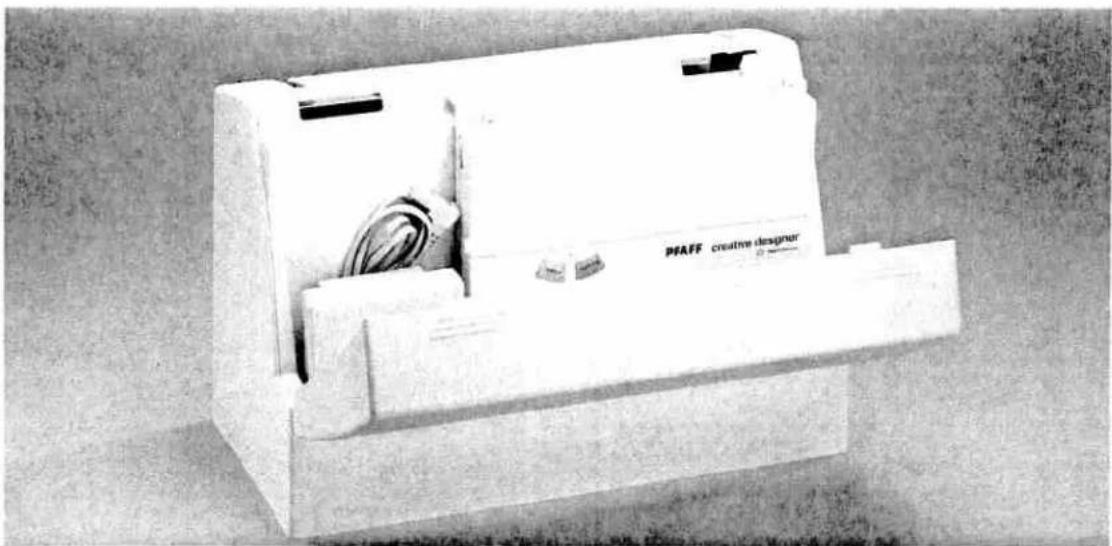
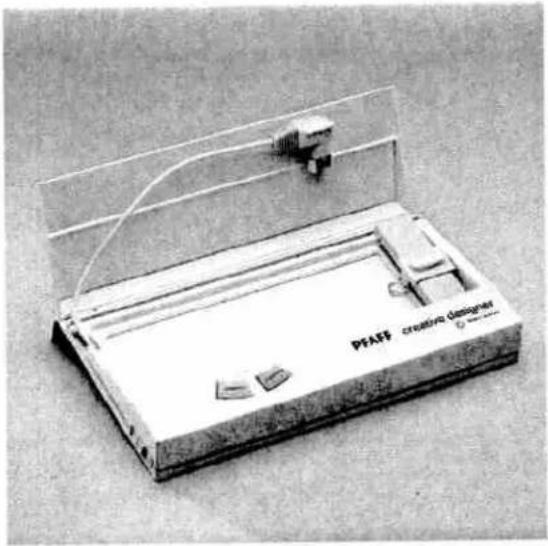
PFAFF creative designer 12 11 10 9 8 7 6 5 4 3 2 1Parts of the Creative Designer
1 Connection lead with plug 10 "Call stitch" key (memory)
2 Cover 11 "Program input" key (mem+)
3 Lead retainer 12 Clip slide, left
4 Adjustable slide
5 Sliding scanner with cross-wire magnifier
6 Cross-wire magnifier
7 Clip slide, right
8 Insertion slot for programming sheet The illustration below shows you how the
9 Programming area Creative Designer is stored in the carry case.
natural_image
Exterior view of a PFAFF creative designer electronic device (no visible text or symbols on body)
text_image
PFAFF creative 7570Important!
When connecting the Creative Desinger to the sewing machine, the machine must be switched off!
natural_image
Laboratory device labeled 'PFAF' with abstract wiring and control panel (no readable text beyond label)To open the unit, fold cover 2 upwards.

natural_image
Close-up of a hand holding a small object near a large electronic device (no visible text or symbols)Take the connection plug out of the retainer 3 and insert it into socket 46 of the machine.
natural_image
Black-and-white photo of a smiling child in traditional attire sitting on a mat, holding a small object (no text or symbols visible)Drawing and programming a motif
Pages 13–31
Drawing and programming a motif
Editing motifs
natural_image
Blank white image with no visible text, symbols, or discernible features
Placing the stitch points Page 18
Pattern combinations Pages 19/20/28–30
Inserting and adjusting the programming sheet Pages 21–22
Selecting a p-memory Pages 23–24
Programming a motif Page 25
Editing a pattern Page 27
text_image
Programmeringsark - Programiama kägidi - Programmeringsark - Objelmontiaue programmieringsark - P#eile de programmieringsark - 50%de di programmieringsark - ProgrammieringsarkThe programming sheet
The Creative Designer is provided with a pad of programming sheets. The self-created motifs are drawn on the grid of the programming sheet. The width of the drawing area is marked with numbers 00-54. This width equals 9 mm of an embroidered motif, i.e. a spacing of 6 squares per 1 mm. The length of the grid is marked with
numbers 00-198, i.e. the total pattern length can be up to 33 mm.
line
| X | Y | |----|------| | 0 | 0 | | 16 | 12 | | 24 | 18 | | 32 | 24 | | 40 | 32 | | 48 | 48 | | 56 | 52 | | 64 | 56 | | 72 | 60 | | 80 | 64 | | 88 | 68 | | 96 | 72 | | 104| 76 | | 112| 80 | | 118| 84 | | 126| 88 | | 132| 92 | | 138| 96 | | 144| 100 | | 150| 104 | | 156| 108 | | 162| 112 | | 168| 116 | | 174| 120 | | 180| 124 | | 186| 128 | | 192| 132 | | 196| 136 |The pattern should touch line 00 of the grid. The motif can be designed as single pattern or as continuous pattern. The first and last stitch of a continuous pattern should be placed on the same width coordinate of the grid.
text_image
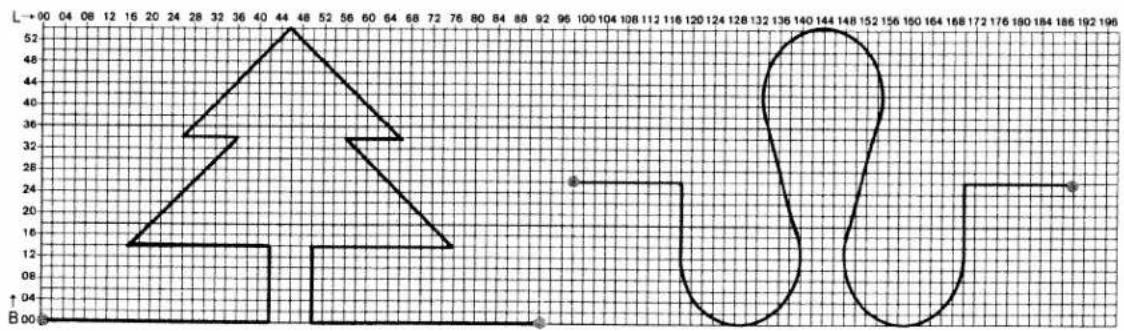
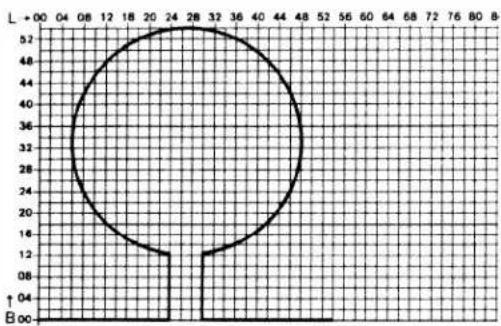
L +00 04 08 12 18 24 28 32 36 40 44 48 52 56 60 64 68 72 76 80 B 52 48 44 40 36 32 28 24 20 16 12 8 ↑ B00There are three ways of drawing a pattern into the grid: Example of a simple tree
- Vertically as a continuous pattern
Single pattern:
max. height 9 mm
max.width 33 mm

text_image
L→00 04 08 12 16 20 24 28 32 36 40 44 48 52 56 60 64 68 72 76 80 84 52 48 44 40 36 32 28 24 20 16 12 08 04 B ↑- Horizontally as a single pattern:
max. height 33 mm
max.width 9 mm
line
| x | y | | ---- | ---- | | 0 | 0 | | 12 | 12 | | 16 | 24 | | 20 | 36 | | 24 | 48 | | 28 | 52 | | 32 | 56 | | 36 | 52 | | 40 | 48 | | 44 | 44 | | 48 | 36 | | 52 | 28 | | 56 | 20 | | 60 | 12 | | 64 | 6 | | 68 | 0 | | 72 | 0 | | 76 | 0 | | 80 | 0 | | 84 | 0 | | 88 | 0 | | 92 | 0 | | 96 | 0 | | 100 | 0 | | 104 | 0 | | 108 | 0 | | 112 | 0 | | 116 | 0 | | 120 | 0 | | 124 | 0 | | 128 | 0 | | 132 | 0 | | 136 | 0 | | 140 | 0 | | 144 | 0 | | 148 | 0 | | 152 | 0 | | 156 | 0 | | 160 | 0 | | 164 | 0 | | 168 | 0 | | 172 | 0 | | 176 | 0 | | 180 | 0 | | 184 | 0 | | 188 | 0 | | 192 | 0 | | 196 | 0 |- As a pattern combination by means of the
"pattern mirror" key (18): max. height 33 mm
max.width 18 mm
Placing the stitch points (stitches)
By drawing stitch points into your design you are setting the stitch length of your pattern at the same time. Each point represents one needle penetration in the material. The optimum distance of the points (width and length) is between 4 and 7 squares. Only on curves should the points be drawn more densely, at a distance of roughly 2-5 squares.
After that, the stitch points can be consecutively numbered according to the sewing course of the pattern. This will facilitate the input of the stitch points for complicated patterns consisting of parts to be sewn over several times.
The distance between continuous patterns should be 5 or more squares at the end of each pattern. In the case of single patterns you can determine the distance between the patterns by moving the fabric.
line
| X | Y | |----|-----| | 00 | 44 | | 01 | 12 | | 02 | 08 | | 03 | 12 | | 04 | 44 | | 05 | 12 | | 06 | 44 | | 07 | 12 | | 08 | 44 | | 09 | 12 | | 10 | 44 | | 11 | 12 | | 12 | 44 | | 13 | 12 | | 14 | 44 | | 15 | 12 | | 16 | 44 | | 17 | 12 | | 18 | 44 | | 19 | 12 | | 20 | 44 | | 21 | 12 | | 22 | 44 | | 23 | 12 | | 24 | 44 | | 25 | 12 | | 26 | 44 | | 27 | 12 | | 28 | 44 | | 29 | 12 | | 30 | 44 | | 31 | 12 | | 32 | 44 | | 33 | 12 | | 34 | 44 | | 35 | 12 | | 36 | 44 | | 37 | 12 | | 38 | 44 | | 39 | 12 | | 40 | 44 | | 41 | 12 | | 42 | 44 | | 43 | 12 | | 44 | 44 | | 45 | 12 | | 46 | 44 | | 47 | 12 | | 48 | 44 | | 49 | 12 | | 50 | 44 | | 51 | 12 | | 52 | 44 | | 53 | 12 | | 54 | 44 | | 55 | 12 | | 56 | 44 | | 57 | 12 | | 58 | 44 | | 59 | 12 | | 60 | 44 | | 61 | 12 | | 62 | 44 | | 63 | 12 | | 64 | 44 | | 65 | 12 | | 66 | 44 | | 67 | 12 | | 68 | 44 | | 69 | 12 | | 70 | 44 | | 71 | 12 | | 72 | 44 | | 73 | 12 | | 74 | 44 | | 75 | 12 | | 76 | 44 | | 77 | 12 | | 78 | 44 | | 79 | 12 | | 80 | 44 | | 81 | -12 | | 82 | -12 | | 83 | -12 | | ... (repeated) | ... (repeated)If you are embroidering a motif with zigzag stitches, the length points must be set very densely. The ideal distance is 1 to 2 squares.
Make sure to keep a continuous logical sequence corresponding to the sewing course of the machine. (Interruptions within the motif will also be embroidered!)

line
| X-Axis | Y-Axis | |---|---| | 0 | 36 | | 4 | 42 | | 8 | 48 | | 12 | 52 | | 16 | 52 | | 20 | 52 | | 24 | 52 | | 28 | 52 | | 32 | 52 | | 36 | 52 | | 40 | 52 | | 44 | 52 | | 48 | 52 | | 52 | 48 | | 56 | 44 | | 60 | 40 | | 64 | 36 | | 68 | 32 | | 72 | 30 | | 76 | 28 | | 80 | 26 | | 84 | 24 | | 88 | 22 | | 92 | 20 | | 96 | 18 | | 100 | 16 | | 104 | 14 | | 108 | 12 | | 112 | 10 | | 116 | 8 | | 120 | 6 | A ↑ BPattern combinations (mirroring)
The pattern is sewn in two phases. Draw one half of the pattern on the programming sheet and enter it into the p-memory.

flowchart
graph TD
    A1["A"] --> B1
    B1 --> C1
    C1 --> D1
    D1 --> E1
    E1 --> F1
    F1 --> G1
    G1 --> H1
    H1 --> I1
    I1 --> J1
    J1 --> K1
    K1 --> L1
    L1 --> M1
    M1 --> N1
    N1 --> O1
    O1 --> P1
    P1 --> Q1
    Q1 --> R1
    R1 --> S1
    S1 --> T1
    T1 --> U1
    U1 --> V1
    V1 --> W1
    W1 --> X1
    X1 --> Y1
    Y1 --> Z1
    Z1 --> A2
    style A2 fill:#f9f,stroke:#333
    style A1 fill:#ccf,stroke:#333
    style B1 fill:#cfc,stroke:#333
    style C1 fill:#fcc,stroke:#333
    style D1 fill:#cff,stroke:#333
    style E1 fill:#ffc,stroke:#333
    style F1 fill:#cfc,stroke:#333
    style G1 fill:#fcc,stroke:#333
    style H1 fill:#cfc,stroke:#333
    style I1 fill:#fcc,stroke:#333
    style J1 fill:#cfc,stroke:#333
    style K1 fill:#fcc,stroke:#333
Sew the pattern half with the "single pattern key" (16). Now press the "pattern mirror" key (17) and sew the mirror image of the pattern. Make sure that the needle enters the fabric at pattern start point "A" of the first pattern.
The maximum width for mirrored patterns is 18 mm.
line
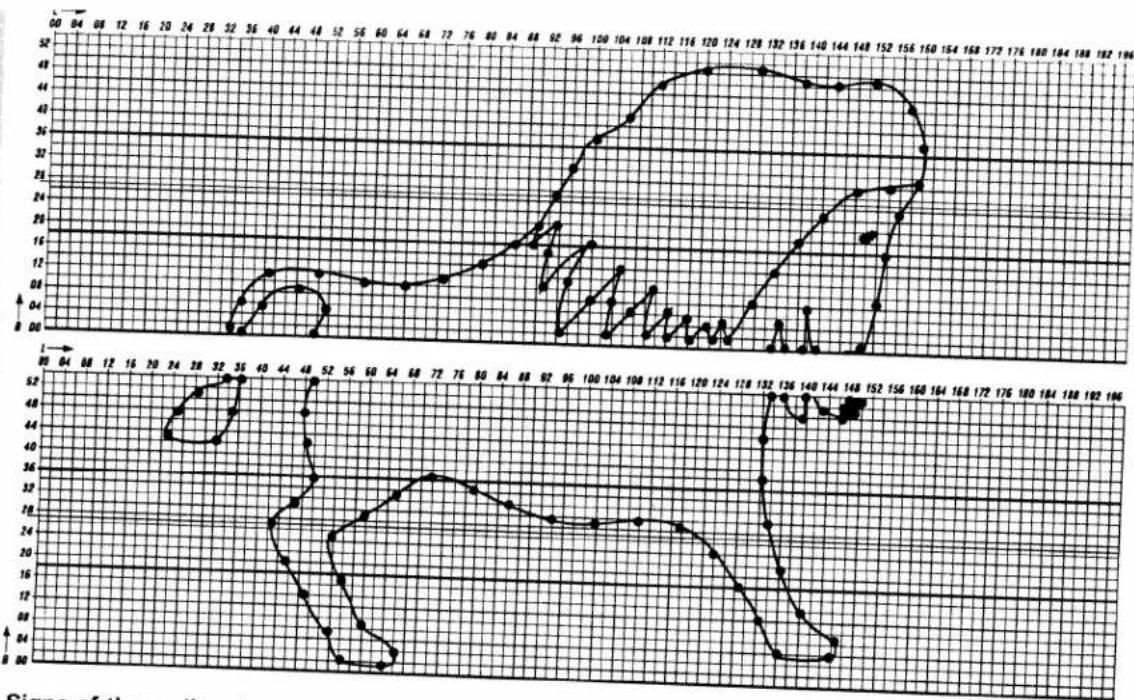
| X | Y (Top Plot) | Y (Bottom Plot) | |----|--------------|-----------------| | 0 | 0 | 0 | | 12 | 0 | 0 | | 15 | 0 | 0 | | 20 | 0 | 0 | | 24 | 0 | 0 | | 28 | 0 | 0 | | 32 | 0 | 0 | | 36 | 0 | 0 | | 40 | 0 | 0 | | 44 | 0 | 0 | | 48 | 0 | 0 | | 52 | 0 | 0 | | 56 | 0 | 0 | | 60 | 0 | 0 | | 64 | 0 | 0 | | 68 | 0 | 0 | | 72 | 0 | 0 | | 76 | 0 | 0 | | 80 | 0 | 0 | | 84 | 0 | 0 | | 88 | 0 | 0 | | 92 | 0 | 0 | | 96 | 0 | 0 | | 100| 0 | 0 | | 104| 0 | 0 | | 108| 0 | 0 | | 112| 0 | 0 | | 116| 0 | 0 | | 120| 0 | 0 | | 124| 0 | 0 | | 128| 0 | 0 | | 132| 0 | 0 | | 136| 0 | 0 | | 140| 0 | 0 | | 144| 0 | 0 | | 148| 0 | 0 | | 152| 0 | 0 | | 156| 0 | 0 | | 160| 0 | 0 | | 164| 0 | 0 | | 168| 0 | 0 | | 172| 0 | 0 | | 176| 0 | 0 | | 180| 0 | 0 | | 184| 0 | 0 | | 188| 0 | 0 | | 192| 0 | 0 | | 196| 0 | 0 |Signs of the zodiac: Leo

line
| L | Series 1 | Series 2 | Series 3 | Series 4 | Series 5 | |----|----------|----------|----------|----------|----------| | 0 | 28 | 20 | 18 | 16 | 14 | | 16 | 26 | 18 | 16 | 14 | 12 | | 24 | 24 | 16 | 14 | 12 | 10 | | 32 | 22 | 14 | 12 | 10 | 8 | | 36 | 20 | 12 | 10 | 8 | 6 | | 40 | 18 | 10 | 8 | 6 | 4 | | 44 | 16 | 8 | 6 | 4 | 2 | | 48 | 14 | 6 | 4 | 2 | 0 | | 52 | 12 | 4 | 2 | 0 | -2 | | 56 | 10 | 2 | 0 | -2 | -4 | | 60 | 8 | 0 | -2 | -4 | -6 | | 64 | 6 | -2 | -4 | -6 | -8 | | 68 | 4 | -4 | -6 | -8 | -10 | | 72 | 2 | -6 | -8 | -10 | -12 | | 76 | 0 | -8 | -10 | -12 | -14 | | 80 | -2 | -10 | -12 | -14 | -16 | | 84 | -4 | -12 | -14 | -16 | -18 | | 88 | -6 | -14 | -16 | -18 | -20 | | 92 | -8 | -16 | -18 | -20 | -22 | | 96 | -10 | -18 | -20 | -22 | -24 | | 100| -12 | -20 | -22 | -24 | -26 | | 104| -14 | -22 | -24 | -26 | -28 | | 108| -16 | -24 | -26 | -28 | -30 | | 112| -18 | -26 | -28 | -30 | -32 | | 116| -20 | -28 | -30 | -32 | -34 | | 120| -22 | -30 | -32 | -34 | -36 | | 124| -24 | -32 | -34 | -36 | -38 | | 128| -26 | -34 | -36 | -38 | -40 | | 132| -28 | -36 | -38 | -40 | -42 | | 136| -30 | -38 | -40 | -42 | -44 | | 140| -32 | -40 | -42 | -44 | -46 | | 144| -34 | -42 | -44 | -46 | -48 | | 148| -36 | -44 | -46 | -48 | -50 | | 152| -38 | -46 | -48 | -50 | -52 | | 156| -40 | -48 | -50 | -52 | -54 | | 160| -42 | -50 | -52 | -54 | -56 | | 164| -44 | -52 | -54 | -56 | -58 | | 168| -46 | -54 | -56 | -58 | -60 | | 172| -48 | -56 | -58 | -60 | -62 | | 176| -50 | -58 | -60 | -62 | -64 | | 180| -52 | -60 | -62 | -64 | -66 | | 184| -54 | -62 | -64 | -66 | -68 | | 188| -56 | -64 | -66 | -68 | -70 | | 192| -58 | -66 | -68 | -70 | -72 | | 196| -60 | -68 | -70 | -72 | -74 | The chart displays two data series (Series 1 and Series 2) plotted against an unlabeled X-axis. The Y-axis is labeled with values from 0 to over 50. The data series are labeled with numbers such as 'L' and 'G'. The lines represent different series of data points. The chart includes a zoomed-in inset for comparison.Signs of the zodiac: Cancer
These patterns are distributed on two p-memories each and combined when sewing (see page 28).
text_image
PFAFF creative designerInserting the programming sheet in the Creative Designer
Slide the clip slides 7 and 12 forwards on both sides. Insert the pattern programming sheet in slot 8. Take care not to fold or twist the sheet. Slide it upwards until the top edge of the paper slides under the top cutout edge of the programming area 9.

text_image
PFAFF creative mem+ memoryAdjusting the programming sheet
Magnifier slide 5 along with the cross-wire magnifier is moved up or down and adjustable slide 4 to the left or right with handle A.
Push the cross-wire magnifier to the left and down as far as it will go.
natural_image
Hand drawing on a ruler with a paper airplane sketch (no text or symbols visible)Now position the programming sheet so that the red cross-hairs of the magnifier 6 are exactly aligned with the cross at point 00.
text_image
PFAFF creative deThen clamp the sheet into position by pushing clip slide 12 to the rear.
text_image
PFAFF creative designer Made in Germany MEMS MEMORY 01.03.2017 PFAFF Programindestagen: Forder de programmation Scheda de programmazione ProgrammseerbiladSet the cross-wire magnifier as far down as possible. Move the sheet until line 00 aligns with the red horizontal line of the magnifier cross. Then clamp the sheet in this position by pushing clip slide 7 to the rear.
Check:
Push the cross-wire magnifier back to the bottom left point 00 and check that the red horizontal line of the magnifier aligns with line 00. Adjust if necessary.
text_image
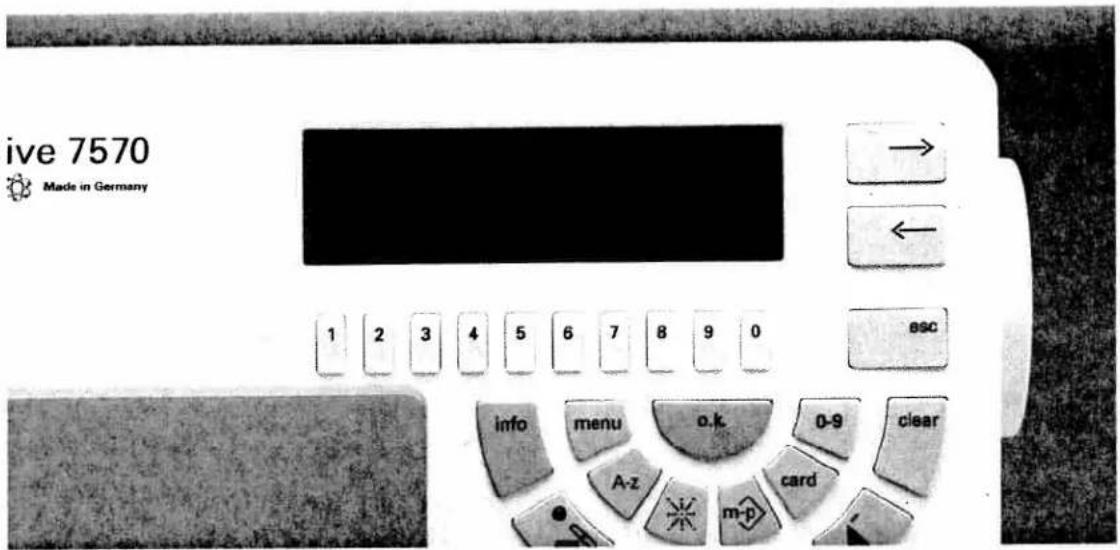
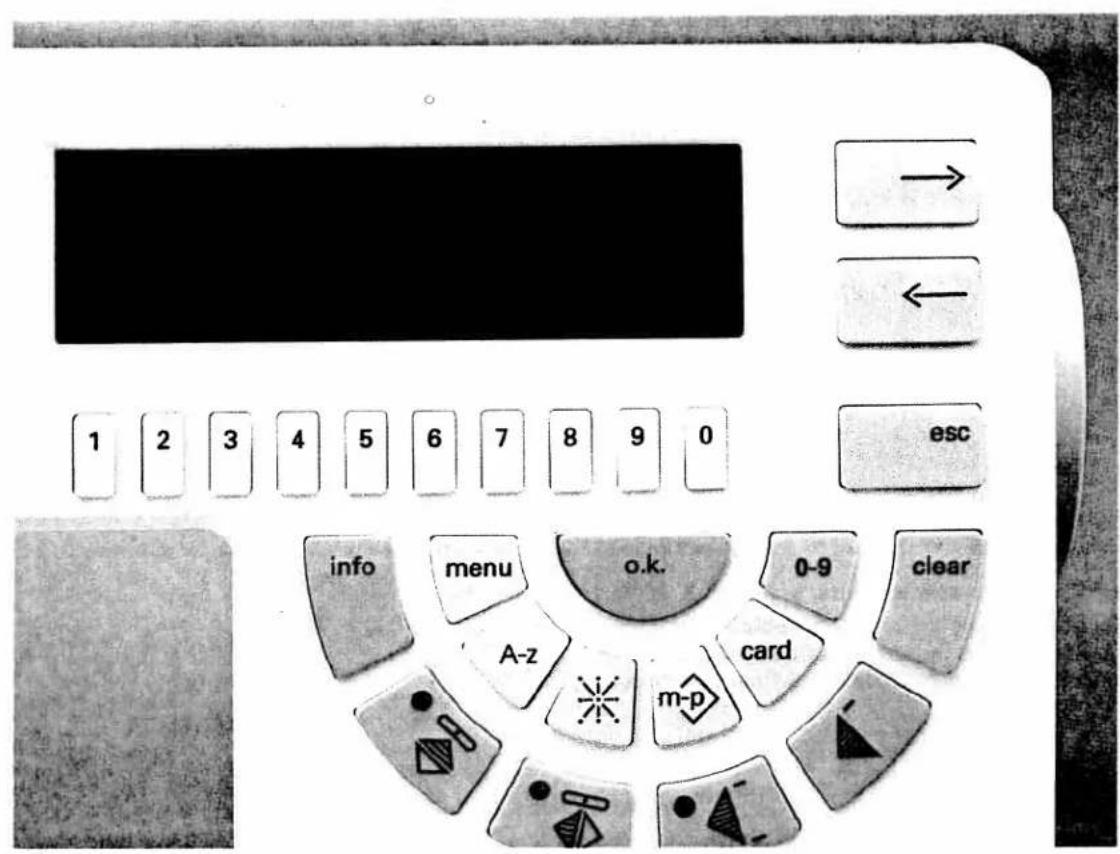
ive 7570 Made in Germany 1 2 3 4 5 6 7 8 9 0 info menu o.k 0-9 clear A-z card m-pSelecting a p-memory
To transfer the design to your sewing machine press key "m-p".
Two messages appear on the display:
1 = Memory for self-programmed patterns (p-memory)
2 = Memory for pattern sequences (m-memory)
For free programming select 1 for the memory for self-programmed patterns by pressing the numeric key.
natural_image
Dark, grainy image with no discernible text, symbols, or structured content.
text_image
1 2 3 4 5 6 7 8 9 0The first 10 of 30 p-memories are displayed.
Using cursor key "→" you can scroll to the next page. Press the numeric key below the desired free p-memory.

text_image
A work area with a cross appears on the screen. You can move the cross on the display with the adjustable slide of the Creative Designer. Pressing the "mem+" key on the designer the first time will change the programming screen while the first stitch is saved in the memory.
Select the stitch points of the motif on the programming sheet with the adjustable slide and confirm stitch point by stitch point by pressing the "mem+" key on the Designer. Make sure to keep a consecutive, logical sequence corresponding to the sewing course of the machine. (Interruptions in a motif will also be stitched.)
natural_image
Black-and-white artistic illustration of a snowy landscape with mountains, birds, and boats (no text or symbols)
Changing the pattern width
The numbered keys 5 and 6 can be used to change the width of a programmed pattern. If you wish to change your pattern without changing the top edge, the pattern start and pattern end points must lie on B 54. The pattern must not be drawn over the entire width of the grid, i.e. there must not be any stitch points on B 00.

line
| L | Value | |---|---| | 00 | 52 | | 04 | 52 | | 08 | 52 | | 12 | 50 | | 16 | 48 | | 20 | 45 | | 24 | 36 | | 28 | 33 | | 32 | 30 | | 36 | 24 | | 40 | 33 | | 44 | 44 | | 48 | 52 | | 52 | 44 | | 56 | 33 | | 60 | 30 | | 64 | 33 | | 68 | 44 | | 72 | 52 | | 76 | 48 | | 80 | 44 | | 84 | 48 | | 88 | 52 | | 92 | 52 | | 96 | 52 | | 100 | 52 | | 104 | 52 | | 108 | 52 | | 112 | 52 | | ↑ | 0 | B = 0 ↑ | 0 | B = 1 B = -1 B = +1 B = -1 B = +1 B = -1 B = +1 B = -1 B = +1 B = -1 B = +1 B = -1 B = +1 B = -1 B = +1 B = -1 B = +1 B = -1 B = +1 B = -1 B = +1 B = -1 B =+1 B = -1 B =+1 B = -1 B =+1 B = -1 B =+1 B = -1 B =+1 B = -1 B =+1 B = -1 B =+1 B = -1 B =+1 B = -1 B =+1 B = -1 B =+1 B = -1 B = +1 B = -1 B =+1 B = -1 B =+1 B = -1 B =+1 B = -1 B =+1 B = -1 B =+1 B = -1 B =+1 B = -1 B =+1 B = -1 B =+1 B = -1 B = +1 B = -1 B = +1 B = -1 B = +1 B = -1 B = +1 B = -1 B = +1 B = -1 B = +1 B = -1 B = +1 B = -1 B = +1 B = -1 B = +1 B = -1 B = + B = +1 B = -1 B = +1 B = -1 B = +1 B = -1 B = +1 B = -1 B = +1 B = -1 B = +1 B = -1 B = +1 B = -1 B = +1 B = -1 B = +1 B = -1 B = +1 B = -1If you wish to change your pattern without changing the bottom edge, the pattern start and pattern end points must lie on B 00. The pattern must not be drawn over the entire width of the grid, i.e. there must not be any stitch points on B 54.

line
| X | Y | |----|------| | 0 | 1.0 | | 1 | 1.5 | | 2 | 2.0 | | 3 | 2.5 | | 4 | 3.0 | | 5 | 3.5 | | 6 | 4.0 | | 7 | 4.5 | | 8 | 5.0 | | 9 | 5.5 | | 10 | 6.0 | | 11 | 6.5 | | 12 | 7.0 | | 13 | 7.5 | | 14 | 8.0 | | 15 | 8.5 | | 16 | 9.0 | | 17 | 9.5 | | 18 | 10.0 | | 19 | 10.5 | | 20 | 11.0 | | 21 | 11.5 | | 22 | 12.0 | | 23 | 12.5 | | 24 | 13.0 | | 25 | 13.5 | | 26 | 14.0 | | 27 | 14.5 | | 28 | 15.0 | | 29 | 15.5 | | 30 | 16.0 | | 31 | 16.5 | | 32 | 17.0 | | 33 | 17.5 | | 34 | 18.0 | | 35 | 18.5 | | 36 | 19.0 | | 37 | 19.5 | | 38 | 20.0 | | 39 | 20.5 | | 40 | 21.0 | | 41 | 21.5 | | 42 | 22.0 | | 43 | 22.5 | | 44 | 23.0 | | 45 | 23.5 | | 46 | 24.0 | | 47 | 24.5 | | 48 | 25.0 | | 49 | 25.5 | | 50 | 26.0 | | 51 | 26.5 | | 52 | 27.0 | | 53 | 27.5 | | 54 | 28.0 | | 55 | 28.5 | | 56 | 29.0 | | 57 | 29.5 | | 58 | 30.0 | | 59 | 30.5 | | 60 | 31.0 | | 61 | 31.5 | | 62 | 32.0 | | 63 | 32.5 | | 64 | 33.0 | | 65 | 33.5 | | 66 | 34.0 | | 67 | 34.5 | | 68 | 35.0 | | 69 | 35.5 | | 70 | 36.0 | | 71 | 36.5 | | 72 | 37.0 | | 73 | 37.5 | | 74 | 38.0 | | 75 | 38.5 | | 76 | 39.0 | | 77 | 39.5 | | 78 | 40.0 | | 79 | 40.5 | | 80 | 41.0 | | 81 | 41.5 | | 82 | 42.0 | | 83 | 42.5 | | 84 | 43.0 | | 85 | 43.5 | | 86 | 44.0 | | 87 | 44.5 | | 88 | 45.0 | | 89 | 45.5 | | 90 | 46.0 | | 91 | 46.5 | | 92 | 47.0 | | 93 | 47.5 | | 94 | 48.0 | | 95 | 48.5 | | 96 | 49.0 | | 97 | 49.5 | | 98 | 50.0 | | 99 | - | | B=1 | - | | B=2 | - | | B=3 | - | | B=4 | - | | B=5 | - | | B=6 | - | | B=7 | - | | B=8 | - | | B=9 | - | | B=10 | - | | B=11 | - | | B=12 | - | | B=13 | - | | B=14 | - | | B=15 | - | | B=16 | - | | B=17 | - | | B=18 | - | | B=19 | - | | B=20 | - | | B=21 | - | | B=22 | - | | B=23 | - | | B=24 | - | | B=25 | - | | B=26 | - | | B=27 | - | | B=28 | - | | B=29 | - | | B=30 | - | | B=31 | - | | B=32 | - | | B=33 | - | | B=34 | - | | B=35 | - | | B=36 | - | | B=37 | - | | B=38 | - | | B=39 | - | | B=40 | - | | B=41 | - | | B=42 | - | | B=43 | - | | B=44 | - | | B=45 | - | | B=46 | - | | B=47 | - | | B=48 | - | | B=49 | - | | B=50 | - | | A: A': A': A': A': A': A': A': A': A': A': A': A': A': A': A': A': A': A': A': A': A': A': A': A': A': A': A': A': A': A': A': A': A': A': A': A': A': A': A': A': A': A': A': A': A': A': A': A': A': A': A'Pattern combinations in two or more p-memories
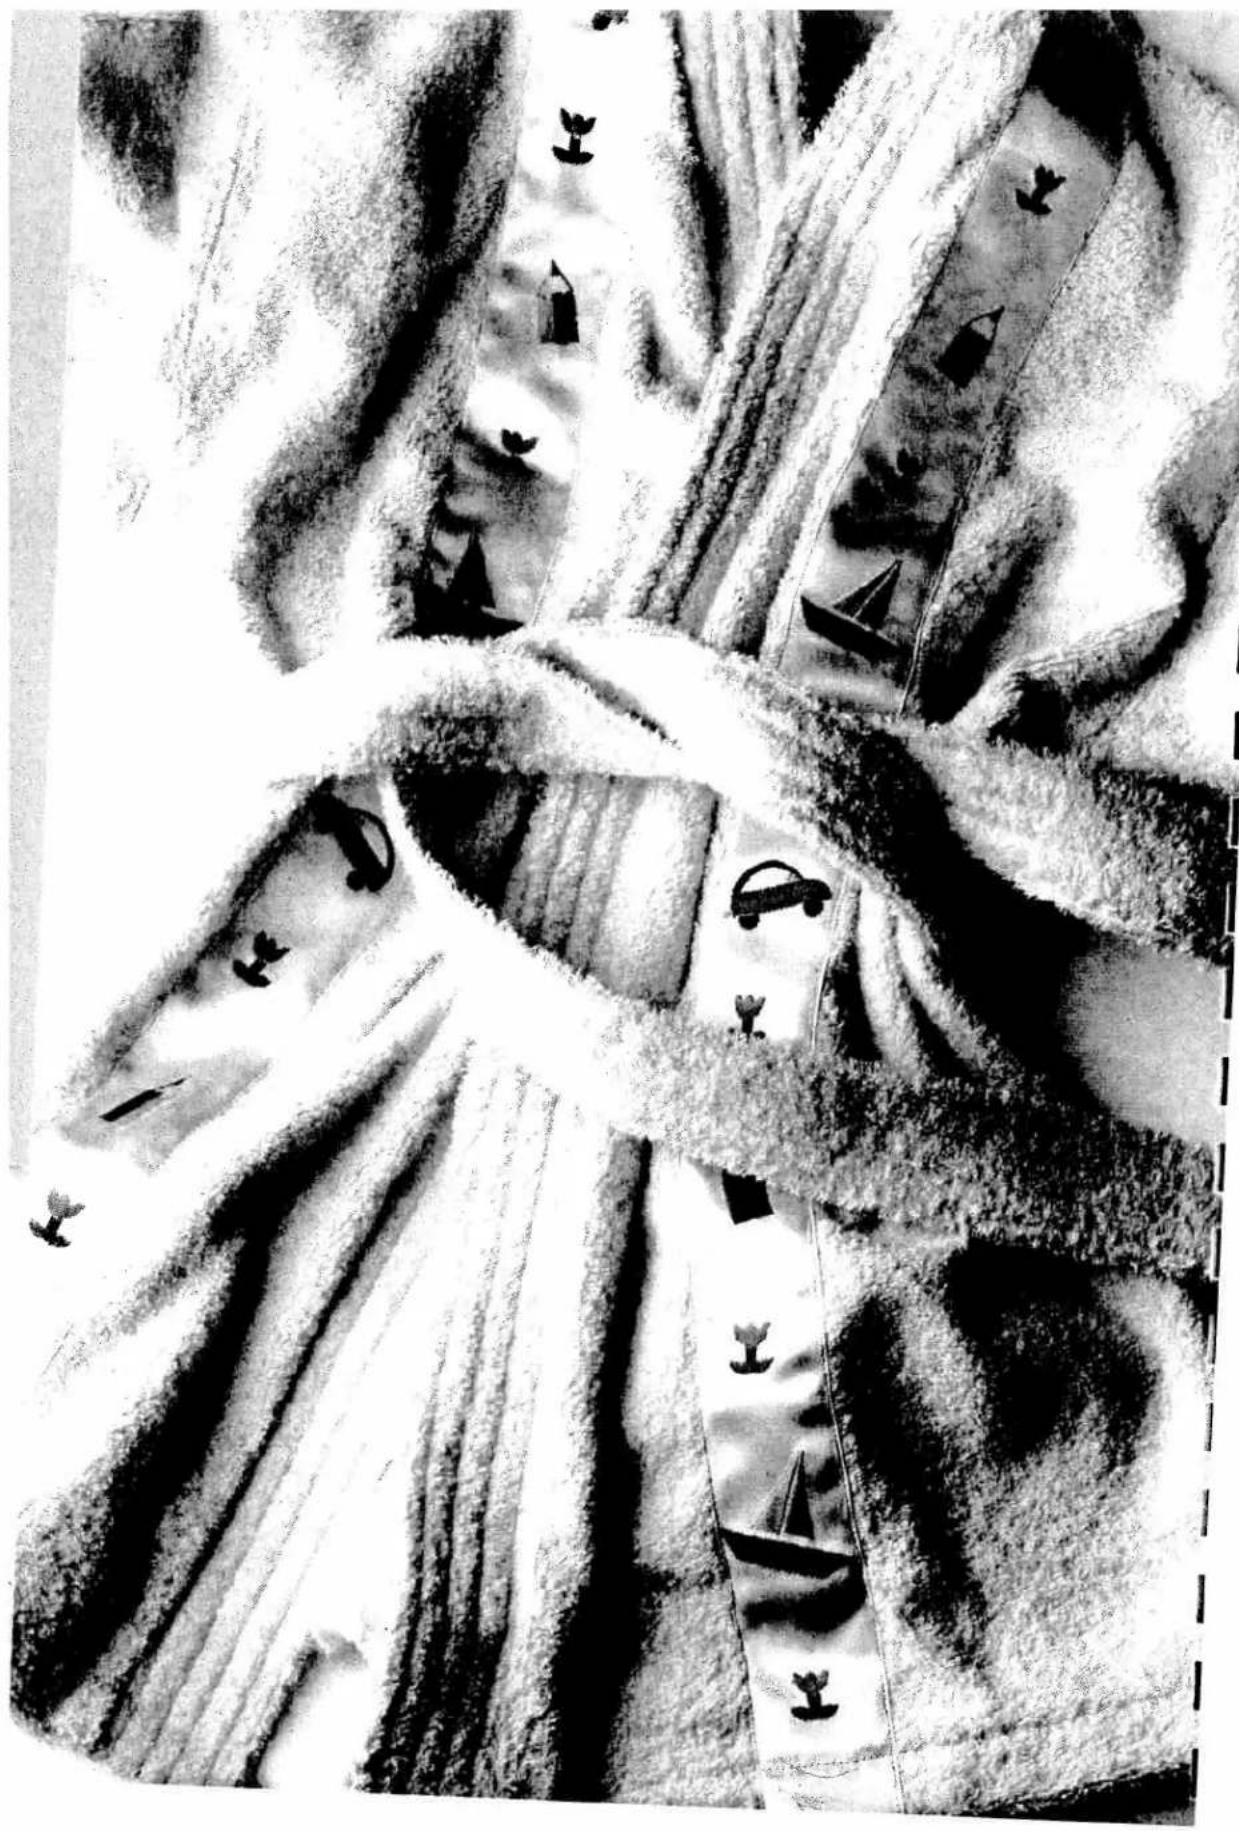
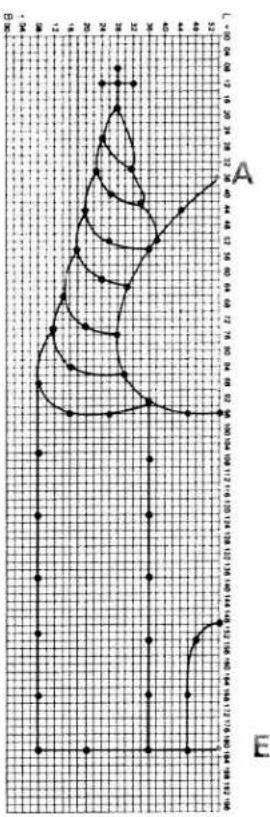
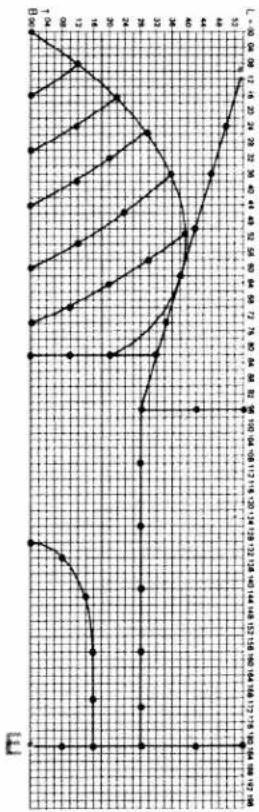
It is possible to design wider patterns by using more than one p-memory for the motif. Tape two or more programming sheets (in our example 4) together and draw your design on the grid. Decide upon and mark a pattern start "A" for each individual programming sheet.
Ensure that the sewing machine only has to sew in one direction (in our example from top to bottom).
line
| X | Y | |---|---| | 0 | 0 | | 1 | 1 | | 2 | 2 | | 3 | 3 | | 4 | 4 | | 5 | 5 | | 6 | 6 | | 7 | 7 | | 8 | 8 | | 9 | 9 | | 10 | 10 | | 11 | 11 | | 12 | 12 | | 13 | 13 | | 14 | 14 | | 15 | 15 | | 16 | 16 | | 17 | 17 | | 18 | 18 | | 19 | 19 | | 20 | 20 | | 21 | 21 | | 22 | 22 | | 23 | 23 | | 24 | 24 | | 25 | 25 |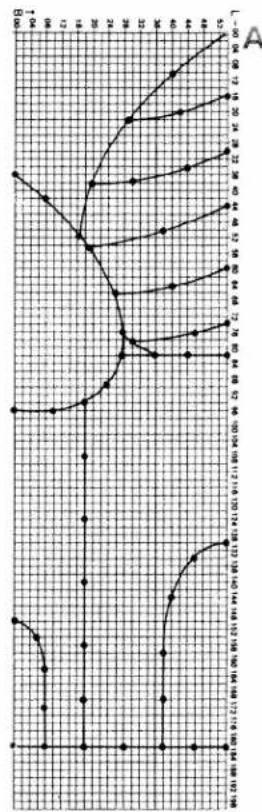
1
line
| Time (s) | Value | | -------- | ----- | | 0 | 0 | | 10 | 1 | | 20 | 2 | | 30 | 3 | | 40 | 4 | | 50 | 5 | | 60 | 6 | | 70 | 7 | | 80 | 8 | | 90 | 9 | | 100 | 10 | | 110 | 11 | | 120 | 12 |A

line
| Time (min) | Value | | ---------- | ----- | | 0 | 12 | | 1 | 10 | | 2 | 8 | | 3 | 6 | | 4 | 4 | | 5 | 2 | | 6 | 0 | | 7 | -2 | | 8 | -4 | | 9 | -6 | | 10 | -8 | | 11 | -10 | | 12 | -12 |Separate the programming sheets so that you have 4 pattern sections. Enter each section in a separate p-memory. Start at point "A" of the right programming sheet and enter the pattern stitch by stitch (number the pattern if necessary). Overlaps may occur. "E" marks the end of the pattern section on each programming sheet.
Enter the second section in the second p-memory beginning here again at point "A". Enter the rest of the sections in the same way.

natural_image
Hand-drawn sketch of a castle with multiple towers and dome structures (no text or symbols)And this is how the motif looks when finished. This example was sewn from right to left. Sew the p-memories one after the other with the single pattern key 15.
Make sure that the needle enters the fabric at pattern start point "A" of the previously sewn pattern half.
Whether sewing a blouse, a shirt, bed linen or whatever you desire, the Creative Designer allows you to realize all of your embroidery ideas.

text_image
AUS CUIE LOVE 21-24Application example
Editing motifs
STEINBOCK
SCHUTZE
WASSERMANN

KREBS

STIER

LOWE

natural_image
Two stick figures in walking pose, no text or symbols presentZILLING

JUNGERAU
WIDDER

WAAGE
EISCHE

SKORPLON
Editing motifs
Pages 33–56
text_image
1 2 3 4 5 6 7 8 9 0 info menu o.k. 0-9 clear A-z card m-pContents
| Fading in/out stitch points | Page 36 |
| Editing a motif | Page 37 |
| Appending / inserting a stitch | Page 37 |
| Moving a stitch | Page 38 |
| Moving a block | Page 39 |
| Spacing between two patterns | Page 40 |
| Symbol "m-" | Pages 41–42 |
| Clearing the p-memory | Pages 42–43 |
| Functions "mem" / "No" | Page 43 |
| Function "num" | Page 44 |
| Changing the pattern length | Page 44 |
| Changing the pattern width | Page 45 |
| Sewing a pattern | Page 45 |
| Balance | Page 46 |
| "Creative card" | Pages 47–49 |
| ROM | Pages 50–51 |
| RAM | Pages 52–53 |
| Programming a p-pattern into an m-memory | Page 54 |

text_image
m+ m- num 1 2 3 4 5 6 7 8 9 0 escFading in/out stitch points
By pressing key "8" the stitch points of a pattern will be faded in or out. Fading in the stitch points makes corrections much easier.

text_image
1 2 3 4 5 6 7 8 9 0 ←→ ←→ ←→ ←→ ←→ ←→ ←→ ←→After you have entered your pattern completely, you can edit it using the following functions: Select the "m+" symbol with key "1". The function "Append stitch" will be highlighted and activated. All further functions must be selected with the "0" key.
m + ↓ Appending a stitch
By moving the adjustable slide and pressing the "mem+" key on the Designer you can add one or several stitches at the end of a pattern.

text_image
1 2 3 4 5 6 7 8 9 0 info menu o.k. 0-9 clear → ← ESCm+↓ Inserting a stitch
Use the cross to select the stitch on the display which is to precede the stitch to be inserted. Press the "memory" key on the Designer. The stitch number will be displayed on the screen. Move the adjustable slide to the position where you want to place the new stitch and press the "mem+" key. The new stitch will be inserted after the selected stitch. The stitch number disappears.

text_image
m+ m- num 1 2 3 4 5 6 7 8 9 0 esc info menu o.k. n.q clearm + ↔ Moving a stitch
Select a stitch with the cross and press the "memory" key on the Designer. The stitch number will be displayed on the screen. By moving the adjustable slide the selected stitch will be moved to a new position while the stitch number will disappear. By pressing the "mem+" key the new stitch will be placed.

text_image
1 2 3 4 5 6 7 8 9 0 esc Info menu o.k. 0-9 clear A-z card m-p ▲ -m+ Moving a block
If you wish to move several stitches or an entire part of your pattern at a time, select the left edge point of the desired block using the cross.
By pressing the "memory" key on the Designer, the stitch number and the block will be displayed on the screen and can be moved to the left and right. Pressing the "mem+" key will confirm the new position.
Resetting the block to its original position is done in the same way.

text_image
m+ mem m- num esc info menu o.k. n-9 clearSpacing between two patterns
In order to sew a pattern sequence with a freely programmed pattern, we recommend to append a spacing after the pattern.
To this end add a few stitches after the stitch point last entered. In this way you prevent the patterns of the sequence from being embroidered with too little space in between.
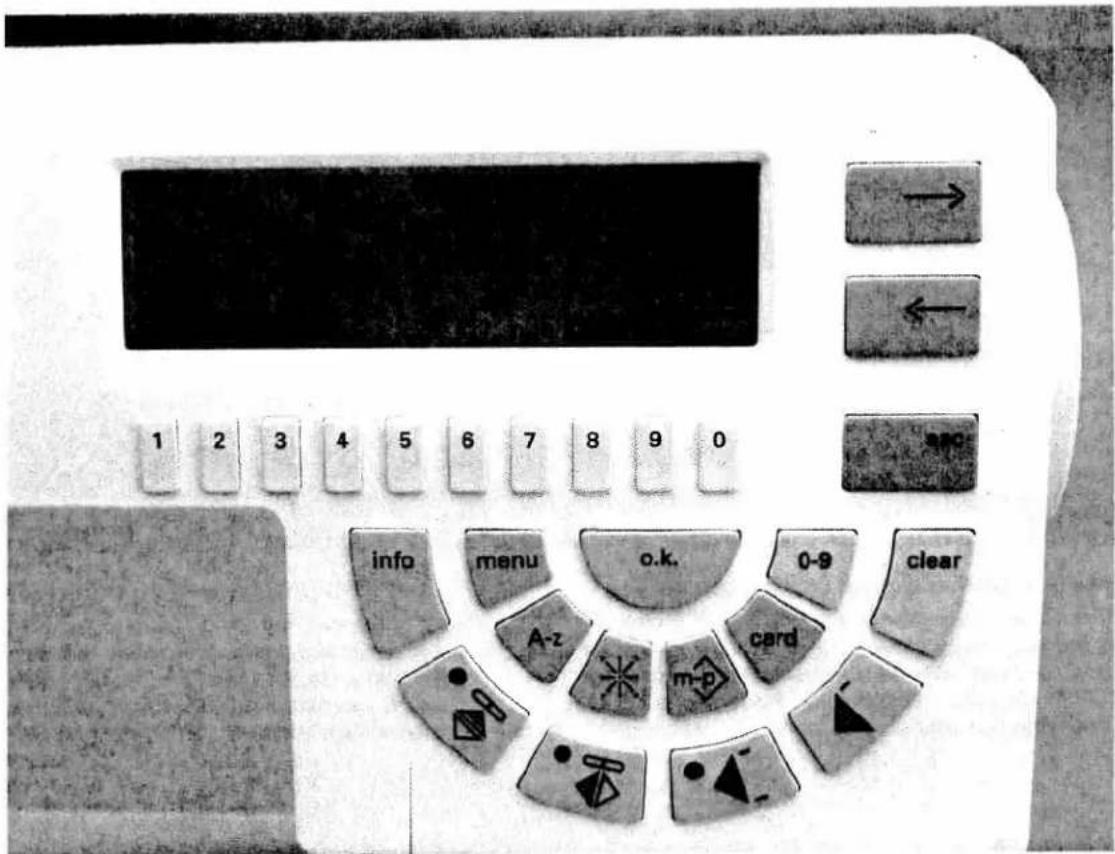
text_image
1 2 3 4 5 6 7 8 9 0 info menu o.k. 0-9 clear A-z card m-p • • • • •Symbol "m-"
By selecting the "m-" symbol with key "3", the menue on the right-hand side of the screen will change. With these functions stitches or patterns can be deleted. The individual functions can be selected with the "0" key underneath and will be highlighted at the same time.
m- ↓ Deleting a stitch at the end
When selecting this function the last stitch of the pattern displayed on the screen will automatically be deleted by pressing the "o.k." key.

text_image
m+ men m- num 1 2 3 4 5 6 7 8 9 0 info menu 0-9m- ↓ Deleting a stitch within a pattern
Press key 0 to highlight symbol "m-↓". Select the stitch to be deleted with the cross and press the "memory" key on the Designer. The message "OK?" appears on the display. Press the "o.k." key to delete the stitch.

m- □ Deleting the entire pattern
When selecting this function the following question appears by pressing the "o.k." key:
"Delete entire pattern?".
By pressing the "o.k." key again, the entire pattern will be deleted. If you do not wish to delete, press the "esc" key.

natural_image
Close-up of a vintage computer control panel with numbered keys (1–9) and a mouse pointer, no readable text or symbols beyond component labels.Clearing a p-memory with "C"
In order to delete a complete p-pattern, select the memory to be deleted with the numeric key underneath. Now the sewing screen is displayed. Function C (for clear) is displayed. By pressing numeric key 9 the question "Delete entire pattern?" is displayed.
Press "o.k." key to confirm. The selected pattern is deleted. If you do not wish to delete, press key "esc".
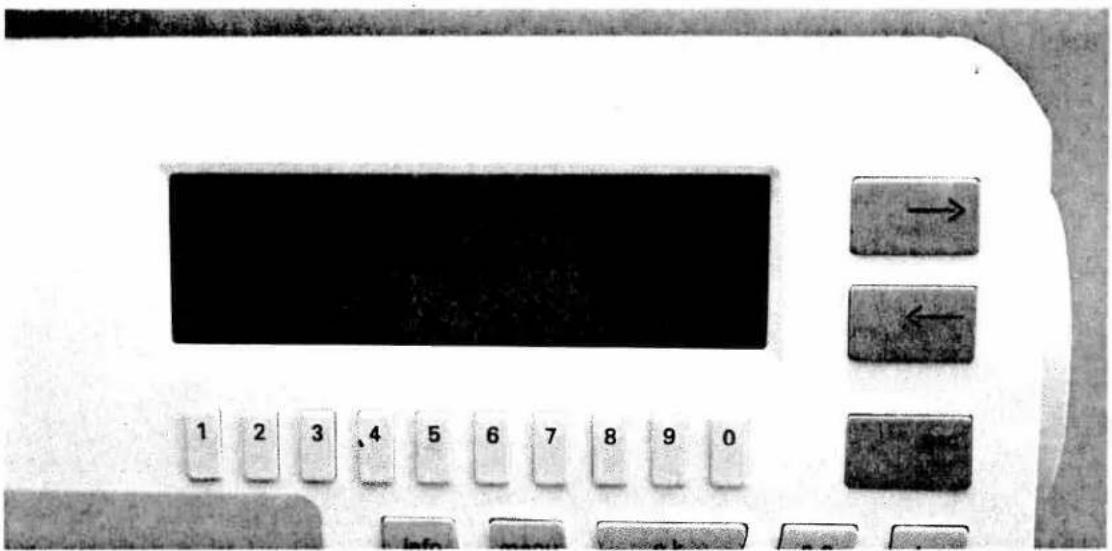
text_image
Close-up of a vintage computer control panel with labeled buttons and a black screen displaying the text.Tracing a pattern with "mem"
To check the individual stitches of a pattern and their sewing direction you can trace the stitches using the "mem" function.
Press key "2" below "mem" and a sub-menu will appear on the screen. By pressing the cursor keys "-" and "→" the cross will move from one stitch to another.
On the top right-hand side of the screen the respective stitch number and the length and width coordinates are displayed.
Function "No."
Key "0" underneath "No." activates the Creative Designer. Choose a stitch with the cross and press the "memory" key on the Designer. The number of the stitch or the stitches that lie on the selected position will be displayed.
e 7570
Made in Germany
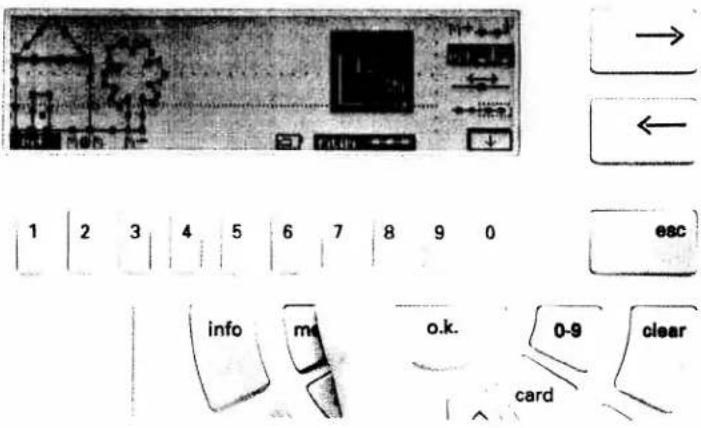
text_image
Diagram showing a device with labeled buttons and internal components, including navigation arrows and function keys.Function "num"
Key "7" underneath "num" activates the Creative Designer. To this end "m+" on the left of the display must be highlighted. By pressing key "7" a coordinate display appears along with the indication of the position where the cross hairs of the Creative Designer are located. This helps you to position the next stitch to be entered.

text_image
P00 0 + Δ 25 - |= 15 5.0 6.0 7.5 9.5 12 15 18 23 28 +
text_image
1 2 3 | 4 | 5 | 6 | 7 | 8 | 9 | 0 nenu o.k. 0-9Changing the pattern length
A freely programmed pattern can be lengthened or shortened after being saved in the memory without any problem at all. To this end press numeric key 6. The sewing display appears.
Above numeric key 1 the length of the pattern is indicated. By pressing this key a sub-menu is enabled where you can select another length with numeric keys 1 to 0.
With numeric key 0 it is possible to change the length in smaller steps.
By pressing the "o.k." key you return to the previous screen.
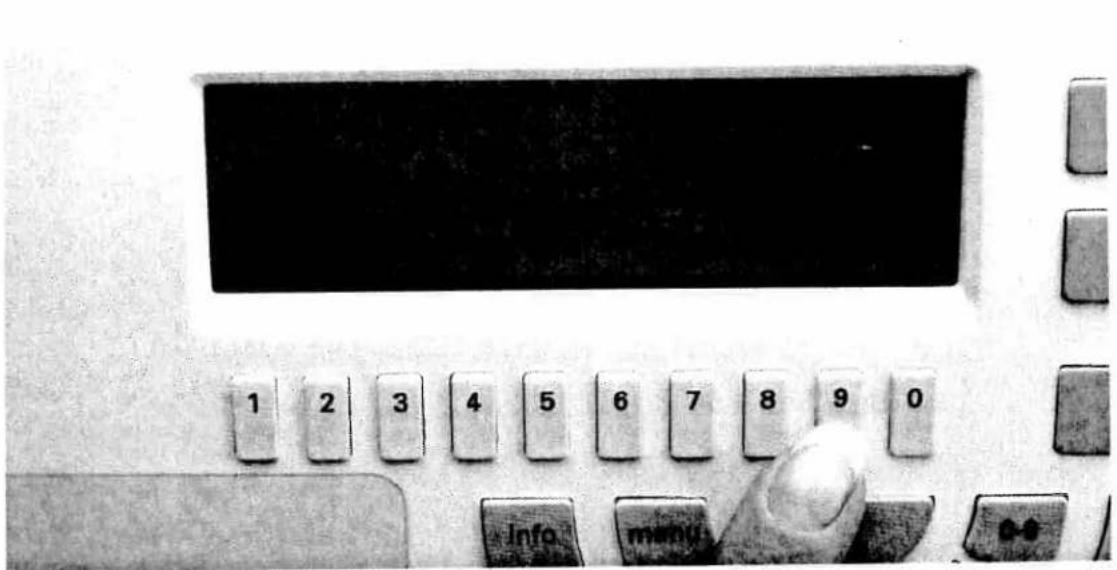
natural_image
Close-up of a vintage computer control panel with numbered keys and a hand adjusting the button (no readable text or symbols)Changing the pattern width
A freely programmed pattern can be made wider or narrower after being saved in the memory without any problem at all. To this end press numeric key 6. The sewing screen appears.
Above numeric key 2 the width of the pattern is indicated. By pressing this key a sub-menu is enabled where you can select another width with numeric keys 1 to 0 (up to 9 mm).
With numeric key 0 it is possible to change the width in smaller steps.

text_image
new num 1 2 3 4 5 6 7 8 9 0 menu o.k. 0-9Sewing the pattern
After pressing key "6" underneath symbol your pattern is ready to be sewn. The following menu appears on the screen: on the bottom left the length and width settings are indicated. By pressing key "1" a sub-menu is enabled under which you can select a different lenght with numeric keys "1-0".
After pressing key "2" (width) you can set the width with the numeric keys.
By pressing either the "o.k." or the "esc" key you will return to the previous screen.
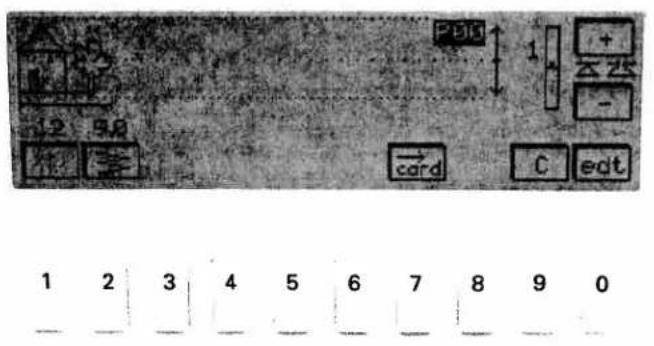
text_image
25bit + - + - card C eat 1 2 3 4 5 6 7 8 9 0
text_image
→ ← escAdjusting the balance
On varying types of fabric, a freely programmed pattern can change unexpectedly. In order to correct the actual embroidery result use the balance feature for the backwards feed.
After saving the pattern in the memory press numeric key 6 for symbol ☐. An indicator scale with symbols "+" and "-" appears on the right-hand side of the screen.
Use cursor keys "←" and "→" to change the machine's backwards feed within a range of -7 to +7.
If the pattern is not closed, the correction must be made with cursor key "→" within a range of +1 to +7, i.e. the machine sews longer backwards stitches and the pattern is closed.
If the pattern overlaps, the correction must be made with cursor key "←" within a range of -1 to -7, i.e. the machine sews shorter backwards stitches and the pattern is sewn more open.

text_image
1 2 3 4 5 6 7 8 9 0 escCreative card
The Creative offers the possibility to file all the patterns you have designed with the Designer on the "Creative card". This ensures that the patterns you have created yourself will be saved for good. The advantage is that you can make your p-memories available for new patterns without losing a single pattern.
A number must be assigned to each new Creative card. This number must be entered since the machine recognizes the card by its number (see Instruction Book 7570, page 95).
text_image
Diagram showing a black rectangular block with arrows pointing to its top and left sides, alongside a row of numbered boxes labeled 1 through 9 and an 'esc' button.Saving a pattern on the Creative card
Insert the Creative card in slot (47) on the machine. After selecting an occupied p-memory the sewing screen appears and the selected pattern is displayed. By pressing key 7 underneath "card" you save the current pattern on the Creative card. Two messages appear consecutively:
If the message "wrong card or no card, o.k.?" appears, you must check whether the card has been inserted correctly or whether the card inserted is actually a Creative card. To delete the message from the display press the "o.k." key.
"please wait" and "o.k.". Now the pattern is saved.
text_image
Diagram illustrating a sequence of numbers and a mapping to an esc-like structure, with arrows indicating direction.Selecting a pattern from the Creative card
Insert the Creative card in the slot (47). Press key "card" (14). The patterns or, in case not only p-patterns are saved, a menu appear on the screen. In this case press the corresponding numeric key to select normal pattern (9 mm). The p-patterns are displayed.
Select a p-pattern by pressing the numeric key underneath. Then press the "o.k." key. Now the pattern is ready to be sewn and can be changed in width, length and balance.
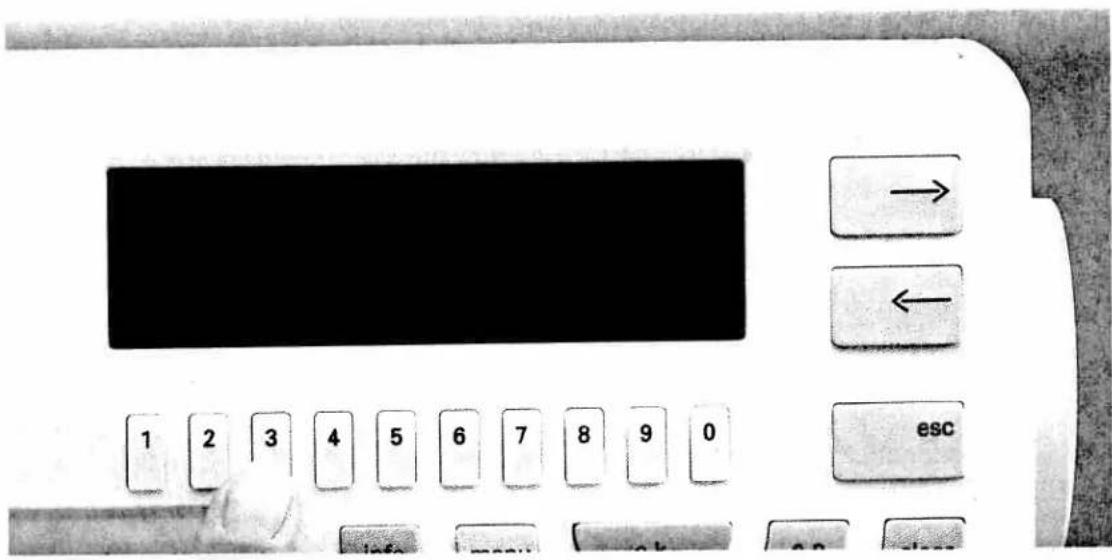
text_image
1 2 3 4 5 6 7 8 9 0 escLoading a pattern from the "Creative card"
If you wish to load a p-pattern from the Creative card to a p-memory of the machine, you must first insert the card in slot (47) and select a free p-memory. The programming screen is displayed. Press key "3" underneath "card" and the card number and the pattern selection are displayed.
Now select the pattern by pressing the numeric key underneath. The pattern is now in the programming display and can be processed. If you press key 6 the sewing display appears and the pattern can be sewn.
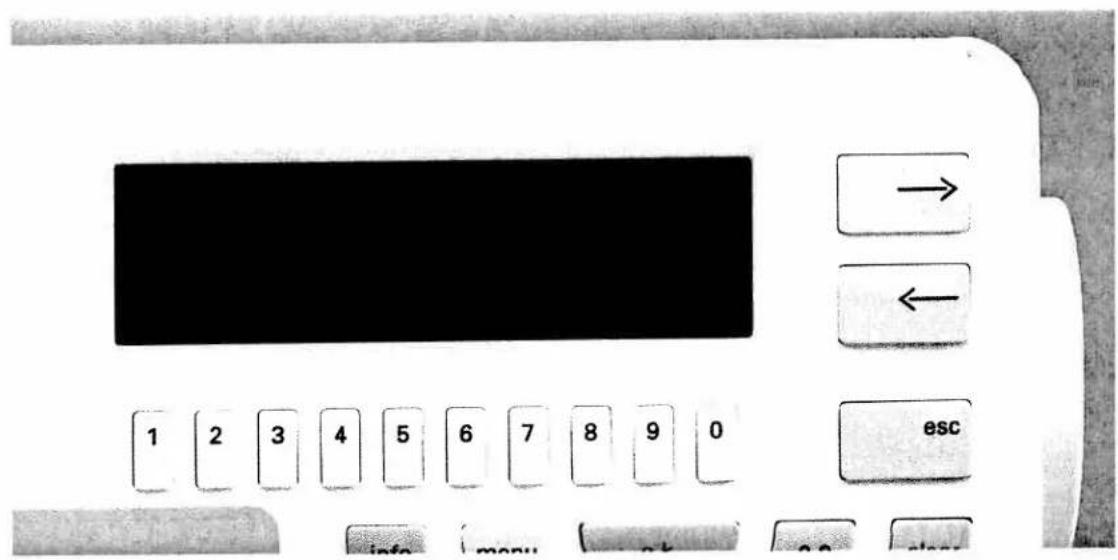
text_image
→ ← 1 2 3 4 5 6 7 8 9 0 esc info menu n k a e starDeleting a pattern from the "Creative card"
If you wish to delete a pattern from the Creative card, press key "card" (14) on the sewing machine. The p-patterns appear on the screen or the menu is displayed in case not only p-patterns are saved on the card. Press the corresponding numeric key to select normal pattern (9 mm). The p-patterns of the Creative card are displayed.
Now select the pattern to be deleted. It will be highlighted.
By pressing the "clear" key (10) the query "Delete entire pattern?" is displayed. The pattern will be deleted if you confirm by pressing "o.k.".

text_image
card rom ram num 1 2 3 4 5 6 7 8 9 0 esc info menu o.k. 0-9 clear A-z card m-pROM
Within the p-memory you have the possibility to edit a preprogrammed motif from the Creative's pattern selection by transferring it to a p-memory and changing it with the connected Creative Designer. Press keys "m-p" and 1 for the p-memory.
Select a free p-memory with the numeric keys and the programming display appears.
By pressing key "4" for the rom function, the pattern selection message appears.
text_image
1 2 3 4 5 6 7 8 9 0 → ← ABCEnter the number of the pattern you wish to edit and confirm with "o.k.".

text_image
1 2 3 4 5 6 7 8 9 0 esc info menu o.k. 0-9 clearThe pattern will appear in the programming display and can be changed with any of the functions described so far (delete a stitch, move a stitch, insert a stitch, etc.).
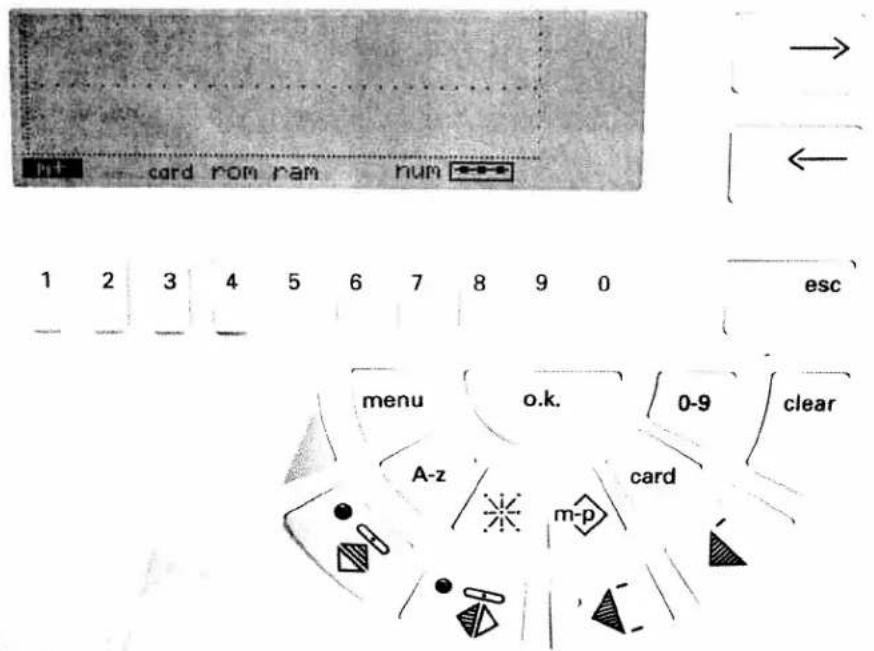
text_image
card rom ram num 1 2 3 4 5 6 7 8 9 0 esc menu o.k. 0-9 clear A-z card m-pRAM
With the "ram" function you can copy the contents of a p-memory into another p-memory. You need this function if, for example, you wish to edit a pattern with the Designer or add to it without losing the original pattern.
Press key "m-p" and key 1 for p-memory. The p-memory selection appears on the screen. Select a free p-memory with the numeric keys. Press key "5" for "ram". The p-memory directory appears.
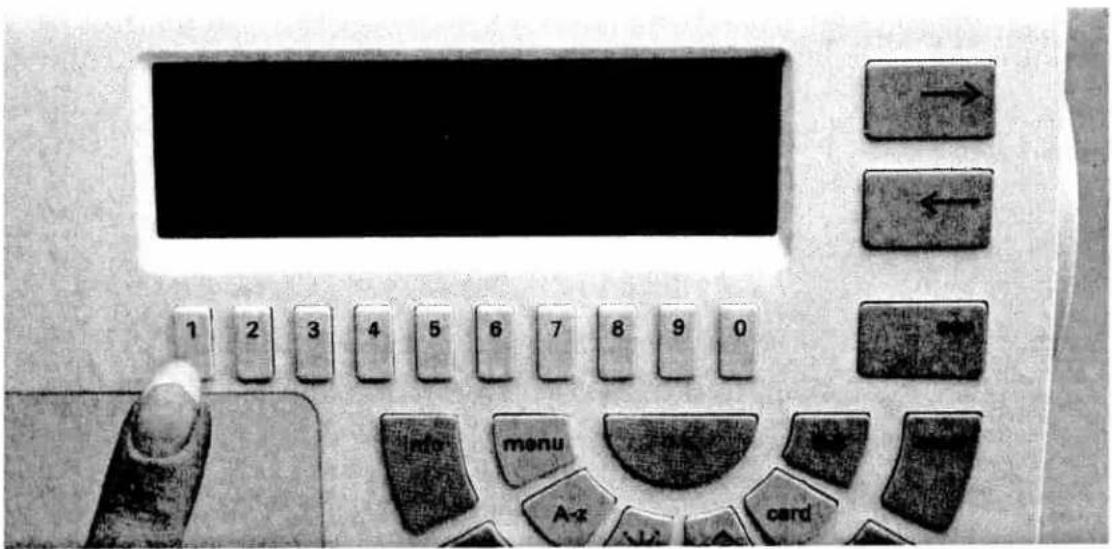
text_image
1 2 3 4 5 6 7 8 9 0 info menu cardUsing the numeric keys, select the memory containing the pattern you wish to transfer to the free memory. On the screen the pattern that has been copied to the free memory appears in the programming display.

text_image
Close-up of a vintage computer control panel with labeled buttons and a black LCD screen displaying the same.Now you can edit the pattern with any of the functions described before (delete, insert a stitch, etc.).
tive 7570

Made in Germany

text_image
1 2 3 4 5 6 7 8 9 0 esc info menu o.k. A-z 0-9 clear cardProgramming a p-pattern into an m-memory
If you wish to combine your freely programmed patterns with the programs from the machine, you must program the corresponding p-memory into an empty m-memory. Select an empty m-memory and enter the pattern (e.g. 194).
Now select the p-memory containing the desired pattern. The pattern is displayed along with the length and width data, which you can still edit before saving it (as described below). On the right-hand side of the display the message "Save with o.k." appears. When pressing the "o.k." key the p-pattern will be saved in the m-memory.
ive 7570

Made in Germany
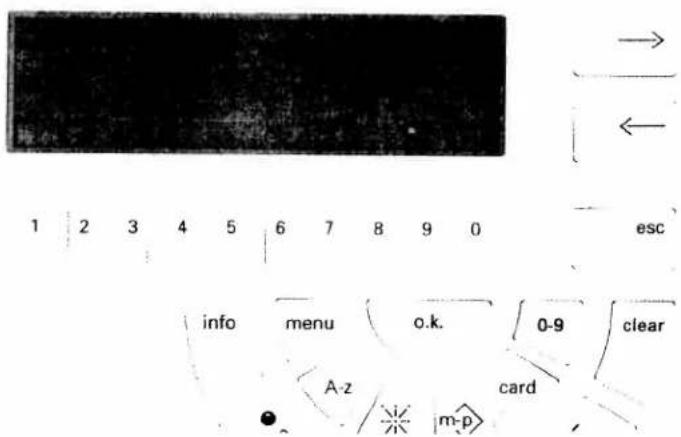
text_image
1 2 3 4 5 6 7 8 9 0 esc info menu o.k. 0-9 clear A-z card m-pWidth and length
The width, length and balance can still be edited before saving the pattern in the m-memory. After editing press the "o.k." key. The pattern will be added to the pattern sequence.
natural_image
Black-and-white photo of a woman in a white shirt with floral embroidery, standing against a dark background (no text or symbols visible)
natural_image
Black-and-white artistic composition featuring a girl's face, floral patterns, and a bird-like creature (no text or symbols)PFAFF
G. M. PFAFF
Aktiengesellschaft
Printed in Germany by
Subject to technical modifications.
No. 29-629 995-08/000·HR·8/95