creative 4874 - Sewing machine PFAFF - Free user manual and instructions
Find the device manual for free creative 4874 PFAFF in PDF.

User questions about creative 4874 PFAFF
0 question about this device. Answer the ones you know or ask your own.
Ask a new question about this device
Download the instructions for your Sewing machine in PDF format for free! Find your manual creative 4874 - PFAFF and take your electronic device back in hand. On this page are published all the documents necessary for the use of your device. creative 4874 by PFAFF.
USER MANUAL creative 4874 PFAFF
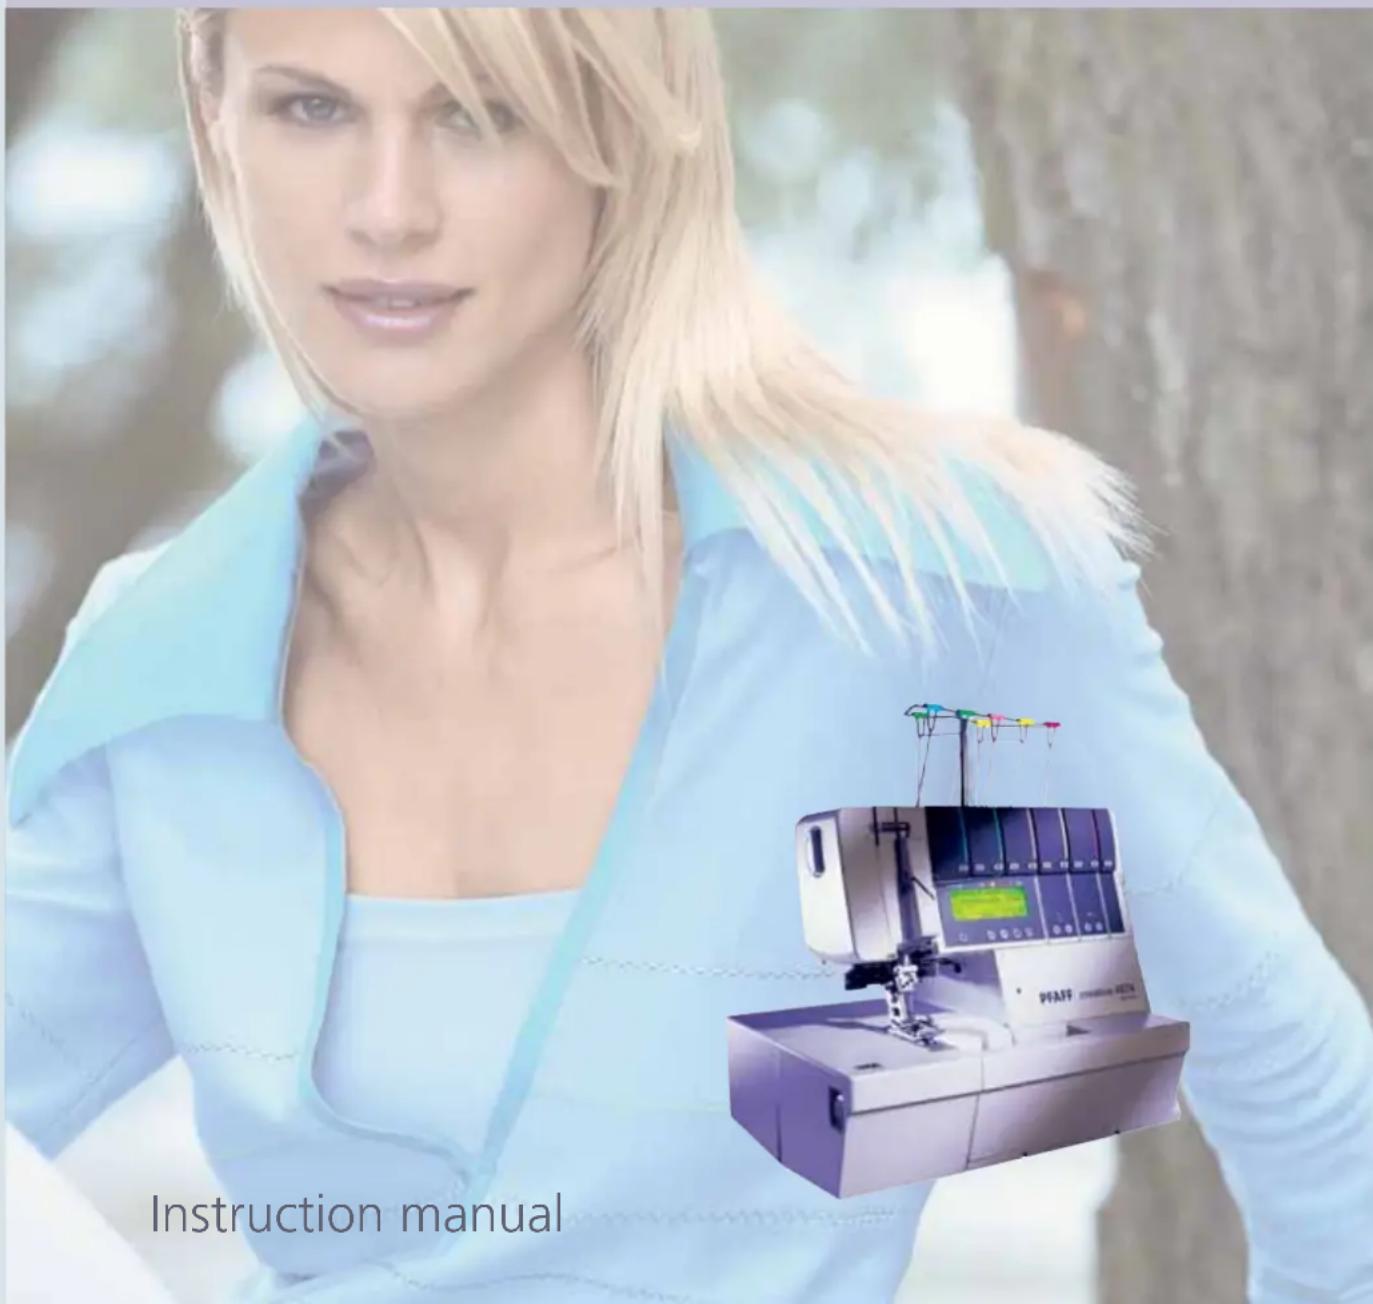
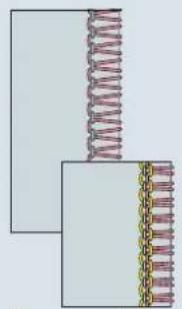
creative™ 4874 coverlock
text_image
Instruction manualInstruction manual
This household sewing machine is designed to comply with IEC/EN 60335-2-28 and UL1594
IMPORTANT SAFETY INSTRUCTIONS
When using an electrical appliance, basic safety precautions should always be followed, including the following: Read all instructions before using this household sewing machine.
DANGER - To reduce the risk of electric shock:
- A sewing machine should never be left unattended when plugged in. Always unplug this sewing machine from the electric outlet immediately after using and before cleaning.
• Always unplug before relamping. Replace bulb with same type rated 12 V, 5 Watt.
WARNING - To reduce the risk of burns, fi re, electric shock, or injury to persons:
- This sewing machine is not intended for use by persons (including children) with reduced physical, sensory or mental capabilities, or lack of experience and knowledge, unless they have been given supervision or instruction concerning use of the sewing machine by a person responsible for their safety.
• Children should be supervised to ensure that they do not play with the sewing machine. - Use this sewing machine only for its intended use as described in this manual. Use only attachments recommended by the manufacturer as contained in this manual.
- Never operate this sewing machine if it has a damaged cord or plug, if it is not working properly, if it has been dropped or damaged, or dropped into water. Return the sewing machine to the nearest authorised dealer or service center for examination, repair, electrical or mechanical adjustment.
- Never operate the sewing machine with any air openings blocked. Keep ventilation openings of the Sewing machine and foot controller free from the accumulation of lint, dust, and loose cloth.
- Keep fingers away from all moving parts. Special care is required around the Sewing machine needle.
- Always use the proper needle plate. The wrong plate can cause the needle to break.
- Do not use bent needles.
- Do not pull or push fabric while stitching. It may deflect the needle causing it to break.
- Wear safety glasses.
- Switch the sewing machine off ("0") when making any adjustment in the needle area, such as threading needle, changing needle, threading bobbin, or changing presser foot, etc.
- Always unplug the sewing machine from the electrical outlet when removing covers, lubricating, or when making any other user servicing adjustments mentioned in the instruction manual.
- Never drop or insert any object into any opening.
- Do not use outdoors.
- Do not operate where aerosol (spray) products are being used or where oxygen is being administrated.
- To disconnect, turn all controls to the off ("0") position, then remove plug from outlet.
- Do not unplug by pulling on cord. To unplug, grasp the plug, not the cord.
- Hold plug when rewinding into cord reel. Do not allow plug to whip when rewinding.
- Keep fingers away from moving parts, especially the area near the blades.
SAVE THESE INSTRUCTIONS
For the USA and Canada
This sewing machine has a polarized plug (one blade wider than the other). To reduce the risk of electric shock, this plug is intended to fit in a polarized outlet only one way. If the plug does not fit fully in the outlet, reverse the plug. If it still does not fit, contact a qualified electrician to install the proper outlet. Do not modify the plug in any way.
Table of contents
Technical part
Safety Instructions 1-3
How to use this instruction manual 1-6
Parts of creative 4874 1-10
Summary of stitch programs for the creative 4874 1-13
Technical section, general
Machine cover 2-2
Electrical connection 2-2
Connect the foot control 2-2
Power switch 2-2
Swivel table 2-3
Trim catcher 2-3
Front cover 2-3
Detachable thread stand 2-4
Thread stand 2-4
Thread guide slide 2-4
Foam pads/Cone holders 2-5
Thread run-off disc 2-5
Spool net 2-5
Detachable thread guide 2-5
Hand wheel 2-6
Presser foot lift 2-6
Presser foot 2-7
Changing the presser foot 2-7
Needle position 2-8
Changing a needle 2-9
Threading (stitch programs 01-20) 2-10 - 2-17
Thread guides 2-10
Threading the needle(s) 2-18 - 2-19
Important note on threading 2-20
Changing spools with the machine threaded 2-20
Needle threader 2-21
Summary of threading paths and
threading sequences 2-22
Speed control 2-25
Presser foot pressure 2-25
Thread cutter 2-26
Check spring for edging the thread chain 2-26
Disengage the upper knife 2-27
Engage the upper knife 2-27
Stitch finger 2-28
Attach converter 2-29
Disengage the upper looper 2-30
Remove knife guard 2-31
Set seam width 2-32
Setting the stitch length 2-33
Differential feed 2-34
Electronic functions
Set language 3-2
LCD Display 3-2
Button functions 3-4
Save 3-5
Recalling the memory 3-5
Selecting a memory 3-5
Notes on the saving to memory 3-6
Deleting all memories 3-6
Changing settings for tension, stitch length and differential feed directly without saving 3-7
Error 3-7
Cover stitch
Switching the machine to cover stitch
(progs. 01, 02, 03) 4-2
Threading the cover-stitch looper 4-4
Threading the needle(s) 4-6
Summary of threading paths and their threading sequences 4-7
Important notes on sewing with the cover stitch 4-7
Sewing table 4-7
Starting to sew 4-8
Preparing the project 4-8
Stopping sewing 4-8
Ruler 4-9
Stitch formation 4-10
Top Cover Stitch
Sewing program sticker 5-2
Detachable thread guide for top/deco cover 5-2
Detachable thread stand 5-2
Stitch program selection 5-3
Top/deco switch lever 5-3
Accessories 5-5
Top cover hook 5-5
Top cover round thread guide 5-6
Top cover triangle thread guide 5-6
Threading the cover-stitch looper 5-7
Threading the needle(s) 5-9
Top cover thread tension, blue 5-10
Threading the top cover thread 5-10
Summary of threading paths and their threading sequences 5-11
Starting to sew 5-12
Important notes on sewing with the
top cover stitch 5-12
Sewing table 5-12
Preparing your project 5-12
Stopping sewing 5-13
Stitch formation 5-14
Care of the machine
Removing the needle plate 9-2
Placing the needle plate 9-2
Oiling the machine 9-2
Cleaning of the machine 9-2
Cleaning rubber feet 9-3
Replacing the upper knife 9-3
Secure the upper knife for heavier fabric 9-3
Changing the light bulb 9-4
What happens if...? 9-5
Deco Cover
Sewing for stitch 6-2
Detachable thread stand 6-2
Detachable thread guide for top/deco cover 6-2
Top/deco switch lever 6-3
Stitch program selection 6-3
Accessories 6-6
Decorative thread guide 6-6
Threading the cover-stitch looper 6-7
Threading the needle(s) 6-9
Deco-cover thread tension dials, blue and yellow 6-10
Threading the deco cover threads 6-10
Summary of threading paths and their threading sequences 6-11
Important notes on sewing with the
Deco Cover Stitch 6-13
Sewing table 6-13
Preparing your project 6-13
Starting to sew 6-14
Stopping sewing 6-14
Stitch formation 6-16
Thread Tension
Correct thread tension 7-2
Correcting stitch formation 7-3 - 7-22
Thread table for 2-, 3-, and 4-thread overlock seams 7-23
Accessories
Standard accessories 8-2
Special accessories 8-5
natural_image
Woman in blue outfit carrying a plaid bag, outdoors with blurred greenery background (no text or symbols)Simple, up-to-date sewing
Congratulations! You have bought a high-quality product that provides unique advantages. Your new creative™ 4874 can take any fabric in its stride and will sew through thick and thin for you.
Your PFAFF® coverlock™ features the very latest in design and technology, and it is just as easy to use as this instruction manual is to follow.
If you now take a bit of time to study the instruction manual, nothing can go wrong. It is certainly time well spent, since it is the only way to find out just what your machine can do, and make full use of all its features.
If you have any further questions, just ask your PFAFF dealer. He is happy to be of service with any help or advice.
So now let's get started! We wish you many enjoyable hours creating your very own fashion ideas!
How to use this instruction manual
To make it as easy as possible to use your creative 4874, we have given this instruction manual a clear structure. The various chapters cover the following topics:
- Technical part – This chapter contains pages that describe the individual parts of the machine, as well as the table of contents and a program summary.
- Technical section, general – This chapter contains information on all the basic mechanical functions of your creative 4874. You will also find additional information in chapters 5 and 7.
- Electronic functions – This chapter contains information about all the electronic functions of the machine.
- Cover stitch – In this chapter, we explain the basic functioning of your creative 4874, using the coverstitch as an example.
- Top cover stitch – In this chapter, we describe the basic functioning of your creative 4874 with reference to top cover stitching.
- Deco cover – In this chapter, we are going to describe the basic functioning of your creative 4874 using the example of the deco cover stitch.
- Thread tension – This chapter includes information on correct thread tensions for all the stitches you can create with your creative 4874. We also provide you with a number of hints on selecting the correct thread.
- Accessories – This chapter includes a list of all standard and special presser feet available for use with your creative 4874.
- Care of the machine – This chapter includes all the information you need for care and maintenance of your creative 4874 and suggestions for solving certain problems.
Technical Part
This chapter contains pages that describe the individual parts of the machine and a program summary.
Note: Some fabrics have a lot of excess dye which can cause discoloration on other fabric but also on your sewing machine. This discoloring may be very difficult or impossible to remove.
Fleece and denim fabric in especially red and blue often contain a lot of excess dye.
If you suspect that your fabric/ready-to-wear garment contains a lot of excess dye, always pre-wash it before sewing/embroidering to avoid the discoloring.
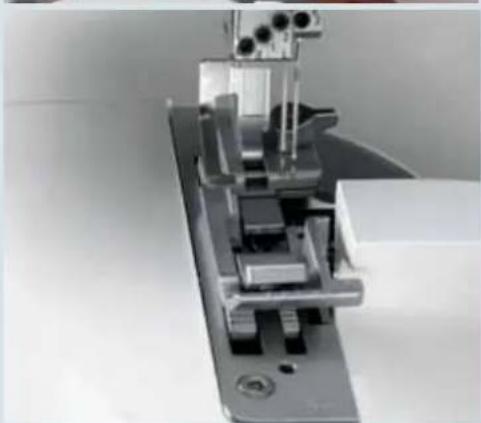
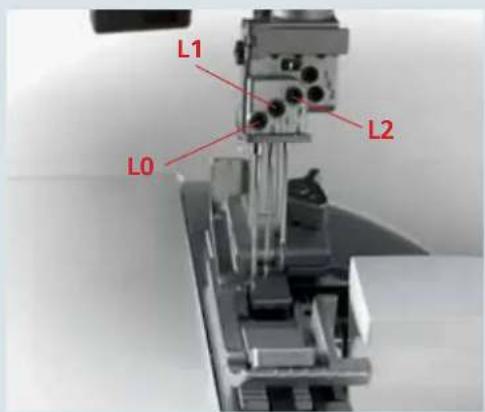
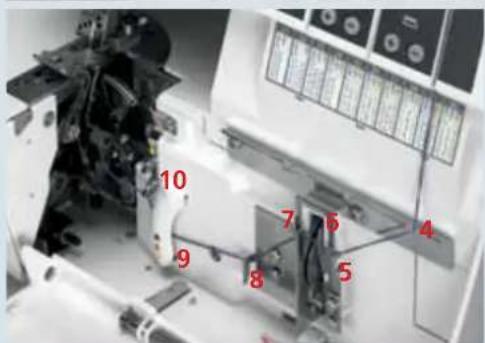
Parts of creative 4874
1 Needle thread tension
2 Needle thread tension
3 Carrying handle
4 Thread tension / upper looper
5 Thread tension / lower looper
6 Thread tension/ double chain-stitch and cover-stitch looper
7 Tension buttons + / -
8 Speed control
9 LCD Display
10 Tension release button
11 Stitch program selection buttons + / -
12 Memory button M
13 Memory selection button P
14 Stitch length adjustment buttons + / -
15 Differential feed adjustment buttons + / -
16 Front cover
17 Knife guard
18 Upper looper
disconnection lever
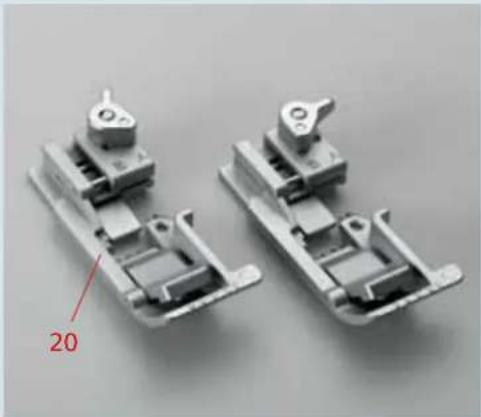
19 Needle plate
20 Standard presser foot
21 Swivel table
22 Seam width adjustment knob
23 Viewer for seam width
24 Needle holder
25 Top/deco sewing program sticker
26 Adjustment knob for presser foot pressure
27 Detachable thread stand
28 Thread guide slide - Top / deco cover
29 Color coded thread guides -Top / deco cover

text_image
Labeled diagram of a machine with numbered parts, likely for assembly or manufacturing documentation.30 Upper looper
31 Lower looper
32 Stitch fi nger
33 Double chainstitch and cover-stitch looper
34 Threading aid for double chainstitch and cover-stitch looper
35 Movable upper knife
36 Fixed lower knife
37 Check spring for edging the thread chain
38 Needle plate disconnection lever
39 Knob for lowering the upper knife
40 Tweezers
41 Converter
42 Allen key
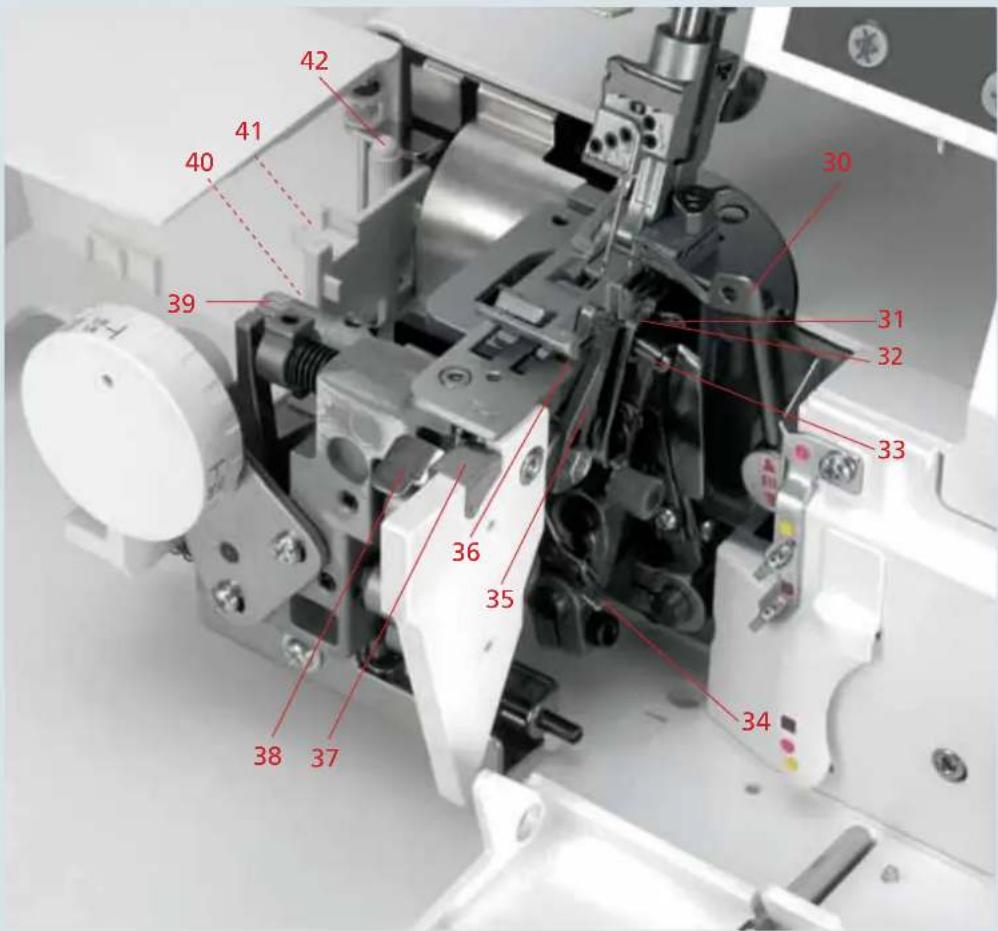
text_image
42 41 40 39 36 35 38 37 30 31 32 33 3443 Color coded telescoping thread guides
44 Telescoping thread guide slide
45 Thread tensions top/ deco cover
46 Rear thread guides top/deco cover
47 Thread cutter
48 Slots for detachable thread stand
49 Thread stand
50 Spool pin
51 Cone thread holder
52 Foam pads
53 Power cable socket
54 Foot control socket
55 Power switch
56 Hand wheel
57 Presser foot lifter
58 Rear thread guides
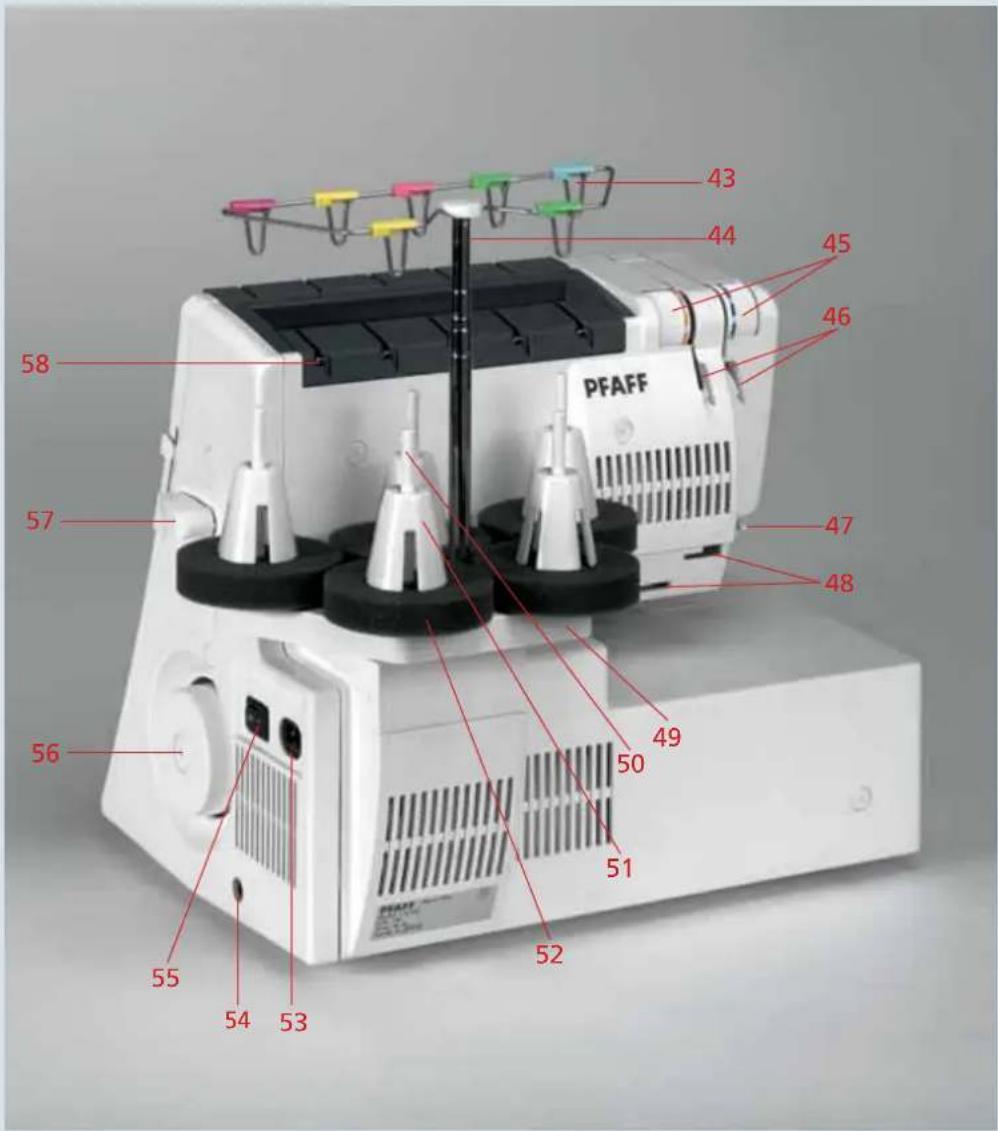
text_image
PFAFF 43 44 45 46 58 57 47 48 56 50 49 51 52 55 54 53Summary of stitch programs for the creative 4874
natural_image
Two rectangular panels with dashed and dotted lines, one with a patterned side (no text or symbols)Program 01
natural_image
Diagram showing two layered structures with dashed and solid lines, one partially submerged in a red truss bridge (no text or symbols)Program 02
natural_image
Two abstract diagrams showing vertical dashed lines and a patterned grid structure (no text or symbols)Program 03

natural_image
Two overlapping document sheets with a dashed vertical line and a pink dotted line on the right page (no text or symbols)Program 04
natural_image
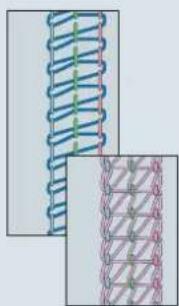
Two spring illustrations with coiled spring, no text or symbols presentProgram 05
natural_image
Two spring-loaded components with coiled spring, no text or symbols visibleProgram 06
natural_image
Pure diagram of two overlapping rectangular blocks with a coiled spring pattern on top (no text or symbols)
natural_image
Pure diagram of two rectangular blocks with a coiled spring, no text or symbols presentProgram 08Program 07
natural_image
Pure diagram of two vertical coils placed on a rectangular base, no text or symbols present
natural_image
Two abstract geometric shapes with interlocking rings, no text or symbols presentProgram 10Program 09
Program No. Description Use
| 01 2-needle cover hem, narrow For hemming stretch fabrics and piping, for decorative effects. | |
| 02 2-needle cover hem, wide For hemming stretch fabrics and for decorative effects. | |
| 03 3-needle cover hem For hemming highly stretch fabric and for decorative effects. | |
| 04 Chainstitch For sewing together extremely durable fabrics such as upholstery covers and denim, both without overedge. May also be used for decorative effects. | |
| 05 2-thread fl atlock, narrow As fl atlock seam for sewing stretchy fabrics together with decorative effect, or for overedging light fabrics. | |
| 06 2-thread fl atlock, wide As fl atlock seam for sewing stretchy fabrics together with decorative effect, or for overedging medium fabrics. | |
| 07 2-thread serging, narrow For overedging light fabrics. | |
| 08 | 2-thread flat hem For overedging very fine fabrics and as decorative edge fi nish. |
| 09 | 2-thread fold. rolled hem For overedging very fine fabrics and as decorative edge fi nish. |
| 10 3-thread overedge seam, narrow For edging light, easily fraying fabrics. | |

natural_image
Pure electrical circuit lines without any symbolsProgram 11
natural_image
Pure diagram of coiled spring components without any text, numbers, or symbolsProgram 12
natural_image
Two rectangular panels with coiled spring patterns, no text or symbols presentProgram 13

natural_image
Two spring-loaded components with coiled spring, shown from different angles (no text or symbols)Program 14

natural_image
Pure diagram of two rectangular blocks with a coiled spring-like structure on top, no text or symbols present.Program 15

natural_image
Two rectangular panels with coiled metal coils, no text or symbols presentProgram 16
natural_image
Diagram showing two layered structures with a coiled spring above and a coiled spring below, no text or symbols present.Program 17
natural_image
Two rectangular panels with coiled spring-like structures, no text or symbols present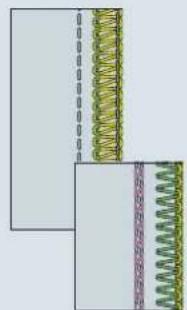
natural_image
Diagram showing two layered structures with coiled spring elements, no text or symbols presentProgram 19Program 18rogram 20

natural_image
Pure diagram of layered materials with no text, numbers, or symbolsProgram No. Description Use
| 11 3-thread overedge seam, wide For overedging medium to heavy, easily fraying fabrics. | |
| 12 3-thread serging, wide For overedging heavy fabrics not prone to fraying | |
| 13 3-thread fl atlock, narrow As fl atlock seam for sewing stretchy fabrics together with decorative effect and as decorative edge fi nish. Also for overedging medium weight fabrics. | |
| 14 3-thread fl atlock, wide As fl atlock seam for sewing stretchy fabrics together with decorative effect and as decorative edge fi nish. Also for overedging medium weight fabrics. | |
| 15 2-needle, 3-thread overedge seam | For sewing together and overedging light, highly stretchy fabrics. |
| 16 3-thread fl at hem For overedging light to medium fabrics and as decorative edge fi nish. | |
| 17 3-thread fold. rolled hem For overedging light to medium fabrics and as decorative edge fi nish. | |
| 18 4-thread overedge seam For sewing together all fabrics with overedge, particularly stretch fabrics. | |
| 19 4-thread safety stitch, wide For sewing together heavy fabrics with overedge. | |
| 20 5-thread safety stitch, wide For sewing together heavy fabrics with overedge. | |

natural_image
Diagram showing two types of coiled fibers or springs, one with a blue helical end and the other with a pink lattice structure (no text or symbols)Program 21

natural_image
Two technical diagrams showing coiled and triangular structural components (no text or symbols)Program 22
natural_image
Two-panel illustration showing coiled and striped structures (no text or symbols)
chemical
Molecular structure diagram showing layered arrangement of atoms with color-coded elementsProgram 28
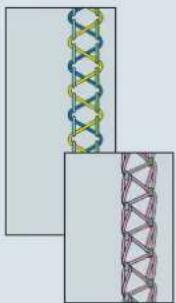
natural_image
Two abstract geometric diagrams showing a DNA double helix and a zigzag patterned structure (no text or symbols)Program 24Program 2Program 25

natural_image
Two abstract diagrams showing wavy and zigzag patterns, one with dashed lines and the other with solid lines (no text or symbols)
natural_image
Two abstract diagrams showing a chain of interlocking chains and a patterned structure (no text or symbols)Program 30
chemical
Molecular structure diagram showing a helical chain with yellow, blue, and green atoms connected by bondsProgram 26

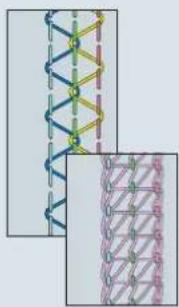
natural_image
Diagram of a DNA double helix structure with two views showing different helix orientations (no text or labels)Program 27
chemical
Diagram of a layered material structure showing layered arrangement with green, red, and pink componentsProgram 28
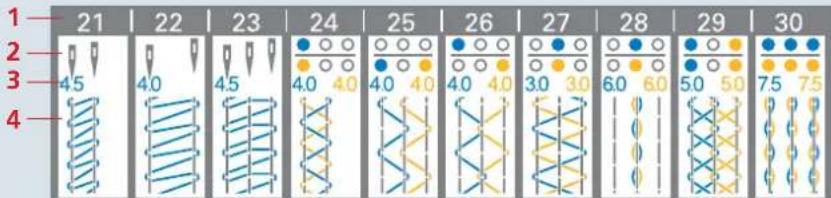
Program No. Description Use
| 21 2-needle Top-cover, narrow For hemming stretch fabric and for decorative effects. |
| 22 2-needle Top-cover, wide For hemming stretch fabric and for decorative effects. |
| 23 3-needle Top-cover For hemming highly stretch fabric and for decorative effects. |
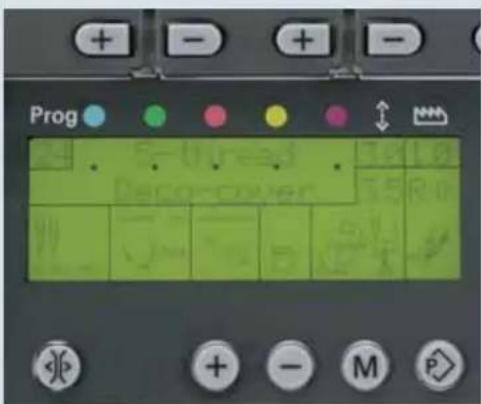
| 24 5-thread Deco-cover For decorative effects and for sewing stretch fabric. |
| 25 6-thread Deco-cover For decorative effects and for sewing stretch fabric. |
| 26 6-thread Deco-cover For decorative effects and for sewing stretch fabric. |
| 27 6-thread Deco-cover For decorative effects and for sewing stretch fabric. |
| 28 6-thread Deco-cover For decorative effects and for sewing stretch fabric. |
| 29 8-thread Deco-cover For decorative effects and for sewing stretch fabric. |
| 30 10-thread Deco-cover For decorative effects and for sewing stretch fabric. |

natural_image
Interior bedroom with yellow and red checkerboard curtains, a large window, and a bed of pillows (no text or symbols visible)Technical section, general
This chapter contains information on all the basic mechanical functions of your creative 4874. You will also find additional information in chapters 5 and 7.
Machine cover
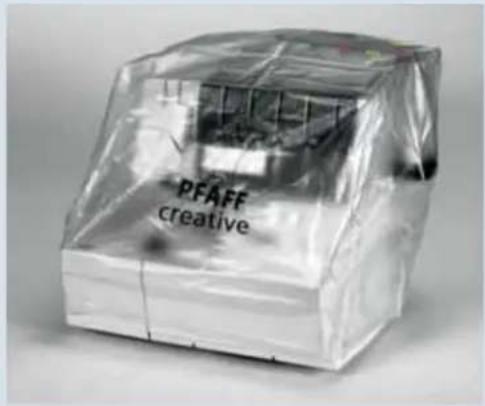
The machine cover protects your machine from dust and dirt. When you have fi nished sewing, push the thread guides (28 and 44) down. The thread stand (49) must be pushed as far as it will go towards close to the machine; you can take the thread cones off fi rst, but this is not essential. Now you can pull the 4874 cover over the machine. The operator's manual and accessories can be placed in the pockets.
Electrical connection
Plug the power cable into socket (53) on the machine, and the power supply.
text_image
PFAFF creative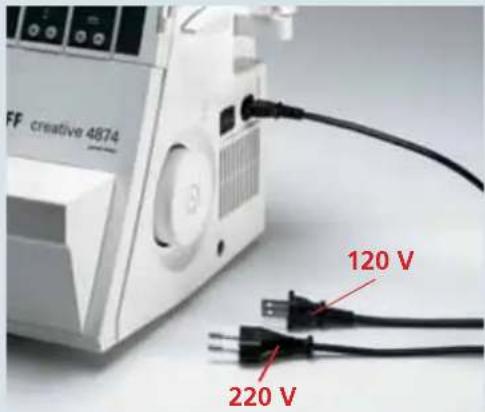
text_image
FF creative 4874 120 V 220 VConnect the foot control
Insert the foot control plug in the socket (54) on the machine.
The foot control YC-485 has to be used for this sewing machine.

natural_image
White portable electronic device labeled 'creative 4874' next to a smaller electronic device with cables (no visible text or symbols on device body)Power switch
When the power switch (55) is turned on, the sewing light and the LCD display will light up (9).
The machine is now ready for use.

natural_image
Close-up of a white electronic device with ventilation slots and a black cable inserted (no visible text or symbols)Technical section, general

natural_image
Close-up of a mechanical device interior showing internal components and no visible text or symbolsSwivel table
Push the swivel table (21) to the left. The converter, the tweezers and the allen key are located behind the swivel table.
Note: As soon as either the swivel table (21) or the front cover (16) is opened, the power supply to the machine is cut off for safety reasons, so that you cannot continue sewing.

text_image
PFAFF creative 4874Front cover
Push the front cover (16) to the right as far as it will go and swing it down. The top/deco cover sewing program sticker is behind the front cover. The 5 most important stitch types and their threading paths are illustrated in color on the inside of the front cover.
Note: As soon as either the front cover (16) or the swivel table (21) is opened, the power supply to the machine is cut off for safety reasons, so that you cannot continue sewing.

natural_image
Close-up of a white industrial machine labeled 'PFAFF creative 4874' with no visible text or symbols on its body.Trim catcher
Insert the upper catches of the trim catcher in the upper slots in the front cover (16).
Press the bottom part of the catcher until the lower catches engage in the lower slots of the front cover.
text_image
PFAFF creative 4874Perform these steps in reverse order to remove the trim catcher.
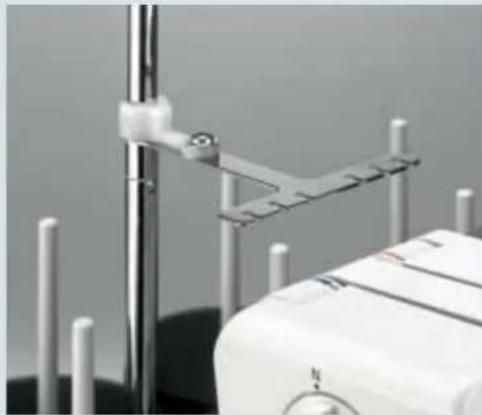
Note: The detachable thread stand is required for stitch programs 21 – 30.
Detachable thread stand
Insert the top catches of the detachable thread stand (27) into the top slots on the rear cover and press the bottom portion of the stand against the cover.
Push the detachable thread stand to the right as far as it will go.
Place one foam pad (52) and one cone holder (51) on each of the spool pins (50).
To remove, push the thread stand to the left and pull up.
Thread stand
Before placing the spools, you must slide the thread stand (49) back as far as it will go.
Place one foam pads (52) and one thread cone holder (51) on each of the spool pins (50).
Thread guide slide
Pull the thread guide (28 and 44) up as far as it will go.
To assure optimum thread feed, the two top slide sections must be rotated slowly until you hear their locking pommels click into place.
natural_image
Close-up of industrial equipment components with no visible text or symbols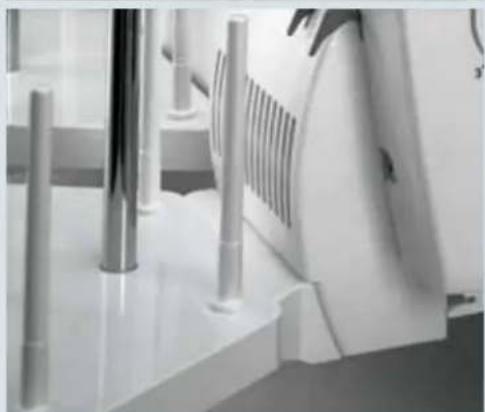
natural_image
Close-up of a kitchen appliance with metal fixtures and ventilation grilles (no visible text or symbols)
natural_image
Close-up of a PFAFF industrial machine with spools and control panel (no visible text or symbols)
natural_image
Hand placing colorful microphones onto a device with control panel (no visible text or symbols)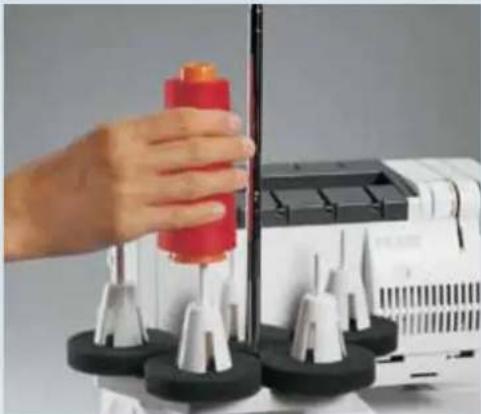
natural_image
Hand operating a sewing machine with spools and black base (no visible text or symbols)Foam pads/Cone holders
If you are using large cones (5,000 - 10,000 mm), the foam pads (52) and the cone holders (51) will be helpful to you.
With synthetic threads, the foam pads catch threads that have slipped down and help to advance the thread fl awlessly.
Cone holders serve to ensure that large cones are well positioned.

natural_image
Close-up of a sewing machine with black and gold components, no visible text or symbols on the device itself.Thread run-off disc
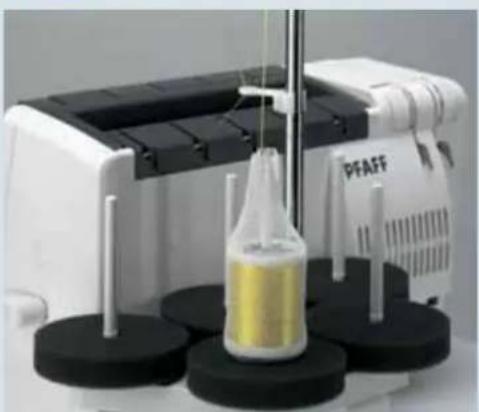
The thread run-off disc in the accessory box is used for smaller spools. Use the foam pads (52) and place the spool on the pin (50). Attach the thread run-off disc as shown in the illustration.

natural_image
Close-up of hands holding a wrapped object with red and white bands (no text or symbols visible)Spool net
The spool net in the accessory box should be pulled over the reel from below. Use for synthetic threads or decorative threads that can easily unwind from the spool. After you have done this, you can place the spool on the foam pad.
natural_image
Laboratory setup with a white PFAFF machine and a yellow liquid bottle on black circular bases (no visible text or symbols)Detachable thread guide
For sewing with decorative thread, use the detachable thread guide in the accessory box. Place it on the thread guide (44) and thread as shown in the illustration. Use the spool net and the foam pad.
Hand wheel
When turning the hand wheel (56) by hand, e.g. to raise the needle(s) to their highest position, always turn toward you.
Presser foot lift
Use the presser foot lifter (57) to raise or lower the presser foot. If you push the lifter one step up, you will be able to raise the presser foot to its maximum height of 6.5 mm for particularly thick fabrics.
Note: Once a thread chain has been formed, the presser foot no longer needs to be raised as long as you are working with the same thread and the same presser foot. You can simply lift the front of the presser foot gently with your thumb. Slide the fabric under the raised part of the presser foot. When the foot control is activated, the fabric will then be gripped and advanced by the feed dog automatically.
natural_image
Close-up of a white electronic device with a circular dial and red arrow indicator (no text or symbols)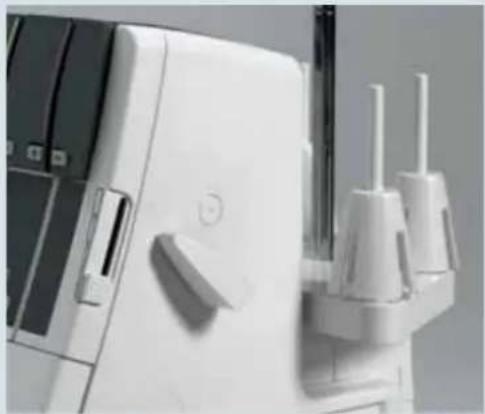
natural_image
Close-up of a white medical device with two metallic clips and a handle (no visible text or symbols)
natural_image
Close-up of a hand operating a PFAFF creative textile machine (no visible text or symbols on the machine body)Technical section, general
natural_image
Two mechanical component assemblies with no visible text or symbolsPresser foot
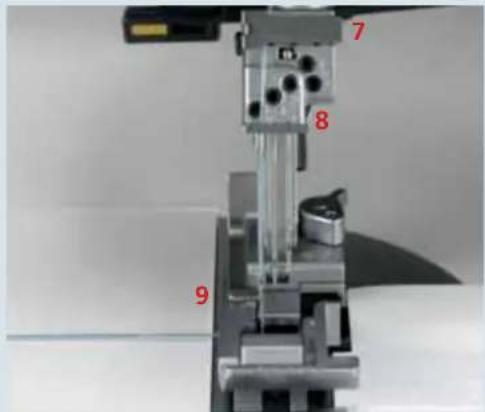
The standard presser foot has two different positions:
Position "A" - for sewing cover stitch (progs. 1, 2, 3), double chainstitch (prog. 4), the 4-thread safety seam (prog. 19) and the 5-thread safety seam (prog. 20).
Position "B" - for sewing programs 05 - 18.
To choose these positions, simply move the selection lever.
Note: The position of the presser foot, "A" or "B", appears in the LCD display (9) (see page 3-2).

natural_image
Two transparent plastic clip components labeled F and R, shown against a plain background (no text or symbols on the objects themselves)For cover stitch (progs. 1, 2, 3) and double chainstitch (prog. 4), clearview foot F from the accessory box can also be used.
For top cover (progs. 21, 22, 23) and deco cover (progs. 24 – 30), use clearview foot R from the accessories box.
Note: The foot you need to use will be shown in the LCD display (9) (see page 3-2).

natural_image
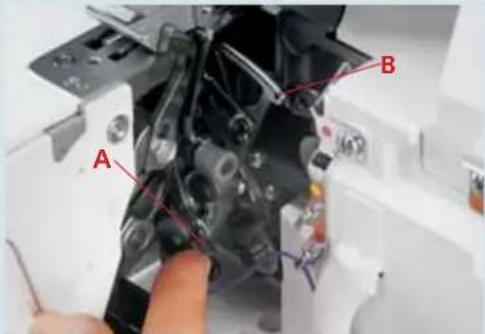
Close-up of a hand operating a sewing machine needle with labeled component A (no text or symbols beyond label)Changing the presser foot

Turn off the power switch
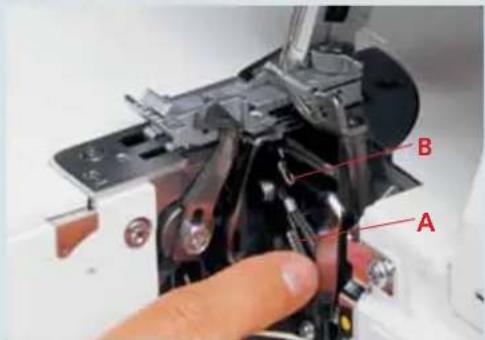
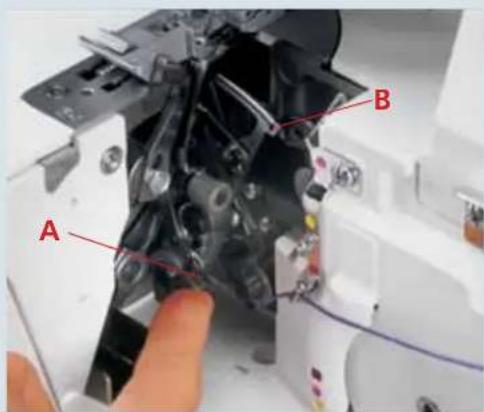
To remove: Raise the needle(s) to its/their highest position. Lift up the presser foot and press lever A on the back of the presser foot holder. The presser foot is released automatically and you can pull it out to the left.
natural_image
Mechanical assembly with metallic components and mounting base (no visible text or symbols)To insert: Place the presser foot below the presser foot holder so that when the presser foot lifter is lowered, the pin on the foot is directly beneath the presser foot holder. Lower the presser foot and if necessary press lever A, the presser foot will now click back into place.
Check: Lift the presser foot to confirm that it is correctly attached.
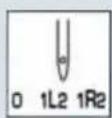
Needle position
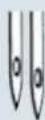
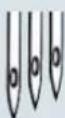
The 4874 offers a choice of 5 needle positions. You can sew with as many as 3 needles simultaneously. The needle positions are L0, L1, L2, R1 and R2. A retaining screw is provided above each needle.
Note: If the needles are inserted at R2 and R1, the left needle is slightly higher than the right.
In this operator's manual and in the LCD display (9) (see page 3-2), the different needle positions are shown in a schematic diagram. See the examples at top and bottom. Insert the needle(s) as shown in the LCD display (9) (see page 3-2).

text_image
R1 R2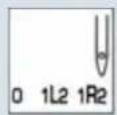


text_image
L1 L0 L2If the needles are inserted at L1 and L2, the left needle is slightly lower than the right.
If the needles are inserted at L0 and L2, the left needle is also lower than the right.
If the needles are inserted at L0, L1 and L2, the left needle is at the lowest point.


natural_image
Close-up of a sewing machine needle stitching a metal frame (no visible text or symbols)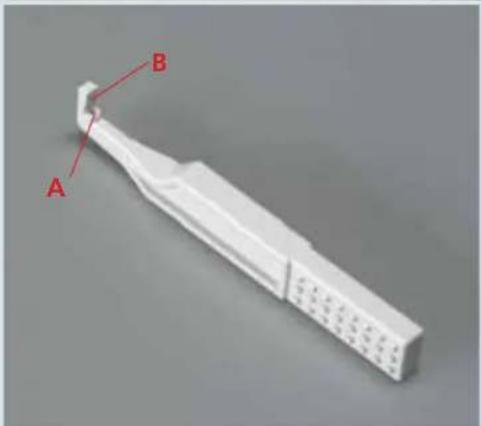
natural_image
3D model of a white plastic tool with labeled parts A and B (no text or symbols beyond labels)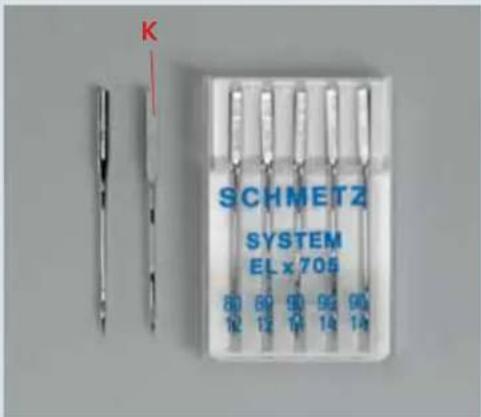
text_image
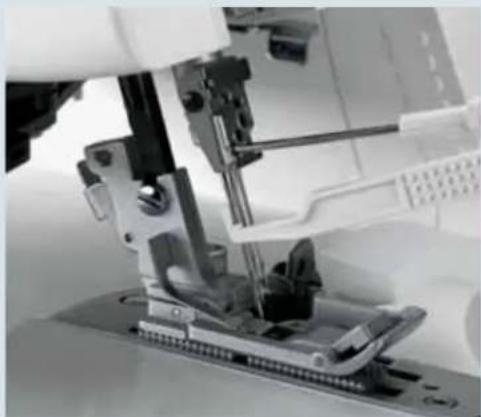
K SCHMETZ SYSTEM EL x 705 80 69 90 92 90 12 14 14Changing a needle
Turn off at the power switch
To remove: Lower the presser foot and raise the needle(s) to its/their highest position. Take the needle changing tool out of the accessory box and push it up over the needle as far as it will go. Loosen (but do not remove) the needle's retaining screw with the allen key and pull the needle out from below.
To insert: Insert the needle in hole A of the needle changing tool so that the fl at side K of the needle is opposite face B of the tool. Insert the needle as far as it will go into the needle holder (you may have to push a little harder by hand) and tighten the retaining screw. Remove the needle changing tool.
The 4874 uses system EL X 705 overlock needles, Cat. No. 2002.
Threading (stitch programs 01-20)
Thread guides
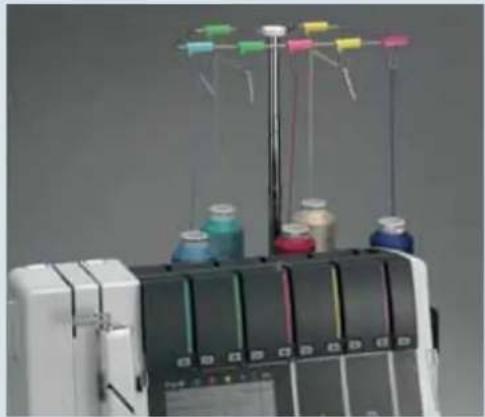
Slide the thread stand (49) backwards and pull the thread guide (44) up as far as it will go.
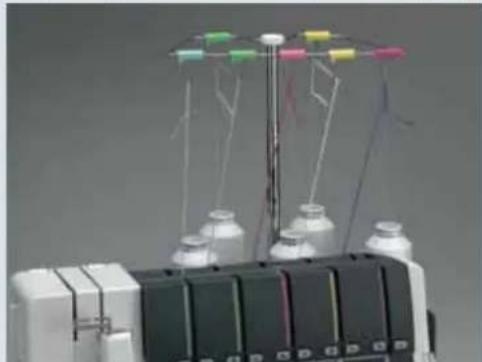
Place the spools on the spool pins (50). For notes on the spool net, the thread run-off disc, the foam pads and the cone holders, please see page 2-5. Thread the threads from the back to the front through the thread guides (43) as indicated by the color codes.
Lift the carrying handle (3). Thread the threads underneath the carrying handle into the rear thread guides (58). To do this, pull the thread down with both hands until it slips under the thread guide. Pass the thread between the tension discs and pull it down so that it is between the tension discs. Fold the carrying handle forwards.
natural_image
Industrial machine with spools of colored paper and control panel (no visible text or symbols)
natural_image
Person operating a sewing machine with colorful thread spools and yarn spool nearby (no visible text or symbols)Note: The thread tensions for threading are shown in the LCD display (9) (see page 3-5). The sticker behind the front cover is also provided to make threading easier.
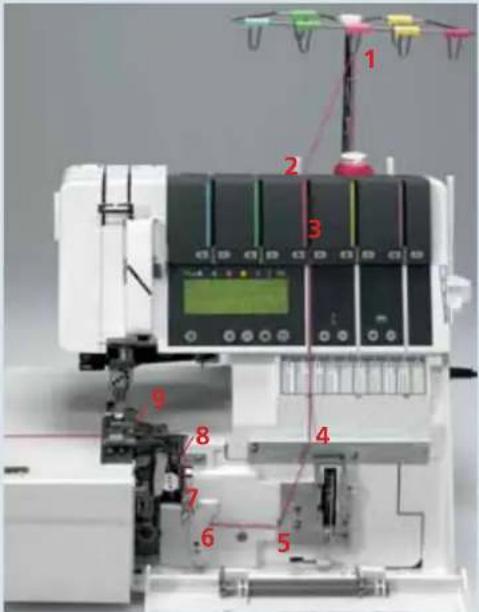
Thread single threads in order from 1 to 5. The open thread guides make threading easy. To ease the task further, use the tweezers located behind the swivel table.
Remove the trim catcher and open the front cover.
text_image
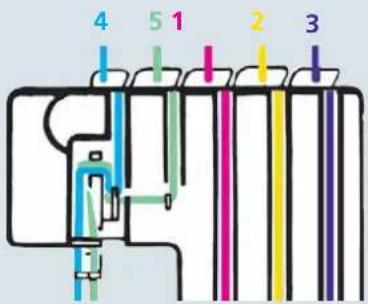
4 5 1 2 3
text_image
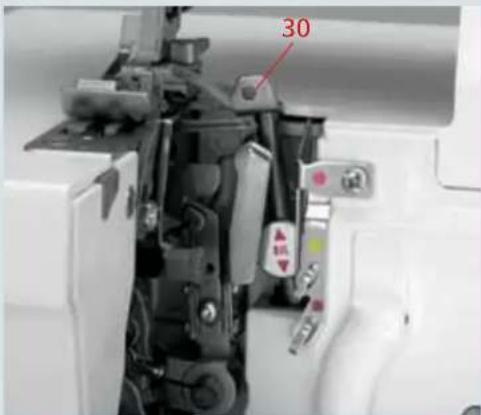
30Threading
Upper looper (red)
Turn the hand wheel towards you until the upper looper (30) reaches its highest position.
text_image
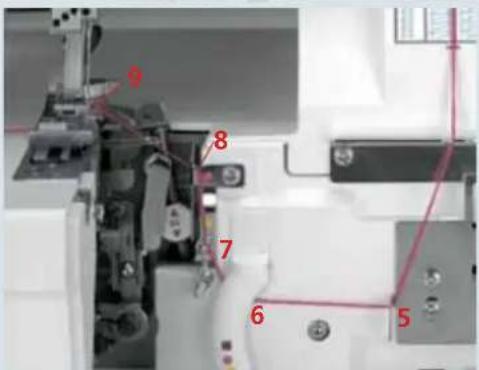
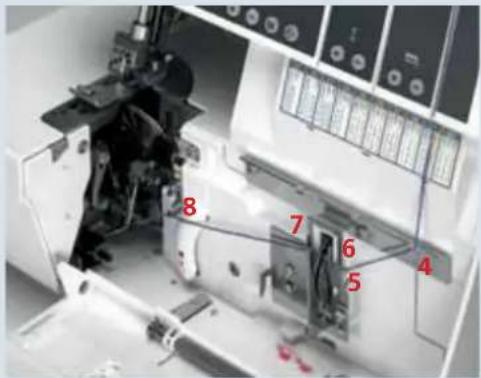
Labeled diagram of a sewing machine with numbered components, likely for assembly or maintenance instructions.Thread the threads in order from 1 to 9. Some of the thread guides are marked with a red dot.

natural_image
Close-up of mechanical components with red wire and numbered annotation (8), no readable text or symbols present.Thread the thread in thread guides 1 to 7. Pass the thread over the top of guide 8 from above and pull it down and to the left until it slips into the guide.
text_image
Labeled mechanical assembly diagram with numbered components and red annotationsFrom the front, pass the thread through the eye 9 of the upper looper. Pull about 10 cm (5") of thread through the hook and place it facing to the left under the presser foot.
Threading
Lower Looper (yellow)
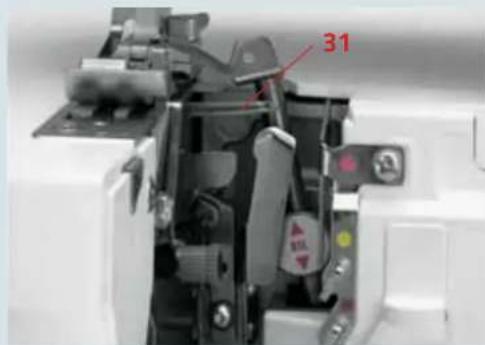
Turn the hand wheel towards you until the lower looper (31) is as far to the right as possible.
Thread the thread in order from 1 to 10. Some of the thread guides are marked with a yellow dot.
text_image
31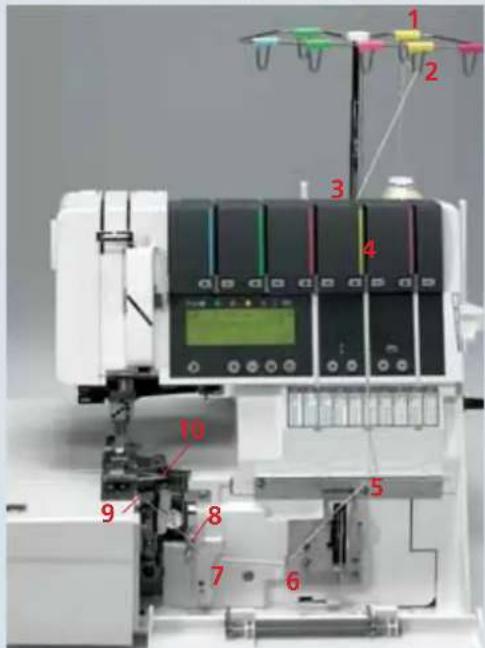
text_image
Labeled diagram of a machine tool with numbered components, likely for assembly or manufacturing documentation.Thread the thread in thread guides 1 to 6. Pass the thread under the latch 7 and into thread guide 8.

text_image
Labeled mechanical assembly diagram showing numbered components for assembly or maintenanceNote: The lever will return to its original position as soon as you start to sew.
Press lever A down and hook the thread into guide B from left to right. The illustration right shows how to do this.
text_image
A B
text_image
B C APass the thread forwards through eye C (= Threading point 10) of the lower looper.
natural_image
Close-up of a mechanical assembly with visible gears and components (no text or symbols)Pull about 10 cm (5") of thread through the hook and place it to the left under the presser foot.
Threading
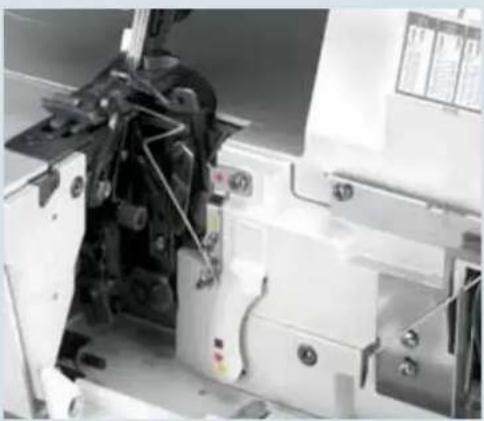
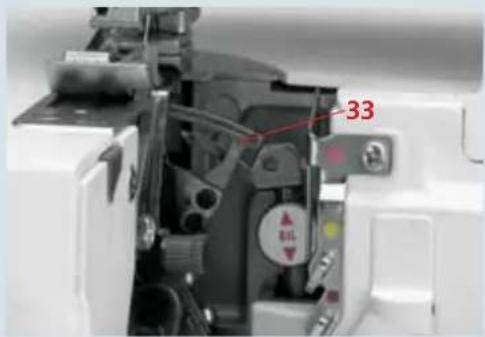
Double chainstitch and cover stitch looper for progs. 04, 19 and 20 (purple)
Turn the hand wheel towards you until the double chainstitch and cover stitch looper (33) is as far to the right as possible.
Thread the thread in order from 1 to 12. Some of the thread guides are marked with a purple square.
text_image
33
text_image
Labeled diagram of a machine tool with numbered components, likely for assembly or testing purposes.Note: In the case of thread guides 6 and 7, the thread is simply placed on top of them, not threaded through.
Thread the thread in the guides from 1 to 8. Pull the thread under latch 9 and into thread guide 10.
text_image
10 7 6 4 9 8 5Note: The lever will return to its original position as soon as you start to sew.
Press lever A up and hook the thread into slot B. The illustration right shows how to do this.
text_image
A B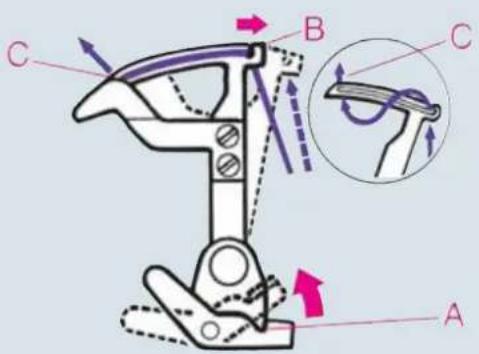
text_image
Technical diagram of a mechanical device with labeled parts A, B, C and directional arrows indicating motion or force vectors.From the front, pass the thread through eye C (- threading point 12) of the double chain stitch and cover stitch looper.

natural_image
Close-up of a mechanical assembly with visible gears and control panels (no text or symbols)Pull about 10 cm (5") of thread through the looper and place it to the left under the presser foot.
Exception:
Threading double chain stitch and coverstitch looper for coverstitch (progs. 01, 02, 03) top/deco stitches (progs. 21-30) (purple)
Turn the hand wheel towards you until the double chainstitch or coverstitch looper (33) is as far to the right as possible.
Thread the threads in order from 1 to 10. Thread guide 8 is marked with a purple square
Note: In the case of thread guides 6 and 7, the thread is simply placed on top of them, not threaded through.
Thread the threads in the guides from 1 to 8. (Caution: The thread does not pass under the latch.)
Note: The lever will return to its original position as soon as you start to sew.
Press lever A up and hook the thread into slot B. The illustration right shows how to do this.

text_image
33
text_image
Labeled diagram of a laboratory instrument with numbered components, likely for equipment identification or testing purposes.
text_image
8 7 6 5 4
text_image
A B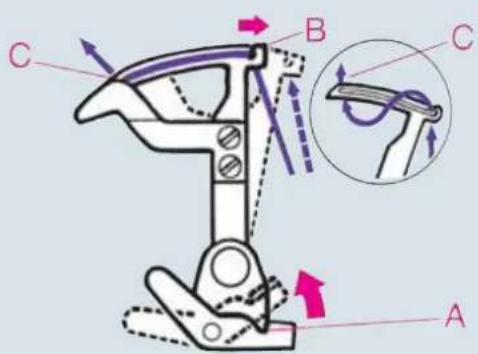
text_image
Technical diagram of a mechanical device with labeled parts A, B, C and directional arrows indicating motion or force vectors.From the front, pass the thread through eye C (- threading point 10) of the double chain stitch and cover stitch looper.

natural_image
Close-up of a mechanical assembly with no visible text or symbolsPull about 10 cm (5") of thread through the hook and place it to the left under the presser foot.
Threading the needle(s)
Thread the thread in order from 1 to 8.
The thread must pass through the lower slot in thread guide 5. To thread needles more easily, use the needle threader in the accessories box (see page 2-21).
Pull the thread about 10 cm (5") through the eye of the needle and place it facing to the left under the presser foot (if necessary, press the tension release button (10), see page 3-4).
If you sew with the needle(s) L0, L1, or L2 you have to use the thread guide A.

text_image
1 2 3 4 5 6 7 8 PFAFF creative 4874
text_image
5 4 Prog
text_image
7 8
text_image
ATechnical section, general

text_image
1 2 3 4 5 6 7 8 9 PFAFF creative 4874Exception:
Threading needle L2 when sewing the 5-thread safety seam (prog. 20), the 4-thread safety seam (prog. 19) and double chainstitch (prog. 04)
Thread the thread in order from 1 to 9.
Note: To thread the double chainstitch (prog. 04) you have to thread the green tension (see page 2-22).
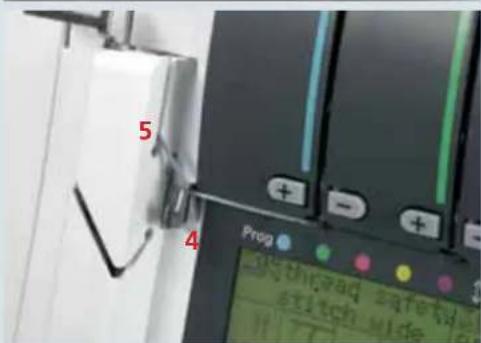
text_image
5 Prop 4 50 the rad safetid stich wideThe thread must pass through the upper slot in thread guide 5.

text_image
7 8 9Pull the thread about 10 cm (5") through the eye of the needle and place it facing to the left under the presser foot (if necessary, press the tension release button (10), see page 3-4).
Note: Even when the looper threads break, you must remove the threads from the eye of the needle, rethread the looper threads, and then rethread the needles.
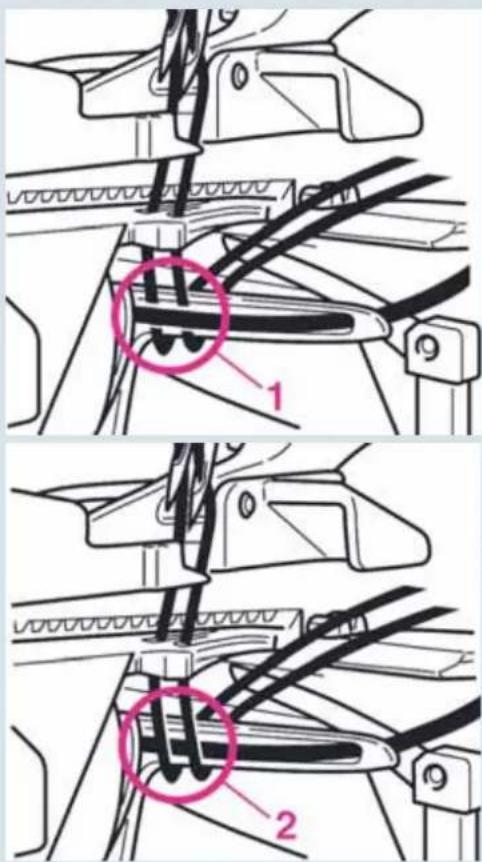
Important note on threading
Always thread the needles last, so the needle thread pass over the looper thread as shown in Fig. 2 and not under it as in Fig. 1. Otherwise the thread may break or stitches may be formed incorrectly.
text_image
Technical diagram showing mechanical assembly steps with labeled parts 1 and 2, highlighting a highlighted section in image 1.Changing spools with the machine threaded
Cut the spool threads close to the spool and position new spools. Tie the thread that is still in the machine to the threads on the new spools and unthread the needles. Press the tension release button (10) (see page 3-4) and pull the needle threads until the knots have advanced through the last thread guide before the needles. Cut the knots off and thread the thread through the eye of the needle. You can pull the looper threads all the way through the looper eyes and place them to the left under the presser foot.
natural_image
Laboratory setup with pipette and test tubes (no visible text or labels)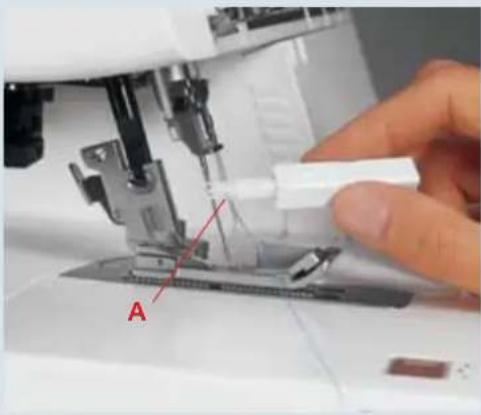
natural_image
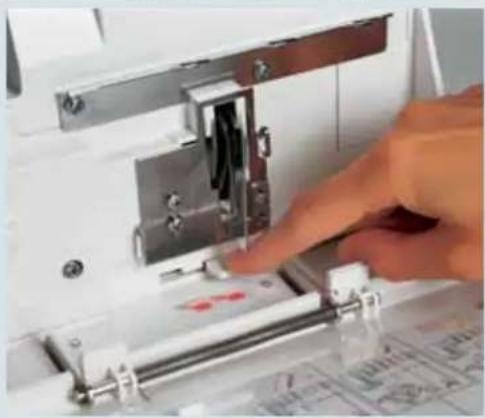
Close-up of a sewing machine needle stitching fabric, with a hand adjusting the component (no visible text or symbols)Needle threader
Turn off at the power switch
Raise the needle(s) to its/their highest position and lower the presser foot. Place the thread running from right to left in notch A of the needle threader (the needle threader is included in the accessory box).
One of the two triangles must be pointing upwards.
natural_image
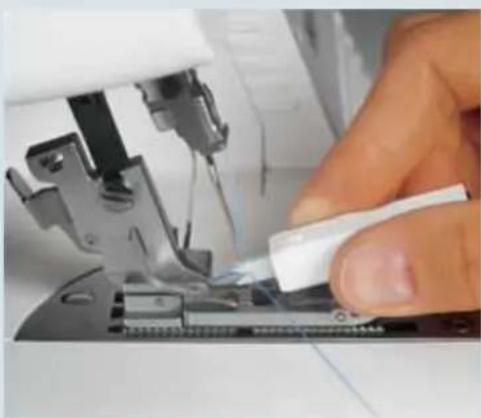
Close-up of a hand using a sewing machine to adjust or install a component (no visible text or symbols)Place the needle threader against the front groove of the needle. Move down as far as the eye of the needle and press the threader gently against the needle. This causes a small metal pin to pass through the eye and the needle is threaded automatically.
Note: If you press too hard, the small metal pin will bend and you will no longer be able to use the threader to thread the needle.
natural_image
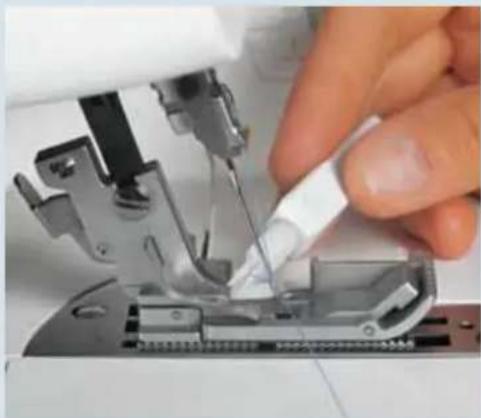
Close-up of a hand using a sewing machine to adjust or repair a metal component (no visible text or symbols)Now you can use the needle threader to pull the thread loop through to the rear.
Summary of threading paths and threading sequences
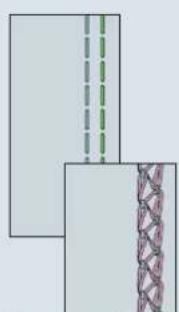
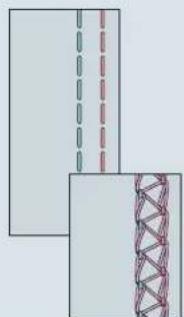
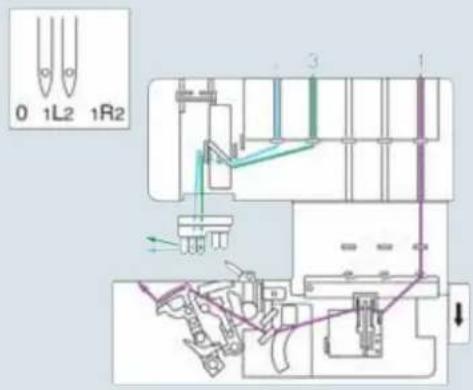
Stitch program 01:
2-needle cover hem, narrow
Stitch program 02:
2-needle cover hem, wide
Stitch program 03:
3-needle cover hem
Stitch program 04:
Chainstitch
text_image
0 1L2 1R2 3 1
text_image
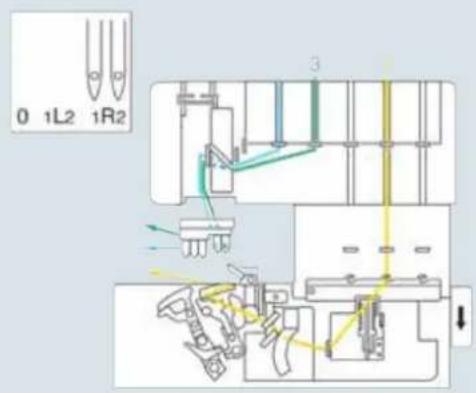
0 1L2 1R2 3 1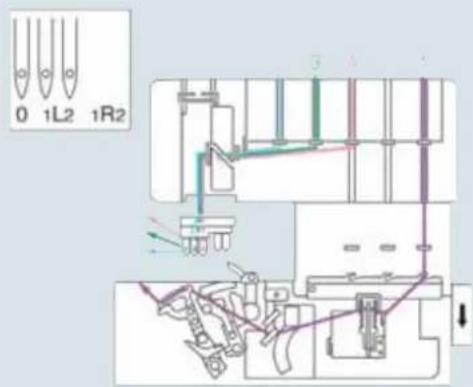
text_image
0 1L2 1R2
text_image
0 1L2 1R2Technical section, general

text_image
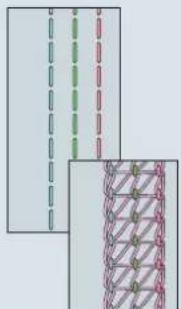
0 1L2 1R2Stitch program 05:
2-thread fl atlock, narrow
Stitch program 07:
2-thread serging, narrow
Stitch program 08:
2-thread fl at hem
Stitch program 09:
2-thread fold. rolled hem
text_image
0 1L2 1R2Stitch program 06:
2-thread fl atlock, wide
text_image
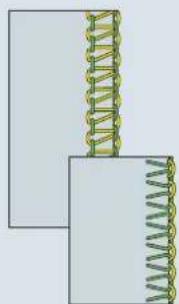
0 1L2 1R2 3 1Stitch program 10:
3-thread overedge seam, narrow
Stitch program 13:
3-thread fl atlock, narrow
Stitch program 16:
3-thread fl at hem
Stitch program 17:
3-thread fold. rolled hem
text_image
0 1L2 1R2Stitch program 11:
3-thread overedge seam, wide
Stitch program 12:
3-thread serging, wide
Stitch program 14:
3-thread fl atlock, wide
Stitch program 15:
2-needle, 3-thread overedge seam
text_image
0 1L2 1R2 3Stitch program 18:
4-thread overedge seam
text_image
0 1L2 1R2Stitch program 19:
4-thread safety stitch, wide

text_image
0 1L2 1R2 4 2 1000 1000 1000Stitch program 20:
5-thread safety stitch, wide

text_image
0 1L2 1R2 Y 5 1 2 3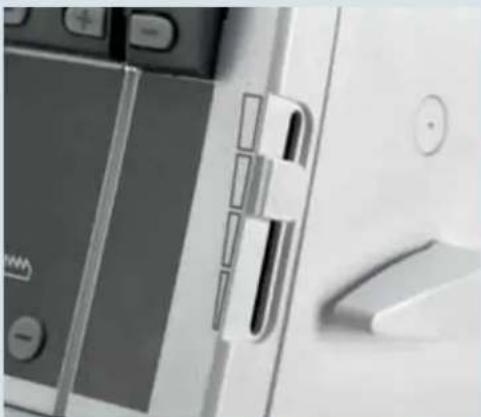
natural_image
Close-up of a smartphone keyboard and mouse with no visible text or symbolsSpeed control
With the speedcontrol slider (8), you can set the maximum speed to any value from 700 rpm to 1500 rpm.
If you select programs 21 – 30, the maximum speed is reduced to 400 rpm.

natural_image
Close-up of a white industrial machine with a circular dial and labeled components (no readable text or symbols)Presser foot pressure
The preset presser foot pressure on the machine is suitable for medium fabrics. For most fabrics, the presser foot pressure does not need to be altered.
If you intend to work with lighter or heavier fabrics, however, it may be necessary to reset the pressure. In this case, you can choose from six positions; make your selection with the presser foot pressure adjustment knob (26).
The standard setting is "N".
Note: Lower the presser foot before turning the presser foot pressure adjustment knob. This makes the knob easier to turn.
Thread cutter
At the end of a seam, sew a thread chain of 15 to 20 cm (7"-10") and pull the thread chain from back to front over the thread cutter (47).
This will cut off the thread chain.
Check spring for edging the thread chain
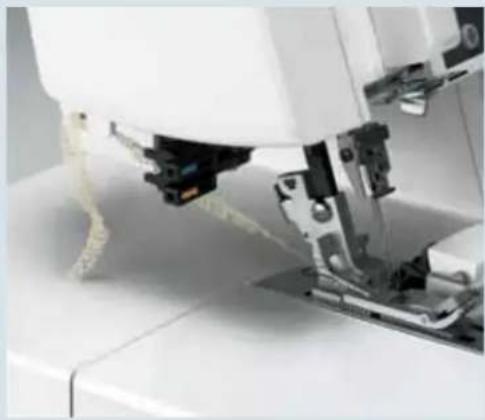
Use the check spring for edging the thread chain (37) to edge the thread chain at the start of the seam.
To do this, sew a thread chain at least 10 cm long before you begin the seam. Raise the presser foot and pull the thread chain carefully away from the stitch fi nger (32). Draw the thread chain forwards and secure it under the spring.
Note: This technique cannot be used for the 5-thread safety seam, the 4-thread safety seam, the double chain stitch, the rolled hem, or for sewing in the fabric (progs. 01-03, 21-30).
Place the fabric just in front of the needle(s). If necessary, fi rst cut about 3 cm along the cutting line with a pair of scissors. Lower the presser foot and start sewing. The thread chain will be drawn inside the seam automatically.
natural_image
Close-up of a sewing machine needle stitching white fabric (no visible text or symbols)
natural_image
Close-up of a sewing machine needle stitching fabric, no visible text or symbols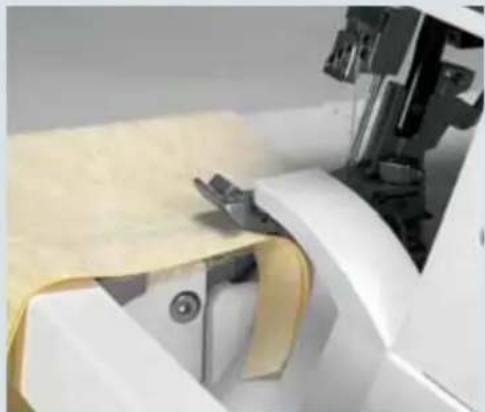
natural_image
Close-up of a sewing machine needle stitching yellow fabric, no visible text or symbols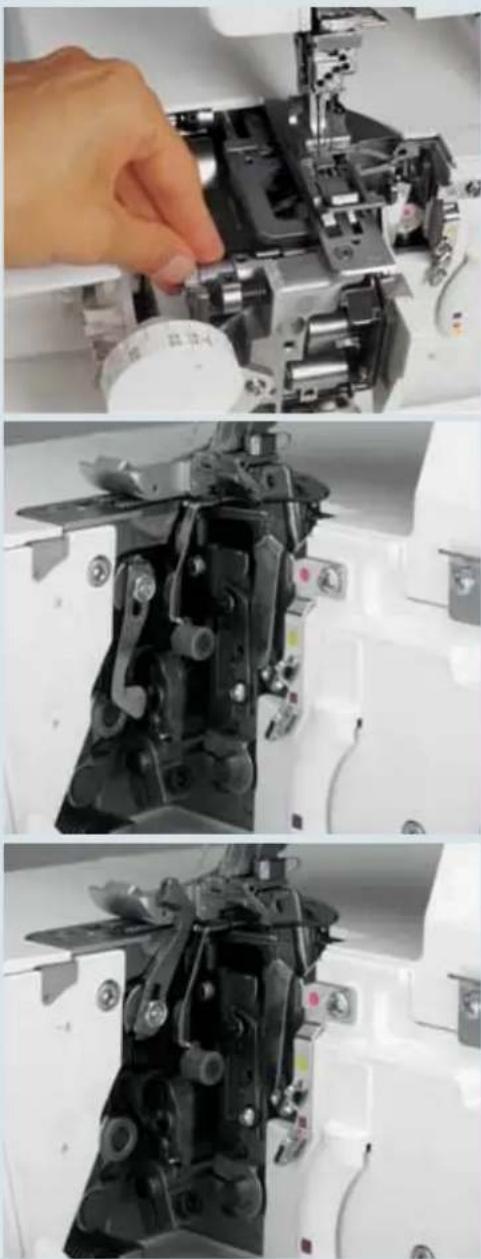
natural_image
Three-panel photo showing a hand operating a sewing machine, with close-up views of mechanical components (no visible text or symbols)Disengage the upper knife
Turn off the power switch
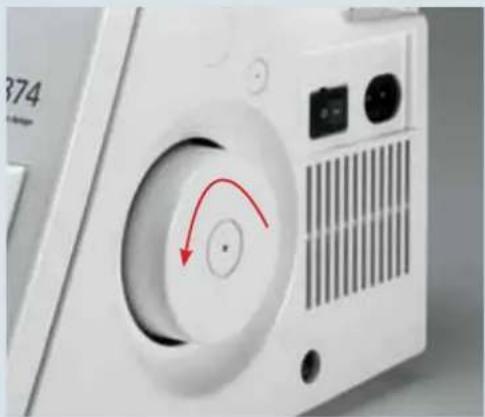
Remove the trim catcher and open the front cover and the swivel table. Raise the upper knife (35) to its highest position by turning the hand wheel. Now push the knob for lowering the upper knife (39) as far as it will go to the right.
Turn the knob towards you until the upper knife is seated in its lowest position. The upper knife is now disengaged.
Engage the upper knife
Push the knob for lowering the upper knife (39) to the right and swing the knife back until it clicks back into its working position. Close the front cover and the swivel table and reattach the trim catcher.
Note: The position of the upper knife will be shown in the LCD display (9) (see page 3-2).
Stitch fi nger
For Standard Overlock Seams:
For sewing all standard overlock seams (ex. progs. 01-04 and 21-30) the stitch finger (32) remains in its engaged position.
For rolled hems
Remove the trim catcher and open the front cover. Pull knob A of the stitch fi nger (32) to the right and swing it down into its disengaged position.
Note: The position of the stitch finger will be shown in the LCD display (9) (see page 3-2).
You can sew all rolled hems with this setting. This setting is also used for sewing coverstitches, double chain stitch, top cover and deco cover (progs. 01-04 and 21-30).

natural_image
Close-up of a sewing machine needle stitching a circuit board (no visible text or symbols)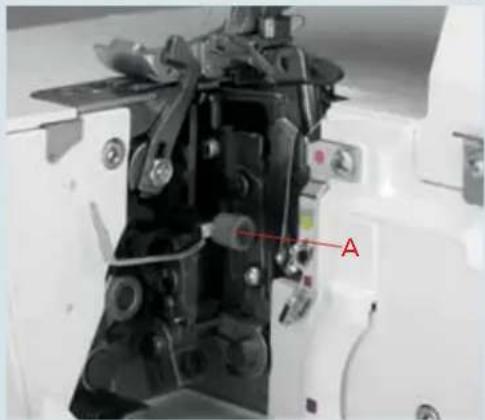
natural_image
Close-up of a mechanical assembly with labeled component 'A' (no readable text or symbols beyond label)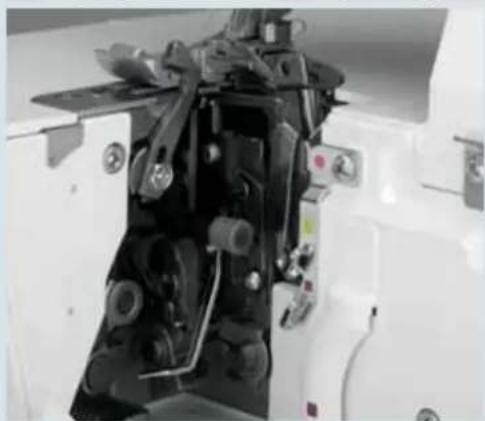
natural_image
Close-up of a mechanical assembly with visible gears and springs (no text or symbols)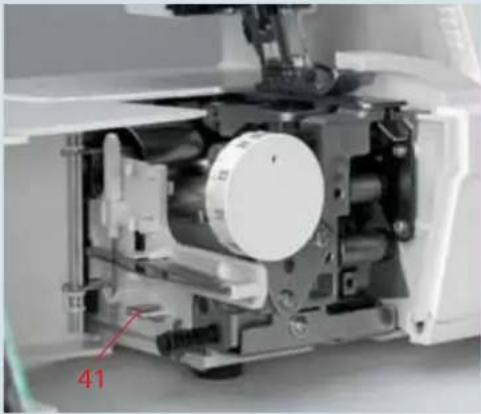
natural_image
Interior view of a mechanical device with a circular component and labeled part '41' (no readable text or symbols beyond label)Attach converter
Turn off the power switch
The converter (41) must be attached for all 2-thread seams (except program 04) and the 2-needle, 3-thread overedge seam. Open the swivel table and take out the converter.
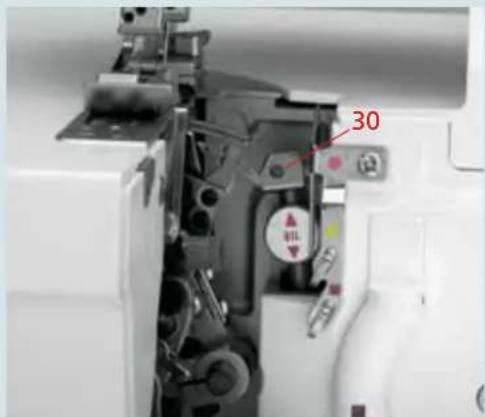
text_image
30Move the upper looper (30) beside and to the right of the needle by turning the hand wheel.

natural_image
Close-up of a sewing machine's internal components, including gears and buttons, with no visible text or symbols.Secure the tip of the converter in the eye of the upper looper and push the converter onto the upper looper base.

natural_image
Close-up of a mechanical device with visible components and a red arrow indicating direction (no text or symbols)To remove the converter, fi rst release its tip from the eye of the upper looper. Now you can pull the converter up and out.
Note: The LCD display (9) will show whether the converter should be attached (see page 3-2).
Disengage the upper looper
You can disengage the upper looper (30) with the upper looper disconnection lever (18). Remove the trim catcher and open the front cover. Turn the hand wheel to bring the looper to its lowest position.
text_image
30Note: The LCD display (9) will show whether the upper looper should be attached (see page 3-2).
Press the upper looper disconnection lever (18) down and push it to the left. Turn the hand wheel to ensure that the looper is indeed disengaged.
To engage the upper looper, push the upper looper disconnection lever (18) into its position to the right. Turn the hand wheel until the looper engages with an audible click and moves upwards again. Close the front cover and attach the trim catcher.
natural_image
Close-up of a hand operating a sewing machine with metal components and a red mark on the base (no visible text or symbols)
natural_image
Three-panel photo showing a white plastic electronic device interior with internal components and a red 'A' label, no readable text or symbols present.Remove knife guard
Remove the trim catcher and open the front cover. Pull the knife guard (17) up and off.
To insert, place the knife guard under latch A and push down into the front cover guides.
Note: The sewing table (accessory) is attached in the same way.
Set seam width
Turn the seam width adjustment knob (22) to select any seam width value from 3.5 to 6.0 mm; it will also be displayed in the viewing window (23). (Double chain stitch is sewn with a gap of 6.5 to 9 mm.)

natural_image
Close-up of a white electronic device casing with a small display and control buttons (no visible text or symbols)Figure A: If loops are protruding from the edge of your seam, turn the seam width selection knob upwards to shift the upper knife (35) to the right.
Figure B: If your seam puckers at the edge, turn the seam width selection knob downwards to shift the upper knife (35) to the left.
natural_image
Pure electrical circuit lines without any symbolsA

natural_image
Pure electrical circuit lines without any symbolsB
Note: The seam width settings 3,5 mm and 6,0 mm are only relevant for the needle R1. This set-value is reduced by 2,0 mm when using the needle R2, i.e. you have a seam width which is completely adjustable from 1,5 mm to 4,0 mm.

natural_image
Pure diagram of a zigzag line and a coiled spring pattern without any text or symbols1,5 mm 4,0 mm
natural_image
Pure diagram of a coiled spring or rope structure without any text, numbers, or symbols3,5 mm 6,0 mm

text_image
Prog + - MSetting the stitch length
The stitch length is selected automatically by the creative 4874. However, it can be changed and stored at any time using stitch length adjustment buttons (14) (see page 3-4).

natural_image
Woman in blue shirt and white pants posing outdoors with trees and sky in background (no text or symbols visible)Note: The effect of the differential feed also depends on the stitch length selected and the type of fabric being used.
Differential feed
The differential feed consists of two feed dogs arranged one behind the other.
Both feed dogs (A + B) move the fabric. The movement of the front feed dog (A) can be regulated using the differential feed adjustment buttons (15). The setting range is from 0.5 to 2. This setting regulates the amount of material being fed by the front feed dog.
The creative 4874 selects the differential feed automatically, but it can be changed at any time using the setting buttons (15) and can be stored (see page 3-4).
The default setting is 1; with this setting, the movement of the front feed dog (A) is synchronized with that of the rear feed dog (B), which means that the front feed dog advances the same quantity of fabric as the rear feed dog.
natural_image
Close-up of a sewing machine needle stitching a metal component, labeled A and B (no text or symbols on the main subject)If you set the differential feed to 0.5 the front feed dog moves at half the speed of the rear feed dog. This means that the front feed dog feeds only half as much fabric as the rear feed dog. This stretches the fabric.

text_image
Prog + - + - + + - M PThis way, when you are working with very fine fabrics such as silk and taffeta you can prevent puckering of the seam. The seam will remain flat (A).
But you can also use it to achieve fashionable effects such as the "lettuce edge" with a rolled edge (B).
natural_image
Close-up of a textured surface with a wavy boundary and labeled points A and B (no text or symbols beyond labels)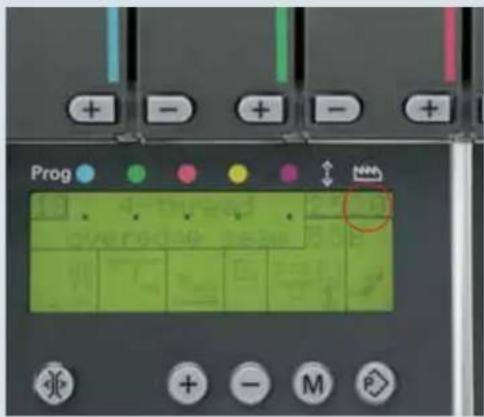
text_image
Prog + - + - + MIf you set the differential feed to 2.0 the front feed dog moves at twice the speed of the rear feed dog. This means that the front feed dog moves twice as much fabric as the rear feed dog. This gathers the fabric.

natural_image
Close-up of fabric with labeled sections A and B, showing textured fabric and a patterned edge (no text or symbols beyond labels)In this way, you can prevent the seam from stretching when you work with knits such as jersey or cable knits. The seam will remain fl at (A).
However, you can also use it to achieve fashionable effects such as the gathered effect with very fine fabrics (B).
The following table includes notes on setting the differential feed. Always test your setting first on a piece of scrap fabric.
Type of fabric / effect Differential feed setting
| gather<2> <1,5> | normal<1> | stretch<0,5> | |
| Very light fabrics: silk, satin, poplin, taffeta, linings. | • | • | |
| Normal fabrics: light and medium-heavy cottons, fi ne cords, thermal-wear | • | ||
| Light knitwear: jerseys, polo fabrics, cut-pile pullovers, tricot, fine knitwear and gathered fabrics. | • | • | |
| Heavy knitwear: sweatshirt fl eece, heavy gathered fabrics, heavy knitwear | • | ||
| Stretch “lettuce edge” effect: medium and light knitwear, jerseys, knitwear, ruffl ed sleeve and collar edges, skirt hems, dense stitch lengths. | • | ||
| Gathering: ruffl ing light fabrics and lace, seam allowances for curves, arches on blouses, shirts, round pockets, fl aps, stretching or gentle ruffl ing of sleeves, sleeve widths for cuffs or gathered fabrics. | • |

natural_image
Portrait of a woman wearing a pink floral-patterned cardigan, standing indoors with blurred background art (no text or symbols visible)Electronic functions
This chapter contains information about all the electronic functions of the machine.
Set language
You can select any of the following languages:
Czech, Danish, German, English, Spanish, French, Italian, Dutch, Polish, and Portuguese. Hold down the program selection buttons +/- (11) simultaneously as you switch the machine on. Use program selection button + (11) to select the language you want. Press the memory button M (12) once to store the language you have selected.
Now the description will be displayed in your chosen language.
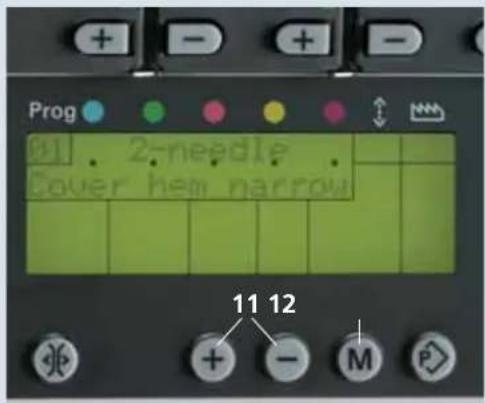
text_image
Prog 2-needle Cover hem narrow 11 12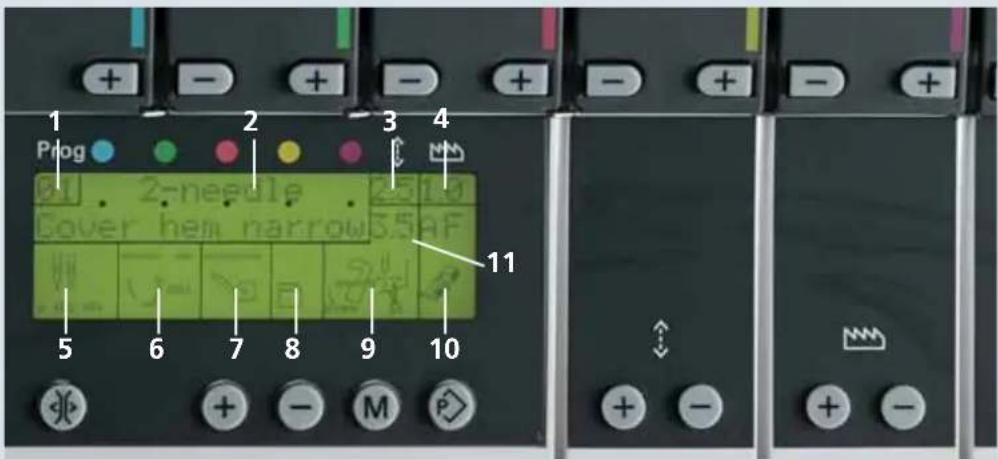
text_image
1 Prog 2 3 4 2 needle Cover hem narrow 5 6 7 8 9 10 11LCD Display
- Stitch program number
- Stitch designation (Main menu)
- Stitch length in mm
- Differential feed setting
- Needle position
- Position of the swivelling stitch fi nger

text_image
Stitch fi nger engaged. Stitch fi nger disengaged.- Position of the upper looper

text_image
Upper looper engaged Upper looper disengaged Converter engaged- Position of the sewing table

- Position of the upper knife

- Setting for the standard presser foot:
A or B – as well as F appears in the display, you can also use clearview foot F from the accessory box.
- Seam width in mm

text_image
Prog 2-needle Top-cover barrow RIf you have selected stitch programs 21-30, R appears in the display. Use clearview foot R.
text_image
Prog Prog CoverIf you have selected stitch programs 24 -30 and you press the program selection button + beside the R, one of these two symbols will appear:
<> The two arrows pointing away from each other indicate that a thick thread can be used for the deco cover (45) thread tensions.
<< The two arrows pointing towards each other indicate that a thin yarn can be used for the deco cover (45) thread tensions.

text_image
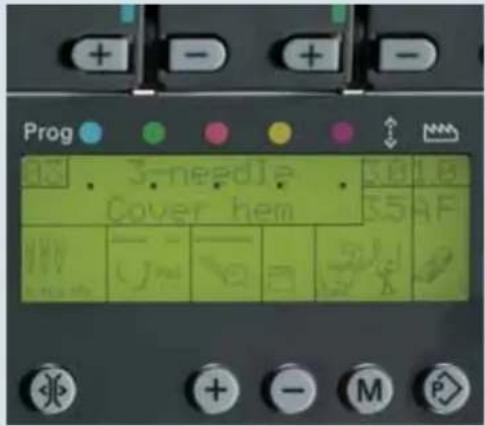
Prog 01 . 2=needle . 2.5 1.0 Cover hem narrow SS AF 10 11 12 13 + - M P 7 14 15Button functions
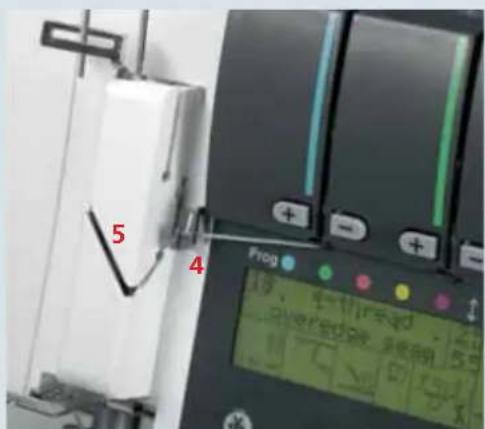
7 Tension buttons +/-: To increase or decrease the tension settings.
10 Tension release button: If you press the tension release button, all thread tension discs are opened automatically. Keep the button pressed down and you can remove the threads by pulling gently.
11 Stitch program selection buttons +/-: Use these buttons to select the program you want. There are 30 programs to choose from. If you keep the buttons pressed down for a moment longer, the display scrolls through the programs automatically. The program that was last used always appears when the machine is first switched on.
12 Memory button M: Use this button to store changed settings for stitch length, differential feed and thread tensions.
13 Memory selection button P: Press this button to open the program memory and memories A, B and C. This button will always return you to the main menu.
14 Stitch length setting buttons +/-: If you press one of these buttons, the program memory opens. Use the +/- to adjust the stitch length. If you press the memory selection button P repeatedly, you will be returned to the main menu and the changed setting will be cancelled. If no changes are made within 10 seconds, the display switches back to the main menu automatically.
15 Differential feed setting buttons +/-: If you press one of these buttons, the program memory opens. Use the +/- to adjust the differential feed. If you press the memory selection button P repeatedly, you will be returned to the main menu and the changed setting will be cancelled. If no changes are made within 10 seconds, the display switches back to the main menu automatically.

text_image
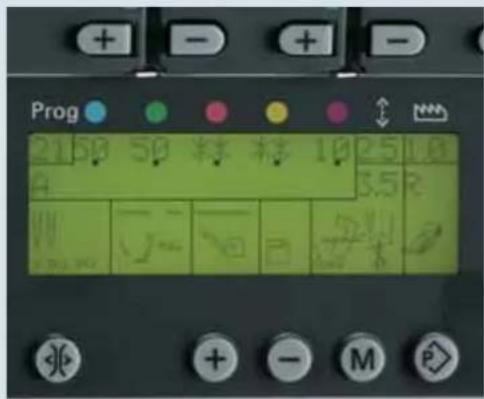
Prog 21 50 50 精 10 25 10 35 R W 4 6 7 8 9 10 11 12 13 14 15 16 17 18 19 20 21 22 23 24 25 26 27 28 29 30 31 32 33 34 35 36 37 38 39 40 41 42 43 44 45 46 47 48 49 50Save
Recalling the memory
Use the program selection buttons +/- to recall the program you want. If you press the memory selection button P once, the program memory will open. The settings for the thread tensions, stitch length and differential feed are displayed next to the program number. Tension settings marked with two asterisks ** are not available for that program and do not have to be threaded. If no changes are made within 10 seconds, the display switches back to the main menu automatically.

other
| Position | Value | |---|---| | 21 | 4.5 | | 22 | 4.0 | | 23 | 4.5 | | 24 | 4.0 | | 25 | 4.0 | | 26 | 4.0 | | 27 | 3.0 | | 28 | 6.0 | | 29 | 6.0 | | 30 | 5.0 | | 30 | 7.5 |Note: The top/deco cover (45) thread tension settings are not displayed and are therefore also not set automatically. These settings can be found on the top/deco cover stitch program sticker, and must be set manually. The top/deco cover stitch program sticker is behind the front cover.
text_image
Prog 21 50 50 精 精 10 2.5 1.0 A 3.5 R W + - M PSelecting a memory
Call the program you want using the program selection button +/- . You can choose from three memories (A, B and C) for each program. To access them, press the memory selection button P repeatedly until the memory you want appears. In our example, we have selected memory A for stitch program 21.
Save
The settings for automatic thread tensions, stitch length, and differential feed can be changed and stored. To do this, use the appropriate buttons +/- to change the previous setting. In our example we have changed the stitch length setting from 2.5 to 3.0.
Note: If you press memory selection button P repeatedly, you will be returned to the main menu.
By pressing memory button M you activate memory A, which is indicated by the fl ashing letter A. To store the changed setting, press the memory button M again – the fl ashing will stop and the setting will be stored.
If the memory button M is not pressed within 10 seconds, the letter will stop fl ashing and the changed setting will not be stored in the memory.

text_image
Prog + - + - 50 50 50 50 50 1.0 0.0 2.0 2.0 2.0 2.0 3.0 3.0 3.0 3.0 4.0 4.0 4.0 4.0 5.0 5.0 5.0 5.0 6.0 6.0 6.0 6.0 7.0 7.0 7.0 7.0 8.0 8.0 8.0 8.0 9.0 9.0 9.0 9.0 10.0 10.0 10.0 10.0 11.0 11.0 11.0 11.0 12.0 12.0 12.0 12.0 13.0 13.0 13.0 13.0 14.0 14.0 14.0 14.0 15.0 15.0 15.0 15.0 16.0 16.0 16.0 16.0 17.0 17.0 17.0 17.0 18.0 18.0 18.0 18.0 19.0 19.0 19.0 19.0 20.0 20.0 20.0 20.0 21.0 21.0 21.0 21.0 22.0 22.0 22.0 22.0 23.0 23.0 23.0 23.0 24.0 24.0 24.0 24.0 25.0 25.0 25.0 25.0 26.0 26.0 26.0 26.0 27.0 27.0 27.0 27.0 28.0 28.0 28.0 28.0 29.0 29.0 29.0 29.0 30.0 30.0 30.0 30.0 31.0 31.0 31.0 31.0 32.0 32.0 32.0 32.0 33.0 33.0 33.0 33.0 34.0 34.0 34.0 34.0 35.0 35.0 35.0 35.0 36.0 36.0 36.0 36.0 37.0 37.0 37.0 37.0 38.0 38.0 38.0 38.0 39.0 39.0 39.0 39.0 40.0 40.0 40.0 40.0 41.0 41.0 41.0 41.0 42.0 42.0 42.0 42.0 43.0 43.0 43.0 43.0 44.0 44.0 44.0 44.0 45.0 45.0 45.0 45.0 46.0 46.0 46.0 46.0 47.0 47.0 47.0 47.0 48.0 48.0 48.0 48.0 49.0 49.0 49.0 49.0 50.0 50.0 50.0 50.0 51.0 51.0 51.0 51.0 52.0 52.0 52.0 52.0 53.0 53.0 53.0 53.0 54.0 54.0 54.0 54.0 55.0 55.0 55.0 55.0 56.0 56.0 56.0 56.0 57.0 57.0 57.0 57.0 58.0 58.0 58.0 58.0 59.0 59.0 59.0 59.0 60.0 60.0 60.0
text_image
Prog 50 50 10 0 0 6 5 5 5 5 5 5 5 5 5 5 5 5 5 5 5 5 5 5 5 5 5 5 5 5 5 5 5 5 5 5 5Notes on the saving to memory
If you do not select a memory to receive the settings you want to save, the changed settings will be stored in a vacant memory automatically when you press memory button M.
If all memories already contain settings, the changed settings will not be accepted.
You cannot delete individual memories, but you can overwrite them.
Deleting all memories
Switch the machine off. Press the program selection buttons +/- and the memory button M together. Hold the buttons down and switch the machine on. After about 10 seconds, the last stitch program used on the 4874 will appear in the display, and the contents of all memories will be deleted.

text_image
Prog 01 40 40 核料 20 3.5 20 3.5 AF W J W E 5/8Changing settings for tension, stitch length and differential feed directly without saving
If you want to change tension settings in the middle of a sewing project, but don't want to save these values, press one of the tension buttons +/- To change the stitch length or the differential feed value, press the corresponding +/- buttons. The program memory will open. Now you can change any setting with the corresponding +/- buttons. If you press memory selection button P repeatedly you will be returned to the main menu, the changed setting will not be saved. If no changes are made within 10 seconds, the display switches back to the main menu automatically.

text_image
Prog . ERROR 1 . . .Error
If a stepping motor for controlling thread tension should fail, the following message appears in the display:
ERROR. Error 1 means: stepping motor number 1 for the blue needle thread tension is no functioning. If the Error message is still displayed after you have switched the machine off and on again, you should take your machine to a service center.

natural_image
A man and a young boy posing together on a basketball against a blue background (no text or symbols visible)Cover stitch
In this chapter, we explain the basic functioning of your creative 4874, using the coverstitch as an example.
Cover stitch
Switching the machine to cover stitch (progs. 01, 02, 03)
Note: Always set up your creative 4874 as shown in the display fi rst. Then open the program memory (see page 3-5) before threading the machine.
Use the program selection buttons +/- (11) to select one of the cover-stitches. In our example, we have selected program 03, 3-needle cover hem.

The stitch length and the differential feed are set automatically, but can be altered and stored individually (see page 3-4).

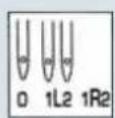
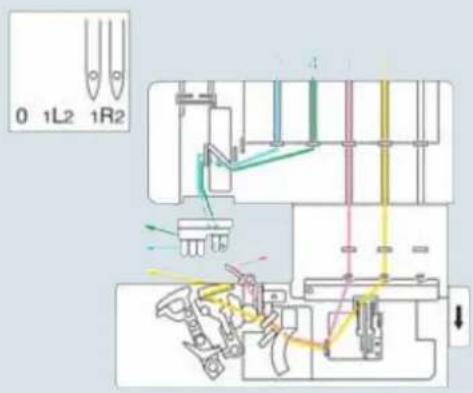
0 1L2 1 R2
With the needle changing tool, insert needles L 0, 1 and 2 as far as they will go into the needle holder (make sure they are inserted all the way with your fingers). Tighten the associated retaining screw and remove the needle changing tool.

Pull knob A of the swivelling stitch fi nger (32) to the right and swing it down into its disengaged position.
text_image
Prog 3-needle Cover hem 5.0 5.5 AF + - M P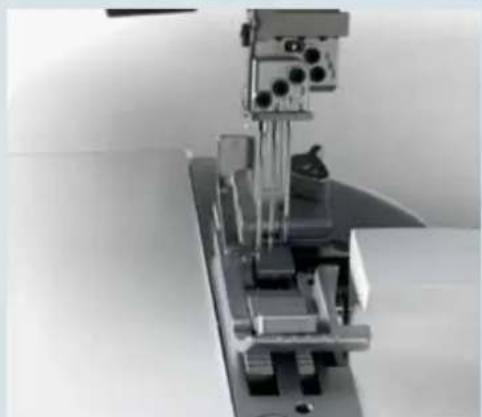
natural_image
Mechanical assembly with vertical metal components and mounting base (no visible text or symbols)
natural_image
Close-up of a mechanical device with labeled component A, showing internal components and wiring (no readable text or symbols beyond label)
natural_image
Close-up of a hand pressing down on a sewing machine component (no visible text or symbols)
natural_image
Disassembled electronic device with open casing and internal components (no visible text or symbols)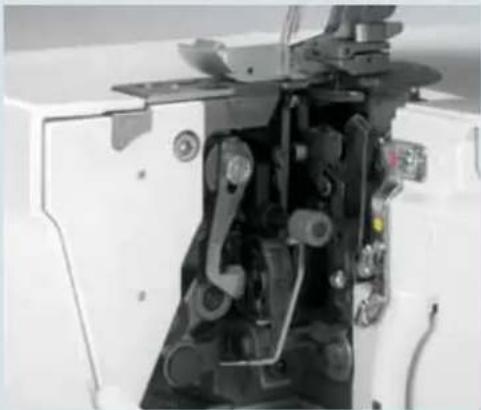
natural_image
Close-up of a sewing machine's internal mechanism (no visible text or symbols)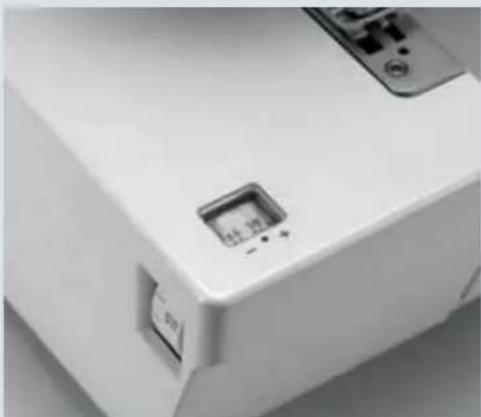
natural_image
Close-up of a white electronic device casing with a small display and control buttons (no visible text or symbols)
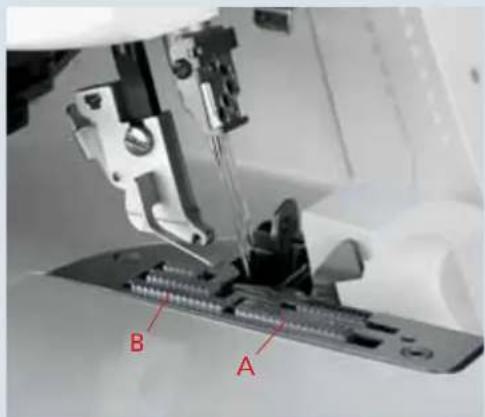
Turn the hand wheel to bring the upper looper to its lowest position. Press the lever to disengage the upper looper (18) down and push it to the left. Turn the hand wheel to ensure that the looper is disengaged.

Remove the knife guard and push the sewing table (accessory) down between the two front cover guides.

Raise the upper knife (35) to its highest position by turning the hand wheel. Now push the knob for lowering the upper knife (39) as far as it will go to the right.
Turn the knob towards you until the upper knife is seated in its lowest position. The upper knife is now disengaged.

Turn the seam width selection knob (22) to set the seam width to 3.5 mm.
AF

Set the standard presser foot heel to A or insert the clearview foot F from the accessory box.
When you press the memory selection button P once, the program memory opens. The thread tension settings appear beside the program number in the display.
First thread the purple thread tension for the cover-stitch looper, followed by the blue, green and red thread tensions for the needles.
You can also refer to the threading diagram behind the front cover.
Threading the cover-stitch looper
Turn the hand wheel towards you until the cover-stitch looper (33) is as far to the right as possible.
Thread the thread in order from 1 to 10.
Thread guide 8 is marked with a purple square

natural_image
Close-up of a sewing machine needle stitching fabric (no visible text or symbols)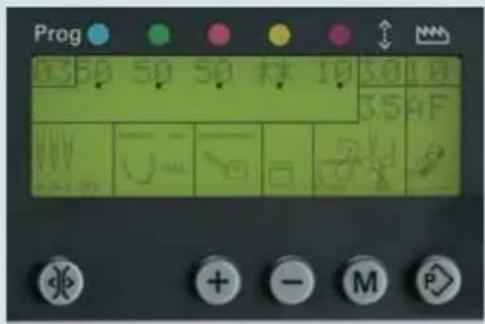
text_image
Prog 50 50 50 根 10 30 10 55 4F U O S P + - M P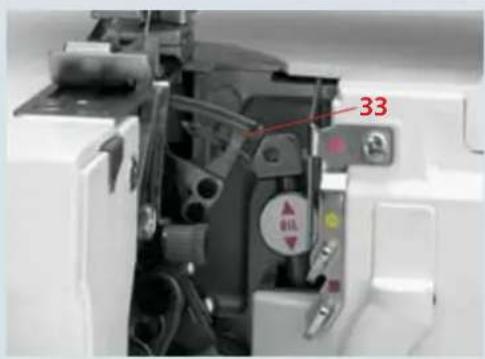
text_image
33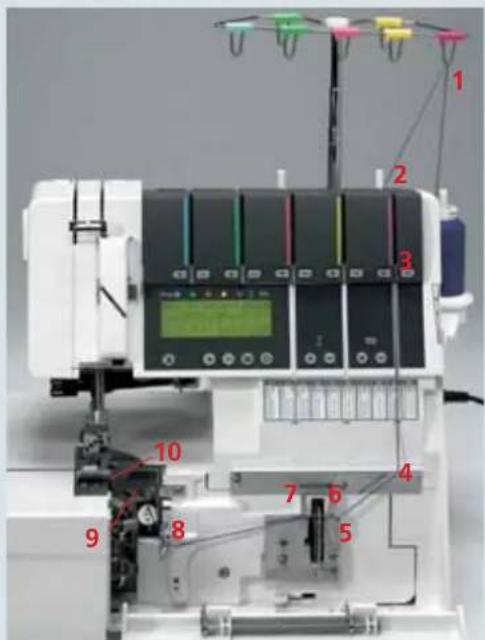
text_image
Labeled diagram of a sewing machine with numbered components and digital display panelCover stitch
text_image
8 7 6 5 4Thread the thread in the guides from 1 to 8. (Make sure: The thread does not pass under the latch)
Note: In the case of thread guides 6 and 7, the thread is simply placed on top of them, not threaded through.
text_image
A BPress lever A up and hook the thread into slot B. The illustration below shows how to do this.
Note: The lever will return to its original position as soon as you start to sew.

text_image
C B C AFrom the front, pass the thread through eye C (- threading point 10) of the double chain stitch or cover stitch looper.

natural_image
Close-up of a precision machine with mechanical components and control panel (no visible text or symbols)Pull about 10 cm (5") of thread through the looper and place it to the left under the presser foot.
Threading the needle(s)
Thread the threads in order from 1 to 9.

text_image
1 2 3 4 5 6 7 8 9 PFAFF creative 4874The thread must pass through the lower slot in thread guide 5.
To thread needles more easily, use the needle threader in the accessory box.
text_image
5 4 FrogPull the thread about 10 cm (5") through the eye of the needle and place it to the left under the presser foot (if necessary, press the tension release button (10), see page 3-4).
text_image
7 8 9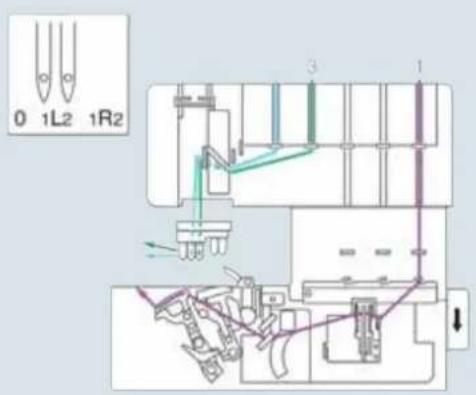
text_image
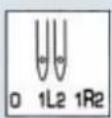
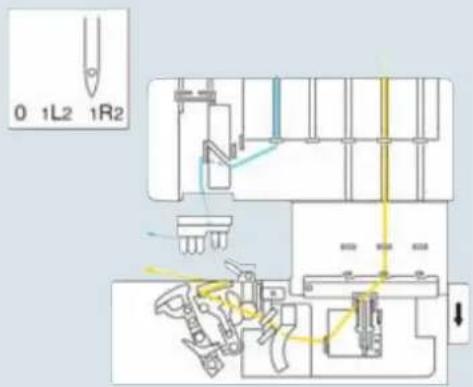
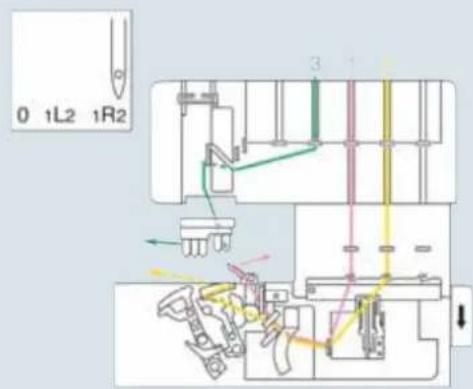
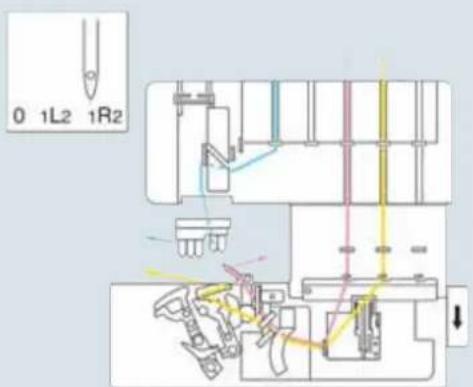
0 1L2 1R2 3 1Summary of threading paths and their threading sequences
Stitch program 01:
2-needle cover hem, narrow

text_image
0 1L2 1R2 3 1Stitch program 02:
2-needle cover hem, wide

text_image
0 1L2 1R2Stitch program 03:
3-needle cover hem

natural_image
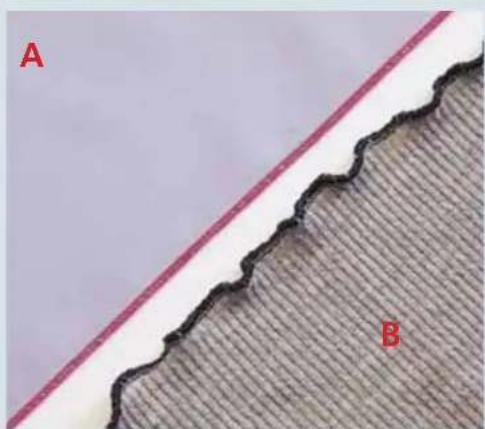
White plastic electrical connector component (no visible text or symbols)Important notes on sewing with the cover stitch
Sewing table
The sewing table is marked with various measurements. The figures at the top are centimeters, those at the bottom represent inches.
Note: The hem guide H2 may be ordered as an extra accessory. It makes hemming child's play without the need to iron the hem before you sew.
Preparing the project
When hemming, it is helpful to iron the hem beforehand. Depending on the hemdepth, add 0.5 cm (1/4") to the hem. For example, if you want a 2 cm hem, iron up 2.5 cm(1" hem iron up 1 1/4").
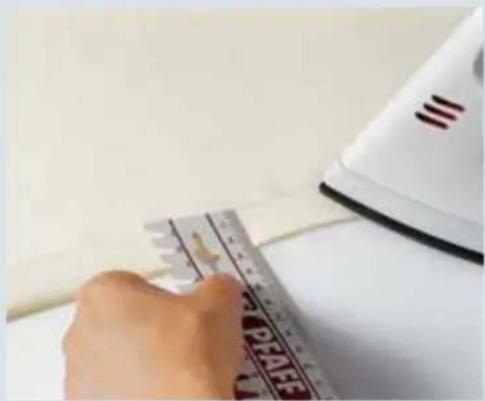
natural_image
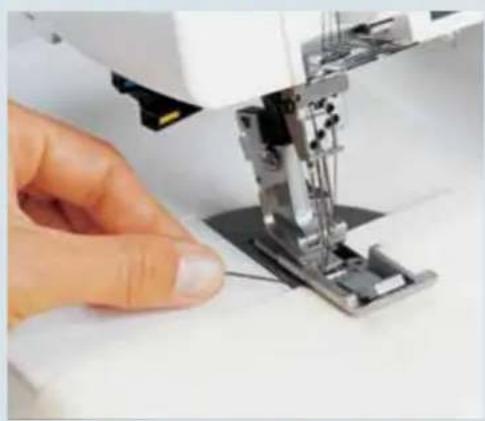
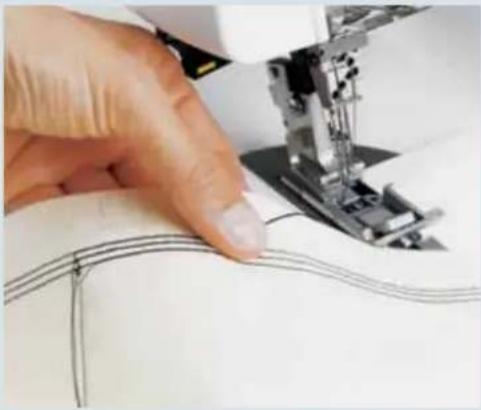
Close-up of a hand using a ruler to cut a piece of paper, with an iron on a white surface (no visible text or symbols)Starting to sew
Lift up the presser foot and position the fabric under the presser foot so that the needles pierce the fabric on the fi rst stitch. The raw edge must be along the two on the ruler of the sewing table.
Keep the threads moderately taut and start sewing slowly. As soon as the first few stitches have been formed, you can increase the sewing speed.
natural_image
Close-up of a hand operating a sewing machine on a white surface (no visible text or symbols)Note: In most cases, the differential feed will need to be adjusted. Sew a test seam fi rst.
Stopping sewing
- If you are sewing to the edge of the project:
Grasp the threads at the end of the seam and sew slowly off the project. As you do so, pull the threads gently backwards.

natural_image
Close-up of a hand using a sewing machine to press fabric (no visible text or symbols)- If you are sewing a continuous hem (around a project):
Sew 4–5 stitches over the previous stitches. On the last stitch, turn the hand wheel towards you slowly until the needles reach their lowest position.
natural_image
Close-up of a sewing machine needle stitching a metal workpiece (no visible text or symbols)
natural_image
Close-up of a hand operating a sewing machine with visible wiring and components (no text or symbols)Now turn the hand wheel back until the needles are in their highest position. At the same time, loosen the needle threads slightly with one finger.
natural_image
Close-up of a hand using a sewing machine to cut fabric into a seam (no visible text or symbols)Raise the presser foot. Grasp the threads at the end of the seam and press the tension release button to pull the project out. Cut the threads off. Pull the needle threads through to the wrong side of the fabric and tie off.

natural_image
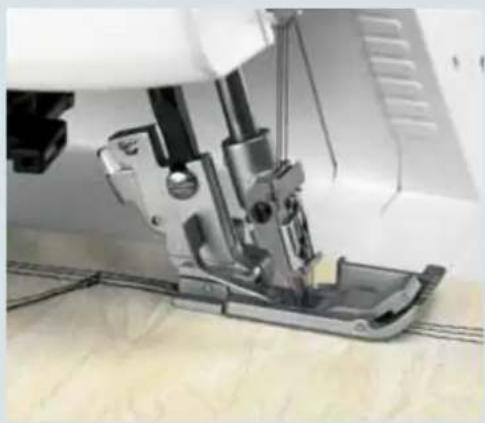
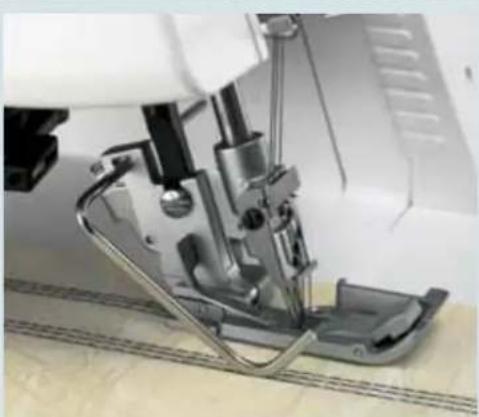
Close-up of a sewing machine needle and base mechanism (no visible text or symbols)Edge guide
Slide the edge guide from the accessory box left to right into guide A of the presser foot holder. You can adjust the ruler as you wish by sliding it in the guide.
natural_image
Close-up of a sewing machine needle and foot assembly (no visible text or symbols)The edge guide is used for sewing seams at a constant distance from the edge of a project. It can also be used programs 21-30.
To return your creative 4874 to normal sewing:
Open the front cover and take off the sewing table. Push the upper looper lever to the right so that the upper looper is engaged. Return the stitch finger to its upright and engage the movable knife. Replace the knife guard onto the front cover, and close the cover.
Stitch formation
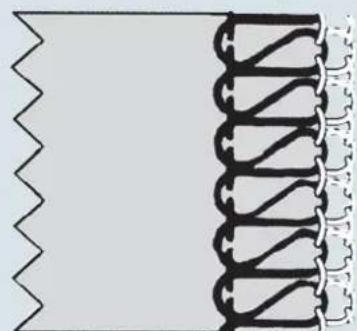
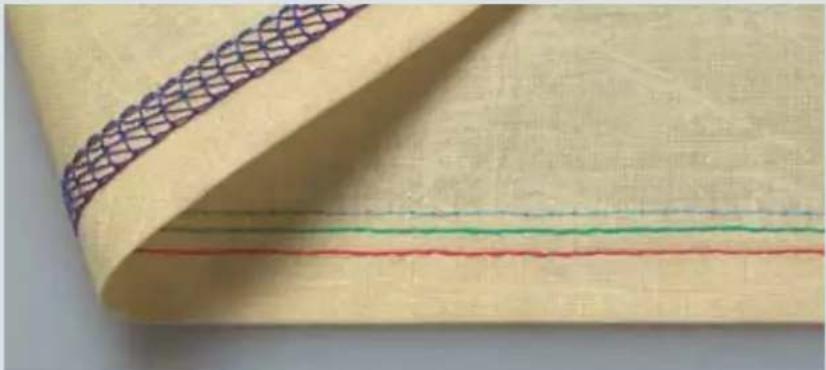
3-needle cover hem, program 03
If all the thread tensions are set correctly, the needle threads (blue, green and red) are almost invisible on the underside of the fabric. The looper thread (purple) lies slack between them.
natural_image
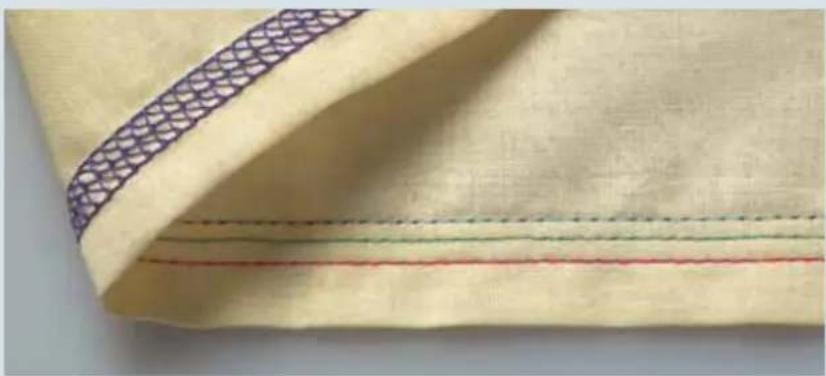
Close-up of a beige fabric with a patterned seam and three horizontal colored lines (red, green, blue) on the right side, no text or symbols visible.The needle threads (blue, green and red) are too loose and form small loops on the underside of the fabric.
Choose a higher setting for the blue, green and red thread tensions.

natural_image
Close-up of a beige fabric with a decorative patterned seam and three horizontal colored lines (red, green, blue) on the right side.The needle threads (blue, green and red) are too tight and the fabric is puckering.
Set a lower value for the blue, green and red thread tensions.
natural_image
Close-up of a beige fabric with a patterned seam and three horizontal colored lines (red, green, blue) on the side, no text or symbols visible.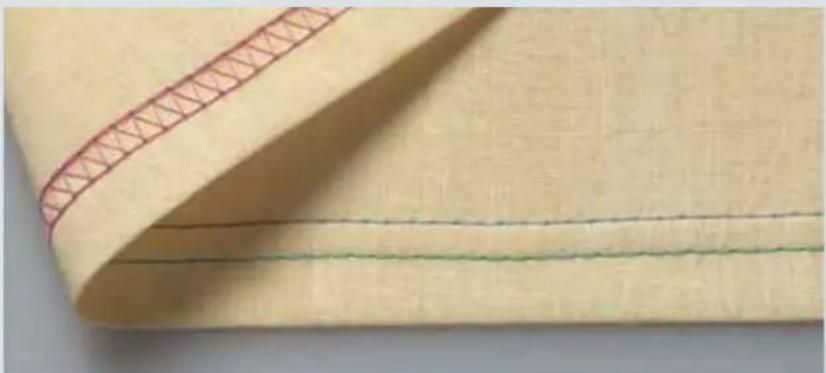
natural_image
Close-up of a beige fabric with red stitching and three horizontal lines (no text or symbols)2-needle cover hem, narrow and wide, programs 01, 02
If all the thread tensions are set correctly, the needle threads (blue and green) are almost invisible on the underside of the fabric. The looper thread (purple) lies slack between them.

natural_image
Close-up of a beige fabric with three horizontal green and red stitching lines (no text or symbols)The right needle thread (green) is too loose.
Adjust the green thread tension to a higher setting.

natural_image
A young girl in a red raincoat standing on a grassy field, accompanied by a small dog toy and a red ribbon (no text or symbols visible)Top Cover Stitch
In this chapter, we describe the basic functioning of your creative 4874 with reference to top cover stitching.
Top Cover Stitch
Switching the machine to top cover operation (progs. 21, 22, 23).
Detachable thread stand
For top cover sewing you need to use the detachable thread stand. Insert the top catches of the thread stand (27) into the top slots on the rear cover and press the bottom portion of the stand against the cover. Push the detachable thread stand to the right as far as it will go. Place one foam pad (52) on each spool pin (50).
To remove, push the thread stand to the left and pull upwards.
natural_image
Close-up of industrial equipment components with no visible text or symbolsDetachable thread guide for top/deco cover
Pull the thread guide up as far as it will go and twist it until the locking pommels click into place. Place the detachable thread guide from the accessories box on top of the first thread guide slide.
natural_image
Close-up of a medical or laboratory setup with metallic rods and a central vertical rod, no visible text or symbols.Sewing program sticker
The top/deco sewing program sticker (25) is located behind the front cover and includes the following information:
- Row: Stitch program number
- Row: Needle position
- Row: Tension setting in blue. (Remember, the blue thread tension must be changed manually.)
- Row: Stitch formation with needle stitch lines in grey
text_image
1 21 22 23 24 25 26 27 28 29 30 4 4.5 4.0 4.5 4.0 4.0 4.0 4.0 4.0 4.0 3.0 3.0 6.0 6.0 5.0 5.0 7.5 7.5
natural_image
Close-up of a mechanical device with labeled component A, no visible text or symbols on the device itself.Top/deco switch lever
Choose a stitch program and move the top/deco switch lever A to the correct position:
Right for top cover, programs 21, 22 and 23.
Left for deco cover, programs 24 – 30.
For our example, we have chosen program 23.
Note: If the top/deco switch lever is not in the correct position, the machine will not run in programs 21 – 30 and an alarm will sound.

text_image
Prog 3 needle Top-cover 35R J M + - M PStitch program selection
Switch the machine on and select one of the top cover programs with the program selection buttons +/- (11). The stitch length and differential feed will be adjusted and the sewing speed will be slowed automatically. For our example, we have selected program 23, 3-needle, 4-thread top cover.
If you hear an alarm when you make your stitch program selection, this means that the top/deco switch lever (A) is in the wrong position.

The stitch length and the differential feed are set automatically, but can be altered and stored individually (see page 3-4).
Note: Always set up your creative 4874 as shown in the display fi rst. Then open the program memory (see page 3-5) before threading the machine.

natural_image
Close-up of a mechanical device with metallic components and mounting base (no visible text or symbols)
0 1L2 1 R2
With the needle changing tool, insert needles L 0, 1 and 2 as far as they will go into the needle holder (make sure the needles are inserted all the way with your fingers). Tighten the associated retaining screw and remove the needle changing tool.

Pull knob A of the stitch fi nger (32) to the right and swing it down into its disengaged position.

Turn the hand wheel to bring the upper looper to its lowest position. Press the upper looper disconnection lever (18) down and push it to the left. Turn the hand wheel to ensure that the upper looper is disengaged.

Remove the knife guard and push the sewing table (accessory) down between the two front cover guides.

Raise the upper knife (32) to its highest position by turning the hand wheel. Now push the knob for lowering the upper knife (39) as far as it will go to the right.
Turn the knob towards you until the upper knife is in its lowest position. The upper knife is now disengaged.
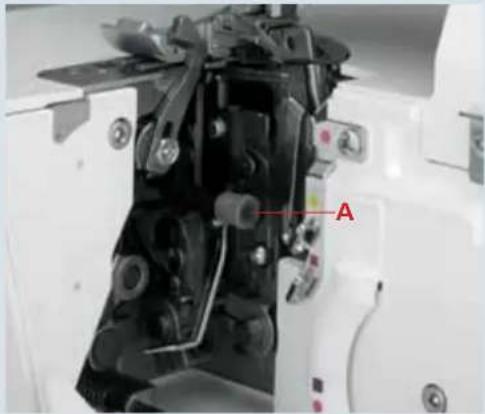
natural_image
Close-up of a mechanical device with labeled component A, showing internal components and wiring (no readable text or symbols)
natural_image
Close-up of a hand operating a sewing machine with metal clamps and a spring mechanism (no visible text or symbols)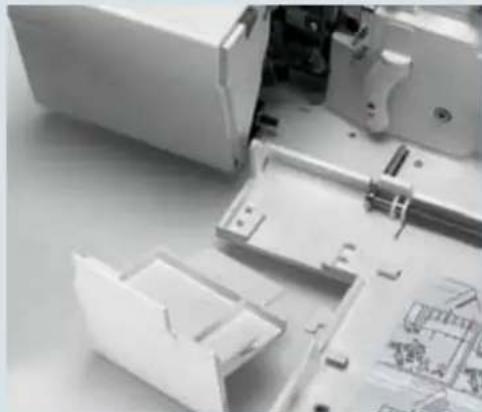
natural_image
Close-up of a mechanical assembly with plastic housing and internal components (no visible text or symbols)
natural_image
Close-up of a mechanical assembly with visible gears and components (no text or symbols)
natural_image
Close-up of a white electronic device with a digital display showing '100.12' and control buttons (no readable text or symbols beyond basic labels)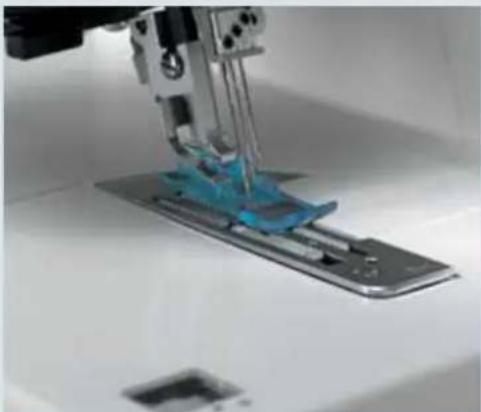
natural_image
Close-up of a sewing machine needle stitching a blue plastic component on a metal base (no visible text or symbols)
text_image
1 2 3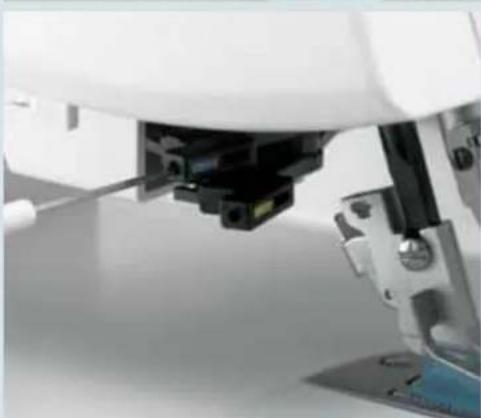
natural_image
Close-up of a white mechanical device with a black component inserted, showing a tool interacting with the base (no visible text or symbols)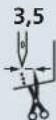
Turn the seam width adjustment knob (22) to set the seam width to 3.5 mm.
R

Use clearview foot R from the accessory box.
Accessories
The following accessories are provided for the top cover:
- Top cover hook
- Top cover round thread guide
- Top cover triangle thread guide
Top cover hook
Insert the top cover hook into the top slot (blue) of the holder.
To do this, loosen but do not remove the screw on the side with the allen key.
Note: You must attach presser foot R and lower it.
Insert the top cover hook and tighten the screw.
To remove the top cover hook, loosen the screw with the allen key.
Place the screwdriver between the top cover hook and the holder. Press the tip of the screwdriver gently forwards. The top cover hook will pop out of the holder.
Top cover round thread guide
Loosen screws R1 and R2. Insert the Top cover round thread guide into the holder and tighten the screws, R2 first and then R1.
Top cover triangle thread guide
The triangle thread guide device has a wide slot A and black handle B.
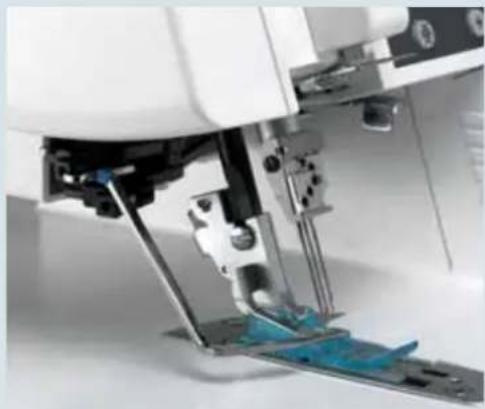
natural_image
Close-up of a sewing machine needle stitching blue fabric (no visible text or symbols)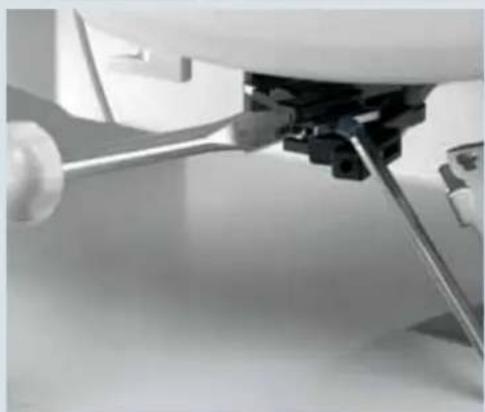
natural_image
Close-up of a mechanical assembly with a tool inserted, no visible text or symbols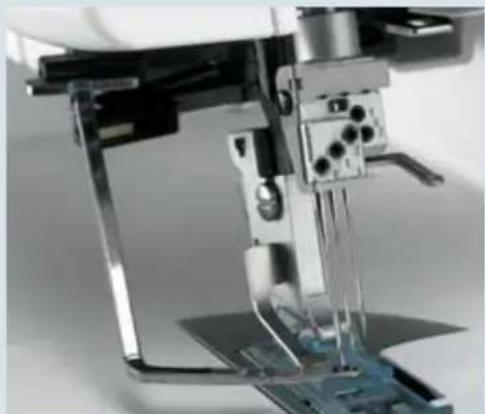
natural_image
Close-up of a sewing machine needle stitching a circuit board (no visible text or symbols)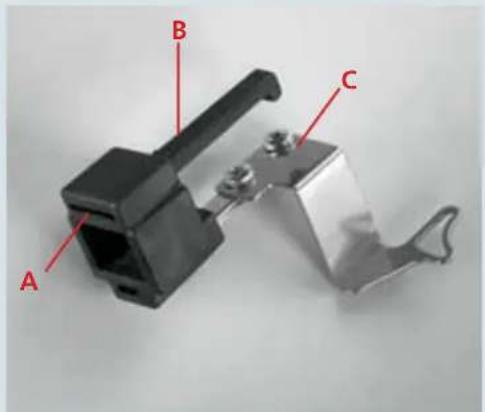
text_image
A B C
natural_image
Close-up of a robotic arm with a finger pressing a component, no visible text or symbolsWhen attaching the thread guide, make sure that the holder for the top/deco switch lever is fully seated in slot A. Now push the thread guide device back as far as it will go until you hear it click into place.
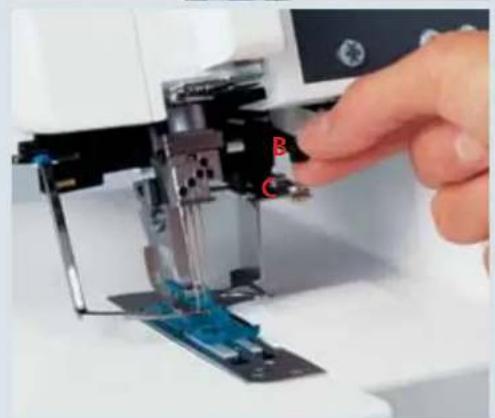
natural_image
Close-up of a hand operating a sewing machine needle with blue fabric and labeled parts (no text or symbols visible)To remove it, press handle B down against C (the part where the triangle thread guide is attached). Pull it gently towards you and out of the holder.

text_image
Prog 23 50 50 50 10 50 0 55 R 64 75 80 90 10 11 12 13 + - M PWhen you press the memory selection button P once, the program memory opens. The thread tension values appear beside the program number in the display. First thread the purple thread tension for the cover-stitch looper, followed by the blue, green and red thread tensions for the needles.
You can also refer to the threading diagram behind the front cover. Finally, you must thread the blue top cover thread.

natural_image
Close-up of a sewing machine interior showing mechanical components and a numbered label '33' (no readable text or symbols beyond labels)Threading the cover-stitch looper
Turn the hand wheel towards you until the cover-stitch looper (33) is as far to the right as possible.
Thread the threads in order from 1 to 10. Thread guide 8 is marked with a purple square

text_image
Labeled industrial sewing machine setup with numbered components and thread spool, showing internal components and measurement instruments.Note: In the case of thread guides 6 and 7, the thread is simply placed on top of them, not threaded through.
Thread the thread in the guides from 1 to 8. (Make sure: The thread does not pass under the latch)
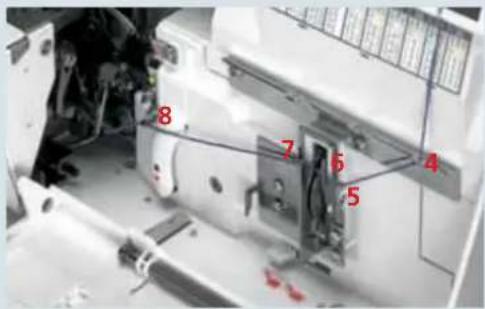
text_image
8 7 6 4 5Note: The lever will return to its original position as soon as you start to sew.
Press lever A up and hook the thread into slot B. The illustration below shows how to do this.

text_image
A BFrom the front, pass the thread through eye C (- threading point 10) of the double chain stitch and cover stitch looper.

text_image
Technical diagram of a mechanical device with labeled parts A, B, C and directional arrows indicating motion or force vectors.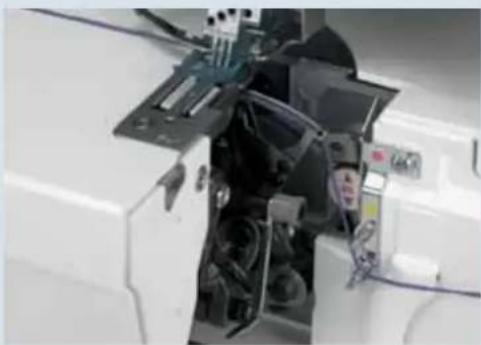
natural_image
Close-up of a mechanical device with visible components and wiring (no text or symbols)Pull about 10 cm (5") of thread through the looper and place it to the left under the presser foot.
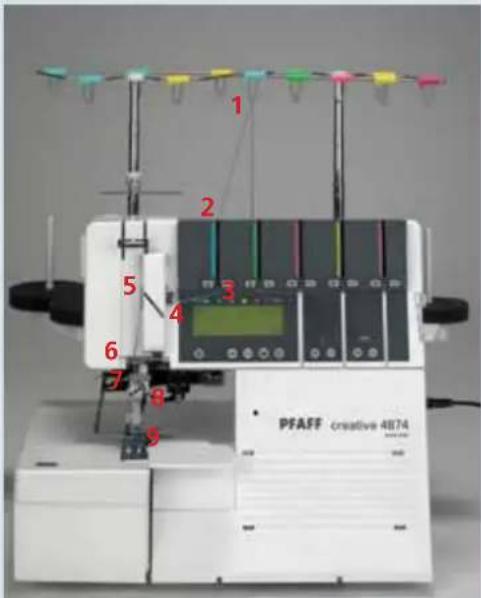
text_image
1 2 3 4 5 6 7 8 9 PFAFF creative 4874Threading the needle(s)
Thread the thread in order from 1 to 9.

text_image
5 4The thread must pass through the lower slot in thread guide 5. To thread needles more easily, use the needle threader in the accessory box.

text_image
7 8 9Pull the thread about 10 cm (5") through the eye of the needle and place it to the left under the presser foot (if necessary, press the tension release button (10), see page 3-4).
Top cover thread tension, blue
Set the top cover thread tension, blue (45) as indicated on the stitch program sticker. To do this, turn the thread tension dial by hand until the corresponding setting appears directly above line A.
Threading the top cover thread
Place the spool on the front left spool pin of the detachable thread stand. Thread the corresponding thread guide from the back forwards.
With both hands, pull the thread between the tension discs and place it under the rear thread guide (46).
Now feed the thread into the hole in the detachable thread guide.
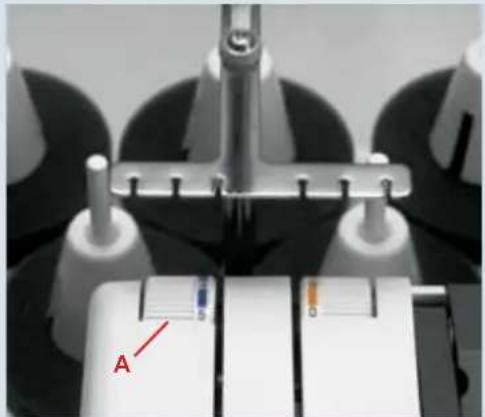
natural_image
Close-up of a mechanical device with labeled components (A) and no visible text or symbols on the main subject.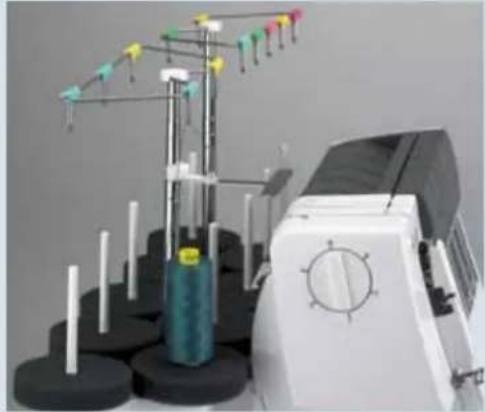
natural_image
Industrial sewing machine with spools and needle array (no visible text or symbols)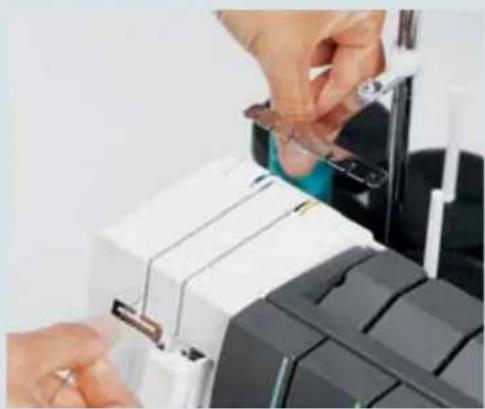
natural_image
Close-up of hands installing or adjusting a mechanical component with a tool (no visible text or symbols)
natural_image
Industrial sewing machine with spool and needle assembly (no visible text or symbols)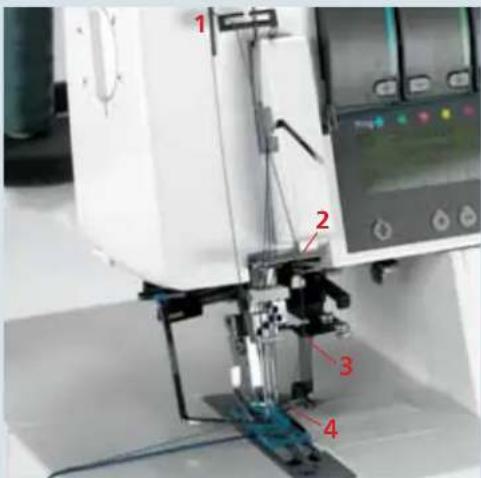
text_image
Labeled mechanical device diagram showing components 1 to 4 with red annotations indicating parts of the setup.Thread the thread in order 1 to 4 and place the thread to the left over the presser foot. Some thread guides are marked in blue.

text_image
0 1L2 1R2 4 3 1 500 600 800Summary of threading paths and their threading sequences
Stitch program 21
2-needle Top cover, narrow
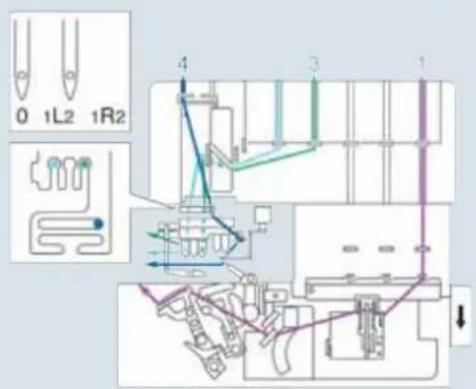
text_image
0 1L2 1R2 4 3 1Stitch program 22
2-needle Top cover, wide
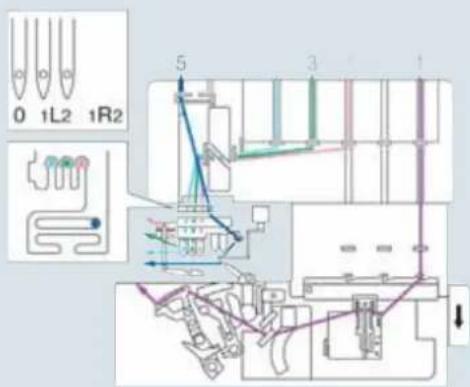
text_image
0 1L2 1R2 5 3 1Stitch program 23
3-needle, Top cover
Important notes on sewing with the top cover stitch
Sewing table
The sewing table is marked with various measurement units. The figures at the top are centimeters, those at the bottom represent inches.
Preparing your project
If you are going to use top cover stitches for decorative effects, you can mark the outlines on the right side of the fabric with textile pen or chalk, and sew along these lines.
Test your textile pen with your fabric.
If you intend to use top cover stitches for hemming, it is helpful to iron a hem beforehand. Depending on the hemdepth, add 0.5 cm (1/4") to the hem. For example, if you want a 2 cm hem, iron up 2.5 cm (1" hem, iron up 1 1/4").
Note: Test sew the cover stitch first, without adding the top cover thread. When the stitch is tested, continue sewing also with the top cover thread.
Starting to sew
Lift up the presser foot and position the fabric under the presser foot so that the needles pierce the fabric on the fi rst stitch. The top cover thread must be in front of the needles in order to be picked up on the very fi rst stitch. The raw edge must be along the two of the sewing table. Keep the threads moderately taut and start sewing slowly. As soon as the fi rst few stitches have been formed, the top cover thread can be cut short at the start of the seam and you can increase the sewing speed.
natural_image
White plastic electrical connector component (no visible text or symbols)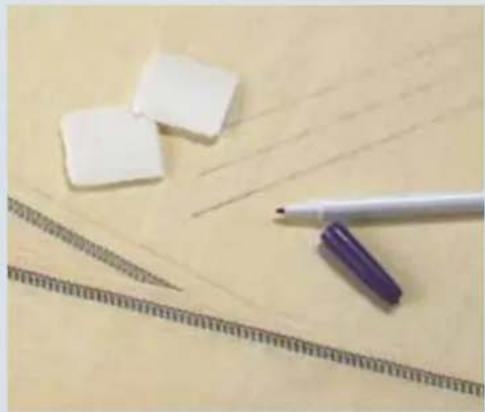
natural_image
Close-up of white erasers, a pen, and a ruler on a wooden surface (no text or symbols visible)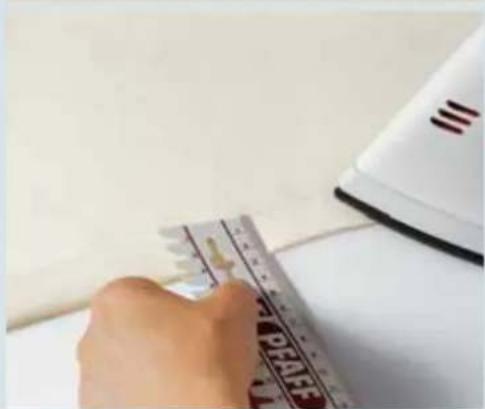
natural_image
Close-up of a hand using a power tool on a surface, with a white iron and paper nearby (no visible text or symbols)
natural_image
Close-up of a sewing machine needle stitching a blue plastic component, with a hand adjusting the part (no visible text or symbols)
natural_image
Close-up of a sewing machine needle stitching fabric, with no visible text or symbolsStopping sewing
- If you are sewing to the edge of the project:
Grasp the threads at the end of the seam and sew slowly off the project. As you do so, pull the threads gently backwards.
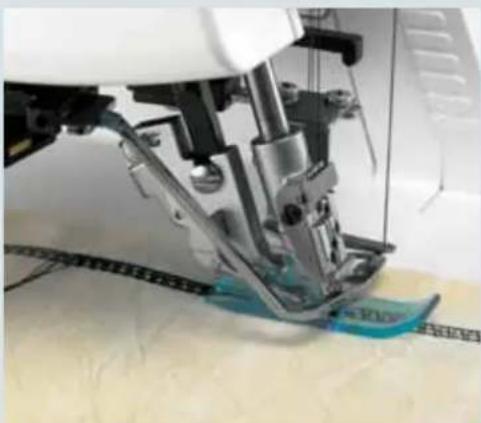
natural_image
Close-up of a sewing machine needle stitching fabric, showing mechanical components and a blue fabric patch (no text or symbols visible)- If you are sewing a continuous hem (around a project):
Sew 4–5 stitches over the previous stitches. On the last stitch, turn the hand wheel towards you slowly until the needles reach their lowest position.

natural_image
Close-up of a robotic arm interacting with a small electronic device (no visible text or symbols)Now turn the hand wheel back until the needles are in their highest position. At the same time, loosen the needle threads slightly with one finger.

natural_image
Close-up of a hand guiding fabric at a sewing machine (no visible text or symbols)Raise the presser foot. Grasp the threads at the end of the seam and press the tension release button to pull the work piece out. Cut the threads off. Pull the top cover threads through to the wrong side of the fabric and tie off.
Stitch formation
Since the top cover-stitch consists of a combination of the cover-stitch with top cover thread, we offer suggestions about adjustment options that predominantly refer to the cover-stitch.
3-needle Top cover, stitch program 23
If all the thread tensions are set correctly, the needle threads (blue, green and red) are almost invisible on the underside of the fabric. The looper thread (purple) lies slack between them.
The top cover thread (blue) lies slack between the needle threads on the top side of the fabric.

natural_image
Close-up of a fabric with a woven seam and stitching pattern (no text or symbols visible)If there are protruding loops in the top cover thread (blue).
Adjust the blue thread tension (45) of the top cover to a higher setting.

natural_image
Close-up of a fabric with a woven seam and patterned edge (no text or symbols visible)The needle threads (blue, green and red) are too loose and form small loops on the underside of the fabric.
Adjust the blue, green and red thread tensions to a higher setting.

natural_image
Close-up of a fabric with a coiled spring and stitching pattern (no text or symbols)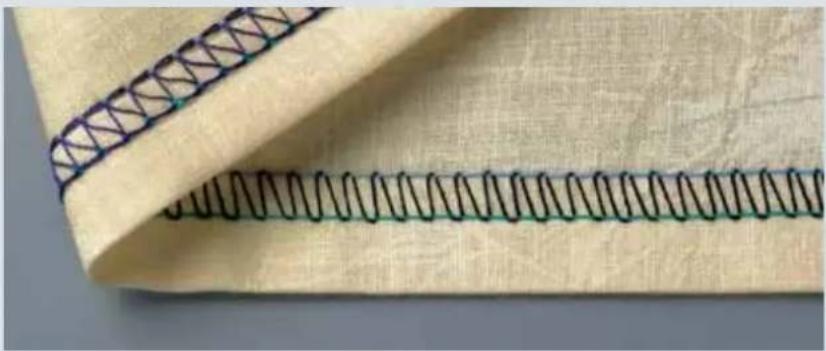
natural_image
Close-up of a fabric with a woven seam and stitching pattern (no text or symbols)2-needle top cover, narrow and wide, stitch programs 21, 22
If all the thread tensions are set correctly, the needle threads (blue and green) are almost invisible on the underside of the fabric. The hook thread (purple) lies slack between them.
The top cover thread (blue) lies slack between the needle threads on the top side of the fabric.

text_image
###
If there are protruding loops in the top cover thread (blue).
Adjust the blue thread tension (45) of the top cover to a higher setting.
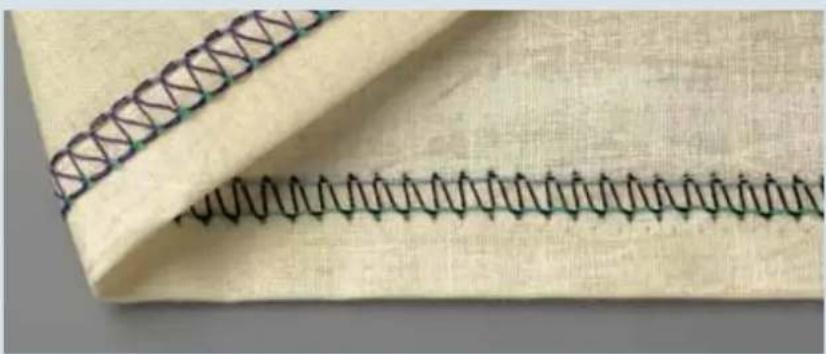
natural_image
Close-up of a fabric with a woven seam and stitching pattern (no text or symbols)If the top cover thread is barely visible.
Adjust the blue thread tension (45) of the top cover to a lower setting.
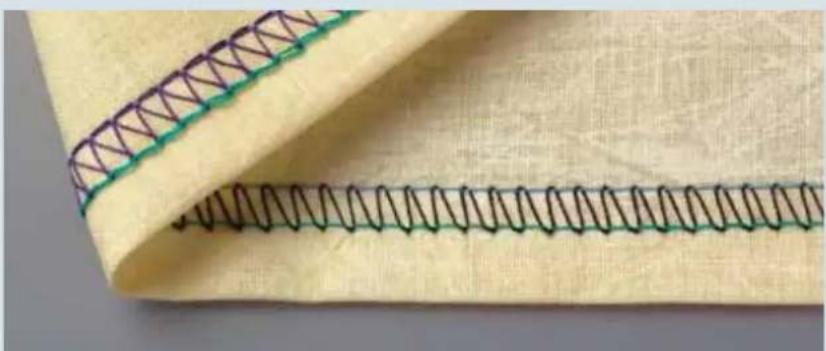
natural_image
Close-up of a fabric with a woven seam and stitching pattern (no text or symbols)The right needle thread (green) is too loose.
Adjust the green thread tension to a higher setting.

natural_image
Portrait of a woman wearing a striped cap and blue top, outdoors with blurred greenery background (no text or symbols visible)Deco Cover
In this chapter, we are going to describe the basic functioning of your creative 4874 using the example of the deco cover stitch.
Deco Cover
Switching the machine to deco cover operation (progs. 24 - 30)
Detachable thread stand
For deco cover sewing you need to use the detachable thread stand. Insert the top catches of the thread stand (27) into the top slots on the rear cover and press the bottom portion of the stand against the cover. Push the detachable thread stand to the right as far as it will go. Place one foam pad (52) on each spool pin (50).
To remove, push the thread stand to the left and pull upwards.
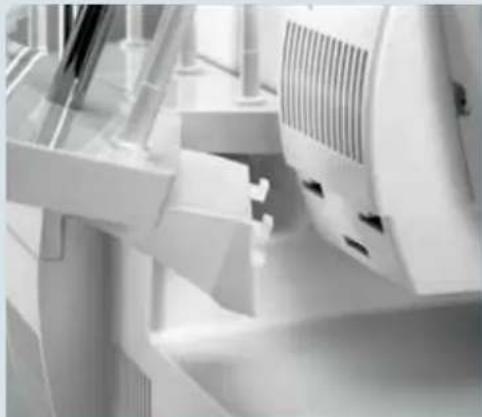
natural_image
Close-up of industrial equipment components with no visible text or symbolsDetachable thread guide for top/deco cover
Pull the thread guide slide up as far as it will go and twist it until the locking pommels click into place.
Place the detachable thread guide from the accessory box on top of the first thread guide.
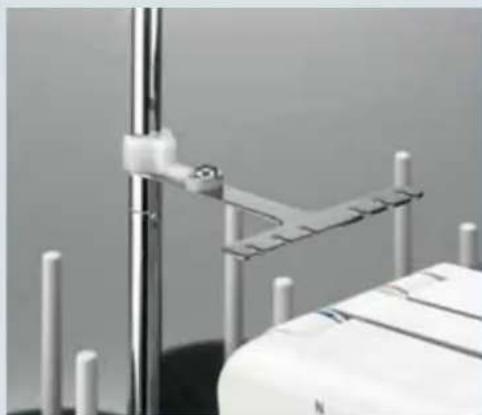
natural_image
Close-up of a medical device with metallic rods and a vertical rod, no visible text or symbolsStitch program sticker
The top/deco stitch program sticker (25) is located behind the front cover and includes the following information:
- Row: Stitch program number.
- Row: Threading diagram for the decorative thread guides.
- Row: Tension setting in blue and yellow, i.e. the blue and yellow thread tension must be changed to this setting manually.
- Row: Stitch formation with needle stitch line in grey.

text_image
21 | 22 | 23 | 24 | 25 | 26 | 27 | 28 | 29 | 30 4.5 4.0 4.5 4.0 4.0 4.0 4.0 3.0 3.0 6.0 6.0 5.0 5.0 7.5 7.5 1 2 3 4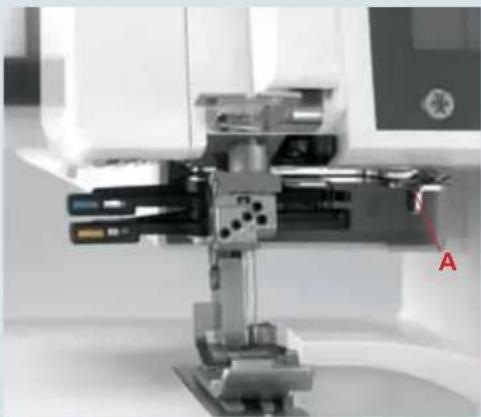
natural_image
Close-up of a precision mechanical device with no visible text or symbolsTop/deco switch lever
Choose a stitch program and move the top/deco switch lever A to the correct position:
Right for top cover, programs 21, 22 and 23
Left for deco cover, programs 24 - 30
For our example, we have chosen program 27.
Note: If the top/deco switch lever is not in the correct position, the machine will not run in programs 21 – 30 and an alarm will sound.
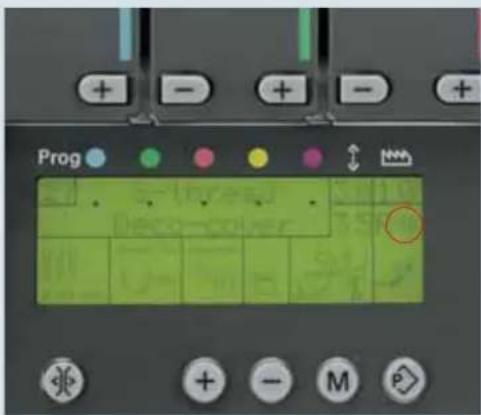
text_image
Prog + - + - + ↓ ↑ ↑ + - M PStitch program selection
Switch the machine on and use the program selection buttons +/- (11) to select one of the deco cover programs.
With deco cover stitches, you can choose from two programs for each stitch. The decorative thread guides will be set at their initial positions, and the sewing speed will be slowed automatically. In our example we selected 3-needle, 6-thread deco cover stitch program 27. The machine gives a warningsignal if the top/deco switch lever A is in the wrong position.
When you first select the program, the 4874 is set for use with thicker thread in the decorative thread guides. This is indicated by the <> symbol.

text_image
Prog + - + - + + - M PIf you press program selection key + again, the same program is displayed, but the machine is now set for use with thinner thread for decorative thread guides. This is indicated by the >> symbol.
3.0 1.0
The stitch length and the differential feed are set automatically, but can be altered and stored individually (see page 3-4).
Note: Always set up your creative 4874 as shown in the display. Then open the program memory (see page 3-5) before threading the machine.

0 1L2 1 R2
With the needle changing tool, insert needles L 0, 1 and 2 as far as they will go into the needle holder (make sure the needles are inserted all the way with your fingers). Tighten the associated retaining screw and remove the needle changing tool.

Pull knob A of the stitch fi nger (32) to the right and swing it down into its disengaged position.

Turn the hand wheel to bring the upper looper to its lowest position. Press the lever (18) down and push it to the left. Turn the hand wheel to ensure that the upper looper is indeed disengaged.

Remove the knife guard and push the sewing table (accessory) down between the two front cover guides.
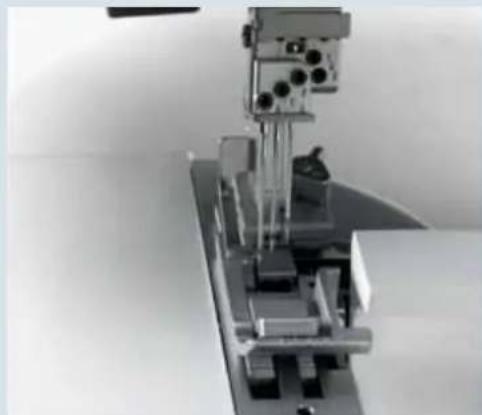
natural_image
Mechanical assembly with a vertical metal frame and mechanical components (no visible text or symbols)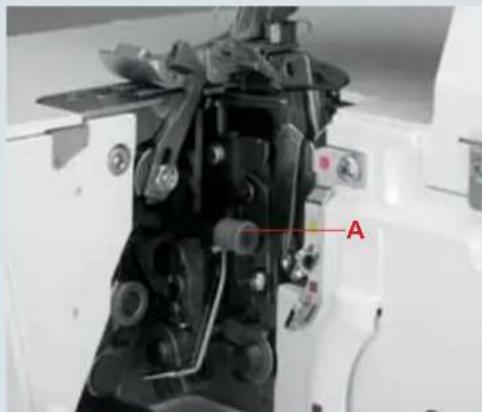
natural_image
Close-up of a mechanical device with labeled component 'A' (no readable text or symbols beyond label)
natural_image
Close-up of a hand operating a sewing machine with metal components and a red mark on the base (no visible text or symbols)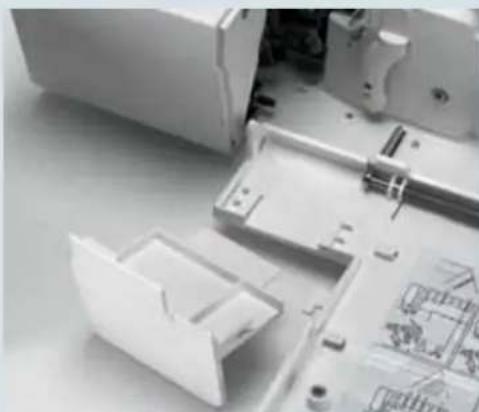
natural_image
Interior view of an electronic device showing exposed internal components and a plastic housing (no text or symbols visible)
natural_image
Close-up of a sewing machine's internal mechanism with no visible text or symbols
natural_image
Close-up of a white electronic device casing with a small display and control buttons (no visible text or symbols)
natural_image
Close-up of a sewing machine needle stitching a blue plastic component on a metal base (no visible text or symbols)
Raise the upper knife (32) to its highest position by turning the hand wheel. Now push the knob for lowering the upper knife (36) as far as it will go to the right. Turn the knob towards you until the upper knife is in its lowest position. The upper knife is now disengaged.
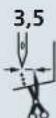
Turn the seam width selection knob (22) to set the seam width to 3.5 mm.
R

Use clearview foot R from the accessory box. The machine is now set for thicker thread for use with the decorative thread guides.
If you press program selection key + again, the machine is set for thinner thread for use with the decorative thread guides.
Accessories
The following accessories are provided for deco cover:
- Blue decorative thread guide
- Yellow decorative thread guide
Both decorative thread guides have three holes for threading the decorative threads. This is indicated on the stitch program sticker by the following symbol:
This symbol indicates which of the holes to insert the thread, and which of the two thread tensions (blue/yellow) you must use. The top row refers to the blue decorative thread guide and the bottom row to the yellow decorative thread guide.
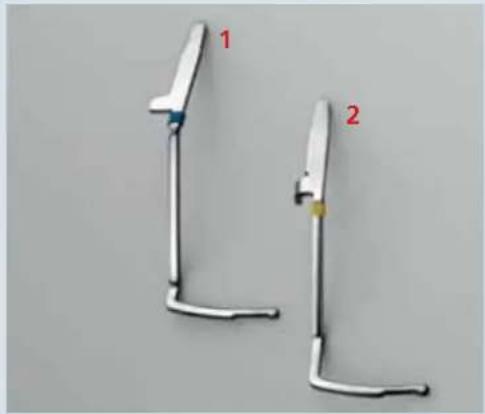
natural_image
Two white metal tools with red labels 1 and 2, no text or symbols on the tools themselvesNote: The preser foot R has to be attached. Lower the presser foot.
Decorative thread guide
First insert the yellow decorative thread guide in the bottom slot (yellow) in the holder, then place the blue decorative guide in the top slot (blue).
To do this, loosen but do not remove the screws on the side with the allen key.

natural_image
Close-up of a sewing machine needle stitching blue fabric (no visible text or symbols)Insert the decorative thread guides and tighten the screws.
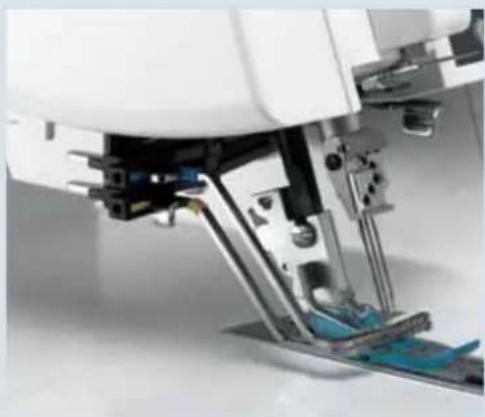
natural_image
Close-up of a sewing machine needle and base mechanism (no visible text or symbols)
natural_image
Close-up of a mechanical assembly with a white cylindrical component and metal rod (no visible text or symbols)To remove the decorative thread guides, loosen the screws with the allen key. Place the screwdriver between the decorative thread guide and the holder and press the tip of the screwdriver gently forwards. The thread guide will pop out of the holder. Remove the blue one first, and then the yellow one.

text_image
Prog + - + -When you press the memory selection button P once, the program memory opens. The thread tension values appear beside the program number in the display.
First thread the purple thread tension for the cover-stitch looper, followed by the blue, green and red thread tensions for the needles. You can also refer to the threading diagram behind the front cover.
Finally the blue and yellow deco cover threads are threaded.
text_image
33 81LThreading the cover-stitch looper
Turn the hand wheel towards you until the cover-stitch looper (33) is as far to the right as possible.
Thread the threads in order from 1 to 10. Thread guide 8 is marked with a purple square.
Note: In the case of thread guides 6 and 7, the thread is simply placed on top of them, not threaded through.
Thread the thread in the guides from 1 to 8. (Make sure the thread does not pass under the latch.)
Note: The lever will return to its original position as soon as you start to sew.
Press lever A up and hook the thread into slot B. The illustration below shows how to do this.
From the front, pass the thread through eye C (- threading point 10) of the double chain stitch and cover stitch looper.
text_image
Labeled diagram of a sewing machine with numbered components and measurement instruments
text_image
8 7 6 5 4
text_image
A B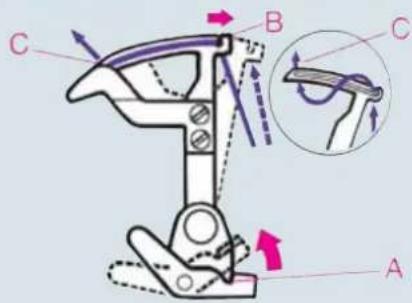
text_image
Technical diagram of a mechanical device with labeled parts A, B, C and directional arrows indicating motion or force vectors.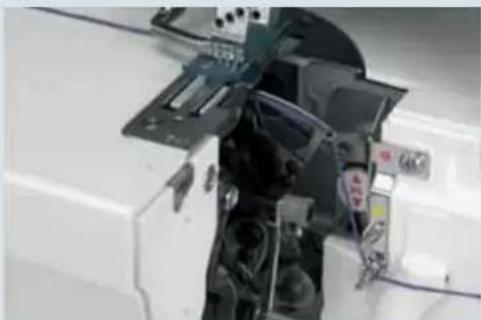
natural_image
Interior view of a white electronic device with exposed circuit board and mechanical components (no visible text or symbols)Pull about 10 cm (5") of thread through the looper and place it to the left under the presser foot.
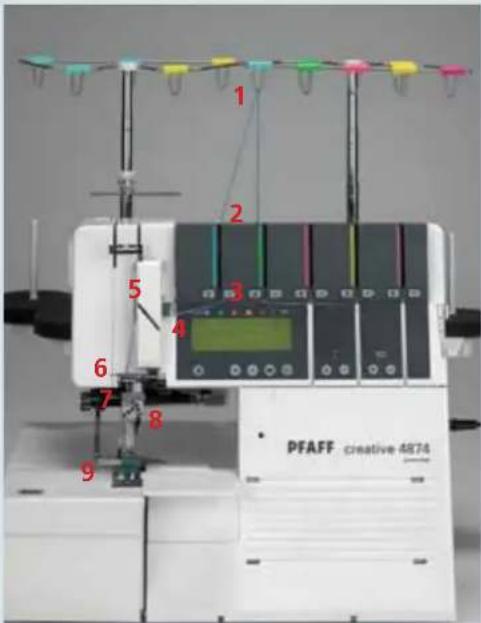
text_image
1 2 3 4 5 6 7 8 9 PFAFF creative 4874Threading the needle(s)
Thread the threads in order from 1 to 9.

text_image
5 4The thread must pass through the lower slot in thread guide 5.
To thread needles more easily, use the needle threader in the accessory box.

text_image
7 8 9Pull the thread about 10 cm (5") through the eye of the needle and place it to the left under the presser foot (if necessary, press the tension release button (10), see page 3-4.
Deco-cover thread tension dials, blue and yellow
Set the deco cover thread tensions, blue and yellow (45) as indicated on the stitch program sticker. To do this, turn the thread tension dials until the corresponding settings appear directly above line A and line B.
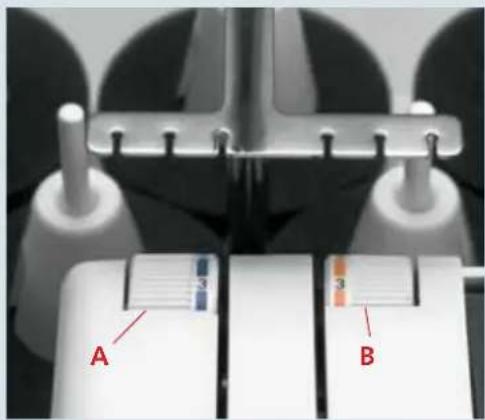
text_image
A BThreading the deco cover threads
Place the spools on the corresponding spool pins (1 x blue, 1 x yellow) of the detachable thread stand. Thread the corresponding color coded thread guides from the back forwards.
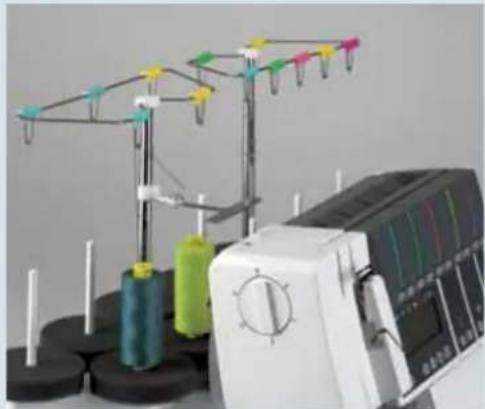
natural_image
Laboratory sewing machine with spools of thread and colorful yarn spools (no visible text or labels)In the case of program 30, 3-needle, 10-thread deco cover, the corresponding spool pin of the yellow thread guide for thread stand (49) must be used to position the sixth or decorative thread.
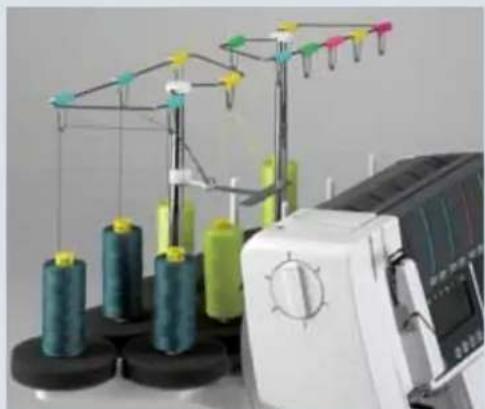
natural_image
Industrial sewing machine with spools of thread and a digital display (no visible text or symbols)Note: For program 29 two threads will be positioned between each tension disc. For program 30 three threads will be positioned between each tension disc.
With both hands, pull the threads between the tension discs and place them under rear thread guides (46).
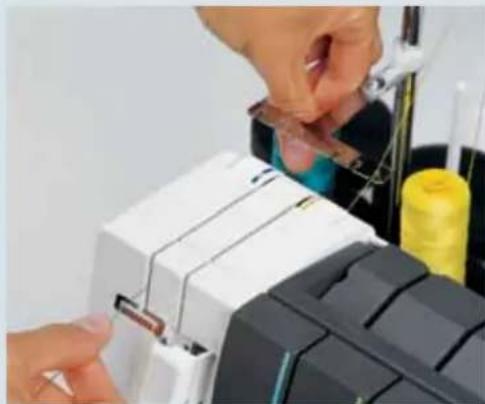
natural_image
Close-up of hands assembling or adjusting a mechanical component with visible traces and parts (no text or symbols)
natural_image
Close-up of a sewing machine with spools and metal frame (no visible text or symbols)Now guide the thread into the color coded thread guide in the detachable thread stand.
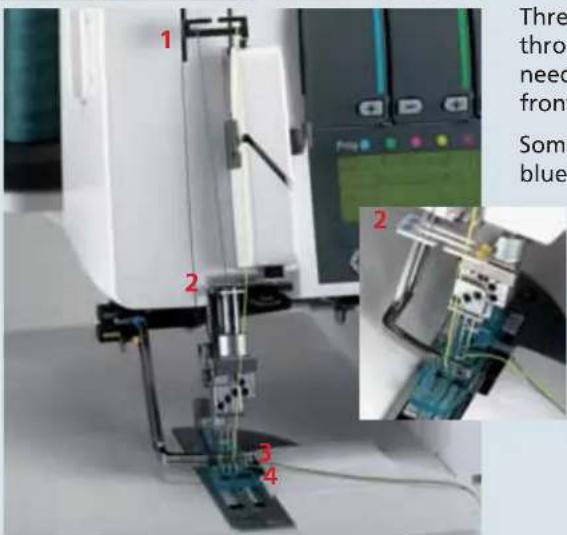
text_image
1 2 3 4 Thre thro need front Some blueThread the deco cover threads in order through 1 to 4 and bring them behind the needles. With tweezers, turn them to the front towards you.
Some of the thread guides are marked in blue and yellow.

text_image
0 1L2 1R2 4 3 1Summary of threading paths and their threading sequences
Stitch program 24
5-thread deco cover

text_image
0 1L2 1R2 5 3 4 1Stitch program 25
6-thread deco cover
Stitch program 26
6-thread deco cover

text_image
0 1L2 1R2 5 3 1 1Stitch program 27
6-thread deco cover
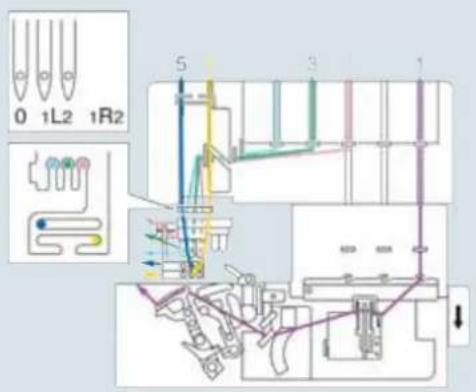
text_image
0 1L2 1R2 5 3 1Stitch program 28
6-thread deco cover
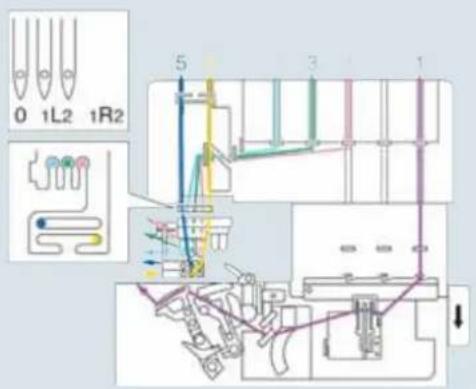
text_image
0 1L2 1R2 5 3 1Stitch program 29
8-thread deco cover
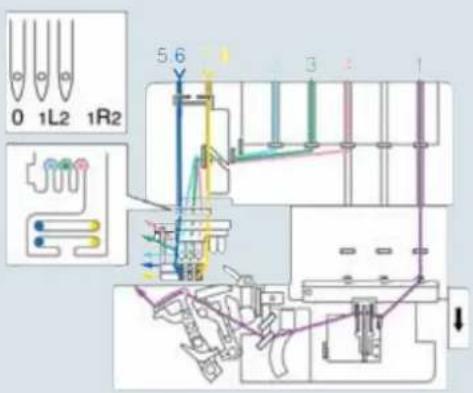
text_image
0 1L2 1R2 5 6 3 1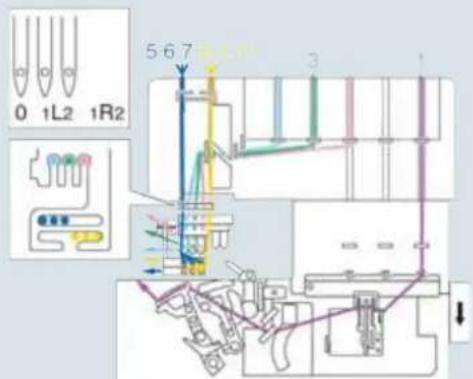
text_image
0 1L2 1R2 5-6-7 3 1Stitch program 30
10-thread deco cover
natural_image
White plastic electrical connector component (no visible text or symbols)Important notes on sewing with the Deco Cover Stitch
Sewing table
The sewing table is marked with various measurement units. The figures at the top are centimeters, those at the bottom represent inches.

natural_image
Close-up of a notebook with erasers, a pen, and lined paper (no visible text or symbols)Preparing your project
If you are going to use deco cover stitches for decorative effects, you can mark the outlines on the right side of the fabric with a textile pen or chalk, and sew along these lines.
Test your textile pen with your fabric.

natural_image
Close-up of a hand using a ruler to measure a quantity, with an iron on top (no visible text or symbols)If you intend to use deco cover stitches for hemming, it is helpful to iron a hem beforehand. Depending on the hemdepth, add 0.5 cm (1/4") to the hem. For example, if you want a 2 cm hem, iron up 2.5 cm (1" hem, iron up 1 1/4").
Note: Test sew the cover stitch first, without adding the deco cover thread. When the stitch is tested, continue sewing also with the deco cover thread.
Starting to sew
Lift up the presser foot and position the fabric under the presser foot so that the needles pierce the fabric on the fi rst stitch. The deco cover threads must be behind the needles in order to be picked up on the very fi rst stitch.
The raw edge must be along the two of the sewing table. Keep the threads moderately taut and start sewing slowly. As soon as the first few stitches have been formed, the deco cover threads can be cut short at the start of the seam and you can increase the sewing speed.
Stopping sewing
- If you are sewing to the edge of the project:
Grasp the threads at the end of the seam and sew slowly off the project. As you do so, pull the threads gently backwards.
- If you are sewing a continuous hem (around a project):
Sew 4–5 stitches over the previous stitches. On the last stitch, turn the hand wheel towards you slowly until the needles reach their lowest position.
Now turn the hand wheel back until the needles are in their highest position. At the same time, loosen the needle threads slightly with one finger.

natural_image
Close-up of a 3D printer with visible wiring and components (no text or symbols)
natural_image
Close-up of a hand using a sewing machine to press or install electronic components (no visible text or symbols)
natural_image
Close-up of a sewing machine needle stitching blue fabric on a white surface (no text or symbols visible)
natural_image
Close-up of a sewing machine needle stitching fabric, with a hand operating the process (no visible text or symbols)
natural_image
Close-up of a hand operating a sewing machine needle stitching fabric (no visible text or symbols)Raise the presser foot. Grasp the threads at the end of the seam and press the tension release button to pull the project out. Cut the threads off. Pull the deco cover threads through to the wrong side of the fabric and tie off.

natural_image
Interior scene with a white lace window, floral pattern, and tableware in a blue room (no visible text or symbols)Stitch formation
Since deco cover consists of a combination of cover stitch with deco cover threads, we will present suggestions for adjustment with reference to cover-stitch.
5-thread deco-cover, program 24
If all the thread tensions are set correctly, the needle threads (blue and green) are almost invisible on the underside of the fabric. The looper thread (purple) lies slack between them.
The deco cover threads (blue and yellow) are lying slack between the needle threads on the top side of the fabric.

natural_image
Close-up of a fabric with a wavy seam and patterned edge, no text or symbols visibleIf there are protruding loops in the deco cover threads (blue and yellow).
Adjust the yellow and blue thread tensions (45) of the deco cover threads to a higher setting.

natural_image
Close-up of a fabric with a wavy seam and a patterned seam, no text or symbols visibleIf the deco cover threads (blue and yellow) are barely visible.
Adjust the yellow and blue thread tensions (45) of the deco cover threads to a lower setting.

natural_image
Close-up of a fabric with a wavy seam and a patterned seam, no text or symbols visible
natural_image
Close-up of a fabric with a wavy seam and a patterned seam, no text or symbols visibleIf the needle threads (blue and green) are too loose and form small loops on the underside of the fabric.
Adjust the blue and green needle thread tensions to a higher setting.

natural_image
Close-up of a fabric with a wavy seam and a patterned seam, no text or symbols visibleIf the needle threads (blue and green) are too tight and the fabric is puckering.
Adjust the green and blue needle thread tensions to a lower setting.
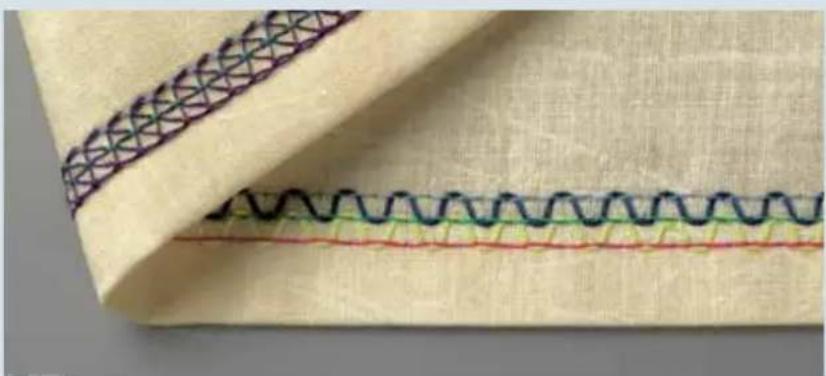
natural_image
Close-up of a fabric with a wavy seam and patterned stitching (no text or symbols)6-thread deco cover, stitch program 25
If all the thread tensions are set correctly, the needle threads (blue, green and red) are almost invisible on the underside of the fabric. The looper thread (purple) lies slack between them.
The deco cover threads (blue and yellow) are lying slack between the needle threads on the top side of the fabric.
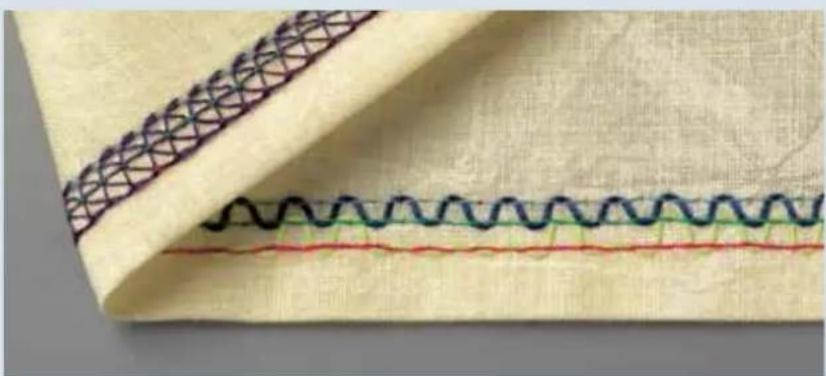
natural_image
Close-up of a fabric with wavy seam and patterned stitching (no text or symbols)If there are protruding loops in the decorative threads (blue and yellow).
Adjust the yellow and blue thread tensions (45) of the deco cover to a higher setting.
If the deco cover threads (blue and yellow) are barely visible.
Adjust the yellow and blue thread tensions (45) of the deco cover threads to a lower setting.

natural_image
Close-up of a fabric with a woven seam and stitching pattern, no text or symbols visibleIf the needle threads (blue, green and red) are too loose.
Adjust the blue, green and red needle thread tensions to a higher setting.
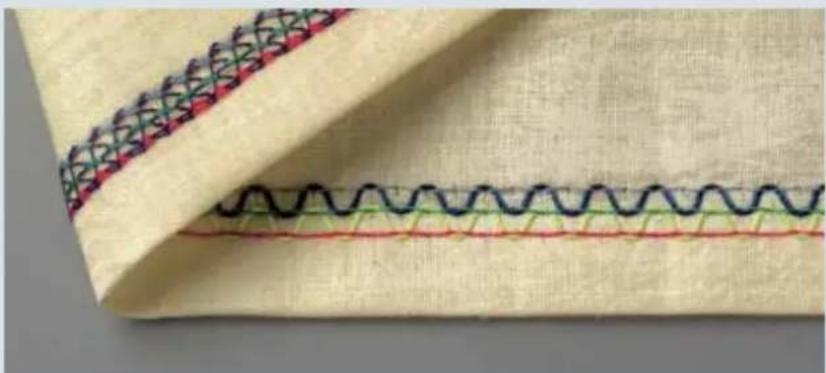
natural_image
Close-up of a fabric with wavy seam and stitching pattern (no text or symbols)If the needle threads (blue, green and red) are too tight and the fabric is puckering.
Adjust the blue, green and red needle thread tensions to a lower setting.
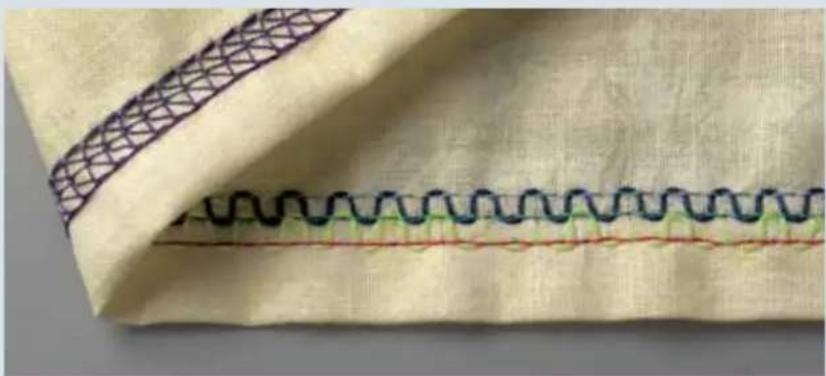
natural_image
Close-up of a fabric with wavy seam and patterned stitching (no text or symbols)The stitch formation adjustments for programs 26, 27 and 29 are based on those for program 25.
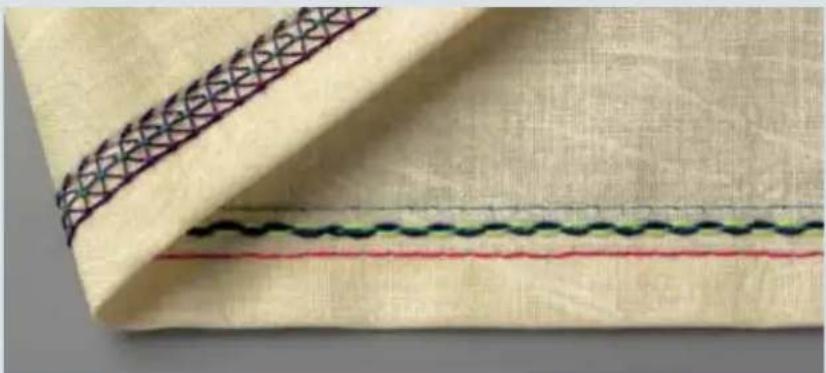
natural_image
Close-up of a fabric with a patterned seam and wavy seam, no text or symbols visible6-thread deco cover, stitch program 28
If all the thread tensions are set correctly, the needle threads (blue, green and red) are almost invisible on the underside of the fabric. The looper thread (purple) lies slack between them. The deco cover threads (blue and yellow) are lying slack around the middle needle thread on the top side of the fabric.
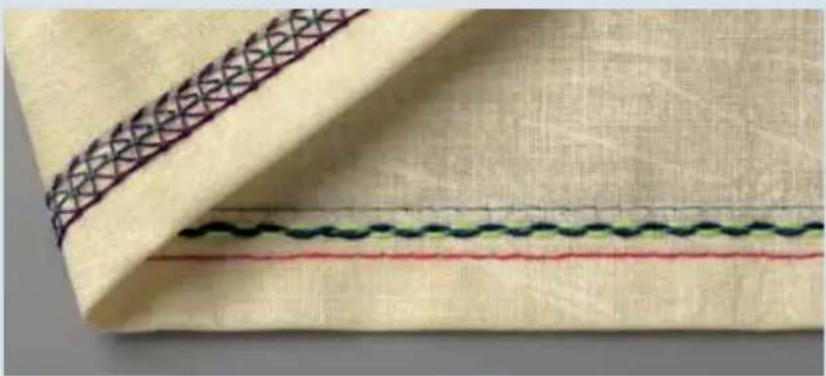
natural_image
Close-up of a fabric with a woven seam and three horizontal lines, no text or symbols visible.There are protruding loops in the deco cover threads (blue and yellow).
Adjust the yellow and blue thread tensions of the deco cover to a higher setting. Or it may be necessary to return both deco cover guides to their initial position. For this purpose, there are two alternatives:
Turn the machine off at the main switch and then turn it back on.
Press the program button + once to advance to the next program menu and then press - button once to return to the selected program.

natural_image
Close-up of a fabric with a woven seam and three distinct stitching lines (no text or symbols)If the needle threads (blue, green and red) are too loose.
Adjust the blue, green and red needle thread tensions (45) to a higher setting.
The stitch formation adjustments for program 30 are based on those for program 28.

natural_image
Woman in a bright blue blazer outdoors, no visible text or symbolsThread Tension
This chapter includes information on correct thread tensions for all the stitches you can create with your creative 4874. We also provide you with a number of hints on selecting the correct thread.
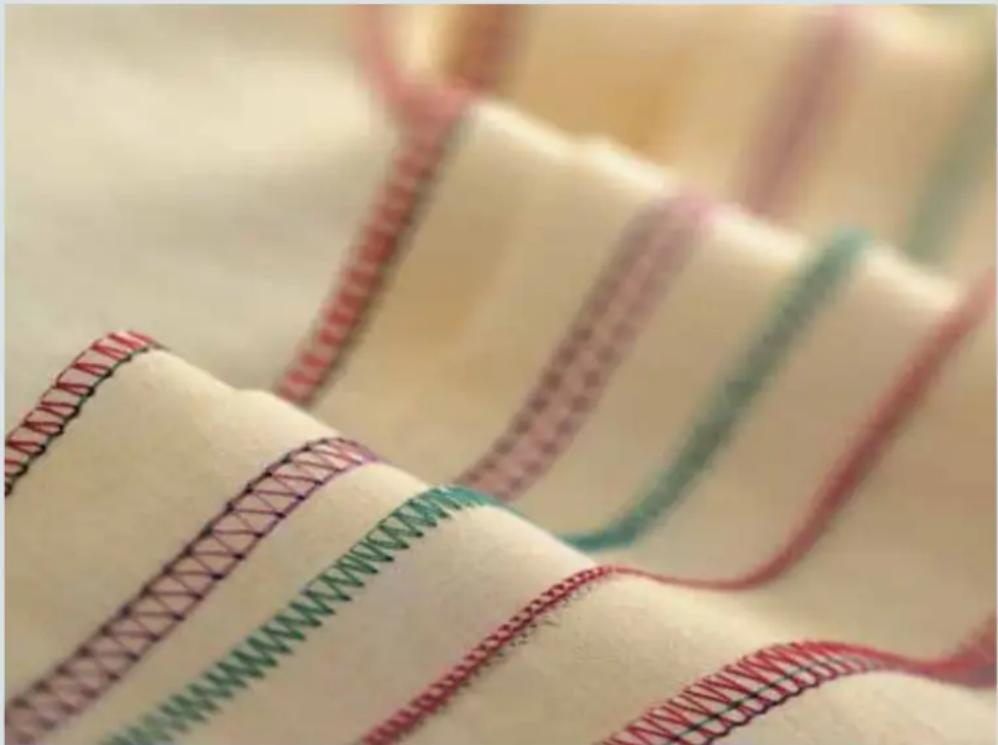
natural_image
Close-up of fabric swatches with colorful stitching and stitching details (no readable text or symbols)Correct thread tension
Your 4874 automatically sets the thread tension, stitch length and differential feed for each stitch type. However, the type of fabric, the quality of the thread and the needle size all affect seam formation to some degree, so it may be necessary to adjust the thread tension settings.
Also check that your 4874 is threaded correctly and the threads are all the way in the tension discs before adjusting the tensions. The stitch length or seam width may need to be adjusted to accommodate the fabric you are sewing.

Note: The thread tensions for the top cover and deco cover threads (42) must be set manually. The settings can be found on the stitch program sticker behind the front cover.
To change the automatic thread tensions, press one of the tension buttons +/-. The program memory will open. Now you can change all your settings using the +/- buttons as you wish. If you press memory selection button P repeatedly you will be returned to the main menu; the changed setting will not be saved. If no changes are made within 10 seconds, the display automatically switches back to the main menu.
You can also save your new tension settings. See chapter 3 for instructions on how to do this.
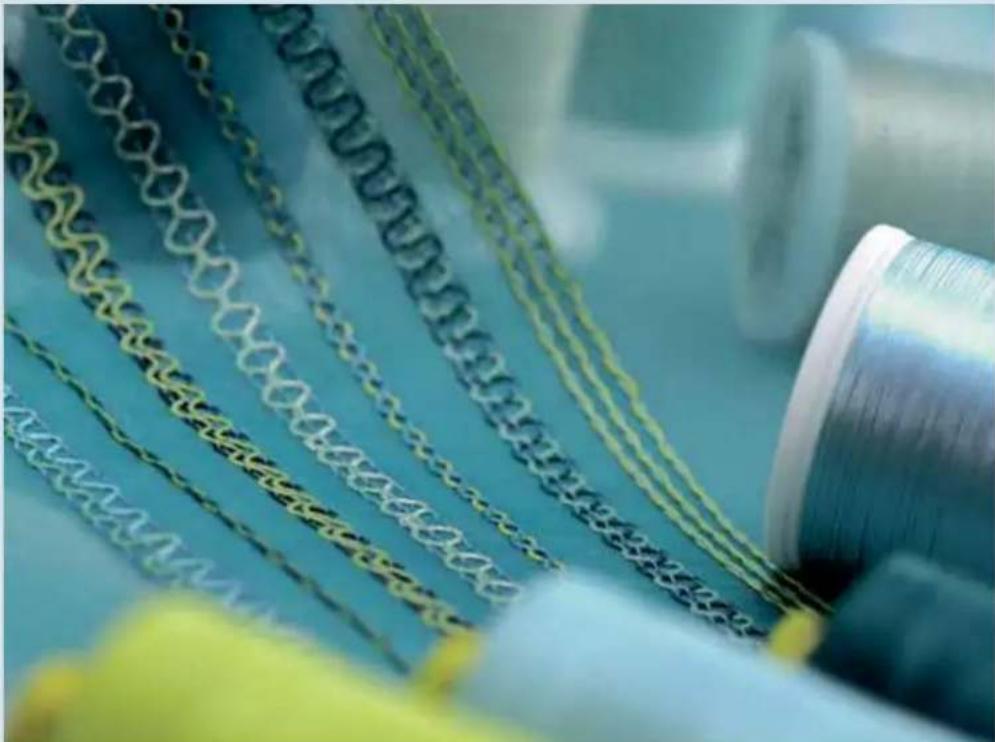
natural_image
Close-up of a textile spool with coiled fabric strips and spools of thread, no visible text or symbolsCorrecting stitch formation
In order to be able to check the thread tension better, you should sew a test seam first, which you can then use to check the looping of the threads.
Adjust the thread tension settings as necessary.
Hint: If you use all the threads in the respective thread tension color, you will find it easier to adjust the thread tension. This way, you will be able to distinguish more easily between the individual threads in the stitch.
2-needle cover-stitch, narrow and wide
Stitch programs 01, 02
If all the thread tensions are set correctly, the needle threads (blue and green) are barely visible on the underside of the fabric. The looper thread (purple) lies slack between them.

natural_image
Folded fabric with a red dashed seam and green lines, showing beige texture (no text or symbols)The right needle thread (green) is too loose.
Adjust the green thread tension to a higher setting.

natural_image
Close-up of a beige fabric with a textured seam and two horizontal lines, no visible text or symbols.The needle threads (green and blue) are set too tightly causing folds in the fabric. Set the green and blue thread tension to a lower value.

natural_image
Close-up of a beige fabric with red stitching and visible seam details (no text or symbols)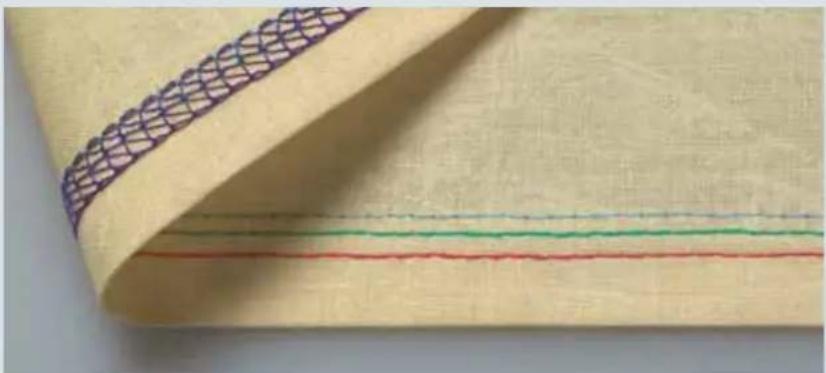
natural_image
Close-up of a beige fabric with a woven pattern and three horizontal colored lines (red, green, blue) on the right side, no text or symbols visible.3-needle cover-stitch
Stitch program 03
If all the thread tensions are set correctly, the needle threads (blue, green and red) are barely visible on the underside of the fabric. The looper thread (purple) lies slack between them.
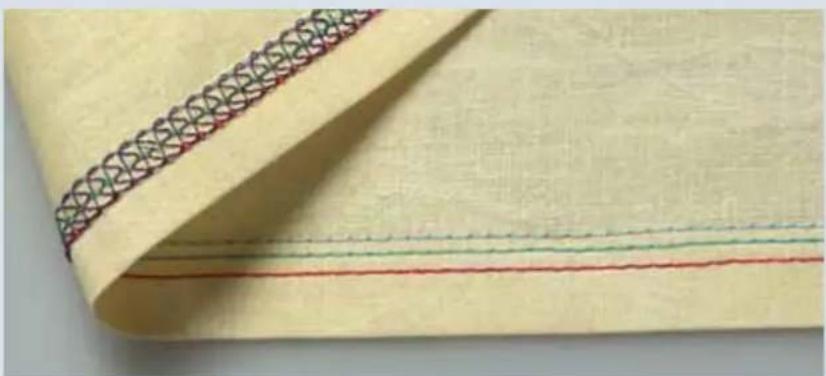
natural_image
Close-up of a beige fabric with a decorative patterned band and three horizontal red and green lines (no text or symbols)The needle threads (blue, green and red) are too loose.
Adjust the blue, green and red thread tensions to a higher setting.
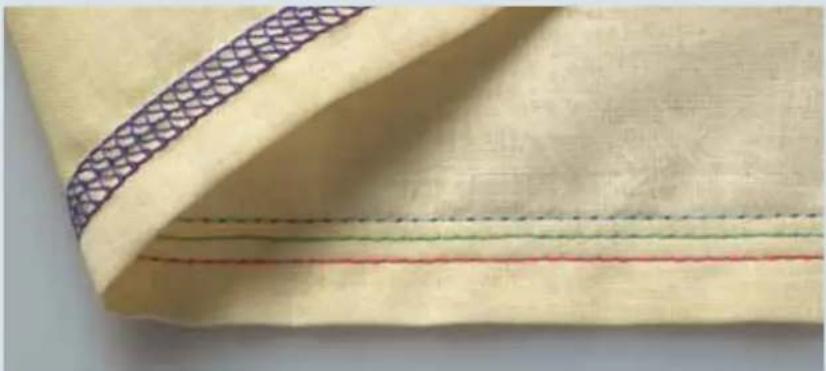
natural_image
Close-up of a beige fabric with a patterned seam and multiple horizontal lines (no text or symbols)The needle threads (blue, green and red) are too tight and the fabric is puckering.
Adjust the blue, green and red thread tensions to a lower setting.
5-thread safety seam
Stitch program 20
Since the 5-thread safety seam consists of a combination of a double chain-stitch and a 3-thread overlock stitch, see below and on page 7-8 for suggestions on how to adjust these stitches.

natural_image
Close-up of a fabric with yellow and pink stitching, showing stitching details (no text or symbols)4-thread safety seam
Stitch program 19
Since the 4-thread safety seam consists of a combination of a double chain-stitch and a 2-thread fl atlock stitch, see below and on page 7-10 for suggestions on how to adjust these stitches.

natural_image
Close-up of a beige fabric with green stitching and a purple band, no text or symbols visibleNote: Attach the converter to sew the 4-thread safety seam (see page 2-29).
Double chain-stitch
Stitch program 04
If all the thread tensions are set correctly, the needle thread (blue) is hardly visible on the underside of the fabric.

natural_image
Folded fabric with a dark purple seam and a light blue horizontal band, no text or symbols visibleThe needle thread (blue) is too loose.
Adjust the blue needle thread tension to a higher setting.

natural_image
Close-up of a yellow fabric with a dark stitching line and a thin green seam, no text or symbols visible.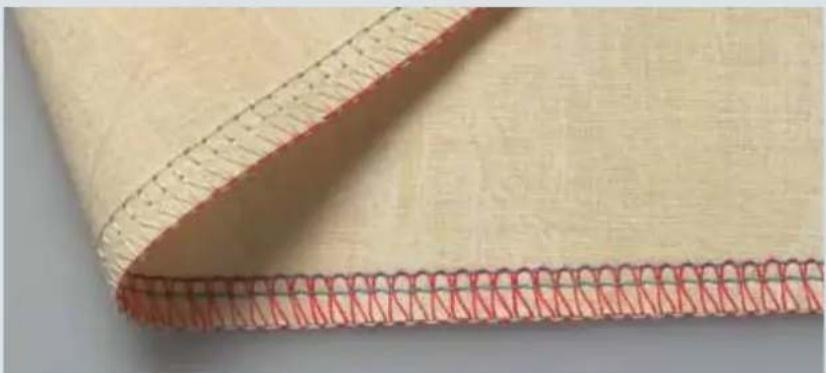
natural_image
Close-up of a beige fabric with red stitching pattern, no text or symbols visible4-thread overlock seam
Stitch program 18
If all the thread tensions are set correctly, the looping of the two looper threads (red and yellow) meet right at the edge of the fabric.
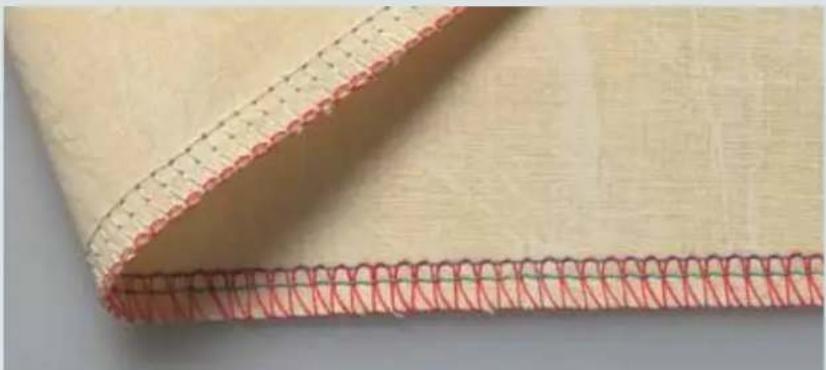
natural_image
Close-up of a beige fabric with red stitching and black stitching lines (no text or symbols)The upper looper thread (red) appears on the underside of the fabric.
Adjust the red thread (upper looper) tension to a higher setting and/or lower the yellow thread (lower looper) tension.
Thread tension setting too low.
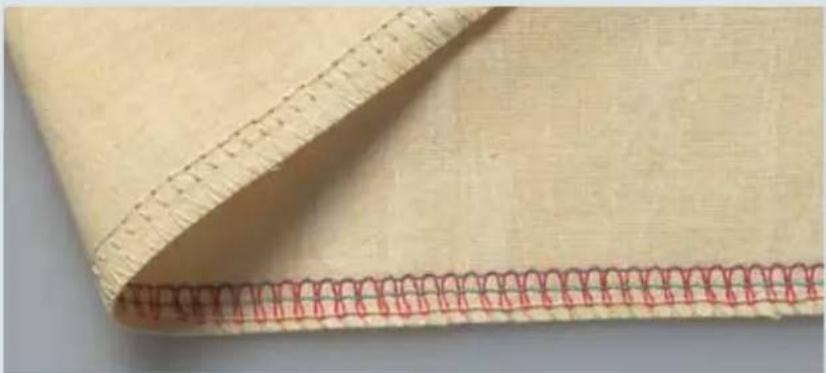
natural_image
Close-up of a beige fabric with red stitching pattern, no text or symbols visibleThe lower looper (yellow) appears on the upper side of the fabric.
Adjust the yellow thread (lower looper (yellow)) tension to a higher setting and/or lower the red thread (upper looper) tension.
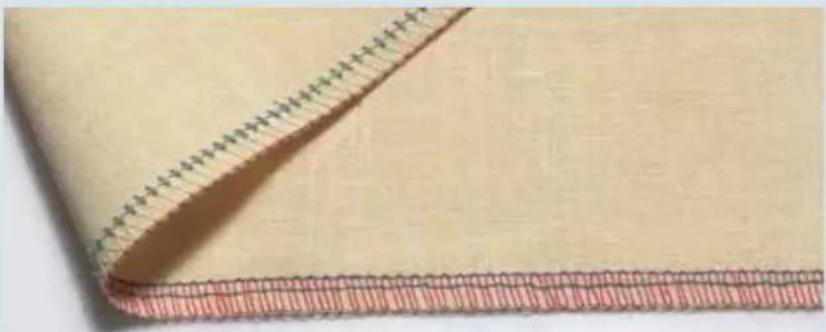
natural_image
Close-up of a beige fabric with a red and white striped pattern, no text or symbols visible.The needle threads (blue and green) are too loose, causing large loops of needle thread on the underside of the fabric. Set the blue and green thread tension to a higher value.
3-thread overlock, narrow and wide
Stitch programs 10 and 11
If all the thread tensions are set correctly, the two looper threads (red and yellow) meet right at the edge of the fabric.
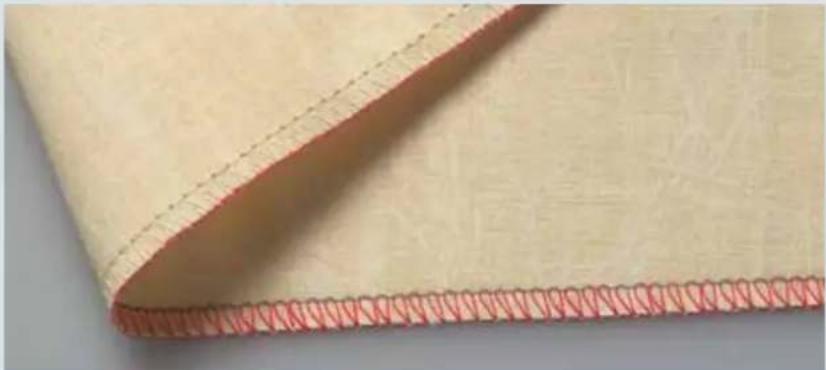
natural_image
Close-up of a beige fabric with red stitching and a dotted seam, no visible text or symbolsThe needle thread is too loose.
Adjust the corresponding needle thread tension to a higher setting.

natural_image
Close-up of a beige fabric with red stitching and green stitching (no text or symbols)The upper looper thread (red) appears on the underside of the fabric.
Adjust the red thread (upper looper) tension to a higher setting and/or lower the yellow thread (lower looper) tension.

natural_image
Close-up of a beige fabric with red stitching and green stitching, showing texture details (no text or symbols)The lower looper thread (yellow) appears on the upper side of the fabric.
Adjust the yellow thread (lower looper) tension to a higher setting and/or lower the red thread (upper looper) tension.

natural_image
Close-up of a beige fabric with red stitching and dashed seam lines (no text or symbols)
natural_image
Close-up of a beige fabric with red stitching pattern, no text or symbols visible3-thread fl atlock, narrow and wide
Stitch programs 13 and 14
If all thread tensions are set correctly, thread looping is right at the edge of the fabric. The upper looper (red) and the needle (blue) meet at the edge of the material. The lower looper (yellow) also is at the edge as a straight piece of thread along the edge.
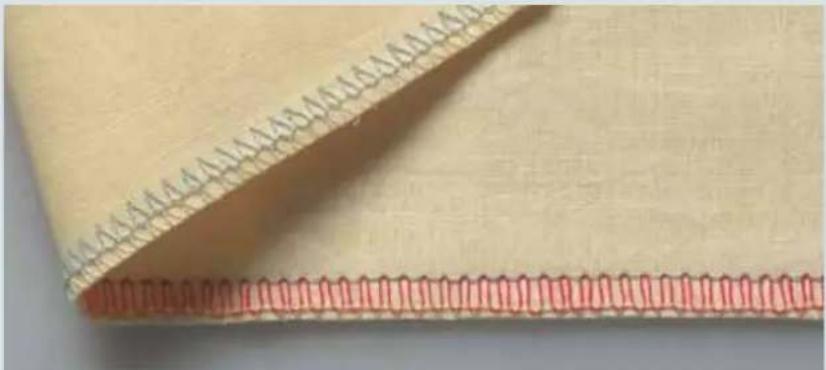
natural_image
Close-up of a beige fabric with a red stitching detail, showing stitching details (no text or symbols)The needle thread does not go all the way to the fabric edge (too tight).
Adjust the needle thread tension (blue) to a lower setting and/or the lower looper thread (yellow) to a higher setting.

natural_image
Close-up of a beige fabric with red stitching pattern, no text or symbols visibleThe upper looper thread (red) appears on the underside of the fabric.
Adjust the red thread tension to a higher setting and/or the needle thread (blue) to a lower setting.
2-thread fl atlock, narrow and wide
Stitch programs 05 and 06
If all the thread tensions are set correctly, the looper and needle threads will meet on the edge of the fabric.
Note: To sew the 2-thread fl atlock attach the converter as described on page 2-29.
The needle thread is too loose or the lower looper thread (yellow) is too tight.
Adjust the corresponding needle thread tension to a higher setting and/or change the yellow thread tension to a lower setting.
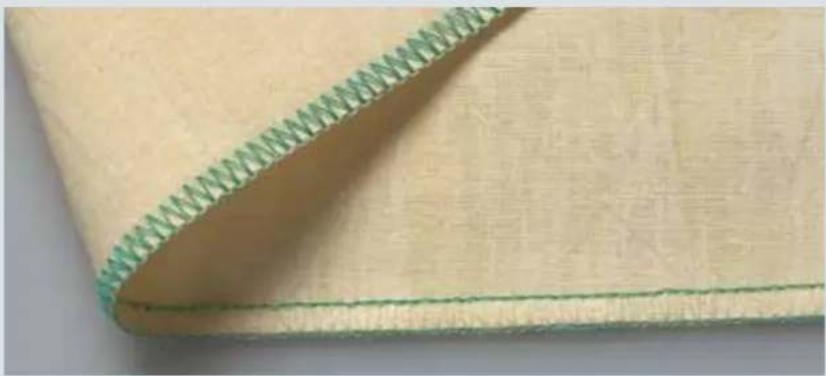
natural_image
Close-up of a beige fabric with a green dotted seam, showing texture and stitching details (no text or symbols)
natural_image
Close-up of a beige fabric with green stitching edge, showing texture and seam details (no text or symbols)The lower looper thread (yellow) is too loose and/or the needle thread is too tight.
Adjust the yellow thread tension to a higher setting and/or change the corresponding needle thread tension to a lower setting.

natural_image
Close-up of a beige fabric with green stitching and a small green band, no visible text or symbols.
natural_image
Close-up of a beige fabric with a red stitching edge, showing texture and stitching details (no text or symbols)3-thread fl at hem
Stitch program 16
If all thread tensions are set correctly, the upper and lower looper threads meet right at the edge of the fabric.
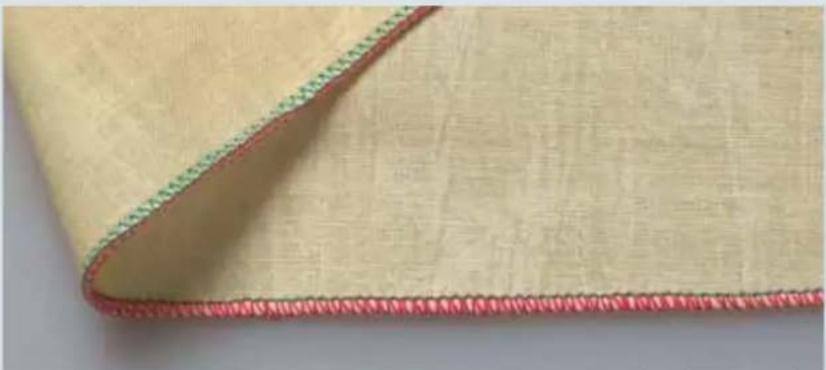
natural_image
Close-up of a beige fabric with red and green stitching, showing texture and folds (no text or symbols)The needle thread (green) is too loose.
Adjust the green needle thread tension to a higher setting.

natural_image
Close-up of a beige fabric with a red dotted seam, showing texture and stitching details (no text or symbols)The upper looper thread (red) appears on the underside of the fabric.
Adjust the red thread (upper looper (red)) tension to a higher setting and/or lower the yellow thread (lower looper (yellow)) tension.
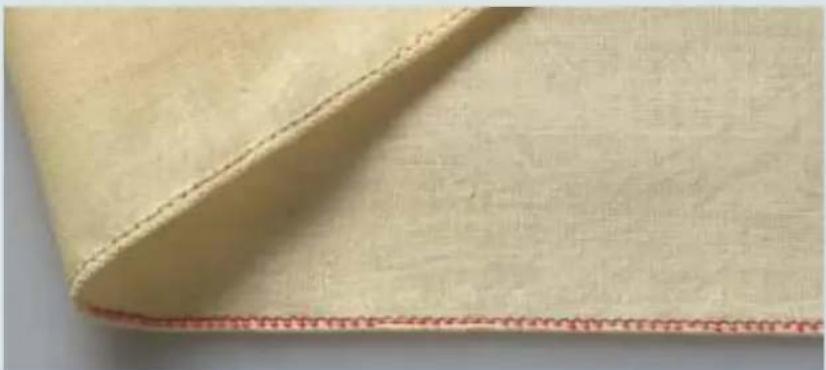
natural_image
Close-up of a beige fabric with a red seam, showing texture and stitching details (no text or symbols)The lower looper thread (yellow) appears on the upper side of the fabric.
Adjust the yellow thread (lower looper (yellow)) tension to a higher setting and/or lower the red thread (upper looper (red)) tension.
3-thread fold, rolled hem
Program 17
If all the thread tensions are set correctly, the upper looper thread (red) loops completely around the edge of the fabric.
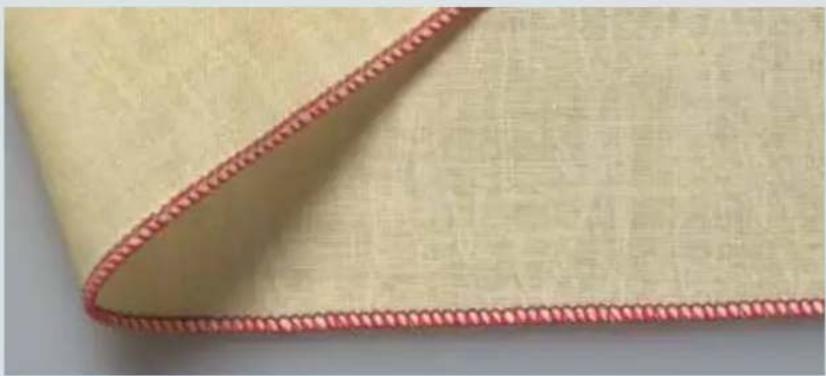
natural_image
Close-up of a beige fabric with a red dotted seam, showing texture and stitching details (no text or symbols)The needle thread (green) is too loose.
Adjust the green thread tension to a higher setting.
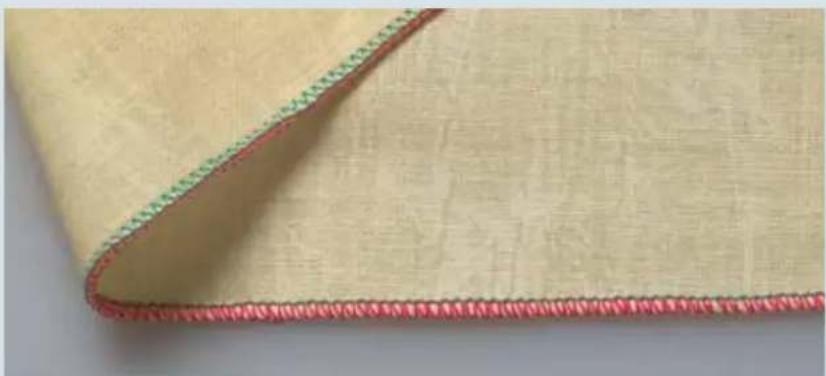
natural_image
Close-up of a beige fabric with red stitching and green dotted edge (no text or symbols)The upper looper thread (red) only partially loops round the edge of the fabric.
Adjust the red thread tension to a lower setting and/or change the yellow thread tension to a higher setting.
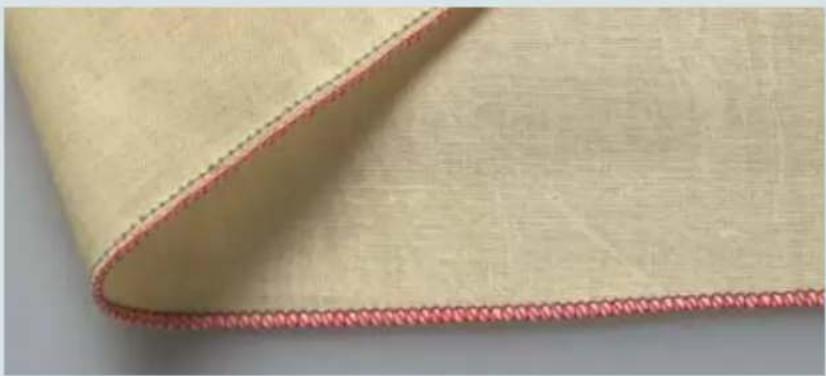
natural_image
Close-up of a beige fabric with a red dotted seam, showing texture and stitching details (no text or symbols)The lower looper (yellow) appears on the upper side of the fabric.
Adjust the yellow thread tension to a higher setting and/or change the red thread tension to a lower setting.
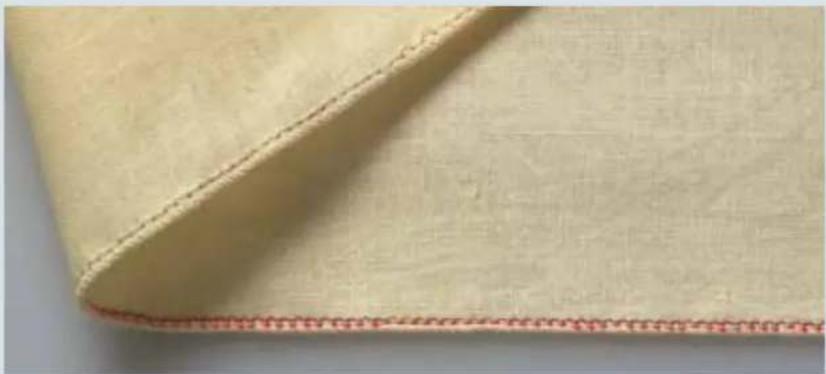
natural_image
Close-up of a beige fabric with a red dotted seam, showing texture and stitching details (no text or symbols)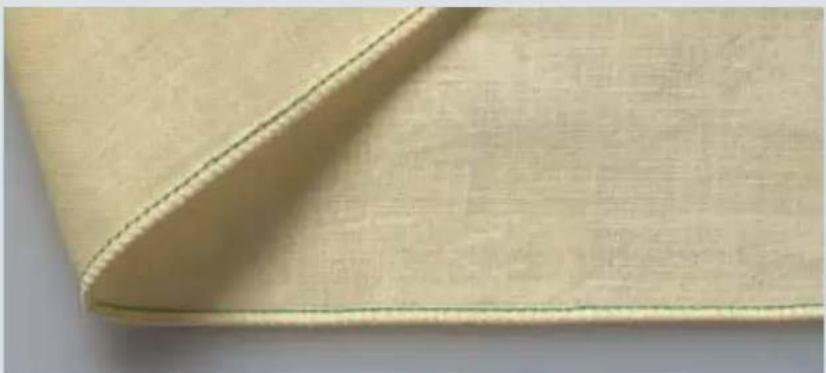
natural_image
Close-up of a beige fabric with a dashed seam, showing texture and stitching details (no text or symbols)2-thread fl at hem
Stitch program 08
If all thread tensions are set correctly, the needle thread (green) and lower looper threads meet at the edge of the fabric.
Note: To sew the 2-thread fl at hem attach the converter as described on page 2-29.
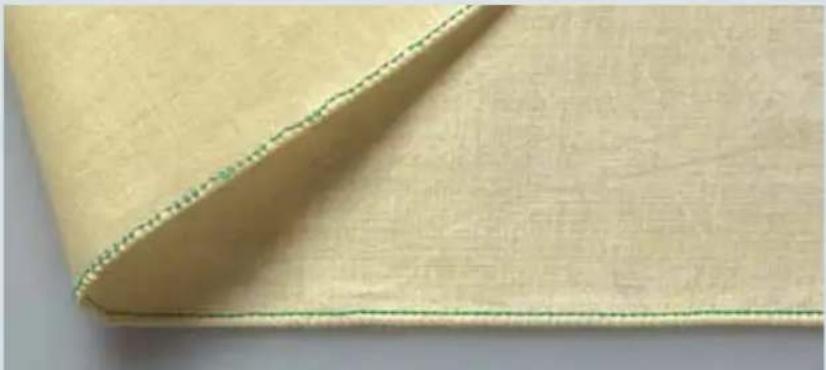
natural_image
Close-up of a beige fabric with green stitching, showing texture and folds (no text or symbols)The needle thread (green) is too loose.
Adjust the green thread tension to a higher setting and/or the yellow thread tension to a lower setting.
2-thread fold, rolled hem
Stitch program 09
If all the thread tensions are set correctly, the lower looper thread (yellow) completely covers the edge of the fabric.
Note: To sew the 2-thread fold, rolled hem attach the converter as described on page 2-29.
The needle thread (green) is too loose.
Adjust the green thread tension to a higher setting and/or the yellow the thread tension lower.
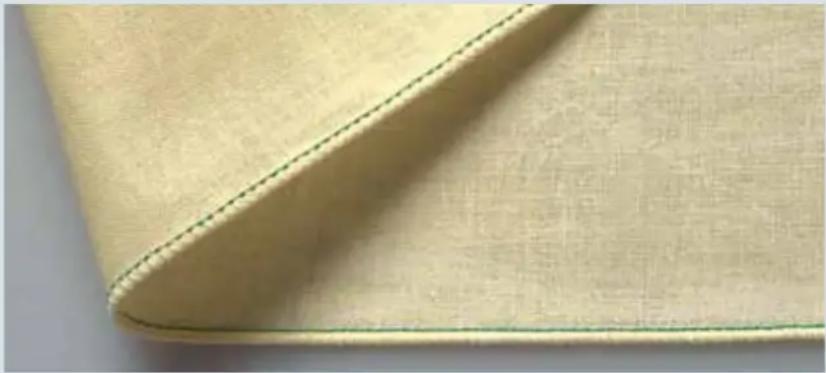
natural_image
Close-up of a beige fabric with a green seam, showing texture and stitching details (no text or symbols)
natural_image
Close-up of a beige fabric with green dotted seam, showing texture and stitching (no text or symbols)The lower looper thread (yellow) is too loose.
Adjust the yellow thread tension to a higher setting.

natural_image
Close-up of a beige fabric with a green seam, showing texture and stitching details (no text or symbols)
natural_image
Close-up of a beige fabric with a green measurement line and dotted seam, no text or symbols visible2-needle, 3-thread overedge seam
Stitch program 15
If all the thread tensions are set correctly, the yellow lower looper thread loops completely round the edge of the fabric.
Note: To sew the 2-needle, 3-thread overedge seam attach the converter as described on page 2-29.
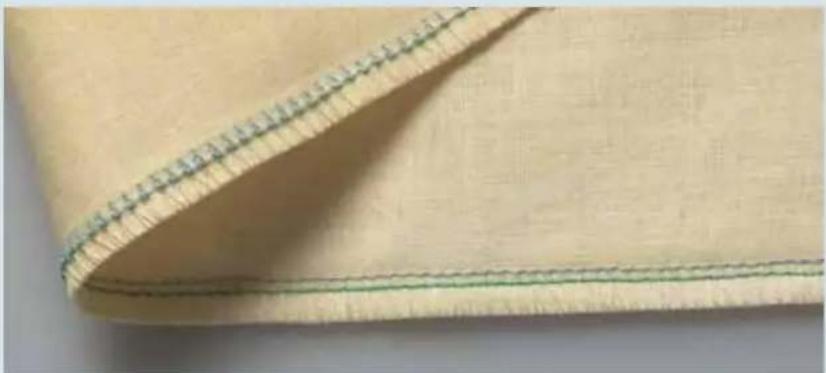
natural_image
Close-up of a beige fabric with a green seam, showing stitching details (no text or symbols)The left needle thread (blue) is too loose.
Adjust the blue needle thread tension to a higher setting.
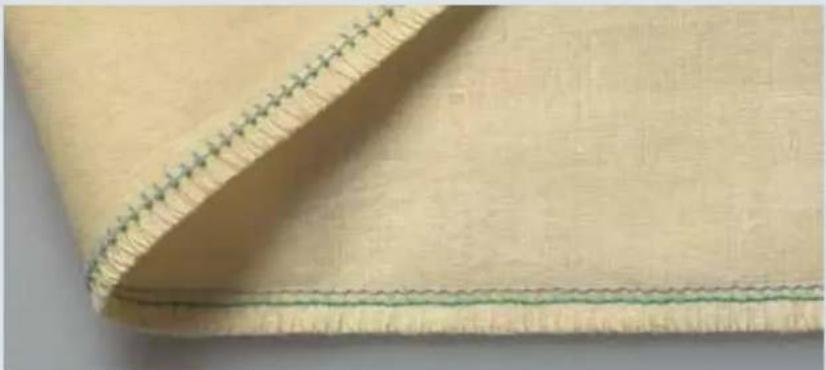
natural_image
Close-up of a beige fabric with a green stitching band, showing texture and stitching details (no text or symbols)The lower looper thread (yellow) is too tight.
Adjust the yellow thread tension to a lower setting.
Stitch formation
We show adjustment options that predominantly refer to the cover-stitch, since the top cover-stitch consists of a combination of cover-stitch with top cover thread.
3-needle top cover
Stitch program 23
If all the thread tensions are set correctly, the needle threads (blue, green and red) are barely visible on the underside of the fabric. The looper thread (purple) lies slack between them.
The top cover thread (blue) lies slack between the needle threads on the top side of the fabric.
If there are protruding loops in the top cover thread (blue), adjust the blue thread tension (45) of the top cover to a higher setting.

natural_image
Close-up of a fabric with a woven seam and stitching pattern (no text or symbols visible)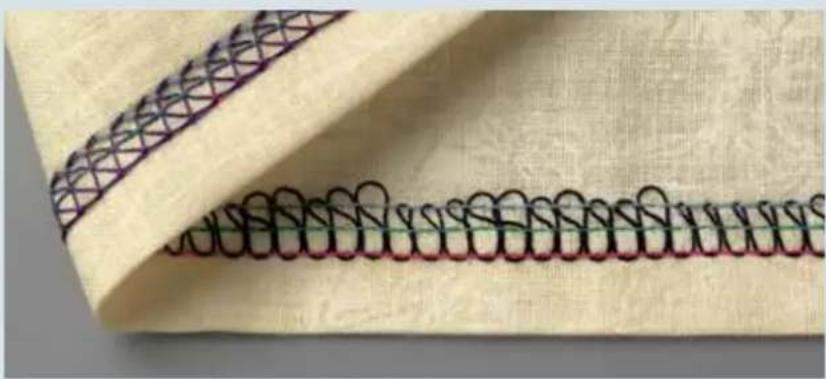
natural_image
Close-up of a fabric with a patterned seam and coiled black rings on beige background (no text or symbols)The needle threads (blue, green and red) are too loose and form small loops on the underside of the fabric.
Adjust the blue, green and red thread tensions to a higher setting.
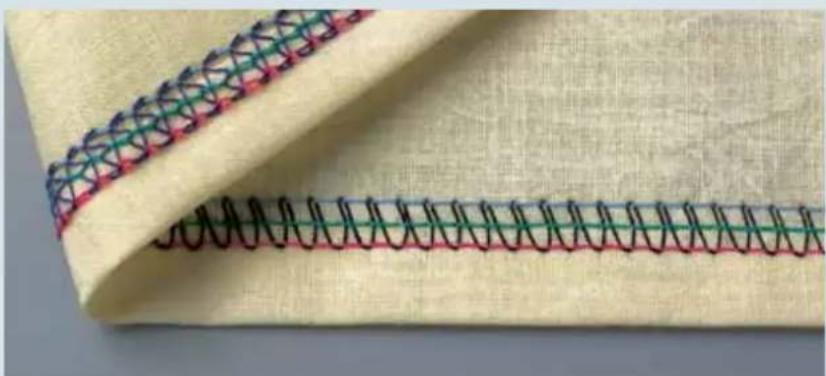
natural_image
Close-up of a fabric with a woven seam and stitching pattern (no text or symbols)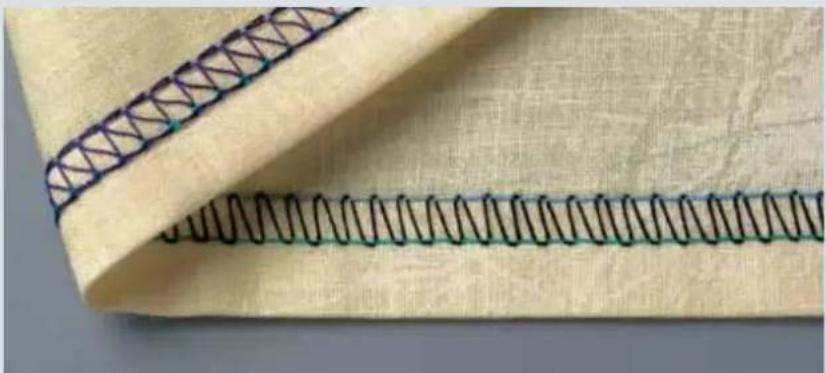
natural_image
Close-up of a fabric with a woven seam and patterned edge (no text or symbols)2-needle top cover-stitch, narrow and wide
Stitch programs 21, 22
If all the thread tensions are set correctly, the needle threads (blue and green) are barely visible on the underside of the fabric. The looper thread (purple) lies slack between them.
The top cover thread (blue) lies slack between the needle threads on the top side of the fabric.
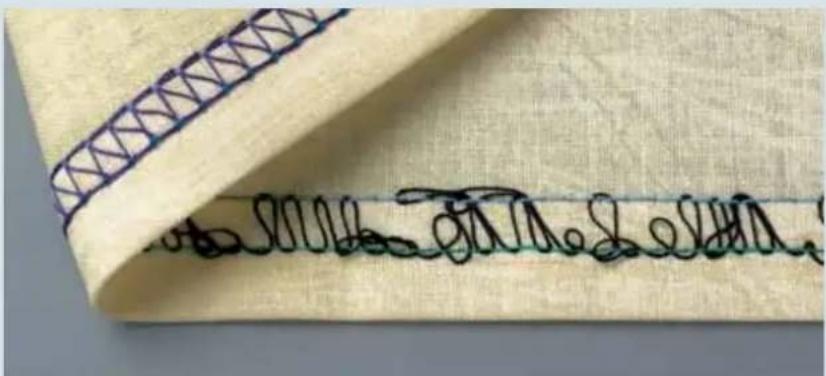
text_image
Close-up of a fabric with visible handwritten signature or watermark text on the fabric itselfIf there are protruding loops in the top cover thread (blue), adjust the blue thread tension (45) of the top cover to a higher setting.

natural_image
Close-up of a fabric with a woven seam and stitching pattern (no text or symbols)If the top cover thread is barely visible, adjust the blue thread tension (45) of the top cover to a lower setting.
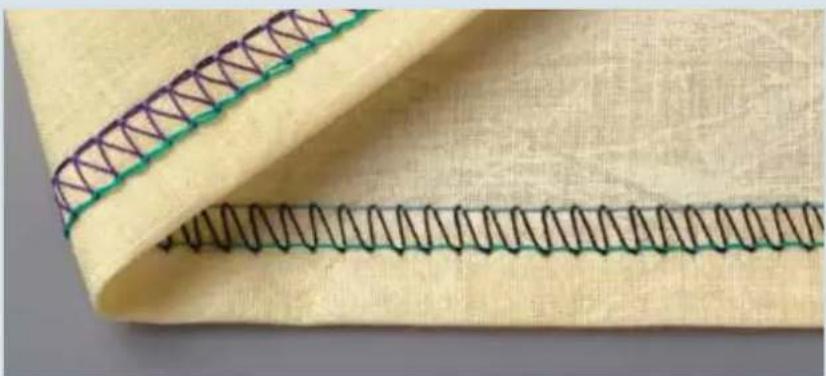
natural_image
Close-up of a fabric with a woven seam and stitching pattern (no text or symbols)The right needle thread (green) is too loose.
Adjust the green thread tension to a higher setting.
Stitch formation
Since deco cover consists of a combination of cover stitch with deco cover threads, we offer suggestions for adjustments with reference to cover-stitch.
5-thread deco-cover
Stitch program 24
If all the thread tensions are set correctly, the needle threads (blue and green) are barely visible on the underside of the fabric. The looper thread (purple) lies slack between them.
The deco cover threads (blue and yellow) are lying slack between the needle threads on the top side of the fabric.
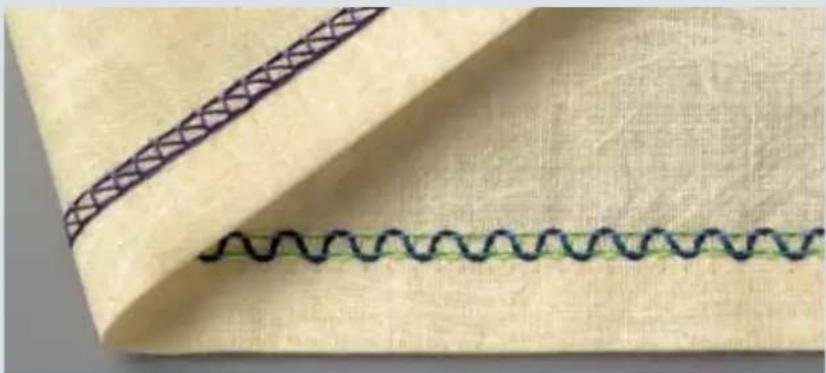
natural_image
Close-up of a fabric with a wavy seam and a patterned seam, no text or symbols visibleIf there are protruding loops in the deco cover threads (blue and yellow), adjust the yellow and blue thread tensions (45) of the deco cover threads to a higher setting.
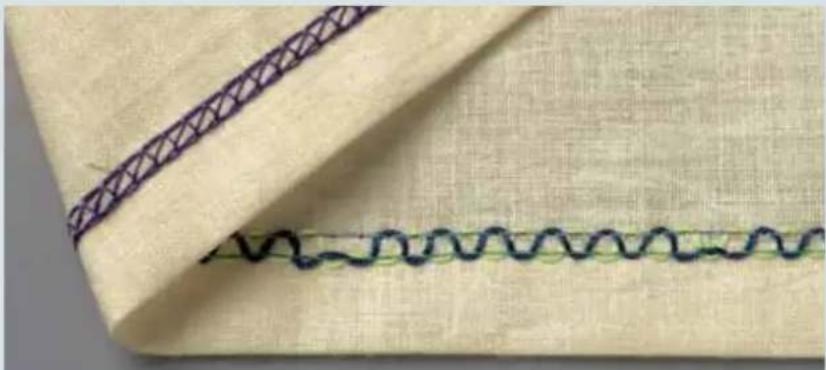
natural_image
Close-up of a fabric with a wavy seam and a patterned seam, no text or symbols visible
natural_image
Close-up of a fabric with a woven seam and stitching pattern (no text or symbols)If the deco cover threads (blue and yellow) are barely visible, adjust the yellow and blue thread tensions (45) of the deco cover threads to a lower setting.
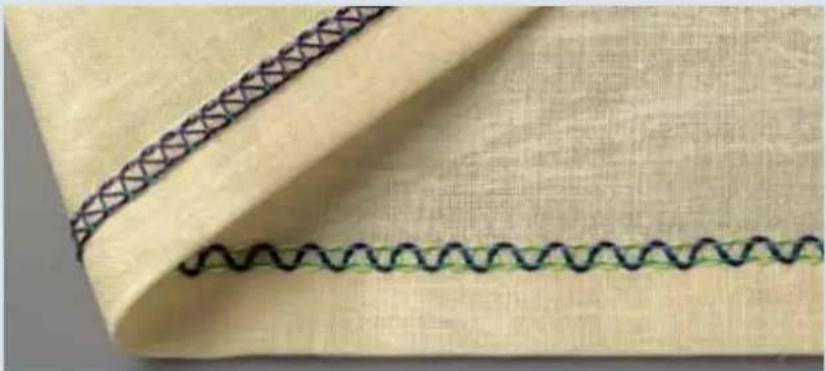
natural_image
Close-up of a fabric with a wavy seam and a patterned seam, no text or symbols visibleIf the needle threads (blue and green) are too loose and form small loops on the underside of the fabric, adjust the blue and green needle thread tensions to a higher setting.

natural_image
Close-up of a fabric with a wavy seam and a dark patterned seam, no text or symbols visible.If the needle threads (blue and green) are too tight and the fabric is puckering, adjust the green and blue needle thread tensions to a lower setting.
6-thread deco cover
Stitch program 25
If all the thread tensions are set correctly, the needle threads (blue, green and red) are barely visible on the underside of the fabric. The looper thread (purple) lies slack between them.
The deco cover threads (blue and yellow) are lying slack between the needle threads on the top side of the fabric.
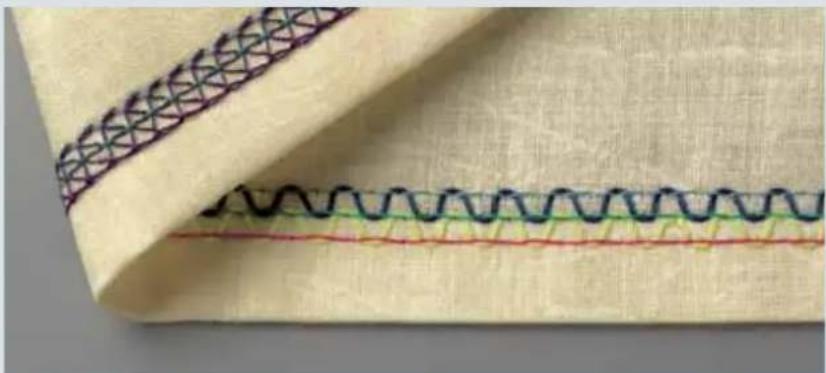
natural_image
Close-up of a fabric with a wavy seam and patterned stitching (no text or symbols)If there are protruding loops in the deco cover threads (blue and yellow), adjust the yellow and blue thread tensions of the deco cover threads to a higher setting.
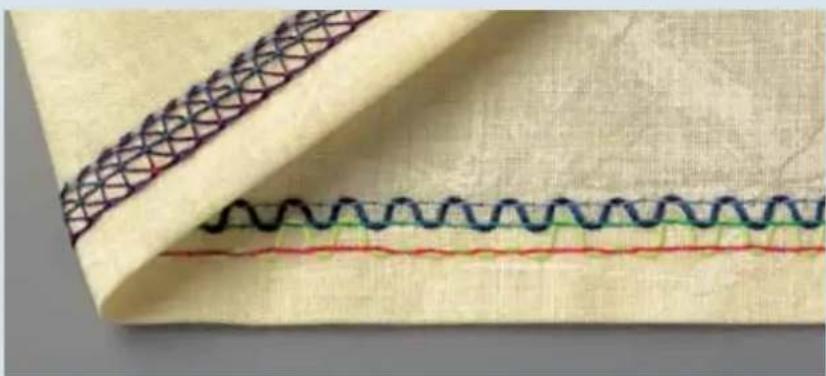
natural_image
Close-up of a fabric with wavy seam and patterned stitching (no text or symbols)If the deco cover threads (blue and yellow) are barely visible, adjust the yellow and blue thread tensions of the deco cover threads to a lower setting.
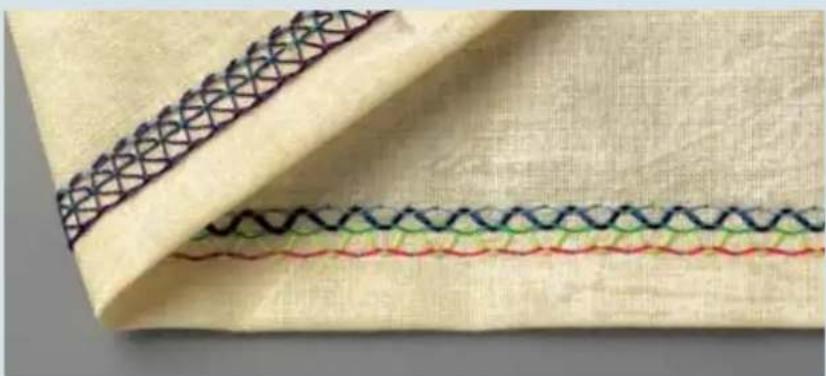
natural_image
Close-up of a fabric with a woven seam and stitching pattern (no text or symbols)
natural_image
Close-up of a fabric with wavy seam and stitching pattern (no text or symbols)If the needle threads (blue, green and red) are too loose, adjust the blue, green and red thread tensions to a higher setting.

natural_image
Close-up of a sewing machine stitching fabric with wavy seam and patterned fabric (no text or symbols)If the needle threads (blue, green and red) are too tight and the fabric is puckering, adjust the blue, green and red needle thread tensions to a lower setting.
Note: The stitch formation adjustments for programs 26, 27 and 29 are based on those for program 25.
6-thread deco cover Stitch program 28
If all the thread tensions are set correctly, the needle threads (blue, green and red) are barely visible on the underside of the fabric. The looper thread (purple) lies slack between them.
The deco cover threads (blue and yellow) are lying slack around the middle needle thread on the top side of the fabric.
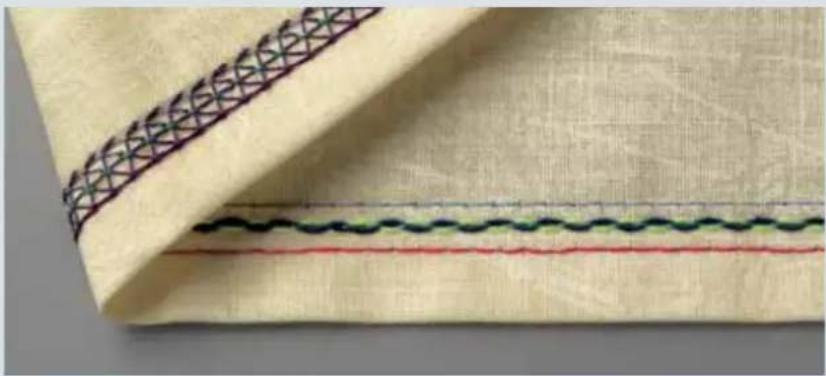
natural_image
Close-up of a fabric with a patterned seam and three horizontal lines (black, green, red) on a beige background, no text or symbols visible.If there are protruding loops in the deco cover threads (blue and yellow), adjust the yellow and blue thread tensions of the deco cover to a higher setting. Or it may be necessary to return both deco cover guides to their initial position. For this purpose, there are two alternatives:
Turn the machine off at the main switch and then turn it back on.
Press the program button + once to advance to the next program menu and then press - button once to return to the selected program.

natural_image
Close-up of a fabric with a woven seam and three horizontal lines (no text or symbols)If the needle threads (blue, green and red) are too loose, adjust the blue, green and red needle thread tensions to a higher setting.
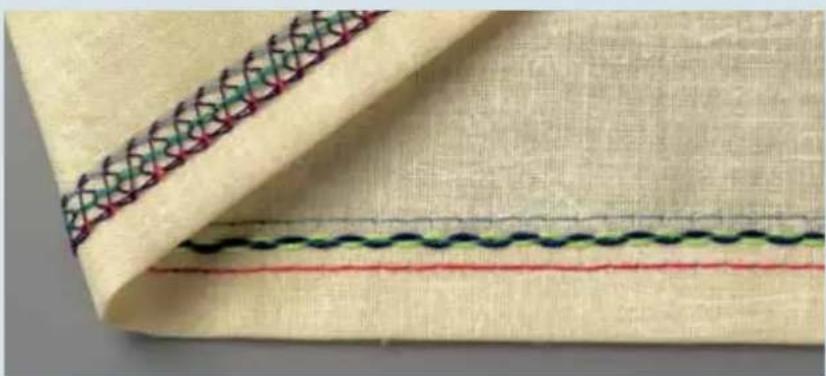
natural_image
Close-up of a fabric with a woven seam and patterned stitching (no text or symbols)When buying sewing threads, you should bear in mind that your creative 4874 uses considerably more than a conventional sewing machine, so you will need to buy correspondingly larger units of thread.
Overlock thread is available in cones (2,000-5,000 m) or mini-kingspools (1,000 m) in a wide range of colors. Of course you can also use standard all-purpose threads.
To prevent overlock seams from expanding excessively, we recommend an overlock thread made from 100% polyester, gauge No. 120.
Textured thread can be used as a looper thread and results in soft and non-bulky seams. Textured threads are particularly suitable for use in sewing rolled hems.
Thread table for 2-, 3-, and 4-thread overlock seams
| Fabric Thread Stitch length | ||
| Light fabrics:Organdy, Fine knitTaffeta, silkLining fabrics | Cotton No. 50-70Synthetic thread No. 70-140 | 2.0-4.0 mm |
| Medium-weight fabrics:Cotton, jerseyLinen, dress fabrics | Cotton No. 40-60Synthetic thread No. 70-140 | 2.0-4.0 mm |
| Heavy fabrics:Tweed, jacket fabric,Denim, heavy cloth | Cotton No. 40-60Synthetic thread No. 70-140 | 2.0-4-0 mm |
| Knitted goods. Cotton No. 40-60 mmSynthetic thread No. 70-140 | 2.0-4.0 mm | |
| 2- or 3-thread rolled hem Polyester thread No. 120-140Textured thread | 1.0-2.0 mm | |
For the top and deco cover stitches many decorative threads can be used. Try heavier and/or textured threads especially for the deco stitches in the decorative loopers.
Test sew with the thread and fabric you will be using. Adjust tensions as necessary (see pages 7-16 - 7-21). Remember some threads will work better than others.
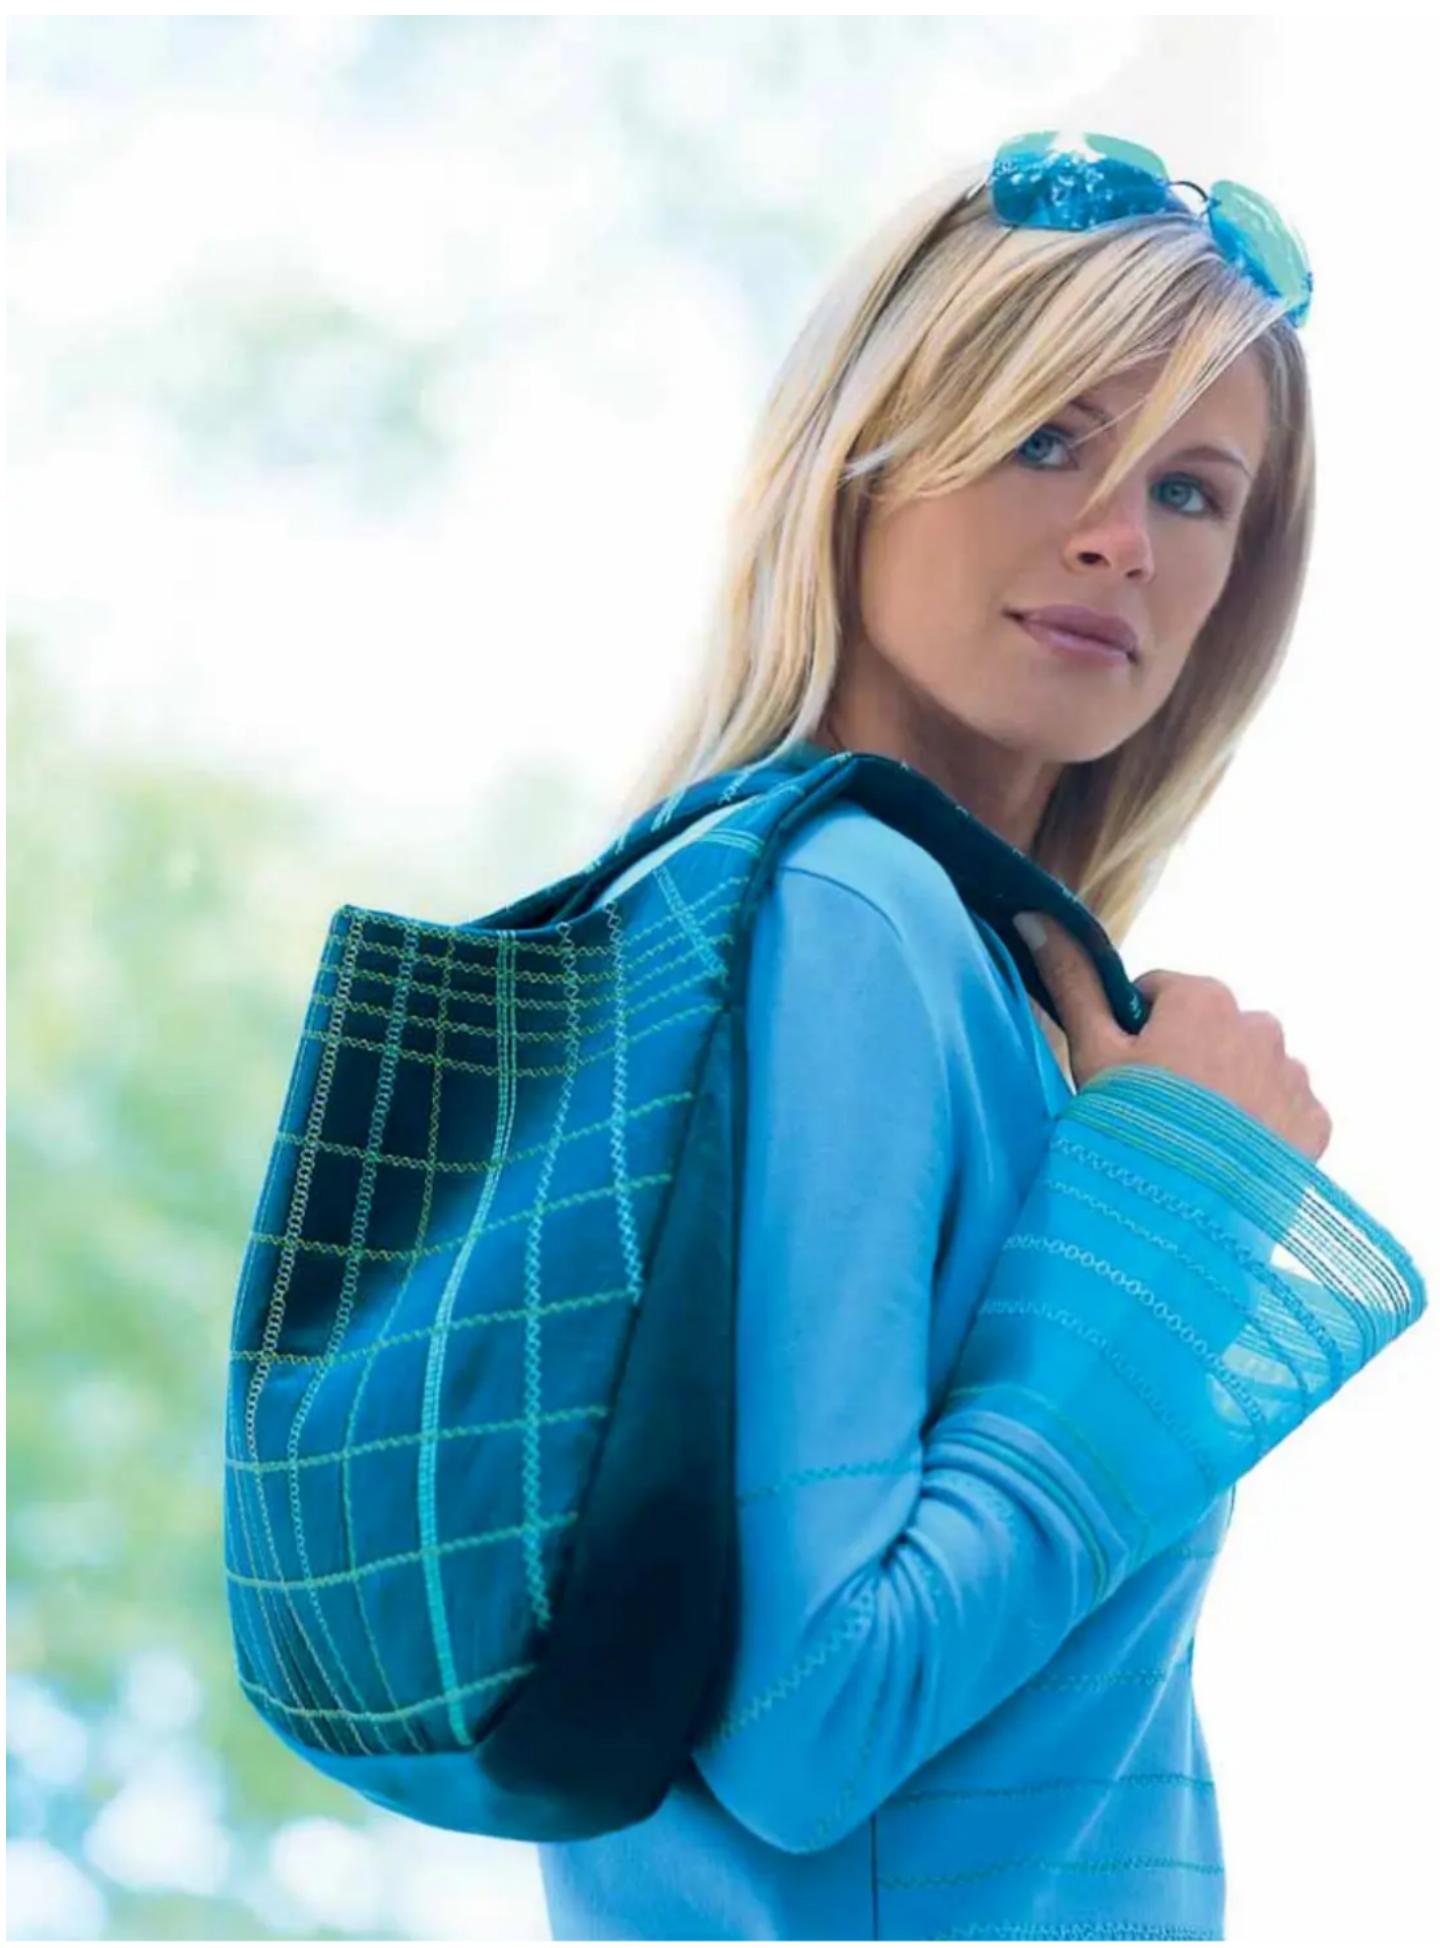
natural_image
Woman in blue jacket carrying a patterned backpack outdoors (no text or symbols visible)Accessories
This chapter includes a list of all standard and special presser feet available for use with your creative 4874.
Standard accessories
The following accessories are included in the accessory box:
Standard presser foot (on the machine)
Part No.: 29 924 993-81/783
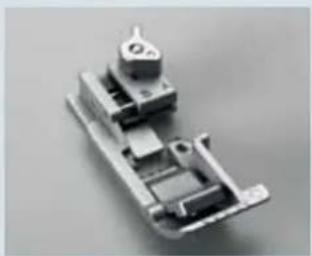
natural_image
3D rendered mechanical component with multiple cylindrical and rectangular parts (no visible text or symbols)
natural_image
Close-up of a transparent plastic clip or connector with internal slots (no visible text or symbols)Clearview foot F
Part No.: 29 924 993-81/744
- Overlock needle system EL X 705, Cat. No. 2002 Part No.: 48 086 004 31 000
- Thread nets (10X) Part No.: 29 924 993-81/299
- Detachable thread guide
Part No.: 29 924 993-81/445
4 Needle threader Part No.: 98 200 255-10/100
5 Screwdriver Part No.: 91 029 480-91/000
6 Needle changing tool Part No.: 29 924 993-81/311

text_image
Labeled photo of medical or dental tools including a screwdriver, tool holder, and medical tubing with numbered parts
natural_image
3D rendered image of a white plastic tool with a handle and spout, labeled with the number 6 (no text or symbols on the object itself)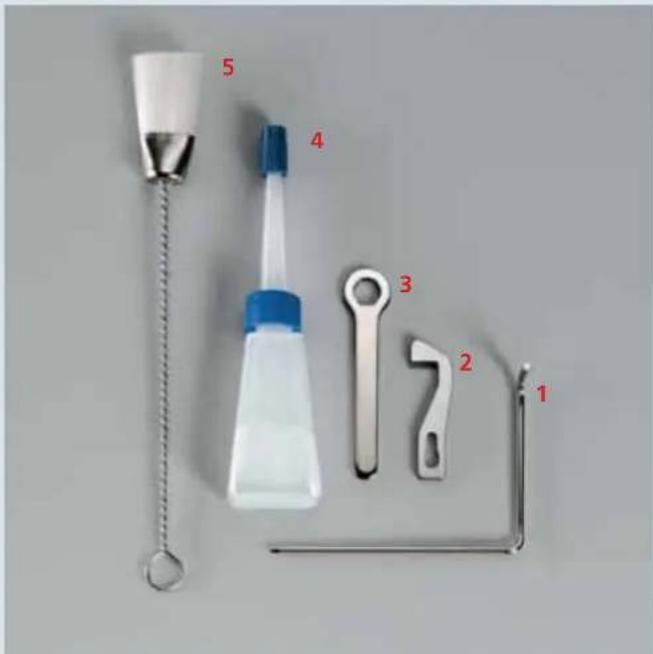
text_image
5 4 3 2 1- Edge guide Part No.: 29 924 993-81/792
- Spare upper knife Part No.: 29 924 993-81/668
- Spanner Part No.: 7 433 000 12 000
- Machine oil Part No.: 93 035 910-91/000
- Lint brush Part No.: 29 924 993-81/432
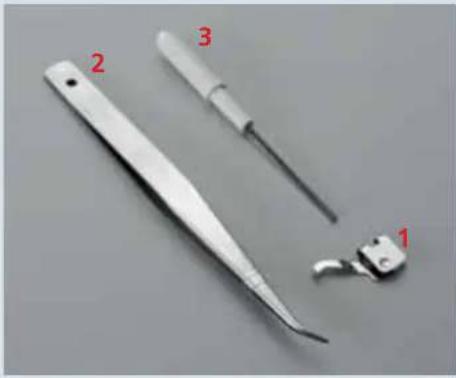
natural_image
Close-up of three medical or dental tools: a long-handled tool, a thin tool with a handle, and a small clamp-like tool (no text or symbols visible)The following accessories are included behind the swivelling table (21) in the machine:
- Converter
Part No.: 29 924 993-81/491 - Tweezers
Part No: 29 924 993 71 012 - Allen keys
Part No.: 29 924 993-81/450
natural_image
Three white plastic electronic components with red labels (1, 2, 3) indicating different parts, no text or symbols present.The following accessories are shipped with the machine:
-
Accessory box
Part. No.: 29 924 993-81/716 -
Trim catcher
Part No.: 29 924 993-81/111
- Sewing table
Part No.: 29 924 993-81/120

natural_image
Collection of mechanical parts including black and white circular components with numbered labels (1, 2, 3), no visible text or symbols.- 10 x Foam pad
Part No.: 29 924 993-81/708 -
10 x Cone holder (on the spool pins)
Part No.: 29 924 993-81/416 -
10 x Thread run-off disc Part No.: 29 924 993-81/426

text_image
PFAFF creative 1 2 31 Foot control
Part No.: 29 924 993-81/718
2 Power cable 230 V or 120 V
Part No.: 230 V 29 924 993-81/486
Part No.: 120 V 70 332 772 14 000
3 Machine cover
Part No.: 29 924 993-81/255
Operating instructions
Part. No.: see rear cover
The following accessories are stored in the trim catcher:
- Clearview foot R (may be included in the accessories box) Part No.: 29-924993-83/073
- Top/deco cover detachable thread guide (may be included in the accessories box) Part No.: 29-924993-83/120
- Top cover hook Part. No.: 29-924993-83/061
- Top cover round thread guide Part No.: 29-924993-83/054
- Top cover triangle thread guide Part No.: 29-924993-83/121
- Blue decorative thread guide Part No.: 29-924993-83/060
- Yellow decorative thread guide Part No.: 29-924993-83/059
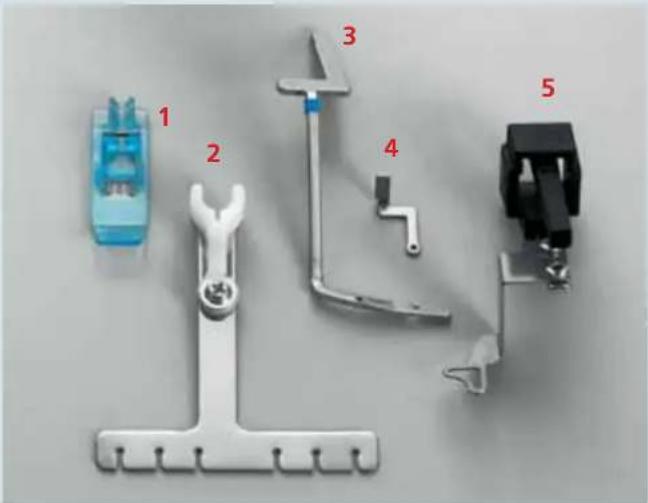
text_image
1 2 3 4 5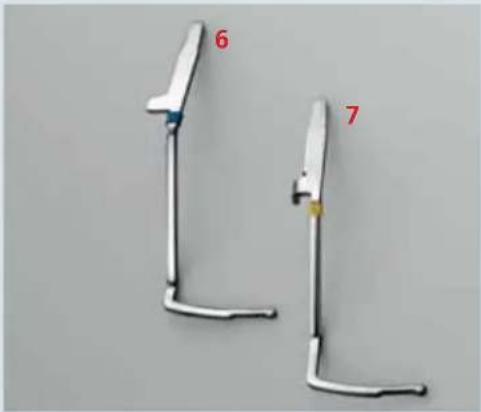
natural_image
Two white metal tools with labeled parts (6 and 7) against a plain background, no text or symbols on the tools themselves.Special accessories
A wide range of accessories is available for use with the creative 4874. Ask your Pfaff dealer for full information.
Accessory Part No. Sewing work
| Multi-purpose foot M 29 924 993 82-002 Foot to which guides H1, H2 and H3 can be attached. | ||
| Lace and 29 924 993 82-003 Guide for applying lace or braiding braiding guide H1 (to the reverse side of the fabric). | ||
| Hemmer guide H2 29 924 993 82-001 Guide for hemming borders. | ||
| Bias-tape guide H3 29 924 993 82-004 Guide for applying bias tape as edging | ||
| Clearview foot N 29 924 993 82-006 Presser foot with groove.Can be used together with guide N1. | ||
| Bridging guide F2 29 924 993 82-008 Guide for joining two pieces of fabric with consistent clearance. Use clearview foot F from the accessories box. | ||
| Lace guide F3 29 924 993 82-005 Guide for applying lace (on the upper side of the fabric). Use clearview foot F from the accessories box. | ||
| Flat-felled-seam guide F4 29 924 993 82-009 Guide for sewing fl at-felled seams.Use clearview foot F from the accessories box. | ||
| Fancy-stitch guide N1 overedge seam and for decorative effects. | 29 924 993 82-007 | For stitching with double chain-stitch or 3-thread |
| Cording foot K | 29 924 993 82-011 | For serging cording with cording tongue K1 and guide K2. |
| Cording tongue K1 | 29 924 993 82-012 | For serging pintucks. |
| Cording guide K2 | 29 924 993 82-010 | For serging cording with gimp thread |
| Strap and belt loop foot L | 29 924 993 82-013 | For sewing belt loops and straps, as well as for ornamentation. |
| Universal tape binder | 29 924 993 82-014 | For binding fabric edges with bias tape of various widths. |
| Beading foot P | 29 924 993 82-015 | For sewing on beads. |
| Beading needle plate P of beads can be sewn on in a single operation while sewing rolled seams. | 29 924 993 82-016 | With beading stitch plate P and beading foot P strings |
| Multi-purpose foot C various elastic inserts. | 29 924 993 82-017 | For sewing on ribbons and elastic in conjunction with the |
Accessory Part No. Sewing work
| Elastic tape insert 29 924 993 82-034 For sewing on elastic tape with a width up to 7.5 mm. 7.5 mm | ||
| Elastic tape insert 29 924 993 82-035 For sewing on elastic tape with a width up to 10 mm. 10 mm | ||
| Elastic tape insert 29 924 993 82-036 For sewing on elastic tape with a width up to 13 mm. 13 mm | ||
| Shirring/Gathering foot G 29 924 993 82-018 For simultaneous gathering and sewing together two layers of fabric. | ||
| Blind hem foot D 29 924 993 82-019 For sewing invisible hems and decorative hems. | ||
| Band and 29 924 993 82-020 For sewing on bands and braiding. Together with K2, the braiding foot Q gimp, interwoven threads, bead strings or ribbons can be oversewn with decorative threads. | ||
| Accessories holder 29 924 993 82-021 Holder on which the following accessories are attached with the locking screw and also in some cases the swivelling arm | ||
| Retaining screw 29 924 993 82-023 For attaching the following accessories to the accessories holder. | ||
| Edge guide with 29 924 993 82-022 For guiding the fabric border and simultaneous measurement of the width of the cut seam (use the machine's standard presser foot). | ||
| Shirring/Gathering tongue 29 924 993 82-027 for simultaneous shirring/gathering and joining two layers of fabric (use the machine's standard presser foot). | ||
| Tape binder 40 mm width 10 to 12 mm (use the machine's standard presser foot). | ||
| Swivelling arm | 29 924 993 82-024 | For attaching the following accessories to the accessories holder. |
| Curved seam guide (use the machine's standard presser foot). | For joining a rounded piece of fabric to a straight piece | |
| Piping and welting foot E | 29 924 993 82-028 For guiding and inserting piping and welting. | |
| Piping and welting attachment | 29 924 993 82-030 For binding together with piping foot E, guiding piping and gimp between two layers of fabrics. | |
Care of the machine
This chapter includes all the information you need for care and maintenance of your creative 4874 and suggestions for solving certain problems.

WARNING!
For your safety when taking care of your machine, always turn off the power switch and unplug the sewing machine from the electrical outlet.
Note: Remove the threads before changing the needle plate.
Removing the needle plate

Turn off the power switch
Raise the presser foot and bring the needles to their highest position. Remove the presser foot and open the swivelling table. Press the needle plate disconnection lever (38) downward. The needle plate can be removed to the left.
Placing the needle plate
Put on the needle plate in the back first on to the guide pin A and press the needle plate downward in the front until it snaps in place.
Cleaning of the machine

Turn off the power switch
Remove the top cover hook or decorative thread guides.
Remove the trim catcher, open the front cover and the swivel table. Disengage the upper knife. Remove the presser foot and the needle plate.
With the lint brush provided in the accessory box, remove lint from the upper and lower knives, the differential feed and the looper area.
Oiling the machine

Turn off the power switch
Bring the upper looper to its highest position by turning the hand wheel. After every cleaning of the machine, oil the points shown with the oil included in the accessories. One or two drops of PFAFF sewing machine oil are sufficient. All other parts are made from special materials and do not need to be oiled.

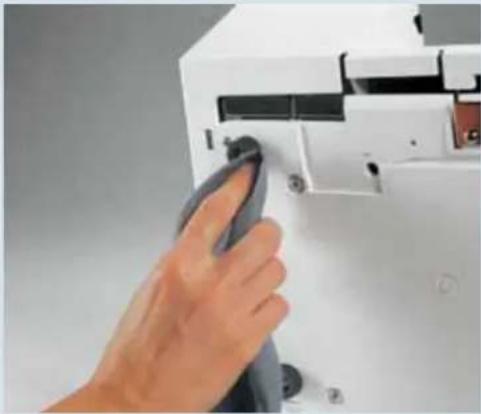
natural_image
Hand inserting a component into a white electronic device (no visible text or symbols)Cleaning rubber feet
Clean the rubber feet of the machine with methyl alcohol from time to time. This will ensure that the machine will not move on the surface on which it is standing.

natural_image
Close-up of a hand using a sewing machine to adjust mechanical components (no visible text or symbols)Replacing the upper knife

Turn off the power switch
Removal:
Set the seam width adjustment knob to 3.5 mm and secure the upper knife in place. Loosen screw A with the spanner from the accessory box and remove the upper knife.
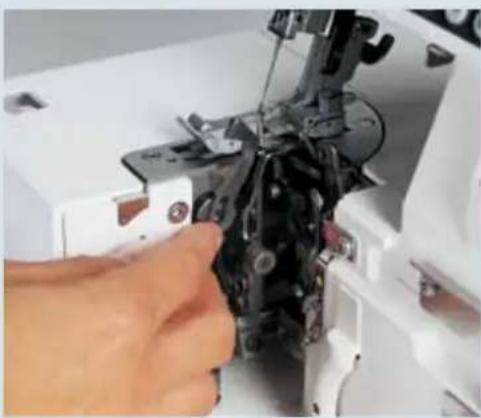
natural_image
Close-up of a hand operating a sewing machine needle to adjust the component (no visible text or symbols)Insertion:
Insert the new upper knife and tighten screw A very slightly. Turn the hand wheel until the upper knife is in its lowest position.

text_image
0.5~1.0 mmIn this position, the front edge of the upper knife must be 0.5 to 1.0 mm below the cutting edge of the lower fixed knife. When you have adjusted the upper knife precisely, you can tighten retaining screw A fully.
Loosen the screw to the upper knife.
Visit you local Pfaff dealer for precise adjustment.
Note: If the upper knife is tightened, the seam width cannot be altered.
Tighten the upper knife

Turn off the power switch
Before sewing particularly heavy fabrics, it is advisable to tighten the upper knife (35). Raise the needle(s) to its/their highest position and open the swivelling table. Tighten the screw A fully with the allen key. When you have fi nished sewing heavy fabrics, you must always slightly loosen this screw again.
Changing the light bulb

Turn off the power switch
Remove the detachable thread stand (27). Use the screwdriver from the accessories box to remove the screw for the sewing light cover (25). Remove the sewing light cover.
Push the bulb as far as it will go into the socket. This will force pin A slightly upwards. Twist the bulb half a turn in counterclockwise direction and pull it out.
Insert the new bulb (no more than 12V, max. 5W) in the socket and twist in clockwise direction until it is fully seated.
Replace the sewing light cover and tighten the screw.

natural_image
Mechanical assembly diagram showing internal components and a labeled section 'A' (no readable text or symbols beyond label)
natural_image
Close-up of a hand operating a white sewing machine with a fabric swatch, no visible text or symbols on the machine or background.
text_image
A C MAX. TE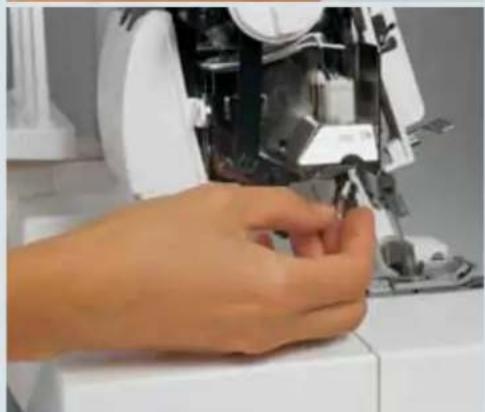
natural_image
Close-up of a hand operating a sewing machine with visible mechanical components (no text or symbols)What happens if...?
This chapter includes some suggested solutions if certain problems arise with your creative 4874. Of course your Pfaff dealer will always be available to provide more information and assistance
| Problem | Cause | Remedy |
| Needle breaks The needle is bent Replace the needle (see page 2-9).or the tip is damaged.The needle has not been Insert the needle fully and correctly (see page 2-9).fully insertedThe fabric was pulled out Do not pull fabric while sewing.too sharply | ||
| Thread breaks Threading is incorrect Thread correctly.The thread will not feed Check whether the thread on the thread stand etc. is jammed.Thread tension is too tight Correct thread tensions (see chapter 7).The needle has not been Insert the needle fully and correctly (see page 2-9).fully insertedWrong needle used Use needle system EL X 705. | ||
| Stitches skippedtip is damagedThe needle has not been Insert the needle fully and correctly (see page 2-9).fully insertedWrong needle used Use needle system EL X 705.Threaded incorrectly Thread correctly. | ||
| Stitches not properlyformed | Thread tension setincorrectly | Reset thread tension (see chapter 7). |
| The seam track of the3- or 4-threadoverlock seamis irregular, so thatthe upper looperis not suppliedwith thread. | The converter is attached | The converter must be removed (see page 2-29). |
| The machine does notoperate eventhough the power switchis on. | The power has been cut offThe top/deco switch lever is notin the correct position | Close the front cover or swivel table.Move the top/deco switch lever to the correct position(see page 5-3). |
| The fabric is notbeing cut cleanly.The upper knife is blunt | Lint between the upper andlower knivesReplace the upper knife (see page 9-3). | Clean knives. |
Problem
Cause
Remedy
Seam puckers Thread tension is too tight Reduce thread tension.
The differential feed is set Adjust differential feed (see page 2-34). incorrectly
The thread has jammed because Thread correctly. of incorrect threading
Fabric is not being The stitch length is too short Increase stitch length (see page 3-4). fed evenly
The presser foot pressure Increase presser foot pressure (see page 2-25). is too low for heavy fabric
The presser foot pressure is too Reduce presser foot pressure (see page 2-25). high for light fabric
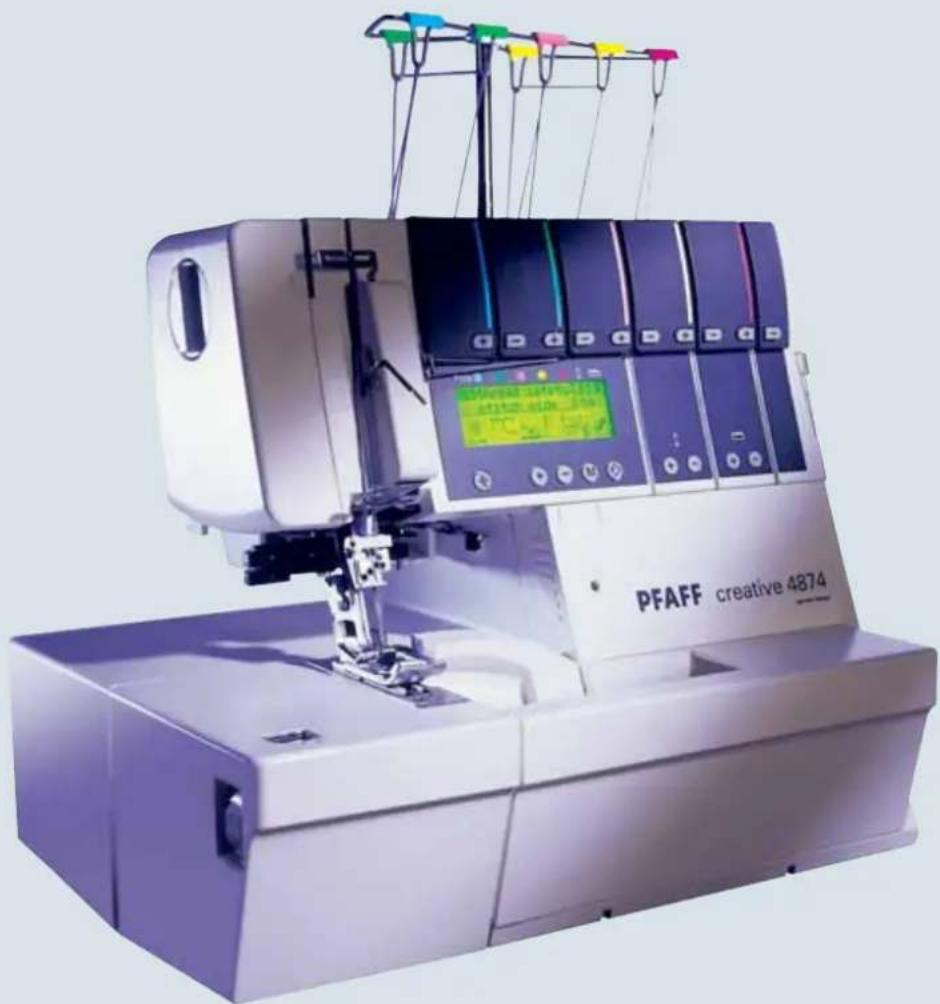
natural_image
PFAFF creative 4874 sewing machine with digital display and multicolored wires (no visible text or symbols on main body)Technical specifi cation
Maximum sewing speed 1500 stitches/min.
Seam width 1,4 mm - 9,0 mm
Cover stitch width 2,5 mm, 5,0 mm
Stitch length 0,5 mm - 4,0 mm
Presser foot exchangeable
Lubrication manual
Presser foot height 4,5 mm
Overedge stroke 2,0 mm
Needle system EL X 705, cat. no. 2002
Needle size 80/12, 90/14
Number of threads 2, 3, 4, 5, 6, 8, 10
Dimensions (width x height x depth) 355 x 290 x 300
Weight 10,5 kg
Packing contents
1 machine
1 detachable thread stand
1 foot control
1 power cable
1 instruction manual/guarantee card
1 trimming waste box
1 machine cover
1 accessory box
1 sewing table
Intellectual Property
PFAFF, CREATIVE and COVERLOCK are registered trademarks or trademarks of VSM Group AB.

Please note that on disposal, this product must be safely recycled in accordance with relevant National legislation relating to electrical/electronic products. If in doubt please contact your retailer for guidance.