creative 2144 - Sewing machine PFAFF - Free user manual and instructions
Find the device manual for free creative 2144 PFAFF in PDF.

User questions about creative 2144 PFAFF
0 question about this device. Answer the ones you know or ask your own.
Ask a new question about this device
Download the instructions for your Sewing machine in PDF format for free! Find your manual creative 2144 - PFAFF and take your electronic device back in hand. On this page are published all the documents necessary for the use of your device. creative 2144 by PFAFF.
USER MANUAL creative 2144 PFAFF
Congratulations on your choice of your Pfaff creative 2144!
As a sewing enthusiast, you have acquired one of the most advanced and innovative sewing and embroidery machines in the world; it will enable you to transform all your creative ideas into reality with unprecedented ease.
If you enjoy sewing to your heart's content – without any compromises – this machine will provide the key to exquisite items of clothing, fashion accessories and home textiles.
Do you enjoy embroidering, or want to create sophisticated, distinctive highlights?
Excellent! Your Pfaff creative 2144 will enable you to experience a totally new dimension of sewing and embroidery – and it is so easy to operate.
Switch on the machine and watch it light up. The multi-color touch screen welcomes you to the world of unlimited, creative possibilities. Make contact – just a touch is all it takes.
Your machine has the perfect built-in information system: the "Creative Assistant":
Your Pfaff creative 2144 has a “Creative Assistant” that guides you step by step through sewing routines, and is always available as a source of helpful advice and information.
You can likewise ask the Sewing Assistant or Embroidery Assistant for advice at any time while sewing and embroidering.
Before you start, please spend some time reading these Operating Instructions. Ideally, try out the procedures being described directly on your new Pfaff creative 2144. This is the easiest way to discover its many creative facets.
You will very soon discover how easy it is to operate your Pfaff creative 2144. User convenience is a priority, as with all Pfaff sewing machines.
But we don't want to keep you any longer. Give a free rein to your imagination. Your Pfaff creative 2144 is bound to become a dependable partner in all your sewing ventures. Our specialist retailers will of course also be pleased to advise you at any time. Enjoy making your ideas become reality.
With best wishes
VSM Group AB
How to use this instructions manual
To make it as easy as possible to use your creative 2144, we have given this instructions manual a clear structure, like your creative sewing machine. The many color diagrams and illustrations vividly illustrate how easy and convenient it is to use your new sewing and embroidery machine.
The various chapters cover the following topics:
- Overview: To help you operate your Pfaff creative 2144, you can find a stitch overview and a machine overview in this chapter. There is also a description of all icons and functions provided in your Pfaff creative 2144. Use these pages to get to know your Pfaff creative 2144 and for assistance when operating it.
- Machine Assistant: The Machine Assistant contains comprehensive technical information, together with many color illustrations on all mechanical functions, such as threading, bobbin winding, etc. All explanations are also stored in the Machine Assistant of your Pfaff creative 2144.
-
Getting started with your Pfaff creative 2144: This contains all basic instructions on how to operate the machine:
-
General operating principle of the multi-color touch screen
• Using the machine's Creative Assistant
• Instructions on operating the machine -
Explanations of the selection menus and the context menu
-
Operate the multi-color touch screen: This chapter familiarizes you with the various different functions and programs, such as sewing buttonholes, creating sewing sequences and embroidery combinations, embroidering, etc.
- Sewing Assistant: The Sewing Assistant chapter contains a "lexicon of sewing"; it also demonstrates and describes various sewing techniques that are possible with your Pfaff creative 2144. Even more detailed sewing information is stored in the Sewing Assistant of your Pfaff creative 2144.
- Embroidery Assistant: The Embroidery Assistant chapter illustrates and describes various embroidery techniques that are possible with your Pfaff creative 2144. Even more detailed embroidery information is stored in the Embroidery Assistant of your Pfaff creative 2144.
- Standard/optional accessories: This chapter lists all standard and optional-accessory presser feet for your Pfaff creative 2144. Their use is explained by means of pictures and texts.
- What to do if...: This chapter provides information and suggested solutions on how to tackle problems. Here, you can also find an index with page references.
- Your chapter: Here you can put in your own notes together with update pages.
The language of your Pfaff creative 2144 is preset by the manufacturer to English or Swedish. If your dealer has not changed it to the language of the country in which the machine is sold, or if you wish to have it set to a different language, you can easily change this. See chapter 3 page 18.
All information in this Pfaff creative 2144 instruction manual is current at the time of printing.
We constantly receive feedback from Pfaff creative 2144 owners and dealers. This information is used to produce program updates. Those updates and complements to the manual are available to you via the Internet.
To get information about the latest software update for your Pfaff creative 2144, regularly contact your local Pfaff dealer and/or consult our web site at:
IMPORTANT SAFETY INSTRUCTIONS
When using an electrical appliance, basic safety precautions should always be followed, including the following:
Read all instructions before using this household sewing machine.
DANGER - To reduce the risk of electric shock:
- A sewing machine should never be left unattended when plugged in. Always unplug this sewing machine from the electric outlet immediately after using and before cleaning.
• Always unplug before relamping. Replace bulb with same type rated 5 Watt.
WARNING - To reduce the risk of burns, fire, electric shock, or injury to persons:
- Do not allow to be used as a toy. Close attention is necessary when this sewing machine is used by or near children.
- Use this sewing machine only for its intended use as described in this manual. Use only attachments recommended by the manufacturer as contained in this manual.
- Never operate this sewing machine if it has a damaged cord or plug, if it is not working properly, if it has been dropped or damaged, or dropped into water. Return the sewing machine to the nearest authorised dealer or service center for examination, repair, electrical or mechanical adjustment.
- Never operate the sewing machine with any air openings blocked. Keep ventilation openings of the Sewing machine and foot controller free from the accumulation of lint, dust, and loose cloth.
- Keep fingers away from all moving parts. Special care is required around the Sewing machine needle.
• Always use the proper needle plate. The wrong plate can cause the needle to break.
• Do not use bent needles. - Do not pull or push fabric while stitching. It may deflect the needle causing it to break.
- Switch the sewing machine off ("0") when making any adjustment in the needle area, such as threading needle, changing needle, threading bobbin, or changing presser foot, etc.
- Always unplug the sewing machine from the electrical outlet when removing covers, lubricating, or when making any other user servicing adjustments mentioned in the instruction manual.
- Never drop or insert any object into any opening.
- Do not use outdoors.
- Do not operate where aerosol (spray) products are being used or where oxygen is being administrated.
- To disconnect, turn all controls to the off ("0") position, then remove plug from outlet.
- Do not unplug by pulling on cord. To unplug, grasp the plug, not the cord.
- Hold plug when rewinding into cord reel. Do not allow plug to whip when rewinding.
SAVE THESE INSTRUCTIONS

Overview
Machine overview 1-1
Embroidery unit overview 1-2
Stitch overview 1-3
Icon explanation sheets 1-9 - 1-23
Machine Assistant
Electrical connection 2-1
Connecting the foot control 2-1
Main switch 2-1
Contrast of the screen 2-1
Top cover 2-2
Accessory tray 2-2
Free arm 2-2
Bobbin winding 2-2
Hook/Bobbin door 2-6
Taking out the bobbin case 2-6
Thread tension 2-6
Inserting the bobbin 2-7
Threading the needle 2-8
Needle threader 2-8
Presser foot lifter 2-9
Bring up the bobbin thread 2-9
Thread cutter 2-9
Changing the presser foot 2-10
Electronic knee lift 2-10
Changing the needle 2-11
Threading the twin needle 2-11
Integrated Dual Feed (IDT-System) 2-12
Lowering the feed dog 2-12
Changing the light bulb 2-13
Changing the needle plate 2-13
Hoop embroidery 2-14
General notes on use of the machine
Function buttons 3-1
The tool bar 3-2
Tool bar after open the Creative Assistant 3-2
Instructions on operating your Pfaff creative 2144 3-2
Selecting a stitch 3-3
Altering the stitch settings 3-4
Single stitch selection 3-4
Adjusting the tie-off program 3-5
More options 3-6
Patchwork program 3-6
Save the program 3-6
Twin needle 3-8
Free motion 3-9
Four sewing directions 3-9
The selection menus 3-11
The Creative Assistant 3-13
The "context" Machine Settings menu 3-18
Turning off the opening screen 3-18
The functions in the "context" Machine Settings menu3-18
Create a personal menu 3-20
Demo 3-23
Information for Sequence/Combinations 3-24
Operating the multi-color touch screen
Selecting the zigzag stitch 4-1
Stitch menu 4-1
Altering stitch settings 4-2
Setting sewing functions and programs 4-2
Zigzag stitch with right needle position 4-3
Tapering 4-3
Selecting decorative stitches 4-4
Altering stitch settings 4-4
Buttonholes 4-5
Sewing-on buttons 4-7
Darning and Bartacking 4-8
Alphabets 4-10
Embroider single designs 4-12
Basting in the embroidery hoop 4-13
Enlarged view 4-13
On screen color changing 4-14
Hoop selection 4-14
Parking position of the embroidery hoop 4-15
Positioning of designs in the embroidery hoop 4-15
Positioning a design on the hooped fabric 4-16
One color embroidery 4-17
Multi-color Embroidery 4-17
"Jumping over stitches" when embroidering several colors 4-18
Embroidering a single color segment 4-19
"Jumping over stitches" when embroidering a single color segment" 4-19
Sewing with the embroidery unit attached 4-19
Embroider monograms and letters 4-19
Prepare a creative memory card for saving 4-22
Sewing sequence 4-22
Embroidery combinations 4-30
Zoom the designs in a combination 4-35
The Creative Data Manager 4-38

natural_image
Two women in dark blazer and patterned garments against a solid purple background (no text or symbols visible)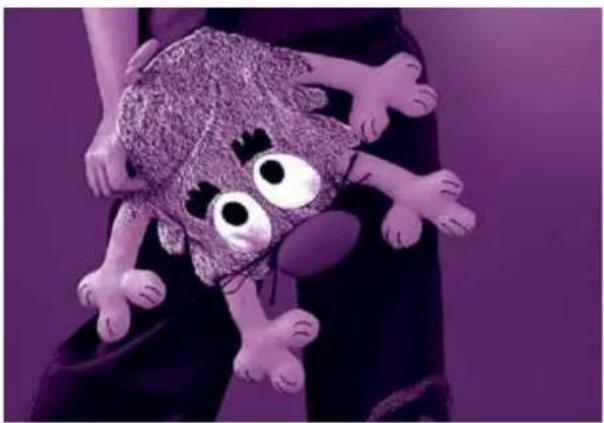
natural_image
Person holding a plush toy with large eyes and limbs against a purple background (no text or symbols visible)Sewing Assistant
Non-stretch seams 5-2
Stretch seams 5-4
Other techniques 5-6
Zippers 5-7
Buttonholes 5-9
Sewing on buttons 5-12
Eyelets 5-12
Smocking 5-13
Darning 5-14 - 5-16
Shell edging 5-17
Roll hemming 5-18
Embroidery Assistant
Embroidery techniques 6-2
Presser feet 6-2
Correction systems 6-2
Stabilizing the fabric 6-2
Spray-on temporary adhesive 6-2
Embroidery thread 6-2
Embroidering without embroidery unit 6-3 - 6-15
Eyelet embroidery 6-3
Hemstitching 6-4
Cross-stitch 6-6
Quilting 6-7
Twin needle embroidery 6-9
Tapering 6-10
Embroider Maxi stitches without embroidery unit 6-11
Embroidery unit 6-12
Hooping the fabric 6-14
Metal clips 6-15
Position the Embroidery foot 6-15
Embroidering with the embroidery unit 6-16 - 6-30
Richelieu work 6-16
Appliqué with embroidery designs 6-17
Step 6-17
Bulk stabilizers 6-18
Embroidery Puffy 6-18
Prisma 3-D film 6-18
Embroider lace 6-18
Embroider on thin fabrics 6-19
Embroider on fine knitted fabric such as Jersey 6-19
Embroider on terry cloth 6-20
Embroider on leather 6-20
Embroider on velvet and cut-pile fabric 6-20
Embroider on weft and warp knitted fabric 6-21
Embroider on small pieces of fabric 6-21
Quilting with the quilt card patterns 6-21
The embroidery template 6-22
Combine embroidery words by moving
the embroidery hoop 6-24
Combine designs in the hoop 6-26
Embroider endless borders beyond
the length of the hoop 6-27
Accessories
Standard accessories 7-1 - 7-4
Optional accessories 7-5 - 7-18
Needle chart 7-19
Trouble Shooting
Sewing 8-1
Embroidery 8-2
Index 8-3
Latest Update
natural_image
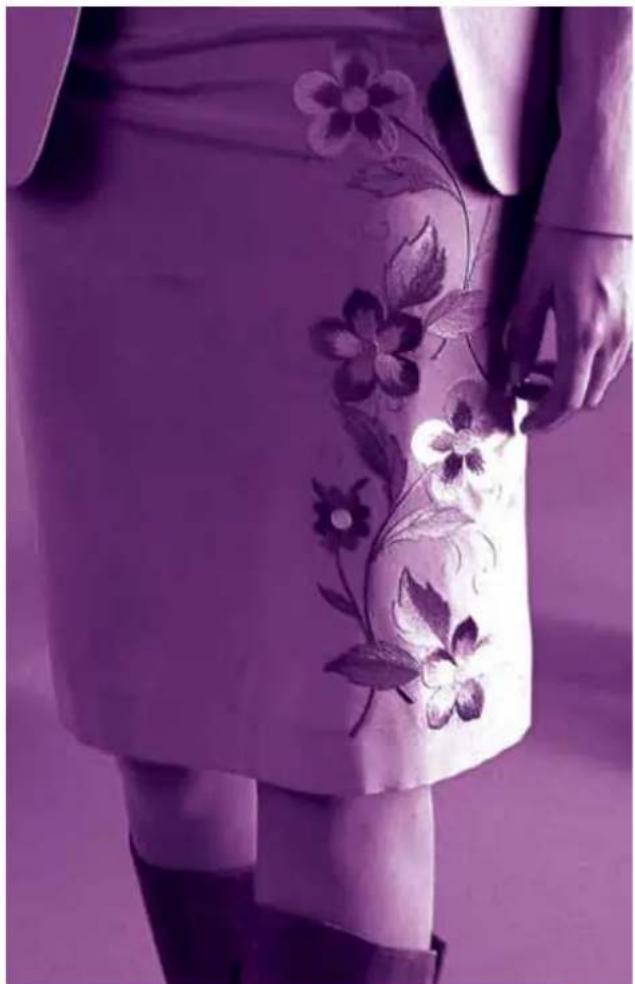
Person wearing a white dress with floral embroidery, viewed from behind (no text or symbols visible)Machine overview
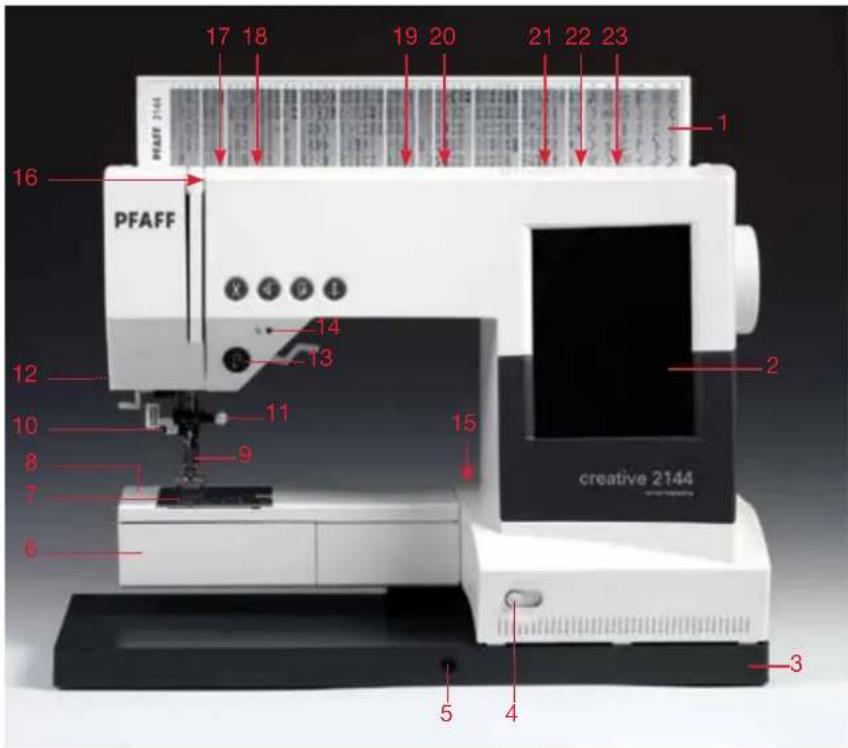
Parts of the creative 2144
1 Top cover with stitch program chart
2 Multi-color touch screen
3 Base plate
4 Slide for lowering the feed dog
5 Connection for knee lifter
6 Hook/bobbin (hook behind it)
7 Feed dog
8 Free arm
9 Presser foot holder with presser foot
10 Needle threader
11 Needle holder with set screw
12 Thread cutter
13 "Reverse sewing" button
14 Signal lamp "bobbin thread monitor"
15 Connection socket for embroidery unit
16 Take-up lever
17 Pre-tension device for threading and bobbin winding
18 Thread guide for threading and bobbin winding
19 Spool holder with spool cap
20 Second spool holder
21 Hole for third spool holder
22 Bobbin winding control
23 Bobbin winder
24 Handwheel
25 Contrast control for the display
26 Front and rear card drive
27 Release buttons for the card drives
28 Voltage switchover
29 Connection socket "lead cord"
30 Connection socket "foot control"
31 Main switch
32 Detachable work support
33 Needle plate
34 Thread guides, right and left
35 Sewing bulb (max. 5 W)
36 Threading slot
37 Carrying handle
38 "Thread cutter" button
39 "Stitch re-start" button
40 "Sew slow" button
41 "Needle up/down" button
42 Presser foot lifter
43 Integrated Dual feed /IDT
text_image
17 18 19 20 21 22 23 1 PFAFF 16 14 13 12 10 9 8 7 6 creative 2144 15 2 3 5 4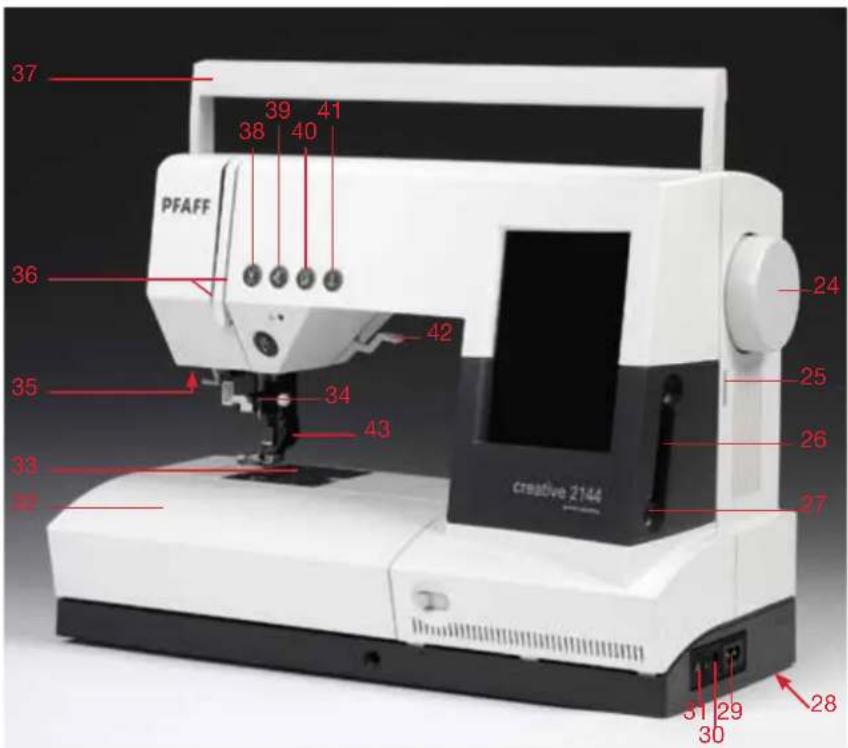
text_image
37 39 41 38 40 PFAFF 36 42 35 34 43 33 28 24 25 26 27 creative 2144 31 29 30 32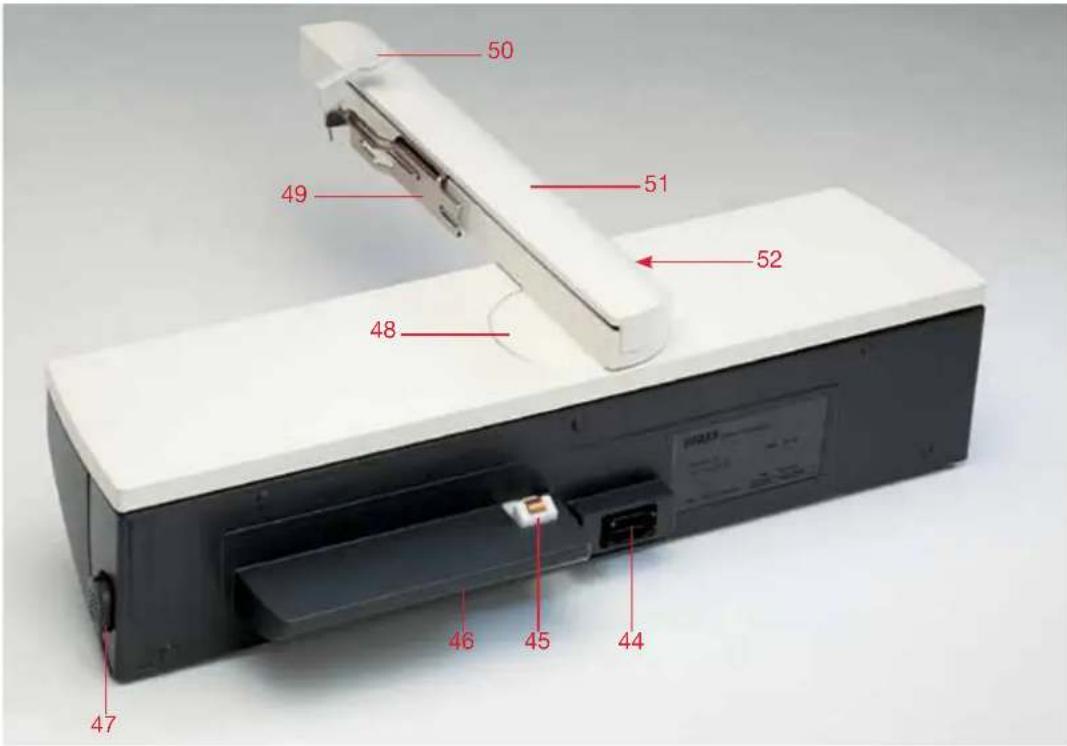
text_image
50 49 51 52 48 47 46 45 44Parts of the embroidery unit
44 Connection plug to the machine
45 Fastening spigot for fitting to the machine
46 Guide way
47 Release button for removing the embroidery unit
48 Sewing range of the embroidery arm
49 Metal guide for fitting the embroidery hoop
50 Release lever for removing the embroidery hoop
51 Embroidery arm
52 Recessed grip for raising and rotating the embroidery arm

text_image
53 54 55 56 57Parts of the embroidery hoop
53 Snap-in pin
54 Two guide pins for retaining the hoop
55 Ribs for fitting the clips
56 Projections for placing the template
57 Retaining screw for the fabric
Stitch overview creative 2144
 |
| Prog No. | Description Application | Width up | to mm |
| 1 | Straight stitch with 19 needle positions | For all straight stitch and topstitching jobs, stitch length can be increased up to 6 mm. 19 needle positions are available, for edge finishing or sewing in zippers. | - |
| 2 | Stretch triple straight stitch with 19 needle positions | For all straight stitch and topstitching jobs, particularly on stretch fabrics, e.g. trouser seams, sportswear and work wear. Stitch length can be increased up to 6 mm for decorative stitching. | - |
| 3 | Zigzag stitch | For finishing seams, overcasting, appliqué work, inserting lace etc. | 9 |
| 4 | Elastic stitch with two perforations | For sewing on elastic, darning tears and applying patches. | 7 |
| 5 | Reverse straight stitch | A durable reverse straight stitch. Suitable for stitch combinations in stitch sequences. | - |
| 6 | Shell-edging stitch | For decorative hems particularly on stretch fabrics, e.g. underwear. | 6 |
| 7 | Honeycomb stitch | For sewing on elastic thread, overstitching terry cloth seams and for ornamental hem seams (smocking effect). | 7 |
| 8 | Elastic stitch with one perforation | For sewing on elastic, darning tears and applying patches. | 7 |
| 9 | Stretch triple elastic stitch | For inserting elastic tape in sportswear and bathing suits. (Extremely durable seam for open-knit materials). | 6 |
| 10 | Purl stitch | Particularly suitable for appliqué work thanks to its stitch density. | 6 |
| 11 | Bridging stitch | For joining foundation garments. Provides a decorative hemstitching effect. | 7 |
| 12 | Decorative elastic stitch | For overstitching elastic cords and wool threads as well as for gathering and smocking. | 6 |
| 13 | Cross-hem stitch | Provides a highly elastic, decorative seam for hem finishing on sportswear and casuals. | 7 |
| 14 | Stretch triple zigzag stitch | For sewing elastic tape on sportswear and bathing suits. Also suitable for hem finishing. | 6 |
| 15 | Quilt stitch with 13 needle positions | For quilt projects. | - |
| 16 | Quilt stitch | For decorative embellishments and topstitching quilt projects. | 9 |
| 17 | Quilt stitch | For decorative embellishments and topstitching quilt projects. | 4,5 |
Stitch overview creative 2144
| 18 | 19 | 20 | 21 | 22 | 23 | 24 | 25 | 26 | 27 | 28 | 29 | 30 | 31 | 32 | 47 | 48 | |
| Prog No. | Description to mm | Application Width up | |
| 18 | Quilting, appliqué or pinstitch | For appliqué work when quilting or pinstitching. Gives an impression of hand-made needlework. | 9 |
| 19 | Closed overedge stitch with selvage thread | For joining and serging very stretchy and easily fraying fabrics in one operation. | 7,5 |
| 20 | Closed overedge stitch | For joining and serging in one operation. | 6 |
| 21 | Edge binding stitch | For hemming and decorative edge finishing on stretch fabrics. | 7,5 |
| 22 | Zigzag stitch (needle position variable from right to left) | For serging, appliqué work and inserting lace. (May be sewn from left to right or from right to left, using the stitch-mirroring key). | 6 |
| 23 | Open overedge stitch | Elastic serging stitch with selvage thread, most suited for stretchy, easily fraying fabrics. | 7,5 |
| 24 | Overedge stitch | For hem overcasting on terry-cloth seams. | 7,5 |
| 25 | Light-knit fabric mending stitch | Very elastic, durable stitch most suited for sewing and darning light-knit fabrics. | 7,5 |
| 26 | Closed overedge stitch | For joining and serging stretch and non-stretch fabrics in one operation. For cover stitching hem edges. | 6 |
| 27 | Pullover stitch | Elastic assembly and serging seam for open-knit fabrics and jersey. | 7,5 |
| 28 | Open overedge stitch | For joining and serging light-knit and open-knit fabrics in one operation. | 7,5 |
| 29 | Cover stitch | For joining terry cloth and stretchy fabrics, for inserting patches. For overstitching hem seams and facings. | 9 |
| 30 | Blindhem stitch | For securing hems invisibly. | 6 |
| 31 | Stretch blindhem stitch | For securing hems invisibly on stretch fabrics. | 6 |
| 32 | Basting stitch | For basting cut-out parts together. | - |
| 47 | Linen buttonhole | Buttonhole for blouses, shirts and linen. | 5,5 |
| 48 | Standard buttonhole | Buttonhole for blouses and shirts. | - |
Stitch overview creative 2144
| 49 | 50 | 51 | 52 | 53 | 54 | 55 | 56 | 57 | 58 | 59 | 60 | 61 | 62 | 63 | 64 | 65 | 66 |
| Prog No. | Description Application to mm | Width up | |
| 49 | Stretch buttonhole | Buttonhole for stretch materials and knitwear. | 5,5 |
| 50 | Cross-stitch buttonhole | Buttonhole for fine stretch materials, also suitable as decorative buttonhole. | 5,5 |
| 51 | Round buttonhole with tapered bar | Buttonhole for shirts, blouses and dresses. | 7 |
| 52 | Round buttonhole with longitudinal bar | Buttonhole for shirts, blouses and dresses. | 7 |
| 53 | Round buttonhole with cross bar | Buttonhole for shirts, blouses and dresses. | 7 |
| 54 | Eyelet buttonhole with tapered bar | Buttonhole for jackets, overcoats and trousers | 8,5 |
| 55 | Eyelet buttonhole with lengthwise bar | Buttonhole for jackets, overcoats and trousers | 8,5 |
| 56 | Eyelet buttonhole with crosswise bar | Buttonhole for jackets, overcoats and trousers | 8,5 |
| 57 | Fancy buttonhole | Decorative buttonhole for shirts, blouses and dresses | - |
| 58 | Fancy buttonhole | Decorative buttonhole for shirts, blouses and dresses | - |
| 59 | Program for sewing on buttons' | For two-hole or four-hole buttons | 6 |
| 60 | Bartack | For reinforcing zippers or pocket openings and securing belt loops | 4 |
| 61 | Pocket tack | For reinforcing pocket openings on trousers | |
| 62 | Arrowed bartack | For reinforcing skirt vents | 7 |
| 63 | Labyrinth | For darning damaged areas. Also suitable for embroidering | 9 |
| 64 | Darning program, lengthwise | For darning damaged areas | 9 |
| 65 | Darning program, lengthwise and crosswise. | For repairing little holes | 9 |
| 66 | Automatic eyelet | Various sizes in the memory. Also suited for embroidery work. | 9 |
Decorative stitches creative 2144
Utility stitches Scalloped edgings

text_image
30 33 36 39 42 45 31 34 37 40 43 46 32 35 38 41 44For the stitches 30. 31 and 32, you find a more detailed explanation in the Stitch overview on page 1-4.
text_image
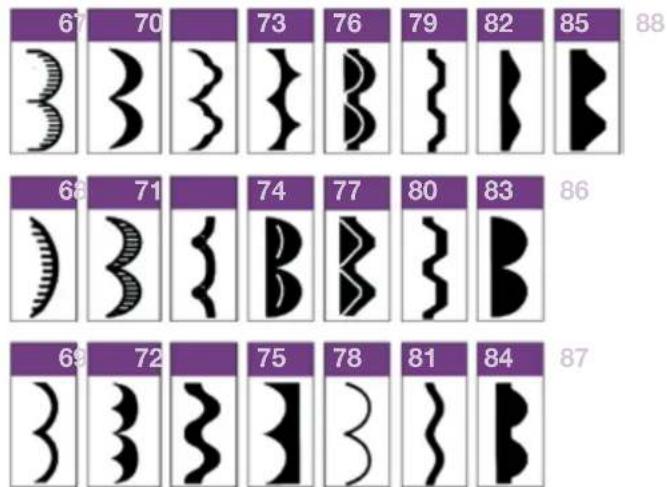
67 70 73 76 79 82 85 88 68 71 74 77 80 83 86 69 72 75 78 81 84 87Satin stitches

text_image
89 92 95 98 101 104 107 110 113 116 90 93 96 99 102 105 108 111 114 91 94 97 100 103 106 109 112 115Cross stitches

text_image
117 120 123 126 129 132 135 118 121 124 127 130 133 136 119 122 125 128 131 134Hem stitches

text_image
137 140 143 146 138 141 144 139 142 145Decorative stitches creative 2144
Leaves and flowers

text_image
147 150 153 156 159 162 165 148 151 154 157 160 163 166 149 152 155 158 161 164 167Decorative stitches 1
text_image
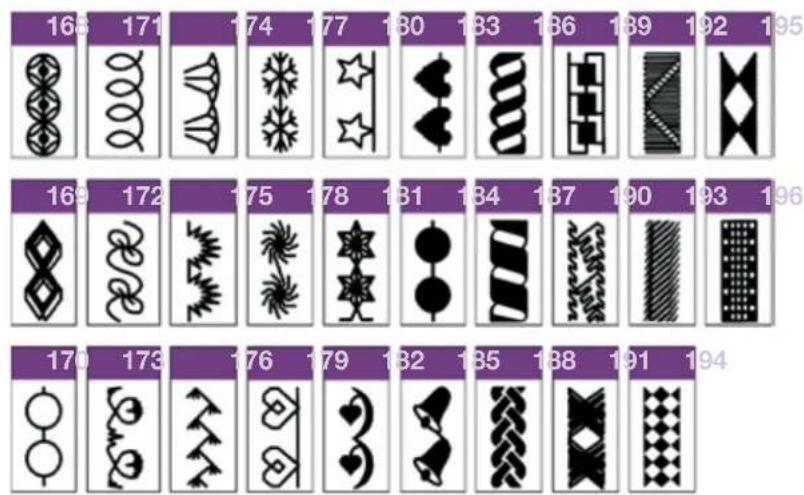
168 171 174 177 180 183 186 189 192 195 169 172 175 178 181 184 187 190 193 196 170 173 176 179 182 185 188 191 194Decorative stitches 2 Animal stitches

text_image
197 200 203 206 209 212 215 218 221 223 226 229 198 201 204 207 210 213 216 219 222 224 227 230 199 202 205 208 211 214 217 220 225 228Embroidery stitches creative 2144
MAXI stitches

Alphabets


Antique Quilt stitches
Welcome Screen
Main menu
Use this function to enter the main menu. The main menu shows a selection of all stitches.
Last stitch
This function automatically activates the stitch that was last used before the machine was switched off.
Information
Use this function to obtain general information on operating the machine.
Tool bar


Main menu
This function allows you to switch back to the main menu, for selection of all stitches.
Context menu
- In the context menu you can obtain a brief description of the icons of the menu strip.
- You can permanently change basic settings of the machine and of stitches.
The context menu always refers specifically to the menu you have selected, because not all functions appearing in every menu are plausible; they can therefore not be adjusted.
Creative Assistant
- There is a Creative Assistant function in your sewing machine to help you; it can be called up at any time. The tool bar then changes color and the functions assigned to the buttons change.
- If you touch the icon in the main menu, the Creative Assistant provides general information on operating the machine.
- If you touch i within a stitch, the direct help function is launched. Pop-up Direct Help provides information on all sewing functions and icons.
Simply touch the field on which you require more information. Information may run to several pages, through which you can scroll with the arrows.
OK
- This function confirms inputs which you have previously marked with the cursor arrows (e.g. to call up a design from the card.)
- You can call up directories, stitch sequences and stitches for further processing.
- You can confirm a design that you call up from a card, for further processing.
- All settings and sewing functions that are displayed on the screen can be specifically modified. You can open a window to alter these settings and the sewing functions. This function closes the window and your settings are saved.
Closing without saving
-
This function allows you to switch back from a menu you have selected to the previous one.
-
You close a window without the settings you have modified being retained; you interrupt the process.
Exceptions: Changes embroidery hoop positions remain even if esc is touched.
Machine Assistant
Touch this icon to open the Machine Assistant.
- This contains, among other procedures, precise instructions on how to use the machine, thread a needle and wind a bobbin, change the presser foot, change the light bulb, and fit the embroidery hoop to the machine.
After touching the icon a menu is opened in which you choose whether the information on the machine's functions is to refer to sewing or embroidering.
Sewing and Embroidery Assistant
Touch this icon to open the Sewing and Embroidery Assistant.
- This provides you with information on sewing techniques, textiles and applications.
- You can also obtain information on hooping the fabric in the embroidery hoop, information on stabilizers, threads and special materials.
After touching the icon a menu is opened in which you choose whether the information on the machine's functions is to refer to sewing or embroidering.
Closing the Creative Assistant
Use this function to close the Creative Assistant and return to the sewing mode. The tool bar then changes color and the functions assigned to the buttons change.
1-10
Function buttons
these buttons are located on the head of the machine

Thread cutter
If you press this button, you automatically cut off the needle thread and bobbin thread.

Stitch re-start
If you press this button, the machine automatically returns to the start of a stitch or program that has already been started.

Sew slow
If you press this button, the machine's max. sewing speed is halved.

Needle up / down
If you press this button, the needle automatically comes to rest in the lower position when you stop sewing.
You can simultaneously determine whether and how far the presser foot is raised when you take your foot off the foot control. A window is opened for this purpose.
You can choose between "0", "low" = 3 mm, "medium" = 6 mm and "high" = 9 mm.
When you press the foot control again, the presser foot is automatically lowered again. This allows you to turn the material beneath the machine without the fabric slipping. The basic setting is "0", i.e. the presser foot is not automatically raised.

Reverse sewing button
This button has several functions
-
If you press this button while sewing, the machine sews in reverse for as long as you keep the button pressed.
-
If you press this button before starting to sew, the machine sews in reverse until you press the button again. When the function is activated, a reverse sewing arrow appears on the multi-color touch screen.
-
If you have activated the tie-off program, tie-off at the end is initiated via this button.
-
In the "Patchwork", "Tapering", "Four sewing directions" and "Darning" programs, you determine the length of the seams with this button.
-
If you are programming the length of a buttonhole, you determine the length of the buttonhole seam with this button.

Bobbin thread monitor
This function is for monitoring the bobbin thread. The bobbin symbol flashes automatically when the bobbin thread is nearing its end.
This function is only activated when the hook cover is closed.
Stitch settings / these are the basic settings for stitches

Stitch width
You can increase or reduce the width of the stitch with the +/- icons.
For all straight stitches:
You can move the needle in steps with the +/- icons.
+ The needle moves to the right in nine steps of 0.5 mm each
- The needle moves to the left in nine steps of 0.5 mm each

Stitch length
You can increase or reduce the length of the stitch with the +/- icons.

Stitch elongation
You can increase or reduce the stitch density of the stitch with the +/- icons.

Thread tension:
You can change the pre-set needle thread tension with the +/- icons.
Sewing:

Side to side mirroring
With this function, you can mirror stitches side to side. Each stitch is mirrored individually. The mirrored stitch then appears on the screen for further processing.

End to end mirroring
With this function, you can mirror stitches end to end.
The mirrored stitch then appears on the screen for further processing.

Tie-off program
A window is opened for tying off your stitch or seams, automatically cutting the thread and raising the presser foot.
You can specify in the selection that the machine is to tie off at the start, or at the start and end of the seam or stitch. Touch the corresponding icon.
If you have activated "Tie-off at end", you can specify that the machine is to cut the threads and then raise the presser foot.

If you have activated "Tie-off at end", use the reverse button to determine the length of the seam.

Tie-off at start
By selecting this function, you specify that the start of the seam or stitch is tied off with four stitches.

Tie-off at end
By selecting this function, you specify that the end of the seam or stitch is tied off with four stitches.

Thread cutter
By touching this icon, you can specify that the machine is to cut the needle thread and bobbin thread at the start or at the end of the seam automatically.

Raise presser foot
By touching this icon, you can now specify that the machine is to lower the presser foot at the start of the seam and to raise it at the end of the seam automatically.

Free motion sewing
When touching this icon, a window opens in which you can choose free motion "Embroidery/Darning/Quilting". The presser foot height is then set to embroidery height. Lower the feed dog. You can now determine the stitch length by pulling the fabric the required distance away from you.
Turn the function off by touching the icon again and select "0". Do not forget to raise the feed dog.

Single stitch
Stitches and stitch sequences can be sewn as single stitches. You can also define a number of stitches as a single stitch. Tie-off is automatically performed at the start and end of the seam or stitch.

Activate this function by touching "ON".
You can determine the number of stitch repeats with the +/- icons.

More functions for Sewing
By touching this icon you can call up further functions for processing or modifying the stitch.
Touch this icon a further time to close the window.

Balance
This function allows you to open a window for correcting the balance of the stitch.
Dialogue window:
You can move the displayed stitch in the direction of the arrow, using the +/- icons. Use a sewn sample as reference. The stitch is automatically corrected.


Patchwork program
With this function, you can specify a particular seam length for joining together several pieces of fabric of equal length and save it permanently when exiting the menu (e.g. for patchwork).
Dialogue window: Open already saved programs or create a new one. Touch "ON" to activate the function.
Sew the desired length, in order to determine a new seam length. The start of the seam is automatically tied off.
If you press the reverse button when you reach the end of the seam, it will be tied off. All subsequent seams are now automatically sewn in your specified length.
With this icon, you increase the programmed length of the seam.
With this icon, you reduce the programmed length of the seam.
With this icon, you open a window for opening, saving, deleting and closing a program.
Twin needle
With this function, you reduce the width of your stitch in order to use a twin needle.
This function must be switched off again when you remove the needle from the machine.
It remains active even after the stitch has been changed, including after the machine has been switched off and back on again. Touch the icon again, then "ON" to turn off the function.
Dialogue window: Open already saved programs or create a new one. Touch "ON" to activate the function. Touch "ON" again to turn off the function.
You can enter the spacing width of the twin needle you are using with the +/- icons. The width of the stitch is now reduced in such a way that the selected dimension is not exceeded. The stitch is depicted by a twin needle on the screen.
Four sewing directions program
With this function, you can program the length and width of a rectangle. The program can be saved permanently in the machine. Use this function for sewing on patches without having to turn the fabric.
Touch this function before starting to sew, to program and permanently save a "four sewing directions program".
Touch this function to decide where to end an already programmed side seam. The machine completes the current stitch and stops.
This icon is active when the function is opened. The arrow icons decides the sewing direction. The machine sews in the direction of the selected arrow.
When the desired seam length is obtained, press the reverse button to change sewing direction. The machine sews in the selected direction until the reverse button is pressed again. Repeat for all sides in the rectangle.
Also the direction arrows can be used to change the sewing direction. Touch the direction arrow following the currently selected, and the machine changes direction and sews in the latest selected.
Touch this icon to call up further functions for processing or modifying the program.
Touch it a further time to close the window.
With this icon you open a window for opening, saving, deleting and closing a program.
This icon allows you to open a window for correcting the balance of the rectangle. Use the sewn sample for reference when adjusting the length of the individual sides.
Use the +/- icons to adjust the rectangle on the screen until it looks like your sewn sample. The rectangle will be adjusted automatically the next time you sew.
The , icons appear in several programs and access the machine's memory
 | Touch "ON" to activate a program, for programming a new setting or for modifying an existing option which can be saved permanently. |
 | Opening the memory of the machine or of a cardUse this function to open a window for opening, saving, deleting or closing a program'Open' iconThis opens a version of the Creative File Manager in order to call up a previously saved program, a stitch or a stitch sequence on the processing screen from a creative card or from the machine's memory.(Stitches, stitch sequences and programs are referred to as 'programs' in the following description.)The input field shows a directory in which the program is automatically saved.With the aid of the cursor icons, move the marker bar onto the program/stitch that you wish to open.The selected program/stitch appears on the processing screen when you touch this icon.'Save' iconIf you have called up and modified a program/stitch that had previously been saved, you can save it again under the same name.The previous version of the program is automatically erased.'Save as' icon:When you touch"Save as", the menu for input of the name is opened.You can give your program a name and select a directory in which to save it.When you open the menu, the machine's memory is automatically selected.The input field shows a directory in which the program can be automatically saved. The input field shows the designation "NEW". You can erase this designation with the delete icon and enter a name of your own choice.A name may be a maximum of eight characters long.Touch this icon to confirm your input.The stitch is now stored in the machine in this directory and can be opened again by selecting this directory.If you touch this icon, a further window for selecting a different directory is opened.You can save the program on the machine in a different directoryIf you wish to save the program on a card, select the appropriate card drive (front or rear drive) in which you have inserted the card.To save the program on the machine, select the directory with the cursor arrows.Touch "esc" to close the window.The program is saved in this directory.Touch "esc" to close the window without saving your input.You can create a directory only in the Creative File Manager.'Close' iconIf you have saved your settings, this function closes the window.If you have not saved your settings, a window querying whether you wish to "Save changes to NEW" appears.If you touch this icon, the menu for input of the name appears. |
 | |
 | |
 | |
 | |
 | |
| [SAC5] | |
 | If you touch this icon, the program is not saved.'Delete' icon:You can delete the complete setting.A window opens with the query"Do you really want to delete the program?"If you touch this icon, the program is deleted. |
 | |
 | If you touch this icon, the program is not deleted. |
Buttonholes
| Prog | Programming while sewingTouch this icon to determine the length of the buttonhole while sewing.Sew the forward buttonhole seam, and then press the reverse button when you reach the end. The machine sews the bartack and the reverse buttonhole seam, and automatically finishes the buttonhole.The process is saved and can be repeated as often as desired. |
| Man | Manual finishingIrrespective of the method used for determining the buttonhole length, you can finish the buttonhole yourself.To do this, touch the reverse button before or during sewing.Finish your buttonhole at the end of the reverse buttonhole seam by pressing the reverse button. |
| More functions for ButtonholesBy touching this icon you can call up further functions for processing or modifying the buttonhole.Touch this icon a further time to close the window.This function allows you to open a window for balancing the buttonhole.Dialogue window: You can move the displayed buttonhole in the direction of the arrow, using the +/- icons. Use a sewn sample for reference. The buttonhole is automatically corrected.Twin needleThis function should be switched off when sewing buttonholes. Remove the twin needle from the machine. | |
| Buttonhole seam widthYou can increase or reduce the width of the buttonhole seam with the +/- icons.Stitch densityYou can increase or reduce the density of the buttonhole seam with the +/- icons.Stitch lengthYou can increase or reduce the length of the buttonhole seam with the +/- icons.Thread tension:You can change the pre-set needle thread tension with the +/- icons.Stitch number for sewing-on buttonsHere you can specify the number of stitches (3-9) that are required for sewing-on your buttons.The input is displayed on the screen. |
Alphabets / Input field

Size adjustment
The size of each character can be adjusted proportionally in several stages via the +/- icons. The specified size is valid for all characters which are entered upon the adjustment.
Input of a word sequence
If the sequence of words is longer than the input field, the characters at the start of the sequence disappear beyond the left-hand edge. A small arrow on the left-hand edge of the field indicates this.

Cursor icons
These cursor icons can be used to move the text cursor in the direction desired. With this cursor (the underscore mark in the input field), you mark a letter so that it can then be altered or erased.
The cursor is positioned to the right of the input point, ready for input of a new character.

Spacer stitch
Use this icon to insert a space between the characters

Delete
Use the "eraser" to delete the character over the cursor (the underscore mark in the input field) or the last input.

Characters
This is one of the four icons for selecting capital letters, lower-case letters, numbers or symbols.
Alphabets / Processing screen

Opening the memory of the machine or of a card
Use this function to open a window for opening, saving, deleting and closing a program. / For more information on this icon see 'Parameters' section

Marking
In order to process a stitch sequence, it must be marked. You can mark a character or a word sequence.
A red dash appears for this purpose; you can move it across the word sequence to be marked with the cursor icons. The marked characters are surrounded by a colored frame.
If you move over a previously marked character or word sequence, the marking is cancelled again.

Delete
You can delete a marked character or word sequence.

Activity arrows
Using these arrows you can browse through the screen.

Zoom in
You can enlarge the representation in several steps. The zone around the marked stitch or stitches is the area that is enlarged.

Zoom out
You can reduce the representation in several steps. The zone around the marked stitch or stitches is the area that is reduced.

Connecting stitches
With this function, you open a window to move your characters in various directions.
These connecting stitches are a maximum of 1 mm long.

Dialogue window:
Using the cursor arrows, you can select the direction in which the stitch is to be placed.
Touch this icon to confirm each input.
The stitches are placed individually; you can alter the direction after every stitch.
More functions for Alphabets
By touching this icon you can call up further functions for processing or modifying the characters or the word sequence.
Touch the icon a further time to close the window
End to end mirroring
With this function, you can mirror letters and sequences end to end. It appears on the screen for further processing.
Side to side mirroring
With this function, you can mirror letters and sequences side to side. Each stitch is mirrored individually. The mirrored stitch then appears on the screen for further processing.
Tie-off program
A window is opened for tying off your word sequences, automatically cutting the thread and raising the presser foot. Tie-off is automatically activated as standard setting.
You can specify in the selection that the machine is to tie off at the start, or at the start and end of the stitch. Touch the corresponding icon.
If you have activated tie-off at the end, you can specify that the machine is to cut the threads and then raise the presser foot.
If you have activated "Tie-off at end", use the reverse button to determine the length of the seam.
Tie-off at start
By selecting this function you specify that the start of the stitch is tied off with four stitches.
Tie-off at end
By selecting this function you specify that the end of the stitch is tied off with four stitches.
Thread cutter
By touching this icon, you can specify that the machine is to cut the needle thread and bobbin thread at the start or at the end of the seam automatically.
Single stitch:
Word sequences can be sewn as single stitches.
You can also define a number of word sequences as a single stitch.
Tie-off is automatically performed at the start and end.
You can determine the number of repeats via the +/- icons.
Balance
This function allows you to open a window for correcting the word sequence.
Dialogue window: You can move the displayed word sequence in the direction of the arrow, using the +/- icons. Use a sewn specimen for reference. The word sequence is automatically corrected.
Twin needle
This function reduces the width of the stitch so that a twin needle can be used.
This function should be switched off for this function. Remove the twin needle from the machine.
Embroidery / card - single designs
Machine's memory
Use this function to access the stitch selection of the machine or to call up the machine's memory.
Front card drive
Use this function to access the front card drive.
Rear card drive
Use this function to access the rear card drive.


End to end mirroring
With this function, you can mirror a design end to end. The mirrored design then appears on the screen for further processing.
Side to side mirroring
With this function, you can mirror a design side to side. The mirrored design then appears on the screen for further processing.
Trouble shooting, e.g. thread breakage
With this function you can open a window showing troubleshooting functions to remedy problems that may occur during embroidering, e.g. thread breakage.
Stitch number
Use this function to open a window for entering a stitch number to which the embroidery hoop moves after the confirmation.
Advance/Reverse stitch by stitch
With this function you can advance/reverse stitch by stitch, including across a change of color.
Advance/Reverse design by design
Within an embroidery combination, use this function to advance/reverse the embroidery hoop design by design.
Advance/Reverse color by color
Use this function to move the embroidery hoop to the start of the previous/next color within a design. The color appears in the icon.
Start of color
This positions the needle at the start of the current color.
The color is displayed in the icon. The window is automatically opened in case of thread breakage.
Cross-hair cursor
This switches on a cross-hair cursor, which shows you the current needle position.
Changing the color
With this function, you open a window for processing the color segments further.
The window is sub-divided into three fields in which you can make changes.
If you confirm your input, this command affects all 3 fields and the window is closed.
Top field / Select color segment
-
In this field you can select a color segment in order to change it. To do this, mark the color segment that is to be changed, using the cursor icons. Only the selected color segment is displayed.
-
You can select a color segment in order to sew only this segment. To do this, press the foot control after marking the color.
If you set the cursor to M, the machine embroiders all areas in the same color.
Middle field / Change color
In this field you can use the cursor keys to mark the color to which you would like to change the selected color segment.
Bottom field / Color intensity
In this field, you can adjust the shade of a color of the selected segment with the cursor keys.
Enlarged representation
With this function, you obtain an enlarged representation of the design on the screen, as upon design selection. By touching "esc" you switch back to the previous screen, without saving the changes.
 | Hoop selectionWith this function, you can select an embroidery hoop that is not yet fitted to the machine. A window for selecting the hoop size appears for this purpose.After the hoop has been selected, it is represented on the screen. |
 | Positioning a designUse this function to get the exact position of your design by orbiting it within the embroidery hoop.With the aid of a cross-hair cursor you can accurately combine one or several designs into a large embroidery combination by changing the position of the fabric in the hoop. |
 | OrbitingTouch these icons to move the embroidery hoop to the upper left/upper right or lower left/lower right corner of the design. |
| [DBXX] | ONUse this function to select that the hair-cross cursor ( and the embroidery hoop ) permanently will be moved to the position in the design where it can be joined to an already embroidered design. |
 | Fine tuningUse the four arrows to move the embroidery hoop in mm steps in the different directions. |
 | Design processingThis opens a window for further processing the design you have marked. You can alter the size, move and rotate the design within the hoop. |
 | Move the designPosition your selected design in the embroidery hoop using your finger tip or stylus.This function must be deselected again. |
 | You can fine tune the designs' position within the hoop with the eight direction arrows.The numbers in top of the pop-up windows tell you how many mm the design has been moved from the center of the hoop. |
 | Rotate the designRotate your selected design directly on the mult-color touch screen using your finger tip or stylus.This function must be deselected again.Use this icon to rotate your design in steps of 1° in the direction of the arrow. |
 | |
 | RepositioningIf you rotate a design and it then protrudes beyond the hoop, a red line appears in place of the hoop. This line alerts you to the fact that the design cannot be embroidered in this position.The design is automatically placed into the embroidering field with this function. |
 | UndoThis function cancels the command described above and places the design back outside the hoop, allowing you to continue turning it.If no red line is visible, a design is within the hoop and can be embroidered. |
 | Size adjustmentYou can adjust the size of the design with the +/- icons. The designs are always adjusted proportionally. |
 | Basting functionTouch this icon to activate the basting function, for stitching around the design with a 6 mm straight stitch. |
 | Thread tensionYou can adjust the thread tension (tighter or slacker) with the +/- icons. |
Embroidery / card - Embroidery alphabets


If you select “Alphabets” in Embroidery/card, the processing screen for the embroidery combination is opened.
Therefore the available icons are displayed in the same colors as for the embroidery combination.
The following icons, which are displayed in the same colors as the embroidery combination, only appear when “Alphabets” is selected.
Activity arrows
Using these arrows you can scroll through the screen.
Select
In order to process a design, it must be selected. You can select a letter or letter combination.
A dash appears for this purpose; you can move it across the letters to be selected with the cursor icons. The selected letter or letter combination is surrounded by a colored frame.
If you move over a previously selected letter or letter combination, the selection is cancelled again.
Zoom in
You can enlarge the representation in several steps. The zone around the marked letter or letter combination is the area that is enlarged.
Zoom out
You can reduce the representation in several steps. The zone around the marked letter or letter combination is the area that is reduced.
Delete
You can delete a selected letter or letter combination.
More functions for embroidery combination
By touching this icon you can call up further functions for processing or modifying the design.
Touch the icon a further time to close the window.
Embroidery combinations


Opening the memory of the machine or of a card
Use this function to open a window for opening, saving, deleting and closing a program.
Select the design
-
If you touch this icon when you have marked an embroidery combination, you can embroider it straight away. The corresponding processing menu for the embroidery combination appears on the screen.
-
If you touch this icon when a design is marked, the processing menu for the embroidery combination appears and the machine is ready to sew.
Select menus
Use this function to create a new embroidery combination. A variant of the main menu is opened.
By touching the desired category and the sorted stitch or design selection, you can select the design directly. The specific setting shown for each selected design can be modified.
If you confirm the design, it appears individually on the processing screen. By touching the icon for selecting designs again, you can add any further designs.
Activity arrows
Use these arrows to scroll through the screen.
Marking
In order to process a design, it must be marked. You can mark a design or an embroidery combination.
A dash appears for this purpose; you can move it across the designs to be marked with the cursor arrows. The marked design is surrounded by a colored frame. If you move over a previously marked design or embroidery combination, the marking is cancelled again. The representation turns black.
More Options
When opening the more options menu, there are several functions available for further processing of the embroidery combinations. See page 1-17 – 1-18 for explanation of the different functions/icons.


Opening the memory of the machine or of a card
Use this function to open a window for opening, saving, deleting and closing a program.
Selecting stored stitches
- If you touch this icon when you have marked a stitch sequence, you can sew the stitch selection straight away. The corresponding processing menu for the stitch sequence appears on the screen.
- If you touch this icon when a stitch is marked, the processing menu for the stitch sequence appears and the machine is ready to sew.
Select menus
Use this function to create a new stitch sequence. A variant of the main menu is opened.
By touching the desired category and the sorted stitch selection, you can select it directly. The specific setting shown for each selected stitch can be modified.
If you confirm the stitch, it appears individually on the processing screen. By touching the icon for selecting stitch menus again, you can add any further stitch.
By touching ok more than once, you can repeat the selection of the same stitch without having to switch back to the selection menu.
Select
In order to process a stitch, it must be selected. You can select a stitch or a stitch sequence.
A dash appears for this purpose; you can move it across the stitches to be selected with the cursor icons. The selected area is surrounded by a frame.
If you move over a previously selected stitch or sequence, the selection is cancelled again.
Delete
You can delete a marked stitch or sequence.
Activity arrows
Using these arrows you can browse through the screen.
More functions for Stitch sequence
By touching this icon you can call up further functions for processing or modifying the stitch sequence. Touch the icon a further time to close the window.
End to end mirroring
With this function, you can mirror each stitch in a stitch sequence end to end. The mirrored stitch then appears on the screen for further processing.
Side to side mirroring
With this function, you can mirror a marked stitch or a stitch sequence side to side.
The mirrored stitch then appears on the screen for further processing.
Zoom in
You can enlarge the representation in several steps. The zone around the marked stitch or stitches is the area that is enlarged.
Zoom out
You can reduce the representation in several steps. The zone around the marked stitch or stitches is the area that is reduced.
Connecting stitches
With this function, you open a window to move your characters in various directions.
These connecting stitches are a maximum of 1 mm long.
Dialogue window:
Using the cursor arrows, you can select the direction in which the stitch is to be placed.
Touch this icon to confirm each input.
The stitches are placed individually; you can alter the direction after every stitch.
| Tie-off programA window is opened for tying off your stitch sequences, automatically cutting the thread and raising the presser foot. Tie-off is here automatically activated as standard setting.You can specify in the selection that the machine is to tie off at the start, or at the start and end of the stitch. Touch the corresponding icon.If you have activated tie-off at the end, you can specify that the machine is to cut the threads and then raise the presser foot.If you have activated "Tie-off at end", use the reverse button to determine the length of the seam. | |
| Tie-off at startBy selecting this function you specify that the start of the stitch is tied off with four stitches. | |
| Tie-off at endBy selecting this function you specify that the end of the stitch is tied off with four stitches. | |
| Thread cutterBy touching this icon, you can specify that the machine is to cut the needle thread and bobbin thread at the start or at the end of the seam automatically. | |
| Raise presser footBy touching this icon, you can now specify that the machine is to lower the presser foot at the start of the seam and to raise it at the end of the seam automatically. | |
| Single stitch:Stitch sequences can be sewn as single stitches.You can also define a number of stitch sequences as a single stitch.Tie-off is automatically performed at the start and end of the stitch sequence.You can determine the number of sequence repeats via the +/- icons. | |
| BalanceThis function allows you to open a window for correcting the stitch sequence.Dialogue window: You can move the displayed stitch sequence in the direction of the arrow, using the +/- icons.Use a sewn sample for reference. The stitch sequence is automatically corrected. | |
| Twin needleThis function reduces the width of the stitch so that a twin needle can be used.This function should be switched off. Remove the twin needle from the machine. |


- The Creative Data Manager organises your machine's stitches. Here you have access to several functions, such as copying, renaming, moving, sorting, deleting, consulting data in the memory or creating directories.
- Two fields are available for processing. Both fields can be used as source or destination, when you copy or move stitches or stitch sequences.
- To open directories, sub-directories, sequences or single stitches there is a marker bar which you can move up or down with the arrows.
If the marker bar is on top of a directory name, you always enter a further data record by touching this icon.
Touch this icon to skip from a selected data record to the previous one.
Activity arrows
Using these arrows you can browse through the screen. The dark marker bar indicates the marked area.
Machine's memory
Use this function to access the stitch selection of the machine or to call up the machine's memory.
Front card drive
Use this function to access the front card drive.
Rear card drive
Use this function to access the rear card drive.
Copying, renaming, moving
A window is opened for copying, renaming and moving stitches/designs, sequences or combinations.
Copying data:
You can duplicate data, such as stitches and stitch sequences, from the machine or a creative card and save them in a different memory or save or insert them on a creative card. To do this, mark your destination file, mark the source file and touch 'Copy'.
Sequence: 1. Mark destination / 2. Mark source / 3. Copy
Renaming data:
To rename data such as stitches, stitch sequences or personal menus, touch 'Rename'. A window for entering a new name (max. 8 characters) is opened.
Move:
You can move stitches or stitch sequences from the machine or from a creative card to another memory or onto a creative card. To do this, mark your source file, mark the destination file and touch 'Move'.
Sequence: 1. Mark destination / 2. Mark source / 3. Move
Delete:
Use this function to delete a data record (directory, stitch or stitch sequence) that you have marked.
Create a directory
Use this function to create an individual directory for your stitches.
A window in which you can enter a name opens.
Memory information
Use this function to consult the data records contained in a directory or stitch that you have marked.
Sort criterion
Use this function to sort your data alphabetically or according to data type.
If you touch the icon when the sort criterion is set to alphabetical, it is switched to data type, and vice-versa.
Stitch selection
- If you touch this icon when you have marked a sequence, you can sew it straight away.
The corresponding processing menu for the stitch sequence or embroidery combination appears on the screen. - If you touch this icon when a stitch is marked, the processing menu for the stitch appears and the machine is ready to sew.
- If you touch this icon when a 'Personal Menu' is marked, the personal menu is displayed and you can select a stitch and sew it. The stitch appears on the corresponding processing screen.
There is a Creative Assistant function in your sewing machine to help you; it can be called up at any time with the
icon on the tool bar. The tool bar then changes color and the functions assigned to the icons change.
Touch the icon to open the Machine Assistant. The Machine Assistant contains precise instructions on how to use your Pfaff creative 2144, thread a needle and wind a bobbin, change the light bulb, and attach the embroidery unit to the machine, plus lots more.
natural_image
White plastic enclosure with internal compartments and mounting holes (no text or symbols visible)
natural_image
Close-up of a white and black electronic device with control buttons and ventilation grilles, labeled '1.2.3.' (no readable text or symbols beyond label)
natural_image
Close-up of a metallic metal panel with diagonal grooves and bolt holes, labeled '28.' (no text or symbols on the panel itself)
text_image
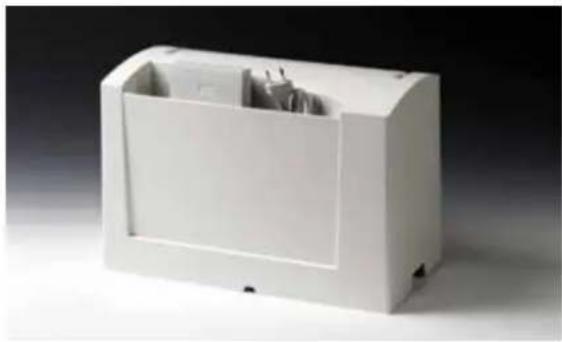
ACarrying case
Place the enclosed power cord and the foot control into the compartment of the carrying case.
Note: Always turn your Pfaff creative 2144 off, before placing the carrying case on the machine. If the machine is on while covered by the carrying case, it could cause severe damage to the multi-color touch screen.
Electrical connection
- Connect the power cord between the socket of the sewing machine and the wall outlet. The socket is located on the right-hand side of the machine.
For the USA and Canada
This sewing machine has a polarized plug (one blade wider than the other). To reduce the risk of electric shock, this plug is intended to fit in a polarized outlet only one way. If the plug does not fit fully in the outlet, reverse the plug. If it still does not fit, contact a qualified electrician to install the proper outlet. Do not modify the plug in any way.
Connecting the foot control
- Pull the retractable cord out of the foot control to a length that is comfortable for you. The foot control has an automatic cord-rewind reel for storage.
Connect the plug of the foot control to the socket of the sewing machine. The socket is located on the right-hand side of the machine. The sewing speed is controlled by pressing the foot control.
The foot control ATK 0080 has to be used for this sewing machine.
Main switch
- When the main switch is switched on, the sewing lamp and the multi-color touch screen light up. Your Pfaff creative 2144 is now ready to use.
Dual voltage
220 V - 240 V / 120 V
The sewing machine is set to the voltage 220 - 240V. To change the voltage to 120V (US/Canada), you must set the voltage switch (28) on the underside of the machine to 120 V.
If you are unsure of the correct voltage for your country, please check with your authorized sewing machine dealer or local electrical authorities before plugging in your machine.
Contrast of the screen
The contrast of the screen is adjustable. The setting can be readjusted with the screen control dial (A).
Top cover
Open the top cover by placing your finger into the recess at either end and lift.
Your Pfaff creative 2144 features 260 different stitches. The stitches are illustrated on the inside of the top cover.
natural_image
Close-up of a white electronic device with a black arrow pointing downward and labeled 'PFAFF' on its side (no readable text beyond label)Accessory tray
Open the accessory tray by placing your left index finger on the ridged area on the left of the lid and open the lid upwards and towards you.
Arranging the accessories
The standard accessories are marked with numbers. Arrange the parts in the respective compartments of the accessory tray.
natural_image
Close-up of a white robotic device with a black arrow pointing upward, indicating a movement or force (no text or symbols visible)Free arm
In order to sew using the free arm, swing the detachable accessory tray (32) to the left and lift it upwards out of the hole. When replacing the accessory tray, make sure it is flush with the free arm of the sewing machine.

natural_image
Close-up of a sewing machine in operation, showing white workbench and blue base (no visible text or symbols)Bobbin winding
Preparing the machine for bobbin winding
Place an empty bobbin so that the pin of the bobbin winder snaps into the slot of the bobbin.

natural_image
Close-up of a small white object with a transparent container and a metallic tool, placed on a white surface (no visible text or symbols)
text_image
PFAFF 2144 PFAFF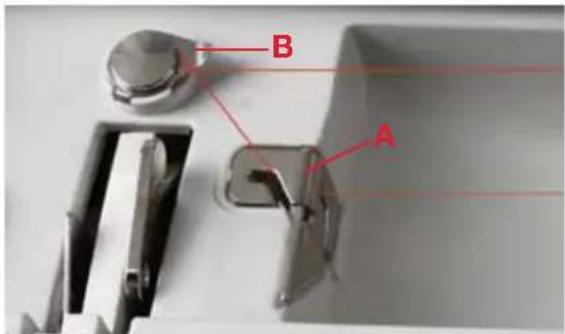
text_image
B A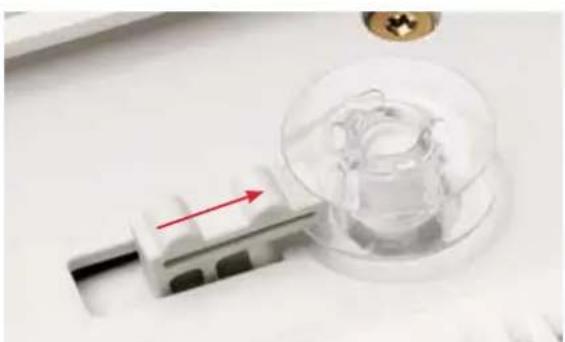
natural_image
Close-up of a medical device with a red arrow pointing to a transparent glass container (no visible text or symbols)Winding the bobbin from the spool pin
Choose a spool cap slightly larger in diameter than the spool. For example use the large spool cap for larger spools of thread, and the smallest cap with cone-type spools. Place the sewing thread on the spool pin. Slide the cap tightly against the spool.
Threading
Place the thread into guide (A) from front to back and pull it counter-clockwise above the bobbin winder thread guide (B).
Wind the start of the thread around the bobbin several times in a clockwise direction.
Note: When bobbin winding always place the thread above the bobbin winder thread guide (B).
Switch on the main switch.
Start bobbin winding by pushing the bobbin winding lever to the right. As soon as the bobbin is full, the winding action will be stopped automatically. Cut the thread and remove the bobbin from the winder.

natural_image
Close-up of a white electronic device with a red coil and indicator lights, no visible text or symbols on the main body.
text_image
PFAFF 2144 PFAFF1. Winding from the second spool pin
Swing the second spool pin (20) up and lock. Place a spool of thread with an appropriate spool cap on the spool pin.
2. Winding from the third spool pin
Insert the third spool pin in the hole (21) provided. Place a spool of thread with an appropriate spool cap on the spool pin.
Threading
Place the thread into thread guide (A) from front to back and pull it counter clockwise above the bobbin winder thread guide (B). Wind the start of the thread around the bobbin several times in a clockwise direction.
text_image
B AStart bobbin winding by pushing the bobbin lever to the right. As soon as the bobbin is full, the winding action will be stopped automatically. Cut the thread and remove the bobbin from the winder

natural_image
Close-up of a mechanical component with a red arrow pointing to a transparent cylindrical part, no visible text or symbols.
natural_image
Close-up of a sewing machine needle and fabric base (no visible text or symbols)Winding a bobbin through the needle
It is possible to wind bobbins even when the machine is fully threaded (see page 2-8 for threading instructions).
Raise the presser foot. Pull the needle thread underneath the presser foot and upward through the right-hand threader slot.
text_image
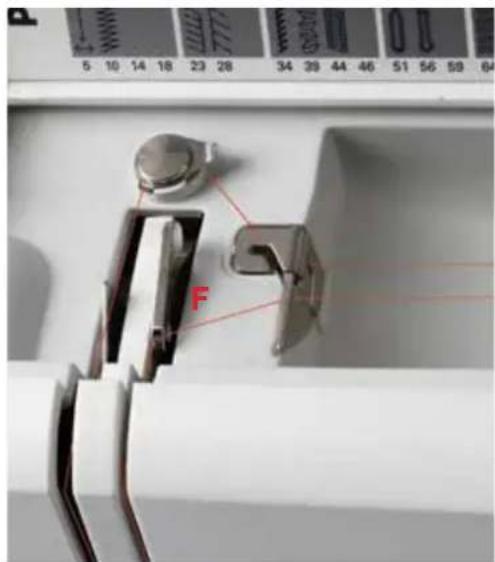
5 10 14 18 23 28 34 39 44 46 51 56 59 64 FPlace the thread from left to right through the take-up lever F.
Note: The take-up lever must be at its highest position.
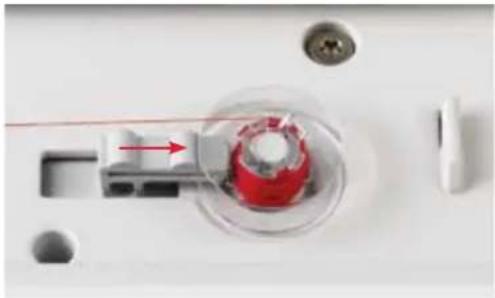
natural_image
Close-up of a red mechanical component with a blue arrow pointing to it, mounted on a white surface (no text or symbols visible)Guide the thread to the right. Wind the start of the thread around the bobbin several times in a clockwise direction. Start bobbin winding by pushing the bobbin lever to the right. As soon as the bobbin is full, the winding action will be stopped automatically. Cut the thread and remove the bobbin from the winder.
Hook/Bobbin door
Hold the bobbin cover (6) on the left side and open it towards the front.

natural_image
Close-up of a sewing machine's internal component with a black arrow indicating rotation (no text or symbols visible)Taking out the bobbin case
Lift the latch of the bobbin case and pull the bobbin case out of the machine. Release the latch and take the empty bobbin out of the bobbin case.

natural_image
Close-up of a hand operating a sewing machine with a mechanical component inside (no visible text or symbols)Thread tension
The following is valid for general sewing work:
Thread tension ok
To obtain a perfect seam appearance and durability make sure the needle and bobbin thread tensions are correctly balanced.
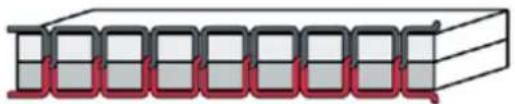
natural_image
Pure diagram of a 3D rectangular block with red and gray sections, no text or symbols presentBobbin thread is visible on the top side of the fabric:
The needle thread tension is too tight or the bobbin thread tension is too loose.
natural_image
Pure diagram of a coiled structure with red spring elements, no text or symbols presentThe thread tension must be corrected (see page 3-4).
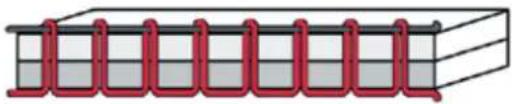
The top thread is visible on the wrong side of the fabric:
The needle thread tension is too loose or the bobbin thread tension is too tight.

natural_image
Pure diagram of a mechanical or structural component with no text, numbers, or symbolsThe thread tension must be corrected (see page 3-4).
For embroidery stitches and buttonholes the top thread should be slightly visible on the wrong side of the fabric.
text_image
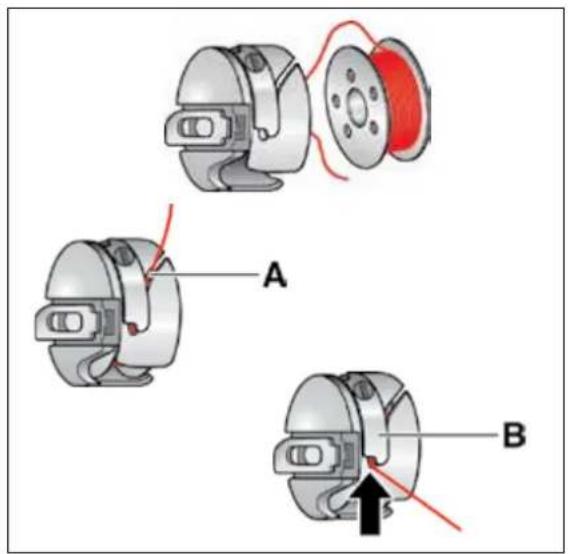
Technical diagram showing three mechanical components labeled A, B, and a red cable with directional arrows indicating motion or assembly.Inserting the bobbin
Insert the full bobbin in the bobbin case. When doing so, pull the thread sideways through the slot on the bobbin case (A), then under the tension spring (B) until it rests in the small hook in the opening (see arrow).
Check: When you pull the thread, the bobbin must turn clockwise.

text_image
D E FInserting the bobbin case
Lift the latch (F) on the bobbin case and push the bobbin case fully onto the pin (D) of the sewing hook. The opening (E) of the bobbin case must face upwards.
Check: Pull the bobbin thread sharply. The bobbin case must not fall out of the hook.
Close the hook/bobbin cover.
Threading the needle
Raise the presser foot. Place the thread on the spool pin and fit a spool cap of the right size.
Using both hands, pull the thread into the thread guide (A) from front to back. Place the thread from the right underneath the bobbin winder thread guide (B).
Now pass it through the left-hand threading slot downwards.
Pull the thread around the stop (C) in the right-hand threading slot and upwards to the take-up lever (F). The thread must be pulled fully into the take-up lever from left to right. Pass the thread downwards in the right-hand threading slot.
Pull the thread from the side behind one of the two thread guides (D).
To thread the needle, please refer to the next section.
Note: When sewing always place the thread underneath the bobbin winder thread guide (B).
Needle threader
In order to make threading of the needle easier and quicker the Pfaff needle threader is built-in. The needle threader allows you to thread the needle automatically.
-
Lower the presser foot. Press the threader down with the handle. The threader hook (R) swivels through the needle eye.
-
Place the thread from the back, over the hook (O) and under the thread hook (R) and hold the end of the thread taut. Reduce the pressure so that the needle threader slowly moves upwards.
-
At the same time, the threader hook swivels out of the needle eye and pulls the thread through the eye. Slightly release the end of the thread, so that a thread loop can form behind the needle. Release the threader and pull the rest of the thread end through the needle eye.

text_image
PFAFF 2144 B A F PFAFF C D
natural_image
Close-up of a sewing machine needle stitching metal components on a cutting board (no visible text or symbols)1.

text_image
O R2.
natural_image
Close-up of mechanical components with red alignment lines (no visible text or symbols)3.
text_image
A B
natural_image
Close-up of a sewing machine with a needle inserted into the center (no visible text or symbols)
natural_image
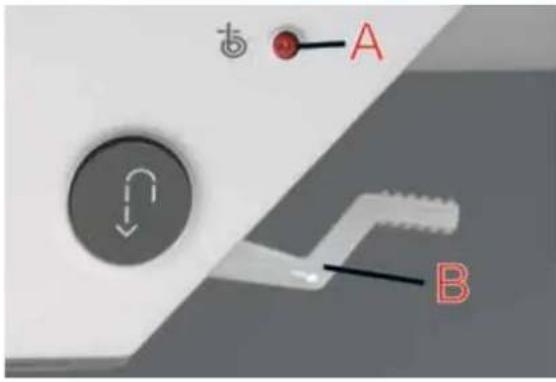
Close-up of a sewing machine needle stitching a metal component (no visible text or symbols)Bobbin thread monitor
When the bobbin thread is nearing its end the red light next to the bobbin symbol (A) flashes automatically.
This function is only activated when the hook cover is closed.
Presser foot lifter
The presser foot is raised or lowered with the presser foot lifter (B).
Bring up the bobbin thread
Raise the presser foot. Hold the needle thread and tap the foot control until the needle goes down and up one time, or turn the handwheel towards you until the needle has reached its highest position and the bobbin thread has formed a loop. Pull the needle thread to bring up the bobbin thread.
Close the hook/bobbin door and pull the threads under the presser foot to the back.
Thread cutter
Pull the threads from the back to the front over the thread cutter.
Changing the presser foot
Removing the presser foot:
Set the needle at its highest position. Raise the presser foot and press the foot upwards at the front and downwards at the back at the same time until it snaps out of the presser foot holder (9). When disengaging buttonhole foot 5A, the runner must be pulled to the back and pressed upwards.
Replacing the presser foot:
Place the presser foot under the presser foot holder (9) so that the pins of the foot engage in the presser foot holder when the presser foot lifter (42) is lowered. Check that the presser foot has engaged properly by raising the presser foot lifter.

natural_image
Close-up of hands operating a sewing machine needle on a workbench (no visible text or symbols)
natural_image
Close-up of a sewing machine needle stitching metal work on a flat base (no visible text or symbols)Electronic knee lift
Your Pfaff creative 2144 is provided with an electronic knee lift for regulating the presser foot height.
- Push the knee lift fully into the provided hole (5) on the machine.
Note: the flat side must face upwards.
- Adjust the rectangular bar on the knee lift until it is positioned at a comfortable height for you.
If you press the knee lift to the right, the presser foot will raise. Now you can guide the fabric with both hands.
- To remove the knee lift, just pull it out of the hole.
natural_image
Hand holding a wall-mounted electrical outlet with a black arrow pointing to the outlet (no visible text or symbols)1.

natural_image
Close-up of a white electronic device with a curved cable and a vertical arrow, mounted on a wall (no visible text or symbols)2.

natural_image
Hand holding a white electrical plug with a black arrow pointing to the tip of a device (no visible text or symbols)3.
natural_image
Close-up of hands installing or adjusting a sewing machine into a small electronic device (no visible text or symbols)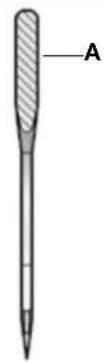
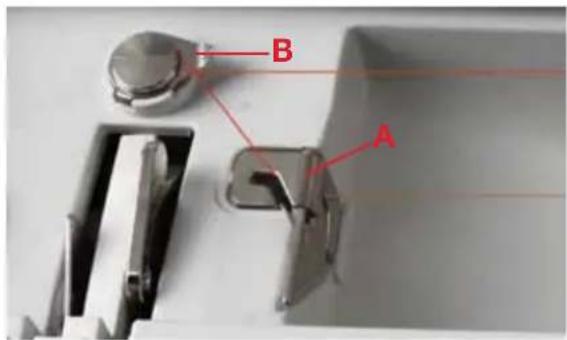
Changing the needle
Removing the needle: Lower the presser foot and set the needle at its highest position. Slightly loosen set screw (B) of the needle and pull the needle out downwards.
Replacing the needle: The flat side (A) of the needle must face to the rear. Insert the needle, pushing it up as far as it will go. Hold the needle and tighten set screw (B) firmly.

text_image
B PFAFF
natural_image
Close-up of a sewing machine needle stitching metal workpiece (no visible text or symbols)Threading the twin needle
Replace the sewing needle with a twin needle.
Swing the second spool holder up and lock. Place a spool of thread with an appropriate spool cap on it. Make sure that both threads are placed underneath the bobbin winder thread guide. During threading in the left threading slot, make sure that you pass one thread to the left and one thread to the right sides of the tension disk (B). Continue threading in the usual manner, making sure the threads do not become twisted together.
Pull the right thread into the right thread guide and thread the right needle. Pull the left thread into the left thread guide and thread the left needle.
It is not possible to use the automatic needle threader with a twin needle.
Integrated Dual Feed (IDT-System)
Pfaff provides the perfect solution for working on all fabrics: the Integrated Dual Feed. The Integrated Dual Feed, as on industrial machines, feeds the fabric from the top and bottom at the same time. The fabric is fed precisely at any stitch length, speed or direction. On light or difficult fabrics such as silk or rayon the Dual Feed prevents puckering of the seam. The even feeding action also ensures perfect matching of checked and striped fabrics. The Integrated Dual Feed is ideal for quilting multiple layers.
Engaging the top feed/Dual Feed
Important: for all work with the Dual Feed, use the presser feet with center back cut-out.
Raise the presser foot.
Press the top feed (red) downwards at the ribbing, until it engages.
Disengaging the top feed/Dual Feed
Hold the top feed firmly at the ribbing with two fingers.
Push the top feed (red) fully downwards, then pull it away from you and release the top feed slowly upward until it engages in normal position.

natural_image
Close-up of a sewing machine needle and footer mechanism (no visible text or symbols)
natural_image
Abstract geometric pattern with blue and green squares arranged in a grid (no text or symbols)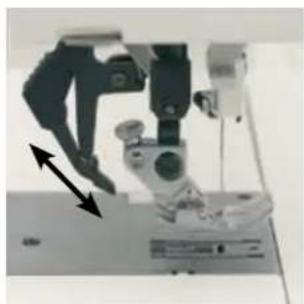
natural_image
Close-up of a mechanical device with arrows indicating motion or assembly (no visible text or symbols)Lowering the feed dog
To lower the feed dog move the slide to the left. To engage the feed dog move the slide to the right.
Note: Raise the presser foot before lowering the feed dog.
You can also lower the feed dog by opening the hook/bobbin door and moving the slide to the right.
To engage the feed dog move the slide to the left.

natural_image
Close-up of a white electronic device with ventilation slots and a handle (no visible text or symbols)
natural_image
Interior view of a white laboratory instrument with a circular chamber and mechanical components (no visible text or symbols)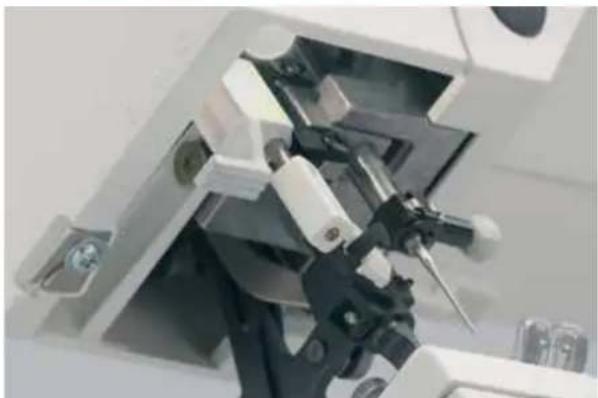
natural_image
Close-up of a mechanical device with transparent casing and internal components (no visible text or symbols)
natural_image
Close-up of a hand inserting a small cylindrical device into a mechanical assembly (no visible text or symbols)
natural_image
Close-up of a sewing machine needle stitching a metal sheet on a white workbench, with a finger pointing to the seam (no visible text or symbols)Changing the light bulb
Switch off the main switch and allow light bulb to cool.
Removing the light bulb:
The light bulb is located inside the needle head of the sewing machine. Light bulbs can be purchased from your PFAFF dealer (the maximum wattage of the light bulb is 5 watts).
Push the light bulb remover (A) upward as far as it will go. Then push upwards and turn it half a rotation counterclockwise. Remove the light bulb.
Replacing the light bulb:
Insert the light bulb into the bulb remover. Guide the light bulb into the slot of the holder. Push the light bulb upward into the holder as far as it will go and turn it half a rotation in a clockwise direction. Take out the bulb remover from the light bulb.
Changing the needle plate
Switch off the main switch
Removing the needle plate
Raise the presser foot and push the detachable work support to the left. Position the needle plate changer (bulb remover) as shown in the figure and press the needle plate upward first on the right, then on the left. The needle plate can now be easily removed.
Replacing the needle plate
Place the needle plate against the rear edge of the cut-out, then press downwards at the front until you hear it snap in place. Before you start sewing, check that the needle plate is lying flat.
Tip: Changing the needle plate is even easier with the feed dog lowered!
Hoop embroidery
For hoop embroidery, set up your Pfaff creative 2144 properly and attach the embroidery unit as described below. It is not possible to select a creative Card if the embroidery unit is not attached.
Before hoop embroidering you must lower the feed dog, disengage the dual feed (IDT System), remove the knee lift and fit the embroidery foot (see below).
Lowering the feed dog
The feed dog must be lowered for hoop embroidery. To lower the feed dog move the slide (4) to the left.
Note: Raise the presser foot before lowering the feed dog
The thread tension is automatically set and can be adjusted for speciality techniques.
Disengaging the top feed/dual feed
The top feed must be disengaged for embroidery work.
Procedure:
Hold the dual feed firmly at the ribbing with two fingers.
Press the top feed (red) fully downwards, then pull it away from you and release it slowly upward until it engages in normal position.
Removing the knee lifter
The knee lifter is not needed for embroidery work and must be removed.
To remove the knee lifter, just pull it out of the hole.
Attaching the embroidery foot
-
Remove the standard presser foot. Carefully loosen the screw (S) until the cross-hole (T) is accessible.
-
Squeeze the embroidery foot gently together and guide the pin of the foot into the cross hole of the presser foot holder as far as it will go.
-
Tighten the screw (S). To remove the embroidery foot loosen the screw (S), squeeze the embroidery foot together and pull it out to the right. Tighten the screw (S).

natural_image
Close-up of a white computer monitor with a scroll wheel and ventilation slots (no visible text or symbols)
natural_image
Close-up of a sewing machine needle and foot assembly (no visible text or symbols)
natural_image
Close-up of a hand holding a white cable with a black arrow pointing downward, against a plain wall (no text or symbols visible)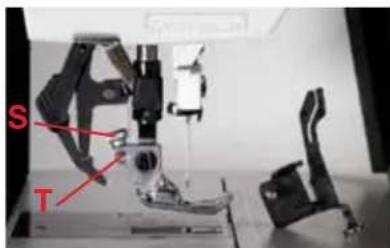
text_image
S T1.

natural_image
Close-up of a mechanical device with a tool and base, no visible text or symbols2.
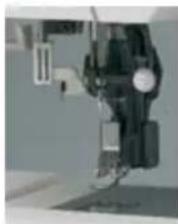
natural_image
Close-up of a mechanical device with no visible text or symbols3.
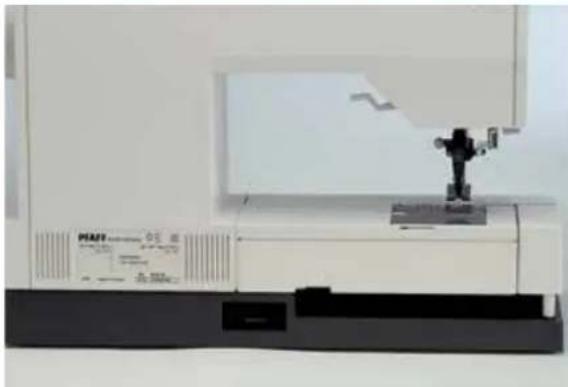
natural_image
Exterior view of a modern office building (no signage)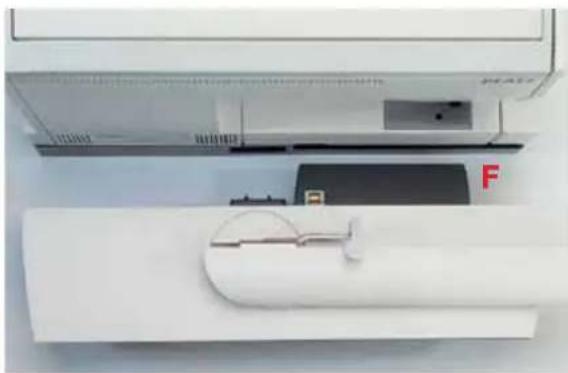
natural_image
Close-up of a white air conditioner unit with a partially visible internal component and a red letter 'F' on the side (no text or symbols on the device itself)
natural_image
Close-up of a sewing machine needle stitching a white sheet metal (no visible text or symbols)
natural_image
Close-up of a sewing machine needle stitching fabric, no visible text or symbols
text_image
creative 2144 300 A AConnecting the embroidery unit
Embroidery unit socket
The socket for the embroidery unit (15) is located at the back of the machine.
Warning!
The sewing machine must be switched off before connecting the embroidery unit!
Place the embroidery unit directly behind the machine and pull it into the socket.
Make sure that the guide (F) is slid between the base plate and the free arm as far as it will go.
Raise the embroidery arm in the area of the recessed grip and turn it to the back.
The embroidery arm locks in embroidery position.
Note: You can change bobbin with the unit attached, but make sure that the accessory tray is not swung too far to the rear. The angle of the accessory tray should not exceed 90°. Otherwise the embroidery unit could be pushed out of its socket.
Inserting a card
Insert a creative Card into the front or rear card drive, in the direction of the arrow, as far as it will go.
The release button springs out approximately 6 mm (1/4") when the card is inserted properly.
To remove the creative Card push the release button (A) next to the relevant card drive.
Embroidery hoop
There are two embroidery hoops supplied with your Pfaff creative 2144. One rectangular hoop with the embroidery surface (C) 140 x 225 mm and a round hoop for embroideries up to 115 x 120 mm.
A: snap-in pin
B: Guide pins for retaining the hoop.
C: Embroidery surface
D: retaining screw for the fabric
Note: A round embroidery hoop with an embroidery surface of 80 x 80 mm is available as an optional accessory from your PFAFF dealer.
Engage the hoop to the embroidery unit
Slide the hoop underneath the presser foot by raising the presser foot lifter as far as possible. The retaining screw (D) of the hoop must be facing you and the guide pins (B) must be pointing to the right.
Slide the hoop with the guide pins (B) into the metal guide until the snap in pin (A) engages behind the release lever (H) of the embroidery unit.
Remove the hoop
To remove the hoop, push down the release lever (H) of the embroidery unit and pull the hoop towards you and away.
Remove the embroidery unit
Raise the embroidery arm in the area of the recessed grip and turn it to the left, until it locks in the storage position.
Note: Before the embroidery arm is turned, make sure that the hoop holder doesn't protrude from the front arm edge.
Press the release button on the left side of the embroidery unit and remove it.
Warning!
The sewing machine must be switched off before removing the embroidery unit!
For more detailed information about embroidery please refer to the following sections:
Chapter 4, section "Embroidery / card"
Chapter 6, "Embroidery Assistant"

text_image
A B C D
natural_image
Close-up of a sewing machine needle stitching fabric, showing metal clamps and a labeled component 'H' (no readable text or symbols beyond the label)
natural_image
Close-up of a white mechanical device with metal clamps and a labeled component 'H' (no readable text or symbols)
natural_image
Close-up of a laboratory instrument with a mounted device and control panel (no visible text or symbols)General notes on use of the machine

text_image
PFAFF creative i Information Main menu Last stitchYour Pfaff creative 2144 is operated by touching the appropriate icon on the multi-color touch screen.
Some screens contain arrows that allow you to scroll forward and back through multiple pages.
Sewing functions for the machine can be individually altered.
Touch to close the window, save your altered settings and be able to select a new function.
Touch 📄, to continue without saving any settings.
Each open window can be repositioned on the screen. Just touch the colored bar with your finger and drag.
We have enclosed pages (chapter 1) with a full set of explanations and the commands available in the menus for each icon.
Please keep these handy reference sheets available for reference when using the machine.
Function buttons
These buttons are located above the needle.
If you press the "Needle up/down" or "Sew slow" button the button will light up. If the function cannot be used at that point, the button remains dark.

Thread cutter: If you press this button, you automatically cut the needle thread and bobbin thread.

Pattern start: If you press this button, the machine automatically returns to the beginning of a stitch/pattern or a sequence that has already been started.

Sew slow: If you press this button, the machine sews at half of the highest speed.

Needle up/ needle down: If you press this button, the needle automatically comes to stop in the lower position when you stop sewing.
You can simultaneously determine whether and how far the presser foot is raised when you take your foot off the foot control. A window is opened for this purpose. You can choose between "0", "low" = 3 mm, "medium" = 6 mm and "high" = 9 mm.
When you press the foot control, the presser foot is automatically lowered. This allows you to pivot the fabric beneath the foot without the fabric slipping. The pre-set value is "0". The lifting height of the presser foot can be permanently adjusted, see "The "context" Machine Settings menu", page 3-19.

Reverse sewing button: This button has several functions
- If you press this button while sewing, the machine sews in reverse for as long as you keep the button pressed.
- If you press this button before starting to sew, the machine sews in reverse until you press the button again.
When the function is activated, a reverse sewing arrow appears on the multi-color touch screen. - If you have activated the tie-off program, tie-off at the end is initiated via this button.
- In the "Patchwork", "Tapering", "Four sewing directions" and "Darning" programs, you determine the length of the seams with this button.
- If you are programming the length of a buttonhole, you determine the length of the buttonhole seam with this button.
The tool bar

text_image
Row of five software icons with text labels: grid, play button, info, o.k., and navigation arrowThere is a tool bar at the lower edge of the multi-color touch screen with various functions, menus and commands for using your Pfaff creative 2144.

- This icon confirms selections which you have previously done with the cursors. (For example to call up a design from the card.)
- You can open directories, stitches and programs to make further changes.
- You can confirm a design or a stitch that you select from a card, to make further changes.
- All settings and sewing functions that are displayed on the screen can be changed.
You can open a window to alter these settings and the sewing functions. This icon closes the window and your settings are saved.

- This function allows you to return to the previous menu.
- To close a window without saving any settings.
Return to main menu, for selection of all stitches.


You can personalize your Pfaff creative 2144's default settings with the "Context" machine settings icon. Change "language", "audio signals" and "messages" to name a few. You can also change permanent settings for stitches such as satin stitch and buttonholes.
The context menu always refers to the menu you have selected. Not all functions are available in all menus. You can create your own "Personal Menu" which then appears instead of the main menu.

Creative Assistant
The Creative Assistant can be accessed at any time. The tool bar then changes color and the functions of the icons change.
Tool bar after open the Creative Assistant

text_image
Row of five software icons including refresh, navigation, battery, and escape symbol
Closes the Creative Assistant

Opens the Sewing and Embroidery Assistant

Opens the Machine Assistant
Your Pfaff creative 2144 has a Pop-up Direct Help for individual sewing functions and icons. If you touch the

icon, Pop-up Direct Help provides explanations in current menu, and also on the individual icons or stit-
If you touch the icon within the stitch, Pop-up Direct Help provides information on all sewing functions and icons.
Icon status:
Icon statuses may change after each selection.

se indicate:

Active, the function can be selected.

Active and selected, the function is selected.
Inactive, the function cannot be selected.
Instructions on operating your Pfaff creative 2144
This chapter explains the basic operations of your Pfaff creative 2144.
- Using an example by way of illustration, we will show you how the sewing functions and settings for a stitch can be changed and the various programs selected.
- You will be given an overview of the selection menus.
- An example will also be provided to explain how the creative assistant is operated.
- We show you how to modify the machine's basic settings in the context menu.
Switch on your machine and a welcome screen appears. You can alter the contrast of the screen with the contrast control dial (25).
3. Getting started with your Pfaff creative 2144
Your machine is operated by touching the appropriate icons on the screen (touch-screen principle).
You can call up an introduction to the machine by touching the icon i Information.
Touch the Main menu icon to open the main menu. The main menu shows the stitch categories and functions.
By touching the Last stitch icon, you can automatically return to the last stitch used before the machine was switched off.
Selecting a stitch
Touch the icon, to open the main menu.

flowchart
graph TD
    A["Join"] --> B["Overcast"]
    B --> C["Utility"]
    C --> D["Buttonholes"]
    D --> E["Darn/Bartack"]
    E --> F["9mm Decorative Stitches"]
    F --> G["MAXI stitches"]
    H["Alphabets"] --> I["Embroidery / Card"]
    I --> J["Sequence/ Combination"]
    J --> K["Selection by number"]
    K --> L["All stitches"]
    L --> M["Last stitch"]
    M --> N["Data Manager"]
- In this menu, you can select a stitch; you are then taken into the logically arranged list of stitches or menus, from which you can select the stitch directly.
- You can open a stitch sequence that has previously been saved, or create a new one.
- You can move, copy, sort and rename stitch data in the machine's Creative Data Manager.
After opening the main menu, "Joining" is automatically highlighted.
Note: If you press the foot control at this point, the display switches to the straight stitch and your Pfaff creative 2144 is ready to sew.
If you have opened a stitch selection, such as "Alphabets"
and you are closing the selection by touching "Alphabets" icon is highlighted.
If you close the selection by touching 📄, "Joining" is highlighted.
Touch "Join".
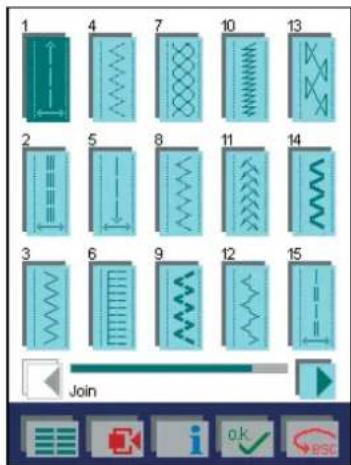
text_image
1 4 7 10 13 2 5 8 11 14 3 6 9 12 15 JoinThis selection provides a list of 18 different stitch types that are suitable for joining stretch and non-stretch fabrics.
The straight stitch is highlighted. If you press the foot control, the display switches directly to the screen for the straight stitch, press it again and the machine sews in accordance to the selected settings (stitch length, needle position, tension)
You can browse one column at a time with the cursor arrows. You can also use the bar between the arrows: gently touch and drag it.
You can touch any stitch to open the screen for that stitch.
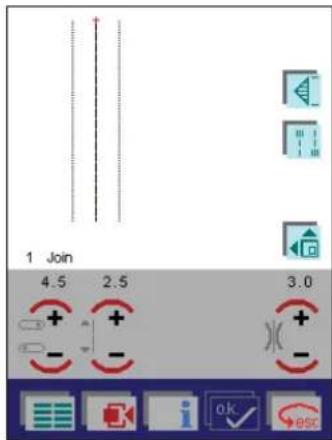
text_image
1 Join 4.5 2.5 3.0When you open the screen the most important settings are visible.
Using the straight stitch as an example, we will now perform various changes in order to explain the machine's basic operating principle.
You can call up further functions for modifying the stitch with the icon. Touch the icon again to close the selection.
You can modify the settings that are displayed, such as the values for needle position, stitch length, thread tension and the sewing functions (mirroring), for the stitch.
To alter various settings and the sewing functions, you can open a window. If you confirm your input by touching

the window is then closed and your settings are
If you touch the 📄️ icon, the window is closed without any settings being changed.
A window that is open can be dragged across the screen by touching the colored bar with your finger.
The machine has a Pop-up Direct Help feature for the individual sewing functions and icons.
To use it, touch 1 when in a stitch, then touch the icon for which you require an explanation.

text_image
1 Join 4.5 6.0 3.0 + + - - + - i ok #scAltering the stitch settings

You can move the needle in steps with the +/- icons. There are 19 different needle positions available.
+ The needle moves to the right in nine steps of 0.5 mm each
- The needle moves to the left in nine steps of 0.5 mm each

You can increase or reduce the length of the stitch with the +/- icons. Here, the length is set to 6 mm. This is the maximum value possible. If the maximum value is selected, the function is automatically shown as inactive (the number indicating the value is red).

You can change the preset needle thread tension with the +/- icons. If you have selected the maximum value, the function is automatically shown as inactive.
If you exit the screen, the stitch settings are reset to the basic settings. The next time the stitch is opened, the stitch length will automatically be restored to 2.5 mm, the needle will be positioned in the center and the tension is set to a value of 3.0.
If you select the context menu in this screen, you have the option of permanently saving the settings you have modified.
Single stitch selection
The following screen shows the window that opens when you touch the icon:
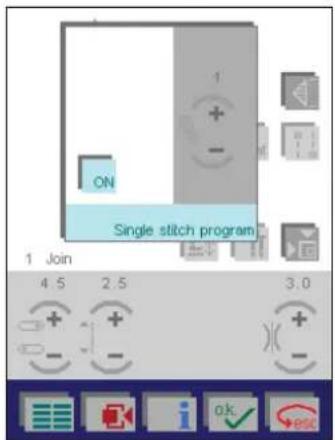
text_image
ON Single stitch program 1 Join 4.5 2.5 3.0Touch ON to activate the function.
Select the number of stitch repeats with the +/- icons. In our example, we have selected 4.
The machine will tie-off automatically at the beginning and
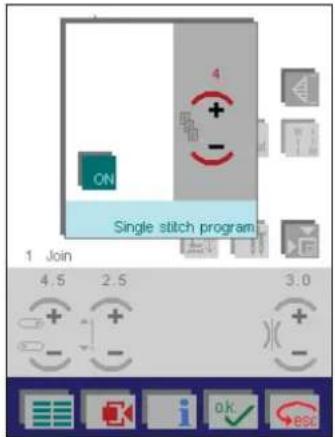
text_image
4 + - ON Single stitch program 1 Join 4.5 2.5 3.0 + + - - + - + -end.
Touch to close the window and save your settings.
To turn the function off, touch and then confirm with OK.
If you touch desc, the window is closed without any settings being saved.
Adjusting the tie-off program
The following screen shows the window that opens when you touch the icon.
This is a program for selecting tie-offs, cutting the thread and raising the presser foot.
You can specify in the selection that the machine is to tie off at the start, or at the start and end. Touch the corresponding icon.
- If you have activated tie-off at the end, you can specify that the machine is to cut the threads and then raise the presser foot.
- If you have activated "Tie-off at end", you determine the length of the seam via the reverse button.
When you open the window, "Tie-off beginning" and "Tie-off end" are not selected.
They can be selected individually.
text_image
1 Join 4.5 2 Tie-off beginning Tie-off end Thread cutter Presser foot lifter Tie-off programIf you touch "Tie-off beginning", the beginning of your seam will be tied off with four stitches.

text_image
1 Join 4.5 2 Tie-off beginning Tie-off end Thread cutter Presser foot lifter Tie-off programIf you have selected the "Tie-off end" icon, the icons for the thread cutter and presser foot lifter are activated.
You can tell the machine to cut the threads and raise the presser foot by touching the icons.
The end of the seam will automatically tie-off.
text_image
Tie-off beginning Tie-off end Thread cutter Presser foot lifter Tie-off programAll options are selected in this window.
text_image
Tie-off beginning Tie-off end Thread cutter Presser foot lifter Tie-off programYou determine the end of the seam with the reverse button.
The threads are cut and the presser foot is raised to its highest position.
Touch to close the window and activate your settings.
If you touch ▶, the window is closed without the settings you have modified being saved; you interrupt the process.
More options
When you open the screen for a stitch, the most important specific settings can be selected directly.

More stitch functions are available by touching the icon. Touch the icon again to close the selection. In the following screen, the icon has been touched.
In straight stitch, three additional options are available.
- Free Motion sewing
- "Patchwork" program ("pat")
- Twin needle function

text_image
1 Join 4.5 2.5 3.0Patchwork program
With this function, you can program and permanently save a desired seam length. This is ideal when joining pieces of fabric of equal length as in patchwork quilting.
The following screen shows the window that opens when you have touched the pat icon.
You can open a previously saved program or create a new.

text_image
prog ON Patchwork 1 Join 4.5 2.5 3.0Touch ON to activate the function.
Press the foot control and sew to the desired length. The beginning of the seam is automatically tied off.
Press the reverse button when you reach your desired length. The seam will be tied off.
All subsequent seams will automatically sew the same length.
To adjust the length of the seam, touch

Touch the + icon to increase the length of the seam. The seam is increased in steps based on the set stitch length. If the stitch length is set to 2 mm, the programmed seam increases in 2 mm steps. The stitch length itself will not change.
Touch the - icon to reduce the length of the seam. The stitch length will not change. The seam is decreased in steps based on the set stitch length. If the stitch length is set to 2 mm, the programmed seam decreases in 2 mm steps. The stitch length itself will not change.
Touch the icon. A window will open allowing you to open, save, delete or close a program.
For a detailed explanation of the individual icons, see chapter 1.
To turn the function off, touch pad and then Confirm with OK.
Save the program
Touch A window opens allowing you to open, save, delete or close a program.
'Open' icon:

text_image
Open Save Save as Close Delete 1 Join 4.5 2.5Touch the icon to access a variant of the Creative Data Manager. You can select previously saved programs from a creative card or from your Pfaff creative 2144's memory.

text_image
PATCHWRK1 [...]Opening from the machine: Use the arrows to scroll to the
machine memory and touch OK to confirm.
Use the arrows to select a previously stored program.
Touch and the program appears on the screen.
Opening from the card: There are two different card drives available. You may have a different card in each drive at the same time. The card or cards must be fully inserted. Touch the icon of the card drive you wish to open.
Touch to select a card from the front card drive.
Touch to select a card from the rear card drive.
Use the arrows to scroll to your chosen pattern.
Touch and the program appears on the screen.
'Save' icon:
After you have altered a previously saved program, touch 'Save'. The original program will be erased and the altered version is saved by the same name.
To save the altered program under a new name, touch "Save as". The original version of the program is retained.
'Save as' icon:
When you touch "Save as", the menu for input of a name is opened. The machine's memory is automatically selected (the default directory).

text_image
PATCHWRK1SEAM1.PAT A B C D E F G H I J K L M N O P Q R S T U V W X Y Z _ - 1 2 3 4 5 6 7 8 9 0The input field shows the designation "NEW". You can erase this designation with the icon and enter a name of your own choice. A name may be a maximum of eight characters long.
Touch OK to confirm your selection.
The program is now stored in the machine in the directory "Rectangle" and can be opened again by selecting it.
If you touch ↓, a window for selecting a different directory is opened.
text_image
\PATCHWRK\SEAM1_PAT [MUSTER]You can save the program in a different directory or on a card.
Saving in the machine: Use the arrows to scroll to a different directory.
Touch ↑ to save the program to the selected directory and close the window.
Touch esc to close the window without saving your program.
Saving on a creative memory card: To save the program on a card, select the appropriate card drive.
If you have created directories on the card, touch the arrow icons to scroll to the desired directory.
Touch to save the program and close the window.
Touch 📄 to close the window without saving your program.
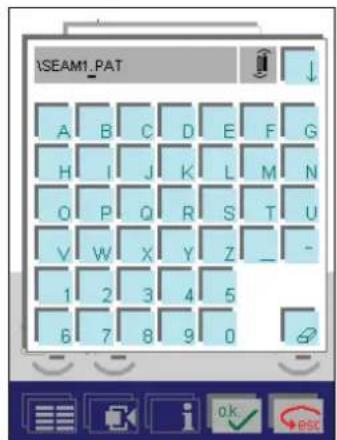
text_image
\SEAM1.PAT A B C D E F G H I J K L M N O P Q R S T U V W X Y Z _ - 1 2 3 4 5 6 7 8 9 0When you confirm the name you have entered by touching
ok, the window will close.
'Close' icon:
If you have saved your settings, this function closes the window.
'Delete' button:
You can delete the selected program.
A window opens with a safety query.
If you touch OK, the program is deleted.
If you touch → BSC, the program is not deleted.

natural_image
Woman smiling while holding up a colorful fabric or textile, with pink curtains in the background (no visible text or symbols)Twin needle
This function allows you to specify the width of the twin needle you will use. The stitch width will automatically be reduced to prevent needle breakage and allow you to sew decorative stitches with a twin needle (See Chapter 6, page 9).
Touch , touch to activate the function.
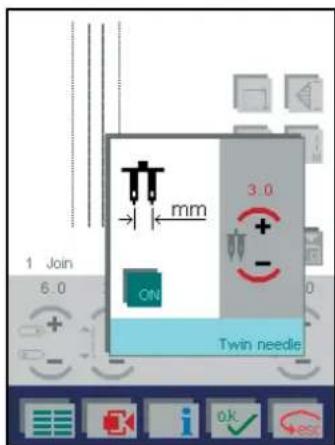
text_image
1 Join 6.0 mm 3.0 + - ON Twin needleTouch the +/- icon to specify your twin needle width. The stitch is shown as it will sew.
Touch to close the window and save your settings.
Touch → esc, to continue without saving any settings.
This function must be deactivated when you remove the needle from the machine. It remains active even after the stitch has been changed, including after the machine has been turned off and on again.
Touch , touch to deactivate the function.
To exit the screen, touch 📄. This takes you directly back to the main menu, where you can select all stitches.
Touch → ESC to return to the previous menu.
Pop-up Direct Help is available for the individual functions and symbols.
To use Pop-up Direct Help, touch 📄. Touch any icon for a brief instructional description.
Free motion
You can set your Pfaff creative 2144 for free motion sewing by touching

text_image
0 Embroidery / Darning / Quilting Free motion 1 Join 4.5 2.5 3.0Then select "Embroidery/Darning/Quilting".
When you activate this function, the presser foot is lifted to embroidery height. Lower the feed dog and attach the darning foot or the quilt foot. When sewing, the speed by which you move the fabric decides the stitch length and stitch width.
Touch the icon again and select "0", to return to normal sewing mode. Do not forget to raise the feed dog.
Four sewing directions
You can program the length and width of a rectangle to be sewn, and save these settings permanently.
This is great for sewing on patches without having to turn the fabric.
The program can be used for stitch no. 2 - 4, 7, 11, 23, and 25. The following screen shows the window that opens
when you have touched the 📋 and then the 📋 icon.

text_image
3 Four sewing directions 4.0 1.5 3.0You have several possibilities to create a four sewing directions program.
1. Sewing in four directions without saving the program
The function is active and your Pfaff creative 2144 is ready to sew.
With the direction arrows you can decide the first direction in which the machine sews.
Press the foot control and the machine sews to the right.
When the desired length is sewn, press the reverse button or touch the next direction icon. Your Pfaff creative 2144 completes the current stitch, the needle is positioned in the outer corner of the rectangle.
Now, the machine sews forward until you press the reverse button or the next direction icon. Your Pfaff creative 2144 completes the current stitch, the needle is positioned in the outer corner of the rectangle.
The length of the other sides are also decided by pressing the reverse button or touching the direction arrows. The size of the rectangle is not saved.
2. Program the four sewing directions program
Touch prog and the desired sewing direction before starting to sew. Then save the program to sew it several times.
Follow the steps above to change the sewing direction.

text_image
0 0 prog men ↑ 3 Four sewing directions 4.0 1.5 3.0 + + - - + - escThe sewn width and length of the first two sides are shown on the screen.
Continue sewing until the rectangle is complete. When all four directions are programmed, the prog icon appears on the multi-color touch screen. Now the program is stored and can be repeated. It can also be saved permanently in the machine.
Note: If you only want to save one, two or three sides of
a rectangle, touch prog when you have sewn the sides you want to save. Only the sides you have programmed will be saved. This is great for patch pockets, that are sewn with three seams.
3. Manual ending of a side seam
To permanently save, or to repeat a program several times, touch prog and the desired sewing direction before starting to sew. If you also touch a man, your Pfaff creative 2144 sews one side and then stops. The length of the sides are determined in the same way as described in section 1. The machine stops after each side. Press the foot control to continue with the next side.
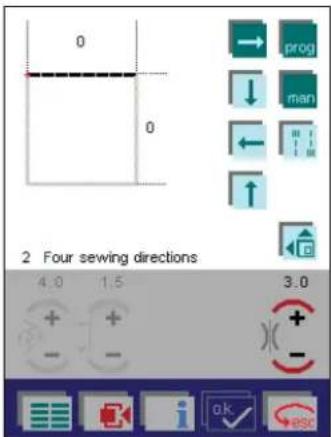
text_image
0 0 2 Four sewing directions 4.0 1.5 3.0 + + - - + - ok esc4. Manual ending of a saved rectangle
Even if a rectangle has been programmed and the prog icon is visible on the screen, you can decide the length of the sewn seams by touching l man. The machine slows down at the end of the third and fourth seam. End the seam by pressing the reverse button, the machine completes the current stitch, places the needle in the outer position and continues with the next side.
More functions for four sewing directions
Touch to open more functions for the four sewing directions program.

text_image
15 15 2 Four sewing directions 4.5 3.0 3.0Touch to open a screen to balance the rectangle. To adjust the length of the sides, use a sewn sample as a template.

text_image
0 + - 0 + - Balance 3.0With the +/- icons, you can adjust the rectangle on the screen until it looks like your sewn sample. The rectangle will be adjusted automatically the next time you sew.
Touch to open, save, delete or close a program.
A detailed description of the icons is found in chapter 1.
Touch Esc to return to the selection menu.
Touch to return to the main menu.
The selection menus
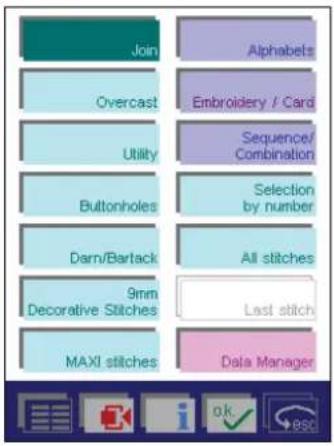
flowchart
graph TD
    A["Join"] --> B["Overcast"]
    B --> C["Utility"]
    C --> D["Buttonholes"]
    D --> E["Darn/Bartack"]
    E --> F["9mm Decorative Stitches"]
    F --> G["MAXI stitches"]
    H["Alphabets"] --> I["Embroidery / Card"]
    I --> J["Sequence/ Combination"]
    J --> K["Selection by number"]
    K --> L["All stitches"]
    L --> M["Last stitch"]
    M --> N["Data Manager"]
Join
This menu provides a selection of stitch types that are suitable for joining stretch and non-stretch fabrics.
Stitches 1 - 18 / see overview of stitches.
Overcast
This menu provides a selection of all stitch types suitable for overcasting.
The closed overedge stitches can be used for joining and overcasting in one operation. These overedge stitches are positioned to the right. Guide the edge of the fabric along the inner edge of the presser foot. If you alter the stitch width, the right-hand needle position remains the same; the other side of the stitch is further to the left if its width is increased or further to the right if reduced.
Stitches 19 - 27 / see overview of stitches.
Utility
This menu provides a selection of stitch types that you can use for a variety of sewing techniques.
Stitches 30 - 46 / see overview of stitches.
Buttonholes
This menu provides a selection of 12 different buttonholes and one program for sewing on buttons. Each buttonhole type is designed for a specific application and fabric. Use the buttonhole Sensormatic guide to sew your buttonholes accurately.
Stitches 47 - 59 / see overview of stitches.
Darn/Bartack
This menu provides a selection of bartacks. The various different bartacks are for reinforcing pocket corners, skirt plackets/slit and attaching belt loops.
The fully automatic darning programs are for repairing damaged areas and darning tears or small holes.
Stitches 60 - 66 / see overview of stitches.
9mm Decorative stitches
This menu provides a selection of all decorative stitches up to 9 mm wide. Especially nice for sewing borders.
They are sub-divided into eight different categories for ease of selection.
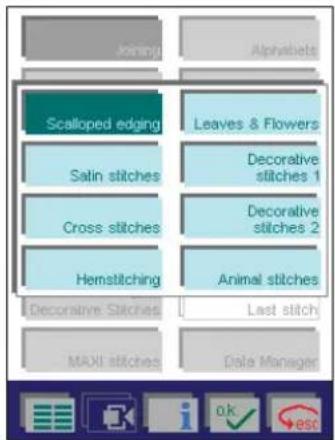
flowchart
graph TD
    A["Scalloped edging"] --> B["Salin stitches"]
    B --> C["Cross stitches"]
    C --> D["Hemstitching"]
    D --> E["Decorative Stitches"]
    E --> F["MAXII stitches"]
    F --> G["Data Manager"]
    H["Alphabets"] --> I["Leaves & Flowers"]
    I --> J["Decorative stitches 1"]
    I --> K["Decorative stitches 2"]
    I --> L["Animal stitches"]
    M["Last stitch"] --> N["OK"]
    N --> O["esc"]
- Scallop edges, for sewing decorative edges on table linen or clothing. The various edgings can be combined. You can alter the density of the stitch, without changing the overall length. This allows you to use speciality threads.
Stitches 67 - 88 / see overview of stitches.
- Satin stitches have a three-dimensional look that offer a wide range of options for embellishing garments or items for the home. You can create additional effects by using a variegated embroidery thread. You can alter the density of the stitch, without changing the overall length. This allows you to use specialty threads.
Stitches 89 - 116 / see overview of stitches.
- Pre-programmed cross stitches allow you to create traditional borders. Individual cross stitches allow you to combine into a motif of your own design.
Note the starting and ending points. When completing the individual cross stitches, position the starting point of the next cross stitch at the ending point of the last cross stitch sewn. The starting and ending points are sed in red. For a more detailed description, see the Chapter 6, Embroidery Assistant.
Stitches 117 - 136 / see overview of stitches.
- Hemstitches allow you to create heirloom effects. These stitches are most effective when sewn with a wing needle on natural fabrics. Bed linens, delicate blouses and childrens garments are beautifully embellished using these stitches.
Stitches 137 - 146 / see overview of stitches.
• Leaves & Flowers can be sewn individually to create larger motifs. They are also ideal for decorative borders.
You can alter the density of the satin stitches, without changing the overall length. This allows you to use speciality threads.
Stitches 147 - 167 / see overview of stitches.
- 38 pictorial or three-dimensional decorative stitches (1) can be combined. You can alter the density of the satin stitches, without changing the overall length. This allows you to use speciality threads.
Stitches 168 - 196 / see overview of stitches.
- Decorative stitches (2), 26 floral patterns. You can alter the density of the satin stitches, without changing the overall length. This allows you to use speciality threads.
Stitches 197 - 222 / see overview of stitches.
- Animal stitches are especially suitable for children's garments. You can alter the density of the satin stitches, without changing the overall length. This allows you to use speciality threads.
Stitches 223 - 230 / see overview of stitches.
- Stitch Artist: For your creative 2144 a PC program has been developed, enabling you to create your own 9 mm stitches and maxi stitches or to modify existing stitches from the sewing machine.
Transfer stitches with the FileAssistant to the "Stitch Artist" stitch selection menu of your creative 2144. This will be found under "decorative stitches" in the main menu.
Note: The selection menu will not be displayed until the first design has been saved.
MAXI stitches
This menu provides a selection of stitches up to 60 mm wide. These stitches can be combined to form borders.
Stitches 231 - 260 / see overview of stitches.
Alphabets
This menu provides a selection of the machine's various fonts. Some font styles include upper and lower case letters, numbers and symbols.
See page 4-11
Embroidery / card
In this menu, you can select or combine embroidery patterns from a card or the machine's memory. You can also personalize your designs.
See page 4-13
Sequence/Combination
In this menu, you can
- create sewing sequences from the machine's stitches. Combinations of MAXI stitches and 9 mm stitches are possible.
See page 4-20
- create embroidery combination by combining built-in stitches, existing memory combinations and designs from creative cards. Embroidery combinations are embroidered using the embroidery unit.
See page 4-28
Selection by number
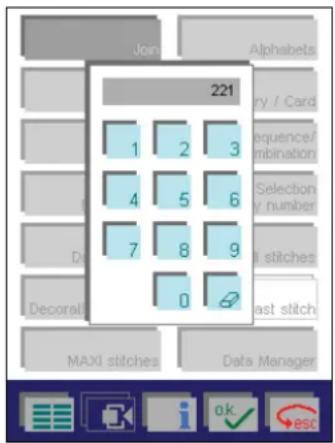
text_image
Join Alphabets 221 1 2 3 1 2 3 4 5 6 7 8 9 0 Entry / Card Sequence/mbination Selection number Di stitches Decorative Last stitch MAXI stitches Data Manager
Enter the stitch number and confirm by touching
. Touch to delete an incorrect number. If you enter more than three digits, the first digit will disappear from the
window. Touch ▶ esc to close the window without making a selection.
All stitches
In this menu, all stitches are displayed one after another in numerical order. You can browse through the menu one page at a time by touching the page symbols. To select a stitch, touch the icon for that stitch.
Last stitch
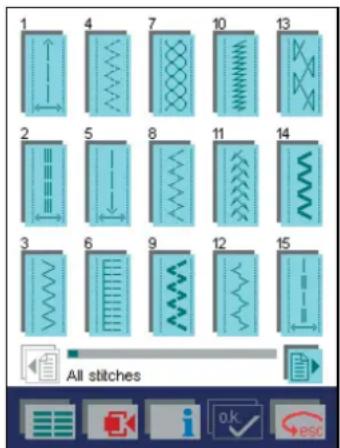
text_image
1 4 7 10 13 2 5 8 11 14 3 6 9 12 15 All stitchesIn this menu, the stitch that was last sewn before your Pfaff creative 2144 was turned off is automatically opened.
Creative Data Manager
The Creative Data Manager organizes your Pfaff creative 2144's stitches. Here you can organize stitches, stitch sequences, "personal menus", and programs as the "Patchwork" program.
You have access to the following functions:
- Personalized stitches can be saved and renamed, copied or deleted.
- Designs can be copied from a card to a creative memory card.
- Sequences/combinations can be renamed, altered or deleted.
- Personal menus can be altered, renamed or deleted.
- New directories and sub-directories can be created in the machine or on a creative memory card.
- Data in the memory can be accessed.
- Individual stitches or designs within a sequence/combination can be accessed.
- An entire directory can be accessed. Your Pfaff creative 2144 is always ready to sew, even when the Creative Data Manager is open (see page 4-36).

natural_image
Woman in a patterned sleeveless dress examining a blue embroidered garment (no visible text or symbols)The Creative Assistant
There is a Creative Assistant function in your sewing machine to help you; it can be called up at any time by tou-
ching the i icon in the tool bar.
The menu then changes color, and the functions assigned to the icons in the tool bar change.

flowchart
graph TD
    A["Join"] --> B["Overcast"]
    B --> C["Utility"]
    C --> D["Buttonholes"]
    D --> E["Darn/Bartack"]
    E --> F["9mm Decorative Stitches"]
    F --> G["MAXI stitches"]
    H["Alphabets"] --> I["Embroidery / Card"]
    I --> J["Sequence/ Combination"]
    J --> K["Selection by number"]
    K --> L["All stitches"]
    L --> M["Last stitch"]
    M --> N["Data Manager"]

Touch this icon to close an information panel or exit the Pop-up Direct Help

Touch this icon to close the entire information mode.

Touch this icon to open the Sewing and Embroidery Assistant
Sewing Assistant
This contains an entire encyclopedia of sewing. It also demonstrates and describes in detail various sewing techniques that are possible with your Pfaff creative 2144.
Embroidery Assistant
This provides you with information on hooping different fabrics, information on stabilizers, threads and special materials for a wide range of fabrics, and details of which sewing machine accessories to use.

Touch this to open the Machine Assistant. This contains comprehensive technical information together with many color diagrams on all mechanical functions such as threading, bobbin winding, etc.

Touch this icon to open the "context" Machine Settings menu for the Creative Assistant. It provides a brief description of the icons in the tool bar. It also allows you to reactivate any deactivated menu information items.
3-14
3. Getting started with your Pfaff creative 2144
If you touch in the main menu, the Creative Assistant provides a brief description of the icons in the tool bar.


Touch esc, to close the information screen without exiting the Creative Assistant. This allows you to access further information by touching a menu.

to close the Creative Assistant in order to action menu.
If you touch on the stitch.

in a menu, you are shown information
Touch select a stitc
to close the Creative Assistant in order to
Each individual help function can be permanently deactivated. The following query appears in each information panel:
"Always show this information?"
Switch on again in the context menu!"
Then confirm with Yes / No

when a stitch is selected, you are shown
If you touch
information on the individual working steps (programming a buttonhole).
If a single stitch is selected, you get a short information message about what presser foot to use and whether or not the IDT-system should be activated.

to close the pop-up information without exi-
Touch → to close the pop-up information without exiting the Creative Assistant.
You can call up information on all sewing functions and icons. To do this, touch the icon for which you require information.
Instructions on using the Creative Assistant Pop-up Direct Help
To illustrate the Creative Assistant's Pop-up Direct Help feature we will use the buttonhole menu.

icon in the main menu, the Creative
Assistant provides a brief description of the tool bar icons. The tool bar changes color, and the functions assigned to the icons change.

text_image
By touching the icon for the desired category, you enter the mode for selecting stitches or patterns. Individual stitches can be selected by simply touching the desired icon. When a stitch is selected, a window will open allowing you to alter various settings and sewing functions. If you confirm the changes by touching OK, the window will close and your settings will be saved. If you begin sewing before touching the OK icon, all changes will be saved but the window
Touch to close the screen without exiting the Creative Assistant.
This allows you to access further information by touching a menu.
In the following screen, we have opened information by
touching Buttonholes.

text_image
This menu provides a selection of 12 different buttonholes and one program for sewing on buttons. Each buttonhole type is designed for a specific application and fabric. Use the buttonhole Sensormatic guide to sew your buttonholes accurately.
to close the screen without exiting the Creati-
This allows you to access further information by touching a menu.
to close the Creative Assistant in order to
select a menu.
3. Getting started with your Pfaff creative 2144

Now touch i. Touch any buttonhole icon for further information.
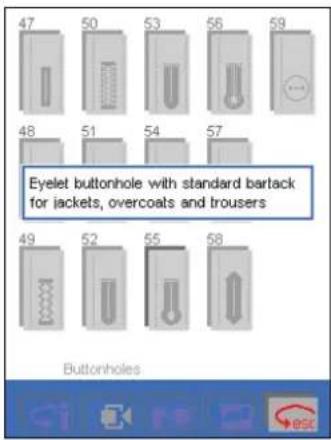
text_image
47 50 53 56 59 48 51 54 57 Eyelet buttonhole with standard bartack for jackets, overcoats and trousers 49 52 55 58 ButtonholesYou are given information on the characteristics and uses of the buttonhole.
Touch Esc to close the screen without exiting the Creative Assistant.
This allows you to select information on another buttonhole.
Touch 📄 to close the Creative Assistant in order to select a buttonhole to sew.
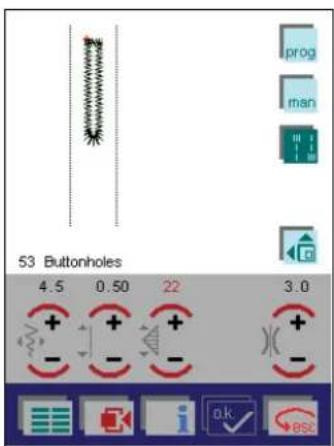
text_image
prog man 53 Buttonholes 4.5 0.50 22 3.0 + + + - - - - + + - - - ok ESCIf you touch 📄 while in the stitch options screen, you obtain further information on the selected buttonhole.
Touch to close the screen without exiting the Creative Assistant.
This allows you to access information on all functions and icons. To do this, touch the icon for further information.
Touch i to close the Creative Assistant.
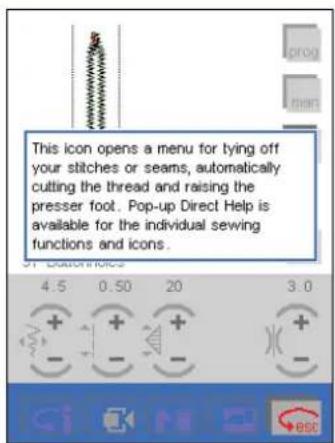
text_image
This icon opens a menu for tying off your stitches or seams, automatically cutting the thread and raising the presser foot. Pop-up Direct Help is available for the individual sewing functions and icons.In our example, the Pop-up Direct Help menu refers to the
icon, which is shown as active and selected.
There may be several pages of information. Use the arrow icons to scroll.
Touch esc to close the screen without exiting the Creative Assistant.
Touch 📄 to close the Creative Assistant.
Instructions on using your Machine Assistant
Your Machine Assistant contains comprehensive technical information, together with many color diagrams on all mechanical functions, such as threading, bobbin winding, etc.
Your Machine Assistant can be accessed at any time!
Touch to open the selection menu.
If you touch "Machine technique / Sewing", a front view of the machine appears.
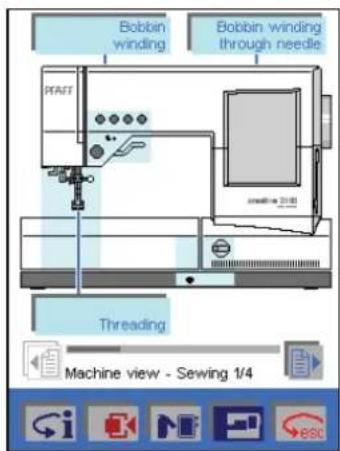
flowchart
graph TD
    A["Bobbin winding"] --> B["Threading"]
    C["Bobbin winding through needle"] --> D["Threading"]
    B --> E["Machine view - Sewing 1/4"]
Touch the page icons to scroll through the four views of your Pfaff creative 2144.
Areas of the machine are labeled and highlighted in color.
Touch an area for a close-up view. A description or additional selections will appear.

text_image
Needle threader Changing the needle Changing the presser tool Bobbin thread Inserting the bobbin Needle bar, bobbinGraphics and text will describe the function.
In our example, "Needle threader" has been touched.

text_image
In order to make threading the needle easy and quick, your PFAFF has a built-in needle threader. The needle threader allows you to thread the needle automatically. Lower the presser foot. Press the threader down with the handle. Threader hook R swivels through the needle eye. Needle threader 1/3Touch the page icons to scroll through multiple pages.
Touch
to return to previous screens.
Touch
to close the Machine Assistant.
Touch
to close the Creative Assistant.
Instructions on using your Sewing and Embroidery Assistant
Touch to open the selection menu.
Your Sewing and Embroidery Assistant can be accessed at any time!
If you touch "Sewing", the following screen appears:
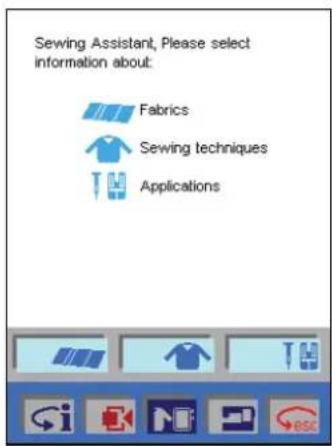
text_image
Sewing Assistant, Please select information about: Fabrics Sewing techniques ApplicationsYou have the possibility to call up sewing techniques that can be used for a special fabric, such as sewing a zipper in a pair of jeans.
You are also given information on the machine accessories to be used, whether the feed dog and the IDT system should be engaged, and which needle, thread tension and presser foot should be used.
Your "Sewing Assistant" is accessed with the icons at the lower edge of the screen.
Touch to select different fabrics.
Touch to access an encyclopedia of sewing techniques such as inserting zippers, sewing blindhems and creating different pocket styles.
Touch to access presser foot and needle recommendations. Also included are Integrated Dual Feed and tension suggestions.
All icons can be selected. There are different ways to obtain information. The different possibilities to seek information follows.
Touch, for example, and a pop-up information window appears. The other two icons become automatically inactive.
Touch to exit one or more screens or close a pop-up information window in order to select another icon, for example. If several screens are open, you return
to the previous opened one. Then touch ▶esc again.
The three icons can be selected in any order.
1.
- You can begin by selecting your Fabric type and then touch Sewing Technique to access your desired step-by-step instruction.
- You can choose your sewing project and attain information about the different working steps.
- Touch to return (side by side) to the main Sewing Techniques screen. You can then touch "Applications" to obtain presser foot and needle recommendations, information whether or not the feed dog should be activated, as well as Integrated Dual Feed and tension suggestions for your specific fabric.
2.
- If you begin by touching "Sewing techniques", the entire directory of sewing techniques is opened.
- Touch ->esc to return to the main Sewing Techniques screen. You can then touch "Applications" to obtain presser foot and needle recommendations, information whether or not the feed dog should be activated, as well as Integrated Dual Feed and tension suggestions for the sewing project.
3.
- If you select a stitch before opening your Sewing Assistant, you can touch "Applications" and you will obtain presser foot and needle recommendations, information whether or not the feed dog should be activated, as well as Integrated Dual Feed and tension suggestions for your stitch.
- If you touch the "Auto. Prog." Icon, additional stitch options will be displayed.

allows you to return to the previous screen.
Touch to close your Sewing Assistant.
Touch i to close your Creative Assistant.
If you are in your Sewing/Embroidery Assistant, touch "Embroidery". The following screen appears.

text_image
Embroidery Assistant, Please select information about: Fabrics Embroidery techniques ApplicationsYour "Embroidery Assistant" is accessed with the icons at the lower edge of the screen.
Touch 📄, a list with fabrics appear. Select your fabric, to call up information about how to hoop your specific fabric with the proper stabilizer.
Touch to access general information on stabilizers and threads.
Touch to access information on how to embroider separate color segments, one color embroideries and multi-color embroideries.
- Touch, and a pop-up information window appears. The other two icons become automatically inactive. - Touch to exit a screen or close a pop-up information window in order to select another icon, for example. If several screens are open, you return to the previous opened one. Then touch again.
The three icons can be selected in any order.
1.
- Touch "Fabrics" to select your fabric type. Touch your fabric, you will receive precise instructions on how to hoop your fabric to obtain optimum embroidery results.
2.
- Touch "Applications", you will receive information on what thread tension, needle and presser foot you should use.
Additionally you can receive information about how to embroider single color segments, single and multi-color embroideries.
3.
- If you touch "Embroidery techniques", you obtain general information on different stabilizers and threads.
You are also given an overview of additional stabilizers to change the embroideries and give them a new effect. These materials should be selected individually. Touch the corresponding icon for the desired material.

allows you to return to the previous screen.
Touch

to close your Embroidery Assistant.
Touch

to close your Creative Assistant.
The “context” Machine Settings menu
You can adjust basic settings of the machine, such as "Language", or permanently alter basic stitch settings, such as the stitch length or the thread tension.
All "context" Machine Settings are not available in all menus.
You can create and select your "Personal Menu" as your opening screen.
- When you have opened the context menu, the icon is shown as active and selected.

Touch this icon again to close the menu.
- Touch to confirm and close a window.
You can open several dialogue windows in succession in order to adjust various functions, for example in the
"Audio signal" menu. Touch to confirm and close. Your settings are saved.
- Touch → esc to close a window without settings being saved.
- Exception: When turning the opening screen on and off, you close the context menu by touching OK.
Turning off the opening screen

text_image
Select language Audio signal Creative card Welcome- screen off Back to default setting Options for messages Edit Insert Help Help Help Help Help Help Help Help Help Help Help Help Help Help Help Help Help Help Help Help Help Help Help Help Help Help Help Help Help Help Help Help Help Help Help Help Help Help Help Help Help Help Help Help Help Help Help Help Help Help Habets Card Sequence/ Animation Selection: Number Stitches Last stitch ManagesIf you touch the "Welcome screen off" icon, the icon is shown as active.
If you touch OK to confirm your selection, the context menu will close.
When the machine is turned on, the main menu will appear.
The Welcome Screen is reactivated by touching the icon again.
Touch OK to close the context menu.
The functions in the "context" Machine Settings menu
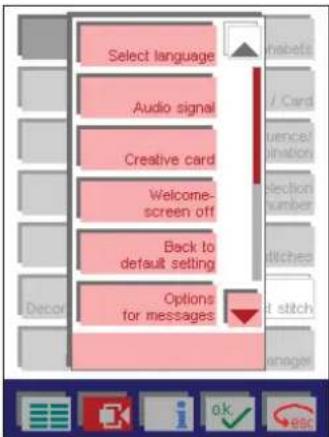
text_image
Select language Audio signal Creative card Welcome-screen off Back to default setting Options for messages Edit Edit Edit Edit Edit Edit Edit Edit Edit Edit Edit Edit Edit Edit Edit Edit Edit Edit Edit Edit Edit Edit Edit Edit Edit Edit Edit Edit Edit Edit Edit Edit Edit Edit Edit Edit Edit Edit Edit Edit Edit Edit Edit EditWindows for altering your basic settings or functions are opened with the various icons in the main menu.
Language
In this menu, you can select the language of your Pfaff creative 2144. Touch the language of your choice and the button is shown as active.
Touch OK to confirm your selection and close the window.
Audio signal
text_image
Buttons Click1 Buttons Click2 Buttons Beep Messages Gong Messages Ding Dong Message Beep Audio signal habeats Card Ueno#tion Selection number Witches Not stitch ManagersDifferent audio signals can be heard when you touch icons or when screen messages appear. You can select your personal audio signals.
- To turn the signals on, touch the icon with the desired audio signal (this becomes active and selected) and
touch to confirm.
- Touch your selected audio signal icon again to turn off the signal (it becomes active).
- Or select a different signal (the button becomes active and selected).
Touch to confirm your selection and close the window.
Creative Memory Card
In this menu, you can format a creative memory card or change the name on a card.
Touch the appropriate card drive icon.
A window opens where you can choose between two options: "Change name" and "Format". Touch to select.
- If you touch "Change name", a field opens where you can enter a new name. The name can have a maximum length of 20 characters.
Touch to confirm your selection.
- If you touch "Format" a safety question appear:
The card is not empty! Will you really format? (all data will be deleted)
Touch to delete all information from the creative memory card.
Back to basic settings
- This function allows you to reset all machine settings that you have previously changed, such as the stitch settings or sewing functions, to the default settings.
- You can reactivate the information texts. All texts are then shown automatically.
Touch to confirm.
Setting the bobbin winding speed

text_image
Save parameter Slow Medium Fast Show dialog Winding speed 1 Join 4.5 3.0You can select the speed at which the bobbin is wound when the machine is stopped.
You can choose between 3 different speeds, "low", "medium" and "high".
If you touch the "Show dialogue" icon, a window for selecting the speed opens each time the bobbin winder is switched on.
The selected speed can be halved at any time by touching the icon.
Note: If you wind the bobbin while the sewing machine is running, the winding speed is automatically set at "low".
Needle Up /Down - raising the presser foot
You can determine how high the presser foot should raise automatically by touching the icon.
If you touch "0", "low", "medium" or "high", the presser foot is raised automatically to the selected position, when you take your foot off the foot control.
The window for setting the presser foot height will not be opened.
If, in addition, you touch the "Show dialogue" icon, the window for setting the presser foot height will always open when you touch the 📄 icon.
The selected presser foot height will always be retained as a new presetting.
The sewing machine is ready to sew immediately.
text_image
no Low Medium High Show dialog Raise presser foot 1 Join 4.5 3.0 + - i o.k estCode

text_image
Audio signal Enter Delete After Code CodeThe code function allows you to lock your Pfaff creative 2144.
Your machine's main menu will not appear until your security code has been entered accurately.
Turn on the machine and enter your code. Confirm your
selection with

The code must have at least four digits, and no more than eight.
The asterisks change into plus symbols as the digits are entered.
Touch the "Delete" icon to delete the code that you have entered.
Touch the "Change" icon to enter a new code.
Thread cutter
text_image
Audio signal Back to default setting auto Off Thread cutter 1 Join 4.5 Options for messages 3.0You can turn off the thread cutter function permanently with this selection.
If you touch "Off" and confirm with 📋, the threads will no longer be cut, even if you have selected the icon in the "Tie-off program".
The standard setting is "auto" = the threads are automatically cut.
Creative Data Manager
You can open your machine's Creative Data Manager here. See Creative Data Manager, p. 4-36.
Personal Menu
You can save a selection of stitches in a "Personal Menu". For example, you might want to create a "Personal Menu" for all the stitches you need for sewing garments. It could also be a stitch that you use so frequently you want it to appear directly when you turn on your Pfaff creative 2144.
You can create several "Personal Menus".
- You do this by opening a section of the Creative Data Manager in which you can create a new "Personal Menu" or modify an existing one.
- You can select one of your "Personal Menus" as your opening screen. Select the "Personal Menu" of your choice and touch "On/Off"
Creating a "Personal Menu"

text_image
1PERS MEN [ . ]Touch the "New" icon to create a new "Personal Menu".
The following message appears:
"Select the stitches you wish to have as the start menu."
Touch OK to confirm.
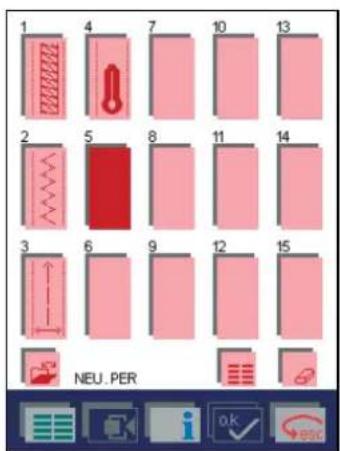
text_image
1 4 7 10 13 2 5 8 11 14 3 6 9 12 15 NEU. PERTouch the icon.
3. Getting started with your Pfaff creative 2144
- Select your desired category and stitch selection. Stitches up to 9 mm can be saved.
- Your stitch will appear.
- The next available space is automatically highlighted. You can select a different empty space by touching to highlight it.
- Touch the icon to select each additional pattern that you wish to store in the "Personal Menu".
Touch 📄 to open a window that allows you to open, save, delete or close a "Personal Menu"

text_image
Open Save Save as Close DeleteOpen
Opens the machine's memory in order to select a previously created "Personal Menu".
Use the arrow icons to scroll through and select your "Personal Menu" in the Creative Data Managers directories.
The "Personal Menu" appears on the screen when the icon is touched.

Save
You can save your settings under an existing name.
The previously saved settings will be automatically replaced with the changes.
Save as
Choose this option to overwrite settings in an existing "Personal Menu" or save your settings with a new name. A message will appear to confirm your selection. Touch

to confirm and save.
If you choose to save the settings under an existing name, the settings will be saved to the existing directory.
If you choose to save the settings under a new name, the menu for input of the name is opened.
Select a name that is maximum eight characters long.
If you touch the icon, a window for selecting the directory opens.
You can save the settings to the machine or card. Select the directory using the arrow icons.
Confirm your input with (A directory can only be created in the Creative Data Manager).
Close
If you have saved your settings, this function closes the menu.
If you have not saved your settings, a message box appears.
Delete
You can delete a "Personal menu". Touch "Delete" to delete the Personal menu, a message box appears.
to delete the Personal Menu.

if you do not want to delete the Personal
You can also delete the Personal Menu by touching

The following message appears on the screen:
"The file has been changed. Save changes?"
to open a window for opening, saving, deleting the program.
Touch

to close the window without saving any changes.
Modifying a "Personal Menu"

text_image
I PERS MEN [..]You can modify a "Personal Menu" that you have already saved by using the "Edit" icon.
The menu's overview of stitches is opened.
- Touch the field with the stitch that you would like to alter. The selected field is highlighted.
- The icon opens a variant of the main menu.
- By selecting the desired category and the stitch selection, you can select the stitch directly. Stitches up to 9 mm can be saved.
The old stitch is replaced by the new one.
3-22
- Touch an additional field; it is now highlighted and can be modified.
- Touch 📁 icon to call up each additional pattern that you wish to modify in the "Personal Menu".
Calling up a "Personal Menu"
You can call up an existing "Personal Menu" via

Touch a stitch to open the screen for that stitch.
The machine is now ready to sew.
"Copying to the Personal Menu"
Unlike the "Personal Menu" (see page 3-20), created in the main menu, you can save different settings for the selected stitch (also maxi stitches) on the processing screen. You can also save buttonholes, a programmed setting for darning or stitches created in the "four sewing directions" program.
"Copy" those settings in an already existing "Personal Menu" or create a new one.
For that purpose, adjust the stitch settings for your design according to your choice or program your settings in the "darning" or "four sewing directions" program and open the context menu and "Copy to Personal Menu" in the processing screen.

text_image
I/PERS_MENU [..]Create a new "Personal Menu" by touching "New", or use the arrow icons to select an existing "Personal Menu", and touch "Edit".
Touch an available space and the stitch will appear there.

text_image
1 4 7 10 13 2 5 8 11 14 3 6 9 12 153. Getting started with your Pfaff creative 2144
If you have selected "New", you leave the menu as described in "Creating a Personal Menu". See page 3-20.
If you have selected "Edit", confirm your input and at the
same time close the "Personal Menu" with

With esc you interrupt the process.
Options for messages
You can switch off the messages that automatically appear in the machine.
You can specify whether the machine should stop for various reasons.
These settings can be determined individually for sewing and embroidering.
Touch the "Sewing" or "Embroidery" icon to decide if the settings should be valid for sewing or embroidering. This enables you to switch between the sewing and embroidery settings.
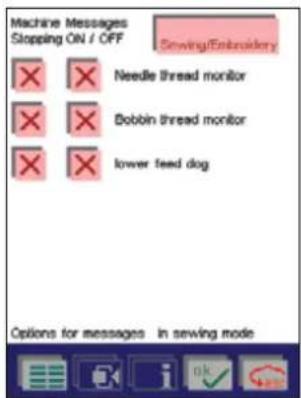
text_image
Machine Messages Stopping ON / OFF Sewing/Extroubledry Needle thread monitor Bobbin thread monitor lower feed dog Options for messages in sewing mode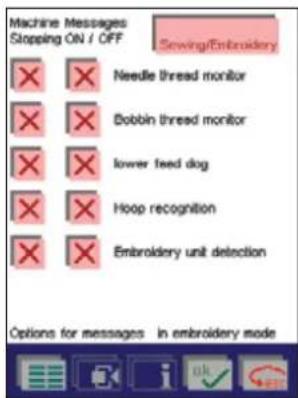
text_image
Machine Messages Stopping ON / OFF Sewing/Embroidery Needle thread monitor Bobbin thread monitor lower feed dog Hoop recognition Embroidery unit detection Options for messages in embroidery modeA X in the icon means that the function is switched on.
Touch that icon to switch that function off. The X in the icon goes out.
All functions are active as standard.
Machine test
This function is solely for the use of service technicians, for checking that your machine is functioning properly.
Demo
You can program a demonstration of the machine into your creative 2144 and replay it permanently. This demo is intended for use in the Pfaff dealer store.
Programming of a demo
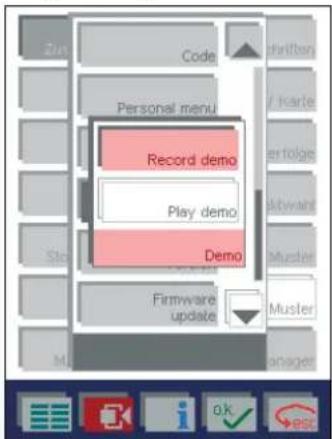
text_image
Zin Code Personal menu Record demo Play demo Demo Firmware update Muster Managers ok BSEFor programming a "demo", touch the "Record demo" icon.
The opening screen appears instantly.
Now you can operate your creative 2144 completely normally and thus compose a demonstration.
With the "reverse sewing button" you finish and save your "demo".
Note: The length of the programmed demo reduces the memory capacity for saving stitch patterns permanently in the sewing machine.
Playing a demo

text_image
Code Personal menu Record demo Play demo Demo Fintware update habets Card vence anation lection number stitches stitch DesignerFor playing your demo, touch the "play demo" icon. Close it with the reverse button.
Version
The current software status of your machine is shown here.
Firmware update
With this function, you can import the latest program version for your Pfaff creative 2144 with an interface card from the PC. Instructions on how to update can be downloaded from the Pfaff home page together with the latest program.
For the latest information about your Pfaff creative 2144, go to www.pfaff.com or contact your local Pfaff dealer.
Saving settings:
If you touch the "Save settings" icon, all altered settings and functions will be saved.
Note: If you have adjusted a program, also that adjustment is saved.
Restore settings :
If you touch the "Restore settings" icon before you leave the processing screen of a stitch, all settings and sewing functions relative to that stitch will be restored to the values set at the factory.
Note: If you have closed a program, also that setting is saved.
Edit hoop size
This function enables you to modify hoop dimensions that you yourself have entered.
A window is opened, letting you select the hoop to be modified.
Note: Only hoop sizes that you yourself have entered are shown in this menu.
Select the hoop to be modified; a window appears, letting
you overwrite the entered hoop size. Touch to confirm your input.
Information for Sequence/Combinations

text_image
Back to default setting Options Actual: 2 Selected: 2 Num of entries: 3 Length over alt: 218,0 mm Width over alt: 134,6 mm 225x140 mm Data Manager NEW.ESQIn the Context menu, touch the “information” icon. You get information about the number of designs (Num of entries: = 3) and the number of selected designs (Selected = 2).
"Actual" indicates the last selected design. This information can be selected only in the "Embroidery combination" and "Stitch sequence" menus.

natural_image
Interior scene with a glass coffee table, a red glass of pomegranate, and a decorative red flower lamp on a patterned tablecloth (no text or symbols visible)Operating the
multi-color touch screen
A welcome screen appears when you turn on your Pfaff creative 2144.
You can change the screen contrast with the contrast control dial (25).
text_image
PFAFF creative i Information Main menu Last stitchSelecting the zigzag stitch
Touch to enter the main menu.

text_image
Join Overcast Utility Buttonholes Darn/Bartack 9mm Decorative Stitches MAXI stitches Alphabets Embroidery / Card Sequence/ Combination Selection by number All stitches Last stitch Data ManagerTouch "Joining"
Stitch menu

text_image
1 4 7 10 13 2 5 8 11 14 3 6 9 12 15 JoinTouch zigzag stitch No 3.

text_image
3 Join 4.0 1.5 4.0 + + - - + - ESCWhen you open the zigzag screen, the most important settings are visible.
You can call up further functions with the icon.

text_image
3 Join 4.0 1.5 4.0 + + - - + - OK ESCTouch the icon again to close this.
Altering stitch settings

Stitch width
You can change the stitch width with the +/- icons.

Stitch length
You can change the stitch length with the +/- icons from 0,2 mm to 6 mm.
We have preset the length to 6 mm. This is the maximum value possible. If you have selected this value, the function is automatically shown as inactive.
The stitch length is reduced in small steps and has a minimum value of 0.2 mm.

Thread tension
You can change the thread tension as needed for speciality techniques.
We have increased the tension to 4.
If you have selected the maximum value, the function is automatically shown as inactive.
The stitch settings will not be changed permanently. The next time the stitch is opened, the stitch length will automatically be restored to 1.5 mm, the stitch width to 4.0 mm and the tension is set to a value of 4.0.
If you open the context menu 📄, you have the possibility to permanently save the changes for the zigzag stitch.
Setting sewing functions and programs
You can alter settings and sewing functions of the zigzag stitch. Simply touch 📋 for the different choices.
Example: Tapering

Tapering is a technique where the width of the zigzag stitch is altered during sewing. Your Pfaff creative 2144 allows you to select different effects or angles which are sewn automatically.
Zigzag stitch No 3 and Purl stitch No 10 in menu "Join" taper from the center needle position.
Touch icon.
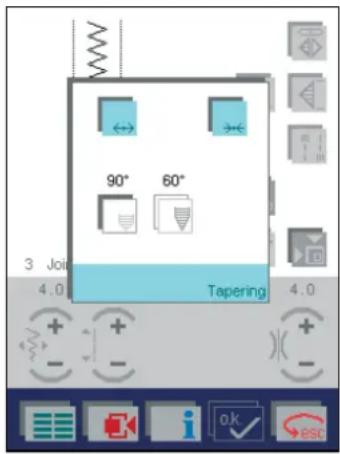
text_image
90° 60° 3 Join 4.0 Tapering 4.0The width of the zigzag starts at 0 mm, and becomes wider until the previously selected stitch width is reached. If you press the reverse key, the width is automatically reduced to 0 mm.
The width of the zigzag stitch tapers to 0 mm and stops. For mitered corners, pivot your fabric and continue stitching. The stitch will automatically become wider as you sew.
The stitch width is reduced to 0 mm at an angle of 30^ .
The stitch width is reduced to 0mm at an angle of 45^ .
Save your change by touching OK, the window is then closed.
Touch esc, the window is closed without any changes being saved.
Touch to return to the main menu.
For a symmetrical stitch layout at 90^ and 60^ angles, tapering is available for the following stitch patterns.
• 4, 6, 9, 12, 14, 33, 34, 41, 42, 112, 130, 133, 137, 139, 141, 169, 177, 194.
Unlike the no. 3 and 10 zigzag stitches, the stitches are not automatically adjusted to 0.35/0.4 mm stitch length and 7 mm stitch width.
Zigzag stitch with right needle position

text_image
Join Overcast Utility Buttonholes Darn/Bartack 9mm Decorative Stitches MAXI stitches Alphabets Embroidery / Card Sequence/ Combination Selection by number All stitches Last stitch Data ManagerTouch "Overcast".
Touch the zigzag stitch No 22. This zigzag stitch is sewn
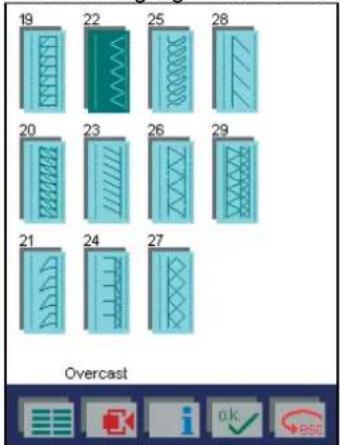
text_image
19 22 25 28 20 23 26 29 21 24 27 Overcastalong the right edge of the presser foot.
The settings that can be altered for stitch No. 22 are the same as for stitch No. 3 and No 10.

text_image
22 Overcast 4.0 1.5 4.0Tapering
With stitch No. 22, the right-hand position of the needle remains constant; the left-hand position changes.
text_image
60° 45° 30° Tapering 22 Ov 4.0 4.0
The width of the zigzag stitch starts at 0 mm and becomes wider until the previously selected stitch width is reached. If you press the reverse key, the width is automatically reduced to 0 mm

The width of the zigzag stitch tapers to 0 mm and stops. For mitered corners, pivot your fabric and continue stitching. The stitch will automatically become wider as you sew.


Use the icon to reverse the needle position. The corner is turned in the other direction.
Save your change by touching OK, the window is then closed.
Touch → esc, the window is closed without any changes being saved.
Touch to return to the main menu.
For an unsymmetrical stitch layout at 90°, 45° and 30° angles, tapering is available for the following stitch patterns.
• 31, 44, 45, 131, 132, 134, 144, 170.
Unlike the no. 3 and 10 zigzag stitches, the stitches are not automatically adjusted to 0.35 mm stitch length and 7 mm stitch width.
Selecting decorative stitches
Touch to enter the main menu.
text_image
Join Overcast Utility Buttonholes Darn/Bartack 9mm Decorative Stitches MAXI stitches Alphabets Embroidery / Card Sequence/ Combination Selection by number All stitches Last stitch Data ManagerTouch "9 mm Decorative stitches".
The decorative stitches are sub-divided into eighth different categories for ease of selection.
text_image
Join Alphabets Scallop edges Leaves/Flowers Satin stitches Decorative 1 Cross stitches Decorative 2 Hemstitches Animal stitches Decorative Stitches Last stitch MAXI stitches Data ManagerTouch "Scalloped edgings" and choose from 22 different stitches.

text_image
67 70 73 76 79 68 71 74 77 80 69 72 75 78 81 Scallop edgesYou can browse one column at a time with the cursor keys. You can also use the bar between the cursor icons: touch it gently and drag it to the right.
Touch scallop No 70 to open it. The most important settings are visible.
text_image
70 Scallop edges 9.0 0.35 20 3.0You can alter further settings and sewing functions of
the decorative stitch. Simply touch 📋 for the different choices. Touch the icon a further time to close the selection.

text_image
70 Scallop edges 9.0 0.35 20 3.0Altering stitch settings
Stitch width
Increase or reduce the width of the stitch with the +/- icons.

Stitch length

Alter the density of the decorative stitch with the +/- icons. The density is pre-set to 0.35 mm. Changing this setting affects the overall pattern length.

Pattern elongation
You can elongate the pattern with the +/- icons. Elongating the pattern does not change the stitch density.

Thread tension
Thread tension can be changed for speciality techniques.
The stitch settings will not be changed permanently. The next time the stitch is opened, the stitch length will automatically be restored to 0.35 mm, the stitch width to 9.0 mm and the tension is set to a value of 3.0.
If you open the context menu 📄, you have the possibility to permanently save the changes for the stitch.
Buttonholes
There are twelve different buttonhole styles and one program for sewing on buttons.
Thanks to the sensor technology in your Pfaff creative 2144, you can sew perfect buttonholes on even the most difficult fabrics such as velvet, plush, knit fabrics and heavy knits.
See page 5-9 for instructions on changing to the buttonho-

flowchart
graph TD
    A["Join"] --> B["Overcast"]
    B --> C["Utility"]
    C --> D["Buttonholes"]
    D --> E["Darn/Bartack"]
    E --> F["9mm Decorative Stitches"]
    F --> G["MAXI stitches"]
    H["Alphabets"] --> I["Embroidery / Card"]
    I --> J["Sequence/Combination"]
    J --> K["Selection by number"]
    K --> L["All stitches"]
    L --> M["Last stitch"]
    M --> N["Data Manager"]
le foot and inserting the buttonhole sensormatic guide.

text_image
47 50 53 56 59 48 51 54 57 49 52 55 58 ButtonholesTouch "Buttonholes". Each buttonhole style is described in chapter 1, "Introduction".
Touch buttonhole No 47

text_image
47 Buttonholes 4.0 0.35 16 3.0The most important set- tings are visible.
Touch to select more options for each buttonhole. Touch the icon again to close.
You have two ways to determine the buttonhole length
- Enter the length of the buttonhole directly on the screen in mm.
Touch the +/- icons on the stitch elongation icon to adjust buttonhole length. The butonhole will be sewn automatically.
- Set the length of the buttonhole while sewing.
Touch prog.
Sew the forward buttonhole seam, then press the reverse button when you reach the correct buttonhole size. The machine sews the bartack and the reverse buttonhole seam, and automatically finishes.
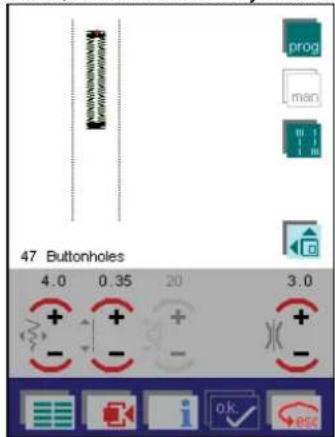
text_image
47 Buttonholes 4.0 0.35 20 3.0The buttonhole length is saved automatically. That is the meaning of the mark that appears in the prog icon. Repeat the programmed buttonhole as often as desired.
Touch prog to clear the size.
Finishing the buttonhole by manual setting
You can determine the length of the reverse buttonhole seam yourself by using the man icon. Use this method for any buttonhole.
Screen when setting the length with

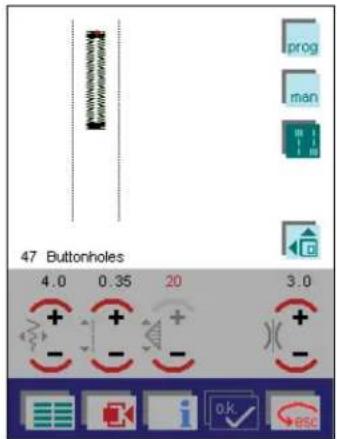
text_image
prog man 47 Buttonholes 4.0 0.35 20 3.0 + + - + + - + + - +Screen when setting the length with


text_image
prog man 47 Buttonholes 4.0 0.35 16 3.0 + + - + + - + + - +Touch man anytime before or during sewing the buttonhole.
Add the second bartack at the end of the reverse seam by pressing the reverse button.
How to correct the buttonhole
Correct the buttonhole balance by touching

The number of stitches is increased or reduced according to the correction value that you have entered. The correction value is expressed by percentage.
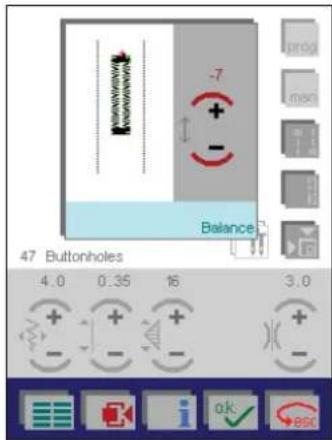
text_image
-7 + - Balance 47 Buttonholes 4.0 0.35 16 3.0Sew a sample buttonhole. Use the +/- icons to recreate your sample on the multi-color touch screen. The button-hole is then adjusted automatically according to the correction value.
By using the Sensormatic guide you will obtain uniform looking buttonhole seams.
Touch 📄 to return to the selection menu for selecting a new stitch.
Touch to return to the main menu.
Tip: To find more information about buttonholes, please advise your Creative Assistant and/or pages 5-9 - 5-11.
Sewing-on buttons
With stitch 59, you can easily sew on two and four hole buttons.
The number of stitches used to fasten the button are pre-set to three. A tie-off is automatically made at the start and at the end of the program. You can also select the program for cutting off the threads and lifting the presser foot.
Touch 📄, to open a window to specify the number of stitches according to your own wishes. Use the +/- icons to specify a number of stitches between 3-9. The selected number of stitches are visible on the screen.

text_image
59 Buttonhole Single stitch program 4.0Touch to close the window and save your settings.
Touch to close the window without saving your settings. The button is sewn with the pre-set number of stitches (3).
(For sewing instructions see page 5-12)
The first chapter of this manual is an overview chapter. Here you can find information about the parts of your Pfaff creative 2144 and all stitches stored in it. There is also an explanation about the different icons appearing in the different menus/screens.
Please keep these pages available for reference when using the machine.
The machine has a Pop-up Direct Help feature for the individual sewing functions and icons.
To use it, touch i when in a stitch, then touch the icon for which you require an explanation.
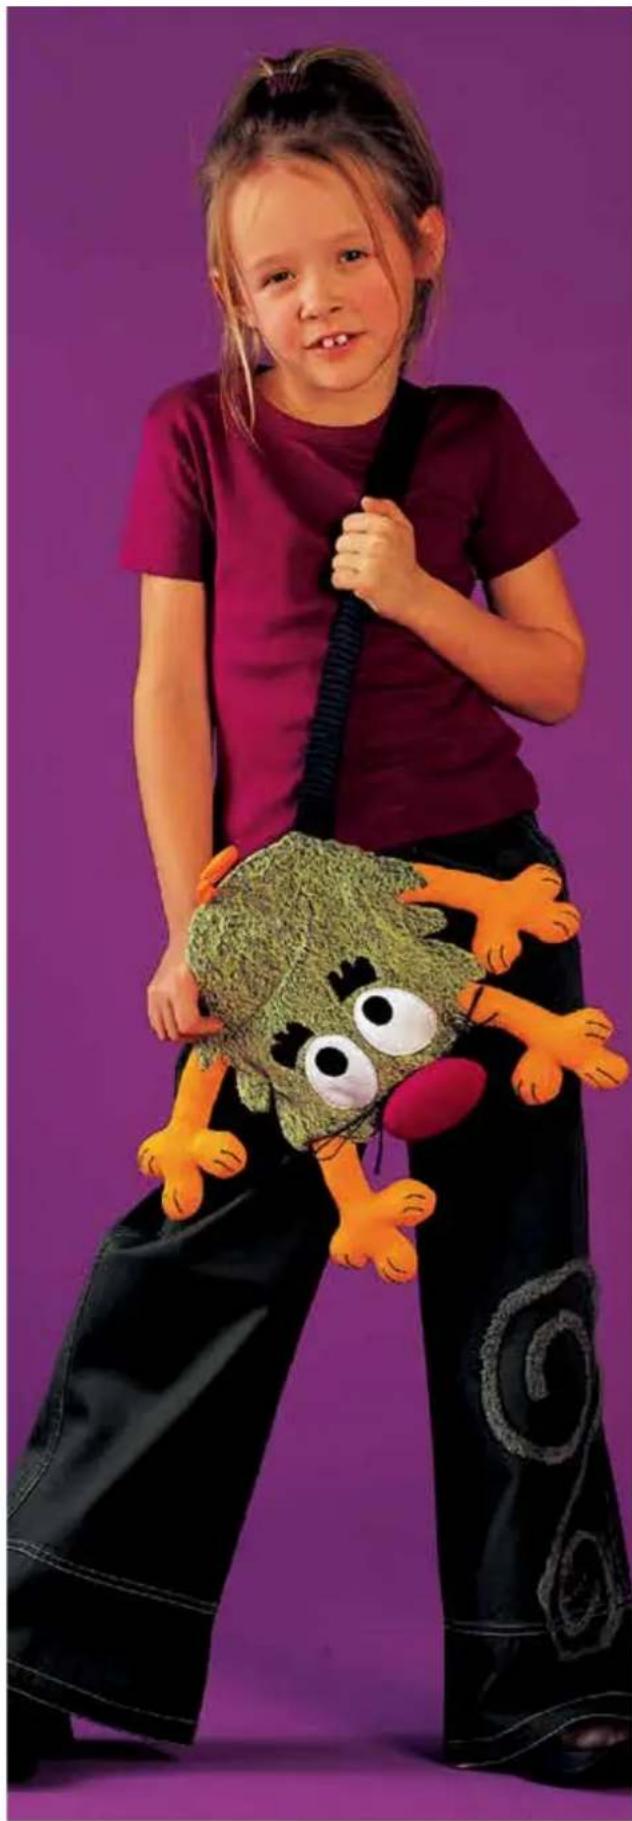
natural_image
A young girl in a maroon shirt holding a green plush toy with orange feet, standing against a solid purple background (no text or symbols visible).Darning and Bartacking
(Free Motion Embroidery + Quilting)
This selection contains various manual and automaticdarning programs and various bartack programs.
The different darning programs are used according to the dimensions and fabric thickness of the damaged areas. The bartack programs are for reinforcing pocket openings, zippers or skirt slashes.
Touch Darn/Bartack on the main menu.
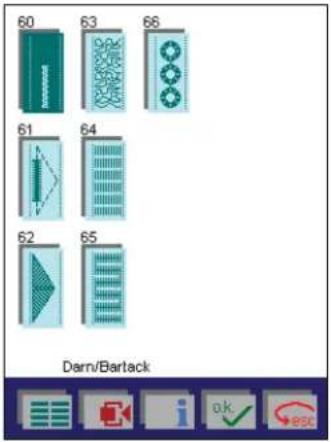
text_image
60 63 66 61 64 62 65 Darn/BartackThe Darn/Bartack stitches are described in chapter 1 (page 1-3).
Touch a bartack icon of your choice. The bartack width and length can be changed by touching the +/- icons.
Touch Esc to return to previous menu.
Automatic Darning
You can easily darn tears and holes with the automatic darkning programs, No 64 and 65 (see page 5-16).
Program No 64 is suited for darning damaged fabric in a lengthwise direction.
Program No 65 is suited for darning holes. It automatically sews over the damaged area lengthwise and crosswise.
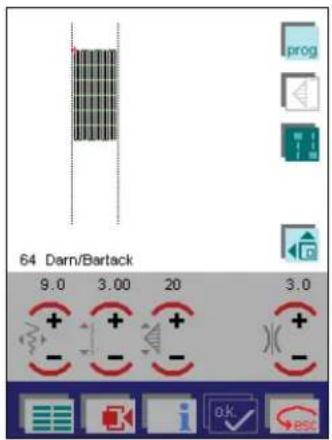
text_image
64 Darn/Bartack 9.0 3.00 20 3.0The shorter the stitch length, the denser the darning.

Use the +/- icons to adjust the stitch length.

Use the +/- icons to adjust the width of the darning area.
There are two possibilities to set the length of the darkning area.
1. Enter the length (in mm) of the area to be darned directly on the screen.

Use the +/- in this icon to set the length. Here, we have adjusted the length to 20 mm.
2. Program the length while sewing
Touch the prog icon to determine the length while sewing. Sew over the damaged area, press the reverse button when you have reached the desired length. The 2144 will now finish the darn.
The length of the darning program is saved automatically, and can be repeated. On the screen, this is shown with a red mark in the "prog" icon.
Touch the icon again to clear the program.
Free Motion darning / embroidery / quilting
With the darning or quilting foot you can stitch your own darning, quilting or embroidery patterns on every fabric (particularly on terry-cloth) without the feeding motion of the machine.
Free-hand guiding does, however, require a little practice.
Select straight stitch (No. 1) or zigzag stitch (No. 3).
Touch

text_image
1 Join 4.5 2.5 3.0 + + - - + - OK /ESCTouch to activate the free motion function.

text_image
0 Embroidery / Derning / Quilting Free motion 1 Join 4.5 2.5 3.0Select "Embroidery/Darning/Quilting"
Attach the darning foot (page 5-15) and lower the feed dog (page 2-12).
When you press the foot control, the darning foot automatically engages in the darning position and you can start darning.
You determine the stitch length and the stitch width by just moving the fabric.
After a few stitches, stop sewing, cut off the thread at the beginning, and resume sewing.
Tip: You will obtain a dense darning if you operate the machine at high speed while guiding the fabric slowly.
To turn the function off, touch 📁 and then "0". Confirm with OK. Do not forget to raise the feed dog.
By touching you switch back to the selection menu for selecting a new stitch.
By touching you switch back to the basic menu of the machine.
- For more detailed information on darning see pages 5-14 to 5-16.
- For more detailed information on quilting and free-motion embroidery see chapter 6.
The machine has a Pop-up Direct Help feature for the individual sewing functions and icons.
To use it, touch i when in a stitch, then touch the icon for which you require an explanation.
text_image
SonkeAlphabets
You can write an entire sequence of words using the machine's fonts and save it permanently in the machine's memory. There are also two Monograms in the machine (Maxi 1 and Maxi 2), that can be sewn as single stitches. All "Alphabets" are sewn with the feed dog engaged. The Integrated Dual Feed should be disengaged.
Touch the "Alphabets" icon.
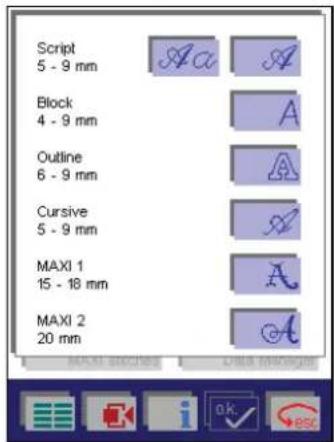
text_image
Script 5 - 9 mm Block 4 - 9 mm Outline 6 - 9 mm Cursive 5 - 9 mm MAXI 1 15 - 18 mm MAXI 2 20 mmSelect a font.

text_image
PFAFF CREATIVE 2144_ 1 2 3 4 5 6 7 8 9 0 . . . . 7.0 + ABC abc - Aa a 0-a 6 b 4 bTouch capital or lower-case letters, numbers or symbols to enter the desired character.
For editing a sequence, position the cursor below the character using the icons.
You can alter the font size, delete characters or insert characters.
If you add a character, it will be inserted to the left of the cursor.
Confirm the entry with OK. The sewing sequence is shown on the screen and you can now sew.
text_image
PEAEE CREATIVE 2144 50 % NEW. SSQ 3.0 + - OK ESCHere we have used the zoom out function to see the sequence in its whole.
If you touch →esc a safety query appears. If you confirm with OK you return to the main menu.
Touch to return to the main menu after a safety query.
Editing a word sequence
In order to process a single character or a word sequence, it must be previously selected.
To select a single character, just move the red dash to the character using the cursor icons. The selected character is surrounded by a colored frame.
To select a word sequence, touch
Then move the red dash across the word sequence to be selected, using the cursor icons. The selected characters are surrounded by a colored frame.
- After selecting one or more characters, you can alter all settings of these characters.
- More functions for altering the selected characters or word sequence and for other processing options can be selected with the icon.
- You can delete one or more characters or the entire word sequence.
If you move over a previously selected character or word sequence, the selection is cancelled again.
If you want to process other characters, just select them using the cursor icons.
When you have finished modifying the characters, cancel the selection by touching the icon again.
The tie-off program is activated automatically.
Saving a word sequence
Touch the icon to save a word sequence.
A window is opened for opening, saving, closing or deleting an embroidery pattern.
Open
Use this function to access the machine's memory and select an existing word sequence.
Save
Use this function to save the sequence under the existing name.
Save as
Use this function to give the sequence a name or rename it.
A name may be a maximum of 8 characters long.
Close
Use this function to close a sequence without saving it (after query).
Delete
Use this function to delete the sequence (after query).
Sewing a monogram
There are two Monogram fonts available in the machine (Maxi 1 and Maxi 2). These are sewn as single stitches. The feed dog should be engaged.
If you select one of the monogram stitches, a screen with the letter A appears automatically.
text_image
505 Alphabets 18.0 18 A 2.0Select the letter of your choice by touching the +/- icons with the letter "A" above. As you touch the +/- icons the letter above them changes as well as the monogram in the upper left corner of the screen.
The tie-off program is activated automatically.
Embroider single designs
Select "Embroidery/Card", to embroider a single design from the machine's memory. You can also embroider a design from a creative card or a creative memory card.
The Pfaff creative card 300 with 32 designs, is supplied with your Pfaff creative 2144.
The Pfaff creative cards of the creative 7570 can be used in the creative 2144. If you use the cards for the 7570, the designs do not appear on the screen in the correct colors of the design.
Selecting a design from the machine's memory or from a creative card
Touch "Embroidery/Card, and the following screen
text_image
Join Alphobets Entry / Card Sequence/ambination Selection by number B D All stitches Drive Decorative Stitches Last stitch MAXI stitches Data Manager OK escappears.
In this menu, you can call up embroidery designs from a creative card or from the machine's built-in memory.
The 2144's built-in stitches (e.g. 9 mm / MAXI stitches) can only be called up in the embroidery combination.
The machine's memory may contain:
-
The designs that have been saved in the machine from a creative card.
-
Designs which have been created on a PC and saved in your 2144.
A design can only be saved from a creative memory card to the machine in the Creative Data Manager.
- Previously created sewing sequences that you have saved permanently in your Pfaff creative 2144.
To select a design from the machine's memory, touch the

icon.
To select a design from a card, touch the icon for the front card drive and the icon for the rear card drive.
Touch the rear card drive icon.
The procedure for selecting a design from the machine's memory and from a creative card is the same.
Selecting a design that is stored on a Pfaff creative card:

text_image
Embroid Framed Alphabet Card_300%The contents of the creative card are opened.
• Designs appear directly on the screen.
- If designs on the card are arranged in different directories, these are shown as folders. You can browse one column at a time with the cursor arrows.
- Touch the "Embroidery" folder to open it. The designs appear on the screen.
text_image
001 124x201 mm 003 123x131 mm 002 129x130 mm 004 79x65 mm card_300\Embroid- Touch any design, and it appears enlarged on the screen.
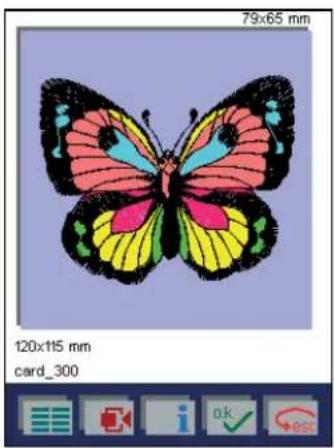
natural_image
Illustration of a butterfly with colorful wings and black perched wings (no text or symbols)Confirm your choice with

or touch the screen.
Your Pfaff creative 2144 calibrates, to sense the size of the hoop attached to the embroidery unit. This might take a few seconds. After the calibration, your Pfaff creative 2144 is ready to embroider.
If no hoop is attached, your Pfaff creative 2144 selects the hoop size most suitable for your design.
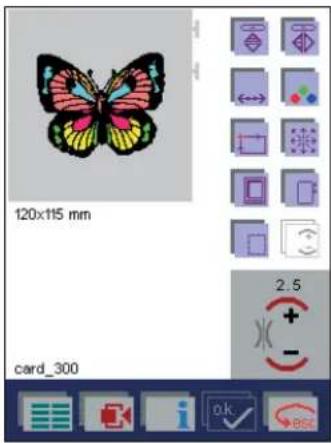
text_image
120x115 mm card_300 2.5 + - OK OKAll settings and sewing functions for the design are displayed on the screen and can be altered.
Basting in the embroidery hoop

If you touch the icon, you activate a basting function.
The machine will then sew a 6 mm straight stitch at a distance of 2 mm around one or more selected designs.
This enables you to secure your fabric to a non-adhesive stabilizer placed beneath it, especially when the fabric to be embroidered cannot be hooped. It also provides support for stretchy fabrics.
Tip: If you select "embroidery / single color segments", only the selected color segment will be basted.

text_image
120x115 mm card_300 2.5 + - OK ESCIf you press the foot control, the embroidery foot is lowered into the embroidery position and the sewing machine starts to baste.
Enlarged view

If you touch the icon, an enlarged representation which covers the whole multi-color touch screen is opened.

natural_image
Illustration of a butterfly with colorful wings and black periscope, set against a solid purple background (no text or symbols)By touching the multi-color touch screen you close that view.
On screen color changing
Touch the icon. The window has three fields in where you can make changes.
If you confirm your input, this command affects all three fields and the window is closed.

text_image
120x115 mm card_300Top field / Select color segment
- Select the color segment you wish to change, using the cursor arrows. Only the selected color in the design is displayed.
- To embroider a single color segment, select that color in the Top field. Press the foot control after choosing the color to be sewn.
- If you set the cursor to M, the machine embroiders all areas in the same color.
Middle field / Change color
Use the cursor arrows to choose the new color, you want the selected color segment to have.
Bottom field / Color intensity
Use the cursor arrows to adjust the shade of a color in a selected segment.
Save your change by touching OK, the window is then closed.
Touch esc, the window is closed without any changes being saved.
Note: After the embroidering has started the cursor arrow
must be reset to 📁 or M when changing the colors !!
After the first stitch, no additional changes can be made for the parameters.
Hoop selection
To change hoop size, touch the icon. A pop-up with the available hoop sizes appear.

text_image
auto 80x80 mm 120x115 mm 120x115 mm 225x140 mm Hoop selection card_300
n. A pop-up with
Touch the desired hoop size to select it. The design appear on the screen within the selected hoop. The measurements of the selected hoop size are visible on the screen below the embroidery field (in this sample, the 225x140 mm hoop is selected).
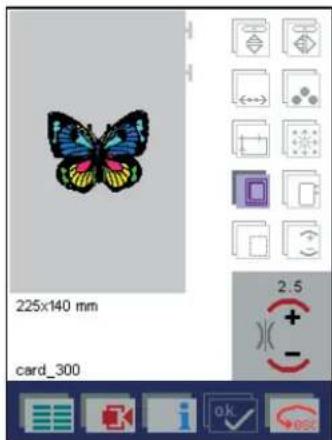
text_image
225x140 mm card_300 2.5 +(The 80x80 hoop is available as an optional accessory from your Pfaff dealer).
Touch ▶esc, the window is closed without any changes being saved.
Make sure to attach a hoop with the same size as displayed on the screen.
Automatic hoop positioning
When you press the foot control to start embroider, your Pfaff creative 2144 perform the calibration once more to position the hoop correctly. When calibrating, the embroidery hoop size attached to the embroidery unit must be the same as the hoop size shown on the screen.
Parking position of the embroidery hoop
When you have completed embroidering a design, you have the option of putting the hoop in a "parking position". This enables you to turn the embroidery arm and makes it easier to remove the embroidery unit.
For that purpose, after the design has been completed, a window with a query appears :
"FINISHED set the embroidery to park position?"
If you confirm the message with 📄, the embroidery hoop moves to the parking position.
If you confirm the message with esc, you can embroider the design again.
Positioning of designs in the embroidery hoop
With the icon you open a window for moving the designs or embroidery combinations within the hoop. You can alter the size of the single designs, rotate and move them on the multi-colour touch screen. Click and drag on the screen or use the increment icons.
With the arrow icons, you can move your selected design or the combination within the embroidery hoop. The numbers at the upper edge of the window indicate how many mm your design or combination has been moved from the center of the hoop.

text_image
18.4 / -67.2 225x140 mm card_300 79/65 0° + + - -If you touch the icon, you can position your selected design or the combination in the hoop with your finger or the stylus directly on the multi-color touch screen.
To deactivate, touch the icon again or activate the function. Both functions cannot be activated at the same time.
Touch the + - icon to rotate the selected design by 1° increments.
If you touch the icon, you can rotate your selected design or the combination in the hoop with your finger or the stylus directly on the multi-color touch screen.
To deactivate, touch the icon again or activate the function. Both functions cannot be activated at the same time.
The selected function is shown as a red icon in the upper left corner of the hoop-area.
If you touch the icon, the design or the combination which protrudes beyond the hoop returns into the hoop.
If you touch the icon, the command described before will be cancelled.
If you confirm the input with OK, the window will be closed and your settings saved.
The or functions remain activated. They are switched off by touching the respective icon.
If you touch ▶esc, the window will be closed, the design or the combination returns to the original position, and the process is interrupted.
The or functions, however, remain active. They are switched off by touching the respective icon.
Positioning a design on the hooped fabric
To precisely position a design, check the position of the design on the hooped fabric before embroidering.
Note: If several designs are selected the following instructions apply to all the selected designs.
For that purpose, touch the icon. A boundary frame marks off the dimensions of the design. The center of the design is indicated by a cross-hair cursor.
Orbiting a design

text_image
225x140 mm card_300- If you press the icon, the embroidery hoop drives to the farthest left upper position of the design. Check that the needle enters the hooped fabric at that place.
If you press the following icons , , , the hoop will orbit the whole design in successive steps
- By touching the design itself on the multi-color touch screen, the cross-hair cursor moves to that place and the hoop drives to the corresponding position.
The cross-hair cursor can be repositioned with your finger to several successive places. Each time you touch the screen the hoop will move to the selected position.
Check that the needle enters that position on the hooped material.
Positioning with the aid of the cross-hair cursor
You can also accurately include one or more designs in a large embroidery combination by rehooping.
For that purpose, touch also the ON icon.
Note: If the design is to be added with precision to an already embroidered design, the design position to which the current design is to be joined must be located in the embroidery field of the attached hoop.
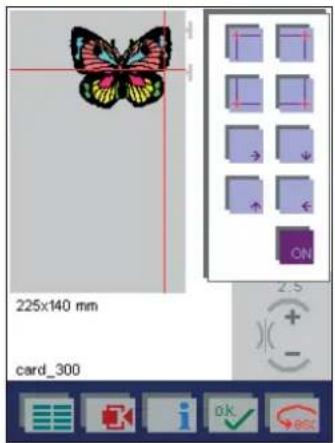
text_image
225x140 mm card_300Touch the multi-color screen at the place of the embroidery hoop where your design is to join the already embroidered design, and the cross-hair cursor and the hoop will move to that position. Check the position on the hooped design by entering the needle into it.
You can move the cross-hair successively to other places with your finger. After each touch the embroidery hoop moves to the corresponding position.

With the arrows,
move the cross-hair cursor in steps in the respective directions, for fine adjustment, until you have found the exact starting position of the design to be embroidered.

With you close the window, and the cursor, the embroidery hoop and thus also the needle remain in the last selected position.
The current design can now be accurately positioned in the multi-color touch screen at the cross-hair cursor. For that
purpose, touch the icon.
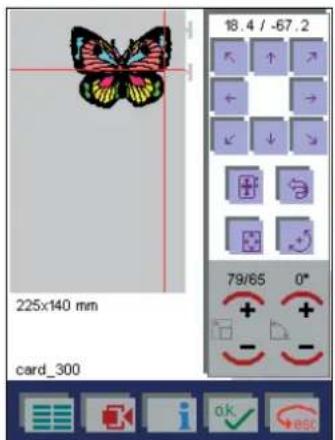
text_image
18.4 / -67.2 225x140 mm card_300 79/65 0° + + - -Note : For positioning an embroidery combination, all designs have to be selected. See page 4-32 “Adjust an embroidery combination”.
Tip: For rehooping and a practical example of how to use the positioning template, see page 6-22ff.
One color embroidery
To embroider the complete design in one color, touch the

icon and and select M in the top field.
Touch

the window is closed.
The design can now be embroidered.
- Press the foot control, the presser foot is automatically lowered to the embroidery position and your Pfaff creative starts embroidering. Tie-off is performed at the start of the design.
- A window with the following message appears: "If you wish to embroider without pressing the foot control, please confirm now with OK."
- After a few stitches, release the foot control and cut off the thread tail. The message window is closed.
- Press the foot control again and touch during embroidering. Your Pfaff creative 2144 will keep on embroidering.
When the designis finished, the threads are tied off and cut, the embroidery foot raises and the machine moves to the center of the design and comes to a standstill.
The "Ready" message appears on the screen.
If you would like to embroider another design from the
card, open the card's directory again by touching and select a new design.

Touch

to switch back to the main menu.
Note: You can stop your Pfaff creative 2144 at any time.
Either touch the screen, or tap the foot control. The machine immediately stops embroidering.
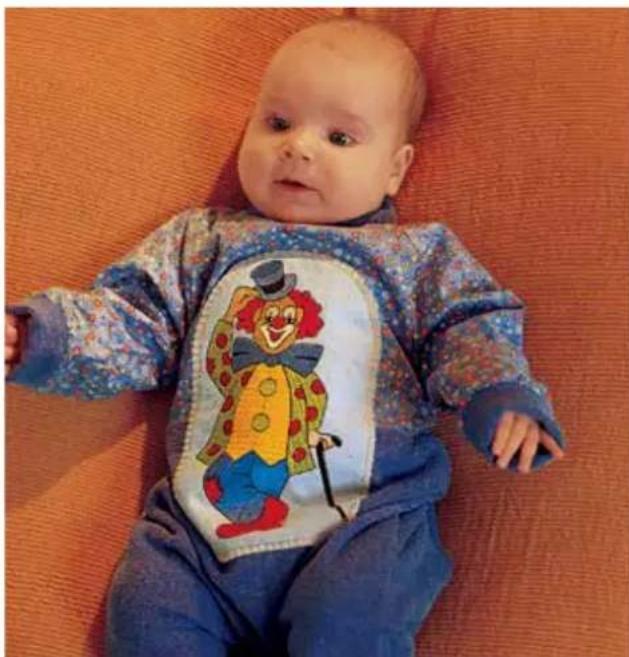
natural_image
Baby wearing a colorful clown-themed outfit, lying on an orange textured surface (no text or symbols visible)Multi-color Embroidery
When embroidering a design consisting of several colors,
you can check the color order by touching

The top field shows the color order, from top to bottom.
The selection arrow must be on the

Have the colors ready in the order in which they are needed, and thread the first color.
- Press the foot control, the presser foot is automatically lowered to the embroidery position and your Pfaff creative starts embroidering. Tie-off is performed at the start of the design.
- A window with the following message appears: "If you wish to embroider without pressing the foot control, please confirm now with OK."
• After a few stitches, release the foot control and cut off the thread tail. The message window is closed. - Press the foot control again and touch during embroidering. Your Pfaff creative 2144 will keep on embroidering.
Your Pfaff creative 2144 stops after each color segment, and the threads are tied off and cut.
A window with the following message appears:
"Change of thread, please insert the next color"
Rethread your Pfaff creative 2144.
- Press the foot control, and your Pfaff creative starts embroidering. Tie-off is performed in the beginning of each color.
- A window with the following message appears: If you wish to embroider without pressing the foot control, please confirm now with OK."
- After a few stitches, release the foot control and cut off the thread tail. The message window is closed.
- Press the foot control again and touch during embroidering. Your Pfaff creative 2144 will keep on embroidering.
Repeat the above process until all thread colors are finished.
When the design is finished, the threads are tied off and cut, the embroidery foot raises and the machine moves to the center of the design and comes to a standstill.
The "Ready" message appears on the screen.
If you would like to embroider another design from the
card, open the card's directory again by touching and select a new design.

Touch
to return to the main menu.
4-18
4. Operate the multi-color touch screen
"Jumping over stitches" when embroidering several colors

With the icon you open a window for moving the hoop to a specific stitch in a design or a combination of designs. Thus you can jump quickly to the beginning of a specific area of a design and embroider only that part.
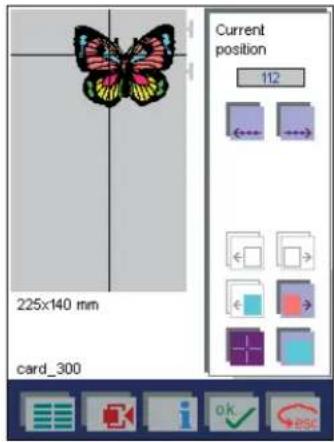
text_image
Current position 112 225x140 mm card_300Touch 112 to open another window for entering a stitch number.
Enter the stitch number.
If you confirm your entry with OK, the embroidery hoop moves to this stitch.

text_image
Current position 4186 225x140 mm card_300With ESC you interrupt the process.
With the icon you can reverse stitch by stitch, also beyond color changes.
With the 📄 → icon you can advance stitch by stitch, also beyond color changes.
With the icon you move the hoop to the start of the preceding color in a design. The color is indicated in the icon.

With the icon you move the hoop to the start of the next color to be embroidered in a design. The color is indicated in the icon. If the last color is selected, this icon is not active.

With the icon you call up a cross-hair cursor which indicates the current needle position.

With the icon you position the needle at the start of the current color.
broidery combination, see "Embroidery combinati-
ons", you reverse the hoop design by design with the icon. If the first design is selected, this icon is not active.

With the icon you advance the hoop design by design. If the last design is selected, this icon is not active.
Embroidering a single color segment
To embroider a single color segment of a design, touch

and select the color with the cursor arrows. Only the ccted color segment is shown on the screen.
Thread your Pfaff creative 2144, using the desired color.
Press the foot control, the presser foot is automatically lowered to the embroidery position and your Pfaff creative starts embroidering as described in "One color embroidery"
"Jumping over stitches" when embroidering a single color segment

text_image
Current position 0 225x140 mm card_300With the icon you move the hoop to the start of the next color segment of a design.
The color is indicated in the icon.
This function is active only when the same color is to be embroidered twice in a design.
With the icon you move the hoop to the start of the preceding color segment in a design. The color is indicated in the icon.
This function is active only when the same color is to be embroidered twice in a design. In our design the sewing machine is located at the start of the first color segment.
With the icon you reposition the needle to the start of the current color.
Note : If you use the number input 0 for moving the hoop, the hoop will move only within the selected color segment.
- If the entered stitch number is too small for the selected color segment, the embroidery hoop will move to the start of the color segment.
- If the stitch number is too large, the embroidery hoop will move to the end of the selected color segment.
In an embroidery combination, see "Embroidery combinati-
ons", you use the icon to reverse and to advance the hoop design by design. You must set the color for every single design.
Sewing with the embroidery unit attached
It is possible to switch directly from embroidering to sewing without having to remove the embroidery unit or take the cards out of the drives.
However, you will have to remove the embroidery hoop.
Engage the feed dog and insert the required presser foot.
By touching 📄, you return to the choice of stitches in the main menu and can select a different stitch.
The embroidery unit moves to its right-hand position to leave the maximum amount of space for sewing.
This is only recommended for minor sewing jobs; for more extensive sewing or when working on large pieces of fabric, it is better to remove the embroidery unit.
Embroider monograms and letters
On the creative card 300, you can find one single monogram and two embroidery alphabets, used to create combinations.
Both single monograms and embroidery alphabets that can be programmed into a combination can be saved on a creative card/creative memory card.
The monogram is found in the folder "Framed" and the embroidery alphabets are found in the folder "Alphabets"
Embroider a monogram that is stored on a card
The monograms are embroidered and can be adjusted in the same way as described in "Embroider single designs" (page 4-13 - 4-16).

text_image
001 77x85 mm 003 77x85 mm 002 77x85 mm 004 77x85 mm card_300\Framed\Open the folder "Framed" on the creative Card 300.
Use the cursor icons to browse one column at a time to select the desired letter.
Touch a monogram, it appears enlarged on the screen.

text_image
77x85 mm 120x115 mm Card_300Confirm the monogram with

or touch the screen.
Your Pfaff creative 2144 calibrates, to sense the size of the hoop attached to the embroidery unit.
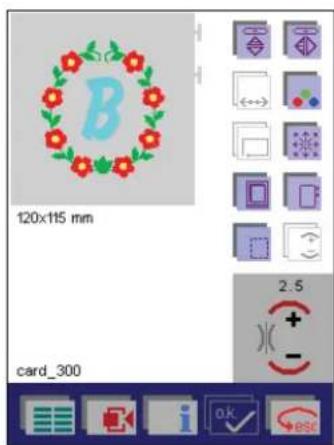
text_image
120x115 mm card_300 2.5All settings and sewing functions are displayed on the screen and can be adjusted for your specific needs.
Touch the desired icon to modify the design. A window for more input opens.
natural_image
Decorative lace tray with embossed letter 'B' and floral border, placed on blue fabric (no text or symbols)Create a word combination of embroidery alphabets

text_image
Join Alphobets Entry / Card Sequence/ambination Selection y number Data 8 stitches Drive Decorative Stitches Last stitch MAX0 stitches Date ManagerTouch "Embroidery/Card".
To select an embroidery alphabet from the machine's memory, touch the icon.
To select an embroidery alphabet from a card, touch the icon for the front card drive and the icon for the rear card drive.
The procedure for selecting an embroidery alphabet from the machine's memory and from a creative card is the same.

text_image
Embroid Framed Alphabet Card_300\Open the folder "Alphabet" on creative card 300. The available alphabets appear on the screen as icons, illustrating the alphabet style.

text_image
Block 20x13 mm Mono... 14x12 mm card_300\Alphabet\Touch the alphabet of your choice, the alphabets input menu opens. You can enter the desired letters.
text_image
PFAFF_ A B C D E F G H I J K L M N O P Q R S T U V W X Y Z - - 20.0 + ABC abc - A#g 0-9 q b card_300\Alphabet\Touch to confirm your input, it appears on the screen.
The difference in the structure of this menu is that more functions are visible and available for selection than in Embroidery / card.

text_image
225x140 mm NEW .ESQ 3.0 + - OK escAll settings and sewing functions displayed on the screen for both single monograms and alphabet combinations can be altered for your specific needs.
The functions for rewriting monograms and for selecting the machine's memory are blocked. These functions are for creating and saving embroidery combinations. To do this, select "Sequence/Combination" and then "Embroidery Combination" in the main menu.
When you open the processing screen for the embroidery combination, the most important settings are directly visible and selectable.
The machine is ready to embroider.
By touching ▶ esc, you return to the card's menu and a new alphabet style can be selected.
By touching you return to the main menu.
Adjust an embroidery alphabet combination
If you wish to adjust a letter or a combination of letters, it must be selected.
To select a letter, move the cursor to the desired letter using the cursor arrows. The selected letter is shown surrounded by a colored frame.
Touch 📄 to select a combination. Select the letters which you wish to adjust, using the cursor arrows. If you keep the icon depressed, all designs will be selected.
Note:
• The letters are selected in the order they were entered.
- Single letters cannot be skipped or omitted when selecting a combination.
- When you adjust several letters in a combination, you have to select and adjust them one by one.
The selected designs are surrounded by a colored frame.
After selecting one or more letters, you can alter all their settings.
You can delete one or more letters, or delete the entire combination.
If you move over a previously selected letter or combination with the cursor arrows, the selection is cancelled again.
If you would like to select another letter, select it with the cursor arrows.
When you have finished modifying the characters, cancel the selection with the icon.
More options in the alphabet combination

If you touch , more functions for modifying the alphabet combination, is opened. Positioning of the combination in the hoop, mirror functions, color changing, and hoop selection are samples of the functions available. Touch the icon a further time to close the window.
text_image
PFAFF 225x140 mm NEW.ESQ 3.0 + - ok escThe different adjustment functions work the same way for embroidery alphabets as for single designs and embroidery combinations.
Prepare a creative memory card for saving
Before designs/combination/sequences can be saved on a creative memory card, it must be formatted.
To format a Creative memory card, insert an empty, unformatted, card in a card drive.
The following message then appears:
text_image
Unknown card type! Do you want to prepare the card for this system? All the information on this card will be lost! (Confirm with OK) Decorative Stitches Last stitch MAX0 stitches Data ManagerTouch OK, the window for entering the name appears. (Max. 8 characters)
Touch to interrupt the process.
By giving the creative memory card a name, you have formatted it!
Sewing sequence
You can combine various stitches and save them permanently in the Sequence/Combination menu.
flowchart
graph TD
    A["Join"] --> B["Overcast"]
    B --> C["Utility"]
    C --> D["Buttonholes"]
    D --> E["Darn/Bartack"]
    E --> F["9mm Decorative Stitches"]
    F --> G["MAXI stitches"]
    H["Alphabets"] --> I["Embroidery / Card"]
    I --> J["Sequence/Combination"]
    J --> K["Selection by number"]
    K --> L["All stitches"]
    L --> M["Last stitch"]
    M --> N["Data Manager"]
The "Sequence/Combination" menu is divided into Sewing and Embroidering.
- In the Sewing sequence menu, you can combine various 9 mm stitches and MAXI stitches from the machine, a creative memory card or a creative card and sew them as a continuous border.
To do this, engage the feed dog.
- In the Embroidery combination menu, you can combine embroidery designs from a creative memory card or a creative card and / or 9 mm stitches and maxi stitches from the machine and embroider them in a hoop.
To do this, the embroidery unit must be attached.
Create a sewing sequence
When you touch "Sewing sequence", the sewing sequence

text_image
Sewing sequence Embroidery combinationscreen opens.

text_image
Screenshot of a software interface toolbar with icons for text, images, charts, and editing toolsHere, you can choose whether you wish to create a new sewing sequence or call up a previously saved sequence.
Touch to open a previously saved sewing sequence from a creative memory card or from the machine's memory.
Touch 📋 on the sequence screen to create a new sewing sequence.
A variant of the main menu is opened.

text_image
Join Overcast Utility 9mm Decorative Stitches MAXI stitches Alphabets Card / machine Selection by number All stitches Last stitchHere, you can choose between stitches from the machine (see chapter 1, Stitch overview) and stitches that are stored on a creative memory card.
Select a stitch from the machine
Touch on the sequence screen, the different stitch menus available in your Pfaff creative 2144 appears.

text_image
Join Overcast Utility 9mm Decorative Stitches MAXI stitches Alphabets Card / machine Selection by number All stitches Last stitchTouch "9mm Decorative Stitches", the selection menu is opened.
Touch "Leaves/Flowers", and the choice of stitches are displayed

text_image
147 150 153 156 159 148 151 154 157 160 149 152 155 158 161 Leaves & flowersIf you touch the stitch that you would like to include in your sewing sequence, a menu in which you can modify the single stitch is opened.
text_image
156 Leaves/Flowers 9.0 0.35 20You can mirror the stitch, alter its density and adjust the thread tension.
Touch to confirm your selection, it appears in the sewing sequence screen.

text_image
NEW.SSQ 2.5When you open the sewing sequence screen, the most important settings are visible and selectable.
A cursor line shows the end of the sewing sequence where all further stitches are added.
If you wish to continue working with a stitch, move the cursor line over the stitch to select it.
A selected stitch is shown surrounded by a frame in the sewing sequence.
More options for adjusting a sewing sequence are accessed by touching 📋.

text_image
NEW .SSQ 9.0 0.35 20Touch the icon again to close the selection.
If you wish to repeat the same stitch, touch it. It appears directly on the screen.
Touch 📄 on the sequence screen to call up each additional stitch that you wish to include in the sewing sequence. The variant of the main menu appears again to enable you to select each additional stitch.
- If you wish to include other stitches from the machine's memory, proceed as described above.
- If you wish to combine stitches from the machine's memory, a creative card or a creative memory card, touch "Card / machine".
Select a stitch from a card
The following window appears when you touch "Card / machine"

text_image
Drive NEW.SSQTouch the proper card drive.
The procedure for selecting a stitch/pattern from the machine's memory or from a creative card is the same.
Selecting a stitch/design that is stored on a card:
You can only select stitches that can be included in a sewing sequence. Embroidery designs, embroidery alphabets or embroidery monograms cannot be used.
The content of the entire creative card is opened.
• Stitches appear directly on the screen.
- If the content on the card is arranged in different directories, these are shown as folders.
text_image
KIDS 2 5 CROSS... 3 1 4 200/specialYou can browse one column at a time with the cursor arrows. Touch a folder to see its content.
When you open the directory where the stitches are stored, or touches a stitch to include it in your sewing sequence, a menu to adjust single stitches is opened.
You can mirror the stitch/design, alter its density and adjust the thread tension.
text_image
155 Leaves/Flowers 9.0 16Touch to confirm the stitch, it appears in the processing window of the sewing sequence.

text_image
NEW.SSQ 9.0 16The stitch is placed next to the first stitch at the cursor line. The cursor line automatically jumps to the end of the last entered stitch.
More options for adjusting a sewing sequence are accessed by touching 📄.
Touch 📋 on the sequence screen to call up stitches that you wish to add in the sewing sequence.
If you wish to repeat the same stitch, touch . The stitch appears directly on the screen.
As soon as you have completed a sewing sequence, you can proceed to sew.
If you touch esc a safety query appears.
If you confirm with OK you return to the Sequence/Combination menu.
Touch to return to the main menu after a safety query.
Arrange stitches within a sewing sequence
To obtain wider borders, you can save connecting stitches in your sewing sequence.
These connecting stitches make it possible to move stitches in various directions.
This results in new shapes and large-area borders.
Connecting stitches are straight stitches with a length of 1 mm. They can be made in 16 different directions.
More than one stitch will often be needed to render stitches visually distinct from one another.
When using connecting stitches, it is very important to note where the stitch you are using starts and ends.
The stitches are sewn in the direction chosen from the end of the stitch.
The next stitch starts at the end of the last jump stitch.
A stitch is placed in the middle of the working area.
When you touch 📄, a screen opens where you can enter the direction (use the arrow icons) and number of connecting stitches. Confirm each connecting stitch with √.
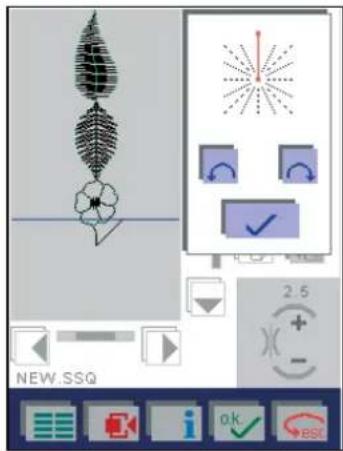
text_image
Software interface screenshot showing a tree diagram with directional arrows and control buttons, including a numeric input field labeled 'NEW.SSQ'.Save your input by touching OK, the window is then closed.
Touch 📄, the window is closed without any changes being saved.
The cursor line shows the end of the connecting stitches at the point where the following stitches will be added.
Touch to call up each additional stitch that you wish to include in the sewing sequence.
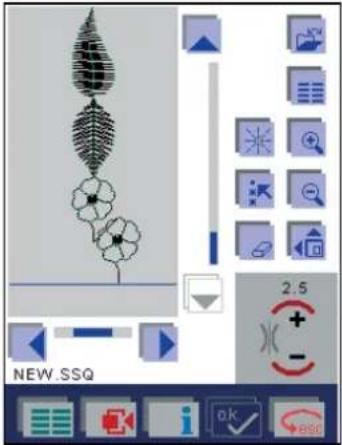
text_image
NEW.SSQ 2.5 + - OK BSCMore options for adjusting a sewing sequence are accessed by touching 📋.
The last stitch in a sequence is always marked and followed by a cursor line marking the point where next stitch will be added.
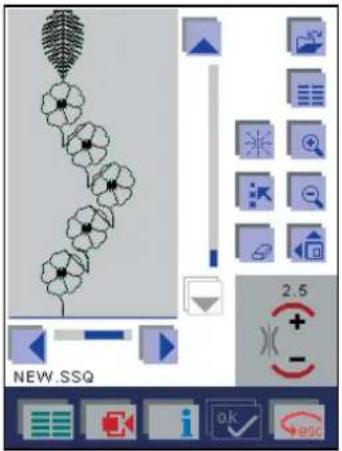
text_image
Software interface screenshot showing a floral design tool with icons and numerical displayTip: Borders with connecting stitches are neatest if the connecting stitches are covered by the actual stitch (in this case the flowers) itself.
Adjust an existing sewing sequence
An existing sewing sequence can be adjusted. By selecting an individual stitch within a sequence or an entire sequence, you can do adjustments according to your wis-

text_image
Software interface screenshot showing a diagram with floral and gear-like shapes, alongside toolbar icons and numerical display.hes.
To select an individual stitch, use the cursor arrows to move the cursor line in front of the stitch you want to adjust. The selected stitch is surrounded by a frame.
Touch 📄 to select a sewing sequence. If you keep the icon depressed, all stitches will be selected.
A cursor line appears. Move it with the cursor arrows across the stitches to select them. The selected stitches are surrounded by a frame.
- After selecting one or more stitches, you can modify all their settings. What settings that can be changed depends on how many stitches and what kind of stitches that are selected.
More options for adjusting the selected stitches or sewing sequences are accessed by touching 📄. - You can delete one or more stitches, or delete the entire sewing sequence.
If you move the cursor line over a previously selected stitch or sewing sequence, the selection is cancelled.
If you would like to adjust another stitch, select it with the cursor arrows.
When you are satisfied with your adjustments, cancel the selection with the icon.
Inserting a stitch in the sewing sequence

text_image
BORDER1. SSQ 2.5If you would like to insert a sitch in the sewing sequence, use the cursor arrows to move the cursor line to the insertion point in the sewing sequence.
The cursor must be positioned at the point where you wish to insert the stitch.
Select a new stitch.
When the stitch has been inserted, the cursor moves to the end of the inserted stitch.
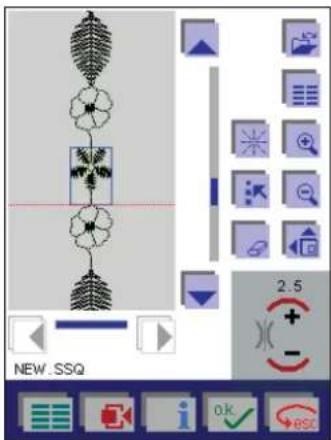
text_image
NEW_SSQ 2.5 + - OK escInserting a stitch at the start of a sewing sequence
If you wish to insert a stitch at the beginning of a sewing sequence, move the cursor line to the beginning of the sewing sequence and select a new stitch.
The stitch is automatically placed at the start of the sewing sequence.
Save a sewing sequence
Touch to save the sewing sequence:
The window for opening, saving, closing or deleting the sewing sequence opens.

text_image
Open Save Save as Close Delete NEW SSQWhen you touch "Save as", the menu for entering the name opens.
You can give your sewing sequence a name and select a path where the sequence should be saved.
When you open the menu, the machine's memory is selec-

text_image
SEQUENCE\BORDER1.SSQ A B C D E F G H I J K L M N O P Q R S T U V W X Y Z _ - 1 2 3 4 5 6 7 8 9 0 NEW. SSQted automatically.
The input field shows a directory where the sewing sequence is automatically saved. The input field shows the name "NEW". You can delete this name with the icon and enter a name of your choice.
A name may be a maximum of 8 characters long. Touch
ok to confirm your input.
The sequence is now stored in the directory "Sewing sequence" in the machine and can be opened again by selecting that directory.
If you touch the □ icon, another window for selecting a different directory is opened.

text_image
1SEQUENCE [..]You can save the sewing sequence in a different machine directory, or on a card.
Save in the machine
To save the sewing sequence in the machine, select the directory with the cursor arrows.
Touch ↑ to close the window. The sewing sequence is saved in the selected directory.
Touch 📄 to close the window without saving your input.
Save on a creative memory card
If you wish to save the sewing sequence on a card, select the appropriate card drive.
If you have created directories on the card, select the appropriate directory with the cursor arrows.
Touch to close the window. The sewing sequence is saved in this directory.
Touch → esc to close the window without saving your
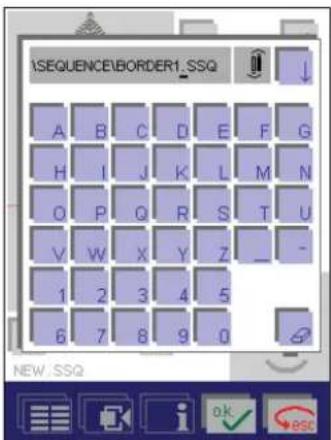
text_image
ISEQUENCE\BORDER1_SSQ A B C D E F G H I J K L M N O P Q R S T U V W X Y Z _ - 1 2 3 4 5 6 7 8 9 0 NEW_SSQinput.
Confirm the name you have entered by touching ☐, the window is closed.
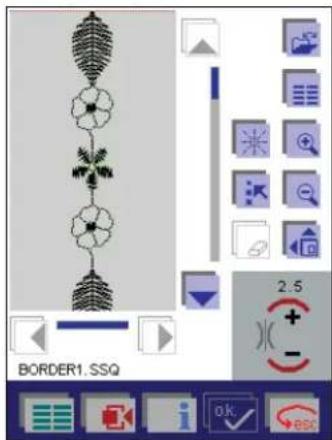
text_image
2.5 BORDER1.SSQThe sewing sequence remains visible on the screen and can be sewn.
If you touch 📄esc a safety query appears.
If you confirm with OK you return to the Sequence/Combination menu.
Touch to return to the main menu after a safety query.
Close a sewing sequence without saving
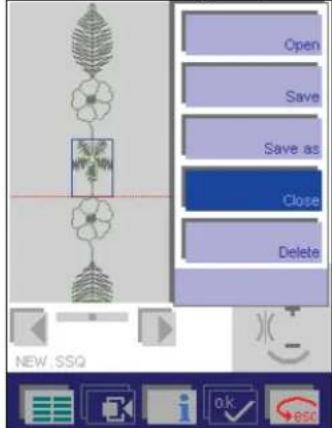
text_image
Open Save Save as Close Delete NEW.SSQ- If you touch and "Close", you exit the menu without saving the sewing sequence.
A window appears with a safety query.
If you touch OK, is the sequence closed.
If you touch Esc, the menu is closed.
- If you touch and "Open", you exit the menu without saving the sewing sequence.
You then simultaneously open a sewing sequence that has previously been saved.
A window appears with a safety query.
If you touch 📄, a version of the Data Manager opens, where you can open a saved sewing sequence.
If you touch → esc, the menu "Open" is closed.
- By touching you return to the main menu.
Delete a sewing sequence
If you touch and "Delete", a window appears with a query.

text_image
Open Save Save as Close Delete NEW .SSQTouch OK to delete the sewing sequence.
Touch if you do not want to delete the sewing sequence.
Select and open a saved sewing sequence
text_image
Screenshot of a software interface with tool icons and control buttons, likely from an older application or design tool.Touch to open a previously saved sewing sequence from a creative memory card or from the machine's memory.
Touch "Open" to open a variant of the Creative Data Manager.

text_image
[SEQUENCE] [...]Open from the machine's memory
Use the cursor arrows to move the selection bar to the directory in which the sewing sequence is stored.
Confirm the directory by touching OK, a list of names in that directory opens.
Select the sewing sequence directly with the cursor arrows.
The selected sewing sequence appears on the screen
when you touch the ↓ icon.
Open from a creative memory card
To open a sewing sequence from a card, select the appropriate card drive.
If there are directories on the creative memory card, proceed as described for opening from the machine.
If there are no directories on your creative memory card, select the sewing sequence directly with the cursor arrows.
The selected sewing sequence appears in the screen when you touch the icon.
All settings for the sewing sequence can now be adjusted for your specific needs.
If you 📄 and "Save", the adjusted sewing sequence is saved under the same name. The sequence previously saved is automatically erased.
To save the sewing sequence under a new name, touch "Save as".
The previously saved sequence is preserved.
Embroidery combinations Create an embroidery combination

text_image
Sewing sequence Embroidery combinationTouch "Embroidery combination", to open the embroidery combination screen.

text_image
225x140 mmHere, you can choose whether you wish to create a new embroidery combination or call up a previously saved one.
Touch to open a previously saved combination from a creative memory card or from the machine's memory.
Touch 📋 to create a new embroidery combination.
A version of the main menu opens.
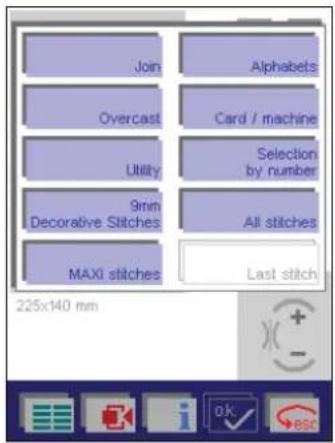
text_image
Join Overcast Utility 9mm Decorative Stitches MAXI stitches Alphabels Card / machine Selection by number All stitches Last stitch 225x140 mmIn this menu, you can choose between desings stored in the machine (see page 3-10 to 3-12) and designs that are stored on a creative memory card.
For a detailed description of the worksteps please refer to the "Sewing sequence" section.
Select a design from the machine's memory or from a creative memory card
In this menu you can select embroidery designs from a creative memory card or from the machine's memory.

text_image
Join Overcast Utility 9mm Decorative Stitches MAXI stitches Alphabets Card / machine Selection by number All stitches Last stitch 225x140 mmThe machine's memory may contain:
- Designs from a creative card or a creative memory card that have been saved in the machine memory.
A design can only be saved from a creative card or a creative memory card to the machine using the Creative Data Manager. - Designs which have been created on a PC and saved in your Pfaff creative 2144.
- Previously created embroidery combinations that have been saved permanently in the machine.
When touching "Embroidery / card", the following window appears.

text_image
Join Alphabets /machine Selection by number Decorative Last stitches Last stitch Drive 225x140 mm NEW .ESQ a.k. eskTo call up a design from the machine's memory, touch

text_image
. To call up a design from a card, touch for the front card drive andfor the rear card drive.
The procedure for selecting a stitch/design from the machine's memory or from a creative card is the same.
Select a design stored on a card
You can only select designs which are possible to include in an embroidery combination.
The contents of the entire creative card are opened.
• Designs appear directly on the screen.
- If designs on the card are arranged in different directories, these are shown as folders.

text_image
Embroid Framed Alphabet Card_3001Touch the folder "Embroid" to see the contents of that directory.

text_image
001 124x201 mm 003 123x131 mm 002 129x130 mm 004 79x65 mm card_300\Embroid\You can browse one column at a time with the cursor arrows.
Touch a design, it appears enlarged on the screen.
Confirm the design with OK or touch the screen, a menu is opened for mirroring, rotating or modifying the size of the single design.

text_image
225x140 mm card_300Confirm with OK, the design appears on the screen.
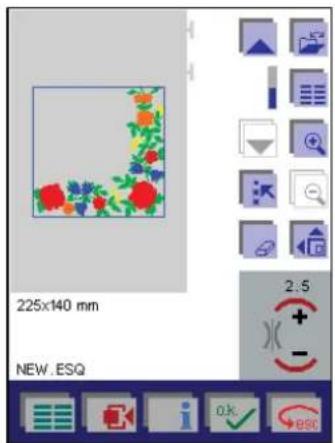
text_image
225x140 mm NEW .ESQ 2.5 + - OK escOn the screen, the most important settings are directly visible and selectable.
Touch 📋 on the sequence screen to call up each additional design that you wish to include in the embroidery combination.
A version of the main menu appears to enable you to call up each additional design.
Touch to access the machine's memory. Save the embroidery combination in the machine's memory or on a creative memory card.
More options for adjusting the embroidery combination are accessed by touching 📋.

text_image
225x140 mm NEW, ESQTouch to close the window.
A design is normally placed in the center of the hoop. The position of any design can be adjusted.
Exception: Continuous designs from the machine's memory.
Move the design within the hoop
The design is placed in the center of the embroidery field (hoop). This position can be adjusted.
Touch 📋 to access more options for adjusting the embroidery combination.
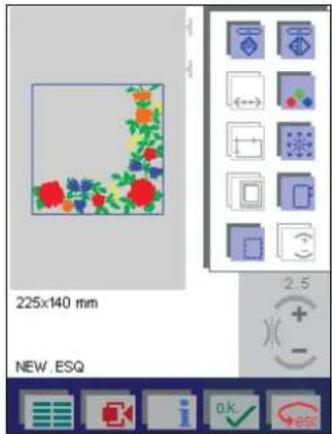
text_image
225x140 mm NEW. ESQUse the 📄 icon to open a screen where the embroidery design or combination can be moved within the hoop, enlarged and rotated in 5 degree steps.

text_image
225x140 mm NEW .ESQ 0.0 / 0.0 105/103 0*Use the cursor arrows to move the selected design or embroidery combination within the hoop.
The numbers at the upper edge of the window show you how far (in mm) your design is moved from the center of the hoop.
Save your change by touching OK, the window is then closed.
Touch -esc, the window is closed, and moved designs return to their original position.
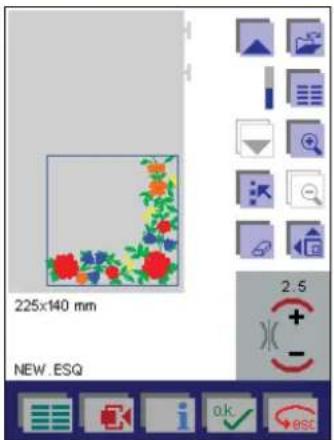
text_image
225x140 mm NEW .ESQ 2 : 5 + - OK escTouch to duplicate the selected design.
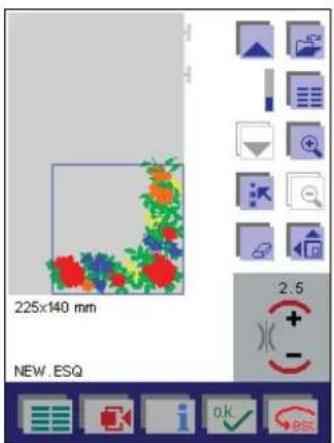
text_image
225x140 mm NEW .ESQ 2.5The design is placed above the other and is ready for further adjustments.
More options for adjusting the embroidery combination are accessed by touching 📋.

text_image
225x140 mm NEW .ESQUse the icon to open a screen where the embroidery design or combination can be moved within the hoop, enlarged and rotated in 5 degree steps.

text_image
225x140 mm NEW .ESQ 0.0 / 0.0 105/103 0° OK ESCUse the cursor arrows to move the selected design or embroidery combination within the hoop.
The numbers at the upper edge of the window show you how far (in mm) your design is moved from the center of the hoop.

text_image
225x140 mm NEW .ESQ 2.5Touch 📄 on the sequence screen to call up each additional design that you wish to include in the embroidery combination. A version of the main menu opened to enable you to call up each additional design.
The design is placed in the center of the hoop and is ready for further adjustment.
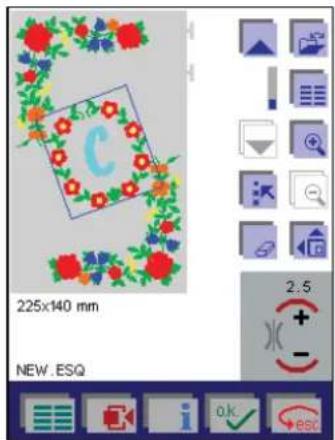
text_image
225x140 mm NEW .ESQ 2.5 + - OK esc
Touch to move the embroidery design within the hoop.
In this sample, we have rotated the monogram.
The machine is always ready to embroider.
Embroidery is performed according to the below.
Note: How to jump over stitches in an embroidery combination, see "Jumping over stitches when embroidering several colors" page 4-18.
Embroider
- Press the foot control, the machine starts embroidering. Tie-off is performed at the start of the design.
• A window appear with the following query:
"If you wish to embroider without pressing the foot control, please confirm now with OK."
- After a few stitches, release the foot control and cut off the thread tail. The window is closed.
• If you press the foot control again and confirm this mes-
sage during embroidering with 🚗, the machine keeps on embroidering.
- When a color segment is completed, the machine stops automatically.
• Each color segment is tied off at the end and the threads are cut.
- Touch 📋 to save. This opens a window for opening, saving, deleting and closing an embroidery combination.
Adjust an embroidery combination
To adjust single designs within the embroidery combination or an entire embroidery combination, they must be selected.

text_image
225x140 mm NEW .ESQ 2.5Select a single design
When opening a screen the last inserted design is automatically selected.
To select a different design, just move to the desired design using the cursor arrows. The selected design is surrounded by a colored frame.
When a design is selected, all its settings can be adjusted. Just touch the icon for the desired operation.
Select an embroidery combination

to select an embroidery combination.
Move the selection to the desired designs using the cursor arrows. The selected designs are surrounded by a colored frame.
Warning:
- The designs are selected in the order they were entered.
- When selecting, you cannot skip or omit single designs.
- Designs, that do not follow each other in a sequence, have to be selected and adjusted individually.
- If you keep the icon depressed, all stitches will be selected.
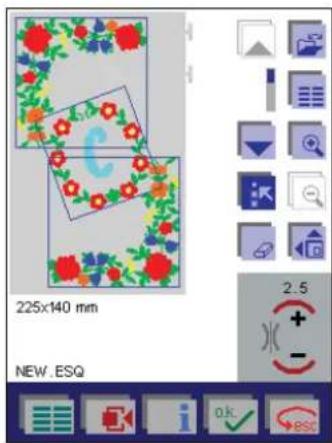
text_image
225x140 mm NEW .ESQ 2.5Selected designs are surrounded with a colored frame.
After selecting a design or designs, you can change all their settings. Touch the icon for the desired operation.
To adjust other designs, just select them using the cursor arrows.
When you have adjusted the designs, deselect by touching

again.
Inserting an additional design in a combination
You can insert additional designs into existing embroidery combinations.
Select the design before the insertion point. Choose the new design. The new design is placed in the center of the hoop and is ready for further adjustments.
Note: Designs are embroidered in the order they were entered. After inserting a design into an existing combination, the embroidery order is changed. The new design is embroidered after the design that was selected.
Move an embroidery combination within the hoop
Use the icon to open a screen where the embroidery design or combination can be moved within the hoop, enlarged and rotated in 5 degree steps.
The selected embroidery combination is surrounded by a colored frame.
Use the cursor arrows to move the selected design or embroidery combination within the hoop.
The numbers at the upper edge of the window show you how far (in mm) your design is moved from the center of the hoop.
Rotate an embroidery combination
You have the possibility to rotate your design/combination. Touch + or - in this icon to set the angle by which you want to rotate your combination.
Save your change by touching OK, the window is then closed.
Touch → esc, the window is closed, and moved designs return to their original position.
To adjust other designs, just select them using the cursor arrows.
When you have adjusted the designs, touch again to deselect.
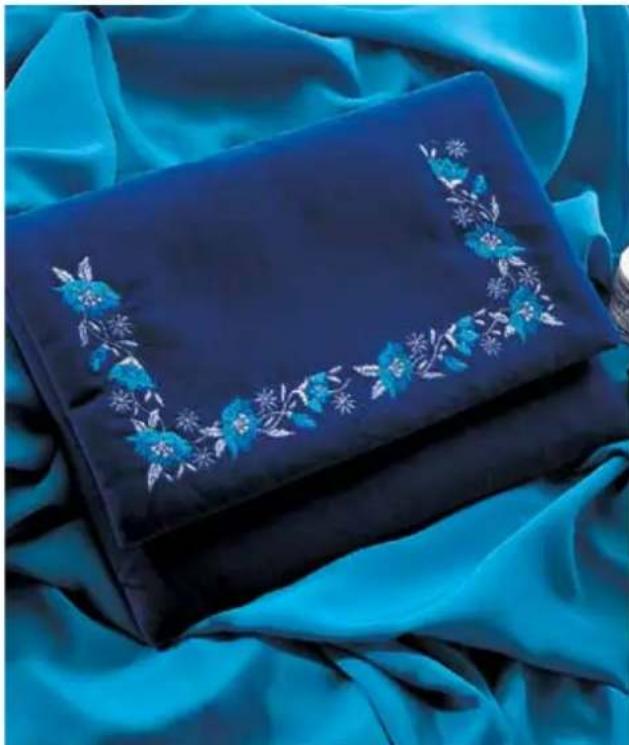
natural_image
Blue fabric with floral embroidery and a matching dark card, placed on a blue fabric background (no text or symbols visible)Zoom the designs in a combination
For easier positioning of the designs within a combination, you can use the zoom function to enlarge the designs on the screen.

text_image
225x140 mm NEW .ESQ 2.5 + - OK escTouch the icon to zoom in the pictured designs in steps up to 800%.

text_image
225x140 mm 200% NEW .ESQ 2.5If you want to select a different design in the combination you can do that with the selection arrows.
Move the zoomed area
When zoomed in, you cannot see the whole combination. On the screen, you can find two scroll bars. Use the scroll bars to "move" the enlarged combination within the visible hoop area.
Touch a scroll bar with your finger tip and drag upwards or downwards depending on what part of the combination you want to see. Drag downwards to see the lower part of the combination and upwards to see the upper part.
If you drag the lower scroll bar to the right, you can see the right part of the combination, the opposite happens if you drag it to the left.
If you have activated the | or functions, you can move or rotate your design or combination also when its is zoomed.
With you zoom out again step by step. Before you start embroider, the combination has to be shown in its natural size.
text_image
225x140 mm NEW .ESQ 2.5Save an embroidery combination
Touch to save the embroidery combination. The window for opening, saving, closing or deleting an embroidery combination is opened.
When you touch "Save as", the menu for entering the name is opened.
You can give your embroidery combination a name and select a path under which to save it.
When you open the menu, the machine's memory is automatically selected.
The input field shows the directory where the embroidery combination is automatically saved. The input field shows
the designation "NEW". You can delete it with Ⓗ and enter a new name.

text_image
...ENCE/MONOCOMB_ESQ A B C D E F G H I J K L M N O P Q R S T U V W X Y Z _ - 1 2 3 4 5 6 7 8 9 0 NEW_ESQA name may be a maximum of 8 characters long. Touch

to confirm your input.
The combination is now saved in the directory "Embroidery combination" of the machine and can be opened again by selecting that directory.
If you touch ↓, a further window for selecting a different directory is opened.
text_image
...ENCE\MONOCOMB_ESQ [SEQUENCE] [..]- If you wish to save the embroidery combination on a card, select the appropriate card drive.
- If you have created directories on the card, select the appropriate directory with ↑.
Confirm the name you have entered by touching , the window is closed. The embroidery combination remains visible on the processing screen and can be embroidered.
Touch and "Close", to exit the menu without saving the embroidery combination.
A window appears with a safety query.
- If you touch OK, the embroidery combination is closed.
- If you touch esc, the embroidery combination is not closed.
Touch and "Open" to exit the menu without saving the embroidery combination.
You then simultaneously open a menu for creating a new embroidery combination.
The window with a safety query.
- If you touch OK, the menu for entering the name appears
- If you touch a ESC, the embroidery combination is discarded. A version of the Creative Data Manager for selecting a design is opened.
- Touch to return to the machine's main menu.
The first chapter of this manual is an overview chapter. Here you can find information about the parts of your Pfaff creative 2144 and all stitches stored in it. There is also an explanation about the different icons appearing in the different menus/screens.
Please keep these pages available for reference when using the machine.
The machine has a Pop-up Direct Help feature for the individual sewing functions and icons.
To use it, touch i when in a stitch, then touch the icon for which you require an explanation.
Open a saved embroidery combination
text_image
225x140 mmTouch to open a previously saved embroidery combination from a creative memory card or from the machine's memory.
Touch "Open" to open a variant of the Creative Data Manager.

text_image
[SEQUENCE] [...]Open from the machine's memory
Touch to open the content of the machine memory. Use the cursor arrows to move the selection bar to the directory in which the sewing combination is stored.
Confirm the directory by touching OK, a list of names in that directory opens.
Select the embroidery combination directly with the cursor arrows.
The selected combination appears on the screen when you touch the icon.
Open from a creative memory card
To open an embroidery combination from a card, select the appropriate card drive.
If there are directories on the creative memory card, proceed as described for opening from the machine.
If there are no directories on your creative memory card, select the embroidery combination directly with the cursor arrows.
The selected combination appears in the screen when you
touch the icon.
All settings for the combination can now be adjusted for your specific needs.
If you 📄 and "Save", the adjusted combination is saved under the same name. The combination previously saved is automatically erased.
To save the combination under a new name, touch "Save as".
The previously saved combination is preserved.
Delete an embroidery combination
Open the combination you want to delete.
Touch
Touch "Delete" to delete the combination. A query appears
asking if you want to delete the combination. Touch to confirm.

Embroider stitches stored in your Pfaff creative 2144
If you add a stitch from the machine memory in an embroidery combination, you follow the instructions in the section "Sewing sequence".
Other procedures are the same as described for embroidery designs.
Exception: Stitches can be adjusted in its stitch settings such as stitch width and stitch length.
The Creative Data Manager
The Creative Data Manager organizes your Pfaff creative 2144's stitches/designs.
Here you can work with stitches/designs, sewing sequences, embroidery combinations, "personal menus" and the "patchwork" program.
Stitches/designs, sewing sequences, embroidery combinations and programs are referred to as 'data' or 'data records'.
- Two fields are available.
- One field is the source data. The other field is the destination data.
• Either field can be used as a source or destination. - To open directories, sub-directories, sequences/combinations, 'personal menus' or data records there is a selection bar which you can move up or down with arrows.
- In order to process a data record, it must be selected. The selected data record is shown against a dark background.
- If a directory is selected touch to access data records.
- To exit a selected directory or another data record, use the cursor arrows to move to [ .. ] and touch OK.
- If you have opened more than one window for setting different functions, touch Esc to return to the previous one, without saving your settings (i.e. you interrupt the input).
By touching 📄esc in the main window, you close the Creative Data Manager.
Touch to return to the Main menu of the machine.
Functions In the Creative Data Manager
- Stitches/designs can be saved; saved stitches/designs can be renamed, copied and deleted.
- Creative card designs can be copied to a creative memory card.
- Sequences/combinations can be created, renamed, altered and deleted.
- Personal menus can be altered, renamed and deleted.
- New directories and sub-directories can be created, whether in the machine or on a creative memory card.
- Properties of data records, individual stitches/designs in a sequence/combination or entire directories can be reviewed.
- Single stitches within a sequence can be seen.
- A complete sequence/combination can be seen.
Working with source and destination fields in the Creative Data Manager
The upper field is used as source, the lower field is used as destination. You can copy and move data from source to destination.

text_image
Embroid [..]- The lower field is the destination. Therefore the first step must be done in the lower field.
In this example we have moved the selection bar to the "sequences" directory of the menu.
- The upper field is the source. Therefore the second step must be done in the upper field. "EMBR" has been
selected with the cursor keys and confirmed with

Then the selection bar has been placed on the "003" design.
- With you open the window to "Copy", "Rename" and "Move" data such as stitches or sewing sequences.
text_image
EnterEdit [ ]Copying data
General : You can duplicate data or data records from the machine, a creative memory card or a creative card and save them to another memory or a creative memory card.
- Touch "Copy", the "003" design is copied to the directory "EMBR"
Note: Data from the built-in memory of the machine cannot be moved or renamed.
Moving data
General : You can move data or data records from the machine or a creative memory card to another memory or a creative memory card.
- Touch "Move", the "003" design is moved to the directory "EMBR".
Renaming data
To rename data or data records, touch "Rename". A window for entering a new name opens.
text_image
CAT_EMB A B C D E F G H I J K L M N O P Q R S T U Y W X Y Z _ - 1 2 3 4 5 6 7 8 9 0A name may be a maximum of 8 characters long. For more information see "Alphabets" section, page 4-11.
Touch OK to confirm your input.
Touch esc to close the window without your input being saved.
To exit a selected directory or another data record, move the cursor keys to [...] and touch OK.
text_image
[..]Touch 📄 to close the Creative Data Manager.
Touch to return to the main menu.
Working with a field in the Creative Data Manager
The following icons refer to the functions available in the Creative Data Manager.

Delete
Use this function to delete a selected stitch/design, sewing sequence or embroidery combination.
The following questions appear:
Do you really want to delete the data?
or
The directory is not empty! Do you still want to delete it?
Touch OK to confirm deletion. Touch to cancel deletion.
This function can be carried out in both fields.

Create a directory
Use this function to create a new directory for your stitches/designs.
- You can do this in the main directory as well as in sub-directories you have already created.
- You can create your own directories and subdirectories for your stitches/designs/sequences/combinations/programs and "personal menus."
- This is possible in the machine as well as on creative cards.
A window for entering the directory name opens.

text_image
MY_OWN_ A B C D E F G H I J K L M N O P Q R S T U V W X Y Z _ - 1 2 3 4 5 6 7 8 9 0You can enter a maximum of 12 characters. For more information see "Alphabets" section, page 4-11.
Touch OK to confirm your input.
Touch to close the window without saving the input.

Memory information
Touch this icon to review properties of the data records contained in a directory or stitches/designs that you have selected.
text_image
[MUPA] [EMB] [MUSTER] [MY_OWN] [PATCH/WRK] [PERS_MEN] Total memory: 524032 Bytes Free memory: 479232 Bytes Directories: 21 Files: 270 Subdirectories: 6 Files: 0 File size: 0 BytesData can only be selected in the upper field.
In the lower, field the contents of the memory are displayed.
To close the window, touch i again or

Sort criterion
Touch this icon to sort your data alphabetically or according to data type.
If you touch the icon when the sort criterion is set to alphabetical, it is switched to data type, and vice-versa.
This function can be carried out in both fields.

Select data records
- If you touch this icon when you have selected a sequence, you can sew the sequence straight away. The corresponding processing menu for the stitch sequence or embroidery combination appears on the screen.
- If you touch the icon when a 'Personal Menu' is selected, the personal menu is displayed and you can select a stitch and sew it. The stitch appears on the corresponding screen.
- If you select a stitch, the processing menu for the stitch appears and the machine is ready to sew.
- If you select the "Patchwork" program, the processing menu for the program appears and the machine is ready to sew.
This function can be carried out in both fields.
Touch 📄 to close the window and automatically return to the Creative Data Manager.