automatic 332 - Sewing machine PFAFF - Free user manual and instructions
Find the device manual for free automatic 332 PFAFF in PDF.

User questions about automatic 332 PFAFF
0 question about this device. Answer the ones you know or ask your own.
Ask a new question about this device
Download the instructions for your Sewing machine in PDF format for free! Find your manual automatic 332 - PFAFF and take your electronic device back in hand. On this page are published all the documents necessary for the use of your device. automatic 332 by PFAFF.
USER MANUAL automatic 332 PFAFF
natural_image
Vintage black sewing machine with visible brand and model number (no text or symbols on body)INSTRUCTION BOOK
PFAFF
Automatic 332-260
INSTRUCTIONS
FOREWORD
Your dream has come true!
You are now the proud owner of a PFAFF 332-260 Automatic -- the sewing machine with unlimited possibilities.
This instruction book will help you understand the machine and give you valuable tips to make sewing more fun for you.
Even if you are an experienced seamstress, you will find this book a valuable guide to easy sewing -- PFAFF Automatic Sewing.
Follow these simple instructions and familiarize yourself with the exclusive automatic features of your machine. You will find sewing exciting on your easy-to-operate PFAFF Automatic.
If you have any sewing problems, please contact your Pfaff dealer. He will be glad to help you at any time.
G·M·PFAFFAG
Sewing Machine Factory
Kaiserslautern

text_image
1 2 3 4 5 6 7 PFAFF 332 8 9 10 11 12 13 14 15 16 17 18R 7379
1 Thread take-up lever
2 Top control cover (A)
3 Dial (B)
4 Embroidery pattern length lever (E)
5 Buttonhole slide lever
6 Bobbin winder
7 Stop motion knob
8 Stitch length stop control
9 Stitch length (forward-reverse) lever
10 Light switch
11 Drop feed control
12 Needle plate
13 Free arm cover (enclosing transverse rotary sewing hook)
14 Needle
15 Upper tension
16 Sewlight swing-out lever
17 Needle position lever (C)
18 Stitch width control (D)
R7
19
20
21
22
23
text_image
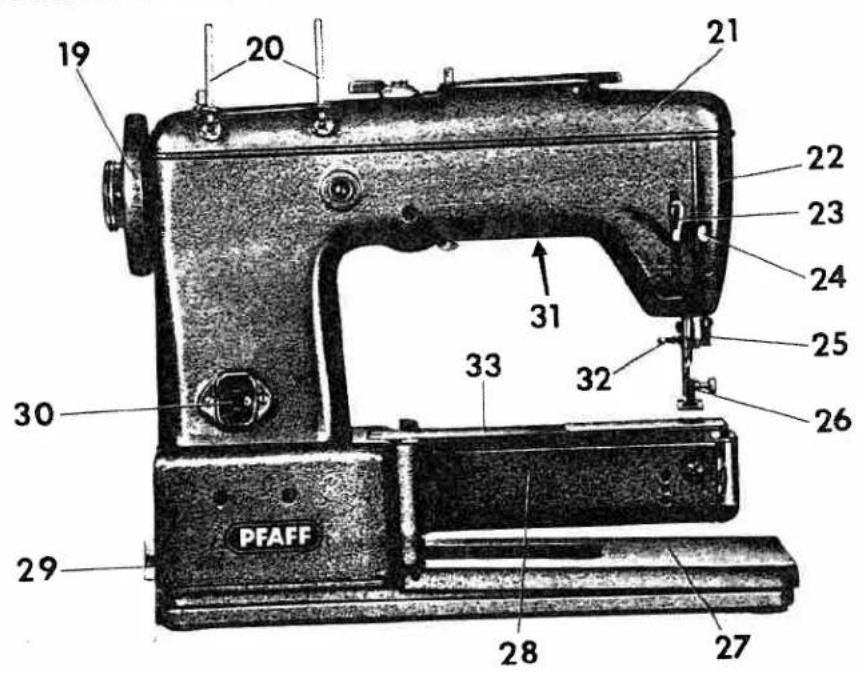
19 20 21 22 23 24 31 33 32 25 26 30 PFAFF 29 28 27R 7383
19 Balance wheel
20 Collapsible spool pins
21 Top cover
22 Face cover
23 Presser bar lever
24 Needle threader lever
25 Automatic needle threader
26 Sewing foot
27 Snap-out workplate
28 Free arm
29 Receptacle for foot control plug
30 Receptacle for power cord plug
31 Sewlight
32 Needle set screw
33 Free arm top cover

text_image
a b cR 7506
Fundamentals of Machine Operation
① Make sure stop motion knob b is tightened before you begin sewing (clockwise as indicated by white arrow).
② Whenever you have to turn the balance wheel a, turn it toward you (counter-clockwise as shown by black arrow).
③ Raise presser bar lever c and place both threads under and behind the sewing foot. Slide material under needle, lower sewing foot -- and you're ready to sew.
R 7074
natural_image
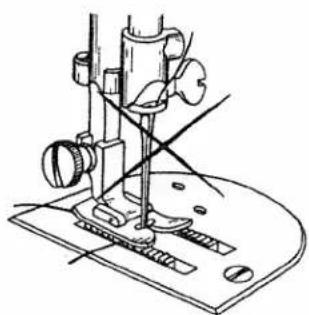
Line drawing of a sewing machine needle and screwdriver (no text or symbols)④ Never run a threaded machine unless you have fabric under the presser foot.

natural_image
Line drawing of a sewing machine needle stitching fabric (no text or symbols)
chine under

Important Points to Remember
natural_image
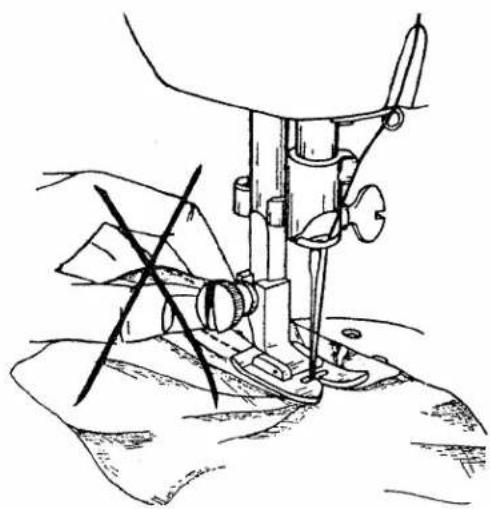
Line drawing of a sewing machine needle stitching fabric (no text or symbols)The machine will feed the material under the sewing foot automatically. All you have to do is guide the work. Never try to hasten feeding by pushing or pulling the fabric while stitching because the needle may bend or break.
A woman sewing by hand will normally draw one stitch tight before making another. On a sewing machine, this is done automatically by take-up lever d.
Therefore, always turn the balance wheel toward you until the take-up lever is at its highest position before you begin and after you have completed a seam. Failure to observe this rule may cause the thread to tangle under the needle plate or slip out of the needle eye.
5
R 6808

natural_image
Black-and-white illustration of a person holding a small object above a dark dog (no text or symbols visible)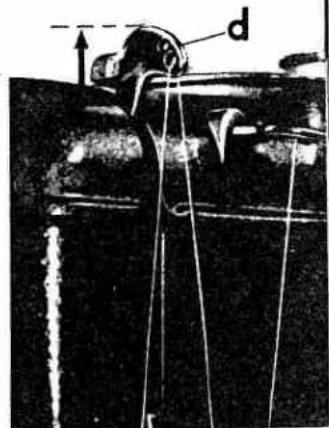
text_image
Technical diagram showing a mechanical or electrical component with labeled parts 'd' and an upward arrow indicating direction.R 6809
natural_image
Four-panel black-and-white illustration showing a sewing machine performing a sewing process, with no visible text or symbols.R 6085
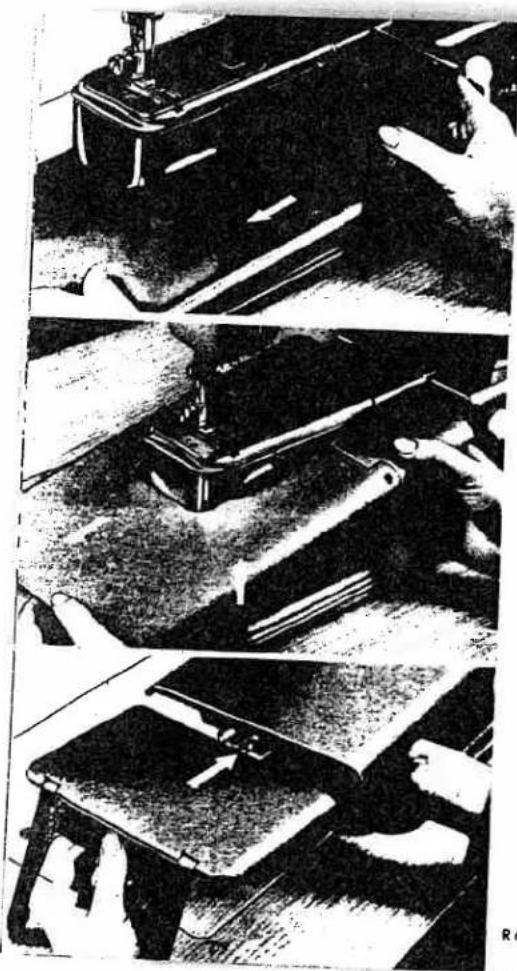
The Snap-Out Workplate
R 6084
Your PFAFF Automatic has a snap-out work-plate which can be raised to give you a full-size work area for flat sewing and embroidery. To raise workplate, pull it out to the left as far as it will go, then lift it until it is flush with the needle plate. Now let it snap into position.
When you want to use the free arm for darning, lower the workplate, proceeding in reverse order.
Larger articles may require a larger work surface. To further increase the sewing area, attach the workplate extension which is in the carrying case. Swing out the collapsible legs.
R 6063
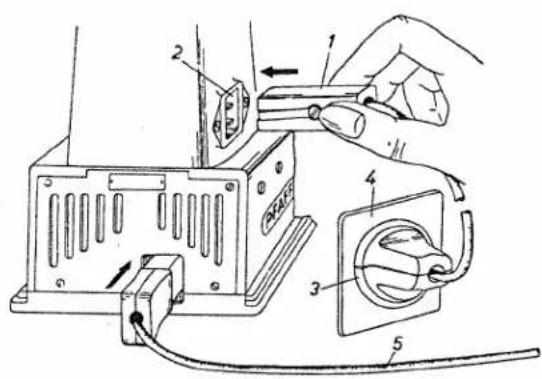
Electrical Information
Make sure that the voltage indicated on the motor label (110 V) corresponds to the voltage in your home. (Check other appliances).
Push plug 1 of power cord into receptacle 2 on back of machine, and plug 3 (at other end of cord) into wall outlet 4. Connect plug of foot control cord 5 with receptacle at balance-wheel end of machine.
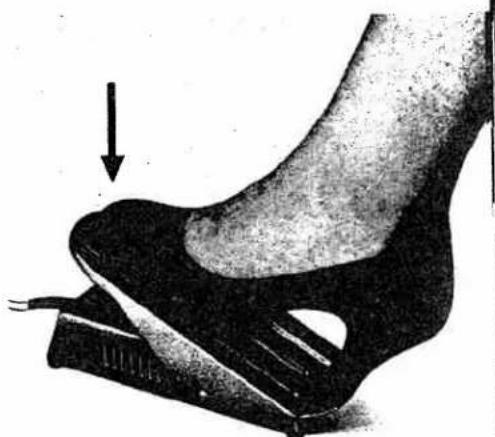
Place the foot control under the table within easy reach of your foot. Place your foot on the control and press. The harder you press, the faster the machine will run. During pauses in stitching, completely remove your foot from the control - do not allow it to rest there.
text_image
Technical diagram showing a hand operating a switch mechanism with labeled parts 1 through 5R 7132
natural_image
Illustration of a foot pressing down on a high-heeled shoe, with a downward arrow indicating motion (no text or symbols present)
text_image
E B D CR 6629
Straight Stitch Sewing
Set:
Dial B - 0
Lever E - 0
Control D-0
Lever C - Centered

text_image
Technical diagram of a sewing machine with fabric cutting and directional arrows indicating measurement or assembly stepsLever f regulates the stitch length and controls forward and reverse sewing. (Lever should be in vertical position before setting stitch length). Control e stops stitch on length desired.
Forward Sewing
Set e on number that indicates stitch length you want (1-5; the higher the number, the longer the stitch). Turn f right as far as it will go.
Reverse Sewing
Turn f left as far as it will go. (The reverse stitches will be the same length as forward stitches).

natural_image
Black-and-white illustration of a round object with labeled points (R, f, e) and a lightning bolt symbol above it (no readable text or symbols beyond labels)8
R 7066
natural_image
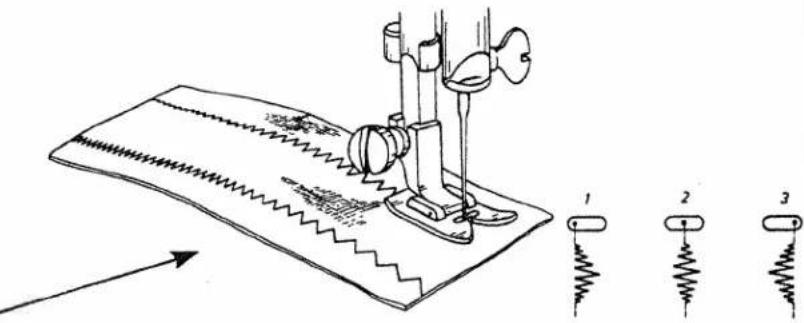
Abstract black-and-white illustration of a stylized human figure with a circular head and abstract lines (no text or symbols)Zigzag Sewing
Set: Dial B-0 Lever E-0
Turn control D left to desired stitch width (indicated by numbers 1 to 4; the higher the number, the wider the stitch).
Do not move C or D while needle is in fabric.
text_image
Technical diagram of sewing machine stitching with three spring components labeled 1, 2, and 3R 7071

text_image
z m 1 2 C 3 D 4 3 2 1 0 WW
Lever f lengthens zigzag stitches or packs them more closely together. To form the satin stitch gradually decrease stitch length almost to 0 until you get the desired effect.
Lever C changes needle position from left to right. Thus the stitching can be moved from the center to the left or right of the needle plate slot.
To change needle position, press lever C down and move into:
Notch 1 - The needle is at the extreme left of the needle plate slot in straight sewing, and swings to the right in zigzag stitching.
Notch 2 - The needle is centered in the needle plate slot in straight sewing, and swings both ways in zigzag stitching.
Notch 3 - The needle is at the extreme right of the needle plate slot in straight sewing, and swings to the left in zigzag stitching.
Pointer x indicates the position of the needle on the top scale.

text_image
A n B C D ER 6631
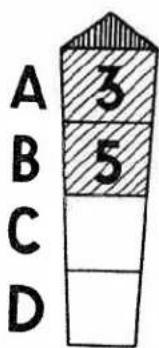
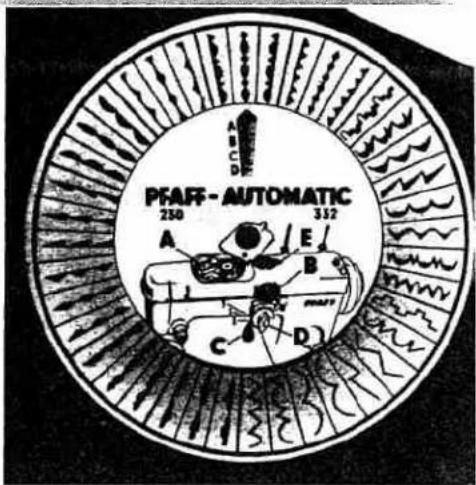
Setting Machine for Automatic Embroidery
Set: Lever E-3
Swing back the cover on control A.
Your embroidery design dial shows all the primary designs you can make with the Automatic. Pick your design and turn the dial so it points to that design. The numbers in the slot indicate the machine dial settings which will give you the design you have chosen.
For example:
Turn A (clockwise) so 3 is opposite n.
Turn B (clockwise) so 5 is at top.
bar_stacked
| Category | Value | |---|---| | A | 3 | | B | 5 | | C | 0 | | D | 0 |Set stitch length lever f (page 8) so stitches are closely packed.
If embroidery design dial shows no symbol for lever C or control D, disregard them.
For such designs C and D will operate automatically. Do not touch them.
10
R 7072

text_image
PFAF - AUTOMATIC 330 325 318 A E B C D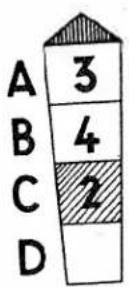
text_image
1 3 C/2 1 2 3If number 1, 2 or 3 appears in box C, move lever C to the appropriate slot. An arrow or 0 in box D indicates that control D should be turned to the right as far as it will go without applying force.

If a 2 appears in box D, you may set the dial exactly at "2"; or, if you want a narrower design, you may set it somewhat lower, say between "1" and "2". Pattern is not clear, if D is set above "2".
A Big Advantage of the PFAFF Automatic Each of the primary designs pictured on the embroidery design dial can be sewn in different lengths. Therefore you can vary the appearance of the pattern without changing the stitch length. The pattern length is controlled by lever E, which has seven graduations – four numbered (1, 3, 5 and 7) and three unnumbered. Maximum pattern length is obtained by setting lever E on "7", and minimum length by setting it on "1". When it is set on "0", the Automatic mechanism is disengaged. 11
natural_image
Close-up of a spacecraft's head and fuselage with visible markings (no text or symbols)R 7095
Machine Setting: A 3, B 4, C 2

text_image
Lever E at: 1 3 5 7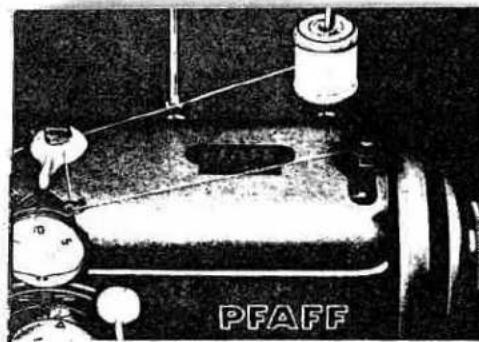
natural_image
Mechanical device labeled 'PFAFF' with no visible text or symbols on the device itselfR 6722
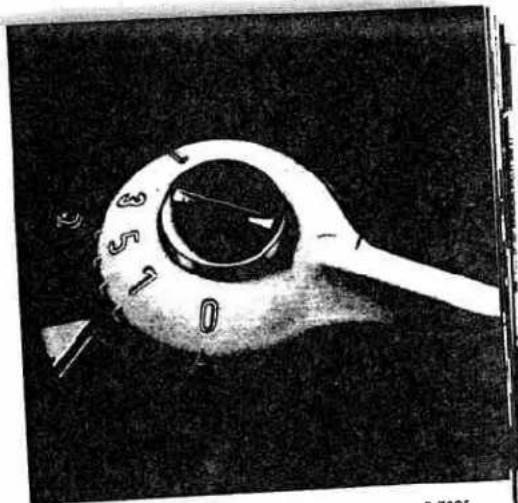
Winding the Bobbin
① Hold balance wheel a and turn stop motion knob b all the way to the left (counter-clockwise).
② Place spool of thread on right-hand spool pin. The bobbin thread should always be the same size as that used on the spool, or a little finer.
③ Pull thread from spool and lead it clockwise around thread retainer g, crossing the thread.

natural_image
Abstract black-and-white illustration of a stylized globe with geometric shapes and no visible text or symbols1
text_image
R 6036 a b FAFF 3322
R 7101
natural_image
Black-and-white illustration of a hand holding a small cylindrical object, possibly a tool or device (no text or symbols visible)3
R 7096

natural_image
Mechanical assembly diagram showing a turning tool and mechanical components (no text or symbols visible)
natural_image
Black-and-white illustration of a helmet with three eyes and a small object above, no visible text or symbolsR 7100
4
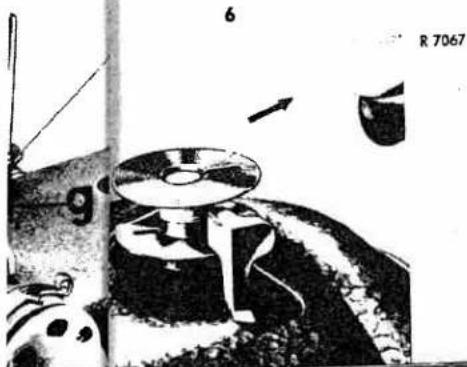
④ Pull it through thread guide h.
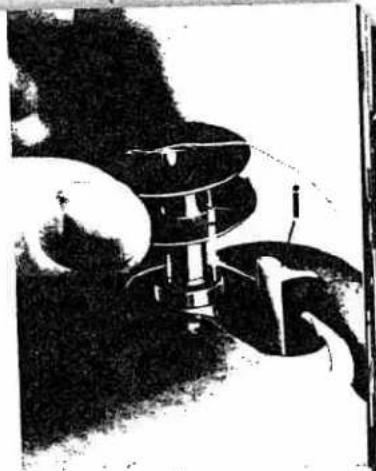
⑤ Pass end of thread through slot in bobbin, from inside. Set bobbin on bobbin winder spindle so that key at base of spindle enters slot in bobbin. Press in lever i.
⑥ Hold end of thread and slowly start machine. Having wound a few turns, break off end of thread and continue winding at a faster pace.
⑦ Bobbin winder will stop automatically when bobbin is full.
⑧ If you don't want a full bobbin, press out lever i when sufficient amount of thread has been wound.
You may continue sewing while you are winding bobbin without disconnecting balance wheel.
natural_image
Black-and-white illustration of a spacecraft with solar panels and orbital paths (no text or symbols)5
R 7102
8
natural_image
Black-and-white illustration of a mechanical device with a disc and gear, no visible text or symbolsR 7097
7

natural_image
Illustration of a mechanical component with a cylindrical housing and a curved arrow, no visible text or symbols.R 7099

natural_image
Illustration of a cylindrical tank with a flanged side, mounted on a platform (no text or symbols visible)
text_image
j kR 6030
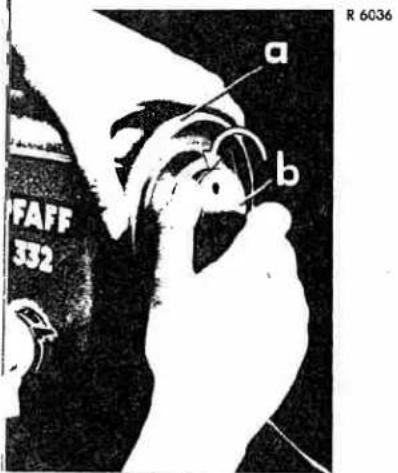
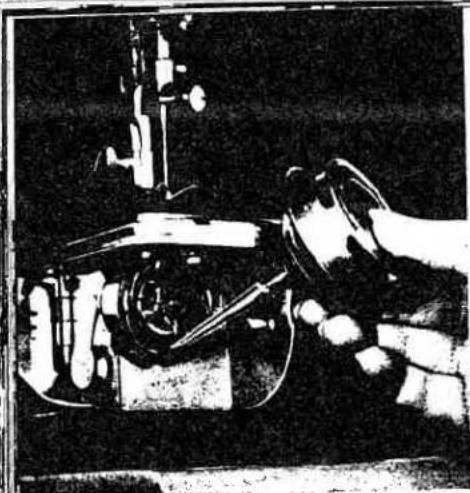
Removing the Bobbin Case
Raise needle to its highest point and open cover j. Lift latch k with your forefinger. Pull out bobbin case with bobbin by holding the latch. When you release latch k, the empty bobbin drops out.
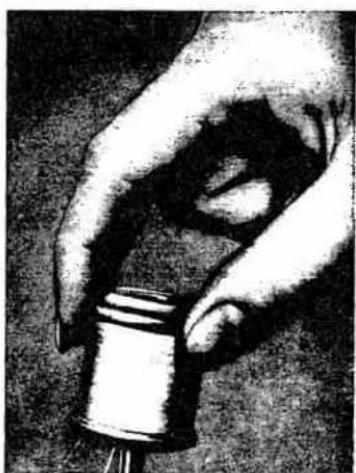
Inserting a Full Bobbin into Bobbin Case
① As shown in illustration 1, hold bobbin in left hand so that the thread end falls from the top down toward you, and insert bobbin into bobbin case.
② Hold the bobbin firmly in the bobbin case and pull the thread into the case slot.
③ Pull the thread under the tension spring until it emerges from the opening at the end of the spring. Leave about three inches of thread hanging from the bobbin case.
④ Hold the case by its open latch, so that the bobbin cannot fall out.

natural_image
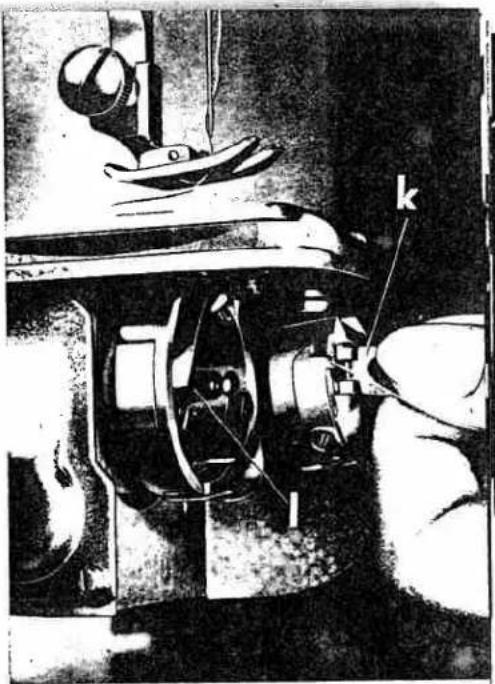
Two black-and-white images showing hands holding a small object, labeled 1 and 2, with no visible text or symbols.Inserting the Bobbin Case
Make sure the needle is still in its highest position.
With thumb and forefinger of left hand, lift latch k and turn bobbin case until slot at end of latch points up. Then place it on center stud I of hook.
In replacing the bobbin case, it is best to hold the loose end of thread so that it will not get jammed between bobbin case and hook. Release latch k.
R 7380
natural_image
Mechanical device with labeled parts (l, k, I) and a spherical component on top, no readable text or symbols beyond labels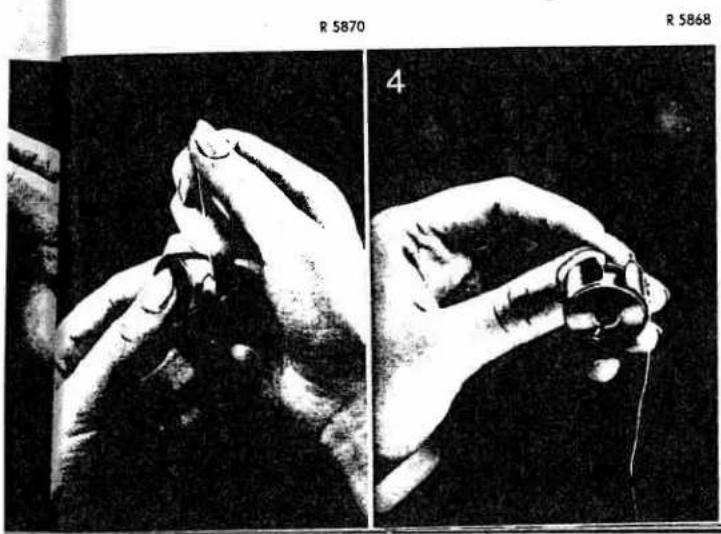
natural_image
Black-and-white photo of two hands holding a small object, no visible text or symbolsPress against bobbin case until you hear it snap into place. An improperly inserted bobbin case will cause needle breakage.
Close cover i.
15
| Types of Fabrics | Mercerized Cotton | Silk | Needle Size |
| Fine Fabrics such as georgette, chiffon, batiste, voile, lawn, silk. | 80 to 100 | 0 to 000 twist | 60 or 70 |
| Lightweight Fabrics such as dress silks and cottons, sheers, woolens, shirting, draperies. | 70 to 80 | A & B twist | 80 |
| Medium Fabrics such as lightweight woolens, madras, muslin, brocades, heavy silks and rayon, gabardine. | 50 to 70 | B & C twist | 90 |
| Heavy Fabrics such as coating, denim, corduroy, slipcover fabrics, bed tickings, lightweight canvas. | 40 to 50 | C & D twist | 100 |
| Very Heavy Fabrics such as heavy tickings, canvas, overcoating, sailcloth, upholstery. | 24 to 40 | E twist | 90 to 110 |
| Synthetics, Rayon, Acetate including nylon, orlon, dacron, plastics, etc. | Determined by weight of fabric 40 to 50 | Determined by thread size 60 to 80 | |
Recommended Needle and Thread Sizes
The appearance of the finished seam is dependent on the correct relationship between needle, thread and fabric. Select the proper thread sizes and needles from this chart.
The same size threads should be used in the needle and on the bobbin. Some experienced seamstresses prefer a somewhat thinner bobbin thread. However, the bobbin thread never should be thicker than the needle thread.
Important Facts about Needles
On PFAFF Automatic sewing machines, System 130R, flat-shank needles are used for all ordinary sewing and embroidery work. The needle system is stamped on the needle plate. Genuine Pfaff needles, System 130, are available from every Pfaff dealer. Bent or blunt needles should not be used.
R 6798
natural_image
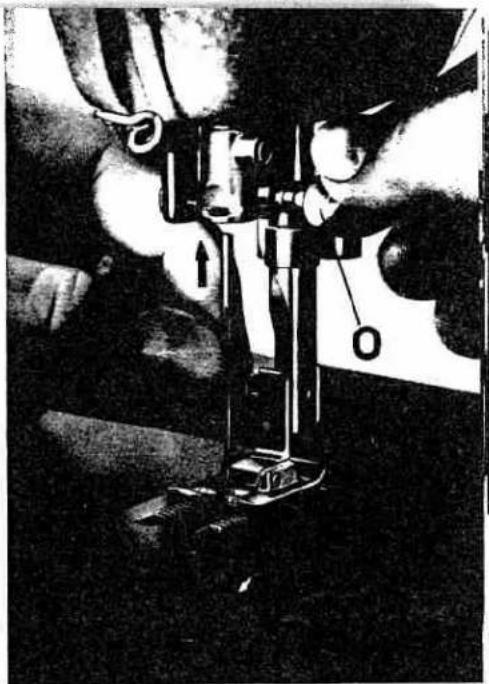
Mechanical device with rotating arms and a hanging weight, no visible text or symbolsChanging the Needle
Bring needle bar to its highest point and lower sewing foot.
Loosen needle set screw o half a turn and pull old needle out of needle clamp. Insert new needle into opening of needle clamp and push it up as far
as it will go. Make sure that the flat side of shank faces toward the back and long groove toward you. Tighten needle set screw o.
The illustration (left) shows you how the needle clamp works. The needle set screw presses against the tapered needle positioning roller which presses against the flat side of the needle shank and holds the needle in place.

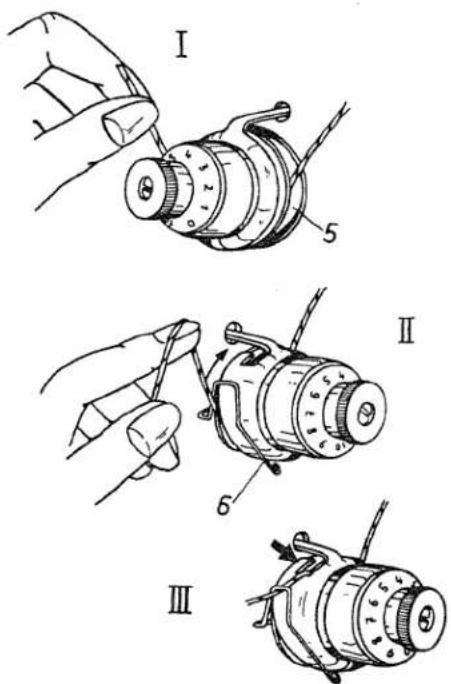
Upper Threading
Place thread on spool pin 1 and lead thread end through holes in thread guides 2 and 3 and through both thread retainer openings 4 (see illustration opposite).
Pull thread between any two of the tension discs 5, (Fig. I) and lead it clockwise (Fig. II) until it snaps into the square notch in the tension cup (Arrow, Fig. III). The thread passes underneath the thread check spring which holds it down permanently.
Bring take-up lever 7 as high as it will go and pass thread from right to left through one of the holes at its end. Pull thread into slots at left of thread guides 8 and 9, and then into the slot at left of needle clamp 10.
Then thread needle, front to back. PFAFF's Automatic needle threader will do this for you easily and quickly.
text_image
I 5 II 6 IIIR 7378
19

text_image
Technical diagram of a vintage sewing machine with numbered parts for identification
natural_image
Black-and-white illustration of a person standing near a wall with a pipe, no visible text or symbolsR 7068
Operating the Automatic Needle Threader
Before you begin, make sure that the needle is at its highest position – when the lower hole of the ascending take-up lever d is in line with the bottom edge of the top cover. Now lower the sewing foot and –
① With your left hand push threader engaging lever p up until threader prong penetrates needle eye. Keep lever p in this position.
② Hold thread loosely and lead from left around pin q behind hook of prong w on needle threader.
③ Slowly lower lever p part way until prong w reverses and pulls thread through the eye.
④ Jerk lever p up slightly so the thread loop will fall off the prong. Release lever p. Pull thread through needle eye.

text_image
R 7069 1 R 7089 2 R 7088 3 R 7087 4 P q wR 5390
When you have had sufficient needle threading practice, you may shorten the procedure as follows:
Push lever p up. Place thread behind hook of prong w so that its end is about 12 inch to the right of the prong. Slowly lower lever p. Prong w now pulls end of the thread – instead of the loop – through needle eye.
Since take-up lever d is not at its highest point when you thread the needle, pull about four inches of thread through the needle eye before you begin sewing.
natural_image
Black-and-white illustration of a vintage sewing machine on a workbench (no visible text or symbols)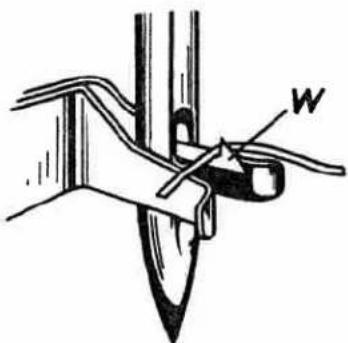
natural_image
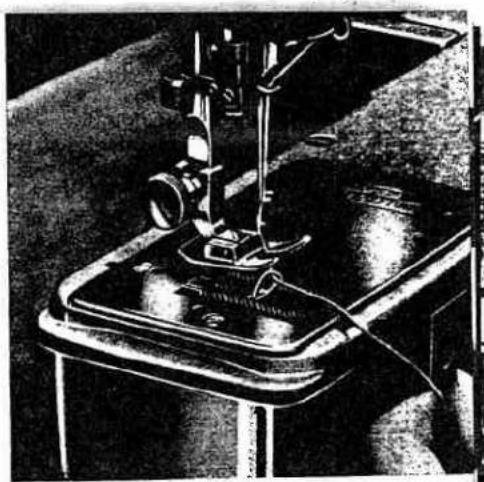
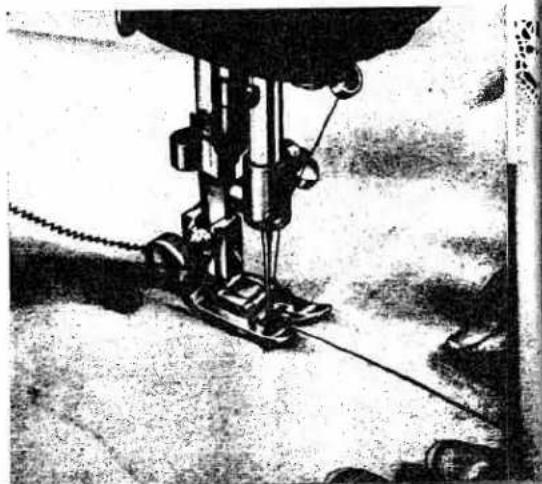
Diagram of a hand holding a tool with a labeled arrow 'W' (no text or symbols beyond the label)Drawing Up the Bobbin Thread
Hold needle thread lightly in your left hand. Turn balance wheel toward you until the needle moves down and up again and take-up lever reaches its highest position. Lightly pull needle thread to draw bobbin thread up through needle plate slot. Place both threads back under sewing foot before you put fabric into machine.

natural_image
Black-and-white photo of a sewing machine stitching fabric, no visible text or symbolsR 7374
To check whether the tensions are correctly balanced, take a closely woven piece of fabric and sew a few straight and zigzag seams. If the straight stitches are tightly drawn in on both sides of the fabric (see seam sketch III), the tensions are correct. The surest way to double-check this is by examining a zigzag seam. If the zigzag seam is equally wide on surface and underside of the fabric, that is, if the threads are locked exactly at the zigs and zags of the seam, the tension adjustment is correct.
Correct Tension Regulation
Balanced tensions are essential for sewing. If your tension is correct, you will have perfect seams as sketched (III) below.
Sketch I - The threads interlock on the underside of the fabric.
Cause: Upper tension too loose or lower tension too tight.
Sketch II - The threads interlock on the surface of the fabric.
Cause: Upper tension too tight or lower tension too loose.

text_image
Diagram illustrating three mechanical or robotic arm configurations labeled L, II, and III, showing different movement paths with tool tips and rotating components.22

natural_image
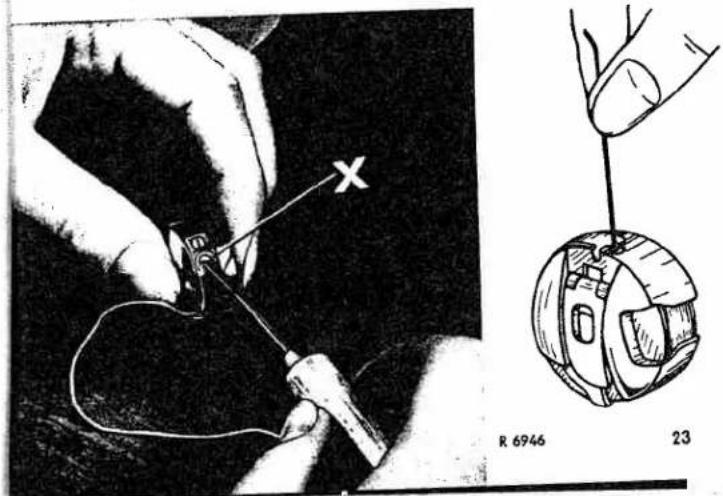
Abstract black-and-white textured pattern with no discernible text or symbolsRegulating the Thread Tension
Bobbin tension rarely needs adjusting, except for embroidery when it should be a little tighter than for ordinary sewing. Adjustment is made by the small screw (x) on the bobbin case:
Turn it left ↙ for looser tension.
Turn it right >> for tighter tension.
Determine correct bobbin tension by holding the thread end between thumb and forefinger and letting the bobbin case hang freely. The tension should be strong enough to keep the bobbin case from being pulled down by its own weight. However, as you jerk your hand slightly, the bobbin case should gradually slide down.

natural_image
Black-and-white photo of a person in a helmet with ropes, no visible text or symbolsR 7345
text_image
R 6946 23△
The final stitch appearance can be regulated by upper tension knob (y) as follows:
Turn left ← for looser tension.
Turn right >> for tighter tension.
The upper tension is so designed that all grades of tension – loose to tight – can be covered with one complete turn of the tension knob. The numbers on the tension dial indicate different degrees of tension. The higher the number, the greater the tension. For ordinary sewing, the upper tension should be set between 3 and 5.

text_image
5 f eR 7066
Stitch Length Regulation
◀ Set f in neutral (vertical position).
Set e so its pointer is on the indicator scale number corresponding to the desired stitch length. Turn lever f to the right as far as it will go. To sew backwards, turn lever f toward the left as far as it will go. Control e stops stitch length, 1 to 5, on indicator scale.
Stitch length may also be regulated by turning e all the way left √ and f in the forward sewing position as far as it will go. Sew a few stitches and regulate the stitch length by turning f slowly toward the left √ until desired stitch length is obtained. To hold the stitch length in position, turn e right √ until it stops.
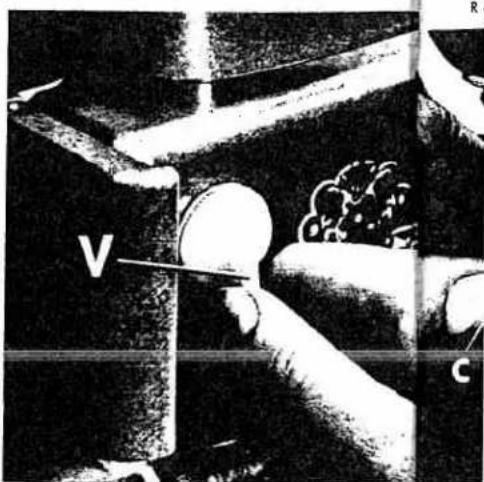
Dropping the Machine Feed
The machine feed is dropped for darning, hoop ▶ embroidery and button sewing.
① To lower feed below the needle plate, turn drop feed control v clockwise. Fabric will cease feeding.
② When control v is turned to the right as far as it will go, feeding of the fabric resumes automatically when you start sewing.

natural_image
Simple line drawing of three rectangular strips with a label '1' and an arrow, no text or symbols present.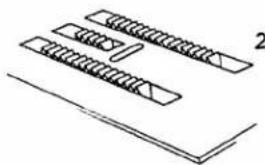
natural_image
Diagram of three types of mechanical components with no visible text or symbols24
text_image
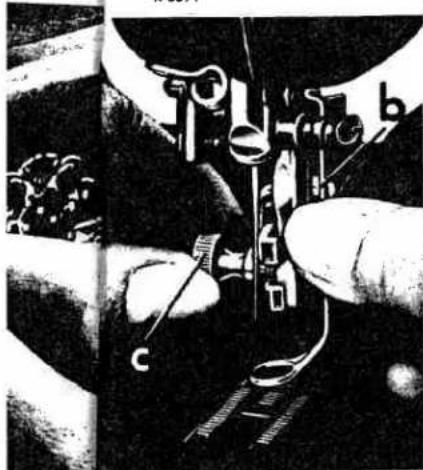
V CR 6029
R 7085
Changing the Sewing Foot
Lift both needle and presser bars to their highest positions and turn screw c to the left. The screw usually can be loosened by hand, but if it is too tight, use a screw driver. Tilt the foot sideways and pull it down. Slip on new foot and tighten screw c.

natural_image
Black-and-white illustration of a robotic device with visible sensor and antenna (no text or symbols)
natural_image
Black-and-white photo of a robotic arm with visible gears and chains (no text or symbols)R 7086
R 6591
R 6592
natural_image
Close-up of hands operating a sewing machine needle (no visible text or symbols)
natural_image
Mechanical device with labeled parts, no visible text or symbolsThe Darning Foot
Remove the sewing foot. Attach darning foot from the rear. Hold spring clip b so that it is behind the needle set screw, and tighten screw c. Attach darning hook d as illustrated so that when you lower presser bar lever e, the darning foot will stay in position. Remember to lower presser bar lever e so that the upper tension is activated.
25
natural_image
Black-and-white illustration of a robotic arm operating a mechanical device (no visible text or symbols)R 6032
Care and Maintenance
Longevity and smooth machine performance are dependent on regular and proper cleaning and oiling.
Use Pfaff sewing machine oil only. Never lubricate machine with animal or vegetable oils. Remove all lint before oiling.
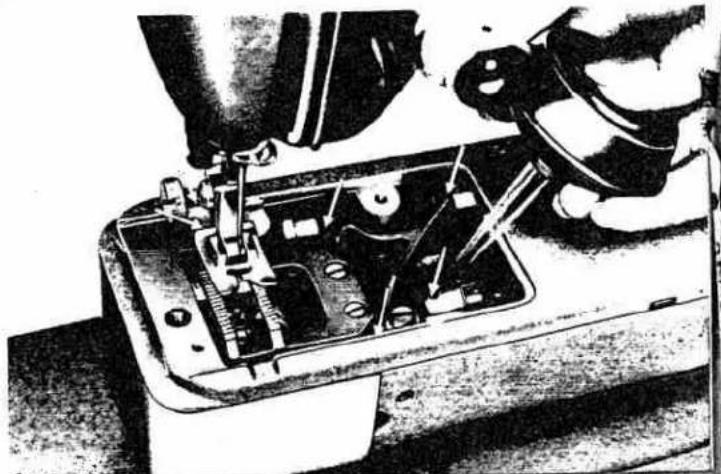
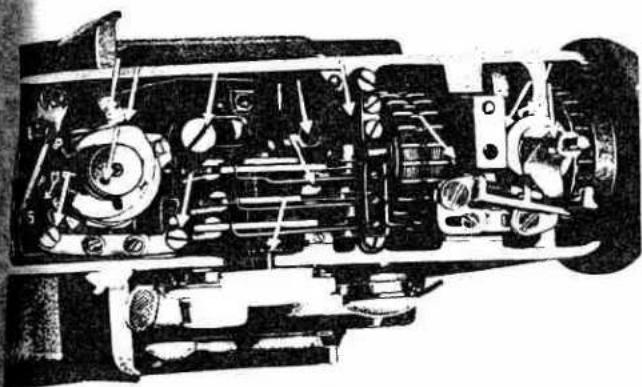
All moving and rotating parts require regular lubrication. It is advisable to establish a pattern when oiling your machine. Begin by removing the needle plate and oiling the mechanism in the free arm. The principal oiling points are marked by arrows.
R 7377

The raceway in the sewing hook is the most important oiling point. Put one drop of oil into the raceway each day you sew. A dry raceway will cause rapid wear. Don't forget to put a drop of oil into each of the two oil holes behind the sewing foot. This is essential to keep the hook shaft bearing oiled.
26
natural_image
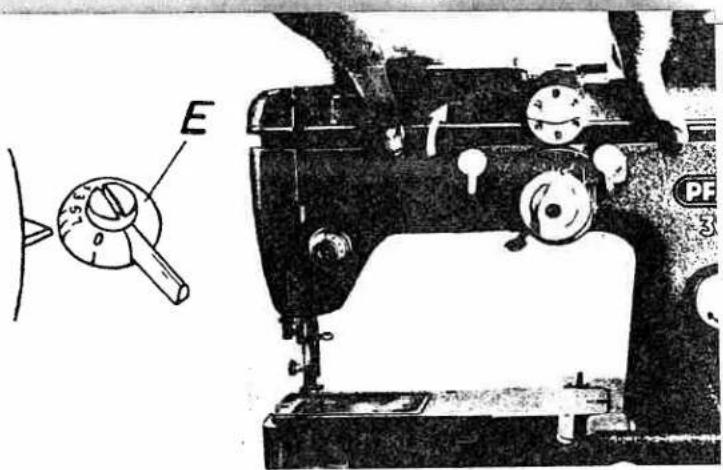
Close-up of a sewing machine's internal components being processed, showing no visible text or symbolsThe oiling points in the machine arm can be reached easily by removing the top cover. Oil should be applied sparingly. Excessive quantities of oil may soil the work and cause machine sluggishness. One or two drops of oil usually will suffice.
Before you remove the top cover, set lever E between 5 and 7. To pull cover up, tilt it back and lift.
text_image
E PF -3R 7382
natural_image
Cross-sectional diagram of a mechanical device showing internal components and no visible text or symbols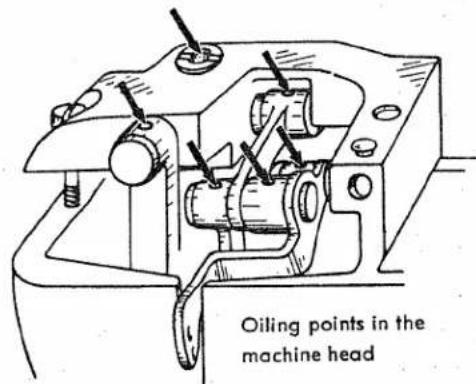
text_image
Oiling points in the machine head27
Sewlight Facts
The 25-watt sewlight is recessed under the machine arm. Lever u swings out the light to illuminate a larger working area.
To change the light bulb:
Swing lever u up (see arrow) and hold. Push bulb up into socket, turn left, and pull out.
When inserting the new bulb, be sure to slide bulb pins into bayonet socket slots.
Press bulb in and turn right.

text_image
R 7084 R 3683 UPress the button on the front of the machine base to switch the sewlight on and off.
28
R 7066
natural_image
Black-and-white photo of a mechanical device with a lever and mounting bracket (no visible text or symbols)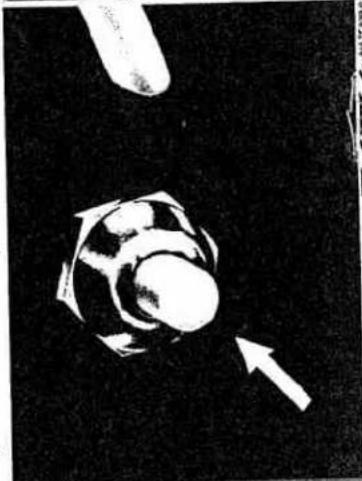
natural_image
Abstract black-and-white illustration of a stylized human figure with a circular head and arrow, no text or symbols present.R 5393
text_image
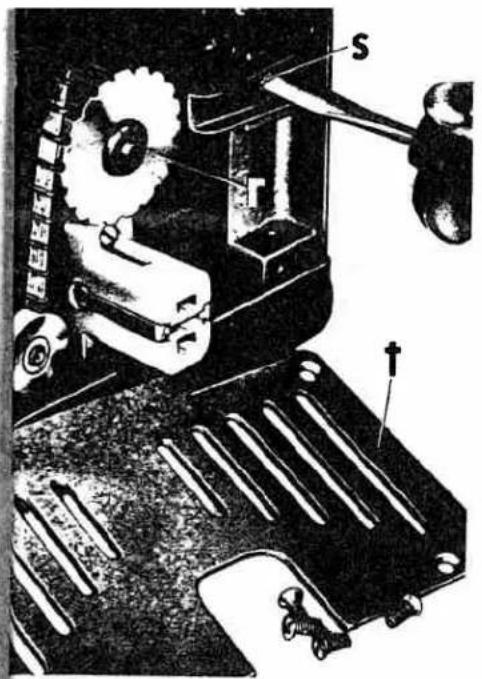
Technical diagram of a mechanical device with labeled parts including 'S', 'r', and a tool, likely illustrating a gear mechanism or assembly.R 6548
The electric motor requires no special attention, except that the brushes should be replaced after 400 hours of service.
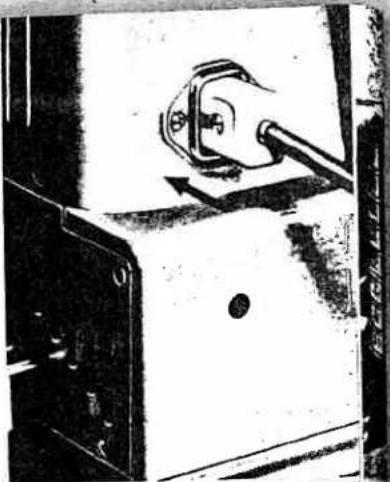
Adjusting the Motor Belt Tension
Your PFAFF 332 Automatic is equipped with a 30-watt electric motor (Type PE 332), which is housed in the machine base and drives the main shaft by means of a driving belt.
If the driving belt tension needs adjustment, take out the four screws in cover t and remove. Loosen screws s and adjust idler r until correct tension is obtained.
Idler r should be set just far enough left that it synchronizes with the belt clips and revolves evenly.
When you tighten screw s, make sure the washer is in the correct position.
Trouble Shooting
1. Machine Skips Stitches
Cause:
Remedy:
Needle incorrectly inserted.
Push needle up as far as it will go and be sure that the long groove faces you, and flat part of needle away from you.
Wrong needle.
The correct needle system is stamped on needle plate.
Needle bent.
Insert new needle.
Machine threaded improperly.
Check and correct threading as instructed.
Needle too fine or too thick for the thread.
Use correct needle and thread.
2. Needle Thread Breaks
Cause:
Remedy:
The above mentioned may cause thread breakage.
See remedies listed under 1. above.
Thread tension too tight.
Adjust tensions as instructed.
Poor or knotty thread used.
Use good quality threads only.
Hook race is jammed with thread or needs oiling.
Clean and oil hook raceway.
Burrs or sharp edges on needle plate slot.
Polish needle plate slot with fine emery cloth.
3. Needle Breaks
Cause:
Bent needle strikes point of sewing hook.
Needle too thin or thread too heavy.
Fabric pulls needle so it bends and strikes needle plate.
Bobbin case inserted incorrectly.
Remedy:
Replace needle at once to prevent further damage.
Use correct needle and thread sizes.
Don't force the feeding motion. Guide the material lightly.
Push bobbin case until you hear it snap into place.
4. Faulty Stitch Formation
Cause:
Improper tension.
Thread too heavy, knotty or hard.
Bobbin unevenly wound.
Pieces of thread between tension discs.
Remedy:
Adjust tensions as instructed.
Use only first-rate thread -- the correct size for the needle and fabric.
Don't run thread over finger when winding the bobbin, but lead it around tension stud on top cover and through thread guide h.
Release upper tension by setting it on "0" and remove thread.
5. Machine Feeds Improperly
Cause:
Feed dog set too low and does not rise up enough above needle plate level.
Remedy:
Have your Pfaff dealer make the necessary adjustment.
Accumulations of lint packed between feed teeth. Take off needle plate and remove lint with a stiff brush.
6. Machine Works Heavily
Cause:
Remedy:
Motor belt is loose and slips, or has shrunk and causes excessive pressure on bearings.
Loosen or tighten motor belt by adjusting idler.
Hook raceway lacks oil or is obstructed by pieces of thread.
Clean and oil hook raceway.
Mechanism clogged by inferior oil.
Use only Pfaff sewing machine oil – never salad oil or glycerine.
Bobbin winder working while sewing. (When a bobbin is not being filled).
Stop bobbin winder.
Snarled thread between balance wheel and bushing.
Unwind and remove thread.
Thread Jamming
If thread jams in the sewing hook mechanism and blocks it, proceed as follows:
① The thread will come out more easily if you put a few drops of oil or cleaning fluid into the hook raceway.
② Tighten the stop motion knob.
③ Move the balance wheel away from you.
④ Take the end of the thread and pull it out while rocking the balance wheel.
⑤ If thread is still jammed, call your Pfaff dealer for help.
Thread jamming can be avoided by following the instructions on pages 4 and 5.
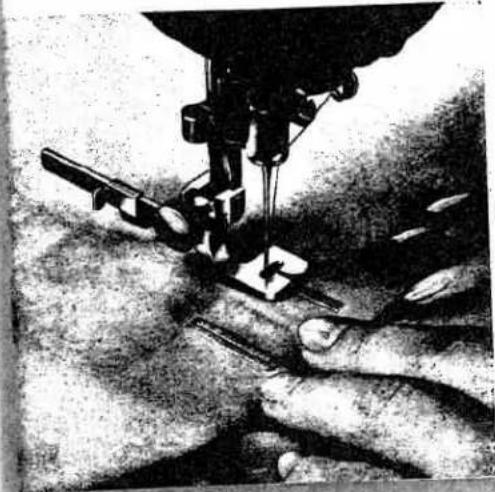
Zipper Insertion
Machine Setting:
E - 0 C - 3 B - 0 D - 0 Stitch Length: 1 - 2
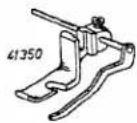
Zipper Foot No. 51300.
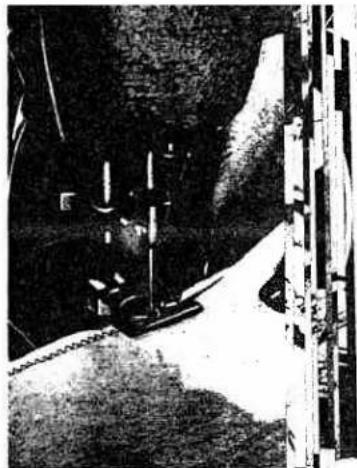
Pin or baste closed zipper on wrong side of fabric. Position of zipper depends on whether or not you want the edge of the fabric to overlap the zipper. Turn fabric to right side. Run a straight seam close to left edge of zipper, stitch across lower end and up the other side in one continuous operation. Use right edge of foot as a guide. For other types of zipper insertion, follow directions in your zipper package.
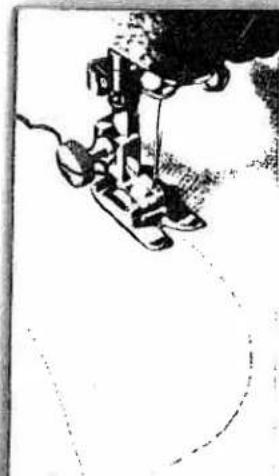
Edge Stitching
Machine Setting:
E - 0 C - 2 B - 0 D - 0 to 4 (optional) Stitch Length: 2 - 4
Sew parallel rows of straight or zigzag stitches at various distances from the fabric edge by using adjustable seam guide No. 53077 and the edge stitcher (without quilting gauge). The seam guide is fastened to the machine bed with the long thumb screw.
R 7423
natural_image
Black-and-white illustration of a robotic arm operating a tool, with no visible text or symbolsR 7104
Quilting
Machine Setting:
E - 0 C - 2 B - 0 D - 0 or 2 (optional) Stitch Length: 1 - 2
Used with the quilting gauge it sews parallel rows of stitching over the entire surface of the fabric. Always guide the gauge finger along the preceding row of stitches.
Attractive tea cosies, slippers, seat pads, and covers can be quilted.
33
R 5905

natural_image
Two-panel black-and-white image showing a sewing machine and fabric cutting process, no visible text or symbols.
natural_image
Black-and-white illustration of a sewing machine needle stitching fabric (no text or symbols visible)R 7171

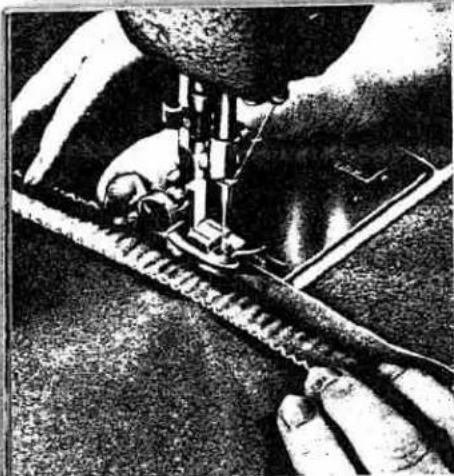
Flat Felled Seams
Machine Setting: E - 0
C-2
B-0
D - 0 or 2 (optional)
Stitch Length: 1-2
Flat felled seams are used to durably join two pieces of fabric. They are made in two operations.
Flat felled seams usually are straight stitched. Narrow zigzag stitches are used for felling on elasticized fabrics only.
First Seam
Lay pieces together wrong sides facing up with the bottom piece protruding 18 inch. Feed both pieces into felling foot, as illustrated, so that the bottom fabric is folded over edge of top
piece and stitched down. Make sure that protruding seam allowance is not folded twice.
Second Seam
Open the two pieces, place them under the needle right side up, insert seam ridge into felling foot opening, and stitch down to the left. Make sure that second seam is placed close to the edge but not beyond it.
The felling foot has a needle slot, rather than a needle hole, to permit zigzag felling.
34
R7154

natural_image
Mechanical assembly diagram showing a sewing machine needle and base mount (no text or labels)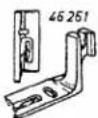
Rolled Hems
Machine Setting:
E-0
C-2
B-0
D - 2 to 4 (optional)
Stitch Length: 2-4
Rolled hems are used to finish sheer or delicate fabrics. For a smooth, unpuckered hem, ease thread tension slightly and set D on 1 to 3. To hem tricot fabrics increase the tension, and use the widest zigzag stitch so the hem has a rolled shell effect.

natural_image
Close-up of a sewing machine needle stitching fabric (no visible text or symbols)R 7375
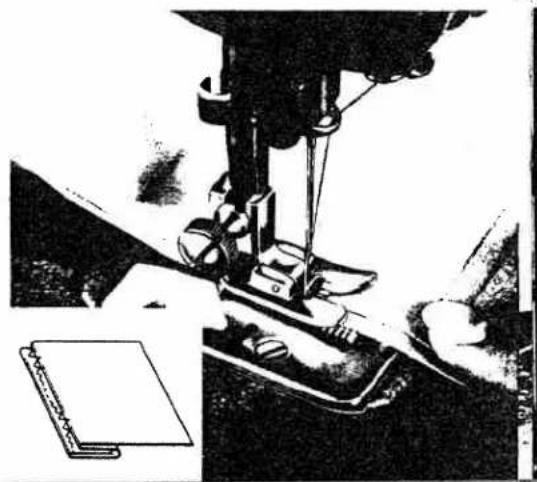
Hemming
Machine Setting:
E-0
C-2
B-0
D-0 or 2 to 4 (optional)
Stitch Length: 2-4
The hemmer foot is indispensable if you want to sew a uniform hem. You can hem with straight or zigzag stitches, depending on the type of fabric you are using. Clip off the corner of the fabric to facilitate insertion into the hemmer foot. Feed fabric so that the raw edge is in line with the left edge of the hemmer foot opening. If you feed less, the fabric will not be folded twice and the raw edge will show. Avoid ugly ends by slowing down feeding. Press the fabric against the needle plate on the left side of the foot before you come to the end of the hem.
35
R 6083
natural_image
Black-and-white photo of a sewing machine needle stitching fabric, no visible text or symbols
natural_image
Close-up of mechanical components including a lever and gear assembly (no visible text or symbols)R 5915
natural_image
Close-up of a sewing machine needle stitching railway tracks (no visible text or symbols)R 6070

Overcasting Edges
Machine Setting :
E - 0
C-2
B-0
D - 2 to 4 (optional)
Stitch Length: 3-4
Overcasting prevents frayed edges. Sew edge with the needle taking one stitch into the fabric and the other over its edge. You may overcast edges after fabric is cut and before the pieces are joined.
Butt Seaming
Machine Setting: E-0
C-2
B-0
D-3 or 4 (optional)
Stitch Length: 1 - 3
Two similar pieces of fabric which do not ravel easily may be butted together and joined with zigzag stitches. Worn bed sheets may be mended this way. Cut out worn center strip. Place the selvaged edges of the remaining pieces of sheet under the sewing foot so that the abutted edges are centered under the needle. Join them with close, wide zigzag stitches. Hem raw edges of sheets.
natural_image
Black-and-white illustration of a mechanical device with wires and components, no visible text or symbolsAttaching Lace
Machine Setting: E-0 B-0 C-2 D-1 to 3
Stitch Length: 1 - 2
You can attach lace edging in one simple operation. Overlap lace on raw edge. Sew to fabric with narrow zigzag stitches, taking one stitch into lace and fabric and the other into lace only.

R 7161
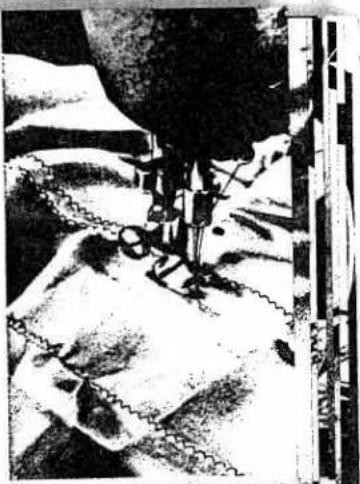
Inserting Lace
Machine Setting: E-0 B-0
C-2 D-1 to 3
Stitch Length: 1 - 2
Pin or baste lace on fabric. Sew together with needle taking one stitch into fabric alone and one into the lace. Carefully trim excess fabric underneath.

natural_image
Black-and-white photo of a person working at a desk with equipment, no visible text or symbols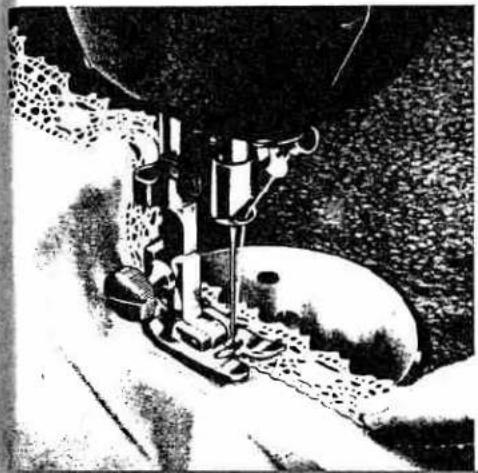
natural_image
Black-and-white illustration of a sewing machine in a garment, no visible text or symbolsR7170
37
R 7177

natural_image
Illustration of a sewing machine stitching fabric (no text or symbols visible)R 7156

Inserting Patches
Machine Setting: E-0 C-2
B-0 D-4
Stitch Length: 1
Large holes can be patched quickly. The following method may also be used for tricot fabrics. Cut patch so that its grain will match the rest of the fabric. Place the patch over the damaged area. Sew it down with zigzag stitch of medium length.
For additional strength stitch over corners twice. Turn over and trim close to seams.

natural_image
Close-up of a sewing machine needle stitching fabric (no visible text or symbols)38
R 7157
Single-Needle Cording
Machine Setting: E-0 C-2
B-0 D-2
Stitch Length: 12-1
Trace pattern on fabric and place a filler thread under the groove in the sole of the cording foot. Follow the pattern and hold the filler thread lightly.
natural_image
Black-and-white illustration of a sewing machine stitching fabric, with no visible text or symbols
Shirring
Machine Setting: E-0 C-2
B-0 D-2 to 2^1/_2
Stitch Length: 2 to 3
Ease Upper Tension
Follow above directions for shirring but place filler thread under rather than on top of the fabric. Fabric and filler thread both are guided in the groove of the foot. Width of zigzag depends on the thickness of the filler thread used.
When you have finished the zigzag seam, slide material along the filler thread to distribute fullness. Finish the shirring with a line of straight stitching.
Leave the filler thread in the shirring or pull it out as you straight-stitch, depending on the stress to which shirring will be exposed.
R 7159
39
R7152
R 7162
natural_image
Black-and-white illustration of a sewing machine stitching fabric, no visible text or symbols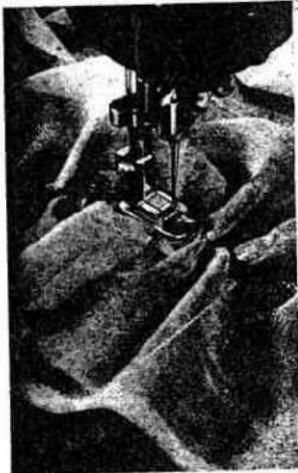
natural_image
Close-up of a sewing machine needle stitching a textured fabric surface (no visible text or symbols)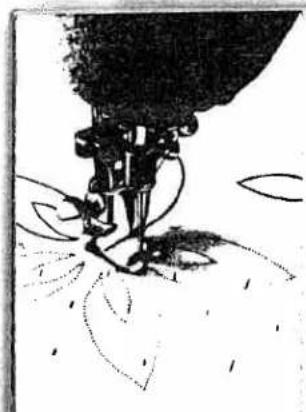
natural_image
Black-and-white illustration of a sewing machine needle stitching fabric (no text or symbols visible)R 7163

Applique Work
Machine Setting: E - 0 C - 2 B - 0 D - 1^1/2 to 3
Stitch Length: Minimum
natural_image
Abstract black-and-white illustration of a stylized flower with leaves and petals (no text or symbols)Pin or baste applique on fabric and overcast edges. Appliques also can be attached with a satin stitch or any embroidery design.
R 7167
40

natural_image
Black-and-white line drawing of a flower with six petals and a small object above it, no text or symbols present.R 7155

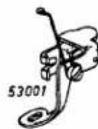
Openwork Embroidery
Machine Setting: E-0
C-2
B-0
D-0 and 2 ^1 / _2
Stitch Length: Minimum
There are hundreds of patterns excellent for openwork embroidery. Let's embroider the 25-square box illustrated. First, sew over all traced lines twice using short straight stitches. Then sew over straight-stitch lines with a medium-wide satin stitch. Make sure that your rows of satin stitching are even so the corners of your squares look neat.

natural_image
Close-up of a sewing machine needle stitching a grid-patterned surface (no visible text or symbols)
natural_image
Black-and-white illustration of a sewing machine stitching a grid-patterned fabric (no text or symbols visible)R 7179
When you finish sewing, cut out every other square. To make an attractive modern design, outline flowers or free forms with an embroidery design instead of satin stitching.
natural_image
Illustration of a person's legs and feet in motion, possibly climbing stairs or climbing shoes (no text or symbols visible)R 7158
Scalloping
Machine Setting:
E-1-7 (optional) B-3
A-5 D-2
Stitch Length: Minimum
Scalloping can be done in a jiffy on your PFAFF 332 Automatic. Scalloped edges can be used effectively as trimming on numerous articles.
The illustrations left show how scalloping adds sparkle to a child's collar. Here's how to do it. First, trace collar pattern on a doubled piece of fabric. Set machine (shown above), place fabric under sewing foot and guide needle along traced line. The
scallops are produced automatically. You may vary the length of the scallops by changing the setting of lever E (see sketch). When you have finished, trim excess fabric along scalloped edge.
R 7168
42
R 7150
Scrollwork
Machine Setting: E-0 C-2 B-0 D-2 to 4
Stitch Length: Minimum
Draw designs on fabric. Clamp work into embroidery hoop. As you are following the scrollwork outline with wide satin stitches, move hoop right, then left, alternating the rhythm and the direction of your movements. An exciting note may be added by using variegated thread.

natural_image
Black-and-white illustration of a sewing machine stitching a circular object with intricate cloud-like patterns (no text or symbols)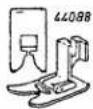
Imitation Hemstitching
Machine Setting:
E-0
C-2
B-0
D-2 ^1 /2
Stitch Length: 1-1 ^1/2
Increase Tensions
Beautiful hemstitching effects on handkerchiefs, blouses, dresses, and so forth, can be made with Pfaff's System 130 (wing) needle available at Pfaff stores at extra cost. Loosely woven fabrics, such as batiste, organdy, georgette, etc., are well suited to hemstitching while woolly fabrics are not recommended because needle penetrations close up. Since the hemstitching needle has a slightly thicker shank, the needle set screw must be turned out far enough for insertion. The hemstitching needle cannot be threaded with the Automatic needle threader.
Hemstitching is very simple (see sketch).
- Sew first row on the left of the area to be hemstilched.
- Stop machine when needle is in fabric on the right.
- Lift sewing foot, turn fabric in the direction of arrow, and lower foot again.
4 Sew second row, as shown in sketch, guiding material parallel to first row so that needle penetrates needle holes of previous zigzag stitches as it descends on the right.
5 If you are making more than two lines of hemstitching, alternately leave needle in fabric on the left and right at turning points, pivot fabric on needle, and proceed as directed above.
natural_image
Black-and-white illustration of a robotic arm operating on a conveyor belt with a gear, no visible text or symbolsHemstitching
Hemstitching is successful on linen and twilled fabrics. For this type of work use an ordinary needle.
Draw several threads out of the fabric. Set machine for a medium-wide zigzag stitch and sew along both edges of the strip, making sure that "zigs" and "zags" in both rows are exactly opposite each other. Set stitch length according to thread bar width you desire. Draw threads from the edge until your fringe is the length you want. Zigzag along this line - and you will have picot edging.
R 7173
43


R 7138
natural_image
Mechanical sewing machine needle stitching a tire (no text or symbols visible)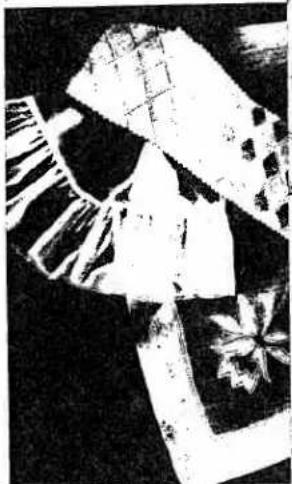
natural_image
Black and white abstract pattern with geometric shapes and floral motifs (no text or symbols)R 7140
natural_image
Close-up of a sewing machine needle stitching fabric (no visible text or symbols)
text_image
R 7139 1 2
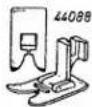
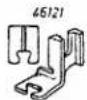
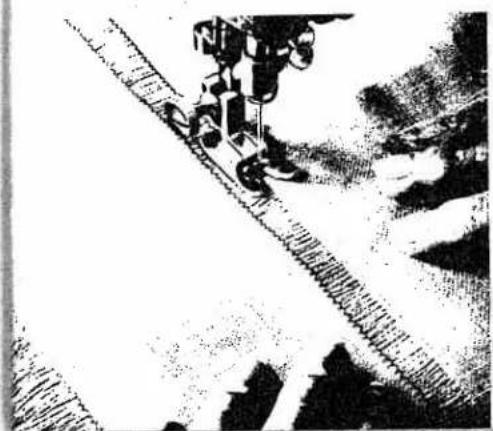
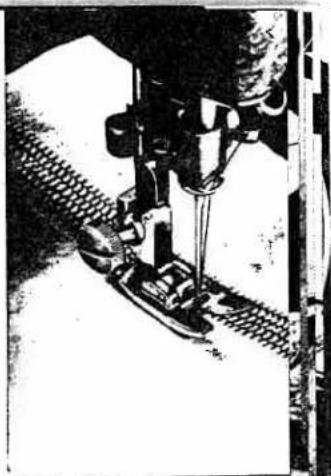
Blindstitching
Machine Setting: E-0
B-0 C-3 D-1 to 2
Stitch Length: Maximum
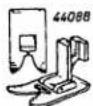
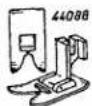
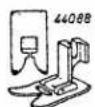
Hemming dresses and skirts by hand is a laborious task. You can do it easily on your PFAFF on medium and heavy fabrics. Use zigzag foot No. 44088 with blindstitch guide Na. 46669, which you can buy at your Pfaff store. Attach the guide so that its vertical flange goes through the sewing foot slot. Use a No. 70 needle, a loose upper tension and thin thread.
Next follow this procedure:
Turn fabric wrong side up. On selvage edge or if bias seam binding is used on edge of hem, fold material once (Fig. 1). On unselvaged fabric, fold twice (Fig. 2). It is advisable to pin or baste hem. Guide work evenly, holding top hem edge against the vertical flange of the blind-stitch guide. Set D so that needle takes left stitch exactly in the folded edge and the right stitch up to or over the hem edge. When hem is finished, stitches will not be visible on top side.
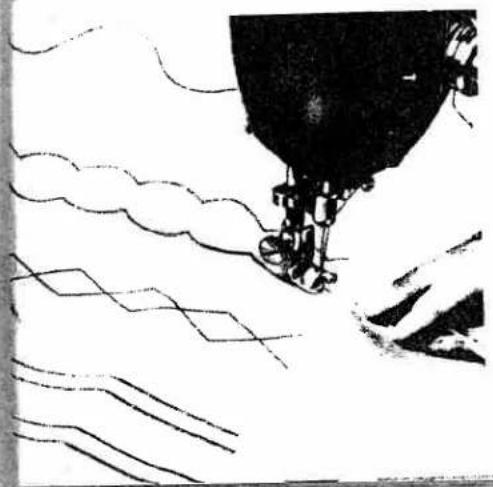
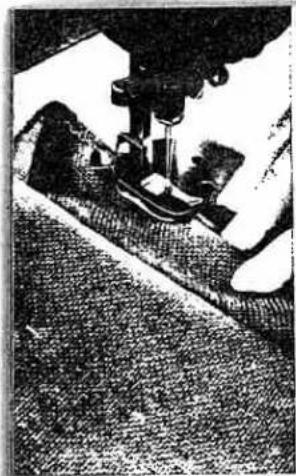
Automatic Blindstitching
Used for draperies or curtains
Machine Setting: E-1 B-1
A-6 C-1 Stitch Length: 1 - 1^1 / 2
Blindstitching is used for medium and heavy fabrics and would be visible on the right side of sheer and filmy fabrics. Therefore these fabrics should be blindstitched with the Automatic so a number of narrow and one wide zigzag stitch are sewn at regular intervals. Use thread that matches fabric and fold the hem as illustrated. Feed fold against left inside edge of foot so that narrow zigzag stitches are made on hem edge and wide stitches pierce fold.
Bulky work is placed in machine with bulk of material to the left of the needle. Set lever C on "3".
44
R 7371
natural_image
Black-and-white illustration of a sewing machine needle stitching fabric, with a notepad and pen nearby (no text or symbols visible)R 6064
Sewing Buttonholes
Machine Setting:
E-0
B-0
C-1
Stitch Length: Minimum
The setting of control D is changed several times while you are making button-holes. So you can easily return the control to its previous setting, turn lever F clockwise, as illustrated. Put lever C in notch 1, so D will be caught in two notches of the buttonhole slide, one position at "1½" for sewing sides, and the other at "3" for bartacking. This setting corresponds to the size of ordinary lingerie buttonholes. When lever F is moved up further, the stops for the stitch width setting change accordingly, and both the parallels and bars of the buttonhole grow wider.


text_image
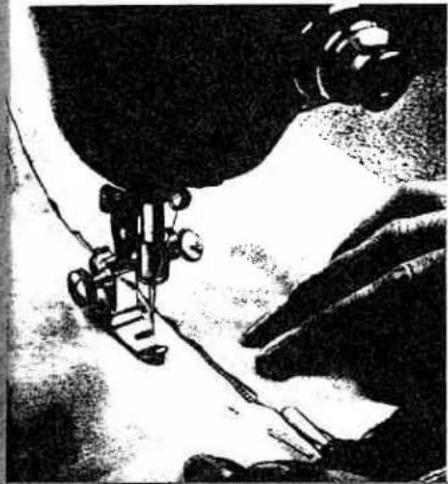
Technical diagram of a rotary dial with labeled components and directional arrows indicating rotation or movement.Use buttonhole foot No. 51016▶ and set slide on buttonhole gauge to buttonhole length desired. If you prefer more prominent buttonholes, pull a filler cord through the hole in left toe of foot. To get the correct stitch
length, sew on a piece of scrap material. In making buttonholes in soft or loosely woven fabrics, it is advantageous to place a piece of tissue paper under the material. To strengthen buttonholes in tricot and knit fabrics, insert a piece of firmly woven cotton material between the fabric layers.
R 7174
45
natural_image
Two black-and-white technical illustrations: top shows a sewing machine on fabric, bottom shows a mechanical device with rollers and a tool (no visible text or symbols)R 6088
Sewing direction
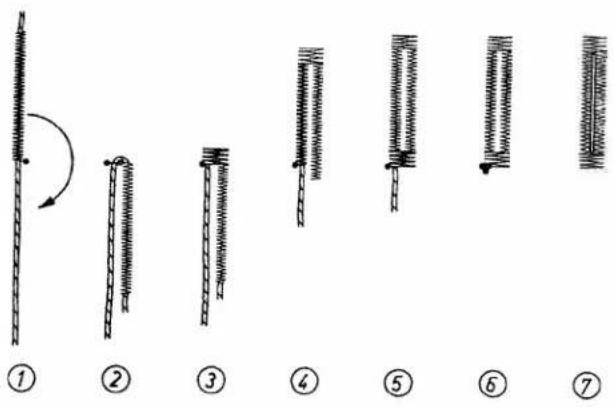
text_image
Diagram showing seven stages of a mechanical or electrical component with numbered labels and directional arrows indicating motion.④ Change D to "1 ^1 /2".
Trim both ends of filler cord at end of first stitch row. Sew second row and stop about 4–6 stitches from end of first row, leaving needle up.
⑤ Turn D to "3", and drop machine feed. Make second tack, as instructed above.
⑥ Switch D back to "0" and make two or three fastening stitches.
⑦ Trim the sewing threads. Open the buttonhole with your seam ripper. Be careful not to injure the bartacks.
⑧ Raise feed. Buttonhole can also be made without a filler cord.
Buttonholes
① Set D at "1 ^1/2 ", C at "1", stitch length lever f on satin stitch.
Attach foot No. 51016 and adjust slide indicator on buttonhole gauge to length of buttonhole desired. Insert filler cord through foot and sew first row, leaving the needle on the right side of the filler cord.
② Lift foot, turn fabric clockwise, using needle as a pivot. Lower foot, take one stitch to the left, pull filler cord taut and lay it parallel to completed line of stitching.
③ Switch D to "3".
Make 4-6 bartack stitches. Raise needle.

natural_image
Illustration of a tool applying material to a surface with a grid-like texture (no text or symbols)R 7160

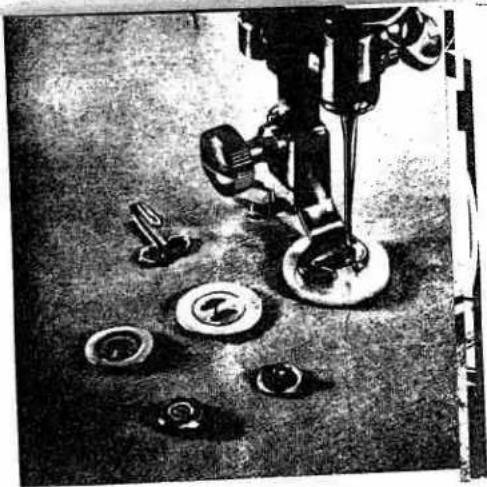
Button Sewing
Machine Setting:
E-0
B-0
C-1
D-0 and 3 to 4
Drop Machine Feed
Don't be afraid to sew on buttons, hooks, eyes or rings with your Pfaff. Make sure the thread take-up lever is at its highest point. Place the button under the button sewing foot. Align button so needle will enter right hole when D is at "0".
natural_image
Black-and-white photo of a vintage sewing machine with multiple circular components scattered on the floor (no visible text or symbols)R 7164
natural_image
Close-up of a sewing machine needle stitching fabric, no visible text or symbolsThen turn D to the left, usually to "4", until needle is centered over the left hole. Sew as many zigzag stitches as you think necessary to fasten button securely. When sewing on four-hole buttons, lift foot, reposition button and repeat the above process, stitching through the second pair of holes.
Now set D on "0" and make two or three tying stitches through one of the holes. Hooks, eyes, snaps, etc. are attached in the same manner.

natural_image
Black-and-white illustration of hands operating a sewing machine (no visible text or symbols)R 6067
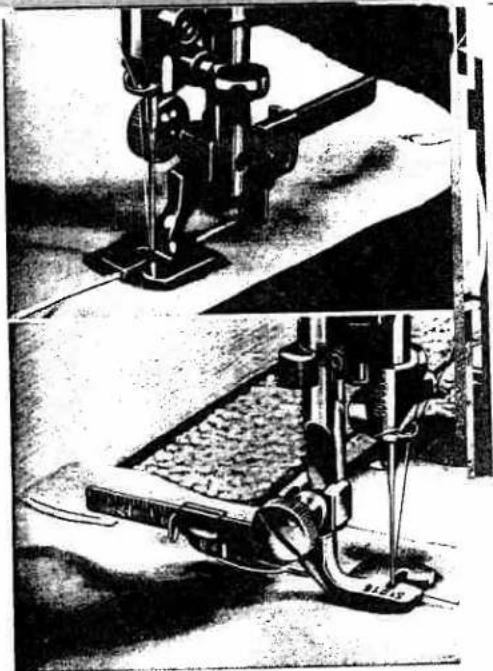
Darning
You will really appreciate the free arm of your PFAFF 332 when you darn sleeves and socks.
Machine Setting: E-0 B-0 C-2 D-0
Remove presser foot and drop machine feed. Use feed cover plate No. 60407 to increase tautness of fabric and permit free movement.
R6121
To fasten the feed cover plate to the machine, slip its spring into the slot in the front edge of the needle plate, as illustrated.
Attach darning foot as instructed on page 25, and suspend presser bar from the rear of the face cover with darning hook No. 46128. Even though the presser bar is suspended, the presser bar lever must be lowered to activate the tension, or the upper tension will be released -- and the thread will jam in the machine.
Machine Setting: E-0 B-0 C-2 D-3 Drop feed.
Use special darning foot No. 51050 for darning woolen socks, sweater sleeves and other woolen articles. Lace filler thread through the hole in the foot. Place thread back and forth across damaged spot (top picture) and anchor it in unworn area. Sew across filler thread with zigzag stitches (bottom picture).
48 R 6122

natural_image
Close-up of hands operating a sewing machine (no visible text or symbols)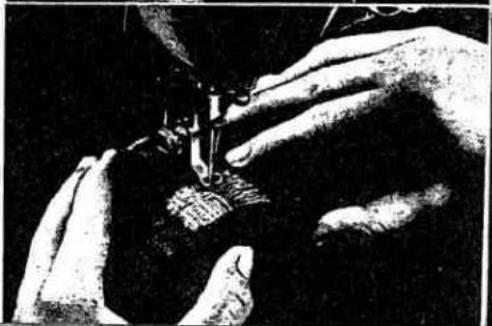
natural_image
Close-up of hands operating a sewing machine (no visible text or symbols)
natural_image
Black-and-white photo of a sewing machine needle stitching fabric, with hands operating it (no visible text or symbols)R 6115
Tubular Articles
Machine Setting:
E-0 B-0 C-2 D-0 Drop feed.
You need no darning hoop to mend sleeves, trouser legs or socks on your PFAFF 332. Simply slip them over the free arm. Stitch back and forth across the hole, first lengthwise, then cross-wise.
Use a thin No. 70 needle.
natural_image
Mechanical assembly diagram showing a valve mechanism with multiple ports and shafts (no text or labels)R 5913
Thin Spots
Remember that "a stitch in time saves nine" and reinforce spots that have worn thin with short stitches made lengthwise and across worn section. Clamp fabric into darning hoop and move it freely under the needle.
Long rips may be darned with the normal sewing foot and without hoop. Raise machine feed and use forward and reverse stitch lever.

natural_image
Black-and-white photo of a sewing machine needle stitching fabric, with no visible text or symbolsR 5924
Small Holes
Darn small and medium-size holes by trimming ragged edges with the fabric grain. First stitch back and forth across the hole from one side to the other with the machine running at high speed. Then turn the fabric at right angles and sew back and forth over preceding work. This anchors threads in the unworn area around the hole.

natural_image
Illustration of a hand operating a sewing machine on a circular object (no text or symbols visible)R 5926
Monogram Embroidery
Machine Setting: E-0 C-2
B-0 D - according to desired width
Drop Machine Feed
◀ Script letters are best for monogram embroidery without a sewing foot. It requires a little practice. You will soon enjoy creative embroidery once you have learned to move the material at a uniform rate. The fabric should be held taut in the hoop, the presser bar suspended and the presser bar lever lowered. Lower needle into fabric at the beginning of your design and draw bobbin thread up through the fabric. Hold both thread ends, and sew over outline, moving hoop slowly and evenly.
R 7165

Sewing Monograms
Machine Setting: E-0
C-2
B-0 D-2 ^1 /2 to 3
Stitch Length: Minimum
The procedure below is primarily used for block letters. Raise feed and set machine for satin stitch. Attach cord stitcher and sew outlines of monogram. Watch that seams do not overlap at joints of letters.
Ask your Pfaff dealer to show you the Ornamentograph, the ingeniously designed monogram and ornamental stitch attachment. You will marvel at its versatility and delight in the countless creative possibilities which it adds to your Automatic.
natural_image
Close-up of a sewing machine needle stitching a circular arc, with no visible text or symbolsCording
Stitch Length: 1 - 2
To cord, use Cording Kit No. 50117 available at extra cost.
R 7373

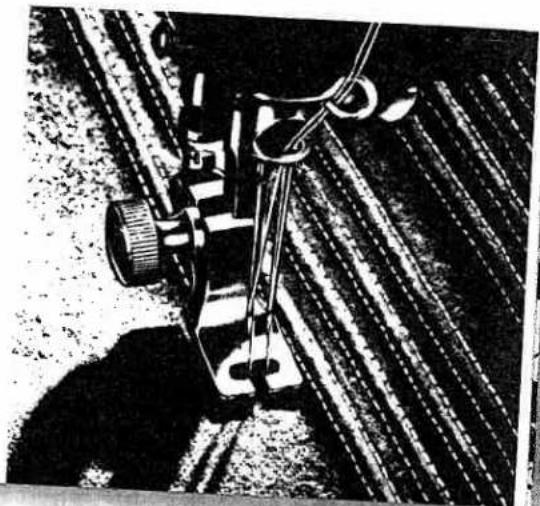
natural_image
Close-up of a hand operating a vintage sewing machine (no visible text or symbols)This set consists of:
4 double-needle holders for needle distances of 116 , 564 , 332 and 764 inch, 3 cording feet, 3 cording plates (2 with cord ducts and 1 with center claw), and 1 package of System 130 B needles. Additional parts for heavier cording are available at extra cost.
The interchangeable double-needle holder is easy to attach.
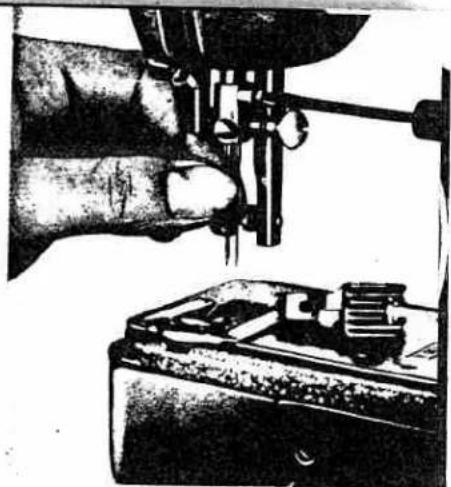
natural_image
Close-up of a hand using a sewing machine to adjust or install a circuit board (no visible text or symbols)R 7370
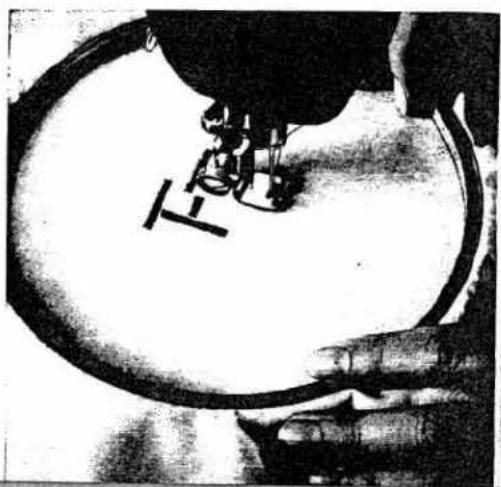
Changing the Needle Holder
Bring take-up lever to highest point, loosen small set screw and change needle holders. Tighten set screw securely. The large needle holder screw must always point toward the right.
Use System 130 B round-shank needles in ^1/16 and ^5/64 -inch double-needle holders, and System 130 R flat-shank needles in ^3/32 and ^7/64 -inch needle holders.
To attach cording plate refer to instructions on page 48 for mounting feed cover plate.
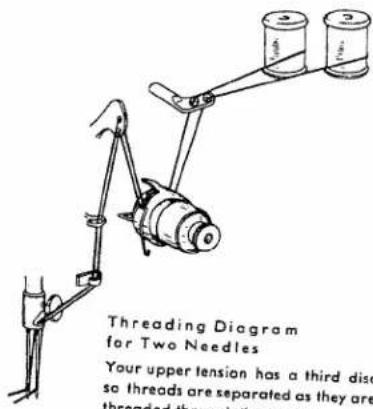
text_image
Threading Diagram for Two Needles Your upper tension has a third disc so threads are separated as they are threaded through the thread.Increase the bobbin tension slightly for cording. Pfaff recommends you fill your cording so it keeps its shape in the laundry. Filler cord thickness depends on cording size you want. To sew filled cording use the two cording plates with cord ducts.
Only very narrow tucks are made without filler cord.
Machine Setting: E-0 B-0 C-2 D-0
Additional Information on Cording
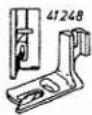
Ordinary cording in medium-heavy fabric is made with cording foot No. 41319 and cording plate No. 60417.
For thicker cording use foot No. 41318 with cording plate No. 60419.
Cording foot No. 41641 and plate No. 60417 (with center claw, but without cord duct) serve to make narrow air tucks in lightweight material.
Pin tucks also are made with cording foot No. 41641, but without cording plate. Cording plate No. 60415 with high center claw is used chiefly for cording in thick felt.
Cording height and width are determined by the distance between the two needles, the cord diameter and the height of the ridge on the cording plate. Thread tensions also influence cording size. For uniform spacing of parallel tucks, attach an adjustable guide to the cording foot. When space between tucks is very narrow, place the preceding seam into one of the grooves of the foot and use it as a guide. This procedure insures uniform and parallel rows of cording.
natural_image
Close-up of a mechanical lifting device with rope and pulley, no visible text or symbols
Two-Needle Decorative Sewing
The eight black symmetric patterns on the narrow-stitch side of the dial wheel can be sewn with two needles, if the needle gauge does not exceed 564 inch. To make them, no machine parts have to be changed. If any of the other designs are sewn with two needles, the needle plate, machine feed and sewing foot must be changed. Your Pfaff dealer will do this for you. These parts have wider slots to allow for movement of both needles. To sew these two-needle designs, the stitch width must be increased to a scant 14 inch.
text_image
PFAF-AUTOMATIC 250 312 A B C DR 5966
R 7178
natural_image
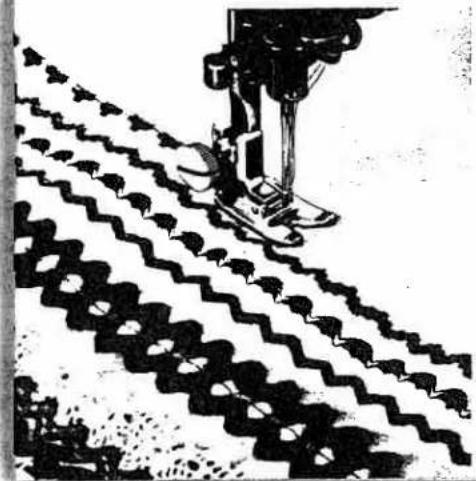
Black-and-white illustration of a sewing machine stitching a patterned fabric (no text or symbols visible)Two-needle designs are particularly attractive when sewn with different color threads.
The sewing abilities of your PFAFF Automatic are practically unlimited. Interesting effects can be obtained by combining various designs, embroidering colored ribbons, glamorizing a garment with lace or rick-rack attached with a line of Automatic stitches and -- well, you probably can think of many articles which would take on new life with a touch of embroidery. Your PFAFF Automatic will help you solve decorative problems and will stimulate your creative fancy.
natural_image
Two black-and-white illustrations: top shows a mechanical device with a tool, bottom shows a robotic arm with chains (no text or symbols)R 7137
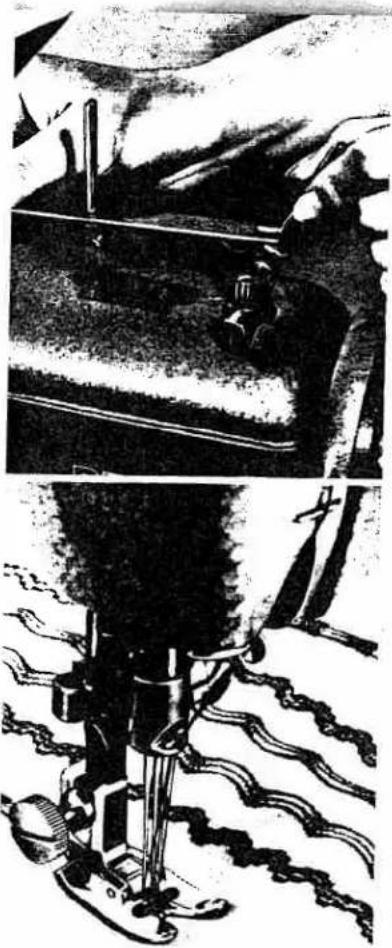
◀ Three-Needle Decorative Sewing
If you want to do 1/4-inch, three-needle decorative sewing, the needle plate, machine feed and sewing foot must be changed. In addition, it is advisable to use spool holder No. 53137, which slips over the regular spool pins (see illustration) and is available at your Pfaff store.
The third thread is led to the needle with the second thread. You can sew the same pattern with three needles that you can make with two needles using the regulation machine parts.
R 7176
54

natural_image
Black-and-white illustration of a sewing machine needle stitching a floral pattern (no text or symbols)R 7175
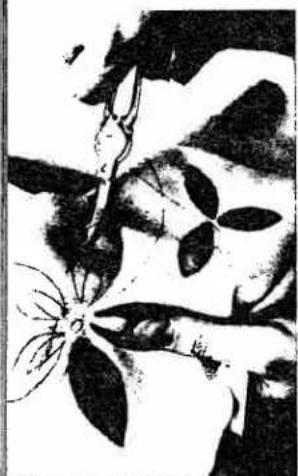
Automatic Embroidery
Interesting design effects are easy to make by combining Automatic patterns. Now you can make flower petals, and other intricate designs.
The more familiar you are with your machine, the more inspired you will be toward creative sewing.
natural_image
Illustration of hands operating a sewing machine tool, no visible text or symbolsR 6533
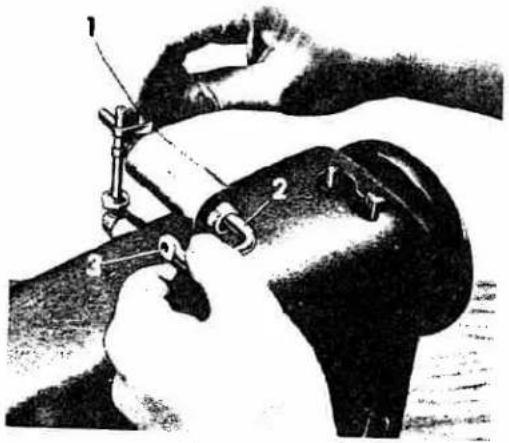
The Transverse Spool Holder
To ensure that the thread will unwind evenly from a cross-wound spool, use the transverse spool holder which is part of the standard equipment of your machine.
To attach the spool holder, slip position spring 1 over the vertical spool pin, the bent portion of the spring pointing toward you. Push the spool of thread on spool pin 2. Press the position pin together, and push pin 2 into the spring slot. With the spring pressed together, adjust its position on the vertical spool pin, as required. When you release the spring, the transverse pin will be held in place firmly. Pass the thread through eyelet 3, and thread the machine as instructed.
Contents
| Page | |
| Foreword | 1 |
| Essential Parts of Machine | 2 |
| Fundamentals of Machine Operation | 4 |
| Important Points to Remember | 5 |
| The Snap-Out Workplate | 6 |
| Electrical Information | 7 |
| Straight Stitch Sewing | 8 |
| Zigzag Sewing | 9 |
| Setting Machine for Automatic Embroidery | 10 |
| Winding the Bobbin | 12 |
| Removing the Bobbin Case | 14 |
| Inserting a Full Bobbin into Bobbin Case | 14 |
| Inserting the Bobbin Case | 15 |
| Recommended Needle and Thread Sizes | 16 |
| Important Facts about Needles | 17 |
| Changing the Needle | 17 |
| Upper Threading | 18 |
| Operating the Automatic Needle Threader | 20 |
| Drawing Up the Bobbin Thread | 21 |
| Correct Tension Regulation | 22 |
| Regulating the Thread Tension | 23 |
| Stitch Length Regulation | 24 |
| Dropping the Machine Feed | 24 |
| Changing the Sewing Foot | 25 |
| The Darning Foot | 25 |
| Care and Maintenance | 26 |
| Sewlight Facts | 28 |
| Adjusting the Motor Belt Tension | 29 |
| Trouble Shooting | 30 |
| Page | |
| Zipper Insertion | 33 |
| Edge Stitching | 33 |
| Quilting | 33 |
| Flat Felled Seams | 34 |
| Rolled Hems | 35 |
| Hemming | 35 |
| Overcasting Edges | 36 |
| Butt Seaming | 36 |
| Attaching Lace | 37 |
| Inserting Lace | 37 |
| Inserting Patches | 38 |
| Single-Needle Cording | 39 |
| Shirring | 39 |
| Applique Work | 40 |
| Openwork Embroidery | 41 |
| Scalloping | 42 |
| Scrollwork | 42 |
| Imitation Hemstitching | 43 |
| Blindstitching | 44 |
| Automatic Blindstitching | 44 |
| Sewing Buttonholes | 45 |
| Button Sewing | 47 |
| Darning | 48 |
| Monogram Embroidery | 50 |
| Sewing Monograms | 50 |
| Cording | 51 |
| Two-Needle Decorative Sewing | 53 |
| Three-Needle Decorative Sewing | 54 |
| Automatic Embroidery | 54 |
| The Transverse Spool Holder | 55 |

A. C. WEBER & CO., INC. Distributor • Chicago