339 - Sewing machine PFAFF - Free user manual and instructions
Find the device manual for free 339 PFAFF in PDF.

User questions about 339 PFAFF
0 question about this device. Answer the ones you know or ask your own.
Ask a new question about this device
Download the instructions for your Sewing machine in PDF format for free! Find your manual 339 - PFAFF and take your electronic device back in hand. On this page are published all the documents necessary for the use of your device. 339 by PFAFF.
USER MANUAL 339 PFAFF
At last you are the owner of this modern light metal Automatic portable sewing machine of advanced functional styling and softly blended colours. It will serve you for all normal sewing and embroidery work that becomes necessary in your home. You will especially appreciate that with this sewing machine you can also darn stockings and make automatically and manually decorative fashion stitches in unending variety.
Pages 4 and 5 will make you familiar with a number of technical terms which might be unknown to you in the beginning. First of all you should read sections 1, 2 and 6. Always take good care of your machine as proper maintenance bears on its smooth function and is essential for long life.
This little booklet has been prepared to give you many useful sewing hints beyond the mere operating instructions.
Whenever you have any questions regarding this machine, your dealer will be glad to help you in whichever way he can.
Backed by many years of experience, Gritzner-Kayser engineers have built this machine for you and packed it with the latest progressive features. It's a marvellous machine and you will surely enjoy sewing on it.
Table of Contents
This is Your Sewing Machine Accessories 4—5
-
Preparing to Sew
Engaging and disengaging the sewing mechanism 7—18
Motor drive and folding table 7
Needle and thread 8—9
Exchanging the sewing foot 10—12
Removing and replacing bobbin and bobbin case 11
Winding the bobbin 13—16
Upper threading, picking up bobbin thread 14 -
Sewing — Setting the Machine 17—18
Fundamentals 19—26
Beginning and stopping to sew 19
Stitch length; Sewing forwards and backwards 20
Adjusting for straight or ziazaa sewing 21
This is Your Sewing Machine
1 Thread take-up lever
2 Thread guides
3 Bobbin winder tension
4 Spool pins
5 Cam control
6 Automatic device
7 Top cover
8 Machine arm
9 Bobbin winder
10 Handwheel
11 Stitch length regulator
12 Stitch length scale
13 Sewlight switch
14 Lever for dropping feed dog
15 Bottom plate
16 Free arm
17 Folding table
18 Swing-away arm cover (hiding hook with bobbin case)
19 Feed dog
20 Sewing foot
21 Sewing foot fastening screw
22 Needle clamp
23 Regulator spring
24 Presser bar lifter (on back of machine)
25 Front cover with sewlight
26 Presser bar regulator
27 Needle plate
28 Needle clamp screw
29 Upper thread tension
30 Needle positioning scale
31 Needle positioning lever
32 Lock disc
33 Zigzag-width scale
34 Zigzag-width lever
natural_image
Close-up of hands connecting a plug to a cable and a power plug, with no visible text or symbols.Sewlight
The built-in sewlight (15 watts) lights up the working area perfectly. Its switch is located at the bottom of the machine arm, on the right-hand side. You should turn off the sewlight before opening or closing the front cover.
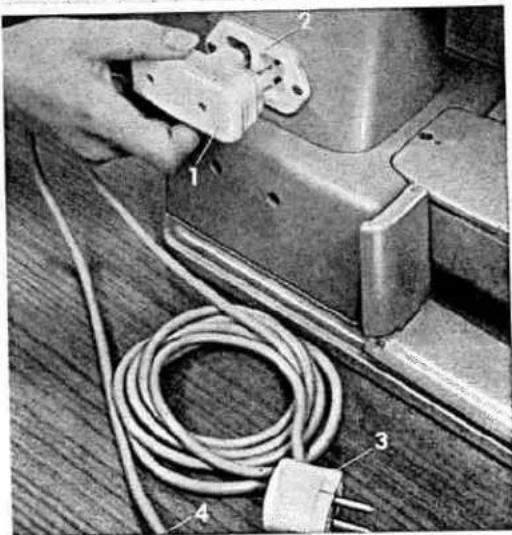
Motor Drive
The voltage indicated on the motor plate must be the same as that of your power-line (f. i. 220 volts). You will find the motor plate on the underside of the bottom plate. Tilt the machine carefully to the back.
Connect the three-pronged plug 1 to the socket 2 on the back of the machine and plug the line cord 3 into the wall socket.
Place the foot control, which is connected to the end of cord 4, under the table so that your right foot will rest on it comfortably, and depress the pedal. The more you depress the control the faster the machine will run. Remember to take your foot off the foot control when you are not actually sewing.
Folding Table and Table Extension
For all normal sewing work and fancy stitching you can raise the folding table to obtain a larger working area to put the material on.
All you have to do is lift up the table a little and pull it all the way to the left until its right part is on a level with the free arm. Then let it snap into the groove under the needle plate.
Reverse procedure to fold away the table.
When working on large-size material the folding table can be extended by screwing on to it the table extension strapped to the inside of the carrying case on the right-hand side. Swing the table extension support to the left.
9

natural_image
Three-panel illustration showing hands operating a sewing machine, inspecting a component with a tool (no text or symbols visible)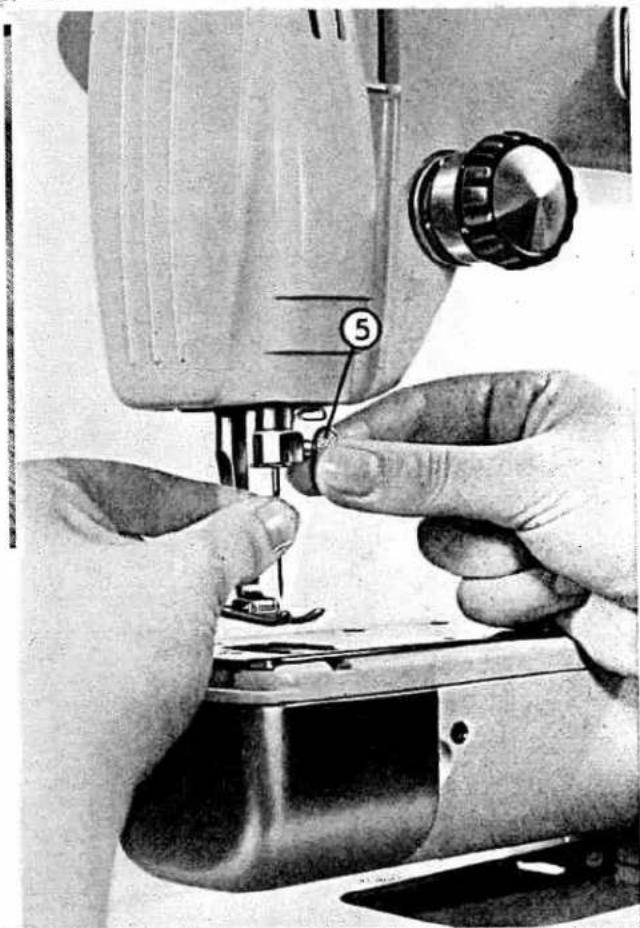
natural_image
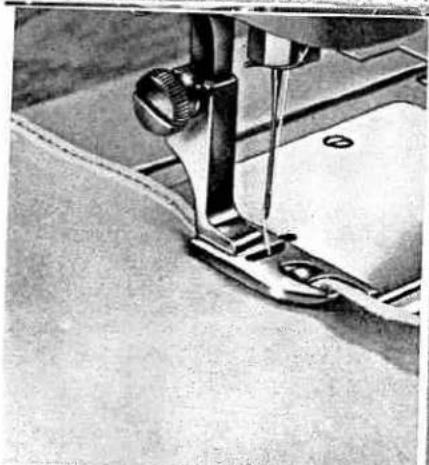
Close-up of hands operating a sewing machine with a numbered component (no visible text or symbols)Inserting the Needle
The machine requires needles system 130 R. Needles of that system are available at your sewing machine dealer.
Bring the thread take-up lever to its highest position and loosen clamp screw 5 all the way. Now take the needle between thumb and forefinger of your left hand, and with its flat side to the back and its long groove facing you, be sure to push it up into the needle clamp as far as it will go. As this is done, retighten the needle clamp screw with your right hand.
Exchanging the Sewing Foot
Raise the presser bar lifter and the needle all the way and loosen the sewing foot fastening screw until you can tilt the sewing foot slightly to the left and take it out from underneath the screw.
To replace the sewing foot place its cut-out side from the left onto the presser bar and move it up until it stops at the threading of the sewing foot fastening screw. Then use a screwdriver to retighten the fastening screw firmly.
Correct Size Needle and Thread
For selecting the right kind and size of thread and needle for various kinds of
fabric, you should go by the table on page 12 to obtain neat stitching results.
For medium-weight linen and cotton fabrics you should start with thread No. 60 and a needle No. 80. When working very fine or very thick material first try out on a piece of remnant whether you have chosen the correct needle and thread size. As bobbin thread you should preferably use thread which is a little softer and finer than the upper thread. For sewing woolen and silk fabrics you will mostly be using sewing silk where there is no difference between upper and bobbin thread.
For fashion stitches we recommend the use of mercerized upper thread or sewing silk or machine embroidery cotton, and as bobbin thread machine embroidery cotton No. 50.
Needle system 130 R
(*) For drying and embedding, embroidered and derving cotton No. 50 size 70-80.
| Example: You want to work, on underwear. On the "saying" under- wear "you go to the right and find thread size 80 indicates the needle size. | ||||||||
| Fine linen, comfortable | 100 | 130 | 130 | 80 | 70 | |||
| Bobbinger, mull, organdie | 120 | 150 | 120 | 80 | ||||
| Fine silks, crape | 100 | 130 | 130 | 80 | ||||
| Fine cotton and rayon knit-wear, frcoat | 100 | 100 | 60 | 90 | ||||
| Fine materials in nylon, relayene and other men-mode fibers e.g. decron, perlon, etlc. | 120 | 200 | 180 | |||||
| Medium-weight materials in nylon, decron, etlc. | 100 | 150 | 120 | 80 | ||||
| Underwear | 80 | 60 | ||||||
| Silk, materials for blouses | 100 | 100 | 60 | |||||
| Light-weight lottetra, muslim | 80 | 80 | 100 | 60 | ||||
| Light-weight clothing | 60 | 80 | 80 | 80 | 80 | 90 | ||
| Fine leather, plastic | 60 | 80 | 80 | 80 | 50 | |||
| Fine leather, interlets | 40 | 60 | 40 | 100 | ||||
| Heavy linen, intelts | 40 | 40 | ||||||
| Heavy materials, materials for codls | 50 | 110 | ||||||
Needle and Thread Table (metric system)
Removing the Bobbin Case
Bring thread take-up lever to its highest position and swing out to the left the cover at the end of the free arm.
With thumb and forefinger of your right hand hold the case by its latch 6. You can now take the bobbin case with the bobbin out to the front. When releasing the latch, the bobbin will fall out.

natural_image
Close-up of a hand operating a sewing machine with a numbered component (6) on the handle, no visible text or symbols beyond the number.Winding the Bobbin
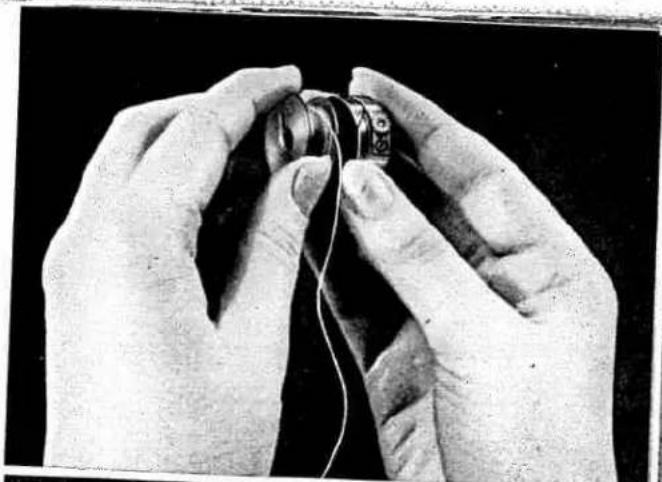
Disengage the sewing mechanism as described on page 7. Now place the spool on the right-hand spool pin, pass the thread through the back thread guide, once clockwise around the tension 7 and to the bobbin on the bobbin winder pin. The small wire on the pin must go into the slot on the underside of the bobbin. Wind the thread ends a few times clockwise around the bobbin. (You may also pass the thread end from the inside of the bobbin out up through the bobbin slot, hold it there for the first few turns of the bobbin winder and then tear it off.)
Now press lever 8 to the back against the bobbin and set the machine in motion. The winder action stops automatically as the bobbin is fully loaded.

text_image
Labeled diagram of a sewing machine with numbered parts, likely for repair or assembly instructions.If you do not want to load the bobbin fully, just pull lever 8 towards you with your forefinger at any time you wish to stop the winder action.
Afterwards re-engage the sewing mechanism.
14
Replacing the Loaded Bobbin
1) Place the bobbin into the bobbin case so that the thread unwinds from top towards you (upper photo).
2) Hold the bobbin in the bobbin case and pass the thread through the threading slot (lower photo, left).
3) Draw the thread along and beneath the tension spring and out through the opening in the case. Leave the thread end hanging out by about 3" (lower photo, right).
4) With the bobbin case latch all the way open, the bobbin cannot fall out.
natural_image
Close-up of hands tying a string around a small object (no text or symbols visible)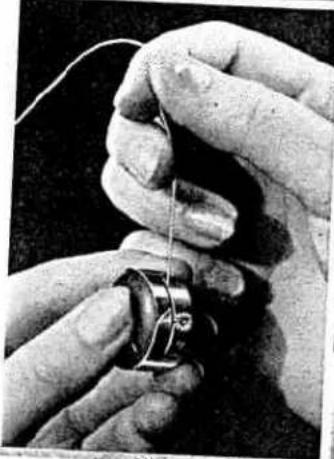
natural_image
Close-up of hands tying a knot around a metal ring (no text or symbols visible)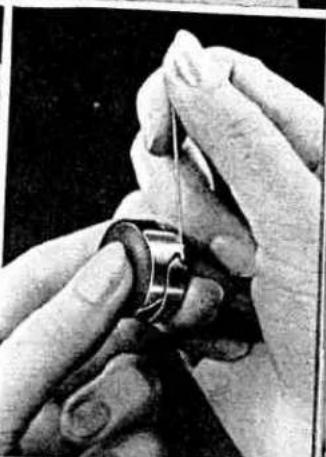
natural_image
Close-up of hands holding a small mechanical component with a string (no visible text or symbols)
text_image
Close-up of a sewing machine needle with numbered parts indicating mechanical assembly stepsReplacing the Bobbin Case
Bring the thread take-up lever again to its highest position and with thumb and forefinger hold the case by its open latch 9 and, with the cut-out on top, slide it onto stud 10. It is best to hold also the loose thread end to prevent it from getting caught between bobbin case and hook. Now let go of the latch and press the bobbin case firmly against the hook until you hear it click into place. Not correctly inserted, the bobbin case will cause breaking of the needles. Close the arm cover.
Upper Threading
Place the spool onto the spool pin and pass the thread through the slot in thread guide 11, across the arm of the machine to the front, then by the right edge of thread guide 12 and up under its hook through the upper hole and down through the lower hole. Now pass it down and clockwise between tension discs of the tension assembly 13, then up and from right to left through take-up lever 14, down through thread guide 15 and needle clamp thread guide 16 and finally from front to back through the needle. Pull about 4" of thread through the needle.

text_image
14 11 12 13 15 16
natural_image
Close-up of a sewing machine needle stitching fabric, no visible text or symbolsPicking up Bobbin Thread
With your left hand hold the end of the upper thread, leaving it a little slack between hand and needle. Then turn the handwheel towards you to allow the thread take-up lever and the needle to travel down once and up again to the highest point. The bobbin thread will thus be drawn up in a loop through the needle plate. Now place both thread ends (about 3" long) under the sewing foot to the back.
(Whenever you do not start working at the edge of the material, for instance when darning somewhere in the middle of the fabric, remember to pick up the bobbin thread only after you have placed the fabric between sewing foot and needle plate. This will enable you, as mentioned on page 19, to hold on to the two thread ends placed under the sewing foot to the back as you start sewing.)
2. Sewing - Setting the Machine
Fundamentals
- When threaded, the machine must never be set in motion without a piece of fabric underneath the sewing foot. Also remember to lower the foot only with fabric under it as otherwise the foot and the teeth of the feed dog might be damaged.
Before starting to stitch and when you finish stitching, always bring the thread take-up lever to its highest point. This will prevent the upper thread from getting caught in the hook or from slipping out of the needle eye. - Before laying the material on the machine, place the ends of both up-
per and bobbin thread under the sewing foot to the back.
- Hold the ends of both threads during the first few stitches so they will not get entangled and block the hook.
- The machine moves the material all by itself. You should merely guide the cloth, never pull it. Only when sewing over hard or thick parts of the fabric reduce the sewing speed and assist the needle by carefully turning the handwheel with your hand, sewing slowly stitch by stitch. This will avoid bending or breaking of the needle.
See section 6, page 62, for maintenance instructions. Remember that faults are often remedied by merely cleaning and oiling the machine.
Starting to Sew
When starting to sew with the straight stitch, you should follow the instructions given on pages 21 and 22. Make sure particularly that you sew at a medium stitch length (setting of stitch length regulator as pictured on page 21) and that the cam control is on straight stitch as pictured on page 23.
Place the fabric between sewing foot and needle plate and let down the sewing foot by lowering the presser bar lifter. As you depress the foot control, the machine is set in motion, yet it is good to aid its start a little with your right hand on the handwheel. During the first few stitches hold the ends of both threads with your left hand.
And remember: Never pull the material along, merely guide it.
When making a sharp turn, stop the machine and raise the sewing foot for a moment but leave the needle in the fabric to act as a pivot as you turn the material into the new direction.
Removing the Work
Bring the thread take-up lever to its highest position, raise the presser bar lifter and remove the fabric to the back. Now cut off the threads. Make sure, however, that you leave the ends of the threads about 3" long under and at the back of the sewing foot so that the machine is ready for the next sewing.
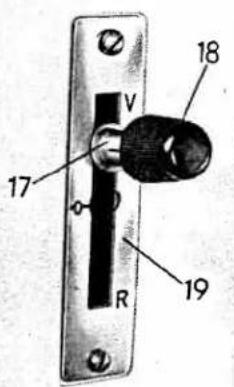
Setting the Stitch Length
You set the stitch length by the stitch length regulator 17. Turn the screw 18 to the left and set the stitch length as you like it. The shortest stitch is sewn when the regulating lever is in centre position; the longest stitch is a good 3/16" with the lever either in its highest or lowest position. For forward sewing the lever is normally set at 1/16" stitch length, as pictured.
With the regulating lever resting in the notch in the centre of the scale, the machine is set to sew very short stitches (almost 0) as the are required for the satin stitch, buttonholes, and a variety of decorative fashion stitches. If the stitch length, however, turns out too short, you need only turn the screw a little to the left (about 1/4 turn) and push the lever up.
Forward and Reserve Stitching
The machine sews forwards as long as the regulator lever is in the upper half of scale 19. For reverse stitching just push the lever down until it stops, without turning the knob. The reverse stitches will then be of the same length as were the forward stitches.
text_image
V 18 17 R 19Adjusting for Straight or Zigzag Sewing
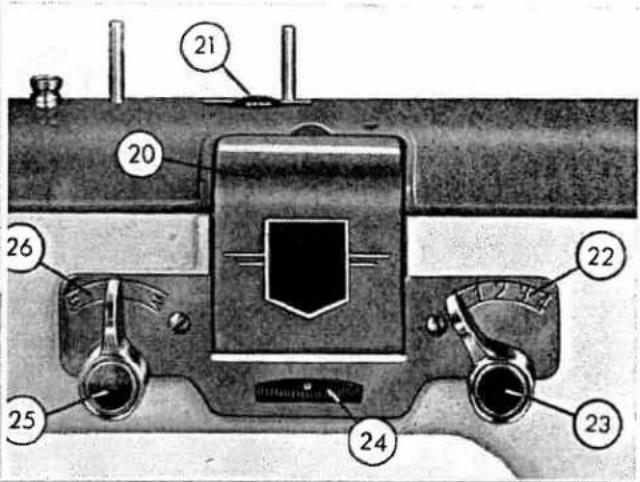
On the machine arm, facing you, you will see: Centre : Hinged cover plate 20 for the Automatic device which opens to the front for inserting the pattern cams (details on page 49 "Automatic Fashion Stitches").
Above: Cam control 21 for straight stitching, zigzag stitching, curved seam and fashion stitches.
text_image
Labeled diagram of a mechanical device with numbered components for identificationRight: Scale 22 for adjusting zigzag width with figures 0—4 and adjustment lever 23 which, for straight stitching, must be set on 0 and for zigzag stitching on one of the other numbers marked on the scale. The largest zigzag width is 5/32".
Below: Lock disc 24 for limiting zig-zag width with figures 0—4 and a buttonhole symbol (details on page 44 "Buttonholing").
Left: Scale 26 for the needle position and adjustment lever 25 which must be in centre position for regular straight and zigzag stitching. Setting this lever to left or right becomes necessary for
22
certain special sewing techniques which will be explained to you in detail later in this book.
You can block the zigzag lever 23 on 0 for straight stitching by turning the lock disc 24 also on 0. To limit the width of the zigzag stitch you set the lock disc 24 and the lever 23 on equal numbers. The lever can then only be moved between 0 and the number selected.
When you have much straight stitching to do at one time, set the cam control
21 on "straight stitch" (as pictured) by rotating it to the left. This disengages the entire zigzag mechanism and the machine will run more smoothly and silently.

natural_image
Close-up of a hand pressing a small mechanical component on a metal surface (no visible text or symbols)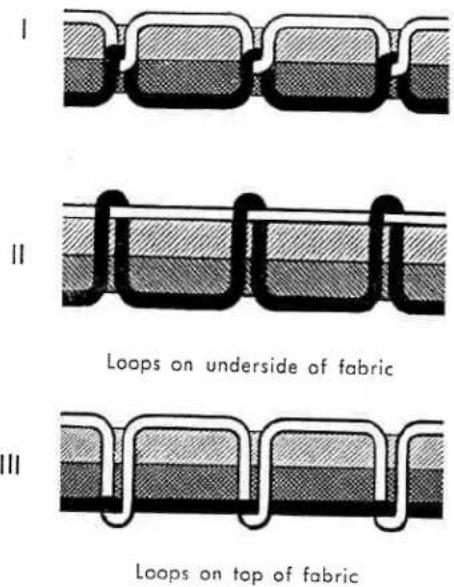
III
Regulating the Thread Tensions
After sewing a few inches, examine the stitching on both sides of the fabric.
The tensions are set correctly if upper and bobbin thread lock in the centre of the cloth. If thin material puckers, both tensions are set too tight.
Sketch I shows what a neat seam will look like when tensions are correctly set.
II Upper thread tension is too strong or bobbin thread tension too weak
III Upper thread tension is too weak or bobbin thread tension too strong
When it becomes necessary to regulate the tension, do so on the upper thread as a change in tension is more likely to occur here than on the bobbin case where the tension should only be changed for special purposes.
Regulating the Upper Tension
Turning to the right ⬇: Tension increases.
Turning to the left ↗: Tension decreases.
The markings on the tension unit scale will help you remember the correct setting for normal sewing whenever you have to change the tension temporarily for special material.
Regulating the Bobbin Case Tension
Once it is set correctly, the bobbin case tension rarely requires any adjustment.
Turning to the right ↗: Tension increases.
Turning to the left ↕: Tension decreases.
You can easily turn the tension screw with the tip of your thumb.

natural_image
Close-up of hands assembling a mechanical component with a coiled roller (no visible text or symbols)
natural_image
Close-up of hands tying a knot with a string (no text or symbols visible)
natural_image
Close-up of a hand adjusting a mechanical component with a metallic knob and metal clip (no visible text or symbols)
natural_image
Close-up of a hand holding a small metallic component with two arrows indicating upward and downward motion (no text or symbols visible)Regulating the Pressure on the Sewing Foot
There should be just enough pressure on the sewing foot to allow the fabric to move along easy. It is rarely necessary to change the pressure.
The pressure is strongest when the inner pin is all the way down, but this strong pressure is seldom required and should be used only for extremely thick and stiff material. When making long stitches on several layers of thick material, you should not press the inner pin all the way down as the thick material by itself will force the sewing foot upwards which automatically increases the pressure.
To release the pressure, press down on the outer ring to have the inner pin go all the way up. When you need only slight pressure for sewing fine and medium-weight material you just press the pin down a short way to leave it between the two extreme settings, so that it will suit the thickness of the fabric. This is the normal setting most often required.
When working on fabrics such as cord and velvet which may easily be marked by the sewing foot, you should always sew with reduced pressure.
With the inner pin in its highest position and the feed dog lowered, darning may be done with the normal sewing foot and without an embroidery hoop (see page 33).
3. Tips for Straight Stitching
Page
Regular Straight Stitch Work 28
Edge Stitching 28
Quilting 29
Felling 30
Hemming 31
Ruffling and Sewing on Flounces in one Operation . . . . . . . . . . . . 31
Pearl Yarn Embroidery ..... 32
Darning Linen . . . . . . . . . . . . . 32
Darning Fine Nylon Stockings ..... 34
Darning Woolen Socks ..... 35
Other Darning Work 36
Hemstitching with Hem-Twin Needle . 37
Upon request we supply free of charge a special leaflet dealing with darning and embroidery work, and the necessary embroidery hoop against extra charge, for carrying out any of the following operations:
Flat Embroidery — Hole Embroidery — Cording — Richelieu Work — Raised Em-
broidery — Festooning — Monogram Embroidery — Hemstitching — Toledo Work — Grained Work — Wool Embroidery and Basting.
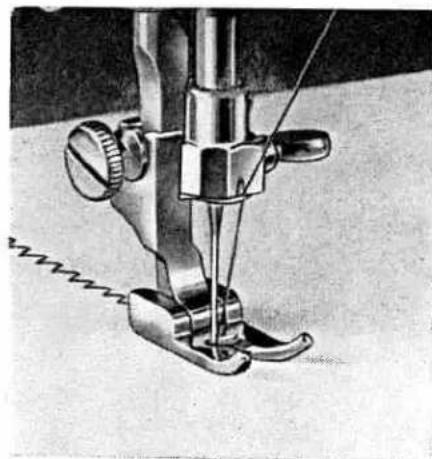
The needle plate with ovale hole fitted to the machine may also be used for all straight stitch work.
All sewing feet and attachments shown on the following pages although not mentioned on page 6, are available at a reasonable extra charge.
Setting the Machine
Zigzag lever on 0, needle positioning lever on centre, control disc preferably on straight stitch (for further particulars see pages 22 and 23 "Adjusting for Straight or Zigzag Sewing"), stitch length regulator as required for the kind of fabric sewn (for details see page 21 "Setting the Stitch Length").
Regular Straight Stitching
a) with standard sewing foot 847 495 (pictured at bottom right on page 6)
You may use this foot for both straight and zigzag stitching. For all normal sewing work on tricot you should use no other than this foot.
b) with straight stitch foot 847 496. (Suited only for straight stitching with a single needle.)
Foot No. 847 496 will serve you for sewing along edges at a distance of half the width of the foot.
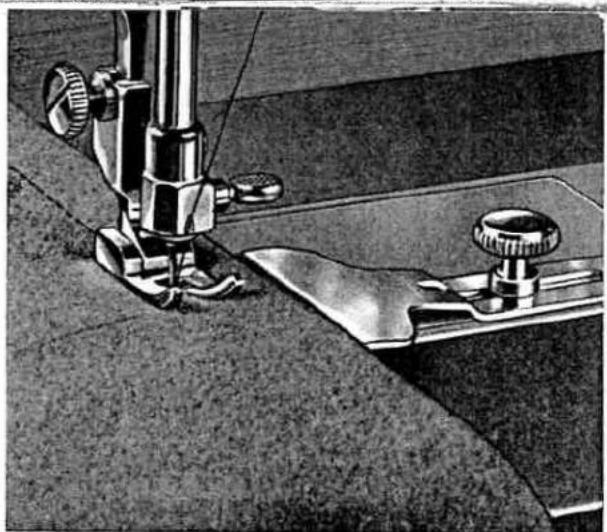
Edge Stitching
a) with edge stitcher 847 602 and guide
This foot is used with guide for making wider hems and maintaining an even line of stitching.

natural_image
Close-up of a sewing machine needle and base mechanism (no visible text or symbols)After setting the guide, firmly tighten the clamp screw. The right edge of the material must be kept close to the guide (picture at left).
This foot is used without guide when carrying out the following work:
- Sewing very close to the edge of the material
- Laying several parallel stitch lines close together
- Sewing on zip-fasteners close to the edge of the material.
This foot enables the stitch to be made along the edges of the material more accurately than with presser feet Nos. 847 495 and 847 496.
b) with flat guide 847 484 and thumb screw 183 090, standard sewing foot 847 495 or straight stitch sewing foot 847 496.
This guide, too, is used for making wider hems and for maintaining an even line of stitching from the edge of the material. It is particularly suitable for heavy texture materials. Attach the guide by placing the broad edge to the left and the slot over one of the two holes located on the right-hand side of the needle plate. Next insert the thumb screw through the slot and tighten it after the required setting has been made. The edge of the material must remain in contact with the broad side of the guide.
Quilting
(f. i. cosies, bedroom slippers, quilts for children and dolls)
Standard sewing foot 847 495 or straight stitch sewing foot 847 496 with quilting guide 847 482 and holder 847 480.
First attach the presser foot. Next slide from the back the rounded guide holder onto the presser bar until it encircles the bar right above the sewing foot.
natural_image
Close-up of a sewing machine needle stitching fabric (no visible text or symbols)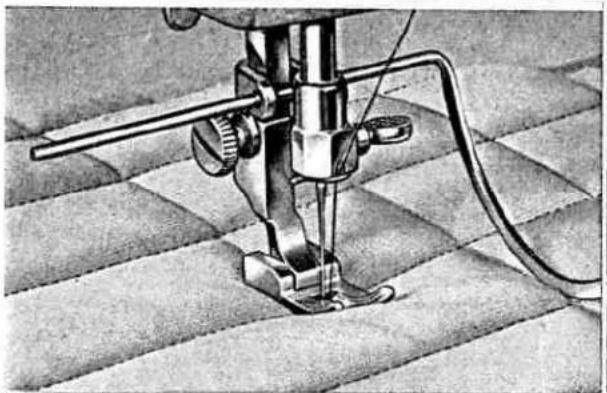
natural_image
Close-up of a sewing machine needle stitching fabric (no visible text or symbols)Now insert into the holder the straight portion of the guide, pushing it through the holes of the holder from right to left, and tighten slightly the screw on the holder, with the rounded part of the guide raised.

natural_image
Close-up of a sewing machine needle and foot, showing mechanical components and stitching (no text or symbols visible)Make your first row of stitches, then move the material to the right to give the desired spacing between the first and second stitch row. Now place the rounded part of the guide on the first stitch row and tighten the screw on the holder firmly. When making your second row of stitches, let the guide slide over the first stitch row. The second row then acts as a guide to the third etc. (Lower picture on page 29.)
Felling
Feller 847 563 for a seam 5/32" wide.
Lay the two pieces to be joined, one over the other, with the lower piece projecting about 1/8" to the right. Pin both pieces together at the start and insert the material into the mouth of the feller.
The lower piece of fabric is sewn down flat over the upper piece. Now open up the material thus joined and run the edge once more through the feller, sewing it down flat.
Hemming
Hemmer 847 552
for hems 5/32" wide
Hemmer 847 549
for hems 5/64" wide
Fold over to the wrong side the edge of the fabric, making a fold about 1/8" wide. Insert a pin at the commencement of the material and with it draw the edge of the material into the curl of the hemmer, where it is automatically turned under twice. Start to sew carefully. Allow the material to feed into the hemmer freely without, however, overfilling the curl. — The hemmer 847349 is suitable for making narrower hems in the same way.
Ruffling and Sewing on Flounces in one Operation
Ruffler 847 520
With this foot you can sew on flounces, f. i. when working on curtains. First you must hem the curtain and the flounce (as described above under "Hemming"). Then lay the edge of the curtain (right side up) into the slot of the sewing foot and the edge of the flounce (also right side up) under the sewing foot.
natural_image
Close-up of a sewing machine needle and foot assembly (no visible text or symbols)
natural_image
Close-up of a vintage mechanical device with a handle and base mount (no visible text or symbols)Now, as you start sewing and gathering simultaneously, let the flounce run along with the curtain at about 3/8" from the edge of it. If you want to make a small heading for the flounce, you will achieve the
natural_image
Close-up of a mechanical tool with a handle and screw-like base, mounted on a wooden surface (no visible text or symbols)same results by placing the curtain and the flounce wrong side up. Instead of using the straight stitch you can also sew with the zigzag stitch, size 2—4, for ruffling and sewing on, in one operation.
Pearl Yarn Embroidery
Standard sewing foot 847 495
Upper thread: cotton. Bobbin thread: fine pearl yarn. Upper thread tension: rather strong. Bobbin thread tension: weak. (For further particulars, see pages 24 and 25 "Regulating the Thread Tensions"). As the pearl yarn embroidery is produced on the underside of the material, the work must be placed wrong side up for sewing.
Darning Linen
a) Without sewing foot, with embroidery hoop (pictured at left) Drop the feed dog by flicking lever 14 (pictured on page 4) to the left. Needle position: left. Upper and bobbin thread: machine embroidery and darning cotton No. 50.
Stretch the part to be darned over the hoop, and place the work flat on the bedplate under the needle. Only now draw the under thread up (see page 18) and lower the presser bar lifter. Work the machine at an even rhythm and move the hoop steadily to and fro, laying the stitch lines closely and parallel across the hole. As this is done, leave the material stretched over the hoop and turn it to sew across the first lines of stitching. Make sure that the lines are laid uneven in length so that the edge around the hole will not fray.
If necessary, repeat the operation until the hole is completely darned or just add a few additional stitch lines where gaps are still visible (see picture on page 32).
b) With standard sewing foot 847 495, without embroidery hoop
Drop the feed dog. Upper and bobbin thread: machine embroidery and darning cotton No. 50. Needle position: centre. Presser bar regulator all the way up (see page 26), the pressure of the sewing foot thus being almost 0.
For sewing without embroidery hoop the fabric should not be too thin or too soft. Here, too, the thread is drawn up only after the fabric has been laid under the sewing foot. Place the ends of both threads under the sewing foot to the back, lower the presser bar lifter, hold the fabric taut with both hands and do the stitching as described under a).
Darning with the normal sewing foot and without embroidery hoop becomes necessary whenever you have to repair linen that has been damaged along the edges.
Darning Fine Nylon Stockings
Without sewing foot, with darning hoop. Drop the feed dog by flicking lever 14 to the left (pictured on page 4). For upper and bobbin thread use (nylon-) machine darning thread corresponding in colour and material to the stocking. Sew with left needle position, using a thin needle (size 60 or 70).

natural_image
Close-up of a sewing machine needle stitching a metal ring, no visible text or symbolsPull the stocking over the free arm and bring the damaged part under the needle. Now place the plastic darning hoop from right under the damaged part of the stocking and stretch this area by putting the tension ring down into the darning hoop from above (damaged area in the centre of the hoop).
Now lower the presser bar lifter to engage the upper thread tension, pick up the bobbin thread and sew around the damaged area once to prevent ladders. Now continue darning in the same way as described on the preceding page with the only difference that the first rows of stitching must be made from left to right and the second rows across from front to back. This sewing technique does not enable the material to be turned around.
Darning with Needle Plate Cover and Hopper Foot
If you prefer darning linen and fine stockings with the needle plate cover 847640, your dealer will be glad to supply it to you. The needle plate cover is placed onto the machine just as the hole embroidery plate (pictured on page 54). Of course, the use of this cover requires the needle in centre position as the cover has only a round needle hole in the centre.
Perhaps you are used to do darning always with a special sewing foot; if so, ask your dealer for a Jura hopper foot II (847615) which you may use for darning linen as described under a) on page 32 and for darning fine stockings. When attaching this special darning foot make sure that the formed wire will be above the needle clamp screw. The presser bar regulator (see page 26) must be all the way up as always when a foot is used for darning.
Darning Woolen Socks
Wool darning foot 847 570
Control disc on zigzag. Drop feed dog. Upper and bobbin thread: Machine embroidery and darning cotton No. 50, suiting the colour of the sock. Darning wool: same type as is the sock. Presser bar regulator must be all the way up (see page 26). Needle position: centre. Width of zigzag stitch: as indicated below.
Needle size: 80.
Pull the sock over the free arm so that the damaged part will be under the sewing foot. (Wool socks are not stretched in a darning hoop.) Lower presser bar lifter, pick up bobbin thread and sew around the damaged area once with a
natural_image
Close-up of a sewing machine stitching fabric with a knotted garment (no visible text or symbols)
natural_image
Close-up of a sewing machine stitching fabric with a needle inserted (no visible text or symbols)zigzag stitch of 1/32" (scale marking 1) to fasten the meshes. (See page 22 for "Setting the Zigzag Width). Now pass the darning wool from back to front through the guide slot on the left back edge of the darning foot and place it right into the oval mouth of the foot. Set the zigzag lever on 4. Now, on the front end of the hole, start darning at a moderate machine speed and lay the darning wool in close parallel lines over the hole, alternately from left to right and right to left, sewing it down to the good material at the edge of the hole.
After the hole is completely covered with darning wool, cut the latter off at the foot, set the zigzag lever between 1 and 2 and sew across the darning wool, covering it with zigzag stitches which should be closely laid together.
Further Darning Techniques
The free arm is also perfect for darning all tubular clothing. Use again machine embroidery and darning cotton No. 50. Proceed in the same way as described for darning fine stockings. Here, too, you may use the darning hoop, the needle plate cover, or the Jura hopper foot II. Whatever you darn, always remember that the stitches must be taken right into the good material.
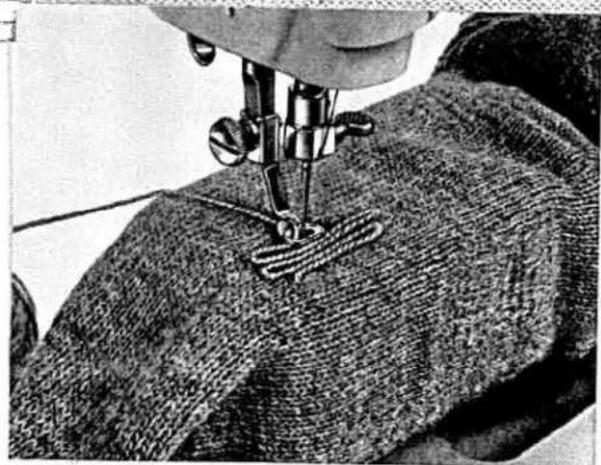
When darning sleeves of woolen sweaters follow the instructions given for "Darning Woolen Socks". Other damaged areas on sweaters can be mended in the same fashion.
Hemstitch with Twin-Hem Needle
Piping foot 847 682 (see page 59)
or universal sewing foot 847 580.
Twin-hem needle system 130
Needle plate with guide slot for filler thread (see picture).
Set control disc 21 on straight stitch (see pages 22/23); for upper and bobbin
thread use machine embroidery and darning cotton No. 50. The filler thread should be cotton, about 1/32" thick. Normal thread tension. Centre needle position. Stitch length as you like (between 1/64" to 1/16"). Zigzag lever on 0.
The new twin-hem needle is a double needle consisting of a conventional medium-size needle and a sword-shaped hemstitch needle (wing needle).

natural_image
Close-up of a sewing machine needle stitching fabric (no visible text or symbols)Refer to page 10 for how to insert the needle. Threading the two needles is done in the same way as described on page 59.
Detach the sewing foot. (Lower the folding table if raised.) Pass the filler thread through the cut-out at the front edge of the needle plate and, with the help of the threader, pull it up through the guide slot located in front of the needle hole. Attach the piping foot and place the end of the filler thread under the centre groove to the back of the foot. Deposit the hank of thread in your lap where it will unwind itself. Now place the fabric under the foot and start making the first row of stitches. Then turn the fabric and make a second row of stitches close to the first one, letting the sword-shaped needle enter the very holes that were made in the first row of stitches. Cut off the ends of the filler thread close to the fabric.
natural_image
Close-up of a sewing machine needle stitching fabric (no text or symbols visible)Glass batiste is especially suitable for this sewing technique where no threads are drawn out.
When working with linen and similar material, you first draw out a number of threads as you would do when hem-stitching by hand.
You may start stitching at the edge of the fabric or anywhere in the middle of it. In the latter case you should fasten the ends of the stitch rows by making a few zigzag stitches across them, with the zigzag lever set on 2 (for correct setting see page 22 and sketch on page 39).
4. Tips for Zigzag Stitching and Fashion Stitches
| Page | |
| Ordinary zigzag stitching | 40 |
| Overcasting, overedging | 40 |
| Edge joining | 41 |
| Sewing on lace | 42 |
| Shell edging | 43 |
| Roll hems | 43 |
| Buttonholes | 44 |
| Sewing on buttons | 46 |
| Blindstitching | 46 |
| Automatic fashion stitches | 48—51 |
| Twin needle fashion stitches | 49 |
| Manual fashion stitches | 52 |
| Satin stitch | 53 |
| Cording | 53 |
| Applique Work | 54 |
| Hole embroidery | 54 |
| Elastic curve seam | 56 |
| Patching | 56 |
All sewing feet and attachments shown on the following pages although not mentioned on page 6, are available at a reasonable extra charge.
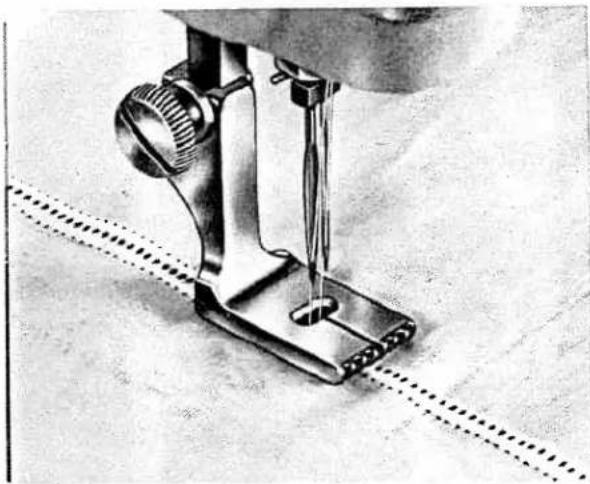
The sewing feet and the needle plate used
for zigzag stitching both have an oval needle hole due to the deflection of the needle.
Setting the Machine

The cam control must be set to indicate the zigzag symbol. Adjust the zigzag lever to the desired zigzag width, the stitch length regulator to the stitch length required, with the needle positioning lever generally on centre (for details see page 22 "Adjusting to Straight or Zigzag Stitching"). Your attention will be drawn to any deviations from the directions given above.
The thread tension for zigzag sewing must not be too strong. When adjusting for zigzag width 4 (5/32") and stitch length about 1/16", the upper thread should appear on the underside of the fabric as small points.
natural_image
Close-up of a sewing machine needle and hook mechanism (no visible text or symbols)
natural_image
Close-up of a sewing machine needle and chain, showing mechanical components and stitching (no text or symbols visible)Ordinary Zigzag Stitching
Standard sewing foot 847 495
The machine will sew zigzag stitches up to approximately 5/32" wide and about 3/16" long. The settings are made with the zigzag lever and the stitch length regulator.
Overcasting, Overedging
Standard sewing foot 847 495
We recommend you to use machine embroidery and darning cotton No. 50. Centre needle position.
The above designations refer to the same sewing work, namely sewing over the edge of the material with the zigzag stitch to prevent fraying.
a) Overcasting raw edges
Place the material with its raw edge under the sewing foot in such a way that the needle, when deflecting to the right, closely passes the edge of the work. When deflecting to the left, the needle will pierce the fabric and sew the required zigzag width. For example, the zigzag lever could be set on 3 or 4 (1/8" to 5/64"), stitch length not shorter than 1/8".
b) Overcasting visible edges
Fold the raw edge of the material narrowly over to the left and sew it down with the straight stitch at
about 1/32" from the edge. Trim close to the line of stitching and finally oversew the material on the right side with zigzag stitches 1/16" to 1/8" wide (scale marking 2—3) and 1/32" long.
Long strips of material can be overseamed conveniently with the edge joiner 847505. The edge of the fabric must be inserted into the left slot of the foot. The zigzag stitch, with left needle position, will then evenly cover the edge, without your having to pay special attention to maintain even stitching (for further particulars see below "Edge Joining").
Edge Joining
Standard sewing foot 847 495 or edge joiner 847 505
Zigzag lever on 3, stitch length to suit the work in hand. Narrowly fold over to the wrong side the raw edges of the two pieces of material and edge-join them neatly with the zigzag stitch. The abutting edges of the material must be placed accurately midway between the zigzag movement of the needle. Trim away the surplus material close to the line of stitching.
Edge joining can also be done with the edge joiner 847505 which has two diagonal slots. After folding the edges of the material over to the wrong side, the two pieces are fed simultaneously into the slots: the fabric
41
on the right into the right-hand slot, the fabric on the left into the left-hand slot. The fabric must pass over the front of the foot, then into the slots and finally out and beneath the rear of the foot.
natural_image
Close-up of a mechanical sewing machine with levers and base mount (no visible text or symbols)Sewing on Lace
Standard sewing foot 847 495
Place the lace over the right edge of the material and oversew the edge of the lace with zigzag stitches of suitable width and stitch length. Trim away the surplus material.

natural_image
Close-up of a sewing machine needle stitching fabric (no visible text or symbols)Lace of curved or sharp-cornered design must first be tacked to the material by hand with small stitches before sewing down.
A stronger join between fabric and lace is obtained if you sew down the lace with small zigzag stitches (scale marking 1—1.5), then trim away the surplus material on the underside and finally oversew the first line of stitching, on the right side, with slightly larger zigzag stitches (scale marking 2—2.5).
You may also use hemmers 847552 and 847549 for sewing on lace. Both hemmers have a diagonal slot on the right. The edge of the fabric is inserted into the curl, where the cloth is automatically turned under twice. At the same time insert the edge of the lace into the slot as with edge joiner 847505 for "Edge Joining" (page 41). The lace is then sewn down with the zigzag stitch direct on the hem.
Shell Edging
Shell edger 847 546
Stitch width: 4. Stitch length: long. Upper and bobbin thread tensions: stronger than usual (see pages 24 and 25: "Regulating the Thread Tensions"). The full effect of this stitch technique is achieved only on very fine and soft texture materials, such as georgette or tricot. Insert the material into the foot as with hemmer 847552 (see page 31 "Hemming"). The zigzag stitch encircles the edge and draws the material in slightly, giving the desired shell effect. The fold is made on the right side of the material.
Roll Hems
Roll hemmer 847547
Stitch width: 3. Stitch length: medium.
Insert the material (fine texture materials) into the roll hemmer as with hemmer 847552 (see page 31 "Heming")- The zigzag stitch encircles the hem, giving a good effect especially when thread of contrasting colour is used.
natural_image
Close-up of a sewing machine needle and chain, showing mechanical components and stitching (no text or symbols visible)
natural_image
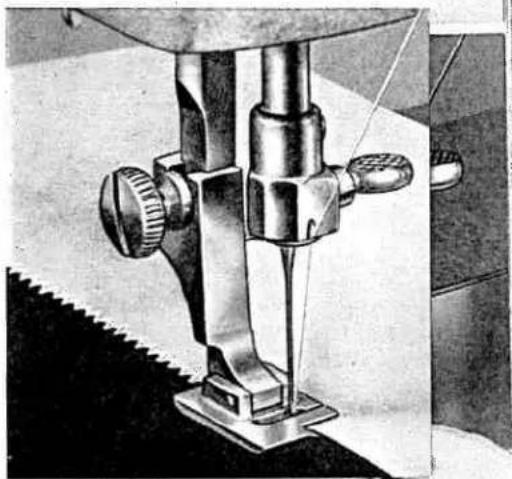
Close-up of a sewing machine needle and screwdriver mechanism (no visible text or symbols)Buttonholes
Sewi
Stand
Place edge overs with able Trim rial.
Universal sewing foot 847 580
a) Buttonholes with gimp thread
Upper and bobbin thread: machine embroidery and darning cotton No. 50. Gimp: cotton thread. Upper thread tension normal, bobbin thread tension somewhat stronger (see pages 24 and 25).
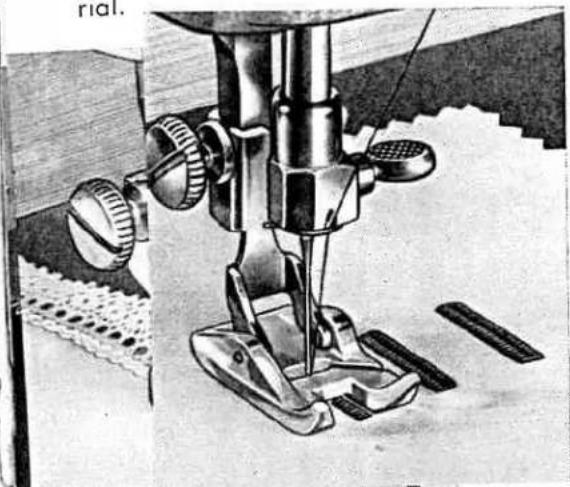
natural_image
Mechanical sewing machine diagram showing base, clamps, and stitching (no text or symbols)Zigzag width: 2 and 4. Stitch length: almost 0 (see page 21!)
Needle position: left. Lock disc 24 all the way to the left to indicate buttonhole symbol (see page 22), which provides a partial stop at 2 to simplify subsequent settings.
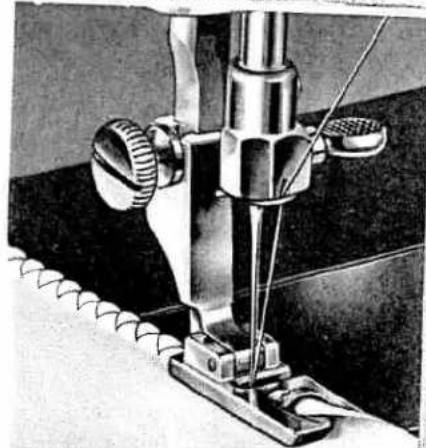
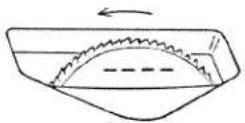
How to proceed
(See also on page 45 "The easy way of making a buttonhole")
A: Place the gimp on the fabric beneath the left groove of the sewing foot and out to the back (see also p.53 "Cording") and sew the first buttonhole purl over it. Leave the needle in the fabric on the right, raise the presser bar lifter and turn the fabric around clockwise.
B: Take one stitch to the left and set the zigzag lever on 4.
C: Firmly hold the material and make the first bar by stitching 6 or 8 times to and fro. Leave the needle in the fabric on the left, slide the zigzag lever back on 2.
D: Now sew the second purl up to almost the end of the first one. Make sure the first purl lies accurately in the right-hand groove of the sewing foot so that the second purl will follow parallel into the groove on the left. Leave the needle in the fabric on the left and slide the zigzag lever again on 4.
E: Make the second bar in the manner already described under "C", leaving the needle again in the fabric on the left. Set the zigzag lever on 0.
F: Now make a few fastening stitches and after removing the work from the machine cut off the ends of the gimp close to the material.
G: Slash the centre of the buttonhole, using the stilletto 847270 supplied. Insert the point of the cutter between the purls and slash the fabric carefully so as to avoid cutting into the bars.
The easy way of making a buttonhole
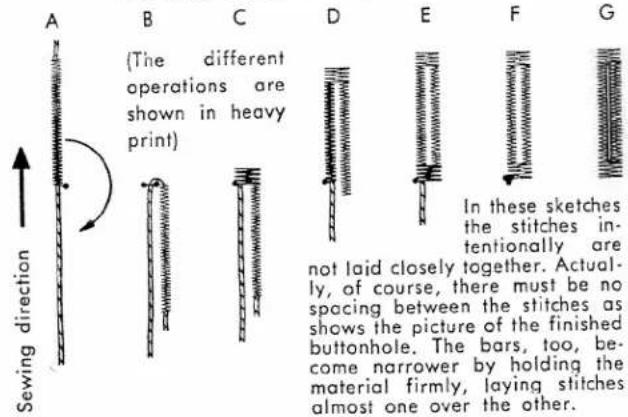
text_image
A B C The different operations are shown in heavy print) D E F G Sewing direction In these sketches the stitches intentionally are not laid closely together. Actually, of course, there must be no spacing between the stitches as shows the picture of the finished buttonhole. The bars, too, become narrower by holding the material firmly, laying stitches almost one over the other.b) Buttonholes without Gimp Sewing foot, thread and setting as before, only without gimp thread. Proceed exactly as described under a).
c) Drawn-up Buttonhole
(Buttonholes in linen) Upper thread: sewing thread No. 30. Bobbin thread: machine embroidery and darning cotton No. 50. Bobbin tension: weak. Upper tension: sufficiently strong to draw up the bobbin thread so that it will form loops on top of the fabric. Without gimp thread. All other details and the various operations are the same as under a). However, you should take only 4 stitches when making the bartacking operations C and E.

Sewing on Buttons
Standard sewing foot 847 495, universal sewing foot 847 580 or button foot 847 500 (photo)
Stitch width: 4. Stitch length: 0. Needle position: left.

natural_image
Close-up of a sewing machine needle stitching circular components on a dark fabric floor (no visible text or symbols)Drop the feed dog by flicking lever 14 (pictured on page 4) to the left.
Place the button on the cloth, lower the presser bar lifter and let the needle pass through the left hole of the button. Stitch 8 or 10 times from hole to hole. Now move the zigzag lever to 0, fasten-off with a few stitches, remove the work from the machine and cut the threads.
Blindstitching with Guide
Standard sewing foot 847 495
The blindstitching guide (as pictured) enables you to make stitches that are visible on one side of the fabric only.
Setting the machine → Set the cam control on the stitch pattern shown (pattern A 1 on page 48). Zigzag width: 1—1.5, allowing for the thickness of the cloth. Stitch length: between 1/32 and 5/64". Thread tension: normal. Attach the blindstitch guide with standard sewing foot 847 495 to the presser bar.
Blind Stitch Guide 847 830
Method of working:
1) When working with light-weight material, fold the raw edges approximately 3/16" over to the left side. With heavier goods, such as Jersey or woolen goods generally, the raw edge must first be overcast or stayed before it is folded over and tacked (see "Overcasting raw edges" on page 40).
2) Now fold the full width of the hem to the left again and then all of it over to the right, allowing the hem to project 3/16" for blind stitching.
3) Raise the sewing foot and place the work under the needle with the projecting part of the hem to the right of the needle. Now lower the presser foot and start sewing. When deflecting to the left, the needle must sew accurately along the edge of the fold.

natural_image
Simple line drawing of a laboratory setup with a funnel and U-shaped tube (no text or symbols)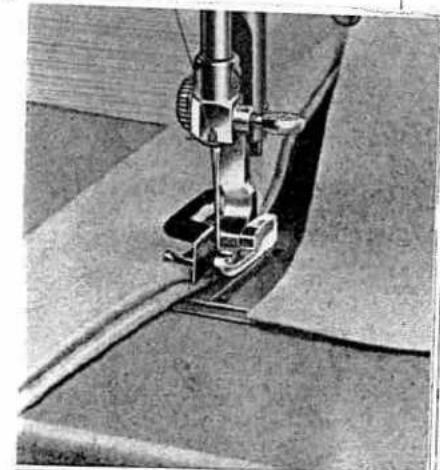
natural_image
Close-up of a sewing machine needle stitching fabric (no visible text or symbols)
natural_image
Close-up of a textured fabric with a zigzag edge and curled edges (no text or symbols visible)B Sewi U Stanc a Place U edge m over n with c able te Trim te rial. (s
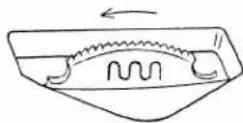
Automatic Fashion Stitching
Universal sewing foot 847 580
Upper thread: mercerized cotton or sewing silk.
Bobbin thread: machine embroidery and darning cotton No. 50.

Zigzag width: 4. Stitch length: almost 0. Needle position: centre.
First open cover 20 of the Automatic device (pictured on page 22) and you will clearly see the double pattern cam mounted on stud 27. Rotate the cam control to the left until it indicates "2". The machine will now sew the pattern clearly marked "2" on the cam. When you wish to sew pattern 1 on the other side of the cam, just set the cam control on "1".
5 double pattern cams lettered A trough E are part of the standard accessories; this makes 10 different basic fashion stitches which may be modified in many ways by decreasing the stitch width and increasing the stitch length.
natural_image
Close-up of mechanical components with gears and textured surfaces (no visible text or symbols)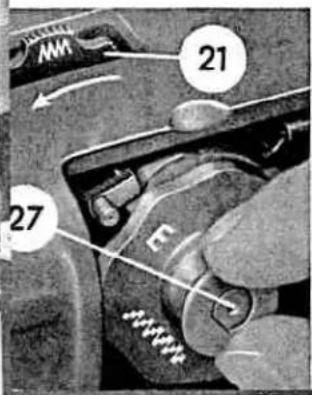
text_image
21 27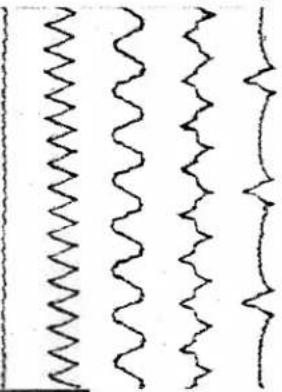
natural_image
Pure zigzag line pattern without any text, numbers, or symbols
text_image
1 B 2 1 C 2 1 D 2 1 EThe fashion stitches will turn out best when you lay some thin paper under the fabric which is removed after sewing. This is especially true for thin material.
Changing the Double Pattern Cams
You will be able to change the cams only after you have set the cam control 21 on zigzag (as pictured on page 39) or on the curve seam symbol. The cam can now be easily drawn off the stud. It is just as easy to slip another cam back on. Make sure that the collar of the cam — or the figure 2 — is facing you when the cam is mounted.

text_image
2 EFashion Stitching with Twin Needles
Universal sewing foot 847 580
You will obtain intriguing effects by making fashion stitches with twin needles of system 130 R and a needle distance of 7/16" or 9/128" (see page 61), or with the piping head set at a small needle distance see pages 57 and 58). For threading see page 59 and picture on page 38 (twin-hem
needle). The twin needle is inserted as described on page 10. Zigzag width: 1—3. Stitch length: as you like. A very special effect is obtained by using two different threads of contrasting colours. The elastic curve seam (page 56) may be used for this purpose, too.
This is important: The zigzag width must not go beyond 3 as otherwise the needle would hit the sewing foot or the needle plate and break.
Sei
Stai
Plac
edg
ove
with
able
Trin
rial.
- 0 - 250 + 4

natural_image
Illustration of a vintage-style telephone handset and earphone (no text or symbols visible)The patterns illustrated here represent only some of the many fashion stitches your machine will automatically sew.

natural_image
Abstract pattern of repeating black-and-white wavy lines with no text or symbols
By using a twin needle and by sewing with two threads of contrasting colours simultaneously, the scope of the machine is further increased (for particulars see page 49: "Fashion Stitching with the Twin Needle").
Manual Fashion Stitches
Universal sewing foot 847580; cam control on zigzag; upper and bobbin thread: machine embroidery and dorning cotton No. 50.
| Pattern No. | 1 | 2 | 3 | 4 | 5 | 6 | 7 | 8 | 9 |
| Stitch length | 1/64'' | almost C | 1/64'' | almost C | 1/32'' | 1/64'' | almost C | almost 0 | 1/32'' |
| Needle Position | centre | left or right | see below | see below | centre | ||||
| Zickzag Width | see below | 1/16'' to 5/64'' | 1/16'' | 5/64 to 7/64 | |||||
| Lever adjustment (at an even speed of the machine) | Zigzag lever to be moved uniformly between positions 0 and 4 | Needle positioning lever to be moved alternately from left to right with the machine making the same number of stitches on both sides | Needle position-ing lever to be moved alternately from left to centre, from centre to right, back to centre etc. | After say 6 zig-zag stitches drop the feed dog and take 6 stitches on the spot. | |||||

text_image
2 3 4 5 6 7 8 9You can make a variety of stitches of different width and length by adjusting the levers as described above. Only a few of the sewing effects possible are illustrated here but you can add many more by applying your own imagination.
Satin Stitch
Universal sewing foot 847 580
Control cam: on zigzag stitch. Stitch length: almost 0. Zigzag width: 2—4 (most effective with 4). Upper tension: slightly weaker than normal. Bobbin tension: slightly stronger than normal (for further particulars see page 24 "Regulating the Thread Tensions").
For upper and bobbin thread use machine embroidery and darning cotton No. 50.
The stitches must be laid close together without visible gaps; it is, therefore, essential to set the stitch length almost to 0 (see also page 21).

natural_image
Close-up of a sewing machine needle and base mechanism (no visible text or symbols)Cording
Universal sewing foot 847 580
Upper and bobbin thread: machine embroidery and darning cotton No. 50. Use cotton gimp. Upper tension: normal. Bobbin tension: slightly stronger than usual (see pages 24 and 25). Zigzag width: 2. Stitch length: almost 0 (see also "Gimp Buttonhole", page 44). Needle position: left.
Place the gimp thread on the fabric under the left groove of the sewing foot to the back and zigzag-stitch over it.
You may also use piping foot 847 682 (as on page 59). If you do, you must sew with centre needle position as the gimp will be placed under the centre groove of the foot.
Appliqué Work
Universal sewing foot 847 580
Upper and bobbin thread: machine embroidery and darning cotton No. 50.
Preparatory work: Place the appliqué on the fabric, as indicated in the pattern, and sew down with the zigzag stitch (scale marking 1). Trim away the surplus material close to the line of stitching.
For the appliqué stitch the upper thread tension must be slightly weaker and the bobbin thread tension slightly stronger than for normal sewing. Stitch length: almost 0.
Now oversew the zigzag stitches along the edge of the appliqué. When using a gimp thread (as with "Cording"), the zigzag width should be 2; without gimp thread, employ zigzag width 3.
Hole Embroidery
Without sewing foot, with embroidery hoop, with hole embroidery plate 847645 (for 5/32" diameter hole)

natural_image
Illustration of a duck swimming in water with a decorative bird nearby (no text or symbols)54

natural_image
Close-up of hands using a sewing machine to adjust or install a small electronic component (no visible text or symbols)Upper and bobbin thread: machine embroidery and darning cotton No. 50. Zigzag width: 2. Needle position: left.
Detach the sewing foot and lower the feed dog. Place the hole embroidery plate onto the needle plate from the front in such a way that its spring tongue will go into the corresponding cut-out provided at the front edge of the needle plate.
Stretch the material in the hoop and make a tiny cross-cut in the material so that the pin of the embroidery plate passes snugly through it. The hoop must lie flat on the bedplate of the machine. Draw up the bobbin thread and lower the presser bar lifter to engage the upper tension. Hold the ends of both threads in your hand, start the machine and turn the hoop evenly around the hole. Finally set the needle positioning lever on centre and the zigzag width lever on 0, make a few fastening-off stitches and cut the threads.

text_image
4 5 2 1 3 6 7The illustration shows in addition to hole 1 other hole embroidery techniques: hole 2 with zigzag width 4; 3 with zigzag width 2 (needle position first left, then right); 4 to 7 are variations with zigzag width 2 to 4. Number 6 is a combination of Nos. 2 and 7 in contrasting colours.
Elastic Curve Seam
Set the cam control to indicate the curve seam symbol (third stitch from left on page 48). This pattern stitch serves perfectly for sewing elastic
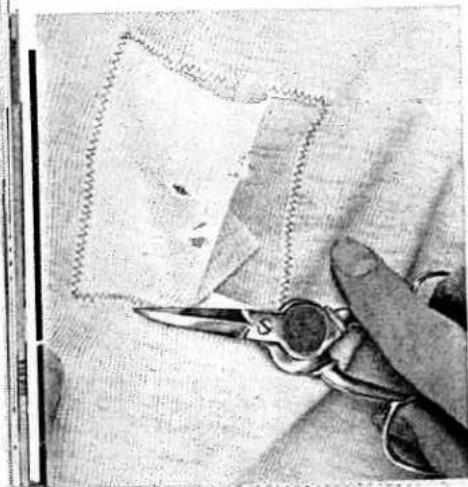
natural_image
Close-up of a hand using scissors to cut fabric with a dotted outline (no text or symbols visible)material. Zigzag width: 4. The curve seam is especially suitable for sewing, hemming, or patching tricot or similar material (see also "Patching").
Beautiful effects may be obtained with the curve seam when you sew with twin needles of needle distances 1/16" and 9/128" (see page 61) using threads of contrasting colour. Check with page 49, "Twin needle fashion stitches", for correctly inserting the needle, threading and limiting the zigzag width.
Patching
Normal sewing foot 847 495
When you have to repair large damaged areas, cut the patch square or rectangular as required to cover the hole or worn area. See to it that the threads of the patch are parallel to those of the material to be repaired. When working with tricot sew down the edges with the elastic curve seam, with other material use the zigzag stitch with zigzag lever on 1.
Patches on clothes for extremely hard wear require a second seam parellell to the first one at a distance of once the width of the sewing foot. Sew twice over the corners, no matter what material.
Finally trim the damaged material close to the seam on the wrong side of the material.
For other normal sewing work on tricot you should always use sewing foot 847 495.
5. Piping
The piping attachment is available upon request and against reasonable extra charge. It comprises:
piping head 847 650
machine needles system 1844
5 needles FI = left-hand needle
5 needles Fr = right-hand needle
piping foot 847665 with one narrow groove (width of groove 1/16")
piping foot 847667 with five medium-wide grooves (width of groove 3/32")
piping foot 847 666 with one wide groove (width of groove 1/8")
special screwdriver 847 262 for piping head (needle plate with guide slot for gimp thread).
Upper and bobbin thread for narrow piping: machine embroidery and darning cotton No. 50; for medium-wide and wide piping: sewing silk. Gimp thread: cotton. Bobbin tension: normal. Upper tension: either slightly weaker or stronger than normal to suit material in hand. On the wrong side of the material, the bobbin thread must appear as if a narrow zigzag titch.
Setting the Machine
Control cam on straight stitch. Stitch length: normal (5/64" to 1/8"). Needle position: centre. Zigzag lever and lock disc on 0.
Bring the thread take-up lever to its highest position and with the help of the screwdriver loosen the screw on the needle clamp (above the needle fastening screw) and carefully draw the needle clamp down and off the bar.
Now take the piping head and loosen both screws on its front side. Push both needles up as far as they will go (with the long groove facing you) and tighten the screws again. Now slide the head up onto the needle bar until it stops and tighten the thumb screw.
Setting the Distance between Needles
The piping head has markings for adjusting to different needle spacings: The lower parts can be adjusted after the two screws on the back of the clamp have been slackened off (right-hand photo).
Narrow Piping
with piping foot 847 665
The markings on the upper part of the clamp must be set in line with the outside markings on the under part.
Medium-wide Piping
with piping foot 847667
The markings on the upper part of the clamp must be set in line with the centre markings on the under part.
Wide Piping
with piping foot 847 666
The markings on the upper part of the clamp must be set in line with the inner-most of the three markings on the under part.
After setting the needles to the required spacing, tighten the screws at the back of the clamp. Now attach the piping foot corresponding to the needle spacing.

natural_image
Close-up of a mechanical device with a textured surface and metal components (no visible text or symbols)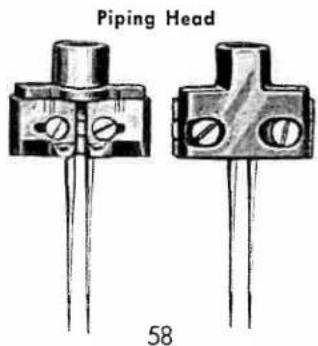
text_image
Piping Head 58
natural_image
Close-up of a sewing machine needle and clasp mechanism (no visible text or symbols)Threading
Place a spool of thread onto each of the two spool pins. Pass both threads together as usual through the two thread guides, then separately around the upper tension (one thread on each side of the centre disc) and through the holes of the thread take-up lever and again together through the next thread guide. Now pass one thread each through the eyelets on the piping head and from front to back through the needles (as with twin-hem needle pictured on page 38). When picking up the bobbin thread, hold both upper threads with your left hand.
Piping Techniques
For sewing slightly pronounced piping in thick and fairly thick material, no gimp thread is used. You can now start sewing immediately at a stitch length of preferably not more than 5/64".
Spacing between the Piping
When laying a number of piping stitches lengthwise, just let the edge of the sewing foot slide along the previous row of piping stitches to ensure neat parallel seams. The spacing can be further reduced by sewing with piping feet with more than one groove, where one of the off-centre grooves glides on the previous row of piping stitches.
For extremely narrow piping (also for the hemstitch mentioned on page 37 and for cording, page 53) you can obtain a special piping foot No. 847682 with seven grooves (each 1/16" wide), upon request and at extra charge.
If you want to have larger spacings between two ore more rows of piping stitches, you may use the quilting guide 847 482 with clamp 847 480 referred to on page 29.
Raised Piping
When working with thin delicate material we recommend you to use a gimp thread (cotton, size suiting the fabric to be sewn). You should also use a gimp thread when sewing medium-wide piping in fairly thick fabric. (Wide piping in thick fabric is done without gimp thread.)
Sewing with a gimp thread requires a needle plate with a guide slot in front of the needle hole (see picture on page 37).
Pass the gimp thread through the cut-out at the front edge of the needle plate and pull it up through the guide slot located in front of the needle hole (as pictured on page 37 and described on page 38 "Hemstitching with Twinhem Needle"). Deposit the hank of thread in your lap where it will unwind itself.
Fancy Piping
Effective designs can be created with straight or diagonal lines of piping, or with lines that cross or curve (as pictured at right). When making a corner leave the needle tips in the material, with the needle eyes just above the fabric. Raise the sewing foot, turn the work in the new direction, lower the sewing foot and continue to sew.
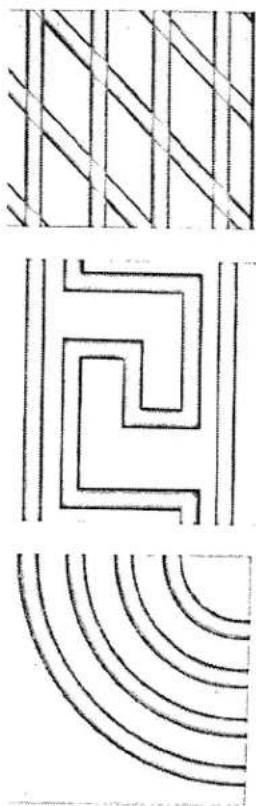
natural_image
Abstract geometric pattern with diagonal stripes, a central zigzag line, and concentric curved lines (no text or symbols)When making a sharp corner, you should turn the work only half way in the new direction, lower the foot and make one stitch. Now complete the turn and continue to sew in the new direction.
Cord piping
A cord effect is produced by laying medium-wide piping lines quite closely side by side.
Piping with Ordinary Twin Needles
Instead of the piping head 847650 you may also use ordinary twin needles of system 130 R for piping. These twin needles are inserted into the normal needle clamp as described on page 10. They are available with different needle spacings: 1/16", 9/128", 5/64", 3/32", 1/8" and 5/32".
For small piping use piping foot 847665 and twin needle 1/16" or 9/128".
For medium-wide piping use piping foot 847667 and twin needle 5/64" or 3/32".
For wide piping use piping foot 847 666 and twin needle 1/8" or 5/32".
The method of working is the same as with the piping head. You can, of course, also sew fashion stitches with the twin needles (see page 49).
6. Maintenance
Oiling and Cleaning the Machine
is essential for smooth, trouble-free operation and long machine life.
Use only approved sewing machine oil available at your dealer.
natural_image
Close-up of a mechanical sewing machine component (no visible text or symbols)You should make it a rule to oil the bearings of all working parts regularly; oiling intervals depend on how often you use the machine.
As lint and thread ends settle in the working mechanism during sewing and combine with the lubrication oil, it becomes necessary from time to time to clean the machine thoroughly before oiling it. Never instead a suitable brush or a pointed wooden stick with a piece of soft cloth wrapped around it.
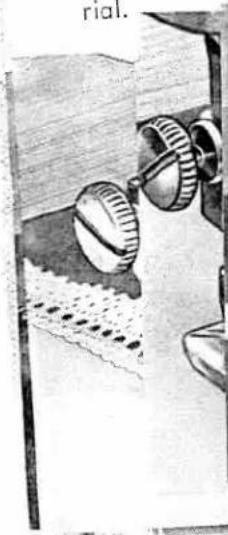
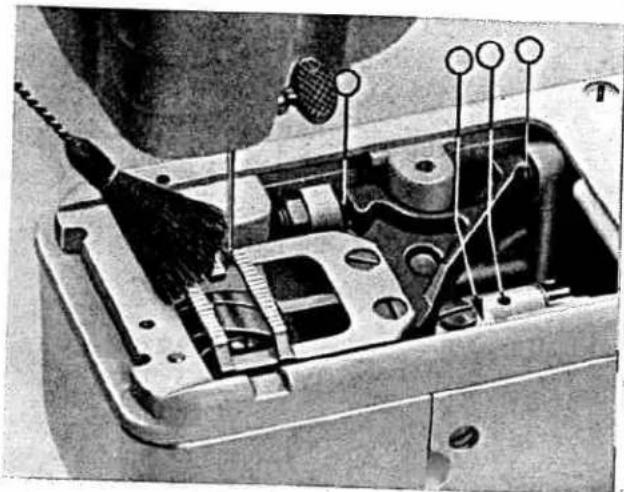
Specially the hook requires regular oiling. Every day you use your machine apply one drop of oil to the hook (photo at left).
It is natural that most of the lint and thread ends settle down in the hook area and in the feed assembly, causing the machine to run noisier. Take out the bobbin case or, respectively, unscrew the needle plate to do the necessary cleaning.
The hook of your machine is so designed that it will not cause trouble even if the machine is improperly operated. If it still happens that threads get caught in the hook race, turn the handwheel a few times back and forth. If necessary, apply a few drops of paraffin to the hook and simultaneously turn the hook with your left hand and the handwheel with your right hand back and forth in the correspondingly same direction, and the machine will again run smoothly.
Additional Hints for Oiling and Cleaning
Apply only one or two drops of oil to every oiling point. Oil systematically; it is suggested to start with the oiling points in the arm, after taking off the needle plate.
natural_image
Interior view of an open electronic device with visible wiring and components (no text or symbols)Oiling points in the front part of the arm are accessible after opening the sewlight cover.
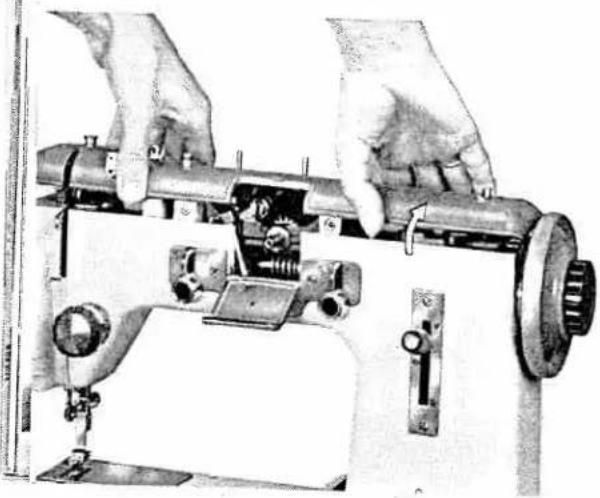
Before taking off the top cover open always cover 20 of the Automatic device (see page 22). Take care that you will not damage the bobbin winder as you take off the top cover.
Make sure that there will never be any oil on the driving belts and on the bobbin winder pulley.
natural_image
Illustration of hands operating a sewing machine with no visible text or symbols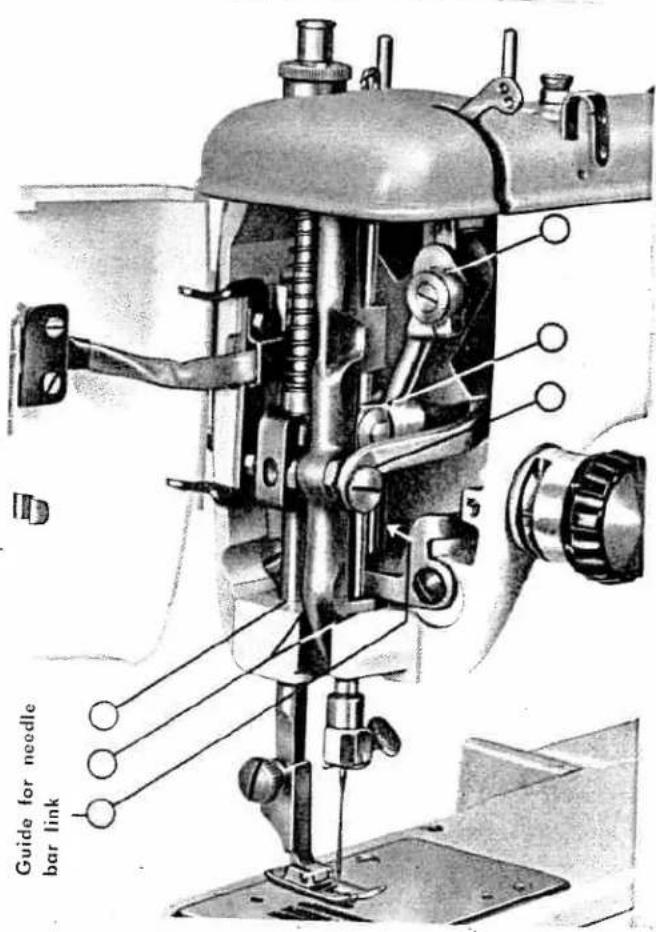
text_image
Guide for needle bar linkIn the photos the oiling points are marked by circles. Of the two oiling points for the hook one is located in the needle plate, the other next to the needle plate behind the sewing foot. Remember them too when oiling the machine.
When thoroughly cleaning the machine (if necessary also before first using it and after it has not been used for any length of time) first apply some paraffin to the oiling points, run the machine rapidly for a minute (not threaded), clean over with a cloth, and oil the machine.
Before using the machine the next time, wipe off all surplus oil especially in the hook and needle areas.
It may even be good to make a few stitches on a remnant first so as to avoid the good fabric getting dirty.
Quite often trouble is eliminated by merely cleaning and oiling.
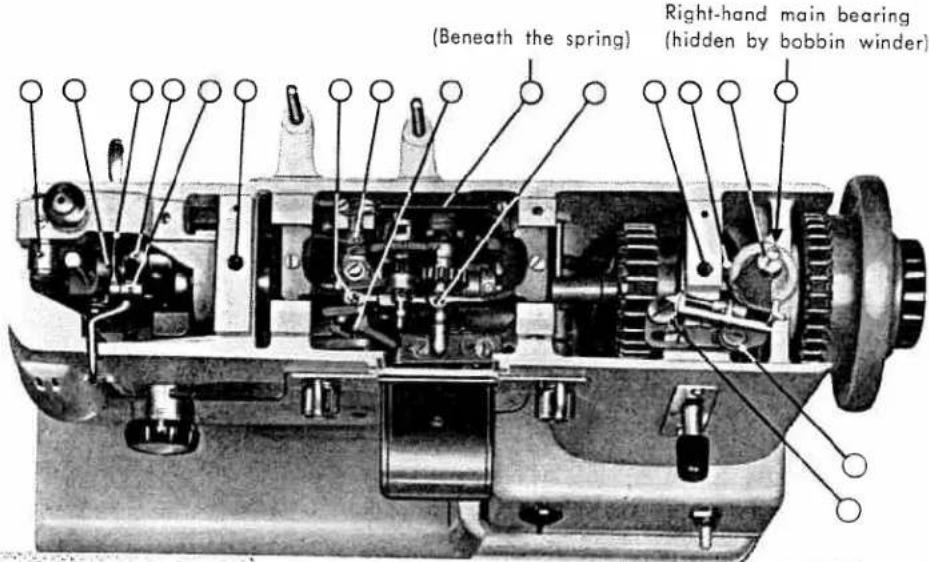
text_image
(Beneath the spring) Right-hand main bearing (hidden by bobbin winder)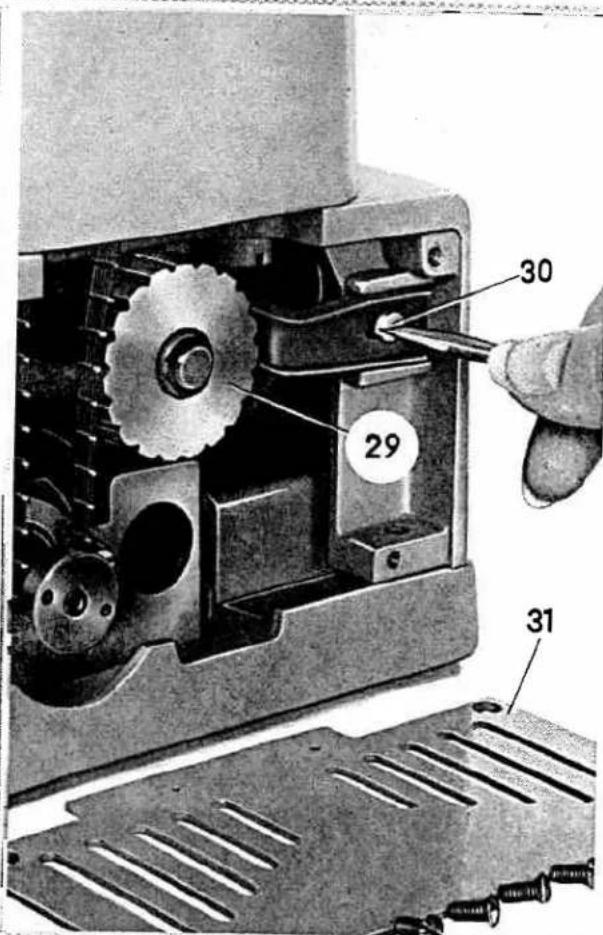
text_image
30 29 31Motor-drive
The machine has a belted motor-drive. The belt should never be too tight nor too slack to ensure smooth troublefree action. There should normally be just a slight give. As the tightness of the belt may vary after some time, you should once in a while take off the ventilation plate 31 on the right-hand side of the machine by loosening the four fastening screws.
The belt should be just so tight that its steel wires keep engaging the regulating wheel 29, causing it to rotate evenly. The regulating wheel can be adjusted after loosening screw 30. When retightening the wheel bracket make sure the rubber lining fits well.
The motor requires no particular care. Only the carbon brushes will have to be replaced after a number of years.
Suppression:
The motor has a suppression circuit.
Input: Motor with sewlight about 75 Watts, maximum.
Sewing Speed:
Approximately 1300 stitches p/m.
Exchanging the Sewlight Bulb
Exchanging the sewlight bulb (15 W) is as simple as this: Pull out wall plug, open sewlight cover, slightly press the bulb upwards, turn it to the left and draw it out of the socket. Introduce a new bulb in such a way that the guide studs slide into the slots of the socket. Press the bulb upwards turn it to the right, and it is fixed.

natural_image
Close-up of a hand operating a mechanical switch device with visible wiring and components (no text or symbols)7. Cause and Remedy of Faults
Remember:
Many machine troubles are caused by non-observance of these instructions. In many cases faulty working of your machine can be remedied merely by cleaning and oiling.
-
The machine is dirty — clean it.
-
Unsuitable oil has been used — clean the machine with paraffin and oil it with approved oil.
The machine works heavily:
- Thread ends are caught up in the hook race — oil the hook, turn the handwheel and the hook back and forth as described on page 63.
- The motor belt is too tight — adjust the regulating wheel (see page 66).
- Certain parts have run dry — oil them.
The machine is noisy:
- Thread ends are lodged in the hook race — oil the hook, turn the handwheel and the hook back and forth as described on page 63.
- The motor belt is too slack — adjust the regulating wheel (see page 66).
- Certain parts have run dry — oil them.
The upper thread breaks:
- The needle is bent or inaccurately inserted—replace the needle (see page 10).
- Knotty, inferior quality thread is being used — use a better quality.
- The upper thread is incorrectly threaded — thread the machine correctly (see page 17).
- The needle is too fine for the thread or fabric — use a thicker needle (see pages 10, 11 and 12).
-
The tension regulator spring 735090 is broken — get a new one to replace it.
-
The upper tension is too strong — loosen it (see page 25).
- The eye of the needle has a cutting edge — replace the needle.
- The bobbin case has a rough spot cutting the thread — take out the bobbin case and consult your dealer.
- The needle plate hole has a cutting edge — smoothen it with emerycloth.
- The feed does not transport the work properly owing to an accumulation of lint and thread ends — unscrew the needle plate and clean the feed assembly thoroughly.
The bobbin thread breaks:
- Knotty, inferior thread is being used — use a better quality.
- The bobbin thread tension is too strong — loosen it (see page 25).
- The bobbin case tension is too weak — tighten it (see page 25).
- The needle is bent — replace it by a new one (see page 10).
- The bobbin thread is wound unevenly — wind evenly and not too tight.
- The bobbin case has a rough spot — take out the bobbin case and consult your dealer.
The machine skips stitches:
- The needle is not inserted all the way up in the needle clamp — correct this (see page 10).
- The needle is bent or blunt — replace the needle (see page 10).
- Thread tensions are incorrectly set — adjust them (see pages 24 and 25).
- The needle is too fine or too thick for the thread — replace the needle or the thread so they will suit each other and the material (see pages 10, 11 and 12).
-
The thread curls up because it is unsuitable for machine sewing — use suitable thread.
-
A wrong type of needle is being used — obtain the correct needle system 130 R from your dealer.
- The hook point is damaged — consult your dealer.
- A wrong sewing foot has been used — as far as possible the normal sewing foot 847 495 should be used. (For special sewing work, as corners of shirt collars, ask for special sewing feet by supplying a work sample.)
The needle breaks:
-
The needle has not been correctly inserted — push it all the way up in the clamp. The needle is bent or blunt — replace the needle (see page 10).
-
The needle is too thin for the thread or fabric — use a thicker needle (see pages 11 and 12).
- The upper tension is too strong — loosen it (see page 25).
- The material has been pulled along during sewing — only when sewing over thick parts of the fabric, you may aid the feed a little, sewing slowly stitch by stitch. Otherwise the material must never be pulled along.
- The needle, instead of entering the needle hole, hits the sewing foot or the needle plate — you are using the wrong sewing foot or (especially when sewing with twin needles) the zigzag width has not been limited (see page 49) or the needle is inserted too far to the front of the clamp.
Unsatisfactory feed of the material:
- Lint and thread ends in the feed assembly are impeding the smooth movement of the feed dog — remove the needle plate and thoroughly clean the feed assembly.
- The feed dog is set too low (normally when sewing the full height of the teeth should protrude from the needle plate) — after removing the needle plate look up an expert and have the feed dog raised a little by adjusting the lifter eccentric.
The material puckers:
- Both thread tensions are set too strong – loosen both upper and bobbin thread tension (see page 25).
- The sewing foot exerts too much pressure — reduce the pressure following instructions on page 26.
- When sewing thin material — place some thin paper under the fabric and set the stitch length not too long.
Uneven stitching
- The thread is uneven or too thick — change the thread.
- The tension is wrong — adjust it (see pages 24 and 25).
- Upper and bobbin thread do not unwind evenly because there is dirt lodged in the bobbin or between the tension discs in the upper tension shell — clean the machine where necessary.
-
The needle is blunt or bent — change the needle.
-
The bobbin has been replaced improperly — check the position of the bobbin in the bobbin case following instructions on pages 15 and 16.
The bobbin winder slips
The friction surface is oily — take off the top cover and wipe the oil off the bobbin winder and the friction surface on the handwheel until they are dry.
Table of present and former numbers of sewing feet and attachments Our sewing feet and bottom are
Our sewing feet and attachments have now been given new numbers, mostly consisting of six figures. Your sewing machine dealer knows already some of these sewing feet by their former numbers. The cross-reference list below is to help you order replacement feet or additional sewing feet as they are mentioned on the pages of this instruction booklet.
| New number | Former number | New number | Former number |
| 14.3506 | — | 847 552 | Z-383 |
| 14.3593 | — | 847 563 | Z-1025 (1025) |
| 183 090 | 410 | 847 570 | — |
| 520 030 | — | 847 580 | GA-51 903 |
| 735 090 | VZK-41 131 | 847 602 | Z-292 |
| 847 250 | 188 | 823 350 | — |
| 847 260 | 140 c | 847 615 | Z-1027 a |
| 847 261 | 533 | 847 640 (60 407) | — |
| 847 262 | 387 | 847 645 | — |
| 847 270 | 1.01.410 | 847 650 | Z-379 |
| 847 480 | Z-1016 | 847 665 | 367 |
| 847 482 | 1194 | 847 666 | 368 |
| 847 484 | 535 | 847 667 | 368 a |
| 847 495 | Z-343 f | 847 682 | 367 c |
| 847 496 | Z-1028 | 847 810 | VZK-47 901 |
| 847 500 | 348 | 847 830 | SSZ-51 051 |
| 847 505 | Z-295 | 847 978 | 1-01.384 |
| 847 520 | 299 | 847 981 | 132 a |
| 847 546 | Z-384 | 847 991 | — |
| 847 547 | Z-382 | 847 996 | — |
| 847 549 | Z-385 |