CM1936ZF2 - Lawn mower BLACK & DECKER - Free user manual and instructions
Find the device manual for free CM1936ZF2 BLACK & DECKER in PDF.

User questions about CM1936ZF2 BLACK & DECKER
0 question about this device. Answer the ones you know or ask your own.
Ask a new question about this device
Download the instructions for your Lawn mower in PDF format for free! Find your manual CM1936ZF2 - BLACK & DECKER and take your electronic device back in hand. On this page are published all the documents necessary for the use of your device. CM1936ZF2 by BLACK & DECKER.
USER MANUAL CM1936ZF2 BLACK & DECKER
19 Inch (483mm) Cordless Mulching Rear Bag Mo
INSTRUCTION MANUAL
Catalog Number CM1936ZF2
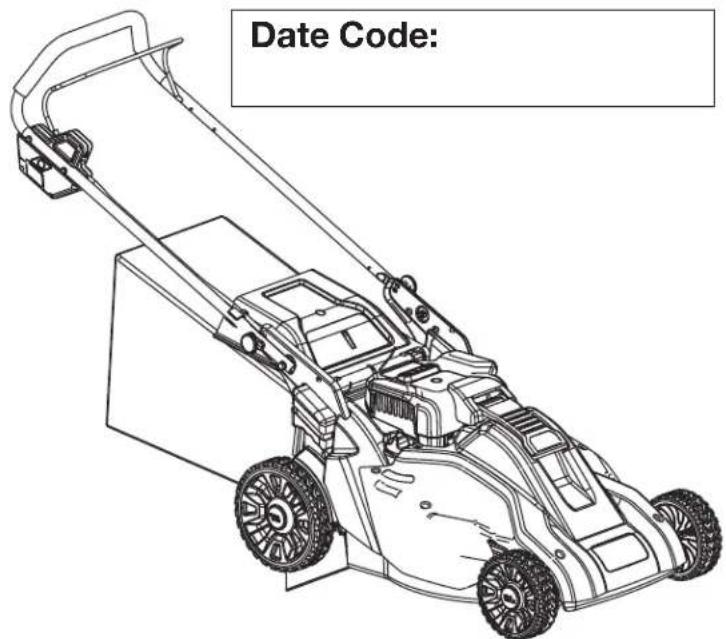
text_image
Date Code:Thank you for choosing Black & Decker!
Go to www.BlackandDecker.com/NewOwner to register your new product.
PLEASE READ BEFORE RETURNING THIS PRODUCT FOR ANY REASON:
If you have a question or experience a problem with your Black & Decker purchase, go to HTTP://WWW.BLACKANDDECKER.COM/INSTANTANSWERS
for instant answers 24 hours a day.
If you can't find the answer or do not have access to the internet, call 1-800-544-6986 from 8 a.m. to 5 p.m. EST Mon. -- Fri. to speak with an agent.
Please have the catalog number available when you call.
KEY INFORMATION YOU SHOULD KNOW:
- Do not operate mower unless handle is locked into position.
- For best cutting results, keep blade sharpened and balanced.
- Inspect and thoroughly clean your mower after each use (a deck with caked grass will degrade performance).
• Make sure mowing area is clear of other persons or pets prior to starting and during operation. - Fully charge your mower before using it for the first time for optimal performance. Fully charge your battery after every use.
SAVE THIS INSTRUCTION MANUAL FOR FUTURE REFEREN
SAFETY GUIDELINES - DEFINITIONS
It is important for you to read and understand this manual. The information it contains relates to protecting YOUR SAFETY and PREVENTING PROBLEMS. The symbols below are used to help you recognize this information.
⚠️DANGER: Indicates an imminently hazardous situation which, if not avoided, will result in death or serious injury.
⚠ WARNING: Indicates a potentially hazardous situation which, if not avoided, could result in death or serious injury.
⚠️CAUTION: Indicates a potentially hazardous situation which, if not avoided, may result in minor or moderate injury.
NOTICE: Used without the safety alert symbol indicates a potentially hazardous situation which, if not avoided, may result in property damage.
The following are explanations of important safety hazard pictorials on the mower.

- User must read and understand the instruction manual.

- To avoid the risk of serious injury do not mow up and down slopes. Always mow across slopes.
- To avoid the risk of injury to bystanders keep all persons and pets at a safe distance from the mower while operating.

- Rotating blades can cause serious injury. Keep hands and feet clear of mower deck and discharge opening at all times. Always be sure blade has stopped (wait for the blade to stop rotating (approximately 3 seconds) after releasing bail handle and removing the safety key) before removing and replacing grass catcher, cleaning, servicing, transporting or lifting the mower.
- Objects struck by mower blade can cause serious injury. Stay behind the handle when the motor is running. Always ensure persons and pets are clear of the discharge from the mower while operating. Always inspect mowing area before mowing and remove objects that could be thrown by blade. Release bail handle to turn mower off and wait for the blade to stop rotating (approximately 3 seconds) before crossing walk, roads, patio and gravel drives.
⚠ WARNING: IMPORTANT SAFETY WARNINGS AND INSTRUCTIONS
WARNING: When using electric lawn mowers, basic safety precautions should always be followed to reduce risk of fire, electric shock, and personal injury, including the following.
READ ALL INSTRUCTIONS
TO REDUCE RISK OF INJURY:
- Before any use, be sure everyone using this lawn mower reads and understands all safety instructions and other information contained in this manual.
- Save these instructions and review frequently prior to use and in instructing others.
⚠️DANGER: IMPORTANT SAFE PRACTICES FOR WALK-BEHIND MOWERS
This mower is capable of amputating hands and feet and throwing objects. Failure to observe the following safety instructions could result in serious injury or death.
GENERAL OPERATION
-
Read, understand, and follow all instructions on the mower and in the instruction manual before starting.
-
Do not put hands or feet near or under the mower. Keep clear of the discharge opening at all times.
-
Only allow responsible adults, who are familiar with the instructions, to operate this mower.
-
Clear the area where the mower is to be used of objects such as rocks, sticks, wire, toys, bones, etc., which could be thrown by the blade. Objects struck by the blade can cause severe injury to persons. Stay behind the handle when the motor is running.
-
Be sure the area surrounding the mower is clear of bystanders before operating. All bystanders and pets should be kept at a safe distance. Stop the mower if anyone enters the area surrounding the mower.
-
Do not operate mower barefooted or while wearing sandals. Always wear substantial footwear.
-
Do not pull mower backward unless absolutely necessary. Always look down and behind before and while moving backward.
-
Never direct discharged material toward anyone. Avoid discharging material against a wall or obstruction. Material may ricochet back toward the operator. Release bail handle to turn mower off and stop the blade when crossing gravel surfaces.
-
Do not operate mower without the entire grass catcher, discharge guard, rear guard, or other safety protective devices in place and working. Periodically check all guards and safety protective devices to ensure they are in good working order and will operate properly and perform their intended function. Replace a damaged latch, guard or other safety device before further use.
-
Never leave a running mower unattended.
-
Always release the bail handle to stop the motor and wait until the blade comes to a complete stop and remove the safety key before cleaning the mower, removing the grass catcher, un-clogging the discharge guard, when leaving the mower, or before making any adjustments, repairs or inspections.
-
Operate mower only in daylight or good artificial light when objects in the path of the blade are clearly visible from the operating area of the mower.
-
Do not operate mower while under the influence of alcohol or drugs, or when you are tired or ill. Always stay alert, watch what you are doing, and use common sense.
-
Avoid dangerous environments. Never operate mower in damp or wet grass, never use mower in the rain. Always be sure of your footing; walk; never run.
-
Disengage the drive system, if so equipped, before starting the motor.
-
If the mower should start to vibrate abnormally, release the bail handle, wait for the blade to stop and remove the safety key and battery pack, then check for the cause immediately. Vibration is generally a warning of trouble.
-
Always wear proper eye and respiratory protection when operating the mower.
-
The use of any accessory or attachment not recommended for use with this mower could be hazardous. Only use accessories approved by Black & Decker.
-
Never overreach while operating the mower. Always be sure to keep proper footing and balance at all times while operating the mower.
SLOPE OPERATION
Slopes are a major factor related to slip and fall accidents, which can result in severe injury. Operation on all slopes requires extra caution. If you feel uneasy on a slope, do not mow it.
- Mow across the face of slopes; never up and down. Exercise extreme caution when changing direction on slopes.
- Watch for holes, ruts, bumps, rocks, or other hidden objects. Uneven terrain could cause a slip and fall accident. Tall grass can hide obstacles.
- Do not mow on wet grass or excessively steep slopes. Poor footing could cause a slip and fall accident.
- Do not mow near drop-offs, ditches, or embankments. You could lose your footing or balance.
CHILDREN
Tragic accidents can occur if the operator is not alert to the presence of children. Children are often attracted to the mower and the mowing activity. Never assume that children will remain where you last saw them.
- Keep children out of the mowing area and under the watchful care of a responsible adult other than the operator.
- Be alert and turn mower off if a child enters the area.
- Never allow children to operate the mower.
- Use extra care when approaching blind corners, shrubs, trees, or other objects that may block your view of a child.
GENERAL SERVICE
-
Never operate mower in a closed area.
-
Keep all nuts and bolts tight to be sure the equipment is in safe working condition.
- Never tamper with safety devices. Check their proper operation regularly.
- Keep mower free of grass, leaves, or other debris build-up. Allow mower to cool before storing.
- If you strike a foreign object, release bail handle to turn mower off, wait for the blade to stop and remove the safety key and battery pack, then inspect the mower. Repair, any damage, before starting and operating the mower.
- Never make any adjustments or repairs with the motor running or while the safety key is in the mower.
- Always remove safety key and battery pack before adjusting, cleaning, repairing, inspecting, transporting, storing or leaving the mower.
- Check grass catcher components and the discharge guard frequently and when necessary replace with Black & Decker recommended parts only.
- Mower blades are sharp. Wrap the blade or wear gloves, and use extra caution when servicing them.
- Maintain or replace safety and instruction labels, as necessary.
This device complies with part 15 of the FCC rules. Operation is subject to the following two conditions: (1) This device may not cause harmful interference, and (2) this device must accept any interference received, including interference that may cause undesired operation.
NOTE: This equipment has been tested and found to comply with the limits for a Class B digital device, pursuant to Part 15 of the FCC Rules. These limits are designed to provide reasonable protection against harmful interference in a residential installation. This equipment generates, uses and can radiate radio frequency energy and, if not installed and used in accordance with the instructions, may cause harmful interference to radio communications. However, there is no guarantee that interference will not occur in a particular installation.
If this equipment does cause harmful interference to radio or television reception, which can be determined by turning the equipment off and on, the user is encouraged to try to correct the interference by one or more of the following measures:
- Reorient or relocate the receiving antenna.
- Increase the separation between the equipment and receiver.
- Connect the equipment into an outlet on a circuit different from that to which the receiver is connected.
- Consult the dealer or an experienced radio/TV technician for help.
Changes or modifications to this unit not expressly approved by the party responsible for compliance could void the user's authority to operate the equipment. This Class B digital apparatus complies with Canadian ICES-003.
SAVE THESE INSTRUCTIONS
⚠ WARNING: GENERAL SAFETY WARNINGS AND INSTRUCTIONS FOR ALL LAWN MOWERS
- STORE IDLE LAWN MOWER INDOORS. Always store with safety key removed. Lawn mowers should be stored indoors in dry, secured area – out of reach of children.
- DON'T FORCE MOWER. It will do the job better and with less likelihood of a risk of injury at the rate for which it was designed.
- USE RIGHT APPLIANCE. Do not use the mower for any job except that for which it is intended.
- DRESS PROPERLY. Do not wear loose clothing or jewelry. They can be caught in moving parts. Rubber gloves, long pants and substantial, non-skid footwear are recommended when working outdoors.
- USE SAFETY GLASSES AND OTHER SAFETY EQUIPMENT. Use safety goggles or safety glasses with side shields, complying with applicable safety standards and, when needed, a face shield. Also use face or dust mask if operation is dusty. This applies to all persons in the work area. Also use a hard hat, hearing protection, gloves, safety shoes and dust collection systems when specified or required. Safety glasses or the like are available at extra cost at your local dealer or Black & Decker Service Center.
- DON'T ABUSE CORD. Never carry charger by cord or yank it to disconnect from receptacle. Keep cord away from heat, oil, and sharp edges.
- MAINTAIN MOWER WITH CARE. Keep cutting edge clean and sharp for best performance and to reduce the risk of injury. Follow instructions for lubricating and changing accessories. Inspect mower cord periodically and if damaged, have it repaired by authorized service facility. Keep handles dry, clean, and free from oil and grease.
- AVOID UNINTENTIONAL STARTING. Don't carry mower with safety key inserted in switch housing. Be sure bail handle is not engaged while inserting safety key.
- BEFORE USING, always visually inspect to see that the blade, blade fasteners and cutter assembly are not worn or damaged. Replace worn or damaged blades and fasteners in sets to preserve balance. Inspect the mower cord - ensure it is in good condition. Cord insulation must be intact with no cracks or deterioration.
• USE OF EXTENSION CORDS
Make sure the extension cord is in good condition before using. Always use the proper size extension cords with the lawn mower – that is, proper wire size for various lengths of cord and heavy enough to carry the current the lawn mower will draw. Use of an undersized cord will cause a drop in line voltage resulting in loss of power and overheating. For proper size cords see chart below.
| Volts | Minimum Gauge for Cord Sets | ||||
| Total Length of Cord in Feet | |||||
| 120V | 0-25(0-7,6m) | 26-50(7,6-15,2m) | 51-100(15,2-30,4m) | 101-150(30,4-45,7m) | |
| 240V | 0-50(0-15,2m) | 51-100(15,2-30,4m) | 101-200(30,4-60,9m) | 201-300(60,9-91,4m) | |
| Ampere Rating | |||||
| More Than | Not more Than | American | Wire | Gauge | |
| 0 | 6 | 18 | 16 | 16 | 14 |
| 6 | 10 | 18 | 16 | 14 | 12 |
| 10 | 12 | 16 | 16 | 14 | 12 |
| 12 | 16 | 14 | 12 | Not Recommended | |
- CHECK FOR DAMAGED PARTS. Before further use of the mower, a guard or other part that is damaged should be carefully checked to determine that it will operate properly and perform its intended function. Check for alignment of moving parts, binding of moving parts, breakage of parts, mounting, and any other conditions that may affect their operation. A guard or other part that is damaged should be properly repaired or replaced by an authorized service center unless otherwise indicated elsewhere in this manual. - REPAIRS AND SERVICE. Repairs, maintenance and any adjustments not specified in this manual should be performed by Black & Decker authorized service centers or other qualified service organizations, always using identical replacement parts.
⚠️DANGER: ADDITIONAL WARNINGS FOR MOWERS
• ALWAYS firmly grip handle with both hands when operating mower.
- NEVER wear radio or music headphones while operating mower.
- CONTAIN long hair.
- NEVER attempt to make a wheel height adjustment while the motor is running or while the safety key is in the switch housing.
- IF MOWER stalls, release bail handle to turn mower off, wait for blade to stop and remove the safety key and battery pack, before attempting to unclog the chute or remove anything from under the deck.
- KEEP HANDS and feet away from cutting area.
- KEEP BLADES sharp. Always use protective gloves when handling the mower blade.
• IF YOU are using a grass catcher, check it frequently for wear and deterioration. If excessively worn, replace with new bag for your safety.
- USE EXTREME CAUTION when reversing or pulling mower toward you.
⚠ WARNING: Some dust created by this product contains chemicals known to the State of California to cause cancer, birth defects or other reproductive harm. Some examples of these chemicals are:
• compounds in fertilizers
- compounds in insecticides, herbicides and pesticides
• arsenic and chromium from chemically treated lumber
To reduce your exposure to these chemicals, wear approved safety equipment such as dust masks that are specially designed to filter out microscopic particles.
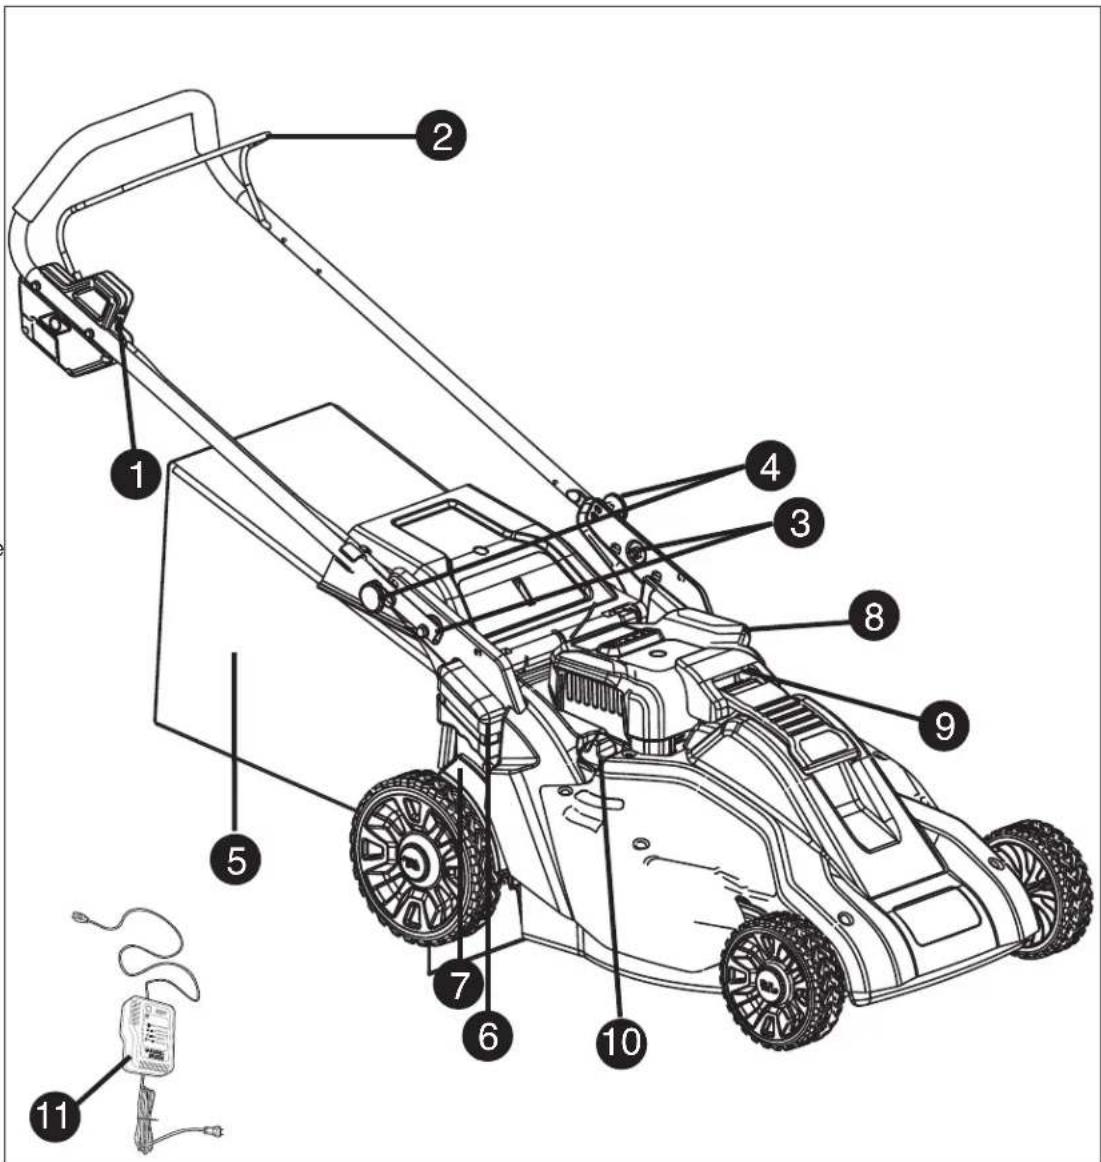
FUNCTIONAL DESCRIPTION CM1936ZF2
1.) Safety key/charging port
2.) Bail Handle (Switch lever)
3.) Handle attachment bolts
4.) Handle quick adjust knobs
5.) Grass bag
6.) Cut height adjustment release
7.) Cut height indicator
8.) Removable battery
9.) Battery latch
10) On Demand knob
11.) Charger
text_image
Technical diagram of a lawn mower with numbered parts and an analog meter for scalePREPARATION
PLEASE REFER TO DIAGRAMS (A, B, C...) AND ITEM NUMBERS (1, 2, 3...) AS NOTED THROUGHOUT MANUAL. FOR EXAM A-1 REFERS TO ITEM 1 IN FIGURE A.
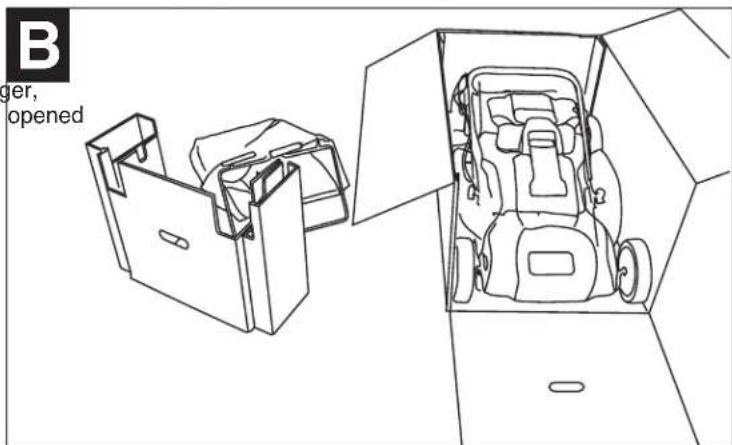
UNPACKING - (FIGURES A, B)
⚠️ CAUTION: Pinch point. To avoid being pinched, keep fingers from area between handle and plates.
STEP 1:
Carefully cut down the sides of the box on the opposite end of and fold the flap down as show WARNING: Sharp blade. Keep body parts away from blade.

text_image
A away of the handleSTEP 2:
With the carton end cut open, remove the cardboard filler, charger, accessory bag and grass bag and push the mower out of the opened carton.
natural_image
Line drawing of a car interior with open doors and internal compartments, no text or symbols presentASSEMBLY
Tools required for assembly, not supplied:
Adjustable or 1/2 inch (13mm) wrench.
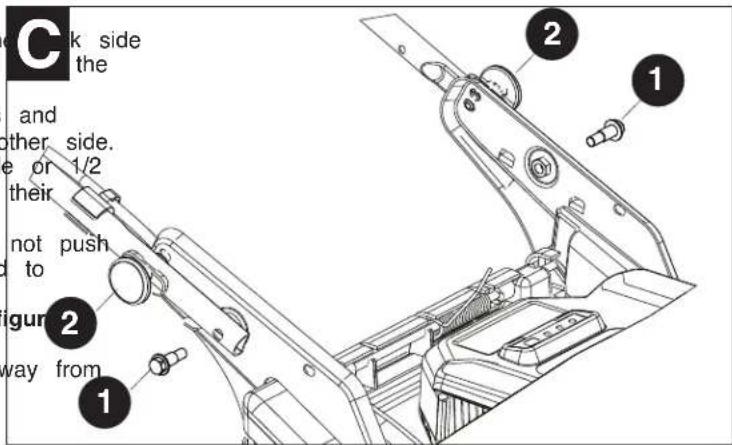
HANDLE ASSEMBLY (FIGURE C)
- Position the handle so that the handle holes line up with the C-2 side plate holes. The handle quick adjust knobs C-2 will line up the deck side plate top holes.
- Place handle attachment bolts C-1 through the handle holes and thread into the deck side plate. Before tightening repeat for other side.
- Tighten handle attachment bolts C-1 securely using adjustable or 1/2 inch (13mm) wrench. Ensure that each bolt is tightened until their shoulder bottoms out on the plate.
- To set desired handle height refer to handle adjustment. Do not push or use mower unless handle is properly fastened and secured to mower.
The handle quick adjust knobs C-2 will appear as shown in f when they are fully engaged into the plates.
CAUTION: Pinch point. To avoid being pinched, keep fingers at area between handle and plates when raising or adjusting.
text_image
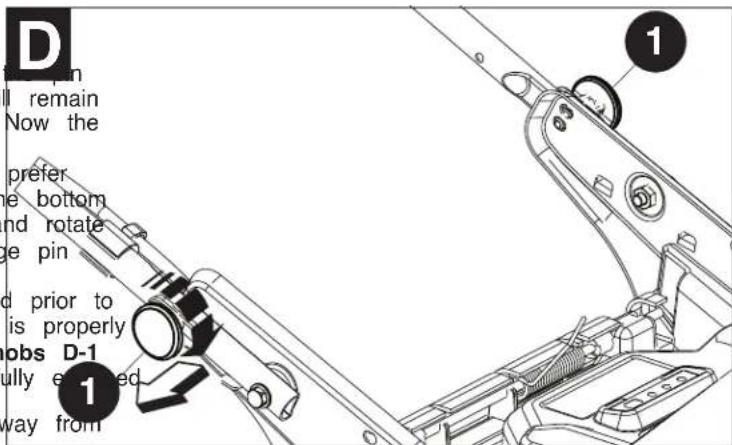
C k side the and ther side. e or 1/2 their not push to figur 2 way from 1 2 1HANDLE ADJUSTMENT (FIGURE D)
- Remove safety key.
- Hold handle with one hand, pull out and rotate one handle adjust knob D-1 on mower handle a quarter-turn to release from the metal plate hole. Handle quick adjust knob D-1 will remain in this retracted position. Repeat for the opposite side knob. Now the handle is free to move into another handle height position.
- Move the handle to desired height position. Taller users will prefer using the top hole position, while shorter users may prefer the bottom hole position. While holding handle with one hand, pull out and rotate one handle quick adjust knob D-1 a quarter-turn to re-engage pin into metal plate hole. Repeat for the other knob.
- Shake handle slightly to ensure handle pins are fully engaged prior to using mower. Do not push or use the mower unless handle is properly fastened and secured to mower. The handle quick adjust knobs D-1 will appear as shown in figure D when the knob pins are fully extended into the plates.
CAUTION: Pinch point. To avoid being pinched, keep fingers away from area between handle and plates when raising or adjusting.
text_image
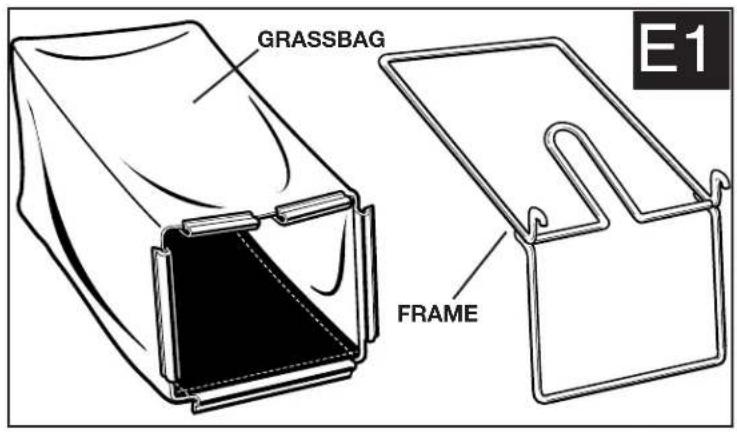
D I remain Now the prefer e bottom nd rotate e pin d prior to is properly obs D-1 fully enabled way fromASSEMBLING THE GRASS CATCHER (FIGURES E1, E2, E3, E4)
- Before starting to assemble the grass bag to the frame, check that the grass bag and frame are similar to figure E1.
- Slide the grass bag onto the frame as shown in figure E2.
- Assemble the top clips to the frame as shown in figure E3, then assemble the two side clips and the bottom clip last.
- Completely assembled grass catcher is shown in figure E4.
text_image
GRASSBAG FRAME E1
natural_image
Line drawing of a mechanical component with internal structure and mounting bracket (no text or symbols)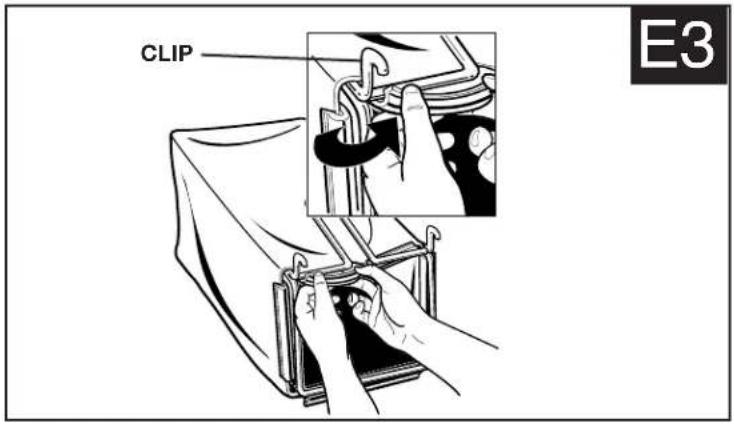
text_image
CLIP E3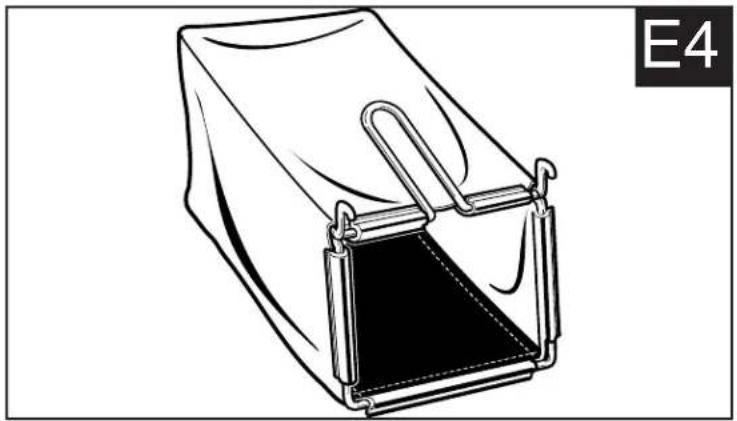
natural_image
Line drawing of a rectangular device with a black interior and metal clip, labeled E4 (no text or symbols on the device itself)WHEEL HEIGHT ADJUSTMENT (1-1/2 IN. (38mm TO 3-1/2 IN. (89mm) FIGURES F, G
NOTE: Certain types of grass or grass conditions may require varying the height of the mower deck. Grasses of mature lawns often are seriously injured when mowed shorter than 1-1/2 inches (38mm), and a height of 1-1/2 to 2 inches (38mm) to (51mm) is preferred on large lawns.
- Before making any adjustments, release bail handle to turn mower off, wait for blade to stop, and remove safety key.
- Your mower features the Black & Decker one touch wheel height adjustment system. This system will adjust all four wheels at the same time.
-
To raise or lower the cutting height, place the palm of your hand on the palm rest F-1 and with your fingers, squeeze upward on the finger grip F-2 and hold.
-
While holding the finger grip up you can raise or lower the cutting height. The mower has seven blade height adjustment positions. Refer to the scale G-1 and pointer G-2 at the rear of the mower. The pointer will indicate the height setting for cutting your lawn. This setting can be a reference for the next time you want to put your lawn at the same height.
When you have the mower at the height you would like, ho place with your left hand on the lower right handle bar and the finger grip with your right hand to lock the height adjust Note: To ensure that the deck is securely locked in one of seven positions, press down on the palm rest after releasing finger grip.

text_image
F varying are and on large rower height the hand on the cutting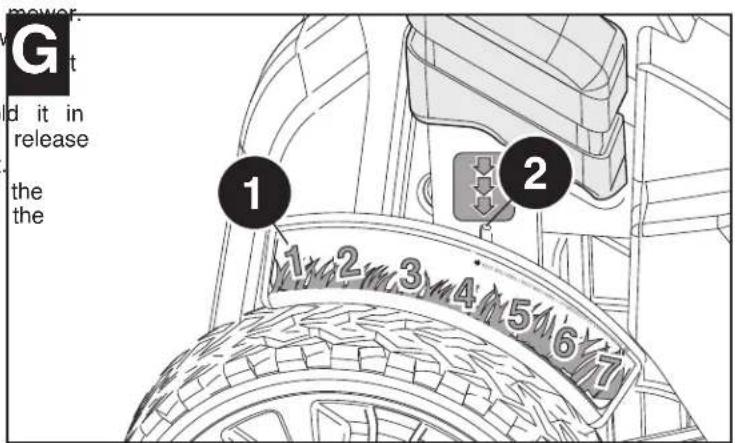
text_image
power G it id it in release the the 1 2 1x2m3x4x5x6x7BATTERY
⚠️ CAUTION: USE ONLY BLACK & DECKER APPROVED REPLACEMENT BATTERIES - CONTACT YOUR LOCAL SERVICE C OR 1-800-544-6986.
The battery is a 36-volt sealed lead acid system. There is no liquid contained within the battery and the mower/battery can therefore be stored in any position without fear of leakage.
IT IS RECOMMENDED THAT THE BATTERY BE RECHARGED AFTER USE TO PROLONG THE BATTERY LIFE. FREQUENT CH WILL NOT HARM YOUR BATTERY, AND WILL ENSURE THAT THE BATTERY IS FULLY CHARGED AND READY FOR ITS NE STORING BATTERY NOT FULLY CHARGED WILL SHORTEN BATTERY LIFE. REFER TO OFF-SEASON STORAGE SECTION.
- For optimal performance the battery should be kept on constant charge when not in use.
- The battery should be charged in its proper orientation.
- The battery prefers to be charged in a cool, dry place.
• The battery does not need to be fully discharged before recharging.
• 2 to 3 initial charging cycles may be required after purchase to achieve maximum run time capacity. - A fully charged battery can be safely stored down to -40^ (-40°F).
• The battery is maintenance free.
• The CM1936ZF2 can use either the RB-3610, RB-3612 or RB-3675 battery. The battery should not be used for any other purpose.
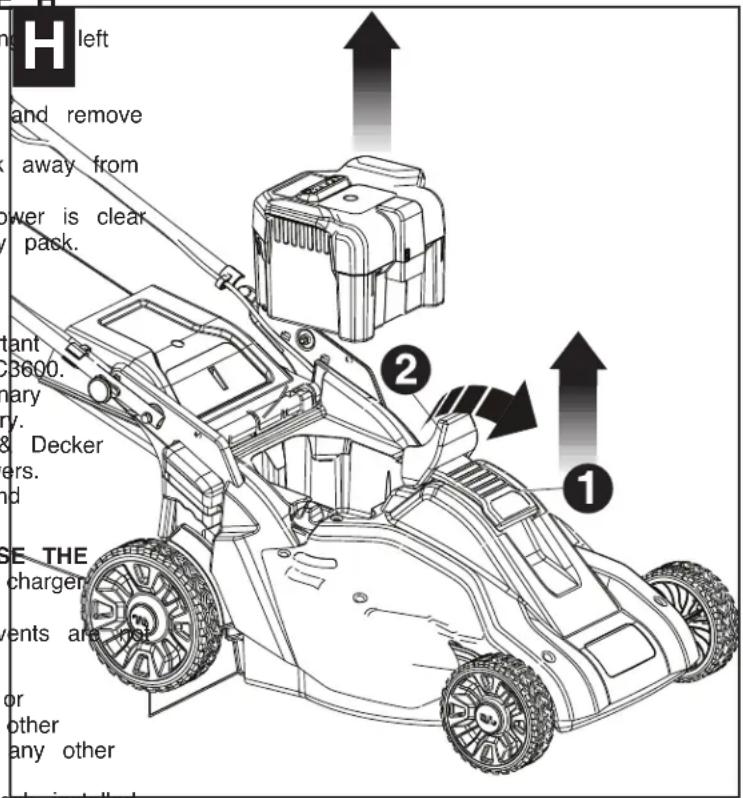
REMOVING BATTERY FROM MOWER - FIGURE H
The battery can be removed from the mower for storage/charging left in the mower for charging.
Prior to removing battery, place mower on level ground.
Release bail handle to turn mower off, wait for blade to stop, safety key.
To remove the battery, lift the lever H-1, and then rotate back battery pack to unlatch clasp H-2. Lift battery pack out.
Prior to the installation of the battery pack, ensure that the mo of debris and the charger plug is disconnected from the battery
CHARGER SAFETY RULES
IMPORTANT SAFETY INSTRUCTIONS
- SAVE THESE INSTRUCTIONS - This manual contains important safety and operating instructions for battery charger Model FC3600.
- Before using battery charger, read all instructions and cautionary markings on battery charger, battery, and product using battery.
- ⚠CAUTION: To reduce risk of injury, charge only Black & Decker 36 volt sealed lead acid type rechargeable batteries for mowers. Other types of batteries may burst causing personal injury and damage.
- Plug charger directly into an electrical outlet. DO NOT ABUSE THE CORD. Never carry charger by cord. Do not disconnect the charger from the outlet, mower or battery by pulling it by the cord.
- Place the charger on a solid surface and ensure that the vents are blocked.
- ⚠WARNING: To reduce the risk of fire, electrical shock, or personal injury do not attempt to use this charger with any other product. Likewise, do not attempt to charge the battery with any other charger.
- Do not service mower with charger, safety key or battery pack installed.
- Do not operate a damaged charger. Replace damaged cords or charger immediately at an authorized Black & Decker service center.
- Always charge the mower in a dry area protected from the weather. Do not expose the mower, battery or charger to rain. Do not charge in wet locations. Do not charge battery when temperature is above 104^ F ( 40^ C) or below 41^ F ( 5^ C). Remove battery and charge indoors if above or below these temperatures. Charge the battery in a well ventilated location.
- Keep the mower, battery and charger away from water, heat sources, (such as radiators, heaters, stoves, etc.) flames, or chemicals. Be careful not to damage the charger cord, by keeping cord away from sharp edges.
- Prior to reinstalling the battery into the mower, disconnect charger plug from battery, or damage may occur.
WARNING: FIRE HAZARD
ALWAYS DISCONNECT THE CHARGER FROM THE POWER SUPPLY (WALL OUTLET) BEFORE REMOVING THE CHARGER CONNECTOR. UNDER CERTAIN CONDITIONS, WITH THE CHARGER PLUGGED IN TO THE POWER SUPPLY, THE EXPOSED CONNECTOR CAN BE SHORTED BY FOREIGN MATERIAL AND MAY CAUSE A FIRE.
FOREIGN MATERIALS OF A CONDUCTIVE NATURE, SUCH AS, BUT NOT LIMITED TO, STEEL WOOL, ALUMINUM FOIL, OR BUILD-UP OF METALLIC PARTICLES, SHOULD BE KEPT FROM THE CONNECTOR. ALWAYS UNPLUG CHARGER BEFORE ATTEMPTING TO CLEAN.
text_image
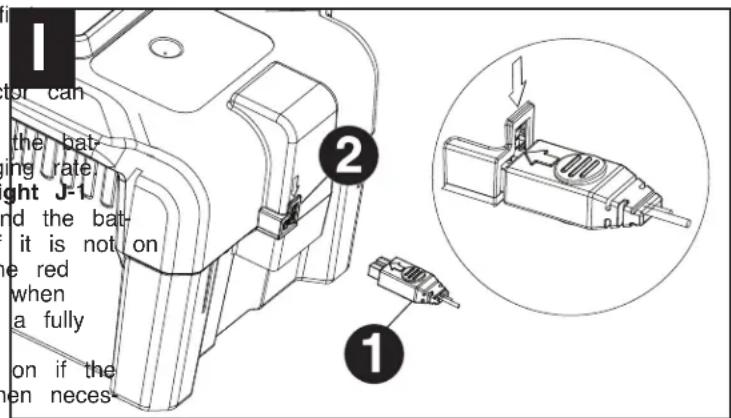
H left and remove away from power is clear / pack. tant 3600. mary ry. & Decker ers. nd SE THE charger ents are not or other any other lock installedCHARGING PROCEDURE- FIGURES I, J
-
To charge your mower remove the battery from the mower
-
Align the charger plug I-1 with the arrow on top and insert the charger plug into the receptacle I-2 on the battery pack (blue terminal to blue terminal, white terminal to white terminal). The charger connects only be plugged into the battery one way.
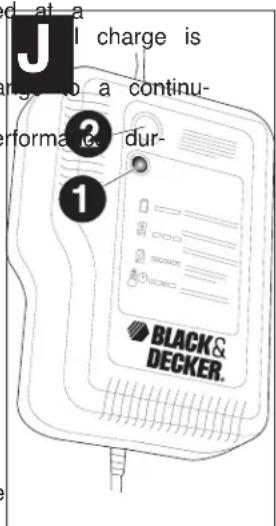
-
There are two charging rates to choose from when charging tery. The charger will default to the "normal" or regular charge NORMAL CHARGING RATE - When in this mode, the red li on the charger should come on indicating you have power artery is being charged. Check the charger for the red light, if check the charger connector for proper alignment (step 2). The light should extinguish and the green light J-1 will come on charging is complete (takes approximately 12 hours to charge discharged mower).
FAST CHARGING RATE - NOTE: Fast Charge mode is only on if the fast charge button J-2 is depressed. Use this mode only when necessary to improve task completion.
When in this mode, the red light J-1, will be on flashing off indicating that the battery is being charged at a
faster rate. After about 30 minutes the initial fast charge cycle is complete, and approximately 80% available. The light will change to a flashing green light.
After approximately 3 hours of fast charging the battery will be fully charged, and the light will charge to a continuous green light indicating a maintenance mode.
- It is recommended to leave the battery on constant charge (between mowing uses) for optimum performance during the mowing season.
text_image
1 for can ther bat- ing rate ght J-1 and the bat- it is not on e red when a fully ion if the en neces 2 1OPERATION
KNOW YOUR MOWER
READ THIS INSTRUCTION MANUAL AND SAFETY RULES BEFORE OPERATING YOUR MOWER. See "Functional Description" to
familiarize yourself with the location of various controls and adjustments. Save this manual for future reference.
text_image
J I charge is to a continu- forma i dur- 1 BLACK & DECKER.SAFETY KEY
⚠️ DANGER : SHARP MOVING BLADE.
In order to prevent accidental start-up or unauthorized use of your Cordless Mower, a removable safety keyK-1 has been incorporated into the design of your mower. The mower will be completely disabled when the Safety Key has been removed from the mower.

text_image
K ed into ed when 1NOTE: THE SAFETY KEY HAS A HOLE IN THE CENTER TO ALLOW FOR STORAGE ON A NAIL, OUT OF THE REACH OF NOT TETHER SAFETY KEY TO MOWER.
⚠ DANGER: ROTATING BLADES CAN CAUSE SERIOUS INJURY. TO PREVENT SERIOUS INJURY, REMOVE SAFETY KEY WHEN UNATTENDED, OR WHEN CHARGING, CLEANING, SERVICING, TRANSPORTING, LIFTING, OR STORING MOWER.
TO TURN MOWER ON
Insert safety key L-1 into the switch housing, until it is fully sea-side housing. The mower is now operational.
⚠️ DANGER: SHARP MOVING BLADE. NEVER ATTEMPT TO OVERRIDE THE OPERATION OF THIS SWITCH AND SAFETY KEY SYSTEM AS SERIOUS INJURY COULD RESULT.
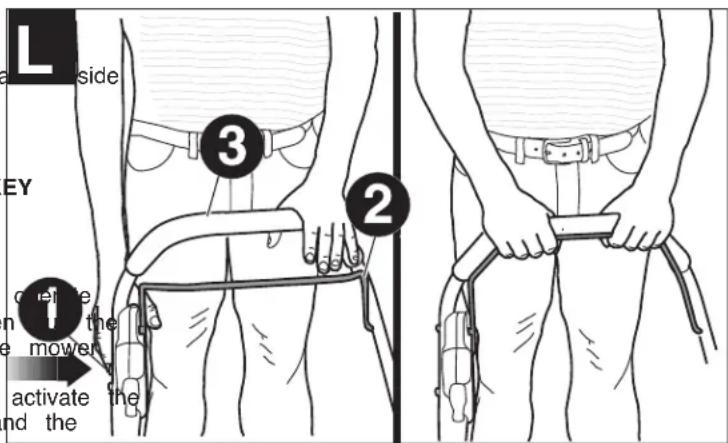
ON-OFF SWITCH (BAIL HANDLE) - FIGURE L
Your mower is equipped with a special on-off switch system. To the system, first push button L-1 on side of switch housing, their bail handle (switch lever) L-2 to the handlebar L-3. To turn the off, just release the bail handle.
Once the bail handle has returned to the original position it will activate "Automatic Braking Mechanism". The motor is electrically braked and the mower blade will stop rotating in 3 seconds or less.
text_image
L side 3 2 EY on the mower activate the and theMOWER OVERLOAD
To prevent damage due to overload conditions, do not try to re much grass at one time. Slow down your cutting pace, or raise height.
MEETS CPSC SAFETY REQUIREMENTS
Black and Decker Mowers conform to the safety standards of the American National Standards Institute, and the U.S. Consumer Product Safety Commission. The blade turns when the blade motor is running
SAFETY SHIELD AND REAR DOOR - FIGURE M
The safety shield M-1 is designed to minimize the throwing of other objects by the mower blade backward from under the mower. The shield, along with the rear door M-2, minimizes the possibility accidental foot contact with the blade. DO NOT operate mower with the safety shield and rear door in place.
DANGER: Sharp moving blade. Do not operate the mower if rear door is not closed under spring tension as serious injury could result. Take your mower to the nearest service center for repair.

text_image
M too the cut 2 e duct nning stones ver dity without if the puld 1INSTALLING GRASS CATCHER - FIGURE N, O
- Release bail handle to turn mower off, wait until the blade remove safety key.
- Reaching down between the mower handles, raise the rear discharge door N-1 to a vertical position and hold the door Ensure that the mulch insert N-3 has been removed.
- Pick up the grass catcher N-2 by the handle O-3 and place catcher between the mower handles as shown.

text_image
N nd up. e the grass 1 2 3 4- Position the grass catcher hanger hooks N-4 on the mower shown in figure O. Release the rear discharge door.
⚠️ DANGER: Sharp moving blade. Never operate the mower the hanger hooks on the grass catcher are seated properly on and the rear discharge door rests firmly against the top of the catcher as serious injury could result.

text_image
unless the mower grass"ON-DEMAND"
Your mower is equipped with the On-Demand feature that allows the conversion of mulching to bagging or discharging with the turn of a knob.
Release bail handle to turn mower off, wait for the blade to come to a complete stop. Then remove safety key.
Discharge Mode:
-
Remove grass catcher.
-
Ensure the rear discharge door rests firmly against the deck.
-
Press and turn On-Demand knob so that it is in-line with the word "DISCH (see figure P).
Your mower is now in rear discharge mode. The cut grass will be deposited closed door exit onto the lawn.
Bagging Mode:
-
Install grass catcher.
-
Ensure rear discharge door rests firmly against the top of the grass catcher.
-
Press and turn On-Demand knob so that it is in-line with the word "BAG" P-1 (see figure P).
Your mower is now in Bagging mode.
Note: To change to rear discharge mode at this point, just remove the grass catcher.

text_image
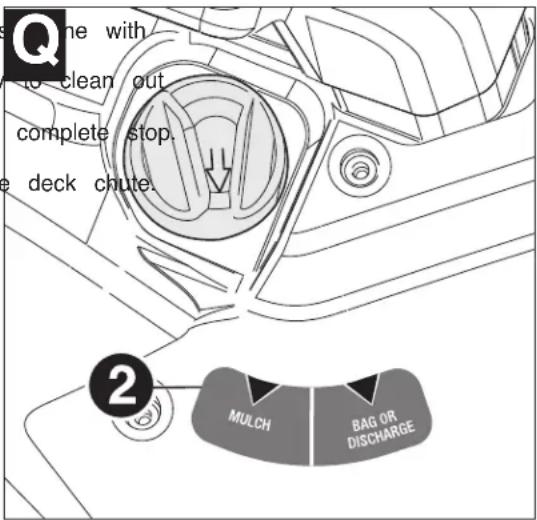
P P-1 BEARGE" P-1 below the catcher. MULCH BAG OR DISCHARGE ①Mulching Mode:
- To convert to mulch mode press and turn the On-Demand knob so that it is one with the word "MULCH" Q-2 (see figure Q). Your mower is now in mulch mode.
Note: If it becomes difficult to rotate the On-Demand knob, it may be necessary the deck chute.
-
Release bail handle to turn mower off and wait for the blade to come to a Then remove safety key and battery pack.
-
Hold rear discharge door open, and clean out any debris that may be in the Also clean out deck bottom as necessary.
text_image
Qone with to clean out complete stop. e deck chute. ② MULCH BAG OR DISCHARGEMOWING TIPS
NOTE: ALWAYS INSPECT AREA WHERE MOWER IS TO BE USED AND REMOVE ALL STONES, STICKS, WIRE, BONES AND DEBRIS WHICH MIGHT BE THROWN BY THE ROTATING BLADE.
- Mow across the face of slopes, never up-and-down. Exercise extreme caution when changing direction on slopes. Do not mow excessively steep slopes. Always maintain good footing.
- Release bail handle to turn mower "OFF" when crossing any gravel area (stones can be thrown by the blade).
- Set mower at highest cutting height when mowing in rough ground or in tall weeds. Removing too much grass at one time can cause the motor to be overloaded and to stop. Refer to troubleshooting guide.
- If a grass catcher is used during the fast growing season, the grass may tend to clog up at the discharge opening. Release bail handle to turn mower off and remove the safety key. Remove the catcher and shake the grass down to the back end of the bag. Also clean out any grass or debris which may be packed around the discharge opening. Replace the grass catcher.
- If mower should start to vibrate abnormally, release bail handle to turn mower off and remove safety key. Check immediately for cause. Vibration is a warning of trouble. Do not operate mower until a service check has been made. Refer to troubleshooting guide in manual.
- ALWAYS RELEASE BAIL HANDLE TO TURN MOWER OFF AND REMOVE SAFETY KEY WHEN LEAVING IT UNATTENDED EVEN FOR A SHORT PERIOD OF TIME.
THE FOLLOWING SUGGESTIONS WILL HELP YOU TO OBTAIN OPTIMUM RUN TIME FROM YOUR CORDLESS MOWER:
- Slow down in areas where the grass is especially long or thick.
- When mulching, avoid cutting more than 1-1/2 inches (38mm) off the length at any one time.
- Avoid mowing when the grass is wet from rain or dew-soaked.
- Cut your lawn frequently, especially during high growth periods.
NOTE: IT IS RECOMMENDED THAT YOUR MOWER BE RECHARGED AFTER USE TO PROLONG THE BATTERY LIFE. FREQU CHARGING WILL NOT HARM YOUR BATTERY, AND WILL ENSURE THAT THE BATTERY IS FULLY CHARGED AND READY NEXT USE. STORING BATTERY NOT FULLY CHARGED WILL SHORTEN BATTERY LIFE.
MULCHING MOWING TIPS
Your mower was shipped from Black & Decker with the mulch insert installed if not equipped with On-Demand. While mulching, your new mower is designed to cut the grass clippings into small pieces and distribute them back into the lawn. Under normal conditions, the mulched grass will biodegrade quickly to provide nutrients to the lawn.
Please review the following recommendations for optimum mulching performance.
- Avoid mowing when the grass is wet from rain or dew. Wet grass may form clumps which interfere with the mulching action and reduce run-time. The best time to mow grass is in the late afternoon when the grass is dry and the newly cut area will not be exposed to direct sunlight.
- For best mulching performance, set the cutting height to remove about one third of the grass blade length, ideally no more than 1-1/2 in. at one time. If the lawn is overgrown, it may be necessary to increase the cut height to reduce the pushing effort and prevent overloading the motor. Slow your cutting pace in tall or thick grass conditions. For extremely heavy mulching, it is advisable to first cut at a high cut height setting, and then re-cut to the final cut height. Otherwise, make narrower cuts and mow slowly. ALWAYS MAKE SURE BLADE IS SHARP.
- For best performance, keep the mower housing free of built-up grass. From time to time release bail handle to turn mower off and wait for the blade to come to a complete stop. Then remove the safety key and battery pack and turn mower on its side. Using an object such as a stick, wipe out any accumulation of grass in the blade area. Be careful of the sharp edges of the blade. Clean often in wet, spring grass, and always after every use.
-
Certain types of grass or grass conditions may require that an area be mulched a second time to fully disperse the grass throughout the lawn. If cutting a second time, it is advisable to cut perpendicular (across) the first cut pattern. DO NOT CHANGE CUT PATTERN IN ANY WAY THAT WOULD CAUSE MOWING DOWN A HILL.
-
Change your cutting pattern from week to week. This will help prevent matting of the lawn.
MAINTENANCE
IMPORTANT: To assure product SAFETY and RELIABILITY, repairs, maintenance and adjustment (including brush inspection and replacement) should be performed by BLACK & DECKER Service Centers or other qualified service organizations, always using Black & Decker replacement parts. When servicing use ONLY IDENTICAL REPLACEMENT PARTS.
REMOVING AND INSTALLING BLADE - FIGURE R
- RELEASE BAIL HANDLE TO TURN MOWER OFF, WAIT FOR THE BLADE AND REMOVE SAFETY KEY AND BATTERY PACK.
- Cut a piece of 2x4 wood R-1 (about 2 feet long) (610 mm) to keep blade while removing flange nut.
- Turn the mower on its side. Wear gloves and proper eye protection. Be ca edges of blade. Position wood R-1 and remove flange nut R-3 with 3/4 in. (19mm) wrench R-2 as shown in figure R.

text_image
R to stop, from turning areful of sharp 1 2 3-
Remove square metal blade spacer S-2, square plastic blade insulator S-3 and blade S-4 as shown in figure S. Examine blade insulator for damage and replace if necessary.
-
When replacing sharpened or new blade on shoulder of fan S-5, make sure "GRASS SIDE" on the blade will be facing the ground when the mower is its normal upright position. After installing blade S-4, place plastic blade insulator S-3 on blade such that the raised lips on one side engage the edges of Then install the blade spacer S-2 so that it sits inside the raised lips on of the blade insulator. Be sure to align the flats in the hole of the blade flats of the shaft, rotating the blade and blade insulator together as necessary.

text_image
S e the returned to the blade. the other spacer with me 1 2 3 4 5 6- Position piece of wood T-1 to keep blade from turning as shown in figure T. Install flange nut with the flange against the blade spacer and securely tighten.
BLADE SHARPENING
KEEP BLADE SHARP FOR BEST MOWER PERFORMANCE. A DULL BLADE NOT CUT GRASS CLEANLY OR MULCH PROPERLY.
USE PROPER EYE PROTECTION WHILE REMOVING, SHARPENING, AND INSTALLING BLADE. ENSURE THAT SAFETY KEY AND BATTERY PACK IS REMOVED.
Sharpening the blade twice during a mowing season is usually sufficient under circumstances. Sand causes the blade to dull quickly. If your lawn has sandy frequent sharpening may be required.
REPLACE BENT OR DAMAGED BLADE IMMEDIATELY.
WHEN SHARPENING THE BLADE:
-
Make sure blade remains balanced.
-
Sharpen blade at the original cutting angle.
-
Sharpen cutting edges on both ends of blade, removing equal amounts of material from both ends.
TO SHARPEN BLADE IN A VISE:
-
Be sure the bail handle is released, the blade has stopped and safety key pack removed before removing the blade.
-
Remove blade from mower. See instructions for removing and installing blade
-
Secure blade U-1 in a vise U-2.
-
Wear proper eye protection and gloves and be careful not to cut yourself.
-
Carefully file the cutting edges of the blade with a fine tooth file U-3 or stone, maintaining the original cutting edge.
-
Check balance of blade. See instructions for blade balancing.
-
Replace blade on mower and tighten securely.

text_image
T DOES normal soil more 1
text_image
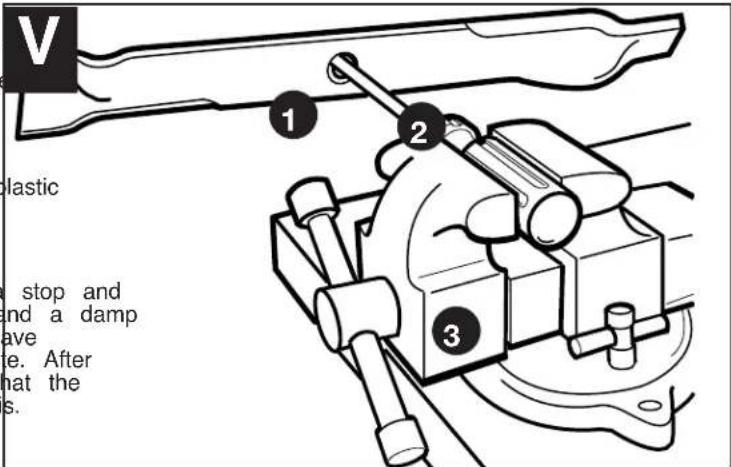
U battery e. sharpening ① ② ③BLADE BALANCING
Check balance of blade by placing center hole in blade V-1 over a nail or round shank screwdriver V-2, clamped horizontally in a vise V-3. If either end of the blade rotates downward, file that end. Blade is prop balanced when neither end drops.
LUBRICATION
No lubrication is necessary. Do not oil the wheels. They have plastic bearing surfaces which require no lubrication.
CLEANING
Release bail handle to turn mower off, let the blade come to a stop and then remove safety key and battery pack. Use only mild soap and a damp cloth to clean the mower. Clean out any clippings which may have accumulated on the underside of the deck and in discharge chute. After several uses, check all exposed fasteners for tightness. Ensure that the mower battery compartment and terminals are kept clear of debris.
text_image
V 1 2 3 stop and and a damp ave e. After that the s.PREVENTING CORROSION
Fertilizers and other garden chemicals contain agents which greatly accelerate the corrosion of metals. If you mow in areas where fertilizers or chemicals have been used, the mower should be cleaned immediately afterward as follows: (1) Release bail handle to turn mower off and remove safety key and battery pack. (2) Wipe all exposed parts with a damp cloth. A CAUTION: DO NOT POUR OR SPRAY WATER ON THE MOWER IN AN ATTEMPT TO CLEAN IT. Do not store the lawn mower on or adjacent to fertilizers or chemicals. Such storage can cause rapid corrosion.
TRANSPORTING AND STORAGE
⚠️ DANGER: Rotating blade can cause serious injury. Release bail handle to turn mower off and remove the safety key before lifting, transporting or storing the mower. Store in a dry place. Note: The mower will not be as heavy to lift if the battery pack is removed first. Do not use the latch as a lift point for the mower. Do not lift the mower by the battery handles.
⚠ WARNING: Mower should not be lifted by the handle when in storage position. Use the metal side plates and deck as grab points.
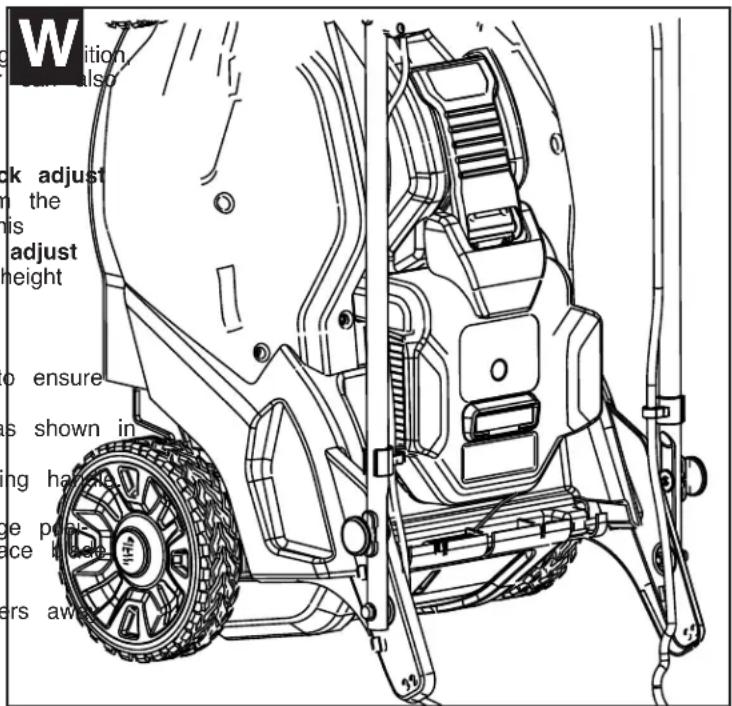
STORAGE POSITION
For more compact storing the mower can be stored in an upright with the handle folded over as shown in figure W. The mower be charged In this upright position.
To place the mower in a convenient storage position:
- Remove safety key.
- Hold handle with one hand, pull and rotate one handle quick knob on mower handle a quarter-turn to release the pin from metal plate hole. Handle quick adjust knob will remain in the retracted position. Repeat for the opposite side handle quick knob. Now the handle is free to move into another handle h position.
- Swing the handle forward over the front of the mower.
- Pull and rotate handle quick adjust knobs a quarter-turn to re-engage pins into metal plate holes. Shake handle slightly to handle pins are fully engaged in the metal plates.
- Now the mower can be rotated back onto its rear wheels at figure W.
- Be careful not to pinch power cord when folding and unfolding
CAUTION: If handle is not in locked position in upright storage tion, the handle may fall back and cause injury or damage. Place side against vertical wall.
⚠️ CAUTION: Pinch point. To avoid being pinched, keep fingers from area between handles when lowering.
OFF-SEASON STORAGE
text_image
W tion also ck adjust n the his adjust height o ensure as shown in ing hard ce pnis ce hake ers awa- In warmer climates to ensure optimal performance, it is recommended that the battery be maintained on constant charge.
-
The mower may be stored with the charger disconnected if all of the following conditions are met.
-
the battery is fully charged before storing. (Failure to store fully charged will shorten battery life).
- the average temperature of the storage location is below 50°F (10°C).
- storage duration is less than 6 months.
BATTERY SERVICE AND INSTALLATION
When service or repair is required, it is recommended that you take your mower to an authorized Black & Decker Service Center. When servicing or replacing batteries, please note:
- Use only the same type and size of battery as originally supplied.
- Do not dispose of the batteries in a fire. The cell may explode. See Battery Recycling information below.
- Do not open or mutilate the batteries. Released electrolyte is corrosive and may cause damage to the eyes or skin. It may be toxic if swallowed.
- Exercise care in handling batteries in order not to short the battery with conducting materials such as rings, bracelets, and keys. The battery or conductor may overheat and cause burns.
THE RBRC™ SEAL (BATTERY RECYCLING)
The RBRC ^™ (Rechargeable Battery Recycling Corporation) Seal on the lead acid battery (or battery pack) indicates that the costs to recycle the battery (or battery pack) at the end of its useful life have already been paid by Black & Decker. In some areas, it is illegal to place spent lead acid batteries in the trash or municipal solid waste stream and the RBRC program provides an environmentally conscious alternative.

RBRC in cooperation with Black & Decker and other battery users, has established programs in the United States and Canada to facilitate the collection of spent lead acid batteries. Help protect our environment and conserve natural resources by returning the lead acid battery to an authorized Black & Decker service center or to your local retailer for recycling. You may also contact your local recycling center for information on where to drop off the spent battery, or call 1-800-544-6986.
Accessories
Recommended accessories for use with your mower are available from your local dealer or authorized service center. If you need assistance regarding accessories, please call: 1-800-544-6986
⚠ WARNING: The use of any accessory not recommended for use with this lawn mower could be hazardous.
p/n 242501-05 REPLACEMENT GRASS BAG
MB-1200 REPLACEMENT BLADE
RB-3610, RB-3612 or RB-3675 BATTERY PACK
FC3600 FAST CHARGER
HERE ARE SOME HELPFUL HINTS TO GET THE MOST FROM YOUR BLACK & DECKER CORDLESS MOWER...AND KEEP Y LOOKING BEAUTIFUL
- Lawns should first be mowed in the spring when the grass is about 2-1/2 to 3 inches (63mm) to (76mm) high. Mowing too early restricts the grass root systems which renew themselves every spring. New grass should be mowed when it is about 2-1/2 inches (63mm) high.
- Do not remove too much grass blade surface at one time...never more than 1/3 of the leaf height during each cutting. Cutting too close "shocks" sensitive grass blades, resulting in a shallow root system and thus making it more difficult for your lawn to reach water in the soil.
- Lawn care experts say that excessively close cutting is responsible for much of the difficulty experienced on many lawns. The depth and strength of the roots of grass are almost exactly proportional to its growth. Grasses of mature lawns often are seriously injured when mowed shorter than 1-1/2 inches (38mm), and a height of 1-1/2 to 2 inches (38mm) to (51mm) is preferred on large lawns.
- Mow your lawn when it is dry to avoid clumping of wet grass. If you have a choice, late afternoon is the ideal time for mowing, not only
because the grass is dry, but also because the sensitive new cut area of the grass will not be exposed to intense sunlight.
5. Keep the mowing blade sharp for a nice clean cut. This improves the mower's performance and enhances the look of your lawn. A dull blade shatters and bruises the tips of the grass. This impairs the healthy growth of your lawn and increases susceptibility to turf diseases. If the grass tips are bruised it causes a brownish color and gives your lawn an unhealthy appearance. A dull blade may also pull up young seedlings.
6. Try to mow your lawn at the same (consistent) cutting height. While there are times when you should vary the cutting height with the changing seasons, a consistent cutting height produces a healthier, lovelier lawn with generally fewer weeds. Mow more frequently during periods of fast growth. Frequent cutting ensures that the lower, less attractive portion of the grass will not show.
7. If your lawn has grown too long, (a vacation, for example, may interrupt your cutting schedule) mow at a cutting height one or two positions higher than normal. A second pass at "normal" cutting height a few days later will put your lawn back on schedule. Changing the cutting height is a simple matter with Black & Decker's One Touch Wheel Height Adjustment, which simultaneously adjusts all four wheels at once.
8. During the spring and fall, (or after an interruption to the cutting schedule) the grass will be longer and thicker. If the motor continually slows down while cutting, try setting the wheels for a higher cutting height. Excessive motor loading can result in uneven cutting and quicker discharge of the battery.
9. Three good ideas to enhance your lawn's appearance: Vary the mowing direction frequently; mow horizontally on hillsides; (this is also a good safety practice) and do not forget to overlap the mowing path on each pass.
10. Always mow grass so that clippings are discharged onto cut lawn. This will keep your lawn looking fresh by avoiding "Cut Grass" build-up which will eventually brown and appear ugly. This method also preserves your battery charge, ensuring you get the most from your Black & Decker Cordless Power Mower.
11. During the spring and fall seasons when the grass is longer and thicker, you can use your mower without its battery being fully recharged. (i.e. green charge indication light is on). This will enable you to perform short cutting tasks, but we don't recommend this be done frequently. The battery and mower perform much better if charged fully.
TROUBLESHOOTING GUIDE
PROBLEM SOLUTION
| 1. Mower doesn't run when bail handle is activated. | A. Check to make sure safety key has been installed and is fully seated and that button on switch housing is being completely depressed.B. Release bail handle to turn mower off. Remove safety key and battery turn mower over and check that blade is free to turn.C. Check that the battery cavity is free of debris and is connected proD. Has battery been fully charged? Plug in charger and wait for green come on. |
| 2. Motor stops while mowing. A. Release bail handle to | turn mower off. Remove safety key and battery pack.Turn mower over and check that blade is free to turn.B. Raise cutting height of wheels to highest position and start mower.C. Check that the battery cavity is free of debris and is connected proD. Has battery been fully charged? Plug in charger and wait for green come on.E. Avoid overloading the mower. Slow down the cutting pace, or raise height. |
| 3. Mower runs but cutting performance is unsatisfactory, or does not cut entire lawn. | A. Has battery been fully charged? Plug in charger and wait for green light to come on.”B. Release bail handle to turn mower off. Remove safety key and battery Turn mower over and check:Blade for sharpness - Keep blade sharp.Deck and discharge chute for clogging.C. Wheel height adjustment may be set too low for grass condition. Rail cutting height. |
| 4. Mower is too hard to push. | A. Raise cutting height to reduce deck drag on grass. Check each wheel for free rotation. |
| 5. Mower is abnormally noisy and vibrates. | A. Release bail handle to turn mower off. Remove safety key and battery pack. Turn mower on side and check blade to ensure it has not been be damaged. If blade is damaged, replace with a Black & Decker replacement blade. If the underside of the deck is damaged return m a Black & Decker Authorized service center.B. If there is no visible damage to the blade and the mower still vibrablade may need to be balanced. See manual for Blade Balancing. If still vibrates after blade is balanced, release bail handle to turn mow remove safety key and battery pack and remove blade. Rotate blade degrees and retighten. If mower still vibrates, return the mower to an authorized Black & Decker service center. |
| 6. Battery charger LED's not on. | A. Check plug connection. Unplug charger, wait a few seconds. Plug charger in again to see if LED's come on.B. The battery pack charge port is accessible only when removed from Check charge port to see if charger LED's come on.C. Replace charger. |
| 7. Battery charger LED does not flip to green. | A. A. Unplug charger and wait a few seconds. Plug in again and leave on charge for minimum 8 hours at Normal rate, or one hour in Fast C (flashing green light).B. If charger LED is not green, battery may need to be diagnosed. Ta authorized service center.14 |
PROBLEM SOLUTION
| 8. Mower not picking up clippings with bag. A. Chute | clogged. Release bail handle to turn mower off. Remove safety key and battery pack. Clear chute of grass clippings.B. Too much cut grass. Raise cutting height of wheels to shorten lengthC. Bag full. Empty bag more often. |
| 9. When mulching there are clippings visible. | A. Too much cut grass. Raise cutting height of wheels to shorten length of the cut. Do not cut off more than 1/3 of total length.B. Check blade for sharpness. Always keep blade sharp. |
| 10. On mower equipped with On Demand - A. Deck chute may be too clogged. Release bail handle to turn mower off.Knob is difficult to adjust into position. Remove safety key and battery pack. Clear chute of grass clippings. | |
NOTE
Should the red light remain on after charging the battery for 24 hours on initial charge, the mower can still be used. The battery may need to be "conditioned" requiring a few battery charge and discharge cycles before the green indicator light comes on. THIS IS ONLY A GUIDE INTENDED TO ENABLE YOU TO PERFORM VISUAL CHECKS AND SIMPLE TESTS. SHOULD NONE SOLUTIONS PROVIDE SATISFACTION OR IMPROVE PERFORMANCE CALL 1-800-544-6986 (1-800-54-HOW-TO) TO SPEAK TO A CONSUMER SERVICE REPRESENTATIVE OR TAKE THIS MOWER TO THE CLOSEST AUTHORIZED BLACK & DECKER SERVICE CENTER FOR SERVICING.
Service Information
All Black & Decker Service Centers are staffed with trained personnel to provide customers with efficient and reliable power tool service. Whether you need technical advice, repair, or genuine factory replacement parts, contact the Black & Decker location nearest you. To find your local service location, refer to the yellow page directory under "Tools—Electric" or call: 1-800-544-6986 or visit www.blackanddecker.com
WARRANTIES
Full Two-Year Home Use Warranty
Black & Decker (U.S.) Inc. warrants this product for two years against any defects in material or workmanship. The defective product will be replaced or repaired at no charge in either of two ways.
The first, which will result in exchanges only, is to return the product to the retailer from whom it was purchased (provided that the store is a participating retailer). Returns should be made within the time period of the retailer's policy for exchanges (usually 30 to 90 days after the sale). Proof of purchase may be required. Please check with the retailer for their specific return policy regarding returns that are beyond the time set for exchanges.
The second option is to take or send the product (prepaid) to a Black & Decker owned or authorized Service Center for repair or replacement at our option. Proof of purchase may be required. Black & Decker owned and authorized Service Centers are listed under "Tools-Electric" in the yellow pages of the phone directory.
This warranty does not apply to accessories. This warranty gives you specific legal rights and you may have other rights which vary from state to state or province to province. Should you have any questions, contact the manager of your nearest Black & Decker Service Center. This product is not intended for commercial use.
FREE WARNING LABEL REPLACEMENT: If your warning labels become illegible or are missing, call 1-800-544-6986 for a free replacement.
LATIN AMERICA: This warranty does not apply to products sold in Latin America. For products sold in Latin America, check country specific warranty information contained in the packaging, call the local company or see the website for warranty information.
Deck Warranty
Lifetime Warranty for DECK only against any defects in material or workmanship.
Imported by Black & Decker (U.S.) Inc., 701 E. Joppa Rd. Towson, MD 21286 U.S.A.

See 'Tools-Electric' - Yellow Pages for Service & Sales

natural_image
Line drawing of a lawn mower with visible blades and wheels (no text or symbols)text_image
Technical diagram of a lawn mower with numbered parts and an attached probe device labeled 11.PRÉPARATION
SE REPORTER AUX SCHÉMAS (A, B, C...) ET AUX NUMÉROS D'ARTICLE (1, 2, 3...) TELS QU'INDIQUÉS DANS CE MODE D'EMPLOI. PAR EXEMPLE, A-1 IDENTIFIE L'ARTICLE 1 DE L'ILLUSTRATION A.
DÉBALLAGE (ILLUSTRATIONS A, B)
natural_image
Line drawing of a car inside an open box, showing internal compartments and housing (no text or symbols)ENSEMBLE DE POIGNÉE (FIGURE C)
natural_image
Line drawing of a mechanical device with a clamping bracket and internal components (no text or symbols)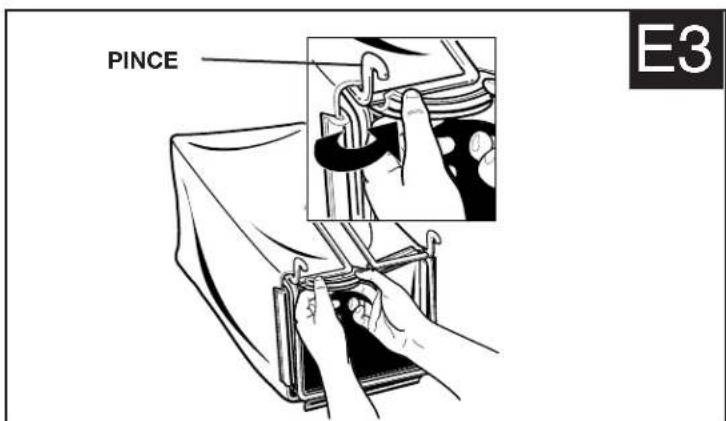
text_image
PINE E3
natural_image
Line drawing of a rectangular device with a black interior and metal clip, labeled E4 (no text or symbols on the device itself)RÉGLAGE DE LA HAUTEUR DES ROUES (38 M 89 MM (1 1/2 PO À 3 1/2 PO) ILLUSTRATIONS
text_image
T É rmales. onneux, des 1LORS DE L'AFFÛTAGE DE LA LAME :
natural_image
Line drawing of a lawn mower with visible blades and wheels (no text or symbols)natural_image
Line drawing of a mechanical device with internal components and mounting brackets (no text or symbols)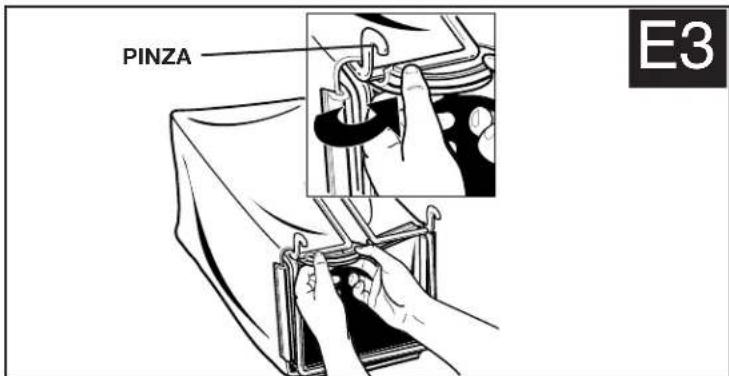
text_image
PINZA E3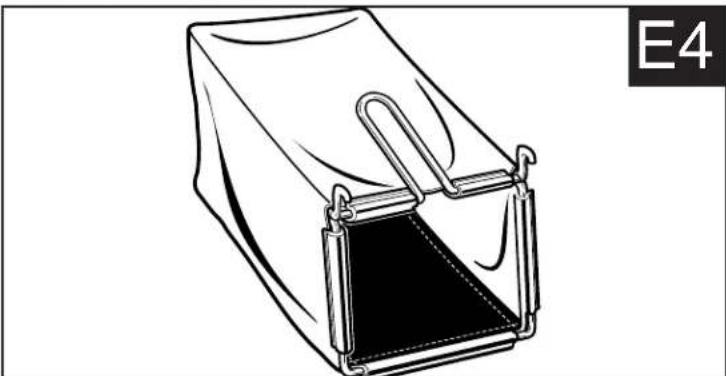
natural_image
Line drawing of a rectangular device with a black interior and metal frame, labeled E4 (no text or symbols on the device itself)AJUSTE DE ALTURA DE LAS RUEDAS DE 38 MM (1-1/2 PULGADAS) A 89 MM (3-1/2 PULGA
FIGURAS F, G
Date of purchase · Fecha de compra Invoice No. · No. de factura
Col. Fracc. Universidad
Chihuahua, Chihuahua
Tel. 01 614 413 64 04
Fernando González Armenta
Bolivia No. 605
Col. Felipe Carrillo Puerto
Cd. Madero, Tampico
Tel. 01 833 221 34 50