Optio L20 - Camera PENTAX - Free user manual and instructions
Find the device manual for free Optio L20 PENTAX in PDF.

User questions about Optio L20 PENTAX
0 question about this device. Answer the ones you know or ask your own.
Ask a new question about this device
Download the instructions for your Camera in PDF format for free! Find your manual Optio L20 - PENTAX and take your electronic device back in hand. On this page are published all the documents necessary for the use of your device. Optio L20 by PENTAX.
USER MANUAL Optio L20 PENTAX
Thank you for purchasing this PENTAX Digital Camera.
Please read this manual before using the camera in order to get the most out of all the features and functions. Keep this manual safe, as it can be a valuable tool in helping you to understand all the camera's capabilities.
Regarding copyrights
Images taken using the PENTAX Digital Camera that are for anything other than personal enjoyment cannot be used without permission according to the rights as specified in the Copyright Act. Please take care, as there are cases where limitations are placed on taking pictures even for personal enjoyment during demonstrations, performances or of items on display. Images taken with the purpose of obtaining copyrights also cannot be used outside the scope of use of the copyright as laid out in the Copyright Act, and care should be taken here also.
Regarding trademarks
• PENTAX and Optio are trademarks of HOYA CORPORATION.
• SDHC logo ( ) is a trademark of SD-3C, LLC.
- A r c S, and its logo are either the registered trademark or trademark of ArcSoft Inc. in the United States and/or other countries.
- Microsoft and Windows are registered trademarks of Microsoft Corporation in the United States and other countries. Windows Vista is either a registered trademark or trademark of Microsoft Corporation in the United States and/or other countries.
• Macintosh and Mac OS are trademarks of Apple Inc., registered in the U.S. and other countries.
- This product supports PRINT Image Matching III. PRINT Image Matching enabled digital still cameras, printers and software help photographers to produce images more faithful to their intentions. Some functions are not available on printers that are not PRINT Image Matching III compliant. Copyright 2001 Seiko Epson Corporation. All Rights Reserved. PRINT Image Matching is a trademark of Seiko Epson Corporation. The PRINT Image Matching logo is a trademark of Seiko Epson Corporation.
- Eye-Fi, the Eye-Fi connected are trademarks of Eye-Fi, Inc.
- All other brands or product names are trademarks or registered trademarks of their respective companies.
Regarding Product Registration
In order to better serve you, we request that you complete the product registration, which can be found on the CD-ROM supplied with the camera or the PENTAX website. Thank you for your cooperation.
Refer to "Connecting to a Computer" (p.213) for more information.


natural_image
Pure geometric lines and shapes without any text, numbers, or symbols
To users of this camera
- Do not use or store this device in the vicinity of equipment that generates strong electromagnetic radiation or magnetic fields.
Strong static charges or the magnetic fields produced by equipment such as radio transmitters could interfere with the monitor, damage the stored data, or affect the product's internal circuitry and cause camera misoperation. - The liquid crystal panel used in the display is manufactured using extremely high precision technology. Although the level of functioning pixels is 99.99% or better, you should be aware that 0.01% or fewer of the pixels may not illuminate or may illuminate when they should not. However, this has no effect on the recorded image.
- If you point the camera toward an object that is bright, a band of light may appear on the screen display. This phenomenon is referred to as "smear" and is not a malfunction of the camera.
- There is a possibility that the illustrations and the display screen in this manual are different from the actual product.
- In this manual, both an SD Memory Card and an SDHC Memory Card are referred to as SD Memory Cards hereafter.
- In this manual, the generic term "computer(s)" refers to either a Windows PC or a Macintosh hereafter.
- In this manual, the term "battery" refers to any type of batteries used for this camera and accessories.
Using Your Camera Safely
We have paid close attention to the safety of this product. When using this product, we request your special attention regarding items marked with the following symbols.

Warning
This symbol indicates that violating this item could cause serious personal injuries.

Caution
This symbol indicates that violating this item could cause minor or medium personal injuries, or loss of property.
About the Camera

Warning
- Do not disassemble or modify the camera. High voltage areas are present inside the camera, with the risk of electric shock.
- If the camera interior is exposed due to dropping or otherwise damaging the camera, never touch the exposed portion. There is a risk of electric shock.
- Wrapping the strap around your neck is dangerous. Take care that small children do not hang the strap around their necks.
- If any irregularities occur during use, such as smoke or a strange odor, stop use immediately, remove the battery or the AC adapter, and contact your nearest PENTAX Service Center. Continuing to use the product can cause a fire or electric shock.

Caution
- Do not place your finger over the flash when discharging the flash. You may burn yourself.
- Do not cover the flash with clothing when discharging the flash. Discoloration may occur.
- Some portions of the camera heat up during use. There is a risk of low temperature burns when holding such portions for long periods.
- Should the monitor be damaged, be careful of glass fragments. Also, be careful not to allow the liquid crystal to get on your skin, in your eyes or mouth.
- Depending on your individual factors or physical condition, the use of the camera may cause itching, rashes or blisters. In case of any abnormality, stop using the camera and get medical attention immediately.
About the Battery Charger and the AC Adapter

Warning
• Always use the battery charger and AC adapter exclusively developed for this product, with the specified power and voltage. Using a battery charger or AC adapter not exclusive to this product, or using the exclusive battery charger or AC adapter with an unspecified power or voltage can cause a fire, electric shock, or camera breakdown. The specified voltage is 100 - 240V AC.

- Do not disassemble or modify the product. This can cause a fire or electric shock.
- If the generation of smoke or strange odor from the product or other abnormality occurs, immediately discontinue use and consult a PENTAX Service Center. Continuing to use the product can cause a fire or electric shock.
- If water should happen to get inside the product, consult a PENTAX Service Center. Continuing to use the product can cause a fire or electric shock.
- If a thunder storm should occur while using the battery charger, unplug the AC plug cord and discontinue use. Continuing to use the product can cause damage to the equipment, fire, or electric shock.
- Wipe off the plug of the AC plug cord if it becomes covered with dust. Dust on the plug may cause a fire.

Caution
- Do not place or drop heavy objects on or forcefully bend the AC plug cord. Doing so may damage the cord. Should the AC plug cord be damaged, consult a PENTAX Service Center.
- Do not touch or short-circuit the terminal area of the AC plug cord while the cord is plugged in.
- Do not plug or unplug the power cord with wet hands. This can cause an electric shock.
- Do not drop the product, or subject it to violent impact. This can cause equipment breakdown.
- Do not use the battery charger to charge a battery other than a rechargeable lithium-ion battery D-LI92. Attempting to charge other types of batteries may cause an explosion, or heating, or may damage the battery charger.
- To reduce the risk of hazards, use only a CSA/UL certified power supply cord set, cord is Type SPT-2 or heavier, minimum NO.18 AWG copper, one end with a molded-on male attachment plug cap (with a specified NEMA configuration), and the other is provided with a molded-on female connector body (with a specified IEC nonindustrial type configuration) or the equivalent.


About the Battery

Warning
- Be sure to store the battery out of the reach of small children. Placing it in their mouths may cause an electric shock.
- If any leakage from the battery should come in contact with your eyes, do not rub them. Flush your eyes with clean water and get medical attention immediately.

Caution
- Only use the specified battery with this camera. Use of other batteries may cause an explosion or fire.
- Do not disassemble the battery. Disassembling the battery may cause an explosion or leakage.
- Remove the battery from the camera immediately if it becomes hot or begins to smoke. Be careful not to burn yourself during removal.
- Keep wires, hairpins, and other metal objects away from the + and - contacts of the battery.
- Do not short the battery or dispose of the battery in fire. This can cause an explosion or fire.
-
If any leakage from the battery should come in contact with skin or clothes, wash the affected areas thoroughly with water.
• Precautions for D-LI92 Battery Usage: -
BATTERY MAY EXPLODE OR CATCH FIRE IF MISTREATED.
- DO NOT DISASSEMBLE OR DISPOSE THE BATTERY OF IN A FIRE.
- DO NOT CHARGE EXCEPT UNDER SPECIFIED CHARGING CONDITIONS.
- DO NOT HEAT ABOVE 140°F / 60°C, OR SHORT CIRCUIT.
- DO NOT CRUSH OR MODIFY.
Keep the Camera and Supplied Accessories out of the Reach of Small Children

Warning
- Do not place the camera and supplied accessories within the reach of small children.
-
If the product falls or is operated accidentally it may cause serious personal injuries.
-
Wrapping the strap around a neck may cause suffocation.
- To avoid the risk of a small accessory such as the battery or SD Memory Cards from being swallowed by mistake, keep them out of the reach of small children. Seek medical attention immediately if an accessory is accidentally swallowed.
Care to be Taken During Handling
Before Using Your Camera
- When traveling, take the Worldwide Service Network listing that is included in the package. This will be useful if you experience problems abroad.
- When the camera has not been used for a long time, confirm that it is still working properly, particularly prior to taking important pictures (such as at a wedding or when traveling). Pictures and sound cannot be guaranteed if recording, playback or transferring your data to a computer, etc. is not possible due to a malfunction of your camera or recording media (SD Memory Card), etc.
About the Battery and Charger
- Storing the battery fully charged may decrease the battery performance. Avoid storing in high temperatures.
- If the battery is left inserted and the camera is not used for a long time, the battery will over-discharge and shorten the battery's usage span.
- Charging the battery a day before use or on the day of use is recommended.
- The AC plug cord provided with this camera is developed exclusively for the battery charger D-BC92. Do not use it with other devices.
Precautions on Carrying and Using Your Camera
- Do not subject the camera to high temperatures or high humidity. Do not leave the camera in a vehicle, as the temperature can get very high.
- Do not subject the camera to strong vibrations, shocks, or pressure. Use a cushion to protect the camera from vibrations of motorcycles, automobiles, or ships.
- The temperature range for camera use is 0^ to 40^ (32°F to 104°F).
-
The monitor may appear black at high temperatures, but will return to normal at normal temperatures.
-
The monitor may respond more slowly at low temperatures. This is due to liquid crystal properties, and is not a malfunction.
- Sudden temperature changes will cause condensation on the inside and outside of the camera. Place the camera in your bag or a plastic bag, and remove it after temperature of the camera and surroundings are equalized.
- Avoid contact with garbage, mud, sand, dust, water, toxic gases, or salts. These could cause the camera to breakdown. Wipe the camera dry off any rain or water drops.
- Please do not press forcefully on the monitor. This could cause it to break or malfunction.
- Be careful not to sit down with the camera in your back pocket as this may damage the exterior of the camera or the display.
- Be careful not to overtighten the tripod screw when using a tripod.
- The lens on this camera is not interchangeable. The lens is not removable.
Cleaning Your Camera
- Do not clean the product with organic solvents such as thinner, alcohol or benzene.
- Use a lens brush to remove dust accumulated on the lens. Never use a spray blower for cleaning as it may damage the lens.
Storing Your Camera
- Do not store the camera with preservatives or chemicals. Storage in high temperatures and high humidity can cause mold to grow on the camera. Remove the camera from its case and store it in a dry and well-ventilated location.
Other Precautions
- Periodic inspections are recommended every one to two years to maintain high performance.
- Refer to "Precautions When Using an SD Memory Card" (p.39) regarding the SD Memory Card.
- Please note that deleting images or sound files, or formatting the SD Memory Cards or the built-in memory does not completely erase the original data. Deleted files can sometimes be recovered using commercially available software. It is the user's responsibility to ensure the privacy of such data.
Contents
Using Your Camera Safely 1
Care to be Taken During Handling ....5
Contents 7
Composition of the Operating Manual 13
Camera Features....14
Checking the Contents of the Package 17
Names of Parts....18
Names of Operating Parts 19
Monitor Indications ....20
Getting Started 29
Attaching the Strap....30
Powering the Camera ....31
Charging the Battery....31
Installing the Battery 32
Using the AC Adapter....35
Installing the SD Memory Card....37
Number of Images Recordable on an SD Memory Card ....40
Turning the Camera On and Off 41
Starting-up in the Playback Mode....42
Initial Settings 43
Setting the Display Language....43
Setting the Date and Time....47
Common Operations 49
Understanding the Button Functions ....50
Mode 50
▶ Mode ....52
Switching Between Mode and Mode....54
Setting the Camera Functions ....56
Operating the Menus ....56
Menu List 60
Taking Pictures 63
Taking Still Pictures....64
Taking Pictures....64
Setting the Shooting Mode 67
Using the Face Detection Function .....70
Taking Pictures Automatically (Auto Picture Mode) 72
Taking Pictures in the Custom Settings (Program Mode) .....73
Taking Pictures in the Basic Mode (Green Mode)....74
Using the Zoom 76
Taking Pictures of Dark Scenes (Night Scene/Night Scene Portrait/Digital SR/Fireworks/Candlelight Mode)....78
Taking Pictures of People (Half-length Portrait/ Portrait/Natural Skin Tone Mode)....80
Taking Pictures of Children (Kids Mode) 81
Taking Pictures of Your Pet (Pet Mode) 82
Taking Pictures of Sports and Leisure Activities (Surf & Snow/Sport Mode) 85
Taking Pictures Indoors (Party Mode) 86
Taking Pictures of Text (Text Mode) 87
Framing Your Pictures (Frame Composite Mode) 88
Using the Self-timer 90
Taking a Series of Pictures (Continuous Shooting/Burst Shooting Mode)....91
Taking Pictures Using the Remote Control Unit (Optional) .....93
Using the Digital Wide Function (Digital Wide Mode) .....94
Taking Panoramic Pictures (Digital Panorama Mode)....97
Setting the Shooting Functions....100
Selecting the Flash Mode 100
Selecting the Focus Mode 102
Selecting the Number of Recorded Pixels 106
Setting the Exposure (EV Compensation) 108
Correcting the Brightness (D-Range Setting) 109
Adjusting the White Balance....110
Setting the AE Metering....112
Setting the Sensitivity ....114
Setting Blink Detection 115
Setting Shake Reduction 116
Setting the Instant Review....117
Setting the Image Sharpness (Sharpness)....117
Setting the Color Saturation (Saturation)....118
Setting the Image Contrast (Contrast)....119
Setting the Date Imprint Function 119
Calling Up a Specific Function....120

Recording Movies ....123
Recording a Movie....123
Selecting the Recorded Pixels and Frame Rate for Movies .....125
Setting the Movie SR (Movie Shake Reduction) Function......126
Saving the Settings (Memory) 128
Playing Back and Deleting Images 131
Playing Back Images ....132
Playing Back Still Pictures 132
Playing Back a Movie 133
Multi-Image Display 134
Using the Playback Function 136
Slideshow 139
Rotating the Image 141
Zoom Playback....142
Zoom In on the Subject's Face Automatically (Face Close-up Playback) 144
Deleting Images and Sound Files....146
Deleting a Single Image ....146
Deleting Selected Images and Sound Files....148
Deleting All Images and Sound Files....150
Recovering Deleted Images 151
Protecting Images and Sound Files from Deletion (Protect) .....152
Connecting the Camera to AV Equipment....155
Editing and Printing Images 157
Editing Images ....158
Changing the Image Size (Resize)....158
Cropping Images 159
Processing Images So That Faces Look Smaller....160
Using the Digital Filters....162
Red-eye Compensation....166
Adding a Frame (Frame Composite) 167
Overlaying Your Original Frame on an Image 171
Editing Movies 176
Copying Images and Sound Files....179
Setting the Printing Service (DPOF)....181
Printing a Single Image 181
Printing All Images....183
Recording and Playing Back Sound 185
Recording Sound (Voice Recording) 186
Setting the Voice Recording Function 186
Recording Sound....187
Playing Back Sound 188
Adding a Voice Memo to Images ....190
Recording a Voice Memo 190
Playing Back a Voice Memo....191
Settings 193
Camera Settings....194
Formatting an SD Memory Card....194
Changing the Sound Settings....195
Changing the Date and Time....196
Setting the World Time 198
Setting the Text Size on the Menu 201
Changing the Display Language 202
Changing the Naming System of the Folder....203
Changing the Video Output Format....204
Setting the Eye-Fi Communication 205
Adjusting the Brightness of the Display 206
Using the Power Saving Function 206
Setting Auto Power Off 207
Registering the Subscreen Image (Subscreen Input)......208
Changing the Start-up Screen 209
Correcting Defective Pixels in the CCD Sensor (Pixel Mapping) .210
Resetting to Default Settings (Reset) 211
Connecting to a Computer 213
Setting Up Your Computer ....214
Provided Software 214
System Requirements 214
Installing the Software 216
Setting the USB Connection Mode....219

Connecting to a Windows PC 221
Connecting the Camera and Your Windows PC ....221
Transferring Images 222
Disconnecting the Camera from Your Windows PC....224
Starting "MedialImpression 2.0 for PENTAX" .....226
Viewing Images 229
Details on How to Use "MedialImpression 2.0 for PENTAX"......230
Connecting to a Macintosh 231
Connecting the Camera and Your Macintosh....231
Transferring Images 232
Disconnecting the Camera from Your Macintosh 233
Starting "MedialImpression 2.0 for PENTAX" ....233
Viewing Images 236
Details on How to Use "MedialImpression 2.0 for PENTAX"......236
Transferring Images Using an Eye-Fi Card 237
Appendix 239
Functions Available for Each Shooting Mode....240
Messages....242
Troubleshooting....244
Default Settings....246
List of World Time Cities....251
Optional Accessories ....252
Main Specifications ....253
WARRANTY POLICY....258
Index....263
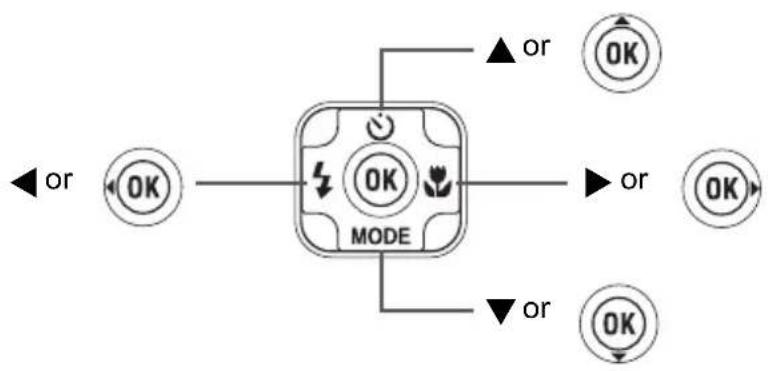
In this manual, the method for operating the four-way controller is shown in illustrations, such as in the ones below.
flowchart
graph TD
    A["MODE"] --> B["OK"]
    A --> C["OR"]
    D["OK"] --> E["← or"]
    F["OK"] --> G["← or"]
    H["OK"] --> I["← or"]
The meanings of the symbols used in this Operating Manual are explained below.
| indicates the reference page number for an explanation of the related operation. | |
| indicates information that is useful to know. | |
| indicates precautions to be taken when operating the camera. | |
| This is the mode for capturing still pictures and recording movies. In this manual, the mode for taking still pictures is referred to as the “still picture capture mode” and the mode for recording movies is referred to as the “mode”. | |
| This is the mode for viewing still pictures and playing back movies and sound files. |
Composition of the Operating Manual
This Operating Manual contains the following chapters.
1 Getting Started
This chapter explains what you need to do after purchasing the camera before you start taking pictures. Be sure to read it and follow the instructions.
2 Common Operations
This chapter explains common operations such as the functions of the buttons and how to use the menus. For more details, refer to the respective chapters below.
3 Taking Pictures
This chapter explains the various ways of capturing images and how to set the relevant functions.
4 Playing Back and Deleting Images
This chapter explains how to view still pictures and movies on the camera or on a TV screen and how to delete images from the camera.
5 Editing and Printing Images
This chapter explains the various ways of printing still pictures and how to edit images with the camera.
6 Recording and Playing Back Sound
This chapter explains how to record sound files or add sound (a voice memo) to an image, and how to play back them.
7 Settings
This chapter explains how to set the camera-related functions.
8 Connecting to a Computer
This chapter explains how to connect the camera to a computer, and includes installation instructions and a general overview of the provided software.
9 Appendix-
This chapter deals with troubleshooting and lists the optional accessories.

Camera Features
In addition to basic picture-taking, the Optio I-10 has a variety of shooting modes to suit different situations. This section describes how to make the most of the key features of your camera. Together with the explanations of camera operations, it will enable you to enjoy your camera to the full.
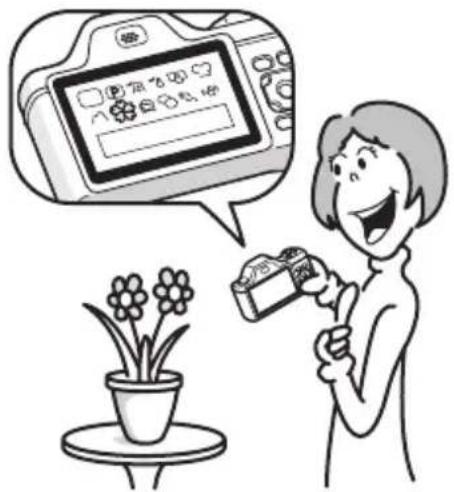
Easy-to-Navigate Capture and Playback Functions!
The user-friendly design of the Optio I-10 enables easy operation with only a few buttons. Simply by choosing the appropriate icon, you can select the shooting mode (p.67) and choose the optimal settings for the situation, or the playback mode (p.136, p.158) and enjoy the various playback and editing functions. A guide on the display lets you check the functions available in each mode and how to use them.
natural_image
Illustration of a smiling person holding a camera with flowers, next to a potted plant and a digital camera screen (no text or symbols)● A shooting mode guide is displayed in the Capture Mode Palette and a playback mode guide in the Playback Mode Palette (p.67, p.136).
- Use the Green Mode to take pictures easily using standard settings (p.74).
Resistant to Camera Shake!
The Optio I-10 is equipped with an optical camera shake reduction feature (Shake Reduction). This feature prevents camera shake when you take a picture in dark locations or at the moment you release the shutter.
Perfect for Portrait Shots!
The Optio I-10 comes with a “Face Detection” function that spots the faces in your shot and automatically adjusts the focus and exposure for the faces. It can detect up to 32 people per shot (*), so it will help you take perfect group shots too. It will automatically release the shutter when people are smiling, or if anyone blinked, it will tell you that so you can take the shot again until it is perfect. It also has a feature that lets you enlarge each person’s face in sequence during playback so you can quickly check their facial expressions.
* Up to 31 face detection frames (up to 30 frames in Half-length Portrait mode) are displayed on the monitor.
● Face Detection function (p.70)
● ● Modes for taking stunning pictures of people (p.80)
- ● Close-ups of people's faces for easy checking during playback (p.144)
Add Various Frames to Your Pictures!

natural_image
Illustration of a hand holding a camera with a heart-shaped logo, next to a cartoon dog (no text or symbols present)When you take a picture with the Optio I-10, you can choose from a wide range of fun frames to create attractive framed shots (p.88). You can also add frames to pictures you have taken. Adjust the position of the subject in the picture or reduce or enlarge the picture size to match the frame shape and size. Now you no longer have to worry about the subject not fitting into the frame (p.167).
● ● For decorating your pictures with a frame
Display Images and Sound Files in Calendar Format!
With the OptioI-10, you can display recorded images and sound files by date in calendar format (p.135). This lets you quickly find the image or sound file you want to play back.
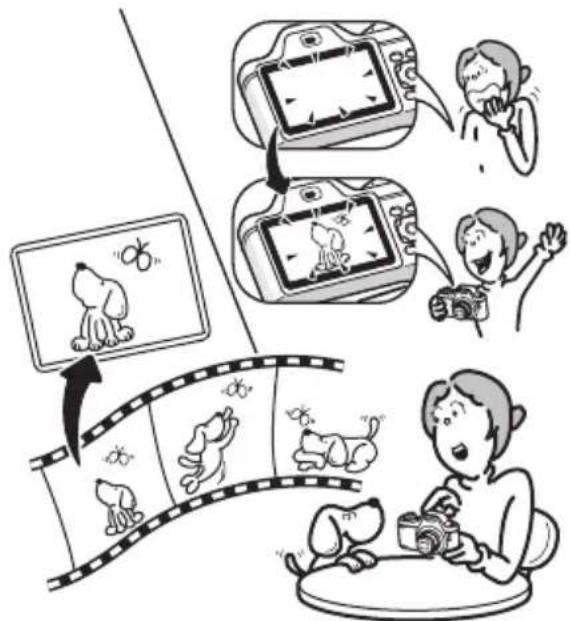
Advanced Movie Recording Functions
The Optio I-10 has a shake reduction function (Movie SR) to reduce camera shake during movie recording (p.126). And it enables you to record movies in 1280×720 pixel (16:9) HDTV format (*) (p.125).
* When connecting to and playing back images on AV equipment, image data is output at normal screen resolution. To view movies in HDTV, transfer the data to a computer and play it back on the computer.
- Use the camera to shoot fun-filled movies of your children or pets as a visual diary of their development (p.123).
A Multitude of Functions Inside the Camera for Enjoying Images Without a Computer!
The Optio I-10 has a variety of functions to let you enjoy playing back and editing images without having to connect the camera to your computer and transfer the images first. The camera is all you need to take and edit still pictures and movies (p.158). And no more worries about accidentally deleting images, because now, with the Optio I-10, you can recover them again (p.151).
text_image
Illustration showing a film strip with cartoon dogs and camera recording, accompanied by Chinese text describing the scene.- Resize (p.158), Cropping (p.159) and Red-eye Compensation (p.166) can be used, while the image is displayed in the playback mode.
- You can divide a movie into two or select a frame from a movie to save it as a still picture (p.176).
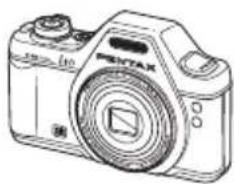
Checking the Contents of the Package
natural_image
Line drawing of a vintage digital camera with lens and control buttons (no text or symbols)Camera Optio I-10

natural_image
Simple line drawing of a U-shaped object with a handle (no text or symbols)Strap O-ST20 (*)
Software (CD-ROM)
S-SW102

natural_image
Coiled cable with two connectors (no text or symbols visible)USB cable I-USB7 (*)
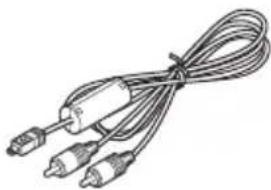
natural_image
Line drawing of a coiled cable with three connectors (no text or symbols)AV cable I-AVC7 (*)

Rechargeable lithium-ion battery D-LI92 (*)
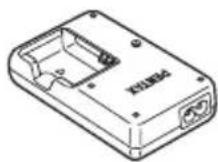
Battery charger D-BC92 (*)
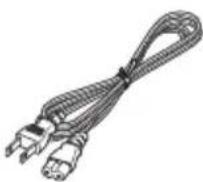
AC plug cord Quick Guide

text_image
PENTAX Optio I-10 Guide Quick
Operating Manual (this manual)
Items marked with an asterisk (*) are also available as optional accessories. The battery charger and AC plug cord are only sold as a set (Battery Charger Kit K-BC92). For other optional accessories, refer to "Optional Accessories" (p.252).
Names of Parts
Front

text_image
Flash Self-timer lamp/Focus assist light Remote control receiver Lens Tripod socket PC/AV terminal Battery/card coverBack
text_image
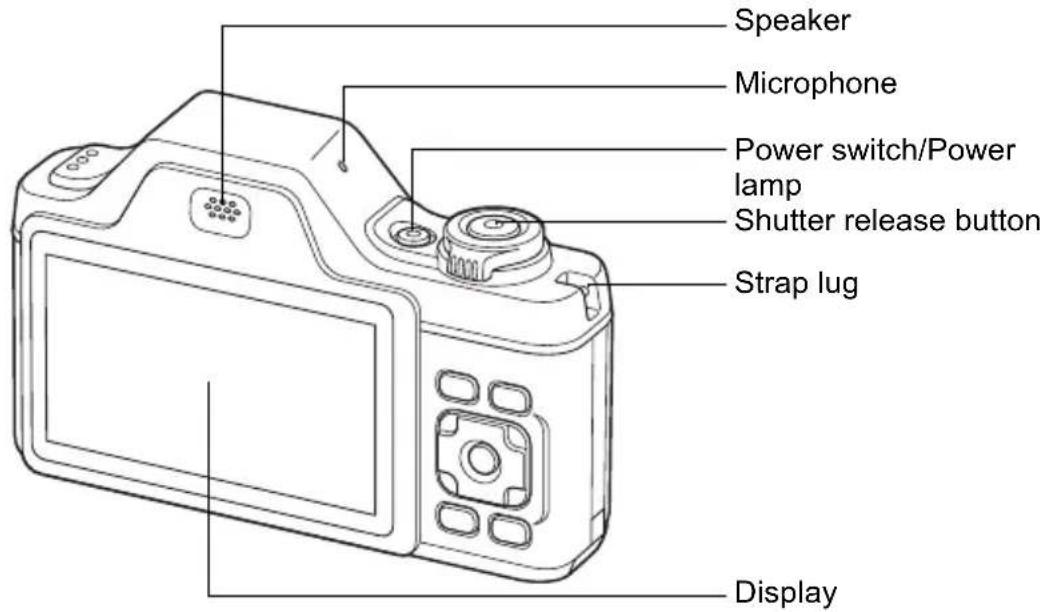
Speaker Microphone Power switch/Power lamp Shutter release button Strap lug DisplayNames of Operating Parts
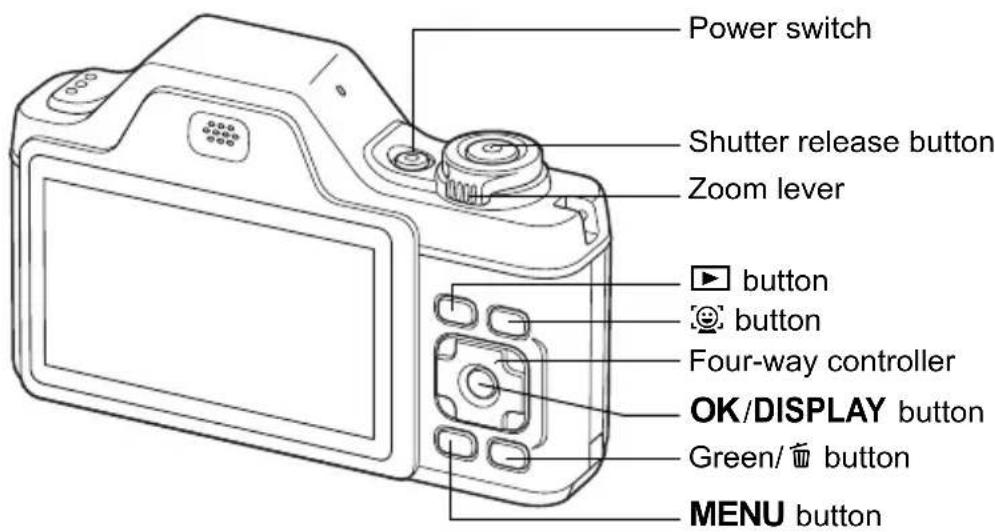
text_image
Power switch Shutter release button Zoom lever ► button 😊 button Four-way controller OK/DISPLAY button Green/ 🔒 button MENU button
Refer to "Understanding the Button Functions" (p.50 - p.54) for an explanation of the function of each button.
Monitor Indications
Display in Mode
The display shows information such as the shooting conditions in the capture mode. The display changes in the following sequence each time you press the OK/DISPLAY button: "Normal Display", "Histogram + Info", "No Info" and "Simple Display + Subscreen".


When the shooting mode is set to ● (Green) mode, the monitor display is as shown on the right. You cannot change the information on the display by pressing the OK/DISPLAY button (p.74).

natural_image
Black-and-white photo of a wooden pier at dusk with a gable on the water, no visible text or symbolsNormal Display in Still Picture Capture Mode
text_image
11 12 13 14 15 1 P Eye-Fi 2 3 4 5 +1.0 6 1/250 7 F3.5 8 9 38 10 18 19 16 02/02/'10 11/4/25 171 Shooting mode (p.67)
2 Battery level indicator (p.34)
3 Face Detection icon (p.70)
4 Date Imprint setting (p.119)
5 EV Compensation (p.108)
6 Shutter speed
7 Aperture
8 Camera shake reduction icon (p.116)
9 Memory status (p.41)
10 Remaining image storage capacity
11 Flash Mode (p.100)
12 Drive Mode (p.90, p.91)
13 Focus Mode (p.102)
14 Eye-Fi communication status (p.205)
15 Digital Zoom/Intelligent Zoom icon (p.76)
16 Focus frame (p.64)
17 Date and time (p.47)
18 World Time setting (p.198)
19 D-Range Setting (p.109)
* 6 and 7 appear only when the shutter release button is pressed halfway.
* 8 varies depending on the following conditions.
| (AUTO) | When the shutter release button is pressed halfway with [Shake Reduction] in the [☐ Rec. Mode] menu set to ☑ (On). |
| When [Shake Reduction] is set to □ (Off) (If the camera shake is likely to occur, ▲ is indicated when the shutter button is pressed halfway.) |
* For 13, when the focus mode is set to AF and the Auto-Macro function is activated, the 🔊 appears on the display (p.102).
* 14 changes as follows depending on the [Eye-Fi] setting in [Setting] menu.
| Eye-Fi•) | During Eye-Fi communication. The camera is communicating or searching for the access point when [Eye-Fi] is set to ☑ (on). |
| Eye-Fi•- | Eye-Fi communication waiting. The camera is not communicating when [Eye-Fi] is set to ☑ (on). |
| Eye-Fi® | Eye-Fi communication prohibited. [Eye-Fi] is set to □ (off). |
| Eye-Fi▲ | Eye-Fi version error. The version of the Eye-Fi card is out of date. |
* 17 disappears if any operation is not performed for two seconds.
* 19 depends on the [D-Range Setting] setting in the [Rec. Mode] menu.
| When [Highlight Correction] is set to √ | |
| When [Shadow Correction] is set to √ | |
| When [Highlight Correction] and [Shadow Correction] are both set to √ |
If [Highlight Correction] and [Shadow Correction] are both set to □ (Off), nothing appears in 19.
* Some indications may not appear depending on the shooting mode.
Histogram + Info/No Info Display in Still Picture Capture Mode
A1 to A18 and B3 appear when "Histogram + Info" is selected. Only B3 appears when "No Info" is selected.
text_image
A9A10A11 A12A13 A1 P Eye B3 A2 A3 DATE A5 +1.0 B1 1/250 B2 F3.5 A6 AUTO A7 38 A8 12M AWB 60200 A16A17A18A19A20A1 Shooting mode (p.67)
A2 Battery level indicator (p.34)
A3 Face Detection icon (p.70)
A4 Date Imprint setting (p.119)
A5 EV Compensation (p.108)
A6 Camera shake reduction icon (p.116)
A7 Memory status (p.41)
A8 Remaining image storage capacity
A9 Flash Mode (p.100)
A10 Drive Mode (p.90, p.91)
A11 Focus Mode (p.102)
A12 Eye-Fi communication status (p.205)
A13 Digital Zoom/ Intelligent Zoom icon (p.76)
A14 Histogram (p.28)
A15 Sensitivity (p.114)
A16 World time setting (p.198)
A17 D-Range Setting (p.109)
A18 Recorded Pixels (p.106)
A19 White Balance (p.110)
A20 AE Metering (p.112)
B1 Shutter speed
B2 Aperture
B3 Focus frame (p.64)
* A6 varies depending on the following conditions.
| (AUTO) | When the shutter release button is pressed halfway with [Shake Reduction] in the [☐ Rec. Mode] menu set to ☑ (On). |
| When [Shake Reduction] is set to □ (Off) (If the camera shake is likely to occur, ▲ is indicated when the shutter button is pressed halfway.) |
* A12 changes as follows depending on the [Eye-Fi] setting in [Setting] menu.
| Eye-Fi•) | During Eye-Fi communication. The camera is communicating or searching for the access point when [Eye-Fi] is set to ☑ (on). |
| Eye-Fi•• | Eye-Fi communication waiting. The camera is not communicating when [Eye-Fi] is set to ☑ (on). |
| Eye-Fi® | Eye-Fi communication prohibited. [Eye-Fi] is set to □ (off). |
| Eye-Fi▲ | Eye-Fi version error. The version of the Eye-Fi card is out of date. |
* A17 depends on the [D-Range Setting] setting in the [☐ Rec. Mode] menu.
| When [Highlight Correction] is set to √ | |
| When [Shadow Correction] is set to √ | |
| When [Highlight Correction] and [Shadow Correction] are both set to √ |
If [Highlight Correction] and [Shadow Correction] are both set to □ (Off), nothing appears in A17.
* B1 and B2 appear only when the shutter release button is pressed halfway.
* When the shooting mode is AUTO PICT (Auto Picture) and if you press the shutter release button halfway, the automatically selected shooting mode appears in A1 even when "No Info" is selected (p.72).
* Some indications may not appear depending on the shooting mode.
Simple Display + Subscreen in Still Picture Capture Mode

text_image
1 2 3 4 5 6 7 8 9 1 0 Eye-Fi 11 12 14:25 AUTO 38 131 Subscreen image (p.208)
2 Battery level indicator (p.34)
3 Current time (p.47)
4 Camera shake reduction icon (p.116)
5 Memory status (p.41)
6 Remaining image storage capacity
7 Flash Mode (p.100)
8 Drive Mode (p.90, p.91)
9 Focus Mode (p.102)
10 Eye-Fi communication status (p.205)
11 Face Detection icon (p.70)
12 Focus frame (p.64)
13 Digital Zoom/ Intelligent Zoom icon (p.76)
* 4 varies depending on the following conditions.
| (AUTO) | When the shutter release button is pressed halfway with [Shake Reduction] in the [☐ Rec. Mode] menu set to ☑ (On). |
| When [Shake Reduction] is set to □ (Off) (If the camera shake is likely to occur, ▲ is indicated when the shutter button is pressed halfway.) |
* For 9, when the focus mode is set to AF and the Auto-Macro function is activated, the 🔊 appears on the display (p.102).
* Some indications may not appear depending on the shooting mode.
Display in ▶ Mode
The display shows the shooting information of the image in the playback mode. The display changes in the following sequence each time you press the OK/DISPLAY button: "Normal Display", "Histogram + Info", "No Info" and "Simple Display + Subscreen".
Normal Display

natural_image
Black-and-white photo of a forested area with trees and a paved path, no visible text or symbols
Histogram + Info

text_image
1/250 F3.5 Edit 12° AWB 200
No Info

natural_image
Black-and-white photo of a staircase leading up a tree-lined path, with no visible text or symbols.
Simple Display + Subscreen
natural_image
Black-and-white photo of a tree-lined pathway leading to a distant building, with no visible text or symbols.Normal Display/Histogram + Info Display in Playback Mode (All of the display items are displayed here for explanatory purposes.)
The display shows information such as the shooting conditions. A1 to A11 appear when “Normal Display” or “Histogram + Info” is selected. B1 to B7 appear only when “Histogram + Info” is selected.
text_image
A1 A2 A3 A4 A5 B1 B2 A6 Edit Bye-H 10 0-00 38 A7 A8 A9 A10 A11 B3 B4 12M AWB B5B6B7A1 Face Detection icon (p.70)
A2 Playback mode
▶: Still Picture (p.132)
Movie (p.133)
Sound (p.188)
A3 Battery level indicator (p.34)
A4 Protect icon (p.152)
A5 Voice memo icon (p.191)
A6 Four-way controller guide
A7 File number
A8 Folder number (p.203)
A9 Memory status (p.41)
A10 Eye-Fi communication status (p.205)
A11 Volume icon
B1 Shutter speed
B2 Aperture
B3 Histogram (p.28)
B4 Sensitivity (p.114)
B5 Recorded Pixels (p.106)
B6 White Balance (p.110)
B7 AE Metering (p.112)
* A1 appears only if the Face Detection function worked when the image was shot.
* In "Normal Display", A3 disappears if no operation is performed for two seconds.
* A6 appears even when “No Info” is selected, but disappears if no operation is performed for two seconds. When no operation is performed for two seconds in “Normal Display” or “Histogram + Info”, only “Edit” disappears.
* A11 appears only when the volume is being adjusted during playback of movies, sound files or voice memo (p.133, p.188, p.191).
Simple Display + Subscreen in Playback Mode

text_image
1 2 3 Edit 4 5 Eye-fi 61 Next image
2 Previous image
3 Four-way controller guide
4 Volume icon
5 Eye-Fi communication status (p.205)
6 Face Detection icon (p.70)
Guide Indications
A guide for each available button operation appears as follows on the display during operation.
| ▲ | Four-way controller (▲) |
| ▼ | Four-way controller (▼) |
| ◀ | Four-way controller (◀) |
| ▶ | Four-way controller (▶) |
| MENU | MENU button |
| Zoom lever | |
| OK/DISPLAY button | |
| Shutter release button | |
| Green/ button | |
| button |
Using the Histogram
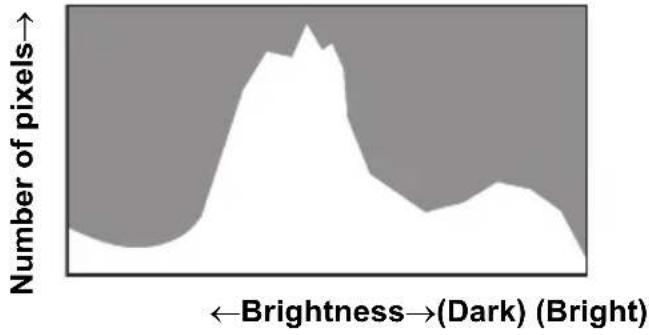
A histogram shows the brightness distribution of an image. The horizontal axis represents brightness (dark at the left and bright at the right) and the vertical axis represents the number of pixels.
The shape of the histogram before and after shooting tells you whether the brightness and contrast are correct or not, and lets you decide if you need to use EV compensation and take the picture again.
area
| Brightness→(Dark) (Bright) | Number of pixels | | -------------------------- | ---------------- | |Understanding Brightness
If the brightness is correct, the graph peaks in the middle. If the image is too dark, the peak is on the left side, and if it is too bright, the peak is on the right side. Dark image Correct image Bright image natural_image
Abstract grayscale shape with a white peak and irregular edges, no text or symbols present.natural_image
Abstract white silhouette on a gray background, no text or symbols presentnatural_image
Abstract white silhouette on gray background, no text or symbols presentUnderstanding Contrast
The graph peaks gradually for images in which contrast is balanced. The graph peaks on both sides but sinks in the middle for images with a large difference in contrast and low amounts of mid-level brightness.1 Getting Started
Attaching the Strap 30 Powering the Camera 31 Installing the SD Memory Card .... 37 Turning the Camera On and Off 41 Initial Settings 43   natural_image
Pure geometric lines and shapes without any text, numbers, or symbolsnatural_image
Pure geometric lines and shapes without any text, numbers, or symbolsAttaching the Strap
Attach the strap (O-ST20) supplied with the camera. text_image
Diagram of a digital camera with labeled parts including cable, connector, and cable connection instructionsPowering the Camera
Charging the Battery
Use the supplied battery charger (D-BC92) to charge the supplied rechargeable lithium-ion battery (D-LI92) before using it in the camera for the first time or after a long period of non-use, or when the [Battery depleted] message appears. Note: AC plug cord "Listed, Type SPT-2 or NISPT-2, 18/2 flexible cord, rated 125 V, 7A, minimum 6 ft (1.8 m)" text_image
Charging indicator While charging: Lights Charging finished: Turns off Battery Battery charger 1 2 To power outlet AC plug cordnatural_image
Pure geometric lines and shapes without any text, numbers, or symbolstext_image
31Installing the Battery
Use the rechargeable lithium-ion battery D-LI92 that is provided with the camera. Charge the battery before using it in the camera for the first time. text_image
PENTIN Battery Battery/ card cover Battery lock lever Battery1 Open the battery/card cover.
Slide the battery/card cover outward (①). 2 Press the battery lock lever in the direction of ② and insert the battery so that the PENTAX logo is facing toward the screen display.
Match the marks on the battery to the marks inside the battery compartment and push the battery in until it is locked in place.  Make sure that the battery is inserted with the PENTAX logo pointing toward the screen display. If the battery is incorrectly oriented, malfunction may result.3 Close the battery/card cover.
Close the battery/card cover and slide it inward.Removing the Battery
1 Open the battery/card cover.
2 Press the battery lock lever in the direction of ②.
The battery will be ejected. Take care not to drop the battery when removing it.  - This camera uses a rechargeable lithium-ion battery D-LI92. Use of any other type of battery may damage the camera and cause malfunction. - Insert the battery correctly. If the battery is incorrectly oriented, malfunction may result. - Do not remove the battery while the camera is turned on. - When storing the battery for more than 6 months, charge the battery for 30 minutes using the battery charger and store the battery separately. Be sure to recharge the battery every 6 to 12 months. Storing the battery below room temperature is ideal. Avoid storing it in high temperatures. - The date and time may be returned to the default setting if the camera is left without the battery for a long time. - Be careful as the camera or the battery may become hot when the camera is used continuously for a long period of time. • Image Storage Capacity, Movie Recording Time, Sound Recording Time, and Playback Time (at 23°C with the display on and the battery fully charged)| Image Storage Capacity*1 (flash used for 50% of shots) | Movie Recording Time*2 | Sound Recording Time*2 | Playback Time*2 |
| Approx. 250 pictures | Approx. 100 min. | Approx. 350 min. | Approx. 300 min. |
| Screen Display Battery Status | |
| (green) Adequate power remains. | |
| (green) Battery is running low. | |
| (yellow) Battery is running very low. | |
| (red) Battery is exhausted. | |
| [Battery depleted] The camera will turn off after this message appears. |
Using the AC Adapter
Use of the optional AC adapter kit (K-AC92) is recommended if you intend to use the camera for a long time or connect it to a computer. text_image
8 AC plug cord 4 7 AC adapter 6 3 DC coupler DC terminalInstalling the SD Memory Card
This camera uses either an SD Memory Card or an SDHC Memory Card. (Both cards are referred to as SD Memory Cards hereafter.) Captured images and sound files are saved on the SD Memory Card if a card is inserted in the camera. They are saved in the built-in memory if a card is not inserted (p.41).  - Be sure to use this camera to format (initialize) an SD Memory Card that is unused or has been used on other cameras or digital devices. Refer to “Formatting an SD Memory Card” (p.194) for instructions on formatting. - Make sure that the camera is turned off before inserting or removing the SD Memory Card.  - The still picture storage capacity varies depending on the capacity of the SD Memory Card and the selected number of recorded pixels and quality level (p.40). - The self-timer lamp blinks while the SD Memory Card is being accessed (data is being recorded or read).Backing Up Data
The camera may not be able to access data in the built-in memory in the case of a malfunction. Use a computer or other device to back up important data in another location. text_image
SD Memory Card socket Battery/card cover SD Memory CardTo Remove the SD Memory Card
1 Open the battery/card cover. 2 Push the card into the SD Memory Card socket to eject it. Pull the card out. Precautions When Using an SD Memory Card
\- The SD Memory Card is equipped with a write-protect switch. Setting the switch to LOCK prevents new data from being recorded on the card, the stored data from being deleted, and the card from being formatted by the camera or computer. appears on the display when the card is write-protected. Write-protect switch  - Care should be taken when removing the SD Memory Card immediately after using the camera, as the card may be hot. - Keep the card cover closed and do not remove the SD Memory Card or turn the camera off while the image is being played back or saved to the card, or the camera is connected to a computer with the USB cable, as this may cause the data to be lost or the card to be damaged. - Do not bend the SD Memory Card or subject it to violent impact. Keep it away from water and store away from high temperature. - Keep the card cover closed and do not remove the SD Memory Card during formatting as this may damage the card and render it unusable. - The data on the SD Memory Card may be deleted in the following circumstances. We do not accept any liability for data that is deleted (1) when the SD Memory Card is mishandled by the user. (2) when the SD Memory Card is exposed to static electricity or electrical interference. (3) when the SD Memory Card has not been used for a long time. (4) when the SD Memory Card is ejected or the battery is removed while the data on the card is being recorded or accessed. - If it is not used for a long time, the data on the card may become unreadable. Be sure to regularly make a backup of important data on a computer. - Avoid using or storing the card where it may be exposed to static electricity or electrical interference. - Avoid using or storing the card in direct sunlight or where it may be exposed to rapid changes in temperature or to condensation. - When using an SD Memory Card with a slow recording speed, recording may stop while you are taking movies even when there is adequate space in the memory, or shooting and playback may take a long time. - Be sure to format SD Memory Cards that are unused or have been used on another camera. Refer to "Formatting an SD Memory Card" (p.194).       Number of Images Recordable on an SD Memory Card
The sizes of the recorded images differ depending on the number of recorded pixels of the images, so the number of images that will be saved on an SD Memory Card also differs. Choose the appropriate number of recorded pixels for still pictures on the [Rec. Mode] menu. Selecting the Number of Recorded Pixels 📄p.106 Choose the appropriate number of recorded pixels and frame rate in [Movie] on the [☐ Rec. Mode] menu. Selecting the Recorded Pixels and Frame Rate for Movies 📄p.125 For an approximate guide to the number of images or the length of recorded movies that can be saved on an SD Memory Card, see “Main Specifications” (p.254).Turning the Camera On and Off
text_image
Power switch1 Press the power switch.
The camera turns on and the display turns on. When you turn the camera on, the lens cover opens and the lens extends. If the [Language/Screen or [Date Adjustment] screen appears when you turn the camera on, follow the procedure on p.43 to set the display language and/or current date and time.2 Press the power switch again.
The display turns off, the lens closes, and the camera turns off. Taking Still Pictures 📋p.64Checking the SD Memory Card
The SD Memory Card is checked when the camera turns on and the memory status is displayed.| The SD Memory Card is inserted. Images and sound files will be saved on the SD Memory Card. | |
| The SD Memory Card is not inserted. Images and sound files will be saved in the built-in memory. | |
| The write-protect switch on the SD Memory Card is in the LOCK position (p.39). Images and sounds cannot be recorded. |
natural_image
Black-and-white photo of a coastal cityscape with palm trees and distant buildings under a cloudy sky (no visible text or symbols)Starting-up in the Playback Mode
If you want to play back images or sound files straightaway without taking any pictures, you can start up the camera in the playback mode. text_image
Power switch button1 Press the power switch while holding down the ▶ button.
The display turns on with the lens retracted and the camera turns on in the playback mode.  To switch from the playback mode to the capture mode, press the button or press the shutter release button halfway. Playing Back Still Pictures 📄p.132Initial Settings
The [Language/1] screen appears when the camera is turned on for the first time. Perform the operations in "Setting the Display Language" below to set the language, and in "Setting the Date and Time" (p.47) to set the current date and time. The language, date, and time can be changed later. Refer to the pages below for instructions. - To change the language, follow the steps in "Changing the Display Language" (p.202). - To change the date and time, follow the steps in “Changing the Date and Time” (sp.196).Setting the Display Language
natural_image
Line drawing of a DSLR camera with front panel and control buttons (no text or symbols)text_image
Language/言語 English 日本語 Türkçe Français Dansk Ελληνικά Deutsch Svenska Русский Español Suomi İnu Português Polski 한국어 Italiano Čeština 中文繁體 Nederlands Magyar 中文简体 MENU Cancel OK2 Press the OK button.
The [Initial Setting] screen appears in the selected language. If the desired settings for [Hometown] and [DST] (Daylight Saving Time) appear, proceed to Step 3. Proceed to “To Set Hometown and DST” (p.46) if the desired settings do not appear. text_image
Initial Setting Language/言语 English ▶ Hometown New York Settings complete MENU Cancel3 Press the four-way controller (▼) twice to select [Settings complete].
text_image
Initial Setting Language/言語 English Hometown New York DST Settings complete MENU Cancel OK OK4 Press the OK button.
The [Date Adjustment] screen appears. Set the date and time by following the procedure in "Setting the Date and Time" (p.47). If you accidentally select the wrong language and proceed to the next procedure, perform the following operation to set the desired language. \- When the Wrong Language Has Been Inadvertently Selected 1 Press the four-way controller (▶). 2 Use the four-way controller (▲▼◀▶) to select the language and press the OK button. The [Initial Setting] screen appears in the selected language. \- When the Screen After Step 2 Appears in the Wrong Language 1 Press the MENU button. The setting screen is canceled and the camera is set to still picture capture mode. 2 Press the MENU button. The [Rec. Mode] menu appears. 3 Press the four-way controller (▶). 4 Use the four-way controller (▼▲) to select [Language/言語]. 5 Press the four-way controller (▶). The [Language/ screen appears. 6 Use the four-way controller (▲▼◀▶) to select the language. 7 Press the OK button. The [Setting] menu appears in the selected language. The language is now switched to your desired language. To reset [Hometown], [Date] and [Time], refer to the pages below for instructions. - To change [Hometown], follow the steps in "Setting the World Time" (p.198). - To change the [Date] and [Time], follow the steps in “Changing the Date and Time” (p.196).        To Set Hometown and DST
3 Press the four-way controller (▼).
The frame moves to [💡 Hometown]. text_image
Initial Setting Language/言語 English Hometown New York DSH Settings complete MENU Cancel4 Press the four-way controller (▶).
The [💡 Hometown] screen appears.5 Use the four-way controller (◀▶) to choose a city.
text_image
Hometown City ← New York DST MENU Cancel OK OK6 Press the four-way controller (▼).
The frame moves to [DST] (Daylight Saving Time).7 Use the four-way controller (◀▶) to select √ or □.
8 Press the OK button.
The [Initial Setting] screen reappears.9 Press the four-way controller (▼) to select [Settings complete].
text_image
Initial Setting Language/言語 English Hometown New York Settings complete MENU Cancel OK OK10 Press the OK button.
The [Date Adjustment] screen appears. Next, set the date and time.  The video output format (NTSC/PAL) is set to the format of the city selected in [Hometown] on the [Initial Setting] screen. Refer to "List of World Time Cities" (p.251) for the video output format of each city set as the initial setting, and "Changing the Video Output Format" (p.204) for changing the setting of the video output format.Setting the Date and Time
Set the current date and time and the display style. 1 Press the four-way controller (▶). The frame moves to [mm/dd/yy]. 2 Use the four-way controller (▲▼) to choose the date and time display style. Choose from [mm/dd/yy], [dd/mm/yy] or [yy/mm/dd]. text_image
Date Adjustment Date Format mm/dd/yy 24h Date 01/01/2010 Time 00:00 Settings complete MENU Canceltext_image
Date Adjustment Date Format mm/dd/yy 24h Date 01/01/2010 Time 00:00 Settings complete MENU Canceltext_image
Date Adjustment Date Format mm/dd/yy 24h Date 01/01/2010 Time 00:00 Settings complete MENU Cancel7 Press the four-way controller (▶).
The frame moves to the month.8 Use the four-way controller (▲▼) to change the month.
Change the day and year in the same manner. Next, change the time. If you selected [12h] in Step 4, the setting switches between am and pm corresponding to the time. text_image
Date Adjustment Date Format mm/dd/yy 24h Date 01/01/2010 Time 00:00 Settings complete MENU Cancel9 Press the four-way controller (▼) to select [Settings complete].
text_image
Date Adjustment Date Format mm/dd/yy 24h Date 01/01/2010 Time 00:00 Settings complete MENU Cancel OK OK10 Press the OK button.
This confirms the date and time.  If you press the OK button in Step 10, the camera clock is reset to 00 seconds. To set the exact time, press the OK button when the time signal (on the TV, radio, etc.) reaches 00 seconds.  When the [Initial Setting] or [Date Adjustment] screen is displayed, you can cancel the setting operation and switch to the capture mode by pressing the MENU button. In this case, the [Initial Setting] screen will appear next time you turn the camera on. [Language/ ], [Date], [Time], [Hometown] and [DST] can be changed. Refer to the pages below for instructions. - To change the language, follow the steps in “Changing the Display Language” (p.202). - To change the date and time, follow the steps in “Changing the Date and Time” (p.196). - To change the city or turn DST on and off, follow the steps in “Setting the World Time” (p.198).   2Common Operations
Understanding the Button Functions ..... 50 Setting the Camera Functions .... 56Understanding the Button Functions
Mode
text_image
Diagram of a digital camera with numbered parts for identification⑥Four-way controller
▲ Changes the drive mode (p.90, p.91). ▼ Displays the Capture Mode Palette (p.67). ◀Changes the flash mode (p.100). ▶ Changes the focus mode (p.102). ▲▼ Adjusts the focus when the focus mode is set to MF (p.103).⑦ OK/DISPLAY button
Changes the information on the display (p.20).⑧Green button
Switches to the ● (Green) mode (p.74). Calls up the assigned function (p.120).⑨MENU button
Displays the [☐ Rec. Mode] menu (p.56).Mode
text_image
Diagram of a digital camera with numbered parts for identification⑤ [😊] button
Zooms in on the subject's faces in the face-detected image in the order the faces were detected when the picture was taken. (Face close-up playback) (p.144)⑥Four-way controller
▲ Plays back and pauses a movie or sound file (p.133, p.188). ▼ Displays the Playback Mode Palette (p.136). Stops a movie or sound file during playback (p.133, p.188). ◀▶ Displays the previous or next image or sound file during single-image display (p.132). Fast-forwards, fast-reverses, frame forwards, frame reverses, reverses a movie and makes a movie play forwards during playback (p.133). Fast-forwards, fast-reverses, and moves to the next index in sound file playback (p.188). ▲▼◀▶ Selects an image in six-/twelve-image display, a folder in folder display, and a date in calendar display (p.134, p.135). Moves the display area during zoom display (p.142). Moves the image when using the Frame Composite function (p.167). Adjusts the position of a frame or an image when you are using the Original Frame function (p.171, p.174).⑦ OK/DISPLAY button
Changes the information on the display (p.25). Returns to single-image display during six-/twelve-image display or zoom display (p.134, p.142). Changes to twelve-image display of the selected folder during folder display (p.135). Changes to single-image display of the selected date during calendar display (p.136).⑧Green/ 📋 button
Switches from single-image display to the Delete screen (p.146). Switches from six-/twelve-image display to the Select & Delete screen (p.148). Switches from folder display to the calendar display screen (p.135). Switches from calendar display to the folder display screen (p.135).⑨ MENU button
Displays the [Setting] menu during single-image display (p.56). Returns to single-image display during Playback Mode Palette display (p.136). Returns to single-image display during six-/twelve-image display or zoom display (p.134). Changes to twelve-image display of the selected folder during folder display (p.135). Changes to twelve-image display of the selected date during calendar display (p.135).Switching Between Mode and Mode
In this manual, the capture mode, such as for taking still pictures, is referred to as “mode” (the capture mode). The playback mode, such as for displaying captured images on the display, is referred to as “mode” (the playback mode). In mode, you can perform simple editing operations on the captured images. Follow the procedure below to switch between ⏻ mode and ▶ mode. To Switch from Mode to Mode1 Press the ▶ button.
The camera switches to ▶ mode. To Switch from ▶ Mode to 📷 Mode1 Press the ▶ button or the shutter release button halfway.
The camera switches to 📷 mode. Displaying data stored in the built-in memory
When an SD Memory Card is inserted in the camera, images, movies, and sounds on the SD Memory Card are displayed. If you want to display images, movies and sounds in the built-in memory, turn the camera off and remove the SD Memory Card, or follow the procedure below to use the "Built-in memory display" function.  Make sure that the camera is turned off before inserting or removing the SD Memory Card. \- Viewing images in the built-in memory while the SD Memory Card is inserted (built-in memory display) When you press and hold down the ▶ button for more than one second in mode, the lens is retracted. After the message [Displays image/sound from built-in memory] appears, images, movies and sound files stored in the built-in memory are displayed. - In the built-in memory display, you can play back still pictures (including enlarged display) (p.132, p.142), movies (p.133) and sounds (p.188), and switch between six-/twelve-image display, folder display and calendar display (p.134). - In the built-in memory display, you cannot delete data, delete a selection, display the Playback Mode Palette or display the menu. If you want to perform any of these operations on images, movies or sounds in the built-in memory, do so after removing the SD Memory Card.Setting the Camera Functions
To change the camera settings, press the MENU button to display the [☐ Rec. Mode] menu or [✗ Setting] menu. Menus for playing back and editing images and sound files are displayed from the Playback Mode Palette (p.136).Operating the Menus
Press the MENU button in ☐ mode to display the [☐ Rec. Mode] menu. Press the MENU button in ▶ mode to display the [◀ Setting] menu. Use the four-way controller (◀▶) to switch between [☐ Rec. Mode] menu and [◀ Setting] menu.  During recording natural_image
Black-and-white photo of a coastal landscape with birds flying and boats on the water (no visible text or symbols)natural_image
Black-and-white photo of a coastal scene with trees and hills, no visible text or symbolstext_image
Rec. Mode 1/3 Recorded Pixels 12 M White Balance AWB AF Setting AE Metering Sensitivity Auto EV Compensation ± 0.0 MENU Exittext_image
Setting 1/3 Sound Date Adjustment 01/01/2010 World Time Text Size Standard Language/言语 English Folder Name Date MENU Exittext_image
Rec. Mode 1/3 Recorded Pixels ▶ Z M White Balance AWB AF Setting [ ] AE Metering 500 Sensitivity Auto EV Compensation ± 0.0 MENU Exittext_image
Setting 1/3 Sound Date Adjustment 01/01/2010 World Time Text Size Standard Language/言语 English Folder Name Date MENU Exitnatural_image
Black-and-white outdoor scene with trees and buildings under a cloudy sky (no visible text or symbols)natural_image
Black-and-white photo of a coastal landscape with trees and hills, no visible text or symbolsEx.) To set the [Sensitivity] on the [☐ Rec. Mode] menu
1 Press the MENU button in mode.
The [Rec. Mode] menu appears.2 Press the four-way controller (▼).
The frame moves to [Recorded Pixels]. text_image
Rec. Mode 1/3 Recorded Pixels ▶ 2M White Balance AWB AF Setting AE Metering Sensitivity Auto EV Compensation ±0.0 MENU Exit3 Press the four-way controller (▼) four times.
The frame moves to [Sensitivity].4 Press the four-way controller (▶).
A pull-down menu appears with the items that can be selected. The pull-down menu displays only those items that can be selected with the current camera settings. text_image
Rec. Mode 1/3 Recorded Pixels 2M White Balance Auto AF Setting 80 AE Metering 100 Sensitivity 200 EV Compensation 400 MENU Cancel OK OK5 Use the four-way controller (▲▼) to change the setting.
The sensitivity changes each time the four-way controller (▲▼) is pressed.6 Press the OK button or the four-way controller (◀).
The setting is saved and then the camera is ready for setting the other functions. To exit the settings, press the MENU button. To use another operation, refer to the following alternate Step 6 options. To Save the Setting and Start Taking Pictures
6 Press the shutter release button halfway.
The setting is saved and the camera returns to capture status. When the shutter release button is pressed fully, the picture is taken.  When the [Setting] menu is displayed from ▶ mode, you can switch to ▶ mode by pressing the ▶ button.To Save the Setting and Start Playback of Images
6 Press the ▶ button.
When the [Rec. Mode] menu is displayed from mode, the setting is saved and the camera returns to playback status.To Cancel the Changes and Continue with Menu Operations
6 Press the MENU button.
The changes are canceled and the screen shown in Step 3 reappears.  The MENU button function differs depending on the screen. Refer to the guide indications. MENU Exit Exits the menu and returns to the original screen.  Returns to the previous screen with the current setting. MENU Cancel Cancels the current selection, exits the menu and returns to the previous screen.Menu List
This displays the items that can be set with the menus and provides descriptions of each item. See the list of default settings in the Appendix "Default Settings" (p.246) to check whether the settings are saved when the camera is turned off and whether the settings return to the defaults when the camera is reset.[Rec. Mode] Menu
This menu shows the functions related to taking still pictures and recording movies.| Item Description | Option Page | ||
| Recorded Pixels | For choosing the number of recorded pixels of still pictures p.106 | ||
| White Balance | For adjusting the color balance according to the lighting conditions | p.110 | |
| AF Setting | Focusing Area | For changing the area of the autofocus p.104 | |
| Focus Assist | For choosing whether or not to use the Focus Assist function. | p.105 | |
| AE Metering | For setting the area of the screen that is metered to determine the exposure | p.112 | |
| Sensitivity For setting the sensitivity p.114 | |||
| EV Compensation | For adjusting the overall brightness of the picture p.108 | ||
| Movie | Recorded Pixels | For choosing the number of recorded pixels of movies p.125 | |
| Movie SR | For choosing whether or not to use the movie shake reduction function | p.126 | |
| D-Range Setting | Highlight Correction | Adjusts the bright areas when the image is too bright | p.109 |
| Shadow Correction | Adjusts the dark areas when the image is too dark | ||
| Shake Reduction | For correcting camera shake during shooting. p.116 | ||
| Blink Detection | For choosing whether to use the Blink Detection function when the Face Detection function worked | p.115 | |
| Digital Zoom | For choosing whether or not to use the Digital Zoom function | p.77 | |
| Instant Review For choosing whether to display Instant Review p.117 | |||
| Memory | For choosing whether to save the set values of the shooting function or return to the defaults when the camera is turned off | p.128 | |
| Green Button | For assigning a function to the Green button in mode | p.120 |
| Sharpness For choosing sharp or soft outlines p.117 | ||
| Saturation For setting the color saturation p.118 | ||
| Contrast For setting the image contrast level p.119 | ||
| Date Imprint | For choosing whether to imprint the date and/or time when taking still pictures | p.119 |
- [Rec. Mode] Menu 1
text_image
Rec. Mode 1/3 Recorded Pixels ▶ 12m White Balance AWB AF Setting [ ] AE Metering Sensitivity Auto EV Compensation ±0.0 MENU Exit- [Rec. Mode] Menu 2
text_image
Rec. Mode 2/3 Movie D-Range Setting Shake Reduction ✓ Blink Detection ✓ Digital Zoom ✓ Instant Review ✓ MENU Exit- [Rec. Mode] Menu 3
text_image
Rec. Mode 3/3 Memory Green Button Sharpness Saturation Contrast Date Imprint Off MENU Exit[Setting] Menu
| Item Description | on Page | |
| Sound | For adjusting the operation volume and playback volume, and setting the start-up sound, shutter sound, key operation sound and self-timer sound | p.195 |
| Date Adjustment For adjusting the date and time p.196 | ||
| World Time For setting the Hometown and Destination p.198 | ||
| Text Size | For setting the text size of the menu. | p.201 |
| Language/言語 | For setting the language in which menus and messages appear | p.202 |
| Folder Name | For choosing how names are assigned to folders for storing images and sound files | p.203 |
| USB Connection | For setting the USB connection mode (MSC or PTP) when connected to a computer via the USB cable | p.219 |
| Video Out For setting | the output format to AV equipment p.204 | |
| Eye-Fi | For setting whether or not to use Eye-Fi communication. | p.205 |
| Brightness Level For change | changing the brightness of the display p.206 | |
| Power Saving | For setting the time until the camera enters power-saving mode | p.206 |
| Auto Power Off | For setting the time until the camera turns off automatically | p.207 |
| Reset For returning settings to their defaults p.211 | ||
| Delete All | For deleting all the saved images and sound files at once | p.150 |
| Pixel Mapping | For mapping out and correcting for defective pixels in the CCD sensor | p.210 |
| Format For formatting | the SD Memory Card p.194 | |
Setting] Menu 1 ● ● [
text_image
Setting 1/3 Sound Date Adjustment 01/01/2010 World Time Text Size Standard Language/言語 English Folder Name Date MENU ExitSetting] Menu 2
text_image
Setting 2/3 USB Connection >MSC Video Out NTSC Eye-Fi □ Brightness Level Power Saving 5sec. Auto Power Off 3min. MENU Exit- [Setting] Menu 3
text_image
Setting 3/3 Reset Delete All Pixel Mapping Format MENU Exit3Taking Pictures
Taking Still Pictures 64 Setting the Shooting Functions ..... 100 Recording Movies 123 Saving the Settings (Memory) 128   natural_image
Pure geometric lines and shapes without any text, numbers, or symbolsnatural_image
Pure geometric diagram with intersecting lines and circular shapes (no text or symbols)Taking Still Pictures
Taking Pictures
The Optio I-10 features a wide range of shooting modes and functions to suit almost any subject or scene. This chapter describes how to take pictures with the most commonly used standard settings (the factory default settings). text_image
Shutter release button Zoom lever Power switch1 Press the power switch.
The camera turns on and is ready to take still pictures. In this manual, this is called "still picture capture mode".2 Confirm the subject and shooting information on the display.
The focus frame in the middle of the display indicates the zone of automatic focusing. When the camera detects a person's face, the Face Detection function is activated and the face detection frame appears (p.70). natural_image
Black-and-white photo of a coastal landscape with palm trees and hills, no visible text or symbolstext_image
AUTO PICT 38natural_image
Diagram of a camera lens with directional arrows indicating rotation and adjustment (no text or symbols)3 Press the shutter release button halfway.
The camera emits Focus Assist light in dark shooting situations (p.105). The focus frame (or face detection frame) on the display turns green when the camera focuses on the subject at the correct distance. natural_image
Black-and-white beach scene with palm trees and a distant castle under cloudy sky (no text or symbols)4 Press the shutter release button fully.
The picture is taken. The flash discharges automatically depending on the light conditions. The image appears on the display (Instant Review: p.67) and is saved to the SD Memory Card or the built-in memory.  Press the Green button to switch to the ● (Green) mode and let the camera set all the shooting functions automatically (p.74).Using the Shutter Release Button
The shutter release button works in a two-step action as follows.Press halfway
This refers to pressing the shutter release button gently to the first position. This locks the focus setting and the exposure. The green focus frame lights on the display when the shutter release button is pressed halfway and the subject is in focus. If the subject is out of focus, the frame turns white.Press fully
This refers to pressing the shutter release button all the way down to the fully depressed position. This takes a picture. Poor focusing conditions
The camera may not be able to focus under the following conditions. In these cases, lock the focus on an object the same distance away as the subject (by pressing and holding the shutter release button halfway), then aim the camera at your subject and press the shutter release button fully. - Objects that lack contrast such as a blue sky or white wall - Dark places or objects, or conditions that prevent light being reflected back • Horizontal lines or intricate patterns - Fast moving objects - When there is an object in the foreground and an object in the background in the captured area • Strongly reflected light or strong backlighting (bright background)Instant Review and Blink Detection
The image appears on the display immediately after it is captured (Instant Review). If the camera detects that the subject's eyes are closed while the Face Detection function (p.70) is activated, the message [Closed eyes have been detected] appears for 3 seconds (Blink Detection).  - When the Face Detection function does not work, Blink Detection also does not function. Even if the subject's faces are detected, Blink Detection could not function depending on the condition of the detected faces. - You can also disable the Blink Detection function (p.115).Setting the Shooting Mode
The Optio I-10 has a variety of shooting modes that let you take pictures or record movies in different situations simply by choosing the appropriate mode for the particular situation from the Capture Mode Palette. text_image
Four-way controller OK button1 Press the four-way controller (▼) in mode.
The Capture Mode Palette appears.2 Use the four-way controller (▲▼◀▶) to choose a shooting mode.
When an icon is selected in the Capture Mode Palette, the selected shooting mode guide appears. text_image
Landscape 1/2 For capturing landscape views. Enhances colors of sky and foliage MENU Cancel OK OKPress the OK button.
The shooting mode is selected and the camera returns to capture status. natural_image
Black-and-white beach scene with palm trees, a small island, and a distant tower under a cloudy sky (no visible text or symbols)| Shooting Mode Description Page | ||
| AUTO PICT | Auto Picture Automatically selects the best capture mode. p.72 | |
| P | Program | Used for basic shooting. Various functions can also be set with this mode. |
| Night Scene | For night time images. Use of a tripod or other support is suggested. | |
| Night Scene Portrait | For images of people at night. Use of a tripod or other support is advised. | |
| Half-length Portrait | For portraits with proper framing by automatic zoom. | |
| Movie For recording movies. p.123 | ||
| Landscape | For capturing landscape views. Enhances colors of sky and foliage. | |
| Flower | For images of flowers. The outline of the flower is softened. | |
| Portrait | For capturing portraits. Reproduces a healthy and bright skin tone. | |
| Surf & Snow | For bright images such as sand or snow.Accurately meters for bright scenes. | |
| Sport | For a fast moving subject. Tracks the subject until the picture is taken. | |
| (▲) | Digital SR Higher sensitivity reduces blur. p.78 | |
| Kids | For capturing moving kids. Reproduces a healthy and bright skin tone. | |
| Pet | Automatically detects and captures a pet's full face. | |
| Food | For images of food and prepared dishes.Enhances saturation and contrast. | |
| Fireworks | For capturing fireworks. Use of a tripod or other support is suggested. | |
| Shooting Mode Description Page | ||
| Frame Composite For capturing images with a frame. p.88 | ||
| Party For capturing images at parties or in dim light. p.86 | ||
| Natural Skin Tone For images of people. Enhances skin tones while smoothing blemishes. | p.80 | |
| Candlelight For capturing scenes in candlelight. p.78 | ||
| Text Captures text in an easy to read manner. Text contrast can be adjusted. | p.87 | |
| Blog Captures images for blogs or email. The number of recorded pixels is fixed at 640 (640×480). | — | |
| Digital Wide Stitches two pictures together to create a wider image. | p.94 | |
| Digital Panorama Stitches images taken with the camera to create a panoramic photograph. | p.97 | |
Using the Face Detection Function
When the camera detects a person's face in the image, the Face Detection function displays a yellow frame (Face detection frame) around the face on the display screen, sets the focus (Face Detection AF) and compensates the exposure (Face Detection AE). If the subject in the face detection frame moves, the frame also moves and changes its own size as it tracks the face. The Face Detection function can detect up to 32 people's faces. If it detects multiple faces, the camera displays a yellow frame over the main face and white frames over the other face(s). It can display up to a total of 31 frames (up to 30 frames in Half-length Portrait mode), including a main frame and white frame(s). natural_image
Black-and-white photo of a smiling woman with a camera lens overlay (no text or symbols on the subject)natural_image
Black-and-white photo of two children outdoors, one with a targeting icon and the other holding a child's face (no text or symbols)To Switch the Face Detection Function
By default, the Face Detection function is set to Face Detection On. You can switch to the Smile Capture function, which automatically releases the shutter when your subject smiles. The Face Detection function is switched as follows each time the 😊 button is pressed: Smile Capture → Face Detection Off → Face Detection On  text_image
buttonflowchart
graph TD
    A["Input Data"] --> B["Processing"]
    B --> C["Output Data"]
    style A fill:#f9f,stroke:#333
    style B fill:#bbf,stroke:#333
    style C fill:#dfd,stroke:#333
Taking Pictures Automatically (Auto Picture Mode)
In AUTO PICT (Auto Picture) mode, the camera automatically selects the most appropriate mode depending on the situations and subjects. text_image
Shutter release button Four-way controller OK buttonnatural_image
Black-and-white photo of a coastal landscape with trees, hills, and distant buildings under a cloudy sky (no visible text or symbols)| Portrait Flower Candle | A### | A### |
| Landscape Sport Night Scene | A### | A### |
| Night Scene Portrait Others* |
5 Press the shutter release button fully.
The picture is taken.  The following restrictions apply in AUTO PICT mode: - You cannot turn the Face Detection function off. - The focusing area setting is fixed at [ ] (Multiple). - The (NEW) mode cannot be selected when using Digital Zoom or Intelligent Zoom. - If the (Night Scene) mode is selected when the flash mode is t_A (Auto) or t_A^ (Auto + Red-eye), the flash mode automatically changes to t_A^ (Flash Off). - If the Right Scene Portrait) mode is selected when the flash mode is _A (Auto), the flash mode automatically changes to ^ ; (Flash On + Red-eye) when the camera detects a face and determines that the flash is needed.Taking Pictures in the Custom Settings (Program Mode)
In ☐ (Program) mode, the camera automatically sets the shutter speed and aperture for taking still pictures. However, you can change other settings such as the flash mode and the number of recorded pixels. text_image
Shutter release button Four-way controller OK button3 Press the OK button.
The P mode is selected and the camera returns to capture status. When the camera detects a person's face, the Face Detection function is activated and the face detection frame appears (p.70). natural_image
Black-and-white beach scene with palm trees, a distant island, and a parking sign (no readable text or symbols)4 Set the functions you want to change.
Refer to "Setting the Shooting Functions" (p.100 - p.122) for details on how to set the functions.5 Press the shutter release button halfway.
The focus frame on the display turns green when the camera focuses on the subject at the correct distance.6 Press the shutter release button fully.
The picture is taken.Taking Pictures in the Basic Mode (Green Mode)
In ● (Green) mode, you can enjoy easy picture-taking using standard settings, regardless of the settings in the [☐ Rec. Mode] menu. The ● mode settings are as shown below.| Flash Mode t_A (Auto) Sensitivity Auto | |
| Drive Mode □ (Standard) EV Compens | |
| Focus Mode AF (Standard) | |
| Face Detection On | |
| Information Display | Normal Blink Detect |
| Shake Reduction | ☑ (On) |
| Recorded Pixels | 12M (4000×3000) |
| White Balance | AWB (Auto) |
| Focusing Area | [ ] (Multiple) |
| Focus Assist | ☑ (On) |
| AE Metering | ◎ (Multi-segment metering) |
| ion ±0.0 | |
| Highlight Correction | ☐ (Off) |
| Shadow Correction | ☐ (Off) |
| on ☑ (On) | |
| Digital Zoom | ☑ (On) |
| Instant Review | ☑ (On) |
| Sharpness | -■+ (Normal) |
| Saturation | -■+ (Normal) |
| Contrast | -■+ (Normal) |
| Date Imprint | Off |
text_image
Shutter release button Green button1 Press the Green button in mode.
The camera switches to ● mode. Press the Green button again to return to the status before ● mode was selected. When the camera detects a person's face, the Face Detection function is activated and the face detection frame appears (p.70). natural_image
Black-and-white photo of a wooden pier with a traditional pavilion on calm water, no visible text or symbols.2 Press the shutter release button halfway.
The focus frame on the display turns green when the camera focuses on the subject at the correct distance.3 Press the shutter release button fully.
The picture is taken.  - Assign ▪ mode to the [Green Button] on the [☐ Rec. Mode] for using ▪ mode (p.121). The default setting is ▪ mode. - In ● mode, you cannot change the information on the display by pressing the OK/DISPLAY button. - If you press the MENU button in ● mode, the [◀ Setting] menu appears. The [◀ Rec. Mode] menu cannot be displayed. - When the camera is turned off in ● mode, it turns on in ● mode next time the power switch is pressed.Using the Zoom
You can use the zoom to change the captured area. text_image
Zoom lever Four-way controller OK button1 Turn the zoom lever in mode.
Right (☐) Enlarges the subject. Left (▲▲▲) Widens the area that is captured by the camera. natural_image
Diagram of a car interior with directional arrows indicating movement or rotation (no text or symbols)text_image
Zoom ratio Zoom bar AUTO PIET 25.0 x 38text_image
Zoom in with high image quality. Zoom in with some degree of image deterioration. Optical zoom range*1 Intelligent Zoom range*2 Digital Zoom range| Recorded Pixels | Intelligent Zoom Digital Zoom | |
| 12M / 12M / 9M 169 | Not Available (5× optical zoom only) | Equivalent to approx.31.3× |
| 7M / 5.3M 169 Approx. | 6.5× | |
| 5M / 3.8M 169 Approx. | 7.7× | |
| 3M Approx. | 9.8× | |
| 2.1M 169 Approx. | 10.4× | |
| 2M Approx. | 12.5× | |
| 1024 Approx. | 19.5× | |
| 640 | Approx. 31.3×(Same as Digital Zoom) |
To Set the Digital Zoom
The Digital Zoom is set to ☑ (On) in the default settings. To take pictures using only the optical zoom and Intelligent Zoom, set the Digital Zoom to □ (Off). 1 Press the MENU button in mode. The [Rec. Mode] menu appears. 2 Use the four-way controller (▲▼) to select [Digital Zoom].3 Use the four-way controller (◀▶) to select ☑ or □.
√ Uses Digital Zoom □ Uses only optical zoom and Intelligent Zoom The setting is saved. text_image
Rec. Mode 2/3 Movie D-Range Setting Shake Reduction ✓ Blink Detection ✓ Digital Zoom ✓ Instant Review ✓ MENU Exit4 Press the MENU button.
The camera returns to capture status. Saving the Digital Zoom Function setting 📄p.128Taking Pictures of Dark Scenes (Night Scene/Night Scene Portrait/Digital SR/Fireworks/Candlelight Mode)
You can choose settings appropriate for taking pictures of dark scenes, such as nightscapes. | Night Scene | For night time images. Use of a tripod or other support is suggested. |
 | Night Scene Portrait | For images of people at night. Use of a tripod or other support is advised.If the camera detects a face when the flash mode is set to 12 (Auto), the flash mode automatically changes to 12 (Flash On + Red-eye). |
 | Digital SR | Higher sensitivity reduces blur. The sensitivity is automatically set to Auto and the number of recorded pixels is fixed at 5M (2592×1944)/ 3.8M_169 (2592×1464). |
 | Fireworks | For capturing fireworks. Use of a tripod or other support is suggested. The sensitivity is fixed at its minimum setting. |
| [B6TH] | Candlelight For capturing scenes in candlelight. | |
Taking Pictures of People (Half-length Portrait/Portrait/Natural Skin Tone Mode)
The ⚙ (Half-length Portrait), 🎥 (Portrait) and 🌘 (Natural Skin Tone) modes are suitable for taking pictures of people. The Face Detection function (p.70) operates for each shooting mode, making it easier to emphasize the subject's face when taking pictures.| [4XD0] | Half-length Portrait | For portraits with proper framing by automatic zoom. The number of recorded pixels is fixed to 3M (2048×1536)/2.1M/169 (1920×1080). |
| [8407] | Portrait | For capturing portraits. Reproduces a healthy and bright skin tone. |
 | Natural Skin Tone | For images of people. Enhances skin tones while smoothing blemishes. |
text_image
Shutter release button Four-way controller OK button3 Press the OK button.
The 📋, 🔔 or 🔗 mode is selected and the camera returns to capture status. When the camera detects a person's face, the Face Detection function is activated and the face detection frame appears (p.70). natural_image
Black-and-white photo of a smiling woman with camera frame overlay (no text or symbols on the image itself)4 Press the shutter release button halfway.
The focus frame on the display turns green when the camera focuses on the subject at the correct distance. If the camera detects a person's face in ☐ mode, the camera automatically zooms in to enlarge the area in the orange frame shown in Step 3.5 Press the shutter release button fully.
The picture is taken.Taking Pictures of Children (Kids Mode)
The ⚙ (Kids) mode is suitable for taking pictures of moving children. It also reproduces healthy and bright skin tone. The Face Detection function (p.70) operates automatically for this mode, making it easier to emphasize the subject's face when taking pictures. text_image
Shutter release button Four-way controller OK button1 Press the four-way controller (▼) in mode.
The Capture Mode Palette appears. 2 Use the four-way controller (▲▼◀▶) to select ⚙. 3 Press the OK button. The ⚙ mode is selected and the camera returns to capture status. When the camera detects a person's face, the Face Detection function is activated and the face detection frame appears (p.70). natural_image
Black-and-white photo of a child kicking a soccer ball on a field, no visible text or symbolsTaking Pictures of Your Pet (Pet Mode)
In (Pet) mode, the camera automatically releases the shutter when a registered pet is detected. You can capture the color of your pet's coat. text_image
Shutter release button button Four-way controller OK button Green button MENU button3
Press the OK button.
The pet registration screen appears. Aiming the camera at a pet's full face automatically releases the shutter and the pet registration confirmation screen appears. When you select [Registry] using four-way controller (▲) and press the OK button, the picture of the registered pet is indicated on the upper-left corner of the display and the camera returns to the capture status. When the camera detects the pet's face, the camera automatically releases the shutter. You can also take a picture by pressing the shutter release button. When you press the 😊 button twice in the capture status screen, the pet registration screen appears to register another pet. You can register up to three pets. text_image
If pet face turns to camera from, let's batk-registering MENU Canceltext_image
Register this image? Registry Cancel OK OKnatural_image
Black-and-white photo of a tabby cat resting on pavement, no visible text or symbolsTo Switch the Pet You Want to Shoot
If you have registered two or three pets, choose the pet you want to detect. 1 Press the 😊 button on the capture status screen in (Pet) mode. The pet registration screen appears. text_image
Selecting pet to shoot New Registry MENU Cancel Delete OK OKTo Delete the Pet from the Entry
1 Press the 😊 button on the capture status screen in (Pet) mode. The pet registration screen appears. text_image
Selecting pet to shoot New Registry MENU Cancel Delete OK OKTaking Pictures of Sports and Leisure Activities (Surf & Snow/Sport Mode)
 Surf & Snow Surf & Snow | For bright images such as sand or snow. Accurately meters for bright scenes. |
 Sport Sport | For a fast moving subject. Tracks the subject until the picture is taken. |
text_image
Shutter release button Four-way controller OK buttonnatural_image
Black-and-white photo of a child kicking a soccer ball on a grass field, no visible text or symbols4 Press the shutter release button halfway.
The focus frame on the display turns green when the camera focuses on the subject at the correct distance. When the 🎨 (Sport) mode is selected, the focus frame follows the subject while the shutter release button is pressed halfway.5 Press the shutter release button fully.
The picture is taken.Taking Pictures Indoors (Party Mode)
The ⬇ (Party) mode is perfect for taking pictures indoors, such as snapshots at parties. text_image
Shutter release button Four-way controller OK button1 Press the four-way controller (▼) in mode.
The Capture Mode Palette appears.2 Use the four-way controller (▲▼◀▶) to select ↗.
3 Press the OK button.
The ⚡ mode is selected and the camera returns to capture status. When the camera detects a person's face, the Face Detection function is activated and the face detection frame appears (p.70).4 Press the shutter release button halfway.
The focus frame on the display turns green when the camera focuses on the subject at the correct distance.5 Press the shutter release button fully.
The picture is taken. Taking Pictures of Text (Text Mode)
The ☐ (Text) mode allows you to take clear pictures of written text. This is convenient for capturing a digital copy of an important document or enhancing legibility of small print.| A | Color Maintains | original colored text. |
| A | Neg. Color Reverses the color of the text. | |
| A | B & W Turns text into black and white. | |
| A | Neg. B & W Turns text into reversed black and white. |
text_image
Shutter release button Four-way controller OK buttontext_image
A A A Card being forming at the time may use large white cards may be deleted in the following circumstances: the SD Memory Card is misandled by the user, the SD Memory Card is exposed to static electric the card has not been used for a long time. in the card is ejected, the AC adapter is disconnected filed service life. If it is not used for a long time, the important data on a PC. where it may be exposed to static electricity or ele in direct sunlight or where it may be exposed to card with a slow recording speed, recording may stop memory, or shooting and playback may take a long time. The PENTAX well is the common probability can also be applied to the right.5 Press the OK button.
The selected icon appears and the camera returns to capture status. When the camera detects a person's face, the Face Detection function is activated and the face detection frame appears (p.70). text_image
A Card being deleted as this may be large or small and may be deleted in the following circumstances: the SD Memory Card is misordered by the user, the SD Memory Card is exposed to static electric the card has not been used for a long time. the card is ejected, the AC adapter is disconnected filed service life. If it is not used for a long time, the important data on a PC. where it may be exposed to static electricity or all in direct sunlight or where it may be exposed to the and with a slow recording speed, recording may stop memory, or shooting and playback may take a long memory card, access the PENTAX website and could the card compatibility can also be answered by your 386 Press the shutter release button halfway.
The focus frame on the display turns green when the camera focuses on the subject at the correct distance.7 Press the shutter release button fully.
The picture is taken.Framing Your Pictures (Frame Composite Mode)
In ☐ (Frame Composite) mode, you can take pictures using the frames stored in the camera. text_image
Shutter release button Zoom lever Four-way controller OK button1 Press the four-way controller (▼) in mode.
The Capture Mode Palette appears.2 Use the four-way controller (▲▼◀▶) to select ○.
3 Press the OK button.
The 12-frame display of the frame selection screen appears.  4 Use the four-way controller (▲▼◀▶) to choose the frame you want to use. natural_image
Grid of black-and-white photos showing two children in various poses, with no visible text or symbols.natural_image
Diagram of a camera with lens and control buttons, no text or symbols present| Four-way controller (◀▶) | Press to choose a different frame. |
| Zoom lever to the left (☐) | Returns to the 12-frame display of the frame selection screen, and then perform Step 4 to choose a different frame. |
natural_image
Black-and-white photo of two baby faces with star patterns in the background (no text or symbols)Optional Frames
The optional frames are stored in the built-in memory in the Optio I-10. These optional frames are deleted if the files on the built-in memory are deleted with a computer or the built-in memory is formatted. To reload the optional frames into the built-in memory, copy the files from the CD-ROM (S-SW102) supplied with the camera (p.170). Adding a Frame to a captured image 📄p.167Using the Self-timer
In Self-timer mode, the picture is taken ten seconds or two seconds after the shutter release button is pressed. Stabilize the camera with a tripod or other support when taking a picture using the self-timer.| Self-timer | Use this mode when you want to be included in a group picture. The picture is taken approximately ten seconds after the shutter release button is pressed. |
| 2 sec. Self-timer | Use this mode to avoid camera shake. The picture is taken approximately two seconds after the shutter release button is pressed. |
text_image
Shutter release button Four-way controller OK button3 Use the four-way controller (◀▶) to select ⏻ or ⚙₂ₛ and press the OK button.
The camera is ready to take the picture using the self-timer. When the camera detects a person's face, the Face Detection function is activated and the face detection fram text_image
Drive Mode Self-timer MENU Cancel OK OK4 Press the shutter release button halfway.
The focus frame on the display turns green when the camera focuses on the subject at the correct distance.5 Press the shutter release button fully.
The picture is taken ten seconds or two seconds later.  Focusing may be compromised if you move the camera while the self-timer lamp is blinking when taking still pictures.  - In (Movie) mode, recording will start after ten seconds (or two seconds). - Press the shutter release button halfway while the self-timer is engaged to stop the countdown and press fully to restart the countdown. - s cannot be selected while (Green) mode setting remains the default. Select s in another shooting mode and then switch the shooting mode to .Taking a Series of Pictures (Continuous Shooting/Burst Shooting Mode)
In these modes, pictures are taken continuously as long as the shutter release button is pressed.| Continuous Shooting | Each time a picture is taken, the image is saved in the memory before the next image is taken. The higher the image quality, the longer the interval between shots. |
| Burst Shooting | The number of recorded pixels is fixed at 5M (2592×1944)/ 3.8M_169 (2592×1464) and the interval between shots is shorter than “Continuous Shooting”. |
text_image
Shutter release button Four-way controller OK button1 Press the four-way controller (▲) in mode.
The [Drive Mode] screen appears.2 Use the four-way controller (◀▶) to select □ or □HS and press the OK button.
The camera is ready to take a series of pictures. text_image
Drive Mode Continuous Shooting MENU Cancel OK OK3 Press the shutter release button halfway.
The focus frame on the display turns green when the camera focuses on the subject at the correct distance.4 Press the shutter release button fully.
Pictures are taken continuously as long as you keep the shutter release button pressed.  - The flash does not discharge in □ and □ _hs modes. - and _HS cannot be selected in (Green), AUTO PICT (Auto Picture), (Night Scene), (Movie), (Fireworks), (Frame Composite), WIDE (Digital Wide) or ▶(Digital Panorama) mode.  - The interval of ☐ (Continuous Shooting) varies according to the Recorded Pixels and Quality Level settings. - The focus, exposure and white balance are locked with the first shot. - When the Face Detection function is activated (p.70), it works only when taking the first shot. • The Blink Detection function works only for the last shot.Taking Pictures Using the Remote Control Unit (Optional)
You can release the shutter or adjust the zoom from a distance by using the remote control unit (optional).| 3-sec Remote Control | The shutter will be released after about three seconds when the shutter release button on the remote control unit is pressed. |
| 0-sec Remote Control | The shutter will be released immediately when the shutter release button on the remote control unit is pressed. |
text_image
Shutter release button Four-way controller OK buttontext_image
Drive Mode Remote Control MENU Cancel OK OK4
Press the shutter release button on the remote control unit.
When _3s (3-sec Remote Control) is selected: The focus frame turns green at the point where the focus is achieved and the camera takes a picture after about three seconds. When ☐ (0-sec Remote Control) is selected: The camera takes a picture immediately.  - The operating range is approx. 4 m (13 ft) from the front of the camera when using the remote control unit. - In (Movie) mode, pressing the shutter release button again stops the recording. - The camera takes a picture even if the focus is not achieved. - In Remote Control mode, the self-timer lamp blinks. When the camera receives a shutter release signal, the self-timer lamp blinks quickly right before and after the shot takes place. Also, when the camera receives a zoom signal, the self-timer lamp blinks quickly. - If the shutter release button is pressed halfway during the countdown, the countdown stops. If the shutter release button is pressed fully, the camera starts the countdown again. - ^3s / cannot be selected in (Green) mode.Using the Digital Wide Function (Digital Wide Mode)
In WIDE (Digital Wide) mode, you can stitch two vertical images captured with this camera into a single frame up to approx. 21 mm coverage (35 mm film equivalent). natural_image
Black-and-white photo sequence showing a traditional Japanese garden with pavilions, water, and mountains in the background (no text or symbols)text_image
Shutter release button Four-way controller OK buttonnatural_image
Black-and-white photo of a traditional Chinese garden scene with pavilions, a pond, and distant mountains (no visible text or symbols)5 Press the shutter release button fully.
The first captured image is temporarily saved, and the shooting screen for the second image is displayed. natural_image
Black-and-white photo of a traditional-style building with a boat on water, no visible text or symbols6 Take the second image.
Overlap the image on the preview guide on the left of the screen to compose the second image. Repeat Steps 4 and 5 to take the second image. The stitched first and second image appears on the display (Instant Review), and then is saved.  - To minimize distortion when taking the second image, turn the camera so that it pivots around the right edge of the preview guide on the screen. - Some distortion may result from moving objects, repeating patterns, or if nothing exists when overlapping the first and second image on the preview guide. - When the Face Detection function is activated (p.70), it works only when taking the first image. - The stitched together images are saved with the pixel size of 5M (2592×1944).To Cancel after Taking the First Shot
1 When the shooting screen for the second image is displayed in Step 5 on p.96, press the OK button.
A confirmation dialog appears.2 Use the four-way controller (▲▼) to select an option and press the OK button.
| Save Saves the first image and you can retake the first shot. The first image is saved in 3M (2048×1536). |
| Discard Discards the first image and you can retake the first shot. |
| Cancel Returns to the shooting screen for the second image. |
text_image
Save the Image(s) and exit this screen? Save Discard CancelTaking Panoramic Pictures (Digital Panorama Mode)
In ■■ (Digital Panorama) mode, you can stitch together two or three captured frames to create a panoramic photograph with the camera. text_image
Shutter release button Four-way controller OK button4 Use the four-way controller (◀▶) to choose the direction in which the images will be joined.
The screen for taking the first frame is displayed. When the camera detects a person's face, the Face Detection function is activated and the face detection frame appears (p.70). text_image
Set shift directionnatural_image
Black-and-white cityscape photo showing a waterfront street lamp and distant skyscraper under overcast sky (no visible text or symbols)5 Press the shutter release button halfway.
The focus frame on the display turns green when the camera focuses on the subject at the correct distance.6 Press the shutter release button fully.
The screen for taking the second frame is displayed after you take the first frame.If you select right (▶) in Step 4:
The right edge of the first frame appears in semi-transparent form on the left edge of the display.If you select left (◀) in Step 4:
The left edge of the first frame appears in semi-transparent form on the right edge of the display.7 Take the second frame.
Move the camera so that the semi-transparent image and the actual view overlap and press the shutter release button. text_image
SHUTTER 2nd Trisante OK Exit2nd Frame8 Take the third frame.
Repeat Steps 5 to 7 to take the third frame. The panorama images are joined and a stitched together image appears. The stitched together image does not appear when [Instant Review] (p.67, p.117) is □ (Off).  - Some distortion may result from moving objects, repeating patterns, or if nothing exists when overlapping the first and second frames or the second and third frames on the preview guide. - When the Face Detection function is activated (p.70), it works only when taking the first frame.To Cancel after Taking the First or Second Frame
1 After shooting the first frame in Step 6 on p.98 or the second frame in Step 7, press the OK button.
A confirmation dialog appears.2 Use the four-way controller (▲▼) to select an option and press the OK button.
| Save Saves the captured image(s) and you can retake the first frame. When this option is selected after shooting the second frame, the first and the second frames are stitched together and saved as a panoramic photograph. |
| Discard Discards the captured image(s) and you can retake the first frame. |
| Cancel Returns to the previous shooting screen. |
text_image
Save the image(s) and exit this screen? Save Discard CancelSetting the Shooting Functions
Selecting the Flash Mode
 Auto Auto | The flash discharges automatically depending on the light conditions. If you use the Face Detection function, the mode is automatically set to ^ⓧ . |
 Flash Off Flash Off | The flash does not discharge, regardless of the brightness. Use this mode to take pictures where flash photography is prohibited. |
| Flash On The flash dis | charges regardless of the brightness. |
| ^ⓦ Auto + Red-eye | This mode reduces the phenomenon of red eyes caused by the light from the flash being reflected in the subject's eyes. The flash discharges automatically (A pre-flash discharges before the main flash). |
 Flash On + Red-eye Flash On + Red-eye | This mode reduces the phenomenon of red eyes caused by the light from the flash being reflected in the subject's eyes. The flash discharges regardless of the light conditions (A pre-flash discharges before the main flash). |
| ^SOFT Soft Flash | This mode reduces the intensity of the flash so that the flash is not too bright even when fired at close range. The flash discharges regardless of the light conditions. |
natural_image
Line drawing of a DSLR camera with front panel and control buttons (no text or symbols)1 Press the four-way controller (◀) in ⚙ mode.
The [Flash Mode] screen appears. The flash mode changes each time the button is pressed. You can also change the setting using the four-way controller (▲▼). text_image
Flash Mode Auto MENU Cancel OK OK2 Press the OK button.
The setting is saved and the camera returns to capture status.About the red-eye phenomenon
Taking pictures using the flash may cause the subject's eyes to appear red in the resulting picture. This phenomenon occurs when the light from the flash is reflected in the subject's eyes. It can be reduced by illuminating the area around the subject or moving closer to the subject and zooming out to a wider angle. Setting the flash mode to ^① A or ^② is also an effective way of reducing red eyes. If the subject's eyes appear red despite such precautions, they can be corrected by the red-eye compensation function (p.166). Saving the Flash Mode setting 📄p.128       text_image
101Selecting the Focus Mode
| AF Standard | Use this mode when the distance to the subject is 40 cm (16 in.) or more. The camera is focused on the subject in the autofocus area when the shutter release button is pressed halfway. |
| Macro | This mode is used when the distance to the subject is approx. 10 cm to 50 cm (4 in. to 20 in.). The camera is focused on the subject in the autofocus area when the shutter release button is pressed halfway. |
| Super Macro | This mode is used when the distance to the subject is approx. 8 cm to 15 cm (3 in. to 5 in.). The camera is focused on the subject in the autofocus area when the shutter release button is pressed halfway. |
| PF Pan Focus | This mode is used when you ask someone to take pictures for you, or when taking pictures of the scenery through the window of a car or train. The entire picture, from the front to the back, is focused. |
| Infinity | This mode is used for taking distant objects. The flash is set to ⚙ (Flash Off). |
| MF Manual Focus This | mode lets you adjust the focus manually. |
natural_image
Line drawing of a DSLR camera with front panel and control buttons (no text or symbols)1 Press the four-way controller (▶) in ☐ mode.
The [Focus Mode] screen appears. The focus mode changes each time the button is pressed. You can also change the setting using the four-way controller (▲▼). text_image
Focus Mode Standard AF SF PF MF MENU Cancel OK OK2 Press the OK button.
The setting is saved and the camera returns to capture status.  - In ● (Green) mode, you can only select AF, 🖼 or PF. - The focus mode is fixed at ▲ in ⚙ (Fireworks) mode. - When AF is selected and the subject is closer than 40 cm (16 in.), the camera automatically focuses from 10 cm (Auto-Macro function). In this case, 🚗 appears on the display. - When shooting with ⚙ selected, if the subject is further than 50 cm (20 in.) away, the camera automatically focuses to ∞ (Infinity). By pressing the shutter release button fully, you can also take a picture even when the focus is not set. Saving the Focus Mode setting 📄p.128To Set the Focus Manually (Manual Focus)
1 Press the four-way controller (▶) in mode.
The [Focus Mode] screen appears.2 Press the four-way controller (▶) to select MF.
3 Press the OK button.
The central portion of the image is magnified to full screen on the display. text_image
Focus Mode Manual Focus AF SD PF MF MENU Cancel OK OK4 Use the four-way controller (▲▼) to adjust the focus.
The MF indicator appears on the display to indicate the approximate distance to the subject. Adjust the focus using the indicator as a guide. ▲for distant focus ▼ for closer focus text_image
MF 4 m 2 MENU → OK OK5 Press the OK button.
The focus is fixed and the camera returns to capture status. After the focus is fixed, you can press the four-way controller (▶) again to display the MF indicator and readjust the focus.  The shooting mode and drive mode cannot be changed while the MF indicator is displayed.  To switch from MF to another focus mode, press the four-way controller (▶) while the MF indicator is displayed.To Set the Focusing Area
You can change the autofocus area (Focusing Area).| [ ] Multiple Normal autofocus area | |
| [ ] Spot The autofocus area becomes smaller. | |
| ≡∞ Automatic Tracking AF Keeps moving subjects in focus. |
1 Press the MENU button in mode.
The [Rec. Mode] menu appears.2 Use the four-way controller (▲▼) to select [AF Setting].
3 Press the four-way controller (▶).
The [AF Setting] screen appears.4 Use the four-way controller (▲▼) to select [Focusing Area].
5 Press the four-way controller (▶).
A pull-down menu appears.6 Use the four-way controller (▲▼) to change the focusing area setting.
text_image
AF Setting Focusing Area Focus Assist MENU Cancel OK OK7 Press the OK button.
The setting is saved.8 Press the MENU button twice.
The camera returns to capture status.  - In (Movie) and (Frame Composite) modes, the focusing area cannot be set to ⌘. - In ● (Green) and AUTO PICT (Auto Picture) modes, the focusing area is fixed at [ ]. - If you change the focusing area setting frequently, you can save time by assigning it to the Green button (p.120).To Set the Focus Assist Light (Focus Assist)
The camera automatically emits the Focus assist light in dark shooting situations. You can set the light to on or off.1 Press the MENU button in mode.
The [Rec. Mode] menu appears.2 Use the four-way controller (▲▼) to select [AF Setting].
3 Press the four-way controller (▶).
The [AF Setting] screen appears.4 Use the four-way controller (▲▼) to select [Focus Assist].
5 Use the four-way controller (◀▶) to select √ or □.
√ Focus Assist function works. □ Focus Assist function does not work. text_image
AF Setting Focusing Area [ ] Focus Assist ✓ → MENU ↩6 Press the MENU button twice.
The camera returns to capture status.         \- The Focus Assist light cannot be used in ⚙ (Movie) or when [Focus Mode] is set to ▲ (Infinity)/MF (Manual Focus).Selecting the Number of Recorded Pixels
You can choose from 11 recorded pixels settings for still pictures. The larger the number of recorded pixels, the clearer the details will appear when you print your picture. As the quality of the printed picture also depends on the image quality, exposure control, resolution of the printer, and other factors, you do not need to select more than the required number of recorded pixels. 3M is adequate for making postcard-size prints. The more pixels there are, the larger the picture and the bigger the file size. Refer to the following table for the appropriate settings according to expected usage.| Recorded Pixels Expected Usage | |
| 12M 4000×300012M | |
| 9M 4000×2256 | |
| 7M 3072×2304 | |
| 5.3M 3072×1728 | |
| 5M 2592×1944 | |
| 3.8M 2592×1464 | |
| 3M 2048×1536 | |
| 2.1M 1920×1080 | |
| 1024 1024× 768 | |
| 640 640× 480 | |
natural_image
Black-and-white beach scene with palm trees, a lighthouse, and a clear sky (no visible text or symbols)text_image
Recordable Image No. 12 Recorded Pixels 12M White Balance 12M AF Setting 9M AE Metering 7M Sensitivity 5.3M EV Compensation 5M MENU Cancel OK OKSetting the Exposure (EV Compensation)
You can adjust the overall brightness of the picture. Use this function to take pictures that are intentionally overexposed or underexposed. 1 Press the MENU button in mode. The [Rec. Mode] menu appears. 2 Use the four-way controller (▲▼) to select [EV Compensation]. 3 Use the four-way controller (◀▶) to select the EV value. To brighten, select a positive (+) value. To darken, select a negative (−) value. You can choose the EV setting in the range of -2.0 EV to +2.0 EV in 1/3 EV steps. text_image
Rec. Mode 1/3 Recorded Pixels 12M White Balance AWB AF Setting [] AE Metering Sensitivity Auto EV Compensation ±0.0 MENU ExitCorrecting the Brightness (D-Range Setting)
Expands the dynamic range and prevents bright and dark areas from occurring. [Highlight Correction] adjusts the bright areas when the image is too bright and [Shadow Correction] adjusts the dark areas when the image is too dark. 1 Press the MENU button in mode. The [Camera] Rec. Mode] menu appears. 2 Use the four-way controller (▲▼) to select [D-Range Setting]. 3 Press the four-way controller (▶). The [D-Range Setting] screen appears. 4 Use the four-way controller (▲▼) to select [Highlight Correction] or [Shadow Correction]. text_image
D-Range Setting Highlight Correction Shadow Correction MENU6 Press the MENU button twice.
The camera returns to capture status. The D-Range Setting icon appears on the display.| When [Highlight Correction] is set to √ | |
| When [Shadow Correction] is set to √ | |
| When [Highlight Correction] and [Shadow Correction] are set to √ |
natural_image
Black-and-white photo of a coastal scene with palm trees, hills, and a distant building (no visible text or symbols)Adjusting the White Balance
You can take pictures in natural colors by adjusting the white balance according to the light conditions at the time of shooting.| AWB Auto The camera adjusts the white balance automatically. | |
| Daylight Use this mode when taking pictures outside in sunlight. | |
| Shade Use this mode when taking pictures outside in the shade. | |
| Tungsten Light Use this mode when taking pictures under electric or other tungsten light. | |
| Fluores. Light Use this mode when taking pictures under fluorescent light. | |
| Manual Use this mode when adjusting the white balance manually. | |
text_image
White Balance AWB Auto MENU Cancel OK OKTo Set the White Balance Manually
Have a blank sheet of white paper or similar material ready. 1 In the [White Balance] screen, use the four-way controller (▲▼) to select ☐ (Manual). 2 Point the camera at the blank sheet of paper or other material so that it fills the frame displayed in the center of the screen. text_image
White Balance AWB SHUTTER AdjustAdjust MENU Cancel OK OKSetting the AE Metering
You can set the area of the screen where the brightness is metered to determine the exposure.| Multi-segment metering | The camera divides the image into 256 areas, meters the brightness and determines the exposure. |
| Center-weighted metering | The camera takes a reading of the overall brightness of the picture with the center of the image having more influence on the exposure. |
| Spot AE metering | The camera determines the exposure by metering the brightness only at the center of the image. |
text_image
Rec. Mode 1/3 Recorded Pixels 12 M White Balance AWB AF Setting * AE Metering 50% Sensitivity 00 EV Compensation * MENU Cancel OK OKSetting the Sensitivity
You can select the sensitivity to suit the brightness of the surroundings.| Auto T | The sensitivity is automatically adjusted by the camera. (Sensitivity 80 - 800) |
| 80 | The lower the sensitivity, the less noise that affects the image. The shutter speed will be slower in low light conditions.100 |
| 200 | |
| 400 | |
| 800 | |
| 1600 | Higher sensitivity settings use faster shutter speeds in low light conditions to reduce camera shake, but the image may be affected by noise. |
| 3200 | |
| 6400 |
text_image
Rec. Mode 1/3 Recorded Pixels 12M White Balance Auto AF Setting 80 AE Metering 100 Sensitivity 200 EV Compensation 400 MENU Cancel OK OKSetting Blink Detection
This specifies whether Blink Detection function works when you use the Face Detection function. The default setting is ☑ (On). 1 Press the MENU button in mode. The [Rec. Mode] menu appears. 2 Use the four-way controller (▲▼) to select [Blink Detection]. 3 Use the four-way controller (◀▶) to select ☑ or □. √ Blink Detection function works. □ Blink Detection function does not work. The setting is saved. text_image
Rec. Mode 2/3 Movie D-Range Setting Shake Reduction ✓ Blink Detection ✓ Digital Zoom ✓ Instant Review ✓ MENU ExitSetting Shake Reduction
You can set this function to reduce camera shake which occurs during shooting. The default setting is ☑ (On).  Use the Movie SR function (p.126) to correct camera shake in 🚗 (Movie) mode. 1 Press the MENU button in mode. The [Camera] Rec. Mode] menu appears. 2 Use the four-way controller (▲▼) to select [Shake Reduction]. 3 Use the four-way controller (◀▶) to select ☑ or □. ☑ Corrects camera shake. □ Does not correct camera shake. text_image
Rec. Mode 2/3 Movie D-Range Setting Shake Reduction ✓ Blink Detection ✓ Digital Zoom ✓ Instant Review ✓ MENU ExitSetting the Instant Review
Use this setting to specify whether or not an Instant Review is displayed immediately after images are shot. The default setting is ☑ (On). 1 Press the MENU button in mode. The [Rec. Mode] menu appears. 2 Use the four-way controller (▲▼) to select [Instant Review]. 3 Use the four-way controller (◀▶) to select ☑ or □. √ Instant Review is displayed. □ Instant Review is not displayed. text_image
Rec. Mode 2/3 Movie D-Range Setting Shake Reduction ✓ Blink Detection ✓ Digital Zoom ✓ Instant Review ✓ MENU ExitSetting the Image Sharpness (Sharpness)
You can give the image sharp or soft outlines. 1 Press the MENU button in mode. The [☐ Rec. Mode] menu appears. 2 Use the four-way controller (▲▼) to select [Sharpness].3 Use the four-way controller (◀▶) to change the sharpness level.
 text_image
Rec. Mode 3/3 Memory Green Button Sharpness Saturation Contrast Date Imprint Off MENU Exit4 Press the MENU button.
The camera returns to capture status.  If you change the [Sharpness] setting frequently, you can save time by assigning it to the Green button (p.120).Setting the Color Saturation (Saturation)
You can set the color saturation.1 Press the MENU button in mode.
The [Rec. Mode] menu appears.2 Use the four-way controller (▲▼) to select [Saturation].
3 Use the four-way controller (◀▶) to change the saturation level.
 text_image
Rec. Mode 3/3 Memory Green Button Sharpness Saturation Contrast Date Imprint Off MENU Exit4 Press the MENU button.
The camera returns to capture status.  If you change the [Saturation] setting frequently, you can save time by assigning it to the Green button (p.120).       natural_image
Pure geometric lines and shapes without any text, numbers, or symbolsSetting the Image Contrast (Contrast)
You can set the image contrast level. 1 Press the MENU button in mode. The [Rec. Mode] menu appears. 2 Use the four-way controller (▲▼) to select [Contrast]. 3 Use the four-way controller (◀▶) to change the contrast level.  text_image
Rec. Mode 3/3 Memory Green Button Sharpness Saturation Contrast Date Imprint Off MENU ExitSetting the Date Imprint Function
You can choose whether to imprint the date and/or time when taking still pictures. 1 Press the MENU button in mode. The [☐ Rec. Mode] menu appears. 2 Use the four-way controller (▲▼) to select [Date Imprint]. 3 Press the four-way controller (▶). A pull-down menu appears.       4 Use the four-way controller (▲▼) to select the Date Imprint details.
Choose from [Date], [Date & Time], [Time] or [Off]. text_image
Rec. Mode 3/3 Memory Green Button Sharpness Saturation Contrast Date Imprint Date & Time Time Off MENU Cancel OK OK5 Press the OK button.
The setting is saved.6 Press the MENU button.
The camera returns to capture status.  - The date and/or time imprinted with the Date Imprint function cannot be deleted. - Note that if the printer or the image editing software is set to print the date and the images to be printed already have the date and/or time imprinted, the imprinted dates and/or times may overlap.  - DATE appears on the display in mode when [Date Imprint] is set. - The date and/or time are imprinted on the picture with the display style set in the [Date Adjustment] screen (p.47).Calling Up a Specific Function
You can assign a function to the Green button and recall it quickly by simply pressing the Green button. This is useful for going straight to the setting screens of frequently used functions. The following functions can be assigned to the Green button: - (Green) Mode • Highlight Correction - Recorded Pixels • Shadow Correction - White Balance • Sharpness - Focusing Area • Saturation • AE Metering • Contrast - Sensitivity • Voice Recording - EV Compensation   - The Green button setting can be returned to its default setting by selecting [Reset] on the [Setting] menu. - The functions other than ● (Green) mode and Voice Recording can be set in the usual manner on the [☐ Rec. Mode] menu. - You cannot save different settings for the same function on the Green button and on the [Rec. Mode] menu.To Assign a Function to the Green Button
1 Press the MENU button in mode. The [Rec. Mode] menu appears. 2 Use the four-way controller (▲▼) to select [Green Button]. 3 Press the four-way controller (▶). A pull-down menu appears. 4 Use the four-way controller (▲▼) to choose a function and press the OK button. text_image
Green Button Green Mode Recorded Pixels White Balance Focusing Area AE Metering ISO Sensitivity MENU Cancel OK OKTo Use the Green Button
1 Press the Green button in mode.
The function assigned to the Green button is called up.2 Use the four-way controller (◀▶) to change the settings and press the OK button.
The camera returns to capture status. text_image
EV Compensation ±0.0Recording Movies
Recording a Movie
This mode enables you to record movies. Sound is recorded at the same time. text_image
Shutter release button Zoom lever Four-way controller OK button1 Press the four-way controller (▼) in mode.
The Capture Mode Palette appears.2 Use the four-way controller (▲▼◀▶) to select ▶ (Movie).
text_image
Movie 1/2 AUTO PICT For recording movies MENU Cancel OK OK3 Press the OK button.
The camera enters the mode and returns to capture status. The following information appears on the display. 1 Movie mode icon 2 Movie shake reduction icon 3 Remaining recordable time 4 REC indicator (blinks during recording) 5 Focus frame (does not appear during recording) text_image
1 REC 07:34 02 02/'10 144255 2 3 4 5natural_image
Diagram of a camera lens with directional arrows indicating rotation (no text or symbols)4 Press the shutter release button fully.
Recording starts. You can continue recording until the built-in memory or the SD Memory Card is full, or the size of the recorded movie reaches 2 GB.5 Press the shutter release button fully.
Recording stops. Playing Back a Movie 📋p.133  - The flash does not discharge in mode. - The focus mode can be changed before recording starts. - When the focus mode is set to MF(Manual Focus), you can adjust the focus before recording starts. - You can use the optical zoom only before recording, while the digital zoom is available both before and during recording. - Even if you change the display mode by pressing the OK/DISPLAY button while recording a movie, the histogram cannot be displayed on the monitor. - When the shooting mode is set to ☑, the Face Detection function is automatically activated. You can switch to Smile Capture or Face Detection Off by pressing the ⚙️ button before starting recording a movie (p.70). When the Smile Capture function is selected, movie recording starts automatically when the camera detects the subject's smile. However, depending on the condition of the detected faces, movie recording may not start automatically because the Smile Capture function may not work. If this happens, press the shutter release button to start movie recording. - You can record a movie using the remote control unit (optional) (p.93).       natural_image
Pure geometric lines and shapes without any text, numbers, or symbolsKeeping the Shutter Release Button Pressed
If you keep the shutter release button pressed for more than one second, recording will continue as long as you keep the button pressed. Shooting stops when you take your finger off the shutter release button.Selecting the Recorded Pixels and Frame Rate for Movies
You can choose the number of recorded pixels and frame rate settings for movies. The more pixels there are, the clearer the details and the bigger the file size. The more frames per second, the better the quality of the movie, but the file size becomes larger.| Setting | Recorded Pixels | Frame Rate | Use |
| 1280 12 | 80×720 30 fps | Records images in HDTV format (16:9). Movement is recorded smoothly. (default setting) | |
| 1280 12 | 80×720 15 fps | Records images in HDTV format (16:9). Increases the total recording time by making the file size smaller. | |
| 640 64 | 0×480 30 fps | Suitable for viewing on a TV or computer screen. Movement is recorded smoothly. | |
| 640 64 | 0×480 15 fps | Suitable for viewing on a TV or computer screen. Increases the total recording time by making the file size smaller. | |
| 320 32 | 0×240 30 fps | Suitable for posting on a website or attaching to e-mail. Movement is recorded smoothly. | |
| 320 32 | 0×240 15 fps | Suitable for posting on a website or attaching to e-mail. Increases the total recording time by making the file size smaller. |
text_image
125text_image
Rec. Time 02:26 Recorded Pixels Movie SR 1280, 1280, 640, 640, 320, 320 MENU Cancel OK OKSetting the Movie SR (Movie Shake Reduction) Function
In mode, you can correct camera shake while you are recording a movie with the Movie SR (Movie Shake Reduction) function. 1 Press the MENU button in mode. The [Rec. Mode] menu appears. 2 Use the four-way controller (▲▼) to select [Movie]. 3 Press the four-way controller (▶). The [Movie] screen appears. 4 Use the four-way controller (▲▼) to select [Movie SR].5 Use the four-way controller
(◀▶) to select √ or □. ☑ Corrects camera shake. □Does not correct camera shake. The setting is saved. text_image
Movie Recorded Pixels 1250 Movie SR6 Press the MENU button twice.
The camera returns to capture status.Saving the Settings (Memory)
The Memory function is for saving the current camera settings when the camera is turned off. For some camera settings, the Memory function is always set to ☑ (On) (the settings are saved when the camera is turned off), while for others you can choose on or off (to choose whether the settings are saved or not when the camera is turned off). The items which can be set to ☑ (On) or □ (Off) in the Memory function are shown in the table below. (Items not listed here are always saved in the selected settings when the camera is turned off.) If you select ☑ (On), the settings will be saved in the status they were in immediately before the camera was turned off. If you select □ (Off), the settings will be reset to the defaults when the camera is turned off. The table below also shows whether the Memory default setting for each item is on or off.| Item Description | Default Setting | Page | |
| Face Detection | A Face Detection mode set by using the 😊 button | ☐ | p.70 |
| Flash Mode | The flash mode set with the four-way controller (◀) | ☑ | p.100 |
| Drive Mode | The drive mode set with the four-way controller (▲) | ☐ | p.90 p.91 |
| Focus Mode | The focus mode set with the four-way controller (▶) | ☐ | p.102 |
| Zoom Position | The zoom position set with the zoom lever | ☐ | p.76 |
| MF Position | The manual focus position set with the four-way controller (▲▼) | ☐p.103 | |
| White Balance | The [White Balance] setting on the [☐ Rec. Mode] menu | ☐p.110 | |
| Sensitivity | The [Sensitivity] setting on the [☐ Rec. Mode] menu | ☐ | p.114 |
| EV Compensation | The [EV Compensation] setting on the [☐ Rec. Mode] menu | ☐p.108 | |
| AE Metering | The [AE Metering] setting on the [☐ Rec. Mode] menu | ☐p.112 | |
| Digital Zoom | The [Digital Zoom] setting on the [☐ Rec. Mode] menu | ☑p.77 | |
| DISPLAY | The information display mode set with the OK/DISPLAY button | ☐p.20 | |
| File No. | If a new SD Memory Card is inserted when ☑ (On) has been selected, file numbers are assigned sequentially | ☑ — |
text_image
Memory 1/3 Face Detection Flash Mode Drive Mode Focus Mode Zoom Position MF Position MENU →Memo
    130    natural_image
Pure geometric diagram with intersecting lines and circular shapes, no text or symbols present4Playing Back and Deleting Images
Playing Back Images 132 Deleting Images and Sound Files ..... 146 Connecting the Camera to AV Equipment 155Playing Back Images
Playing Back Still Pictures
text_image
button Four-way controller1 Press the ▶ button after taking a picture.
The camera enters the ▶ mode and the captured image appears on the display (single-image display). File number text_image
100-0038 Edit 02/02/'10 14:25To Play Back the Previous or Next Image
2 Press the four-way controller (◀▶).
The previous or next image appears.To Delete the Displayed Image
Press the ⏻ button while the image is displayed to display the Delete screen. Press the four-way controller (▲) to select [Delete] and press the OK button. text_image
Delete CancelPlaying Back a Movie
You can play back the movies you have taken. The sound is played back at the same time. text_image
Zoom lever ► button Four-way controllernatural_image
Black and white photo of a dolphin swimming in water, no visible text or symbols| Zoom lever to the right ( [▲] ) | Increases the volume. |
| Zoom lever to the left ( [▲▲] ) | Reduces the volume. |
| Four-way controller ( ▲ ) Pa | uses playback. |
| Four-way controller ( ▶ ) | Fast-forwards playback while the button is held down. |
| Four-way controller ( ◀ ) Plays back in reverse.Fast-reverses playback while the button is held down. | |
| Four-way controller (▲) Resumes playback. |
| Four-way controller (►) Forwards the frame. |
| Four-way controller (◄) Reverses the frame. |
text_image
Zoom lever ► button Four-way controller OK button Green buttonSix-Image Display/Twelve-Image Display
You can display six or twelve thumbnails of captured images at a time. 1 In ▶ mode, turn the zoom lever to the left (☑). The six-image display appears showing a page consisting of six thumbnail images. Turn the zoom lever to the left (☑) again to switch to twelve-image display. natural_image
Diagram of a camera with circular lens and directional arrows indicating rotation (no text or symbols)text_image
① ② Select & Delete 100-0010text_image
① Select & Delete 100-0010| (No icon) Still picture without sound | |
| Movie (the first frame appears) | |
| (With image) Still picture with sound | |
| (Without image) Sound file only |
Folder Display/Calendar Display
In twelve-image display, turn the zoom lever to the left (☐) to switch to folder display or calendar display. Press the Green button to switch between folder display and calendar display.1
In ▶ mode, turn the zoom lever to the left (☐) three times. The screen changes to folder display or calendar display. natural_image
Diagram of a camera with lens and control buttons, no text or symbols presentFolder display
The list of folders with recorded images and sound files appears.| Four-way controller(▲▼◄►) | Moves the frame. |
| Zoom lever to the right (Q)/OKbutton | Displays the images in the selected folder in twelve-image display. |
| MENU button | Returns to twelve-image display. |
text_image
102 103 104101 106105 101_0707Calendar display
Images and sound files are displayed by date in calendar format. The first image recorded on a date is displayed for that date on the calendar. appears for dates on which a sound file was the first recorded file.| Four-way controller(▲▼◄►) | Moves the frame. |
| Zoom lever to the right (Q) | Displays the images for that date in twelve-image display. |
| OK button | Displays the first image recorded on that date in single-image display. |
| MENU button | Returns to twelve-image display. |
text_image
Frame SUN MON TUE WED THU FRI SAT 7 8 9 10 11 12 13 14 15 16 17 18 19 20 21 22 23 24 25 26 27 28 29 30 31 03 2010Using the Playback Function
1 Press the four-way controller (▼) in ▶ mode.
The Playback Mode Palette appears.2 Use the four-way controller (▲▼◀▶) to choose an icon.
The guide for the selected function appears below. text_image
Slideshow 1/2 For continuously playing back images. Screen or sound effects can be set MENU Cancel OK OK3 Press the OK button.
The selected playback function is called up. flowchart
graph TD
    A["Edit 02/02/'10 14:25"] --> B{OK}
    B --> C["Slideshow 1/2"]
    C --> D["For continuously playing back images. Screen or sound effects can be set"]
    D --> E["OK"]
    E --> F["Image Rotation 1/2"]
    F --> G["Rotates captured images. Useful when viewing vertical images on a TV"]
    G --> H["OK"]
    H --> I["SHUTTER Press halfway"]
    I --> J["Closes the Playback Mode Palette and goes to mode."]
    J --> K["OK"]
    K --> L["Goes to the screen for selected playback function."]
| Playback Mode Description Page | |||
| Slideshow | For continuously playing back images. Screen or sound effects can be set. | p.139 | |
| Image Rotation | Rotates captured images. Useful when viewing vertical images on a TV. | p.141 | |
| Small Face Filter Processing image to smaller for detected face. p.160 | |||
| Digital Filter | For modifying images with a Color filter or Soft filter. | p.162 | |
| Original Frame | For making a frame by selecting your favorite frame type and color. Text can be entered, too. | p.171 | |
| Frame Composite | For composing an image with a frame. Select Overwrite or Save as to save. | p.167 | |
| Movie Edit | Save as Still Image | For saving one frame from a movie as a still picture. | p.176 |
| Divide Movies | For dividing a movie into two. | ||
| Adding title picture | For adding a title picture to your movie. p.178 | ||
| Red-eye Compensation | For compensating red-eye. May not work due to the condition of the image. | p.166 | |
| Subscreen Input | For displaying the selected image on the subscreen. | p.208 | |
| Resize | Changes Recorded Pixels and Quality Level to make the file size smaller. | p.158 | |
| Cropping | For cropping images to the size you like. Saved as a new image. | p.159 | |
| Image/Sound Copy | For copying images and sounds between the built-in memory and SD Memory Card. | p.179 | |
| Voice Memo | Attaches sound to images. Recording is possible till the memory card is full. | p.190 | |
| Protect | Protects images and sounds from accidental deletion. Formatting will delete. | p.152 | |
| DPOF | For the print settings. Useful when printing at a printing service. | p.181 | |
| Image Recovery | For recovering image and sound files which were accidentally deleted. | p.151 | |
| Start-up Screen | For setting a captured image as the Start-up Screen. | p.209 | |
Slideshow
You can play back recorded images one after another. 1 In ▶ mode, use the four-way controller (◀▶) to choose the image to start the slideshow with. 2 Press the four-way controller (▼). The Playback Mode Palette appears. 3 Use the four-way controller (▲▼◀▶) to select ▶ (Slideshow). text_image
Slideshow 1/2 For continuously playing back images. Screen or sound effects can be set MENU Cancel OK OKtext_image
Slideshow starts Start Interval 3sec. Screen Effect Wine Sound Effect MENU OK OKTo Set the Slideshow Conditions
You can set the playback interval and also a screen effect and sound effect for when one image changes to the next. 1 Use the four-way controller (▲▼) to select [Interval] in Step 5 on p.139. text_image
Start Interval ▶3sec. Screen Effect: Wipe Sound Effect MENU| Wipe The next image slides over the previous one from left to right |
| Checker The next image appears in small square mosaic blocks |
| Fade The current image gradually fades out and the next image fades in |
| Off No effect |
9 Use the four-way controller (▲▼) to select [Start] and press the OK button.
The slideshow starts using the selected interval and effect.  - The slideshow will continue until you press any button other than the OK button. • Movies or pictures with sound will be played through to the end before the next picture is played back, regardless of the interval setting. However, pressing the four-way controller (▶) while playing back a movie or a picture with sound skips to the next image. • Sound files made in Voice Recording are not played back in the slideshow. - Panorama images are displayed by scrolling from left to right in 4 seconds before the next picture is played back, regardless of the Interval or Screen Effect setting. Connecting the Camera to AV Equipment 📄p.155 Rotating the Image text_image
button Four-way controller OK button1 Press the ▶ button after taking a picture.
The image appears on the display.2 Press the four-way controller (▼).
The Playback Mode Palette appears. 3 Use the four-way controller (▲▼◀▶) to select ◇ (Image Rotation). text_image
Image Rotation 1/2 Rotates captured images. Useful when viewing vertical images on a TV MENU Cancel OK OKnatural_image
Four-panel grayscale image showing a textured surface with small rectangular annotations, no visible text or symbols.Zoom Playback
You can magnify an image up to ten times. text_image
Zoom lever ► button Four-way controller OK button2 Turn the zoom lever to the right (Q).
The image is magnified ( × 1.1 to × 10). Continuing to turn the zoom lever to the right (Q) changes the magnification continuously. You can use the + mark of the guide at the bottom left of the screen to check which portion of the image is magnified.Available operations while an image is magnified
| Four-way controller (▲▼◄►) | Moves the position to be magnified. |
| Zoom lever to the right (Q) | Makes the image bigger (max. ×10). |
| Zoom lever to the left (☐) | Makes the image smaller (min. ×1.1). |
natural_image
Diagram of a camera with a circular lens and directional arrows indicating rotation (no text or symbols)natural_image
Exterior view of a modern building with outdoor furniture and trees in the background (no visible text or signage)3 Press the OK button.
The image returns to single-image display.  Movies cannot be magnified.Zoom In on the Subject's Face Automatically (Face Close-up Playback)
You can enjoy playing back images with the subject's faces zoomed up simply by pressing the 😊 button (Face close-up playback) if the Face Detection function operated when the images were taken. text_image
Zoom lever button buttonnatural_image
Black-and-white photo of a young girl with soft hair, no visible text or symbolsnatural_image
Black-and-white photo of a young child eating with a spoon, no visible text or symbols| Zoom lever to the right (♀) | Zooms up on the subject being displayed for Face close-up playback at an equal or slightly larger magnification ratio. |
| Zoom lever to the left (☐) | Zooms up on the subject being displayed for Face close-up playback at an equal or slightly smaller magnification ratio. |
natural_image
Diagram of a camera with circular lens and directional arrows indicating rotation (no text or symbols)3 Press the OK button.
The image returns to single-image display.  - Face close-up playback is not available for images that are saved as still pictures from the movies. - The magnification ratio for Face close-up playback may differ depending on the conditions such as the size of the face detected when shooting. - Face close-up playback is also available for pet's faces recorded in (Pet) mode.Deleting Images and Sound Files
You can delete images and sound files that you do not want to keep.When images or sound files are inadvertently deleted
Deleted images and sound files can be recovered with the Optio I-10 (p.151). Deleted images and sound files can be recovered even if the camera has been turned off after deletion as long as the SD Memory Card has not been removed. However, deleted images and sound files cannot be recovered after operations to write data such as taking pictures, recording movies, protecting images, saving DPOF settings, resizing images, cropping images, or formatting has been performed.Deleting a Single Image
You can delete a single image or sound file.  Protected images and sound files cannot be deleted (p.152). text_image
button Four-way controller OK button buttontext_image
100-0017 Delete Cancel OK OKTo Delete the Sound from an Image
If sound (voice memo) has been added to an image (p.190), you can delete the sound without deleting the image. 1 In ▶ mode, use the four-way controller (◀▶) to choose the image with sound. ☐ appears on the images with sound. 2 Press the 📋 button. A confirmation screen appears. 3 Use the four-way controller (▲▼) to select [Delete Sound]. text_image
Delete Sound Delete CancelDeleting Selected Images and Sound Files
You can delete several images/sound files selected from the six-/twelve-image display at once.  Protected images and sound files cannot be deleted (p.152). text_image
Zoom lever ► button Four-way controller OK button ◄ buttonnatural_image
Diagram of a camera with lens and control buttons, no text or symbols presenttext_image
Cancel Delete OK MENUtext_image
Cancel Delete OK MENUtext_image
Delete all selected images/sounds ? Select & Delete CancelDeleting All Images and Sound Files
You can delete all the images and sound files at once.  Protected images and sound files cannot be deleted (p.152). text_image
button Four-way controller OK button MENU button1 Press the MENU button in ▶ mode.
The [Setting] menu appears. When you press the MENU button in ☐ mode, press the four-way controller (▶) once.2 Use the four-way controller (▲▼) to select [Delete All].
text_image
Setting 3/3 Reset Delete All Pixel Mapping Format MENU Exit3 Press the four-way controller (▶).
The [Delete All] screen appears.4 Use the four-way controller (▲▼) to select [Delete All].
text_image
Delete All Delete all images/sounds? Delete All Cancel OK OK5 Press the OK button.
All the images and sound files are deleted.Recovering Deleted Images
You can recover images or sound files that were taken with this camera and then deleted.  If any of the following operations have been performed after deleting an image, the deleted image and sound file cannot be recovered. - Shooting - Protect setting/DPOF setting/Resizing/Cropping - Registering a subscreen image - Formatting - Removing the SD Memory Card1 After deleting a file, press the four-way controller (▼).
The Playback Mode Palette appears.2 Use the four-way controller (▲▼◀▶) to select 🔊 (Image Recovery).
When Ⓧ is displayed, there are no images that can be recovered. text_image
Image Recovery 2/2 For recovering image and sound files which were accidentally deleted MENU Cancel OK OK3 Press the OK button.
The number of recoverable images appears. If you selected Ⓧ and pressed the OK button, the message [No image to be processed] appears. In this case, press the OK button to return to the Playback Mode Palette.4 Use the four-way controller (▲▼) to select [Recover].
text_image
What is Recover? Recover Cancel5 Press the OK button.
The files are recovered.  • Recovered images and sound files have the same file name as before they were deleted. - Up to 999 deleted image files can be recovered.Protecting Images and Sound Files from Deletion (Protect)
You can protect stored images and sound files from being accidentally deleted. 1 In ▶ mode, use the four-way controller (◀▶) to choose the image you want to protect. 2 Press the four-way controller (▼). The Playback Mode Palette appears. 3 Use the four-way controller (▲▼◀▶) to select O—(Protect). text_image
Protect 2/2 Protects images and sounds from accidental deletion. Formatting will delete MENU Cancel OK OKtext_image
Single Image/Sound All Images/Sounds Cancel6 Press the OK button.
The message [Protects this image/sound] appears. To protect another image or sound file, use the four-way controller (◀▶) to select another image or sound file.7 Use the four-way controller (▲▼) to select [Protect].
text_image
100-0038 Protects this Image/sound Protect Unprotect Cancel8 Press the OK button.
The selected image or sound file is protected and the screen shown in Step 5 reappears. To protect other images or sound files, repeat Steps 5 to 8. Select [Cancel] to exit the Protect settings.  - To cancel the protection of the image, select [Unprotect] in Step 7. - 📄 appears on the protected images and sound files during playback. - The maximum number of images and sound files you can protect in succession with [Single Image/Sound] is 99.To Protect All Images and Sound Files
1 Select [All Images/Sounds] in Step 5 on p.152. text_image
Single Image/Sound All Images/Sounds Cancel OK OKtext_image
Protects all Interess/sounds Protect Unprotect CancelConnecting the Camera to AV Equipment
By using the supplied AV cable (I-AVC7), you can capture and play back images on equipment with a video IN jack, such as a TV. text_image
External Input Terminal PC/AV terminal VIDEO AUDIO (L) (R) Yellow White5 Turn the camera on.
 - The Power lamp on the camera lights up during a connection. - It is recommended to use the optional AC adapter kit K-AC92 if you intend to use the camera for a long time (p.35). - Depending on the country or region, images and sound files may fail to be played back if the video output format is set differently from the one in use there. If this happens, change the video output format setting (p.204). - The camera display turns off and the volume cannot be adjusted with the zoom lever while the camera is connected to AV equipment.  When connecting to and playing back images on AV equipment, image data is output at normal screen resolution. To view movies recorded at 1280_30 (1280×720, 30 fps) and 1280_5 (1280×720, 15 fps) in HDTV, transfer the data to a computer and play it back on the computer (p.213).5 Editing and Printing Images
Editing Images 158 Setting the Printing Service (DPOF) ..... 181About printing
The following options are available for printing images taken with this camera. 1 Use a printing service. 2 Use your printer with an SD Memory Card slot to print directly from the SD Memory Card. 3 Use your computer's software to print images.Editing Images
Changing the Image Size (Resize)
By changing the recorded pixels of a selected image, you can make the file size smaller than the original. You can use this function to continue taking pictures when the SD Memory Card or the built-in memory is full, by making the images smaller and overwriting the original images to make more space available.  - Panoramic images and movies cannot be resized. - You cannot select a larger resolution than that of the original image. 1 In ▶ mode, use the four-way controller (◀▶) to choose the image you want to resize. 2 Press the four-way controller (▼). The Playback Mode Palette appears. 3 Use the four-way controller (▲▼◀▶) to select □(Resize). text_image
Resize 1/2 Changes Recorded Pixels and Quality Level to make the file size smaller MENU Cancel OK OKtext_image
Recorded Pixels ◄ 12M ► MENU Cancel OK OK6 Press the OK button.
A confirmation dialog for overwriting the image appears. If the selected image is protected, the processed image is saved as a new image and the following confirmation dialog does not appear.7 Use the four-way controller (▲▼) to select [Overwrite] or [Save as].
text_image
Overwrite all and image? Overwrite Save as Cancel8 Press the OK button.
The resized image is saved.Cropping Images
You can delete the unwanted part of a picture and save the cropped image as a new image.  Panoramic images and movies cannot be cropped.1 In ▶ mode, use the four-way controller (◀▶) to choose the image you want to crop.
2 Press the four-way controller (▼).
The Playback Mode Palette appears.3 Use the four-way controller (▲▼◀▶) to select □ (Cropping).
text_image
Cropping 1/2 For cropping images to the size you like. Saved as a new image MENU Cancel OK OK4 Press the OK button.
The cropping screen appears. The largest size of cropped image is shown with a green frame on the screen. The cropped image cannot be larger than this cropping frame size.5 Choose the cropping area.
The following operations move the green frame and set the area for cropping on the screen.| Zoom lever Changes | es the size of the cropped section. |
| Four-way controller (▲▼◄►) | Moves the cropping position up, down, left and right. |
| Green button Rotates | tes the cropping frame.The button is displayed only when the cropping frame size can be rotated. |
natural_image
Black-and-white photo of a beach scene with trees and sky, no visible text or symbols6 Press the OK button.
The cropped image is saved with a new file name. The number of recorded pixels is selected automatically according to the size of the cropped section.Processing Images So That Faces Look Smaller
Images are processed to reduce the size of people's faces detected with the Face Detection function (p.70) when taking pictures so that they look smaller. 1 In ▶ mode, use the four-way controller (◀▶) to choose the image you want to edit. 2 Press the four-way controller (▼). The Playback Mode Palette appears.  3 Use the four-way controller (▲▼◀▶) to select 📋 (Small Face Filter). text_image
Small Face Filter 1/2 Reduces the size of faces in the image, for well- proportioned portraits MENU Cancel OK OKnatural_image
Black-and-white photo of two young children sitting side by side, each with a face bounding box (no text or symbols visible)text_image
MENU Cancel OK OKtext_image
Overwrite original image? Overwrite Save as Cancel10 Press the OK button.
The camera returns to ▶ mode and the processed image is displayed.  You may not be able to process images in the following situations: - When the size of face taken in relation to an image is too large or too small - When faces are located in the edges of an image In such cases, the face detection frame in Step 4 will not appear.Using the Digital Filters
This function lets you change the color tones and perform special processing on a selected image.| B&W | Processes the image into one that has the look of a black and white photograph. |
| Sepia | Processes the image into one that has the look of a sepia photograph. |
| Toy Camera | Processes the image that looks as though it was shot with a toy camera. |
| Retro | Processes the image into one that has the look of an old photo. |
| Color | Processes the image using the selected color filter. You can choose from six filters: red, pink, purple, blue, green, and yellow. |
| Extract Color | Extracts only a specific color and processes the rest of the image into black and white. You can choose from three filters: red, green, and blue. |
| Color Emphasis | There are four filters: Sky Blue/Fresh Green/Delicate Pink/Autumn Leaves. |
| High Contrast | Enhances the contrast of an image. |
| Starburst | Processes the image with a special sparkling look achieved by adding cross-like effects to a highlight area, such as night scenes or lights reflected on water. You can choose from three filters: Cross, Heart, and Star. |
| Soft | Processes the image into a soft image that appears soft overall. |
| Brightness Filter | Adjusts the brightness of the image. |
text_image
Digital Filter 1/2 For modifying images with a Color filter or Soft filter MENU Cancel OK OKtext_image
B&W 1 2 3 4 5 6 7 8 9 10 SOFT 11 MENU Cancel OK OKTo Select a B&W, Sepia or Soft Filter
5 Use the four-way controller (▲▼) to choose a filter. The preview image of the results of the filter effect appears. 6 Press the OK button. A confirmation dialog for overwriting the image appears. If the selected image is protected, the processed image is saved as a new image and the following confirmation dialog does not appear. 7 Use the four-way controller (▲▼) to select [Overwrite] or [Save as]. text_image
Overwrite original image? Overwrite Save as Canceltext_image
Retro MENU Cancel OK OK| Four-way controller (◀) | Default Setting | Four-way controller (▶) | |
| Retro Blue Origin | ginal image Amber |
| Color | Red ↔ Pink ↔ Purple ↔ Blue ↔ Green ↔ Yellow |
| Extract Color | Red ↔ Green ↔ Blue |
| Color Emphasis | Sky Blue ↔ Fresh Green ↔ Delicate Pink ↔ Autumn Leaves |
| Starburst | Cross ↔ Heart ↔ Star |
text_image
Overwrite original image? Overwrite Save as CancelTo Select a Toy Camera, High Contrast or Brightness Filter
5 Use the four-way controller (▲▼) to choose a filter. 6 Use the four-way controller (◀▶) to adjust the effect. text_image
Toy Camera MENU Cancel OK OK| Four-way controller (◀) | Default Setting | Four-way controller (▶) | |
| Toy Camera W | Weak Standard Strong | ||
| High Contrast | Weak Standard Strong | ||
| Brightness Filter | Dark Standard Bright | ||
text_image
Overwrite original image? Overwrite Save as Cancel9 Press the OK button.
The image processed with the filter is saved.Red-eye Compensation
You can correct images where the flash has caused the subject to appear with red eyes.  - The red-eye compensation function cannot be used on panoramic images, movies or on images where red eyes cannot be detected on the camera. An error message appears in Step 4. - The red-eye compensation function can only be used with still pictures taken with this camera. 1 In ▶ mode, use the four-way controller (◀▶) to choose the image you want to correct. 2 Press the four-way controller (▼). The Playback Mode Palette appears. 3 Use the four-way controller (▲▼◀▶) to select Ⓞ! (Red-eye Compensation). text_image
Red-eye Compensation 1/2 For compensating red-eye. May not work due to the condition of the image MENU Cancel OK OKtext_image
Overwrite original image? Overwrite Save as Cancel6 Press the OK button.
The edited image is saved.Adding a Frame (Frame Composite)
This function lets you add a decorative frame to still pictures. Choose a frame from 90 frames already registered in the camera.  The Frame Composite function cannot be used on panoramic images, images recorded with 1024/640 in [Recorded Pixels], or movies. An error message appears in Step 4. 1 In ▶ mode, use the four-way controller (◀▶) to choose the image to which you want to add a frame. 2 Press the four-way controller (▼). The Playback Mode Palette appears. 3 Use the four-way controller (▲▼◀▶) to select ○ (Frame Composite). text_image
Frame Composite 1/2 For composing an image with a frame. Select Over- write or Save as to save MENU Cancel OK OKnatural_image
Grid of black-and-white photo grid showing three rows of children, each with a small inset image (no text or symbols)6 Turn the zoom lever to the right (Q).
The selected frame appears in single-image display. You can choose another frame using either of the following operations.| Four-way controller ( ◀▶ ) | Press to choose a different frame. |
| Zoom lever to the left ( ☑ ) | Returns to the 12-frame display of the frame selection screen, and then perform Step 5 to choose a different frame. |
natural_image
Diagram of a camera with circular lens and directional arrows indicating motion (no text or symbols)natural_image
Black-and-white photo of two young girls with star-shaped decorations in the background (no text or symbols)7 Press the OK button.
The frame position and size adjustment screen appears. You can adjust the image using either of the following operations.| Four-way controller(▲▼◄►) | Press to adjust the position of the image |
| Zoom lever Turn | to make the image larger or smaller. |
text_image
MENU Cancel OK8 Press the OK button.
A confirmation dialog for overwriting the image appears. If the selected image is protected, the processed image is saved as a new image and the following confirmation dialog does not appear.9 Use the four-way controller (▲▼) to select [Overwrite] or [Save as].
text_image
Overwrite original image? Overwrite Save as Cancel10 Press the OK button.
The edited image is saved with the recorded pixels of 3M (2048×1536)/2.1M 169 (1920×1080).Optional Frames
The optional frames are stored in the built-in memory in the Optio I-10. These optional frames are deleted if the files on the built-in memory are deleted with a computer or the built-in memory is formatted. To reload the optional frames into the built-in memory, copy the files from the CD-ROM (S-SW102) supplied with the camera.To Copy Frames
1 Remove the SD Memory Card from the camera. If you leave the SD Memory Card in the camera, the frames will be copied onto the card, not into the camera's built-in memory. 2 Connect the camera to the computer using the provided USB cable (I-USB7). Refer to "Connecting to a Computer" (p.213) for instructions on connecting the camera to a computer. 3 When the device detection window opens, click [Cancel]. 4 Insert the CD-ROM (S-SW102) into the CD-ROM drive. 5 When the installer window opens, click [EXIT]. 6 If there is not already a “FRAME” folder in the root directory of the camera (removable disk), create the folder. 7 Copy the desired files from the FRAME folder in the root directory of the CD-ROM to the FRAME folder on the camera (removable disk). For information on working with files on your computer, refer to the instruction manual supplied with the computer. 8 Disconnect the USB cable from the computer and camera. Refer to "Connecting to a Computer" (p.213) for instructions on disconnecting the cable.  Frames can be stored both in the built-in memory and on the SD Memory Cards, but using large numbers of frames may slow down processing times.To Use a New Frame
The frames downloaded from the PENTAX website or other source can be used for adding a frame to pictures.  - Extract the downloaded frame and copy it to the FRAME folder in the built-in memory or the SD Memory Card. - The FRAME folder is created when the SD Memory Card is formatted with this camera. - For more information on downloading, refer to the PENTAX website.Overlaying Your Original Frame on an Image
You can overlay your original frame (decorative frame) on an image. You can select the type and color of an original frame and its position. Text can also be entered. Frame| Type of original frame | Blur/Edge Composite |
| Frame Type | (All sides)/ (Upper and lower sides)/ (Right and left sides)/ (Upper side)/ (Lower side)/ (Left side)/ (Right side) |
| Color | White/Gray/Black/Pink/Pumpkin/Dark red/Dark green |
| Available characters | A – Z, a – z, 0 – 9, Symbols |
| Display Position | ☐ (Upper-left)/☐ (Upper-center)/☐ (Upper-right)/☐ (Lower-left)/☐ (Lower-center)/☐ (Lower-right) |
| Color | White/Gray/Black/Pink/Pumpkin/Dark red/Dark green |
text_image
Original Frame 1/2 Available to make from the kind and color of a frame. Available to enter text MENU Cancel OK OKtext_image
Blur Edge Composite Cancel OKtext_image
Frame Type Color Text Stamp Position Adjustment MENU Cancel OK Save10 Use the four-way controller (▲▼) to select [Text Stamp].
The Text Stamp screen appears. When you do not enter characters, proceed to Step 12.11 Set up the text stamp.
For details, refer to "To Set Up Text Stamp" (p.175). text_image
Text Stamp ABCDEFGHIJKLMNOPQRSTUVWXYZ 0123456789[1] <> @-1/1/2? #_+ = $ % 0% 2 Finish Delete One Character MENU Cancel OK Enter12 Press the OK button.
A confirmation dialog for overwriting the image appears. If the selected image is protected, the processed image is saved as a new image and the following confirmation dialog does not appear.13 Use the four-way controller (▲▼) to select [Overwrite] or [Save as].
text_image
Overwrite original image? Overwrite Save as Cancel14 Press the OK button.
The edited image is saved with the recorded pixels of 5M (2592×1944)/3.8M16:9 (2592×1464).To Adjust the Position of the Frame and an Image
1 Press the Green button.
The frame position adjustment screen appears.| Four-way controller (▲▼◄►) | Press to adjust the position of the filter |
| Zoom lever to the right (Q) | Turn to make the filter larger |
| Zoom lever to the left (☐) | Turn to make the filter smaller |
text_image
MENU Cancel OK OKCancel2 Press the Green button.
The image position adjustment screen appears.| Four-way controller(▲▼◄►) | Press to adjust the position of the image |
| Zoom lever to the right (Q) | Turn to make the image larger |
| Zoom lever to the left (☐) | Turn to make the image smaller |
text_image
MENU Cancel OK OKCancel3 Press the OK button.
The screen returns to the original screen.To Set Up Text Stamp
1 Use the four-way controller (▲▼◀▶) to select a character and press the OK button.
The selected character is input. Up to 52 characters can be input. text_image
Text Stamp ABCDEFGHIJKLMNOPQRSTUVWXYZ 0123456789 [ ] <> @ = _100 ? #_+=$ % ( ) = _ Finish FRI ENDS Delete One Character MENU Cancel OK Enter| button | Press to switch between upper and lower case |
| Zoom lever to the right (☐) | Turn to move the cursor to the right |
| Zoom lever to the left (☐) | Turn to move the cursor to the left |
| Green button Press | s to delete the character |
2 Use the four-way controller (▲▼◀▶) to select [Finish] and press the OK button.
3 Use the four-way controller (▲▼) to select [Display Position] and press the four-way controller (▶).
text_image
Enter on this condition FRIENDS FRIENDS Display Position Color Preview MENU Cancel OK Save4 Use the four-way controller (▲▼) to select the display position and press the four-way controller (◀).
5 Use the four-way controller (▲▼) to select [Color] and press the four-way controller (▶).
6 Use the four-way controller (▲▼) to select the color and press the four-way controller (◀).
7 Press the OK button.
To View the Preview Screen
1 Press the Green button.
The preview screen appears. text_image
FRIENDSER J ENDS MENU ↻2 Press the MENU button.
The screen returns to the original screen.Editing Movies
You can select a frame from the recorded movie to save as a still picture, divide a movie into two, or add a title picture to a movie. 1 In ▶ mode, use the four-way controller (◀▶) to choose the movie you want to edit. 2 Press the four-way controller (▼). The Playback Mode Palette appears. 3 Use the four-way controller (▲▼◀▶) to select 🎨 (Movie Edit). text_image
Movie Edit 1/2 Clipping still image from movie, movie segmentation, and to add title picture MENU Cancel OK OKtext_image
Save as Still Image Divide Movies Adding title picture Cancel OK OKTo Save a Frame from a Movie as a Still Picture
5 Select [Save as Still Image] on the movie edit selection screen. 6 Press the OK button. The screen appears for selecting a frame to be saved as a still picture. 7 Use the four-way controller (▲▼◀▶) to choose the frame you want to save. ▲Plays or pauses the movie ▼ Stops the movie and returns to the first frame ◀ Reverses the movie frame by frame ▶ Advances the movie frame by frame text_image
100-0042 00:06 Select the image to save 11 MENU Cancel OK OKTo Divide a Movie
5 Select [Divide Movies] on the movie edit selection screen. 6 Press the OK button. The screen for choosing the dividing position appears. 7 Use the four-way controller (▲▼◀▶) to determine the dividing position. ▲Plays or pauses the movie ▼ Stops the movie and returns to the first frame ◀ Reverses the movie frame by frame ▶ Advances the movie frame by frame text_image
Select image for dividing position 11 MENU Cancel OK OK8 Press the OK button.
A confirmation dialog appears.9 Use the four-way controller
(▲▼) to select [Divide]. text_image
Divide at this position? Divide Cancel OK OK10 Press the OK button.
The movie is divided at the specified position, the two portions are saved as new files, and the original one is deleted.  The protected movies cannot be divided.To Add a Title Picture to a Movie
5 Select [Adding title picture] on the movie edit selection screen.
6 Press the OK button.
The screen appears for selecting a title picture.7 Use the four-way controller (◀▶) to choose the desired title picture.
Only images available for use with the title picture are displayed.8 Press the OK button.
The screen appears for confirming the position of the title picture.9 Use the four-way controller (▲▼) to select the position.
☐Adds the title picture to the beginning of the movie Adds the title picture to the end of the movie text_image
Specify the position of title picture to add Cancel OK OK10 Press the OK button.
The selected picture is saved as the title picture.  \- When a title picture is added to the beginning of a movie: When the movie is played back, the still picture is played back for three seconds, and then the movie is played back. The still picture registered as title picture is used as the thumbnail of the movie. When a title picture is added to the end of a movie: When the movie is played back, the movie is played back, and then the still picture is played back for three seconds. The thumbnail of the movie is not changed by adding a title picture to the end of the movie.Copying Images and Sound Files
You can copy images and sound files from the built-in memory to the SD Memory Card and vice versa. This function can be selected only when an SD Memory Card has been inserted in the camera.  Make sure that the camera is turned off before inserting or removing the SD Memory Card. 1 Press the four-way controller (▼) in ▶ mode. The Playback Mode Palette appears. 2 Use the four-way controller (▲▼◀▶) to select 📋 (Image/ Sound Copy). text_image
Image/Sound Copy 1/2 For copying images and sounds between the builtin memory and SD memory card MENU Cancel OK OKTo Copy Files from the Built-in Memory to the SD Memory Card
All the images and sound files in the built-in memory are copied to the SD Memory Card at once. Before copying the images, make sure that there is enough space on the SD Memory Card. 4 Use the four-way controller (▲▼) to select [☐→SD]. text_image
SD SD Cancel OK OK5 Press the OK button.
All the images and sound files are copied to the SD Memory Card.To Copy Files from the SD Memory Card to the Built-in Memory
Selected images and sound files from the SD Memory Card are copied to the built-in memory one at a time. 4 Use the four-way controller (▲▼) to select [SD→●]. 5 Press the OK button. 6 Use the four-way controller (◀▶) to select the image/sound file you want to copy. text_image
100-0017 Covls this image/sound MENU Cancel OK OK7 Press the OK button.
The selected image/sound file is copied to the built-in memory. To copy other images or sound files, repeat Steps 4 to 7. Select [Cancel] to exit the settings.  - If sound (voice memo) has been added to an image, the image is copied with the sound. - When a file is copied from the SD Memory Card to the built-in memory, it is assigned a new file name.Setting the Printing Service (DPOF)
DPOF (Digital Print Order Format) is the format for storing print order data on still pictures captured with a digital camera. Once the print order data has been stored, the pictures can be printed according to the DPOF settings using a DPOF-compatible printer or photo processing lab. You cannot store print order data for movies or sound-only files.  If the picture already has the date and/or time imprinted on it (p.119), do not set [Date] ☑ (On) in DPOF settings. If you select ☑, the imprinted date and/or time may overlap.Printing a Single Image
Set the following items for each image. Copies Choose the number of copies up to 99. Date Specify whether you want the date inserted on the print or not. 1 In ▶ mode, press the four-way controller (▼). The Playback Mode Palette appears. 2 Use the four-way controller (▲▼◀▶) to select ▶ (DPOF). text_image
DPOF 2/2 For the print settings. Useful when printing at a printing service MENU Cancel OK OKtext_image
Single Image All Images Cancel5 Press the OK button.
The message [Applies DPOF settings to this image] appears.6 Use the four-way controller (◀▶) to select an image.
If DPOF settings have already been made for an image, the previous number of copies and date setting (☑ or □) will be displayed.7 Use the four-way controller (▲▼) to choose the number of copies.
text_image
100-0017 Amplise PDF settings to this image Copies 00 Date Date MENU Cancel 3OP OK OK8 Press the Green button to switch ☑ or □ for [Date] setting.
☑ The date will be imprinted. ☐ The date will not be imprinted. To continue setting DPOF print order data, repeat Steps 6 to 8. text_image
100-0017 Applies PDF settings to this image Copies 01 Date ✓ Date MENU Cancel OK OK9 Press the OK button.
The setting is saved and the screen shown in Step 4 reappears.  Depending on the printer or printing equipment at the photo processing lab, the date may not be imprinted on the pictures even if ☑ (On) is selected for [Date] in the DPOF settings.  To cancel DPOF settings, set the number of copies to [00] in Step 7 and press the OK button.Printing All Images
When you choose the number of copies and whether or not to insert the date, the settings are applied to all the images stored in the camera. 1 Select [All Images] in Step 4 on p.181. 2 Press the OK button. The message [Applies DPOF settings to all images] appears. 3 Choose the number of copies and switch √ or □ for [Date] setting. Refer to Steps 7 and 8 in "Printing a Single Image" (p.182) for details of how to make the settings. text_image
Adobe Photoshop settings to all images Copies 01# Date ✓ Date MENU Cancel OK OKMemo
6 Recording and Playing Back Sound
Recording Sound (Voice Recording) 186 Adding a Voice Memo to Images ..... 190   natural_image
Pure geometric lines and shapes without any text, numbers, or symbolsnatural_image
Pure geometric diagram with intersecting lines and circles, no text or symbols presentRecording Sound (Voice Recording)
You can record sound with the camera. The microphone is located on the top of the camera next to the Power switch. When recording sound, aim the camera at the sound source to obtain the best sound quality. text_image
Microphone SpeakerSetting the Voice Recording Function
To use the Voice Recording function, assign it to the Green button first. 1 Press the MENU button in mode. The [Rec. Mode] menu appears. 2 Use the four-way controller (▲▼) to select [Green Button]. 3 Press the four-way controller (▶). A pull-down menu appears. 4 Use the four-way controller (▲▼) to select [Voice Recording] and press the OK button. text_image
Green Button Voice Recording MENU Cancel OK OK5 Press the MENU button.
The Voice Recording function is assigned to the Green button.Recording Sound
text_image
Shutter release button Green button1 Press the Green button in mode.
The camera enters the Voice Recording mode. The remaining recordable time and the recording time of the current file appear on the display. 1 Recording time 2 Remaining recordable time text_image
1 2 01:31:44 00:00:00 SHUTTER Start2 Press the shutter release button fully.
Recording starts. The self-timer lamp blinks during recording. You can record sounds continuously for up to 24 hours. When the Green button is pressed during recording, an index is added to the current sound file. text_image
01:30:32 REC 00:01:22 Index SHUTTER Stop3 Press the shutter release button fully.
Recording stops.  - If you press and hold down the shutter release button for more than one second in Step 2, recording continues until you take your finger off the button. This is useful for recording short sound. - The sound is saved in WAVE monaural files.Playing Back Sound
You can play back the sound files you made in Voice Recording. text_image
Zoom lever button Four-way controllertext_image
1 2 100-0025 00:00:00 00:01:30 02/02/'10 14:25| Zoom lever to the right ( [▲] ) | Increases the volume. |
| Zoom lever to the left ( [▲▲] ) | Reduces the volume. |
| Four-way controller ( ▲ ) | Pauses playback. |
| Four-way controller ( ◀ ) | (If there are no recorded indexes) Fast-reverses playback.(If there are recorded indexes) Plays back starting from the previous index. |
| Four-way controller ( ▶ ) | (If there are no recorded indexes) Fast-forwards playback.(If there are recorded indexes) Plays back starting from the next index. |
| Four-way controller (▲) | Resumes playback. |
| Four-way controller (◀) | Rewinds approx. 5 seconds. |
| Four-way controller (▶) | Advances approx. 5 seconds. |
4
Press the four-way controller (▼).
Playback stops.Adding a Voice Memo to Images
You can add a voice memo to your still pictures.Recording a Voice Memo
1 In ▶ mode, use the four-way controller (◀▶) to choose the still picture to which you want to add a voice memo. 2 Press the four-way controller (▼). The Playback Mode Palette appears. 3 Use the four-way controller (▲▼◀▶) to select 📋 (Voice Memo). text_image
Voice Memo 2/2 Attaches sound to images. Recording is possible till the memory card is full MENU Cancel OK OKnatural_image
Black-and-white photo of a wooden pier with a traditional pavilion on calm water, no visible text or symbolsPlaying Back a Voice Memo
text_image
Zoom lever button Four-way controllernatural_image
Black-and-white photo of a wooden pier with a traditional pavilion on calm water, no visible text or symbols.| Zoom lever to the right ( [IMAGE] ) | Increases the volume |
| Zoom lever to the left ( [IMAGE] ) | Reduces the volume |
Memo
    192    natural_image
Pure geometric diagram with intersecting lines and circular shapes, no text or symbols present7 Settings
Camera Settings 194   natural_image
Pure geometric lines and shapes without any text, numbers, or symbolsnatural_image
Pure geometric diagram with intersecting lines and circular shapes, no text or symbols presentCamera Settings
Formatting an SD Memory Card
Formatting deletes all the data on the SD Memory Card. Be sure to use this camera to format (initialize) an SD Memory Card that is unused or has been used on other cameras or digital devices.  - Do not remove the SD Memory Card during formatting as this may damage the card and render it unusable. - Formatting deletes protected images and any data recorded on the card with a computer or any camera. - SD Memory Cards formatted on a computer or device other than this camera cannot be used. Be sure to format the card with the camera. - The built-in memory cannot be formatted except when an error occurs.1 Press the MENU button in Q mode.
The [✗ Setting] menu appears. When you press the MENU button in ☐ mode, press the four-way controller (▶) once.2 Use the four-way controller (▲▼) to select [Format].
3 Press the four-way controller (▶).
The [Format] screen appears.4 Use the four-way controller (▲▼) to select [Format].
text_image
Format All data deleted Format Cancel OK OK5 Press the OK button.
Formatting starts. When formatting is completed, the camera returns to 🔒 mode or Q mode.Changing the Sound Settings
You can adjust the volume of operation sounds and change the type of sound. 1 Press the MENU button in ▶ mode. The [Setting] menu appears. When you press the MENU button in ☐ mode, press the four-way controller (▶) once. 2 Use the four-way controller (▲▼) to select [Sound]. 3 Press the four-way controller (▶). The [Sound] screen appears. text_image
Sound Operation Volume ←→ Playback Volume ←→ Start-up Sound 1 Shutter Sound 1 Operation Sound 1 Self-timer Sound 1 MENU →To Change the Operation Volume/Playback Volume
4 Use the four-way controller (▲▼) to select [Operation Volume]. 5 Use the four-way controller (◀▶) to adjust the volume. Set the volume to 0 to mute the start-up sound, shutter sound, operation sound, and self-timer sound. 6 Change [Playback Volume] in the same way as in Steps 4 and 5.To Change the Sound Type
4 Use the four-way controller (▲▼) to select [Start-up Sound]. 5 Press the four-way controller (▶). A pull-down menu appears. 6 Use the four-way controller (▲▼) to select the sound type. Choose from [1], [2], [3], [4] or [Off]. 7 Press the OK button. 8 Set [Shutter Sound], [Operation Sound] and [Self-timer Sound] in the same way as in Steps 4 to 7. 9 Press the MENU button twice. The camera returns to ☐ mode or ▶ mode.Changing the Date and Time
You can change the initial date and time settings (p.47). You can also set the format in which the date appears on the camera. 1 Press the MENU button in ▶ mode. The [Setting] menu appears. When you press the MENU button in ☐ mode, press the four-way controller (▶) once. 2 Use the four-way controller (▲▼) to select [Date Adjustment]. 3 Press the four-way controller (▶). The [Date Adjustment] screen appears. 4 Press the four-way controller (▶). The frame moves to [mm/dd/yy]. Depending on the initial setting or previous setting, [dd/mm/yy] or [yy/mm/dd] may be displayed. 5 Use the four-way controller (▲▼) to choose the date and time display style. Choose from [mm/dd/yy], [dd/mm/yy] or [yy/mm/dd]. text_image
Date Adjustment Date Format mm/dd/yy 24h Date 01/01/2010 Time 00:00 Settings complete MENU Cancel6 Press the four-way controller (▶).
The frame moves to [24h].7 Use the four-way controller (▲▼) to select [24h] (24-hour display) or [12h] (12-hour display).
text_image
Date Adjustment Date Format mm/dd/yy 24h Date 01/01/2010 Time 00:00 Settings complete MENU Cancel8 Press the four-way controller (▶).
The frame returns to [Date Format].9 Press the four-way controller (▼).
The frame moves to [Date]. text_image
Date Adjustment Date Format mm/dd/yy 24h Date 01/01/2010 Time 00:00 Settings complete MENU Cancel10 Press the four-way controller (▶).
The frame moves to one of the following items depending on the date format set in Step 5. Month for [mm/dd/yy] Day for [dd/mm/yy] Year for [yy/mm/dd] The following operations and screens use [mm/dd/yy] as an example. The operations are the same even if another date format has been selected.11 Use the four-way controller (▲▼) to change the month.
text_image
Date Adjustment Date Format mm/dd/yy 24h Date 01/01/2010 Time 00:00 Settings complete MENU Cancel12 Press the four-way controller (▶).
The frame moves to the day field. Use the four-way controller (▲▼) to change the day. After changing the day, change the year in the same manner.13 Change the time in the same way as in Steps 8 to 12.
If you selected [12h] in Step 7, the setting switches between am and pm corresponding to the time.14 Press the four-way controller (▼) to select [Settings complete].
text_image
Date Adjustment Date Format mm/dd/yy 24h Date 01/01/2010 Time 00:00 Settings complete MENU Cancel OK OK15 Press the OK button.
The date and time settings are saved.  When you press the OK button in Step 15, the camera clock is reset to 00 seconds. To set the exact time, press the OK button when the time signal (on the TV, radio, etc.) reaches 00 seconds.Setting the World Time
The date and time selected in “Setting the Date and Time” (p.47) and “Changing the Date and Time” (p.196) serve as the ⚙️ (Hometown) date and time. By using the world time function, you can display the time in a city other than the Hometown (→ Destination). This is useful when taking pictures in a different time zone.To Set the Destination
1 Press the MENU button in ▶ mode.
The [Setting] menu appears. When you press the MENU button in ☐ mode, press the four-way controller (▶) once.  | 2 | Use the four-way controller ( ▲▼) to select [World Time]. |
| 3 | Press the four-way controller(▶).The [World Time] screen appears. |
| World Time | |
| Select Time | |
| DestinationNew York | DST114:25 |
| HometownNew York | DST114:25 |
| Destination 14:25 | |
| City | New York |
| DST | TimeDif. ±0:00 |
| MENU Cancel OK OK | |
To Display the Time of the Destination (Select Time)
1 Press the MENU button in ▶ mode.
The [Setting] menu appears. When you press the MENU button in ☐ mode, press the four-way controller (▶) once.2 Use the four-way controller (▲▼) to select [World Time].
3 Press the four-way controller (▶).
The [World Time] screen appears.4 Use the four-way controller (▲▼) to select [Select Time].
text_image
World Time Select Time Destination London 19:25 Hometown New York 14:25 MENU5 Press the four-way controller (▶).
A pull-down menu appears.6 Use the four-way controller (▲▼) to select ↗ or ⬇.
→Displays the time of the Destination city Displays the time of the Hometown city text_image
World Time Select Time Destination London 19:25 Hometown New York 14:25 MENU Cancel OK OK7 Press the OK button.
The setting is saved. 8 Press the MENU button twice.
The camera returns to ☐ mode or ▶ mode. When → (Destination) is selected in Step 6, the → icon appears on the display to indicate that the destination date and time are displayed in mode. natural_image
Black-and-white beach scene with palm trees, a distant island, and a camera icon (no readable text or symbols)Setting the Text Size on the Menu
You can set the text size of the item selected with the cursor on the menu to [Standard] (normal display) or [Large] (magnified display).1 Press the MENU button in ▶ mode.
The [Setting] menu appears. When you press the MENU button in ☐ mode, press the four-way controller (▶) once.2 Use the four-way controller (▲▼) to select [Text Size].
3 Press the four-way controller (▶).
A pull-down menu appears.4 Use the four-way controller (▲▼◀▶) to select the text size.
Select from [Standard] or [Large]. text_image
Setting 1/3 Sound Date Adjustment 01/01/2010 World Time Text Size Standard Language/言語 Large Folder Name Date MENU Cancel OK OK5 Press the OK button.
The setting is saved.Changing the Display Language
You can change the language in which the menus, error messages, etc. are displayed. The camera supports the following 20 languages: English, French, German, Spanish, Portuguese, Italian, Dutch, Japanese, Danish, Swedish, Finnish, Polish, Czech, Hungarian, Turkish, Greek, Russian, Thai, Korean and Chinese (traditional and simplified). 1 Press the MENU button in ▶ mode. The [Setting] menu appears. When you press the MENU button in ☐ mode, press the four-way controller (▶) once. 2 Use the four-way controller (▲▼) to select [Language/言語]. 3 Press the four-way controller (▶). The [Language/ screen appears. 4 Use the four-way controller (▲▼◀▶) to select the language. text_image
Language/言語 English 日本語 Türkçe Français Dansk Ελληνικά Deutsch Svenska Русский Español Suomi İne Português Polski 한국어 Italiano Čeština 中文繁體 Nederlands Magyar 中文简体 MENU Cancel OKChanging the Naming System of the Folder
You can change the naming system of the folder for storing images. When the naming system is set to the date, pictures are saved in separate folders by the date they were taken.| PENTX xxxPENTX (where xxx is the 3-digit folder number) | |
| Date | xxx_mmdd (3-digit folder number_month day)* xxx_ddmm (3-digit folder number_day month) when the [Date Format] is set to [dd/mm/yy] |
flowchart
graph TD
    A["DCIM"] --> B["100 Pentx"]
    B --> C["Computer"]
flowchart
graph TD
    A["DCIM"] --> B["100PENTX"]
    A --> C["101"]
    C --> D["101_0925"]
flowchart
graph TD
    A["DCIM"] --> B["100"]
    A --> C["101"]
    A --> D["102"]
    B --> E["100PENTX"]
    C --> F["101_0925"]
    D --> G["102_1001"]
1 Press the MENU button in ▶ mode.
The [Setting] menu appears. When you press the MENU button in ☐ mode, press the four-way controller (▶) once.2 Use the four-way controller (▲▼) to select [Folder Name].
3 Press the four-way controller (▶).
A pull-down menu appears. 4 Use the four-way controller (▲▼) to select [PENTX] or [Date]. text_image
Setting 1/3 Sound Date Adjustment 01/01/2010 World Time Text Size Standard Language/言語 PENTX Folder Name Date MENU Cancel OK OKChanging the Video Output Format
When you connect the camera to AV equipment, choose the appropriate video output format (NTSC or PAL) for taking and playing back images. 1 Press the 3 button in ▶ mode. The [Setting] menu appears. When you press the 3 button in ☐ mode, press the four-way controller (▶) once. 2 Use the four-way controller (▲▼) to select [Video Out]. 3 Press the four-way controller (▶). A pull-down menu appears. 4 Use the four-way controller (▲▼) to select a video output format. Choose the video output format to match the input format of the AV equipment. text_image
Setting 2/3 USB Connection MSC Video Out NTSC Eye-Fi PAL Brightness Level Power Saving 5sec. Auto Power Off 3min. MENU Cancel OK OKSetting the Eye-Fi Communication
You can automatically transfer images or movies to a computer or similar devices via wireless LAN using a commercially available Eye-Fi card. For details on transferring images, refer to "Transferring Images Using an Eye-Fi Card" (p.237). The default setting is □ (Off).1 Press the MENU button in ▶ mode.
The [Setting] menu appears. When you press the MENU button in ☐ mode, press the four-way controller (▶) once.2 Use the four-way controller (▲▼) to select [Eye-Fi].
3 Use the four-way controller (▲▼◀▶) to select √ or □.
√ Turns on communication using an Eye-Fi card □ Turns off communication using an Eye-Fi card text_image
Setting 2/3 USB Connection MSC Video Out NTSC Eye-Fi Brightness Level Power Saving 5sec. Auto Power Off 3min. MENU Cancel OK OK4 Press the OK button.
The setting is saved.  - To establish an Eye-Fi communication, you first have to specify a wireless LAN access point and transfer destination on the Eye-Fi card. For details on how to set up the card, refer to the operating manual supplied with the Eye-Fi card. - The Eye-Fi setting returns to the default setting when the camera is turned off.       Adjusting the Brightness of the Display
You can adjust the brightness of the display.1 Press the MENU button in ▶ mode.
The [Setting] menu appears. When you press the MENU button in ☐ mode, press the four-way controller (▶) once.2 Use the four-way controller (▲▼) to select [Brightness Level].
3 Use the four-way controller (◀▶) to adjust the brightness.
 text_image
Setting 2/3 USB Connection MSC Video Out NTSC Eye-Fi □ Brightness Level ←→ Power Saving 5sec. Auto Power Off 3min. MENU Cancel4 Press the MENU button.
The camera returns to 📄 mode or ▶ mode. The display appears with the set brightness.Using the Power Saving Function
You can save battery power by setting the display to dim automatically when no operation is performed for a fixed time. After the power saving function has been activated, the display returns to the ordinary brightness if any button is pressed.1 Press the MENU button in ▶ mode.
The [Setting] menu appears. When you press the MENU button in ☐ mode, press the four-way controller (▶) once.2 Use the four-way controller (▲▼) to select [Power Saving].
3 Press the four-way controller (▶).
A pull-down menu appears.4 Use the four-way controller (▲▼) to select the time until the camera enters power saving mode.
Choose from [2min.], [1min.], [30sec.], [15sec.], [5sec.] or [Off]. text_image
Setting 2/3 USB Connection 2min. Video Out 1min. Eye-Fi 30sec. Brightness Level 15sec. Power Saving 5sec. Auto Power Off Off MENU Cancel OK OK5 Press the OK button.
The setting is saved.  \- Power Saving does not function in the following situations: \- While taking pictures in ☐ (Continuous Shooting) mode \- In the playback mode \- While recording a movie \- While the camera is connected to a computer \- When using the AC adapter \- While a menu is being displayed \- When no operation is performed after the camera is turned on, Power Saving is activated only after 15 seconds elapse even if [5sec.] is set.Setting Auto Power Off
You can set the camera to turn off automatically when no operation is performed for a fixed time.1 Press the MENU button in ▶ mode.
The [W Setting] menu appears. When you press the MENU button in ☐ mode, press the four-way controller (▶) once.2 Use the four-way controller (▲▼) to select [Auto Power Off].
3 Press the four-way controller (▶).
A pull-down menu appears.4 Use the four-way controller (▲▼) to select the time until the camera turns off automatically.
Choose from [5min.], [3min.] or [Off]. text_image
Setting 2/3 USB Connection MSC Video Out NTSC Eye-Fi □ Brightness Level 5min. Power Saving 3min. Auto Power Off Off MENU Cancel OK OK5 Press the OK button.
The setting is saved.  - Auto Power Off does not function in the following situations: - While recording sound in Voice Recording mode - While taking pictures in ☐ (Continuous Shooting) mode - While recording a movie - During a slideshow or movie/sound playback - While the camera is connected to a computer - While images are being transferred in Eye-Fi communication.Registering the Subscreen Image (Subscreen Input)
You can choose the subscreen image displayed on the upper-left corner of the display. - One of the 3 pre-installed screens - One of your own images (compatible images only)1 In ▶ mode, press the four-way controller (▼).
The Playback Mode Palette appears.2 Use the four-way controller
(▲▼◀▶) to select (Subscreen Input). text_image
Subscreen Input 1/2 Set to display the selected image on shooting screen MENU Cancel OK OK3 Press the OK button.
The image selection screen appears. 4 Use the four-way controller (◀▶) to choose the image for the subscreen.
Only images suitable for the subscreen are displayed. You can also choose one of the 3 pre-installed screens already stored in the camera. natural_image
Black-and-white beach scene with palm trees and distant buildings under a cloudy sky (no readable text or symbols)5 Press the OK button.
The subscreen image is set.  \- Once the subscreen image has been set, it will not be deleted even if the original image is deleted or the SD Memory Card is formatted.Changing the Start-up Screen
You can choose the start-up screen displayed when the camera is turned on. You can choose any of the following images as the start-up screen: - The Guide Display Start-up Screen showing a guide to the shooting modes and buttons - One of the 3 pre-installed screens - One of your own images (compatible images only)1 In ▶ mode, press the four-way controller (▼).
The Playback Mode Palette appears.2 Use the four-way controller (▲▼◀▶) to select ⓄITO (Start-up Screen).
text_image
Start-up Screen 2/2 For setting a captured image as the Start-up Screen MENU Cancel OK OK3 Press the OK button.
The image selection screen appears.4 Use the four-way controller (◀▶) to choose the image for the start-up screen.
Only images suitable for the start-up screen are displayed. You can also choose one of the 3 pre-installed screens or the Guide Display Start-up Screen already stored in the camera. natural_image
Black-and-white beach scene with palm trees and distant buildings under a cloudy sky (no readable text or symbols)5 Press the OK button.
The start-up screen is set.  - Once the start-up screen has been set, it will not be deleted even if the original image is deleted or the SD Memory Card is formatted. - Select [Off] to hide the start-up screen. - The start-up screen is not displayed when the camera starts up in the playback mode.Correcting Defective Pixels in the CCD Sensor (Pixel Mapping)
Pixel Mapping is a function for mapping out and correcting defective pixels in the CCD sensor. Run the Pixel Mapping function if image dots always seem to be defective in the same place.1 Press the MENU button in ☐ mode, and press the four-way controller (▶).
The [Setting] menu appears. [Pixel Mapping] cannot be selected when the MENU button is pressed in ▶ mode.2 Use the four-way controller (▲▼) to select [Pixel Mapping].
3 Press the four-way controller (▶).
The [Pixel Mapping] screen appears. text_image
Setting 3/3 Reset Delete All Pixel Mapping Format MENU Exit4 Use the four-way controller (▲▼) to select [Pixel Mapping].
text_image
Pixel Mapping Checks the image sensor and corrects defective pixels Pixel Mapping Cancel5 Press the OK button.
Defective pixels are mapped and corrected.  When the battery level is low, [Not enough battery power remaining to activate Pixel Mapping] is displayed on the monitor. Use the AC adapter kit K-AC92 (optional) or load a charged battery.Resetting to Default Settings (Reset)
You can reset the camera settings to their defaults. Refer to "Default Settings" (p.246) for the reset settings.1 Press the MENU button in ▶ mode.
The [◀ Setting] menu appears. When you press the MENU button in ☐ mode, press the four-way controller (▶) once.2 Use the four-way controller (▲▼) to select [Reset].
3 Press the four-way controller (▶).
The [Reset] screen appears.4 Use the four-way controller (▲▼) to select [Reset].
text_image
Reset Returns to default settings Reset Cancel OK OK5 Press the OK button.
The settings return to the defaults.  The following settings are not affected by resetting: - Date Adjustment - World Time - Language/ 言語 - Video Out8Connecting to a Computer
Setting Up Your Computer 214 Connecting to a Windows PC ...... 221 Connecting to a Macintosh 231 Transferring Images Using an Eye-Fi Card 237   natural_image
Pure geometric lines and shapes without any text, numbers, or symbolsnatural_image
Pure geometric lines and shapes without any text, numbers, or symbolsSetting Up Your Computer
By installing the software included on the provided CD-ROM on your computer and connecting the camera to your computer with the USB cable, you can transfer images and movies captured with your camera to the computer and then display and manage them. This section explains how to install the provided software and the other necessary preparations for enjoying the captured pictures and movies on your computer.Provided Software
The following software is included in the provided CD-ROM (S-SW102). \- Image viewing/managing/editing software “MedialImpression 2.0 for PENTAX” (12 languages: English, French, German, Spanish, Portuguese, Italian, Dutch, Swedish, Russian, Chinese [traditional and simplified], Korean, and Japanese)  It is recommended to use the optional AC adapter kit K-AC92 when the camera is connected to a computer (p.35). If the battery runs out of power while images are being transmitted to a computer, the data may be lost or damaged.System Requirements
The following system requirements must be met for you to fully enjoy the images and movies captured with the camera on your computer. Windows| OS Windows XP SP2 | Windows Vista or Windows 7• The OS must be preinstalled and updated to the latest version. |
| CPU Pentium IV 1.6 | GHz or equivalent AMD Athlon (Intel Core 2Duo 2.0 GHz or equivalent AMD Athlon X2 processor recommended) |
| Memory 512 MB mini | mum (1 GB or more recommended) |
| Hard Disk Space 300 | MB minimum |
| Monitor 1024 × 768 p | xels, 16-bit color monitor or higher |
| Others CD-ROM drive | USB port as standard equipment |
| OS Mac OS X (Ver.10.3.9, 10.4, 10.5, 10.6)• The OS must be preinstalled and updated to the latest version. |
| CPU Power Macintosh 233 MHz processor or higher (Intel Core Duo processor recommended) |
| Memory 512 MB minimum (1 GB or more recommended) |
| Hard Disk Space 300 MB minimum (1 GB or more recommended) |
| Monitor 1024 × 768 pixels, 16-bit color monitor or higher |
| Others CD-ROM driveUSB port as standard equipment |
Installing the Software
Windows
Install the image viewing/managing/editing software (MediaImpression 2.0 for PENTAX).  - Make sure your Windows PC meets the system requirements before installing the software. - When multiple accounts have been set up, log on with an account that has administrative rights before installing the software.1 Turn your Windows PC on.
2 Insert the CD-ROM (S-SW102) into the CD-ROM drive.
The "MedialImpression 2.0 for PENTAX" installer screen appears.If you are using Windows Vista
When the [AutoPlay] screen appears, display the language selection screen following the steps below. 1) Click [Run setup.exe]. 2) Click [Allow].If the installer screen does not appear
Display the installer screen following the steps below. 1) Double-click [My Computer] on the desktop. 2) Double-click the [CD-ROM drive (S-SW102)] icon. 3) Double-click the [Setup.exe] icon.3 Click [ArcSoft].
The "Choose Setup Language" screen appears. text_image
PENTAX® Software Installer ArcSoft® MediaImpression 2.0 for PENTAX Product Registration4 Choose a language, and click [OK].
The setup screen appears. Follow the on-screen guidance to install the software. text_image
Choose Setup Language Select the language for this installation from the choices below. English OK Cancel5 Click [Finish].
"MedialImpression 2.0 for PENTAX" installation is complete. text_image
MediaImpression 2.0 for FENTAX ArcSoft InstallShield Wizard Complete Setup has installed mediaimpression 2.0 to FENTAX on your computer. Please be next to install the system before naming the software to the list line. Finish6 Click [Exit] on the installation screen.
The window closes.Macintosh
Install the image viewing/managing/editing software (MediaImpression 2.0 for PENTAX). 1 Turn your Macintosh on. 2 Insert the CD-ROM (S-SW102) into the CD-ROM drive. 3 Double-click the CD-ROM (S-SW102) icon. 4 Double-click the [Pentax Software Installer] icon. The "MedialImpression 2.0 for PENTAX" installer screen appears.       5 Click [ArcSoft].
The setting screen appears. Follow the on-screen guidance to install the software. text_image
PENTAX® Software Installer ArcSoft® MediaImpression 2.0 for PENTAX Product Registration6 Click [Close].
"MedialImpression 2.0 for PENTAX" installation is complete. text_image
Installation completed successfully Install Succeeded The software was successfully installed.7 Click [Exit] on the installation screen.
The window closes.Product Registration on the Internet
In order to better serve you, we request that you complete the product registration. If your computer is connected to the Internet, please click [Product Registration] on the setup screen after the language selection screen is displayed. The world map screen shown on the right for Internet Product Registration is displayed. Click the displayed country or region and then follow the instructions to register your product. Only customers in countries and regions displayed on the software installation screen can register their products on the Internet Product Registration. text_image
PENTAX Software Installer Canada U.S.A. Europe Japan Australia See: Only the modifications of Japanese countries, and might not replace their architecture on the Internet Product Recommendation.Setting the USB Connection Mode
Set the device to which the camera is connected with the USB cable.  Make sure to set the USB connection mode before connecting your camera to the computer. You cannot perform the following setting if the camera is already connected to your computer with the USB cable. 1 Turn your camera on. 2 Press the MENU button in ▶ mode. The [Setting] menu appears. When you press the MENU button in ☐ mode, press the four-way controller (▶) once. 3 Use the four-way controller (▲▼) to select [USB Connection]. 4 Press the four-way controller (▶). A pull-down menu appears. 5 Use the four-way controller (▲▼) to select [MSC]. text_image
Setting 2/3 USB Connection MSC Video Out PTP Eye-Fi Brightness Level Power Saving 5sec. Auto Power Off 3min. MENU Cancel OK OKMSC and PTP
MSC (Mass Storage Class)
A general-purpose driver program that handles devices connected to the computer via USB as a memory device. Also indicates a standard for controlling USB devices with this driver. By simply connecting a device that supports USB Mass Storage Class, you can copy, read, and write files from a computer without installing a dedicated driver.PTP (Picture Transfer Protocol)
A protocol that allows transfer of digital images and control of digital cameras via USB, standardized as ISO 15740. You can transfer image data between devices that support PTP without installing a device driver. Unless otherwise specified, select MSC when connecting the Optio I-10 to your computer.Connecting to a Windows PC
Connecting the Camera and Your Windows PC
Connect your camera to the Windows PC using the provided USB cable (I-USB7). 1 Turn your Windows PC on. 2 Turn your camera off. 3 Connect your camera to the Windows PC using the USB cable. Connect the terminal of the USB cable with arrow mark facing the front side of the camera. natural_image
Diagram showing a camera connected to a device via cable, with no visible text or symbolsTransferring Images
Transfer the images captured with the camera to your Windows PC.  If there is no SD Memory Card in the camera, the images stored in the built-in memory will be transferred to your Windows PC.5 Click [Import media files to local disk].
The "MedialImpression 2.0 for PENTAX" starts. text_image
Removable Disk (F:) Always do this for pictures Pictures options Import pictures using Windows View pictures using Windows View pictures using Windows Media Center Import media files to local disk using Media/Impression 2.0 for PENTAX For new options Open folder to view files using Windows Explorer Speedup my system using Windows ReadyStreet Set AutoPlay defaults in Control Panel6 Set up [Destination Folder] and select [Subfolder Name].
text_image
Microsoft Office File Edit View Insert Help Share this image is available to the Web http://www.wasim.com/10.0000000000000000000000000000000000000000000000000000000000000000000000000000000000000000000000000000 Share this image is available to the Web http://www.wasim.com/10.000000000000000000 Share this image is available to the Web http://www.wasim.com/10.00000000000000000 Share this image is available to the Web http://www.wasim.com/10.0000000000000000 Share this image is available to the Web http://www.wasim.com/10.0000000 Share this image is available to the Web http://www.wasim.com/10.0000 Share this image is available to the Web http://www.wasim.com/1 Share this image is available to the Web http://www.wasim.com/1 Share this image is available to the Web http://www.wasim.com/1 Share this image is available to the Web http://www.wasim.com/1 Share this image is available to the Web http://www.wasim.com/1 Share this image is available to the Web http://www.wasim.com/1 Share this image includes an icon for a cat (e.g., cat, cat) and a bird (e.g., bird, bird). All images are shown in a grid format with labels indicating the image type and color.7 Select the image you want to copy, then click [Import].
The selected images are copied to the PC. text_image
AutoCAD 3.0 by 2019 File Edit View Insert Help Add: 100% Add: 100% Add: 100% Add: 100% Add: 100% Add: 100% Add: 100% Add: 100% Add: 100% Add: 100% Add: 100% Add: 100% Add: 100% Add: 100% Add: 100% Add: Add Add Add Add Add Add Add Add Add Add Add Add Add Add Add Add Add Add Add Add Add Add Add Add Add Add Add Add Add Add Add Add Add Add Add Add Add Add Add Add Add Add Add Add Add Add Add Add Add Add Add8 Click [Done].
text_image
Revised Image 10.0 (RGB) Export Name: 123456788 Image_caption: Image_caption: Image_caption: Image_caption: Image_caption: Image_caption: Image_caption: Image_caption: Image_caption: Image_caption: Image_caption: Image_caption: Image_caption: Image_caption: Image_caption: Image_caption: Image_caption: Image_caption: Image_caption: Image_caption: Image_caption: Image_caption: Image_caption: Image_caption: Image_caption: Image_caption: Revised Image 10.0 (RGB) Export Name: 123456788 Image_caption: Image_caption: Image_caption: Image_caption: Image_caption: Image_caption: Image_caption: Image_caption: Image_caption: Revised Image 10.0 (RGB) Export Name: 123456788 Image_caption: Image_caption: Image_caption: Image_caption: Image_caption: Image_caption: Revised Image 10.0 (RGB) Export Name: 123456788 Image_caption: Image_caption: Image_caption: Image_caption: Image_caption: Revised Image 10.0 (RGB) Export Name: 123456788 Image_caption: Image_caption: Image_caption: Image_caption: Image_caption: Revised Image 10.0 (RGB) Export Name: 123456788 Image_caption: Image_caption: Image_caption: Image_caption: Image_caption: Revised Image10.0 (RGB) Export Name: 123456788 Image_caption: Image_caption: Image_caption: Image_caption: Revised Image10.0 (RGB) Export Name: 123456788 Image_caption: Image_caption: Revised Image10.0 (RGB) Export Name: 123456788 Image_caption: Revised Image10.0 (RGB) Export Name: 123456788 Image_caption: Revised Image10.0 (RGB) Export Name: 123456788 Image_caption: Revised Image10.0 (RGB) Export Name: 123456788 Image_caption: Revised Image10.0 (GB) Export Name: 123456788 123456788 123456788 123456788 123456788 123456788 123456788 123456788 123456788 123456788 123456788 Revised Image 10.0 (RGB) Export Name: 123456788 123456788 123456788 123456788 123456788 123456788 123456788 123456788 123456788 1234When the "AutoPlay" Screen Does Not Appear
5 Double-click the [MedialImpression 2.0 for PENTAX] icon on the desktop.  6 Click [Import]. text_image
Screenshot of a software interface showing image editing options with a preview pane and file listtext_image
Multi-Image 1200 (RGB) Add Cancel8 Set up [Destination Folder] and select [Subfolder Name].
text_image
Add to Add to Add to Add to Add to Add to Add to Add to Add to Add to Add to Add to Add to Add to Add to Add to Add to Add to Add to Add to Add to Add to Add to Add to Add to Add to Add to Add to Add to Add to Add to Add to Add to Add to Edit... Add to Add to Add to Add to Add to Add to Add to Add to Add to Add to Add to Add to Add to Add to Add to Add to Add to Add to Add to Add to Add to Add to Add to Add to Add to Add to Add to Add to Add to Add to Add to Add to Add to Add to Add to Add to Add to Add to Add to Add to Add to Add to Add to Add to Add to Add to Add to Add to Add to Add to Add to Add to Add to Add to Add to Add to Add to Add to Add to Add to Add to Add to Add to Add to Add to Add to Addto9 Select the image you want to copy, then click [Import].
The selected images are copied to the PC. text_image
Screenshot of a software interface showing a grid of 3D dog images with Chinese labels, likely for image processing or categorization.10 Clice [Done].
text_image
AI models AIA AI models AI models AI models AI models AI models AI models AI models AI models AI models AI models AI models AI models AI models AI models AI models AI models AI models AI models AI models AI models AI models AI models AI models AI models AI models AI models AI models AI models AI models AI models AI models AI models AI models AI modelsDisconnecting the Camera from Your Windows PC
1 Double-click the [Safely Remove Hardware] icon in the task bar.
text_image
Safely Remove Hardware 3:54 PM2 Select [USB Mass Storage Device] and click [Stop].
The "Stop a Hardware device" screen appears. text_image
Safety Remove Hardware Select the device you want to unplug or eject. and then click. Stop. When Windows notify you that it is safe to do as unplug the device from your computer. USB Mass Storage Device USB Mass Storage Device at: Post_#0005.Hub_#0004 Properties Stop Display device components Close3 Select [USB Mass Storage Device] and click [OK].
A message appears indicating that the hardware can be safely removed. text_image
Stop a Hardware device Confirm devices to be stopped. Choose OK to continue. Windows will attempt to stop the following devices. After the devices are stopped they may be removed safely. USB Mass Storage Device www.voultre (1)4 Click [OK], then click [Close].
text_image
Safe To Remove Hardware This device can now be safely removed from the computer. OKtext_image
Safety Remove Hardware Select the device you want to unplug or reject, and then click. Stop. When Windows notifies you that it is safe to do so unplug the device from your computer. Hardware devices Properties Stop Display device components Close5 Disconnect the USB cable from your Windows PC and the camera.
      - If the camera (removable disk) is being used by an application such as "MedialImpression 2.0 for PENTAX", the camera cannot be disconnected until the application is closed. - The camera will automatically switch to the playback mode when the USB cable is disconnected from your Windows PC or the camera. "MedialImpression 2.0 for PENTAX" lets you view, edit, manage, search for, share, and print images.1 Double-click the [MedialImpression 2.0 for PENTAX] icon on the desktop.
"MedialImpression 2.0 for PENTAX" starts and the main window appears. Media Window Interface
text_image
MediaImpression 2.0 for PENTAX File Edit For ALAYAT Welcome to MediaImpression 2.0 for PENTAX. Choose a media type or action from the editor below. Service & Support A B Pick this button to import media file from a media icon or storage device. Import Easy Pro Easy Print Make Slideshare Make Mouse NCT Upload to YouTube Easy Archive Photo Effects Stop this page when you launch the programA Media browser tool
You can view images, movies, or play back audio files.B Edit/Managing tool
You can edit or manage images. For example, you can import, edit or print images.       Media Browser Interface
text_image
MediaImpression 2.0 for PENTAX Show Pictures Only Folders A B PC_01X1.JPG PC_01X2.JPG PC_01X3.JPG PC_01X4.JPG PC_01X5.JPG PC_01X6.JPG PC_01X7.JPG PC_01X8.JPG PC_01X9.JPG PC_01X10.JPG PC_01X11.JPG PC_01X12.JPG PC_01X13.JPG PC_01X14.JPG C Select All 2.5MB 1 Pack(s) selected / 13 Pack(s) Import Photo Window Creating Window Editing Movie Preview Skew Upgrade Easy ArchiveA Folders pane
Displays the configuration of folders in your computer. When you browse a folder, the contents of the folder appear in the media thumbnail pane.B Media thumbnail pane
Displays the contents of the selected folder or the results of the most recent search (the file or folder that matches the search item).C Edit/Managing tool panel
This panel provides editing/managing functions, such as an importing, editing, printing.Viewing Images
1 Click [Pictures], [Videos], or [All Media] from the main window. text_image
Microsoft Word 文件(F) 编辑(E) 查看(V) 新建(N) 取消(C) 保存(S) 保存(S) 保存(S) 保存(S) 保存(S) 类型(T): Normal 大小(S): 100 高度(H): 5 像素 (100%) 宽度(W): 2 像素 (100%) 缩放(S): 0 像素 (100%) 重设(R): 1 像素 (100%) 复制(R)... 粘贴(P)... Ctrl+Alt+Alt+Alt+Alt+Alt+Alt+Alt+Alt+Alt+Alt+Alt+Alt+Alt+Alt+Alt+Alt+Alt+Alt+Alt+Alt+Alt+Alt+Alt+Alt+Alt+Alt+Alt+Alt+Alt+Alt+Alt+Alt+Alt+Alt+Alt+Alt+Alt+Alt+Alt+Alt+Alt+Alt+ Alt+F 确定 取消 取消 应用(A) 帮助(H) 新建(N) 保存(S) 导出(E) 剪切(T) 复制(C) 粘贴(P) Ctrl+Alt+Alt+Alt+Alt+Alt+Alt+Alt+Alt+Alt+Alt+Alt+Alt+Alt+Alt+Alt+Alt+Alt+Alt+Alt+Alt+Alt+Alt+Alt+Alt+Alt+Alt+Alt+Alt+ Alt+F 确定 取消 取消 应用(A) 帮助(H) 新建(N) 保存(S) 导出(E) 剪切(T) 复制(C) 粘贴(P) Ctrl+Alt+Alt-Alt+Alt+Alt+Alt+Alt+Alt+Alt+Alt+Alt+Alt+Alt+Alt+Alt+Alt+Alt+Alt+Alt+ Alt+F 确定 取消 取消 应用(A) 帮助(H) 新建(N) 保存(S) 导出(E) 剪切(T) 复制(C) 粘贴(P) Ctrl+Alt+Alt-Alt+Alt+Alt+Alt+Alt+Alt+Alt+Alt+Alt+Alt+Alt+ Alt+F 确定 取消 取消 应用(A) 帮助(H) 新建(N) 保存(S) 导出(E) 剪切(T) 复制(C) 粘贴(P) Ctrl+Alt+Alt-Alt-Alt+Alt+Alt+Alt+Alt+Alt+Alt+Alt+ Alt+F 确定 取消 取消 应用(A) 帮助(H) 新建(N) 保存(S) 导出(E) 剪切(T) 复制(C) 粘贴(P) Ctrl+Alt+Alt-Alt-Alt+Alt+Alt+ Alt+F 确定 取消 取消 应用(A) 帮助(H) 新建(N) 保存(S) 导出(E) 剪切(T) 复制(C) 粘贴(P) Ctrl+Alt+Alt-Alt-Alt+Alt- Alt+F 确定 取消 取消 应用(A) 帮助(H) 新建(N) 保存(S) 导出(E) 剪切(T) 复制(C) 粘贴(P) Ctrl+Alt+Alt-Alt-Alt- Alt+ Alt+ Alt+ Alt + Alt + Alt + Alt + Alt + Alt + Alt + Alt + Alt + Alt + Alt + Alt + Alt + Alt + Alt + Alt + Alt + Alt + Alt + Alt + Alt + Alt + Alt + Alt + Alt + Alt + Alt + Alt + Alt + Alt + Alt + Alt + Alt + Alt + Alt + Alt + Alt + Alt + Alt + Alt + Alt + Alt + Alt + Alt + Alt + Alt + Alt + Alt + Alt + Alt + Alttext_image
File Edit View Share view 100% (RGB) Share view 100% (RGB) Share view 100% (RGB) Share view 100% (RGB) Share view 100% (RGB) Share view 100% (RGB) Share view 100% (RGB) Share view 100% (RGB) Share view 100% (RGB) Share view 100% (RGB) Share view 100% (RGB)natural_image
Black-and-white photo of a tabby kitten resting on a surface (no text or symbols visible)Photo Viewer
The image is displayed on the "Photo Viewer" screen if you double-click the image file directly without starting MediaImpression 2.0 for PENTAX. With the viewer, you can enlarge/reduce the display size of the image or edit it and so on. You can also play back movies or sound files. natural_image
Black-and-white photo of a tabby kitten resting on a rock (no text or symbols visible)Details on How to Use “MedialImpression 2.0 for PENTAX”
You can find more information on how to use "MediaImpression 2.0 for PENTAX" by using the help pages.1 Click [Help] from [Extras] on the menu bar.
The help screen appears.2 Click the desired topic.
An explanation is displayed. text_image
MedialImpression® Local PERINATAL Rehabilitation for Multiple Symptoms ■ Very severe ■ Multiple Impairities ■ Abnormal ■ Abnormal Delivery ■ Abnormal ■ Abnormal Delivery ■ Abnormal ■ Abnormal Delivery ■ Abnormal ■ Abnormal Delivery ■ Abnormal ■ Abnormal Delivery ■ Abnormal ■ Abnormal Delivery ■ Abnormal ■ Abnormal Delivery ■ Abnormal ■ Abnormal Delivery ■ Abnormal ■ Abnormal Delivery ■ Abnormal ■ Abnormal Delivery ■ Abnormal ■ Abnormal Delivery ■ Abnormal ■ Abnormal Delivery ■ Symptom ■ Abnormal ■ Abnormal Delivery ■ Abnormal ■ Abnormal Delivery ■ Abnormal ■ Abnormal Delivery ■ Abnormal ■ Abnormal Delivery ■ Abnormal ■ Abnormal Delivery ■ Abnormal ■ Abnormal Delivery ■ Abnormal ■ Abnormal Delivery ■ Abnormal ■ Abnormal Delivery ■ Abnormal ■ Abnormal Delivery ■ Abnormal ■ Abnormal Delivery ■ Abnormal ■ Abnormal DeliveryConnecting to a Macintosh
Connecting the Camera and Your Macintosh
Connect your camera to the Macintosh using the provided USB cable (I-USB7). 1 Turn your Macintosh on. 2 Turn your camera off. 3 Connect your camera to the Macintosh using the USB cable. Connect the terminal of the USB cable with arrow mark facing the front side of the camera. natural_image
Diagram showing a camera connected to a smartphone via cable, no text or symbols presentTransferring Images
Transfer the images captured with the camera to your Macintosh.  If there is no SD Memory Card in the camera, the images stored in the built-in memory will be transferred to your Macintosh. 5 Double-click the [MedialImpression] folder inside the [Applications] folder. 6 Double-click the [MedialImpression 2.0 for PENTAX] icon. "MedialImpression 2.0 for PENTAX" starts and the main browser window appears. 7 Set up [Destination Folder] and select [Subfolder Name]. text_image
Multi-Image 2.0 for MRSU Share Share Share Share Share Share Share Share Share Share Share Share Share Share Share Share Share Share Share Share Share Share Share Share Share Share Share Share Share Share Share Share Share Share Share Share Share Share Share Share Share Share Share Share Share Share Share Share Share Share Stacked to the Share of the Share of the Share of the Share of the Share of the Share of the Share of the Share of the Share of the Share of the Share of the Share of the Share of the Share of the Share of the Share of the Share of the Share of the Share of the Share of the Share of the Share of the Share of the Share of the Share of the Share of the Share of the Share of the Share of the Share of the Share of the Share of the Share of the Share of The Sharetext_image
Add和完善 1.0 for PC/PC Add和完善 1.0 for PC/PC Add和完善 1.0 for PC/PC Add和完善 1.0 for PC/PC Add和完善 1.0 for PC/PC Add和完善 1.0 for PC/PC Add和完善 1.0 for PC/PC Add和完善 1.0 for PC/PC Add和完善 1.0 for PC/PC Add和完善 1.0 for PC/PC Edit View... Add和完善 1.0 for PC/PC Add和完善 1.0 for PC/PC Add和完善 1.0 for PC/PC Add和完善 1.0 for PC/PC Add和完善 1.0 for PC/PC Add和完善 1.0 for PC/PC Add和完善 1.0 for PC/PC Add和完善 1.0 for PC/PC Add和完善 1.0 for PC/PC + Add和完善 1.0 for PC/PC + Add和完善 1.0 for PC/PC + Add和完善 1.0 for PC/PC + Add和完善 1.0 for PC/PC + Add和完善 1.0 for PC/PC + Add和完善 1.0 for PC/PC + Add和完善 1.0 for PC/PC + Add和完善 1.0 for PC/PC + Add和完善 1. + Add和完善 1. + Add和完善 1. + Add和完善 1. + Add和完善 1. + Add和完善 1. + Add和完善 1. + Add和完善 1. + Add和完善 1. + Add和完善 1. + Add和完善 1. + Add和完善 1. + Add和完善 1. + Add和完善 1. + Add和完善 1. + Add和完善 1. + Add和完善 1. + Add和完善 + Add和完善 1. + Add和完善 1. + Add和完善 1. + Add和完善 1. + Add和完善 1. + Add和完善 1. + Add和完善 1. + Add和完善 1. + Add和完善 1. + Add和完善 1. + Add和完善 1. + Add和完善 1. + Add和完善 1. + Add和完善 1. + Add和完善 1. + Add和完善 1. + Add完善 + Add完善 + Add完善 + Add完善 + Add完善 + Add完善 + Add完善 + Add完善 + Add完善 + Add完善 + Add完善 + Add完善 + Add完善 + Add完善 + Add完善 + Add完善 + Add完善 + Add完善 + Add完善 + Add完善 + Add完善 + Add完善 + Add完善 + Add完善 + Add完善 + Add完善text_image
Audiovisual 1.0 for PDF Add to Remove Add to Remove Add to Remove Add to Remove Add to Remove Add to Remove Add to Remove Add to Remove Add to Remove Add to Remove Add to Remove Add to Remove Add to Remove Add to Remove Add to Remove Add to Remove Add to Remove Add to Remove Add to Remove Add to Remove Add to Add to Add to Add to Add to Add to Add to Add to Add to Add to Add to Add to Add to Add to Add to Add to Add to Add to Add to Add to Add to Add to Add to Add to Add to Add to Add to Add to Add to Add to Add to Add to Add to Add toDisconnecting the Camera from Your Macintosh
1 Drag [NO\_NAME] on the desktop to the trash.
If the SD Memory Card has a volume label, drag the icon of that name to the trash.2 Disconnect the USB cable from your Macintosh and the camera.
 - If the camera (removable disk) is being used by an application such as "MediaImpression 2.0 for PENTAX", the camera cannot be disconnected until the application is closed. - The camera will automatically switch to the playback mode when the USB cable is disconnected from your Macintosh or the camera.Starting "MedialImpression 2.0 for PENTAX"
"MedialImpression 2.0 for PENTAX" lets you view, edit, manage, search for, share, and print images.1 Double-click the [MedialImpression] folder inside the [Applications] folder.
2 Double-click the [MedialImpression 2.0 for PENTAX] icon.
"MedialImpression 2.0 for PENTAX" starts and the main browser window appears.Media Window Interface
text_image
MediaImpression 2.0 for PENTAX Welcome to MediaImpression 2.0 for PENTAX. Choose a media type or action from the option below. A Pictures Video Music AI Media B Import Easy File Easy Print Make Refresh Help Move Easy Archive Photo Effects Skip the page when you launch the programA Media browser tool
You can view images, movies, or play back audio files.B Edit/Managing tool
You can edit or manage images. For example, you can import, edit or print images.Media Browser Interface
text_image
MediaImpression 2.0 for PENTAX Macromedia Browser Photo select media files and select an action. Show Pictures OBL Folders Desktop Mouse Image Mouse Image AutoCAD A B SELECT NAME: PENTAX/100% (100%) A#DIV05.JPG A#DIV07.JPG A#DIV08.JPG A#DIV09.JPG A#DIV10.JPG C Select All 22.0046 11.00(×) Import Photo Viewer Closing Preview Photo Editing Make Home Store Easy ArchiveA Folders pane
Displays the configuration of folders in your computer. When you browse a folder, the contents of the folder appear in the media thumbnail pane.B Media thumbnail pane
Displays the contents of the selected folder or the results of the most recent search (the file or folder that matches the search item).C Edit/Managing tool panel
This panel provides editing/managing functions, such as an importing, editing, printing.       Viewing Images
1 Click [Pictures], [Videos], or [All Media] from the main window. 2 Select and click the folder containing the image you want to view in the folder pane. Images are displayed in the media thumbnail pane. 3 Select and double-click the image you want to view in the media thumbnail pane. The selected image is displayed with the viewer. With the viewer, you can enlarge/ reduce the display size of the image or edit it and so on. You can also play back movies or sound files. natural_image
Black-and-white photo of a tabby kitten resting on a rock (no text or symbols visible)Details on How to Use “MedialImpression 2.0 for PENTAX”
You can find more information on how to use "MediaImpression 2.0 for PENTAX" by using the help pages. 1 Select [MedialImpression] from [Help] on the menu bar. The help screen appears. 2 Click the desired topic. An explanation is displayed.Transferring Images Using an Eye-Fi Card
You can automatically transfer images or movies to a computer or similar devices via wireless LAN using a memory card that is equipped with the wireless LAN (Eye-Fi card) function.1 Specify the wireless LAN access point and transfer destination on the Eye-Fi card.
For details on how to set up the card, refer to the operating manual supplied with the Eye-Fi card2 Turn the camera off.
3 Insert an Eye-Fi card that has been set up.
4 Turn the camera on.
5 Set [Eye-Fi] in the [◀ Setting] menu to ☑ (On).
The images are transferred automatically. For details on how to set up the camera, refer to "Setting the Eye-Fi Communication" (p.205). The following icons appear on the display.| Eye-Fi•» | During Eye-Fi communication. The camera is communicating or searching for the access point when [Eye-Fi] is set to ☑ (on). |
| Eye-Fi•• | Eye-Fi communication waiting. The camera is not communicating when [Eye-Fi] is set to ☑ (on). |
| Eye-FiⓆ | Eye-Fi communication prohibited. When [Eye-Fi] is set to □ (off). |
| Eye-Fi⚠ | Eye-Fi version error. The version of the Eye-Fi card is out of date. |
9Appendix
Functions Available for Each Shooting Mode 240 Messages 242 Troubleshooting 244 Default Settings 246 List of World Time Cities 251 Optional Accessories 252 Main Specifications 253 WARRANTY POLICY 258 Index 263   natural_image
Pure geometric lines and shapes without any text, numbers, or symbolsnatural_image
Pure geometric lines and shapes without any text, numbers, or symbolsFunctions Available for Each Shooting Mode
√: Can be set. ×: Cannot be set.| Function\Shooting Mode | AUTOPICT | P | # | # | # | # | # | # | |||||
| Zoom lever | Zoom operation | √*1 | √*1 | √*2 | √*1 | √*1 | √*1 | √*1 | √*2 | √*1 | |||
| button | Face Detection On | √ | √ | √ | √ | √ | √ | √ | √ | √ | |||
| Smile Capture | |||||||||||||
| Face Detection Off | ×√ | √ | √ | × | × | √ | √ | √ | |||||
| Flash Mode | A (Auto) | √ | √ | √ | ×√ | √ | ×√ | ||||||
| A (Flash Off) | √ | √ | √ | √ | √ | √ | √ | √ | *5√ | ||||
| A (Flash On) | √ | √ | ×√ | √ | √ | ×√ | |||||||
| A (Auto + Red-eye) | √ | √ | × | × | √ | √ | × | √ | |||||
| A (Flash On + Red-eye) | √ | √ | ×√ | √ | √ | ×√ | |||||||
| SOFT (Soft Flash) | √ | √ | ×√ | √ | √ | ×√ | |||||||
| Drive Mode | ☐ (Standard) | √ | √ | √ | √ | √ | √ | √ | √ | √ | |||
| ☑ (Self-timer) | √ | √ | √ | √ | √ | √ | √ | √ | √ | ||||
| ☑ (2 sec. Self-timer) | |||||||||||||
| ☐ (Continuous Shooting) | × | √ | × | × | √ | √ | × | √ | |||||
| ☐HS (Burst Shooting) | |||||||||||||
| ☐3s (3-sec Remote Control) | √ | √ | ×√ | √ | √ | √ | √ | ||||||
| ☐ (0-sec Remote Control) | |||||||||||||
| Focus Mode | AF (Standard) | √ | √ | √ | √ | √ | √ | √ | √ | √ | |||
| ☑ (Macro) | √ | √ | √ | √ | √ | √ | √ | √ | √ | ||||
| ☑ (Super Macro) | √ | √ | ×√ | √ | √ | √ | √ | ||||||
| PF (Pan Focus) | √ | √ | √ | √ | √ | √ | √ | √ | √ | ||||
| ▲ (Infinity) | √ | √ | ×√ | √ | √ | √ | √ | ||||||
| MF (Manual Focus) | √ | √ | ×√ | √ | √ | √ | √ | ||||||
| Rec. Mode] menu | Recorded Pixels | √*7 | √*7 | ×*8 | √*7 | √*7 | ×*9 | √*10 | √*7 | ||||
| White Balance | ×*15 | √ | ×*15 | √ | ×*15 | ×*15 | √ | ×*15 | |||||
| Focusing Area | ×*16 | √ | ×*16 | √ | √ | √ | √*17 | √ | |||||
| Focus Assist | √ | √ | ×*18 | √ | √ | √ | ×*19 | √ | |||||
| AE Metering | ×*20 | √ | ×*20 | √ | ×*20 | ×*20 | ×*20 | ×*20 | |||||
| Sensitivity | √ | √ | ×*21 | √ | √ | √ | ×*21 | √ | |||||
| EV Compensation | ×*23 | √ | ×*23 | √ | √ | √ | √ | √ | |||||
| D-Range Setting | × | √ | × | √ | √ | √ | √ | √ | |||||
| Shake Reduction | √ | √ | ×*18 | √ | √ | √ | √*10 | √ | |||||
| Blink Detection | √ | √ | ×*18 | √ | √ | √ | × | √ | |||||
| Sharpness | × | √ | ×*24 | √ | × | × | √ | × | |||||
| Saturation | |||||||||||||
| Contrast | |||||||||||||
| Date Imprint | √ | √ | ×*19 | √ | √ | √ | × | √ | |||||
| (▲) | WIDE | Shooting ModeFunction | Page | |||||
| √*3 | √*3 | √ | √*1 | √*4 | × | √*1 | Zoom operation Zoom lever p.76 | |
| √ | √ | √ | √ | √ | √ | √ | Face Detection On | button p.70Smil |
| √ | √ | √ | √ | √ | √ | √ | Face Detection Off | |
| √ | √ | ×√ | √ | √ | √ | A (Auto) | Flash Mode | |
| √ | √ | √ | *5√ | √ | √ | √ | (Flash Off) | |
| √ | √ | ×√ | √ | √ | √ | (Flash On) | ||
| √ | √ | ×√ | √ | √ | √ | (Auto + Red-eye) | ||
| √ | √ | ×√ | √ | √ | √ | (Flash On + Red-eye) | ||
| √ | √ | ×√ | √ | √ | √ | Soft (Soft Flash) | ||
| √ | √ | √ | √ | √ | √ | √ | (Standard) | Drive Mode |
| √ | √ | √ | √ | √ | √ | √ | (Self-timer) | |
| (2 sec. Self-timer) | ||||||||
| √ | √ | × | × | √× | × | (Continuous Shooting) | ||
| (Burst Shooting) | ||||||||
| √ | √ | √ | √ | √ | √ | √ | (3-sec Remote Control) | |
| (0-sec Remote Control) | ||||||||
| √ | √ | ×√ | √ | √ | √ | AF (Standard) | Focus Mode | |
| √ | √ | ×√ | √ | √ | √ | (Macro) | ||
| √ | √ | ×√ | √ | × | √ | (Super Macro) | ||
| √ | √ | ×√ | √ | √ | √ | PF (Pan Focus) | ||
| √ | √ | √ | *6√ | √ | √ | √ | (Infinity) | |
| √ | √ | ×√ | √ | √ | √ | MF (Manual Focus) | ||
| √*7 | ×*11 | √ | ×*9 | ×*12 | ×*13 | ×*14 | Recorded Pixels | p.106 |
| ×*15 | √ | ×*15 | √ | ×*15 | √ | √ | White Balance | |
| √ | √ | ×*16 | √*17 | √ | √ | √ | Focusing Area | |
| √ | √ | ×*19 | √ | √ | √ | √ | Focus Assist | |
| ×*20 | √ | ×*20 | √ | ×*20 | √ | √ | AE Metering | |
| √ | ×*21 | ×*22 | √ | √ | √ | √ | Sensitivity | |
| √ | √ | √ | √ | √ | √ | √ | EV Compensation | |
| √ | √ | √ | √ | √ | √ | √ | D-Range Setting | |
| √ | √ | √ | √ | √ | √ | √ | Shake Reduction | |
| ×√ | √ | √ | √ | × | × | Blink Detection | ||
| ×√ | ×√× | √ | √ | Sharpness | ||||
| Saturation | ||||||||
| Contrast | ||||||||
| √ | √ | √ | √ | √ | √ | √ | Date Imprint |
Messages
Messages such as the following may appear on the display during camera operation.| Message Description | |
| Battery depleted | The battery is exhausted. Charge the battery using the battery charger (p.31). |
| Memory card full | The SD Memory Card is full and no more images can be saved.Insert a new SD Memory Card or delete unwanted images (p.37, p.146).Change the number of recorded pixels or quality level of recorded images and try again (p.158). |
| Memory card error | Shooting and playback are impossible due to a problem with the SD Memory Card. You may be able to display or copy the images on the card using a computer. |
| The built-in memory is not formatted | The data within the built-in memory are damaged. Format the built-in memory. |
| Card is not formatted | The SD Memory Card you have inserted is unformatted or has been formatted on a computer or other device and is not compatible with this camera. Format the SD Memory Card in the camera (p.194). |
| Card is locked The SD Memory Card is write-protected (p.39). | |
| Compression error | This message occurs when the camera fails to compress an image. Change the number of recorded pixels of the image and try shooting or saving it again. |
| No image/sound There are no image/sound files on the SD Memory Card. | |
| Movie recording stopped | This message appears when the internal temperature of the camera has exceeded normal operating limits while recording a movie. |
| The camera will turn off to prevent damage from overheating | The camera turned off because it has overheated. Wait until it cools down and then turn it back on. |
| Deleting | This message appears while deleting an image or sound file. |
| Camera cannot play this image and sound | You are trying to play back an image or sound in a format not supported by this camera. You may be able to play it back on another brand of camera or on your computer. |
| Image folder cannot be created | The largest file number (9999) has been assigned to an image in the largest folder number (999) and no more images can be saved. Insert a new SD Memory Card or format the card (p.194). |
| Message Description | |
| Protected | The image or sound file you are trying to delete is protected (p.152). |
| Data being recorded | Displayed when you try to switch to ▶ mode while an image is still being recorded, or when the protect setting or DPOF setting is being changed. It disappears after the image is recorded or the setting is changed. |
| Data being processed | Displayed when the camera takes more than five seconds to display an image due to image processing, or when the SD Memory Card or the built-in memory is being formatted. |
| Built-in memory full Displayed if the built-in memory is full when saving a file. | |
| No image to be processed | Displayed when there are no images or sound files. |
| This image/sound cannot be processed | Displayed for files that cannot be processed. |
| No card in the camera Displayed when no SD Memory Card is inserted. | |
| The built-in memory is not enough to copy images/sounds | Displayed when there is insufficient built-in memory to perform copying. |
| Cannot process correctly | Displayed when Red-eye Compensation processing fails. |
| Display image/sound from built-in memory | Displayed when the camera enters the built-in memory display. |
| Not enough battery power remaining to activate Pixel Mapping | Appears during pixel mapping if the battery level is insufficient. Replace the battery with a fully charged one or use an AC adaptor kit K-AC92 (optional). (p.35) |
| Problem Cause | Remedy | |
| The camera will not turn on | The battery is not installed | Check if a battery is installed. If not, install a battery. |
| The battery is installed incorrectly | Check orientation of the battery. Reinsert the battery according to the ⊕⊖ symbols in the battery compartment (p.32). | |
| The battery is exhausted | Charge the battery. | |
| No image appears on the display | The camera is connected to a computer | The display is off when the camera is connected to a computer. |
| The camera is connected to a TV | The display is off when the camera is connected to a TV. | |
| The display is hard to see | The brightness level of the display is set too dark | Adjust the brightness level in [Brightness Level] in the [Setting] menu (p.206). |
| Power Saving function is on | When the Power Saving function is on, the display automatically darkens after a certain amount of time. Press a button to return to the normal brightness level. Select [Off] in [Power Saving] in the [Setting] menu to turn the Power Saving function off (p.206). | |
| The shutter will not release | The flash is charging | Pictures cannot be taken while the flash is charging. Wait until charging is finished. |
| There is no available space on the SD Memory Card or in the built-in memory | Insert an SD Memory Card with available space or delete unwanted images (p.37, p.146). | |
| Recording Wait until recording is finished. | ||
| The picture is dark when using the flash | The subject is too far away in a dark environment, such as a night scene | The picture becomes dark if the subject is too far away. Take pictures within the specified flash range. |
| Problem Cause | Remedy | |
| The subject is not in focus | The subject is difficult to focus on with autofocus | The camera may have difficulty in focusing on such subjects as: low contrast subjects (a white wall, a blue sky, etc.), dark subjects, finely-patterned objects, rapidly-moving objects. It is also difficult to get proper focus when shooting through a window or a net. Try shooting using the focus lock (p.66), or Manual Focus (p.103). |
| The subject is not in the focusing area | Locate the desired subject in the focus frame (focusing area) in the center of the display. If it is difficult to do so, first lock the focus on the desired subject (focus lock), and then move the camera to recompose. | |
| The flash does not discharge | The flash mode is set to ➕ | Set to ➕A (Auto) or ➕ (Flash On) (p.100). |
| The drive mode is set to ➕ or ➕IsThe focus mode is set to ➕The shooting mode is set to ➕ or ➕ | The flash does not discharge in these modes. |
Default Settings
The table below lists the factory default settings. The meaning of the indications for menu items with a default setting is explained below.Last Memory Setting
Yes : The current setting (last memory) is saved when the camera is turned off. No : The setting returns to the default setting when the camera is turned off. \* : The setting depends on the [Memory] setting (p.128). — : N / AReset Setting
Yes : The setting returns to the default setting with the Reset function (p.211). No : The setting is saved even after reset. — : N / A ● ● [Rec. Mode] Menu Items| Item Default Setting | Last Memory Setting | Reset Setting | Page | ||
| Recorded Pixels 12M (4000×300) Yes Yes p.106 | |||||
| White Balance | AWB (Auto) | * | Yes | p.110 | |
| AF Setting | Focusing Area | [ ] (Multiple) | Yes | Yes | p.104 |
| Focus Assist | ☑ (On) | Yes | Yes | p.105 | |
| AE Metering | ◎ (Multi-segment) | * | Yes | p.112 | |
| Sensitivity | Auto | * | Yes p. | 114 | |
| EV Compensation | ±0.0 | * | Yes p. | 108 | |
| Movie | Recorded Pixels | 1280 (1280×720/30 fps) | Yes | Yes | p.125 |
| Movie SR | ☑ (On) | Yes | Yes | p.126 | |
| D-Range Setting | Highlight Correction | □ (Off) | Yes | Yes | p.109 |
| Shadow Correction | □ (Off) | Yes | Yes | ||
| Shake Reduction | ☑ (On) | Yes | Yes | p.116 | |
| Blink Detection | ☑ (On) | Yes | Yes | p.115 | |
| Digital Zoom | ☑ (On) | * | Yes | p.77 | |
| Instant Review | ☑ (On) | Yes | Yes | p.117 | |
| Item | Default Setting | Last Memory Setting | Reset Setting | Page | |
| Memory | Face Detection □ (Off) Yes Yes p.70 | ||||
| Flash Mode ☑ (On) Yes Yes p.100 | |||||
| Drive Mode □ (Off) Yes Yes | p.90 p.91 | ||||
| Focus Mode □ (Off) Yes Yes p.102 | |||||
| Zoom Position □ (Off) Yes Yes p.76 | |||||
| MF Position □ (Off) Yes Yes p.103 | |||||
| White Balance □ (Off) Yes Yes p.110 | |||||
| Sensitivity □ (Off) Yes Yes p.114 | |||||
| EV Compensation □ (Off) Yes Yes p.108 | |||||
| AE Metering □ (Off) Yes Yes p.112 | |||||
| Digital Zoom ☑ (On) Yes Yes p.77 | |||||
| DISPLAY □ (Off) Yes Yes p.20 | |||||
| File No. | ☑ (On) | Yes | Yes | — | |
| Green Button | Green Mode | Yes Yes | p.120 | ||
| Sharpness | —■—+ (Normal) | Yes | Yes | p.117 | |
| Saturation | —■—+ (Normal) | Yes | Yes | p.118 | |
| Contrast | —■—+ (Normal) | Yes | Yes | p.119 | |
| Date Imprint | Off Yes Yes p. | 119 | |||
| Item Default Setting | Last Memory Setting | Reset Setting | Page | ||
| Sound | Operation Volume 3 | Yes Yes | p.195 | ||
| Playback Volume 3 | Yes Yes | ||||
| Start-up Sound 1 | Yes Yes | ||||
| Shutter Sound 1 | Yes Yes | ||||
| Operation Sound 1 | Yes Yes | ||||
| Self-timer Sound 1 | Yes Yes | ||||
| Date Adjustment | Date Format (date) | According to initial setting | Yes No | p.47 p.196 | |
| Date Format (time) | 24h Yes No | ||||
| Date 1/1/2010 Yes | No | ||||
| Time | According to initial setting | Yes No | |||
| World Time | Select Time 🔒 Hometown | Yes Yes | p.198 | ||
| Destination (City) | According to initial setting | Yes No | |||
| Destination (DST) | ☐ (Off) | Yes | No | ||
| Hometown (City) | According to initial setting | Yes No | |||
| Hometown (DST) | ☐ (Off) | Yes | No | ||
| Text Size | Standard | Yes No | p.201 | ||
| Language/言語 | According to initial setting | Yes No | p.43 p.202 | ||
| Folder Name | Date | Yes Yes | p.203 | ||
| USB Connection | MSC | Yes Yes | p.219 | ||
| Video Out | According to initial setting | Yes No | p.204 | ||
| Eye-Fi | ☐ (Off) | No | Yes | p.205 | |
| Brightness Level | - - + | Yes | Yes | p.206 | |
| Power Saving | 5 sec. Yes Yes | p.206 | |||
| Auto Power Off | 3 min. Yes Yes | p.207 | |||
| Reset | Cancel | — | — | p.211 | |
| Delete All | Cancel | — | — | p.150 | |
| Pixel Mapping | Cancel | — | — | p.210 | |
| Format | Cancel | — | — | p.194 | |
| Item Default Setting | Last Memory Setting | Reset Setting | Page | ||
| Slideshow | Interval 3 sec. Yes Yes | p.1399 | |||
| Sound Effect (On) Yes Yes | |||||
| Image Rotation Normal — p.141 | |||||
| Small Face Filter | Approx. 7% | No | No | ||
| Digital Filter | B&W | No | — p.162 | ||
| Original Frame | Blur | All sides/White | No | — p.171 | |
| Edge Composite | All sides/White | No | — | ||
| Frame Composite | Default1 | Yes Yes | p.167 | ||
| Movie Edit | Save as Still Image | — | — — | ||
| Divide Movies | — | — — | |||
| Adding title picture | — | — — p.178 | |||
| Red-eye Compensation | — | — — p.166 | |||
| Subscreen Input | Default start-up screen 1 | — — p.208 | |||
| Resize | Recorded Pixels | Depending on the picture taken | — — p.158 | ||
| Cropping | Depending on the picture taken | — — p.159 | |||
| Image/Sound Copy | Built-in memory → SD Memory Card | — — p.179 | |||
| Voice Memo | — | — — p.190 | |||
| Protect | Single Image/ Sound | Depending on the recorded image/sound | — | — | |
| All Images/Sounds | Depending on the recorded image/sound | — | — | ||
| DPOF | Single Image | Copies: 0 | — — | ||
| All Images | Date: □ (Off) | — | — | ||
| Image Recovery | Cancel | — — p.151 | |||
| Start-up Screen | ☑ (On) | Yes | Yes | ||
| Item Function | on Default Setting | Last Memory Setting | Reset Setting | Page | ||
| button | Operation Mode | mode — — — | ||||
| Zoom lever Zoom Position Full wide-angle * No p.76 | ||||||
| Four-way controller | ▲ | Drive Mode | (Standard) | * | Yes | p.90p.91 |
| ▼ | Shooting Mode | (Auto Picture) | Yes | Yes p.67 | ||
| ◀ | Flash Mode | (Auto) | * Yes | p.100 | ||
| ▶ | Focus Mode | AF (Standard) | * | Yes | p.102 | |
| MENU button | Menu Display | Capture mode:[Rec. Mode] menuPlayback mode:[Setting] menu | — — | p.56 | ||
| OK/DISPLAY button | Information Display | Normal | * Yes | p.20 | ||
| button | Operation Mode | Face Detection On | * Yes | p.70 | ||
natural_image
Pure geometric diagram with intersecting lines and circles, no text or symbols presentList of World Time Cities
City: indicates cities that can be set as either the Initial Setting (p.43) or the World Time (p.198). Video Output Format: indicates the video output format of the city set as the initial setting.| Region City | Video Output Format | Region | City | Video Output Format | |
| North America | Honolulu NTSC Africa/ | West AsiaPALPAL | Istanbul PAL | ||
| Anchorage NTSC Cairo PAL | |||||
| Vancouver NTSC Jerusalem PAL | |||||
| San Francisco NTSC Nairobi PAL | |||||
| Los Angeles NTSC Jeddah PAL | |||||
| Calgary NTSC Tehran PAL | |||||
| Denver NTSC Dubai PAL | |||||
| Chicago NTSC Karachi | |||||
| Miami | NTSC Kabul | ||||
| Toronto NTSC Male | PAL | ||||
| New York | NTSC Delhi | ||||
| Halifax | NTSC Colombo | ||||
| Central and South America | Mexico City | NTSC Kathmandu | |||
| Lima | NTSC Dacca | ||||
| Santiago NTSC East | Asia Yangor | NTSCPALVientianePAL | |||
| Caracas | NTSC Bangkok | ||||
| Buenos Aires | PAL | Kuala Lumpur | PAL | ||
| Sao Paulo PAL | PAL | ||||
| Rio de Janeiro | NTSC Singapore | ||||
| Europe | Lisbon | PAL | Phnom Penh | PAL | |
| Madrid | PAL | Ho Chi Minh PAL | |||
| London | PAL | Jakarta | PAL | ||
| Paris | PAL | Hong Kong | PAL | ||
| Amsterdam | PAL | Beijing | PAL | ||
| Milan PAL | PAL | ||||
| Rome | PAL | Manila | NTSC | ||
| Copenhagen | PAL | Taipei | NTSC | ||
| Berlin | PAL | Seoul | NTSC | ||
| Prague PAL | NTSC | ||||
| Stockholm | PAL | Guam | NTSC | ||
| Budapest | PAL Oceania | Perth PALNoumeaWellington P | |||
| Warsaw | PAL | Adelaide | PAL | ||
| Athens | PAL | Sydney | PAL | ||
| Helsinki PAL | PAL | ||||
| Moscow PAL | PAL | ||||
| Africa/West Asia | Dakar | PAL | Auckland | PAL | |
| Algiers | PAL | Pago Pago | NTSC | ||
| Johannesburg PAL | |||||
Optional Accessories
A number of dedicated accessories are available for this camera. Products marked with an asterisk (\*) are the same as those supplied with the camera. ● Power supply Rechargeable lithium-ion battery D-LI92 (\*) Battery charger kit K-BC92 (\*) (Battery charger D-BC92, AC plug cord) AC adapter kit K-AC92 (AC adapter D-AC64, DC coupler D-DC92, AC plug cord) The battery charger and AC plug cord are only sold as a set. \- Remote control unit Remote Control O-RC1 (available in the near future) ● Cable USB cable I-USB7 (\*) AV cable I-AVC7 (\*) \- Strap O-ST20 (\*) O-ST8 Silver chain strap O-ST24 Genuine leather strap \- - Camera case O-CC102 Snapshot case with a neck strap (attached at both ends of the case) 50236 Ivory canvas and leather case - vintage look 50237 Black canvas and leather case - vintage lookMain Specifications
Type Fully automatic compact digital still camera with built-in zoom lens| Number of Effective Pixels | Approx. 12.1 megapixels | |
| Image Sensor 1/2.3 inch CCD | ||
| Number of Recorded Pixels | Still | 12M/12M (4000×3000), 9M (16:9) (4000×2256),7M (3072×2304), 5.3M (16:9) (3072×1728),5M (2592×1944), 3.8M (16:9) (2592×1464),3M (2048×1536), 2.1M (16:9) (1920×1080),1024 (1024×768), 640 (640×480)* Fixed at 3M/2.1M in Half-length Portrait mode.* Fixed at 5M/3.8M in Digital SR mode.* Fixed at 3M/2.1M in Frame Composite mode.* Fixed at 5M in Digital Wide mode, however, the first frame uses 3M .* Fixed at 2M for one frame in Digital Panorama mode.* Fixed at 640 in Blog mode.* Fixed at 5M when the sensitivity is set to 3200 or 6400.* Fixed at 5M/3.8M in Burst Shooting mode. |
| Movie | 1280 (1280×720/30 fps), 1280 (1280×720/15 fps) 640 (640×480/30 fps), 640 (640×480/15 fps) 320 (320×240/30 fps), 320 (320×240/15 fps)(recorded pixels/frame rate) | |
| Sensitivity(Standard Output Sensitivity) | Auto (ISO 80, 100, 200, 400, 800)Manual (ISO 80, 100, 200, 400, 800, 1600, 3200, 6400)* Fixed at Auto (ISO 80 - 6400) in Digital SR mode. | |
| File Format Still JPEG (Exif 2.2), DCF 2.0, DPOF,PRINT Image Matching III | ||
| Storage Media Built-in memory (approx. 26.7 MB), SD Memory Card, SDHCMemory Card | ||
| Built-in Memory | 512 MBSD Memory Card | |
| 12M 4000×3000 | 6 pictures 107 pictures | |
| 12M 4000×3000 | 11 pictures 209 pictures | |
| 9M 4000×2256 | 14 pictures 253 pictures | |
| 7M 3072×2304 | 16 pictures 299 pictures | |
| 5.3M 3072×1728 | 20 pictures 368 pictures | |
| 5M 2592×1944 | 20 pictures 368 pictures | |
| 3.8M 2592×1464 | 27 pictures 479 pictures | |
| 3M 2048×1536 | 33 pictures 592 pictures | |
| 2.1M 1920×1080 | 48 pictures 863 pictures | |
| 1024 1024×768 | 100 pictures 1777 pictures | |
| 640 640×480 | 190 pictures 3358 pictures |
| Built-in Memory | 512 MBSD Memory Card | |
| 1280_30 (1280×720/30 fps) | 8 sec. 2 min. | 32 sec. |
| 1280_35 (1280×720/15 fps) | 17 sec. 5 min. | 5 sec. |
| 640_30 (640×480/30 fps) | 25 sec. 7 min. | 31 sec. |
| 640_35 (640×480/15 fps) | 50 sec. 14 min. | 48 sec. |
| 320_30 (320×240/30 fps) | 40 sec. 11 min. | 59 sec. |
| 320_35 (320×240/15 fps) | 1 min. 17 sec. 22 | min. 53 sec. |
| Sound | 21 min. 9 sec. | 6 hr. 14 min. 15 sec. |
| White Balance Auto, Daylight, Shade, Tungsten Light, Fluorescent Light, Manual | ||
| Lens Focal Length 5.1 mm - 25.5 mm | (approx. 28 mm - 140 mm in 35 mm equivalent focal length) | |
| Aperture F3.5 (W) - F5.9 (T) | ||
| Lens Composition 7 elements in 6 groups (3 aspherical elements) | ||
| Zoom Type Electrically driven | ||
| Optical Zoom 5× | ||
| Intelligent Zoom | Approx. 6.5× at 7M (3072×2304), Approx. 31.3× at 640 (640×480) (when combined with optical zoom) | |
| Digital Zoom Up to approx. 6.25× | ||
| Motion Blur Reduction | Still “CCD shift reduction (Shake Reduction)”, Hi-sensitivity shake reduction mode (Digital SR) | |
| Movie Electronic movie shake reduction (Movie SR) | ||
| Display 2.7 inch wide-LCD, approx. 230,000 dots, Wide viewing angle, AR coating | ||
| Playback Modes Single-frame, 6-frame, 12-frame, Enlargement (max. 10×, scrollable), Face Close-up Playback, Folder Display, Calendar Display, Sound Playback, Histogram Display, Deleting Selected Images, Slideshow, Image Rotation, Small Face Filter, Digital Filter, Original Frame, Frame Composite, Movie Playback/Edit (Save as still images, Divide a movie, Adding title picture), Red-eye Compensation, Subscreen Input, Resize, Cropping, Image&Sound Copy, Voice Memo, Protect, DPOF, Image Recovery, Start-up Image Setting | ||
| Focus Modes Autofocus, Macro, Super Macro, Pan Focus, Infinity, Manual Focus | ||
| Focus | Type | TTL contrast detection system by sensor 9-point autofocus (multiple/spot/automatic tracking AF changeable) |
| Focus range (From lens face) | Standard : 0.4 m - ∞ (1.31 ft - ∞) (Wide-angle)1.0 m - ∞ (3.28 ft - ∞)(Telephoto)Macro : 0.1 m - 0.5 m (0.33 ft - 1.64 ft)(Wide-angle)0.2 m - 0.5 m (0.66 ft - 1.64 ft) (At the intermediate position of the zoom range)Super Macro : 0.08 m - 0.15 m (0.26 ft - 0.49 ft)(At the intermediate position of the zoom range)* It is possible to switch to Pan Focus, Infinity and Manual Focus.* Face Detection AF is available only while the camera detects the subject's face. | |
| Focus Lock | By half-pressing the shutter release button | |
| Exposure Control Metering System Multi-segment metering, Center-weighted metering, Spot metering | |
| Exposure Compensation | ±2 EV (can be set in 1/3 EV steps) |
| Face Detection Detection of up to 32 people's faces (up to 31 face detection frames on the display, or up to 30 frames in Half-length Portrait mode), Smile Capture, Blink Detection* Face Detection AE is available only while the camera detects the subject's face. | |
| Pet Detection Detection of up to 3 pet's faces | |
| Shooting Modes Auto Picture, Program, Night Scene, Night Scene Portrait, Half-length Portrait, Movie, Landscape, Flower, Portrait, Surf & Snow, Sport, Digital SR, Kids, Pet, Food, Fireworks, Frame Composite, Party, Natural Skin Tone, Candlelight, Text, Blog, Digital Wide, Digital Panorama, Green | |
| Digital Filters B&W, Sepia, Toy Camera, Retro (Blue, Amber), Color (Red, Pink, Purple, Blue, Green, Yellow), Extract color (Red, Green, Blue), Color emphasis (Sky Blue, Fresh Green, Delicate Pink, Autumn Leaves), High contrast, Starburst (Cross, Heart, Star), Soft, Brightness Filter | |
| Movie Continuous | Approx. 1 second - until built-in memory or SD Memory Card is full (however, maximum size is limited to 2 GB) |
| Shutter Speed 1/2000 sec. - 1/4 sec. (Wide), 1/1500 sec. - 1/4 sec. (Telephoto), max. 4 sec. (Night Scene mode) | |
| Built-in Flash Modes Auto, Flash Off, Flash On, Auto + Red-eye, Flash On + Red-eye, Soft Flash | |
| Flash Range Wide-angle: approx. 0.15 m - 4.0 m(approx. 0.49 ft - 13.12 ft)(Sensitivity: in Auto condition)Telephoto: approx. 1.0 m - 2.4 m(approx. 3.28 ft - 7.87 ft)(Sensitivity: in Auto condition) | |
| Drive Modes Single-frame, Self-timer (approx. 10 sec., approx. 2 sec.), Continuous, Burst Shooting, Remote Control (3-sec Remote Control, 0-sec Remote Control) | |
| Self-timer | Electronic control type, control time: Approx. 10 sec., 2 sec. |
| Time Function World Time | 75 cities (28 time zones) |
| Power Source | Rechargeable lithium-ion battery D-LI92, AC adapter kit (optional) |
| Battery Life Number of Recordable Images approx. 250 pictures | * Recording capacity shows approximate number of shots recorded during CIPA-compliant testing (with display on, flash used for 50% of the shots, and 23 degrees centigrade/73 degrees Fahrenheit). Actual performance may vary according to operating conditions. |
| Playback Time approx. 300 min. | * According to the result of in-house testing. Actual time may differ depending on usage conditions. |
| Movie Recording Time approx. 100 min. | |
| Sound Recording Time approx. 350 min. | |
| Interfaces USB 2.0 (high-speed compatible) /PC/AV terminal | |
| Video Output NTSC/PAL (monaural) | |
| Dimensions Approx. 100.5 (W) × 65 (H) × 28 (D) mm (Approx. 4 (W) × 2.6 (H) × 1.1 (D) in.) (excluding operating or protruding parts) | |
| Weight Approx. 132 g (4.7 oz) (excluding battery and SD Memory Card) Approx. 153 g (5.3 oz) (including battery and SD Memory Card) | |
| Accessories Rechargeable lithium-ion battery, battery charger, AC plug cord, USB cable, AV cable, software (CD-ROM), strap, Operating Manual, Quick Guide | |