
2017 AA - Screwdriver SKIL - Free user manual and instructions
Find the device manual for free 2017 AA SKIL in PDF.

| Brand | SKIL |
| Model | 2017 AA |
| Product type | Cordless screwdriver |
| Power supply | Rechargeable battery (charger included) |
| Max torque (hard screwdriving) | 28 Nm (2016) / 30 Nm (2017) |
| Number of clutch positions | 21 (VariTorque) |
| Chuck | Self-tightening |
| Variable speed | Yes, with soft start |
| Reverse rotation | Yes, by switch |
| Battery charging time | At least 5 hours |
| Charge indicators | Green light (charger ready), red light (charging) |
| Materials that can be drilled | Wood, metal, brick, natural stone, ceramic, plastic |
| Usage | Domestic, non-professional |
| Safety | Double insulation, automatic charger shutdown in case of overheating |
| Maintenance | Clean contacts with alcohol or special product |
| After-sales service | SKIL authorized service center |
| Sound pressure level | <70 dB(A) |
| Vibration (metal drilling/screwdriving) | <2.5 m/s² |
| Weight (approx.) | 1.2 kg |
Frequently Asked Questions - 2017 AA SKIL
User questions about 2017 AA SKIL
0 question about this device. Answer the ones you know or ask your own.
Ask a new question about this device
Download the instructions for your Screwdriver in PDF format for free! Find your manual 2017 AA - SKIL and take your electronic device back in hand. On this page are published all the documents necessary for the use of your device. 2017 AA by SKIL.
USER MANUAL 2017 AA SKIL
natural_image
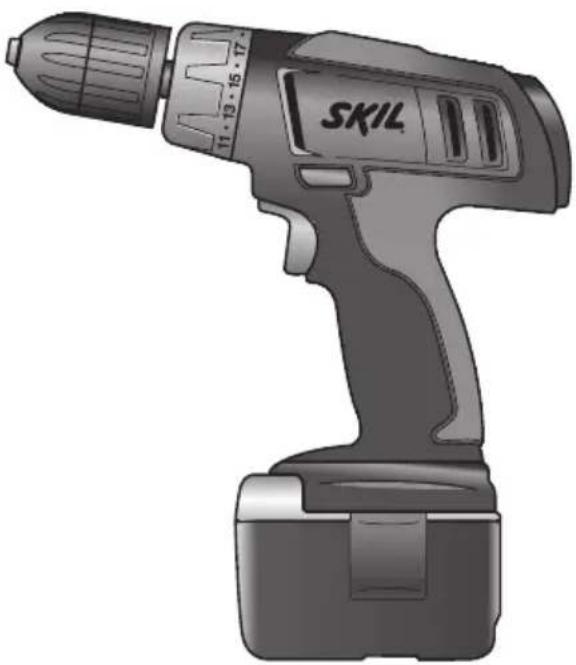
Illustration of a SKIL electric drill putter with visible model number 11-13-15-17 (no text or symbols on the device body)natural_image
Icon of a person reading a book inside a circle, with number 3 above (no text or symbols)
natural_image
Simple line drawing of a house with a numbered circle (4) above it, no text or symbols present.
natural_image
Simple geometric diagram with two concentric squares, one circled in white (no text or symbols)
natural_image
Simple line drawing of a shield with an internal circle and number 6, no text or symbols present.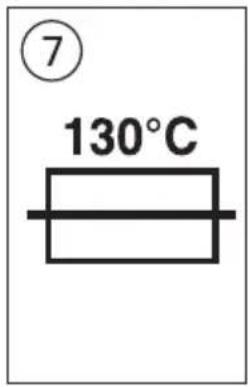
flowchart
graph LR
    A["●"] --> B["●"]
    B --> C["⊕"]


natural_image
Line drawing of a hand holding a SKIL electric drill with a light bulb nearby (no text or symbols)

GB
Cordless drill/driver 2016/2017
INTRODUCTION
- This tool is intended for drilling in wood, metal, brick, stone, ceramic and plastic as well as for screwdriving in wood
• This tool is not intended for professional use - Read and save this instruction manual ③
TECHNICAL DATA①
Max. torque for hard screwdriving application according to ISO 5393 : 28 Nm (2016) / 30 Nm (2017)
TOOL ELEMENTS ②
A Switch for on/off and speed control
B Switch for changing direction of rotation
C Keyless chuck
D Ring for torque control
E Ventilation slots
F Charger
G Green charging light
H Red charging light
SAFETY
GENERAL SAFETY INSTRUCTIONS
WARNING! Read all safety warnings and all instructions. Failure to follow the warnings and instructions may result in electric shock, fire and/or serious injury. Save all warnings and instructions for future reference. The term "power tool" in the warnings refers to your mains-operated (corded) power tool or battery-operated (cordless) power tool.
1) WORK AREA SAFETY
a) Keep work area clean and well lit. Cluttered or dark areas invite accidents.
b) Do not operate power tools in explosive atmospheres, such as in the presence of flammable liquids, gases or dust. Power tools create sparks which may ignite the dust or fumes.
c) Keep children and bystanders away while operating a power tool. Distractions can cause you to lose control.
2) ELECTRICAL SAFETY
a) Power tool plugs must match the outlet. Never modify the plug in any way. Do not use any adapter plugs with earthed (grounded) power tools.
Unmodified plugs and matching outlets will reduce risk of electric shock.
b) Avoid body contact with earthed or grounded surfaces such as pipes, radiators, ranges and refrigerators. There is an increased risk of electric shock if your body is earthed or grounded.
c) Do not expose power tools to rain or wet conditions. Water entering a power tool will increase the risk of electric shock.
d) Do not abuse the cord. Never use the cord for carrying, pulling or unplugging the power tool. Keep cord away from heat, oil, sharp edges or moving parts. Damaged or entangled cords increase the risk of electric shock.
e) When operating a power tool outdoors, use an extension cord suitable for outdoor use. Use of a cord suitable for outdoor use reduces the risk of electric shock.
f) If operating a power tool in a damp location is unavoidable, use an earth leakage circuit breaker. Use of an earth leakage circuit breaker reduces the risk of electric shock.
3) PERSONAL SAFETY
a) Stay alert, watch what you are doing and use common sense when operating a power tool. Do not use a power tool while you are tired or under the influence of drugs, alcohol or medication. A moment of inattention while operating power tools may result in serious personal injury.
b) Use personal protective equipment. Always wear eye protection. Protective equipment such as dust mask, non-skid safety shoes, hard hat, or hearing protection used for appropriate conditions will reduce personal injuries.
c) Prevent unintentional starting. Ensure the switch is in the off-position before connecting to power source and/or battery pack, picking up or carrying the tool. Carrying power tools with your finger on the switch or energising power tools that have the switch on invites accidents.
d) Remove any adjusting key or wrench before turning the power tool on. A wrench or a key left attached to a rotating part of the power tool may result in personal injury.
e) Do not overreach. Keep proper footing and balance at all times. This enables better control of the power tool in unexpected situations.
f) Dress properly. Do not wear loose clothing or jewelry. Keep your hair, clothing and gloves away from moving parts. Loose clothes, jewelry or long hair can be caught in moving parts.
g) If devices are provided for the connection of dust extraction and collection facilities, ensure these are connected and properly used. Use of dust collection can reduce dust-related hazards.
4) POWER TOOL USE AND CARE
a) Do not force the power tool. Use the correct power tool for your application. The correct power tool will do the job better and safer at the rate for which it was designed.
b) Do not use the power tool if the switch does not turn it on and off. Any power tool that cannot be controlled with the switch is dangerous and must be repaired.
c) Disconnect the plug from the power source and/or the battery pack from the power tool before making any adjustments, changing accessories, or storing power tools. Such preventive safety measures reduce the risk of starting the power tool accidentally.
d) Store idle power tools out of the reach of children and do not allow persons unfamiliar with the power tool or these instructions to operate the power tool.
Power tools are dangerous in the hands of untrained users.
e) Maintain power tools. Check for misalignment or binding of moving parts, breakage of parts and any other condition that may affect the power tool's operation. If damaged, have the power tool repaired before use. Many accidents are caused by poorly maintained power tools.
f) Keep cutting tools sharp and clean. Properly maintained cutting tools with sharp cutting edges are less likely to bind and are easier to control.
g) Use the power tool, accessories and tool bits etc., in accordance with these instructions, taking into account the working conditions and the work to be performed. Use of the power tool for operations different from those intended could result in a hazardous situation.
5) BATTERY TOOL USE AND CARE
a) Recharge only with the charger specified by the manufacturer. A charger that is suitable for one type of battery pack may create a risk of fire when used with another battery pack.
b) Use power tools only with specifically designated battery packs. Use of any other battery packs may create a risk of injury and fire.
c) When battery pack is not in use, keep it away from other metal objects like paper clips, coins, keys, nails, screws, or other small metal objects that can make a connection from one terminal to another. Shorting the battery terminals together may cause burns or a fire.
d) Under abusive conditions, liquid may be ejected from the battery; avoid contact. If contact accidentally occurs, flush with water. If liquid contacts eyes, additionally seek medical help.
Liquid ejected from the battery may cause irritation or burns.
6) SERVICE
a) Have your power tool serviced by a qualified repair person using only identical replacement parts. This will ensure that the safety of the power tool is maintained.
SAFETY INSTRUCTIONS FOR CORDLESS DRILL/DRIVERS
- Avoid damage that can be caused by screws, nails and other elements in your workpiece; remove them before you start working
- Always check that the supply voltage is the same as the voltage indicated on the nameplate of the charger
- In case of electrical or mechanical malfunction, immediately switch off the tool or unplug charger from power source
- SKIL can assure flawless functioning of the tool only when original accessories are used
- Use only accessories with an allowable speed matching at least the highest no-load speed of the tool
-
The tool/charger is not intended for use by persons (including children) with reduced physical, sensory or mental capabilities, or lack of experience and knowledge, unless they have been given supervision or instruction concerning use of the tool/charger by a person responsible for their safety
-
Ensure that children do not play with the tool/charger
- Secure the workpiece (a workpiece clamped with clamping devices or in a vice is held more securely than by hand)
-
Hold power tool by insulated gripping surfaces, when performing an operation where the cutting accessory or fastener may contact hidden wiring or its own cord (cutting accessory and fasteners contacting a "live" wire may make exposed metal parts of the power tool "live" and could give the operator an electric shock)
-
Use suitable detectors to find hidden utility lines or call the local utility company for assistance (contact with electric lines can lead to fire or electrical shock; damaging a gas line can result in an explosion; penetrating a water pipe will cause property damage or an electrical shock)
- Do not work materials containing asbestos (asbestos is considered carcinogenic)
- Dust from material such as paint containing lead, some wood species, minerals and metal may be harmful (contact with or inhalation of the dust may cause allergic reactions and/or respiratory diseases to the operator or bystanders); wear a dust mask and work with a dust extraction device when connectable
- Certain kinds of dust are classified as carcinogenic (such as oak and beech dust) especially in conjunction with additives for wood conditioning; wear a dust mask and work with a dust extraction device when connectable
- Follow the dust-related national requirements for the materials you want to work with
- Ensure that switch B ② is in the middle (locking) position before making any adjustments or changing accessories as well as when carrying or storing the tool
CHARGING/BATTERIES
- Charge battery only with the charger that is supplied with the tool
- Do not touch the contacts in the charger
- Do not expose tool/charger/battery to rain
- Do not charge battery in damp or wet environments
- Store tool/charger/battery in locations where temperature will not exceed 40°C or drop below 0°C
- Do not use charger when damaged; take it to one of the officially registered SKIL Service Stations for a safety check
- Do not use charger when cord or plug is damaged; cord or plug should be replaced immediately at one of the officially registered SKIL Service Stations
- Do not use battery when damaged; it should be replaced immediately
- Do not disassemble charger or battery
- Do not attempt to recharge non-rechargeable batteries with the charger
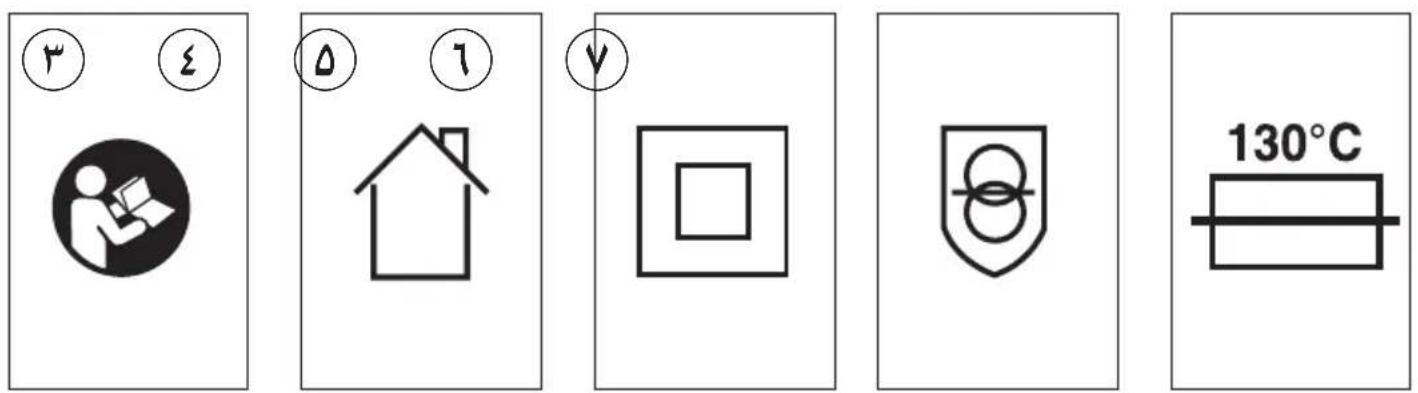
EXPLANATION OF SYMBOLS ON CHARGER/BATTERY
③ Read the instruction manual before use
④ Only use the charger indoors
⑤ Double insulation (no earth wire required)
⑥ Fail-safe isolating transformer (the power source is electrically separated from the transformer output)
⑦ Automatic shut-off when charger gets too hot (thermic fuse blows and charger becomes useless)
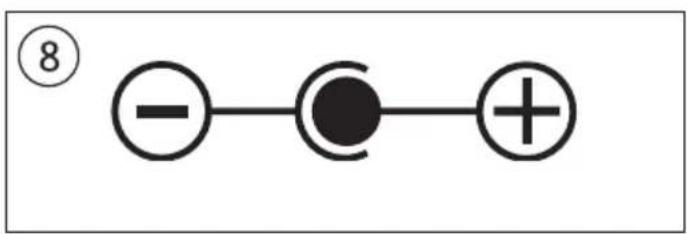
⑧ Incorrect polarity of the charger connection could cause a hazard (only charge the battery with the charger supplied)
⑨ Do not dispose of the charger together with household waste material
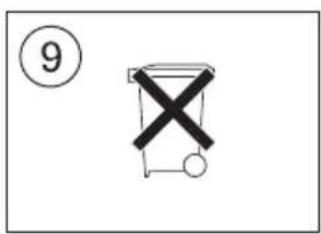
⑩ Do not dispose of the battery together with household waste material
USE
- Charging battery ⑪
-battery of new tools is not fully charged
-connect charger to power source as illustrated
-green light G will turn on indicating that the charger is ready for operation
-insert battery into charger
-red light H will turn on indicating that the battery is being charged
-charge the battery for at least 5 hours, after which the battery may be used even though the red light may still be on (the red light may require more than 5 hours to turn off)
!remove battery from charger after charging period has ended thereby lengthening the service life of the battery
IMPORTANT:
-while charging, the charger and the battery may become warm to touch; this is normal and does not indicate a problem
-ensure that the outside surface of the battery is clean and dry before inserting into charger
-do not charge at temperatures below 0^ C and over 40^ C; this will seriously damage the battery as well as the charger
-do not remove battery from tool while it is running! a battery that is new or has not been used for a longer period does not develop its full capacity until after approximately 5 charging/discharging cycles
-do not repeatedly recharge the battery after only a few minutes of operation; this may result in a reduction of operating time and battery efficiency
-if you anticipate long periods of non-use for the tool, it is best to unplug the charger from its power source
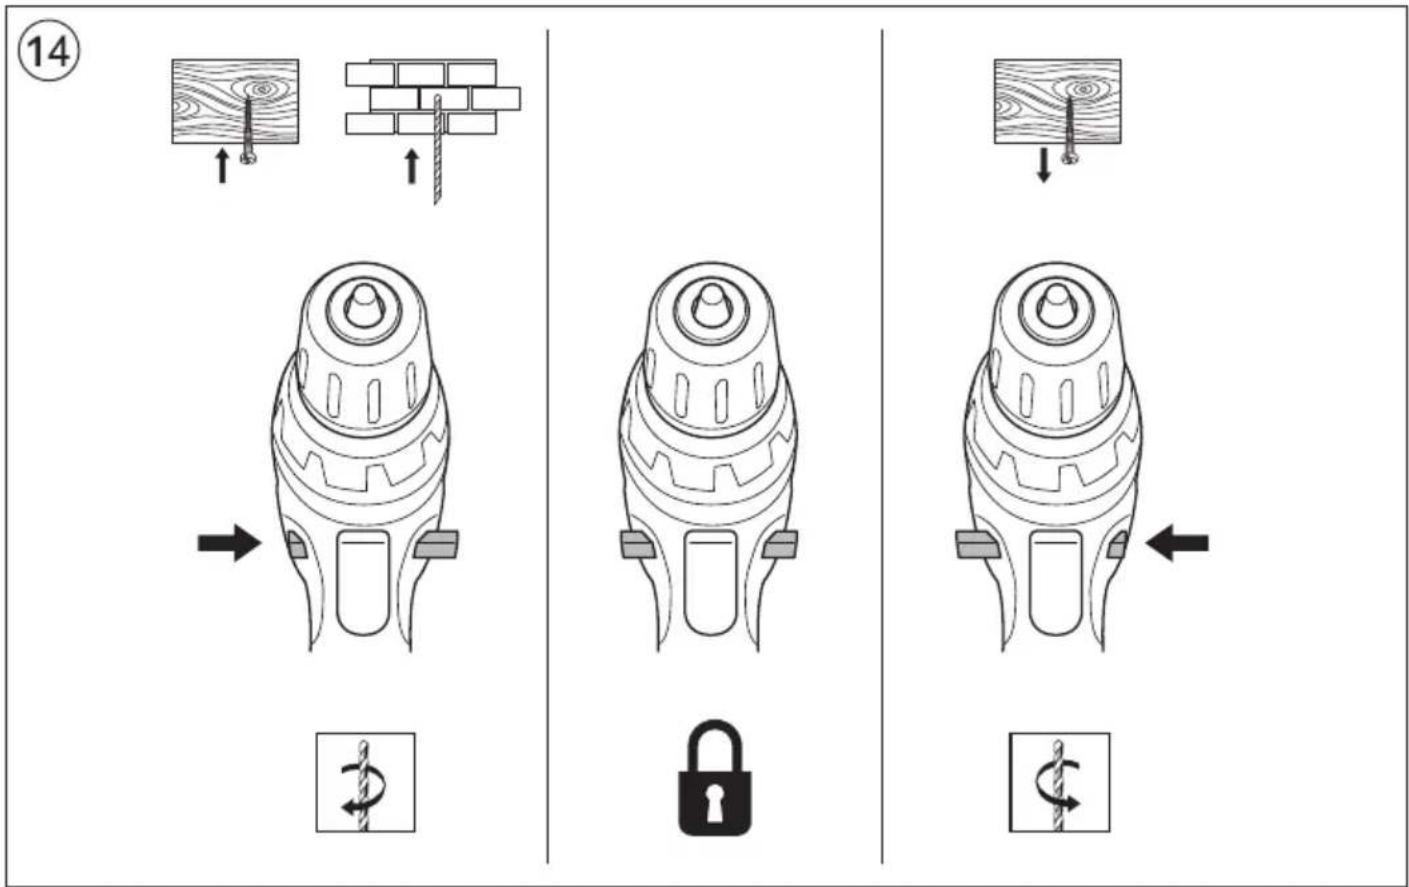
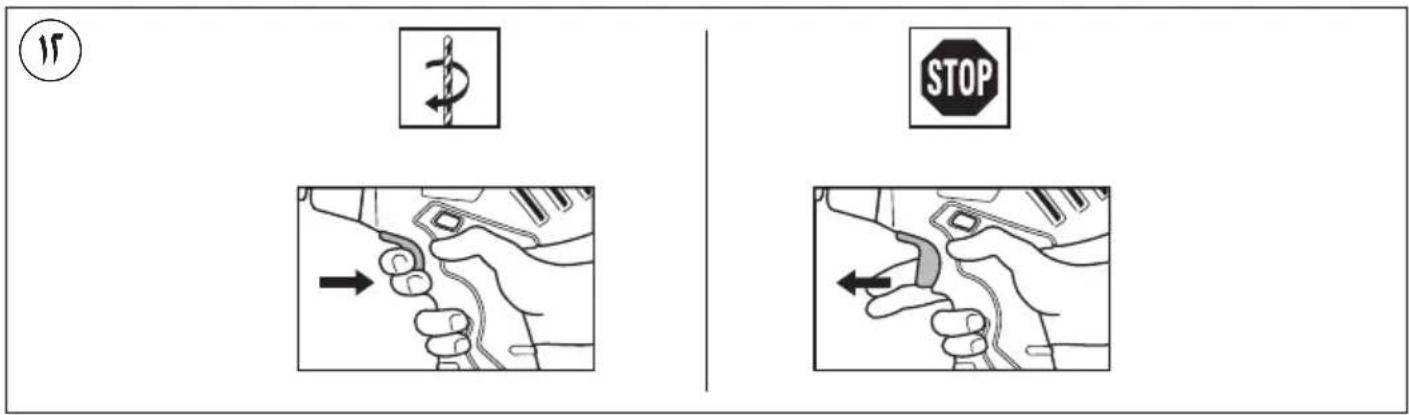
- On/off ⑫
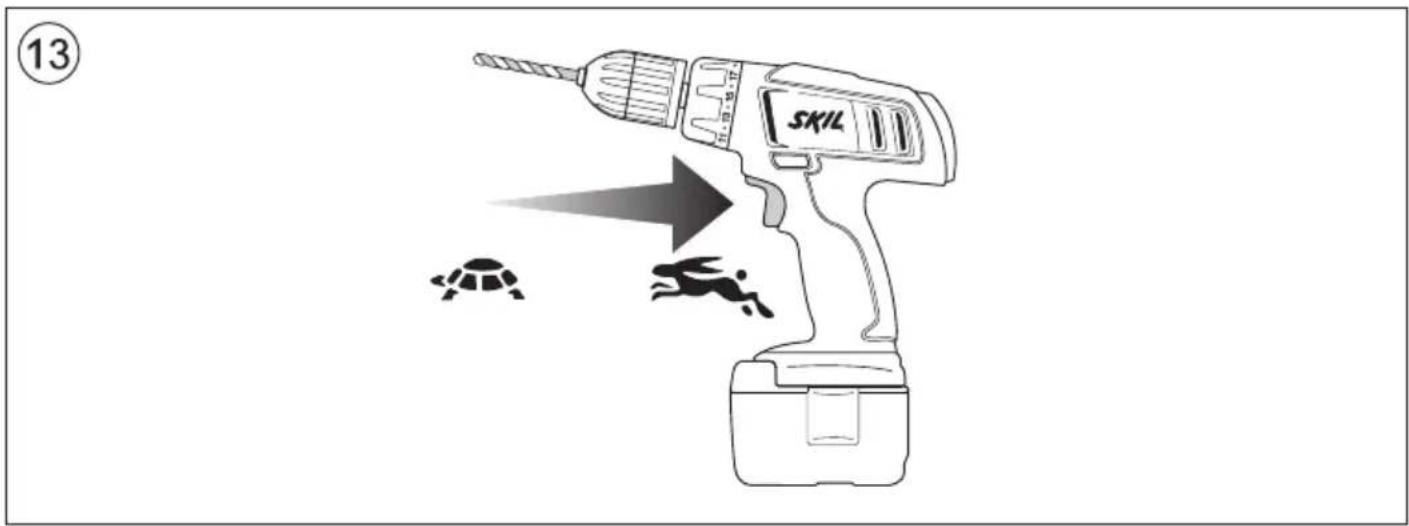
• Speed control for smooth starting ⑬ - Changing direction of rotation ⑭
-when not properly set in left/right position, switch A② cannot be activated
!change direction of rotation only when tool is at a complete standstill
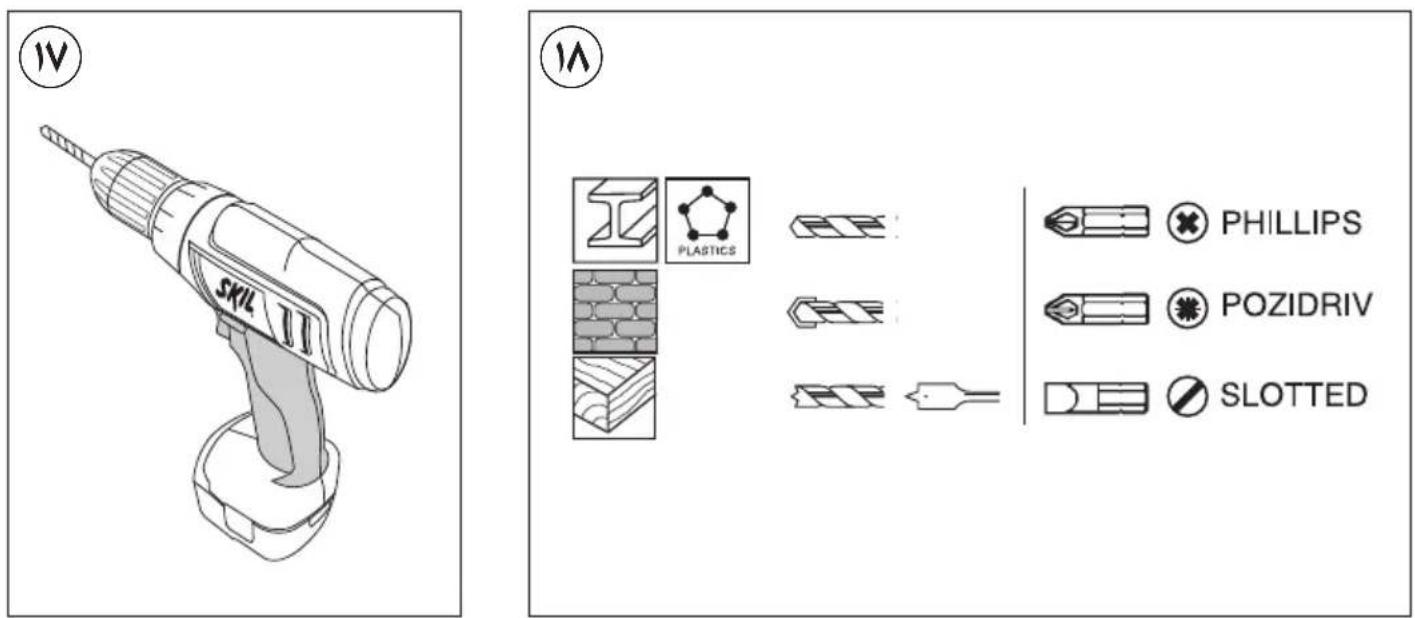
- Changing bits ⑮
-insert the bit as deep as possible in the chuck !do not use bits with a damaged shank
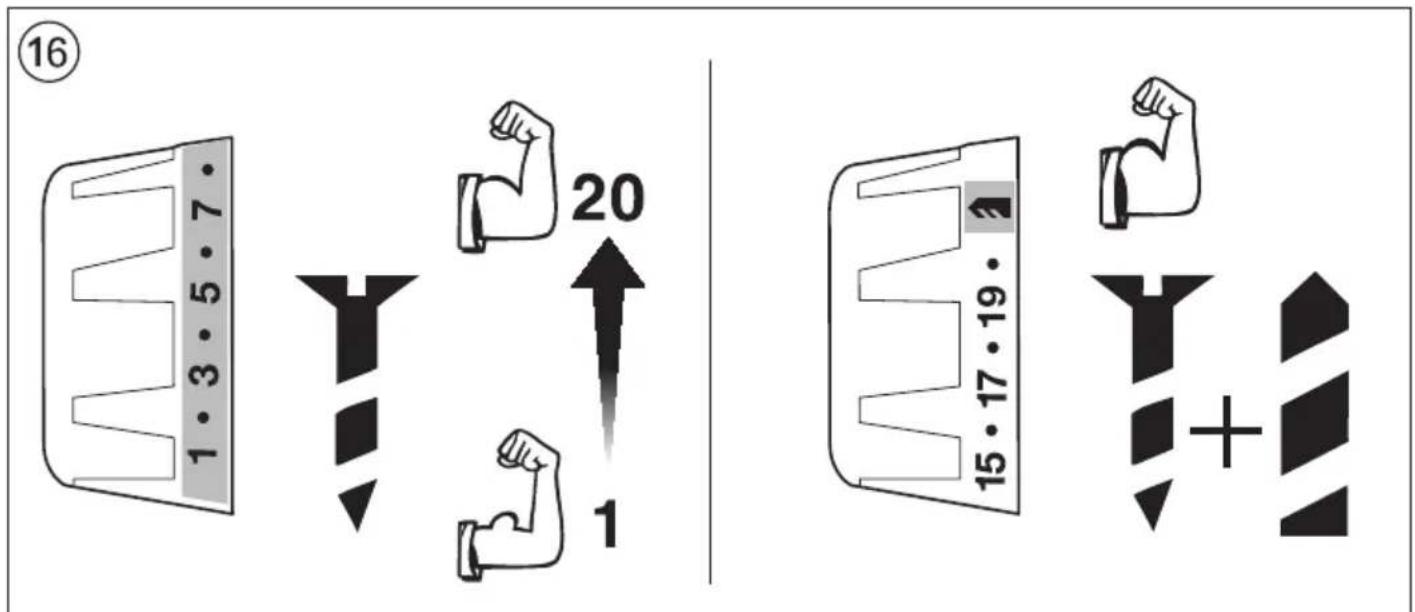
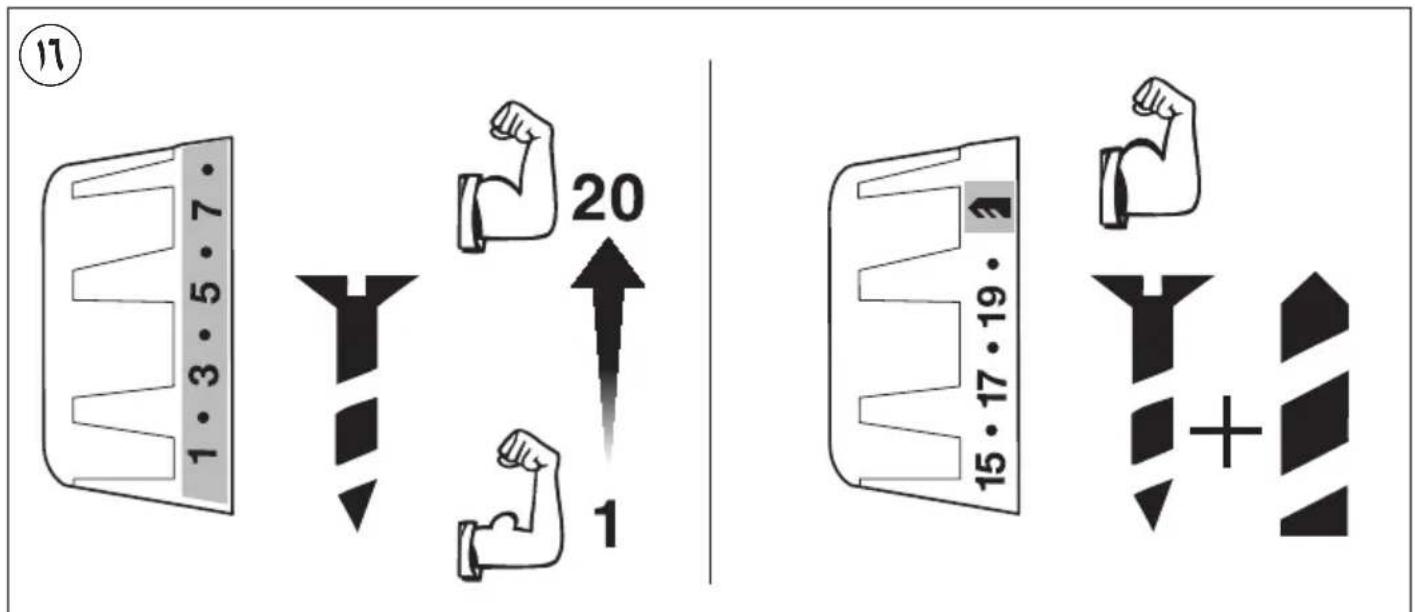
- Torque control (VariTorque) ⑯
-limits the amount of output torque delivered by the chuck (21 clutch settings)
-when turning in a screw, first try VariTorque position 1 and increase until the desired depth has been reached
- Holding and guiding the tool ⑰
!while working, always hold the tool at the grey-coloured grip area(s)
-keep ventilation slots E② uncovered
-do not apply too much pressure on the tool; let the tool do the work for you
APPLICATION ADVICE
- Use the appropriate bits ⑱ !only use sharp bits
- When drilling ferrous metals
- pre-drill a smaller hole, when a large hole is required
- lubricate drill bit occasionally with oil
- When turning in a screw at/near the cross cut end or an edge of wood, pre-drill a hole in order to avoid cracking of the wood
- For an optimal use of the tool a steady pressure on the screw is required, especially while removing
- When screwdriving in hard wood one should pre-drill a hole
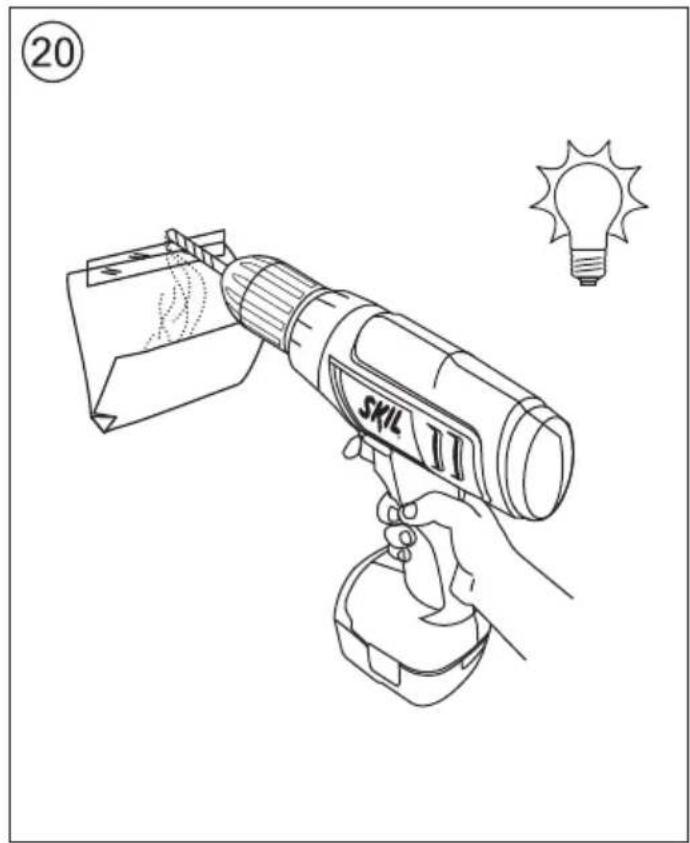
- Splinterfree drilling in wood ⑲
• Dustfree drilling in walls ⑳
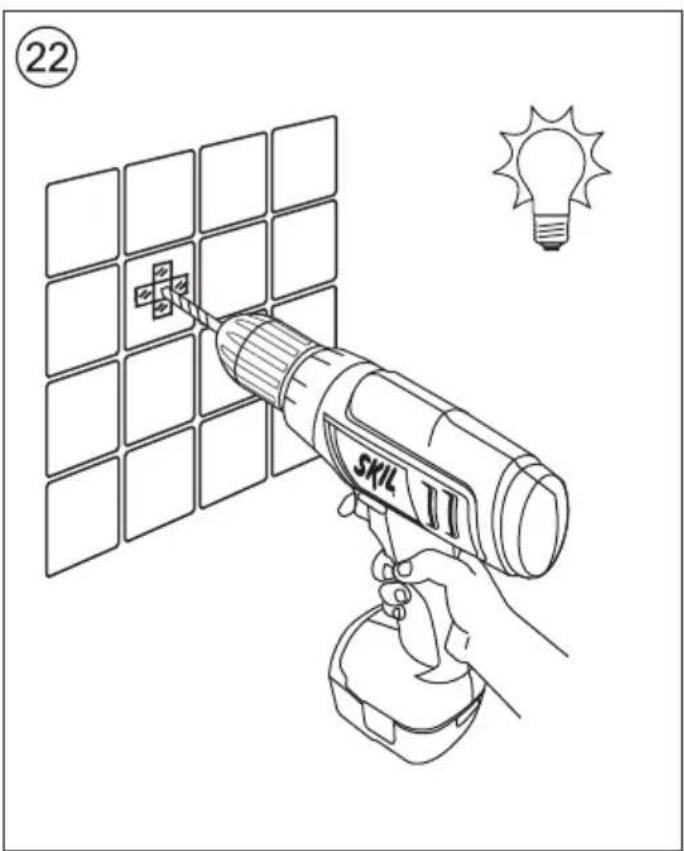
• Dustfree drilling in ceilings ②1 - Drilling in tiles without skidding ②
• For more tips see www.skil.com
MAINTENANCE / SERVICE
• This tool is not intended for professional use
- Keep tool and charger clean
-clean charging contacts in charger with alcohol or contact cleaner
!unplug charger from power source before cleaning
- If the tool/charger should fail despite the care taken in manufacturing and testing procedures, repair should be carried out by an after-sales service centre for SKIL power tools
- send the tool or charger undismantled together with proof of purchase to your dealer or the nearest SKIL service station (addresses as well as the service diagram of the tool are listed on www.skil.com)
- in case of a defective charger send both charger and battery to your dealer or the SKIL service station
ENVIRONMENT
- Do not dispose of electric tools, accessories and packaging together with household waste material (only for EU countries)
-in observance of European Directive 2002/96/EC on waste of electric and electronic equipment and its implementation in accordance with national law, electric tools that have reached the end of their life must be collected separately and returned to an environmentally compatible recycling facility symbol ⑨ will remind you of this when the need for disposing occurs
- The battery must be kept separate from the natural environment and should not be disposed of as normal domestic waste (symbol ^10 will remind you of this when the need for disposing occurs)
!prior to disposal protect battery terminals with heavy tape to prevent short-circuit
CE DECLARATION OF CONFORMITY
- We declare under our sole responsibility that the product described under "Technical data" is in conformity with the following standards or standardization documents: EN 60335, EN 61000, EN 60745, EN 55014, in accordance with the provisions of the directives 2006/95/EC, 2004/108/EC, 2006/42/EC, 2011/65/EU
• Technical file at: SKIL Europe BV (PT-SEU/ENG1), 4825 BD Breda, NL
- Measured in accordance with EN 60745 the sound pressure level of this tool is < 70 dB(A) (standard deviation: 3 dB) and the vibration * m/s ^2 (hand-arm method; uncertainty K = 1.5 m/s ^2 )
* when drilling in metal <2.5 m/s²
* when screwdriving <2.5 m/s² - The vibration emission level has been measured in accordance with a standardised test given in EN 60745; it may be used to compare one tool with another and as a preliminary assessment of exposure to vibration when using the tool for the applications mentioned
- using the tool for different applications, or with different or poorly maintained accessories, may significantly increase the exposure level
- the times when the tool is switched off or when it is running but not actually doing the job, may significantly reduce the exposure level !protect yourself against the effects of vibration by maintaining the tool and its accessories, keeping your hands warm, and organizing your work patterns

Perceuse/visseuse sans fil 2016/2017 INTRODUCTION
Operations & Engineering
Olaf Dijkgraaf
Approvals Manager

SKIL Europe BV, 4825 BD Breda, NL
25.09.2013
CE12
GERÄUSCH/VIBRATION
Operations & Engineering
Olaf Dijkgraaf
Approvals Manager
SKIL Europe BV, 4825 BD Breda, NL
25.09.2013
CE12
ST∅J/VIBRATION
1) SIKKERHET PÅ ARBEIDSPLASSEN
a) Hold arbeidsområdet rent og ryddig. Rotete arbeidsområder eller arbeidsområder uten lys kan føre til ulykker.
b) Ikke arbeid med maskinen i eksplosjonsutsatte omgivelser – der det befinner seg brennbare
væsker, gass eller støv. Elektroverktøy lager gnister som kan antenne støv eller damper.
VEDLIKEHOLD / SERVICE
Operations & Engineering
Olaf Dijkgraat
Approvals Manager

SKIL Europe BV, 4825 BD Breda, NL
25.09.2013
CE12
ST∅Y/VIBRASJON
Operations & Engineering
Olaf Dijkgraaf
Approvals Manager
SKIL Europe BV, 4825 BD Breda, NL
25.09.2013
CE12
MELU/TÄRINÄ
60335, EN 61000, EN 60745, EN 55014, conforme as disposições das directivas 2006/95/CE, 2004/108/CE, 2006/42/CE, 2011/65/UE
- Processo técnico em: SKIL Europe BV (PT-SEU/ENG1), 4825 BD Breda, NL
Operations & Engineering
Olaf Dijkgraaf
Approvals Manager

SKIL Europe BV, 4825 BD Breda, NL 25.09.2013
C€12
RUÍDO/VIBRAÇÕES
Operations & Engineering
Olaf Dijkgraaf
Approvals Manager

SKIL Europe BV, 4825 BD Breda, NL
25.09.2013

CE12
Operations & Engineering
Olaf Dijkgraaf
Approvals Manager

SKIL Europe BV, 4825 BD Breda, NL
25.09.2013
CE12
HAŁASU/WIBRACJE
Operations & Engineering
Olaf Dijkgraaf
Approvals Manager


SKIL Europe BV, 4825 BD Breda, NL 25.09.2013
CE12
ΘΟΡΥΒΟ/ΚΡΑΔΑΣΜΟΥΣ
ÜLDISED OHUTUSJUHISED
Operations & Engineering
Olaf Dijkgraaf
Approvals Manager

SKIL Europe BV, 4825 BD Breda, NL
25.09.2013

CE12
MÜRA/VIBRATSIOON
APKALPOŠANA / APKOPE
TECHNINIAI DUOMENYS ①
Maks. sukimo momentas kietosios jungties atveju pagal ISO 5393 : 28 Nm (2016) / 30 Nm (2017)
PRIETAISO ELEMENTAI②
Operations & Engineering
Olaf Dijkgraat
Approvals Manager


SKIL Europe BV, 4825 BD Breda, NL
25.09.2013
CE12
TRIUKŠMINGUMAS/VIBRACIJA
Operations & Engineering
Approvals Manager

SKIL Europe BV, 4825 BD Breda, NL
25.09.2013
CE12
ZHURMA/VIBRIMI
natural_image
Simple line drawing of a pencil (no text or symbols)
natural_image
Simple line drawing of a pencil (no text or symbols)CE اعلاميه مېنى بر رعايت استاندارد
• داده
natural_image
Line drawing of a hand holding a SKIL electric drill with a light bulb nearby (no text or symbols)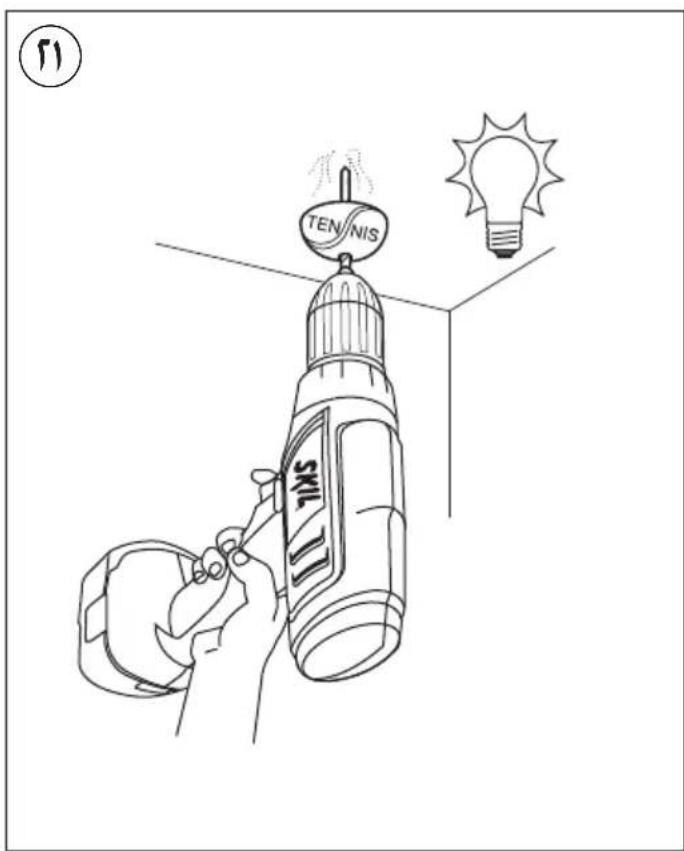

natural_image
Illustration of a hand using a SKIL tool to install a solar panel array, with a light bulb nearby (no text or symbols)


2016

2017


مcheck لاسلكي امفك
SKIL®
2016
2017
natural_image
Illustration of a SKIL electric drill with handle and base (no text or symbols on the device body)دليل الاستعمال
AR
راهنماي اصلی
FA


09/132610Z05387
سکیل أروبا ب.ق - کونینانبرج 60


- GB
- Cordless drill/driver 2016/2017
- INTRODUCTION
- TECHNICAL DATA①
- TOOL ELEMENTS ②
- SAFETY
- GENERAL SAFETY INSTRUCTIONS
- SAFETY INSTRUCTIONS FOR CORDLESS DRILL/DRIVERS
- CHARGING/BATTERIES
- EXPLANATION OF SYMBOLS ON CHARGER/BATTERY
- USE
- APPLICATION ADVICE
- MAINTENANCE / SERVICE
- ENVIRONMENT
- CE DECLARATION OF CONFORMITY
- Perceuse/visseuse sans fil 2016/2017 INTRODUCTION
- GERÄUSCH/VIBRATION
- ST∅J/VIBRATION
- VEDLIKEHOLD / SERVICE
- ST∅Y/VIBRASJON
- MELU/TÄRINÄ
- RUÍDO/VIBRAÇÕES
- HAŁASU/WIBRACJE
- ΘΟΡΥΒΟ/ΚΡΑΔΑΣΜΟΥΣ
- ÜLDISED OHUTUSJUHISED
- MÜRA/VIBRATSIOON
- APKALPOŠANA / APKOPE
- TECHNINIAI DUOMENYS ①
- PRIETAISO ELEMENTAI②
- TRIUKŠMINGUMAS/VIBRACIJA
- ZHURMA/VIBRIMI
- CE اعلاميه مېنى بر رعايت استاندارد
Brand : SKIL
Model : 2017 AA
Category : Screwdriver